Posts Tagged ‘bash shell script’

How to set up dsmc client Tivoli ( TSM ) release version and process check monitoring with Zabbix

Thursday, December 17th, 2020

zabbix-monitor-dsmc-client-monitor-ibm-tsm-with-zabbix-howto

As a part of Monitoring IBM Spectrum (the new name of IBM TSM) if you don't have the money to buy something like HP Open View monitoring or other kind of paid monitoring system but you use Zabbix open source solution to monitor your Linux server infrastructure and you use Zabbix as a main Services and Servers monitoring platform you will want to monitor at least whether the running Tivoli dsmc backup clients run fine on each of the server (e.g. the dsmc client) runs normally as a backup solution with its common /usr/bin/dsmc process service that connects towards remote IBM TSM server where the actual Data storage is kept.

It might be a kind of weird monitoring to setup to have the tsm version frequently reported to a Zabbix server on a first glimpse, but in reality this is quite useful especially if you want to have a better overview of your multiple servers environment IBM (Spectrum Protect) Storage manager backup solution actual release.
 
So the goal is to have reported dsmc interactive storage manager version as reported from
 

[root@server ~]# dsmc

IBM Spectrum Protect
Command Line Backup-Archive Client Interface
  Client Version 8, Release 1, Level 11.0
  Client date/time: 12/17/2020 15:59:32
(c) Copyright by IBM Corporation and other(s) 1990, 2020. All Rights Reserved.

Node Name: Sub-Hostname.FQDN.COM
Session established with server TSM_SERVER: AIX
  Server Version 8, Release 1, Level 10.000
  Server date/time: 12/17/2020 15:59:34  Last access: 12/17/2020 13:28:01


into zabbix and set reports in case if your sysadmins have changed version of a IBM TSM to a newer version. Thus for non sysadmins and less technical persons as Service Delivery Managers (SDMs) it is much easier to track changes of multiple servers Tivoli version to a newer one.

Enough talk let me next show you how to setup the required with a small UserParameter one liner bash shell script.
 

1. Create TSM Userparameter script


With Userparameter key and content as below:

[root@server ~]# vim /etc/zabbix/zabbix_agentd.d/userparameter_TSM.conf


UserParameter=dsmc.version,cat /var/tsm/sched.log | grep Clie | tail -n 1 | awk '{print $7 " " $8 " " $9 " " $10 " " $11 " " $12 " " $13}'


The script output of TivSM version will be reported as so:

[root@server ~]# cat /var/tsm/sched.log | grep Clie | tail -n 1 | awk '{print $7 " " $8 " " $9 " " $10 " " $11 " " $12 " " $13}'
Client Version 8, Release 1, Level 11.0


If you want to get only a major version report from dsmc:

UserParameter=dsmc.version,cat /var/tsm/sched.log | grep Clie | tail -n 1 | awk '{print $7 " " $8 " " $9}'


The output as a major version you will get is

[root@server ~]# cat /var/tsm/sched.log | grep Clie | tail -n 1 | awk '{print $7 " " $8 " " $9}'
Client Version 8,


2. Restart the zabbix agent to load userparam script

To load above configured Userparameter script we need to restart zabbix-agent client

[root@server ~]# systemctl restart zabbix-agent

[root@server ~]#  systemctl status zabbix-agent
● zabbix-agent.service – Zabbix Agent
   Loaded: loaded (/usr/lib/systemd/system/zabbix-agent.service; enabled; vendor preset: disabled)
   Active: active (running) since Wed 2020-07-22 16:17:17 CEST; 4 months 26 days ago
 Main PID: 7817 (zabbix_agentd)
   CGroup: /system.slice/zabbix-agent.service
           ├─7817 /usr/sbin/zabbix_agentd -c /etc/zabbix/zabbix_agentd.conf
           ├─7818 /usr/sbin/zabbix_agentd: collector [idle 1 sec]
           ├─7819 /usr/sbin/zabbix_agentd: listener #1 [waiting for connection]
           ├─7820 /usr/sbin/zabbix_agentd: listener #2 [waiting for connection]
           ├─7821 /usr/sbin/zabbix_agentd: listener #3 [waiting for connection]
           └─7822 /usr/sbin/zabbix_agentd: active checks #1 [idle 1 sec]


3. Create template for TSM Service check and TSM Version


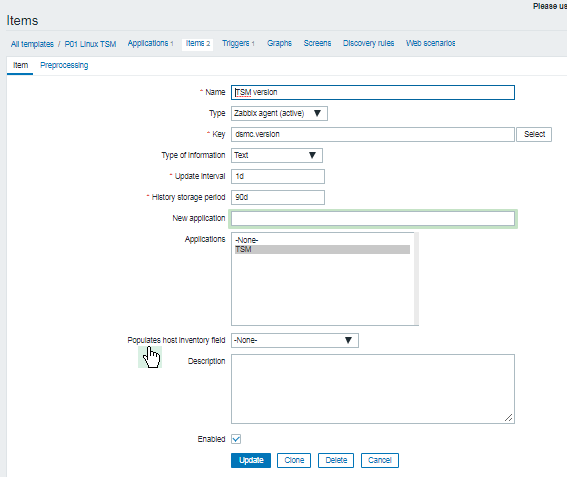
You will need to create 1 Trigger and 2 Items for the Service check and for TSM version reporting
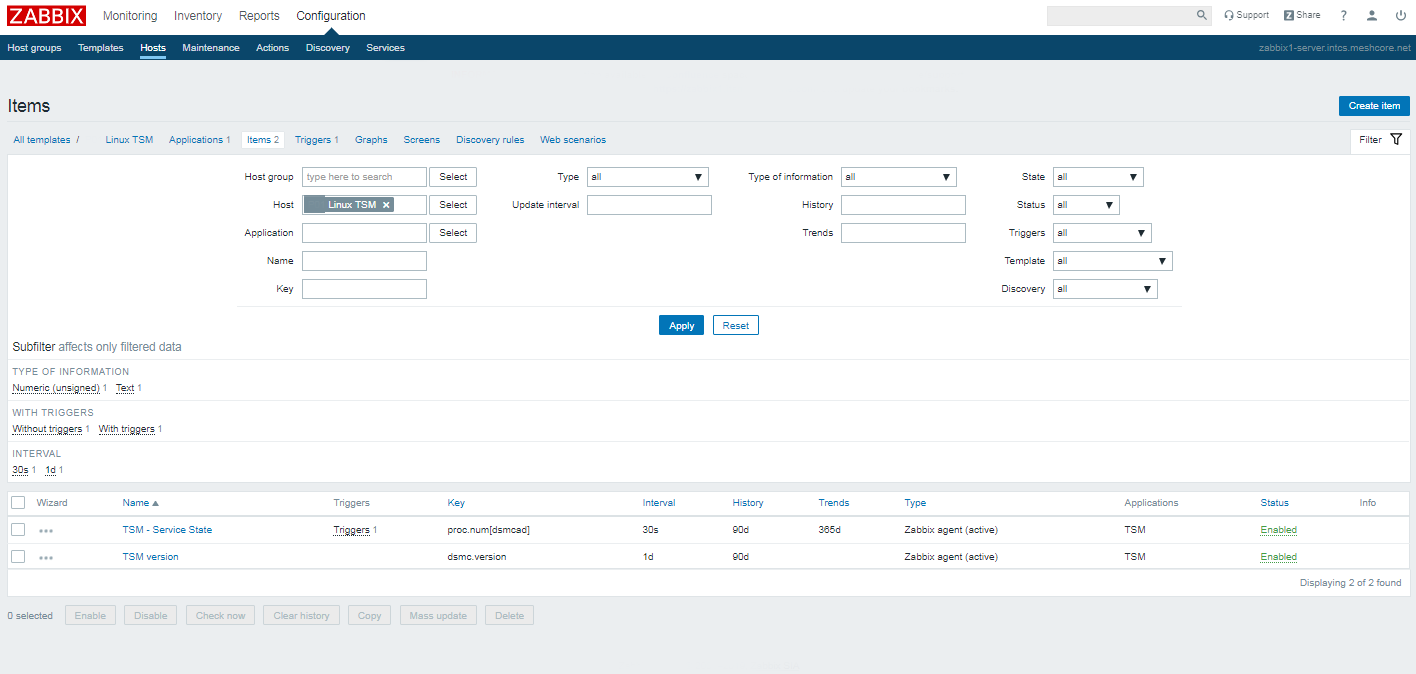
tsm-service-version-screenshot-zabbix
As you see necessery names / keys to create are:

Name / Key: TSM – Service State proc.num{dsmcad}

Name / key: TSM version dmsc.version


3.1 Create the trigger


Now lets create the trigger that will report the Service State
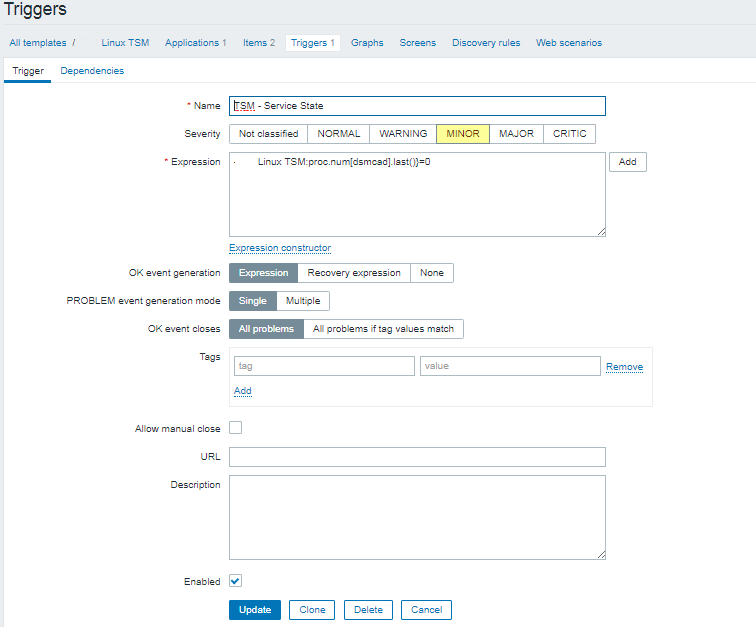
tsm-service-state-zabbix-screenshot


Linux TSM:proc.num[dsmcad].last()}=0


3.2 Create the Items
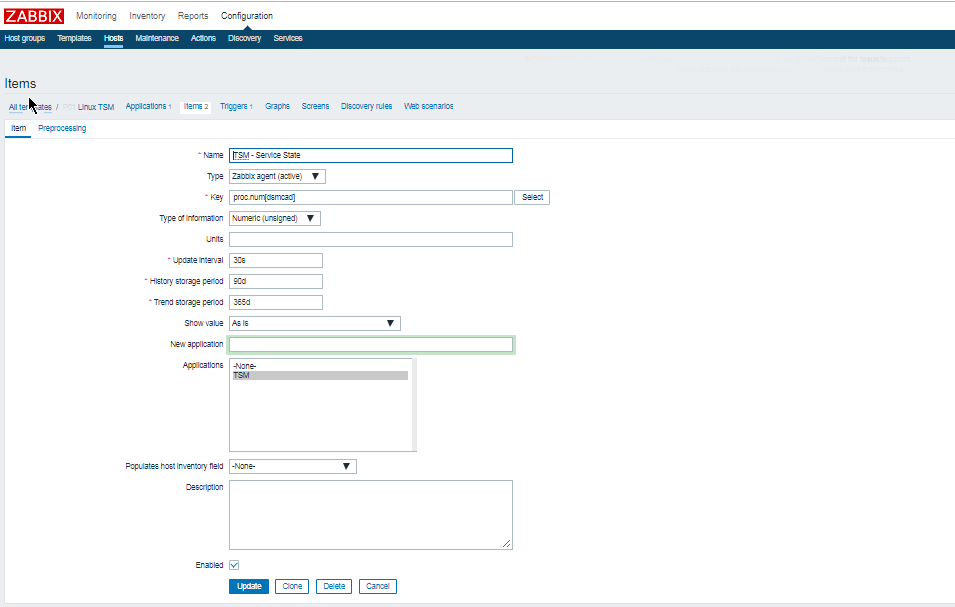

zabbix-dsmc-proc-num-item-setting-screenshot-linux


Name: dsmcad
Key: proc.num{dsmcad}


tsm-version-item-zabbix-screenshot
 

Update interval: 1d
History Storage period: 90d
Applications: TSM


3.3 Create Zabbix Action

As usual if you want to receive some Email Alerting or lets say send SMS in case of Trigger is matched create the necessery Action with
instructions on how to solve the problem if there is a Standard Operation Procedure ( SOP ) as often called in the corporate world for that.

That's all folks ! 🙂


Report haproxy node switch script useful for Zabbix or other monitoring

Tuesday, June 9th, 2020

zabbix-monitoring-logo
For those who administer corosync clustered haproxy and needs to build monitoring in case if the main configured Haproxy node in the cluster is changed, I've developed a small script to be integrated with zabbix-agent installed to report to a central zabbix server via a zabbix proxy.
The script  is very simple it assumed DC1 variable is the default used haproxy node and DC2 and DC3 are 2 backup nodes. The script is made to use crm_mon which is not installed by default on each server by default so if you'll be using it you'll have to install it first, but anyways the script can easily be adapted to use pcs cmd instead.

Below is the bash shell script:

UserParameter=active.dc,f=0; for i in $(sudo /usr/sbin/crm_mon -n -1|grep -i 'Node ' |awk '{ print $2 }'); do ((f++)); DC[$f]="$i"; done; \
DC=$(sudo /usr/sbin/crm_mon -n -1 | grep 'Current DC' | awk '{ print $1 " " $2 " " $3}' | awk '{ print $3 }'); \
if [ “$DC” == “${DC[1]}” ]; then echo “1 Default DC Switched to ${DC[1]}”; elif [ “$DC” == “${DC[2]}” ]; then \
echo "2 Default DC Switched to ${DC[2]}”; elif [ “$DC” == “${DC[3]}” ]; then echo “3 Default DC: ${DC[3]}"; fi


To configure it with zabbix monitoring it can be configured via UserParameterScript.

The way I configured  it in Zabbix is as so:


1. Create the userpameter_active_node.conf

Below script is 3 nodes Haproxy cluster

# cat > /etc/zabbix/zabbix_agentd.d/userparameter_active_node.conf

UserParameter=active.dc,f=0; for i in $(sudo /usr/sbin/crm_mon -n -1|grep -i 'Node ' |awk '{ print $2 }'); do ((f++)); DC[$f]="$i"; done; \
DC=$(sudo /usr/sbin/crm_mon -n -1 | grep 'Current DC' | awk '{ print $1 " " $2 " " $3}' | awk '{ print $3 }'); \
if [ “$DC” == “${DC[1]}” ]; then echo “1 Default DC Switched to ${DC[1]}”; elif [ “$DC” == “${DC[2]}” ]; then \
echo "2 Default DC Switched to ${DC[2]}”; elif [ “$DC” == “${DC[3]}” ]; then echo “3 Default DC: ${DC[3]}"; fi

Once pasted to save the file press CTRL + D


The version of the script with 2 nodes slightly improved is like so:
 

UserParameter=active.dc,f=0; for i in $(sudo /usr/sbin/crm_mon -n -1|grep -i 'Node ' |awk '{ print $2 }' | sed -e 's#:##g'); do DC_ARRAY[$f]=”$i”; ((f++)); done; GET_CURR_DC=$(sudo /usr/sbin/crm_mon -n -1 | grep ‘Current DC’ | awk ‘{ print $1 ” ” $2 ” ” $3}’ | awk ‘{ print $3 }’); if [ “$GET_CURR_DC” == “${DC_ARRAY[0]}” ]; then echo “1 Default DC ${DC_ARRAY[0]}”; fi; if [ “$GET_CURR_DC” == “${DC_ARRAY[1]}” ]; then echo “2 Default Current DC Switched to ${DC_ARRAY[1]} Please check “; fi; if [ -z “$GET_CURR_DC” ] || [ -z “$DC_ARRAY[1]” ]; then printf "Error something might be wrong with HAProxy Cluster on  $HOSTNAME "; fi;


The haproxy_active_DC_zabbix.sh script with a bit of more comments as explanations is available here 
2. Configure access for /usr/sbin/crm_mon for zabbix user in sudoers


# vim /etc/sudoers

zabbix          ALL=NOPASSWD: /usr/sbin/crm_mon


3. Configure in Zabbix for active.dc key Trigger and Item

active-node-switch1

How to build Linux logging bash shell script write_log, logging with Named Pipe buffer, Simple Linux common log files logging with logger command

Monday, August 26th, 2019

how-to-build-bash-script-for-logging-buffer-named-pipes-basic-common-files-logging-with-logger-command

Logging into file in GNU / Linux and FreeBSD is as simple as simply redirecting the output, e.g.:
 

echo "$(date) Whatever" >> /home/hipo/log/output_file_log.txt


or with pyping to tee command


echo "$(date) Service has Crashed" | tee -a /home/hipo/log/output_file_log.txt


But what if you need to create a full featured logging bash robust shell script function that will run as a daemon continusly as a background process and will output
all content from itself to an external log file?
In below article, I've given example logging script in bash, as well as small example on how a specially crafted Named Pipe buffer can be used that will later store to a file of choice.
Finally I found it interesting to mention few words about logger command which can be used to log anything to many of the common / general Linux log files stored under /var/log/ – i.e. /var/log/syslog /var/log/user /var/log/daemon /var/log/mail etc.
 

1. Bash script function for logging write_log();


Perhaps the simplest method is just to use a small function routine in your shell script like this:
 

write_log()
LOG_FILE='/root/log.txt';
{
  while read text
  do
      LOGTIME=`date "+%Y-%m-%d %H:%M:%S"`
      # If log file is not defined, just echo the output
      if [ “$LOG_FILE” == “” ]; then
    echo $LOGTIME": $text";
      else
        LOG=$LOG_FILE.`date +%Y%m%d`
    touch $LOG
        if [ ! -f $LOG ]; then echo "ERROR!! Cannot create log file $LOG. Exiting."; exit 1; fi
    echo $LOGTIME": $text" | tee -a $LOG;
      fi
  done
}


  •  Using the script from within itself or from external to write out to defined log file


echo "Skipping to next copy" | write_log


2. Use Unix named pipes to pass data – Small intro on what is Unix Named Pipe.


Named Pipe –  a named pipe (also known as a FIFO (First In First Out) for its behavior) is an extension to the traditional pipe concept on Unix and Unix-like systems, and is one of the methods of inter-process communication (IPC). The concept is also found in OS/2 and Microsoft Windows, although the semantics differ substantially. A traditional pipe is "unnamed" and lasts only as long as the process. A named pipe, however, can last as long as the system is up, beyond the life of the process. It can be deleted if no longer used.
Usually a named pipe appears as a file, and generally processes attach to it for IPC.


Once named pipes were shortly explained for those who hear it for a first time, its time to say named pipe in unix / linux is created with mkfifo command, syntax is straight foward:
 

mkfifo /tmp/name-of-named-pipe


Some older Linux-es with older bash and older bash shell scripts were using mknod.
So idea behind logging script is to use a simple named pipe read input and use date command to log the exact time the command was executed, here is the script.


#!/bin/bash
named_pipe='/tmp/output-named-pipe';
output_named_log='
/tmp/output-named-log.txt ';

if [ -p $named_pipe ]; then
rm -f $named_pipe
fi
mkfifo $named_pipe

while true; do
read LINE <$named_pipe
echo $(date): "$LINE" >>/tmp/output-named-log.txt
done


To write out any other script output and get logged now, any of your output with a nice current date command generated output write out any output content to the loggin buffer like so:


echo 'Using Named pipes is so cool' > /tmp/output-named-pipe
echo 'Disk is full on a trigger' > /tmp/output-named-pipe

  • Getting the output with the date timestamp

# cat /tmp/output-named-log.txt
Mon Aug 26 15:21:29 EEST 2019: Using Named pipes is so cool
Mon Aug 26 15:21:54 EEST 2019: Disk is full on a trigger


If you wonder why it is better to use Named pipes for logging, they perform better (are generally quicker) than Unix sockets.


3. Logging files to system log files with logger


If you need to do a one time quick way to log any message of your choice with a standard Logging timestamp, take a look at logger (a part of bsdutils Linux package), and is a command which is used to enter messages into the system log, to use it simply invoke it with a message and it will log your specified output by default to /var/log/syslog common logfile


root@linux:/root# logger 'Here we go, logging'
root@linux:/root # tail -n 3 /var/log/syslog
Aug 26 15:41:01 localhost CRON[24490]: (root) CMD (chown qscand:qscand -R /var/run/clamav/ 2>&1 >/dev/null)
Aug 26 15:42:01 localhost CRON[24547]: (root) CMD (chown qscand:qscand -R /var/run/clamav/ 2>&1 >/dev/null)
Aug 26 15:42:20 localhost hipo: Here we go, logging


If you have took some time to read any of the init.d scripts on Debian / Fedora / RHEL / CentOS Linux etc. you will notice the logger logging facility is heavily used.

With logger you can print out message with different priorities (e.g. if you want to write an error message to mail.* logs), you can do so with:
 

 logger -i -p mail.err "Output of mail processing script"


To log a normal non-error (priority message) with logger to /var/log/mail.log system log.


 logger -i -p mail.notice "Output of mail processing script"


A whole list of supported facility named priority valid levels by logger (as taken of its current Linux manual) are as so:


FACILITIES AND LEVELS
       Valid facility names are:

              auth
              authpriv   for security information of a sensitive nature
              cron
              daemon
              ftp
              kern       cannot be generated from userspace process, automatically converted to user
              lpr
              mail
              news
              syslog
              user
              uucp
              local0
                to
              local7
              security   deprecated synonym for auth

       Valid level names are:

              emerg
              alert
              crit
              err
              warning
              notice
              info
              debug
              panic     deprecated synonym for emerg
              error     deprecated synonym for err
              warn      deprecated synonym for warning

       For the priority order and intended purposes of these facilities and levels, see syslog(3).


If you just want to log to Linux main log file (be it /var/log/syslog or /var/log/messages), depending on the Linux distribution, just type', even without any shell quoting:


logger 'The reason to reboot the server Currently was a System security Update


So what others is logger useful for?

 In addition to being a good diagnostic tool, you can use logger to test if all basic system logs with its respective priorities work as expected, this is especially
useful as I've seen on a Cloud Holsted OpenXEN based servers as a SAP consultant, that sometimes logging to basic log files stops to log for months or even years due to
syslog and syslog-ng problems hungs by other thirt party scripts and programs.
To test test all basic logging and priority on system logs as expected use the following logger-test-all-basic-log-logging-facilities.sh shell script.


#!/bin/bash
for i in {auth,auth-priv,cron,daemon,kern, \
lpr,mail,mark,news,syslog,user,uucp,local0 \
,local1,local2,local3,local4,local5,local6,local7}

do        
# (this is all one line!)


for k in {debug,info,notice,warning,err,crit,alert,emerg}
do

logger -p $i.$k "Test daemon message, facility $i priority $k"

done

done

Note that on different Linux distribution verions, the facility and priority names might differ so, if you get

logger: unknown facility name: {auth,auth-priv,cron,daemon,kern,lpr,mail,mark,news, \
syslog,user,uucp,local0,local1,local2,local3,local4, \
local5,local6,local7}

check and set the proper naming as described in logger man page.


4. Using a file descriptor that will output to a pre-set log file


Another way is to add the following code to the beginning of the script

#!/bin/bash
exec 3>&1 4>&2
trap 'exec 2>&4 1>&3' 0 1 2 3
exec 1>log.out 2>&1
# Everything below will go to the file 'log.out':

The code Explaned

  •     Saves file descriptors so they can be restored to whatever they were before redirection or used themselves to output to whatever they were before the following redirect.
    trap 'exec 2>&4 1>&3' 0 1 2 3
  •     Restore file descriptors for particular signals. Not generally necessary since they should be restored when the sub-shell exits.

          exec 1>log.out 2>&1

  •     Redirect stdout to file log.out then redirect stderr to stdout. Note that the order is important when you want them going to the same file. stdout must be redirected before stderr is redirected to stdout.

From then on, to see output on the console (maybe), you can simply redirect to &3. For example
,

echo "$(date) : Do print whatever you want logging to &3 file handler" >&3


I've initially found out about this very nice bash code from serverfault.com's post how can I fully log all bash script actions (but unfortunately on latest Debian 10 Buster Linux  that is prebundled with bash shell 5.0.3(1)-release the code doesn't behave exactly, well but still on older bash versions it works fine.

Sum it up


To shortlysummarize there is plenty of ways to do logging from a shell script logger command but using a function or a named pipe is the most classic. Sometimes if a script is supposed to write user or other script output to a a common file such as syslog, logger command can be used as it is present across most modern Linux distros.
If you have a better ways, please drop a common and I'll add it to this article.


Auto restart Apache on High server load (bash shell script) – Fixing Apache server temporal overload issues

Saturday, March 24th, 2012

auto-restart-apache-on-high-load-bash-shell-script-fixing-apache-temporal-overload-issues

I've written a tiny script to check and restart, Apache if the server encounters, extremely high load avarage like for instance more than (>25). Below is an example of a server reaching a very high load avarage:;

server~:# uptime
13:46:59 up 2 days, 18:54, 1 user, load average: 58.09, 59.08, 60.05
load average: 0.09, 0.08, 0.08

Sometimes high load avarage is not a problem, as the server might have a very powerful hardware. A high load numbers is not always an indicator for a serious problems. Some 16 CPU dual core (2.18 Ghz) machine with 16GB of ram could probably work normally with a high load avarage like in the example. Anyhow as most servers are not so powerful having such a high load avarage, makes the machine hardly do its job routine.

In my specific, case one of our Debian Linux servers is periodically reaching to a very high load level numbers. When this happens the Apache webserver is often incapable to serve its incoming requests and starts lagging for clients. The only work-around is to stop the Apache server for a couple of seconds (10 or 20 seconds) and then start it again once the load avarage has dropped to less than "3".

If this temporary fix is not applied on time, the server load gets increased exponentially until all the server services (ssh, ftp … whatever) stop responding normally to requests and the server completely hangs …

Often this server overloads, are occuring at night time so I'm not logged in on the server and one such unexpected overload makes the server unreachable for hours.
To get around the sudden high periodic load avarage server increase, I've written a tiny bash script to monitor, the server load avarage and initiate an Apache server stop and start with a few seconds delay in between.

#!/bin/sh
# script to check server for extremely high load and restart Apache if the condition is matched
check=`cat /proc/loadavg | sed 's/\./ /' | awk '{print $1}'`
# define max load avarage when script is triggered
max_load='25'
# log file
high_load_log='/var/log/apache_high_load_restart.log';
# location of inidex.php to overwrite with temporary message
index_php_loc='/home/site/www/index.php';
# location to Apache init script
apache_init='/etc/init.d/apache2';
#
site_maintenance_msg="Site Maintenance in progress - We will be back online in a minute";
if [ $check -gt "$max_load" ]; then>
#25 is load average on 5 minutes
cp -rpf $index_php_loc $index_php_loc.bak_ap
echo "$site_maintenance_msg" > $index_php_loc
sleep 15;
if [ $check -gt "$max_load" ]; then
$apache_init stop
sleep 5;
$apache_init restart
echo "$(date) : Apache Restart due to excessive load | $check |" >> $high_load_log;
cp -rpf $index_php_loc.bak_ap $index_php_loc
fi
fi

The idea of the script is partially based on a forum thread – Auto Restart Apache on High Loadhttp://www.webhostingtalk.com/showthread.php?t=971304Here is a link to my restart_apache_on_high_load.sh script

The script is written in a way that it makes two "if" condition check ups, to assure 100% there is a constant high load avarage and not just a temporal 5 seconds load avarage jump. Once the first if is matched, the script first tries to reduce the server load by overwritting a the index.php, index.html script of the website with a one stating the server is ongoing a maintenance operations.
Temporary stopping the index page, often reduces the load in 10 seconds of time, so the second if case is not necessery at all. Sometimes, however this first "if" condition cannot decrease enough the load and the server load continues to stay too high, then the script second if comes to play and makes apache to be completely stopped via Apache init script do 2 secs delay and launch the apache server again.

The script also logs about, the load avarage encountered, while the server was overloaded and Apache webserver was restarted, so later I can check what time the server overload occured.
To make the script periodically run, I've scheduled the script to launch every 5 minutes as a cron job with the following cron:

# restart Apache if load is higher than 25
*/5 * * * * /usr/sbin/restart_apache_on_high_load.sh >/dev/null 2>&1

I have also another system which is running FreeBSD 7_2, which is having the same overload server problems as with the Linux host.
Copying the auto restart apache on high load script on FreeBSD didn't work out of the box. So I rewrote a little chunk of the script to make it running on the FreeBSD host. Hence, if you would like to auto restart Apache or any other service on FreeBSD server get /usr/sbin/restart_apache_on_high_load_freebsd.sh my script and set it on cron on your BSD.

This script is just a temporary work around, however as its obvious that the frequency of the high overload will be rising with time and we will need to buy new server hardware to solve permanently the issues, anyways, until this happens the script does a great job 🙂

I'm aware there is also alternative way to auto restart Apache webserver on high server loads through using monit utility for monitoring services on a Unix system. However as I didn't wanted to bother to run extra services in the background I decided to rather use the up presented script.

Interesting info to know is Apache module mod_overload exists – which can be used for checking load average. Using this module once load avarage is over a certain number apache can stop in its preforked processes current serving request, I've never tested it myself so I don't know how usable it is. As of time of writting it is in early stage version 0.2.2
If someone, have tried it and is happy with it on a busy hosting servers, please share with me if it is stable enough?

How to take multiple screenshots with scrot and ImageMagick import commands in terminal on GNU / Linux and FreeBSD

Friday, January 13th, 2012

scrot and import are two commands, which can be used to take screenshot in terminal on Linux and FreeBSD:

To use scrot cmd to take screenshots on Ubuntu and Debian the scrot package has to be installed:

noah:~# apt-get install scrot
...

scrot should also be available on most other Linux distributions in the main repositories, I'll be glad to hear if someone has used it on Fedora, SUSE etc.

On FreeBSD, there is a port called scrot , to install on FreeBSD:

freebsd# cd /usr/ports/graphics/scrot
freebsd# make install clean
...

Scrot has plenty of nice arguments one can use to make a screenshot. Maybe the most handy one in my view is after a preliminary set delay before screenshot is taken.

To take screenshot with it after lets say 5 seconds delay before the screenshot:

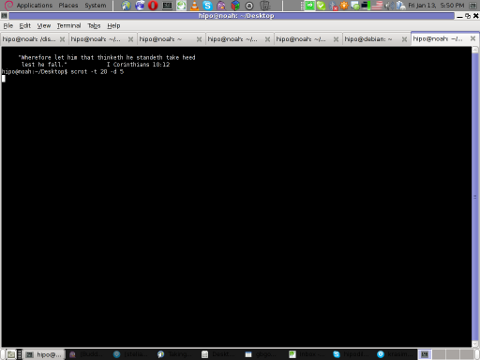
hipo@noah:~/Desktop$ scrot -t 20 -d 5

Screenshot scrot my debian Linux gnome-termina

To put an year, month and day and year followed by screen resolution with scrot :

hipo@noah:~$ scrot '%Y-%m-%d_$wx$h.png'

Another way to take a screenshot of screen with command is by using ImageMagick'simport image manipulation package.
To take screenshot of the current screen via terminal using import , type in xterm, gnome-termina or Gnome's Run Application (ALT+F2)

hipo@noah:~$ import -window root ScreenShot.png

To make import command to save the taken screenshot in a format (minute:hour:day:month:year)i :

hipo@noah:~$ import -window root $screenshot_dir/screenshot-$(date +%M_%k_%d_%m_%Y|sed -e 's/^ *//').png

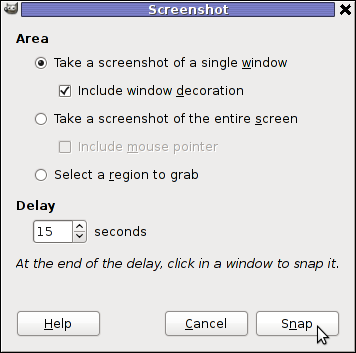
Taking a delayed screenshot is also possible via The GIMP via menus File -> Create -> Screenshot

GIMP Screenshot 15 seconds delay GIMP window screenshot

Now here is an interesting question, what if I would like to take periodic screenshots of what I do on my Desktop to take random movie scenes from a movie I watch with totem or vlc??

This task is quite easily achiavable with a little bash shell script, I wrote:

screenshot_dir='Screenshots';
seconds='60';
if [ ! -d "$screenshot_dir" ]; then
mkdir $screenshot_dir;
fi
while [ 1 ]; do
sleep $seconds;
(import -window root $screenshot_dir/screenshot-$(date +%M_%k_%d_%m_%Y|sed -e 's/^ *//').png) &
done

This script will take screenshot automatically to Screenshots/ directory every (1 min – 60 seconds)
You can also my downloads take_screenshot_every_60_secs_import.sh here

To use take_screenshot_every_60_secs_import.sh just issue the script inside xterm or gnome-terminal, after that simply use your computer as you normally would.
The script will take snapshots every minute and store all taken screenshots in Screenshots dir.

If you prefer to use scrot to take automatically the screenshots every lets say 5 minutes, you can use a script like:

screenshot_dir='Screenshots';
# 300 secs (5 mins)seconds='300';
if [ ! -d "$screenshot_dir" ]; then
mkdir $screenshot_dir;
fi
while [ 1 ]; do
sleep $seconds;
(scrot $screenshot_dir/'%Y-%m-%d_$wx$h.png') &
done

You can fetch take_screenshot_every_60_secs_scrot.sh here

The script using scrot is better in terms of efficiency, the system load scrot will put on your machine will be less.
Using some of this scripts will be handy if you need screenshots to Movies, Programs and favourite Free Software games.
Hope this is educative to someone 😉

How to convert OGG Vorbis .ogg to MP3 on GNU / Linux and FreeBSD

Friday, July 27th, 2012

I’ve used K3B just recently to RIP an Audio CD with music to MP3. K3b has done a great job ripping the tracks, the only problem was By default k3b RIPs songs in OGG Vorbis (.ogg) and not mp3. I personally prefer OGG Vorbis as it is a free freedom respecting audio format, however the problem was the .ogg-s cannot be read on many of the audio players and it could be a problem reading the RIPped oggs on Windows. I’ve done the RIP not for myself but for a Belarusian gfriend of mine and she is completely computer illiterate and if I pass her the songs in .OGG, there is no chance she succed in listening the oggs. I’ve seen later k3b has an option to choose to convert directly to MP3 Using linux mp3 lame library this however is time consuming and I have to wait another 10 minutes or so for the songs to be ripped to shorten the time I decided to directly convert the existing .ogg files to .mp3 on my (Debian Linux). There are probably many ways to convert .ogg to mp3 on linux and likely many GUI frontends (like SoundConverter) to use in graphic env.

SoundConverter Debian GNU Linux graphic GUI environment program for convertion of ogg to mp3 and mp3 to ogg, convert multiple sound formats on GNU / Linux.

I however am a console freak so I preferred doing it from terminal. I’ve done quick research on the net and figured out the good old ffmpeg is capable of converting .oggs to .mp3s. To convert all mp3s just ripped in the separate directory I had to run ffmpeg in a tiny bash loop.

A short bash shell script 1 liner combined with ffmpeg does it, e.g.;

for f in *.ogg; do ffmpeg -i "$f" "`basename "$f" .ogg`.mp3"; done.....

The loop example is in bash so in order to make the code work on FreeBSD it is necessery it is run in a bash shell and not in BSDs so common csh or tcsh.

Well, that’s all oggs are in mp3; Hip-hip Hooray 😉

How to add multiple email accounts in qmail’s vpopmail with vpasswd via ssh (console) / Little shell script to add multiple email addresses

Sunday, June 12th, 2011

I’ve been assigned the task to add on one of the qmail powered servers I administrate about 50 email addresses via command line.

Each email addresses was required to be configured to have the same mail password.
Adding the email addresses via an interface would be a killing time consuming task and will probably require at least 1 hour of time to add the emails with qmailwebmin, qadmin, qubit or the other vpopmail qmail web administration interfaces available nowdays.

To solve the task, I’ve used a line oner bash shell script which reads all my 80 emails from a file and adds them with vpopmail’s command line tool vpasswd on the mail server.

Here is the one liner shell script I’ve written to solve the task:

debian:~# while read line; do vadduser $line Email_Pass_Phrase; done < email_list_file.txt

In above’s code I’ve used the email_list_file.txt file is a text file on the server and contains list of all my 50 email addresses, where each line in the file contains one email. The Email_Pass_Phrase is actually the password I’ve set for all the new email addresses being created with vpasswd

That’s all now the 50 email addresses on the server are created and I’ve saved at least one hour of boring repeating actions in the browser 😉

How to fix upside-down / inverted web camera laptop Asus K51AC issue on Ubuntu Linux and Debian GNU / Linux

Monday, February 13th, 2012

Skype Video Inverted bat like linux screenshot

Does your camera show video correctly in cheese but shows captured video upside-down (inverted) in skype ?
This is an issue a friend of mine experienced on his Asus K51AC-SX037D laptop on both Ubuntu and Debian Linux.
As you can see in the picture above it is funny as with this bug the person looks like a batman 😉
As the webcam upside-down issue was present on both latest Ubuntu 11.10 and latest stable Debian Squeeze 6.02, my guess was other GNU / Linux rpm based distro like Fedora might have applied a fix to this weird Skype inverted video (bat human like) issue.
Unfortunately testing the webcam with Skype on latest both Fedora 16 and Linux Mint 12 appeared to produce the same webcam bug.

A bit of research for the issue online and try outs of a number of suggested methods to resolve the issue led finally to a work around, thanks to this post
Here is few steps to follow to make the webcam show video like it should:

1. Install libv4l-0 package

root@linux:~# apt-get --yes install libv4-0
...

Onwards to start skype directly from terminal and test the camera type:

hipo@linux:~$ LD_PRELOAD=/usr/lib/libv4l/v4l1compat.so skype

This is the work around for 32 bit Linux install, most people however will probably have installed 64 bit Linux, for 64bit Linux installs the above command should be little different:

hipo@linux:~$ LD_PRELOAD=/usr/lib32/libv4l/v4l1compat.so skype

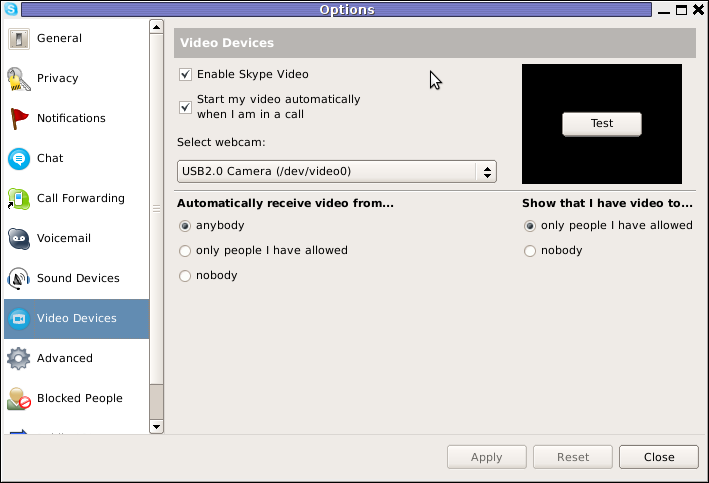
Once skype is launched test the camera and see if the camera capture is now uninverted, through menus:

S -> Options -> Video Devices -> Test

Skype Options Video devices screenshot

2. Create a skype Wrapper script Launcher

To make skype launch everytime with exported shell variable:
LD_PRELOAD=/usr/lib32/libv4l/v4l1compat.so

A new skype wrapper bash shell script should be created in /usr/local/bin/skype , the file should contain:

#!/bin/sh
LD_PRELOAD=/usr/lib32/libv4l/v4l1compat.so
/usr/bin/skype

To create the script with echo in a root terminal issue;

root@linux:~# echo '#!/bin/sh' >> /usr/local/bin/skype
root@linux:~# echo 'LD_PRELOAD=/usr/lib32/libv4l/v4l1compat.so' >> /usr/local/bin/skype
root@linux:~# echo '/usr/bin/skype' >> /usr/local/bin/skype
root@linux:~# chmod +x /usr/local/bin/skype

3. Edit the Skype gnome menu to substitute /usr/bin/skype Skype Launcher with /usr/local/bin/skype

Gnome 2 has a handy menu launcher, allowing to edit and add new menus and submenus (menus and items) to the Application menu, to launch the editor one has to click over Applications with last mouse button (right button) and choose Edit Menus

GNOME Edit menus screenshot

The menu editor like the one in the below screenshot will appear:

GNOME 2 Menu Editor Screenshot

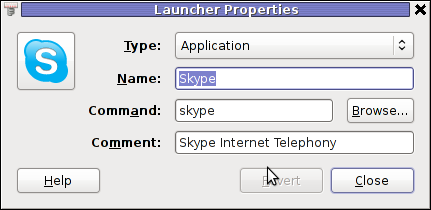
In the preceeding Launcher properties window, Command: skype has to be substituted with:

GNOME2 Skype screenshot Launcher properties

Command: /usr/local/bin/skype

For console freaks who doesn't want to bother in editting Skype Launcher via GUI /usr/share/applications/skype.desktop file can be editted in terminal. Inside skype.desktop substitute:

Exec=skype

with

Exec=/usr/local/bin/skype

Skype fixed inverted bat like screenshot

As one can imagine the upside-down video image in Skype is not a problem because of Linux, but rather another bug in Skype (non-free) software program.
By the way everyone, who is using his computer with Free Software operating system FreeBSD, Linux etc. knows pretty well by experience, that Skype is a very problematic software; It is often a cause for system unexpected increased system loads, problems with (microphone not capturing), camera issues, issues with pulseaudio, problem with audio playbacks … Besides the long list of bugs there are unexpected display bugs in skype tray icon, bugs in skype messanger windows and at some rare occasions the program completely hangs and had to be killed with kill command and re-launched again.

Another worrying fact is Skype's versions available for GNU / Linux and BSD is completely out of date with its "competitor" operating systems MS Windows, MacOS X etc.
For people like me and my friend who want to use free operating system the latest available skype version is not even stable … current version fod download from skype's website is (Skype 2.2Beta)!

On FreeBSD the skype situation is even worser, freebsd have only option to run Skype ver 1.3 or v. 2.0 at best, as far as I know skype 2.2 and 2.2beta is not there.

Just as matter of comparison the latest Skype version on Windows is 5.x. Windows release is ages ahead its Linux and BSD ver. From a functional point of view the difference between Linux's 2.x and Windows 5.x is not that much different, what makes difference is is the amount of bugs which Linux and BSD skype versions contain…
Skype was about 6 months ago bought by Microsoft, therefore the prognosis for Skype Linux support in future is probably even darker. Microsoft will not probably bother to release new version of Skype for their competitor free as in freedom OSes.

I would like to thank my friend and brother in Christ Stelian for supplying me with the Skype screenshots, as well as for being kind to share how he fixed his camera with me.

How to add cron jobs from command line or bash scripts / Add crontab jobs in a script

Saturday, July 9th, 2011

I’m currently writting a script which is supposed to be adding new crontab jobs and do a bunch of other mambo jambo.

By so far I’ve been aware of only one way to add a cronjob non-interactively like so:

                  linux:~# echo '*/5 * * * * /root/myscript.sh' | crontab -

Though using the | crontab – would work it has one major pitfall, I did completely forgot | crontab – OVERWRITES CURRENT CRONTAB! with the crontab passed by with the echo command.
One must be extremely careful if he decides to use the above example as you might loose your crontab definitions permanently!

Thanksfully it seems there is another way to add crontabs non interactively via a script, as I couldn’t find any good blog which explained something different from the classical example with pipe to crontab –, I dropped by in the good old irc.freenode.net to consult the bash gurus there 😉

So I entered irc and asked the question how can I add a crontab via bash shell script without overwritting my old existing crontab definitions less than a minute later one guy with a nickname geirha was kind enough to explain me how to get around the annoying overwridding.

The solution to the ovewrite was expected, first you use crontab to dump current crontab lines to a file and then you append the new cron job as a new record in the file and finally you ask the crontab program to read and insert the crontab definitions from the newly created files.
So here is the exact code one could run inside a script to include new crontab jobs, next to the already present ones:

linux:~# crontab -l > file; echo '*/5 * * * * /root/myscript.sh >/dev/null 2>&1' >> file; crontab file

The above definition as you could read would make the new record of */5 * * * * /root/myscript.sh >/dev/null be added next to the existing crontab scheduled jobs.

Now I’ll continue with my scripting, in the mean time I hope this will be of use to someone out there 😉

Runing sudo command simultaneously on multiple servers with SSHSUDO

Tuesday, June 21st, 2011

ssh multiple server command execute
I just was recommended by a friend a nifty tool, which is absoutely nifty for system administrators.

The tool is called sshsudo and the project is hosted on http://code.google.com/p/sshsudo/.

Let’s say you’re responsible for 10 servers with the same operating system let’s say; CentOS 4 and you want to install tcpdump and vnstat on all of them without logging one by one to each of the nodes.

This task is really simple with using sshsudo.
A typical use of sshsudo is:


[root@centos root]# sshsudo -u root \
comp1,comp2,comp3,comp4,comp5,comp6,comp7,comp8,comp9,comp10 yum install tcpdump vnstat

Consequently a password prompt will appear on the screen;
Please enter your password:

If all the servers are configured to have the same administrator root password then just typing one the root password will be enough and the command will get issued on all the servers.

The program can also be used to run a custom admin script by automatically populating the script (upload the script), to all the servers and issuing it next on.

One typical use to run a custom bash shell script on ten servers would be:


[root@centos root]# sshsudo -r -u root \
comp1,comp2,comp3,comp4,comp5,comp6,comp7,comp8,comp9,comp10 /pathtoscript/script.sh

I’m glad I found this handy tool 😉