Posts Tagged ‘system boot’

How to Install and Set Up an NFS Server network Shares on on Linux to easify data transfer across multiple hosts

Monday, April 7th, 2025

How to Configure NFS Server in Redhat,CentOS,RHEL,Debian,Ubuntu and Oracle Linux

Network File System (NFS) is a protocol that allows one system to share directories and files with others over a network. It's commonly used in Linux environments for file sharing between systems. In this guide, we'll walk you through the steps to install and set up an NFS server on a Linux system.

Prerequisites

Before you start, make sure you have:

  • A Linux system distros (e.g., Ubuntu, CentOS, Debian, etc.)
  • Root or sudo privileges on the system.
  • A network connection between the server (NFS server) and clients (machines that will access the shared directories).
     

1. Install NFS Server Package


On Ubuntu / Debian based Linux systems:

a. First, update the package list 

# apt update

b. Install the NFS server package
 

# apt install nfs-kernel-server

On CentOS/REL-based systems:

 2. Install the NFS server package
 

      # yum install nfs-utils 

Once the package is installed, ensure that the necessary services are enabled.

 3. Create Shared Directory for file sharing

Decide which directory you want to share over NFS. If the directory doesn't exist, you can create one. For example:

# mkdir -p /nfs_srv_dir/nfs_share

Make sure the directory has the appropriate permissions so that the nfs clients can access it.

# chown nobody:nogroup /nfs_srv_dir/nfs_share 
# chmod 755 /nfs_srv_dir/nfs_share

4. Configure NFS Exports ( /etc/exports file)

The NFS exports file (/etc/exports) is perhaps most important file you will have to create and deal with regularly to define the expored shares, this file contains the configuration settings for directories you want to share with other systems.

       a. Open the /etc/exports file for editing:

vi /etc/exports

Add an entry for the directory you want to share. For example, if you're sharing /nfs_srv_dir/nfs_share and allowing access to all systems on the network (192.168.1.0/24), add the following line:
 

/nfs_srv_dir/nfs_share 192.168.1.0/24(rw,sync,no_subtree_check)


Here’s what each option means:

  • rw: Read and write access.
  • sync: Ensures that changes are written to disk before responding to the client.


Here is few lines of  example of my working /etc/exports on my home running NFS server

/var/www 192.168.0.209/32(rw,no_root_squash,async,subtree_check)
/home/jordan 192.168.0.209/32(rw,no_root_squash,async,subtree_check)
/mnt/sda1/icons-frescoes/ 192.168.0.209/32(rw,no_root_squash,async,subtree_check)
/home/mobfiles 192.168.0.209/32(rw,no_root_squash,async,subtree_check)
/mnt/sda1/icons-frescoes/ 192.168.0.200/32(rw,no_root_squash,async,subtree_check)
/home/hipo/public_html 192.168.0.209/32(rw,no_root_squash,async,subtree_check)
/home/alex/public_html 192.168.0.209/32(rw,no_root_squash,async,subtree_check)
/home/necroleak/public_html 192.168.0.209/32(rw,no_root_squash,async,subtree_check)
/bashscripts 192.168.0.209/32(rw,no_root_squash,async,subtree_check)
/backups/Family-Videos 192.168.0.200/32(ro,no_root_squash,async,subtree_check)


5. Export the NFS Shares with exportfs command

Once the export file is configured, you need to inform the NFS server to start sharing the directory:
 

# exportfs -a


The -a flag will make it export all the sharings.

6. Start and Enable NFS Services

You need to start and enable the NFS server so it will run on system boot.

On Ubuntu / Debian Linux run the following commands:
 

# systemctl start nfs-kernel-server 
# systemctl enable nfs-kernel-server


On CentOS / RHEL Linux:
 

# systemctl start nfs-server
# systemctl enable nfs-server


7. Allow NFS Traffic Through the Firewall

If your server has a firewall configured / enabled, you will need to allow NFS-related ports through the firewall.
These ports include 2049 TCP protocol Ports (NFS) and 111 (RPCbind) UDP and TCP protocol , and some additional ports.

On Ubuntu/Debian (assuming you are using ufw [UNCOMPLICATED FIREWALL]):

# ufw allow from 192.168.1.0/24 to any port nfs sudo ufw reload

On CentOS / RHEL Linux:

# firewall-cmd –permanent –add-service=nfs sudo firewall-cmd –permanent –add-service=mountd sudo firewall-cmd –permanent –add-service=rpc-bind sudo firewall-cmd –reload

8. Verify NFS Server is Running

To ensure the NFS server is running properly, use the following command:
 

# systemctl status nfs-kernel-server

or

# systemctl status nfs-server

You should see output indicating that the service is active and running.


9. Test the NFS Share (Client-Side)

To test the NFS share, you will need to mount it on a client machine. Here's how to mount it:

On the client machine, install the NFS client utilities:

Ubuntu / Debian Linux

# apt install nfs-common

For CentOS / RHEL Linux

# yum install nfs-utils


Create a mount point (Nomatter the distro),:
 

# mkdir -p /mnt/nfs_share


Mount the NFS share:

# mount -t nfs <nfs_server_ip>:/nfs_srv_dir/nfs_share /mnt/nfs_share

Replace <nfs_server_ip> with the IP address of the NFS server or DNS host alias if you have one defined in /etc/hosts file.

Verify that the share is mounted:

​# df -h

You should see the NFS share listed under the mounted file systems.

10. Configure Auto-Mount at Boot (Optional)

To have the NFS share automatically mounted at boot, you can add an entry to the /etc/fstab file on the client machine.

Open /etc/fstab for editing:

# vi /etc/fstab

Add the following line: 

<server-ip>:/nfs_srv_dir/nfs_share /mnt/nfs_share nfs defaults 0 0

Save and close the file.

The NFS share will now be automatically mounted whenever the system reboots.

Debug NFS configuration issues (basics)


You can continue to modify the /etc/exports file to share more directories or set specific access restrictions depending on your needs.

If you encounter any issues, checking the server logs or using
 

# exportfs -v
/var/www          192.168.0.209/32(async,wdelay,hide,sec=sys,rw,secure,no_root_squash,no_all_squash)
/home/var_data      192.168.0.205/32(async,wdelay,hide,sec=sys,rw,secure,no_root_squash,no_all_squash)
/mnt/sda1/
        192.168.0.209/32(async,wdelay,hide,sec=sys,rw,secure,no_root_squash,no_all_squash)
/mnt/sda2/info
        192.168.0.200/32(async,wdelay,hide,sec=sys,rw,secure,no_root_squash,no_all_squash)
/home/mobfiles    192.168.0.209/32(async,wdelay,hide,sec=sys,rw,secure,no_root_squash,no_all_squash)
/home/var_data/public_html
        192.168.0.209/32(async,wdelay,hide,sec=sys,rw,secure,no_root_squash,no_all_squash)
/var/public
        192.168.0.209/32(async,wdelay,hide,sec=sys,rw,secure,no_root_squash,no_all_squash)
/neon/data
        192.168.0.209/32(async,wdelay,hide,sec=sys,rw,secure,no_root_squash,no_all_squash)
/scripts      192.168.0.209/32(async,wdelay,hide,sec=sys,rw,secure,no_root_squash,no_all_squash)
/backups/data-limited
        192.168.0.200/32(async,wdelay,hide,sec=sys,ro,secure,no_root_squash,no_all_squash)
/disk/filetransfer
        192.168.0.200/23(async,wdelay,hide,sec=sys,ro,secure,no_root_squash,no_all_squash)
/public_shared/data
        192.168.0.200/23(async,wdelay,hide,sec=sys,ro,secure,no_root_squash,no_all_squash)


 Of course there is much more to be said on that you can for example, check /var/log/messages /var/log/syslog and other logs that can give you hints about issues, as well as manually try to mount / unmount a NFS stuck share to know more on what is going on, but for a starter that should be enough.

command can help severely in troubleshooting the NFS configuration.

Sum it up what learned ?

We learned how to  set up basic NFS server and mounted its shared directory on a client machine.
This is a great solution for centralized file sharing and collaboration on Linux systems (even though many companies are trying to not use it due to its lack of connection encryption for historical reasons NFS has been widely used over the years and has helped dramatically for the Internet as we know it to become the World Wide Web of today. Thus for a well secured network and perhaps not a critical files infrastructure, still NFS is a key player in file sharing among heterogenous networks for multitudes of Gigabytes or Terra Pentabytes of data you would like to share amoung your Personal Computers / Servers / Phones / Tablets and generally all kind of digital computer equipment devices.

Linux: How to set KVM Virtual Machine to autostart on system boot

Thursday, July 15th, 2021

linux-kvm-set-vm-to-automatically-boot-on-linux-system-boot

Recently I've written a short article on how to make auto boot OpenVZ container Virtual Machine if system gets rebooted as I had the task to do so in daily job as sysadmin.
Few days ago after some power outage in one of Frankfurt based Data Centers, some Rack tech equipment has been temporary powered of and once the electricity was up again, some Linux servers  running Kernel Based Virtualization ( KVM ) some of the virtual machines did not managed to automatically start up and we had to manually start them one by one.
To manually start each of the machines that did not start up had to do the trivial:

[root@hypervisor ~]# virsh list
 Id    Name                           State
—————————————————-
 3     VM500                   running

[root@hypervisor ~]# virsh dominfo VM500
Id:             3
Name:           VM500
UUID:           82075903-a4ce-5ec0-a3d8-9ee83d85fc75
OS Type:        hvm
State:          running
CPU(s):         2
CPU time:       247407.9s
Max memory:     2097152 KiB
Used memory:    2097152 KiB
Persistent:     yes
Autostart:      disable
Managed save:   no
Security model: selinux
Security DOI:   0
Security label: system_u:system_r:svirt_t:s0:c447,c723 (permissive)

[root@hypervisor ~]# virsh start VM_domain_Name

Of course logcally to prevent future issues in case if Linux server gets suddenly rebooted due to whatever reason, we had to configure the machines in questions to automatically boot on OS system boot.

In some rare cases if above start command does not help you might want to check what is the status of libvirtd and investigate the logs in /var/log/libvirt/ i.e. /var/log/libvirt/libvirt.log

An alternative but more complicated way to set virtual machine to automatically start on boot is by using default location for automatic VM start just like OpenXEn has its /etc/xen/auto/ dirtory from where each soft symlinked VM configuration from /etc/xen/VM_name.cfg is started in KVM Hypervisor hosts to auto boot a certain vm you have to link /etc/libvirt/qemu/VM-to-autoboot-name.xml to /etc/libvirt/qemu/autostart/VM-to-autoboot-name.xml

[root@hypervisor ~]# systemctl status libvirtd
● libvirtd.service – Virtualization daemon
   Loaded: loaded (/usr/lib/systemd/system/libvirtd.service; enabled; vendor preset: enabled)
   Active: active (running) since Tue 2021-06-29 10:21:30 CEST; 2 weeks 2 days ago
     Docs: man:libvirtd(8)
           https://libvirt.org
 Main PID: 1809 (libvirtd)
    Tasks: 22 (limit: 32768)
   CGroup: /system.slice/libvirtd.service
           ├─1809 /usr/sbin/libvirtd
           ├─2335 /usr/sbin/dnsmasq –conf-file=/var/lib/libvirt/dnsmasq/default.conf –leasefile-ro –dhcp-script=/us…
           ├─2336 /usr/sbin/dnsmasq –conf-file=/var/lib/libvirt/dnsmasq/default.conf –leasefile-ro –dhcp-script=/us…
           ├─2386 /usr/sbin/dnsmasq –conf-file=/var/lib/libvirt/dnsmasq/Host-Only.conf –leasefile-ro –dhcp-script=/…
           └─2387 /usr/sbin/dnsmasq –conf-file=/var/lib/libvirt/dnsmasq/Host-Only.conf –leasefile-ro –dhcp-script=/…

If for some reason libvirtd is not running or disabled state you will have to enable it with:

[root@hypervisor ~]# systemctl enable libvirtd

If the virtualization is running on some RPM based distribtuion OpenSuse whatever and libvirtd is controlled via chkconfig (redhat runlevel alternative system), you will have to :

[root@hypervisor ~]# chkconfig libvirtd on

Disabling KVM Virtual Machine from auto start on server boot

[root@hypervisor ~]# virsh autostart Debian10 –disable
Domain Debian10 unmarked as autostarted

How to install VirtualBox Virtual Machine to run Windows XP on Ubuntu Linux (11.10)

Tuesday, January 17th, 2012

Enable_VirtualBox_Windows_XP-fullscreen-with-vboxguest-additions-iso
My beloved sister was complaining games were failing to properly be played with wine emulator , therefore I decided to be kind and help her by installing a Windows XP to run inside a Virtual Machine.My previous install experiments with running MS Windows XP on Linux was on Debian using QEMU virtualmachine emulator.
However as Qemu is a bit less interactive and slower virtualmachine for running Windows (though I prefer it for being completely free software), this time I decided to install the Windows OS with Virtualbox.

My hope was using VirtualBox would be a way easier but I was wrong… I've faced few troubles and I thought many people who initially try to install Virtualbox VM to run Windows on Ubuntu and other Debian based Linux distros will probably experience the same problems as mine, so here is how this article was born.

Here is what I did to have a VirtualBox OS emulator to run Windows XP SP2 on Ubuntu 11.10 Linux

1. Install Virtualbox required packages with apt

root@ubuntu:~# apt-get install virtualbox virtualbox-dkms virtualbox-guest-dkms root@ubuntu:~# apt-get install virtualbox-ose-dkms virtualbox-guest-utils virtualbox-guest-x11
...

If you prefer more GUI or lazy to type commands, the Software Package Manager can also be used to straight install the same packages.
virtualbox-dkms virtualbox-guest-dkms packages are the two which are absolutely necessery in order to enable VirtualBox to support installing Microsoft Windows XP. DKMS modules are also necessery to be able to emulate some other proprietary (non-free) operating systems.
The DKMS packages provide a source for building Vbox guest (OS) additional kernel modules. They also require the kernel source to be install otherwise they fail to compile.

Failing to build the DKMS modules will give you error every time you try to create new VirtualMachine container for installing a fresh Windows XP.
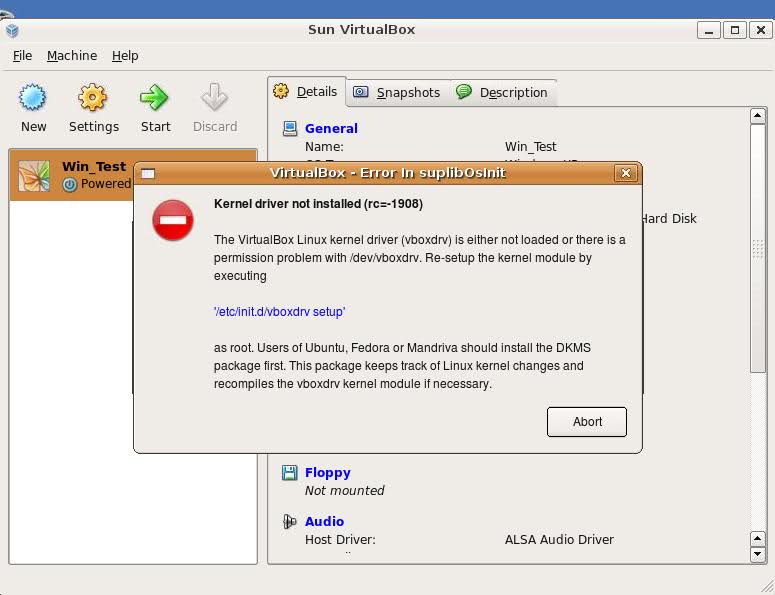
The error happens if the two packages do not properly build the vboxdrv extra Vbox kernel module while the Windows XP installer is loaded from a CD or ISO. The error to pop up is:

Kernel driver not installed (rc=-1908)

The VirtualBox Linux kernel driver (vboxdrv) is either not loaded or there is a permission problem with /dev/vboxdrv. Please reinstall the kernel module by executing

VirtualBox vboxdrv not loaded error Ubuntu Screen

To fix the error:

2. Install latest Kernel source that corresponds to your current kernel version

root@ubuntu:~# apt-get install linux-headers-`uname -r`
...

Next its necessery to rebuild the DKMS modules using dpkg-reconfigure:

3. Rebuild VirtualBox DKMS deb packages

root@ubuntu:~# dpkg-reconfigure virtualbox-dkms
...
root@ubuntu:~# dpkg-reconfigure virtualbox-guest-dkms
...
root@ubuntu:~# dpkg-reconfigure virtualbox-ose-dkms
...

Hopefully the copilation of vboxdrv kernel module should complete succesfully.
To test if all is fine just load the module:

4. Load vboxdrv virtualbox kernel module

root@ubuntu:~# modprobe vboxdrv
root@ubuntu:~#

If you get some error during loading, this means vboxdrv failed to properly compile, try read thoroughfully what the error is and fix it) ;).

As a next step the vboxdrv has to be set to load on every system boot.

5. Set vboxdrv to load on every Ubuntu boot

root@ubuntu:~# echo 'vboxdrv' >> /etc/modules

I am not sure if this step is required, it could be /etc/init.d/virtualbox init script automatically loads the module, anyways putting it to load on boot would do no harm, so better do it.

That's all now, you can launch VirtualBox and use the New button to initiate a new Virtual Machine, I will skip explaining how to do the configurations for a Windows XP as most of the configurations offered by default would simply work without any tampering.

After booting the Windows XP installer I simply followed the usual steps to install Windows and all went smoothly.
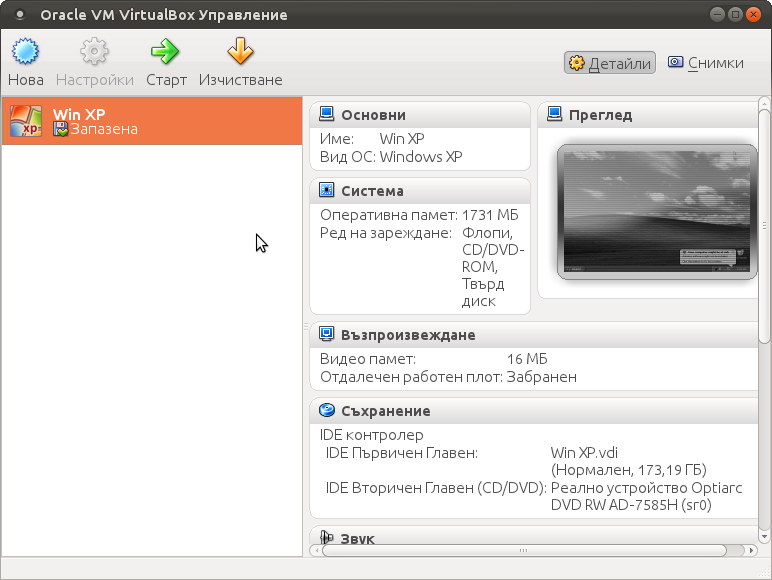
Below you see a screenshot showing the installed Windows XP Virtualbox saved VM session. The screenshot letters are in Bulgarian as my sisters default lanaguage for Ubuntu is bulgarian 😉

VirtualBox installed MS Windows VM screenshot

I hope this article helps someone out there. Please drop me a comment if you experience any troubles with it. Cya 🙂

Make QMAIL with vpopmail vchkpw, courier-authlib and courier-imap auth work without MySQL on Debian Linux qmailrocks Thibs install

Friday, September 28th, 2012

How to make qmail vpopmail vchkpw courier-authlib and courier-imap work storing mails on hard disk with qmailrocks Thibs install

Recently installed a new QMAIL, following mostly Thibs Qmailrocks install guide. I didn’t followed literally Thibs good guide, cause in his guide in few of the sections like Install Vpopmail he recommends using MySQL as a Backend to store Vpopmail email data and passwords; I prefer storing all vpopmail data on the file system as I believe it is much better especially for tiny QMAIL mail servers with less than 500 mail box accounts.

In this little article I will explain, how I made Vpopmail courier-authlib and courier-imap play nice together without storing data in SQL backend.

1. Compile vpopmail with file system data storage support

So here is how I managed to make vpopmail + courier-authlib + courier-imap, work well together:

First its necessery to compile Vpopmailin store all its users data and mail data on file system. For this in Thibs Vpopmail Intsall step compiled Vpopmail without support for MySQL, e.g. instead of using his pointed compile time ./configure, arguments I used:


# cd /downloads/vpopmail-5.4.33
# ./configure \
--enable-qmaildir=/var/qmail/ \
--enable-qmail-newu=/var/qmail/bin/qmail-newu \
--enable-qmail-inject=/var/qmail/bin/qmail-inject \
--enable-qmail-newmrh=/var/qmail/bin/qmail-newmrh \
--enable-tcprules-prog=/usr/bin/tcprules \
--enable-tcpserver-file=/etc/tcp.smtp \
--enable-clear-passwd \
--enable-many-domains \
--enable-qmail-ext \
--enable-logging=y \
--enable-auth-logging \
--enable-libdir=/usr/lib/ \
--disable-roaming-users \
--disable-passwd \
--enable-domainquotas \
--enable-roaming-users
....
....
# make && make install-strip
# cat > ~vpopmail/etc/vusagec.conf < < __EOF__
Server:
Disable = True;
__EOF__
echo 'export PATH=$PATH:/var/qmail/bin/:/home/vpopmail/bin/' > /etc/profile.d/extrapath.sh
chmod +x /etc/profile.d/extrapath.sh
source /etc/profile

A tiny shell script with all above options to compile (qmail) vpopmail without MySQL / PostgreSQL support is here

For other steps concerning creation of vpopmail/vchkpw – user/group just follow as Thibs suggests.

2. Compile and install courier-authlib-0.59.1

I’ve made mirror of courier-authlib.0.59.1.tar.gz cause this version includes support for vchkpw without mysql, its a pity newer versions of courier-authlib not any more have support for vpopmail to store its data directly on the hard disk.

Then on downlaod, compile && install courier-authlib:

Download authlib courier-authlib.0.59.1.tar.gz – (I made mirror of courier-authlib.0.59.1.tar.gz you can use my mirror or download it somewhere else from the net):


# cd /usr/local/src
# wget -q https://www.pc-freak.net/files/courier-authlib.0.59.1.tar.gz
# tar -zxvvf courier-authlib.0.59.1.tar.gz

Compile courier-authlib

# ./configure --prefix=/usr/local --exec-prefix=/usr/local --with-authvchkpw --without-authldap --without-authmysql --disable-root-check --with-ssl --with-authchangepwdir=/usr/local/libexec/authlib
....
# make && make install && make install-strip && make install-configure
....

On Debian Squeeze, this version of courier-authlib compiles fine, on Debian Lenny I use it too and there it is okay.

Unless above commands returns a compile error authlib will be installed inside /usr/local/libexec. If you get any errors it is most likely due to some missing header files. The error should be self explanatory enough, but just in case you have troubles to find what deb is necessery to install, please check here the complete list of installed packages I have on the host . In case of problems the quickest way (if on Debian Squeeze) is to install same packages, type:


# wget -q https://www.pc-freak.net/files/list_of_all_deb_necessery_installed_packages_for_authlib.txt
# for i in $(cat list_of_all_deb_necessery_installed_packages_for_authlib.txt |awk '{ print $2 }'); do
apt-get install --yes $i;
done

This is for the lazy ones though it might install you some packs you don’t like to have on your host, so just install it in case you know what you’re doing 🙂

Next step is to set proper configuration for courier-authdaemon.

3. Configure courier-authlib in /usr/local/etc/authlib

Again for the lazy ones I have prepared a good config which is working 100% with vpopmail configured to store mails on the file system, to install the “good” configs, fetch mine and put them in proper location, e.g.:


# cd /usr/local/etc
# wget -q https://www.pc-freak.net/files/authlib-config-for-qmail-with-hdd-directory-stored-userdata.tar.gz
# tar -zxvvf authlib-config-for-qmail-with-hdd-directory-stored-userdata.tar.gz
....

For those who prefer not to use my configuration as pointed above, here is what you will need to change manually in configs:

Edit /usr/local/etc/authlib/authdaemonrc and make sure there variable authmodulelist and authmodulelist and daemons=5
equals to:


authmodulelist="authvchkpw"


authmodulelistorig="authuserdb authpgsql authldap authmysql authcustom authvchkpw authpipe"


daemons=10

Bear in mind here the setting daemons, will set how many maximum parallel connections should be possible to authdaemond on new IMAP fetch mail user requests. Setting it to 10 will allow your mail server to support up to 10 users to paralelly check your mail for a tiny mail server this setting is okay if you expect higher number of parallel mail users raise the setting to some setting fitting your needs.

P.S. On some qmail installations this value has created weird problems and took me hours to debug the whole mess is caused by this setting, make sure you plan it now unless you don’t to loose some time in future.

4. Stop debian courier-authdaemon and start custom compiled one

Now all is ready and authdaemond can be started, but before that if you have installed courier-authlib as a debian package you need to stop it via init script and only when completely sure old default Debian courier-authdaemon is stopped launch the new installed one:


# /etc/init.d/courier-authdaemon stop
# s ax |grep -i authdaemond |grep -v grep
#
# /usr/local/sbin/authdaemond start
#

To make the newly custom source installed courier-authdaemon to load itself on system boot instead of the debian installed package


# dpkg -l |grep -i courier-authdaemon
ii courier-authdaemon 0.63.0-3 Courier authentication daemon

open /etc/init.d/courier-authdaemond, after line:


. /lib/lsb/init-functions

add


/usr/local/sbin/authdaemond start
exit 0

This will make the script exit once launches cmd /usr/local/sbin/authdaemond start

5. Compile and Install courier-imap

You will also have to install from courier-imap archive source, I have tested it and know Qmail + Vpopmail + Courier-Imap works for sure with version courier-imap-4.1.2.tar.bz2

As of time of writing this post courier-imap-4.11.0.tar.bz2 is the latest available for download from Courier-imap download site unfortunately this version requires higher version of >= courier-authlib-0.63

In order install courier-imap-4.1.2.tar.bz2


# cd /usr/local/src
# wget -q https://www.pc-freak.net/files/courier-imap-4.1.2.tar.bz2
# tar -jxvvf courier-imap-4.1.2.tar.bz2
...
# chown -R hipo:hipo courier-imap-4.1.2
# su hipo
$ cd courier-imap-4.1.2/
$ export CFLAGS="-DHAVE_OPEN_SMTP_RELAY -DHAVE_VLOGAUTH"
$ export COURIERAUTHCONFIG=/usr/local/bin/courierauthconfig
$ export CPPFLAGS=-I/usr/local/courier-authlib/include
$ ./configure --prefix=/usr/local/courier-imap --disable-root-check
...
$ exit
# make
...
# make install
...
# make install configure

It is recommended courier-imap to be compiled with non root username. In above code I use my username hipo, other people have to use any non-root user.

6. Set proper configuration and new init script for courier-imap

In /usr/lib/courier-imap, download following working configs (for convenience I’ve made tar with my configs):


# cd /usr/lib/courier-imap
# rm -rf etc
# wget -q https://www.pc-freak.net/files/courier-imap-config-etc.tar.gz

Then you will have to overwrite default courier-imap init script in /etc/init.d/courier-imap with another one to start the custom compiled one instead of debian default installed courier-imap


# mv /etc/init.d/courier-imap /root
# cd /etc/init.d
# wget -q https://www.pc-freak.net/files/debian-courier-imap
# mv debian-courier-imap courier-imap
# chmod +x courier-imap

This init script is written use /var/lock/subsys/courier-imap, so you will have to also create /var/lock/subsys/


# mkdir -p /var/lock/subsys

7. Start custom installed courier-imap

The start/stop init script of newly installed courier-imap is /usr/lib/courier-imap/libexec/imapd.rc


/usr/lib/courier-imap/libexec/imapd.rc start

Since a new /etc/init.dcourier-imap is installed too, it can be also used to control courier-imap start/stop.

Well thats should be enough for Courier-authlib and Courier-Authlib to communicate fine between each other and be able to connect and fetch e-mail stored in file system by vpopmail.

8. Test if Qmail IMAP proto finally works


# telnet localhost 143
Trying 127.0.0.1...
Connected to localhost.
Escape character is '^]'.
* OK [CAPABILITY IMAP4rev1 UIDPLUS CHILDREN NAMESPACE THREAD=ORDEREDSUBJECT THREAD=REFERENCES SORT QUOTA IDLE AUTH=CRAM-MD5 ACL ACL2=UNION STARTTLS] Courier-IMAP ready. Copyright 1998-2011 Double Precision, Inc. See COPYING for distribution information.
a login username@mail-domain.com my-username-password
a OK LOGIN Ok.
a LIST "" "*"
* LIST (\HasNoChildren) "." "INBOX.Sent"
* LIST (\Marked \HasChildren) "." "INBOX"
* LIST (\HasNoChildren) "." "INBOX.Drafts"
* LIST (\HasNoChildren) "." "INBOX.Trash"
a OK LIST completed
a EXAMINE Inbox
* FLAGS (\Draft \Answered \Flagged \Deleted \Seen \Recent)
* OK [PERMANENTFLAGS ()] No permanent flags permitted
* 6683 EXISTS
* 471 RECENT
* OK [UIDVALIDITY 1272460837] Ok
* OK [MYRIGHTS "acdilrsw"] ACL
a OK [READ-ONLY] Ok
* 1 FETCH (BODY[] {2619}
Return-Path:
Delivered-To: hipo@my-domain-name.com
Received: (qmail 22304 invoked by uid 1048); 24 Apr 2012 14:49:49 -0000
Received: from unknown (HELO localhost) (127.0.0.1)
by mail.my-domain-name.com with SMTP; 24 Apr 2012 14:49:49 -0000
Delivered-To: hipo@my-domain-name.com
Received: from localhost [127.0.0.1]
......
......

That’s all it works. Enjoy 🙂

Disable bluetooth on Linux IBM / Lenovo Thinkpad laptops

Thursday, February 14th, 2013

bluetooth gnu linux disable bluetooth linux how to tux logo bluetooth thinkpad

I have a Debian GNU / Linux squeeze with bluetooth and bluetooth is started automatically on system boot. This is pretty annoying, cause I use bluetooth quite rarely.
 disable / enable bluetooth via terminal is controlled via Linux sysfs virtual filesystem. The command to disable bluetooth one time is:

debian:~# echo 0 > /sys/devices/platform/thinkpad_acpi/bluetooth_enable

It is efficient in terms of energy saving especially if you use often your notebook on battery to turn off bluetooth permanently and only enable it when needed with:

debian:~# echo 1 > /sys/devices/platform/thinkpad_acpi/bluetooth_enable

To permanently disable bluetooth on Linux boot use:

# service bluetooth stop

In /etc/rc.local before exit 0 line place:

echo 0 > /sys/devices/platform/thinkpad_acpi/bluetooth_enable

An alternative method to permanently disable bluetooth (on other non-Thinkpad – any brand laptops) is via rfkill (bluetooth device control interface), on Ubuntu rfkill is installed by default but Debian users has to explicitly install it via apt:

debian:~# apt-get install –yes rfkill

Once rfkill is installed on host put a line before exit 0 in /etc/local:

rfkill block bluetooth
 

How to disable IPv6 on Debian / Ubuntu / CentOS and RHEL Linux

Friday, December 9th, 2011

I have few servers, which have automatically enabled IPv6 protocols (IPv6 gets automatically enabled on Debian), as well as on most latest Linux distribituions nowdays.

Disabling IPv6 network protocol on Linux if not used has 2 reasons:

1. Security (It’s well known security practice to disable anything not used on a server)
Besides that IPv6 has been known for few criticil security vulnerabilities, which has historically affected the Linux kernel.
2. Performance (Sometimes disabling IPv6 could have positive impact on IPv4 especially on heavy traffic network servers).
I’ve red people claiming disabling IPv6 improves the DNS performance, however since this is not rumors and did not check it personally I cannot positively confirm this.

Disabling IPv6 on all GNU / Linuces can be achieved by changing the kernel sysctl settings net.ipv6.conf.all.disable_ipv6 by default net.ipv6.conf.all.disable_ipv6 equals 1 which means IPv6 is enabled, hence to disable IPv6 I issued:

server:~# sysctl net.ipv6.conf.all.disable_ipv6=0

To set it permanently on system boot I put the setting also in /etc/sysctl.conf :

server:~# echo 'net.ipv6.conf.all.disable = 1 >> /etc/sysctl.conf

The aforedescribed methods should be working on most Linux kernels version > 2.6.27 in that number it should work 100% on recent versions of Fedora, CentOS, Debian and Ubuntu.

To disable IPv6 protocol on Debian Lenny its necessery to blackist the ipv6 module in /etc/modprobe.d/blacklist by issuing:

echo 'blacklist ipv6' >> /etc/modprobe.d/blacklist

On Fedora / CentOS there is a another universal “Redhat” way disable IPv6.

On them disabling IPv6 is done by editting /etc/sysconfig/network and adding:

NETWORKING_IPV6=no
IPV6INIT=no

I would be happy to hear how people achieved disabling the IPv6, since on earlier and (various by distro) Linuxes the way to disable the IPv6 is probably different.
 

Alto to stop Iptables IPV6 on CentOS / Fedora and RHEL issue:

# service ip6tables stop

# service ip6tables off

How to make GRE tunnel iptables port redirect on Linux

Saturday, August 20th, 2011

I’ve recently had to build a Linux server with some other servers behind the router with NAT.
One of the hosts behind the Linux router was running a Window GRE encrypted tunnel service. Which had to be accessed with the Internet ip address of the server.
In order < б>to make the GRE tunnel accessible, a bit more than just adding a normal POSTROUTING DNAT rule and iptables FORWARD is necessery.

As far as I’ve read online, there is quite of a confusion on the topic of how to properly configure the GRE tunnel accessibility on Linux , thus in this very quick tiny tutorial I’ll explain how I did it.

1. Load the ip_nat_pptp and ip_conntrack_pptp kernel module

linux-router:~# modprobe ip_nat_pptp
linux-router:~# modprobe ip_conntrack_pptp

These two modules are an absolutely necessery to be loaded before the remote GRE tunnel is able to be properly accessed, I’ve seen many people complaining online that they can’t make the GRE tunnel to work and I suppose in many of the cases the reason not to be succeed is omitting to load this two kernel modules.

2. Make the ip_nat_pptp and ip_nat_pptp modules to load on system boot time

linux-router:~# echo 'ip_nat_pptp' >> /etc/modules
linux-router:~# echo 'ip_conntrack_pptp' >> /etc/modules

3. Insert necessery iptables PREROUTING rules to make the GRE tunnel traffic flow

linux-router:~# /sbin/iptables -A PREROUTING -d 111.222.223.224/32 -p tcp -m tcp --dport 1723 -j DNAT --to-destination 192.168.1.3:1723
linux-router:~# /sbin/iptables -A PREROUTING -p gre -j DNAT --to-destination 192.168.1.3

In the above example rules its necessery to substitute the 111.222.223.224 ip address withe the external internet (real IP) address of the router.

Also the IP address of 192.168.1.3 is the internal IP address of the host where the GRE host tunnel is located.

Next it’s necessery to;

4. Add iptables rule to forward tcp/ip traffic to the GRE tunnel

linux-router:~# /sbin/iptables -A FORWARD -p gre -j ACCEPT

Finally it’s necessery to make the above iptable rules to be permanent by saving the current firewall with iptables-save or add them inside the script which loads the iptables firewall host rules.
Another possible way is to add them from /etc/rc.local , though this kind of way is not recommended as rules would add only after succesful bootup after all the rest of init scripts and stuff in /etc/rc.local is loaded without errors.

Afterwards access to the GRE tunnel to the local IP 192.168.1.3 using the port 1723 and host IP 111.222.223.224 is possible.
Hope this is helpful. Cheers 😉

Workaround “Running chkdsk in Read-Only mode” on Windows XP

Tuesday, July 16th, 2013

running chkdsk in read only mode microsoft windows XP chkdsk schedule check drive C on next restart

I had to fix old Notebook Dell Insspiron 1501 (890 mb ram and 1.60 Ghz CPU) notebook with Windows XP SP2. The notebook looks okay but as it is an old piece of hardware I decided to check hard drives for bad sectors with Windows (Check Disk) –  chkdsk. 

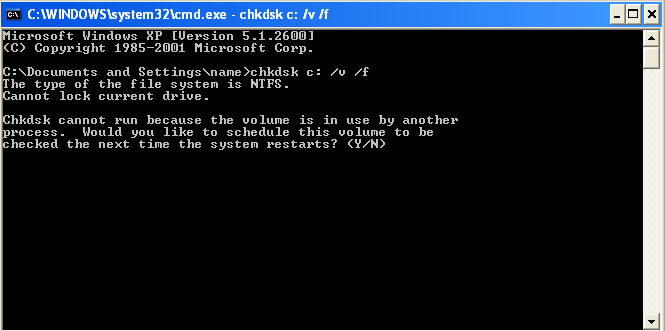
Running chkdsk via -> cmd.exe does not work because file system is in use and once you run chkdsk it does spit warning and error:


"Running CHKDSK in Read-Only mode
".

Errors found. CHKDSK cannot continue in read-only mode

Because it checks hdd in read-only its check is not completely reliable and in case some bad block is matched it is not possible for chkdsk to write on HDD and try fix or move it to some free space blocks.


To work around this its necessary to run chkdsk with options:

chkdsk C: /v /f

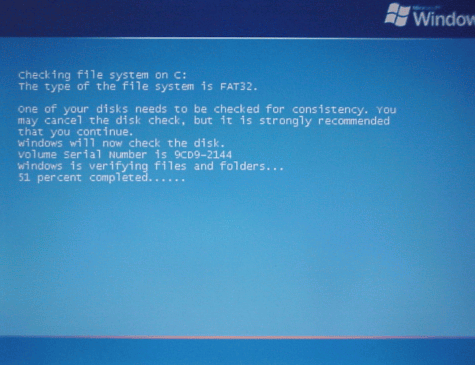
This command brings out prompt like in below screenshot offering to run CHKDSK on C drive on next system boot before starting Windows services which does lock files on file system – making it unavailable for CHKDSK to read blocks on it.

Checking file system on C drive before boot windows XP screenshot

The notebook had 3  Drives C:\, D:\ and E:\ so I run above command also on D:\ and E:\ to make sure there are no physical damages on D and E partitions, i.e.:

chkdsk D: /v /f
....

chkdsk E: /v /f
...
.....

screen -d Fix “Must run suid root for multiuser support.” su user detach error

Thursday, March 28th, 2013

I had to run a shell script to run automatically in detached screen during Linux system boot up via /etc/rc.local. This is needed because the server uses the tiny shell script to fetch data from remote host database and fill information into local MySQL server.

My idea was to su from root to www-data (Apache) user – the script has requirements to run with Apache user, then it has to run detached using GNU screen (multi terminal emulator. The tiny one line script I imagined would do the trick is like so:

# tty=$(tty); su www-data -c 'cd /home/user/www/enetpulse; screen -d /home/user/www/enetpulse/while_true.sh'; chmod 0720 $tty

I run this as root user to test whether it will work or not before I put it in /etc/rc.local but for my surprise got an error:
 

Must run suid root for multiuser support.

After a quick investigation on what is causing it I came across the solution which is to include screen arguments (-m -S shared). The working variant that gets around the error – i.e. successfully changes user privileges to Debian Apache user (www-data) and then detach with screen is:

# tty=$(tty); chmod a+rw $tty; su www-data -c 'cd /home/user/www/enetpulse; screen -d -m -S shared /home/user/www/enetpulse/while_true.sh'; chmod 0720 $tty;

That's all now script works out as planned on next server reboot

How to disable PC Speaker on FreeBSD / Mute PC-Speaker on BSD kernels

Wednesday, May 16th, 2012


old school personal computer pc speaker / freebsd disable Pc-Speaker picture

After finding out How PC Speaker is muted on Linux , I've decided to also disable the annoying beeps on BSD. This is in tandem with the minimalistic philosophy I try to apply to every server I manage.

Also on BSD Desktop machines it is quite annoying especially if csh (C Shell) is used, everytime you press TAB you get the beep sound. On BSD beep sound produced on tab completion is louder than in Linux and that makes it even more annoying …

Disabling pc-speaker beeps on BSDs is done via a sysctl kernel variable:

freebsd# sysctl hw.syscons.bell=0
hw.syscons.bell: 0 -> 0

To further permanently disable on system boot add hw.syscons.bell=0 to /etc/sysctl.conf, e.g.:

freebsd# echo 'hw.syscons.bell=0' >> /etc/sysctl.conf


Well that's it no more mind drilling beeps :)