Posts Tagged ‘value’

How to Avoid the 7 Most Frequent Mistakes in Python Programming

Monday, September 9th, 2019

python-programming-language-logo

Python is very appealing for Rapid Application Development for many reasons, including high-level built in data structures, dynamic typing and binding, or to use as glue to connect different components. It’s simple and easy to learn but new Python developers can fall in the trap of missing certain subtleties.

Here are 7 common mistakes that are harder to catch but that even more experienced Python developers have fallen for.


1. The misuse of expressions as function argument defaults

Python allows developers to indicate optional function arguments by giving them default values. In most cases, this is a great feature of Python, but it can create some confusion when the default value is mutable. In fact, the common mistake is thinking that the optional argument is set to whatever default value you’ve set every time the function argument is presented without a value. It can seem a bit complicated, but the answer is that the default value for this function argument is only evaluated at the time you’ve defined the function, one time only.  

how-to-avoid-the-7-most-frequent-mistakes-in-python-programming-3


2. Incorrect use of class variables

Python handles class variables internally as dictionaries and they will follow the Method Resolution Order (MRO). If an attribute is not found in one class it will be looked up in base classes so references to one part of the code are actually references to another part, and that can be quite difficult to handle well in Python. For class attributes, I recommend reading up on this aspect of Python independently to be able to handle them.

how-to-avoid-the-7-most-frequent-mistakes-in-python-programming-2


3. Incorrect specifications of parameters for exception blocks

There is a common problem in Python when except statements are provided but they don’t take a list of the exceptions specified. The syntax except Exception is used to bind these exception blocks to optional parameters so that there can be further inspections. What happens, however, is that certain exceptions are then not being caught by the except statement, but the exception becomes bound to parameters. The way to get block exceptions in one except statement has to be done by specifying the first parameter as a tuple to contain all the exceptions that you want to catch.

how-to-avoid-the-7-most-frequent-mistakes-in-python-programming-1
 

4. Failure to understand the scope rules

The scope resolution on Python is built on the LEGB rule as it’s commonly known, which means Local, Enclosing, Global, Built-in. Although at first glance this seems simple, there are some subtleties about the way it actually works in Python, which creates a more complex Python problem. If you make an assignment to a variable in a scope, Python will assume that variable is local to the scope and will shadow a variable that’s similarly named in other scopes. This is a particular problem especially when using lists.


5. Modifying lists during iterations over it


When a developer deletes an item from a list or array while iterating, they stumble upon a well known Python problem that’s easy to fall into. To address this, Python has incorporated many programming paradigms which can really simplify and streamline code when they’re used properly. Simple code is less likely to fall into the trap of deleting a list item while iterating over it. You can also use list comprehensions to avoid this problem.

how-to-avoid-the-7-most-frequent-mistakes-in-python-programming-8


6. Name clash with Python standard library


Python has so many library modules which is a bonus of the language, but the problem is that you can inadvertently have a name clash between your module and a module in the standard library. The problem here is that you can accidentally import another library which will import the wrong version. To avoid this, it’s important to be aware of the names in the standard library modules and stay away from using them.

how-to-avoid-the-7-most-frequent-mistakes-in-python-programming-5


7. Problems with binding variables in closures


Python has a late binding behavior which looks up the values of variables in closure only when the inner function is called. To address this, you may have to take advantage of default arguments to create anonymous functions that will give you the desired behavior – it’s either elegant or a hack depending on how you look at it, but it’s important to know.


how-to-avoid-the-7-most-frequent-mistakes-in-python-programming-6

Python is very powerful and flexible and it’s a great language for developers, but it’s important to be familiar with the nuances of it to optimize it and avoid these errors.

Ellie Coverdale, a technical writer at Essay roo and UK Writings, is involved in tech research and projects to find new advances and share her insights. She shares what she has learned with her readers on the Boom Essays blog.

Virtualbox Shared folder set up on Linux between Host and Guest OS – Set up Virtualbox shared folder to Copy files from PC Host to Guest

Wednesday, September 12th, 2018

mount-shares-between-host-OS-and-guest-virtual-machine-howto-virtualbox-vbox-logo

How to set-up Virtualbox shared folder to Copy files from PC Host  and Guest Virtualized OS?

Running VirtualBox Host is an easy thing to set-up across all Operating Systems.  Once you have it sooner or later you will need to copy files from the VM Host OS (that in my case is GNU / Linux) to the virtualized Guest operating system (again in my case that's again another Linux ISO running indide the Virtual Machine).

Below are steps to follow To use Virtualbox Shared Folder functionality to copy files between VBox and your Desktop / server Linux install.

1. Install Virtualbox Guest Additions CD Image ISO

I've explained how to add the Guest Additions CD image thoroughfully in my previous article Howto enable Copy / Paste Virtualbox betwen Linux guest and Host OS
Anyways I'll repeat myself below for sake of clarity:

To do so use Oracle VBox menus (on the booted virtualized OS VBox window):


Devices -> Insert Guest additions CD Image


Mount the ISO inside the Linux Virtual Machine:

root@debian:~# mount /media/cdrom1/
 

If the mount fails and there are no files inside the mount point it might be because the virtualbox-dkms and virtualbox-guest-dkms packages might be missing on the Host OS.

To install them (on Debian GNU / Linux) assuming that you're using virtualbox default distro packages /etc/apt/sources.list :
 

apt-get install –yes -qq virtualbox-dkms virtualbox-guest-dkms


and run:


root@debian:/media/cdrom1# cd /media/cdrom1; sh VBoxLinuxAdditions.run


2. Create directory for Shared Folder that will be used to access Host / OS files from the Guest Virtualized OS
 

root@debian:~# mkdir /mnt/shared_folder


3. Map from VBox program interface Shared folder settings and Mount /mnt/shared_folder location

virtualbox-virtual-machine-devices-shared-folders-shared-folder-settings-linux-screenshot


Devices -> Shared Folder -> Shared Folder settings -> Transient Folders (click blue folder add small button right)


From Transient Folders add whatever directory you want to be shared from your local notebook / PC to the VM.

virtualbox-devices-Shared-Folder-Add-Shared-Folder-add-share-linux-screenshot
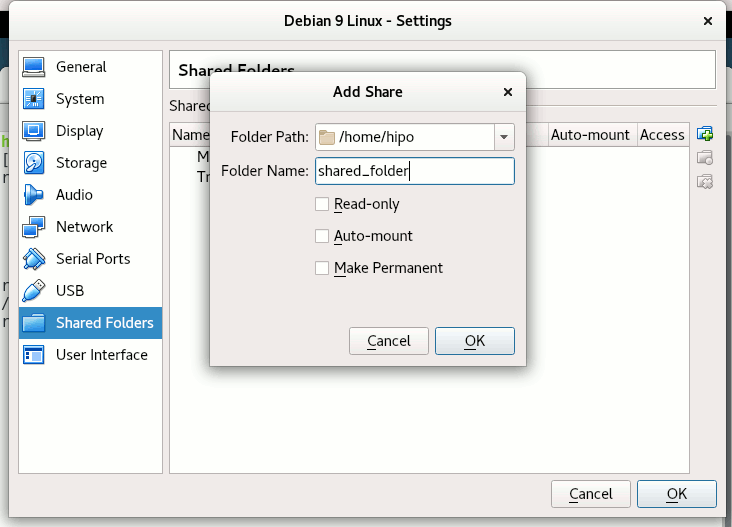
Depending on whether you would like to mount the shared folder only for reading files (choose Read Only) to make it a permanent shared folder (and not just for the one session of current running Virtual Machine until its killed use Make Permanent) or check Auto-Mount tick if you want the shared_folder mapping to be mounted on every VM boot.

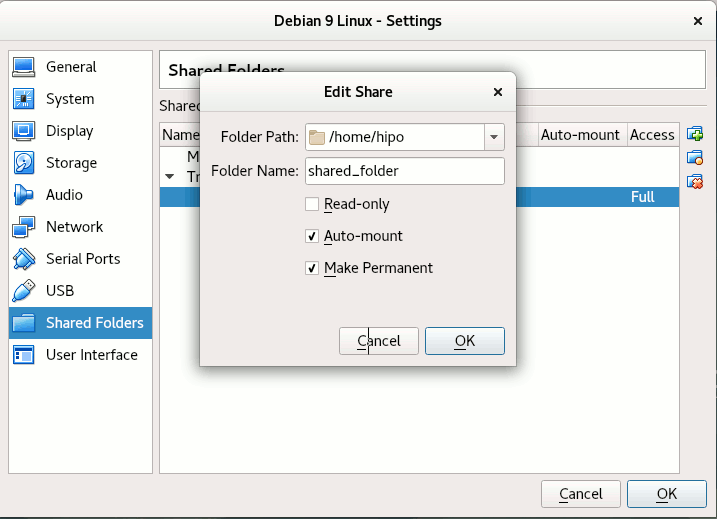
Once the shared_folder directory location is set-up from GUI menu click OK and in order for the settings to take effect, you'll need to restart the VM Guest with Linux (use halt command from terminal) or Power Off the Machine via the VBox menus.

To mount use command like:

mount -t vboxsf name_of_folder_linked_from_vbox  /mnt/name_folder_guest_os/


mount-vboxsf-shared-folder-mnt-shared-linux-guest-screenshot

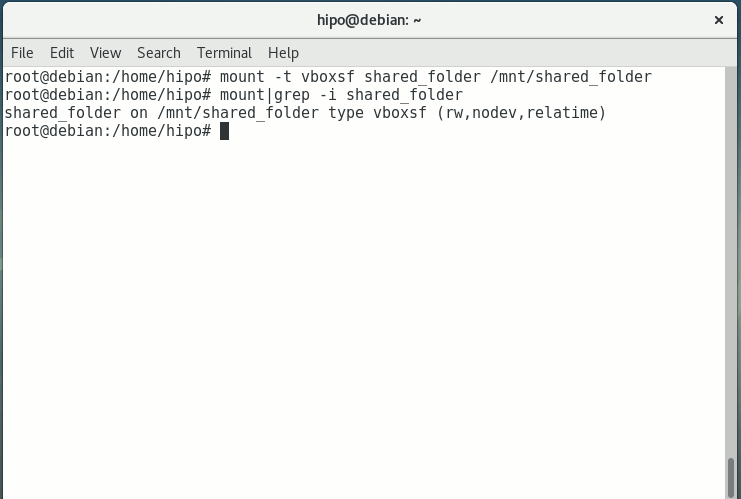
In my case I wanted to share home folder /home so the command I used is:

root@debian:~# mount -t vboxsf  shared_folder /mnt/shared_folder


If everything is fine your Host OS file content from /home will be visible (for read and write if you Mapped it so) 
under /mnt/shared_folder …

And as Turtles Ninja used to heavily say Cowabunga !!! 🙂
You have it mounted and ready for file share between Desktop -> Virtualized OS.


Bear in mind that above mount command has to run as root (superuser) to succeed.

You now could copy files from your Host OS (running the Virtual Machine) and the Guest OS (Virtualized OS) using /mnt/shared_folder mount point without problems.

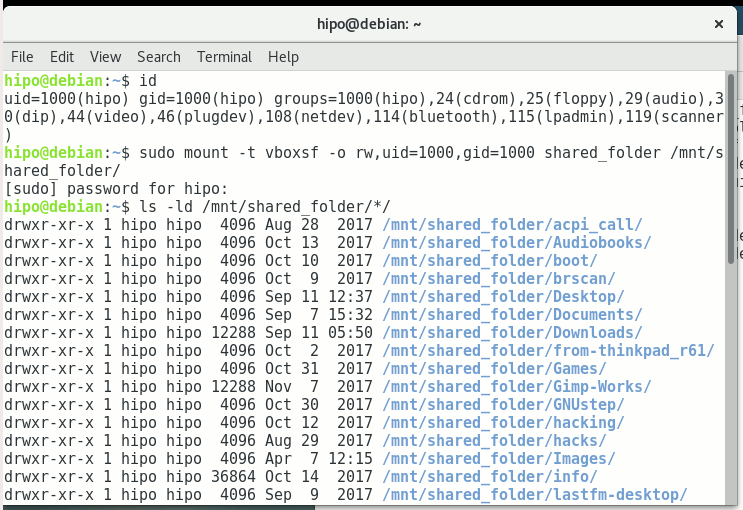
The example is if you want to share files between VirtualBox installed Linux and the Guest (Desktop / server) OS, however at many cases mounting your Host OS directory for root users might be not very practical but, instead you might prefer to do the mount for specific non admin user, for example I prefer to do the shared folder mount with my pointed non-root username hipo.

Here is how to do above VM shared_folder mount for non-root user:

First you need to know the exact UID / GID (User ID / Group ID) of user, you can get that with id command:


hipo@linux:~$  id
uid=1000(hipo) gid=1000(hipo) groups=1000(hipo),24(cdrom),25(floppy),29(audio),30(dip),44(video),46(plugdev),108(netdev),114(bluetooth),115(lpadmin),119(scanner)


As you see UID / GID in my case are 1000 / 1000

hipo@linux:~$ sudo mount -t vboxsf -o rw,uid=1000,gid=1000 shared_folder /mnt/shared_folder


mount-virtual-box-shared_folder-with-non-administration-permissions-non-root-permissions-id-and-mount-command-screenshot-linux


4. Mounting configured shared_folder to automatically mount into the Guest OS Linux on every boot

a) Configuring shared_folder auto-mount using /etc/rc.local

If you need the shared_folder to automatically mount next-time you boot the virtual machine quickest way is to add the mount command to /etc/rc.local (on Debian 8 and Debian 9 and newer Ubuntu Linuxes rc.local is missing by default to enable it to work like it worked before read follow my previous article ).

b) Configuring auto-mount for shared_folder through /etc/fstab

The more professional way to auto-mount on emulated OS VM boot time,  you could add the vboxsf mount definitions to /etc/fstab with your favourite text-editor mcedit, nano, joe etc. … (for me that's vim).

Syntax of /etc/fstab is as follows:
 

<Device> <Mount Point> <Type> <Options> <Dump> <Pass>

root@linux:~# vim /etc/fstab


shared_folder /mnt/shared_folder                                vboxsf rw,uid=1000,gid=1000 0 0

Note that you will want to change 1000 / 1000, id / gid with the ones of the non-admin user you would like to add to mount it for.

A quick way to add it to /etc/fstab with a shell one-liner is with command
 

root@linux:~# echo 'shared_folder /mnt/shared_folder                                vboxsf rw,uid=1000,gid=1000 0  0' >> /etc/fstab

An alternative way to add a user to have permissions for vboxsf file system (without specifying the long -o uid=1000,gid=1000 options is to simply add the username in question to group vboxsf like so:

c) Adding non super user username to vboxsf group

root@linux:~# usermod -G vboxsf hipo
root@linux:~# grep -i vboxsf /etc/group
vboxsf:x:999:hipo


hipo@linux:~$ sudo mount -t vboxsf  shared_folder /mnt/shared_folder


without the extra arguments and the options to pass to /etc/fstab (for eventual requirement to auto mount the shared_folder) would be more simple e.g.:


echo 'shared_folder /mnt/shared_folder                                vboxsf ' >> /etc/fstab


One note to make here is if the uesr is added to vboxsf the line for /etc/fstab to auto mount to mount for root user and non-root will be identical.

Then you can get the /etc/fstab auto-mount configured tested by running:

c) Checking auto-mount is working

hipo@linux:~# mount -a
hipo@linux:~# mount |grep -i vboxsf
shared_folder on /mnt/shared_folder type vboxsf (rw,nodev,relatime)


5. What if you end up with mounting failed errors ? – What might be causing the mounting failed Protocol error (a few things to check to solve)


In case of troubles with the mount you might get an error like:

hipo@linux:~# mount -t vboxsf  share_folder /mnt/shared_folder

/sbin/mount.vboxsf: mounting failed with the error: Protocol error


This error might be caused because of Insert Guest Additions CD Image might be not properly enabled and installed using the ISO provided VBoxLinuxAdditions.sh shell script.
Other common reason you might get this error if you have mistyped the Folder name: given in Shared Folders -> Folder Path -> Add Share for example I have given shared_folder as a Map name but as you can see in above mount -t vboxsf, I've mistyped share_folder instead of the correct one shared_folder inserted.
In some VBox releases this error was caused by bugs in the Virtual Machine.
 

virtualbox-virtual-machine-shared-folder-transient-folder-add-folder-linux-VM-guest-linux

One useful tip is to be able to check whether a Virtualbox Virtual Machine has a configured shared_folder (if you're logging to manage the machine on remote server – nomatter whether you have logged in with VNC / Teamviewer / Citrix etc. or via SSH session.

To do so use VBoxControl as of time of writting usually located on most distributions under (/usr/bin/VBoxControl)


hipo@linux:~# VBoxControl sharedfolder list -automount
Oracle VM VirtualBox Guest Additions Command Line Management Interface Version 5.2.18
(C) 2008-2018 Oracle Corporation
All rights reserved.


Auto-mounted Shared Folder mappings (0):

No Shared Folders available.

You can use VBoxControl command to get set and list a number of settings on the VBox VM, here is an useful example with it where you get information about numerous VBox info values:


root@linux:~# VBoxControl guestproperty enumerate
Oracle VM VirtualBox Guest Additions Command Line Management Interface Version 5.2.18
(C) 2008-2018 Oracle Corporation
All rights reserved.


Name: /VirtualBox/GuestInfo/OS/Product, value: Linux, timestamp: 1536681633430852000, flags: <NULL>
Name: /VirtualBox/GuestInfo/Net/0/V4/IP, value: 10.0.2.15, timestamp: 1536681633438717000, flags: <NULL>
Name: /VirtualBox/HostInfo/GUI/LanguageID, value: en_US, timestamp: 1536697521395621000, flags: RDONLYGUEST
Name: /VirtualBox/GuestInfo/Net/0/MAC, value: 08002762FA1C, timestamp: 1536681633442120000, flags: <NULL>
Name: /VirtualBox/GuestInfo/OS/ServicePack, value: <NULL>, timestamp: 1536681633431259000, flags: <NULL>
Name: /VirtualBox/HostInfo/VBoxVerExt, value: 5.2.18, timestamp: 1536681619002646000, flags: TRANSIENT, RDONLYGUEST
Name: /VirtualBox/GuestInfo/Net/0/V4/Netmask, value: 255.255.255.0, timestamp: 1536681633440157000, flags: <NULL>
Name: /VirtualBox/GuestInfo/OS/Version, value: #1 SMP Debian 4.9.110-3+deb9u2 (2018-08-13), timestamp: 1536681633431125000, flags: <NULL>
Name: /VirtualBox/GuestAdd/VersionExt, value: 5.2.18, timestamp: 1536681633431582000, flags: <NULL>
Name: /VirtualBox/GuestAdd/Revision, value: 124319, timestamp: 1536681633432515000, flags: <NULL>
Name: /VirtualBox/HostGuest/SysprepExec, value: <NULL>, timestamp: 1536681619002355000, flags: TRANSIENT, RDONLYGUEST
Name: /VirtualBox/GuestInfo/OS/LoggedInUsers, value: 1, timestamp: 1536681673447293000, flags: TRANSIENT, TRANSRESET
Name: /VirtualBox/GuestInfo/Net/0/Status, value: Up, timestamp: 1536681633443911000, flags: <NULL>
Name: /VirtualBox/GuestInfo/Net/0/Name, value: enp0s3, timestamp: 1536681633445302000, flags: <NULL>
Name: /VirtualBox/HostGuest/SysprepArgs, value: <NULL>, timestamp: 1536681619002387000, flags: TRANSIENT, RDONLYGUEST
Name: /VirtualBox/GuestAdd/Version, value: 5.2.18, timestamp: 1536681633431419000, flags: <NULL>
Name: /VirtualBox/HostInfo/VBoxRev, value: 124319, timestamp: 1536681619002668000, flags: TRANSIENT, RDONLYGUEST
Name: /VirtualBox/GuestInfo/Net/0/V4/Broadcast, value: 10.0.2.255, timestamp: 1536681633439531000, flags: <NULL>
Name: /VirtualBox/HostInfo/VBoxVer, value: 5.2.18, timestamp: 1536681619002613000, flags: TRANSIENT, RDONLYGUEST
Name: /VirtualBox/GuestInfo/OS/LoggedInUsersList, value: hipo, timestamp: 1536681673446498000, flags: TRANSIENT, TRANSRESET
Name: /VirtualBox/GuestInfo/Net/Count, value: 1, timestamp: 1536698949773993000, flags: <NULL>
Name: /VirtualBox/GuestInfo/OS/Release, value: 4.9.0-7-amd64, timestamp: 1536681633431001000, flags: <NULL>
Name: /VirtualBox/GuestInfo/OS/NoLoggedInUsers, value: false, timestamp: 1536681673447965000, flags: TRANSIENT, TRANSRESET
Name: /VirtualBox/GuestAdd/HostVerLastChecked, value: 5.2.18, timestamp: 1536681702832389000, flags: <NULL>

Hope you enjoyed ! Have phun! 🙂

Enable TLS 1.2 Internet Explorer / Make TLS 1.1 and TLS 1.2 web sites work on IE howto

Monday, August 1st, 2016

Internet-Explorer-cannot-display-the-webpage-IE-error
 

Some corporate websites and web tools especially one in DMZ-ed internal corporation networks require an encryption of TLS 1.2 (Transport Layer of Security cryptographic protocol)   TLS 1.1 protocol   both of which are already insecure (prone to vulnerabilities).

Besides the TLS 1.2 browser requirements some corporate tool web interfaces like Firewall Opening request tools etc. are often are very limited in browser compitability and built to only work with certain versions of Microsoft Internet Explorer like leys say IE (Internet Explorer) 11.

TLS 1.2 is supported across IE 8, 9, 10 and 11, so sooner or later you might be forced to reconfigure your Internet Explorer to have enabled the disabled by OS install TLS 1.2 / 1.1.

For those unaware of what TLS (Transport Layer of Security) protocol is so to say the next generation encryption protocol after SSL (Secure Socket Layer) also both TLS and SSL terms are being inter-exchangably used when referring with encrypting traffic between point (host / device etc.) A and B by using a key and a specific cryptographic algorithm.
TLS is usually more used historically in Mail Servers, even though as I said some web tools are starting to use TLS as a substitute for the SSL certificate browser encryption or even in conjunction with it.
For those who want to dig a little bit further into What is TLS? – read on technet here.

I had to enable TLS on IE and I guess sooner others will need a way to enable TLS 1.2 on Internet Explorer, so here is how this is done:
 

Enable-Internet-Explorer-TLS1.2-TLS-1.1-internet-options-IE-screensho


    1. On the Internet Explorer Main Menu (press Alt + F to make menu field appear)
    Select Tools > Internet Options.

    2. In the Internet Options box, select the Advanced tab.

    3. In the Security category, uncheck Use SSL 3.0 (if necessery) and Check the ticks:

    Use TLS 1.0,
    Use TLS 1.1 and Use TLS 1.2 (if available).

    4. Click OK
   
     5. Finally Exit browser and start again IE.


Once browser is relaunched, the website URL that earlier used to be showing Internet Explorer cannot display the webpagre can't connect / missing website error message will start opening normally.

Note that TLS 1.2 and 1.1 is not supported in Mozilla Firefox older browser releases though it is supported properly in current latest FF releases >=4.2.

If you  have fresh new 4.2 Firefox browser and you want to make sure it is really supporting TLS 1.1 and TLS 1.2 encrpytion:


(1) In a new tab, type or paste about:config in the address bar and press Enter/Return. Click the button promising to be careful.

(2) In the search box above the list, type or paste TLS and pause while the list is filtered

(3) If the security.tls.version.max preference is bolded and "user set" to a value other than 3, right-click > Reset the preference to restore the default value of 3

(4) If the security.tls.version.min preference is bolded and "user set" to a value other than 1, right-click > Reset the preference to restore the default value of 1

The values for these preferences mean:

1 => TLS 1.0 2 => TLS 1.1 3 => TLS 1.2


To get a more concrete and thorough information on the exact TLS / SSL cryptography cipher suits and protocol details supported by your browser check this link


N.B. ! TLS is by default disabled in many latest version browsers such as Opera, Safari etc.  in order to address the POODLE SSL / TLS cryptographic protocol vulnerability

Change Skype for Business UI to Lync – Skype for Business Lync Theme / Remove Skype for Business coloroful UI and Switch to Lync simple interface

Wednesday, February 17th, 2016

Revert-skype-for-business-Lync-User-Interface-change-skype-for-business-theme-skin

If you are working in a large corporation such as (HP or HPE – Hewlett Packard Enterprise (HPE is the new splitted company brand name for the Software and Servers division of ex-HP) / IBM / Dell or any other company with the size of top fortune companies and you Computer Domain admistrator has forced your work PC to already use Skype for Business instead of the good tested Lync Client along with the goodies and PROS of having the newer Skype for Business (S4B) as usual for old fashened users like me and the avarage employee the New S4B interface will turn into nightmare with all this circled names and more buttons and the annoying Skype Blue Theme.

For anyone who has even basic idea of design and aesthetics, I believe the default Theme of Skype For Business  will be evaluated as a serious "interface downgrade" compared to the simple looking Interface and White Skin of Lync Client.

With this said it will be logical for the end user like me to desire to customize a bit default S4B Skin to make it more elegant looking like Lync 2013 client but guess what there is a Surprise if you google around, Skype For Business just like the regular Skype client doesn't have integrated support for Skins / Themes.
To make the horror complete, many big corporations are choosing to migrate their Email infrastructure from the classical and well tested Windows Domain with Exchange Server to  Microsoft Office 365 (Cloud services),
which makes the dependency on M$ products even bigger and in the long run control and spying on people's email and information (people's data security even worsers) as you know how hackable Windows prooved to be over the years.


Well for those who remember the good old times of IRC (Internet Relay Chat) and ICQ (I seek you) 🙂 and even Jabber when chatting emerged and boomed into popularity all the chat clients nomatter whether it was a free software under GPL / BSD license or it was a Proprietary licensed software, there was always alternative on the Interface Outlook of the Chat clients and on practically all popular Chat / Audio / Video communication Standards / Protocols, there used to be some option for the users to use either a different client or to customize the outook of the program.

Well now the big surprise with Skype Protocol which was purchased by Microsoft some years ago back is this terrible already M$ program doesn't have any option for changing the Theme and even basic customization besides the ones provided by default by Microsoft. For my surprise such a trivial and everybody used program like Skype with perhaps already 1.5 or 2 Billion or even more users doesn't have even basic support for customization !!!
To make the Skype program use horror story even worser Microsoft does upgrade the Skype client agressively and for the last 3 or 4 years Skype is owned by Microsoft the interface gets changing slightly or even completely with every next release.

Now with latest Skype versions since a 1.5 year or so the agressiveness of the program even increased further as it wants you to automatically upgrade, every time you run Skype.
With this in mind and the fact, I have to spend about 8 to 10 years on the PC with Skype for Business switched on on my notebook with no option to use Lync for communication because of the Domain Exchange forcing the changes to all of the users within our EMEA.

So after some serious digging on the Internet, the only work around to change the Skype For Business Theme available by a couple of sources is to Revert Back the Skype User Interface to Lync 2013 Client by changing a value to the Windows registry and get back the good old elegant Lync interface instead of S4B.

The Windows registry value that needs to be changed is:

[HKEY_CURRENT_USER\Software\Microsoft\Office\Lync]


The default value there is:
 

Windows Registry Editor Version 5.00
[HKEY_CURRENT_USER\Software\Microsoft\Office\Lync]
"CanSharePptInCollab"=dword:00000001
"CanAppShareInCollab"=dword:00000001
"CanShareOneNoteInCollab"=dword:00000001
"EnableSkypeUI"=hex:01,00,00,00


The value has to be changed to:

Windows Registry Editor Version 5.00
[HKEY_CURRENT_USER\Software\Microsoft\Office\Lync]
"CanSharePptInCollab"=dword:00000001
"CanAppShareInCollab"=dword:00000001
"CanShareOneNoteInCollab"=dword:00000001
"EnableSkypeUI"=hex:00,00,00,00


restart_lync_screenshot-ms-windows

The value "EnableSkypeUI"=hex:01,00,00,00 – instructs so Skype for Business UI is used:
"EnableSkypeUI"=hex:00,00,00,00 – instructs S4B to revert back to Old Lync interface

For a little bit more on the value check out also articles – Alternate Between The Microsoft Lync and Skype for Business
and Managing the Skype Client UI in Skype for Business.

To modify about registry setting you will either have to manually run regedit from Start -> Run ->  cmd.exe or use Windows button + R and type inside run box:
 

regedit


Or even better just use and Run (Click over twice) on this skype.reg (download) sciprt which will modify registry

Because the Domain administrator has forced a policy to automatically offer Change of Lync Interface to Skype for Business on every notebook boot to disable EnableSkypeUI registry value and make Skype appear in the good old Lync UI, I've created also a tiny Batch script lync_ui.bat with following content:
 

cd \
cd \Users\georgi\scripts
 regedit /s skype.reg
exit


You can download lync_ui.bat from here

Note that both skype.reg and lync_ui.bat should be existing in my case in C:\Users\georgi\scipts , change this path to whatever your username is and create scripts folder in your User Home dir.
If unsure about the home directory name you can check it from command prompt with:
 

C:\Users\georgi> echo %HOMEPATH%
\Users\georgi


To make the lync_ui.bat (script invoking skype.reg)  be executed on every PC boot, you need to add it to:

Start -> All Programs -> StartUp

https://www.pc-freak.net/images/how-to-add-script-to-windows-startup-screenshto-microsoft-windows-7

Well this is it now you will have back the Lync UI, Enjoy! 🙂


Command to get CPU server load in % percentage using bash and /proc/stat on Linux

Wednesday, March 11th, 2015

Command-to-get-CPU-server-load-in-percentage-using-bash-shell-script-and-linux-proc-stat

Getting load avarage is easy with uptime command, however since nowadays Linux servers are running on multiple CPU machines and Dual cores, returned load avarage shows only information concerning a single processor. Of course seeing overall CPU server load is possible with TOP / TLoad command  / HTOP and a bunch of other monitoring commands, but how you can get a CPU percentage server load using just  /proc/stat and bash scripting? Here is hwo:
 

:;sleep=1;CPU=(`cat /proc/stat | head -n 1`);PREV_TOTAL=0;for VALUE in "${CPU[@]}”; do let “PREV_TOTAL=$PREV_TOTAL+$VALUE”;done;PREV_IDLE=${CPU[4]};sleep $sleep; CPU=(`cat /proc/stat | head -n 1`);unset CPU[0];IDLE=${CPU[4]};TOTAL=0; for VALUE in “${CPU[@]}"; do let "TOTAL=$TOTAL+$VALUE"; done;echo $(echo "scale=2; ((($sleep*1000)*(($TOTAL-$PREV_TOTAL)-($IDLE-$PREV_IDLE))/($TOTAL-$PREV_TOTAL))/10)" | bc -l );

52.45

As you can see command output shows CPU is loaded on 52.45%, so this server will soon have to be replaced with better hardware, because it gets CPU loaded over 50%

It is useful to use above bash shell command one liner together with little for loop to refresh output every few seconds and see how the CPU is loaded in percentage over time.


for i in $(seq 0 10); do :;sleep=1;CPU=(`cat /proc/stat | head -n 1`);PREV_TOTAL=0;for VALUE in "${CPU[@]}”; do let “PREV_TOTAL=$PREV_TOTAL+$VALUE”;done;PREV_IDLE=${CPU[4]};sleep $sleep; CPU=(`cat /proc/stat | head -n 1`);unset CPU[0];IDLE=${CPU[4]};TOTAL=0; for VALUE in “${CPU[@]}"; do let "TOTAL=$TOTAL+$VALUE"; done;echo $(echo "scale=2; ((($sleep*1000)*(($TOTAL-$PREV_TOTAL)-($IDLE-$PREV_IDLE))/($TOTAL-$PREV_TOTAL))/10)" | bc -l ); done

47.50

13.86
27.36
82.67
77.18

To monitor "forever" output from all server processor overall load use:
 

while [ 1 ]; do :;sleep=1;CPU=(`cat /proc/stat | head -n 1`);PREV_TOTAL=0;for VALUE in “${CPU[@]}”; do let “PREV_TOTAL=$PREV_TOTAL+$VALUE”;done;PREV_IDLE=${CPU[4]};sleep $sleep; CPU=(`cat /proc/stat | head -n 1`);unset CPU[0];IDLE=${CPU[4]};TOTAL=0; for VALUE in “${CPU[@]}"; do let "TOTAL=$TOTAL+$VALUE"; done;echo $(echo "scale=2; ((($sleep*1000)*(($TOTAL-$PREV_TOTAL)-($IDLE-$PREV_IDLE))/($TOTAL-$PREV_TOTAL))/10)" | bc -l ); done


How to Turn Off, Suppress PHP Notices and Warnings – PHP error handling levels via php.ini and PHP source code

Friday, April 25th, 2014

php-logo-disable-warnings-and-notices-in-php-through-htaccess-php-ini-and-php-code

PHP Notices are common to occur after PHP version upgrades or where an obsolete PHP code is moved from Old version PHP to new version. This is common error in web software using Frameworks which have been abandoned by developers.

Having PHP Notices to appear on a webpage is pretty ugly and give a lot of information which might be used by malicious crackers to try to break your site thus it is always a good idea to disable PHP Notices. There are plenty of ways to disable PHP Notices

The easiest way to disable it is globally in all Webserver PHP library via php.ini (/etc/php.ini) open it and make sure display_errors is disabled:

display_errors = 0

or

display_errors = Off

Note that that some claim in PHP 5.3 setting display_errors to Off will not work as expected. Anyways to make sure where your loaded PHP Version display_errors is ON or OFF use phpinfo();

It is also possible to disable PHP Notices and error reporting straight from PHP code you need code like:


<?php
// Turn off all error reporting
error_reporting(0);
?>


or through code:


ini_set('display_errors',0);


PHP has different levels of error reporting, here is complete list of possible error handling variables:


<?php
// Report simple running errors

error_reporting(E_ERROR | E_WARNING | E_PARSE);

// Reporting E_NOTICE can be good too (to report uninitialized
// variables or catch variable name misspellings …)

error_reporting(E_ERROR | E_WARNING | E_PARSE | E_NOTICE);

// Report all errors except E_NOTICE
// This is the default value set in php.ini

error_reporting(E_ALL ^ E_NOTICE);
// Report all PHP errors (see changelog)

error_reporting(E_ALL);
// Report all PHP errors error_reporting(-1);
// Same as error_reporting(E_ALL);

ini_set('error_reporting', E_ALL); ?>

The level of logging could be tuned on Debian Linux via /etc/php5/apache2/php.ini or if necessary to set PHP log level in PHP CLI through /etc/php5/cli/php.ini with:

error_reporting = E_ALL & ~E_NOTICE


If you need to remove to remove exact warning or notices from PHP without changing the way  PHPLib behaves is to set @ infront of variable or function that is causing NOTICES or WARNING:
For example:
 

@yourFunctionHere();
@var = …;


Its also possible to Disable PHP Notices and Warnings using .htaccess file (useful in shared hosting where you don't have access to global php.ini), here is how:

# PHP error handling for development servers
php_flag display_startup_errors off
php_flag display_errors off
php_flag html_errors off
php_flag log_errors on
php_flag ignore_repeated_errors off
php_flag ignore_repeated_source off
php_flag report_memleaks on
php_flag track_errors on
php_value docref_root 0
php_value docref_ext 0
php_value error_log /home/path/public_html/domain/php_errors.log
php_value error_reporting -1
php_value log_errors_max_len 0

This way though PHP Notices and Warnings will be suppressed errors will get logged into php_error.log

‘host-name’ is blocked because of many connection errors; unblock with ‘mysqladmin flush-hosts’

Sunday, May 20th, 2012

mysql-logo-host-name-blocked-because-of-many-connection-errors
My home run machine MySQL server was suddenly down as I tried to check my blog and other sites today, the error I saw while trying to open, this blog as well as other hosted sites using the MySQL was:

Error establishing a database connection

The topology, where this error occured is simple, I have two hosts:

1. Apache version 2.0.64 compiled support externally PHP scripts interpretation via libphp – the host runs on (FreeBSD)

2. A Debian GNU / Linux squeeze running MySQL server version 5.1.61

The Apache host is assigned a local IP address 192.168.0.1 and the SQL server is running on a host with IP 192.168.0.2

To diagnose the error I've logged in to 192.168.0.2 and weirdly the mysql-server was appearing to run just fine:
 

debian:~# ps ax |grep -i mysql
31781 pts/0 S 0:00 /bin/sh /usr/bin/mysqld_safe
31940 pts/0 Sl 12:08 /usr/sbin/mysqld –basedir=/usr –datadir=/var/lib/mysql –user=mysql –pid-file=/var/run/mysqld/mysqld.pid –socket=/var/run/mysqld/mysqld.sock –port=3306
31941 pts/0 S 0:00 logger -t mysqld -p daemon.error
32292 pts/0 S+ 0:00 grep -i mysql

Moreover I could connect to the localhost SQL server with mysql -u root -p and it seemed to run fine. The error Error establishing a database connection meant that either something is messed up with the database or 192.168.0.2 Mysql port 3306 is not properly accessible.

My first guess was something is wrong due to some firewall rules, so I tried to connect from 192.168.0.1 to 192.168.0.2 with telnet:
 

freebsd# telnet 192.168.0.2 3306
Trying 192.168.0.2…
Connected to jericho.
Escape character is '^]'.
Host 'webserver' is blocked because of many connection errors; unblock with 'mysqladmin flush-hosts'
Connection closed by foreign host.

Right after the telnet was initiated as I show in the above output the connection was immediately closed with the error:

Host 'webserver' is blocked because of many connection errors; unblock with 'mysqladmin flush-hosts'Connection closed by foreign host.

In the error 'webserver' is my Apache machine set hostname. The error clearly states the problems with the 'webserver' apache host unable to connect to the SQL database are due to 'many connection errors' and a fix i suggested with mysqladmin flush-hosts

To temporary solve the error and restore my normal connectivity between the Apache and the SQL servers I logged I had to issue on the SQL host:

mysqladmin -u root -p flush-hostsEnter password:

Thogh this temporar fix restored accessibility to the databases and hence the websites errors were resolved, this doesn't guarantee that in the future I wouldn't end up in the same situation and therefore I looked for a permanent fix to the issues once and for all.

The permanent fix consists in changing the default value set for max_connect_error in /etc/mysql/my.cnf, which by default is not too high. Therefore to raise up the variable value, added in my.cnf in conf section [mysqld]:

debian:~# vim /etc/mysql/my.cnf
...
max_connect_errors=4294967295

and afterwards restarted MYSQL:

debian:~# /etc/init.d/mysql restart
Stopping MySQL database server: mysqld.
Starting MySQL database server: mysqld.
Checking for corrupt, not cleanly closed and upgrade needing tables..

To make sure the assigned max_connect_errors=4294967295 is never reached due to Apache to SQL connection errors, I've also added as a cronjob.

debian:~# crontab -u root -e
00 03 * * * mysqladmin flush-hosts

In the cron I have omitted the mysqladmin -u root -p (user/pass) input options because for convenience I have already stored the mysql root password in /root/.my.cnf

Here is how /root/.my.cnf looks like:

debian:~# cat /root/.my.cnf
[client]
user=root
password=a_secret_sql_password

Now hopefully, this would permanently solve SQL's 'failure to accept connections' due to too many connection errors for future.

How to search text strings only in hidden files dot (.) files within a directory on Linux and FreeBSD

Saturday, April 28th, 2012

how-to-search-hidden-files-linux-freebsd-logo_grep
If there is necessity to look for a string in all hidden files with all sub-level subdirectories (be aware this will be time consuming and CPU stressing) use:
 

hipo@noah:~$ grep -rli 'PATH' .*

./.gftp/gftprc
./.gftp/cache/cache.OOqZVP
….

Sometimes its necessery to only grep for variables within the first-level directories (lets say you would like to grep a 'PATH' variable set, string within the $HOME directory, the command is:

hipo@noah:~$ grep PATH .[!.]*

.profile:PATH=/bin:/usr/bin/:${PATH}
.profile:export PATH
.profile:# set PATH so it includes user's private bin if it exists
.profile: PATH="$HOME/bin:$PATH"
.profile.language-env-bak:# set PATH so it includes user's private bin if it exists
.profile.language-env-bak: PATH="$HOME/bin:$PATH"
.viminfo:?/PATH.xcyrillic: XNLSPATH=/usr/X11R6/lib/X11/nls
.xcyrillic: export XNLSPATH

The regular expression .[!.]*, means exclude any file or directory name starting with '..', e.g. match only .* files

Note that to use the grep PATH .[!.]* on FreeBSD you will have to use this regular expression in bash shell, the default BSD csh or tsch shells will not recognize the regular expression, e.g.:

grep PATH '.[!.]*'
grep: .[!.]*: No such file or directory

Hence on BSD, if you need to look up for a string within the home directory, hidden files: .profile .bashrc .bash_profile .cshrc run it under bash shell:

freebsd# /usr/local/bin/bash
[root@freebsd:/home/hipo]# grep PATH .[!.]*

.bash_profile:# set PATH so it includes user's private bin if it exists
.bash_profile:# PATH=~/bin:"${PATH}"
.bash_profile:# do the same with …

Another easier to remember, alternative grep cmd is:

hipo@noah:~$ grep PATH .*
.profile:PATH=/bin:/usr/bin/:${PATH}
.profile:export PATH
.profile:# set PATH so it includes user's private bin if it exists
.profile: PATH="$HOME/bin:$PATH"
….

Note that grep 'string' .* is a bit different in meaning, as it will not prevent grep to match filenames with names ..filename1, ..filename2 etc.
Though grep 'string' .* will work note that it will sometimes output some unwanted matches if filenames with double dot in the beginning of file name are there …
That's all folks 🙂