Posts Tagged ‘root linux’

How to log every Linux executed command by every running system program to separte log via rsyslog for better server Security and audit trails

Wednesday, March 15th, 2023

snoopy-log-all-commands-on-linux-server-tux-logo

To keep a good eye on installed Debian Linux server security if you have to be PCI compliant (e.g. follow a high security) standards or you work in a company, where system security is crucial and any kind of security breach is untorrelated and in case of unexpected security holes exploited on running system processess listening on network peripherals (that malicious crackers) does to be able to easily identify what really happened e.g. do a Security RCA (Root Cause Analysis) for how this hack happened in order to mitigate it for future if possible capture the crackers and close the security hole the better, some kind of paranoid running program logging is required.

For such higher security systems, Linux / BSD / UNIX sysadmins can benefit from;

Snoopy command logger – a small library that logs all program executions on your Linux/BSD system.

Embedding snoopy into a running uptodate system is relatively easy, you either have to download the respective distribution package (in this particular article that would be Debian GNU / Linux) or for Linux distributions, that doesn't have the package integrated into the existing package repositories or externally available package repos, the code can be easily git cloned and installed from github snoopy program page following the README.md


However consider that snoopy run and logging the executed commands, make sure that if you use it you have rsyslogd configured to log to external logging server to make sure (someone did not manipulate the running system to avoid their actions being logged by snoopy, this is pointed by snoopy security disclaimer on the FAQ of official github snoopy project page, the page reads as so:

Security disclaimer
WARNING: Snoopy is not a reliable auditing solution.
Rogue users can easily manipulate environment to avoid their actions being logged by Snoopy. Consult this FAQ entry for more information.                


Most likely this warning is pointed out by the tool authors, in order to set the logging Tool creators free for any liability in case if someone uses the snoopy tool for some unauthorized logging
and sniffing of systems etc.

Before we proceed with the tool, install first for some clarity it is a good idea to know on what kind of Debian Linux you're about to install Snoopy command logger.

root@linux:~ # cat /etc/os-release
PRETTY_NAME="Debian GNU/Linux 11 (bullseye)"
NAME="Debian GNU/Linux"
VERSION_ID="11"
VERSION="11 (bullseye)"
VERSION_CODENAME=bullseye
ID=debian
HOME_URL="https://www.debian.org/"
SUPPORT_URL="https://www.debian.org/support"
BUG_REPORT_URL="https://bugs.debian.org/"


1. Prepare separate log file for snoopy that will keep log of every system command run by running processes visible by (ps -ef)

Next check the permissions user / group and read / write / executable flags with which the default generated rsyslog will be writting and set snoopy to whatever you would like it to write with

root@linux:~ # cat /etc/rsyslog.conf | grep "^\$File\|\$Umask"~
$FileOwner root
$FileGroup adm
$FileCreateMode 0640


Create Rsyslog configuration for snoopy.log

root@linux:~ # cat << EOF | sudo tee /etc/rsyslog.d/01-snoopy.conf
# Send snoopy messages to a dedicated logfile
if (\$programname startswith "snoopy") then {
  action(type="omfile" fileOwner="root" fileGroup="root" fileCreateMode="0600" file="/var/log/snoopy.log")
  stop
}

EOF


To make sure that snoopy library will be preloaded after installation on next boot:

root@linux:~ # cat << EOF | sudo debconf-set-selections
snoopy snoopy/install-ld-preload boolean true
EOF


root@linux:~ # systemctl restart rsyslog


root@linux:~ # systemctl status rsyslog
● rsyslog.service – System Logging Service
     Loaded: loaded (/lib/systemd/system/rsyslog.service; enabled; vendor preset: enabled)
     Active: active (running) since Tue 2023-03-14 12:59:05 EET; 59min ago
TriggeredBy: ● syslog.socket
       Docs: man:rsyslogd(8)
             man:rsyslog.conf(5)
             https://www.rsyslog.com/doc/
   Main PID: 713745 (rsyslogd)
      Tasks: 6 (limit: 4654)
     Memory: 1.1M
        CPU: 548ms
     CGroup: /system.slice/rsyslog.service
             └─713745 /usr/sbin/rsyslogd -n -iNONE

мар 14 12:59:05 haproxy2 systemd[1]: Started System Logging Service.
мар 14 12:59:05 haproxy2 rsyslogd[713745]: warning: ~ action is deprecated, consider using the 'stop' statement instead [v8.210>
мар 14 12:59:05 haproxy2 rsyslogd[713745]: [198B blob data]
мар 14 12:59:05 haproxy2 rsyslogd[713745]: imuxsock: Acquired UNIX socket '/run/systemd/journal/syslog' (fd 3) from systemd.  [>
мар 14 12:59:05 haproxy2 rsyslogd[713745]: [origin software="rsyslogd" swVersion="8.2102.0" x-pid="713745" x-info="https://www.>
мар 14 13:19:05 haproxy2 rsyslogd[713745]: — MARK —
мар 14 13:39:05 haproxy2 rsyslogd[713745]: — MARK —


2. Install snoopy deb package and configure it

root@linux:~ # apt install snoopy
Четене на списъците с пакети… Готово
Изграждане на дървото със зависимости… Готово
Четене на информацията за състоянието… Готово
Следните пакети са били инсталирани автоматично и вече не са необходими:
  bsdmainutils cpp-8 geoip-database libasan5 libbind9-161 libcroco3 libdns1104 libdns1110 libevent-core-2.1-6
  libevent-pthreads-2.1-6 libgdk-pixbuf-xlib-2.0-0 libgdk-pixbuf2.0-0 libgeoip1 libicu63 libisc1100 libisc1105 libisccc161
  libisccfg163 libisl19 liblwres161 libmpdec2 libmpx2 libperl5.28 libpython2-stdlib libpython2.7-minimal libpython2.7-stdlib
  libpython3.7-minimal libpython3.7-stdlib libreadline7 netcat-traditional node-ansi-align node-arrify node-bluebird
  node-boxen node-builtin-modules node-call-limit node-camelcase node-cli-boxes node-cliui node-co node-concat-stream
  node-config-chain node-cross-spawn node-cyclist node-decamelize node-decompress-response node-deep-extend node-detect-indent
  node-detect-newline node-duplexer3 node-duplexify node-editor node-end-of-stream node-errno node-execa node-find-up
  node-flush-write-stream node-from2 node-fs-vacuum node-get-caller-file node-get-stream node-got node-has-symbol-support-x
  node-has-to-string-tag-x node-import-lazy node-invert-kv node-is-buffer node-is-builtin-module node-is-npm node-is-object
  node-is-plain-obj node-is-retry-allowed node-is-stream node-isurl node-json-buffer node-kind-of node-latest-version
  node-lazy-property node-lcid node-libnpx node-locate-path node-lowercase-keys node-mem node-merge-stream node-mimic-fn
  node-mimic-response node-minimist node-mississippi node-node-uuid node-npm-run-path node-os-locale node-p-cancelable
  node-p-finally node-p-limit node-p-locate node-p-timeout node-package-json node-parallel-transform node-path-exists
  node-path-is-inside node-prepend-http node-proto-list node-prr node-pump node-pumpify node-qw node-rc
  node-registry-auth-token node-registry-url node-require-directory node-require-main-filename node-semver-diff node-sha
  node-shebang-command node-shebang-regex node-slide node-sorted-object node-stream-each node-stream-iterate node-stream-shift
  node-strip-eof node-strip-json-comments node-term-size node-through2 node-timed-out node-typedarray node-uid-number
  node-unpipe node-url-parse-lax node-url-to-options node-which-module node-widest-line node-wrap-ansi node-xdg-basedir
  node-xtend node-y18n node-yargs node-yargs-parser perl-modules-5.28 python-pkg-resources python2 python2-minimal python2.7
  python2.7-minimal python3.7-minimal

Използвайте „apt autoremove“ за да ги премахнете.
Следните НОВИ пакети ще бъдат инсталирани:
  snoopy
0 актуализирани, 1 нови инсталирани, 0 за премахване и 1 без промяна.
Необходимо е да се изтеглят 46,0 kB архиви.
След тази операция ще бъде използвано 124 kB допълнително дисково пространство.
Изт:1 http://deb.debian.org/debian bullseye/main amd64 snoopy amd64 2.4.12-1 [46,0 kB]
Изтеглени 46,0 kB за 0с (93,2 kB/сек)
Предварително настройване на пакети …


Selecting previously unselected package snoopy.
(Reading database … 56067 files and directories currently installed.)
Preparing to unpack …/snoopy_2.4.12-1_amd64.deb ...
Unpacking snoopy (2.4.12-1) …
Setting up snoopy (2.4.12-1) …
Processing triggers for libc-bin (2.31-13+deb11u5) …

root@linux:/etc# ls -al /var/log/snoopy.log
-rw——- 1 root root 14472 14 мар 13:40 /var/log/snoopy.log

Any specific configuration for snoopy can be tuned through /etc/snoopy.ini

Now you will find all the commands executed by all monitored running processes in /var/log/snoopy.

root@linux:/etc# tail -30 /var/log/snoopy.log
Mar 14 12:59:32 haproxy2 snoopy[713804]: [login:root ssh:(192.168.0.1 62796 192.168.0.210 22) sid:713792 tty:/dev/pts/2 (0/root) uid:root(0)/root(0) cwd:/]: ldconfig
Mar 14 12:59:32 haproxy2 snoopy[713806]: [login:zabbix ssh:((undefined)) sid:682168 tty:(none) ((none)/(none)) uid:zabbix(108)/zabbix(108) cwd:/]: who
Mar 14 12:59:32 haproxy2 snoopy[713807]: [login:zabbix ssh:((undefined)) sid:682168 tty:(none) ((none)/(none)) uid:zabbix(108)/zabbix(108) cwd:/]: wc -l
Mar 14 13:00:07 haproxy2 snoopy[713815]: [login:root ssh:((undefined)) sid:713815 tty:(none) ((none)/(none)) uid:root(0)/root(0) cwd:/usr/lib/sysstat]: /usr/lib/sysstat/sadc -F -L -S DISK 1 1 /var/log/sysstat
Mar 14 13:00:32 haproxy2 snoopy[713823]: [login:zabbix ssh:((undefined)) sid:682168 tty:(none) ((none)/(none)) uid:zabbix(108)/zabbix(108) cwd:/]: who
Mar 14 13:00:32 haproxy2 snoopy[713824]: [login:zabbix ssh:((undefined)) sid:682168 tty:(none) ((none)/(none)) uid:zabbix(108)/zabbix(108) cwd:/]: wc -l
Mar 14 13:01:32 haproxy2 snoopy[713834]: [login:zabbix ssh:((undefined)) sid:682168 tty:(none) ((none)/(none)) uid:zabbix(108)/zabbix(108) cwd:/]: who
Mar 14 13:01:32 haproxy2 snoopy[713835]: [login:zabbix ssh:((undefined)) sid:682168 tty:(none) ((none)/(none)) uid:zabbix(108)/zabbix(108) cwd:/]: wc -l
Mar 14 13:02:32 haproxy2 snoopy[713843]: [login:zabbix ssh:((undefined)) sid:682168 tty:(none) ((none)/(none)) uid:zabbix(108)/zabbix(108) cwd:/]: who
Mar 14 13:02:32 haproxy2 snoopy[713844]: [login:zabbix ssh:((undefined)) sid:682168 tty:(none) ((none)/(none)) uid:zabbix(108)/zabbix(108) cwd:/]: wc -l
Mar 14 13:03:32 haproxy2 snoopy[713855]: [login:zabbix ssh:((undefined)) sid:682168 tty:(none) ((none)/(none)) uid:zabbix(108)/zabbix(108) cwd:/]: who
Mar 14 13:03:32 haproxy2 snoopy[713856]: [login:zabbix ssh:((undefined)) sid:682168 tty:(none) ((none)/(none)) uid:zabbix(108)/zabbix(108) cwd:/]: wc -l
Mar 14 13:04:32 haproxy2 snoopy[713868]: [login:zabbix ssh:((undefined)) sid:682168 tty:(none) ((none)/(none)) uid:zabbix(108)/zabbix(108) cwd:/]: who


3. Set up logrotation (archiving) for snoopy logs

root@linux:/etc# vim /etc/logrotate.d/snoopy    


/var/log/snoopy.log {
        daily
        rotate 30
        compress
        delaycompress
        notifempty
        create 640 root adm

}
 

If you want to test logrotation without actually rotating the file:               

root@linux:/etc# logrotate –debug –force /etc/logrotate.d/snoopy   
  log needs rotating
rotating log /var/log/snoopy.log, log->rotateCount is 30
dateext suffix '-20230314'
glob pattern '-[0-9][0-9][0-9][0-9][0-9][0-9][0-9][0-9]'
previous log /var/log/snoopy.log.1 does not exist
renaming /var/log/snoopy.log.30.gz to /var/log/snoopy.log.31.gz (rotatecount 30, logstart 1, i 30),


renaming /var/log/snoopy.log.1.gz to /var/log/snoopy.log.2.gz (rotatecount 30, logstart 1, i 1),
renaming /var/log/snoopy.log.0.gz to /var/log/snoopy.log.1.gz (rotatecount 30, logstart 1, i 0),
log /var/log/snoopy.log.31.gz doesn't exist — won't try to dispose of it
renaming /var/log/snoopy.log to /var/log/snoopy.log.1
creating new /var/log/snoopy.log mode = 0640 uid = 0 gid = 4


4. Monitoring only selected applications  executed commands with snoopy                                                                             

By default snoopy after installed will set itself to monitor all kind of running processes on the system is done by preloading the ldconfig's (libcld.so.preload

root@haproxy2:/etc# cat /etc/ld.so.preload
/lib/x86_64-linux-gnu/libsnoopy.so

If you want to monitor a concrete application and not log everything from the running processes in process list, comment this out this line run ldconfig command

Then to any concrete application you would like to monitor with snoopy add to its init script either /etc/init.d/app_init_script or to systemctl's start script before the application binary program run:

export LD_PRELOAD=/lib/snoopy.so


  As per the README states


 Snoopy is placed in /etc/ld.so.preload to trap all occurrences of exec, if 
 you wish to monitor only certain applications you can do so through the    
 LD_PRELOAD environment variable.
Simply set it to /lib/snoopy.so before  loading the application.

For example

 # export LD_PRELOAD=/lib/snoopy.so                                           
 # lynx http://example.com/                           


ipmitool: Reset and manage IPMI (Intelligent Platform Management Interface) / ILO (Integrated Lights Out) remote board on Linux servers

Friday, December 20th, 2019

ipmitool-how-to-get-information-about-hardware-and-reset-ipmi-bmc-linux-access-ipmi-ilo-interface-logo

As a system administration nomatter whether you manage a bunch of server in a own brew and run Data Center location with some Rack mounted Hardware like PowerEdge M600 / ProLiant DL360e G8 / ProLiant DL360 Gen9 (755258-B21) or you're managing a bunch of Dedicated Servers, you're or will be faced  at some point to use the embedded in many Rack mountable rack servers IPMI / ILO interface remote console board management. If IPMI / ILO terms are new for you I suggest you quickly read my earlier article What is IPMI / IPKVM / ILO /  DRAC Remote Management interfaces to server .

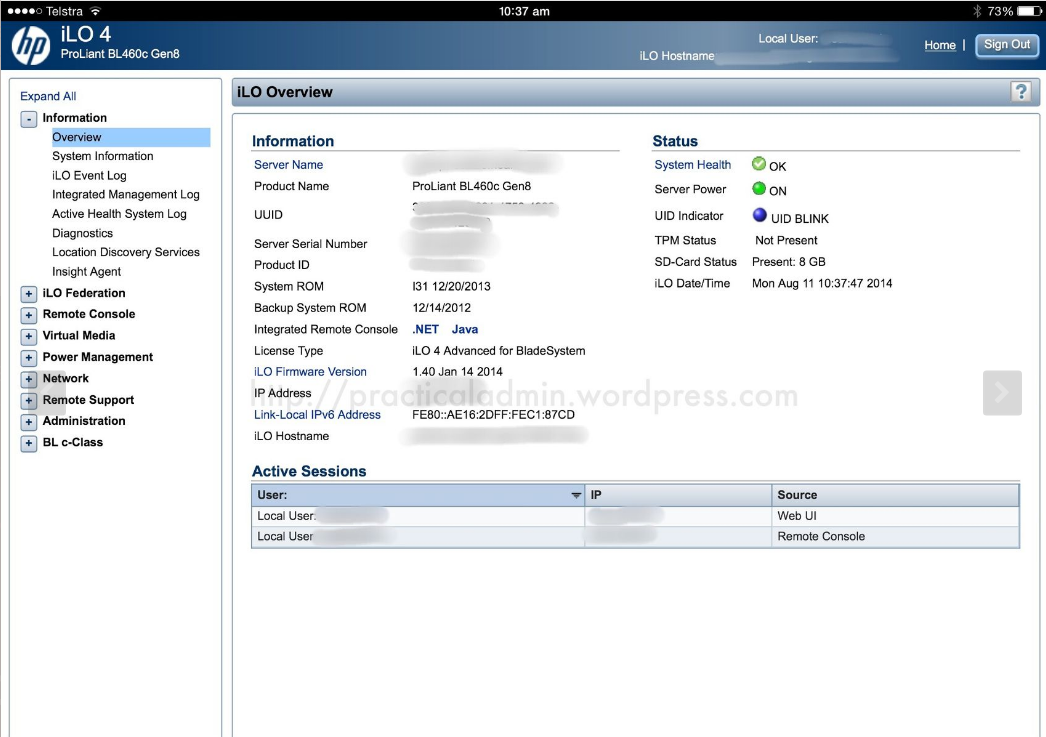
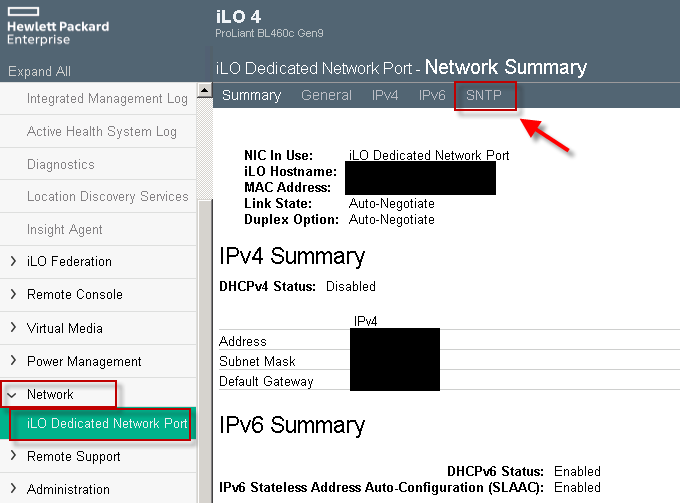
hp-proliant-bl460c-ILO-Interface-screenshot

HP Proliant BL460 C IPMI (ILO) Web management interface 

In short Remote Management Interface is a way that gives you access to the server just like if you had a Monitor and a Keyboard plugged in directly to server.
When a remote computer is down the sysadmin can access it through IPMI and utilize a text console to the boot screen.
The IPMI protocol specification is led by Intel and was first published on September 16, 1998. and currently is supported by more than 200 computer system vendors, such as Cisco, Dell, Hewlett Packard Enterprise, Intel, NEC Corporation, SuperMicro and Tyan and is a standard for remote board management for servers.

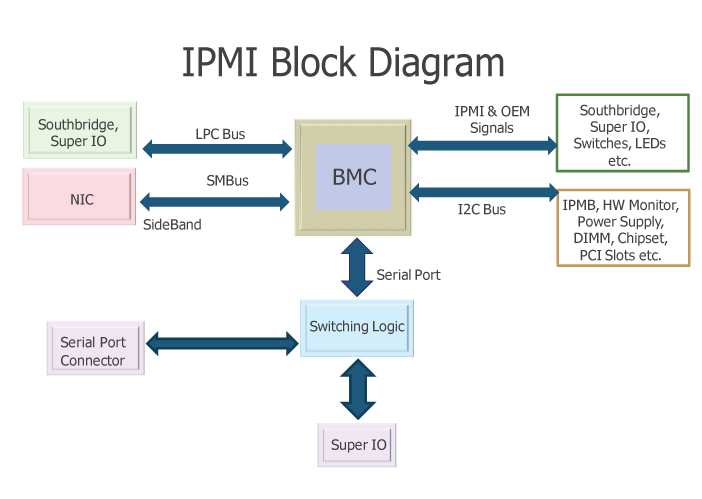
IPMI-Block-Diagram-how-ipmi-works-and-its-relation-to-BMC
As you can see from diagram Baseboard Management Controllers (BMCs) is like the heart of IPMI.

Having this ILO / IPMI access is usually via a Web Interface Java interface that gives you the console and usually many of the machines also have an IP address via which a normal SSH command prompt is available giving you ability to execute diagnostic commands to the ILO on the status of attached hardware components of the server / get information about the attached system sensors to get report about things such as:

  • The System Overall heat
  • CPU heat temperature
  • System fan rotation speed cycles
  • Extract information about the server chassis
  • Query info about various system peripherals
  • Configure BIOS or UEFI on a remote system with no monitor / keyboard attached

Having a IPMI (Intelligent Platform Management Interface) firmware embedded into the server Motherboard is essential for system administration because besides this goodies it allows you to remotely Install Operating System to a server without any pre-installed OS right after it is bought and mounted to the planned Data Center Rack nest, just like if you have a plugged Monitor / Keyboard and Mouse and being physically in the remote location.

IPMI is mega useful for system administration also in case of Linux / Windows system updates that requires reboot in which essential System Libraries or binaries are updated and a System reboot is required, because often after system Large bundle updates or Release updates the system fails to boot and you need a way to run a diagnostic stuff from a System rescue Operating System living on a plugged in via a USB stick or CD Drive.
As prior said IPMI remote board is usually accessed and used via some Remote HTTPS encrypted web interface or via Secure Shell crypted session but sometimes the Web server behind the IPMI Web Interface is hanging especially when multiple sysadmins try to access it or due to other stuff and at times due to strange stuff even console SSH access might not be there, thansfully those who run a GNU / Linux Operating system on the Hardware node can use ipmitool tool http://ipmitool.sourceforge.net/ written for Linux that is capable to do a number of useful things with the IPMI management board including a Cold Reset of it so it turns back to working state / adding users / grasping the System hardware and components information health status, changing the Listener address of the IPMI access Interface and even having ability to update the IPMI version firmware.

Prior to be able to access IPMI remotely it has to be enabled usually via a UTP cable connected to the Network from which you expect it to be accesible. The location of the IPMI port on different server vendors is different.

ibm-power9-server-ipmi

IBM Power 9 Server IPMI port

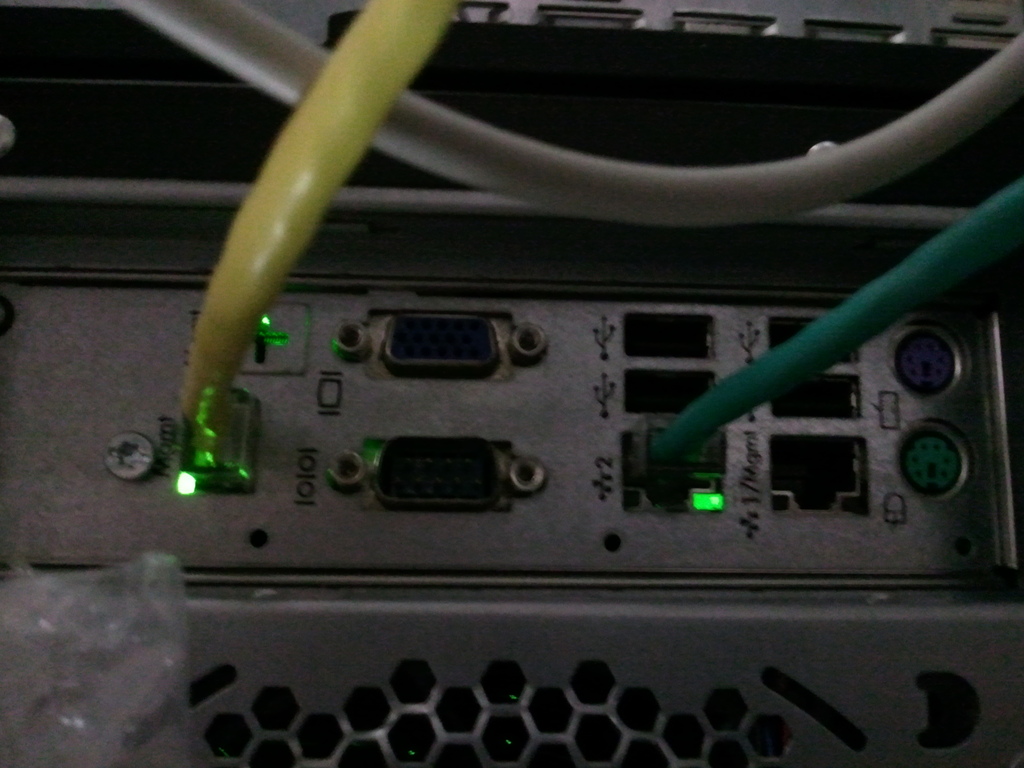
HP-ILO-Bladeserver-Management-port-MGMT-yellow-cabled

HP IPMI console called ILO (Integrated Lights-Out) Port cabled with yellow cable (usually labelled as
Management Port MGMT)

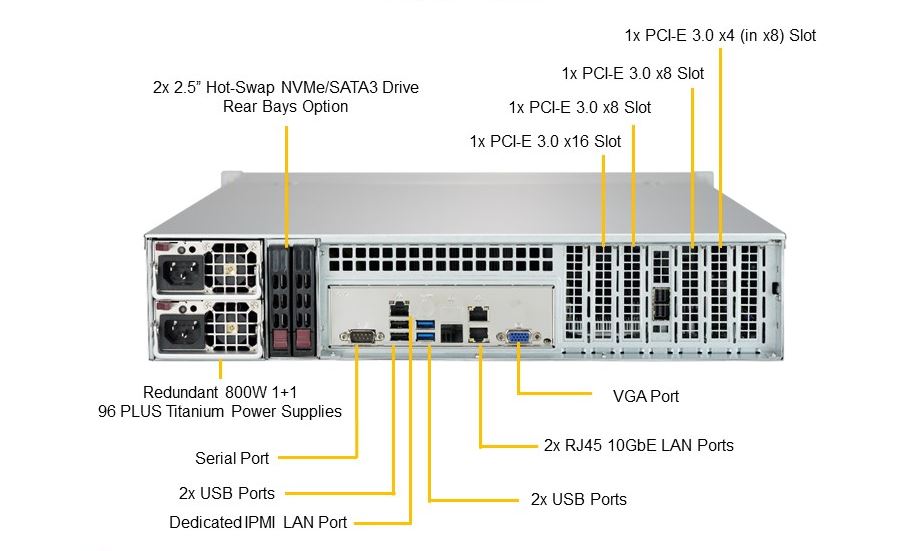
Supermicro-SSG-5029P-E1CTR12L-Rear-Annotated-dedicated-IPMI-lan-port

Supermicro server IPMI Dedicated Lan Port


 In this article I'll shortly explain how IPMITool is available and can be installed and used across GNU / Linux Debian / Ubuntu and other deb based Linuxes with apt or on Fedora / CentOS (RPM) based with yum etc.


1. Install IPMITool


– On Debian


# apt-get install –yes ipmitool 


– On CentOS


# yum install ipmitool OpenIPMI-tools


# ipmitool -V
ipmitool version 1.8.14


On CentOS ipmitool can run as a service and collect data and do some nice stuff to run it:


[root@linux ~]# chkconfig ipmi on 


[root@linux ~]# service ipmi start


Before start using it is worthy to give here short description from ipmitool man page
 

DESCRIPTION
       This program lets you manage Intelligent Platform Management Interface (IPMI) functions of either the local system, via a kernel device driver, or a remote system, using IPMI v1.5 and IPMI v2.0.
       These functions include printing FRU information, LAN configuration, sensor readings, and remote chassis power control.

IPMI management of a local system interface requires a compatible IPMI kernel driver to be installed and configured.  On Linux this driver is called OpenIPMI and it is included in standard  dis‐
       tributions.   On Solaris this driver is called BMC and is included in Solaris 10.  Management of a remote station requires the IPMI-over-LAN interface to be enabled and configured.  Depending on
       the particular requirements of each system it may be possible to enable the LAN interface using ipmitool over the system interface.


2. Get ADMIN IP configured for access

https://3.bp.blogspot.com/-jojgWqj7acg/Wo6bSP0Av1I/AAAAAAAAGdI/xaHewnmAujkprCiDXoBxV7uHonPFjtZDwCLcBGAs/s1600/22-02-2018%2B15-31-09

To get a list of what is the current listener IP with no access to above Web frontend via which IPMI can be accessed (if it is cabled to the Access / Admin LAN port).


# ipmitool lan print 1
Set in Progress         : Set Complete
Auth Type Support       : NONE MD2 MD5 PASSWORD
Auth Type Enable        : Callback : MD2 MD5 PASSWORD
                        : User     : MD2 MD5 PASSWORD
                        : Operator : MD2 MD5 PASSWORD
                        : Admin    : MD2 MD5 PASSWORD
                        : OEM      :
IP Address Source       : Static Address
IP Address              : 10.253.41.127
Subnet Mask             : 255.255.254.0
MAC Address             : 0c:c4:7a:4b:1f:70
SNMP Community String   : public
IP Header               : TTL=0x00 Flags=0x00 Precedence=0x00 TOS=0x00
BMC ARP Control         : ARP Responses Enabled, Gratuitous ARP Disabled
Default Gateway IP      : 10.253.41.254
Default Gateway MAC     : 00:00:0c:07:ac:7b
Backup Gateway IP       : 10.253.41.254
Backup Gateway MAC      : 00:00:00:00:00:00
802.1q VLAN ID          : 8
802.1q VLAN Priority    : 0
RMCP+ Cipher Suites     : 1,2,3,6,7,8,11,12
Cipher Suite Priv Max   : aaaaXXaaaXXaaXX
                        :     X=Cipher Suite Unused
                        :     c=CALLBACK
                        :     u=USER
                        :     o=OPERATOR
                        :     a=ADMIN
                        :     O=OEM


3. Configure custom access IP and gateway for IPMI


[root@linux ~]# ipmitool lan set 1 ipsrc static


[root@linux ~]# ipmitool lan set 1 ipaddr 192.168.1.211
Setting LAN IP Address to 192.168.1.211


[root@linux ~]# ipmitool lan set 1 netmask 255.255.255.0
Setting LAN Subnet Mask to 255.255.255.0


[root@linux ~]# ipmitool lan set 1 defgw ipaddr 192.168.1.254
Setting LAN Default Gateway IP to 192.168.1.254


[root@linux ~]# ipmitool lan set 1 defgw macaddr 00:0e:0c:aa:8e:13
Setting LAN Default Gateway MAC to 00:0e:0c:aa:8e:13


[root@linux ~]# ipmitool lan set 1 arp respond on
Enabling BMC-generated ARP responses


[root@linux ~]# ipmitool lan set 1 auth ADMIN MD5

[root@linux ~]# ipmitool lan set 1 access on


4. Getting a list of IPMI existing users


# ipmitool user list 1
ID  Name             Callin  Link Auth  IPMI Msg   Channel Priv Limit
2   admin1           false   false      true       ADMINISTRATOR
3   ovh_dontchange   true    false      true       ADMINISTRATOR
4   ro_dontchange    true    true       true       USER
6                    true    true       true       NO ACCESS
7                    true    true       true       NO ACCESS
8                    true    true       true       NO ACCESS
9                    true    true       true       NO ACCESS
10                   true    true       true       NO ACCESS


– To get summary of existing users

# ipmitool user summary
Maximum IDs         : 10
Enabled User Count  : 4
Fixed Name Count    : 2

5. Create new Admin username into IPMI board
 

[root@linux ~]# ipmitool user set name 2 Your-New-Username


[root@linux ~]# ipmitool user set password 2
Password for user 2: 


[root@linux ~]# ipmitool channel setaccess 1 2 link=on ipmi=on callin=on privilege=4


[root@linux ~]# ipmitool user enable 2
[root@linux ~]# 


6. Configure non-privilege user into IPMI board

If a user should only be used for querying sensor data, a custom privilege level can be setup for that. This user then has no rights for activating or deactivating the server, for example. A user named monitor will be created for this in the following example:

[root@linux ~]# ipmitool user set name 3 monitor


[root@linux ~]# ipmitool user set password 3
Password for user 3: 


[root@linux ~]# ipmitool channel setaccess 1 3 link=on ipmi=on callin=on privilege=2


[root@linux ~]# ipmitool user enable 3

The importance of the various privilege numbers will be displayed when  ipmitool channel  is called without any additional parameters.


[root@linux ~]# ipmitool channel
Channel Commands: authcap   <channel number> <max privilege>
                  getaccess <channel number> [user id]
                  setaccess <channel number> <user id> [callin=on|off] [ipmi=on|off] [link=on|off] [privilege=level]
                  info      [channel number]
                  getciphers <ipmi | sol> [channel]


Possible privilege levels are:
   1   Callback level
   2   User level
   3   Operator level
   4   Administrator level
   5   OEM Proprietary level
  15   No access
[root@linux ~]# 

The user just created (named 'monitor') has been assigned the USER privilege level. So that LAN access is allowed for this user, you must activate MD5 authentication for LAN access for this user group (USER privilege level).

[root@linux ~]# ipmitool channel getaccess 1 3
Maximum User IDs     : 15
Enabled User IDs     : 2

User ID              : 3
User Name            : monitor
Fixed Name           : No
Access Available     : call-in / callback
Link Authentication  : enabled
IPMI Messaging       : enabled
Privilege Level      : USER

[root@linux ~]# 


7. Check server firmware version on a server via IPMI


# ipmitool mc info
Device ID                 : 32
Device Revision           : 1
Firmware Revision         : 3.31
IPMI Version              : 2.0
Manufacturer ID           : 10876
Manufacturer Name         : Supermicro
Product ID                : 1579 (0x062b)
Product Name              : Unknown (0x62B)
Device Available          : yes
Provides Device SDRs      : no
Additional Device Support :
    Sensor Device
    SDR Repository Device
    SEL Device
    FRU Inventory Device
    IPMB Event Receiver
    IPMB Event Generator
    Chassis Device


ipmitool mc info is actually an alias for the ipmitool bmc info cmd.

8. Reset IPMI management controller or BMC if hanged


As earlier said if for some reason Web GUI access or SSH to IPMI is lost, reset with:

root@linux:/root#  ipmitool mc reset
[ warm | cold ]


If you want to stop electricity for a second to IPMI and bring it on use the cold reset (this usually
should be done if warm reset does not work).


root@linux:/root# ipmitool mc reset cold


otherwise soft / warm is with:


ipmitool mc reset warm


Sometimes the BMC component of IPMI hangs and only fix to restore access to server Remote board is to reset also BMC


root@linux:/root# ipmitool bmc reset cold


9. Print hardware system event log


root@linux:/root# ipmitool sel info
SEL Information
Version          : 1.5 (v1.5, v2 compliant)
Entries          : 0
Free Space       : 10240 bytes
Percent Used     : 0%
Last Add Time    : Not Available
Last Del Time    : 07/02/2015 17:22:34
Overflow         : false
Supported Cmds   : 'Reserve' 'Get Alloc Info'
# of Alloc Units : 512
Alloc Unit Size  : 20
# Free Units     : 512
Largest Free Blk : 512
Max Record Size  : 20


 ipmitool sel list
SEL has no entries

In this particular case the system shows no entres as it was run on a tiny Microtik 1U machine, however usually on most Dell PowerEdge / HP Proliant / Lenovo System X machines this will return plenty of messages.

ipmitool sel elist

ipmitool sel clear

To clear anything if such logged

ipmitool sel clear


10.  Print Field Replaceable Units ( FRUs ) on the server 


[root@linux ~]# ipmitool fru print


FRU Device Description : Builtin FRU Device (ID 0)
 Chassis Type          : Other
 Chassis Serial        : KD5V59B
 Chassis Extra         : c3903ebb6237363698cdbae3e991bbed
 Board Mfg Date        : Mon Sep 24 02:00:00 2012
 Board Mfg             : IBM
 Board Product         : System Board
 Board Serial          : XXXXXXXXXXX
 Board Part Number     : 00J6528
 Board Extra           : 00W2671
 Board Extra           : 1400
 Board Extra           : 0000
 Board Extra           : 5000
 Board Extra           : 10

 Product Manufacturer  : IBM
 Product Name          : System x3650 M4
 Product Part Number   : 1955B2G
 Product Serial        : KD7V59K
 Product Asset Tag     :

FRU Device Description : Power Supply 1 (ID 1)
 Board Mfg Date        : Mon Jan  1 01:00:00 1996
 Board Mfg             : ACBE
 Board Product         : IBM Designed Device
 Board Serial          : YK151127R1RN
 Board Part Number     : ZZZZZZZ
 Board Extra           : ZZZZZZ<FF><FF><FF><FF><FF>
 Board Extra           : 0200
 Board Extra           : 00
 Board Extra           : 0080
 Board Extra           : 1

FRU Device Description : Power Supply 2 (ID 2)
 Board Mfg Date        : Mon Jan  1 01:00:00 1996
 Board Mfg             : ACBE
 Board Product         : IBM Designed Device
 Board Serial          : YK131127M1LE
 Board Part Number     : ZZZZZ
 Board Extra           : ZZZZZ<FF><FF><FF><FF><FF>
 Board Extra           : 0200
 Board Extra           : 00
 Board Extra           : 0080
 Board Extra           : 1

FRU Device Description : DASD Backplane 1 (ID 3)
….


Worthy to mention here is some cheaper server vendors such as Trendmicro might show no data here (no idea whether this is a protocol incompitability or IPMItool issue).


11. Get output about system sensors Temperature / Fan / Power Supply


Most newer servers have sensors to track temperature / voltage / fanspeed peripherals temp overall system temp etc.
To get a full list of sensors statistics from IPMI 
 

# ipmitool sensor
CPU Temp         | 29.000     | degrees C  | ok    | 0.000     | 0.000     | 0.000     | 95.000    | 98.000    | 100.000
System Temp      | 40.000     | degrees C  | ok    | -9.000    | -7.000    | -5.000    | 80.000    | 85.000    | 90.000
Peripheral Temp  | 41.000     | degrees C  | ok    | -9.000    | -7.000    | -5.000    | 80.000    | 85.000    | 90.000
PCH Temp         | 56.000     | degrees C  | ok    | -11.000   | -8.000    | -5.000    | 90.000    | 95.000    | 100.000
FAN 1            | na         |            | na    | na        | na        | na        | na        | na        | na
FAN 2            | na         |            | na    | na        | na        | na        | na        | na        | na
FAN 3            | na         |            | na    | na        | na        | na        | na        | na        | na
FAN 4            | na         |            | na    | na        | na        | na        | na        | na        | na
FAN A            | na         |            | na    | na        | na        | na        | na        | na        | na
Vcore            | 0.824      | Volts      | ok    | 0.480     | 0.512     | 0.544     | 1.488     | 1.520     | 1.552
3.3VCC           | 3.296      | Volts      | ok    | 2.816     | 2.880     | 2.944     | 3.584     | 3.648     | 3.712
12V              | 12.137     | Volts      | ok    | 10.494    | 10.600    | 10.706    | 13.091    | 13.197    | 13.303
VDIMM            | 1.496      | Volts      | ok    | 1.152     | 1.216     | 1.280     | 1.760     | 1.776     | 1.792
5VCC             | 4.992      | Volts      | ok    | 4.096     | 4.320     | 4.576     | 5.344     | 5.600     | 5.632
CPU VTT          | 1.008      | Volts      | ok    | 0.872     | 0.896     | 0.920     | 1.344     | 1.368     | 1.392
VBAT             | 3.200      | Volts      | ok    | 2.816     | 2.880     | 2.944     | 3.584     | 3.648     | 3.712
VSB              | 3.328      | Volts      | ok    | 2.816     | 2.880     | 2.944     | 3.584     | 3.648     | 3.712
AVCC             | 3.312      | Volts      | ok    | 2.816     | 2.880     | 2.944     | 3.584     | 3.648     | 3.712
Chassis Intru    | 0x1        | discrete   | 0x0100| na        | na        | na        | na        | na        | na


To get only partial sensors data from the SDR (Sensor Data Repositry) entries and readings


[root@linux ~]# ipmitool sdr list 

Planar 3.3V      | 3.31 Volts        | ok
Planar 5V        | 5.06 Volts        | ok
Planar 12V       | 12.26 Volts       | ok
Planar VBAT      | 3.14 Volts        | ok
Avg Power        | 80 Watts          | ok
PCH Temp         | 45 degrees C      | ok
Ambient Temp     | 19 degrees C      | ok
PCI Riser 1 Temp | 25 degrees C      | ok
PCI Riser 2 Temp | no reading        | ns
Mezz Card Temp   | no reading        | ns
Fan 1A Tach      | 3071 RPM          | ok
Fan 1B Tach      | 2592 RPM          | ok
Fan 2A Tach      | 3145 RPM          | ok
Fan 2B Tach      | 2624 RPM          | ok
Fan 3A Tach      | 3108 RPM          | ok
Fan 3B Tach      | 2592 RPM          | ok
Fan 4A Tach      | no reading        | ns
Fan 4B Tach      | no reading        | ns
CPU1 VR Temp     | 27 degrees C      | ok
CPU2 VR Temp     | 27 degrees C      | ok
DIMM AB VR Temp  | 24 degrees C      | ok
DIMM CD VR Temp  | 23 degrees C      | ok
DIMM EF VR Temp  | 25 degrees C      | ok
DIMM GH VR Temp  | 24 degrees C      | ok
Host Power       | 0x00              | ok
IPMI Watchdog    | 0x00              | ok


[root@linux ~]# ipmitool sdr type Temperature
PCH Temp         | 31h | ok  | 45.1 | 45 degrees C
Ambient Temp     | 32h | ok  | 12.1 | 19 degrees C
PCI Riser 1 Temp | 3Ah | ok  | 16.1 | 25 degrees C
PCI Riser 2 Temp | 3Bh | ns  | 16.2 | No Reading
Mezz Card Temp   | 3Ch | ns  | 44.1 | No Reading
CPU1 VR Temp     | F7h | ok  | 20.1 | 27 degrees C
CPU2 VR Temp     | F8h | ok  | 20.2 | 27 degrees C
DIMM AB VR Temp  | F9h | ok  | 20.3 | 25 degrees C
DIMM CD VR Temp  | FAh | ok  | 20.4 | 23 degrees C
DIMM EF VR Temp  | FBh | ok  | 20.5 | 26 degrees C
DIMM GH VR Temp  | FCh | ok  | 20.6 | 24 degrees C
Ambient Status   | 8Eh | ok  | 12.1 |
CPU 1 OverTemp   | A0h | ok  |  3.1 | Transition to OK
CPU 2 OverTemp   | A1h | ok  |  3.2 | Transition to OK


[root@linux ~]# ipmitool sdr type Fan
Fan 1A Tach      | 40h | ok  | 29.1 | 3034 RPM
Fan 1B Tach      | 41h | ok  | 29.1 | 2592 RPM
Fan 2A Tach      | 42h | ok  | 29.2 | 3145 RPM
Fan 2B Tach      | 43h | ok  | 29.2 | 2624 RPM
Fan 3A Tach      | 44h | ok  | 29.3 | 3108 RPM
Fan 3B Tach      | 45h | ok  | 29.3 | 2592 RPM
Fan 4A Tach      | 46h | ns  | 29.4 | No Reading
Fan 4B Tach      | 47h | ns  | 29.4 | No Reading
PS 1 Fan Fault   | 73h | ok  | 10.1 | Transition to OK
PS 2 Fan Fault   | 74h | ok  | 10.2 | Transition to OK


[root@linux ~]# ipmitool sdr type ‘Power Supply’
Sensor Type "‘Power" not found.
Sensor Types:
        Temperature               (0x01)   Voltage                   (0x02)
        Current                   (0x03)   Fan                       (0x04)
        Physical Security         (0x05)   Platform Security         (0x06)
        Processor                 (0x07)   Power Supply              (0x08)
        Power Unit                (0x09)   Cooling Device            (0x0a)
        Other                     (0x0b)   Memory                    (0x0c)
        Drive Slot / Bay          (0x0d)   POST Memory Resize        (0x0e)
        System Firmwares          (0x0f)   Event Logging Disabled    (0x10)
        Watchdog1                 (0x11)   System Event              (0x12)
        Critical Interrupt        (0x13)   Button                    (0x14)
        Module / Board            (0x15)   Microcontroller           (0x16)
        Add-in Card               (0x17)   Chassis                   (0x18)
        Chip Set                  (0x19)   Other FRU                 (0x1a)
        Cable / Interconnect      (0x1b)   Terminator                (0x1c)
        System Boot Initiated     (0x1d)   Boot Error                (0x1e)
        OS Boot                   (0x1f)   OS Critical Stop          (0x20)
        Slot / Connector          (0x21)   System ACPI Power State   (0x22)
        Watchdog2                 (0x23)   Platform Alert            (0x24)
        Entity Presence           (0x25)   Monitor ASIC              (0x26)
        LAN                       (0x27)   Management Subsys Health  (0x28)
        Battery                   (0x29)   Session Audit             (0x2a)
        Version Change            (0x2b)   FRU State                 (0x2c)


12. Using System Chassis to initiate power on / off / reset / soft shutdown


!!!!!  Beware only run this if you know what you're realling doing don't just paste into a production system, If you do so it is your responsibility !!!!! 

–  do a soft-shutdown via acpi 


ipmitool [chassis] power soft


– issue a hard power off, wait 1s, power on 


ipmitool [chassis] power cycle


– run a hard power off


ipmitool [chassis] power off

 
– do a hard power on 


ipmitool [chassis] power on


–  issue a hard reset


ipmitool [chassis] power reset


– Get system power status
 

ipmitool chassis power status


13. Use IPMI (SoL) Serial over Lan to execute commands remotely


Besides using ipmitool locally on server that had its IPMI / ILO / DRAC console disabled it could be used also to query and make server do stuff remotely.

If not loaded you will have to load lanplus kernel module.
 

modprobe lanplus


 ipmitool -I lanplus -H 192.168.99.1 -U user -P pass chassis power status

ipmitool -I lanplus -H 192.168.98.1 -U user -P pass chassis power status

ipmitool -I lanplus -H 192.168.98.1 -U user -P pass chassis power reset

ipmitool -I lanplus -H 192.168.98.1 -U user -P pass chassis power reset

ipmitool -I lanplus -H 192.168.98.1 -U user -P pass password sol activate

– Deactivating Sol server capabilities
 

 ipmitool -I lanplus -H 192.168.99.1 -U user -P pass sol deactivate


14. Modify boot device order on next boot


!!!!! Do not run this except you want to really modify Boot device order, carelessly copy pasting could leave your server unbootable on next boot !!!!!

– Set first boot device to be as BIOS

ipmitool chassis bootdev bios


– Set first boot device to be CD Drive

ipmitool chassis bootdev cdrom 


– Set first boot device to be via Network Boot PXE protocol

ipmitool chassis bootdev pxe 


15. Using ipmitool shell


root@iqtestfb:~# ipmitool shell
ipmitool> 
help
Commands:
        raw           Send a RAW IPMI request and print response
        i2c           Send an I2C Master Write-Read command and print response
        spd           Print SPD info from remote I2C device
        lan           Configure LAN Channels
        chassis       Get chassis status and set power state
        power         Shortcut to chassis power commands
        event         Send pre-defined events to MC
        mc            Management Controller status and global enables
        sdr           Print Sensor Data Repository entries and readings
        sensor        Print detailed sensor information
        fru           Print built-in FRU and scan SDR for FRU locators
        gendev        Read/Write Device associated with Generic Device locators sdr
        sel           Print System Event Log (SEL)
        pef           Configure Platform Event Filtering (PEF)
        sol           Configure and connect IPMIv2.0 Serial-over-LAN
        tsol          Configure and connect with Tyan IPMIv1.5 Serial-over-LAN
        isol          Configure IPMIv1.5 Serial-over-LAN
        user          Configure Management Controller users
        channel       Configure Management Controller channels
        session       Print session information
        dcmi          Data Center Management Interface
        sunoem        OEM Commands for Sun servers
        kontronoem    OEM Commands for Kontron devices
        picmg         Run a PICMG/ATCA extended cmd
        fwum          Update IPMC using Kontron OEM Firmware Update Manager
        firewall      Configure Firmware Firewall
        delloem       OEM Commands for Dell systems
        shell         Launch interactive IPMI shell
        exec          Run list of commands from file
        set           Set runtime variable for shell and exec
        hpm           Update HPM components using PICMG HPM.1 file
        ekanalyzer    run FRU-Ekeying analyzer using FRU files
        ime           Update Intel Manageability Engine Firmware
ipmitool>


16. Changing BMC / DRAC time setting


# ipmitool -H XXX.XXX.XXX.XXX -U root -P pass sel time set "01/21/2011 16:20:44"


17. Loading script of IPMI commands

# ipmitool exec /path-to-script/script-with-instructions.txt  


Closure

As you saw ipmitool can be used to do plenty of cool things both locally or remotely on a server that had IPMI server interface available. The tool is mega useful in case if ILO console gets hanged as it can be used to reset it.
I explained shortly what is Intelligent Platform Management Interface, how it can be accessed and used on Linux via ipmitool. I went through some of its basic use, how it can be used to print the configured ILO access IP how
this Admin IP and Network configuration can be changed, how to print the IPMI existing users and how to add new Admin and non-privileged users.
Then I've shown how a system hardware and firmware could be shown, how IPMI management BMC could be reset in case if it hanging and how hardware system even logs can be printed (useful in case of hardware failure errors etc.), how to print reports on current system fan / power supply  and temperature. Finally explained how server chassis could be used for soft and cold server reboots locally or via SoL (Serial Over Lan) and how boot order of system could be modified.

ipmitool is a great tool to further automate different sysadmin tasks with shell scrpts for stuff such as tracking servers for a failing hardware and auto-reboot of inacessible failed servers to guarantee Higher Level of availability.
Hope you enjoyed artcle .. It wll be interested to hear of any other known ipmitool scripts or use, if you know such please share it.

Howto Configure Linux shell Prompt / Setup custom Terminal show Prompt using default shell variables PS1, PS2, PS3, PS4

Tuesday, August 27th, 2019

how-to-configure-lunux-bsd-shell-prompt-ps1-howto-make-your-terminal-console-shell-nice-and-shiny-1

System Console, Command Operation Console  or Terminal is a Physical device for text (command) input from keyboard, getting the command output and monitoring the status of a shell or programs I/O operations generated traditionally with attached screen. With the development of Computers, physical consoles has become emulated and the input output is translated on the monitor usually via a data transfer  protocol historically mostly over TCP/IP connection to remote IP with telnet or rsh, but due to security limitations Consoles are now accessed over data (encrypted) network protocols with SHA2 / MD5 cryptography algorithm enabled such as over SSH (Secure Shell) network protocol..
The ancestors of physical consoles which in the past were just a Terminal (Monitoring / Monitor device attached to a MainFrame system computer).

Mainframe-physical-terminal-monitor-Old-Computer

What is Physical Console
A classical TTY (TeleTYpewriter) device looked like so and served the purpose of being just a communication and display deivce, whether in reality the actual computing and storage tape devices were in a separate room and communicating to Terminal.

mainframe-super-computer-computing-tape-machine
TTYs are still present in  modern UNIX like GNU / Linux distrubions OSes and the BSD berkley 4.4 code based FreeBSD / NetBSD / OpenBSD if you have installed the OS on a physical computer in FreeBSD and Solaris / SunOS there is also tty command. TTY utility in *nix writes the name of the terminal attached to standard input to standard output, in Linux there is a GNU remake of same program part called GNU tty of coreutils package (try man tty) for more.

The physical console is recognizable in Linux as it is indicated with other tree letters pts – (pseudo terminal device) standing for a terminal device which is emulated by an other program (example: xterm, screen, or ssh are such programs). A pts is the slave part of a pts is pseudo there is no separate binary program for it but it is dynamically allocated in memory.
PTS is also called Line consle in Cisco Switches / Router devices, VTY is the physical Serial Console connected on your Cisco device and the network connection emulation to network device is creates with a virtual console session VTL (Virtual Terminal Line). In freebsd the actual /dev/pts* /dev/tty* temporary devices on the OS are slightly different and have naming such as /dev/ttys001.
But the existence of tty and pts emulator is not enough for communicating interrupts to Kernel and UserLand binaries of the Linux / BSD OS, thus to send the commands on top of it is running a System Shell as CSH / TSH / TCSH or BASH which is usually the first program set to run after user logs in over ptty or pseudo tty virtual terminal.

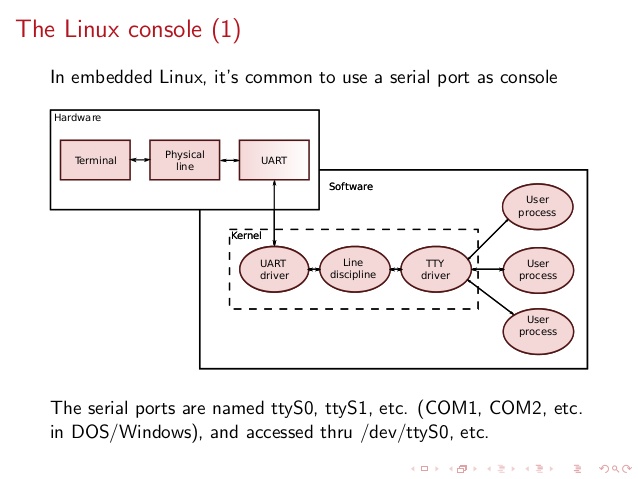
linux-tty-terminal-explained-brief-intro-to-linux-device-drivers-20-638


Setting the Bash Prompt in Terminal / Console on GNU / Linux

Bash has system environments to control multiple of variables, which are usually visible with env command, one important variable to change in the past was for example USER / USERNAME which was red by IRC Chat clients  such as BitchX / irssi and could be displayed publicly so if not changed to a separate value, one could have known your Linux login username by simple /whois query to the Nickname in question (if no inetd / xinetd service was running on the Linux box and usually inetd was not running).

Below is my custom set USER / USERNAME to separate

hipo@pcfreak:~$ env|grep USER
USERNAME=Attitude
USER=Attitude

There is plenty of variables to  tune email such as MAIL store directory, terminal used TERM, EDITOR etc. but there are some
variables that are not visible with env query as they're not globally available for all users but just for the single user, to show this ones you need to use declare command instead, to get a full list of All Single and System Wide defined variables and functions type declare in the bash shell, for readability, below is last 10 returned results:


hipo@pcfreak:~$ declare | tail -10
{
    local quoted=${1//\'/\'\\\'\'};
    printf "'%s'" "$quoted"
}
quote_readline ()
{
    local quoted;
    _quote_readline_by_ref "$1" ret;
    printf %s "$ret"
}


PS1 is present there virtually on any modern Linux distribution and is installed through user home's directory $HOME/.bashrc , ~/.profile or .bash_profile or System Wide globally for all existing users in /etc/passwd (password database file) from /etc/bash.bashrc
In Debian / Ubuntu / Mint GNU / Linux this system variable is set in user home's .bashrc but in Fedora / RHEL Linux distro,
PS1 is configured from /home/username/.bash_profile to find out where PS1 is located for ur user:

cd ~
grep -Rli PS1 .bash*

Here is one more example:

hipo@pcfreak:~$ declare|grep -i PS1|head -1
PS1='\[\e]0;\u@\h: \w\a\]${debian_chroot:+($debian_chroot)}\u@\h:\w\$ '
 

hipo@pcfreak:~$ grep PS1 /etc/bash.bashrc
[ -z “$PS1” ] && return
# but only if not SUDOing and have SUDO_PS1 set; then assume smart user.
if ! [ -n “${SUDO_USER}” -a -n “${SUDO_PS1}” ]; then
  PS1='${debian_chroot:+($debian_chroot)}\u@\h:\w\$ '


Getting current logged in user shell configured PS1 variable can be done with echo:

hipo@pcfreak:~$ echo $PS1
\[\e]0;\u@\h: \w\a\]${debian_chroot:+($debian_chroot)}\u@\h:\w\$

So lets observe a little bit the meaning of this obscure line of (code) instructions code which are understood by BASH when being red from PS1 var to do so, I'll give a list of meaning of main understood commands, each of which is defined with \.

The ${debian_chroot} shell variable is defined from /etc/bash.bashrc

Easiest way to change PS1 is to export the string you like with the arguments like so:


root@linux:/home/hipo# export PS1='My-Custom_Server-Name# '
My-Custom_Server-Name# echo $PS1
My-Custom_Server-Name#


  •     \a : an ASCII bell character (07)
  •     \d : the date in “Weekday Month Date” format (e.g., “Tue May 26”)
  •     \D{format} : the format is passed to strftime(3) and the result is inserted into the prompt string; an empty format results in a locale-specific time representation. The braces are required
  •     \e : an ASCII escape character (033)
  •     \h : the hostname up to the first ‘.’
  •     \H : the hostname
  •     \j : the number of jobs currently managed by the shell
  •     \l : the basename of the shell's terminal device name
  •     \n : newline
  •     \r : carriage return
  •     \s : the name of the shell, the basename of $0 (the portion following the final slash)
  •     \t : the current time in 24-hour HH:MM:SS format
  •     \T : the current time in 12-hour HH:MM:SS format
  •     \@ : the current time in 12-hour am/pm format
  •     \A : the current time in 24-hour HH:MM format
  •     \u : the username of the current user
  •     \v : the version of bash (e.g., 2.00)
  •     \V : the release of bash, version + patch level (e.g., 2.00.0)
  •     \w : the current working directory, with $HOME abbreviated with a tilde
  •     \W : the basename of the current working directory, with $HOME abbreviated with a tilde
  •     \! : the history number of this command
  •     \# : the command number of this command
  •     \$ : if the effective UID is 0, a #, otherwise a $
  •     \nnn : the character corresponding to the octal number nnn
  •     \\ : a backslash
  •     \[ : begin a sequence of non-printing characters, which could be used to embed a terminal control sequence into the prompt
  •     \] : end a sequence of non-printing characters

The default's PS1 set prompt on Debian Linux is:
 

echo $PS1
\[\e]0;\u@\h: \w\a\]${debian_chroot:+($debian_chroot)}\u@\h:\w\$


As you can see \u (print username) \h (print hostname)  and \W (basename of current working dir) or \w (print $HOME/current working dir)
are the most essential, the rest are bell character, escape character etc.

A very good way to make your life easier and learn the abbreviations / generate exactly the PS1 PROMPT you want to have is with Easy Bash PS1 Generator Web Utility
with which you can just click over buttons that are capable to produce all of the PS1 codes.
 

1. How to show current hour:minute:seconds / print full date in Prompt Shell (PS)


Here is an example with setting the Bash Shell prompt  to include also the current time in format hour:minute:seconds (very useful if you're executing commands on a critical servers and you run commands in some kind of virtual terminal like screen or tmux.
 

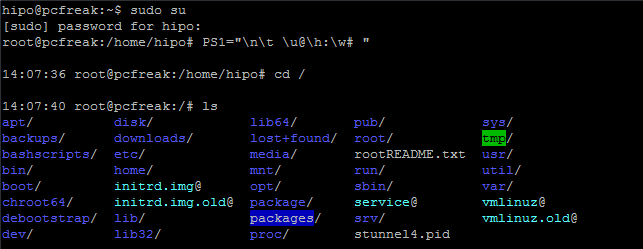
root@pcfreak:~# PS1="\n\t \u@\h:\w# "
14:03:51 root@pcfreak:/home#


PS1-how-to-setup-date-time-hour-minutes-and-seconds-in-bash-shell-prompt


export PS1='\u@\H \D{%Y-%m-%d %H:%M;%S%z}] \W ] \$ '


export-PS1-Linux-set-full-date-time-clock-prompt-screenshot-console


Make superuser appear in RED color (adding PS1 prompt custom color for a User)
 

root@pcfreak:~$  PS1="\\[$(tput setaf 1)\\]\\u@\\h:\\w #\\[$(tput sgr0)\\]"


how-to-change-colors-in-bash-prompt-shell-on-linux-shell-environment

In above example the Shell Prompt Color changed is changed for administrator (root) to shebang symbol # in red, green, yellow and blue for the sake to show you how it is done, however this example can be adapted for any user on the system. Setting different coloring for users is very handy if you have to administer Mail Server service like Qmail or other Application that consists of multiple small ones of multiple daemons such as qmail + vpopmail + clamd + mysql etc. Under such circumstances, coloring each of the users in different color like in the example for debugging is very useful.

Coloring the PS1 system prompt on Linux to different color has been a standard practice in Linux Server environments running Redhat Enterprise Linux (RHEL) and SuSE Enterprise Linux and some Desktop distributions such as Mint Linux.

To make The Root prompt Red colored only for system super user (root) on any Linux distribution
, add the following to /etc/bashrc, e.g.

vim /etc/bashrc


# If id command returns zero, you've root access.
if [ $(id -u) -eq 0 ];
then # you are root, set red colour prompt
  PS1="\\[$(tput setaf 1)\\]\\u@\\h:\\w #\\[$(tput sgr0)\\]"
else # normal
  PS1="[\\u@\\h:\\w] $"
fi


2. How to make the prompt of a System user appear Green


Add to ~/.bashrc  following line


PS1="\\[$(tput setaf 2)\\]\\u@\\h:\\w #\\[$(tput sgr0)\\]"


3. Print New line, username@hostname, base PTY, shell level, history (number), newline and full working directory $PWD


export PS1='\n[\u@\h \l:$SHLVL:\!]\n$PWD\$ '


4. Showing the numbert of jobs the shell is currently managing.


This is useful if you run and switch with fg / bg (foreground / background) commands
to switch between jobs and forget some old job.


export PS1='\u@\H \D{%Y-%m-%d %H:%M;%S%z}] \W \$]'


Multi Lines Prompt / Make very colorful Shell prompt full of stats info

PS1="\n\[\033[35m\]\$(/bin/date)\n\[\033[32m\]\w\n\[\033[1;31m\]\u@\h: \[\033[1;34m\]\$(/usr/bin/tty | /bin/sed -e ‘s:/dev/::’): \[\033[1;36m\]\$(/bin/ls -1 | /usr/bin/wc -l | /bin/sed ‘s: ::g’) files \[\033[1;33m\]\$(/bin/ls -lah | /bin/grep -m 1 total | /bin/sed ‘s/total //’)b\[\033[0m\] -> \[\033[0m\]"


prompt-show-how-many-files-and-virtual-pts-ps1-linux
 

5. Set color change on command failure


If you have a broken command or the command ended with non zero output with some kind of bad nasty message and you want to make, that more appearing making it red heighlighted, here is how:


PROMPT_COMMAND='PS1="\[\033[0;33m\][\!]\`if [[ \$? = “0” ]]; then echo “\\[\\033[32m\\]”; else echo “\\[\\033[31m\\]”; fi\`[\u.\h: \`if [[ `pwd|wc -c|tr -d ” “` > 18 ]]; then echo “\\W”; else echo “\\w”; fi\`]\$\[\033[0m\] “; echo -ne “\033]0;`hostname -s`:`pwd`\007"'


6. Other beautiful PS1 Color Prompts with statistics


PS1="\n\[\e[32;1m\](\[\e[37;1m\]\u\[\e[32;1m\])-(\[\e[37;1m\]jobs:\j\[\e[32;1m\])-(\[\e[37;1m\]\w\[\e[32;1m\])\n(\[\[\e[37;1m\]! \!\[\e[32;1m\])-> \[\e[0m\]"


another-very-beuatiful-bash-colorful-prompt


7. Add Muliple Colors to Same Shell prompt


function prompt { local BLUE="\[\033[0;34m\]” local DARK_BLUE=”\[\033[1;34m\]” local RED=”\[\033[0;31m\]” local DARK_RED=”\[\033[1;31m\]” local NO_COLOR=”\[\033[0m\]” case $TERM in xterm*|rxvt*) TITLEBAR=’\[\033]0;\u@\h:\w\007\]’ ;; *) TITLEBAR=”” ;; esac PS1=”\u@\h [\t]> ” PS1=”${TITLEBAR}\ $BLUE\u@\h $RED[\t]>$NO_COLOR " PS2='continue-> ' PS4='$0.$LINENO+ ' }

colorful-prompt-blue-and-red-linux-console-PS1
 

8. Setting / Change Shell background Color


changing-background-color-of-bash-shell-prompt-linux


export PS1="\[$(tput bold)$(tput setb 4)$(tput setaf 7)\]\u@\h:\w $ \[$(tput sgr0)\]"


tput Color Capabilities:

  • tput setab [1-7] – Set a background color using ANSI escape
  • tput setb [1-7] – Set a background color
  • tput setaf [1-7] – Set a foreground color using ANSI escape
  • tput setf [1-7] – Set a foreground color

tput Text Mode Capabilities:

  • tput bold – Set bold mode
  • tput dim – turn on half-bright mode
  • tput smul – begin underline mode
  • tput rmul – exit underline mode
  • tput rev – Turn on reverse mode
  • tput smso – Enter standout mode (bold on rxvt)
  • tput rmso – Exit standout mode
  • tput sgr0 – Turn off all attributes

Color Code for tput:

  • 0 – Black
  • 1 – Red
  • 2 – Green
  • 3 – Yellow
  • 4 – Blue
  • 5 – Magenta
  • 6 – Cyan
  • 7 – White


9. Howto Use bash shell function inside PS1 variable

If you administrate Apache or other HTTPD servers or any other server whose processes are forked and do raise drastically at times to keep an eye while actively working on the server.


function httpdcount { ps aux | grep apache2 | grep -v grep | wc -l } export PS1="\u@\h [`httpdcount`]> "

10. PS2, PS3, PS4 little known variables
 

I'll not get much into detail to PS2, PS3, PS4 but will mention them as perhaps many people are not even aware they exist.
They're rarely used in the daily system administrator's work but useful for Shell scripting purposes of Dev Ops and Shell Scripting Guru Programmers.

  • PS2 – Continuation interactive prompt

A very long unix command can be broken down to multiple line by giving \ at the end of the line. The default interactive prompt for a multi-line command is “> “.  Let us change this default behavior to display “continue->” by using PS2 environment variable as shown below.

hipo@db-host :~$ myisamchk –silent –force –fast –update-state \
> –key_buffer_size=512M –sort_buffer_size=512M \
> –read_buffer_size=4M –write_buffer_size=4M \
> /var/lib/mysql/bugs/*.MYI
[Note: This uses the default “>” for continuation prompt]

  • PS3 – Prompt used by “select” inside shell script (usefulif you write scripts with user prompts)


  • PS4 – Used by “set -x” to prefix tracing output
    The PS4 shell variable defines the prompt that gets displayed.

You can find  example with script demonstrating PS2, PS3, PS4 use via small shell scripts in thegeekstuff's article Take control of PS1, PS2, PS3, PS4 read it here


Summary


In this article, I've shortly reviewed on what is a TTY, how it evolved into Pseudo TTY and how it relates to current shells which are the interface communicating with the modern UNIX like Operating systems's userland and kernel.
Also it was reviewed shortly how the current definitions of shell variables could be viewed with declare cmd. Also I went through on how to display the PS1 variable and  on how to modify PS1 and make the prompt different statistics and monitoring parameters straight into the command shell. I've shown some common PS1 strings that report on current date hour, minute, seconds, modify the coloring of the bash prompt shell, show processes count, and some PS1 examples were given that combines beuatiful shell coloring as well as how the Prompt background color can be changed.
Finally was shown how a combination of commands can be executed by exporting to PS1 to update process counf of Apache on every shell prompt iteration.
Other shell goodies are mostly welcome


How to build Linux logging bash shell script write_log, logging with Named Pipe buffer, Simple Linux common log files logging with logger command

Monday, August 26th, 2019

how-to-build-bash-script-for-logging-buffer-named-pipes-basic-common-files-logging-with-logger-command

Logging into file in GNU / Linux and FreeBSD is as simple as simply redirecting the output, e.g.:
 

echo "$(date) Whatever" >> /home/hipo/log/output_file_log.txt


or with pyping to tee command


echo "$(date) Service has Crashed" | tee -a /home/hipo/log/output_file_log.txt


But what if you need to create a full featured logging bash robust shell script function that will run as a daemon continusly as a background process and will output
all content from itself to an external log file?
In below article, I've given example logging script in bash, as well as small example on how a specially crafted Named Pipe buffer can be used that will later store to a file of choice.
Finally I found it interesting to mention few words about logger command which can be used to log anything to many of the common / general Linux log files stored under /var/log/ – i.e. /var/log/syslog /var/log/user /var/log/daemon /var/log/mail etc.
 

1. Bash script function for logging write_log();


Perhaps the simplest method is just to use a small function routine in your shell script like this:
 

write_log()
LOG_FILE='/root/log.txt';
{
  while read text
  do
      LOGTIME=`date "+%Y-%m-%d %H:%M:%S"`
      # If log file is not defined, just echo the output
      if [ “$LOG_FILE” == “” ]; then
    echo $LOGTIME": $text";
      else
        LOG=$LOG_FILE.`date +%Y%m%d`
    touch $LOG
        if [ ! -f $LOG ]; then echo "ERROR!! Cannot create log file $LOG. Exiting."; exit 1; fi
    echo $LOGTIME": $text" | tee -a $LOG;
      fi
  done
}


  •  Using the script from within itself or from external to write out to defined log file


echo "Skipping to next copy" | write_log


2. Use Unix named pipes to pass data – Small intro on what is Unix Named Pipe.


Named Pipe –  a named pipe (also known as a FIFO (First In First Out) for its behavior) is an extension to the traditional pipe concept on Unix and Unix-like systems, and is one of the methods of inter-process communication (IPC). The concept is also found in OS/2 and Microsoft Windows, although the semantics differ substantially. A traditional pipe is "unnamed" and lasts only as long as the process. A named pipe, however, can last as long as the system is up, beyond the life of the process. It can be deleted if no longer used.
Usually a named pipe appears as a file, and generally processes attach to it for IPC.


Once named pipes were shortly explained for those who hear it for a first time, its time to say named pipe in unix / linux is created with mkfifo command, syntax is straight foward:
 

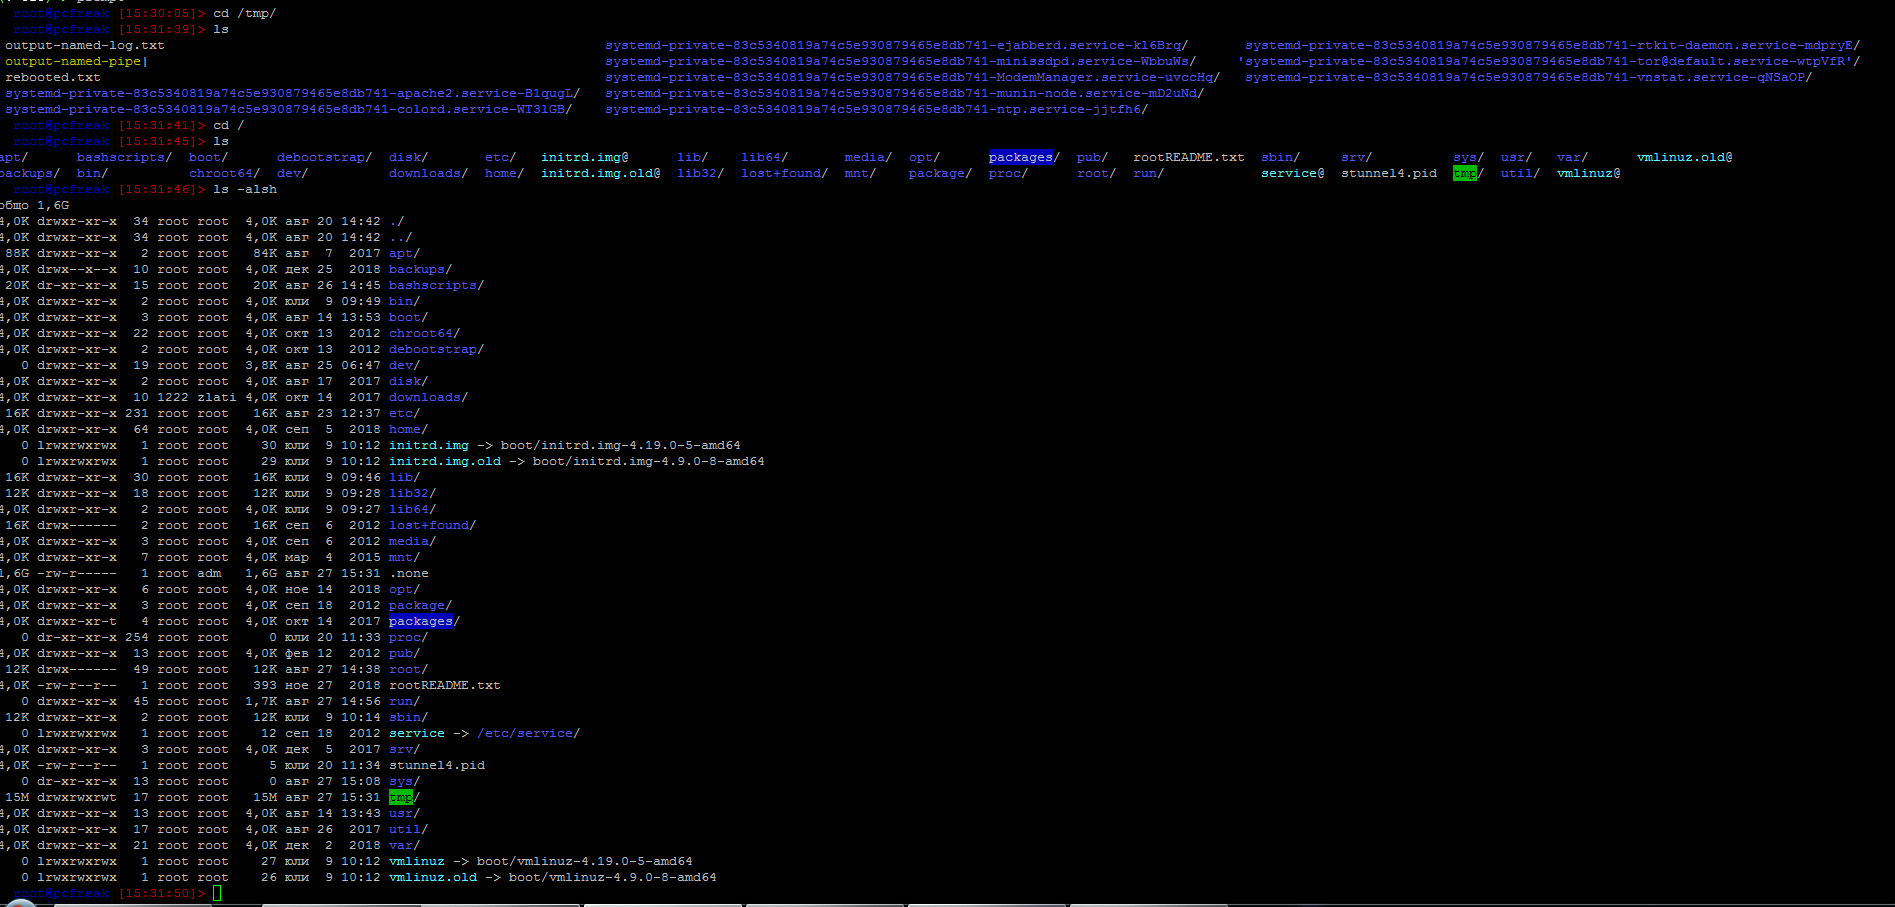
mkfifo /tmp/name-of-named-pipe


Some older Linux-es with older bash and older bash shell scripts were using mknod.
So idea behind logging script is to use a simple named pipe read input and use date command to log the exact time the command was executed, here is the script.


#!/bin/bash
named_pipe='/tmp/output-named-pipe';
output_named_log='
/tmp/output-named-log.txt ';

if [ -p $named_pipe ]; then
rm -f $named_pipe
fi
mkfifo $named_pipe

while true; do
read LINE <$named_pipe
echo $(date): "$LINE" >>/tmp/output-named-log.txt
done


To write out any other script output and get logged now, any of your output with a nice current date command generated output write out any output content to the loggin buffer like so:


echo 'Using Named pipes is so cool' > /tmp/output-named-pipe
echo 'Disk is full on a trigger' > /tmp/output-named-pipe

  • Getting the output with the date timestamp

# cat /tmp/output-named-log.txt
Mon Aug 26 15:21:29 EEST 2019: Using Named pipes is so cool
Mon Aug 26 15:21:54 EEST 2019: Disk is full on a trigger


If you wonder why it is better to use Named pipes for logging, they perform better (are generally quicker) than Unix sockets.


3. Logging files to system log files with logger


If you need to do a one time quick way to log any message of your choice with a standard Logging timestamp, take a look at logger (a part of bsdutils Linux package), and is a command which is used to enter messages into the system log, to use it simply invoke it with a message and it will log your specified output by default to /var/log/syslog common logfile


root@linux:/root# logger 'Here we go, logging'
root@linux:/root # tail -n 3 /var/log/syslog
Aug 26 15:41:01 localhost CRON[24490]: (root) CMD (chown qscand:qscand -R /var/run/clamav/ 2>&1 >/dev/null)
Aug 26 15:42:01 localhost CRON[24547]: (root) CMD (chown qscand:qscand -R /var/run/clamav/ 2>&1 >/dev/null)
Aug 26 15:42:20 localhost hipo: Here we go, logging


If you have took some time to read any of the init.d scripts on Debian / Fedora / RHEL / CentOS Linux etc. you will notice the logger logging facility is heavily used.

With logger you can print out message with different priorities (e.g. if you want to write an error message to mail.* logs), you can do so with:
 

 logger -i -p mail.err "Output of mail processing script"


To log a normal non-error (priority message) with logger to /var/log/mail.log system log.


 logger -i -p mail.notice "Output of mail processing script"


A whole list of supported facility named priority valid levels by logger (as taken of its current Linux manual) are as so:


FACILITIES AND LEVELS
       Valid facility names are:

              auth
              authpriv   for security information of a sensitive nature
              cron
              daemon
              ftp
              kern       cannot be generated from userspace process, automatically converted to user
              lpr
              mail
              news
              syslog
              user
              uucp
              local0
                to
              local7
              security   deprecated synonym for auth

       Valid level names are:

              emerg
              alert
              crit
              err
              warning
              notice
              info
              debug
              panic     deprecated synonym for emerg
              error     deprecated synonym for err
              warn      deprecated synonym for warning

       For the priority order and intended purposes of these facilities and levels, see syslog(3).


If you just want to log to Linux main log file (be it /var/log/syslog or /var/log/messages), depending on the Linux distribution, just type', even without any shell quoting:


logger 'The reason to reboot the server Currently was a System security Update


So what others is logger useful for?

 In addition to being a good diagnostic tool, you can use logger to test if all basic system logs with its respective priorities work as expected, this is especially
useful as I've seen on a Cloud Holsted OpenXEN based servers as a SAP consultant, that sometimes logging to basic log files stops to log for months or even years due to
syslog and syslog-ng problems hungs by other thirt party scripts and programs.
To test test all basic logging and priority on system logs as expected use the following logger-test-all-basic-log-logging-facilities.sh shell script.


#!/bin/bash
for i in {auth,auth-priv,cron,daemon,kern, \
lpr,mail,mark,news,syslog,user,uucp,local0 \
,local1,local2,local3,local4,local5,local6,local7}

do        
# (this is all one line!)


for k in {debug,info,notice,warning,err,crit,alert,emerg}
do

logger -p $i.$k "Test daemon message, facility $i priority $k"

done

done

Note that on different Linux distribution verions, the facility and priority names might differ so, if you get

logger: unknown facility name: {auth,auth-priv,cron,daemon,kern,lpr,mail,mark,news, \
syslog,user,uucp,local0,local1,local2,local3,local4, \
local5,local6,local7}

check and set the proper naming as described in logger man page.


4. Using a file descriptor that will output to a pre-set log file


Another way is to add the following code to the beginning of the script

#!/bin/bash
exec 3>&1 4>&2
trap 'exec 2>&4 1>&3' 0 1 2 3
exec 1>log.out 2>&1
# Everything below will go to the file 'log.out':

The code Explaned

  •     Saves file descriptors so they can be restored to whatever they were before redirection or used themselves to output to whatever they were before the following redirect.
    trap 'exec 2>&4 1>&3' 0 1 2 3
  •     Restore file descriptors for particular signals. Not generally necessary since they should be restored when the sub-shell exits.

          exec 1>log.out 2>&1

  •     Redirect stdout to file log.out then redirect stderr to stdout. Note that the order is important when you want them going to the same file. stdout must be redirected before stderr is redirected to stdout.

From then on, to see output on the console (maybe), you can simply redirect to &3. For example
,

echo "$(date) : Do print whatever you want logging to &3 file handler" >&3


I've initially found out about this very nice bash code from serverfault.com's post how can I fully log all bash script actions (but unfortunately on latest Debian 10 Buster Linux  that is prebundled with bash shell 5.0.3(1)-release the code doesn't behave exactly, well but still on older bash versions it works fine.

Sum it up


To shortlysummarize there is plenty of ways to do logging from a shell script logger command but using a function or a named pipe is the most classic. Sometimes if a script is supposed to write user or other script output to a a common file such as syslog, logger command can be used as it is present across most modern Linux distros.
If you have a better ways, please drop a common and I'll add it to this article.


What is inode and how to find out which directory is eating up all your filesystem inodes on Linux, Increase inode count on a ext3 ext4 and ufs filesystems

Tuesday, August 20th, 2019

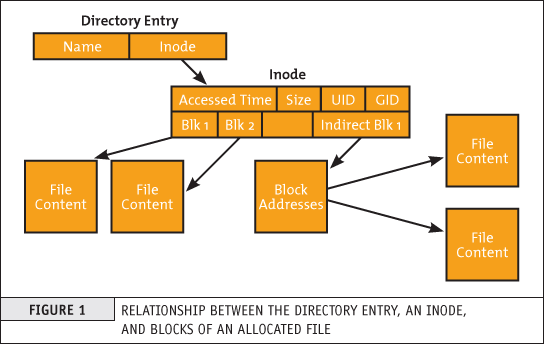
what-is-inode-find-out-which-filesystem-or-directory-eating-up-all-your-system-inodes-linux_inode_diagram

If you're a system administrator of multiple Linux servers used for Web serving delivery / Mail server sysadmin, Database admin or any High amount of Drives Data Storage used for backup servers infra, Data Repository administrator such as Linux hosted Samba / CIFS shares, etc. or using some Linux Hosting Provider to host your website or any other UNIX like Infrastructure servers that demands a storage of high number of files under a Directory  you might end up with the common filesystem inode depletion issues ( Maximum Inode number for a filesystem is predefined, limited and depending on the filesystem configured size).

In case a directory stored files end up exceding the amount of possible addressable inodes could prevent any data to be further assiged and stored on the Filesystem.

When a device runs out of inodes, new files cannot be created on the device, even though there may be plenty free space available and the first time it happened to me very long time ago I was completely puzzled how this is possible as I was not aware of Inodes existence  …

Reaching maximum inodes number (e.g. inode depletion), often happens on Busy Mail servers (receivng tons of SPAM email messages) or Content Delivery Network (CDN – Website Image caching servers) which contain many small files on EXT3 or EXT4 Journalled filesystems. File systems (such as Btrfs, JFS or XFS) escape this limitation with extents or dynamic inode allocation, which can 'grow' the file system or increase the number of inodes.


Hence ending being out of inodes could cause various oddities on how stored data behaves or communicated to other connected microservices and could lead to random application disruptions and odd results costing you many hours of various debugging to find the root cause of inodes (index nodes) being out of order.

In below article, I will try to give an overall explanation on what is an I-Node on a filesystem, how inodes of FS unit could be seen, how to diagnose a possible inode poblem – e.g.  see the maximum amount of inodes available per filesystem and how to prepare (format) a new filesystem with incrsed set of maximum inodes.


What are filesystem i-nodes?


This is a data structure in a Unix-style file system that describes a file-system object such as a file or a directory.
The data structure described in the inodes might vary slightly depending on the filesystem but usually on EXT3 / EXT4 Linux filesystems each inode stores the index to block that contains attributes and disk block location(s) of the object's data.
– Yes for those who are not aware on how a filesystem is structured on *nix it does allocate all stored data in logical separeted structures called data blocks. Each file stored on a local filesystem has a file descriptor, there are virtual unit structures file tables and each of the inodes that are a reference number has a own data structure (inode table).

Inodes / "Index" are slightly unusual on file system structure that stored the access information of files as a flat array on the disk, with all the hierarchical directory information living aside from this as explained by Unix creator and pioneer- Dennis Ritchie (passed away few years ago).

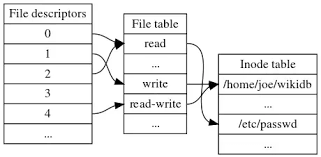
what-is-inode-very-simplified-explanation-diagram-data

Simplified explanation on file descriptors, file table and inode, table on a common Linux filesystem

Here is another description on what is I-node, given by Ken Thompson (another Unix pioneer and father of Unix) and Denis Ritchie, described in their paper published in 1978:

"    As mentioned in Section 3.2 above, a directory entry contains only a name for the associated file and a pointer to the file itself. This pointer is an integer called the i-number (for index number) of the file. When the file is accessed, its i-number is used as an index into a system table (the i-list) stored in a known part of the device on which the directory resides. The entry found thereby (the file's i-node) contains the description of the file:…
    — The UNIX Time-Sharing System, The Bell System Technical Journal, 1978  "


What is typical content of inode and how I-nodes play with rest of Filesystem units?


The inode is just a reference index to a data block (unit) that contains File-system object attributes. It may include metadata information such as (times of last change, access, modification), as well as owner and permission data.


On a Linux / Unix filesystem, directories are lists of names assigned to inodes. A directory contains an entry for itself, its parent, and each of its children.

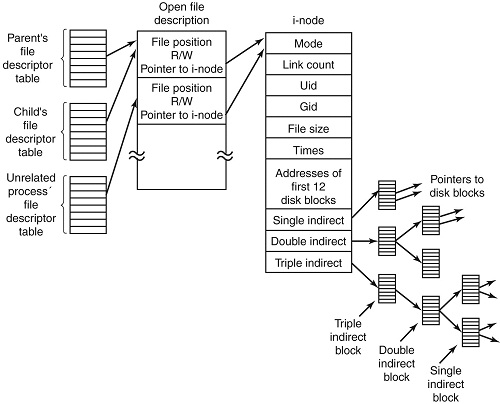
Structure-of-inode-table-on-Linux-Filesystem-diagram


Structure of inode table-on Linux Filesystem diagram (picture source GeeksForGeeks.org)

  • Information about files(data) are sometimes called metadata. So you can even say it in another way, "An inode is metadata of the data."
  •  Inode : Its a complex data-structure that contains all the necessary information to specify a file. It includes the memory layout of the file on disk, file permissions, access time, number of different links to the file etc.
  •  Global File table : It contains information that is global to the kernel e.g. the byte offset in the file where the user's next read/write will start and the access rights allowed to the opening process.
  • Process file descriptor table : maintained by the kernel, that in turn indexes into a system-wide table of files opened by all processes, called the file table .

The inode number indexes a table of inodes in a known location on the device. From the inode number, the kernel's file system driver can access the inode contents, including the location of the file – thus allowing access to the file.

  •     Inodes do not contain its hardlink names, only other file metadata.
  •     Unix directories are lists of association structures, each of which contains one filename and one inode number.
  •     The file system driver must search a directory looking for a particular filename and then convert the filename to the correct corresponding inode number.

The operating system kernel's in-memory representation of this data is called struct inode in Linux. Systems derived from BSD use the term vnode, with the v of vnode referring to the kernel's virtual file system layer.


But enough technical specifics, lets get into some practical experience on managing Filesystem inodes.
 

Listing inodes on a Fileystem


Lets say we wan to to list an inode number reference ID for the Linux kernel (files):


root@linux: # ls -i /boot/vmlinuz-*
 3055760 /boot/vmlinuz-3.2.0-4-amd64   26091901 /boot/vmlinuz-4.9.0-7-amd64
 3055719 /boot/vmlinuz-4.19.0-5-amd64  26095807 /boot/vmlinuz-4.9.0-8-amd64


To list an inode of all files in the kernel specific boot directory /boot:


root@linux: # ls -id /boot/
26091521 /boot/


Listing inodes for all files stored in a directory is also done by adding the -i ls command flag:

Note the the '-1' flag was added to to show files in 1 column without info for ownership permissions


root@linux:/# ls -1i /boot/
26091782 config-3.2.0-4-amd64
 3055716 config-4.19.0-5-amd64
26091900 config-4.9.0-7-amd64
26095806 config-4.9.0-8-amd64
26091525 grub/
 3055848 initrd.img-3.2.0-4-amd64
 3055644 initrd.img-4.19.0-5-amd64
26091902 initrd.img-4.9.0-7-amd64
 3055657 initrd.img-4.9.0-8-amd64
26091756 System.map-3.2.0-4-amd64
 3055703 System.map-4.19.0-5-amd64
26091899 System.map-4.9.0-7-amd64
26095805 System.map-4.9.0-8-amd64
 3055760 vmlinuz-3.2.0-4-amd64
 3055719 vmlinuz-4.19.0-5-amd64
26091901 vmlinuz-4.9.0-7-amd64
26095807 vmlinuz-4.9.0-8-amd64


To get more information about Linux directory, file, such as blocks used by file-unit, Last Access, Modify and Change times, current External Symbolic or Static links for filesystem object:
 

root@linux:/ # stat /etc/
  File: /etc/
  Size: 16384         Blocks: 32         IO Block: 4096   catalog
Device: 801h/2049d    Inode: 6365185     Links: 231
Access: (0755/drwxr-xr-x)  Uid: (    0/    root)   Gid: (    0/    root)
Access: 2019-08-20 06:29:39.946498435 +0300
Modify: 2019-08-14 13:53:51.382564330 +0300
Change: 2019-08-14 13:53:51.382564330 +0300
 Birth: –


Within a POSIX system (Linux-es) and *BSD are more or less such, a file has the following attributes[9] which may be retrieved by the stat system call:

   – Device ID (this identifies the device containing the file; that is, the scope of uniqueness of the serial number).
    File serial numbers.
    – The file mode which determines the file type and how the file's owner, its group, and others can access the file.
    – A link count telling how many hard links point to the inode.
    – The User ID of the file's owner.
    – The Group ID of the file.
    – The device ID of the file if it is a device file.
    – The size of the file in bytes.
    – Timestamps telling when the inode itself was last modified (ctime, inode change time), the file content last modified (mtime, modification time), and last accessed (atime, access time).
    – The preferred I/O block size.
    – The number of blocks allocated to this file.


Getting more extensive information on a mounted filesystem


Most Linuxes have the tune2fs installed by default (in debian Linux this is through e2fsprogs) package, with it one can get a very good indepth information on a mounted filesystem, lets say about the ( / ) root FS.
 

root@linux:~# tune2fs -l /dev/sda1
tune2fs 1.44.5 (15-Dec-2018)
Filesystem volume name:   <none>
Last mounted on:          /
Filesystem UUID:          abe6f5b9-42cb-48b6-ae0a-5dda350bc322
Filesystem magic number:  0xEF53
Filesystem revision #:    1 (dynamic)
Filesystem features:      has_journal ext_attr resize_inode dir_index filetype needs_recovery sparse_super large_file
Filesystem flags:         signed_directory_hash
Default mount options:    (none)
Filesystem state:         clean
Errors behavior:          Continue
Filesystem OS type:       Linux
Inode count:              30162944
Block count:              120648960
Reserved block count:     6032448
Free blocks:              13830683
Free inodes:              26575654
First block:              0
Block size:               4096
Fragment size:            4096
Reserved GDT blocks:      995
Blocks per group:         32768
Fragments per group:      32768
Inodes per group:         8192
Inode blocks per group:   512
Filesystem created:       Thu Sep  6 21:44:22 2012
Last mount time:          Sat Jul 20 11:33:38 2019
Last write time:          Sat Jul 20 11:33:28 2019
Mount count:              6
Maximum mount count:      22
Last checked:             Fri May 10 18:32:27 2019
Check interval:           15552000 (6 months)
Next check after:         Wed Nov  6 17:32:27 2019
Lifetime writes:          338 GB
Reserved blocks uid:      0 (user root)
Reserved blocks gid:      0 (group root)
First inode:              11
Inode size:              256
Required extra isize:     28
Desired extra isize:      28
Journal inode:            8
First orphan inode:       21554129
Default directory hash:   half_md4
Directory Hash Seed:      d54c5a90-bc2d-4e22-8889-568d3fd8d54f
Journal backup:           inode blocks


Important note to make here is file's inode number stays the same when it is moved to another directory on the same device, or when the disk is defragmented which may change its physical location. This also implies that completely conforming inode behavior is impossible to implement with many non-Unix file systems, such as FAT and its descendants, which don't have a way of storing this invariance when both a file's directory entry and its data are moved around. Also one inode could point to a file and a copy of the file or even a file and a symlink could point to the same inode, below is example:

$ ls -l -i /usr/bin/perl*
266327 -rwxr-xr-x 2 root root 10376 Mar 18  2013 /usr/bin/perl
266327 -rwxr-xr-x 2 root root 10376 Mar 18  2013 /usr/bin/perl5.14.2

A good to know is inodes are always unique values, so you can't have the same inode number duplicated. If a directory is damaged, only the names of the things are lost and the inodes become the so called “orphan”, e.g.  inodes without names but luckily this is recoverable. As the theory behind inodes is quite complicated and is complicated to explain here, I warmly recommend you read Ian Dallen's Unix / Linux / Filesystems – directories inodes hardlinks tutorial – which is among the best academic Tutorials explaining various specifics about inodes online.


How to Get inodes per mounted filesystem


root@linux:/home/hipo# df -i
Filesystem       Inodes  IUsed   IFree IUse% Mounted on


dev             2041439     481   2040958   1% /dev
tmpfs            2046359     976   2045383   1% /run
tmpfs            2046359       4   2046355   1% /dev/shm
tmpfs            2046359       6   2046353   1% /run/lock
tmpfs            2046359      17   2046342   1% /sys/fs/cgroup
/dev/sdb5        1221600    2562   1219038   1% /usr/var/lib/mysql
/dev/sdb6        6111232  747460   5363772  13% /var/www/htdocs
/dev/sdc1      122093568 3083005 119010563   3% /mnt/backups
tmpfs            2046359      13   2046346   1% /run/user/1000


As you see in above output Inodes reported for each of mounted filesystems has a specific number. In above output IFree on every mounted FS locally on Physical installed OS Linux is good.


Here is an example on how to recognize a depleted Inodes on a OpenXen Virtual Machine with attached Virtual Hard disks.

linux:~# df -i
Filesystem         Inodes     IUsed      IFree     IUse%   Mounted on
/dev/xvda         2080768    2080768     0      100%    /
tmpfs             92187      3          92184   1%     /lib/init/rw
varrun            92187      38          92149   1%    /var/run
varlock            92187      4          92183   1%    /var/lock
udev              92187     4404        87783   5%    /dev
tmpfs             92187       1         92186   1%    /dev/shm


Finding files with a certain inode


At some cases if you want to check all the copy files of a certain file that have the same i-node pointer it is useful to find them all by their shared inode this is possible with simple find (below example is for /usr/bin/perl binary sharing same inode as perl5.28.1:


ls -i /usr/bin/perl
23798851 /usr/bin/perl*


 find /usr/bin -inum 435308 -print
/usr/bin/perl5.28.1
/usr/bin/perl


Find directory that has a large number of files in it?

To get an overall number of inodes allocated by a certain directory, lets say /usr /var


root@linux:/var# du -s –inodes /usr /var
566931    /usr
56020    /var/

To get a list of directories use by inode for a directory with its main contained sub-directories sorted from 1 till highest number use:
 

du -s –inodes * 2>/dev/null |sort -g


Usually running out of inodes means there is a directory / fs mounts that has too many (small files) that are depleting the max count of possible inodes.

The most simple way to list directories and number of files in them on the server root directory is with a small bash shell loop like so:
 

for i in /*; do echo $i; find $i |wc -l; done


Another way to identify the exact directory that is most likely the bottleneck for the inode depletion in a sorted by file count, human readable form:
 

find / -xdev -printf '%h\n' | sort | uniq -c | sort -k 1 -n


This will dump a list of every directory on the root (/) filesystem prefixed with the number of files (and subdirectories) in that directory. Thus the directory with the largest number of files will be at the bottom.


The -xdev switch is used to instruct find to narrow it's search to only the device where you're initiating the search (any other sub-mounted NAS / NFS filesystems from a different device will be omited).


Print top 10 subdirectories with Highest Inode Usage


Once identifed the largest number of files directories that is perhaps the issue, to further get a list of Top subdirectories in it with highest amount of inodes used, use below cmd:


for i in `ls -1A`; do echo "`find $i | sort -u | wc -l` $i"; done | sort -rn | head -10


To list more than 10 of the top inodes used dirs change the head -10 to whatever num needed.

N.B. ! Be very cautious when running above 2 find commands on a very large filesystems as it will be I/O Excessive and in filesystems that has some failing blocks this could create further problems.

To omit putting a high I/O load on a production filesystem, it is possible to also use du + very complex regular expression:
 

cd /backup
du –inodes -S | sort -rh | sed -n         '1,50{/^.\{71\}/s/^\(.\{30\}\).*\(.\{37\}\)$/\1…\2/;p}'


Results returned are from top to bottom.


How to Increase the amount of Inodes count on a new created volume EXT4 filesystem

Some FS-es XFS, JFS do have an auto-increase inode feature in case if their is physical space, whether otheres such as reiserfs does not have inodes at all but still have a field reported when queried for errors. But the classical Linux ext3 / ext4 does not have a way to increase the inode number on a live filesystem. Instead the way to do it there is to prepare a brand new filesystem on a Disk / NAS / attached storage.

The number of inodes at format-time of the block storage can be as high as 4 billion inodes. Before you create the new FS, you have to partition the new the block storage as ext4 with lets say parted command (or nullify the content of an with dd to clean up any previous existing data on a volume if there was already existing data:
 

parted /dev/sda


dd if=/dev/zero of=/dev/path/to/volume


  then format it with this additional parameter:


mkfs.ext4 -N 3000000000 /dev/path/to/volume


Here in above example the newly created filesystem of EXT4 type will be created with 3 Billion inodes !, for setting a higher number on older ext3 filesystem max inode count mkfs.ext3 could be used instead.

Bear in mind that 3 Billion number is a too high number and if you plan to have some large number of files / directories / links structures just raise it up to your pre-planning requirements for FS. In most cases it will be rarely anyone that want to have this number higher than 1 or 2 billion of inodes.

On FreeBSD / NetBSD / OpenBSD setting inode maximum number for a UFS / UFS2 (which is current default FreeBSD FS), this could be done via newfs filesystem creation command after the disk has been labeled with disklabel:


freebsd# newfs -i 1024 /dev/ada0s1d


Increase the Max Count of Inodes for a /tmp filesystem


Sometimes on some machines it is necessery to have ability to store very high number of small files (e.g. have a very large number of inodes) on a temporary filesystem kept in memory. For example some web applications served by Web Server Apache + PHP, Nginx + Perl-FastCGI are written in a bad manner so they kept tons of temporary files in /tmp, leading to issues with exceeded amount of inodes.
If that's the case to temporary work around you can increase the count of Inodes for /tmp to a very high number like 2 billions using:


mount -o remount,nr_inodes=<bignum> /tmp

To make the change permanent on next boot if needed don't forget to put the nr_inodes=whatever_bignum as a mount option for the temporary fs to /etc/fstab

Eventually, if you face this issues it is best to immediately track which application produced the mess and ask the developer to fix his messed up programs architecture.


Conclusion


It was explained on the very common issue of having maximum amount of inodes on a filesystem depleted and the unpleasent consequences of inability to create new files on living FS.
Then a general overview was given on what is inode on a Linux / Unix filesystem, what is typical content of inode, how inode addressing is handled on a FS. Further was explained how to get basic information about available inodes on a filesystem, how to get a filename/s based on inode number (with find), the well known way to determine inode number of a directory or file (with ls) and get more extensive information on a FS on inodes with tune2fs.
Also was explained how to identify directories containing multitudes of files in order to determine a sub-directories that is consuming most of the inodes on a filesystem. Finally it was explained very raughly how to prepare an ext4 filesystem from scratch with predefined number to inodes to much higher than the usual defaults by mkfs.ext3 / mkfs.ext4 and *bsds newfs as well as how to raise the number of inodes of /tmp tmpfs temporary RAM filesystem.

Mail send from command line on Linux and *BSD servers – useful for scripting

Monday, September 10th, 2018

mail-send-email-from-command-line-on-linux-and-freebsd-operating-systems-logo

Historically Email sending has been very different from what most people use it in the Office, there was no heavy Email clients such as Outlook Express no MX Exchange, no e-mail client capabilities for Calendar and Meetings schedule as it is in most of the modern corporate offices that depend on products such as Office 365 (I would call it a connectedHell 365 days a year !).

There was no free webmail and pop3 / imap providers such as Mail.Yahoo.com, Gmail.com, Hotmail.com, Yandex.com, RediffMail, Mail.com the innumerous lists goes and on.
Nope back in the day emails were doing what they were originally supposed to like the post services in real life simply send and receive messages.

For those who remember that charming times, people used to be using BBS-es (which were basicly a shared set-up home system as a server) or some of the few University Internal Email student accounts or by crazy sysadmins who received their notification and warnings logs about daemon (services) messages via local DMZ-ed network email servers and it was common to read the email directly with mail (mailx) text command or custom written scripts … It was not uncommon also that mailx was used heavily to send notification messages on triggered events from logs. Oh life was simple and clear back then, and even though today the email could be used in a similar fashion by hard-core old school sysadmins and Dev Ops / simple shell scriptings tasks or report cron jobs such usage is already in the deep history.

The number of ways one could send email in text format directly from the GNU / Linux / *BSD server to another remote mail MTA node (assuming it had properly configured Relay server be it Exim or Postifix) were plenty.

In this article I will try to rewind back some of the UNIX history by pinpointing a few of the most common ways, one used to send quick emails directly from a remote server connection terminal or lets say a cheap VPS few cents server, through something like (SSH or Telnet) etc.
 

1. Using the mail command client (part of bsd-mailx on Debian).
 

In my previous article Linux: "bash mail command not found" error fix
I ended the article with a short explanation on how this is done but I will repeat myself one more time here for the sake of clearness of this article.

root@linux:~# echo "Your Sample Message Body" | mail -s "Whatever … Message Subject" remote_receiver@remote-server-email-address.com


The mail command will connect to local server TCP PORT 25 on local configured MTA and send via it. If the local MTA is misconfigured or it doesn't have a proper MX / PTR DNS records etc. or not configure as a relay SMTP remote mail will not get delivered. Sent Email should be properly delivered at remote recipient address.

How to send HTML formatted emails using mailx command on Linux console / terminal shell using remote server through SSH ?

Connect to remote SSH server (VPS), dedicated server, home Linux router etc. and run:


root@linux:~# mailx -a 'Content-Type: text/html'
      -s "This is advanced mailx indeed!" < email_content.html
      "first_email_to_send_to@gmail.com, mail_recipient_2@yahoo.com"


email_content.html should be properly formatted (at best w3c standard compliant) HTML.

Here is an example email_content.html (skeleton file)


    To: your_customer@gmail.com
    Subject: This is an HTML message
    From: marketing@your_company.com
    Content-Type: text/html; charset="utf8"

    <html>
    <body>
    <div style="
        background-color:
        #abcdef; width: 300px;
        height: 300px;
        ">
    </div>
Whatever text mixed with valid email HTML tags here.
    </body>
    </html>


Above command sends to two email addresses however if you have a text formatted list of recipients you can easily use that file with a bash shell script for loop and send to multiple addresses red from lets say email_addresses_list.txt .

To further advance the one liner you can also want to provide an email attachment, lets say the file email_archive.rar by using the -A email_archive.rar argument.


root@linux:~# mailx -a 'Content-Type: text/html'
      -s "This is advanced mailx indeed!" -A ~/email_archive.rar < email_content.html
      "first_email_to_send_to@gmail.com, mail_recipient_2@yahoo.com"


For those familiar with Dan Bernstein's Qmail MTA (which even though a bit obsolete is still a Security and Stability Beast across email servers) – mailx command had to be substituted with a custom qmail one in order to be capable to send via qmail MTA daemon.
 

2. Using sendmail command to send email
 

Do you remember that heavy hard to configure MTA monster sendmail ? It was and until this very day is the default Mail Transport Agent for Slackware Linux.

Here is how we were supposed to send mail with it:


[root@sendmail-host ~]# vim email_content_to_be_delivered.txt


Content of file should be something like:

Subject: This Email is sent from UNIX Terminal Email

Hi this Email was typed in a file and send via sendmail console email client
(part of the sendmail mail server)

It is really fun to go back in the pre-history of Mail Content creation 🙂


[root@sendmail-host ~]# sendmail -v user_name@remote-mail-domain.com  < /tmp/email_content_to_be_delivered.txt


-v argument provided, will make the communication between the mail server and your mail transfer agent visible.
 

3. Using ssmtp command to send mail
 

ssmtp MTA and its included shell command was used historically as it was pretty straight forward you just launch it on the command line type on one line all your email and subject and ship it (by pressing the CTRL + D key combination).

To give it a try you can do:


root@linux:~# apt-get install ssmtp
Reading package lists… Done
Building dependency tree       
Reading state information… Done
The following additional packages will be installed:
  libgnutls-openssl27
The following packages will be REMOVED:
  exim4-base exim4-config exim4-daemon-heavy
The following NEW packages will be installed:
  libgnutls-openssl27 ssmtp
0 upgraded, 2 newly installed, 3 to remove and 1 not upgraded.
Need to get 239 kB of archives.
After this operation, 3,697 kB disk space will be freed.
Do you want to continue? [Y/n] Y
Get:1 http://ftp.us.debian.org/debian stretch/main amd64 ssmtp amd64 2.64-8+b2 [54.2 kB]
Get:2 http://ftp.us.debian.org/debian stretch/main amd64 libgnutls-openssl27 amd64 3.5.8-5+deb9u3 [184 kB]
Fetched 239 kB in 2s (88.5 kB/s)         
Preconfiguring packages …
dpkg: exim4-daemon-heavy: dependency problems, but removing anyway as you requested:
 mailutils depends on default-mta | mail-transport-agent; however:
  Package default-mta is not installed.
  Package mail-transport-agent is not installed.
  Package exim4-daemon-heavy which provides mail-transport-agent is to be removed.


(Reading database … 169307 files and directories currently installed.)
Removing exim4-daemon-heavy (4.89-2+deb9u3) …
dpkg: exim4-config: dependency problems, but removing anyway as you requested:
 exim4-base depends on exim4-config (>= 4.82) | exim4-config-2; however:
  Package exim4-config is to be removed.
  Package exim4-config-2 is not installed.
  Package exim4-config which provides exim4-config-2 is to be removed.
 exim4-base depends on exim4-config (>= 4.82) | exim4-config-2; however:
  Package exim4-config is to be removed.
  Package exim4-config-2 is not installed.
  Package exim4-config which provides exim4-config-2 is to be removed.

Removing exim4-config (4.89-2+deb9u3) …
Selecting previously unselected package ssmtp.
(Reading database … 169247 files and directories currently installed.)
Preparing to unpack …/ssmtp_2.64-8+b2_amd64.deb …
Unpacking ssmtp (2.64-8+b2) …
(Reading database … 169268 files and directories currently installed.)
Removing exim4-base (4.89-2+deb9u3) …
Selecting previously unselected package libgnutls-openssl27:amd64.
(Reading database … 169195 files and directories currently installed.)
Preparing to unpack …/libgnutls-openssl27_3.5.8-5+deb9u3_amd64.deb …
Unpacking libgnutls-openssl27:amd64 (3.5.8-5+deb9u3) …
Processing triggers for libc-bin (2.24-11+deb9u3) …
Setting up libgnutls-openssl27:amd64 (3.5.8-5+deb9u3) …
Setting up ssmtp (2.64-8+b2) …
Processing triggers for man-db (2.7.6.1-2) …
Processing triggers for libc-bin (2.24-11+deb9u3) …


As you see from above output local default Debian Linux Exim is removed …

Lets send a simple test email …


hipo@linux:~# ssmtp user@remote-mail-server.com
Subject: Simply Test SSMTP Email
This Email was send just as a test using SSMTP obscure client
via SMTP server.
^d


What is notable about ssmtp is that even though so obsolete today it supports of STARTTLS (email communication encryption) that is done via its config file


/etc/ssmtp/ssmtp.conf


4. Send Email from terminal using Mutt client
 

Mutt was and still is one of the swiff army of most used console text email clients along with Alpine and Fetchmail to know more about it read here

Mutt supports reading / sending mail from multiple mailboxes and capable of reading IMAP and POP3 mail fetch protocols and was a serious step forward over mailx. Its syntax pretty much resembles mailx cmds.


root@linux:~# mutt -s "Test Email" user@example.com < /dev/null


Send email including attachment a 15 megabytes MySQL backup of Squirrel Webmail


root@linux:~# mutt  -s "This is last backup small sized database" -a /home/backups/backup_db.sql user@remote-mail-server.com < /dev/null


5. Using simple telnet to test and send email (verify existence of email on remote SMTP)
 

As a Mail Server SysAdmin this is one of my best ways to test whether I had a server properly configured and even sometimes for the sake of fun I used it as a hack to send my mail 🙂
telnet is and will always be a great tool for doing SMTP issues troubleshooting.
 

It is very useful to test whether a remote SMTP TCP port 25 is opened or a local / remote server firewall prevents connections to MTA.

Below is an example connect and send example using telnet to my local SMTP on www.pc-freak.net (QMail powered (R) 🙂 )

sending-email-using-telnet-command-howto-screenshot


root@pcfreak:~# telnet localhost 25
Trying 127.0.0.1…
Connected to localhost.
Escape character is '^]'.
220 This is Mail Pc-Freak.NET ESMTP
HELO mail.www.pc-freak.net
250 This is Mail Pc-Freak.NET
MAIL FROM:<hipo@www.pc-freak.net>
250 ok
RCPT TO:<roots_bg@yahoo.com>
250 ok
DATA
354 go ahead
Subject: This is a test subject


This is just a test mail send through telnet
.
250 ok 1536440787 qp 28058
^]
telnet>


Note that the returned messages are native to qmail, a postfix would return a slightly different content, here is another test example to remote SMTP running sendmail or postfix.


root@pcfreak:~# telnet mail.servername.com 25
Trying 127.0.0.1…
Connected to localhost.localdomain (127.0.0.1).
Escape character is '^]'.
220 mail.servername.com ESMTP Sendmail 8.13.8/8.13.8; Tue, 22 Oct 2013 05:05:59 -0400
HELO yahoo.com
250 mail.servername.com Hello mail.servername.com [127.0.0.1], pleased to meet you
mail from: systemexec@gmail.com
250 2.1.0 hipo@www.pc-freak.net… Sender ok
rcpt to: hip0d@yandex.ru
250 2.1.5 hip0d@yandex.ru… Recipient ok
data
354 Enter mail, end with "." on a line by itself
Hey
This is test email only


Thanks
.
250 2.0.0 r9M95xgc014513 Message accepted for delivery
quit
221 2.0.0 mail.servername.com closing connection
Connection closed by foreign host.


It is handy if you want to know whether remote MTA server has a certain Emailbox existing or not with telnet by simply trying to send to a certian email and checking the Email server returned output (note that the message returned depends on the remote MTA version and many qmails are configured to not give information on the initial SMTP handshake but returns instead a MAILER DAEMON failure error sent back to your sender address. Some MX servrers are still vulnerable to this attack yet, historically dreamhost.com. Below attack screenshot is made at the times before dreamhost.com fixed the brute force email issue.

Terminal-Verify-existing-Email-with-telnet

6. Using simple netcat TCP/IP Swiss Army Knife to test and send email in console

netcat-logo-a-swiff-army-knife-of-the-hacker-and-security-expert-logo
Other tool besides telnet of testing remote / local SMTP is netcat tool (for reading and writting data across TCP and UDP connections).

The way to do it is analogous but since netcat is not present on most Linux OSes by default you need to install it through the package manager first be it apt or yum etc.

# apt-get –yes install netcat


First lets create a new file test_email_content.txt using bash's echo cmd.


# echo 'EHLO hostname
MAIL FROM: hip0d@yandex.ru
RCPT TO:   solutions@www.pc-freak.net
DATA
From: A tester <hip0d@yandex.ru>
To:   <solutions@www.pc-freak.net>
Date: date
Subject: A test message from test hostname


Delete me, please
.
QUIT
' >>test_email_content.txt


# netcat -C localhost 25 < test_email_content.txt


220 This is Mail Pc-Freak.NET ESMTP
250-This is Mail Pc-Freak.NET
250-STARTTLS
250-SIZE 80000000
250-PIPELINING
250 8BITMIME
250 ok
250 ok
354 go ahead
451 See http://pobox.com/~djb/docs/smtplf.html.

Because of its simplicity and the fact it has a bit more capabilities in reading / writing data over network it was no surprise it was among the favorite tools not only of crackers and penetration testers but also a precious debug tool for the avarage sysadmin. netcat's advantage over telnet is you can push-pull over the remote SMTP port (25) a non-interactive input.


7. Using openssl to connect and send email via encrypted channel


root@linux:~# openssl s_client -connect smtp.gmail.com:465 -crlf -ign_eof

    ===
               Certificate negotiation output from openssl command goes here
        ===

        220 smtp.gmail.com ESMTP j92sm925556edd.81 – gsmtp
            EHLO localhost
        250-smtp.gmail.com at your service, [78.139.22.28]
        250-SIZE 35882577
        250-8BITMIME
        250-AUTH LOGIN PLAIN XOAUTH2 PLAIN-CLIENTTOKEN OAUTHBEARER XOAUTH
        250-ENHANCEDSTATUSCODES
        250-PIPELINING
        250-CHUNKING
        250 SMTPUTF8
            AUTH PLAIN *passwordhash*
        235 2.7.0 Accepted
            MAIL FROM: <hipo@pcfreak.org>
        250 2.1.0 OK j92sm925556edd.81 – gsmtp
            rcpt to: <systemexec@gmail.com>
        250 2.1.5 OK j92sm925556edd.81 – gsmtp
            DATA
        354  Go ahead j92sm925556edd.81 – gsmtp
            Subject: This is openssl mailing

            Hello nice user
            .
        250 2.0.0 OK 1339757532 m46sm11546481eeh.9
            quit
        221 2.0.0 closing connection m46sm11546481eeh.9
        read:errno=0


8. Using CURL (URL transfer) tool to send SSL / TLS secured crypted channel emails via Gmail / Yahoo servers and MailGun Mail send API service


Using curl webpage downloading advanced tool for managing email send might be  a shocking news to many as it is idea is to just transfer data from a server.
curl is mostly used in conjunction with PHP website scripts for the reason it has a Native PHP implementation and many PHP based websites widely use it for download / upload of user data.
Interestingly besides support for HTTP and FTP it has support for POP3 and SMTP email protocols as well
If you don't have it installed on your server and you want to give it a try, install it first with apt:
 

root@linux:~# apt-get install curl


To learn more about curl capabilities make sure you check cURL –manual arg.
 

root@linux:~# curl –manual


a) Sending Emails via Gmail and other Mail Public services

Curl is capable to send emails from terminal using Gmail and Yahoo Mail services, if you want to give that a try.

gmail-settings-google-allow-less-secure-apps-sign-in-to-google-screenshot

Go to myaccount.google.com URL and login from the web interface choose Sign in And Security choose Allow less Secure Apps to be -> ON and turn on access for less secure apps in Gmail. Though I have not tested it myself so far with Yahoo! Mail, I suppose it should have a similar security settings somewhere.

Here is how to use curl to send email via Gmail.

Gmail-password-Allow-less-secure-apps-ON-screenshot-howto-to-be-able-to-send-email-with-text-commands-with-encryption-and-outlook


root@linux:~# curl –url 'smtps://smtp.gmail.com:465' –ssl-reqd \
  –mail-from 'your_email@gmail.com' –mail-rcpt 'remote_recipient@mail.com' \
  –upload-file mail.txt –user 'your_email@gmail.com:your_accout_password'


b) Sending Emails using Mailgun.com (Transactional Email Service API for developers)

To use Mailgun to script sending automated emails go to Mailgun.com and create account and generate new API key.

Then use curl in a similar way like below example:


curl -sv –user 'api:key-7e55d003b…f79accd31a' \
    https://api.mailgun.net/v3/sandbox21a78f824…3eb160ebc79.mailgun.org/messages \
    -F from='Excited User <developer@yourcompany.com>' \
    -F to=sandbox21a78f824…3eb160ebc79.mailgun.org \
    -F to=user_acc@gmail.com \
    -F subject='Hello' \
    -F text='Testing Mailgun service!' \
   –form-string html='<h1>EDMdesigner Blog</h1><br /><cite>This tutorial helps me understand email sending from Linux console</cite>' \
    -F attachment=@logo_picture.jpg


The -F option that is heavy present in above command lets curl (Emulate a form filled in button in which user has pressed the submit button).
For more info of the options check out man curl.


9. Using swaks command to send emails from


root@linux:~# apt-cache show swaks|grep "Description" -B 10
Package: swaks
Version: 20170101.0-1
Installed-Size: 221
Maintainer: Andreas Metzler <ametzler@debian.org>
Architecture: all
Depends: perl
Recommends: libnet-dns-perl, libnet-ssleay-perl
Suggests: perl-doc, libauthen-sasl-perl, libauthen-ntlm-perl
Description-en: SMTP command-line test tool
 swaks (Swiss Army Knife SMTP) is a command-line tool written in Perl
 for testing SMTP setups; it supports STARTTLS and SMTP AUTH (PLAIN,
 LOGIN, CRAM-MD5, SPA, and DIGEST-MD5). swaks allows one to stop the
 SMTP dialog at any stage, e.g to check RCPT TO: without actually
 sending a mail.
 .
 If you are spending too much time iterating "telnet foo.example 25"
 swaks is for you.
Description-md5: f44c6c864f0f0cb3896aa932ce2bdaa8


root@linux:~# apt-get instal –yes swaks

root@linux:~# swaks –to mailbox@example.com -s smtp.gmail.com:587
      -tls -au <user-account> -ap <account-password>


The -tls argument (in order to use gmail encrypted TLS channel on port 587)

If you want to hide the password not to provide the password from command line so (in order not to log it to user history) add the -a options.

10. Using qmail-inject on Qmail mail servers to send simple emails

Create new file with content like:
 

root@qmail:~# vim email_file_content.text
To: user@mail-example.com
Subject: Test


This is a test message.
 

root@qmail:~# cat email_file_content.text | /var/qmail/bin/qmail-inject


qmail-inject is part of ordinary qmail installation so it is very simple it even doesn't return error codes it just ships what ever given as content to remote MTA.
If the linux host where you invoke it has a properly configured qmail installation the email will get immediately delivered. The advantage of qmail-inject over the other ones is it is really lightweight and will deliver the simple message more quickly than the the prior heavy tools but again it is more a Mail Delivery Agent (MDA) for quick debugging, if MTA is not working, than for daily email writting.

It is very useful to simply test whether email send works properly without sending any email content by (I used qmail-inject to test local email delivery works like so).
 

root@linux:~# echo 'To: mailbox_acc@mail-server.com' | /var/qmail/bin/qmail-inject


11. Debugging why Email send with text tool is not being send properly to remote recipient

If you use some of the above described methods and email is not delivered to remote recipient email addresses check /var/log/mail.log (for a general email log and postfix MTAs – the log is present on many of the Linux distributions) and /var/log/messages or /var/log/qmal (on Qmail installations) /var/log/exim4 (on servers running Exim as MTA).

https://www.pc-freak.net/images/linux-email-log-debug-var-log-mail-output

 Closure

The ways to send email via Linux terminal are properly innumerous as there are plenty of scripted tools in various programming languages, I am sure in this article,  also missing a lot of pre-bundled installable distro packages. If you know other interesting ways / tools to send via terminal I would like to hear it.

Hope you enjoyed, happy mailing !

How to stop REDSHIFT night light brightness and color saturation eye strain protection on GNU / Linux

Tuesday, August 7th, 2018

http://jonls.dk/assets/redshift-icon-256

You know on most operating systems such as Windows 8 / 10 ,  Mac OS X as well as  GNU / Linux / BSDs (FreeBSD) etc. with graphical environments such as  GNOME / KDE etc. , there is this default functionality nowadays that is helping to reduce eye strain and improve night sleep by modifying the light and brightness as well as coloring eminated by the monitor. 

On Windows this technology is called Night Light and is easily enabled by nagivating through menus:


Start  > Settings  > System > Display > Night light > Night light settings.


set-your-display-windows-night-time-windows-os-10

Windows 10 Night Time settings shot

On GNU / Linux and BSD-es the eye strain application that comes preinstalled by default on most distributions is redshift – for more what is redshift check out my previous article get more peaceful night sleep on Ubuntu, Mint and Xubuntu Linux.

There is also the alternative to use F.lux (which by the way is used to prevent eye strain on Mac OS X and was the program of choice to prevent eye strain in older Windows versions)

Even though Night Light / and redshift monitor color warmth change is often mostly useful and have a positive impact improving sleep as well removes eye strain on Linux my experience with it is not too positive as it changes the monitor color gamma and makes it often quite reddish and annoying even through a normal day and not only night time.
This makes the work experience on the computer not pleasurable thus just removing it for me and I guess for many would be a must.

Assuming that you have installed Free software OS such as Linux with redshift (note that on on older releases of Deb and RPM package based distributions: you will have to manually install it with something like:)

On Debian based distros with:
 

root@debian:~# apt-get install –yes redshift redshift-gtk


On RPM Fedora / Cent OS, Redhat Enterprise Linux etc. with a command like:


[root@fedora]# yum install –yes redshift redshift-gtk

redshift-on-KDE-settings-menu

Redshift settings on Linux with KDE GUI

So in order to remove redshift it completely from Linux which usually on most GNU / Linux distros is running as a default process

redshift-change-monitor-brightness-to-reduce-eye-strain-gnome


1. * Make sure you kill all processes called redshift and redshift-gtk


to do so check processes with same name and KILL 'EM ALL!:
 

root@linux:~# ps aux|grep -i redshift
hipo     44058  2.8  0.5 620980 42340 pts/2    Sl+  20:33   0:00 /usr/bin/python3 /usr/bin/redshift-gtk
hipo     44059  0.1  0.0 295712  6476 pts/2    Sl+  20:33   0:00 /usr/bin/redshift -v

root@linux:~# kill -9 44058 44059


2. * Set the color temperature of the Monitor / Screen back to 6500K (this can be done either by the button menu that most screens have)


or manually with redshift itself by executing command:


root@linux:~# redshift -O 6500


As the screen is back to normal color gamma, its now time to completely remove redshift in order to prevent it to mess up with your monitor colors, on next PC boot or on Gnome / Mate whatever UI used session logout.

To do so issue commands:


root@linux:~# dpkg –purge redshift redshift-gtk
(Reading database … 516053 files and directories currently installed.)
Removing redshift-gtk (1.11-1) …
Purging configuration files for redshift-gtk (1.11-1) …
Removing redshift (1.11-1) …
Processing triggers for man-db (2.8.3-2) …
Processing triggers for hicolor-icon-theme (0.17-2) …
Processing triggers for mime-support (3.61) …
Processing triggers for gnome-menus (3.13.3-11) …
Processing triggers for desktop-file-utils (0.23-3) …
Processing triggers for menu (2.1.47+b1) …

3. Enjoy normal colors on your monitor  Goodbye Forever REDSHIFT, goodbuy dark crappy Screen during the day. Hello normal Screen light !!! 🙂

Enable printing from Windows and Macs remotely through Linux Print server – Share Brother Printer DCP-1610W with Linux CUPS and Samba Windows Share

Thursday, March 23rd, 2017

Brother-Printer-model-DCP-1610W-printer-scanner-and-copier-in-one-picture
I've recently bought a new Printer model Brother DCP 1610W and as in my home I have already a small Linux router and a web server where this blog and a couple of other websites runs and I need multiple PC / notebook / mobile phone enabled people to print on the Printer easily pretty much like a Printing server for a Small Office environment.

To do that of course I needed it configured to be accessible remotely for print via LAN and Wireless network. The task is not a complex one and printing remotely over the network is a standard thing many company organizations / universities and univerities does for quite some time and hence nowadays most printers are network connect ready so you just have to place them inside your home or corporate network and use the time to configure them via their web configuration interface or even some have their own embedded wifi adapter, as well as many printers nowdays can even be ready to print directly by just connecting the Printer to the Wi-Fi network and installing its drivers on a Win host.

Anyhow the most common way for both home printer configurations and corporate I'm aware of still is to Share the printer via Windows Server or Win Server Domain so anyone connected to the Network to be able to Add the printer via Winblows.

In the case i'm going to describe below my home the Wi-Fi router is connected to an 5 Port Network Switch (HUB) which on its hand is connected to the Linux router which serves multiple things (a Linux router, a hosting server (web server and a database server hosted, a mail server, traffic proxy server, a firewall and a NAT router), I decided to Share the printer to Wi-Fi connected and LAN clients directly switched via an UTP cable to the switch by using the good old Linux Samba Sharing server.

I did not actually do that for a really long time hence before I started I did some quick research to get an idea on the general steps to partake to succeed in Sharing the Printer over the network of this Debian's Wiki SystemPrinting Guide was mostly helpful.


1. Downloading and Installing necessery Brother Printer deb packages
 

A small remark to make here is my Linux server is running Debian GNU / Linux and hence this article is giving details on how Printer can be Shared on Debian though a minor adaptation of the article should make it possible to install also on any RHEL / CentOS / SuSE etc. Redhat based RPM Linux distribution.)

First step to do is to download Brother printer vendor provided drivers as of moment of writting this article they're here

To download the drivers get the proper links and use wget or curl to download all the necessery .deb archives in lets say in /root/brother-printer-drivers e.g. before that create the folder with:
 

root@linux:/root# mkdir /root/brother-printer-drivers

Also it might be helpful for those who need some other Brother Printer Linux driver complete list of Brother Printer all Linux drivers as of time of writting this post is found on this URL here

Next you need to install following Brother printer driver deb packages brscan-skey brscan4 dcp1610wcupswrapper dcp1610wlpr

root@linux:/root# cd brother-printer-drivers
root@linux:/root/brother-printer-drivers# dpkg -i –force-all brscan-skey-0.2.4-1.amd64.deb

root@linux:/root# dpkg -i –force-all brscan4-0.4.4-1.amd64.deb

root@linux:/root# dpkg -i –force-all dcp1610wcupswrapper-3.0.1-1.i386.deb

root@linux:/root# dpkg -i –force-all dcp1610wlpr-3.0.1-1.i386.deb

root@linux/root# cd  ../


Once installed dpkg -l should show like so:
 

root@linux:/root# dpkg -l |grep -i brother
ii  brscan-skey                                0.2.4-1                      Brother Linux scanner S-KEY tool
ii  brscan4                                    0.4.4-1                      Brother Scanner Driver
ii  dcp1610wcupswrapper                        3.0.1-1                      Brother DCP-1610W CUPS wrapper driver
ii  dcp1610wlpr                                3.0.1-1                      Brother DCP-1610W LPR driver

Brother's vendor provided packages will install drivers under /opt/brother
 

root@linux:/root# ls -al /opt/brother/
общо 16
drwxr-xr-x 4 root root 4096 яну 26 13:58 ./
drwxr-xr-x 3 root root 4096 яну 26 13:55 ../
drwxr-xr-x 3 root root 4096 яну 26 13:58 Printers/
drwxr-xr-x 4 root root 4096 яну 26 13:58 scanner/


2. Installing CUPS Printing Service and related Filters and Postscript packages necessery for PDF processing on CUPS server side


root@linux:/root#  apt-get install –yes cups cups-client cups-common cups-pdf cups-ppdc foomatic-db foomatic-db-engine foomatic-filters foomatic-filters-ppds openprinting-ppds lpr hp-ppd hpijs cups-pdf ghostscript-cups

Your printing should work normally without cups-pdf and ghostscript-cups packages installed but I install them just in case if PDF processing is problematic you can skip that.

It is also useful to install sane and sane-utils packages if you're going to use the brother's scanner capabilities.

root@linux:/root# apt-get install –yes sane sane-utils

Note that considering that all packages installed fine and the CUPS service is running, this should have set a proper printer into /etc/printcap a short database used to describe printers. printcap file is being used by UNIX's spooling system and allows you to dynamic addition and deletion of printers, for Linux / *Nix hosts which have more than one printer connected and added in CUPs records for the various printer goes there.
With a single Brother DCP-1610W Printer like my case is you should have records similar to these:

root@linux:~/brother-printer-drivers# cat /etc/printcap
DCP1610W:\
        :mx=0:\
        :sd=/var/spool/lpd/DCP1610W:\
        :sh:\
        :lp=/dev/usb/lp0:\
        :if=/opt/brother/Printers/DCP1610W/lpd/filter_DCP1610W:


3. Adding a Printer in CUPS the easy way through CUPS Printing System Web Interface


CUPS has a nice web interface for setting up and administering printers and print queues.

Below is a selfexplanatory screenshot of Add Printer screen 

add-a-new-printer-cups-web-admin-interface-screenshot-in-a-firefox-browser  .


Use your favourite browser (Firefox, Opera, Chromium, lynx, elinks – yes the great news is console / terminal browsers are also supported well by cups web iface) to display interface and add a printer via the Administration screen. If you are asked for a username and password see here.

cups-web-admin-interface-accessed-in-browser-listing-brother-dcp1610w-printer-screenshot

There are three sections. The first is for local printers; that is, printers which are usually attached to the machine you are using. These are very often printers using a USB connection but can be parallel or serial port printers.

Adding a USB printer is a common occurance and one should automatically be detected as a local printer and a URI (Unified Resource Indicator) for its connection displayed on the next page.
 

The Other Network Printers section requires you to specify the destination for the remote print queue/printer, which could be on the local network or many kilometres away. AppSocket is almost always available on a network printer and other devices and requires only the IP address of the printer and a port number. An Internet Printing Protocol (IPP) URI is the preferrred choice for connecting to another CUPS server because it is CUPS' native protocol. ipp14 is the ipp backend from CUPS 1.4 and Debian-specific. It is provided because some devices do not work with the current ipp backend, which has a stricter adherence to the IPP standard. A Line Printer Daemon (LPD) URI could be considered if the remote printing service does not support IPP satisfactorily or at all. As before, when a remote print queue is doing the filtering choose RAW as the Make/Manufacturer.


4. Printer Status and Control testing whether CUPS printing is up and running


Once cups is installed and hopefully up and running you should see the cups process up and running to check it do:

root@linux:/root# /etc/init.d/cups status; ps axuwwf|grep -i cups|grep -v grep
Status of Common Unix Printing System: cupsd is running.
root      2815  0.0  0.0  75364  2912 ?        Ss   Mar17   0:00 /usr/sbin/cupsd -C /etc/cups/cupsd.conf

To get some further testing you can also use lpstat command and should get ouput similar to belows:
 

root@linux:/root# lpstat -t
scheduler is running
no system default destination
device for DCP1610W: usb://Brother/DCP-1610W%20series
DCP1610W accepting requests since Fri Mar 17 23:03:37 2017
printer DCP1610W disabled since Fri Mar 17 23:03:37 2017 –
        Unplugged or turned off

At the moment of issuing above command it shows printer is disabled because of moment of execution the printer was turned off for a while cause I was not needing it you should get usually an output of enabled and ready to print.

lpstat is also about to report whether a queue is accepting jobs and what is yet to be printed you can do


5. Install and Configure Samba Sharing Server on the Linux server


You can setup CUPS to allow Windows machines to print to a CUPS server using an http address.

First, install the samba package. When you are asked to use WINS, say yes.

root@linux:/root#  apt-get install samba

Next you might want to set setup your /etc/cups/cupsd.conf file by default CUPS would listen to LPD's port 631 if you don't have a strong firewall isolating you from the Internet on port 631 you might want to change that port to another one lets say to Port 49651.


I personally prefer keep the default port 631 and do use a robust firewall. If you want to change it modify config to something like:

# Our private connection we listen to Listen *:49651 # Allow machines on local network to use printers <Location /printers> Order allow,deny Allow 192.168.0.* Allow 192.168.1.* </Location>

If you like to filter access to CUPs daemon to receive Printing requests to be originating only from the local network place in smb.conf also something with your private network ranges:

# Allow machines on local network to use printers

<Location /printers>
Order allow,deny
Allow 192.168.0.*
Allow 192.168.1.*
Allow 192.168.2.*
</Location>
<Location />
  # Allow remote administration…
  Order allow,deny
##  Allow all
Allow 192.168.0.*
Allow 192.168.1.*
Allow 192.168.2.*
</Location>
<Location />
  # Allow remote administration…
  Order allow,deny
##  Allow all
Allow 192.168.0.*
Allow 192.168.1.*
Allow 192.168.2.*
</Location>
<Location /admin>
  # Allow remote administration…
  Order allow,deny
##  Allow all
Allow 192.168.0.*
Allow 192.168.1.*
Allow 192.168.2.*
</Location>


This will listen on port 49651 from any network. You may use some other port number besides 631. Note that the dynamic and/or private ports as specified by the IANA are in the range 49152 through 65535. Also, this will only allow computers from the local network to print to the CUPS printers.
 

6. Use CUPS Printing server to print over the network directly


Next you need to restart the CUPS daemon once again as it will be used for samba printing


# service cups restart


Now on each Windows machine, Choose that you want to install a network printer and that you want to install a printer on the Internet or home/office network. The URL you will use should be smth like:


http://<cups_server_hostname>:49651/printers/DCP1610W


Lastly, select the Brother downloaded from Internet or the one that's available on the Install CD, for any other vendor printer if it is lets say HP Printer or Canon to install use the respective provided driver or as a last resort use the Generic section driver labeled MS Publisher Color Printer.


7. Configure Samba to Share CUPS network enabled printer


I've done a minor changes in default installed /etc/samba/smb.conf to make the printer accessible from The Samba server here is the main things to consider changing:
 

# Change this to the workgroup/NT-domain name your Samba server will part of
   workgroup = WORKGROUP

#   security = user
security = share

[printers]
   comment = PC Freak Printer
   browseable = yes
   path = /var/spool/samba
   printable = yes
   guest ok = yes
   read only = yes
   create mask = 0700

# Windows clients look for this share name as a source of downloadable
# printer drivers
[print$]
   comment = Printer Drivers
   path = /var/lib/samba/printers
   browseable = yes
   read only = yes
   guest ok = yes


Next restart Samba server to make the new setting take affect:
 

root@linux:/# /etc/init.d/samba restart
Stopping Samba daemons: nmbd smbd.
Starting Samba daemons: nmbd smbd.
root@linux:/# ps axu|grep -E "smb|nmb"
root     21887  0.0  0.0 169588  1904 ?        Ss   16:53   0:00 /usr/sbin/nmbd -D
root     21892  0.0  0.0 197560  3272 ?        Ss   16:53   0:00 /usr/sbin/smbd -D
root     21894  0.0  0.0 197560  1564 ?        S    16:53   0:00 /usr/sbin/smbd -D
root     21899  0.0  0.0 112368   840 pts/6    S+   16:53   0:00 grep -E smb|nmb

root@linux:/#

Complete current smb.conf configuration I use to make the Brother Printer DCP 1610W accesible via network share is here

This section needs updating as you can setup print server via samba print sharing just by uploading drivers.

When printing to windows printers in an NT domain using SMB the Device URI should use similar to:


smb://username:password@domain/server/printername


This allows Samba to authenticate against a domain controller for acces to the printer queue.

In my case as you can see in below smb.conf configuration I've configured Samba security = share which will allow anyone to access the samba server without authentication so you can omit  username:password@ part

One good way to determine the printername  (in case you are not sure of) is to use smbclient command line tool. computername refers to the name of the machine that shares the printer:


smbclient -L copmputername


computername is the name of the samba server machine or its IP address


E.g.
 

hipo@linux:~$ smbclient -L //192.168.0.1/
Enter Attitude's password:
Domain=[WORKGROUP] OS=[Unix] Server=[Samba 3.5.6]

        Sharename       Type      Comment
        ———       —-      ——-
        print$          Disk      Printer Drivers
        IPC$            IPC       IPC Service (pcfreak server)
        DCP1610W        Printer   DCP1610W
Domain=[WORKGROUP] OS=[Unix] Server=[Samba 3.5.6]

        Server               Comment
        ———            ——-
        PCFREAK              pcfreak server

        Workgroup            Master
        ———            ——-
        WORKGROUP            WORKGROUP


Check the ouput for entries of Type "Printer":


The resulting (Linux / Mac OS) Samba Share access URL from the output above would be

smb://192.168.0.1/DCP1610W


8. Adding Printer to your Windows machines to enable actual Remote Samba Sharing printing

Assuming you already know the Printer share name, here is what I needed to do to have the Printer Added on each of Windows Desktop PCs and Notebooks


Control Panel -> Devices and Printers -> Add a printer -> (Add a Network wireless or bluetooth printer)

Then instead of Searching the printer to click on:

The printer that I wasn't listed

add-samba-network-share-brother-dcp-1610w-printer-to-windows-7-machine-no-printer-found-from-add-printer

Then type in the URL or IP (as in my case) leading to the printer as you see in below screenshot:


9. Printer Samba Sharing Using Macintosh notebook as the Client and Debian as the Server


1. Assuming you have cups to set up the printer on Debian as described above.

2. On the Mac (OS X 10.4+) start Print and Fax from System Preferences. Use the + button to add a printer.

3. Look first in the "Default" tab. If the automagic printer-sharing has worked, and your Mac is connected to the local network properly, then the Debian-based printer should already be visible in the list.

Just select it and use the recommended print driver. If you face problems you can try to play with
Gutenprint Printer drivers to make it printing.

4. If your printer is not visible in the Default tab, then try adding it on the "IP" tab.

Pick IPP as the protocol, give the plain IP address of the server in the address box (in my case that's 192.168.0.1, and in the Queue box put
"printers/DCP1610W

Put whatever helps you identify the printer in the Name and Location boxes (fields), and choose a printer driver than matches Brother DCP1610W or with another printer installed whatever you used to set up the printer on Debian .
Finally Pray that God help you to make it work and press the Add button. If you prayed honestly and repenting for your sins perhaps you will have mercy and it will work, of course if not try to research online on how to fix it further by God's grace.

Note that making printing work on Mac is a little bit of tricky and it might cause you some extra effort / nerves to complete.


10. Some other Useful maintanance commands you might need in future CUPS Printer queue jobs maintance


For displaying or setting print queue options and defaults:

lpoptions -p <print_queue_name> -l

Stopping and starting print queues. Acceptance and rejection of jobs sent to a destination:
 

cupsdisable <print_queue_name>
cupsenable <print_queue_name>
cupsaccept <print_queue_name>
cupsreject <print_queue_name>


To Cancel all jobs on a destination and additionally delete job data files:

cancel -a <print_queue_name>
cancel -a -x <print_queue_name>

That's all folks, Thanks God the printer should be working. Enjoy!

How to fix upside-down / inverted web camera laptop Asus K51AC issue on Ubuntu Linux and Debian GNU / Linux

Monday, February 13th, 2012

Skype Video Inverted bat like linux screenshot

Does your camera show video correctly in cheese but shows captured video upside-down (inverted) in skype ?
This is an issue a friend of mine experienced on his Asus K51AC-SX037D laptop on both Ubuntu and Debian Linux.
As you can see in the picture above it is funny as with this bug the person looks like a batman 😉
As the webcam upside-down issue was present on both latest Ubuntu 11.10 and latest stable Debian Squeeze 6.02, my guess was other GNU / Linux rpm based distro like Fedora might have applied a fix to this weird Skype inverted video (bat human like) issue.
Unfortunately testing the webcam with Skype on latest both Fedora 16 and Linux Mint 12 appeared to produce the same webcam bug.

A bit of research for the issue online and try outs of a number of suggested methods to resolve the issue led finally to a work around, thanks to this post
Here is few steps to follow to make the webcam show video like it should:

1. Install libv4l-0 package

root@linux:~# apt-get --yes install libv4-0
...

Onwards to start skype directly from terminal and test the camera type:

hipo@linux:~$ LD_PRELOAD=/usr/lib/libv4l/v4l1compat.so skype

This is the work around for 32 bit Linux install, most people however will probably have installed 64 bit Linux, for 64bit Linux installs the above command should be little different:

hipo@linux:~$ LD_PRELOAD=/usr/lib32/libv4l/v4l1compat.so skype

Once skype is launched test the camera and see if the camera capture is now uninverted, through menus:

S -> Options -> Video Devices -> Test

Skype Options Video devices screenshot

2. Create a skype Wrapper script Launcher

To make skype launch everytime with exported shell variable:
LD_PRELOAD=/usr/lib32/libv4l/v4l1compat.so

A new skype wrapper bash shell script should be created in /usr/local/bin/skype , the file should contain:

#!/bin/sh
LD_PRELOAD=/usr/lib32/libv4l/v4l1compat.so
/usr/bin/skype

To create the script with echo in a root terminal issue;

root@linux:~# echo '#!/bin/sh' >> /usr/local/bin/skype
root@linux:~# echo 'LD_PRELOAD=/usr/lib32/libv4l/v4l1compat.so' >> /usr/local/bin/skype
root@linux:~# echo '/usr/bin/skype' >> /usr/local/bin/skype
root@linux:~# chmod +x /usr/local/bin/skype

3. Edit the Skype gnome menu to substitute /usr/bin/skype Skype Launcher with /usr/local/bin/skype

Gnome 2 has a handy menu launcher, allowing to edit and add new menus and submenus (menus and items) to the Application menu, to launch the editor one has to click over Applications with last mouse button (right button) and choose Edit Menus

GNOME Edit menus screenshot

The menu editor like the one in the below screenshot will appear:

GNOME 2 Menu Editor Screenshot

In the preceeding Launcher properties window, Command: skype has to be substituted with:

GNOME2 Skype screenshot Launcher properties

Command: /usr/local/bin/skype

For console freaks who doesn't want to bother in editting Skype Launcher via GUI /usr/share/applications/skype.desktop file can be editted in terminal. Inside skype.desktop substitute:

Exec=skype

with

Exec=/usr/local/bin/skype

Skype fixed inverted bat like screenshot

As one can imagine the upside-down video image in Skype is not a problem because of Linux, but rather another bug in Skype (non-free) software program.
By the way everyone, who is using his computer with Free Software operating system FreeBSD, Linux etc. knows pretty well by experience, that Skype is a very problematic software; It is often a cause for system unexpected increased system loads, problems with (microphone not capturing), camera issues, issues with pulseaudio, problem with audio playbacks … Besides the long list of bugs there are unexpected display bugs in skype tray icon, bugs in skype messanger windows and at some rare occasions the program completely hangs and had to be killed with kill command and re-launched again.

Another worrying fact is Skype's versions available for GNU / Linux and BSD is completely out of date with its "competitor" operating systems MS Windows, MacOS X etc.
For people like me and my friend who want to use free operating system the latest available skype version is not even stable … current version fod download from skype's website is (Skype 2.2Beta)!

On FreeBSD the skype situation is even worser, freebsd have only option to run Skype ver 1.3 or v. 2.0 at best, as far as I know skype 2.2 and 2.2beta is not there.

Just as matter of comparison the latest Skype version on Windows is 5.x. Windows release is ages ahead its Linux and BSD ver. From a functional point of view the difference between Linux's 2.x and Windows 5.x is not that much different, what makes difference is is the amount of bugs which Linux and BSD skype versions contain…
Skype was about 6 months ago bought by Microsoft, therefore the prognosis for Skype Linux support in future is probably even darker. Microsoft will not probably bother to release new version of Skype for their competitor free as in freedom OSes.

I would like to thank my friend and brother in Christ Stelian for supplying me with the Skype screenshots, as well as for being kind to share how he fixed his camera with me.