Posts Tagged ‘archive files’

Linux show largest sized packages / Which Deb, RPM Linux installed package use most disk space and How to Free Space for critical system updates

Sunday, January 12th, 2020

linux-show-largest-sized-packages-which-deb-rpm-linux-package-use-most-disk-space-to-free-space-for-critical-system-updates

A very common problem that happens on both Linux installed servers and Desktop Linux is a starting to fill / (root partition). This problem could happen due to several reasons just to point few of them out of my experience low disk space (ending free space) could be due to:

– Improper initial partitioning / bad space planning / or OS install made in a hurry (due to time constrains)
– Linux installed on old laptop machine with low Hard Disk Drive capacity (e.g. 80 Giga / 160 GB)
– Custom user partitioning on install time aiming for a small root partition originally and changing space requirements in time
– Due to increasing space taken by Linux updates / user stored files etc / distribution OS Level upgrades dist-upgrades.
– Improperly assigned install time partitions cause of lack of knowledge to understand how partitioning is managed.
– Due to install being made in a hurry

– Linux OS installed on a Cloud based VPN (e.g. running) in a Cloud Instance that is hosted in Amazon EC2, Linode, Digital Ocean, Hostgator etc.

So here is a real time situation that happened me many times, you're launching an apt-get upgrade / apt-get dist-upgrade or yum upgrade the packages are about to start downloading or downloaded and suddenly you get a message of not enough disk space to apply OS package updates …
That's nasty stuff mostly irritating and here there are few approaches to take.

a. perhaps easiest you can ofcourse extend the partition (with a free spaced other Primary or Extended partition) with something like:

parted (the disk partitioning manipulator for Linux), gparted (in case if Desktop with GUI / XOrg server running)

b. if not enough space on the Hard Disk Drive or SSD (Solid State Drive) and you have a budget to buy and free laptop / PC slot to place another physical HDD to clone it to a larger sized HDD and use some kind of partition clone tool, such as:

or any of the other multiple clone tools available in Linux.

But what if you don't have the option for some reason to extend the paritiotn, how can you apply the Critical Security Errata Updates issued to patch security vulnerabilities reported by well known CVEs?
Well you can start with the obvious easy you can start removing unnecessery stuff from the system (if home is also stored on the / – root partiiton) to delete something from there, even delete the /usr/local/man pages if you don't plan to read it free some logs by archiving purging logs from /var/log/* …

But if this is not possible, a better approach is simply try to remove / purge any .deb / .rpm whatever distro package manager packages that are not necessery used and just hanging around, that is often the case especially on Linux installed on Notebooks for a personal home use, where with years you have installed a growing number of packages which you don't actively use but installed just to take a look, while hunting for Cool Linux games and you wanted to give a try to Battle of Wesnoth  / FreeCIV / AlienArena / SuperTux Kart / TuxRacer etc.  or some GUI heavy programs like Krita / Inskape / Audacity etc.

To select which package might be not needed and just takes space hence you need to to list all installed packages on the system ordered by their size this is different in Debian based Linuces e.g. – Debian GNU / Linux / Ubuntu / Mint etc. and RPM based ones Fedora / CentOS / OpenSuSE


1. List all RPM installed packages by Size on CentOS / SuSE
 

Finding how much space each of the installed rpm packages take on the HDD and displaying them in a sorted order is done with:

rpm -qa –queryformat '%10{size} – %-25{name} \t %{version}\n' | sort -n

From the command above,  the '%10{size}' option aligns the size of the package to the right with a padding of 10 characters. The '%-25{name} aligns the name of the package to the left, padded to 25 characters. The '%{version} indicates the version and 'sort -n' flag sorts the packages according to size from the smallest to the largest in bytes.


2. List all installed RPM packages sorted by size on Fedora

Fedora has introduced the dnf package manager instead of yum, to get how much size individual rpm package occupies on system:

dnf info samba
Available Packages
Name        : samba
Arch        : x86_64
Epoch       : 2
Version     : 4.1.20
Release     : 1.fc21
Size        : 558 k
Repo        : updates
Summary     : Server and Client software to interoperate with Windows machines
URL         : http://www.samba.org/
License     : GPLv3+ and LGPLv3+
Description : Samba is the standard Windows interoperability suite of programs
            : for Linux and Unix.


To get a list of all packages on system with their size

dnf info * | grep -i "Installed size" |sort -n


3. List all installed DEB packages on Debian / Ubuntu / Mint etc. with dpkg / aptitude / apt-get and wajig


The most simple way to get a list of largest packages is through dpkg


# dpkg-query -Wf '${Installed-Size}\t${Package}\n' | sort -n
        brscan4
6       default-jre
6       libpython-all-dev
6       libtinfo-dev
6       python-all
6       python-all-dev
6       task-cinnamon-desktop
6       task-cyrillic
6       task-desktop
6       task-english
6       task-gnome-desktop
6       task-laptop
6       task-lxde-desktop
6       task-mate-desktop
6       task-print-server
6       task-ssh-server
6       task-xfce-desktop
8       mysql-client
8       printer-driver-all


207766    libwine
215625    google-chrome-stable
221908    libwine
249401    frogatto-data
260717    linux-image-4.19.0-5-amd64
262512    linux-image-4.19.0-6-amd64
264899    mame
270589    fonts-noto-extra
278903    skypeforlinux
480126    metasploit-framework


above cmd displays packages in size order, largest package last, but the output will include also size of packages, that used to exist,
have been removed but was not purged. Thus if you find  a package that is shown as very large by size but further dpkg -l |grep -i package-name shows package as purged e.g. package state is not 'ii' but 'rc', the quickest work around is to purge all removed packages, that are still not purged and have some configuration remains and other chunks of data that just take space for nothing with:

# dpkg –list |grep "^rc" | cut -d " " -f 3 | xargs sudo dpkg –purge


Be cautious when you execute above command, because if for some reason you uninstalled a package with the idea to keep old configuration files only and in case if you decide to use it some time in future to reuse already custom made configs but do run above purge commands all such package saved kept configs will disappear.
For people who don't want to mess up with, uninstalled but present packages use this to filter out ready to be purged state packages.

# dpkg-query -Wf '${db:Status-Status} ${Installed-Size}\t${Package}\n' | sed -ne 's/^installed //p'|sort -n


aptitude – (high level ncurses interface like to package management) can also be easily used to list largest size packages eating up your hard drive in both interactive or cli mode, like so:


# aptitude search –sort '~installsize' –display-format '%p %I' '~i' | head
metasploit-framework 492 MB
skypeforlinux 286 MB
fonts-noto-extra 277 MB
mame 271 MB
linux-image-4.19.0-6-amd64 269 MB
linux-image-4.19.0-5-amd64 267 MB
frogatto-data 255 MB
libwine 227 MB
google-chrome-stable 221 MB
libwine:i386 213 MB


  • –sort is package sort order, and ~installsize specifies a package sort policy.
  • installsize means 'sort on (estimated) installed size', and the preceding ~ means sort descending (since default for all sort policies is ascending).
  • –display-format changes the <you guessed :->. The format string '%p %I' tells aptitude to output package name, then installed size.
  • '~i' tells aptitude to search only installed packages.

How much a certain .deb package removal will free up on the disk can be seen with apt-get as well to do so for the famous 3D acceleration Graphic Card (enabled) or not  test game extremetuxracer

apt-get –assume-no –purge remove "texlive*" | grep "be freed" | 
   awk '{print $4, $5}'

Perhaps,  the easiest to remember and more human readable output biggest packages occupied space on disk is to install and use a little proggie called wajig to do so


# apt install –yes wajig


Here is how to pick up 10 biggest size packages.

root@jeremiah:/home/hipo# wajig large|tail -n 10
fonts-noto-cjk-extra               204,486      installed
google-chrome-stable               215,625      installed
libwine                            221,908      installed
frogatto-data                      249,401      installed
linux-image-4.19.0-5-amd64         260,717      installed
linux-image-4.19.0-6-amd64         262,512      installed
mame                               264,899      installed
fonts-noto-extra                   270,589      installed
skypeforlinux                      278,903      installed
metasploit-framework               480,126      installed


As above example lists a short package name and no description for those who want get more in depth knowledge on what exactly is the package bundle used for use:

# aptitude search –sort '~installsize' –display-format '%30p %I %r %60d' '~i' |head


%30p %I %r %60d display more information in your format string, or change field widths, enhanced format string

Meaning of parameters is:

  • %30p : package name in field width=30 char
  • %I : estimated install size
  • %r : 'reverse depends count': approximate number of other installed packages which depend upon this package
  • %60d : package's short description in field width=60 char

wajig is capable is a python written and idea is to easify Debian console package management (so you don't have to all time remember when and with which arguments to use apt-get / apt-cache etc.), below is list of commands it accepts.


root@jeremiah:/home/hipo## wajig commands
addcdrom           Add a Debian CD/DVD to APT's list of available sources
addrepo            Add a Launchpad PPA (Personal Package Archive) repository
aptlog             Display APT log file
autoalts           Mark the Alternative to be auto-set (using set priorities)
autoclean          Remove no-longer-downloadable .deb files from the download cache
autodownload       Do an update followed by a download of all updated packages
autoremove         Remove unused dependency packages
build              Get source packages, unpack them, and build binary packages from them.
builddeps          Install build-dependencies for given packages
changelog          Display Debian changelog of a package
clean              Remove all deb files from the download cache
contents           List the contents of a package file (.deb)
dailyupgrade       Perform an update then a dist-upgrade
dependents         Display packages which have some form of dependency on the given package
describe           Display one-line descriptions for the given packages
describenew        Display one-line descriptions of newly-available packages
distupgrade        Comprehensive system upgrade
download           Download one or more packages without installing them
editsources        Edit list of Debian repository locations for packages
extract            Extract the files from a package file to a directory
fixconfigure       Fix an interrupted install
fixinstall         Fix an install interrupted by broken dependencies
fixmissing         Fix and install even though there are missing dependencies
force              Install packages and ignore file overwrites and depends
hold               Place packages on hold (so they will not be upgraded)
info               List the information contained in a package file
init               Initialise or reset wajig archive files
install            Package installer
installsuggested   Install a package and its Suggests dependencies
integrity          Check the integrity of installed packages (through checksums)
large              List size of all large (>10MB) installed packages
lastupdate         Identify when an update was last performed
listall            List one line descriptions for all packages
listalternatives   List the objects that can have alternatives configured
listcache          List the contents of the download cache
listcommands       Display all wajig commands
listdaemons        List the daemons that wajig can start, stop, restart, or reload
listfiles          List the files that are supplied by the named package
listhold           List packages that are on hold (i.e. those that won't be upgraded)
listinstalled      List installed packages
listlog            Display wajig log file
listnames          List all known packages; optionally filter the list with a pattern
listpackages       List the status, version, and description of installed packages
listscripts        List the control scripts of the package of deb file
listsection        List packages that belong to a specific section
listsections       List all available sections
liststatus         Same as list but only prints first two columns, not truncated
localupgrade       Upgrade using only packages that are already downloaded
madison            Runs the madison command of apt-cache
move               Move packages in the download cache to a local Debian mirror
new                Display newly-available packages
newdetail          Display detailed descriptions of newly-available packages
news               Display the NEWS file of a given package
nonfree            List packages that don't meet the Debian Free Software Guidelines
orphans            List libraries not required by any installed package 
policy             From preferences file show priorities/policy (available)
purge              Remove one or more packages and their configuration files
purgeorphans       Purge orphaned libraries (not required by installed packages)
purgeremoved       Purge all packages marked as deinstall
rbuilddeps         Display the packages which build-depend on the given package
readme             Display the README file(s) of a given package
recdownload        Download a package and all its dependencies
recommended        Display packages installed as Recommends and have no dependents
reconfigure        Reconfigure package
reinstall          Reinstall the given packages
reload             Reload system daemons (see LIST-DAEMONS for available daemons)
remove             Remove packages (see also PURGE command)
removeorphans      Remove orphaned libraries
repackage          Generate a .deb file from an installed package
reportbug          Report a bug in a package using Debian BTS (Bug Tracking System)
restart            Restart system daemons (see LIST-DAEMONS for available daemons)
rpm2deb            Convert an .rpm file to a Debian .deb file
rpminstall         Install an .rpm package file
search             Search for package names containing the given pattern
searchapt          Find nearby Debian package repositories
show               Provide a detailed description of package
sizes              Display installed sizes of given packages
snapshot           Generates a list of package=version for all installed packages
source             Retrieve and unpack sources for the named packages
start              Start system daemons (see LIST-DAEMONS for available daemons)
status             Show the version and available versions of packages
statusmatch        Show the version and available versions of matching packages
stop               Stop system daemons (see LISTDAEMONS for available daemons)
tasksel            Run the task selector to install groups of packages
todo               Display the TODO file of a given package
toupgrade          List versions of upgradable packages
tutorial           Display wajig tutorial
unhold             Remove listed packages from hold so they are again upgradeable
unofficial         Search for an unofficial Debian package at apt-get.org
update             Update the list of new and updated packages
updatealternatives Update default alternative for things like x-window-manager
updatepciids       Updates the local list of PCI ids from the internet master list
updateusbids       Updates the local list of USB ids from the internet master list
upgrade            Conservative system upgrade
upgradesecurity    Do a security upgrade
verify             Check package's md5sum
versions           List version and distribution of given packages
whichpackage       Search for files matching a given pattern within packages


4. List installed packages order by size in Arch Linux

ArchLinux is using the funny named package manager – pacman (a nice prank for the good old arcade game).
What is distinctive of pacman uses libalpm (Arch Linux Package Management (ALPM) library) as a back-end to perform all the actions.


# pacman -Qi | awk '/^Name/{name=$3} /^Installed Size/{print $4$5, name}' | sort -hr | head -25
296.64MiB linux-firmware
144.20MiB python
105.43MiB gcc-libs
72.90MiB python2
66.91MiB linux
57.47MiB perl
45.49MiB glibc
35.33MiB icu
34.68MiB git
30.96MiB binutils
29.95MiB grub
18.96MiB systemd
13.94MiB glib2
13.79MiB coreutils
13.41MiB python2-boto
10.65MiB util-linux
9.50MiB gnupg
8.09MiB groff
8.05MiB gettext
7.99MiB texinfo
7.93MiB sqlite
7.15MiB bash
6.50MiB lvm2
6.43MiB openssl
6.33MiB db


There is another mean to list packages by size using a ArchLinux tool called pacgraph


# pacgraph -c | head -25

Autodetected Arch.
Loading package info
Total size: 1221MB
367MB linux
144MB pacgraph
98MB cloud-init
37MB grub
35MB icu
34MB git
31698kB binutils
19337kB pacman
11029kB man-db
8186kB texinfo
8073kB lvm2
7632kB nano
7131kB openssh
5735kB man-pages
3815kB xfsprogs
3110kB sudo
3022kB wget
2676kB tar
2626kB netctl
1924kB parted
1300kB procps-ng
1248kB diffutils


4. Debian Goodies


Most debian users perhaps never hear of debian-goodies package, but I thought it is worthy to mention it as sooner or later as a sysadmin or .deb based Desktop user it might help you somewhere.
 

Debian-goodies is sall toolbox-style utilities for Debian systems
 These programs are designed to integrate with standard shell tools,
 extending them to operate on the Debian packaging system.

 .
  dglob  – Generate a list of package names which match a pattern
           [dctrl-tools, apt*, apt-file*, perl*]
  dgrep  – Search all files in specified packages for a regex
           [dctrl-tools, apt-file (both via dglob)]
 .
 These are also included, because they are useful and don't justify
 their own packages:
 .
  check-enhancements
 
           – find packages which enhance installed packages [apt,
                dctrl-tools]
  checkrestart
 
           – Help to find and restart processes which are using old versions
               of upgraded files (such as libraries) [python3, procps, lsof*]
  debget     – Fetch a .deb for a package in APT's database [apt]
  debman     – Easily view man pages from a binary .deb without extracting
               [man, apt* (via debget)]
  debmany    – Select manpages of installed or uninstalled packages [man |
               sensible-utils, whiptail | dialog | zenity, apt*, konqueror*,
               libgnome2-bin*, xdg-utils*]
  dhomepage  – Open homepage of a package in a web browser [dctrl-tools,
               sensible-utils*, www-browser* | x-www-browser*]
  dman       – Fetch manpages from online manpages.debian.org service [curl,
               man, lsb-release*]
  dpigs      – Show which installed packages occupy the most space
               [dctrl-tools]
  find-dbgsym-packages
             – Get list of dbgsym packages from core dump or PID [dctrl-tools,
               elfutils, libfile-which-perl, libipc-system-simple-perl]
  popbugs    – Display a customized release-critical bug list based on
               packages you use (using popularity-contest data) [python3,
               popularity-contest]
  which-pkg-broke
             – find which package might have broken another [python3, apt]
  which-pkg-broke-build
             – find which package might have broken the build of another
               [python3 (via which-pkg-broke), apt]

Even simpler by that is to use dpigs shell script part of the debian-goodies package which will automatically print out the largest packages.

dpigs command output is exactly the same as 'dpkg-query -Wf '${Installed-Size}\t${Package}\n' | sort -nr | head', but is useful cause you don't have to remember that complex syntax.


5. Checking where your space is gone in a Spacesniffer like GUI manner with Baobab


In my prior article Must have software on a new installed Windows 2 of the  of the precious tools to set are Spacesniffer and WinDirStat.
Windows users will be highly delighted to know that SpaceSniffer equivallent is already present on Linux – say hello baobab.
Baobab
is simple but useful Graphic disk usage overview program for those who don't want to mess to much with the console / terminal to find out which might be the possible directory candidate for removal. It is very simplistic but it does well what it is aimed for, to install it on a Debian or .deb based OS.

# apt install –yes baobab
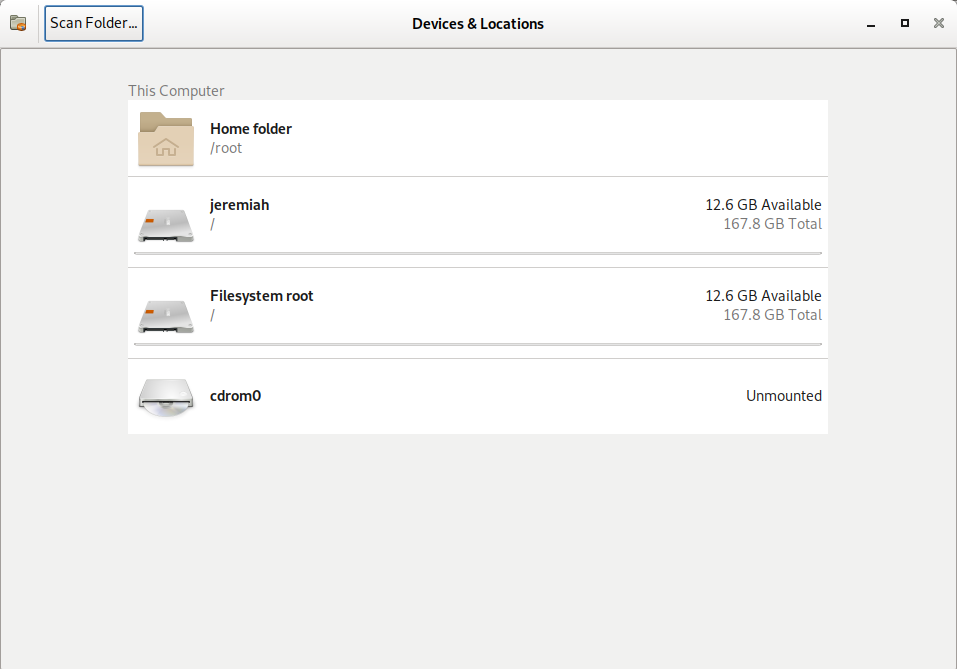

baobab-entry-screen-debian-gnu-linux-screenshot

baobab Linux Hard Disk Usage Analyzer for GNOME. – It can easily scan either the whole filesystem or a specific user-requested branch (Iocal or remote)
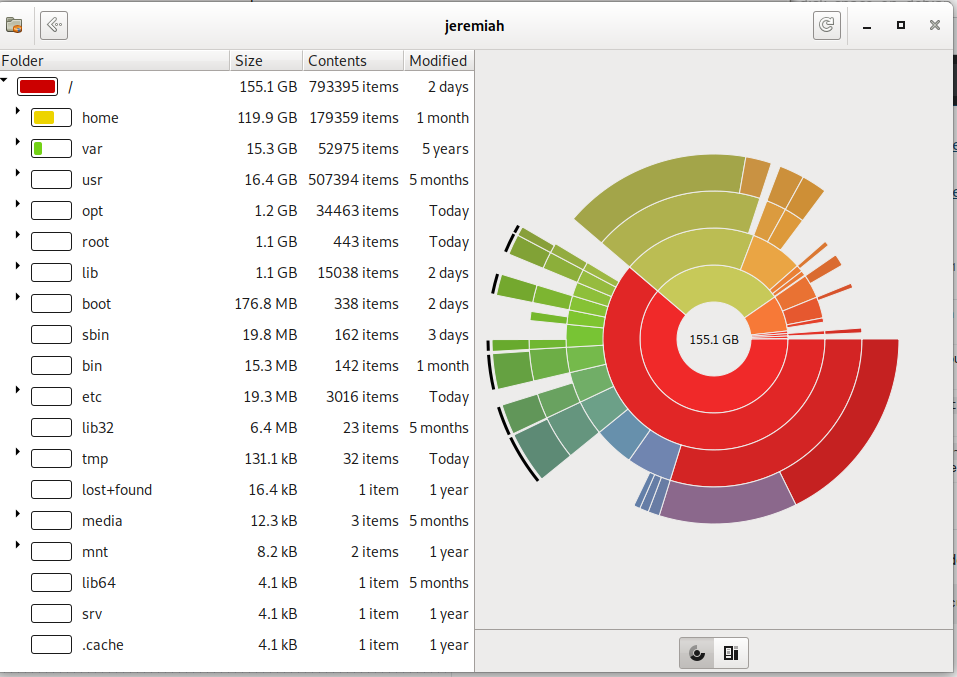
 

baobab-entry-screen-debian-gnu-linux-directories-taking-most-space-pie-screenshot

Baobab / (root) directory statistics Rings Chart pie
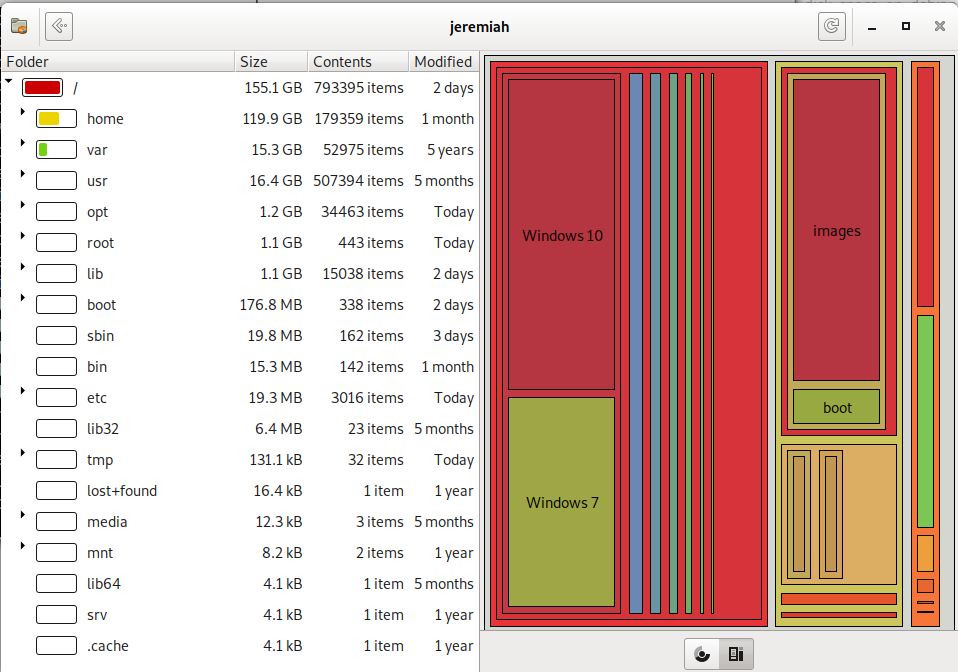
 

baobab-entry-screen-debian-gnu-linux-disk-space-by-size-visualized-screenshot

baobab – Treemap Chart for directory usage sorted by size on disk 

!!! Note that before removing any files found as taking up too much space with baobab – make sure this files are not essential parts of a .deb package first, otherwise you might break up your system !!!

KDE (Plasma) QT library users could use Qdirstat instead of baobab 
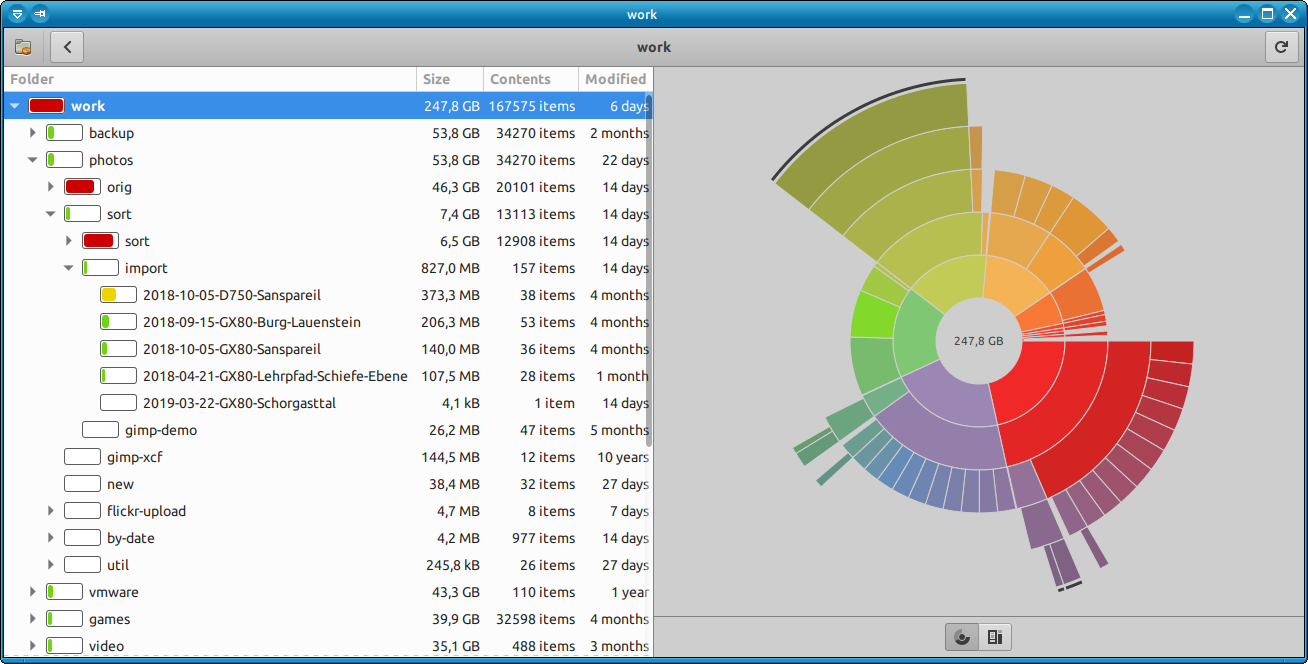
qdirstat-on-gnu-linur checking what is the disk space bottleneck qdirstat KDE


6. Use ncdu or duper perl script tool to generate directory disk usage in ASCII chart bar

ncdu and duper are basicly the same except one is using ncurses and is interactive in a very simplistic interface with midnight commander.
 

# apt install –yes ncdu
# ncdu /root
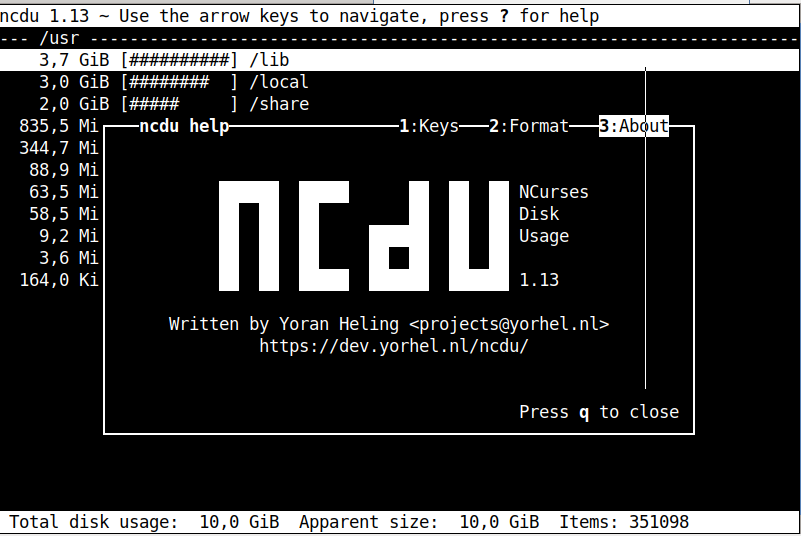

ncdu-gnu-linux-debian-screenshot


# apt-get install –yes durep
# durep -td 1 /usr

[ /usr    14.4G (0 files, 11 dirs) ]
   6.6G [#############                 ]  45.54% lib/
   5.5G [###########                   ]  38.23% share/
   1.1G [##                            ]   7.94% bin/
 552.0M [#                             ]   3.74% local/
 269.2M [                              ]   1.83% games/
 210.4M [                              ]   1.43% src/
  88.9M [                              ]   0.60% libexec/
  51.3M [                              ]   0.35% sbin/
  41.2M [                              ]   0.28% include/
   8.3M [                              ]   0.06% lib32/
 193.8K [                              ]   0.00% lib64/


Conclusion


In this article, I've shortly explained the few approach you can take to handle low disk space preventing you to update a regular security updates on Linux.
The easiest one is to clone your drive to a bigger (larger) sized SATA HDD or SDD Drive or using a free space left on a hard drive to exnted the current filling up the root partition. 

Further, I looked through the common reasons for endind with a disk being low spaced and a quick work around to free disk space through listing and purging larges sized package, this is made differently in different Linux distributions, because different Linux has different package managers. As I'm primary using Debian, I explained thoroughfully on how this is achieved with apt-get / dpkg-query / dpkg / aptitude and the little known debian-goodies .deb package manager helper pack. For GUI Desktop users there is baobab / qdirstat. ASCII lovers could enjoy durep and ncdu.

That's all folks hope you enjoyed and learned something new. If you know of other cool tools or things this article is missing please share.

Install and Run Multiple Tomcat and JAVA server instances on single Windows server Howto

Friday, June 17th, 2016

tomcat-windows-install-multiple-tomcats-on-one-single-windows-logo
I've had a task at my work place to install Multiple Tomcat servers on Windows 2012 Server R2 the task seems trivial however I've faced few minor issues and the few searches in Google returned very few articles discussing the topic and this give me the idea that it might be helpful to others to come up with my own article as this might save time for those Linux guys who need to install Multiple Tomcat instances on the same Windows server without spending too much time to dig into the arcane winblows.

I stumbled on some issues during installation  thus took the time to systemize below shortly how I managed to run 2 Tomcat servers on One Windows 2012 R2 machine.
 

First thing to do is to obtain latest compiled Tomcat server archive from Tomcat's official download page here.

Latest Tomcat stable release as of time of writting this article is 7.0.69, so I've downloaded 64 Bit archive (as the server is running X64 Operating system) and unarchived it twice on the Install server under 2 separate directory locations under:


D:\Tomcat\Tomcat_Instance-1


and


D:\Tomcat\Tomcat_Instance-2


Copy of the 7.0.69 X86 tomcat zip archive is here and X64 bit tomcat 7.0.69 is here

Once the files are properly untarred I also needed to download also Java as the WAR application supposed to run on the Windows machine had as requirement Java JDK 8.

Downloading Java is a trivial task, however in my case the server used to be in DMZ (Demiliterized Zone) / Firewalled network and hence instead of using the default Java installer provided from Oracle website which is trying to download from Internet, I had instead to download and use the Offline current JAVA 8u91 version.
Just for sake of some convenience I've made a mirrored version of X86 JAVA 8 (8u91) is here and JAVA 8u91 X64 version here


install-Java-JDK-and-JRE-8-on-Microsoft-Windows-howto

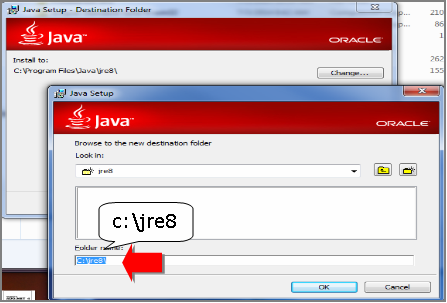
JAVA JDK install is a trivial task just run the isntaller set the proper locations initially for JDK base folder in my case this was:


D:\Java\jdk


and later throughout during install, I was asked also to fill in full path location for JRE, in my case this was


D:\Java\jre


It was a little bit surprising for me that JRE install path had to be entered and because I was not careful enough I had twice entered the same path for both JRE and JDK, i.e. entered on both prompts:


D:\Java


This caused issues and a messed Java install but I realized that after the 3rd re-install of Java when I decided to also read instead of by habit click Next / Next and Complete the install as used to be in the good old days of Windows XP and Windows 98 🙂

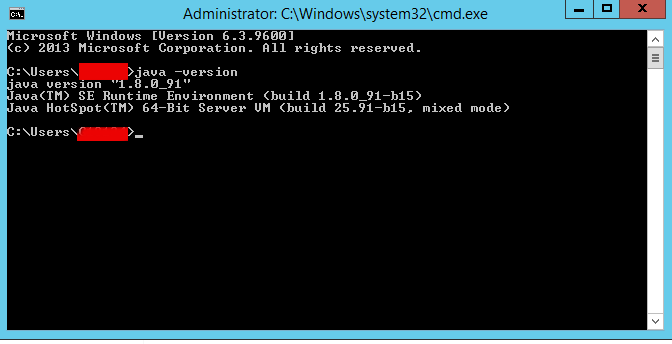
Once Java set up correctly I've tested it with:


C:\Users\georgi> java -version


test-java-version-on-microsoft-windows-command-howto-screenshot


It is also necessery to set properly following 2 JAVA command line environment variables:
 

JAVA_HOME
JRE_HOME


On the logged in user Environment Variables with which Tomcat will be running on how to do that check my previous article how to add Environment Variables on Windows


Make sure you have the following 2 environment variables set upped:


JAVA_HOME=D:\Java\jdk


JRE_HOME=D:\Java\jre


For one time set (assuming Java is installed) under D:Javajre and D:Javajdk, you will need to type in command prompt:

set JAVA_HOME=D:\Java\jdk

set JRE_HOME=D:\Java\jre

Once assured Java is running fine I proceeded to run the Tomcat serevrs, in order to make them working it was necessery to change all coinciding Port names under:


conf/server.xml


because if there are coinciding ports (assuming that like me you're trying to run both Tomcat under the same IP address), the servers will fail to run because they're trying to bind under the same Port TCP addresses.

Assuming that the tomcat archive files are copied from .zip into D:TomcatTomcat_Instance-1 and D:TomcatTomcat_Instance-2 folders and you have in each of the 2 the following directory structure:


    /bin : This directory contains the startup and shutdown scripts for both Windows and Linux.
    /conf : This directory contains the main configuration files for Tomcat. The two most important are the server.xml and the global web.xml .
    /server : This directory contains the Tomcat Java Archive files.
    /lib : This directory contains Java Archive files that Tomcat is dependent upon.
    /logs : This directory contains Tomcat’s log files.
    /src : This directory contains the source code used by the Tomcat server. Once Tomcat is released, it will probably contain interfaces and abstract classes only.
    /webapps : All web applications are deployed in this directory; it contains the WAR file.
    /work : This is the directory in which Tomcat will place all servlets that are generated from JSPs. If you want to see exactly how a particular JSP is interpreted, look in this directory.


You will need to edit server.xml in both of the Tomcats and make sure the configuration for ports is not coinciding, i.e., I've changed the following configurations for Tomcat_Instance-2 installation:


    Connector Port : This is the port where Apache Tomcat listen for the HTTP requests. Default port is 8080, I've changed this to 8089 for second Tomcat server
    Shutdown Port : This port is used when we try to shutdown the Apache Tomcat Server. Default port is 8005 so changed that to 8006 in Tomcat_Instance-2
    AJP (Apache JServ Protocol) Connector Port : The Apache JServ Protocol (AJP) is a binary protocol that can conduct inbound requests from a web server through to an application server that sits behind the web server.
I've commented out the configuration for AJP completely and used for my custom needs the following server.xml configuration:

<Connector port="11111" address="10.251.27.24" protocol="AJP/1.3" enableLookups="false"/>

    Redirect Port : Any redirection happening inside Apache Tomcat will happen through this port. In Apache TOMCAT there are two instance where redirect Port is mentioned. First one is for the Apache TOMCAT server and other one is for the AJP port. Default here is port 8443 so changed that one to to listen to 8444 instead.


Another thing necessery to do is to create setenv.bat file under both D:\TomcatTomcat_Instance-1\bin and D:\Tomcat\Tomcat_Instance-2\bin with following content:
 

set JRE_HOME=D:\java\jre
set JAVA_HOME=d:\java\jdk
exit /b 0


The quickest way to do it without bothering with Notepad text editor is by issuing:


cd tomcat\Tomcat_Instance1\bin
echo set JRE_HOME=D:\java\jre > setenv.bat
echo set JAVA_HOME=D:javajdk >> setenv.bat


cd tomcat\Tomcat_Instance2\bin
echo set JRE_HOME=D:\java\jre > setenv.bat
echo set JAVA_HOME=D:\java\jdk >> setenv.bat


The setenv.sh is a standard variables file read by Tomcat on Instance start up time
 

Next part of Tomcat installation is to install each of the 2 instances after defining CATALINA_BASE to point to first and second Tomcat instance directories, e.g open a Command Prompt (cmd.exe) and run there:


set CATALINA_BASE=D:\Tomcat\Tomcat_Instance-1

C:|> d:

D:|> cd Tomcat\Tomcat_Instance-1\bin


D:Tomcat\Tomcat_Instance-1\bin> service install Tomcat_Instance-1


You will get output like:


Using CATALINA_BASE:   " D:\Tomcat\Tomcat_Instance-1"
Using CATALINA_HOME:   " D:\Tomcat\Tomcat_Instance-1"
Using CATALINA_TMPDIR: " D:\TomcatTomcat_Instance-1\temp"
Using JRE_HOME:        "D:\java\jre"
Using CLASSPATH:       "D:\Tomcat\Tomcat_Instance-1\bin\bootstrap.jar; D:\Tomcat\Tomcat_Instance-1\bin\tomcat-juli.jar"


Then for the second Tomcat server instance run in command prompt:


set CATALINA_BASE=D:\Tomcat\Tomcat_Instance-2

d:

cd Tomcat\Tomcat_Instance-2\bin
service install Tomcat_Instance-2

Using CATALINA_BASE:   " D:\Tomcat\Tomcat_Instance-2"
Using CATALINA_HOME:   " D:\Tomcat\Tomcat_Instance-2"
Using CATALINA_TMPDIR: " D:\Tomcat\Tomcat_Instance-2\temp"
Using JRE_HOME:        "D:\java\jre"
Using CLASSPATH:       "D:\Tomcat\Tomcat_Instance-1\bin\bootstrap.jar; D:\TomcatTomcat_Instance-2\bin\tomcat-juli.jar"

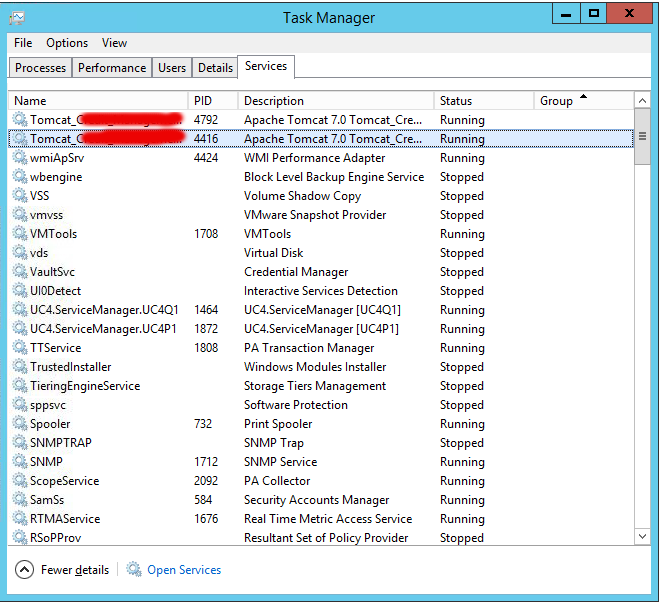
windows-running-two-tomcat-instances-on-the-same-single-server-screenshot


Here is all the service.bat batch file parameters:


D:\Tomcat\Tomcat_Instance-11\bin>service.bat /
?
Unknown parameter "/?"


Usage: service.bat install/remove [service_name] [/user username]


To test both Tomcat servers where they run simultaneously without issues, I run in 2 separate command prompts – opened (cmd.exe) two times and run in each of them:

What this little command does is uses Tomcat7.exe command to Add / Remove / Modify the Tomcat instance into Windows Services, the same can be happily done also with the good old
sc (service configure) windows command.


D:

cd Tomcat\Tomcat_Instance-1\bin\startup.bat

D:

cd Tomcat\Tomcat_Instance-2\bin\startup.bat
 

Both executed without errors in command line and to stop them I've pressed the usual CTRL+C.
To make sure once again both server instances ran wihtout errors, I've checked in D:TomcatTomcat_Instance-{1,2}logs/catalina*.log and in both of them all looked fine.
Another good check if you want to be 10000% sure Tomcat is running is to look up for Tomcat listening on above configured ports, for example run below in cmd:


D:Tomcat> netstat -a|findstr "8080"


I've also used the 2 following command to set up proper Services description for both of services:


D:\Tomcat\Tomcat_Instance-1\tomcat7 //US//Tomcat_Instance1 –Description="Apache Tomcat Server – Tomcat-Instance1.my-site.com"

D:\Tomcat\Instance_Instance-2\tomcat7 //US//Tomcat_Instance2 –Description="Apache Tomcat Server – Tomcat-Instance2.my-site.com "


A very helpful resource during the Apache (Windows Service) instance install / setup /modification that helped me is on Tomcat's official site here
 

N! B! Very important note to make here for anyone experiencing strange issues when trying to add multiple issues is below:

I've experienced some issues while trying to add the 2 Tomcat servers into Windows services initially with tomcat7.exe command like so:

Trying installing Tomcat71 service with cmd:
 

 tomcat7 //IS//Tomcat71 –DisplayName="Apache Tomcat 7" ^
     –Install="D:\Tomcat\Tomcat_Instance-1\bin\tomcat7.exe" –Jvm=auto ^
     –StartMode=jvm –StopMode=jvm ^
     –StartClass=org.apache.catalina.startup.Bootstrap –StartParams=start ^
     –StopClass=org.apache.catalina.startup.Bootstrap –StopParams=stop


And Tomcat72 instance with cmd:
 

 tomcat7 //IS//Tomcat71 –DisplayName="Apache Tomcat 7" ^
     –Install="D:\Tomcat\Tomcat_Instance-2\bin\tomcat7.exe" –Jvm=auto ^
     –StartMode=jvm –StopMode=jvm ^
     –StartClass=org.apache.catalina.startup.Bootstrap –StartParams=start ^
     –StopClass=org.apache.catalina.startup.Bootstrap –StopParams=stop


I've tried multiplet imes to Add and remove the Tomcat71 and Tomcat72 Windows service names (with) Tomcat DS (Delete Service)
 

tomcat7 //DS/Tomcat71
tomcat7 //DS/Tomcat72


And strangely the two instances were continuously crashing when I tried to start them (with Properties button and Start instruction) from Windows Task Manager (taskmgr.exe) -> Services

Finally I realized the issue is caused by some problems that somehow occured with Windows Service Names Tomcat71 and Tomcat72 by simply readding the two instances under another name the instances stopped crashing and all worked thanks to help of colleague Anatoliy who pointed me tot he problem by trying to install his own instances under a different service name).

Thanks God finally the 2 instances run fine !


How to split / rar in parts large data archive files on Linux and Windows – Transfer big files across servers located in DMZ rescticted areas

Friday, November 28th, 2014

how-to-split-rar-in-parts-large-data-archive-files-on-Linux-and-Windows-Transfer-big-files-across-servers-in-firewalled-restricted-areas

I was working on a Application Migration Project whose goal was to Install a business application called Asset Guardian and then move current company Data from the old server to the new AppServer.
F
or that purpose the company vendor Asset Guardian shipped to a Public access FTP, a huge (12GB) ZIP archive file which had to be transferred into a well secured DMZ-ed corporation network with various implemented Traffic Shaping Network policies, a resctrictive firewall allowing access to Internal Network only and to Few (Restrictive configured) Proxy Server IPs on port 80 and 8080.

One of the proxy servers allowed access to the Internet and I set this one and tried downloading the Huge Archive file  with the Windows 2012 server default browser Internet Explorer 10, though the download started it kept slow between ~ 300 – 500KB sec and when reached 3.4GB download failed. I tried resuming the download but as the remote Public FTP server where files resides doesn't support FTP RESUME function.
I thought it might be that Internet Explorer is badly managing the download so, I go forward and installed Portable Firefox (mirrored version 33.1.1 is here). Re-running download with firefox also failed, so the next logical step was for me to try downloading with Windows version of Wget (Wget) and with Portable Free Download Manager 3.9.14.1481 (mirrored here) using both of them was unable to complete download (probably due to firewall or Proxy screwing the proxy inspected traffic) thus I had to look for another way to copy the enormous archive into the company network.

To get around the issue I tried to download the file from FTP to another Server running Apache and tried re-downloading the big file archive (Asset-Guardian-data.zip) from Apache Webserver via HTTP protocol, this download method didn't work neither using plain HTTP protocol for download when downloaded file reached (3.4GB), thus I realized this is due to restrictive Proxy servers (dropping file downloads) bigger than  3.4GBs).

Then to be able to transfer the huge 12GB file, it seems the only left option was to to chop the big file on smaller file chunks and transfer them one by one.
In my case I had the Asset-Guardian-Files.zip transferred already to the Apache (Webserver) host which is running Linux so basicly the task was to Transfer Big archive file between the SuSE Linux Enterprise Server (SLES) 11 and Windows 2012 Server.

Quickesy way to do that is by using UNIX split command, i.e.:

split -b 1024m Asset-Guardian-Files.zip


The outputted files each 1GB are with naming (xaa, xab, xac, xad, xae, xaf, gaf etc.) in same folder where split command is run:

To later merge the files on the Windows 2012 server (copy) command is used:

copy /b file1 + file2 + file3 + file4 filetogether


In my case the command to issue on Win 2012 server was:

copy /b xaa + xab + xac + xae + xae + xaf + xaf + xag xah xai xaj xak Asset-Guardian-files.zip


This method to chop and transfer the file is most simple one and it doesn't require the two servers to have WinRAR or Console RAR / unrar installed.

If instead of Copy Huge File from Linux -> Windows host you need to copy too big file (lets say 100GB) between 2 Windows servers (Windows server host A and Windows server Host B – both situated in different firewall corporate networks) you will need to download to Win Host A and use Windows UNIX split equivalent tool called sfk (The Swiss File Knife) , sfk has port also for Mac OS so in case of need for need for migrating huge archive file from Mac OS X host it will serve as Linux's split – I've made SFK (current version) mirror here.

Another way to cut the 12GB file in parts and transfer to destination host via HTTP was to use rar (on the Linux host), then download the file on Win 2012 server and use Winrar Portable Free to extract the multiple files:

To make archive separate in parts set out to certain size out of a huge file with rar on Linux use:

cd /var/www
rar -a -v1000000k Asset_Guardian_Files.splitted.rar /var/www/Asset_Guardian_Files.zip

10000000Kbs = 10000000/1024 = 976MBs, hence rar produced parts will be sized to 976MB rar parts.

To find out archives check for *splitted*.rar in your /var/www

ls -al /var/www/*splitted*.rar
-rw-r–r– 1 root root 1048576 ное 28 18:34 Asset-Guardian-Files.splitted.part1.rar
-rw-r–r– 1 root root 1048576 ное 28 18:34 Asset-Guardian-Files.splitted.part2.rar
-rw-r–r– 1 root root 1048576 ное 28 18:34 Asset-Guardian-Files.splitted.part3.rar
-rw-r–r– 1 root root 1048576 ное 28 18:34 Asset-Guaridna-Filse.splitted.part4.rar


Then to download the files M$ Win 2012 server IE (http://my-linux-host.com/Asset-Guardian-Files.splitted.part1.rar, http://my-linux-host.com/Asset-Guardian-Files.splitted.part2.rar. etc.)

Thanks God, Problem Solved 🙂

Use rsync to copy from files from destination host to source host (rsync reverse copy) / few words on rsync

Monday, January 9th, 2012

I've recently had to set up a backup system to synchronize backup archive files between two remote servers and as I do usually with this situation I just set up a crontab job to periodically execute rsync to copy data from source server to the destination server . Copying SRC to DEST is the default behaviour rsync uses, however in this case I had to copy from the destination server to the source server host (in other words sync files the reversely.

The usual way to copy with rsync via SSH (from SRC to DEST) is using a cmd line like:

debian:~$ /usr/bin/rsync -avz -e ssh backup-user@xxx.xxx.xxx.xxx:/home/backup-user/my-directory .

Where the xxx.xxx.xxx.xxx is my remote server IP with which files are synched.
According to rsync manual, the proposed docs SYNOPSIS is in the format;
Local: rsync [OPTION…] SRC… [DEST

Obviusly the default way to use rsync is to copy source to destination which I used until now, but in this case I had to the other way around and copy files from a destination host to the source server. It was logical that swapping the SRC and DEST would complete my required task. Anyways I consulted with some rsync gurus in irc.freenode.net , just to make sure it is proper to just swap the SRC, DEST arguments.
I was told this is possible, so I swapped args;

debian:~$ /usr/bin/rsync -avz -e ssh . backup-user@xxx.xxx.xxx.xxx:/home/backup-user/my-directory
...

Surprisingly this worked 😉 Anyways I was adviced by by a good guy nick named scheel , that putting -e ssh to command line is generally unnecessery except if there is no some uncommon used SSH port over which the data is transferred. An example case in which -e 'ssh is necessery would be if transferring via lets say SSH port 1234;

rsync -avz -e 'ssh -p1234' /source user@host:/dest

In all other cases omitting '-e ssh' is better as '-e ssh' is rsync default. Therefore my final swapped line I put in cron to copy from a destinatio to source host with rsync looked like so:

05 03 2 * * /usr/bin/ionice -c 3 /usr/bin/rsync -avz my-directory backup-user@xxx.xxx.xxx.xxx:/home/backup-user/ >/dev/null 2>&1