Posts Tagged ‘remote server’

How to start Syslog ( Syslog-ng ) on IBM AIX

Thursday, October 20th, 2022

how-to-enable-syslog-ng-on-ibm-aix-unix-know-AIX-logo.svg

Syslog-ng is a system logging application, which can be a replacement of the default syslog. With syslog-ng, the log messages can be sent in an ecrypted/secure channel to a remote server. If the central log server or the network connection becomes unavailable syslog-ng will store messages on the local hard disk.

The syslog-ng application automatically sends the stored messages to the server when the connection is reestablished, in the same order the messages were received. The disk buffer is persistent – no messages are lost even if syslog-ng is restarted. (Another possibility to send those messages to a secondary server.)

syslog-ng can filter log messages and select only the ones matching certain criteria, but it cannot interpret and analyze the meaning behind the messages. It can receive messages from files, remote hosts, and other sources, and these are sent to one or more destinations (files, remote hosts..),

It has a server – client model, here only syslog-ng client informations will be described (syslog-ng server has not been tested, only client, which were sending messages to a remote server (qradar).)

One missing feature of syslog-ng, that it cannot rotate logs by itself. For log rotation an external tool like logrotate needs to be used.


1. Install / Uninstall syslog-ng on AIX


1.1. Install syslog-ng on AIX
 

After downloading the syslog-ng installer package, we have 2 options
– run ./syslog-ng-<edition>-<version>-<OS>-<platform>.run script, or
– install as an rpm package: rpm -i syslog-ng-premium-edition-<version>-<OS>-<arch>.rpm

During install, the default syslogd will be replaced automatically by syslog-ng (no parallel operation is possible).


1.2. Uninstall syslog-ng on AIX
 

If the .run installer has been used: /opt/syslog-ng/bin/uninstall.sh (The uninstall script will automatically restore the syslog daemon used before installing syslog-ng.)
If the .rpm package has been used: rpm -e syslog-ng-premium-edition (with rpm, it does not restore the syslog daemon used before syslog-ng).


AIX is a custom and non-free OS if you had to deal with it you might might ponder how to stop / start syslog-ng.
The paths to binaries on AIX
The configuration is not universal, but represents the GEK server.

2. Set Automatic start of syslog-ng on AIX

Enable Start from /etc/tcpip:

start /opt/freeware/sbin/syslog-ng "$src_running"


3. Check syslog-ng configuration is correct
 

Configuration could be under separate locations but the most likely ones for  syslog-ng.conf and license.txt files are located in the
/opt/syslog-ng/etc/ directory or /etc/syslog-ng depending on how it was configured on install time.


After changing tuning the configuration, it can be checked for errors:

# /opt/freeware/sbin/syslog-ng –syntax-only

How to redirect TCP port traffic from Internet Public IP host to remote local LAN server, Redirect traffic for Apache Webserver, MySQL, or other TCP service to remote host

Thursday, September 23rd, 2021


Linux-redirect-forward-tcp-ip-port-traffic-from-internet-to-remote-internet-LAN-IP-server-rinetd-iptables-redir


1. Use the good old times rinetd – internet “redirection server” service


Perhaps, many people who are younger wouldn't remember rinetd's use was pretty common on old Linuxes in the age where iptables was not on the scene and its predecessor ipchains was so common.
In the raise of mass internet rinetd started loosing its popularity because the service was exposed to the outer world and due to security holes and many exploits circulating the script kiddie communities
many servers get hacked "pwned" in the jargon of the script kiddies.

rinetd is still available even in modern Linuxes and over the last years I did not heard any severe security concerns regarding it, but the old paranoia perhaps and the set to oblivion makes it still unpopular soluttion for port redirect today in year 2021.
However for a local secured DMZ lans I can tell you that its use is mostly useful and I chooes to use it myself, everynow and then due to its simplicity to configure and use.
rinetd is pretty standard among unixes and is also available in old Sun OS / Solaris and BSD-es and pretty much everything on the Unix scene.

Below is excerpt from 'man rinetd':


DESCRIPTION
     rinetd redirects TCP connections from one IP address and port to another. rinetd is a single-process server which handles any number of connections to the address/port pairs
     specified in the file /etc/rinetd.conf.  Since rinetd runs as a single process using nonblocking I/O, it is able to redirect a large number of connections without a severe im‐
     pact on the machine. This makes it practical to run TCP services on machines inside an IP masquerading firewall. rinetd does not redirect FTP, because FTP requires more than
     one socket.
     rinetd is typically launched at boot time, using the following syntax:      /usr/sbin/rinetd      The configuration file is found in the file /etc/rinetd.conf, unless another file is specified using the -c command line option.

To use rinetd on any LInux distro you have to install and enable it with apt or yum as usual. For example on my Debian GNU / Linux home machine to use it I had to install .deb package, enable and start it it via systemd :


server:~# apt install –yes rinetd

server:~#  systemctl enable rinetd


server:~#  systemctl start rinetd


server:~#  systemctl status rinetd
● rinetd.service
   Loaded: loaded (/etc/init.d/rinetd; generated)
   Active: active (running) since Tue 2021-09-21 10:48:20 EEST; 2 days ago
     Docs: man:systemd-sysv-generator(8)
    Tasks: 1 (limit: 4915)
   Memory: 892.0K
   CGroup: /system.slice/rinetd.service
           └─1364 /usr/sbin/rinetd


rinetd is doing the traffic redirect via a separate process daemon, in order for it to function once you have service up check daemon is up as well.

root@server:/home/hipo# ps -ef|grep -i rinet
root       359     1  0 16:10 ?        00:00:00 /usr/sbin/rinetd
root       824 26430  0 16:10 pts/0    00:00:00 grep -i rinet

+ Configuring a new port redirect with rinetd


Is pretty straight forward everything is handled via one single configuration – /etc/rinetd.conf

The format (syntax) of a forwarding rule is as follows:

     [bindaddress] [bindport] [connectaddress] [connectport]


Besides that rinetd , could be used as a primitive firewall substitute to iptables, general syntax of allow deny an IP address is done with (allow, deny) keywords:
 

allow 192.168.2.*
deny 192.168.2.1?


To enable logging to external file ,you'll have to include in the configuration:

# logging information
logfile /var/log/rinetd.log

Here is an example rinetd.conf configuration, redirecting tcp mysql 3306, nginx on port 80 and a second web service frontend for ILO to server reachable via port 8888 and a redirect from External IP to local IP SMTP server.


#
# this is the configuration file for rinetd, the internet redirection server
#
# you may specify global allow and deny rules here
# only ip addresses are matched, hostnames cannot be specified here
# the wildcards you may use are * and ?
#
# allow 192.168.2.*
# deny 192.168.2.1?


#
# forwarding rules come here
#
# you may specify allow and deny rules after a specific forwarding rule
# to apply to only that forwarding rule
#
# bindadress    bindport  connectaddress  connectport


# logging information
logfile /var/log/rinetd.log
83.228.93.76        80            192.168.0.20       80
192.168.0.2        3306            192.168.0.19        3306
83.228.93.76        443            192.168.0.20       443
# enable for access to ILO
83.228.93.76        8888            192.168.1.25 443

127.0.0.1    25    192.168.0.19    25


83.228.93.76 is my external ( Public )  IP internet address where 192.168.0.20, 192.168.0.19, 192.168.0.20 (are the DMZ-ed Lan internal IPs) with various services.

To identify the services for which rinetd is properly configured to redirect / forward traffic you can see it with netstat or the newer ss command
 

root@server:/home/hipo# netstat -tap|grep -i rinet
tcp        0      0 www.pc-freak.net:8888   0.0.0.0:*               LISTEN      13511/rinetd      
tcp        0      0 www.pc-freak.n:http-alt 0.0.0.0:*               LISTEN      21176/rinetd        
tcp        0      0 www.pc-freak.net:443   0.0.0.0:*               LISTEN      21176/rinetd      


+ Using rinetd to redirect External interface IP to loopback's port (127.0.0.1)


If you have the need to redirect an External connectable living service be it apache mysql / privoxy / squid or whatever rinetd is perhaps the tool of choice (especially since there is no way to do it with iptables.

If you want to redirect all traffic which is accessed via Linux's loopback interface (localhost) to be reaching a remote host 11.5.8.1 on TCP port 1083 and 1888, use below config

# bindadress    bindport  connectaddress  connectport
11.5.8.1        1083            127.0.0.1       1083
11.5.8.1        1888            127.0.0.1       1888


For a quick and dirty solution to redirect traffic rinetd is very useful, however you'll have to keep in mind that if you want to redirect traffic for tens of thousands of connections constantly originating from the internet you might end up with some disconnects as well as notice a increased use of rinetd CPU use with the incrased number of forwarded connections.


2. Redirect TCP / IP port using DNAT iptables firewall rules


Lets say you have some proxy, webservice or whatever service running on port 5900 to be redirected with iptables.
The easeiest legacy way is to simply add the redirection rules to /etc/rc.local​. In newer Linuxes rc.local so if you decide to use,
you'll have to enable rc.local , I've written earlier a short article on how to enable rc.local on newer Debian, Fedora, CentOS


# redirect 5900 TCP service 
sysctl -w net.ipv4.conf.all.route_localnet=1
iptables -t nat -I PREROUTING -p tcp –dport 5900 -j REDIRECT –to-ports 5900
iptables -t nat -I OUTPUT -p tcp -o lo –dport 5900 -j REDIRECT –to-ports 5900
iptables -t nat -A OUTPUT -o lo -d 127.0.0.1 -p tcp –dport 5900 -j DNAT  –to-destination 192.168.1.8:5900
iptables -t nat -I OUTPUT –source 0/0 –destination 0/0 -p tcp –dport 5900 -j REDIRECT –to-ports 5900


Here is another two example which redirects port 2208 (which has configured a bind listener for SSH on Internal host 192.168.0.209:2208) from External Internet IP address (XXX.YYY.ZZZ.XYZ) 
 

# Port redirect for SSH to VM on openxen internal Local lan server 192.168.0.209 
-A PREROUTING  -p tcp –dport 2208 -j DNAT –to-destination 192.168.0.209:2208
-A POSTROUTING -p tcp –dst 192.168.0.209 –dport 2208 -j SNAT –to-source 83.228.93.76


3. Redirect TCP traffic connections with redir tool


If you look for an easy straight forward way to redirect TCP traffic, installing and using redir (ready compiled program) might be a good idea.


root@server:~# apt-cache show redir|grep -i desc -A5 -B5
Version: 3.2-1
Installed-Size: 60
Maintainer: Lucas Kanashiro <kanashiro@debian.org>
Architecture: amd64
Depends: libc6 (>= 2.15)
Description-en: Redirect TCP connections
 It can run under inetd or stand alone (in which case it handles multiple
 connections).  It is 8 bit clean, not limited to line mode, is small and
 light. Supports transparency, FTP redirects, http proxying, NAT and bandwidth
 limiting.
 .
 redir is all you need to redirect traffic across firewalls that authenticate
 based on an IP address etc. No need for the firewall toolkit. The
 functionality of inetd/tcpd and "redir" will allow you to do everything you
 need without screwy telnet/ftp etc gateways. (I assume you are running IP
 Masquerading of course.)

Description-md5: 2089a3403d126a5a0bcf29b22b68406d
Homepage: https://github.com/troglobit/redir
Tag: interface::daemon, network::server, network::service, role::program,
 use::proxying
Section: net
Priority: optional


server:~# apt-get install –yes redir

Here is a short description taken from its man page 'man redir'


DESCRIPTION
     redir redirects TCP connections coming in on a local port, [SRC]:PORT, to a specified address/port combination, [DST]:PORT.  Both the SRC and DST arguments can be left out,
     redir will then use 0.0.0.0.

     redir can be run either from inetd or as a standalone daemon.  In –inetd mode the listening SRC:PORT combo is handled by another process, usually inetd, and a connected
     socket is handed over to redir via stdin.  Hence only [DST]:PORT is required in –inetd mode.  In standalone mode redir can run either in the foreground, -n, or in the back‐
     ground, detached like a proper UNIX daemon.  This is the default.  When running in the foreground log messages are also printed to stderr, unless the -s flag is given.

     Depending on how redir was compiled, not all options may be available.


+ Use redir to redirect TCP traffic one time


Lets say you have a MySQL running on remote machine on some internal or external IP address, lets say 192.168.0.200 and you want to redirect all traffic from remote host to the machine (192.168.0.50), where you run your Apache Webserver, which you want to configure to use
as MySQL localhost TCP port 3306.

Assuming there are no irewall restrictions between Host A (192.168.0.50) and Host B (192.168.0.200) is already permitting connectivity on TCP/IP port 3306 between the two machines.

To open redirection from localhost on 192.168.0.50 -> 192.168.0.200:


server:~# redir –laddr=127.0.0.1 –lport=3306 –caddr=192.168.0.200 –cport=3306


If you need other third party hosts to be additionally reaching 192.168.0.200 via 192.168.0.50 TCP 3306.

root@server:~# redir –laddr=192.168.0.50 –lport=3306 –caddr=192.168.0.200 –cport=3306


Of course once you close, the /dev/tty or /dev/vty console the connection redirect will be cancelled.


+ Making TCP port forwarding from Host A to Host B permanent


One solution to make the redir setup rules permanent is to use –rinetd option or simply background the process, nevertheless I prefer to use instead GNU Screen.
If you don't know screen is a vVrtual Console Emulation manager with VT100/ANSI terminal emulation to so, if you don't have screen present on the host install it with whatever Linux OS package manager is present and run:


root@server:~#screen -dm bash -c 'redir –laddr=127.0.0.1 –lport=3306 –caddr=192.168.0.200 –cport=3306'


That would run it into screen session and detach so you can later connect, if you want you can make redir to also log connections via syslog with ( -s) option.

I found also useful to be able to track real time what's going on currently with the opened redirect socket by changing redir log level.

Accepted log level is:


  -l, –loglevel=LEVEL
             Set log level: none, err, notice, info, debug.  Default is notice.


root@server:/ # screen -dm bash -c 'redir –laddr=127.0.0.1 –lport=3308 –caddr=192.168.0.200 –cport=3306 -l debug'


To test connectivity works as expected use telnet:
 

root@server:/ # telnet localhost 3308
Trying 127.0.0.1…
Connected to localhost.
Escape character is '^]'.
g
5.5.5-10.3.29-MariaDB-0+deb10u1-log�+c2nWG>B���o+#ly=bT^]79mysql_native_password

6#HY000Proxy header is not accepted from 192.168.0.19 Connection closed by foreign host.

once you attach to screen session with


root@server:/home #  screen -r


You will get connectivity attempt from localhost logged : .
 

redir[10640]: listening on 127.0.0.1:3306
redir[10640]: target is 192.168.0.200:3306
redir[10640]: Waiting for client to connect on server socket …
redir[10640]: target is 192.168.0.200:3306
redir[10640]: Waiting for client to connect on server socket …
redir[10793]: peer IP is 127.0.0.1
redir[10793]: peer socket is 25592
redir[10793]: target IP address is 192.168.0.200
redir[10793]: target port is 3306
redir[10793]: Connecting 127.0.0.1:25592 to 127.0.0.1:3306
redir[10793]: Entering copyloop() – timeout is 0
redir[10793]: Disconnect after 1 sec, 165 bytes in, 4 bytes out

The downsides of using redir is redirection is handled by the separate process which is all time hanging in the process list, as well as the connection redirection speed of incoming connections might be about at least 30% slower to if you simply use a software (firewall ) redirect such as iptables. If you use something like kernel IP set ( ipsets ). If you hear of ipset for a first time and you wander whta it is below is short package description.


root@server:/root# apt-cache show ipset|grep -i description -A13 -B5
Maintainer: Debian Netfilter Packaging Team <pkg-netfilter-team@lists.alioth.debian.org>
Architecture: amd64
Provides: ipset-6.38
Depends: iptables, libc6 (>= 2.4), libipset11 (>= 6.38-1~)
Breaks: xtables-addons-common (<< 1.41~)
Description-en: administration tool for kernel IP sets
 IP sets are a framework inside the Linux 2.4.x and 2.6.x kernel which can be
 administered by the ipset(8) utility. Depending on the type, currently an
 IP set may store IP addresses, (TCP/UDP) port numbers or IP addresses with
 MAC addresses in a  way which ensures lightning speed when matching an
 entry against a set.
 .
 If you want to
 .
  * store multiple IP addresses or port numbers and match against the
    entire collection using a single iptables rule.
  * dynamically update iptables rules against IP addresses or ports without
    performance penalty.
  * express complex IP address and ports based rulesets with a single
    iptables rule and benefit from the speed of IP sets.

 .
 then IP sets may be the proper tool for you.
Description-md5: d87e199641d9d6fbb0e52a65cf412bde
Homepage: http://ipset.netfilter.org/
Tag: implemented-in::c, role::program
Section: net
Priority: optional
Filename: pool/main/i/ipset/ipset_6.38-1.2_amd64.deb
Size: 50684
MD5sum: 095760c5db23552a9ae180bd58bc8efb
SHA256: 2e2d1c3d494fe32755324bf040ffcb614cf180327736c22168b4ddf51d462522

Update reverse sshd config with cronjob to revert if sshd reload issues

Friday, February 12th, 2021

Update-reverse-sshd-config-with-cronjob-to-revert-if-sshd-reload-issues

Say you're doing ssh hardening modifying /etc/ssh/sshd_config for better system security or just changing options in sshd due to some requirements. But you follow the wrong guide and you placed some ssh variable which is working normally on newer SSH versions ssh OpenSSH_8.0p1 / or 7 but the options are applied on older SSH server and due to that restarting sshd via /etc/init.d/… or systemctl restart sshd cuts your access to remote server located in a DC and not attached to Admin LAN port, and does not have a working ILO or IDRAC configured and you have to wait for a couple of hours for some Support to go to the server Room / Rack / line location to have access to a Linux physical tty console and fix it by reverting the last changes you made to sshd and restarting.

Thus logical question comes what can you do to assure yourself you would not cut your network access to remote machine after modifying OpenSSHD and normal SSHD restart?

There is an old trick, I'm using for years now but perhaps if you're just starting with Linux as a novice system administrator or a server support guy you would not know it, it is as simple as setting a cron job for some minutes to periodically overwrite the sshd configuration with a copy of the old working version of sshd before modification.

Here is this nice nify trick which saved me headache of call on technical support line to ValueWeb when I was administering some old Linux servers back in the 2000s

root@server:~# crontab -u root -e

# create /etc/ssh/sshd_config backup file
cp -rpf /etc/ssh/sshd_config /etc/ssh/sshd_config_$(date +%d-%m-%y)
# add to cronjob to execute every 15 minutes and ovewrite sshd with the working version just in case
*/15 * * * * /bin/cp -rpf /etc/ssh/sshd_config_$(date +%d-%m-%y) /etc/ssh/sshd_config && /bin/systemctl restart sshd
# restart sshd 
cp -rpf /etc/ssh/sshd_config_$(date +%d-%m-%y) /etc/ssh/sshd_config && /bin/systemctl restart sshd


Copy paste above cron definitions and leave them on for some time. Do the /etc/ssh/sshd_config modifications and once you're done restart sshd by lets say

root@server:~#  killall -HUP sshd 


If the ssh connectivity continues to work edit the cron job again and delete all lines and save again.
If you're not feeling confortable with vim as a text editor (in case you're a complete newbie and you don't know) how to get out of vim. Before doing all little steps you can do on the shell with  export EDITOR=nano or export EDITOR=mcedit cmds,this will change the default text editor on the shell. 

Hope this helps someone… Enjoy 🙂

Ansible Quick Start Cheatsheet for Linux admins and DevOps engineers

Wednesday, October 24th, 2018

ansible-quick-start-cheetsheet-ansible-logo

Ansible is widely used (Configuration management, deployment, and task execution system) nowadays for mass service depoyments on multiple servers and Clustered environments like, Kubernetes clusters (with multiple pods replicas) virtual swarms running XEN / IPKVM virtualization hosting multiple nodes etc. .

Ansible can be used to configure or deploy GNU / Linux tools and services such as Apache / Squid / Nginx / MySQL / PostgreSQL. etc. It is pretty much like Puppet (server / services lifecycle management) tool , except its less-complecated to start with makes it often a choose as a tool for mass deployment (devops) automation.

Ansible is used for multi-node deployments and remote-task execution on group of servers, the big pro of it it does all its stuff over simple SSH on the remote nodes (servers) and does not require extra services or listening daemons like with Puppet. It combined with Docker containerization is used very much for later deploying later on inside Cloud environments such as Amazon AWS / Google Cloud Platform / SAP HANA / OpenStack etc.

Ansible-Architechture-What-Is-Ansible-Edureka

0. Instaling ansible on Debian / Ubuntu Linux


Ansible is a python script and because of that depends heavily on python so to make it running, you will need to have a working python installed on local and remote servers.

Ansible is as easy to install as running the apt cmd:


# apt-get install –yes ansible
 

The following additional packages will be installed:
  ieee-data python-jinja2 python-kerberos python-markupsafe python-netaddr python-paramiko python-selinux python-xmltodict python-yaml
Suggested packages:
  sshpass python-jinja2-doc ipython python-netaddr-docs python-gssapi
Recommended packages:
  python-winrm
The following NEW packages will be installed:
  ansible ieee-data python-jinja2 python-kerberos python-markupsafe python-netaddr python-paramiko python-selinux python-xmltodict python-yaml
0 upgraded, 10 newly installed, 0 to remove and 1 not upgraded.
Need to get 3,413 kB of archives.
After this operation, 22.8 MB of additional disk space will be used.

apt-get install –yes sshpass


Installing Ansible on Fedora Linux is done with:


# dnf install ansible –yes sshpass


On CentOS to install:
 

# yum install ansible –yes sshpass

sshpass needs to be installed only if you plan to use ssh password prompt authentication with ansible.

Ansible is also installable via python-pip tool, if you need to install a specific version of ansible you have to use it instead, the package is available as an installable package on most linux distros.

Ansible has a lot of pros and cons and there are multiple articles already written on people for and against it in favour of Chef or Puppet As I recently started learning Ansible. The most important thing to know about Ansible is though many of the things can be done directly using a simple command line, the tool is planned for remote installing of server services using a specially prepared .yaml format configuration files. The power of Ansible comes of the use of Ansible Playbooks which are yaml scripts that tells ansible how to do its activities step by step on remote server. In this article, I'm giving a quick cheat sheet to start quickly with it.
 

1. Remote commands execution with Ansible
 

First thing to do to start with it is to add the desired hostnames ansible will operate with it can be done either globally (if you have a number of remote nodes) to deploy stuff periodically by using /etc/ansible/hosts or use a custom host script for each and every ansible custom scripts developed.

a. Ansible main config files

A common ansible /etc/ansible/hosts definition looks something like that:


# cat /etc/ansible/hosts
[mysqldb]
10.69.2.185
10.69.2.186
[master]
10.69.2.181
[slave]
10.69.2.187
[db-servers]
10.69.2.181
10.69.2.187
[squid]
10.69.2.184

Host to execute on can be also provided via a shell variable $ANSIBLE_HOSTS
b) is remote hosts reachable / execute commands on all remote host

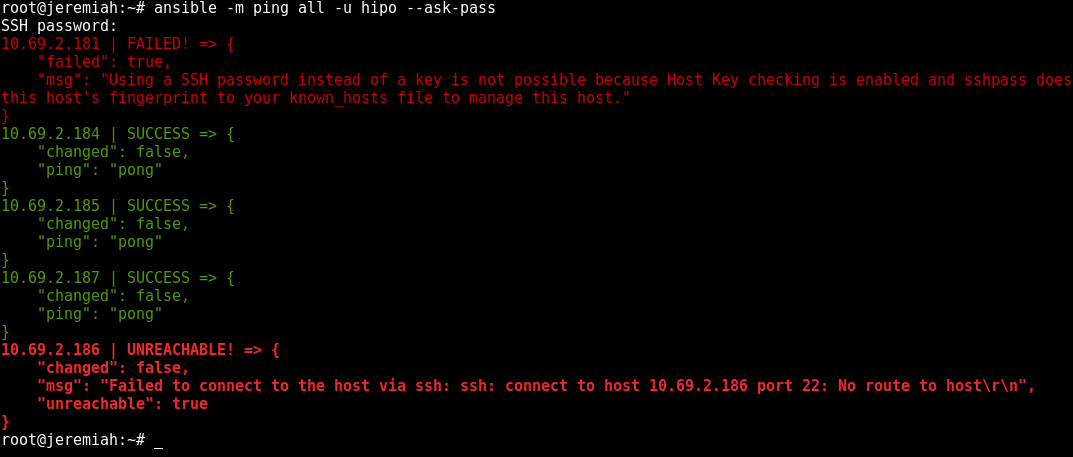
To test whether hour hosts are properly configure from /etc/ansible/hosts you can ping all defined hosts with:


ansible all -m ping


ansible-check-hosts-ping-command-screenshot

This makes ansible try to remote to remote hosts (if you have properly configured SSH public key authorization) the command should return success statuses on every host.


ansible all -a "ifconfig -a"


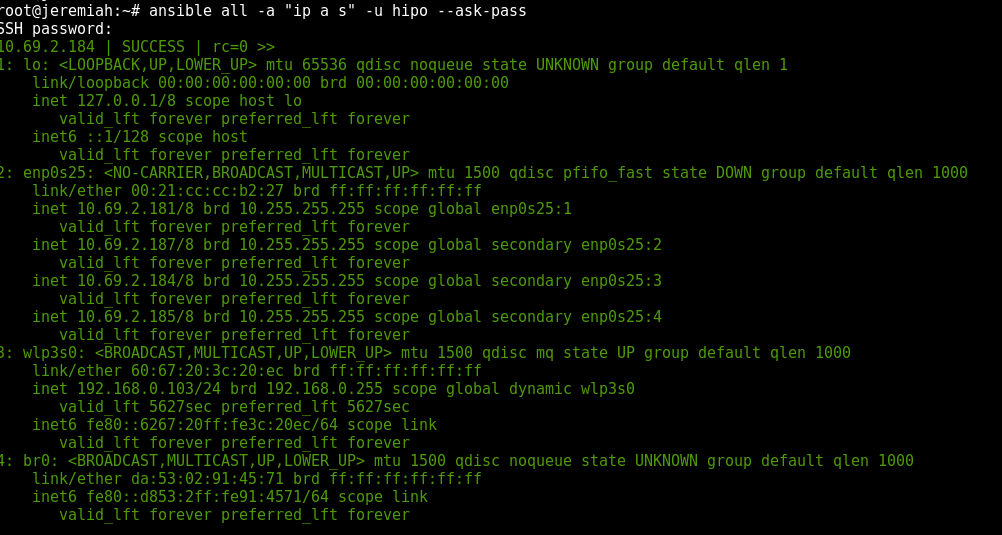
If you don't have SSH keys configured you can also authenticate with an argument (assuming) all hosts are configured with same password with:


ansible all –ask-pass -a "ip all show" -u hipo –ask-pass


ansible-show-ips-ip-a-command-screenshot-linux

If you have configured group of hosts via hosts file you can also run certain commands on just a certain host group, like so:


ansible <host-group> -a <command>

It is a good idea to always check /etc/ansible/ansible.cfg which is the system global (main red ansible config file).

c) List defined host groups
 

ansible localhost -m debug -a 'var=groups.keys()'
ansible localhost -m debug -a 'var=groups'

d) Searching remote server variables


# Search remote server variables
ansible localhost -m setup -a 'filter=*ipv4*'


ansible localhost -m setup -a 'filter=ansible_domain'


ansible all -m setup -a 'filter=ansible_domain'


# uninstall package on RPM based distros
ansible centos -s -m yum -a "name=telnet state=absent"
# uninstall package on APT distro
ansible localhost -s -m apt -a "name=telnet state=absent"


2. Debugging – Listing information about remote hosts (facts) and state of a host


# All facts for one host
ansible -m setup
  # Only ansible fact for one host
ansible
-m setup -a 'filter=ansible_eth*'
# Only facter facts but for all hosts
ansible all -m setup -a 'filter=facter_*'


To Save outputted information per-host in separate files in lets say ~/ansible/host_facts


ansible all -m setup –tree ~/ansible/host_facts


3. Playing with Playbooks deployment scripts


a) Syntax Check of a playbook yaml


ansible-playbook –syntax-check


b) Run General Infos about a playbook such as get what a playbook would do on remote hosts (tasks to run) and list-hosts defined for a playbook (like above pinging).


ansible-playbook –list-hosts
ansible-playbook
–list-tasks


To get the idea about what an yaml playbook looks like, here is example from official ansible docs, that deploys on remote defined hosts a simple Apache webserver.


– hosts: webservers
  vars:
    http_port: 80
    max_clients: 200
  remote_user: root
  tasks:
  – name: ensure apache is at the latest version
    yum:
      name: httpd
      state: latest
  – name: write the apache config file
    template:
      src: /srv/httpd.j2
      dest: /etc/httpd.conf
    notify:
    – restart apache
  – name: ensure apache is running
    service:
      name: httpd
      state: started
  handlers:
    – name: restart apache
      service:
        name: httpd
        state: restarted

To give it a quick try save the file as webserver.yml and give it a run via ansible-playbook command
 

ansible-playbook -s playbooks/webserver.yml


The -s option instructs ansible to run play on remote server with super user (root) privileges.

The power of ansible is its modules, which are constantly growing over time a complete set of Ansible supported modules is in its official documenation.

Ansible-running-playbook-Commands-Task-script-Successful-output-1024x536

There is a lot of things to say about playbooks, just to give the brief they have there own language like a  templates, tasks, handlers, a playbook could have one or multiple plays inside (for instance instructions for deployment of one or more services).

The downsides of playbooks are they're so hard to write from scratch and edit, because yaml syntaxing is much more stricter than a normal oldschool sysadmin configuration file.
I've stucked with problems with modifying and writting .yaml files and I should say the community in #ansible in irc.freenode.net was very helpful to help me debug the obscure errors.

yamllint (The YAML Linter tool) comes handy at times, when facing yaml syntax errors, to use it install via apt:
 

# apt-get install –yes yamllint


a) Running ansible in "dry mode" just show what ansible might do but not change anything
 

ansible-playbook playbooks/PLAYBOOK_NAME.yml –check


b) Running playbook with different users and separate SSH keys


ansible-playbook playbooks/your_playbook.yml –user ansible-user
 
ansible -m ping hosts –private-key=~/.ssh/keys/custom_id_rsa -u centos


c) Running ansible playbook only for certain hostnames part of a bigger host group


ansible-playbook playbooks/PLAYBOOK_NAME.yml –limit "host1,host2,host3"


d) Run Ansible on remote hosts in parallel

To run in raw of 10 hosts in parallel
 

# Run 10 hosts parallel
ansible-playbook <File.yaml> -f 10            


e) Passing variables to .yaml scripts using commandline

Ansible has ability to pre-define variables from .yml playbooks. This variables later can be passed from shell cli, here is an example:

# Example of variable substitution pass from command line the var in varsubsts.yaml if present is defined / replaced ansible-playbook playbooks/varsubst.yaml –extra-vars "myhosts=localhost gather=yes pkg=telnet"


4. Ansible Galaxy (A Docker Hub) like large repository with playbook (script) files


Ansible Galaxy has about 10000 active users which are contributing ansible automation playbooks in fields such as Development / Networking / Cloud / Monitoring / Database / Web / Security etc.

To install from ansible galaxy use ansible-galaxy

# install from galaxy the geerlingguy mysql playbook
ansible-galaxy install geerlingguy.mysql


The available packages you can use as a template for your purpose are not so much as with Puppet as Ansible is younger and not corporate supported like Puppet, anyhow they are a lot and does cover most basic sysadmin needs for mass deployments, besides there are plenty of other unofficial yaml ansible scripts in various github repos.

How to mount NFS network filesystem to remote server via /etc/fstab on Linux

Friday, January 29th, 2016

mount-nfs-in-linux-via--etc-fstab-howto-mount-remote-partitions-from-application-server-to-storage-server
If you have a server topology part of a project where 3 (A, B, C) servers need to be used to deliver a service (one with application server such as Jboss / Tomcat / Apache, second just as a Storage Server holding a dozens of LVM-ed SSD hard drives and an Oracle database backend to provide data about the project) and you need to access server A (application server) to server B (the Storage "monster") one common solution is to use NFS (Network FileSystem) Mount. 
NFS mount is considered already a bit of obsoleted technology as it is generally considered unsecre, however if SSHFS mount is not required due to initial design decision or because both servers A and B are staying in a serious firewalled (DMZ) dedicated networ then NTS should be a good choice.
Of course to use NFS mount should always be a carefully selected Environment Architect decision so remote NFS mount, imply  that both servers are connected via a high-speed gigabyte network, e.g. network performance is calculated to be enough for application A <-> to network storage B two sides communication not to cause delays for systems end Users.

To test whether the NFS server B mount is possible on the application server A, type something like:


mount -t nfs -o soft,timeo=900,retrans=3,vers=3, proto=tcp remotenfsserver-host:/home/nfs-mount-data /mnt/nfs-mount-point


If the mount is fine to make the mount permanent on application server host A (in case of server reboot), add to /etc/fstab end of file, following:

1.2.3.4:/application/local-application-dir-to-mount /application/remote-application-dir-to-mount nfs   rw,bg,nolock,vers=3,tcp,timeo=600,rsize=32768,wsize=32768,hard,intr 1 2


If the NTFS server has a hostname you can also type hostname instead of above example sample IP 1.2.3.4, this is however not recommended as this might cause in case of DNS or Domain problems.
If you want to mount with hostname (in case if storage server IP is being commonly changed due to auto-selection from a DHCP server):

server-hostA:/application/local-application-dir-to-mount /application/remote-application-dir-to-mount nfs   rw,bg,nolock,vers=3,tcp,timeo=600,rsize=32768,wsize=32768,hard,intr 1 2

In above example you need to have the /application/local-application-dir-to-mount (dir where remote NFS folder will be mounted on server A) as well as the /application/remote-application-dir-to-mount
Also on server Storage B server, you have to have running NFS server with firewall accessibility from server A working.

The timeou=600 (is defined in) order to make the timeout for remote NFS accessibility 1 hour in order to escape mount failures if there is some minutes network failure between server A and server B, the rsize and wsize
should be fine tuned according to the files that are being red from remote NFS server and the network speed between the two in the example are due to environment architecture (e.g. to reflect the type of files that are being transferred by the 2)
and the remote NFS server running version and the Linux kernel versions, these settings are for Linux kernel branch 2.6.18.x which as of time of writting this article is obsolete, so if you want to use the settings check for your kernel version and
NTFS and google and experiment.

Anyways, if you're not sure about wsize and and rise, its perfectly safe to omit these 2 values if you're not familiar to it.

To finally check the NFS mount is fine,  grep it:


# mount|grep -i nfs
sunrpc on /var/lib/nfs/rpc_pipefs type rpc_pipefs (rw)
server-hostA:/application/remote-application-dir-to-mount on /application/remote-application-dir-to-mount type nfs (rw,bg,nolock,nfsvers=3,tcp,timeo=600,rsize=32768,wsize=32768,hard,intr,addr=1.2.3.4)


That's all enjoy 🙂


How to make a mirror of website on GNU / Linux with wget / Few tips on wget site mirroring

Wednesday, February 22nd, 2012

how-to-make-mirror-of-website-on-linux-wget

Everyone who used Linux is probably familiar with wget or has used this handy download console tools at least thousand of times. Not so many Desktop GNU / Linux users like Ubuntu and Fedora Linux users had tried using wget to do something more than single files download.
Actually wget is not so popular as it used to be in earlier linux days. I've noticed the tendency for newer Linux users to prefer using curl (I don't know why).

With all said I'm sure there is plenty of Linux users curious on how a website mirror can be made through wget.
This article will briefly suggest few ways to do website mirroring on linux / bsd as wget is both available on those two free operating systems.

1. Most Simple exact mirror copy of website

The most basic use of wget's mirror capabilities is by using wget's -mirror argument:

# wget -m http://website-to-mirror.com/sub-directory/

Creating a mirror like this is not a very good practice, as the links of the mirrored pages will still link to external URLs. In other words link URL will not pointing to your local copy and therefore if you're not connected to the internet and try to browse random links of the webpage you will end up with many links which are not opening because you don't have internet connection.

2. Mirroring with rewritting links to point to localhost and in between download page delay

Making mirror with wget can put an heavy load on the remote server as it fetches the files as quick as the bandwidth allows it. On heavy servers rapid downloads with wget can significantly reduce the download server responce time. Even on a some high-loaded servers it can cause the server to hang completely.
Hence mirroring pages with wget without explicity setting delay in between each page download, could be considered by remote server as a kind of DoS – (denial of service) attack. Even some site administrators have already set firewall rules or web server modules configured like Apache mod_security which filter requests to IPs which are doing too frequent HTTP GET /POST requests to the web server.
To make wget delay with a 10 seconds download between mirrored pages use:

# wget -mk -w 10 -np --random-wait http://website-to-mirror.com/sub-directory/

The -mk stands for -m/-mirror and -k / shortcut argument for –convert-links (make links point locally), –random-wait tells wget to make random waits between o and 10 seconds between each page download request.

3. Mirror / retrieve website sub directory ignoring robots.txt "mirror restrictions"

Some websites has a robots.txt which restricts content download with clients like wget, curl or even prohibits, crawlers to download their website pages completely.

/robots.txt restrictions are not a problem as wget has an option to disable robots.txt checking when downloading.
Getting around the robots.txt restrictions with wget is possible through -e robots=off option.
For instance if you want to make a local mirror copy of the whole sub-directory with all links and do it with a delay of 10 seconds between each consequential page request without reading at all the robots.txt allow/forbid rules:

# wget -mk -w 10 -np -e robots=off --random-wait http://website-to-mirror.com/sub-directory/

4. Mirror website which is prohibiting Download managers like flashget, getright, go!zilla etc.

Sometimes when try to use wget to make a mirror copy of an entire site domain subdirectory or the root site domain, you get an error similar to:

Sorry, but the download manager you are using to view this site is not supported.
We do not support use of such download managers as flashget, go!zilla, or getright

This message is produced by the site dynamic generation language PHP / ASP / JSP etc. used, as the website code is written to check on the browser UserAgent sent.
wget's default sent UserAgent to the remote webserver is:
Wget/1.11.4

As this is not a common desktop browser useragent many webmasters configure their websites to only accept well known established desktop browser useragents sent by client browsers.
Here are few typical user agents which identify a desktop browser:
 

  • Mozilla/5.0 (Windows NT 6.1; rv:6.0) Gecko/20110814 Firefox/6.0
  • Mozilla/5.0 (X11; Linux i686; rv:6.0) Gecko/20100101 Firefox/6.0
  • Mozilla/6.0 (Macintosh; I; Intel Mac OS X 11_7_9; de-LI; rv:1.9b4) Gecko/2012010317 Firefox/10.0a4
  • Mozilla/5.0 (Windows NT 6.1; Win64; x64; rv:2.2a1pre) Gecko/20110324 Firefox/4.2a1pre

etc. etc.

If you're trying to mirror a website which has implied some kind of useragent restriction based on some "valid" useragent, wget has the -U option enabling you to fake the useragent.

If you get the Sorry but the download manager you are using to view this site is not supported , fake / change wget's UserAgent with cmd:

# wget -mk -w 10 -np -e robots=off \
--random-wait
--referer="http://www.google.com" \--user-agent="Mozilla/5.0 (Windows; U; Windows NT 5.1; en-US; rv:1.8.1.6) Gecko/20070725 Firefox/2.0.0.6" \--header="Accept:text/xml,application/xml,application/xhtml+xml,text/html;q=0.9,text/plain;q=0.8,image/png,*/*;q=0.5" \--header="Accept-Language: en-us,en;q=0.5" \--header="Accept-Encoding: gzip,deflate" \--header="Accept-Charset: ISO-8859-1,utf-8;q=0.7,*;q=0.7" \--header="Keep-Alive: 300"

For the sake of some wget anonimity – to make wget permanently hide its user agent and pretend like a Mozilla Firefox running on MS Windows XP use .wgetrc like this in home directory.

5. Make a complete mirror of a website under a domain name

To retrieve complete working copy of a site with wget a good way is like so:

# wget -rkpNl5 -w 10 --random-wait www.website-to-mirror.com

Where the arguments meaning is:
-r – Retrieve recursively
-k – Convert the links in documents to make them suitable for local viewing
-p – Download everything (inline images, sounds and referenced stylesheets etc.)
-N – Turn on time-stamping
-l5 – Specify recursion maximum depth level of 5

6. Make a dynamic pages static site mirror, by converting CGI, ASP, PHP etc. to HTML for offline browsing

It is often websites pages are ending in a .php / .asp / .cgi … extensions. An example of what I mean is for instance the URL http://php.net/manual/en/tutorial.php. You see the url page is tutorial.php once mirrored with wget the local copy will also end up in .php and therefore will not be suitable for local browsing as .php extension is not understood how to interpret by the local browser.
Therefore to copy website with a non-html extension and make it offline browsable in HTML there is the –html-extension option e.g.:

# wget -mk -w 10 -np -e robots=off \
--random-wait \
--convert-links http://www.website-to-mirror.com

A good practice in mirror making is to set a download limit rate. Setting such rate is both good for UP and DOWN side (the local host where downloading and remote server). download-limit is also useful when mirroring websites consisting of many enormous files (documental movies, some music etc.).
To set a download limit to add –limit-rate= option. Passing by to wget –limit-rate=200K would limit download speed to 200KB.

Other useful thing to assure wget has made an accurate mirror is wget logging. To use it pass -o ./my_mirror.log to wget.
 

How rescue unbootable Windows PC, Windows files through files Network copy to remote server shared Folder using Hirens Boot CD

Saturday, November 12th, 2011

hirens-boot-cd-logo-how-to-rescue-unbootable-pc-with-hirens-bootcd
I'm rescuing some files from one unbootable Windows XP using a livecd with Hirens Boot CD 13

In order to rescue the three NTFS Windows partitions files, I mounted them after booting a Mini Linux from Hirens Boot CD.

Mounting NTFS using Hirens BootCD went quite smoothly to mount the 3 partitions I used cmds:

# mount /dev/sda1 /mnt/sda1
# mount /dev/sda2 /mnt/sda2
# mount /dev/sdb1 /mnt/sdb1

After the three NTFS file partitions are mounted I used smbclient to list all the available Network Shares on the remote Network Samba Shares Server which by the way possessed the NETBIOS name of SERVER 😉

# smbclient -L //SERVER/
Enter root's password:
Domain=[SERVER] OS=[Windows 7 Ultimate 7600] Server=[Windows 7 Ultimate 6.1]

Sharename Type Comment
——— —- ——-
!!!MUSIC Disk
ADMIN$ Disk Remote Admin
C$ Disk Default share
Canon Inkjet S9000 (Copy 2) Printer Canon Inkjet S9000 (Copy 2)
D$ Disk Default share
Domain=[SERVER] OS=[Windows 7 Ultimate 7600] Server=[Windows 7 Ultimate 6.1]
Server Comment
——— ——-
Workgroup Master
——— ——-

Further on to mount the //SERVER/D network samba drive – (the location where I wanted to transfer the files from the above 3 mounted partitions):

# mkdir /mnt/D
# mount //192.168.0.100/D /mnt/D
#

Where the IP 192.168.0.100 is actually the local network IP address of the //SERVER win smb machine.

Afterwards I used mc to copy all the files I needed to rescue from all the 3 above mentioned win partitions to the mounted //SERVER/D
 

Text Monitoring of connection server (traffic RX / TX) business in ASCII graphs with speedometer / Easy Monitor network traffic performance

Friday, May 4th, 2012

While reading some posts online related to MS-Windows TcpViewnetwork traffic analyzing tool. I've came across very nice tool for tracking connection speed for Linux (Speedometer). If I have to compare it, speedometer is somehow similar to nethogs and iftop bandwidth network measuring utilities .

What differentiates speedometer from iftop / nethogs / iptraf is it is more suitable for visualizing a network file or data transfers.
The graphs speedometer draws are way easier to understand, than iftop graphs.

Even complete newbies can understand it with no need for extraordinary knowledge in networking. This makes Speedometer, a top tool to visually see the amount of traffic flowing through server network interface (eth0) … (eth1) etc.

What speedometer shows is similar to the Midnight Commander's (mc) file transfer status bar, except the statistics are not only for a certain file transfer but can show overall statistics over server passing network traffic amount (though according to its manual it can be used to also track individual file transfers).

The simplicity for basic use makes speedometer nice tool to track for network congestion issues on Linux. Therefore it is a  must have outfit for every server admin. Below you see a screenshot of my terminal running speedometer on a remote server.
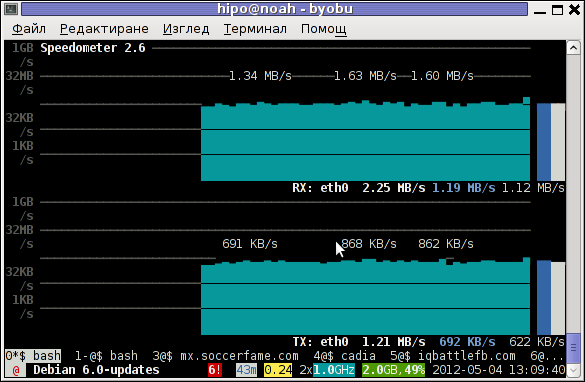
Speedometer ascii traffic track server network business screenshot in byobu screen like virtual terminal emulator

1. Installing speedometer on Debian / Ubuntu and Debian derivatives

For Debian and Ubuntu server administrators speedometer is already packaged as a deb so its installation is as simple as:

debian:~# apt-get --yes install speedometer
....

2. Installing speedometer from source for other Linux distributions CentOS, Fedora, SuSE etc.

Speedometer is written in python programming language, so in order to install and use on other OS Linux platforms, it is necessery to have installed (preferably) an up2date python programming language interpreter (python ver. 2.6 or higher)..
Besides that it is necessary to have installed the urwid -( console user interface library for Python) available for download via excess.org/urwid/


Hence to install speedometer on RedHat based Linux distributions one has to follow these steps:

a) Download & Install python urwid library

[root@centos ~]# cd /usr/local/src
[root@centos src]# wget -q http://excess.org/urwid/urwid-1.0.1.tar.gz
[root@centos src]# tar -zxvvf urwid-1.0.1.tar.gz
....
[root@centos src]# cd urwid-1.0.1
[root@centos urwid-1.0.1]# python setup.py install
running install
running build
running build_py
creating build
creating build/lib.linux-i686-2.4
creating build/lib.linux-i686-2.4/urwid
copying urwid/tests.py -> build/lib.linux-i686-2.4/urwid
copying urwid/command_map.py -> build/lib.linux-i686-2.4/urwid
copying urwid/graphics.py -> build/lib.linux-i686-2.4/urwid
copying urwid/vterm_test.py -> build/lib.linux-i686-2.4/urwid
copying urwid/curses_display.py -> build/lib.linux-i686-2.4/urwid
copying urwid/display_common.py -> build/lib.linux-i686-2.4/urwid
....

b) Download and install python-setuptools

python-setuptools is one other requirement of speedometer, happily on CentOS and Fedora the rpm package is already there and installable with yum:

[root@centos ~]# yum -y install python-setuptools
....

c) Download and install Speedometer

[root@centos urwid-1.0.1]# cd /usr/local/src/
[root@centos src]# wget -q http://excess.org/speedometer/speedometer-2.8.tar.gz
[root@centos src]# tar -zxvvf speedometer-2.8.tar.gz
.....
[root@centos src]# cd speedometer-2.8
[root@centos speedometer-2.8]# python setup.py install
Traceback (most recent call last):
File "setup.py", line 26, in ?
import speedometer
File "/usr/local/src/speedometer-2.8/speedometer.py", line 112
n = n * granularity + (granularity if r else 0)
^

While running the CentOS 5.6 installation of speedometer-2.8, I hit the
"n = n * granularity + (granularity if r else 0)
error.

After consultation with some people in #python (irc.freenode.net), I've figured out this error is caused due the outdated version of python interpreter installed by default on CentOS Linux 5.6. On CentOS 5.6 the python version is:

[root@centos ~]# python -V
Python 2.4.3

As I priorly said speedometer 2.8's minimum requirement for a python to be at v. 2.6. Happily there is quick way to update python 2.4 to python 2.6 on CentOS 5.6, as there is an RPM repository maintained by Chris Lea which contains RPM binary of python 2.6.

To update python 2.4 to python 2.6:

[root@centos speedometer-2.8]# rpm -Uvh http://yum.chrislea.com/centos/5/i386/chl-release-5-3.noarch.rpm[root@centos speedometer-2.8]# rpm --import /etc/pki/rpm-gpg/RPM-GPG-KEY-CHL[root@centos speedometer-2.8]# yum install python26

Now the newly installed python 2.6 is executable under the binary name python26, hence to install speedometer:

[root@centos speedometer-2.8]# python26 setup.py install
[root@centos speedometer-2.8]# chown root:root /usr/local/bin/speedometer
[root@centos speedometer-2.8]# chmod +x /usr/local/bin/speedometer

[root@centos speedometer-2.8]# python26 speedometer -i 1 -tx eth0

The -i will instruct speedometer to refresh the screen graphs once a second.

3. Using speedometer to keep an eye on send / received traffic network congestion

To observe, the amount of only sent traffic via a network interface eth0 with speedometer use:

debian:~# speedometer -tx eth0

To only keep an eye on received traffic through eth0 use:

debian:~# speedometer -rx eth0

To watch over both TX and RX (Transmitted and Received) network traffic:

debian:~# speedometer -tx eth0 -rx eth0

If you want to watch in separate windows TX and RX traffic while  running speedometer you can run in separate xterm windows speedometer -tx eth0 and speedometer -rx eth0, like in below screenshot:
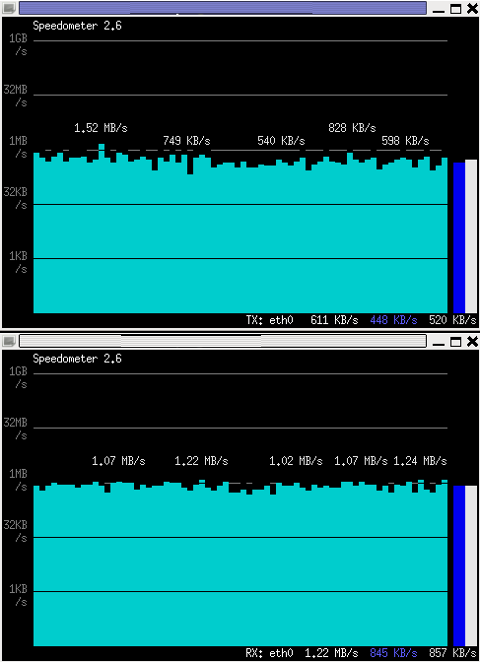
Monitor Received and Transmitted server Network traffic in two separate xterm windows with speedometer ascii graphs

4. Using speedometer to test network maximum possible transfer speed between server (host A) and server (host B)

The speedometer manual suggests few examples one of which is:

How fast is this LAN?

host-a$ cat /dev/zero | nc -l -p 12345
host-b$ nc host-a 12345 > /dev/null
host-b$ speedometer -rx eth0

When I red this example in speedometer's manual, it wasn't completely clear to me what the author really meant, but a bit after when I thought over the example I got his point.

The idea behind this example is that a constant stream of zeros taken from /dev/zero will be streamed over via a pipe (|) to nc which will bind a port number 12345, anyone connecting from another host machine, lets say a server with host host-b to port 12345 on machine host-a will start receiving the /dev/zero streamed content.

Then to finally measure the streamed traffic between host-a and host-b machines a speedometer is started to visualize the received traffic on network interface eth0, thus measuring the amount of traffic flowing from host-a to host-b

I give a try to the exmpls, using for 2 test nodes my home Desktop PC, Linux running  arcane version of Ubuntu and my Debian Linux notebook.

First on the Ubuntu PC I issued
 

hipo@hip0-desktop:~$ cat /dev/zero | nc -l -p 12345
 

Note that I have previously had installed the netcat, as nc is not installed by default on Ubuntu and Debian. If you, don't have nc installed yet, install it with:

apt-get –yes install netcat

"cat /dev/zero | nc -l -p 12345" will not produce any output, but will display just a blank line.

Then on my notebook I ran the second command example, given in the speedometer manual:
 

hipo@noah:~$ nc 192.168.0.2 12345 > /dev/null

Here the 192.168.0.2 is actually the local network IP address of my Desktop PC. My Desktop PC is connected via a normal 100Mbit switch to my routing machine and receives its internet via  NAT. The second test machine (my laptop), gets its internet through a WI-FI connection received by a Wireless Router connected via a UTP cable to the same switch to which my Desktop PC is connected.

Finally to test / get my network maximum thoroughput I had to use:

hipo@noah:~$ speedometer -rx wlan0

Here, I  monitor my wlan0 interface, as this is my (laptop) wireless card interface over which I have connectivity to my local network and via which through the the WI-FI router I get connected to the internet.

Below is a snapshot captured showing approximately what is the max network thoroughput from:

Desktop PC -> to my Thinkpad R61 laptop
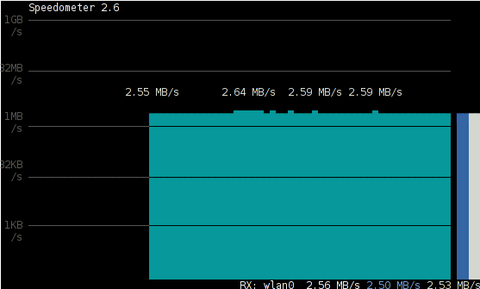
Using Speedometer to test network thorougput between two network server hosts screenshot Debian Squeeze Linux

As you can see in the shot approximately the maximum network thoroughput is in between:
2.55MB/s min and 2.59MB/S max, the speed is quite low for a 100 MBit local network, but this is normal as most laptop wireless adapters hardly transfer traffic in more than 10 to 20 MBits per sec.

If the same nework thoroughput test is conducted between two machines both connected to a same 100 M/bit switch, the traffic should be at least a 8 MB/sec.

There is something, else to take in consideration that probably makes the provided example network thoroughput measuring a bit inaccurate. The fact that the /dev/zero content is stremed over is slowing down the zeroes sent over network because of the  pipe ( | ) use slows down the stream.

5. Using speedometer to visualize maximum writting speed to a local hard drive on Linux

In the speedometer manual, I've noticed another interesting application of this nifty tool.

speedometer can be used to track and visualize the maximum writing speed a hard disk drive or hard drive partition can support on Linux OS:

A copy paster from the manual text is as follows:

How fast can I write data to my filesystem? (with at least 1GB free)
dd bs=1000000 count=1000 if=/dev/zero of=bigfile &
speedometer bigfile

However, when I tried copy/pasting the example in terminal, to test the maximum writing speed to an external USB hard drive, only dd command was started and speedometer failed to initialize and display graphs of the file creation speed.

I've found a little "hack" that makes the man example work by adding a 3 secs sleep like so:

debian:/media/Expansion Drive# dd bs=1000000 count=1000 if=/dev/zero of=bigfile & sleep 3; speedometer bigfile

Here is a screenshot of the bigfile created by dd and tracked "in real time" by speedometer:
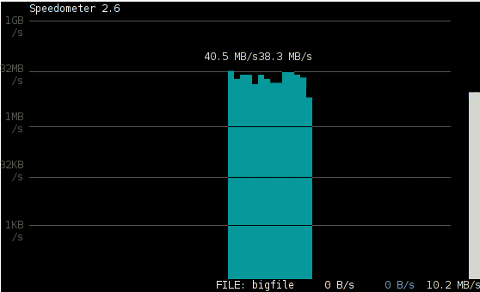
How fast is writting data to local USB expandable hard disk Debian Linux speedometer screenshot

Actually the returned results from this external USB drive are, quite high, the possible reason for that is it is connected to my laptop over an USB protocol verion 3.

6. Using Speedometer to keep an eye on file download in progress

This application of speedometer is mostly useless especially on Linux where it is used as a Desktop.

However in some occasions if files are transferred over ssh or in non interactive FTP / Samba file transfers between Linux servers it can come handy.

To visualize the download and writing speed of lets say FTP transferred .AVI movie (during the actual file transfer) on the download host issue:

# speedometer Download-Folder/What-goes-around-comes-around.avi

7. Estimating approximate time for file transfer

There is another section in the speedometer manual pointing of the program use to calculate the time remaining for a file transfer.

The (man speedometer) provided example text is:

How long it will take for my 38MB transfer to finish?
speedometer favorite_episode.rm $((38*1024*1024))

At first glimpse it hard to understand (like the other manual example). A bit of reasoning and I comprehend what the man author meant by the obscure calculation:

$((38*1024*1024))

This is a formula used in which 38 has to be substituted with the exact file size amount of the transferred file. The author manual used a 38MB file so this is why he put $((38* … in the formula.

I give it a try – (just for the sake to see how it works) with a file with a size of 2500MB, in below two screenshot pictures I show my preparation to copy the file and the actual copying / "real time" transfer tracking with speedometer's status percentage completion bar.
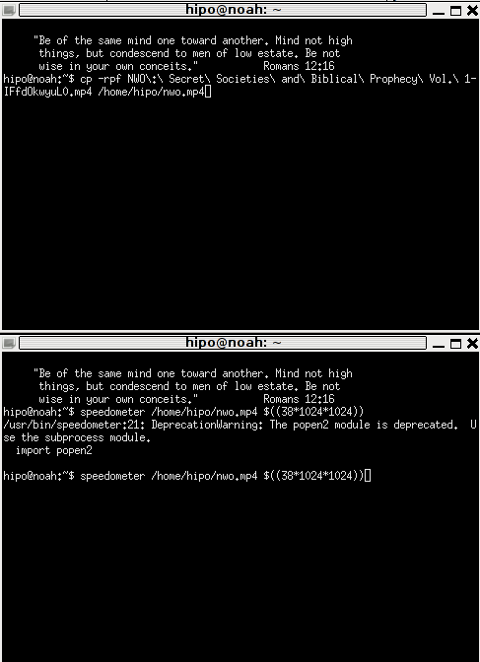
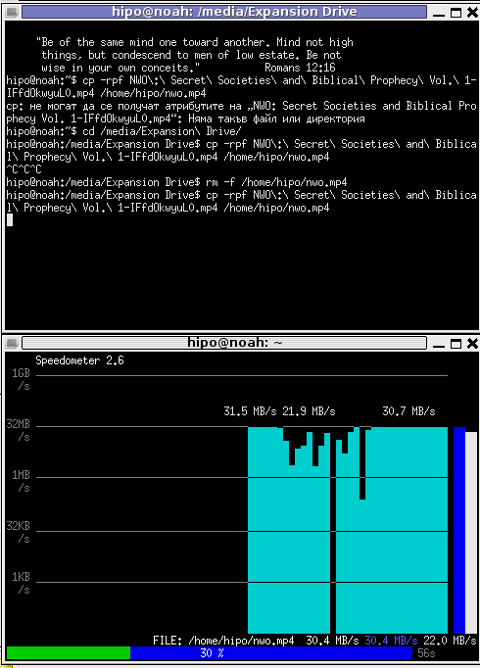
xterm terminal copy file and estimate file copying operation speed on linux with speedometer preparation

Two xterm terminals one is copying a file the other one uses speedometer to estimate the time remaining to complete the file transfer from expansion USB hard drive to my laptop harddrive


How to create ssh tunnels / ssh tunneling on Linux and FreeBSD with openssh

Saturday, November 26th, 2011

ssh-tunnels-port-forwarding-windows-linux-bypassing-firewall-diagram
SSH tunneling
allows to send and receive traffic using a dedicated port. Using an ssh traffic can have many reasons one most common usage reason is to protect the traffic from a host to a remote server or to access port numbers which are by other means blocked by firewall, e.g.: (get around firewall filtering)
SSH tunneling works only with TCP traffic. The way to make ssh tunnel is with cmds:

host:/root# ssh -L localhost:deshost:destport username@remote-server.net
host:/root# ssh -R restport:desthost:localport username@remote-server.net
host:/root# ssh -X username@remote-server.net

This command will make ssh to bind a port on localhost of the host host:/root# machine to the host desthost:destport (destination host : destinationport). Important to say deshost is the host destination visible from the remote-server.net therefore if the connection is originating from remote-server.net this means desthost will be localhost.
Mutiple ssh tunnels to multiple ports using the above example commands is possible. Here is one example of ssh tunneling
Let’s say its necessery to access an FTP port (21) and an http port (80), listening on remote-server.net In that case desthost will be localhost , we can use locally the port (8080) insetad of 80, so it will be no necessery to make the ssh tunnel with root (admin privileges). After the ssh session gets opened both services will be accessible on the local ports.

host:/home/user$ ssh -L 21:localhost:21 -L 8080:localhost:80 user@remote-server.net

That’s all enjoy 😉

ZenMap Nmap multi platform Graphical frontend for checking port security

Saturday, June 15th, 2013

graphic program to scan remote network server port security on GNU Linux and Windows ZenMap

Recently I wrote little article with some examples for scanning server port security with Nmap. I forgot to mention in the article that there is also Nmap frontend GUI program called ZenMap. ZenMap port is available for both Windows and Linux. In Debian, Ubuntu, Mint and other debian derivative distributions ZenMap is available from standard package repositories;

 noah:~# apt-cache show zenmap|grep -i description -A 3

Description-en: The Network Mapper Front End
 Zenmap is an Nmap frontend. It is meant to be useful for advanced users
 and to make Nmap easy to use by beginners. It was originally derived
 from Umit, an Nmap GUI created as part of the Google Summer of Code.
Description-md5: 4e4e4c6aeaa4441484054473e97b7168
Tag: implemented-in::python, interface::x11, network::scanner, role::program,
 uitoolkit::gtk, use::scanning, x11::application
Section: net

To install  ZenMap on Debian / Ubuntu Linux:

noah:~# apt-get install --yes zenmap
...

In Fedora, CentOS and other RPM based Linux-es to install ZenMap run:

noah:~# yum -y install nmap-frontend nmap
...

To use Nmap's Frontend full functionality, you have to run it as (root) superuser:

hipo@noah:~$ sudo su
[sudo] password for hipo:
noah:~# zenmap

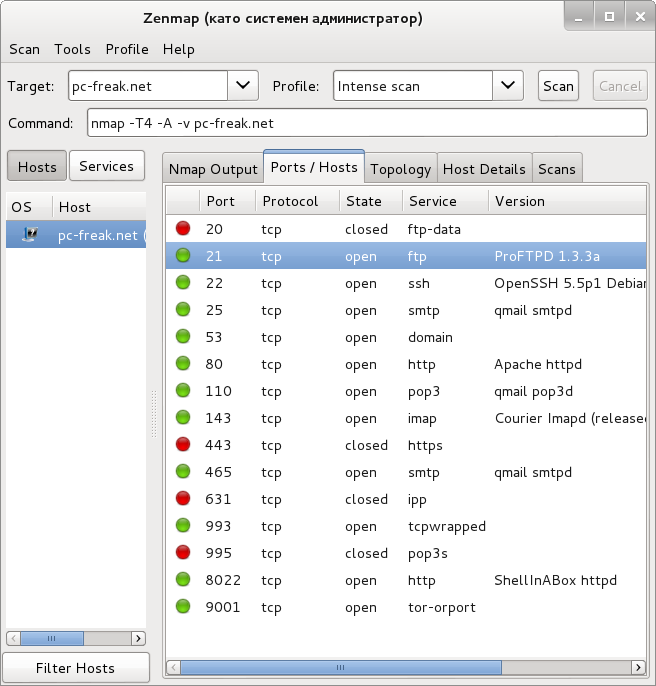
Zenmap saves, a lot of time as there is no need to  remember Nmap's arguments or run few Nmap scans until you get essential information for remote scanned machine.
It automatically gives details on Remote server running services (fingerprint)

Zenmap remote server security services scan with services software version

Very useful report it makes as well is network (and host) topology diagram,

network scanner remote host Linux Windows toplogy guess ZenMap screenshot

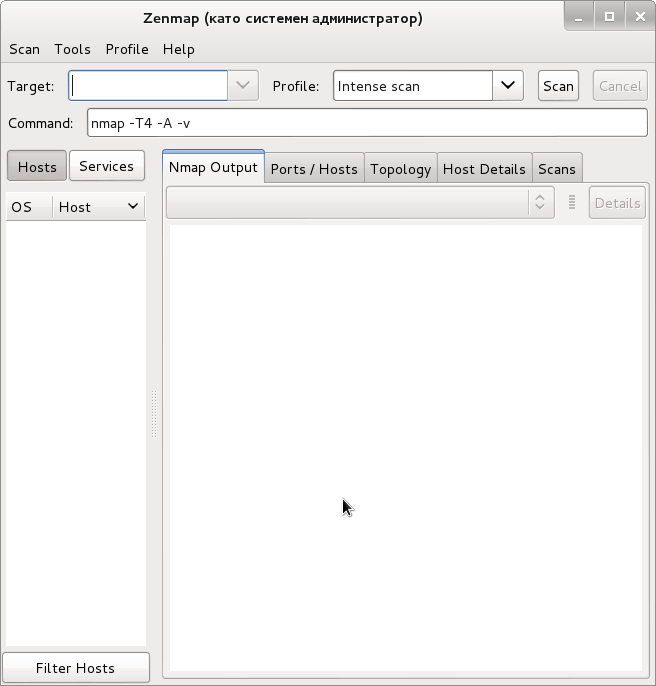
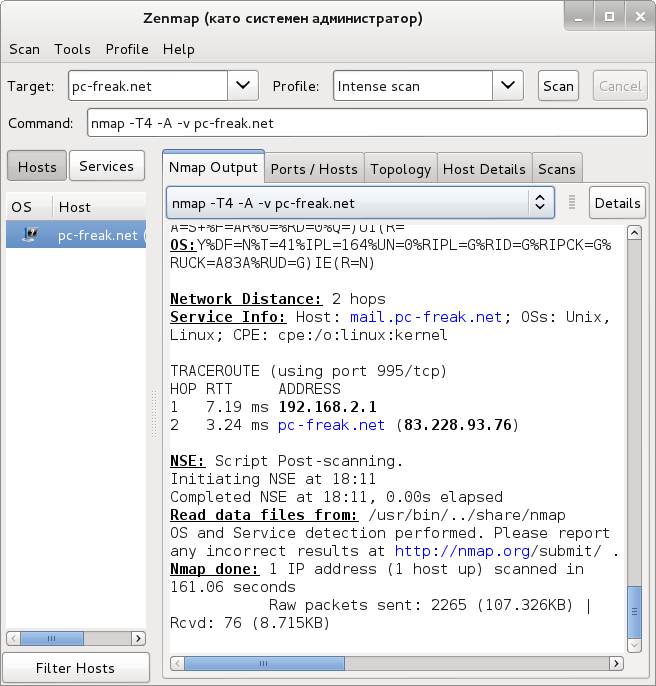
ZenMap is just Nmap frontend and under the GUI it does use Nmap with various arguments to do produce scan results. In Nmap Output tab, you can see a lot of verbose info.

Zenmap Linux Windows GUI port scanne nmap output tab screen Debian / Ubuntu Linux

Happy scanning 🙂