Posts Tagged ‘default behaviour’
Sunday, September 20th, 2009 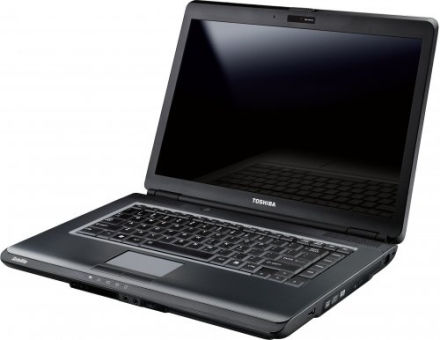
Today I had the task to Install Ubuntu GNU / Linux on Toshiba L300 PLSBGE Laptop.
I had already installed Windows Vista Enterprise on the notebook. Thus I used Acronis Disk Directory Suite to partition the harddrive for Ubuntu even though I could have used the gparted included on Ubuntu’s installation CD. I’ve asked specificly if
I could use the Ubuntu CD to repartition my hard drive in #ubuntu in irc.freenode.net.
The answer was positive it’s absolutely safe to resize an NTFS partition using Ubuntu’s installation LiveCD and gparted.That seems like a good news for all of us the free software users / enthusiasts / hobbyists etc.
I hated the default Ubuntu behaviour it automatically decided to install itself on a automatically created 2.5 GB partition.
I thought it won’t be so dumb to install itself on such a tiny partition. Well guess what I was wrong IT WAS SO DUMB!
Even though I had already 80 GB ext3 partition. Ubuntu’s default behaviour was to install on an automatically created 2.5GB partition.
Right after the installation I was stunned just to realize there was no free space on the drive where the dumbass installed itself.
After that I had some issues deleting the already cretead partitions, which for some reason messed up. Luckily the good old fdisk fixed the situation so I could easily delete all the partitions except the vista and recreate them again using gparted with Ubuntu’s install LiveCD. The install was completely flawless. Everything worked out of the box, no external efforts to fix broken stuff like usually happens in Linux fantastic! The only broken thing was that switching to plain console with ctrl+alt+f1 would visualize a non working display output and I couldn’t see the ttys at all. That wasn’t such a hassle since the system is planned to work only in GUI mode. I guess Ubuntu is going through a real development with a positive end results. Even external USB printer Canon PIXMA IP3300 worked by simply plugging it in. For some weird reason to make the printer work correctly I had to use driver for Canon PIXMA IP3000. Anyways it worked with it and the printer started printing correctly even though officially on some of the linux printers databases it’s reported the printer won’t work correctly never ever.END—–
Tags: default behaviour, fdisk, free software users, good, hard drive, partitions, printer work, Ubuntu 9.04 Jaunty on Toshiba L300 PLSBGE Laptop, weird reason, working
Posted in Linux, Linux on Laptops | 1 Comment »
Friday, February 12th, 2016 
If you don't much care about logging in logs from which domain / hostnames requests to webserver originate and you want to boost up the Apache Webserver performance a bit especially on a heavy loaded Websites, where no need for stuff like Webalizer, Awstats etc. , e.g. you're using GoogleAnalytics to already track requests (beware as sometimes GoogleAnalytics could be missing requests to your webserver, so having some kind of LogAnalyzer software on server is always a plus). But anyways accepting that many of us already trust GoogleAnalytitcs.
Then a great tuning option to use in default domain configuration or in multiple VirtualHosts config is:
HostnameLookups off
If you want to make the HostnameLookups off as a default behaviour to all your virtualhosts on Debian / Ubuntu / CentOS / SuSE / RHEL distro virtualhosts add either to default config /etc/apache2/sites-enabled/000-default (on Deb based Linuxes) or (on RPM based ones), add directive to /etc/httpd/httpd.conf
For self-hosted websites (if run your own small hosting) or for a home situated webservers with up to 20-50 websites it is also a useful optimization tip to include in /etc/hosts file all the IPs of sites with respective domain names following the normal syntax of /etc/hosts, e.g. in my own /etc/hosts, I have stuff like:
pcfreak:~$ cat /etc/hosts
127.0.0.1 localhost localhost.localdomain
127.0.1.1 pcfreak.www.pc-freak.net pcfreak mail.www.pc-freak.net
192.168.0.14 new-pcfreak
219.22.88.70 fw
212.36.0.70 ftp.bg.debian.org
212.211.132.32 security.debian.org
83.228.93.76 pcfreak.biz www.pc-freak.net www.pc-freak.net
# for wordpress plugins
216.58.209.3 gstatic.com
91.225.248.129 www.linkedin.com
74.50.119.198 www.blogtopsites.com
94.31.29.40 static.addtoany.com
216.58.209.202 fonts.googleapis.com
216.58.209.14 www.google-analytics.com
216.58.209.14 feeds.feedburner.com
93.184.220.241 wprp.zemanta.com
199.30.80.32 stumbleupon.com
156.154.168.17 stumbleupon.com
2.18.89.251 platform.linkedin.com
# The following lines are desirable for IPv6 capable hosts
# … etc. put IPs and hostnames following above syntax
As you see from above commented section for wordpress plugins, I've included some common websites used by WordPress enabled plugins to prevent my own hosting server to query DNS server every time. The normal way the Linux / Unix works is it first checks in /etc/hosts and only if the hostname is not defined there then it queries the DNS caching server in my case this is a local DJBDNS cache server, however defining the hosts in /etc/hosts saves a lot of milisecons on every request and often if multiple hosts are defined could save (decrease site opening for end users) with seconds.
Well now use some website speed testing plugin like Yslow, Firebug Fiddler or HTTPWatch
Tags: default behaviour, end users, hosts file, net, org, performance increase, stuff, syntax, website speed, wordpress plugins
Posted in Curious Facts, Everyday Life, Linux, Networking, Performance Tuning, Remote System Administration, System Administration, Various, Web and CMS, Wordpress | No Comments »
Wednesday, April 18th, 2012 
The default behaviour of lynx – console text browser on Linuces, BSD and other free OSes is to always ask, for the accept cookies prompt once an internet web page is opened that requires browser cookies to be enabled.
I should admin, having this "secure by default" (always ask for new cookies) behaviour in lynx was a good practice from a security point of view.
Another reason, why this cookies prompt is enabled by default is back in the days, when lynx was actively developed by programmers the websites with cookies support was not that many and even cookies was mostly required for user/pass authentication (all those who still remember this days the websites that requires authentication was a way less than today) …
With this said the current continuing security cautious behaviour in the browser, left from its old days is understandable.
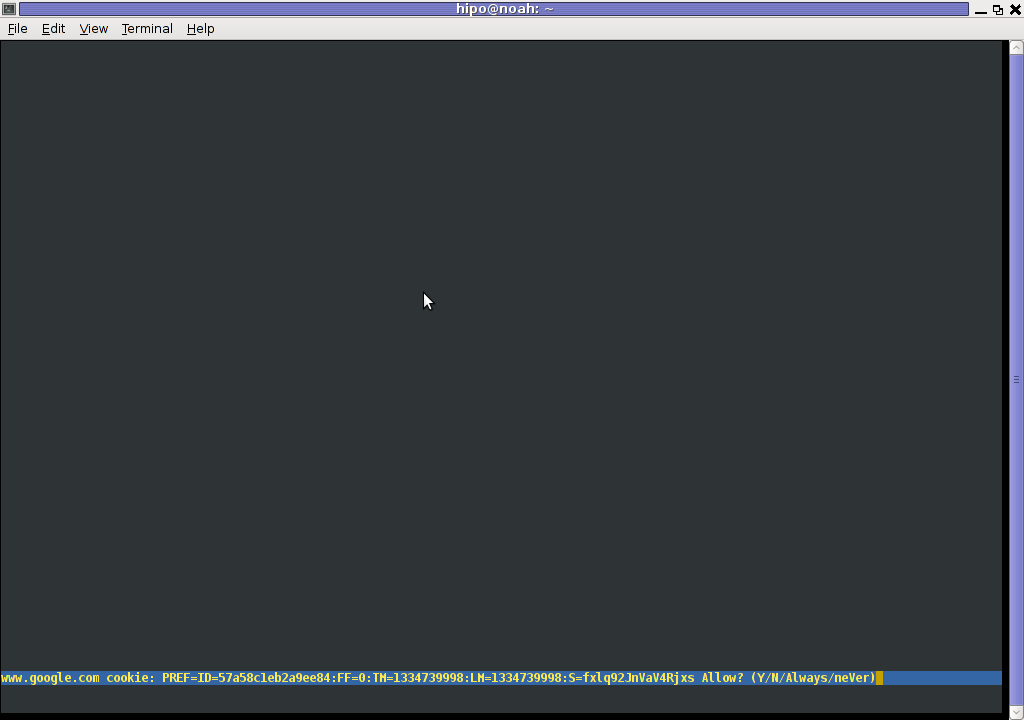
However I personally sometimes, need to use lynx more frequently and this behaviour of always opening a new website in text mode in console to prompts me for a cookie suddenly becomes a big waste of time if you use lynx to browser more than few sites. Hence I decided to change the default way lynx handles cookies and make them enabled by default instead.
Actually even in the past, when I was mainly using internet in console on every new server or home Linux install, I was again making the cookies to be permanently accepted.
Everyone who used lynx a few times already knows its "annoying" to all time accept cookie prompts … This provoked me to write this short article to explain how enabling of constant cookie accepting in lynx is done
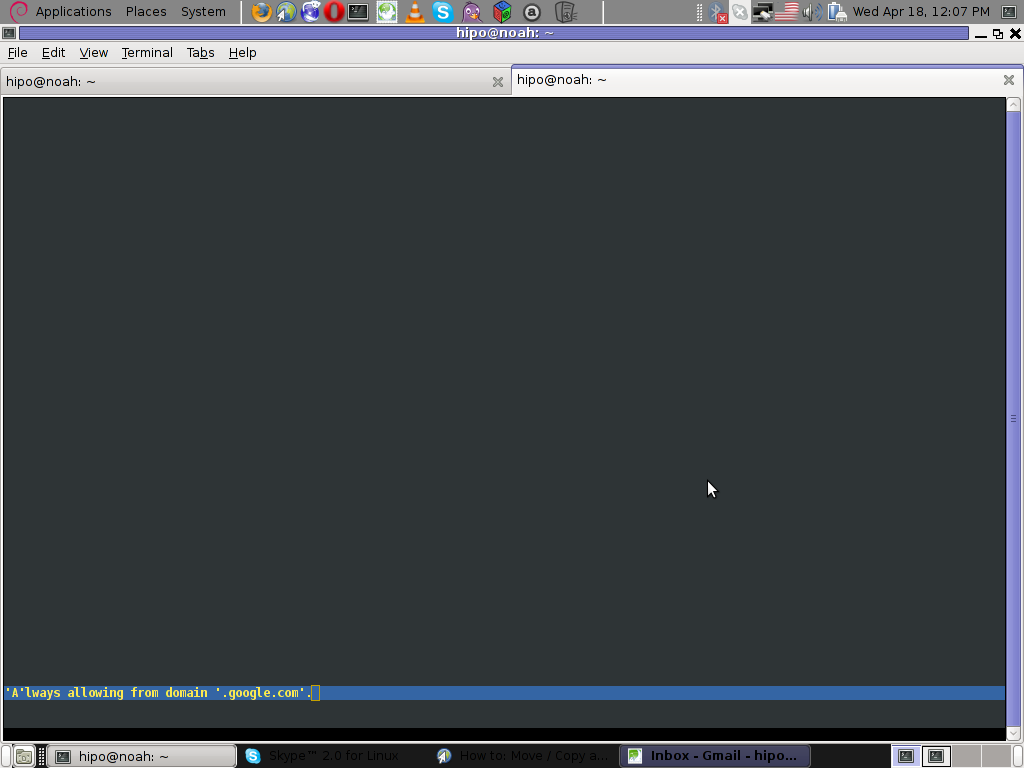
To enable the persistent cookies in lynx, one needs to edit lynx.cfg on different GNU / Linux and BSD* distributions lynx.cfg is located in different directory.
Most of the lynx.cfg usual locations are /etc/lynx/lynx.cfg or /etc/lynx.cfg as of time of writting this post in Debian Squeeze GNU / Linux the lynx.cfg is located in /etc/lynx-cur/lynx.cfg, whether for FreeBSD / NetBSD / OpenBSD users the file is located in /usr/local/etc/lynx.cfg
What I did to allow all cookies is open lynx.cfg in vim edit and change the following lines:
a)
#FORCE_SSL_COOKIES_SECURE:FALSE
with
FORCE_SSL_COOKIES_SECURE:TRUE
b)
#SET_COOKIES:TRUE
uncomment it to:
SET_COOKIES:TRUE
c) next, change
ACCEPT_ALL_COOKIES:FALSE
ACCEPT_ALL_COOKIES:TRUE
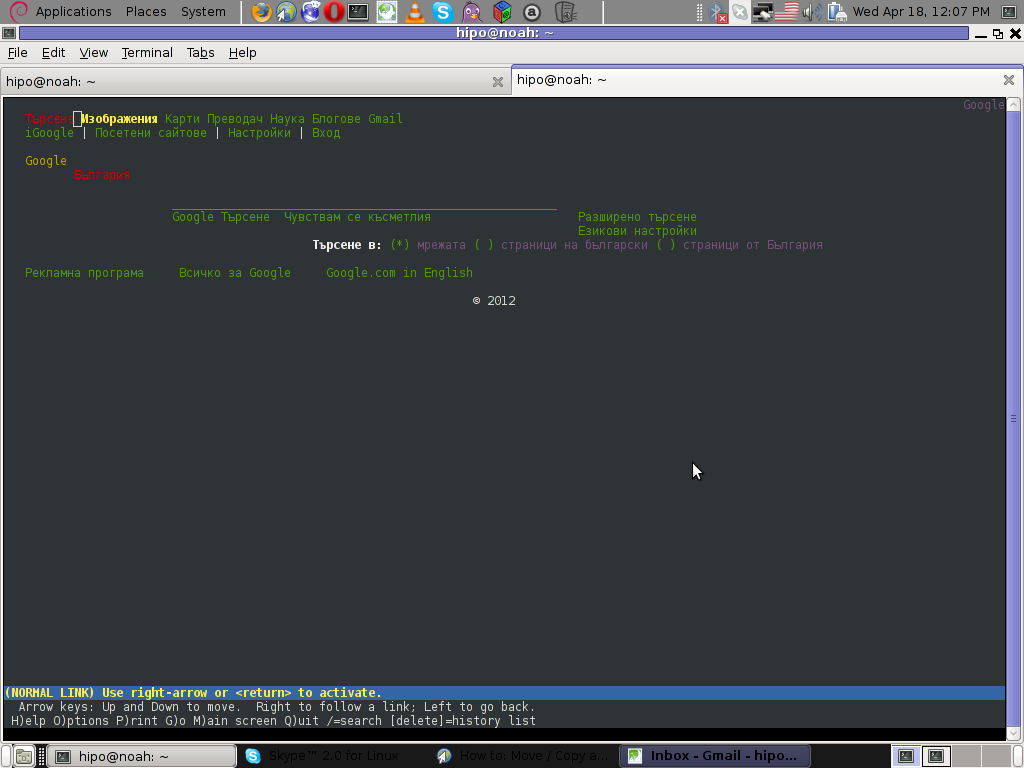
Onwards opening any website with lynx auto-accepts the cookies.
For people who care about there security (who still browse in console (surely not many anymore)), permanently allowing the cookies is not a good idea. But for those who are ready to drop off little security for convenience its ok.
Tags: ALL, authentication, Auto, browser cookies, BSD, bsd distributions, cfg, change, convenience, Cookie, default behaviour, Draft, everyone, file, free oses, GNU, gnu linux, good, How to, internet web, Linux, Lynx, lynx one, NetBSD, Onwards, OpenBSD, page, persistent cookies, point of view, programmers, quot, reason, security point, squeeze, support, text, text browser, text mode, time, TRUEb, TRUEc, TRUEuncomment, uncomment, use, using internet, vim, waste, waste of time, web page, writ
Posted in Curious Facts, Everyday Life, FreeBSD, Linux, System Administration | 1 Comment »
Sunday, July 25th, 2010 
I’ve decided to write a short post on how to install in a quick manner Google Chrome on Debian GNU/Linux.
There are few reasons why you would consider installing Chrome, however the most obvious one is is the browser speed.
I should admit the browsing experience with Chrome looks and feels far better compared to Iceweasel (e.g. Firefox) on Debian.
It could be that web loading speed performance with Epiphany or Opera is similar to Chrome in terms of velocity, apart from the faster browser experience with Google Chrome, I’ve seen reports online that sometimes Google Chrome behaves better when it comes to multimedia audio and video streams online.
Another thing I notice in Google Chrome is that it’s generally much lighter and loads the base browser times faster than Iceweasel.
The most accurate way to install Chrome on Debian Linux is using Google Linux repositories
So to install add to your /etc/apt/sources.list the following google linux repo
# Google software repository

deb http://dl.google.com/linux/deb/ stable non-free main
e.g.
debian-deskop:~# echo "deb http://dl.google.com/linux/deb/ stable non-free main" >> /etc/apt/sources.list
Then update your repositories list with apt-get:
debian-desktop:~# apt-get update
Next choose your google chrome preferred release between the available (beta, stable and unstrable) version.
I’ve chose to install the Google Chrome stable release apt-getting it like shown below
debian-desktop:~# apt-get install google-chrome-stable
Now the google chrome will be ready to use to start using it either start it up from the Gnome / KDE Menus or exec the command:
debian-desktop:~$ google-chrome
So far so good, you will have now a gnome browser, however what is really irritating is the default behaviour of the chrome install by default it tampers with the default browser configured for my whole Linux desktop system in other words it automatically links:
/etc/alternatives/gnome-www-browser to -> /usr/bin/google-chrome as well as,
/etc/alternatives/x-www-browser to -> /usr/bin/google-chrome
Well I wasn’t happy with that unwarranted install behaviour of Google Chrome therefore I decided to reverse my default Gnome and System Browser back to Epiphany.
First I removed the links to /usr/bin/google-chrome
debian-desktop:~# rm -f /etc/alternatives/gnome-www-browser

debian-desktop:~# rm -f /etc/alternatives/x-www-browser
And thereafter I linked it back to Epiphany
debian-desktop:~# ln -sf /usr/bin/epiphany /etc/alternatives/gnome-www-browser

debian-desktop:~# ln -sf /usr/bin/epiphany /etc/alternatives/x-www-browser
Tags: browser, command, Debian Lenny, default behaviour, experience, Google Chrome, Google Linux, Install Google Chrome Web Browser Chrome on 32 and 64 bit Debian Lenny and Squeeze/Sid Linux, list, online, release, speed
Posted in Linux, Linux and FreeBSD Desktop, Various | 1 Comment »
Saturday, May 15th, 2010 
I received a comment today from one of my blog readers. That he likes my blog content but he looks for a way to subscribe to my blog.
Though I had a subscription button configured in my wordpress template of choice. The button is located on place in the template that is absolutely unnoticable (at the bottom of the page). This is by the way I believe a default behaviour in case if the default wordpress plugin is used.
Thus I decided to set a clear RSS Subscription button on my blog.
Though at a first glimpse the task looked quite trivial it happened to be a way more complex!
I’ve tried a number of things before I can succeed in adding an RSS button.
The most simple though not really flexible way was through:
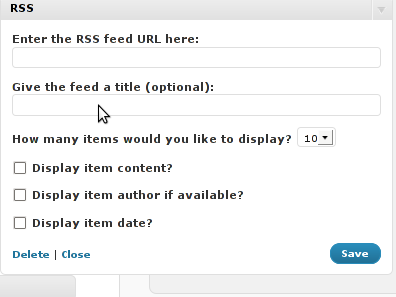
WordPress’s Widgets (Using the RSS Widget) .
This approach however has one major inconvenience.
Using the default wordpress RSS Widget you cannot configure the Widget to keep displaying 0 items of the feed.
In other words you cannot configure from the the sliding menu reading:
How many items would you like to display? 0 in order to prevent completely showing up of any of the feed on the page.
If you leave it with one. The RSS icon of RSS widget would point directly to your blog instead to the RSS feed configured.
So in practice configuring it especially in my case rendered completely useless.
The appearing link from the default RSS widget for some weird reason doesn’t includes a link to where my feed is located https://www.pc-freak.net/blog/feed/
In the meantime I looked online to look for something that will facilitate me in completing the simple task to add an RSS Subscribe Feed to my Blog.
I asked for help in freenode’s irc network #wordpress channel. And a guy from there suggested that I go with wp-o-matic wordpress plugin
Anyways It took me a few minutes to realize this plugin is suitabile if you want to show other blogs feed to your blog instead of adding a RSS feed link to your own blog, this wasn’t my goal so I skipped next in looking for something to help me on.
In the meantime I found the interesting feedburner google feed service that is able to help in creating, publishing and distributing RSS & Atom feeds.
I recommend you check it if you still haven’t. It takes only a few clicks to register in order to use feedburner as a feed service.
Once you are set-up with Feedburner, you can activate all the cool functions, such as allowing your readers to subscribe via email, and also the Feedburner Flares.
Another nice thing about using feedburner is that it formats your fed content in a really pretty layout. By the way since the 2004 feedburner is owned by Google. So in a certain terms using feedburner instead of the default wordpress blog feed will probably attract more google visitors to your blog and is generally good for your blog placement in search engines.
For more of the advantages check feedburner’s google service website .
However there is one major disadvantage in using the feedburner’s feed service. Using the service rob you out of control of your feed, since all the feeds will be properly generated and formatted from feedburner.
The newly created service for feedburner by me is located on www.feeds.feedburner.com/WalkingInLightWithChrist-FaithComputingDiary
Now to be able to use the newly installed feedburner service with my blog I had to test a couple of plugins before I came to the ones that really worked.
I played with feedburner_feedsmith_plugin , feedburner-widget , feedlist.2.61 , wp-keiths-easy-rss , rss-atom-avatar but I couldn’t make any of them work properly with feedburner. Some of the up mentioned plugins were a real hell to configure so I completely abandondoned them seeing their inflexibility. Others were completely abondonede for more than 2 years from now, etc. etc. Fundamentally none of them worked for me.
I finally was able to bring up the feedburner service on my worpdress using The FD Feedburner plugin
All necessery to enable the plugin after you download into wordpress’s wp-content/plugins directory is to configure the plugin from:
Plugins -> FeedBurner Configuration Here is the screenshot on the FD Feedburner plugin configuration screen:
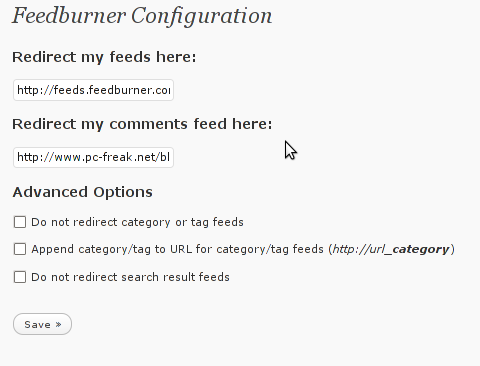
As you can see in the screenshot the plugin is really simple to configure. All you need to provide it with is the url provided to you by feedburner right after you register your blog for the service.
Now as you will have your http://www.yourwebsite.com/blog/feed/ be redirected to the feedburner’s website generated feed for your website by the FD FeedBurner WordPress Plugin all left to be done is to provide a link on your blog to your blog feed.
To accomplish this you will have to download the add-to-any-subscribe wordpress plugin.
Again installation of add-to-any-subscribe is a piece of cake, to install follow The install instructions here
Now hopefully your feedburner feed will be able to be distrubuted to your visitors via the AddtoAny subscription button on your blog.
Tags: Adding RSS Feed to Wordpress in conjunction with FeedBurner / Wordpress add-to-any-subscribe plugin, configured, conjunction, default behaviour, google, help, irc network, link, piece of cake, RSS, simple, wordpress blog, wordpress plugin, www
Posted in Everyday Life, System Administration, Various, Web and CMS, Wordpress | 12 Comments »
Saturday, April 7th, 2012 I've recently wanted to use PHP's embedded system(""); – external command execute function in order to use ls + wc to calculate the number of files stored in a directory. I know many would argue, this is not a good practice and from a performance view point it is absolutely bad idea. However as I was lazy to code ti in PHP, I used the below line of code to do the task:
<?

echo "Hello, ";

$line_count = system("ls -1 /dir/|wc -l");

echo "File count in /dir is $line_count \n";

?>
This example worked fine for me to calculate the number of files in my /dir, but unfortunately the execution output was also visialized in the browser. It seems this is some kind of default behaviour in both libphp and php cli. I didn't liked the behaviour so I checked online for a solution to prevent the system(); from printing its output.
What I found as a recommendations on many pages is instead of system(); to prevent command execution output one should use exec();.
Therefore I used instead of my above code:
<?

echo "Hello, ";

$line_count = exec("ls -1 /dir/|wc -l");

echo "File count in /dir is $line_count \n";

?>
By the way insetad of using exec();, it is also possible to just use ` (backtick) – in same way like in bash scripting's “.
Hence the above code can be also written for short like this:
<?

echo "Hello, ";

$line_count = `ls -1 /dir/|wc -l`;

echo "File count in /dir is $line_count \n";

?>
🙂
Tags: Auto, backtick, bad idea, behaviour, browser, code lt, command, command execution, count, default behaviour, dir, Draft, exec, execution, file, fine, function, idea, kind, libphp, line, online, order, performance, performance view, quot, solution, task, way
Posted in Programming, Web and CMS | 2 Comments »
Tuesday, March 13th, 2012 The default picture viewer on Xubuntu's XFCE is risterroro. Risterroro is quite lightweight, but anyways is lacking even basic functionality with reading a number of pictures in a directory and showing, them one by one lacks any picture automated slider. The lack of picture back/forward functionality makes picture viewing very inconvenient on those Linux distro.

Thanksfully this kind of unconfortable default behaviour on Xubuntu can easily be changed to use a handy picture viewer program called gpicview
xubuntu-linux:~# apt-get install --yes gpicview

Gpicview is a good minimalistic program which has all the functionality of the default GNOME picture viewer program eog – (eye of the Gnome). If you're aaccustomed to GNOME's eog you can always install and use eog instead 🙂
Tags: Auto, behaviour, default, default behaviour, directory, distro, Draft, eog, functionality, Gnome, gpicview, gpicviewGpicview, kind, Lack, Linux, linux distro, minimalistic, number, picture, program, Risterroro, slider, Thanksfully, viewer, XFCE, Xubuntu
Posted in Linux, Linux and FreeBSD Desktop, System Administration | No Comments »
Thursday, June 2nd, 2011 he Joomla CMS default behaviour is that Page titles of the Joomla Articles created are always set to the page Title assigned to each of the articles.
This is not very good behaviour in terms of SEO, as the page title of each link on the main page is different and there is no continuous repeating pattern in all of the joomla pages.
Everyone that has even basic idea of SEO knows that page titles are very important weight factor to make indexing inside Search Engines succesful.
There is a well know SEO rule which is the more reoccuring pattern one has in his page titles, more is stressed on the keywords contained in the title.
As I said for some weird reason Joomla has no common page Title for all my the created Article pages linked via the Main Menu*
Thus in order to improve this bad default Joomla SEO behaviour one has to change the default auto assigned titles for created pages, manually.
Two things are necessery to change each of the joomla already existing TITLES.
1. Go to each of the pages (.e.g. Home etc.) and change the Parameters System Page Title settings
After logging in with administrator in Joomla, navigate to
Menus -> Main Menu*
Further on choose a menu item from all your existing items, let’s say Home and click on it.
On the left side below the Save, Apply, Close and Help buttons you will notice the menus:
Parameters (Basic), Parameters (Component), Parameters (System)
When clicked on Parameters (System) a submenu will appear:
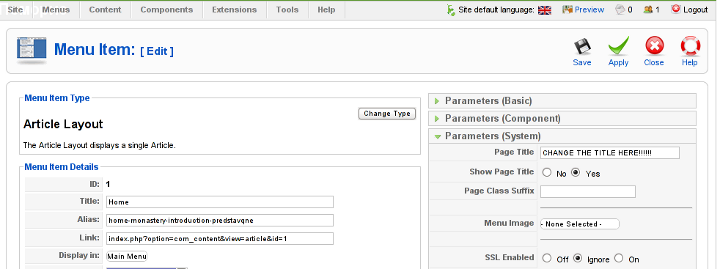
Above is a screenshot of the up-described Parameters (System) [Page Title] location
You need to change where it reads on the screenshot CHANGE THE TITLE HERE !!!!!! 😉
After entering your own desired page title go and save the article via the Apply or Save button (also visible in the screenshot).
Now as the custom Page Title is set, next step is to enable the custom Page Title for the respective Article in Article Manager
2. Enable custom Page Title for created pages in Joomla
Go to the Article Manager by following the menus:
Content -> Article Manager
Select the Article of which you want to change the Page Title to some custom text and click over it.
As the article opens for edit in an html editor, navigate to Parameters (Advanced) tab and therein change the Show Title from default setting value:
Use Global
to
Yes
Once again use the Save or Apply button to confirm the new settings and open your website in a new tab, try to browse and check the title of the articles parameters just edited. It should show up in the Title (page heading) the custom input Title.
Now repeat the same procedure for all pages (Articles), existing in Joomla to attune the Page Titles to some Google friendly strings and enjoy the better Search engine indexing which should likely follow.
Tags: article manager, Auto, Button, cms, Component, component parameters, custom, default behaviour, Draft, everyone, Global, good behaviour, home, indexing, location, menu, menus, necessery, page, page titles, Parameters, reason, screenshot, Search, search engines, SEO, show, submenu, tab, text, value, weird reason
Posted in Joomla, Various, Web and CMS | No Comments »
Tuesday, April 12th, 2011 Until recently, I have used a default wordpress theme which historically is a bit old and used to be a default theme to the older versions of wordpress.
Since however, I’ve went to many updates and on the other hand I do like and enjoy the template I have decided to continue use it for my blog until this very day.
However this nice theme’s default behaviour is a bit weird, since by default the Single opened posts are configured in a way that the usual index page sidebar is missing.
As in the sidebar there are plenty of navigation buttons and search in the blog button, at a certain moment I have realized it’s probably not a good idea that the single.php (single blog posts) open up with the right sidebar missing.
Thus I’ve decided to put back the missing sidebar in the single posts, with a hope that this will be helpful to my readers and hence have positive impact on the overall blog user experience.
Doing so prooved to be rather easy, here is how I added back the right sidebar to my wordpress single posts :
1. Edit blog/wp-content/themes/default/single.php
debian:~# vim /var/www/blog/wp-content/themes/default/single.php
2. In the single.php look up for the code:
<div id="content" class="widecolumn">
Substitute this html code with:
<div id="content" class="narrowcolumn">
3. Next find the code:
<?php get_footer(); ?>
Right before the get_footer(); php function add in the function;
<?php get_sidebar(); ?>
Tadam! Refresh a single post in Firefox and you should see your blog index.php sidebar to show up.
Tags: behaviour, blog, Button, code lt, content themes, default behaviour, default theme, div, div id, Firefox, footer, function, gt 3, hand, idea, impact, index page, moment, navigation buttons, older versions, page, php, Search, Single, substitute, Tadam, use, user experience, var, vim, way, wordpress blog, www
Posted in Web and CMS, Wordpress | 2 Comments »
Monday, January 9th, 2012 I've recently had to set up a backup system to synchronize backup archive files between two remote servers and as I do usually with this situation I just set up a crontab job to periodically execute rsync to copy data from source server to the destination server . Copying SRC to DEST is the default behaviour rsync uses, however in this case I had to copy from the destination server to the source server host (in other words sync files the reversely.
The usual way to copy with rsync via SSH (from SRC to DEST) is using a cmd line like:
debian:~$ /usr/bin/rsync -avz -e ssh backup-user@xxx.xxx.xxx.xxx:/home/backup-user/my-directory .
Where the xxx.xxx.xxx.xxx is my remote server IP with which files are synched.
According to rsync manual, the proposed docs SYNOPSIS is in the format;
Local: rsync [OPTION…] SRC… [DEST
Obviusly the default way to use rsync is to copy source to destination which I used until now, but in this case I had to the other way around and copy files from a destination host to the source server. It was logical that swapping the SRC and DEST would complete my required task. Anyways I consulted with some rsync gurus in irc.freenode.net , just to make sure it is proper to just swap the SRC, DEST arguments.
I was told this is possible, so I swapped args;
debian:~$ /usr/bin/rsync -avz -e ssh . backup-user@xxx.xxx.xxx.xxx:/home/backup-user/my-directory

...
Surprisingly this worked 😉 Anyways I was adviced by by a good guy nick named scheel , that putting -e ssh to command line is generally unnecessery except if there is no some uncommon used SSH port over which the data is transferred. An example case in which -e 'ssh is necessery would be if transferring via lets say SSH port 1234;
rsync -avz -e 'ssh -p1234' /source user@host:/dest
In all other cases omitting '-e ssh' is better as '-e ssh' is rsync default. Therefore my final swapped line I put in cron to copy from a destinatio to source host with rsync looked like so:
05 03 2 * * /usr/bin/ionice -c 3 /usr/bin/rsync -avz my-directory backup-user@xxx.xxx.xxx.xxx:/home/backup-user/ >/dev/null 2>&1
Tags: archive files, Auto, avz, backup system, case, cmd, cmd line, copy, copying, cron, default, default behaviour, destIn, destinatio, destination, destination host, destination server, docs, Draft, example, example case, few words, format, gurus, host, job, nbsp, necessery, nick, option, port 1234, remote server, rsync, scheel, server host, server ip, source host, source server, ssh port, sync files, system, usr bin
Posted in FreeBSD, Linux, System Administration | No Comments »


How to permanently enable Cookies in Lynx text browser – Disable accept cookies prompt in lynx console browser
Wednesday, April 18th, 2012The default behaviour of lynx – console text browser on Linuces, BSD and other free OSes is to always ask, for the accept cookies prompt once an internet web page is opened that requires browser cookies to be enabled.
I should admin, having this "secure by default" (always ask for new cookies) behaviour in lynx was a good practice from a security point of view.
Another reason, why this cookies prompt is enabled by default is back in the days, when lynx was actively developed by programmers the websites with cookies support was not that many and even cookies was mostly required for user/pass authentication (all those who still remember this days the websites that requires authentication was a way less than today) …
With this said the current continuing security cautious behaviour in the browser, left from its old days is understandable.
However I personally sometimes, need to use lynx more frequently and this behaviour of always opening a new website in text mode in console to prompts me for a cookie suddenly becomes a big waste of time if you use lynx to browser more than few sites. Hence I decided to change the default way lynx handles cookies and make them enabled by default instead.
Actually even in the past, when I was mainly using internet in console on every new server or home Linux install, I was again making the cookies to be permanently accepted.
Everyone who used lynx a few times already knows its "annoying" to all time accept cookie prompts … This provoked me to write this short article to explain how enabling of constant cookie accepting in lynx is done
To enable the persistent cookies in lynx, one needs to edit lynx.cfg on different GNU / Linux and BSD* distributions lynx.cfg is located in different directory.
Most of the lynx.cfg usual locations are /etc/lynx/lynx.cfg or /etc/lynx.cfg as of time of writting this post in Debian Squeeze GNU / Linux the lynx.cfg is located in /etc/lynx-cur/lynx.cfg, whether for FreeBSD / NetBSD / OpenBSD users the file is located in /usr/local/etc/lynx.cfg
What I did to allow all cookies is open lynx.cfg in vim edit and change the following lines:
a)
#FORCE_SSL_COOKIES_SECURE:FALSEwith
FORCE_SSL_COOKIES_SECURE:TRUEb)
#SET_COOKIES:TRUEuncomment it to:
SET_COOKIES:TRUEc) next, change
ACCEPT_ALL_COOKIES:FALSEACCEPT_ALL_COOKIES:TRUEOnwards opening any website with lynx auto-accepts the cookies.
For people who care about there security (who still browse in console (surely not many anymore)), permanently allowing the cookies is not a good idea. But for those who are ready to drop off little security for convenience its ok.
Tags: ALL, authentication, Auto, browser cookies, BSD, bsd distributions, cfg, change, convenience, Cookie, default behaviour, Draft, everyone, file, free oses, GNU, gnu linux, good, How to, internet web, Linux, Lynx, lynx one, NetBSD, Onwards, OpenBSD, page, persistent cookies, point of view, programmers, quot, reason, security point, squeeze, support, text, text browser, text mode, time, TRUEb, TRUEc, TRUEuncomment, uncomment, use, using internet, vim, waste, waste of time, web page, writ
Posted in Curious Facts, Everyday Life, FreeBSD, Linux, System Administration | 1 Comment »