Posts Tagged ‘apt-get’

All Debian Linux package repository apt sources.list file for Debian versions 6, 7, 8, 9, 10, 11 and 12

Friday, May 31st, 2024

debian-package-management-repositories-for-all-distributions

If you have to administrate legacy Debian servers, that keeps hanging either for historical reasons or just because you didn't have time to upgrade it up to latest versions, machines that are hanging in the hangar or a mid office building Old server room, doing nothing but simply NAT (Network Address Translation), Proxying, serving  traffic via Squid / Haproxy / Apache / Varnish or Nginx server but you still want to have the possibility to extend the OS even though it is out of date / End of Life reached and out of support as well as perhaps full of security holes, but due to its unvisibility on the Internet hanging in a Demilitarized network the machine stayed on the Local (DMZ)-ed network and still for example you need to install simple things for administration reasons locally on the machine, for example nmap or netcat or some of the network tools for monitoring such as iftop or iptraf etc. you might find out unfortunately that this is not possible anymore, because the configured /etc/apt/sources.list repository mirror is no longer available at its URL. Thus to restore the functioning of apt and apt-get pkg management tools on Debian you need to correct the broken missing package mirrors due to resructurings on the network with a correct ones, originally provided by Debian or eventually if this doesn't work a possible Debian package archive URL. 

In this article, I'll simply provide such URLs you might use to correct your no longer functioning package manager due to package repositoriy unavailibility, below are the URLs (most of which that should be working as of year 2024). To resolve the issues edit and place the correct Debian version you're using.

1. Check the version of the Debian Linux

# cat /etc/debian_version


or use the universal way to check the linux OS, that should be working on almost all Linux distributions

# cat /etc/issue
Debian GNU/Linux 9 \n \l

2. Modify /etc/apt/sources.list and place URL according to Debian distro version

# vim /etc/apt/sources.list


3. Repositories URL list Original and Archived for .deb packages according to Debian distro release
Debian 6 (Wheezy)

Original repostiroes (Not Available and Not working anymore as of year 2024)


Old Archived .deb repository for 6 Squeeze

deb http://archive.debian.org/debian squeeze main
deb http://archive.debian.org/debian squeeze-lts main


​Debian 7 (Wheezy)

Original repostiroes (Not Available and Not working anymore as of year 2024)

Old Archived .deb repository for Jessie (still working as of 2024) :

deb http://archive.debian.org/debian wheezy main contrib non-free
deb http://archive.debian.org/debian-security wheezy/updates main

( Security updates are not provided anymore.)

NOTE:  If you get an error about keyrings, just install it
 

# apt-get install debian-archive-keyring


Debian 8 (Jessie)
Original .deb package repository with non-free included for Debian 8 "Jessie"

deb http://deb.debian.org/debian/ jessie main contrib non-free
deb http://ftp.debian.org/debian/ jessie-updates main contrib
deb http://security.debian.org/ jessie/updates main contrib non-free

Old Archived .deb repository for 8 Jessie (still working as of 2024):

deb http://archive.debian.org/debian/ jessie main non-free contrib
deb-src http://archive.debian.org/debian/ jessie main non-free contrib
deb http://archive.debian.org/debian-security/ jessie/updates main non-free contrib
deb-src http://archive.debian.org/debian-security/ jessie/updates main non-free contrib


# echo "Acquire::Check-Valid-Until false;" | tee -a /etc/apt/apt.conf.d/10-nocheckvalid

# apt-get update

# apt-get update && apt-get upgrade


 If you need backports, first be warned that these are archived and no longer being updated; they may have security bugs or other major issues. They are not supported in any way.

deb http://archive.debian.org/debian/ jessie-backports main


Debian 9 (Stretch)
Original .deb package repository with non-free included for Debian 9 "Stretch":


deb http://deb.debian.org/debian/ stretch main contrib non-free
deb http://deb.debian.org/debian/ stretch-updates main contrib non-free
deb http://security.debian.org/ stretch/updates main contrib non-free

Archived old repository .deb for Stretch :

deb http://archive.debian.org/debian/ stretch main contrib non-free
deb http://archive.debian.org/debian/ stretch-proposed-updates main contrib non-free
deb http://archive.debian.org/debian-security stretch/updates main contrib non-free


Debian 10 (Buster)
Origian repository URL:

deb http://deb.debian.org/debian/ buster main non-free contrib
deb http://deb.debian.org/debian/ buster-updates main non-free contrib
deb http://security.debian.org/ buster/updates main non-free contrib


Fixing unworking backports for Debian 10 Buster


Change the /etc/apt/sources.list URL with this one

deb http://archive.debian.org/debian buster-backports main contrib non-free


If you want to list packages installed via the backports repository only, that needs to be replaced with newer versions (if such available from the repository)

# apt list –installed | grep backports
# dpkg –list | grep bpo
# dpkg –list | grep -E '^ii.*bpo.*'

ii  libpopt0:amd64                        1.18-2                         amd64        lib for parsing cmdline parameters
ii  libuutil3linux                        2.0.3-9~bpo10+1                amd64        Solaris userland utility library for Linux
ii  libzfs4linux                          2.0.3-9~bpo10+1                amd64        OpenZFS filesystem library for Linux


Debian 11 (Bullseye)
Origianl repository address:

deb http://deb.debian.org/debian bullseye main contrib non-free
deb http://deb.debian.org/debian bullseye-updates main contrib non-free
deb http://security.debian.org/debian-security bullseye-security main contrib non-free

Debian 12 (Bookworm)
Original Repository :


deb http://deb.debian.org/debian bookworm main contrib non-free-firmware non-free
deb http://deb.debian.org/debian bookworm-updates main contrib non-free-firmware non-free
deb http://security.debian.org/debian-security bookworm-security main contrib non-free-firmware non-free

Add Backports to sources.list

deb http://deb.debian.org/debian bookworm-backports main


Thats all, hopefully that would help some sysadmin out there. Enjoy !

Fix ruby: /usr/lib/libcrypt.so.1: version `XCRYPT_2.0′ not found in apt upgrade on Debian Linux 10

Saturday, August 5th, 2023

I've an old legacy Thinkpad Laptop that is for simplicty running Window Maker Wmaker which was laying on my home desk for almost an year and I remembered since i'm for few days in my parents home in Dobrich that it will be a good idea to update its software to the latest Debian packages to patch security issues with it. Thus if you're like me and  you tried to update your Debian 10 Linux to the latest Stable release debian packages  and you end up into a critical error that is preventing apt to to resolve conflicts (fix it with) cmds like:

# apt-get update –fix-missing

# apt –fix-broken install

As usual I looked into Google to see about solution and found few articles, claiming to have scripts that fix it but at the end nothing worked.
And the shitty error occured during the standard:

# apt-get update && apt-get upgrade

ruby: /usr/lib/libcrypt.so.1: version `XCRYPT_2.0' not found

Hence the cause and work around seemed to be very unexpected.
For some reason debian makes a link

root@noah:/lib# ls -al /lib/libcrypt.so.1
lrwxrwxrwx 1 root root 19 Aug  3 16:53 /lib/libcrypt.so.1 ->
libcrypt.so.1.bak

root@noah:/lib# ls -al /lib/libcrypt.so.1.bak
lrwxrwxrwx 1 root root 16 Jun 15  2017 /lib/libcrypt.so.1.bak -> libcrypt-2.24.so

Thus to resolve it and force the .deb upgrade package to continue it is up to simply deleting the strange simlink and re-run the

# apt-get update && apt-get upgrade

Setting up libc6:i386 (2.31-13+deb11u6) …
/usr/bin/perl: /lib/libcrypt.so.1: version `XCRYPT_2.0' not found (required by /usr/bin/perl)
dpkg: error processing package libc6:i386 (–configure):
 installed libc6:i386 package post-installation script subprocess returned error exit status 1
Errors were encountered while processing:
 libc6:i386

Few more times. If you get some critical apt failures still, each time make sure to rerun the command after doing a simple removal of the strange simbolic link with cmd:

# rm -f /lib/libcrypt.so.1

That's all folks after a short while your Debian will be updated to latest Enoy folks ! 🙂

Analyze disk space usage in Linux / BSD with du / find and filelight /qdirstat / baobab GUI disk usage analyzers to check what takes up your disk space on Unix like OSes

Friday, April 21st, 2023

linux-how-to-find-out-what-files-and-directories-has-occupied-all-your-disk-space-partition-from-console-and-GUI_du-find-filelight-baobab-qdirstat-duff-linux-450x450

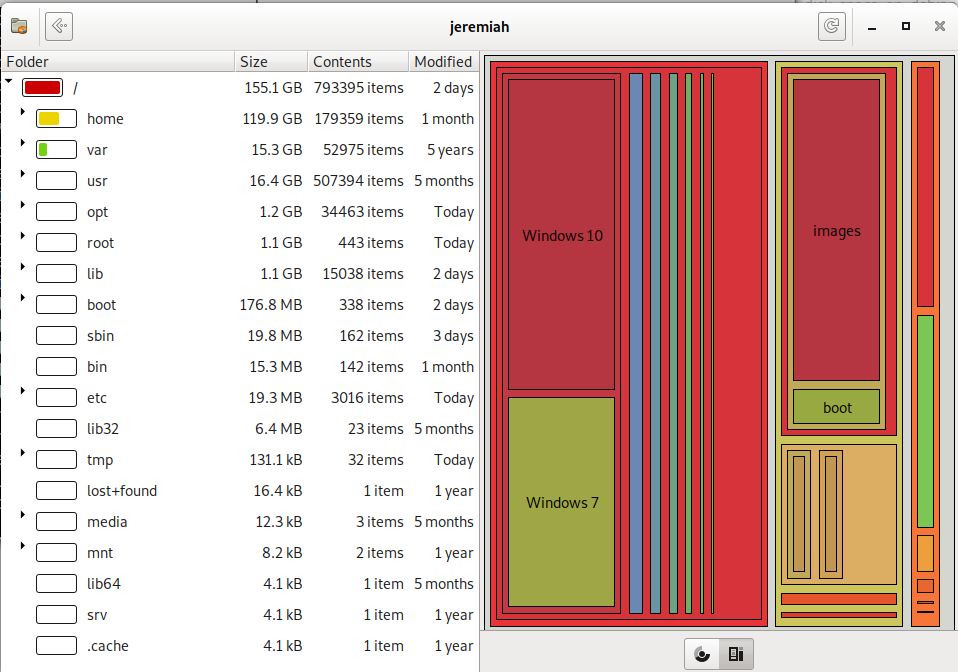
If you're a Desktop Linux or BSD UNIX user and your hard disk / external SSD / flash drive etc. space starts to be misteriously disapper due to whatever reaseon such as a crashing applications producing rapidly log error / warning messages leading quickly to filling up the disk or out of a sudden you have some Disk space lost without knowing what kind of data filled up the disk or you're downloading some big sized bittorrent files forgotten in your bittorrent client or complete mirroring a large website and you suddenly get the result of root directory ( / ) getting fully or nearly filled up, then you definitely would want to check out what has disk activity has eaten up your disk space and leaing to OS and Aplication slow responsiveness.

For the Linux regular *nix user finding out what is filling the disk is a trivial task with with find / du -hsc * but as people have different habits to use find and du I'll show you the most common ways I use this two command line tools to identify disk space low issues for the sake of comparison.
Others who have better easier ways to do it are very welcome to share it with me in the comments.
 

1. Finding large files on hard disk with find Linux command tool
 

host:~# find /home -type f -printf "%s\t%p\n" | sort -n | tail -10
2100000000    /home/hipo/Downloads/MameUIfx incl. ROMs/MameUIfx incl. ROMs-6.bin
2100000000    /home/hipo/Downloads/MameUIfx incl. ROMs/MameUIfx incl. ROMs-7.bin
2100000000    /home/hipo/Downloads/MameUIfx incl. ROMs/MameUIfx incl. ROMs-8.bin
2100000000    /home/hipo/Downloads/MameUIfx incl. ROMs/MameUIfx incl. ROMs-9.bin
2815424080    /home/hipo/.thunderbird/h3dasfii.default\
/ImapMail/imap.gmail.com/INBOX
2925584895    /home/hipo/Documents/.git/\
objects/pack/pack-8590b069cad26ac0af7560fb42b51fa9bfe41050.pack
4336918067    /home/hipo/Games/Mames_4GB-compilation-best-arcade-games-of-your-14_04_2021.tar.gz
6109003776    /home/hipo/VirtualBox VMs/CentOS/CentOS.vdi
23599251456    /home/hipo/VirtualBox VMs/Windows 7/Windows 7.vdi
33913044992    /home/hipo/VirtualBox VMs/Windows 10/Windows 10.vdi

I use less rarely find on Desktops and more when I have to do some kind of data usage analysis on servers, of course for my Linux home computer and any other Linux desktop machines, or just a small incomprehensive analysis du cmd is much more appropriate to use.


2. Finding large files Megabyte occupying space files sorted in Megabytes and Gigas with du
 

  • Check main 10 files sorted in megabytes that are hanging in a directory

pcfkreak:~# du -hsc /home/hipo/*|grep 'M\s'|sort -rn|head -n 10
956M    /home/hipo/last_dump1.sql
711M    /home/hipo/hipod
571M    /home/hipo/from-thinkpad_r61
453M    /home/hipo/ultimate-edition-themes
432M    /home/hipo/metasploit-framework
355M    /home/hipo/output-upgrade.txt
333M    /home/hipo/Плот
209M    /home/hipo/Work-New.tar.gz
98M    /home/hipo/DOOM64
90M    /home/hipo/mp3

  • Get 10 top larges files in Gigabytes that are space hungry and eating up your space

pcfkreak:~# du -hsc /home/hipo/*|grep 'G\s'|sort -rn|head -n 10
156G    total
60G    /home/hipo/VirtualBox VMs
37G    /home/hipo/Downloads
18G    /home/hipo/Desktop
11G    /home/hipo/Games
7.4G    /home/hipo/ownCloud
7.1G    /home/hipo/Документи
4.6G    /home/hipo/music
2.9G    /home/hipo/root
2.8G    /home/hipo/Documents


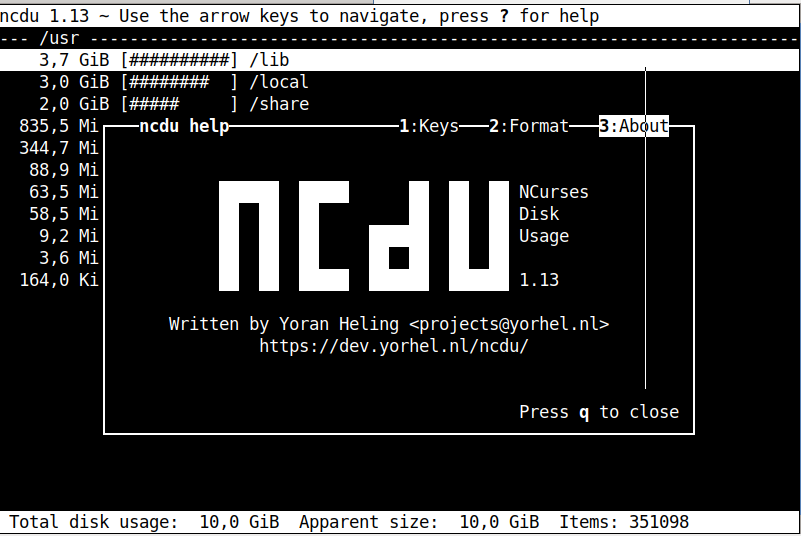
If you want to still work on the console terminal but you don't want to type too much you can use ncdu (ncurses) text tool, install it with

# apt install –yes ncdu


https://www.pc-freak.net/images/ncdu-gnu-linux-debian-screenshot.png

 For the most lazy ones or complete Linux newbies that doesn't want to spend time typing / learing or using text commands or softwares you can also check what has eaten up your full disk space with GUI tools as well.

There are at least 3 tools to use to check in Graphical Interface what has occupied your disk space on Linux / BSD, I'm aware of:

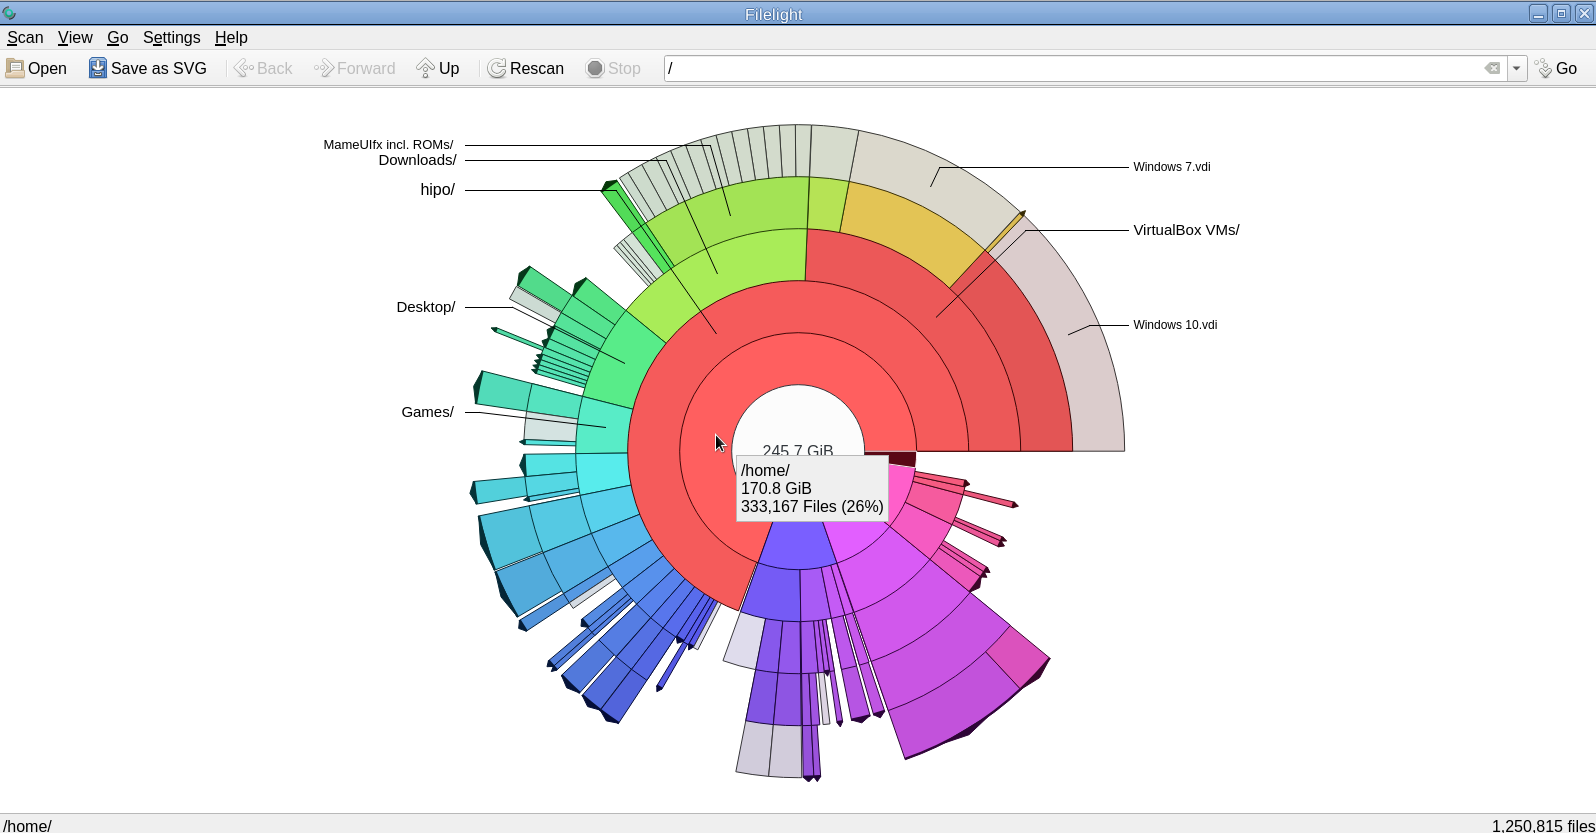
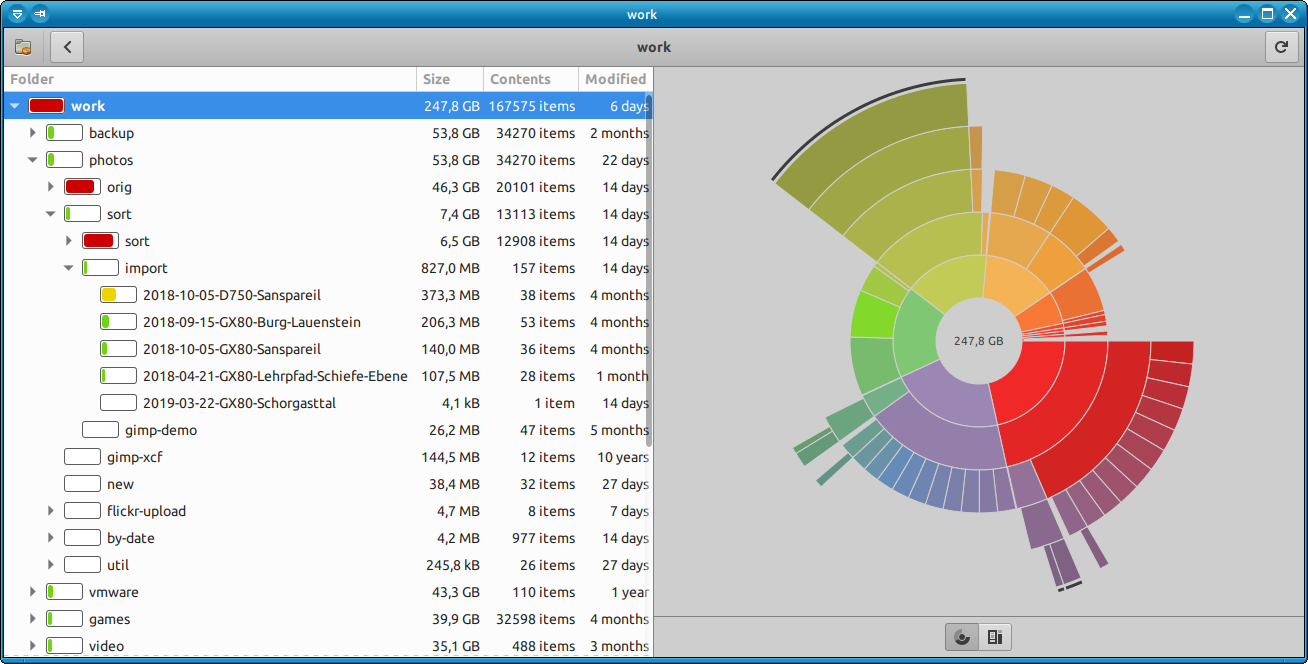
3. Filelight GUI disk usage analysis Linux tool

For those using KDE or preferring a shiny GUI interface that will capture the eye, perhaps filelight would be the option of choice tool to get analysis sum of your directory sturctures and file use on the laptop or desktop *unix OS.

unix-desktop:~# apt-cache show filelight|grep -i description-en -A 7
Description-en: show where your diskspace is being used
 Filelight allows you to understand your disk usage by graphically
 representing your filesystem as a set of concentric, segmented rings.
 .
 It is like a pie-chart, but the segments nest, allowing you to see both
 which directories take up all your space, and which directories
 and files inside those directories are the real culprits.
Description-md5: 397ff9a469e07a772f22460c66b66875


To use it simply go ahead and install it with apt or yum / dnf or whatever Linux package manager your distro uses:

unix-desktop:~# apt-get install –yes filelight

filelight-show-where-disk-space-is-being-used-graphically-tool-linux

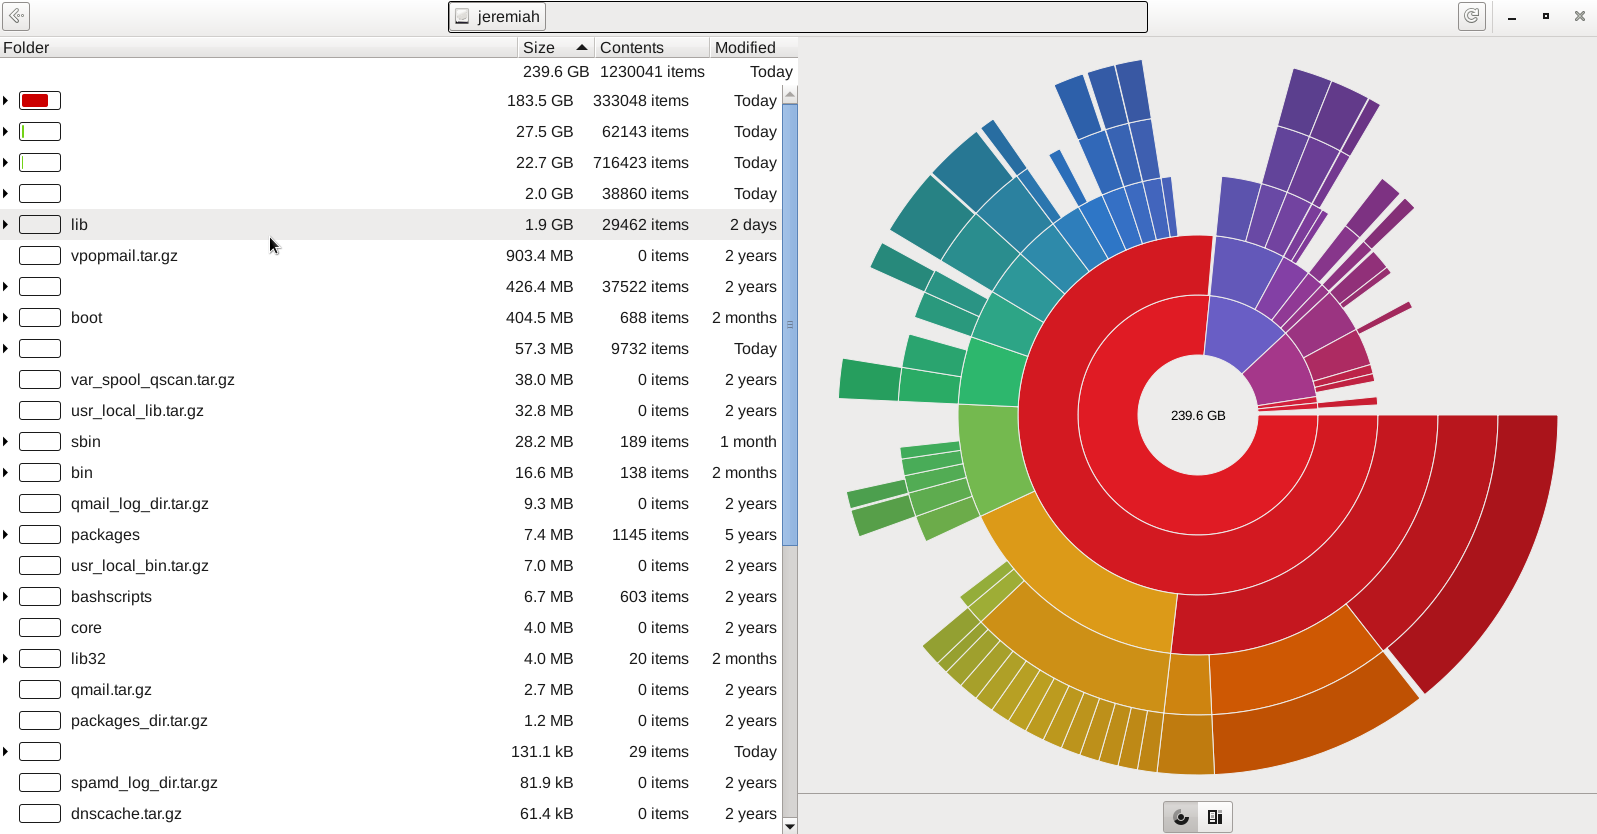
4. GNOME DIsk Usage Analyzer Baobab GUI tool

For those being a GNOME / Mate / Budgie / Cinnamon Graphical interface users baobab shold be the program to use as it uses the famous LibGD library.

unix-desktop:~# apt-cache show baobab|grep -i description-en -A10
Description-en: GNOME disk usage analyzer
 Disk Usage Analyzer is a graphical, menu-driven application to analyse
 disk usage in a GNOME environment. It can easily scan either the whole
 filesystem tree, or a specific user-requested directory branch (local or
 remote).
 .
 It also auto-detects in real-time any changes made to your home
 directory as far as any mounted/unmounted device. Disk Usage Analyzer
 also provides a full graphical treemap window for each selected folder.
Description-md5: 5f6072b89ebb1dc83433fa7658814dc6
Homepage: https://wiki.gnome.org/Apps/Baobab


gnome-disk-analyzer-baobab-tool-screenshot-of-hard-disk-directory-locations-sorted-by-size

5. Qdirstat graphical application to show where your disk space has gone on Linux

Qdirstat is perhaps well known tool to track disk space issues on Linux desktop hosts, known by the hardcore KDE / LXDE / LXQT / DDE GUI interface / environment lovers and as a KDE tool uses the infamous Qt library. I personally don't like it and don't put it on machines I use because I never use kde and don't want to waste my disk space with additional libraries such as the QT Library which historically was not totally free in terms of licensing and even now is in both free and non free licensing GPL / LGPL and QT Commercial Licensing license.

unix-desktop:~# apt-cache show qdirstat|grep -i description-en -A10
Description-en: Qt-based directory statistics
 QDirStat is a graphical application to show where your disk space has gone and
 to help you to clean it up.
 .
 QDirStat has a number of new features compared to KDirStat. To name a few:
  * Multi-selection in both the tree and the treemap.
  * Unlimited number of user-defined cleanup actions.
  * Properly show errors of cleanup actions (and their output, if desired).
  * File categories (MIME types) and their treemap color are now configurable.
  * Exclude rules for directories are easily configurable.
  * Desktop-agnostic; no longer relies on KDE or any other specific desktop.


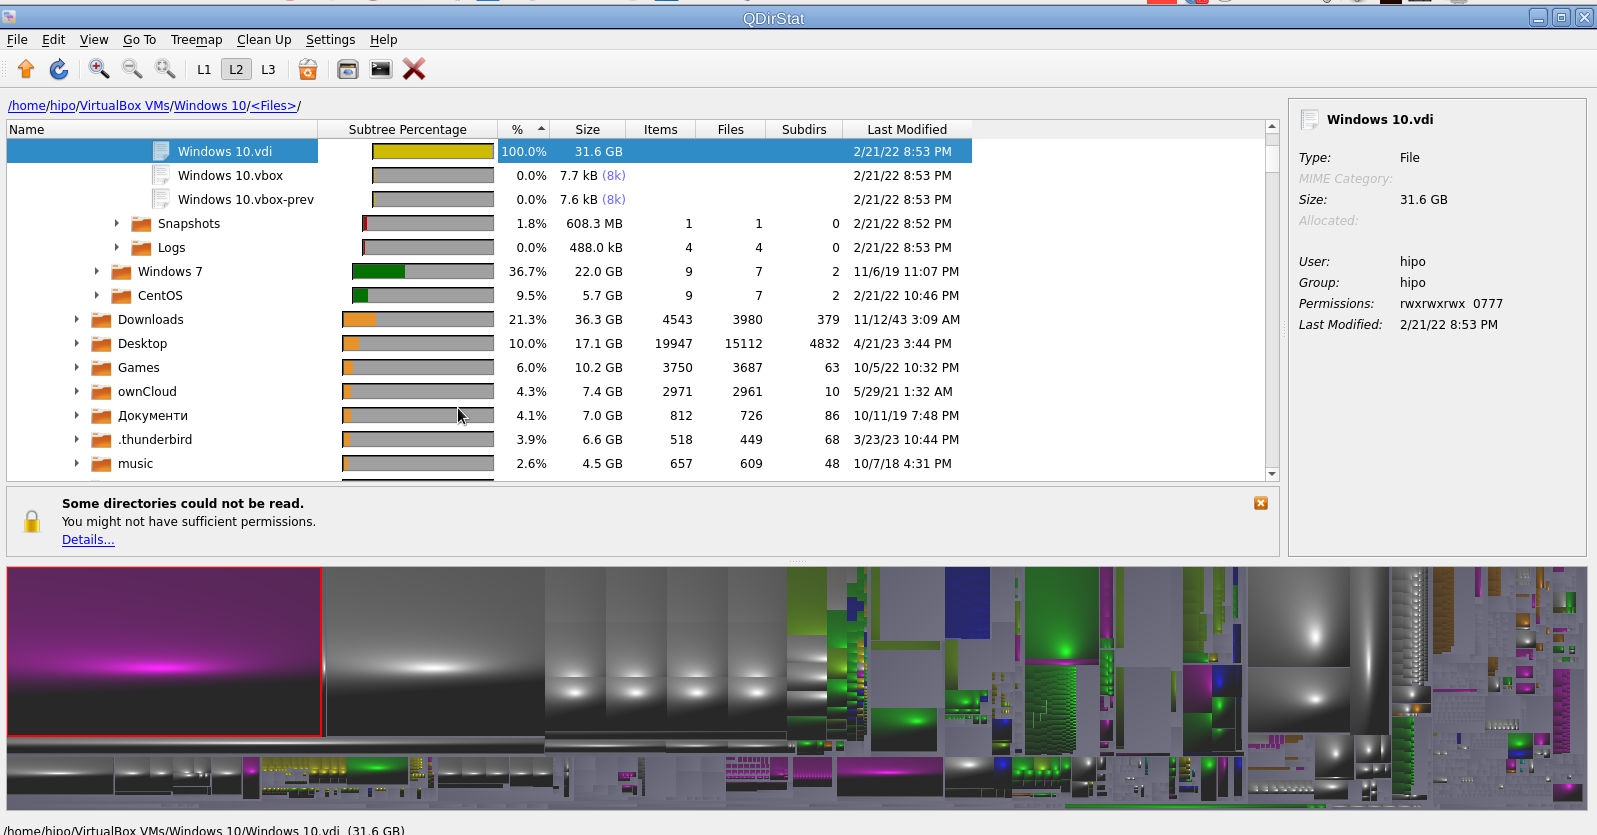
qdirstat-linux-screenshot-show-what-directory-uses-most-hard-disk-space

That shiny fuzed graphics is actually a repsesantation of all directories the bigger and if one scrolls on the colorful gamma a text with directory and size or file will appear. Though the graphical represantation is really c00l to me it is a bit unreadable, thus I prefer and recommend the other two GUI tools filelight or baobab instead.

6. Finding duplicate files on Linux system with duff command tool

Talking about big unknown left-over files on your hard drives, it is appropriate to mention one tool here that is a console one but very useful to anyone willing to get rid of old duplicate files that are hanging around on the disk. Sometimes such copies are produced while copying large amount of files from place to place or simply by mistake while copying Photo / Video files from your Smart Phone to Linux desktop etc. 

This is where the duff command line utility might be super beneficial for you.

unix-desktop:~# apt-cache show duff|grep -i description-en -A3
Description-en: Duplicate file finder
 Duff is a command-line utility for identifying duplicates in a given set of
 files.  It attempts to be usably fast and uses the SHA family of message
 digests as a part of the comparisons.

Using duff tool is very straight forward to see all the duplicate files hanging in a directory lets say your home folder.

unix-desktop:~#  duff -rP /home/hipo

/home/hipo/music/var/Quake II Soundtrack – Kill Ratio.mp3
/home/hipo/mp3/Quake II Soundtrack – Kill Ratio.mp3
2 files in cluster 44 (7913472 bytes, digest 98f38be49e2ffcbf90927f9357b3e24a81d5a649)
/home/hipo/music/var/HYPODIL_01-Scakauec.mp3
/home/hipo/mp3/HYPODIL_01-Scakauec.mp3
2 files in cluster 45 (2807808 bytes, digest ce9067ce1f132fc096a5044845c7fac73e99c0ed)
/home/hipo/music/var/Quake II Suondtrack – March Of The Stoggs.mp3
/home/hipo/mp3/Quake II Suondtrack – March Of The Stoggs.mp3
2 files in cluster 46 (3506176 bytes, digest efcc401b4ebda9b0b2367aceb8e334c8ba1a357d)
/home/hipo/music/var/Quake II Suondtrack – Quad Machine.mp3
/home/hipo/mp3/Quake II Suondtrack – Quad Machine.mp3
2 files in cluster 47 (7917568 bytes, digest 0905c1d790654016c2ecf2949f78d47a870c3822)
/home/hipo/music/var/Cyberpunk Group – Futureshock!.mp3
/home/hipo/mp3/Cyberpunk Group – Futureshock!.mp3

-r (Recursively search into all specified directories.)

P (Don't follow any symbolic links.  This overrides any previous -H or -L option.  This is the default.  Note that this only applies to directories, as sym‐
             bolic links to files are never followed.)

7. Deleting duplicate files with duff

If you're absolutely sure you know what you're doing and you have a backup in case if something messes up during duplicate teletions, to get rid of lets say any duplicate Picture files found by duff run sommething like:

# duff -e0 -r /home/hipo/Pictures/ | xargs -0 rm

!!! Please note that using duff is for those who absolutely know what they're doing and have their data recent data. Deleting the wrong data by mistake with the tool might put you in the first grade and you'll be the only one to blame  🙂 !!!

Wrap it Up

Filling up the disk with unknown large files is a task to resolve that happens often. For the unlazy on Linux / BSD / Mac OS and other UNIX like OS-es the easiest way is to use find or du with some one liner command. For the lazy Windows addicted Graphical users filelightqdirstat or baobab GUI disk usage analysis tools are there.
If you have a lot of files and many of thems are duplicates you can use duff to check them out and remove all unneded duplicates and save space. 
Hope this article, was helpful for someone.
That's all folks, enjoy your data profilactics, if you know any other good easy command or GUI tools or hints for drive disk space profilactics please share.

How to filter dhcp traffic between two networks running separate DHCP servers to prevent IP assignment issues and MAC duplicate addresses

Tuesday, February 8th, 2022

how-to-filter-dhcp-traffic-2-networks-running-2-separate-dhcpd-servers-to-prevent-ip-assignment-conflicts-linux
Tracking the Problem of MAC duplicates on Linux routers
 

If you have two networks that see each other and they're not separated in VLANs but see each other sharing a common netmask lets say 255.255.254.0 or 255.255.252.0, it might happend that there are 2 dhcp servers for example (isc-dhcp-server running on 192.168.1.1 and dhcpd running on 192.168.0.1 can broadcast their services to both LANs 192.168.1.0.1/24 (netmask 255.255.255.0) and Local Net LAN 192.168.1.1/24. The result out of this is that some devices might pick up their IP address via DHCP from the wrong dhcp server.

Normally if you have a fully controlled little or middle class home or office network (10 – 15 electronic devices nodes) connecting to the LAN in a mixed moth some are connected via one of the Networks via connected Wifi to 192.168.1.0/22 others are LANned and using static IP adddresses and traffic is routed among two ISPs and each network can see the other network, there is always a possibility of things to go wrong. This is what happened to me so this is how this post was born.

The best practice from my experience so far is to define each and every computer / phone / laptop host joining the network and hence later easily monitor what is going on the network with something like iptraf-ng / nethogs  / iperf – described in prior  how to check internet spepeed from console and in check server internet connectivity speed with speedtest-cliiftop / nload or for more complex stuff wireshark or even a simple tcpdump. No matter the tools network monitoring is only part on solving network issues. A very must have thing in a controlled network infrastructure is defining every machine part of it to easily monitor later with the monitoring tools. Defining each and every host on the Hybrid computer networks makes administering the network much easier task and  tracking irregularities on time is much more likely. 

Since I have such a hybrid network here hosting a couple of XEN virtual machines with Linux, Windows 7 and Windows 10, together with Mac OS X laptops as well as MacBook Air notebooks, I have followed this route and tried to define each and every host based on its MAC address to pick it up from the correct DHCP1 server  192.168.1.1 (that is distributing IPs for Internet Provider 1 (ISP 1), that is mostly few computers attached UTP LAN cables via LiteWave LS105G Gigabit Switch as well from DHCP2 – used only to assigns IPs to servers and a a single Wi-Fi Access point configured to route incoming clients via 192.168.0.1 Linux NAT gateway server.

To filter out the unwanted IPs from the DHCPD not to propagate I've so far used a little trick to  Deny DHCP MAC Address for unwanted clients and not send IP offer for them.

To give you more understanding,  I have to clear it up I don't want to have automatic IP assignments from DHCP2 / LAN2 to DHCP1 / LAN1 because (i don't want machines on DHCP1 to end up with IP like 192.168.0.50 or DHCP2 (to have 192.168.1.80), as such a wrong IP delegation could potentially lead to MAC duplicates IP conflicts. MAC Duplicate IP wrong assignments for those older or who have been part of administrating large ISP network infrastructures  makes the network communication unstable for no apparent reason and nodes partially unreachable at times or full time …

However it seems in the 21-st century which is the century of strangeness / computer madness in the 2022, technology advanced so much that it has massively started to break up some good old well known sysadmin standards well documented in the RFCs I know of my youth, such as that every electronic equipment manufactured Vendor should have a Vendor Assigned Hardware MAC Address binded to it that will never change (after all that was the idea of MAC addresses wasn't it !). 
Many mobile devices nowadays however, in the developers attempts to make more sophisticated software and Increase Anonimity on the Net and Security, use a technique called  MAC Address randomization (mostly used by hackers / script kiddies of the early days of computers) for their Wi-Fi Net Adapter OS / driver controlled interfaces for the sake of increased security (the so called Private WiFi Addresses). If a sysadmin 10-15 years ago has seen that he might probably resign his profession and turn to farming or agriculture plant growing, but in the age of digitalization and "cloud computing", this break up of common developed network standards starts to become the 'new normal' standard.

I did not suspected there might be a MAC address oddities, since I spare very little time on administering the the network. This was so till recently when I accidently checked the arp table with:

Hypervisor:~# arp -an
192.168.1.99     5c:89:b5:f2:e8:d8      (Unknown)
192.168.1.99    00:15:3e:d3:8f:76       (Unknown)

..


and consequently did a network MAC Address ARP Scan with arp-scan (if you never used this little nifty hacker tool I warmly recommend it !!!)
If you don't have it installed it is available in debian based linuces from default repos to install

Hypervisor:~# apt-get install –yes arp-scan


It is also available on CentOS / Fedora / Redhat and other RPM distros via:

Hypervisor:~# yum install -y arp-scan


Hypervisor:~# arp-scan –interface=eth1 192.168.1.0/24

192.168.1.19    00:16:3e:0f:48:05       Xensource, Inc.
192.168.1.22    00:16:3e:04:11:1c       Xensource, Inc.
192.168.1.31    00:15:3e:bb:45:45       Xensource, Inc.
192.168.1.38    00:15:3e:59:96:8e       Xensource, Inc.
192.168.1.34    00:15:3e:d3:8f:77       Xensource, Inc.
192.168.1.60    8c:89:b5:f2:e8:d8       Micro-Star INT'L CO., LTD
192.168.1.99     5c:89:b5:f2:e8:d8      (Unknown)
192.168.1.99    00:15:3e:d3:8f:76       (Unknown)

192.168.x.91     02:a0:xx:xx:d6:64        (Unknown)
192.168.x.91     02:a0:xx:xx:d6:64        (Unknown)  (DUP: 2)

N.B. !. I found it helpful to check all available interfaces on my Linux NAT router host.

As you see the scan revealed, a whole bunch of MAC address mess duplicated MAC hanging around, destroying my network topology every now and then 
So far so good, the MAC duplicates and strangely hanging around MAC addresses issue, was solved relatively easily with enabling below set of systctl kernel variables.
 

1. Fixing Linux ARP common well known Problems through disabling arp_announce / arp_ignore / send_redirects kernel variables disablement


Linux answers ARP requests on wrong and unassociated interfaces per default. This leads to the following two problems:

ARP requests for the loopback alias address are answered on the HW interfaces (even if NOARP on lo0:1 is set). Since loopback aliases are required for DSR (Direct Server Return) setups this problem is very common (but easy to fix fortunately).

If the machine is connected twice to the same switch (e.g. with eth0 and eth1) eth2 may answer ARP requests for the address on eth1 and vice versa in a race condition manner (confusing almost everything).

This can be prevented by specific arp kernel settings. Take a look here for additional information about the nature of the problem (and other solutions): ARP flux.

To fix that generally (and reboot safe) we  include the following lines into


Hypervisor:~# cp -rpf /etc/sysctl.conf /etc/sysctl.conf_bak_07-feb-2022
Hypervisor:~# cat >> /etc/sysctl.conf

# LVS tuning
net.ipv4.conf.lo.arp_ignore=1
net.ipv4.conf.lo.arp_announce=2
net.ipv4.conf.all.arp_ignore=1
net.ipv4.conf.all.arp_announce=2

net.ipv4.conf.all.send_redirects=0
net.ipv4.conf.eth0.send_redirects=0
net.ipv4.conf.eth1.send_redirects=0
net.ipv4.conf.default.send_redirects=0

Press CTRL + D simultaneusly to Write out up-pasted vars.


To read more on Load Balancer using direct routing and on LVS and the arp problem here


2. Digging further the IP conflict / dulicate MAC Problems

Even after this arp tunings (because I do have my Hypervisor 2 LAN interfaces connected to 1 switch) did not resolved the issues and still my Wireless Connected devices via network 192.168.1.1/24 (ISP2) were randomly assigned the wrong range IPs 192.168.0.XXX/24 as well as the wrong gateway 192.168.0.1 (ISP1).
After thinking thoroughfully for hours and checking the network status with various tools and thanks to the fact that my wife has a MacBook Air that was always complaining that the IP it tried to assign from the DHCP was already taken, i"ve realized, something is wrong with DHCP assignment.
Since she owns a IPhone 10 with iOS and this two devices are from the same vendor e.g. Apple Inc. And Apple's products have been having strange DHCP assignment issues from my experience for quite some time, I've thought initially problems are caused by software on Apple's devices.
I turned to be partially right after expecting the logs of DHCP server on the Linux host (ISP1) finding that the phone of my wife takes IP in 192.168.0.XXX, insetad of IP from 192.168.1.1 (which has is a combined Nokia Router with 2.4Ghz and 5Ghz Wi-Fi and LAN router provided by ISP2 in that case Vivacom). That was really puzzling since for me it was completely logical thta the iDevices must check for DHCP address directly on the Network of the router to whom, they're connecting. Guess my suprise when I realized that instead of that the iDevices does listen to the network on a wide network range scan for any DHCPs reachable baesd on the advertised (i assume via broadcast) address traffic and try to connect and take the IP to the IP of the DHCP which responds faster !!!! Of course the Vivacom Chineese produced Nokia router responded DHCP requests and advertised much slower, than my Linux NAT gateway on ISP1 and because of that the Iphone and iOS and even freshest versions of Android devices do take the IP from the DHCP that responds faster, even if that router is not on a C class network (that's invasive isn't it??). What was even more puzzling was the automatic MAC Randomization of Wifi devices trying to connect to my ISP1 configured DHCPD and this of course trespassed any static MAC addresses filtering, I already had established there.

Anyways there was also a good think out of tthat intermixed exercise 🙂 While playing around with the Gigabit network router of vivacom I found a cozy feature SCHEDULEDING TURNING OFF and ON the WIFI ACCESS POINT  – a very useful feature to adopt, to stop wasting extra energy and lower a bit of radiation is to set a swtich off WIFI AP from 12:30 – 06:30 which are the common sleeping hours or something like that.
 

3. What is MAC Randomization and where and how it is configured across different main operating systems as of year 2022?

Depending on the operating system of your device, MAC randomization will be available either by default on most modern mobile OSes or with possibility to have it switched on:

  • Android Q: Enabled by default 
  • Android P: Available as a developer option, disabled by default
  • iOS 14: Available as a user option, disabled by default
  • Windows 10: Available as an option in two ways – random for all networks or random for a specific network

Lately I don't have much time to play around with mobile devices, and I do not my own a luxury mobile phone so, the fact this ne Androids have this MAC randomization was unknown to me just until I ended a small mess, based on my poor configured networks due to my tight time constrains nowadays.

Finding out about the new security feature of MAC Randomization, on all Android based phones (my mother's Nokia smartphone and my dad's phone, disabled the feature ASAP:


4. Disable MAC Wi-Fi Ethernet device Randomization on Android

MAC Randomization creates a random MAC address when joining a Wi-Fi network for the first time or after “forgetting” and rejoining a Wi-Fi network. It Generates a new random MAC address after 24 hours of last connection.

Disabling MAC Randomization on your devices. It is done on a per SSID basis so you can turn off the randomization, but allow it to function for hotspots outside of your home.

  1. Open the Settings app
  2. Select Network and Internet
  3. Select WiFi
  4. Connect to your home wireless network
  5. Tap the gear icon next to the current WiFi connection
  6. Select Advanced
  7. Select Privacy
  8. Select "Use device MAC"
     

5. Disabling MAC Randomization on MAC iOS, iPhone, iPad, iPod

To Disable MAC Randomization on iOS Devices:

Open the Settings on your iPhone, iPad, or iPod, then tap Wi-Fi or WLAN


  1. Tap the information button next to your network
  2. Turn off Private Address
  3. Re-join the network


Of course next I've collected their phone Wi-Fi adapters and made sure the included dhcp MAC deny rules in /etc/dhcp/dhcpd.conf are at place.

The effect of the MAC Randomization for my Network was terrible constant and strange issues with my routings and networks, which I always thought are caused by the openxen hypervisor Virtualization VM bugs etc.

That continued for some months now, and the weird thing was the issues always started when I tried to update my Operating system to the latest packetset, do a reboot to load up the new piece of software / libraries etc. and plus it happened very occasionally and their was no obvious reason for it.


6. How to completely filter dhcp traffic between two network router hosts
IP 192.168.0.1 / 192.168.1.1 to stop 2 or more configured DHCP servers
on separate networks see each other

To prevent IP mess at DHCP2 server side (which btw is ISC DHCP server, taking care for IP assignment only for the Servers on the network running on Debian 11 Linux), further on I had to filter out any DHCP UDP traffic with iptables completely.
To prevent incorrect route assignments assuming that you have 2 networks and 2 routers that are configurred to do Network Address Translation (NAT)-ing Router 1: 192.168.0.1, Router 2: 192.168.1.1.

You have to filter out UDP Protocol data on Port 67 and 68 from the respective source and destination addresses.

In firewall rules configuration files on your Linux you need to have some rules as:

# filter outgoing dhcp traffic from 192.168.1.1 to 192.168.0.1
-A INPUT -p udp -m udp –dport 67:68 -s 192.168.1.1 -d 192.168.0.1 -j DROP
-A OUTPUT -p udp -m udp –dport 67:68 -s 192.168.1.1 -d 192.168.0.1 -j DROP
-A FORWARD -p udp -m udp –dport 67:68 -s 192.168.1.1 -d 192.168.0.1 -j DROP

-A INPUT -p udp -m udp –dport 67:68 -s 192.168.0.1 -d 192.168.1.1 -j DROP
-A OUTPUT -p udp -m udp –dport 67:68 -s 192.168.0.1 -d 192.168.1.1 -j DROP
-A FORWARD -p udp -m udp –dport 67:68 -s 192.168.0.1 -d 192.168.1.1 -j DROP

-A INPUT -p udp -m udp –sport 67:68 -s 192.168.1.1 -d 192.168.0.1 -j DROP
-A OUTPUT -p udp -m udp –sport 67:68 -s 192.168.1.1 -d 192.168.0.1 -j DROP
-A FORWARD -p udp -m udp –sport 67:68 -s 192.168.1.1 -d 192.168.0.1 -j DROP


You can download also filter_dhcp_traffic.sh with above rules from here


Applying this rules, any traffic of DHCP between 2 routers is prohibited and devices from Net: 192.168.1.1-255 will no longer wrongly get assinged IP addresses from Network range: 192.168.0.1-255 as it happened to me.


7. Filter out DHCP traffic based on MAC completely on Linux with arptables

If even after disabling MAC randomization on all devices on the network, and you know physically all the connecting devices on the Network, if you still see some weird MAC addresses, originating from a wrongly configured ISP traffic router host or whatever, then it is time to just filter them out with arptables.

## drop traffic prevent mac duplicates due to vivacom and bergon placed in same network – 255.255.255.252
dchp1-server:~# arptables -A INPUT –source-mac 70:e2:83:12:44:11 -j DROP


To list arptables configured on Linux host

dchp1-server:~# arptables –list -n


If you want to be paranoid sysadmin you can implement a MAC address protection with arptables by only allowing a single set of MAC Addr / IPs and dropping the rest.

dchp1-server:~# arptables -A INPUT –source-mac 70:e2:84:13:45:11 -j ACCEPT
dchp1-server:~# arptables -A INPUT  –source-mac 70:e2:84:13:45:12 -j ACCEPT


dchp1-server:~# arptables -L –line-numbers
Chain INPUT (policy ACCEPT)
1 -j DROP –src-mac 70:e2:84:13:45:11
2 -j DROP –src-mac 70:e2:84:13:45:12

Once MACs you like are accepted you can set the INPUT chain policy to DROP as so:

dchp1-server:~# arptables -P INPUT DROP


If you later need to temporary, clean up the rules inside arptables on any filtered hosts flush all rules inside INPUT chain, like that
 

dchp1-server:~#  arptables -t INPUT -F

Linux: Howto Fix “N: Repository ‘http://deb.debian.org/debian buster InRelease’ changed its ‘Version’ value from ‘10.9’ to ‘10.10’” error to resolve apt-get release update issue

Friday, August 13th, 2021

Linux's surprises and disorganization is continuously growing day by day and I start to realize it is becoming mostly impossible to support easily this piece of hackware bundled together.
Usually so far during the last 5 – 7 years, I rarely had any general issues with using:

 apt-get update && apt-get upgrade && apt-get dist-upgrade 

to raise a server's working stable Debian Linux version packages e.g. version X.Y to verzion X.Z (for example up the release from Debian Jessie from 8.1 to 8.2). 

Today I just tried to follow this well known and established procedure that, of course nowdays is better to be done with the newer "apt" command instead with the legacy "apt-get"
And the set of 


# apt-get update && apt-get upgrade && apt-get dist-upgrade


has triggered below shitty error:
 

root@zabbix:~# apt-get update && apt-get upgrade
Get:1 http://security.debian.org buster/updates InRelease [65.4 kB]
Get:2 http://deb.debian.org/debian buster InRelease [122 kB]
Get:3 http://security.debian.org buster/updates/non-free Sources [688 B]
Get:4 http://repo.zabbix.com/zabbix/5.0/debian buster InRelease [7096 B]
Get:5 http://security.debian.org buster/updates/main Sources [198 kB]
Get:6 http://security.debian.org buster/updates/main amd64 Packages [300 kB]
Get:7 http://security.debian.org buster/updates/main Translation-en [157 kB]
Get:8 http://security.debian.org buster/updates/non-free amd64 Packages [556 B]
Get:9 http://deb.debian.org/debian buster/main Sources [7836 kB]
Get:10 http://repo.zabbix.com/zabbix/5.0/debian buster/main Sources [1192 B]
Get:11 http://repo.zabbix.com/zabbix/5.0/debian buster/main amd64 Packages [4785 B]
Get:12 http://deb.debian.org/debian buster/non-free Sources [85.7 kB]
Get:13 http://deb.debian.org/debian buster/contrib Sources [42.5 kB]
Get:14 http://deb.debian.org/debian buster/main amd64 Packages [7907 kB]
Get:15 http://deb.debian.org/debian buster/main Translation-en [5968 kB]
Get:16 http://deb.debian.org/debian buster/main amd64 Contents (deb) [37.3 MB]
Get:17 http://deb.debian.org/debian buster/contrib amd64 Packages [50.1 kB]
Get:18 http://deb.debian.org/debian buster/non-free amd64 Packages [87.7 kB]
Get:19 http://deb.debian.org/debian buster/non-free Translation-en [88.9 kB]
Get:20 http://deb.debian.org/debian buster/non-free amd64 Contents (deb) [861 kB]
Fetched 61.1 MB in 22s (2774 kB/s)
Reading package lists… Done
N: Repository 'http://deb.debian.org/debian buster InRelease' changed its 'Version' value from '10.9' to '10.10'


As I used to realize nowdays, as Linux started originally as 'Hackers' operating system, its legacy is just one big hack and everything from simple maintenance up to the higher and more sophisticated things requires a workaround 'hack''.


This time the hack to resolve error:
 

N: Repository 'http://deb.debian.org/debian buster InRelease' changed its 'Version' value from '10.9' to '10.10'


is up to running cmd:
 

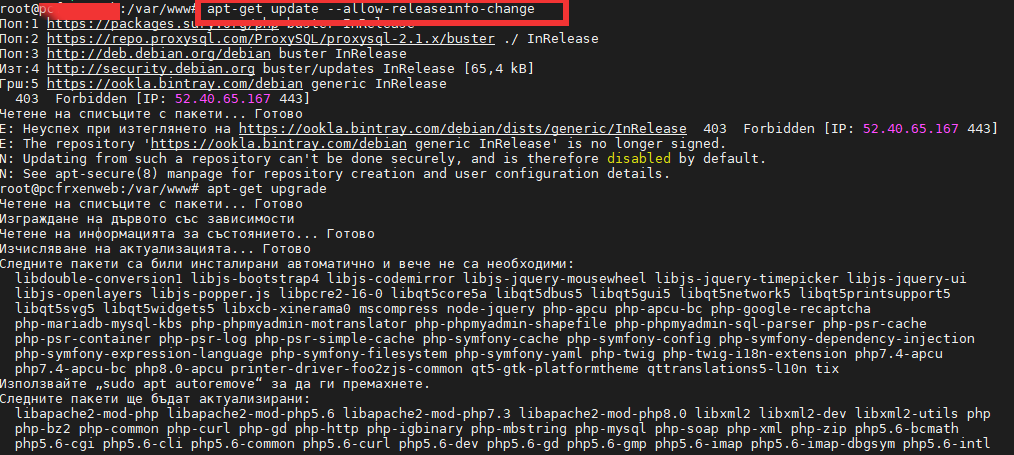
debian-server:~# apt-get update –allow-releaseinfo-change
Поп:1 http://ftp.de.debian.org/debian buster-backports InRelease
Поп:2 http://ftp.debian.org/debian stable InRelease
Поп:3 http://security.debian.org stable/updates InRelease
Изт:5 https://packages.sury.org/php buster InRelease [6837 B]
Изт:6 https://download.docker.com/linux/debian stretch InRelease [44,8 kB]
Изт:7 https://packages.sury.org/php buster/main amd64 Packages [317 kB]
Игн:4 https://attic.owncloud.org/download/repositories/production/Debian_10  InRelease
Изт:8 https://download.owncloud.org/download/repositories/production/Debian_10  Release [964 B]
Изт:9 https://packages.sury.org/php buster/main i386 Packages [314 kB]
Изт:10 https://download.owncloud.org/download/repositories/production/Debian_10  Release.gpg [481 B]
Грш:10 https://download.owncloud.org/download/repositories/production/Debian_10  Release.gpg
  Следните подписи са невалидни: DDA2C105C4B73A6649AD2BBD47AE7F72479BC94B
Грш:11 https://ookla.bintray.com/debian generic InRelease
  403  Forbidden [IP: 52.39.193.126 443]
Четене на списъците с пакети… Готово
N: Repository 'https://packages.sury.org/php buster InRelease' changed its 'Suite' value from '' to 'buster'
W: An error occurred during the signature verification. The repository is not updated and the previous index files will be used. GPG error: https://download.owncloud.org/download/repositories/production/Debian_10  Release: 

apt-get-update-allow-releaseinfo-change-debian-linux-screenshot

Onwards to upgrade the system up to the latest .deb packages, as usual run:

# apt-get -y update && apt-get upgrade -y


and updates should be applied as usual with some prompts on whether you prefer to keep or replace existing service configuration and some information on some general changes that might affect your installed services. In a few minutes and few prompts hopefully your Debian OS should be up to the latest stable.

How to Install and Play old Arcade Multiple Arcade Machine Emulator Games on Linux in 2021 with xmame and GXMame GUI Frontend

Friday, May 14th, 2021

mame-multiple-arcade-machine-emulator
I've earlier blogged on how to install and play old arcade games with xmame compiled from source on the now old Debian 7 Linux under the article Install xmame from source on Debian Linux 7.0 (Wheezy) to play for better MAME (Arcade Games Emulation)
as well article on using the newer version of MAME emulator instead of xmame under the article Playing Arcade old school games on Debian Linux as well as how to make the MAME emulator work with a joystick see my previous How to configure Joystick ( Gamepad ) on Debian, Ubuntu, Mint GNU / Linux easily.

Since I have preinstalled my notebook with fresh Debian 10 Buster, for a long time I did not have the time as well as desire to play my favourite games of the youth to name a few this is Xain'd Sleena / Cadillacs and Dinosaurs (1993) / the Punisher (1993) / Captain Commando (1991) / Super Mario / Contra / Final Fight etc. and rest of the the SEGA Mega Drive / GameBoy / Nintendo / Terminator game (fake clone of nintendo) and other killing Arcade Classics of the late 90s and early year 2000, which we played on a public houses on a game cabinets with a joysticks. 
Hence I tried to reproduce some of my articles just as of 2021 to see whether still we can get a nice playable MAME emulator on Linux with a Graphical GUI for Mate or GNOME. And it seems using a straight mame out of Debian standard repositories did not work with some of the more sophisticated ROM .zip files from the nices such as Punisher or XSLEENA.zip, this is how this article got born in an attempt to give a way for such old school game freaks as me to be able to play there favorite games of the youth.

Below is the few steps adapted mostly from above articles with some head banging and loosing multiple hours wondering until I finally got a working XMAME ROM emulator with the simple but working GXMAME graphical frontend for M.A.M.E..

To compile xmame with joystick support be it analog or whatever joystick you have to use a Makefile like below

https://www.pc-freak.net/files/xmame-0.103-Makefile-for-joystick

Copy it on your PC and remove it to Makefile in the xmame-0.103 source dir:

# cd /usr/local/src/xmame-0.103


I have to install all the necessery package dependencies development header files, some of which are mentioned in the beginning of post articles and some of which I had to install manually, such as the preset Debian meta-package build-essentials Things to install on newly installed GNU / Linux (My favourite must have Linux text and GUI programs missing in fresh Linux installs), just to mention a few I remember had to install based on some compilation errors:

# apt-get install build-essential
# apt-get install –yes zlib1g-dev

# apt-get install –yes libexpat1-dev
# apt-get install –yes libghc-x11-dev
# apt-get install –yes x11proto-video-dev
# apt-get install –yes libxv-dev
# apt-get install libxext6
# apt-get install libxext6-dev
# apt-get install libxext-dev
# apt-get install libjpeg62-turbo-dev
# apt-get install libxinerama-dev
# apt-get install libgtk-3-dev
# apt-get install syslog-ng-dev
# apt-get install libgtk2.0-dev


If I'm missing some package necessery here you will have to find it yourself based on the *.h file produced as error during compile you should look it up with a cmd like:

# apt-file search glib2.h


And install it further.

You will need to edit Makefile or take and straight use or if necessery adapt an already prepared Makefile for my purpose:
 

# wget https://www.pc-freak.net/files/xmame-0.103-Makefile-for-joystick;
# mv https://www.pc-freak.net/files/xmame-0.103-Makefile-for-joystick Makefile
# make && make install


Some .zip roms does not properly work with the newer mame you need to instead use xmame ..

Below is the version I use on Debian 10 as of May 2021 year.

hipo@jeremiah:/usr/local/src$ xmame –version
GLINFO: loaded OpenGL library libGL.so!
GLINFO: loaded GLU    library libGLU.so!
xmame (x11) version 0.103 (May 13 2021)


To make the joystick work in xmame you will need to have a preset of modules loaded on the Linux for my old Genius joystick this is what works.

hipo@jeremiah:~/Games$ cat /etc/modules
# /etc/modules: kernel modules to load at boot time.
#
# This file contains the names of kernel modules that should be loaded
# at boot time, one per line. Lines beginning with "#" are ignored.
snd-seq
3c59x
snd-emu10k1
snd-pcm-oss
snd-mixer-oss
snd-seq-oss
joydev
ns558
sidewinder
gameport
analog
adi
pcigame
iforce
evdev
usbhid


Fill in your joystick module there and make sure you manually load each one of the modules with modprobe command.
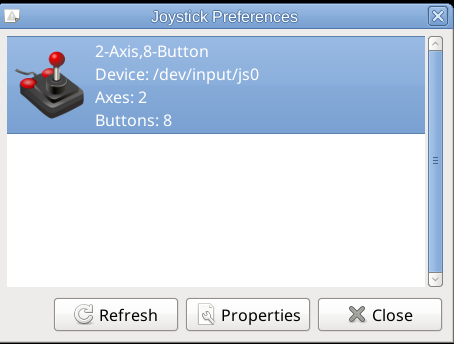
Next calibrate the joystick with some tool like jktest-gtk

jktest-gtk-linux-screenshot
If you need a good frontend for MATE / GNOME for xmame try gxmame. It is a real pain in the ass to configure, note that the only working version of xmame with good configuration as well as gxmame with a game list that is prebuild.
If you need xmame-0.103.tar.bz2 exact xmame version I'm using thethe archive is on:

https://www.pc-freak.net/files/xmame-0.103.tar.bz2
An old bundle of both gxmame and xmamerc configs is here

https://www.pc-freak.net/files/xmame.tar.gz

https://www.pc-freak.net/files/xmame-config-for-joystick-hipo.tar.gz
For example my old working version of xmame ~/.xmame is here https://www.pc-freak.net/files/xmame-config-for-joystick-hipo.tar.gz

Configuration of gxmame (even though it has has a GUI for configuring is below:

https://www.pc-freak.net/files/gxmame.tar.gz

xmamerc sample working file is here

https://www.pc-freak.net/files/xmamerc

My newest current version as of Debian 10 Squeeze of xmame and gxmame is below:

https://www.pc-freak.net/files/gxmame-config-newest_may_2021.tar.gz

https://www.pc-freak.net/files/xmame-config-newest_may_2021.tar.gz

Note that my rom files and stuff is located and configured in neewst configs to be under /home/hipo/Games/roms/ if your location is others grep it in .xmame/* and .gxmame/* files and set the correct PATH locations.

A VERY IMPORTANT NOTE is not to use the stable version of GXMAME even though it worked in 2003 fine as the project is abandoned and unsupported as of 2021 the latest downloadable stable gxmame file on Sourceforge gxmame-0.34b website is not working correctly (even though it compiles fine).
You have to compile and use instead the newer version gxmame-0.35beta1.

If you want to use gxmame with a joystick you need to compile it with the respective option:
 

root@jeremiah:/usr/local/src/gxmame-0.35beta1# ./configure –enable-joystick


gxmame 0.35beta1

Print debugging messages…… : no
Joystick support………….. : yes

GXMame will be installed in /usr/local/bin.
Warning: You have an old copy of gxmame at /usr/local/bin/gxmame.


configure complete, now type 'make'

To install compiled binaries do the usual:
 

# make && make install

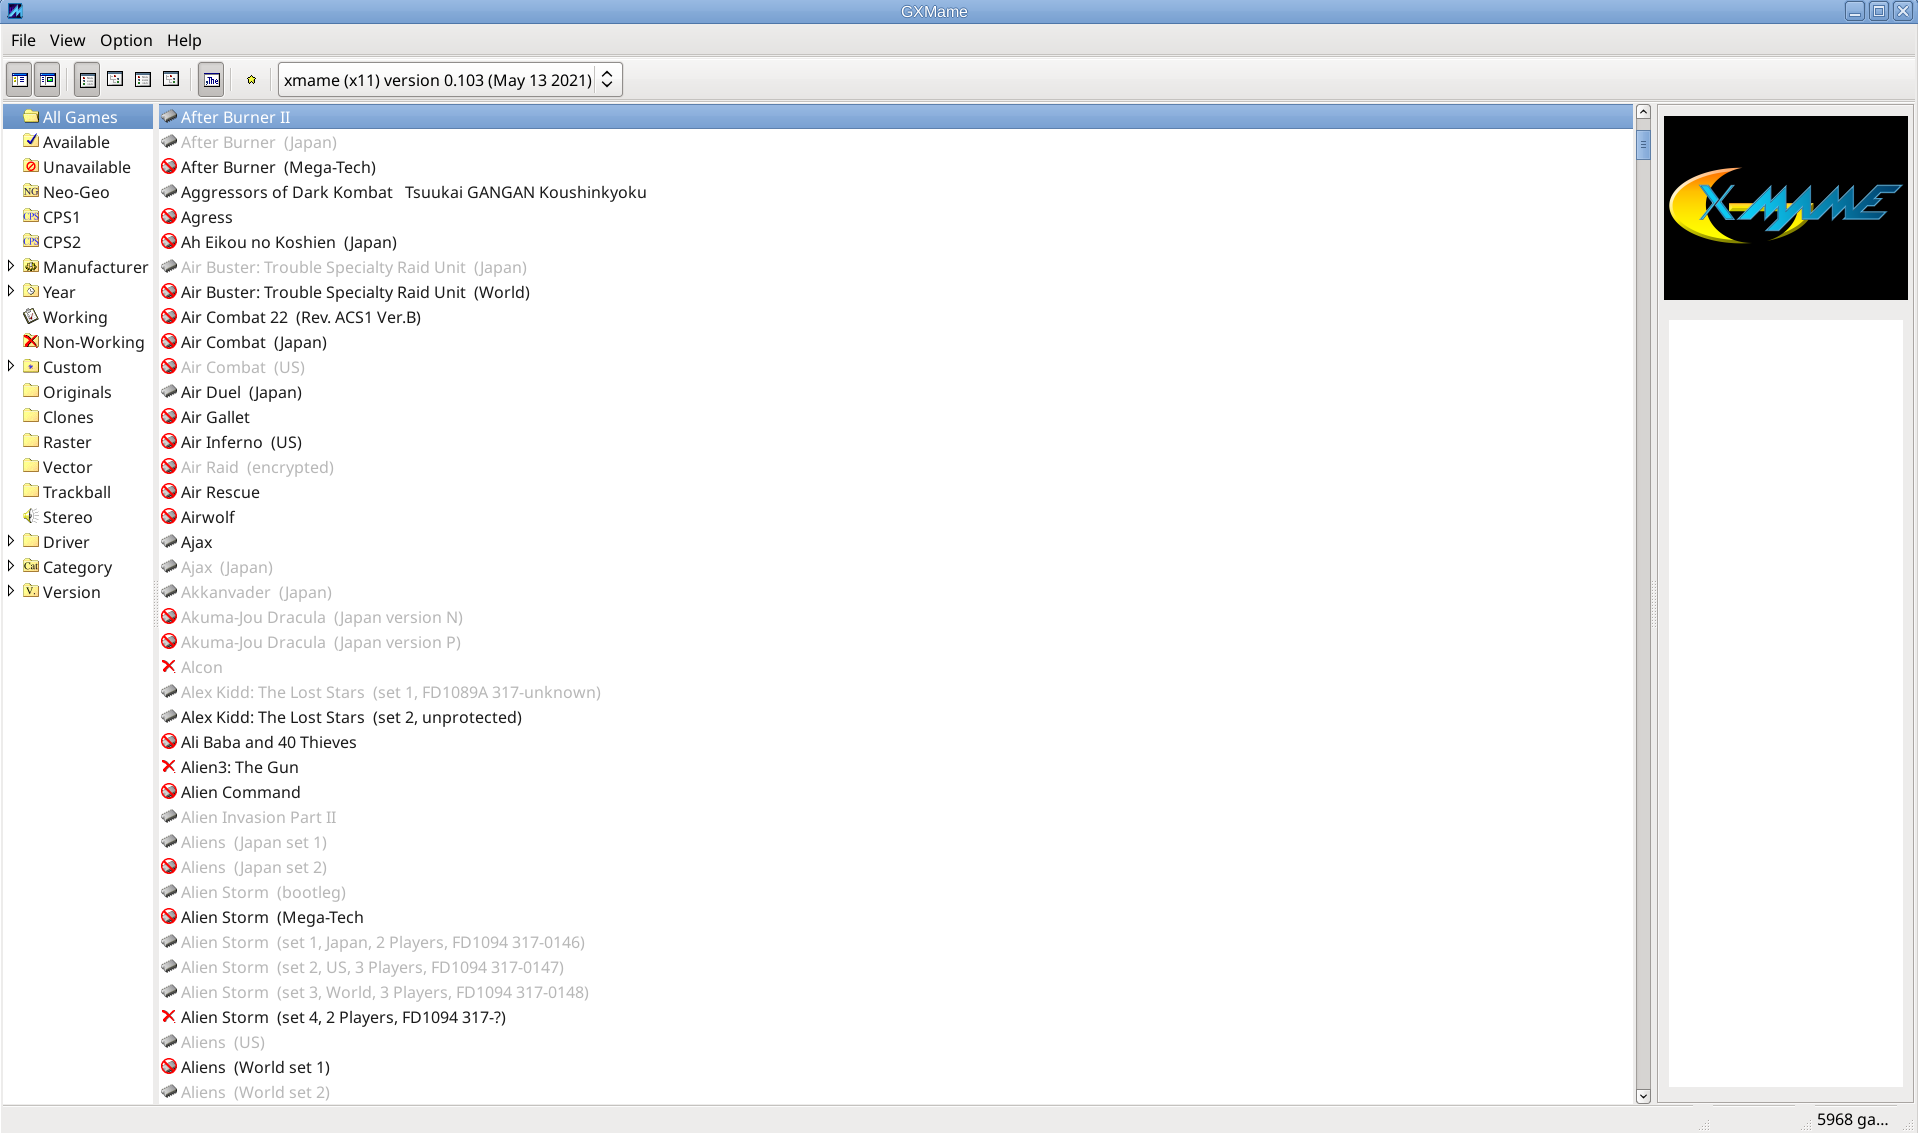
gxmame binary should be installed under /usr/local/bin/gxmame once launched you should get the shiny gxmame GUI.

gxmame-screenshot-debian-10-gnu-linux-mate-desktop

Perhaps there was other stuff I've done in the process I forgot to document here, so if you try to follow my guide and something does not work please tell me what I'm missing and you can't handle it either contact me.

The guide is for Debian Linux but should work on other .Deb based Linux distros such as Ubuntu / Linux Mint etc.

To enjoy my 4GB present of ROM files containing many of best well known M.A.M.E. ARCADE GAMES check archive here. Note that this collection was downloaded on the Internet and I do not hold any responsibility of the archive. If it contains files with any copyright infringment this is to be on your own.
 

Install certbot on Debian, Ubuntu, CentOS, Fedora Linux 10 / Generate and use Apache / Nginx SSL Letsencrypt certificates

Monday, December 21st, 2020

letsencrypt certbot install on any linux distribution with apache or nginx webserver howto</a><p> Let's Encrypt is a free, automated, and open certificate authority brought to you by the nonprofit <a data-cke-saved-href=
Internet Security Research Group (ISRG). ISRG group gave initiative with the goal to "encrypt the internet", i.e. offer free alternative to the overpriced domani registrer sold certificates with the goal to make more people offer SSL / TSL Free secured connection line on their websites. 
ISRG group supported Letsencrypt non-profit certificate authority actrively by Internet industry standard giants such as Mozilla, Cisco, EFF (Electronic Frontier Foundation),  Facebook, Google Chrome, Amazon AWS, OVH Cloud, Redhat, VMWare, Github and many many of the leading companies in IT.

Letsencrpyt is aimed at automating the process designed to overcome manual creation, validation, signing, installation, and renewal of certificates for secure websites. I.e. you don't have to manually write on console complicated openssl command lines with passing on Certificate CSR /  KEY / PEM files etc and generate Self-Signed Untrusted Authority Certificates (noted in my previous article How to generate Self-Signed SSL Certificates with openssl or use similar process to pay money generate secret key and submit the key to third party authority through a their website webadmin  interface in order to Generate SSL brought by Godaddy or Other Certificate Authority.

But of course as you can guess there are downsides as you submit your private key automatically via letsencrypt set of SSL certificate automation domain scripts to a third party Certificate Authority which is at Letsencrypt.org. A security intrusion in their private key store servers might mean a catastrophy for your data as malicious stealer might be able to decrypt your data with some additional effort and see in plain text what is talking to your Apache / Nginx or Mail Server nevertheless the cert. Hence for a high standards such as PCI environments Letsencrypt as well as for the paranoid security freak admins,  who don't trust the mainstream letsencrypt is definitely not a choice. Anyways for most small and midsized businesses who doesn't hold too much of a top secret data and want a moderate level of security Letsencrypt is a great opportunity to try. But enough talk, lets get down to business.

How to install and use certbot on Debian GNU / Linux 10 Buster?
Certbot is not available from the Debian software repositories by default, but it’s possible to configure the buster-backports repository in your /etc/apt/sources.list file to allow you to install a backport of the Certbot software with APT tool.
 

1. Install certbot on Debian / Ubuntu Linux


root@webserver:/etc/apt# tail -n 1 /etc/apt/sources.list
deb http://ftp.debian.org/debian buster-backports main


If not there append the repositories to file:


  • Install certbot-nginx certbot-apache deb packages

root@webserver:/ # echo 'deb http://ftp.debian.org/debian buster-backports main' >> /etc/apt/sources.list


  • Install certbot-nginx certbot-apache deb packages

root@webserver:/ # apt update
root@webserver:/ # apt install certbot python-certbot-nginx python3-certbot-apache python-certbot-nginx-doc


This will install the /usr/bin/certbot python executable script which is used to register / renew / revoke / delete your domains certificates.
 

2. Install letsencrypt certbot client on CentOS / RHEL / Fedora and other Linux Distributions


For RPM based distributions and other Linux distributions you will have to install snap package (if not already installed) and use snap command :


[root@centos ~ :] # yum install snapd
systemctl enable –now snapd.socket

To enable classic snap support, enter the following to create a symbolic link between

[root@centos ~ :] # ln -s /var/lib/snapd/snap /snap

snap command lets you install, configure, refresh and remove snaps.  Snaps are packages that work across many different Linux distributions, enabling secure delivery and operation of the latest apps and utilities.

[root@centos ~ :] # snap install core; sudo snap refresh core

Logout from console or Xsession to make the snap update its $PATH definitions.

Then use snap universal distro certbot classic package

 [root@centos ~ :] # snap install –classic certbot
[root@centos ~ :] # ln -s /snap/bin/certbot /usr/bin/certbot


If you're having an XOrg server access on the RHEL / CentOS via Xming or other type of Xemulator you might check out also the snap-store as it contains a multitude of packages installable which are not usually available in RPM distros.

 [root@centos ~ :] # snap install snap-store


how-to-install-snap-applications-on-centos-rhel-linux-snap-store

snap-store is a powerful and via it you can install many non easily installable stuff on Linux such as eclipse famous development IDE, notepad++ , Discord, the so favourite for the Quality Assurance guy Protocol tester Postman etc.

  • Installing certbot to any distribution via acme.sh script

Another often preferred solution to Universally deploy  and upgrade an existing LetsEncrypt program to any Linux distribution (e.g. RHEL / CentOS / Fedora etc.) is the acme.sh script. To install acme you have to clone the repository and run the script with –install

P.S. If you don't have git installed yet do

root@webserver:/ # apt-get install –yes git


and then the usual git clone to fetch it at your side

# cd /root
# git clone https://github.com/acmesh-official/acme.sh
Cloning into 'acme.sh'…
remote: Enumerating objects: 71, done.
remote: Counting objects: 100% (71/71), done.
remote: Compressing objects: 100% (53/53), done.
remote: Total 12475 (delta 39), reused 38 (delta 18), pack-reused 12404
Receiving objects: 100% (12475/12475), 4.79 MiB | 6.66 MiB/s, done.
Resolving deltas: 100% (7444/7444), done.

# sh acme.sh –install


To later upgrade acme.sh to latest you can do

# sh acme.sh –upgrade


In order to renew a concrete existing letsencrypt certificiate

# sh acme.sh –renew domainname.com


To renew all certificates using acme.sh script

# ./acme.sh –renew-all


3. Generate Apache or NGINX Free SSL / TLS Certificate with certbot tool

Now lets generate a certificate for a domain running on Apache Webserver with a Website WebRoot directory /home/phpdev/public/www


root@webserver:/ # certbot –apache –webroot -w /home/phpdev/public/www/ -d your-domain-name.com -d your-domain-name.com

root@webserver:/ # certbot certonly –webroot -w /home/phpdev/public/www/ -d your-domain-name.com -d other-domain-name.com


As you see all the domains for which you will need to generate are passed on with -d option.

Once certificates are properly generated you can test it in a browser and once you're sure they work as expected usually you can sleep safe for the next 3 months ( 90 days) which is the default for TSL / SSL Letsencrypt certificates the reason behind of course is security.


4. Enable freshly generated letsencrypt SSL certificate in Nginx VirtualHost config

Go to your nginx VirtualHost configuration (i.e. /etc/nginx/sites-enabled/phpmyadmin.adzone.pro ) and inside chunk of config add after location { … } – 443 TCP Port SSL listener (as in shown in bolded configuration)
 

server {

….
   location ~ \.php$ {
      include /etc/nginx/fastcgi_params;
##      fastcgi_pass 127.0.0.1:9000;
      fastcgi_pass unix:/run/php/php7.3-fpm.sock;
      fastcgi_index index.php;
      fastcgi_param SCRIPT_FILENAME /usr/share/phpmyadmin$fastcgi_script_name;
   }


    listen 443 ssl; # managed by Certbot
    ssl_certificate /etc/letsencrypt/live/phpmyadmin.adzone.pro/fullchain.pem; # managed by Certbot
    ssl_certificate_key /etc/letsencrypt/live/phpmyadmin.adzone.pro/privkey.pem; # managed by Certbot
    include /etc/letsencrypt/options-ssl-nginx.conf; # managed by Certbot
    ssl_dhparam /etc/letsencrypt/ssl-dhparams.pem; # managed by Certbot


5. Enable new generated letsencrypt SSL certificate in Apache VirtualHost


In /etc/apache2/{sites-available,sites-enabled}/your-domain.com-ssl.conf you should have as a minimum a configuration setup like below:


NameVirtualHost *:443 <VirtualHost 123.123.123.12:443>
    ServerAdmin hipo@domain.com
    ServerName www.pc-freak.net
    ServerAlias www.your-domain.com wwww.your-domain.com your-domain.com
 
    HostnameLookups off
    DocumentRoot /var/www
    DirectoryIndex index.html index.htm index.php index.html.var


CheckSpelling on
SSLEngine on

    <Directory />
        Options FollowSymLinks
        AllowOverride All
        ##Order allow,deny
        ##allow from all
        Require all granted
    </Directory>
    <Directory /var/www>
        Options Indexes FollowSymLinks MultiViews
        AllowOverride All
##      Order allow,deny
##      allow from all
Require all granted
    </Directory>

Include /etc/letsencrypt/options-ssl-apache.conf
SSLCertificateFile /etc/letsencrypt/live/your-domain.com/fullchain.pem
SSLCertificateKeyFile /etc/letsencrypt/live/your-domain.com/privkey.pem
</VirtualHost>


6. Simulate a certificate regenerate with –dry-run

Soon before the 90 days period expiry approaches, it is a good idea to test how all installed Nginx webserver certficiates will be renewed and whether any issues are expected this can be done with the –dry-run option.

root@webserver:/ # certbot renew –dry-run


– – – – – – – – – – – – – – – – – – – – – – – – – – – – – – – – – – – – – – – –
** DRY RUN: simulating 'certbot renew' close to cert expiry
**          (The test certificates below have not been saved.)

Congratulations, all renewals succeeded. The following certs have been renewed:
  /etc/letsencrypt/live/adzone.pro/fullchain.pem (success)
  /etc/letsencrypt/live/cdn.natsr.pro/fullchain.pem (success)
  /etc/letsencrypt/live/mail.adzone.pro/fullchain.pem (success)
  /etc/letsencrypt/live/natsr.pro-0001/fullchain.pem (success)
  /etc/letsencrypt/live/natsr.pro/fullchain.pem (success)
  /etc/letsencrypt/live/phpmyadmin.adzone.pro/fullchain.pem (success)
  /etc/letsencrypt/live/www.adzone.pro/fullchain.pem (success)
  /etc/letsencrypt/live/www.natsr.pro/fullchain.pem (success)
** DRY RUN: simulating 'certbot renew' close to cert expiry
**          (The test certificates above have not been saved.)
– – – – – – – – – – – – – – – – – – – – – – – – – – – – – – – – – – – – – – – –


7. Renew a certificate from a multiple installed certificate list

In some time when you need to renew letsencrypt domain certificates you can list them and choose manually which one you want to renew.

root@webserver:/ # certbot –force-renewal
Saving debug log to /var/log/letsencrypt/letsencrypt.log

How would you like to authenticate and install certificates?
– – – – – – – – – – – – – – – – – – – – – – – – – – – – – – – – – – – – – – – –
1: Apache Web Server plugin (apache)
2: Nginx Web Server plugin (nginx)
– – – – – – – – – – – – – – – – – – – – – – – – – – – – – – – – – – – – – – – –
Select the appropriate number [1-2] then [enter] (press 'c' to cancel): 2
Plugins selected: Authenticator nginx, Installer nginx

Which names would you like to activate HTTPS for?
– – – – – – – – – – – – – – – – – – – – – – – – – – – – – – – – – – – – – – – –
1: adzone.pro
2: mail.adzone.pro
3: phpmyadmin.adzone.pro
4: www.adzone.pro
5: natsr.pro
6: cdn.natsr.pro
7: www.natsr.pro
– – – – – – – – – – – – – – – – – – – – – – – – – – – – – – – – – – – – – – – –
Select the appropriate numbers separated by commas and/or spaces, or leave input
blank to select all options shown (Enter 'c' to cancel): 3
Renewing an existing certificate
Deploying Certificate to VirtualHost /etc/nginx/sites-enabled/phpmyadmin.adzone.pro

Please choose whether or not to redirect HTTP traffic to HTTPS, removing HTTP access.
– – – – – – – – – – – – – – – – – – – – – – – – – – – – – – – – – – – – – – – –
1: No redirect – Make no further changes to the webserver configuration.
2: Redirect – Make all requests redirect to secure HTTPS access. Choose this for
new sites, or if you're confident your site works on HTTPS. You can undo this
change by editing your web server's configuration.
– – – – – – – – – – – – – – – – – – – – – – – – – – – – – – – – – – – – – – – –
Select the appropriate number [1-2] then [enter] (press 'c' to cancel): 2
Redirecting all traffic on port 80 to ssl in /etc/nginx/sites-enabled/phpmyadmin.adzone.pro

– – – – – – – – – – – – – – – – – – – – – – – – – – – – – – – – – – – – – – – –
Your existing certificate has been successfully renewed, and the new certificate
has been installed.

The new certificate covers the following domains: https://phpmyadmin.adzone.pro

You should test your configuration at:
https://www.ssllabs.com/ssltest/analyze.html?d=phpmyadmin.adzone.pro
– – – – – – – – – – – – – – – – – – – – – – – – – – – – – – – – – – – – – – – –

IMPORTANT NOTES:
 – Congratulations! Your certificate and chain have been saved at:
   /etc/letsencrypt/live/phpmyadmin.adzone.pro/fullchain.pem

   Your key file has been saved at:
   /etc/letsencrypt/live/phpmyadmin.adzone.pro/privkey.pem
   Your cert will expire on 2021-03-21. To obtain a new or tweaked
   version of this certificate in the future, simply run certbot again
   with the "certonly" option. To non-interactively renew *all* of
   your certificates, run "certbot renew"
 – If you like Certbot, please consider supporting our work by:

   Donating to ISRG / Let's Encrypt:   https://letsencrypt.org/donate
   Donating to EFF:                    https://eff.org/donate-le


8. Renew all present SSL certificates

root@webserver:/ # certbot renew

Processing /etc/letsencrypt/renewal/www.natsr.pro.conf
– – – – – – – – – – – – – – – – – – – – – – – – – – – – – – – – – – – – – – – –
Cert not yet due for renewal


– – – – – – – – – – – – – – – – – – – – – – – – – – – – – – – – – – – – – – – –

The following certs are not due for renewal yet:
  /etc/letsencrypt/live/adzone.pro/fullchain.pem expires on 2021-03-01 (skipped)
  /etc/letsencrypt/live/cdn.natsr.pro/fullchain.pem expires on 2021-02-28 (skipped)
  /etc/letsencrypt/live/mail.adzone.pro/fullchain.pem expires on 2021-02-28 (skipped)
  /etc/letsencrypt/live/natsr.pro-0001/fullchain.pem expires on 2021-03-01 (skipped)
  /etc/letsencrypt/live/natsr.pro/fullchain.pem expires on 2021-02-25 (skipped)
  /etc/letsencrypt/live/phpmyadmin.adzone.pro/fullchain.pem expires on 2021-03-21 (skipped)
  /etc/letsencrypt/live/www.adzone.pro/fullchain.pem expires on 2021-02-28 (skipped)
  /etc/letsencrypt/live/www.natsr.pro/fullchain.pem expires on 2021-03-01 (skipped)
No renewals were attempted.
– – – – – – – – – – – – – – – – – – – – – – – – – – – – – – – – – – – – – – – –


9. Renew all existing server certificates from a cron job


The certbot package will install a script under /etc/cron.d/certbot to be run that will attempt every 12 hours however from my experience
often this script is not going to work, the script looks similar to below:

# Upgrade all existing SSL certbot machine certificates


0 */12 * * * root test -x /usr/bin/certbot -a \! -d /run/systemd/system && perl -e 'sleep int(rand(43200))' && certbot -q renew

Another approach to renew all installed certificates if you want to have a specific options and keep log of what happened is using a tiny shell script like this:


10. Auto renew installed SSL / TSL Certbot certificates with a bash loop over all present certificates

#!/bin/sh
# update SSL certificates
# prints from 1 to 104 (according to each certbot generated certificate and triggers rewew and logs what happened to log file
# an ugly hack for certbot certificate renew
for i in $(seq 1 104); do echo "Updating $i SSL Cert" | tee -a /root/certificate-update.log; yes "$i" | certbot –force-renewal | tee -a /root/certificate-update.log 2>&1; sleep 5; done

Note: The seq 1 104 is the range depends on the count of installed SSL certificates you have installed on the machine, that can be seen and set the proper value according to your case when you run one time certbot –force-renewal.
 

Reinstall all Debian packages with a copy of apt deb package list from another working Debian Linux installation

Wednesday, July 29th, 2020

Reinstall-all-Debian-packages-with-copy-of-apt-packages-list-from-another-working-Debian-Linux-installation

Few days ago, in the hurry in the small hours of the night, I've done something extremely stupid. Wanting to move out a .tar.gz binary copy of qmail installation to /var/lib/qmail with all the dependent qmail items instead of extracting to admin user /root directory (/root), I've extracted it to the main Operating system root / directrory.
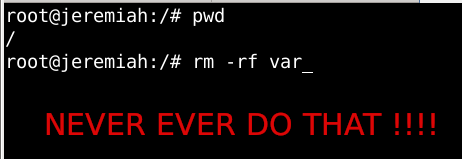
Not noticing this, I've quickly executed rm -rf var with the idea to delete all directory tree under /root/var just 3 seconds later, I've realized I'm issuing the rm -rf var with the wrong location WITH a root user !!!! Being scared on what I've done, I've quickly pressed CTRL+C to immedately cancel the deletion operation of my /var.

wrong-system-var-rm-linux-dont-do-that-ever-or-your-system-will-end-up-irreversably-damaged

But as you can guess, since the machine has an Slid State Drive drive and SSD memory drive are much more faster in I/O operations than the classical ATA / SATA disks. I was not quick enough to cancel the operation and I've noticed already some part of my /var have been R.I.P-pped in the heaven of directories.

This was ofcourse upsetting so for a while I rethinked the situation to get some ideas on what I can do to recover my system ASAP!!! and I had the idea of course to try to reinstall All my installed .deb debian packages to restore system closest to the normal, before my stupid mistake.

Guess my unpleasent suprise when I have realized dpkg and respectively apt-get apt and aptitude package management tools cannot anymore handle packages as Debian Linux's package dependency database has been damaged due to missing dpkg directory 


/var/lib/dpkg 


Oh man that was unpleasent, especially since I've installed plenty of stuff that is custom on my Mate based desktop and, generally reinstalling it updating the sytem to the latest Debian security updates etc. will be time consuming and painful process I wanted to omit.

So of course the logical thing to do here was to try to somehow recover somehow a database copy of /var/lib/dpkg  if that was possible, that of course led me to the idea to lookup for a way to recover my /var/lib/dpkg from backup but since I did not maintained any backup copy of my OS anywhere that was not really possible, so anyways I wondered whether dpkg does not keep some kind of database backups somewhere in case if something goes wrong with its database.
This led me to this nice Ubuntu thred which has pointed me to the part of my root rm -rf dpkg db disaster recovery solution.
Luckily .deb package management creators has thought about situation similar to mine and to give the user a restore point for /var/lib/dpkg damaged database

/var/lib/dpkg is periodically backed up in /var/backups

A typical /var/lib/dpkg on Ubuntu and Debian Linux looks like so:
 

hipo@jeremiah:/var/backups$ ls -l /var/lib/dpkg
total 12572
drwxr-xr-x 2 root root    4096 Jul 26 03:22 alternatives
-rw-r–r– 1 root root      11 Oct 14  2017 arch
-rw-r–r– 1 root root 2199402 Jul 25 20:04 available
-rw-r–r– 1 root root 2199402 Oct 19  2017 available-old
-rw-r–r– 1 root root       8 Sep  6  2012 cmethopt
-rw-r–r– 1 root root    1337 Jul 26 01:39 diversions
-rw-r–r– 1 root root    1223 Jul 26 01:39 diversions-old
drwxr-xr-x 2 root root  679936 Jul 28 14:17 info
-rw-r—– 1 root root       0 Jul 28 14:17 lock
-rw-r—– 1 root root       0 Jul 26 03:00 lock-frontend
drwxr-xr-x 2 root root    4096 Sep 17  2012 parts
-rw-r–r– 1 root root    1011 Jul 25 23:59 statoverride
-rw-r–r– 1 root root     965 Jul 25 23:59 statoverride-old
-rw-r–r– 1 root root 3873710 Jul 28 14:17 status
-rw-r–r– 1 root root 3873712 Jul 28 14:17 status-old
drwxr-xr-x 2 root root    4096 Jul 26 03:22 triggers
drwxr-xr-x 2 root root    4096 Jul 28 14:17 updates

Before proceeding with this radical stuff to move out /var/lib/dpkg/info from another machine to /var mistakenyl removed oned. I have tried to recover with the well known:

  • extundelete
  • foremost
  • recover
  • ext4magic
  • ext3grep
  • gddrescue
  • ddrescue
  • myrescue
  • testdisk
  • photorec

Linux file deletion recovery tools from a USB stick loaded with a Number of LiveCD distributions, i.e. tested recovery with:

  • Debian LiveCD
  • Ubuntu LiveCD
  • KNOPPIX
  • SystemRescueCD
  • Trinity Rescue Kit
  • Ultimate Boot CD


but unfortunately none of them couldn't recover the deleted files … 

The reason why the standard file recovery tools could not recover ?

My assumptions is after I've done by rm -rf var; from sysroot,  issued the sync (- if you haven't used it check out man sync) command – that synchronizes cached writes to persistent storage and did a restart from the poweroff PC button, this should have worked, as I've recovered like that in the past) in a normal Sys V System with a normal old fashioned blocks filesystem as EXT2 . or any other of the filesystems without a journal, however as the machine run a EXT4 filesystem with a journald and journald, this did not work perhaps because something was not updated properly in /lib/systemd/systemd-journal, that led to the situation all recently deleted files were totally unrecoverable.

1. First step was to restore the directory skele of /var/lib/dpkg

# mkdir -p /var/lib/dpkg/{alternatives,info,parts,triggers,updates}


2. Recover missing /var/lib/dpkg/status  file

The main file that gives information to dpkg of the existing packages and their statuses on a Debian based systems is /var/lib/dpkg/status

# cp /var/backups/dpkg.status.0 /var/lib/dpkg/status


3. Reinstall dpkg package manager to make package management working again

Say a warm prayer to the Merciful God ! and do:

# apt-get download dpkg
# dpkg -i dpkg*.deb


4. Reinstall base-files .deb package which provides basis of a Debian system

Hopefully everything will be okay and your dpkg / apt pair will be in normal working state, next step is to:

# apt-get download base-files
# dpkg -i base-files*.deb


5. Do a package sanity and consistency check and try to update OS package list

Check whether packages have been installed only partially on your system or that have missing, wrong or obsolete control  data  or  files.  dpkg  should suggest what to do with them to get them fixed.

# dpkg –audit

Then resynchronize (fetch) the package index files from their sources described in /etc/apt/sources.list

# apt-get update


Do apt db constistency check:

#  apt-get check


check is a diagnostic tool; it updates the package cache and checks for broken dependencies.
 

Take a deep breath ! …

Do :

ls -l /var/lib/dpkg
and compare with the above list. If some -old file is not present don't worry it will be there tomorrow.

Next time don't forget to do a regular backup with simple rsync backup script or something like Bacula / Amanda / Time Vault or Clonezilla.
 

6. Copy dpkg database from another Linux system that has a working dpkg / apt Database

Well this was however not the end of the story … There were still many things missing from my /var/ and luckily I had another Debian 10 Buster install on another properly working machine with a similar set of .deb packages installed. Therefore to make most of my programs still working again I have copied over /var from the other similar set of package installed machine to my messed up machine with the missing deleted /var.

To do so …
On Functioning Debian 10 Machine (Working Host in a local network with IP 192.168.0.50), I've archived content of /var:

linux:~# tar -czvf var_backup_debian10.tar.gz /var

Then sftped from Working Host towards the /var deleted broken one in my case this machine's hostname is jericho and luckily still had SSHD and SFTP running processes loaded in memory:

jericho:~# sftp root@192.168.0.50
sftp> get var_backup_debian10.tar.gz

Now Before extracting the archive it is a good idea to make backup of old /var remains somewhere for example somewhere in /root 
just in case if we need to have a copy of the dpkg backup dir /var/backups

jericho:~# cp -rpfv /var /root/var_backup_damaged

 
jericho:~# tar -zxvf /root/var_backup_debian10.tar.gz 
jericho:/# mv /root/var/ /

Then to make my /var/lib/dpkg contain the list of packages from my my broken Linux install I have ovewritten /var/lib/dpkg with the files earlier backupped before  .tar.gz was extracted.

jericho:~# cp -rpfv /var /root/var_backup_damaged/lib/dpkg/ /var/lib/


7. Reinstall All Debian  Packages completely scripts


I then tried to reinstall each and every package first using aptitude with aptitude this is done with

# aptitude reinstall '~i'

However as this failed, tried using a simple shell loop like below:

for i in $(dpkg -l |awk '{ print $2 }'); do echo apt-get install –reinstall –yes $i; done

Alternatively, all .deb package reninstall is also possible with dpkg –get-selections and with awk with below cmds:

dpkg –get-selections | grep -v deinstall | awk '{print $1}' > list.log;
awk '$1=$1' ORS=' ' list.log > newlist.log
;
apt-get install –reinstall $(cat newlist.log)

It can also be run as one liner for simplicity:

dpkg –get-selections | grep -v deinstall | awk '{print $1}' > list.log; awk '$1=$1' ORS=' ' list.log > newlist.log; apt-get install –reinstall $(cat newlist.log)

This produced a lot of warning messages, reporting "package has no files currently installed" (virtually for all installed packages), indicating a severe packages problem below is sample output produced after each and every package reinstall … :

dpkg: warning: files list file for package 'iproute' missing; assuming package has no files currently installed
dpkg: warning: files list file for package 'brscan-skey' missing; assuming package has no files currently installed
dpkg: warning: files list file for package 'libapache2-mod-php7.4' missing; assuming package has no files currently installed
dpkg: warning: files list file for package 'libexpat1:amd64' missing; assuming package has no files currently installed
dpkg: warning: files list file for package 'libexpat1:i386' missing; assuming package has no files currently installed
dpkg: warning: files list file for package 'php5.6-readline' missing; assuming package has no files currently installed
dpkg: warning: files list file for package 'linux-headers-4.19.0-5-amd64' missing; assuming package has no files currently installed
dpkg: warning: files list file for package 'libgraphite2-3:amd64' missing; assuming package has no files currently installed
dpkg: warning: files list file for package 'libgraphite2-3:i386' missing; assuming package has no files currently installed
dpkg: warning: files list file for package 'libbonoboui2-0:amd64' missing; assuming package has no files currently installed
dpkg: warning: files list file for package 'libxcb-dri3-0:amd64' missing; assuming package has no files currently installed
dpkg: warning: files list file for package 'libxcb-dri3-0:i386' missing; assuming package has no files currently installed
dpkg: warning: files list file for package 'liblcms2-2:amd64' missing; assuming package has no files currently installed
dpkg: warning: files list file for package 'liblcms2-2:i386' missing; assuming package has no files currently installed
dpkg: warning: files list file for package 'libpixman-1-0:amd64' missing; assuming package has no files currently installed
dpkg: warning: files list file for package 'libpixman-1-0:i386' missing; assuming package has no files currently installed
dpkg: warning: files list file for package 'gksu' missing; assuming package has no files currently installed
dpkg: warning: files list file for package 'liblogging-stdlog0:amd64' missing; assuming package has no files currently installed
dpkg: warning: files list file for package 'mesa-vdpau-drivers:amd64' missing; assuming package has no files currently installed
dpkg: warning: files list file for package 'mesa-vdpau-drivers:i386' missing; assuming package has no files currently installed
dpkg: warning: files list file for package 'libzvbi0:amd64' missing; assuming package has no files currently installed
dpkg: warning: files list file for package 'libzvbi0:i386' missing; assuming package has no files currently installed
dpkg: warning: files list file for package 'libcdparanoia0:amd64' missing; assuming package has no files currently installed
dpkg: warning: files list file for package 'libcdparanoia0:i386' missing; assuming package has no files currently installed
dpkg: warning: files list file for package 'python-gconf' missing; assuming package has no files currently installed
dpkg: warning: files list file for package 'php5.6-cli' missing; assuming package has no files currently installed
dpkg: warning: files list file for package 'libpaper1:amd64' missing; assuming package has no files currently installed
dpkg: warning: files list file for package 'mixer.app' missing; assuming package has no files currently installed

After some attempts I found a way to be able to work around the warning message, for each package by simply reinstalling the package reporting the issue with

apt –reinstall $package_name


Though reinstallation started well and many packages got reinstalled, unfortunately some packages such as apache2-mod-php5.6 and other php related ones  started failing during reinstall ending up in unfixable states right after installation of binaries from packages was successfully placed in its expected locations on disk. The failures occured during the package setup stage ( dpkg –configure $packagename) …

The logical thing to do is a recovery attempt with something like the usual well known by any Debian admin:

apt-get install –fix-missing

As well as Manual requesting to reconfigure (issue re-setup) of all installed packages also did not produced a positive result

dpkg –configure -a

But many packages were still failing due to dpkg inability to execute some post installation scripts from respective .deb files.
To work around that and continue installing the rest of packages I had to manually delete all files related to the failing package located under directory 

/var/lib/dpkg/info#

For example to omit the post installation failure of libapache2-mod-php5.6 and have a succesful install of the package next time I tried reinstall, I had to delete all /var/lib/dpkg/info/libapache2-mod-php5.6.postrm, /var/lib/dpkg/info/libapache2-mod-php5.6.postinst scripts and even sometimes everything like libapache2-mod-php5.6* that were present in /var/lib/dpkg/info dir.

The problem with this solution, however was the package reporting to install properly, but the post install script hooks were still not in placed and important things as setting permissions of binaries after install or applying some configuration changes right after install was missing leading to programs failing to  fully behave properly or even breaking up even though showing as finely installed …

The final solution to this problem was radical.
I've used /var/lib/dpkg database (directory) from ther other working Linux machine with dpkg DB OK found in var_backup_debian10.tar.gz (linux:~# host with a working dpkg database) and then based on the dpkg package list correct database responding on jericho:~# to reinstall each and every package on the system using Debian System Reinstaller script taken from the internet.
Debian System Reinstaller works but to reinstall many packages, I've been prompted again and again whether to overwrite configuration or keep the present one of packages.
To Omit the annoying [Y / N ] text prompts I had made a slight modification to the script so it finally looked like this:
 

#!/bin/bash
# Debian System Reinstaller
# Copyright (C) 2015 Albert Huang
# Copyright (C) 2018 Andreas Fendt

# This program is free software: you can redistribute it and/or modify
# it under the terms of the GNU General Public License as published by
# the Free Software Foundation, either version 3 of the License, or
# (at your option) any later version.

# This program is distributed in the hope that it will be useful,
# but WITHOUT ANY WARRANTY; without even the implied warranty of
# MERCHANTABILITY or FITNESS FOR A PARTICULAR PURPOSE.  See the
# GNU General Public License for more details.

# You should have received a copy of the GNU General Public License
# along with this program.  If not, see <http://www.gnu.org/licenses/>.

# —
# This script assumes you are using a Debian based system
# (Debian, Mint, Ubuntu, #!), and have sudo installed. If you don't
# have sudo installed, replace "sudo" with "su -c" instead.

pkgs=`dpkg –get-selections | grep -w 'install$' | cut -f 1 |  egrep -v '(dpkg|apt)'`

for pkg in $pkgs; do
    echo -e "\033[1m   * Reinstalling:\033[0m $pkg"    

    apt-get –reinstall -o Dpkg::Options::="–force-confdef" -o Dpkg::Options::="–force-confold" -y install $pkg || {
        echo "ERROR: Reinstallation failed. See reinstall.log for details."
        exit 1
    }
done


 debian-all-packages-reinstall.sh working modified version of Albert Huang and Andreas Fendt script  can be also downloaded here.

Note ! Omitting the text confirmation prompts to install newest config or keep maintainer configuration is handled by the argument:


-o Dpkg::Options::="–force-confold


I however still got few NCurses Console selection prompts during the reinstall of about 3200+ .deb packages, so even with this mod the reinstall was not completely automatic.

Note !  During the reinstall few of the packages from the list failed due to being some old unsupported packages this was ejabberd, ircd-hybrid and a 2 / 3 more.
This failure was easily solved by completely purging those packages with the usual

# dpkg –purge $packagename

and reruninng  debian-all-packages-reinstall.sh on each of the failing packages.

Note ! The failing packages were just old ones left over from Debian 8 and Debian 9 before the apt-get dist-upgrade towards 10 Duster.
Eventually I got a success by God's grance, after few hours of pains and trials, ending up in a working state package database and a complete set of freshly reinstalled packages.

The only thing I had to do finally is 2 hours of tampering why GNOME did not automatically booted after the system reboot due to failing gdm
until I fixed that I've temprary used ligthdm (x-display-manager), to do I've

dpkg –reconfigure gdm3

lightdm-x-display-manager-screenshot-gdm3-reconfige

 to work around this I had to also reinstall few libraries, reinstall the xorg-server, reinstall gdm and reinstall the meta package for GNOME, using below set of commands:
 

apt-get install –reinstall libglw1-mesa libglx-mesa0
apt-get install –reinstall libglu1-mesa-dev
apt install –reinstallgsettings-desktop-schemas
apt-get install –reinstall xserver-xorg-video-intel
apt-get install –reinstall xserver-xorg
apt-get install –reinstall xserver-xorg-core
apt-get install –reinstall task-desktop
apt-get install –reinstall task-gnome-desktop


As some packages did not ended re-instaled on system because on the original host from where /var/lib/dpkg db was copied did not have it I had to eventually manually trigger reinstall for those too:


apt-get install –reinstall –yes vlc
apt-get install –reinstall –yes thunderbird
apt-get install –reinstall –yes audacity
apt-get install –reinstall –yes gajim
apt-get install –reinstall –yes slack remmina
apt-get install –yes k3b
pt-get install –yes gbgoffice
pt-get install –reinstall –yes skypeforlinux
apt-get install –reinstall –yes vlc
apt-get install –reinstall –yes libcurl3-gnutls libcurl3-nss
apt-get install –yes virtualbox-5.2
apt-get install –reinstall –yes vlc
apt-get install –reinstall –yes alsa-tools-gui
apt-get install –reinstall –yes gftp
apt install ./teamviewer_15.3.2682_amd64.deb –yes


Note that some of above packages requires a properly configured third party repositories, other people might have other packages that are missing from the dpkg list and needs to be reinstalled so just decide according to your own case of left aside working system present binaries that doesn't belong to any dpkg installed package.

After a bit of struggle everything is back to normal Thanks God! 🙂 !


Linux show largest sized packages / Which Deb, RPM Linux installed package use most disk space and How to Free Space for critical system updates

Sunday, January 12th, 2020

linux-show-largest-sized-packages-which-deb-rpm-linux-package-use-most-disk-space-to-free-space-for-critical-system-updates

A very common problem that happens on both Linux installed servers and Desktop Linux is a starting to fill / (root partition). This problem could happen due to several reasons just to point few of them out of my experience low disk space (ending free space) could be due to:

– Improper initial partitioning / bad space planning / or OS install made in a hurry (due to time constrains)
– Linux installed on old laptop machine with low Hard Disk Drive capacity (e.g. 80 Giga / 160 GB)
– Custom user partitioning on install time aiming for a small root partition originally and changing space requirements in time
– Due to increasing space taken by Linux updates / user stored files etc / distribution OS Level upgrades dist-upgrades.
– Improperly assigned install time partitions cause of lack of knowledge to understand how partitioning is managed.
– Due to install being made in a hurry

– Linux OS installed on a Cloud based VPN (e.g. running) in a Cloud Instance that is hosted in Amazon EC2, Linode, Digital Ocean, Hostgator etc.

So here is a real time situation that happened me many times, you're launching an apt-get upgrade / apt-get dist-upgrade or yum upgrade the packages are about to start downloading or downloaded and suddenly you get a message of not enough disk space to apply OS package updates …
That's nasty stuff mostly irritating and here there are few approaches to take.

a. perhaps easiest you can ofcourse extend the partition (with a free spaced other Primary or Extended partition) with something like:

parted (the disk partitioning manipulator for Linux), gparted (in case if Desktop with GUI / XOrg server running)

b. if not enough space on the Hard Disk Drive or SSD (Solid State Drive) and you have a budget to buy and free laptop / PC slot to place another physical HDD to clone it to a larger sized HDD and use some kind of partition clone tool, such as:

or any of the other multiple clone tools available in Linux.

But what if you don't have the option for some reason to extend the paritiotn, how can you apply the Critical Security Errata Updates issued to patch security vulnerabilities reported by well known CVEs?
Well you can start with the obvious easy you can start removing unnecessery stuff from the system (if home is also stored on the / – root partiiton) to delete something from there, even delete the /usr/local/man pages if you don't plan to read it free some logs by archiving purging logs from /var/log/* …

But if this is not possible, a better approach is simply try to remove / purge any .deb / .rpm whatever distro package manager packages that are not necessery used and just hanging around, that is often the case especially on Linux installed on Notebooks for a personal home use, where with years you have installed a growing number of packages which you don't actively use but installed just to take a look, while hunting for Cool Linux games and you wanted to give a try to Battle of Wesnoth  / FreeCIV / AlienArena / SuperTux Kart / TuxRacer etc.  or some GUI heavy programs like Krita / Inskape / Audacity etc.

To select which package might be not needed and just takes space hence you need to to list all installed packages on the system ordered by their size this is different in Debian based Linuces e.g. – Debian GNU / Linux / Ubuntu / Mint etc. and RPM based ones Fedora / CentOS / OpenSuSE


1. List all RPM installed packages by Size on CentOS / SuSE
 

Finding how much space each of the installed rpm packages take on the HDD and displaying them in a sorted order is done with:

rpm -qa –queryformat '%10{size} – %-25{name} \t %{version}\n' | sort -n

From the command above,  the '%10{size}' option aligns the size of the package to the right with a padding of 10 characters. The '%-25{name} aligns the name of the package to the left, padded to 25 characters. The '%{version} indicates the version and 'sort -n' flag sorts the packages according to size from the smallest to the largest in bytes.


2. List all installed RPM packages sorted by size on Fedora

Fedora has introduced the dnf package manager instead of yum, to get how much size individual rpm package occupies on system:

dnf info samba
Available Packages
Name        : samba
Arch        : x86_64
Epoch       : 2
Version     : 4.1.20
Release     : 1.fc21
Size        : 558 k
Repo        : updates
Summary     : Server and Client software to interoperate with Windows machines
URL         : http://www.samba.org/
License     : GPLv3+ and LGPLv3+
Description : Samba is the standard Windows interoperability suite of programs
            : for Linux and Unix.


To get a list of all packages on system with their size

dnf info * | grep -i "Installed size" |sort -n


3. List all installed DEB packages on Debian / Ubuntu / Mint etc. with dpkg / aptitude / apt-get and wajig


The most simple way to get a list of largest packages is through dpkg


# dpkg-query -Wf '${Installed-Size}\t${Package}\n' | sort -n
        brscan4
6       default-jre
6       libpython-all-dev
6       libtinfo-dev
6       python-all
6       python-all-dev
6       task-cinnamon-desktop
6       task-cyrillic
6       task-desktop
6       task-english
6       task-gnome-desktop
6       task-laptop
6       task-lxde-desktop
6       task-mate-desktop
6       task-print-server
6       task-ssh-server
6       task-xfce-desktop
8       mysql-client
8       printer-driver-all


207766    libwine
215625    google-chrome-stable
221908    libwine
249401    frogatto-data
260717    linux-image-4.19.0-5-amd64
262512    linux-image-4.19.0-6-amd64
264899    mame
270589    fonts-noto-extra
278903    skypeforlinux
480126    metasploit-framework


above cmd displays packages in size order, largest package last, but the output will include also size of packages, that used to exist,
have been removed but was not purged. Thus if you find  a package that is shown as very large by size but further dpkg -l |grep -i package-name shows package as purged e.g. package state is not 'ii' but 'rc', the quickest work around is to purge all removed packages, that are still not purged and have some configuration remains and other chunks of data that just take space for nothing with:

# dpkg –list |grep "^rc" | cut -d " " -f 3 | xargs sudo dpkg –purge


Be cautious when you execute above command, because if for some reason you uninstalled a package with the idea to keep old configuration files only and in case if you decide to use it some time in future to reuse already custom made configs but do run above purge commands all such package saved kept configs will disappear.
For people who don't want to mess up with, uninstalled but present packages use this to filter out ready to be purged state packages.

# dpkg-query -Wf '${db:Status-Status} ${Installed-Size}\t${Package}\n' | sed -ne 's/^installed //p'|sort -n


aptitude – (high level ncurses interface like to package management) can also be easily used to list largest size packages eating up your hard drive in both interactive or cli mode, like so:


# aptitude search –sort '~installsize' –display-format '%p %I' '~i' | head
metasploit-framework 492 MB
skypeforlinux 286 MB
fonts-noto-extra 277 MB
mame 271 MB
linux-image-4.19.0-6-amd64 269 MB
linux-image-4.19.0-5-amd64 267 MB
frogatto-data 255 MB
libwine 227 MB
google-chrome-stable 221 MB
libwine:i386 213 MB


  • –sort is package sort order, and ~installsize specifies a package sort policy.
  • installsize means 'sort on (estimated) installed size', and the preceding ~ means sort descending (since default for all sort policies is ascending).
  • –display-format changes the <you guessed :->. The format string '%p %I' tells aptitude to output package name, then installed size.
  • '~i' tells aptitude to search only installed packages.

How much a certain .deb package removal will free up on the disk can be seen with apt-get as well to do so for the famous 3D acceleration Graphic Card (enabled) or not  test game extremetuxracer

apt-get –assume-no –purge remove "texlive*" | grep "be freed" | 
   awk '{print $4, $5}'

Perhaps,  the easiest to remember and more human readable output biggest packages occupied space on disk is to install and use a little proggie called wajig to do so


# apt install –yes wajig


Here is how to pick up 10 biggest size packages.

root@jeremiah:/home/hipo# wajig large|tail -n 10
fonts-noto-cjk-extra               204,486      installed
google-chrome-stable               215,625      installed
libwine                            221,908      installed
frogatto-data                      249,401      installed
linux-image-4.19.0-5-amd64         260,717      installed
linux-image-4.19.0-6-amd64         262,512      installed
mame                               264,899      installed
fonts-noto-extra                   270,589      installed
skypeforlinux                      278,903      installed
metasploit-framework               480,126      installed


As above example lists a short package name and no description for those who want get more in depth knowledge on what exactly is the package bundle used for use:

# aptitude search –sort '~installsize' –display-format '%30p %I %r %60d' '~i' |head


%30p %I %r %60d display more information in your format string, or change field widths, enhanced format string

Meaning of parameters is:

  • %30p : package name in field width=30 char
  • %I : estimated install size
  • %r : 'reverse depends count': approximate number of other installed packages which depend upon this package
  • %60d : package's short description in field width=60 char

wajig is capable is a python written and idea is to easify Debian console package management (so you don't have to all time remember when and with which arguments to use apt-get / apt-cache etc.), below is list of commands it accepts.


root@jeremiah:/home/hipo## wajig commands
addcdrom           Add a Debian CD/DVD to APT's list of available sources
addrepo            Add a Launchpad PPA (Personal Package Archive) repository
aptlog             Display APT log file
autoalts           Mark the Alternative to be auto-set (using set priorities)
autoclean          Remove no-longer-downloadable .deb files from the download cache
autodownload       Do an update followed by a download of all updated packages
autoremove         Remove unused dependency packages
build              Get source packages, unpack them, and build binary packages from them.
builddeps          Install build-dependencies for given packages
changelog          Display Debian changelog of a package
clean              Remove all deb files from the download cache
contents           List the contents of a package file (.deb)
dailyupgrade       Perform an update then a dist-upgrade
dependents         Display packages which have some form of dependency on the given package
describe           Display one-line descriptions for the given packages
describenew        Display one-line descriptions of newly-available packages
distupgrade        Comprehensive system upgrade
download           Download one or more packages without installing them
editsources        Edit list of Debian repository locations for packages
extract            Extract the files from a package file to a directory
fixconfigure       Fix an interrupted install
fixinstall         Fix an install interrupted by broken dependencies
fixmissing         Fix and install even though there are missing dependencies
force              Install packages and ignore file overwrites and depends
hold               Place packages on hold (so they will not be upgraded)
info               List the information contained in a package file
init               Initialise or reset wajig archive files
install            Package installer
installsuggested   Install a package and its Suggests dependencies
integrity          Check the integrity of installed packages (through checksums)
large              List size of all large (>10MB) installed packages
lastupdate         Identify when an update was last performed
listall            List one line descriptions for all packages
listalternatives   List the objects that can have alternatives configured
listcache          List the contents of the download cache
listcommands       Display all wajig commands
listdaemons        List the daemons that wajig can start, stop, restart, or reload
listfiles          List the files that are supplied by the named package
listhold           List packages that are on hold (i.e. those that won't be upgraded)
listinstalled      List installed packages
listlog            Display wajig log file
listnames          List all known packages; optionally filter the list with a pattern
listpackages       List the status, version, and description of installed packages
listscripts        List the control scripts of the package of deb file
listsection        List packages that belong to a specific section
listsections       List all available sections
liststatus         Same as list but only prints first two columns, not truncated
localupgrade       Upgrade using only packages that are already downloaded
madison            Runs the madison command of apt-cache
move               Move packages in the download cache to a local Debian mirror
new                Display newly-available packages
newdetail          Display detailed descriptions of newly-available packages
news               Display the NEWS file of a given package
nonfree            List packages that don't meet the Debian Free Software Guidelines
orphans            List libraries not required by any installed package 
policy             From preferences file show priorities/policy (available)
purge              Remove one or more packages and their configuration files
purgeorphans       Purge orphaned libraries (not required by installed packages)
purgeremoved       Purge all packages marked as deinstall
rbuilddeps         Display the packages which build-depend on the given package
readme             Display the README file(s) of a given package
recdownload        Download a package and all its dependencies
recommended        Display packages installed as Recommends and have no dependents
reconfigure        Reconfigure package
reinstall          Reinstall the given packages
reload             Reload system daemons (see LIST-DAEMONS for available daemons)
remove             Remove packages (see also PURGE command)
removeorphans      Remove orphaned libraries
repackage          Generate a .deb file from an installed package
reportbug          Report a bug in a package using Debian BTS (Bug Tracking System)
restart            Restart system daemons (see LIST-DAEMONS for available daemons)
rpm2deb            Convert an .rpm file to a Debian .deb file
rpminstall         Install an .rpm package file
search             Search for package names containing the given pattern
searchapt          Find nearby Debian package repositories
show               Provide a detailed description of package
sizes              Display installed sizes of given packages
snapshot           Generates a list of package=version for all installed packages
source             Retrieve and unpack sources for the named packages
start              Start system daemons (see LIST-DAEMONS for available daemons)
status             Show the version and available versions of packages
statusmatch        Show the version and available versions of matching packages
stop               Stop system daemons (see LISTDAEMONS for available daemons)
tasksel            Run the task selector to install groups of packages
todo               Display the TODO file of a given package
toupgrade          List versions of upgradable packages
tutorial           Display wajig tutorial
unhold             Remove listed packages from hold so they are again upgradeable
unofficial         Search for an unofficial Debian package at apt-get.org
update             Update the list of new and updated packages
updatealternatives Update default alternative for things like x-window-manager
updatepciids       Updates the local list of PCI ids from the internet master list
updateusbids       Updates the local list of USB ids from the internet master list
upgrade            Conservative system upgrade
upgradesecurity    Do a security upgrade
verify             Check package's md5sum
versions           List version and distribution of given packages
whichpackage       Search for files matching a given pattern within packages


4. List installed packages order by size in Arch Linux

ArchLinux is using the funny named package manager – pacman (a nice prank for the good old arcade game).
What is distinctive of pacman uses libalpm (Arch Linux Package Management (ALPM) library) as a back-end to perform all the actions.


# pacman -Qi | awk '/^Name/{name=$3} /^Installed Size/{print $4$5, name}' | sort -hr | head -25
296.64MiB linux-firmware
144.20MiB python
105.43MiB gcc-libs
72.90MiB python2
66.91MiB linux
57.47MiB perl
45.49MiB glibc
35.33MiB icu
34.68MiB git
30.96MiB binutils
29.95MiB grub
18.96MiB systemd
13.94MiB glib2
13.79MiB coreutils
13.41MiB python2-boto
10.65MiB util-linux
9.50MiB gnupg
8.09MiB groff
8.05MiB gettext
7.99MiB texinfo
7.93MiB sqlite
7.15MiB bash
6.50MiB lvm2
6.43MiB openssl
6.33MiB db


There is another mean to list packages by size using a ArchLinux tool called pacgraph


# pacgraph -c | head -25

Autodetected Arch.
Loading package info
Total size: 1221MB
367MB linux
144MB pacgraph
98MB cloud-init
37MB grub
35MB icu
34MB git
31698kB binutils
19337kB pacman
11029kB man-db
8186kB texinfo
8073kB lvm2
7632kB nano
7131kB openssh
5735kB man-pages
3815kB xfsprogs
3110kB sudo
3022kB wget
2676kB tar
2626kB netctl
1924kB parted
1300kB procps-ng
1248kB diffutils


4. Debian Goodies


Most debian users perhaps never hear of debian-goodies package, but I thought it is worthy to mention it as sooner or later as a sysadmin or .deb based Desktop user it might help you somewhere.
 

Debian-goodies is sall toolbox-style utilities for Debian systems
 These programs are designed to integrate with standard shell tools,
 extending them to operate on the Debian packaging system.

 .
  dglob  – Generate a list of package names which match a pattern
           [dctrl-tools, apt*, apt-file*, perl*]
  dgrep  – Search all files in specified packages for a regex
           [dctrl-tools, apt-file (both via dglob)]
 .
 These are also included, because they are useful and don't justify
 their own packages:
 .
  check-enhancements
 
           – find packages which enhance installed packages [apt,
                dctrl-tools]
  checkrestart
 
           – Help to find and restart processes which are using old versions
               of upgraded files (such as libraries) [python3, procps, lsof*]
  debget     – Fetch a .deb for a package in APT's database [apt]
  debman     – Easily view man pages from a binary .deb without extracting
               [man, apt* (via debget)]
  debmany    – Select manpages of installed or uninstalled packages [man |
               sensible-utils, whiptail | dialog | zenity, apt*, konqueror*,
               libgnome2-bin*, xdg-utils*]
  dhomepage  – Open homepage of a package in a web browser [dctrl-tools,
               sensible-utils*, www-browser* | x-www-browser*]
  dman       – Fetch manpages from online manpages.debian.org service [curl,
               man, lsb-release*]
  dpigs      – Show which installed packages occupy the most space
               [dctrl-tools]
  find-dbgsym-packages
             – Get list of dbgsym packages from core dump or PID [dctrl-tools,
               elfutils, libfile-which-perl, libipc-system-simple-perl]
  popbugs    – Display a customized release-critical bug list based on
               packages you use (using popularity-contest data) [python3,
               popularity-contest]
  which-pkg-broke
             – find which package might have broken another [python3, apt]
  which-pkg-broke-build
             – find which package might have broken the build of another
               [python3 (via which-pkg-broke), apt]

Even simpler by that is to use dpigs shell script part of the debian-goodies package which will automatically print out the largest packages.

dpigs command output is exactly the same as 'dpkg-query -Wf '${Installed-Size}\t${Package}\n' | sort -nr | head', but is useful cause you don't have to remember that complex syntax.


5. Checking where your space is gone in a Spacesniffer like GUI manner with Baobab


In my prior article Must have software on a new installed Windows 2 of the  of the precious tools to set are Spacesniffer and WinDirStat.
Windows users will be highly delighted to know that SpaceSniffer equivallent is already present on Linux – say hello baobab.
Baobab
is simple but useful Graphic disk usage overview program for those who don't want to mess to much with the console / terminal to find out which might be the possible directory candidate for removal. It is very simplistic but it does well what it is aimed for, to install it on a Debian or .deb based OS.

# apt install –yes baobab


baobab-entry-screen-debian-gnu-linux-screenshot

baobab Linux Hard Disk Usage Analyzer for GNOME. – It can easily scan either the whole filesystem or a specific user-requested branch (Iocal or remote)


baobab-entry-screen-debian-gnu-linux-directories-taking-most-space-pie-screenshot

Baobab / (root) directory statistics Rings Chart pie


baobab-entry-screen-debian-gnu-linux-disk-space-by-size-visualized-screenshot

baobab – Treemap Chart for directory usage sorted by size on disk 

!!! Note that before removing any files found as taking up too much space with baobab – make sure this files are not essential parts of a .deb package first, otherwise you might break up your system !!!

KDE (Plasma) QT library users could use Qdirstat instead of baobab 

qdirstat-on-gnu-linur checking what is the disk space bottleneck qdirstat KDE


6. Use ncdu or duper perl script tool to generate directory disk usage in ASCII chart bar

ncdu and duper are basicly the same except one is using ncurses and is interactive in a very simplistic interface with midnight commander.
 

# apt install –yes ncdu
# ncdu /root


ncdu-gnu-linux-debian-screenshot


# apt-get install –yes durep
# durep -td 1 /usr

[ /usr    14.4G (0 files, 11 dirs) ]
   6.6G [#############                 ]  45.54% lib/
   5.5G [###########                   ]  38.23% share/
   1.1G [##                            ]   7.94% bin/
 552.0M [#                             ]   3.74% local/
 269.2M [                              ]   1.83% games/
 210.4M [                              ]   1.43% src/
  88.9M [                              ]   0.60% libexec/
  51.3M [                              ]   0.35% sbin/
  41.2M [                              ]   0.28% include/
   8.3M [                              ]   0.06% lib32/
 193.8K [                              ]   0.00% lib64/


Conclusion


In this article, I've shortly explained the few approach you can take to handle low disk space preventing you to update a regular security updates on Linux.
The easiest one is to clone your drive to a bigger (larger) sized SATA HDD or SDD Drive or using a free space left on a hard drive to exnted the current filling up the root partition. 

Further, I looked through the common reasons for endind with a disk being low spaced and a quick work around to free disk space through listing and purging larges sized package, this is made differently in different Linux distributions, because different Linux has different package managers. As I'm primary using Debian, I explained thoroughfully on how this is achieved with apt-get / dpkg-query / dpkg / aptitude and the little known debian-goodies .deb package manager helper pack. For GUI Desktop users there is baobab / qdirstat. ASCII lovers could enjoy durep and ncdu.

That's all folks hope you enjoyed and learned something new. If you know of other cool tools or things this article is missing please share.

Howto create Linux Music Audio CD from MP3 files / Create playable WAV format Audio CD Albums from MP3s

Tuesday, July 16th, 2019

cdburning-audio-music-cd-from-mp3-on-linuxcomapct-disc-tux-linux-logo

Recently my Mother asked me to prepare a Music Audio CD for her from a popular musician accordionist Stefan Georgiev from Dobrudja who has a unique folklore Bulgarian music.

As some of older people who still remember the age of the CD and who had most likely been into the CD burning Copy / Piracy business so popular in the countries of the ex-USSR so popular in the years 1995-2000 audio ,  Old CD Player Devices were not able to play the MP3 file format due to missing codecs (as MP3 was a proprietary compression that can't be installed on every device without paying the patent to the MP3 compression rights holder.

The revolutionary MP3 compression used to be booming standard for transferring Music data due to its high compression which made an ordinary MP3 of 5 minutes of 5MB (10+ times more compression than an ordinary classic WAV Audio the CPU intensiveness of MP3 files that puts on the reading device, requiring the CD Player to have a more powerful CPU.

Hence  due to high licensing cost and requirement for more powerful CPU enabled Audio Player many procuders of Audio Players never introduced MP3 to their devices and MP3 Neve become a standard for the Audio CD that was the standard for music listening inside almost every car out there.

Nowdays it is very rare need to create a Audio CD as audio CDs seems to be almost dead (As I heard from a Richard Stallman lecture In USA nowadays there is only 1 shop in the country where you can still buy CD or DVD drives) and only in third world as Africa Audio CDs perhaps are still in circulation.

Nomatter that as we have an old Stereo CD player on my village and perhaps many others, still have some old retired CD reading devices being able to burn out a CD is a useful thing.

Thus to make mother happy and as a learning excercise, I decided to prepare the CD for her on my Linux notebook.
Here I'll shortly describe the takes I took to make it happen which hopefully will be useful for other people that need to Convert and burn Audio CD from MP3 Album.


1. First I downloaded the Album in Mp3 format from Torrent tracker

My homeland Bulgaria and specific birth place place the city of Dobrich has been famous its folklore:  Galina Durmushlijska and Stefan Georgiev are just 2 of the many names along with Оркестър Кристал (Orchestra Crystal) and the multitude of gifted singers. My mother has a santiment for Stefan Georgiev, as she listened to this gifted accordinist on her Uncle's marriage.

Thus In my case this was (Стефан Георгиев Хора и ръченици от Добруджа) the album full song list here If you're interested to listen the Album and Enjoy unique Folklore from Dobrudja (Dobrich) my home city, Stefan Georgiev's album Hora and Rachenica Dances is available here


Stefan_Georgiev-old-audio-Music-CD-Hora-i-Rychenici-ot-Dobrudja-Horos-and-Ruchenitsas-from-Dobrudja-CD_Cover
I've downloaded them from Bulgarian famous torrent tracker zamunda.net in MP3 format.
Of course you need to have a CD / DVD readed and write device on the PC which nowdays is not present on most modern notebooks and PCs but as a last resort you can buy some cheap External Optical CD / DVD drive for 25 to 30$ from Amazon / Ebay etc.


2. You will need to install a couple of programs on Linux host (if you don't have it already)


To be able to convert from command line from MP3 to WAV you will need as minimum ffmpeg and normalize-audio packages as well as some kind of command line burning tool like cdrskin  wodim which is
the fork of old good known cdrecord, so in case if you you're wondering what happened with it just
use instead wodim.

Below is a good list of tools (assuming you have enough HDD space) to install:


root@jeremiah:/ # apt-get install –yes dvd+rw-tools cdw cdrdao audiotools growisofs cdlabelgen dvd+rw-tools k3b brasero wodim ffmpeg lame normalize-audio libavcodec58


Note that some of above packages I've installed just for other Write / Read operations for DVD drives and you might not need that but it is good to have it as some day in future you will perhaps need to write out a DVD or something.
Also the k3b here is specific to KDE and if you're a GNOME user you could use Native GNOME Desktop app such brasero or if you're in a more minimalistic Linux desktop due to hardware contrains use XFCE's native xfburn program.

If you're a console / terminal geek like me you will definitely enjoy to use cdw
 

root@jeremiah:/ # apt-cache show cdw|grep -i description -A 1
Description-en: Tool for burning CD's – console version
 Ncurses-based frontend for wodim and genisoimage. It can handle audio and

Description-md5: 77dacb1e6c00dada63762b78b9a605d5
Homepage: http://cdw.sourceforge.net/


3. Selecting preferred CD / DVD / BD program to use to write out the CD from Linux console


cdw uses wodim (which is a successor of good old known console cdrecord command most of use used on Linux in the past to burn out new Redhat / Debian / different Linux OS distro versions for upgrade purposes on Desktop and Server machines.

To check whether your CD / DVD drive is detected and ready to burn on your old PC issue:


root@jeremiah:/# wodim -checkdrive
Device was not specified. Trying to find an appropriate drive…
Detected CD-R drive: /dev/cdrw
Using /dev/cdrom of unknown capabilities
Device type    : Removable CD-ROM
Version        : 5
Response Format: 2
Capabilities   :
Vendor_info    : 'HL-DT-ST'
Identification : 'DVDRAM GT50N    '
Revision       : 'LT20'
Device seems to be: Generic mmc2 DVD-R/DVD-RW.
Using generic SCSI-3/mmc   CD-R/CD-RW driver (mmc_cdr).
Driver flags   : MMC-3 SWABAUDIO BURNFREE
Supported modes: TAO PACKET SAO SAO/R96P SAO/R96R RAW/R16 RAW/R96P RAW/R96R

You can also use xorriso (whose added value compared to other console burn cd tools is is not using external program for ISO9660 formatting neither it use an external or an external burn program for CD, DVD or BD (Blue Ray) drive but it has its own libraries incorporated from libburnia-project.org libs.

Below output is from my Thinkpad T420 notebook. If the old computer CD drive is there and still functional in most cases you should not get issues to detect it.

cdw ncurses text based CD burner tool's interface is super intuitive as you can see from below screenshot:

cdw-burn-cds-from-console-terminal-on-GNU-Linux-and-FreeBSD-old-PC-computer

CDW has many advanced abilities such as “blanking” a disk or ripping an audio CD on a selected folder. To overcome the possible problem of CDW not automatically detecting the disk you have inserted you can go to the “Configuration” menu, press F5 to enter the Hardware options and then on the first entry press enter and choose your device (by pressing enter again). Save the setting with F9.
 

4. Convert MP3 / MP4 Files or whatever format to .WAV to be ready to burn to CD


Collect all the files you want to have collected from the CD album in .MP3 a certain directory and use a small one liner loop to convert files to WAV with ffmpeg:
 

cd /disk/Music/Mp3s/Singer-Album-directory-with-MP3/

for i in $( ls *.mp3); do ffmpeg -i $i $i.wav; done


If you don't have ffmpeg installed and have mpg123 you can also do the Mp3 to WAV conversion with mpg123 cmd like so:


for i in $( ls ); do mpg123 -w $i.wav $i.mp3; done


Another alternative for conversion is to use good old lame (used to create Mp3 audio files but abling to also) decode
mp3 to wav.


lame –decode somefile.mp3 somefile.wav


In the past there was a burn command tool that was able to easily convert MP3s to WAV but in up2date Linux modern releases it is no longer available most likely due to licensing issues, for those on older Debian Linux 7 / 8 / 9 / Ubuntu 8 to 12.XX / old Fedoras etc. if you have the command you can install burn and use it (and not bother with shell loops):

apt-get install burn

or

yum install burn


Once you have it to convert


$ burn -A -a *.mp3


5. Fix file naming to remove empty spaces such as " " and substitute to underscores as some Old CD Players are
unable to understand spaces in file naming with another short loop.


for f in *; do mv "$f" `echo $f | tr ' ' '_'`; done


6. Normalize audio produced .WAV files (set the music volume to a certain level)


In case if wondering why normalize audio is needed here is short extract from normalize-audio man page command description to shed some light.

"normalize-audio  is  used  to  adjust  the volume of WAV or MP3 audio files to a standard volume level.  This is useful for things like creating mp3 mixes, where different recording levels on different albums can cause the volume to  vary  greatly from song to song."
 

cd /disk/Music/Mp3s/Singer-Album-directory-with-MP3/

normalize-audio -m *.wav


7. Burn the produced normalized Audio WAV files to the the CD


wodim -v -fix -eject dev='/dev/sr0' -audio -pad *.wav


Alternatively you can conver all your MP3 files to .WAV with anything be it audacity
or another program or even use 
GNOME's CDBurn tool brasero (if gnome user) or KDE's CDBurn which in my opinion is
the best CD / DVD burning application for Linux K3B.

Burning Audio CD with K3b is up to few clicks and super easy and even k3b is going to handle the MP3 to WAV file Conversion itself. To burn audio with K3B just run it and click over 'New Audio CD Project'.

k3b-on-debian-gnu-linux-burn-audio-cd-screenshot

For those who want to learn a bit more on CD / DVD / Blue-Ray burning on GNU / Linux good readings are:
Linux CD Burning Mini Howto, is Linux's CD Writing Howto on ibiblio (though a bit obsolete) or Debian's official documentation on BurnCD.
 

8. What we learned here


Though the accent of this tutorial was how to Create Audio Music CD from MP3 on GNU / Linux, the same commands are available in most FreeBSD / NetBSD / OpenBSD ports tree so you can use the same method to build prepare Audio Music CD on *BSDs.

In this article, we went through few basic ways on how to prepare WAV files from MP3 normalize the new created WAV files on Linux, to prepare files for creation of Audio Music CD for the old mom or grandma's player or even just for fun to rewind some memories. For GUI users this is easily done with  k3b,  brasero or xfburn.

I've pointed you to cdw a super useful text ncurses tool that makes CD Burninng from plain text console (on servers) without a Xorg / WayLand  GUI installed super easy. It was shortly reviewed what has changed over the last few years and why and why cdrecord was substituted for wodim. A few examples were given on how to handle conversion through bash shell loops and you were pointed to some extra reading resources to learn a bit more on the topic.
There are plenty of custom scripts around for doing the same CD Burn / Covnersion tasks, so pointing me to any external / Shell / Perl scripts is mostly welcome.

Hope this learned you something new, Enjoy ! 🙂