Posts Tagged ‘transfer’

How to move transfer binary files encoded with base64 on Linux with Copy Paste of text ASCII encoded string

Monday, October 25th, 2021

base64-encode-decode-binary-files-to-transfer-between-servers-base64-artistic-logo

If you have to work on servers in a protected environments that are accessed via multiple VPNs, Jump hosts or Web Citrix and you have no mean to copy binary files to your computer or from your computer because you have all kind of FTP / SFTP or whatever Data Copy clients disabled on remote jump host side or CITRIX server and you still are looking for a way to copy files between your PC and the Remote server Side.
Or for example if you have 2 or more servers that are in a special Demilitarized Network Zones ( DMZ ) and the machines does not have SFTP / FTP / WebServer or other kind of copy protocol service that can be used to copy files between the hosts and you still need to copy some files between the 2 or more machines in a slow but still functional way, then you might not know of one old school hackers trick you can employee to complete the copy of files between DMZ-ed Server Host A lets say with IP address (192.168.50.5) -> Server Host B (192.168.30.7). The way to complete the binary file copy is to Encode the binary on Server Host A and then, use cat  command to display the encoded string and copy whole encoded cat command output  to your (local PC buffer from where you access the remote side via SSH via the CITRIX or Jump host.). Then decode the encoded file with an encoding tool such as base64 or uuencode. In this article, I'll show how this is done with base64 and uuencode. Base64 binary is pretty standard in most Linux / Unix OS-es today on most Linux distributions it is part of the coreutils package.
The main use of base64 encoding to encode non-text Attachment files to Electronic Mail, but for our case it fits perfectly.
Keep in mind, that this hack to copy the binary from Machine A to Machine B of course depends on the Copy / Paste buffer being enabled both on remote Jump host or Citrix from where you reach the servers as well as your own PC laptop from where you access the remote side.

base64-character-encoding-string-table

Base64 Encoding and Decoding text strings legend

The file copy process to the highly secured PCI host goes like this:
 

1. On Server Host A encode with md5sum command

[root@serverA ~]:# md5sum -b /tmp/inputbinfile-to-encode
66c4d7b03ed6df9df5305ae535e40b7d *inputbinfile-to-encode


As you see one good location to encode the file would be /tmp as this is a temporary home or you can use alternatively your HOME dir

but you have to be quite careful to not run out of space if you produce it anywhere 🙂


2. Encode the binary file with base64 encoding

 [root@serverB ~]:# base64 -w0 inputbinfile-to-encode > outputbin-file.base64

The -w0 option is given to disable line wrapping. Line wrapping is perhaps not needed if you will copy paste the data.

base64-encoded-binary-file-text-string-linux-screenshot

Base64 Encoded string chunk with line wrapping

For a complete list of possible accepted arguments check here.

3. Cat the inputbinfile-to-encode just generated to display the text encoded file in your SecureCRT / Putty / SuperPutty etc. remote ssh access client

[root@serverA ~]:# cat /tmp/inputbinfile-to-encode
f0VMRgIBAQAAAAAAAAAAAAMAPgABAAAAMGEAAAAAAABAAAAAAAAAACgXAgAAAAAAAAAAA
EAAOAALAEAAHQAcAAYAAAAEAAA ……………………………………………………………… cTD6lC+ViQfUCPn9bs


4. Select the cat-ted string and copy it to your PC Copy / Paste buffer


If the bin file is not few kilobytes, but few megabytes copying the file might be tricky as the string produced from cat command would be really long, so make sure the SSH client you're using is configured to have a large buffer to scroll up enough and be able to select the whole encoded string until the end of the cat command and copy it to Copy / Paste buffer.


5. On Server Host B paste the bas64 encoded binary inside a newly created file

Open with a text editor vim / mc or whatever is available

[root@serverB ~]:# vi inputbinfile-to-encode

Some very paranoid Linux / UNIX systems might not have even a normal text editor like 'vi' if you happen to need to copy files on such one a useful thing is to use a simple cat on the remote side to open a new File Descriptor buffer, like this:

[root@server2 ~]:# cat >> inputbinfile-to-encode <<'EOF'
Paste the string here


6. Decode the encoded binary with base64 cmd again

[root@serverB ~]:# base64 –decode outputbin-file.base64 > inputbinfile-to-encode


7. Set proper file permissions (the same as on Host A)

[root@serverB ~]:#  chmod +x inputbinfile-to-encode


8. Check again the binary file checksum on Host B is identical as on Host A

[root@serverB ~]:# md5sum -b inputbinfile-to-encode
66c4d7b03ed6df9df5305ae535e40b7d *inputbinfile-to-encode

As you can md5sum match on both sides so file should be OK.


9. Encoding and decoding files with uuencode


If you are lucky and you have uuencode installed (sharutils) package is present on remote machine to encode lets say an archived set of binary files in .tar.gz format do:

Prepare the archive of all the files you want to copy with tar on Host A:

[root@Machine1 ~]:#  tar -czvf /bin/whatever /usr/local/bin/htop /usr/local/bin/samhain /etc/hosts archived-binaries-and-configs.tar.gz

[root@Machine1 ~]:# uuencode archived-binaries-and-configs.tar.gz archived-binaries-and-configs.uu

Cat / Copy / paste the encoded content as usual to a file on Host B:

Then on Machine 2 decode:

[root@Machine2 ~]:# uuencode -c < archived-binaries-and-configs.tar.gz.uu


Conclusion


In this short method I've shown you a hack that is used often by script kiddies to copy over files between pwn3d machines, a method which however is very precious and useful for sysadmins like me who has to admin a paranoid secured servers that are placed in a very hard to access environments.

With the same method you can encode or decode not only binary file but also any standard input/output file content. base64 encoding is quite useful stuff to use also in bash scripts or perl where you want to have the script copy file in a plain text format . Datas are encoded and decoded to make the data transmission and storing process easier. You have to keep in mind always that Encoding and Decoding are not similar to encryption and decryption as encr. deprytion gives a special security layers to the encoded that. Encoded data can be easily revealed by decoding, so if you need to copy between the servers very sensitive data like SSL certificates Private RSA / DSA key, this command line utility tool better to be not used for sesitive data copying.


IBM TSM dsmc console client use for listing configured backups, checking set scheduled backups and backup and restore operations howto

Friday, March 6th, 2020

tsm-ibm-logo_tivoli-dsmc-console-client-listing-backups-create-backups-and-restore-on-linux-unix-windows

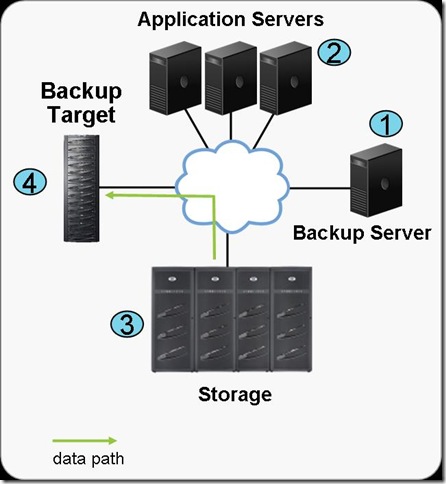
Creating a simple home based backup solution with some shell scripting and rsync is a common use. However as a sysadmin in a middle sized or large corporations most companies use some professional backup service such as IBM Tivoli Storage Manager TSM – recently IBM changed the name of the product to IBM Spectrum.

IBM TSM  is a data protection platform that gives enterprises a single point of control and administration for backup and recovery that is used for Privare Clouds backup and other high end solutions where data criticality is top.
Usually in large companies TSM backup handling is managed by a separate team or teams as managing a large TSM infrastructure is quite a complex task, however my experience as a sysadmin show me that even if you don't have too much of indepth into tsm it is very useful to know how to manage at least basic Incremental backup operations such as view what is set to be backupped, set-up a new directory structure for backup, check the backup schedule configured, check what files are included and which excluded from the backup store etc. 

TSM has multi OS support ans you can use it on most streamline Operating systems Windows / Mac OS X and Linux in this specific article I'll be talking concretely about backing up data with tsm on Linux, tivoli can be theoretically brought up even on FreeBSD machines via the Linuxemu BSD module and the 64-Bit Tivoli Storage Manager RPMs.
Therefore in this small article I'll try to give few useful operations for the novice admin that stumbles on tsm backupped server that needs some small maintenance.
 

1. Starting up the dsmc command line client


Nomatter the operating system on which you run it to run the client run:

# dsmc


tsm-check-backup-schedule-set-time

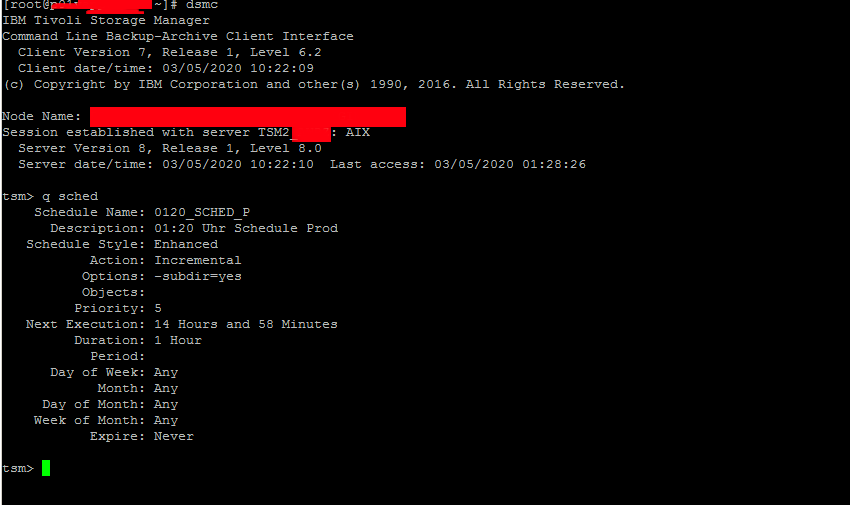
Note that usually dsmc should run as superuser so if you try to run it via a normal non-root user you will get an error message like:


[ user@linux ~]$ dsmc
ANS1398E Initialization functions cannot open one of the Tivoli Storage Manager logs or a related file: /var/tsm/dsmerror.log. errno = 13, Permission denied


Tivoli SM has an extensive help so to get the use basics, type help
 

tsm> help
1.0 New for IBM Tivoli Storage Manager Version 6.4
2.0 Using commands
  2.1 Start and end a client command session
    2.1.1 Process commands in batch mode
    2.1.2 Process commands in interactive mode
  2.2 Enter client command names, options, and parameters
    2.2.1 Command name
    2.2.2 Options
    2.2.3 Parameters
    2.2.4 File specification syntax
  2.3 Wildcard characters
  2.4 Client commands reference
  2.5 Archive
  2.6 Archive FastBack

Enter 'q' to exit help, 't' to display the table of contents,
press enter or 'd' to scroll down, 'u' to scroll up or
enter a help topic section number, message number, option name,
command name, or command and subcommand:    


2. Listing files listed for backups


A note to make here is as in most corporate products tsm supports command aliases so any command supported described in the help like query, could be
abbreviated with its first letters only, e.g. query filespace tsm cmd can be abbreviated as

tsm> q fi

Commands can be run non-interactive mode also so if you want the output of q fi you can straight use:

tsm> dsmc q fi


tsm-check-included-excluded-files-q-file-if-backupped-list-backup-set-directories

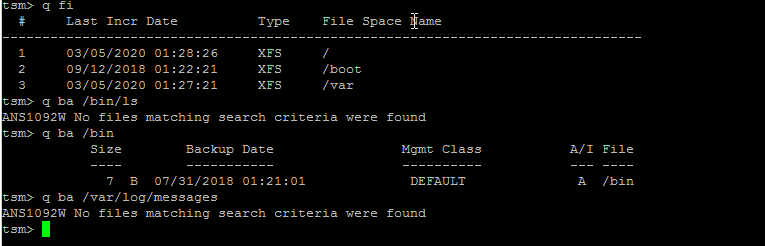
This shows the directories and files that are set for backup creation with Tivoli.


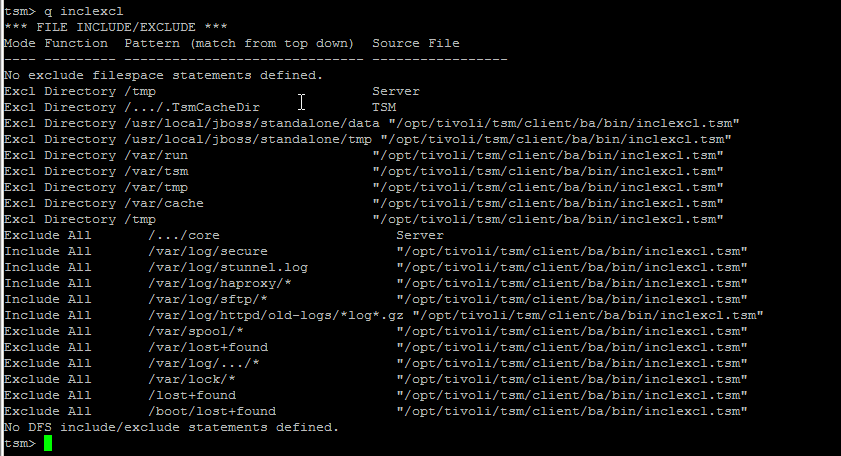
3. Getting included and excluded backup set files


It is useful to know what are the exact excluded files from tsm set backup this is done with query inclexcl

tsm-check-excluded-included-files


4. Querying for backup schedule time

Tivoli as every other backup solution is creating its set to backup files in a certain time slot periods. 
To find out what is the time slot for backup creation use;

tsm> q sched
Schedule Name: WEEKLY_ITSERV
      Description: ITSERV weekly incremental backup
   Schedule Style: Classic
           Action: Incremental
          Options: 
          Objects: 
         Priority: 5
   Next Execution: 180 Hours and 35 Minutes
         Duration: 15 Minutes
           Period: 1 Week  
      Day of Week: Wednesday
            Month:
     Day of Month:
    Week of Month:
           Expire: Never  


tsm-query-partitions-backupeed-or-not


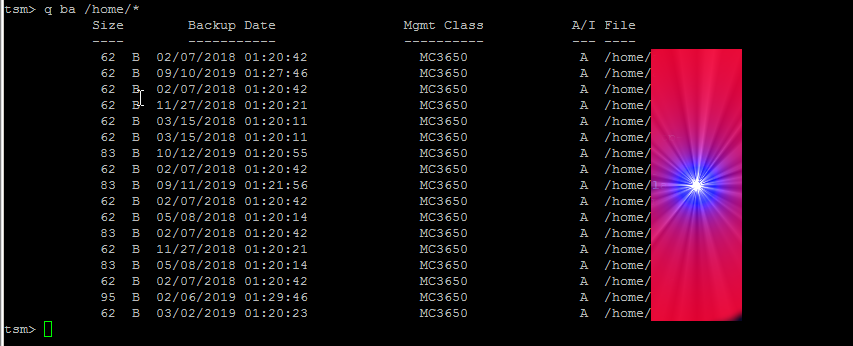
5. Check which files have been backed up

If you want to make sure backups are really created it is a good to check, which files from the selected backup files have already
a working backup copy.

This is done with query backup like so:

tsm> q ba /home/*


tsm-dsmc-query-user-home-for-backups

If you want to query all the current files and directories backed up under a directory and all its subdirectories you need to add the -subdir=yes option as below:


tsm> q ba /home/hipo/projects/* -subdir=yes
   
Size      Backup Date        Mgmt Class A/I File
   —-      ———–        ———- — —-
    512  12-09-2011 19:57:09    STANDARD    A  /home/hipo/projects/hfs0106
  1,024  08-12-2011 02:46:53    STANDARD    A  /home/hipo/projects/hsm41perf
    512  12-09-2011 19:57:09    STANDARD    A  /home/hipo/projects/hsm41test
    512  24-04-2012 00:22:56    STANDARD    A  /home/hipo/projects/hsm42upg
  1,024  12-09-2011 19:57:09    STANDARD    A  /home/hipo/projects/hfs0106/test
  1,024  12-09-2011 19:57:09    STANDARD    A  /home/hipo/projects/hfs0106/test/test2
 12,048  04-12-2011 02:01:29    STANDARD    A  /home/hipo/projects/hsm41perf/tables
 50,326  30-04-2012 01:35:26    STANDARD    A  /home/hipo/projects/hsm42upg/PMR70023
 50,326  27-04-2012 00:28:15    STANDARD    A  /home/hipo/projects/hsm42upg/PMR70099
 11,013  24-04-2012 00:22:56    STANDARD    A  /home/hipo/projects/hsm42upg/md5check  


  • To make tsm, backup some directories on Linux / AIX other unices:


tsm> incr /  /usr  /usr/local  /home /lib


  • For tsm to backup some standard netware drives, use:


tsm> incr NDS:  USR:  SYS:  APPS:  


  • To backup C:\ D:\ E:\ F:\ if TSM is running on Windows


tsm> incr C:  D:  E: F:  -incrbydate 


  • To back up entire disk volumes irrespective of whether files have changed since the last backup, use the selective command with a wildcard and -subdir=yes as below:


tsm> sel /*  /usr/*   /home/*  -su=yes   ** Unix/Linux


7. Backup selected files from a backup location


It is intuitive to think you can just add some wildcard characters to select what you want
to backup from a selected location but this is not so, if you try something like below
you will get an err.


tsm> incr /home/hipo/projects/*/* -su=yes      
ANS1071E Invalid domain name entered: '/home/hipo/projects/*/*'


The proper way to select a certain folder / file for backup is with:


tsm> sel /home/hipo/projects/*/* -su=yes


8. Restoring tsm data from backup


To restore the config httpd.conf to custom directory use:


tsm> rest /etc/httpd/conf/httpd.conf  /home/hipo/restore/


N!B! that in order for above to work you need to have the '/' trailing slash at the end.

If you want to restore a file under a different name:


tsm> rest /etc/ntpd.conf  /home/hipo/restore/


9. Restoring a whole backupped partition


tsm> rest /home/*  /tmp/restore/ -su=yes


This is using the Tivoli 'Restoring multiple files and directories', and the files to restore '*'
are kept till the one that was recovered (saying this in case if you accidently cancel the restore)


10. Restoring files with back date 


By default the restore function will restore the latest available backupped file, if you need
to recover a specific file, you need the '-inactive' '-pick' options.
The 'pick' interface is interactive so once listed you can select the exact file from the date
you want to restore.

General restore command syntax is:
 

tsm> restore [source-file] [destination-file]


tsm> rest /home/hipo/projects/*  /tmp/restore/ -su=yes  -inactive -pick

TSM Scrollable PICK Window – Restore

     #    Backup Date/Time        File Size A/I  File
   ————————————————————————————————–
   170. | 12-09-2011 19:57:09        650  B  A   /home/hipo/projects/hsm41test/inclexcl.test
   171. | 12-09-2011 19:57:09       2.74 KB  A   /home/hipo/projects/hsm41test/inittab.ORIG
   172. | 12-09-2011 19:57:09       2.74 KB  A   /home/hipo/projects/hsm41test/inittab.TEST
   173. | 12-09-2011 19:57:09       1.13 KB  A   /home/hipo/projects/hsm41test/md5.out
   174. | 30-04-2012 01:35:26        512  B  A   /home/hipo/projects/hsm42125upg/PMR70023
   175. | 26-04-2012 01:02:08        512  B  I   /home/hipo/projects/hsm42125upg/PMR70023
   176. | 27-04-2012 00:28:15        512  B  A   /home/hipo/projects/hsm42125upg/PMR70099
   177. | 24-04-2012 19:17:34        512  B  I   /home/hipo/projects/hsm42125upg/PMR70099
   178. | 24-04-2012 00:22:56       1.35 KB  A   /home/hipo/projects/hsm42125upg/dsm.opt
   179. | 24-04-2012 00:22:56       4.17 KB  A   /home/hipo/projects/hsm42125upg/dsm.sys
   180. | 24-04-2012 00:22:56       1.13 KB  A   /home/hipo/projects/hsm42125upg/dsmmigfstab
   181. | 24-04-2012 00:22:56       7.30 KB  A   /home/hipo/projects/hsm42125upg/filesystems
   182. | 24-04-2012 00:22:56       1.25 KB  A   /home/hipo/projects/hsm42125upg/inclexcl
   183. | 24-04-2012 00:22:56        198  B  A   /home/hipo/projects/hsm42125upg/inclexcl.dce
   184. | 24-04-2012 00:22:56        291  B  A   /home/hipo/projects/hsm42125upg/inclexcl.ox_sys
   185. | 24-04-2012 00:22:56        650  B  A   /home/hipo/projects/hsm42125upg/inclexcl.test
   186. | 24-04-2012 00:22:56        670  B  A   /home/hipo/projects/hsm42125upg/inetd.conf
   187. | 24-04-2012 00:22:56       2.71 KB  A   /home/hipo/projects/hsm42125upg/inittab
   188. | 24-04-2012 00:22:56       1.00 KB  A   /home/hipo/projects/hsm42125upg/md5check
   189. | 24-04-2012 00:22:56      79.23 KB  A   /home/hipo/projects/hsm42125upg/mkreport.020423.out
   190. | 24-04-2012 00:22:56       4.27 KB  A   /home/hipo/projects/hsm42125upg/ssamap.020423.out
   191. | 26-04-2012 01:02:08      12.78 MB  A   /home/hipo/projects/hsm42125upg/PMR70023/70023.tar
   192. | 25-04-2012 16:33:36      12.78 MB  I   /home/hipo/projects/hsm42125upg/PMR70023/70023.tar
        0———10——–20——–30——–40——–50——–60——–70——–80——–90–
<U>=Up  <D>=Down  <T>=Top  <B>=Bottom  <R#>=Right  <L#>=Left
<G#>=Goto Line #  <#>=Toggle Entry  <+>=Select All  <->=Deselect All
<#:#+>=Select A Range <#:#->=Deselect A Range  <O>=Ok  <C>=Cancel
pick> 


To navigate in pick interface you can select individual files to restore via the number seen leftside.
To scroll up / down use 'U' and 'D' as described in the legenda.


11. Restoring your data to another machine


In certain circumstances, it may be necessary to restore some, or all, of your data onto a machine other than the original from which it was backed up.

In ideal case the machine platform should be identical to that of the original machine. Where this is not possible or practical please note that restores are only possible for partition types that the operating system supports. Thus a restore of an NTFS partition to a Windows 9x machine with just FAT support may succeed but the file permissions will be lost.
TSM does not work fine with cross-platform backup / restore, so better do not try cross-platform restores.
 Trying to restore files onto a Windows machine that have previously been backed up with a non-Windows one. TSM created backups on Windows sent by other OS platforms can cause  backups to become inaccessible from the host system.

To restore your data to another machine you will need the TSM software installed on the target machine. Entries in Tivoli configuration files dsm.sys and/or dsm.opt need to be edited if the node that you are restoring from does not reside on the same server. Please see our help page section on TSM configuration files for their locations for your operating system. 

To access files from another machine you should then start the TSM client as below:


# dsmc -virtualnodename=RESTORE.MACHINE      


You will then be prompted for the TSM password for this machine.


You will probably want to restore to a different destination to the original files to prevent overwriting files on the local machine, as below:


  • Restore of D:\ Drive to D:\Restore ** Windows 


tsm> rest D:\*   D:\RESTORE\    -su=yes 


  • Restore user /home/* to /scratch on ** Mac, Unix/Linux


tsm> rest /home/* /scratch/     -su=yes  


  • Restoring Tivoli data on old netware


tsm> rest SOURCE-SERVER\USR:*  USR:restore/   -su=yes  ** Netware


12. Adding more directories for incremental backup / Check whether TSM backup was done correctly?

The easiest way is to check the produced dschmed.log if everything is okay there should be records in the log that Tivoli backup was scheduled in a some hours time
succesfully.
A normally produced backup scheduled in log should look something like:


14-03-2020 23:03:04 — SCHEDULEREC STATUS BEGIN
14-03-2020 23:03:04 Total number of objects inspected:   91,497
14-03-2020 23:03:04 Total number of objects backed up:      113
14-03-2020 23:03:04 Total number of objects updated:          0
14-03-2020 23:03:04 Total number of objects rebound:          0
14-03-2020 23:03:04 Total number of objects deleted:          0
14-03-2020 23:03:04 Total number of objects expired:         53
14-03-2020 23:03:04 Total number of objects failed:           6
14-03-2020 23:03:04 Total number of bytes transferred:    19.38 MB
14-03-2020 23:03:04 Data transfer time:                    1.54 sec
14-03-2020 23:03:04 Network data transfer rate:        12,821.52 KB/sec
14-03-2020 23:03:04 Aggregate data transfer rate:        114.39 KB/sec
14-03-2020 23:03:04 Objects compressed by:                    0%
14-03-2020 23:03:04 Elapsed processing time:           00:02:53
14-03-2020 23:03:04 — SCHEDULEREC STATUS END
14-03-2020 23:03:04 — SCHEDULEREC OBJECT END WEEKLY_23_00 14-12-2010 23:00:00
14-03-2020 23:03:04 Scheduled event 'WEEKLY_23_00' completed successfully.
14-03-2020 23:03:04 Sending results for scheduled event 'WEEKLY_23_00'.
14-03-2020 23:03:04 Results sent to server for scheduled event 'WEEKLY_23_00'.


in case of errors you should check dsmerror.log
 

Conclusion


In this article I've briefly evaluated some basics of IBM Commercial Tivoli Storage Manager (TSM) to be able to  list backups, check backup schedules and how to the files set to be
excluded from a backup location and most importantly how to check that data backed up data is in a good shape and accessible.
It was explained how backups can be restored on a local and remote machine as well as how to  append new files to be set for backup on next incremental scheduled backup.
It was shown how the pick interactive cli interface could be used to restore files at a certain data back in time as well as how full partitions can be restored and how some
certain file could be retrieved from the TSM data copy.

Mount remote Linux SSHFS Filesystem harddisk on Windows Explorer SWISH SSHFS file mounter and a short evaluation on what is available to copy files to SSHFS from Windows PC

Monday, February 22nd, 2016

swish-mount-and-copy-files-from-windows-to-linux-via-sshfs-mount

I'm forced to use Windows on my workbook and I found it really irritating, that I can't easily share files in a DropBox, Google Drive, MS OneDrive, Amazon Storage or other cloud-storage free remote service. etc.
I don't want to use DropBox like non self-hosted Data storage because I want to keep my data private and therefore the only and best option for me was to make possible share my Linux harddisk storage
dir remotely to the Windows notebook.

I didn't wanted to setup some complex environment such as Samba Share Server (which used to be often a common option to share file from Linux server to Windows), neither wanted to bother with  installing FTP service and bother with FTP clients, or configuring some other complex stuff such as WebDav – which BTW is an accepted and heavily used solution across corporate clients to access read / write files on a remote Linux servers.
Hence, I made a quick research what else besides could be used to easily share files and data from Windows PC / notebook to a home brew or professional hosting Linux server.

It turned out, there are few of softwares that gives a similar possibility for a home lan small network Linux / Windows hybrid network users such, here is few of the many:

  • SyncThingSyncthing is an open-source file synchronization client/server application, written in Go, implementing its own, equally free Block Exchange Protocol. The source code's content-management repository is hosted on GitHub


    syncthing-logo

  • OwnCloud – ownCloud provides universal access to your files via the web, your computer or your mobile devices


    owncloud-logo

  • Seafile – Seafile is a file hosting software system. Files are stored on a central server and can be synchronized with personal computers and mobile devices via the Seafile client. Files can also be accessed via the server's web interface


seafile-client-in-browser

I've checked all of them and give a quick try of Syncthing which is really easy to start, just download the binary launch it and configure it under https://Localhost:8385 URL from a browser on the Linux server.
Syncthing seemed to be nice and easy to configure solution to be able to Sync files between Server A (Windows) and Server B(Linux) and guess many would enjoy it, if you want to give it a try you can follow this short install syncthing article.
However what I didsliked in both SyncThing and OwnCloud and Seafile and all of the other Sync file solutions was, they only supported synchronization via web and didn't seemed to have a Windows Explorer integration and did required
the server to run more services, posing another security hole in the system as such third party softwares are not easily to update and maintain.

Because of that finally after rethinking about some other ways to copy files to a locally mounted Sync directory from the Linux server, I've decided to give SSHFS a try. Mounting SSHFS between two Linux / UNIX hosts is
quite easy task with SSHFS tool

In Windows however the only way I know to transfer files to Linux via SSHFS was with WinSCP client and other SCP clients as well as the experimental:

As well as few others such as ExpandDrive, Netdrive, Dokan SSHFS (mirrored for download here)
I should say that I first decided to try copying few dozen of Gigabyte movies, text, books etc. using WinSCP direct connection, but after getting a couple of timeouts I was tired of WinSCP and decided to look for better way to copy to remote Linux SSHFS.
However the best solution I found after a bit of extensive turned to be:

SWISH – Easy SFTP for Windows

Swish is very straight forward to configure compared to all of them you download the .exe which as of time of writting is at version 0.8.0 install on the PC and right in My Computer you will get a New Device called Swish next to your local and remote drives C:/ D:/ , USBs etc.

swish-new-device-to-appear-in-my-computer-to-mount-sshfs

As you see in below screenshot two new non-standard buttons will Appear in Windows Explorer that lets you configure SWISH

windows-mount-sshfs-swish-add-sftp-connection-button-screenshot

Next and final step before you have the SSHFS remote Linux filesystem visible on Windows Xp / 7 / 8 / 10 is to fill in remote Linux hostname address (or even better fill in IP to get rid of possible DNS issues), UserName (UserID) and Direcory to mount.

swish-new-fill-in-dialog-to-make-new-linux-sshfs-mount-directory-possible-on-windows

Then you will see the SSHFS moutned:

swish-sshfs-mounted-on-windows

You will be asked to accept the SSH host-key as it used to be unknown so far

swish-mount-sshfs-partition-on-windows-from-remote-linux-accept-key

That's it now you will see straight into Windows Explorer the remote Linux SSHFS mounted:

remote-sshfs-linux-filesystem-mounted-in-windows-explorer-with-swish

Once setupped a Swish connection to copy files directly to it you can use the Send to Embedded Windows dialog, as in below screenshot

swish-send-to-files-windows-screenshot

The only 3 problem with SWISH are:

1. It doesn't support Save password, so on every Windows PC reboot when you want to connect to remote Linux SSHFS, you will have to retype remote login user pass.
Fron security stand point this is not such a bad thing, but it is a bit irritating to everytime type the password without an option to save permanently.
The good thing here is you can use Launch Key Agent
as visible in above screenshot and set in Putty Key Agent your remote host SSH key so the passwordless login will work without any authentication at
all however, this might open a security hole if your Win PC gets infected by virus, which might delete something on remote mounted SSHFS filesystem so I personally prefer to retype password on every boot.

2. it is a bit slow so if you're planning to Transfer large amounts of Data as hundreds of megabytes, expect a very slow transfer rate, even in a Local  10Mbit Network to transfer 20 – 30 GB of data, it took me about 2-3 hours or so.
SWISH is not actively supported and it doesn't have new release since 20th of June 2013, but for the general work I need it is just perfect, as I don't tent to be Synchronizing Dozens of Gigabytes all the time between my notebook PC and the Linux server.

3. If you don't use the established mounted connection for a while or your computer goes to sleep mode after recovering your connection to remote Linux HDD if opened in Windows File Explorer will probably be dead and you will have to re-enable it.

For Mac OS X users who want to mount / attach remote directory from a Linux partitions should look in fuguA Mac OS X SFTP, SCP and SSH Frontend

I'll be glad to hear from people on other good ways to achieve same results as with SWISH but have a better copy speed while using SSHFS.

Best Windows tools to Test (Benchmark) Hard Drives, SSD Drives and RAID Storage Controllers

Wednesday, April 23rd, 2014

atto-windows-hard-disk-benchmark-freeware-tool-screenshot-check-hard-disk-speed-windows
Disk Benchmarking is very useful for people involved in Graphic Design, 3D modelling, system admins  and anyone willing to squeeze maximum of his PC hardware.

If you want to do some benchmarking on newly built Windows server targetting Hard Disk performance, just bought a new hard SSD (Solid State Drives) and you want to test how well Hard Drive I/O operations behave or you want to see a regular HDD benchmarking of group of MS Windows PCs and plan hardware optiomization, check out ATTO Disk Benchmark.

So why exactly ATTO Benchmark? – Cause it is one of the best Windows Free Benchmark tools on the internet.

ATTO is a widely-accepted Disk Benchmark freeware utility to help measure storage system performance. ATTO though being freeware is among top tools utilized in industry. It is very useful in comparing different Hard Disk vendors speed, measure Windows storage systems performance with various transfer sizes and test lengths for reads and writes.

ATTO Disk Benchmark is used by manufacturers of Hardware RAID controllers, its precious tool to test Windows storage controllers, host bus adapters (HBAs).

Here is ATTO Benchmark tool specifications (quote from their webstie):
 

  • Transfer sizes from 512KB to 8MB
  • Transfer lengths from 64KB to 2GB
  • Support for overlapped I/O
  • Supports a variety of queue depths
  • I/O comparisons with various test patterns
  • Timed mode allows continuous testing
  • Non-destructive performance measurement on formatted drives
  • Transfer sizes from 512KB to 8MB
  • Transfer lengths from 64KB to 2GB
  • Support for overlapped I/O
  • Supports a variety of queue depths
  • I/O comparisons with various test patterns
  • Timed mode allows continuous testing
  • Non-destructive performance measurement on formatted drives
  • – See more at: http://www.attotech.com/disk-benchmark/#sthash.rRlgSTOE.dpuf

Here is mirrored latest version of ATTO Disk for Download. Once you get your HDD statistics you will probably want to compare to other people results. On  TomsHardware's world famous Hardware geek site there are plenty of Hard Drives performance Charts

Of course there are other GUI alternatives to ATTO Benchmark one historically famous is NBench

NBench

nbench_benchmark_windows_hard-drive-cpu-and-memory

Nbench is nice little benchmarking program for Windows NT. Nbench reports the following components of performance:

CPU speed: integer and floating operations/sec
L1 and L2 cache speeds: MB/sec
main memory speed: MB/sec
disk read and write speeds: MB/sec

SMP systems and multi-tasking OS efficiency can be tested using up to 20 separate threads of execution.

For Console Geeks or Windows server admins there are also some ports of famous *NIX Hard Disk Benchmarking tools:

NTiogen

NTiogen benchmark was written by Symbios Logic, It's Windows NT port of their popular UNIX benchmark IOGEN. NTIOGEN is the parent processes that spawns the specified number of IOGEN processes that actually do the I/O.
The program will display as output the number of processes, the average response time, the number of I/O operations per second, and the number of KBytes per second. You can download mirror copy of Ntiogen here


There are plenty of other GUI and Console HDD Benchmarking Win Tools, i.e.:

IOMeter (ex-developed by Intel and now abandoned available as open source available on SourceForge)

iometer-benchmark-disk-storage-speed-windows
 

Bench32 – Comprehensive benchmark that measures overall system performance under Windows NT or Windows 95, now obsolete not developed anymore abandoned by producer company.

ThreadMark32 – capable of bench (ex developed and supported by ADAPTEC) but also already unsupported

IOZone – filesystem benchmark tool. The benchmark generates and measures a variety of file operations. Iozone has been ported to many machines and runs under many operating systems.
 

N! B! Important note to make here is above suggested tools will provide you more realistic results than the proprietary vendor tools shipped by your hardware vendor. Using proprietary software produced by a single vendor makes it impossible to analyze and compare different hardwares, above HDD benchmarking tools are for "open systems", e.g. nomatter what the hardware producer is produced results can be checked against each other.
Another thing to consider is even though if you use any of above tools to test and compare two storage devices still results will be partially imaginary, its always best to conduct tests in Real Working Application Environments. If you're planning to launch a new services structure always test it first and don't rely on preliminary returned soft benchmarks.

if you know some other useful benchmarking software i'm missing please share.

luckyBackup Linux GUI back-up and synchronization tool

Wednesday, May 14th, 2014

luckybackup_best-linux-graphical-tool-for-backup_linux_gui-defacto-standard-tool
If you're a using GNU / Linux  for Desktop and you're already tired of creating backups by your own hacks using terminal and you want to make your life a little bit more easier and easily automate your important files back up through GUI program take a look at luckyBackup.

Luckibackup is a GUI frontend to the infamous rsync command line backup  tool. Luckibackup is available as a package in almost all modern Linux distributions its very easy to setup and can save you a lot of time especially if you have to manage a number of your Workplace Desktop Office Linux based computers.
Luckibackup is an absolute must have program for Linux Desktop start-up users. If you're migrating from Microsoft Windows realm and you're used to BackupPC, Luckibackup is probably the defacto Linux BackupPC substitute.

The sad news for Linux GNOME Desktop users is luckibackup is written in QT and it using it will load up a bit your notebook.
It is not installed by default so once a new Linux Desktop is installed you will have to install it manually on Debian and Ubuntu based Linux-es to install Luckibackup apt-get it.

debian:~# apt-get install --yes luckibackup
...

On Fedora and CentOS Linux install LuckiBackup via yum rpm package manager

[root@centos :~]# yum -y install luckibackup
.

Luckibackup is also ported for OpenSuSE Slackware, Gentoo, Mandriva and ArchLinux. In 2009 Luckibackup won the prize of Sourceforge Community Choice Awards for "best new project".

luckyBackup copies over only the changes you've made to the source directory and nothing more.
You will be surprised when your huge source is backed up in seconds (after the first backup).

Whatever changes you make to the source including adding, moving, deleting, modifying files / directories etc, will have the same effect to the destination.
Owner, group, time stamps, links and permissions of files are preserved (unless stated otherwise).

Luckibackup creates different multiple backup "snapshots".Each snapshot is an image of the source data that refers to a specific date-time.
Easy rollback to any of the snapshots is possible. Besides that luckibackup support Sync (just like rsync) od any directories keeping the files that were most recently modified on both of them.

Useful if you modify files on more than one PCs (using a flash-drive and don't want to bother remembering what did you use last. Luckibackup is capable of excluding certain files or directories from backupsExclude any file, folder or pattern from backup transfer.

After each operation a logfile is created in your home folder. You can have a look at it any time you want.

luckyBackup can run in command line if you wish not to use the gui, but you have to first create the profile that is going to be executed.
Type "luckybackup –help" at a terminal to see usage and supported options.
There is also TrayNotification – Visual feedback at the tray area informs you about what is going on.


How to split / rar in parts large data archive files on Linux and Windows – Transfer big files across servers located in DMZ rescticted areas

Friday, November 28th, 2014

how-to-split-rar-in-parts-large-data-archive-files-on-Linux-and-Windows-Transfer-big-files-across-servers-in-firewalled-restricted-areas

I was working on a Application Migration Project whose goal was to Install a business application called Asset Guardian and then move current company Data from the old server to the new AppServer.
F
or that purpose the company vendor Asset Guardian shipped to a Public access FTP, a huge (12GB) ZIP archive file which had to be transferred into a well secured DMZ-ed corporation network with various implemented Traffic Shaping Network policies, a resctrictive firewall allowing access to Internal Network only and to Few (Restrictive configured) Proxy Server IPs on port 80 and 8080.

One of the proxy servers allowed access to the Internet and I set this one and tried downloading the Huge Archive file  with the Windows 2012 server default browser Internet Explorer 10, though the download started it kept slow between ~ 300 – 500KB sec and when reached 3.4GB download failed. I tried resuming the download but as the remote Public FTP server where files resides doesn't support FTP RESUME function.
I thought it might be that Internet Explorer is badly managing the download so, I go forward and installed Portable Firefox (mirrored version 33.1.1 is here). Re-running download with firefox also failed, so the next logical step was for me to try downloading with Windows version of Wget (Wget) and with Portable Free Download Manager 3.9.14.1481 (mirrored here) using both of them was unable to complete download (probably due to firewall or Proxy screwing the proxy inspected traffic) thus I had to look for another way to copy the enormous archive into the company network.

To get around the issue I tried to download the file from FTP to another Server running Apache and tried re-downloading the big file archive (Asset-Guardian-data.zip) from Apache Webserver via HTTP protocol, this download method didn't work neither using plain HTTP protocol for download when downloaded file reached (3.4GB), thus I realized this is due to restrictive Proxy servers (dropping file downloads) bigger than  3.4GBs).

Then to be able to transfer the huge 12GB file, it seems the only left option was to to chop the big file on smaller file chunks and transfer them one by one.
In my case I had the Asset-Guardian-Files.zip transferred already to the Apache (Webserver) host which is running Linux so basicly the task was to Transfer Big archive file between the SuSE Linux Enterprise Server (SLES) 11 and Windows 2012 Server.

Quickesy way to do that is by using UNIX split command, i.e.:

split -b 1024m Asset-Guardian-Files.zip


The outputted files each 1GB are with naming (xaa, xab, xac, xad, xae, xaf, gaf etc.) in same folder where split command is run:

To later merge the files on the Windows 2012 server (copy) command is used:

copy /b file1 + file2 + file3 + file4 filetogether


In my case the command to issue on Win 2012 server was:

copy /b xaa + xab + xac + xae + xae + xaf + xaf + xag xah xai xaj xak Asset-Guardian-files.zip


This method to chop and transfer the file is most simple one and it doesn't require the two servers to have WinRAR or Console RAR / unrar installed.

If instead of Copy Huge File from Linux -> Windows host you need to copy too big file (lets say 100GB) between 2 Windows servers (Windows server host A and Windows server Host B – both situated in different firewall corporate networks) you will need to download to Win Host A and use Windows UNIX split equivalent tool called sfk (The Swiss File Knife) , sfk has port also for Mac OS so in case of need for need for migrating huge archive file from Mac OS X host it will serve as Linux's split – I've made SFK (current version) mirror here.

Another way to cut the 12GB file in parts and transfer to destination host via HTTP was to use rar (on the Linux host), then download the file on Win 2012 server and use Winrar Portable Free to extract the multiple files:

To make archive separate in parts set out to certain size out of a huge file with rar on Linux use:

cd /var/www
rar -a -v1000000k Asset_Guardian_Files.splitted.rar /var/www/Asset_Guardian_Files.zip

10000000Kbs = 10000000/1024 = 976MBs, hence rar produced parts will be sized to 976MB rar parts.

To find out archives check for *splitted*.rar in your /var/www

ls -al /var/www/*splitted*.rar
-rw-r–r– 1 root root 1048576 ное 28 18:34 Asset-Guardian-Files.splitted.part1.rar
-rw-r–r– 1 root root 1048576 ное 28 18:34 Asset-Guardian-Files.splitted.part2.rar
-rw-r–r– 1 root root 1048576 ное 28 18:34 Asset-Guardian-Files.splitted.part3.rar
-rw-r–r– 1 root root 1048576 ное 28 18:34 Asset-Guaridna-Filse.splitted.part4.rar


Then to download the files M$ Win 2012 server IE (http://my-linux-host.com/Asset-Guardian-Files.splitted.part1.rar, http://my-linux-host.com/Asset-Guardian-Files.splitted.part2.rar. etc.)

Thanks God, Problem Solved 🙂

How to change users quota to NO QUOTA on Qmail with Vpopmail Mail server install / Qmail mail over quota issue

Monday, February 20th, 2012


Qmail Vpopmail quota exceeded Dolphin Logo

Already on a couple of mail boxes located on one of the qmail powered mail servers I adminiter, there is an over QUOTA reached problem encountered.

Filling up the mailbox quota is not nice as mails starts get bounced back to the sender with a message QUOTA FULL or EXCEEDED MESSAGE, if this is a crucial mail waiting for some important data etc. the data is never received.
Below is a copy of the mail quota waarning notification message:

Delivered-To: email_use@my-mail-domain.net
Date: Wed, 15 Feb 2012 17:40:36 +0000
X-Comment: Rename/Copy this file to ~vpopmail/domains/.quotawarn.msg, and make appropriate changes
X-Comment: See README.quotas for more information
From: Mail Delivery System <Mailer-Daemon@different.bg>
Reply-To: email@www.pc-freak.net
To: Valued Customer:;
Subject: Mail quota warning
Mime-Version: 1.0
Content-Type: text/plain; charset=iso-8859-1
Content-Transfer-Encoding: 7bit
>
Your mailbox on the server is now more than 90% full. So that you can continue
to receive mail you need to remove some messages from your mailbox.

As you can read from the copy of the mail message above, the message content sent to the mail owner whose quota is getting full is red from /var/vpopmail/domains/.quotawarn.msg

The mail reaching quota problem is very likely to appear in cases like low mailbox quota set, but sometimes also occurs due to bugs in vpopmail quota handling.

Various interesting configuration settings for mail quotas etc. are in /home/vpopmail/etc/vlimits.default file, (assuming vpopmail is installed in /home).

In my specific case, the default vpopmail mailbox quota size was set to only 40 Megabytes.
40MB is too low if compared to todays mailbox size standards which in Gmail and Yahoo  mail services are already a couple of gigabytes.
Hence to get around the quota troubles, I  removed the quota for the mail.
To remove the quota size in vpopmail set for address (email_user@my-mail-domain.net) used cmd:

qmail-server:~# vmoduser -q NOQUOTA email_user@my-mail-domain.net

To save myself from future quota issues, I decided to apply a permanent fix to all those over quota size VPOPMAIL mailbox problems by removing completely quota restriction for all mailboxes in my vpopmail existent mail domain.

To do so, I wrote a quick simple bash loop one-liner script:

qmail-server:~# cd /home/vpopmail/domains
qmail-server:~/vpopmail/domains# cd my-mail-domain.net
qmail-server:~/vpopmail/domains/my-mail-domain.net# for i in *; do \
vmoduser -q NOQUOTA $(echo $i|grep -v vpasswd)@my-mail-domain.net; \
done

This works only on vpopmail installations which are configured to store the mail messages directly on the filesystem. Therefore this approach will not work for people who during vpopmail install had configured it to store mailboxes in MySQL or in other kind of SQL db engine.

Anyways for Vpopmail installed to use SQL backend, the script can be changed to read directly a list with all the mailboxes obtained from databasae (SQL query) and then, loop over each of the mail addresses apply the vmoduser -q NOQUOTA mail@samplemaildomain.net.

I've written also a few lines shell script (remove_vpopmail_emails_domain_quota.sh), it accepts one argument which is a vpopmail domain to which the admin would like to reset all applied mailbox quotas. The script is useful, if you have to often remove all quotas for vpopmail domainsor have to do quota wipe out simultaneously for multiple email domain names  located on different servers.

Using rsync to copy / synchronize files or backups between Linux / BSD / Unix servers

Monday, November 21st, 2011

Rsync and Rsync over ssh logo picture

Many of us have already taken advantage of the powerful Rsync proggie, however I'm quite sure there are still people who never used rsync to transfer files between servers.. That's why I came with this small post to possibly introduce rsync to my blog readers.
Why Rsync and not Scp or SFTP? Well Rsync is designed from the start for large files transfer and optimized to do the file copying job really efficient. Some tests with scp against rsync will clearly show rsync's superiority.
Rsync is also handy to contiue copying of half copied files or backups and thus in many cases saves bandwidth and machine hdd i/o operations.

The most simple way to use rsync is:

server:~# rsync -avz -e ssh remoteuser@remotehost:/remote/directory /local/directory/

Where remoteuser@remotehost — is the the username and hostname of remote server to copy files to.
/remote/directory — is the directory where the rsync copied files should be stored
/local/directory — is the local directory from which files will be copied to remote directory

If not a preliminary passwordless ssh key (RSA / DSA) authentication is configured on remote server, the above command will prompt for a password otherwise the rsync will start doing the transfer.

If one needs to have a RSA or DSA (public / private key) passwordless SSH key authentication , a RSA key first should be generated and copied over to the remote server, like so:

server:~# ssh-keygen -t dsa
...
server:~# ssh-copy-id -i ~/.ssh/id_dsa.pub root@remotehost
...

That's all folks, enjoy rsyncing 😉