Posts Tagged ‘example’

How to Deploy Central DNS on Linux with 3 Authoritative Servers and 1 Recursive Cache

Friday, December 19th, 2025

unbound-centrall-dns-deployment-3-linux-authoritative-servers-and-1-caching-DNS

Centralized DNS is one of those services that must be always UP, predictable, and fast. When it isn’t, everything breaks in strange and unpleasant ways.

This article describes a robust central DNS architecture for Linux environments using:

  • 3 authoritative DNS servers
  • 1 dedicated caching resolver
  • Clear separation between authoritative and recursive roles

Architecture Overview

Roles

Server

Role

Purpose

dns-auth-01

Authoritative

Primary (master)

dns-auth-02

Authoritative

Secondary (slave)

dns-auth-03

Authoritative

Secondary (slave)

dns-cache-01

Recursive / Cache

Internal resolution

Why Separate Roles?

Authoritative and recursive DNS have very different workloads:

  • Authoritative DNS: predictable, zone-based, read-only
  • Recursive DNS: bursty, cache-heavy, user-facing

Mixing them increases attack surface, complexity, and failure impact.

Software Choices

Recommended stack:

  • BIND9 or NSD for authoritative servers
  • Unbound for caching/recursive resolver

Reasons:

  • Mature, well-understood behavior
  • Clear separation of responsibilities
  • Excellent Linux support
  • Scriptable and observable

Network Layout

Example internal layout:

10.0.0.10   dns-auth-01 (master)

10.0.0.11   dns-auth-02 (slave)

10.0.0.12   dns-auth-03 (slave)

10.0.0.20   dns-cache-01 (recursive)

All Linux servers point only to dns-cache-01 as their resolver.

Authoritative DNS Configuration

Master Server (dns-auth-01)

Zones are managed only on the master.

Example BIND zone definition:

zone "example.internal" {

    type master;

    file "/etc/bind/zones/example.internal.zone";

    allow-transfer { 10.0.0.11; 10.0.0.12; };

    also-notify { 10.0.0.11; 10.0.0.12; };

};

Key points:

  • Zone transfers restricted by IP
  • NOTIFY enabled for fast propagation
  • No recursion enabled

Disable recursion:

options {

    recursion no;

    allow-query { any; };

};

Slave Servers (dns-auth-02 / dns-auth-03)

Example configuration:

zone "example.internal" {

    type slave;

    masters { 10.0.0.10; };

    file "/var/cache/bind/example.internal.zone";

};

Slaves:

  • Never edited manually
  • Automatically sync zones
  • Serve as HA and load distribution

Caching Resolver (dns-cache-01)

Use Unbound as a dedicated recursive resolver.

Unbound Configuration

Minimal but effective setup:

server:

    interface: 0.0.0.0

    access-control: 10.0.0.0/24 allow

    do-ip6: no

    hide-identity: yes

    hide-version: yes

    prefetch: yes

    cache-min-ttl: 300

    cache-max-ttl: 86400

Forward Internal Zones to Authoritative Servers

forward-zone:

    name: "example.internal"

    forward-addr: 10.0.0.10

    forward-addr: 10.0.0.11

    forward-addr: 10.0.0.12

External Resolution

Either:

  • Use root hints (recommended for independence)
  • Or forward to trusted upstream resolvers

Example:

forward-zone:

    name: "."

    forward-addr: 9.9.9.9

    forward-addr: 1.1.1.1

Client Configuration

All Linux servers use the caching resolver only:

/etc/resolv.conf

nameserver 10.0.0.20

Or via systemd-resolved:

# resolvectl dns eth0 10.0.0.20

Clients never query authoritative servers directly.

High Availability Considerations

Resolver Redundancy

For production environments:

  • Deploy two caching resolvers
  • Use DHCP or systemd-resolved fallback ordering

Example:

nameserver 10.0.0.20

nameserver 10.0.0.21

Zone Management

  • Store zone files in Git
  • Increment SOA serials automatically
  • Deploy via CI/CD or Ansible

DNS changes should be auditable, not ad-hoc.

Security Hardening

Minimum recommendations:

  • No recursion on authoritative servers
  • Firewall restricts TCP/UDP 53
  • TSIG for zone transfers (optional but recommended)
  • Disable version disclosure
  • Monitor query rates

Monitoring & Validation

Useful tools:

  • dig +trace
  • unbound-control stats
  • rndc status
  • Prometheus exporters for BIND/Unbound

DNS that isn’t monitored will fail silently.

Final Thoughts

This setup scales well, is easy to reason about, and avoids the most common DNS mistakes:

  • Mixing recursive and authoritative roles
  • Letting clients query everything directly
  • Overcomplicating zone management

DNS should be boring.
If it’s exciting, something is wrong.

How to Install and use FreeIPA forcentralized SSO authention on Linux computer domain

Wednesday, October 1st, 2025

freeipa-gnu-linux-free-sso-solution-logo

FreeIPA is a popular open-source identity management solution that centralizes user, host, and service authentication for Linux environments. It combines LDAP, Kerberos, DNS, and certificate management into a single platform, making it easier to manage large Linux deployments securely.

In this article, we’ll cover how to install FreeIPA on a Linux server, perform initial configuration, and start using it for basic user management.

Prerequisites

  • A clean Linux server (CentOS, RHEL, Fedora, or similar)
  • Root or sudo access
  • A fully qualified domain name (FQDN) for your server (e.g., ipa.example.com)
  • Proper DNS setup (recommended but can be configured during installation)
     

1. Update system to the latest

Start by updating your system to ensure all packages are current.
 

# dnf update -y


2. Install FreeIPA Server Packages

Install the FreeIPA server and its dependencies:

# dnf install -y ipa-server ipa-server-dns

  • ipa-server-dns is optional but recommended if you want FreeIPA to manage DNS for your domain.

3. Configure FreeIPA server

Run the FreeIPA installation script to configure the server. Replace ipa.example.com with your actual server hostname.

sudo ipa-server-install

You will be prompted for:

  • Realm name: Usually uppercase of your domain, e.g., EXAMPLE.COM
  • Directory Manager password: LDAP admin password
  • IPA admin password: FreeIPA admin user password
  • DNS configuration: Enable if you want FreeIPA to manage DNS

Sample configuration flow:

Realm name: EXAMPLE.COM

DNS domain name: example.com

Server host name: ipa.example.com

Directory Manager password: [choose a strong password]

IPA admin password: [choose a strong password]

Do you want to configure integrated DNS (BIND)? [yes/no]: yes

The installer will set up Kerberos, LDAP, the CA, DNS (if chosen), and the Web UI.

4. Start and Enable FreeIPA Services

The installer usually starts services automatically, but you can verify with:

# systemctl status ipa

Enable the service to start on boot:
 

# systemctl enable ipa


5. Access FreeIPA Web Interface

Open your browser and navigate to:

https://ipa.example.com/ipa/ui/

Log in using the admin username and the password you set during installation.

6. Add Users and Groups

You can manage users and groups either via the Web UI or the CLI.

Using the CLI:

Add a new user:

# ipa user-add johndoe –first=John –last=Doe –email=johndoe@example.com

Set a password for the new user:

# ipa passwd johndoe


Add a new group:

# ipa group-add developers –desc="Development Team"


Add user to the group:

# ipa group-add-member developers –users=johndoe


7. Join Client Machines to the FreeIPA Domain
 

On a client machine, install the client packages:

# dnf install -y ipa-client

Run the client setup:

# ipa-client-install –mkhomedir

Follow the prompts to join the client to the FreeIPA domain.

8. Test Authentication
 

Try logging into the client machine with the FreeIPA user you created:
 

# ssh username@client-machine-host.com

You should be able to authenticate using the FreeIPA credentials.
 

Conclusion


You now have a basic FreeIPA server up and running, managing users and authentication across your Linux network. FreeIPA simplifies identity management by providing a centralized, secure, and integrated solution. From here, you can explore advanced features like role-based access control, host-based access control, and certificate management.


Here's a practical example of how FreeIPA can be used in a real-world Linux environment.

Scenario: Centralized Authentication in a DevOps Environment
 

Tech Problem

Lets say you are managing a growing team of DevOps engineers and developers across multiple Linux servers (e.g., for CI/CD, staging, and production). Manually creating and maintaining user accounts, SSH keys, and sudo permissions on each server is:

  • Time-consuming
  • Error-prone
  • A security risk (inconsistent policies, orphaned accounts)

Solution: Use FreeIPA to Centralize Identity & Access Management

By deploying FreeIPA, you can:

  • Create user accounts once and manage them centrally
  • Enforce SSO across servers using Kerberos
  • Automatically apply sudo rules, group permissions, and access control policies
  • Easily revoke access for offboarded employees
  • Use host-based access control (HBAC) to control who can log in to what
     

Solution Walkthrough
 

1. Set up FreeIPA server

  • Installed on: ipa.internal.example.com
  • Domain: internal.example.com
  • Realm: INTERNAL.EXAMPLE.COM


2. Add User Accounts

Let's add two users: alice (developer) and bob (DevOps).
 

# ipa user-add alice –first=Alice –last=Smith –email=alice@internal.example.com

# ipa user-add bob –first=Bob –last=Jones –email=bob@internal.example.com

# ipa passwd alice

# ipa passwd bob


3. Create Groups and Roles necessery

Create functional groups for managing permissions.
 

# ipa group-add developers –desc="Developers Team"

# ipa group-add devops –desc="DevOps Team"

# ipa group-add-member developers –users=alice

# ipa group-add-member devops –users=bob

4. Configure Sudo Rules

Let’s allow DevOps team members to use sudo on all servers:
 

# ipa sudorule-add devops-sudo –cmdcat=all

# ipa sudorule-add-user devops-sudo –groups=devops

# ipa sudorule-add-host devops-sudo –hostgroups=all

5. Control Access with HBAC Rules

Let’s say:

  • Developers can access dev and staging servers
  • DevOps can access all servers

# Create host groups
 

# ipa hostgroup-add dev-servers –desc="Development Servers"

# ipa hostgroup-add staging-servers –desc="Staging Servers"


# Add hosts to groups
 

# ipa hostgroup-add-member dev-servers –hosts=dev1.internal.example.com

# ipa hostgroup-add-member staging-servers –hosts=staging1.internal.example.com


# HBAC rule for developers

# ipa hbacrule-add allow-developers

# ipa hbacrule-add-user allow-developers –groups=developers

# ipa hbacrule-add-host allow-developers –hostgroups=dev-servers

# ipa hbacrule-add-host allow-developers –hostgroups=staging-servers

# ipa hbacrule-add-service allow-developers –hbacsvcs=sshd


# HBAC rule for DevOps (all access)

# ipa hbacrule-add allow-devops

# ipa hbacrule-add-user allow-devops –groups=devops

# ipa hbacrule-add-host allow-devops –hostgroups=all

# ipa hbacrule-add-service allow-devops –hbacsvcs=sshd


6. Join Client Servers to FreeIPA

On each Linux server (e.g., dev1, staging1, prod1), run:


# ipa-client-install –mkhomedir –server=ipa.internal.example.com –domain=internal.example.com


Now, user alice can log in to dev1 and staging1, but not prod1. bob can log in to all servers and use sudo.

7. What Happens When Alice Leaves the Company?

Just disable the user in FreeIPA:

# ipa user-disable alice

This immediately revokes her access across all servers — no need to touch individual machines.

Benefits in This Example

Feature

Outcome

Centralized user management

No need to manually create accounts on every server

Group-based sudo

DevOps has privileged access, others don’t

Access control

Developers only access dev/staging, not prod

Kerberos SSO

Secure, passwordless SSH with ticketing

Auditing

Central logs of who accessed what and when

Quick offboarding

Instant account disablement from a single location

Summary

FreeIPA is not just a replacement for LDAP — it's a full-blown identity and access management solution tailored for Linux systems. In this practical example, it brings enterprise-grade access control, authentication, and user management to a DevOps workflow with minimal friction.

Deploying a Puppet Server and Patching multiple Debian Linux Servers

Tuesday, June 17th, 2025

how-to-install-puppet-server-clients-for-multiple-servers-and-services-infrastructure-logo


Puppet Overview

Puppet is a powerful automation tool used to manage configurations and automate administrative tasks across multiple systems. This guide walks you through installing a Puppet server (master) and configuring 10 Debian-based client servers (agents) to automatically install system updates (patches) using Puppet.

Table of Contents

  1. Prerequisites

  2. Step 1: Install Puppet Server on Debian

  3. Step 2: Configure the Puppet Server

  4. Step 3: Install Puppet Agent on 10 Debian Clients

  5. Step 4: Sign Agent Certificates

  6. Step 5: Create a Puppet Module for Patching

  7. Step 6: Assign the Module and Trigger Updates

  8. Conclusion


1. Prerequisites

  • Debian server to act as the Puppet master (e.g., Debian 11)
     
  • Debian servers as Puppet agents (clients)
     
  • Root or sudo access on all systems
     
  • Static IPs or properly configured hostnames
     
  • Network connectivity between master and agents
     

2. Install Puppet Server on Debian

a. Add the Puppet APT repository

# wget https://apt.puppet.com/puppet7-release-bullseye.deb
# dpkg -i puppet7-release-bullseye.deb
# apt update

b. Install Puppet Server

# apt install puppetserver -y

c. Configure JVM memory (optional but recommended)

Edit /etc/default/puppetserver:  

JAVA_ARGS="-Xms512m -Xmx1g"


d. Enable and start the Puppet Server

# systemctl enable puppetserver 
# systemctl start puppetserver


3. Configure the Puppet Server

a. Set the hostname
 

# hostnamectl set-hostname puppet.example.com


Update /etc/hosts with your server’s IP and FQDN if DNS is not configured:  

192.168.1.10 puppet.pc-freak.net puppet


b. Configure Puppet

Edit /etc/puppetlabs/puppet/puppet.conf:

[main] certname = puppet.pc-freak.net
server = puppet.pc-freak.net
environment = production
runinterval = 1h


Restart Puppet server:

# systemctl restart puppetserver

4. Install Puppet Agent on 10 Debian Clients

Repeat this section on each client server (Debian 10/11).

a. Add the Puppet repository

# wget https://apt.puppet.com/puppet7-release-bullseye.deb
# dpkg -i puppet7-release-bullseye.deb 
# apt update


b. Install the Puppet agent

# apt install puppet-agent -y


c. Configure the agent to point to the master

# /opt/puppetlabs/bin/puppet config set server puppet.example.com –section main


d. Start the agent to request a certificate

# /opt/puppetlabs/bin/puppet agent –test


5. Sign Agent Certificates on the Puppet Server

Run on the Puppet master below 2 cmds:

# /usr/bin/puppetserver ca list –all


Sign all pending requests:

# /usr/bin/puppetserver ca sign –all

Verify connection to puppet server is fine:

# /opt/puppetlabs/bin/puppet node find haproxy2.pc-freak.net


6.  Create a Puppet Module for Patching

a. Create the patching module

# mkdir -p /etc/puppetlabs/code/environments/production/modules/patching/manifests


b. Add a manifest file
/etc/puppetlabs/code/environments/production/modules/patching/manifests/init.pp
:

class patching {

  exec { 'apt_update':
    command => '/usr/bin/apt update',
    path    => [‘/usr/bin’, ‘/usr/sbin’],
    unless  => '/usr/bin/test $(find /var/lib/apt/lists/ -type f -mmin -60 | wc -l) -gt 0',
  }

  exec { 'apt_upgrade':
    command => '/usr/bin/apt upgrade -y',
    path    => [‘/usr/bin’, ‘/usr/sbin’],
    require => Exec[‘apt_update’],
    unless  => '/usr/bin/test $(/usr/bin/apt list –upgradable 2>/dev/null | wc -l) -le 1',
  }

}

This class updates the package list and applies all available security and feature updates.

7.  Assign the Module and Trigger Updates

a. Edit site.pp on the Puppet master:


# vim /etc/puppetlabs/code/environments/production/manifests/site.pp


node default {
  include patching
}

node 'agent1.example.com' {
  include patching
}

b. Run Puppet manually on each agent to test:

# /opt/puppetlabs/bin/puppet agent –test

Once confirmed working, Puppet agents will run this patching class automatically every hour (default runinterval).

8. Check the status of puppetserver and puppet agent on hosts is fine
 

root@puppetserver:/etc/puppet# systemctl status puppetserver
● puppetserver.service – Puppet Server
     Loaded: loaded (/lib/systemd/system/puppetserver.service; enabled; preset: enabled)
     Active: active (running) since Mon 2025-06-16 23:44:42 EEST; 37min ago
       Docs: https://puppet.com/docs/puppet/latest/server/about_server.html
    Process: 2166 ExecStartPre=sh -c echo -n 0 > ${RUNTIME_DIRECTORY}/restart (code=exited, status=0/SUCCESS)
    Process: 2168 ExecStartPost=sh -c while ! head -c1 ${RUNTIME_DIRECTORY}/restart | grep -q '^1'; do kill -0 $MAINPID && sleep 1 || exit 1; done (code=exited, status=0/SUCCESS)
   Main PID: 2167 (java)
      Tasks: 64 (limit: 6999)
     Memory: 847.0M
        CPU: 1min 28.704s
     CGroup: /system.slice/puppetserver.service
             └─2167 /usr/bin/java -Xms512m -Xmx1g -Djruby.lib=/usr/share/jruby/lib -XX:+CrashOnOutOfMemoryError -XX:ErrorFile=/var/log/puppetserver/puppetserver_err_pid%p.log -jar /usr/share/pup>

юни 16 23:44:06 haproxy2 systemd[1]: Starting puppetserver.service – Puppet Server…
юни 16 23:44:30 haproxy2 java[2167]: 2025-06-16T23:44:30.516+03:00 [clojure-agent-send-pool-0] WARN FilenoUtil : Native subprocess control requires open access to the JDK IO subsystem
юни 16 23:44:30 haproxy2 java[2167]: Pass '–add-opens java.base/sun.nio.ch=ALL-UNNAMED –add-opens java.base/java.io=ALL-UNNAMED' to enable.
юни 16 23:44:42 haproxy2 systemd[1]: Started puppetserver.service – Puppet Server.

root@grafana:/etc/puppet# systemctl status puppet
* puppet.service – Puppet agent
     Loaded: loaded (/lib/systemd/system/puppet.service; enabled; preset: enabled)
     Active: active (running) since Mon 2025-06-16 21:22:17 UTC; 18s ago
       Docs: man:puppet-agent(8)
   Main PID: 1660157 (puppet)
      Tasks: 6 (limit: 2307)
     Memory: 135.6M
        CPU: 5.303s
     CGroup: /system.slice/puppet.service
             |-1660157 /opt/puppetlabs/puppet/bin/ruby /opt/puppetlabs/puppet/bin/puppet agent –no-daemonize
             `-1660164 "puppet agent: applying configuration"

Jun 16 21:22:17 grafana systemd[1]: Started puppet.service – Puppet agent.
Jun 16 21:22:28 grafana puppet-agent[1660157]: Starting Puppet client version 7.34.0
Jun 16 21:22:33 grafana puppet-agent[1660164]: Requesting catalog from puppet.pc-freak.net:8140 (192.168.1.58)

9. Use Puppet facter to extract interesting information from the Puppet running OS
 

facter is a powerful command-line tool Puppet agents use to gather system information (called facts). You can also run it manually on any machine to quickly inspect system details.

Here are some interesting examples to get useful info from a machine using facter:


a) Get all facts about Linux OS

facter


b) get OS name / version

facter os.name os.release.full
os.name => Debian
os.release.full => 12.10


c) check the machine  hostname and IP address

$ facter hostname ipaddress

hostname => puppet-client1
ipaddress => 192.168.0.220

d) Get amount of RAM on the machine

$ facter memorysize
16384 MB


e) Get CPU (Processor information)

$ facter processors

{
  count => 4,
  models => [“Intel(R) Core(TM) i5-8250U CPU @ 1.60GHz”],
  physicalcount => 1,
  speed => "1.60 GHz"
}

10. Conclusion

You've successfully set up a Puppet server and configured a sample Debian client systems to automatically install security patches using a custom module.
To apply this on the rest of systems where puppet agent is installed repeat the process on each of the left 9 nodes.
This approach provides centralized control, consistent configuration, and peace of mind for you as system administrator if you have the task to manage multiple Debian servers
with an easy.
Of course the given configuration is very sample and to guarantee proper functiononing of your infrastrcutreu you'll have to read and experiment with puppet, however I hope article is a good
standpoint to have puppet server / agent running relatively easy.

How to dump and restore Zabbix database to do monitoring database snapshot, PostGreSQL continuous archiving Point in time recovery setup

Monday, November 21st, 2022

postgresql-db-backup-and-continuous-archiving-on-linux-keep-zabbix-backup-regularly

If you have set up a Zabbix server that is using as a database storage postgresql at home or company, then you will need to make sure you don’t loose any data by producing regular postgresql backups. This small article will show how to do the db backup in conventional way with pg_dump / pg_restore as well as how to set the continuous archiving point in time recovery end point recovery so called PITR..
 

1. Connect to the database and some postgres very basics

-bash-4.2$ psql DBNAME USERNAME
 
-bash-4.2$ psql zabbix zabbix
 

After you access a PostgreSQL database, you can run SQL queries and more. Here are some common psql commands:
 
•    To view help for psql commands, type \?.
•    To view help for SQL commands, type \h.
•    To view information about the current database connection, type \conninfo.
•    To list the database's tables and their respective owners, type \dt.
•    To list all of the tables, views, and sequences in the database, type \z.
•    To exit the psql program, type \q.

       Fundamental backup approaches with postgres

As with everything that contains valuable data, PostgreSQL databases should be backed up regularly. While the procedure is essentially simple, it is important to have a clear understanding of the underlying techniques and assumptions.
 
There are three fundamentally different approaches to backing up PostgreSQL data:
 
•    SQL dump
•    File system level backup
•    Continuous archiving

 
Each has its own strengths and weaknesses; each is discussed in turn in the following sections.
 

2.    Creating SQL Dump of postgresql target database

2.1 Manual SQL dump (custom dump format)

 
Use pg_dump's custom dump format. If PostgreSQL was built on a system with the zlib compression library installed, the custom dump format will compress data as it writes it to the output file.
This will produce dump file sizes similar to using gzip, but it has the added advantage that tables can be restored selectively.
The following command dumps a database using the custom dump format:
 

# sudo su – postgres
-bash-4.2% cd  /var/lib/pgsql/9.5/backups/
 
-bash-4.2$  pg_dump -Fc zabbix > /var/lib/pgsql/9.5/backups/zabbixdbdump`date "+%d%m%y%H%M%S"`.gz

2.2 Schedule backups with cron job

To automate the job schedule a cron job to do the work, somethjing like below:
 

# Minute   Hour   Day of Month       Month          Day of Week        Command
# (0-59)  (0-23)     (1-31)    (1-12 or Jan-Dec)  (0-6 or Sun-Sat)

 
@daily  pg_dump -Fc zabbix > /var/lib/pgsql/9.5/backups/Zabbix_db_dump`date "+\%d\%m\%y\%H\%M\%S"`.gz

3. Restore a database from the dump file

3.1. Restoring a database using pg_restore (usually used)

A custom-format dump is not a script for psql, but instead must be restored with pg_restore, for example:
 

# pg_restore -d zabbix /var/lib/pgsql/9.5/backups/Zabbix_db_dump281118151005.gz

3.2. Second Option restoing with psql after creating a restore database

 
# su postgres

-bash-4.2$ psql template1
 
CREATE DATABASE zabbix OWNER zabbix ENCODING 'UTF8';
\q

-bash-4.2$ psql zabbix < /var/lib/pgsql/9.5/backups/zabbixdbdump291117151002.gz
exit

 
NOTE: if you get a permission denied error when trying to restore, check the Unix permissions on the backup file and all the parent directories.

4.    Continuous Archiving and Point-in-Time Recovery (PITR) backups

At all times, PostgreSQL maintains a write ahead log (WAL) in the pg_xlog/ subdirectory of the cluster's data directory. The log records every change made to the database's data files. This log exists primarily for crash-safety purposes: if the system crashes, the database can be restored to consistency by "replaying" the log entries made since the last checkpoint. However, the existence of the log makes it possible to use a third strategy for backing up databases: we can combine a file-system-level backup with backup of the WAL files. If recovery is needed, we restore the file system backup and then replay from the backed-up WAL files to bring the system to a current state. This approach is more complex to administer than either of the previous approaches, but it has some significant benefits:

           Setting Up the WAL Archiving

In an abstract sense, a running PostgreSQL system produces an indefinitely long sequence of WAL records. The system physically divides this sequence into WAL segment files, which are normally 16MB a piece (although the segment size can be altered when building PostgreSQL). The segment files are given numeric names that reflect their position in the abstract WAL sequence. When not using WAL archiving, the system normally creates just a few segment files and then "recycles" them by renaming no-longer-needed segment files to higher segment numbers. It's assumed that segment files whose contents precede the checkpoint-before-last are no longer of interest and can be recycled.
 
When archiving WAL data, we need to capture the contents of each segment file once it is filled, and save that data somewhere before the segment file is recycled for reuse.
Depending on the application and the available hardware, there could be many different ways of "saving the data somewhere": we could copy the segment files to an NFS-mounted directory on another machine, write them onto a tape drive (ensuring that you have a way of identifying the original name of each file), or batch them together and burn them onto CDs, or something else entirely. To provide the database administrator with flexibility, PostgreSQL tries not to make any assumptions about how the archiving will be done. Instead, PostgreSQL lets the administrator specify a shell command to be executed to copy a completed segment file to wherever it needs to go. The command could be as simple as a cp, or it could invoke a complex shell script — it's all up to you.
 
To enable WAL archiving, set the wal_level configuration parameter to archive or higher, archive_mode to on, and specify the shell command to use in the archive_command configuration parameter.

In practice these settings will always be placed in the postgresql.conf e.g. (/etc/postgresql/12/main/postgresql.conf) file.

In archive_command, %p is replaced by the path name of the file to archive, while %f is replaced by only the file name. (The path name is relative to the current working directory, i.e., the cluster's data directory.)

Use %% if you need to embed an actual % character in the command.

The simplest useful command to enable PITR would, be something like:
 

# – Archiving config setction
 
archive_mode = on                    # enables archiving; off, on, or always
# (change requires restart)
 
archive_command = '/bin/xz -2 -z < %p > /var/lib/pgsql/9.5/archivedir/%f'               # command to use to archive a logfile segment
 
archive_timeout = 1h            # force a logfile segment switch after this
                                                   # number of seconds; 0 disables

Set proxy only for apt, apt-get, aptitude package manager on Debian / Ubuntu Linux

Wednesday, December 22nd, 2021

debian-package-manager-run-via-a-proxy


Intro

Main console package install apt-get / apt and / aptitude did not use the HTTP Proxy environment variables by default as there is no default proxy set on Debian / Ubuntu / Mint and other deb based distros after OS Install. Under some circunstances for DMZ placed or firewall secured servers, direct access to internet address or even Package repository is only allowed via a proxy and hence the package manager needs to have a proxy host set.
 Setting a global wide proxy on Linux is easily possible by setting http_proxy="http://yourhost.com:8080" and https_proxy or if FTP connection via ftp_proxy somewhere in /etc/profile , /etc/bashrc or via /etc/environment but as using this Shell variables set it global wide for all applications lynx / links / wget / curl, sometimes it is useful to set the Proxy host only for deb package management tools.

Note that if you want to set a proxy host for deb operations this can be done during initial OS install installation, the Apt configuration file would have been automatically updated then. 

Creating  an Apt Proxy Conf File

Apt loads all configuration files under /etc/apt/apt.conf.d. We can create a configuration specifically for our proxy there, keeping it separate from all other configurations.

  1. Create a new configuration file named proxy.conf.


    # touch /etc/apt/apt.conf.d/proxy.conf
    
  2. Open the proxy.conf file in a text editor.


    # vi /etc/apt/apt.conf.d/proxy.conf
    
  3. Add the following line to set your HTTP proxy for apt.


    Acquire::http::Proxy "http://username:password@proxy.server:port/";
    
  4. Add the following line to set your HTTPS proxy.


    Acquire::https::Proxy "http://username:passw0rd@proxy.server:port/";
    
  5. Save your changes and exit the text editor.
     

Your proxy settings will be applied the next time you run Apt.

Simplifying the Configuration

As mentioned by a user in the comments below, there is an alternative way for defining the proxy settings. While similar, it removes some redundancy.

Just like in the first example, create a new file under the /etc/apt/apt.conf.d directory for example /etc/apt/apt.conf.d/proxies, and then add the lines as.

Acquire {
HTTP::proxy "http://127.0.0.1:8080";
HTTPS::proxy "http://127.0.0.1:8080";
}


Putty load as default session another session – Save other Putty session configuration to default howto

Thursday, November 29th, 2018

putty-load-button-screenshot

Recently I had to use PuTTY which I haven't used for years to open a number of SSH Pernanent Tunnels necessery for my daily work as a SAP Consultant.

I've saved them under a certain new profile and saved the set SSH Tunnel configuration not in the default Session but in separate named one, therefore had to press Load button every time after clicking over my Putty shortcut icon. 

That was annoying and took few seconds out of my life every next morning for about a week, so finally I found osme time to google it and it seemed it is pretty easy to have any Putty sessoin loaded you like.

Here is how:

1. Create a new Putty Shortcut

putty-screenshot1

putty-shortcut-screenshot-windows

Click over Putty icon while holding CTRL + SHIFT (Control SHIFT keys simultaneously ) and move the mouse somewhere on the desktop to create the shortcut.
 

2. Right click on Putty Shortcut

putty-target-screenshot-windows1

putty-target-screenshot-windows2


"C:\Program Files\PuTTY\putty.exe" -load "your_saved_session" "username@your_server_address" -pw "your_password"


fill out "target" field of shortcut using above code (alter to your own properties).
click Apply button.

If you need to pass a user and password from Shortcut itself (which is a bad practice for security but sometimes useful, for not so important Tunnels – for example a tunnel to an Open Proxy), do it by typing in the target field like so:
 

"C:\Program Files\PuTTY\putty.exe" -load "your_saved_session" "username@your_server_address" -pw "your_password"


And Hooray !!! After that when you click on PuTTy shortcut it loads your session automatically using given username and password.

rc.local missing in Debian 8 Jessie and Debian 9 Stretch and newer Ubuntu 16, Fedora, CentOS Linux – Why is /etc/rc.local not working and how to make it work again

Monday, September 11th, 2017

rc.local-not-working-solve-fix-linux-startup-with-rc.local-explained-how-to-make-rc.local-working-again-on-newer-linux-distributions

If you have installed a newer version of Debian GNU / Linux such as Debian Jessie or Debian  9 Stretch or Ubuntu 16 Xenial Xerus either on a server or on a personal Desktop laptop and you want tto execute a number of extra commands next to finalization of system boot just like we GNU / Linux users used to do already for the rest 25+ years you will be surprised that /etc/rc.local is no longer available (file is completely missing!!!).

This kind of behaviour (to avoid use of /etc/rc.local and make the file not present by default right after Linux OS install) was evident across many RedHack (Redhat) distributions such as Fedora and CentOS Linux for the last number of releases and the tendency was to also happen in Debian based distros too as it often does, however there was a possibility on this RPM based distros as well as rest of Linux distros to have the /etc/rc.local manually created to work around the missing file.

But NOoooo, the smart new generation GNU / Linux architects with large brains decided to completely wipe out the execution on Linux boot of /etc/rc.local from finalization stage, SMART isn't it??

For instance If you used to eat certain food for the last 25+ years and they suddenly prohibit you to eat it because they say this is not necessery anymore how would you feel?? Crazy isn't it??

Yes I understand the idea to wipe out /etc/rc.local did have a reason as the developers are striving to constanly improve the boot speed process (and the introduction of systemd (system and service manager) in Debian 8 Jessie over the past years did changed significantly on how Linux boots (earlier used SysV boot and LSB – linux standard based init scripts), but come on guys /etc/rc.local
doesn't stone the boot process with minutes, including it will add just 2, 3 seconds extra to boot runtime, so why on earth did you decided to remove it??

What I really loved about Linux through the years was the high level of consistency and inter-operatibility, most things worked just the same way across distributions and there was some logic upgrade, but lately this kind of behaviour is changing so in many of the new things in both GUI and text mode (console) way to interact with a GNU / Linux PC all becomes messy sadly …

So the smart guys who develop Gnu / Linux distros said its time to depreciate /etc/rc.local to prevent the user to be able to execute his set of finalization commands at the end of each booted multiuser runlevel.

The good news is you can bring back (resurrect) /etc/rc.local really easy:

To so, just execute the following either in Physical /dev/tty Console or in Gnome-Terminal (for GNOME users) or for KDE GUI environment users in KDE's terminal emulator konsole:


cat <<EOF >/etc/rc.local
#!/bin/sh -e
#
# rc.local
#
# This script is executed at the end of each multiuser runlevel.
# Make sure that the script will "exit 0" on success or any other
# value on error.
#
# In order to enable or disable this script just change the execution
# bits.
#
# By default this script does nothing.
exit 0
EOF
chmod +x /etc/rc.local
systemctl start rc-local
systemctl status rc-local


I think above is self-explanatory /etc/rc.local file is being created and then to enable it we run systemctl start rc-local and then to check the just run rc-local service status systemctl status

You will get an output similar to below:


root@jericho:/home/hipo# systemctl start rc-local
root@jericho:/home/hipo# systemctl status rc-local
● rc-local.service – /etc/rc.local Compatibility
   Loaded: loaded (/lib/systemd/system/rc-local.service; static; vendor preset:
  Drop-In: /lib/systemd/system/rc-local.service.d
           └─debian.conf
   Active: active (exited) since Mon 2017-09-11 13:15:35 EEST; 6s ago
  Process: 5008 ExecStart=/etc/rc.local start (code=exited, status=0/SUCCESS)
    Tasks: 0 (limit: 4915)
   CGroup: /system.slice/rc-local.service
sep 11 13:15:35 jericho systemd[1]: Starting /etc/rc.local Compatibility…
setp 11 13:15:35 jericho systemd[1]: Started /etc/rc.local Compatibility.

To test /etc/rc.local is working as expected you can add to print any string on boot, right before exit 0 command in /etc/rc.local

you can add for example:
 

echo "YES, /etc/rc.local IS NOW AGAIN WORKING JUST LIKE IN EARLIER LINUX DISTRIBUTIONS!!! HOORAY !!!!";


On CentOS 7 and Fedora 18 codename (Spherical Cow) or other RPM based Linux distro if /etc/rc.local is missing you can follow very similar procedures to have it enabled, make sure

/etc/rc.d/rc.local

is existing

and /etc/rc.local is properly symlined to /etc/rc.d/rc.local

Also don't forget to check whether /etc/rc.d/rc.local is set to be executable file with ls -al /etc/rc.d/rc.local

If it is not executable, make it be by running cmd:
 

chmod a+x /etc/rc.d/rc.local


If file /etc/rc.d/rc.local happens to be missing just create it with following content:


#!/bin/sh

# Your boot time rc.commands goes somewhere below and above before exit 0

exit 0


That's all folks rc.local not working is solved,
enjoy /etc/rc.local working again 🙂


How Orthodox Easter is calculated or Why Eastern Orthodox Christians celebrate Pascha (later) on a different date from Roman Catholics ?

Tuesday, April 5th, 2016


why-eastern-orthodox-eastern-is-on-different-date-from-roman-catholics-why-we-orthodox-celebrate-easter-later


Why Does Eastern Orthodox Churches celebrate their Eastern often on a later or a different date from (Western Christians) – Roman Catholic Church, Greek Catholic Church, Anglican, Presbyterian or Protestant (Evangelist), Old Catholic Methodist, Calvinist or some other kind of Lutheran or Charismatic Christian sects?

If you happen to be born innd raised in America or Western European contry it is most likely, you're little if at all or not at all aware of the fact that in the Eastern Orthodox Churches the date of Eastern (Passcha) is celebrated often on a different date from the Roman Catholic and the other schismatic churches.

For example, this year 2016 Roman Catholics already celebrated Passcha on March 27th and we Eastern Orthodox Christians are still in the Great Lent (Fasting) period and we'll have the Easter celebrated on 1st of May.
That certainly raises some questions across people who are not Eastern Orthodox, because the Western Roman Catholic Church and the rest of Protestant Christians are the biggest group of Christians out there and even atheists and people belonging to other religions such as Buddhism or Islam might be puzzled why the Eastern Orthodox Christians celebrate easter on a different they if after all they're Christian and what and why is this division among Christians?

With the increased globalization of the World and the fact that currently there are a lot of multi-national international companies and the fact that the companies and businesses today are mostly multi-cultural with people from all the world and all religions across the globe, for some countries situated within countries with predominant Eastern Orthodox population such as Bulgaria, Romania, Serbia, Greece, Ukraine, Belarus, Russia etc. it might be quite a disturbance because there Orthodox Christian country situated branches might be not able to operate on the days of Orthodox Easter. 

Here is a short example on the martch and dismatch by years between Roman Catholic and Eastern Orthodox Church by years from 2010 to 2020


Roman Catholic and Eastern Orthodox Easters from year 2010 to 2020

Year 2010 2011 2012 2013 2014 2015 2016 2017 2018 2019 2020
                       
Catholic 4/4 24/4 8/4 31/3 20/4 5/4 27/3 16/4 1/4 21/4 12/4
Orthodox 4/4 24/4 15/4 5/5 20/4 12/4 1/5 16/4 8/4 28/4 19/4

Easter 2000 to 2009

Year 2000 2001 2002 2003 2004 2005 2006 2007 2008 2009
                     
Catholic 23/4 15/4 31/3 20/4 11/4 27/3 16/4 8/4 23/3 12/4
Orthodox 30/4 15/4 5/5 27/4 11/4 1/5 23/4 8/4 27/4 19/4


A complete list of Eastern Orthodox Pascha feast days is here

Funnly or strangely e ven many people who are situated within an Eastern Orthodox country doesn't have a good understanding why and what is the reason our Eastern Orthodox Easter feast is celebrated on a different date.
There is a lot written on the reasons why Eastern Orthodox Church celebrates on a different date Passcha from Catholics however in this article, I'll try to make it as short and clear as the reasons behind are often presented quiet messy.


In short there are 2 reasons (rules) why Eastern Orthodox Christian Church celebrates Eastern often on a different date:

1) The Julian calendar which is still used by the Eastern Orthodox Church for counting time
2) Adherence of the Orthodox to the early practices of the Original and Ancient Christian Church for Christian Passcha to not coincide with the Jewish Passover

The consequence of these 2 rules is that the Eastern Orthodox Christians on about 50% of the time throughout  years celebrate Christistmas later from Catholics because the Orthodox Church is following the First Church Ecumenical Council of Nicea (325 A.D.) that has set the rule that Passcha must take place always after the Jewish Passover  because in the Church the Biblical described consequence of events of the Passover and the Crucifix are followed, it appears rest of the Christian churches ignore (break) this requirement and this makes them fall under the Anatemas of the Church fathers from the I Ecumenical Council (see the Full decisions of the 7 Ecumenical Canonical Councils of the Original Church here).


Here the difference for Catholics celebrating on a different date Eastern stems from the fact since the XVI century they're using in Catholic Church the Gregorian calendar (adopted by Pope Gregory the XIII-th) because of scientifical superiority claimed by the Gregorian calendar.

Gregorian Julian calendar-fall-behind-dates by years from 1582 to year 2200

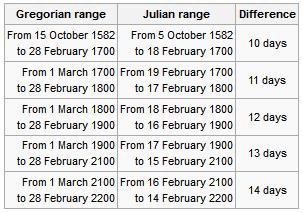
Well as you can see the scientific accuracy of Gregorian calendar is better and with years the Julian calendar is starting to miss astronomical re-calculated dates, causing mathematical incorrectness but the problem with the acceptance of the Gregorian Calendar and the reason why the Eastern Orthodox Church decided not to use the Gregorian calendar for Pascha is the fact that when the Gregorian Calendar was accepted in secular western world and the  Roman Catholic Church in order to matematically align the missing date 13 days were simply dropped off (or from Thursday 4th of October 1582 under Julian Calendar the next day Friday people started being in 15th of October, see the picture below:

inconsistency_change_from_Julian_to_Gregorian_calendar-Date_Change-and-the-missing-13-days

Well as you can see Friday October the 15,  1582 was quite a crazy year for the people as they lay down as 4th of Thursday and they woke up on 15th the next day 🙂

The Eastern Orthodox still to follow the Julian Calendar for Easter feast and some Churches adopted to using partly the Gregorian (Secular) calendar for some of the feasts under the pressure of the Greek Ecumenical Patriarchate , whether some Churches such as the Russian Orthodox Church (ROC) which as of time of writting is the biggest Orthodox Crhuch as well as the Serbian Church are completely using the Julian calendar for calculating all feast days. Now what should be known is difference between Julian and Gregorian calendar is 13 days falling back (Gregorian Calendar is 13 days in future), while Julian calendar is 13 days in time behind the Gregorian.
However as prior said sometimes throughout years the Easterns of (Western) Roman Catholic Church and Eastern Orthodox Church coincide, such a date on which we celebrated Eastern on one date is on 24 April 2011.
The two dates coincide when the full moon following the equinox comes so late that it counts as the first full moon after 21 March in the Julian calendar as well as the Gregorian.
In recent years the conciding years was frequent in 2010, 2011, 2014 and will be again  2017 but after that there will be no coincidence of Orthodox and  Catholic Easter feasts until 2034.

For those who might be wondering why the Eastern Orthodox Church choose to not celebrate Easter on a different date here is some information on how Pascha (Easter) was determined historically in the One and Holy Apostolic Church
which for historical and dogmatical reasons is today Our Holy Eastern Orthodox Church.

During the first three centuries of Christianity, some Christians celebrates Pascha on the First date after Jewish Passover and others celebrates the feast on the same time as Passover.
This was causing confusions in across Churches and this together with other heretical teachings caused the Holy Church Fathers (successors of Holy Apostols) of the First Ecumenical Council to gather and decide
how to solve the issue.

The Holy Fathers therefore devices a uniform formula for calculating the date of the Pascha that was inline and taking in consideration the most early traditions of the Church as well as the Biblical
sequence of events.

Here is the Easter calculation forumla devices on I Ecumenical Council:

Pascha is to be always celebrated on the first Sunday after the first full moon following the vernal equinox but  always after the Jewish Passover.
 

To even better ensure that there was no confusion as to when the vernal equinox occured the date of the vernal equinox was set to be March 21 (which is April 3rd or 13 days later on the Julain Calendar).
The formula was universally accepted by all of Christianity, ensuring the Pascha was celebrated on the same day throughout the entire Universe (world).
The Eastern Orthodox Church which is keeping to strictly keep the decisions of the fathers 7 Councils and thus strictly keeps the formula in the Church.
The Western Church (Roman Catholic Church) used to be holding also the Eastern calculation formula however in modern times it rejected the Nicene formulate that requires that Pascha to always follow the Jewish  Passover.

Now as the apostacy from True Christian faith is increasing Western theologians and many of the misguided or so called heretical (ecumenism movement oriented) orthodox theologians are starting to claim that the provision about the formula
was not important and thus provision of the formula is rejected and thus ignoring the fact that during years 325 – 1582 as well as the historical date from early Christian historians and Early Canons such as Canon VII of the Apostolic Canons clearly reads:

“If any Bishop, or Presbyter, or Deacon celebrate the holy day of Pascha before the vernal equinox with the Jews, let him be deposed.”
 

 The Calendar Issue came to be in 1582  by Pope Gregory XIII with  instituted reform of the traditional Julian calendar. Actually the Protestant Reformation in its beginning harshly defended the Julian Calendar and kept the new Julian Calendar as an unnecessery information at times
when large chunks of the protestantized countries such as Germany and Netherlands were thinking actively of joining the Orthodox Church, however for some historical reason and by the settle backs of the Roman Catholic Church the rejoining of large sea of protestants with Orthodox sadly never happened.

Until 1923 all Eastern Orthodox Chuches was following the Julian calendar for all yearly feasts however as in 1923 an inter-Orthodox congress was helpd in Constantinople attended by some but not all of the Orthodox Churches, the Church fathers gathering took the very
controversial decision to follow a revised Julian calendar (the so called new Orthodox Church Calendar / New Style) which is essentially the same as Gregorian calendar for all things except the celebration of Pascha and few other feasts which continued to be celebrated across all Orthodox Churches on the same dates across all  Eastern Orthodox Churches who are in full eucharistic communion.

The official claimed reason for accepting the Gregorian calendar and moving most of the feasts +13 days in future  was that within some eastern countries many of the orthodox christian workers couldn't attend many of the 12 important feasts because of work duties (for example 7th of January is a working day in most of the world except Russia and thus it is a problem for many to attend the Church service and prepare and much more confortable if the feast is celebrated on 24th of December like it is in Roman Catholic and Protestant christians) – i.e. the change was initiated most for economical reasons right after the end of the 1st world war.

The result is now many of the great 12 Church Feasts in Orthodox Church like Christmas (Nativity of Christ), Epiphany, the Nativity of the Holy Theotokos, Entrance Presentation of the Theotokos in many of the Orthodox Churches together with Catholics but not with Russian Church and the other Orthodox Churches who still stick to the Julian Calendar.
The only other feasts which are being celebrated together with Russian Orthodox Church is Pentecost and Ascension as they're movable feasts depending on Pascha according to Julian calendar.

For us Orthodox tradition and Church teachings are of paramount importance and thus sadly the change to re-visited Julian calendar just created further confusion internally in the Eastern Orthodox Church, today many people who completely stick to the Julian calendar and refuse the re-visited Julian calendar has joined Schismatic Self-Proclaimed Orthodox Old Calendar Churches or for those who prefered to stay in full communion with the rest of the Eastern Orthodox Churches and stick to old calendar joined the Russian Orthodox Church and Serbian Church as they're considered to better keep the true faith tradition and spiritual descendance from the holy apostles. The question of the calendar difference has been largely discussed within the Orthodox Church and hopefully on the upcoming Holy All Orthodox Council upcoming this year in June 16 – 27 2016 the question of returning back the Old Julian calendar for all Church feasts might be also raised and resolved, once and for all.

As a closure I'll say that the most important thing why Pascha tends to falls different from Catholics is to show that actually the Eastern Orthodox Church is the original Church and different from Roman Catholic and the true Church of Christ falling the prescription of the Church fathers.

P.S. As the so called "Holy Orthodox Council", often called by many 8th ecumenical counil already has taken place in Crete and there was no real signs for it to be neither ecuminical nor holy as the Bulgarian, The Russian, Antiochian and Georgian Orthodox Churches refused to take participation and the overall observation online from their website holycouncil.org  evidently shows that this council is not needed neither solved any of the real important non-doctrinal problems of the Orthodox Church it also prooved to be a PR kind of council trying to make in the eyes of the world the ecumenical patriarch Bartholomeo to look like an Orthodox Church (head) pope and perhaps the ones who organized this council had this intention together with the intention to put even more confusion concerning the unity of the Orthodox Church and separate the chirch into two parties (a conservatives) and (liberals) sides.
Also after the council finalized it prooved not to be really what it meant to be Thanks be to our Lord and Saviour Jesus Christ. The refusal of the Bulgarian Orthodox Church to take participation in the council from my point of view as a member of the Orthodox Church was a right one and has delayed the plans of global enemies of the church to destroy it.
An interesting rumor is the holy council in Crete was sponsored with 70 000 000 from anonymous donators within United States some priests claim the money come from secret societies such as free masonry also it is mostly ridiculous the costs that this ecumenical council impeded.


How to mount NFS network filesystem to remote server via /etc/fstab on Linux

Friday, January 29th, 2016

mount-nfs-in-linux-via--etc-fstab-howto-mount-remote-partitions-from-application-server-to-storage-server
If you have a server topology part of a project where 3 (A, B, C) servers need to be used to deliver a service (one with application server such as Jboss / Tomcat / Apache, second just as a Storage Server holding a dozens of LVM-ed SSD hard drives and an Oracle database backend to provide data about the project) and you need to access server A (application server) to server B (the Storage "monster") one common solution is to use NFS (Network FileSystem) Mount. 
NFS mount is considered already a bit of obsoleted technology as it is generally considered unsecre, however if SSHFS mount is not required due to initial design decision or because both servers A and B are staying in a serious firewalled (DMZ) dedicated networ then NTS should be a good choice.
Of course to use NFS mount should always be a carefully selected Environment Architect decision so remote NFS mount, imply  that both servers are connected via a high-speed gigabyte network, e.g. network performance is calculated to be enough for application A <-> to network storage B two sides communication not to cause delays for systems end Users.

To test whether the NFS server B mount is possible on the application server A, type something like:


mount -t nfs -o soft,timeo=900,retrans=3,vers=3, proto=tcp remotenfsserver-host:/home/nfs-mount-data /mnt/nfs-mount-point


If the mount is fine to make the mount permanent on application server host A (in case of server reboot), add to /etc/fstab end of file, following:

1.2.3.4:/application/local-application-dir-to-mount /application/remote-application-dir-to-mount nfs   rw,bg,nolock,vers=3,tcp,timeo=600,rsize=32768,wsize=32768,hard,intr 1 2


If the NTFS server has a hostname you can also type hostname instead of above example sample IP 1.2.3.4, this is however not recommended as this might cause in case of DNS or Domain problems.
If you want to mount with hostname (in case if storage server IP is being commonly changed due to auto-selection from a DHCP server):

server-hostA:/application/local-application-dir-to-mount /application/remote-application-dir-to-mount nfs   rw,bg,nolock,vers=3,tcp,timeo=600,rsize=32768,wsize=32768,hard,intr 1 2

In above example you need to have the /application/local-application-dir-to-mount (dir where remote NFS folder will be mounted on server A) as well as the /application/remote-application-dir-to-mount
Also on server Storage B server, you have to have running NFS server with firewall accessibility from server A working.

The timeou=600 (is defined in) order to make the timeout for remote NFS accessibility 1 hour in order to escape mount failures if there is some minutes network failure between server A and server B, the rsize and wsize
should be fine tuned according to the files that are being red from remote NFS server and the network speed between the two in the example are due to environment architecture (e.g. to reflect the type of files that are being transferred by the 2)
and the remote NFS server running version and the Linux kernel versions, these settings are for Linux kernel branch 2.6.18.x which as of time of writting this article is obsolete, so if you want to use the settings check for your kernel version and
NTFS and google and experiment.

Anyways, if you're not sure about wsize and and rise, its perfectly safe to omit these 2 values if you're not familiar to it.

To finally check the NFS mount is fine,  grep it:


# mount|grep -i nfs
sunrpc on /var/lib/nfs/rpc_pipefs type rpc_pipefs (rw)
server-hostA:/application/remote-application-dir-to-mount on /application/remote-application-dir-to-mount type nfs (rw,bg,nolock,nfsvers=3,tcp,timeo=600,rsize=32768,wsize=32768,hard,intr,addr=1.2.3.4)


That's all enjoy 🙂


How to Copy large data directories between 2 Linux / Unix servers without direct ssh / ftp access between server1 and server2 other by using SSH, TAR and Unix pipes

Monday, April 27th, 2015

how-to-copy-large-data-directories-between-2-linux-unix-servers-without-direct-ssh-ftp-access-btween-each-other

In a Web application data migration project, I've come across a situation where I have to copy / transfer 500 Gigabytes of data from Linux server 1 (host A) to Linux server 2 (host B). However the two machines doesn't have direct access to each other (via port 22) for security reasons and hence I cannot use sshfs to mount remotely host dir via ssh and copy files like local ones.

As this is a data migration project its however necessery to migrate the data finding a way … Normal way companies do it is to copy the data to External Hard disk storage and send it via some Country Post services or some employee being send in Data center to attach the SAN to new server where data is being migrated However in my case this was not possible so I had to do it different.

I have access to both servers as they're situated in the same Corporate DMZ network and I can thus access both UNIX machines via SSH.

Thanksfully there is a small SSH protocol + TAR archiver and default UNIX pipe's capabilities hack that makes possible to transfer easy multiple (large) files and directories. The only requirement to use this nice trick is to have SSH client installed on the middle host from which you can access via SSH protocol Server1 (from where data is migrated) and Server2 (where data will be migrated).

If the hopping / jump server from which you're allowed to have access to Linux  servers Server1 and Server2 is not Linux and you're missing the SSH client and don't have access on Win host to install anything on it just use portable mobaxterm (as it have Cygwin SSH client embedded )

Here is how:
 

jump-host:~$ ssh server1 "tar czf – /somedir/" | pv | ssh server2 "cd /somedir/; tar xf


As you can see from above command line example an SSH is made to server1  a tar is used to archive the directory / directories containing my hundred of gigabytes and then this is passed to another opened ssh session to server 2  via UNIX Pipe mechanism and then TAR archiver is used second time to unarchive previously passed archived content. pv command which is in the middle is not obligitory though it is a nice way to monitor status about data transfer like below:
 

500GB 0:00:01 [10,5MB/s] [===================================================>] 27%


P.S. If you don't have PV installed install it either with apt-get on Debian:


debian:~# apt-get install –yes pv


Or on CentOS / Fedora / RHEL etc.


[root@centos ~]# yum -y install pv


Below is a small chunk of PV manual to give you better idea of what it does:

NAME
       pv – monitor the progress of data through a pipe

SYNOPSIS
       pv [OPTION] [FILE]…
       pv [-h|-V]

DESCRIPTION
       pv  allows  a  user to see the progress of data through a pipeline, by giving information such as time elapsed, percentage
       completed (with progress bar), current throughput rate, total data transferred, and ETA.

       To use it, insert it in a pipeline between two processes, with the appropriate options.  Its standard input will be passed
       through to its standard output and progress will be shown on standard error.

       pv  will  copy  each  supplied FILE in turn to standard output (- means standard input), or if no FILEs are specified just
       standard input is copied. This is the same behaviour as cat(1).

       A simple example to watch how quickly a file is transferred using nc(1):

              pv file | nc -w 1 somewhere.com 3000

       A similar example, transferring a file from another process and passing the expected size to pv:

              cat file | pv -s 12345 | nc -w 1 somewhere.com 3000


Note that with too big file transfers using PV will delay data transfer because everything will have to pass through another 2 pipes, however for file transfers up to few gigabytes its really nice to include it.

If you only need to transfer huge .tar.gz archive and you don't bother about traffic security (i.e. don't care whether transferred traffic is going through encrypted SSH tunnel and don't want to put an overhead to both systems for encrypting the data and you have some unfiltered ports between host 1 and host 2 you can run netcat on host 2 to listen for connections and forward .tar.gz content via netcat's port like so:
 

linux2:~$ nc -l -p 12345 > /path/destinationfile
linux2:~$ cat /path/sourcfile | nc desti.nation.ip.address 12345


Another way to transfer large data without having connection with server1 and server2 but having connection to a third host PC is to use rsync and good old SSH Tunneling, like so:
 

jump-host:~$ ssh -R 2200:Linux-server1:22 root@Linux-server2 "rsync -e 'ssh -p 2200' –stats –progress -vaz /directory/to/copy root@localhost:/copy/destination/dir"