Posts Tagged ‘ESTABLISHED’

Check the count and monitor of established / time_wait TCP, UDP connections on Linux and Windows with netstat command

Wednesday, February 6th, 2019

netstat-windows-linux-commands-to-better-understand-your-server-type-of-networrk-tcp-udp-connections

For me as a GNU / Linux sysadmin it is intuitive to check on a server the number of established connections / connections in time_wait state and so on .

I will not explain why this is necessery as every system administrator out there who had a performance or network issues due to server / applications connection overload or have been a target of Denial of Service (DoS)
or Distributed Denial of Service attacks (DDoS)  
is well aware that a number of connections in different states such as SYN_ACK /  TIME_WAIT or ESTABLISHED state could be very nasty thing and could cause a productive application or Infrastructure service to be downed for some time causing from thousands of Euros to even millions to some bussinesses as well as some amount of data loss …

To prevent this therefore sysadmins should always take a look periodically on the Connection states on the adminned server (and in this number I say not only sys admins but DevOps guys who are deploying micro-services for a customer in the Cloud – yes I believe Richard Stallman is right here they're clouding your minds :).

Even though cloud services could provide a very high amount of Hardware (CPU / Memory / Storage) resources, often for custom applications migrating the application in the Cloud does not solve it's design faults or even problems on a purely classical system administration level.


1. Get a statistic for FIN_WAIT1, FOREIGN, SYNC_RECV, LAST_ACK, TIME_WAIT, LISTEN and ESTABLISHED  Connections on GNU / Linux


On GNU / Linux and other Linux like UNIXes the way to do it is to grep out the TCP / UDP connection type you need via netstat a very useful cmd in that case is:


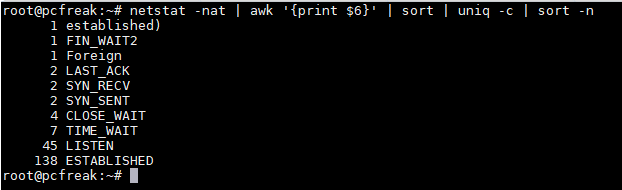
root@pcfreak:~# netstat -nat | awk '{print $6}' | sort | uniq -c | sort -n
      1 established)
      1 FIN_WAIT1
      1 Foreign
      1 SYN_RECV
      3 LAST_ACK
      4 FIN_WAIT2
      8 TIME_WAIT
     45 LISTEN
    147 ESTABLISHED


2. Netstat 1 liner to Get only established and time_wait connections state 


Other ways to check only TCP ESTABLISHED connections on Linux I use frequently are:


root@pcfreak:~# netstat -etna|grep -i establi|wc -l
145


netstat-connection-types-statistics-linux-established-time-wait-check-count

Or to get whole list of connections including the ones who are about to be esatablished in FIN_WAIT2, TIME_WAIT, SYN_RECV state:


root@pcfreak:~# netstat -tupen |wc -l
164


3. Other Linux useful one liner commands to track your connection types
 

netstat -n -p | grep SYN_REC | sort -u

List out the all IP addresses involved instead of just count.

netstat -n -p | grep SYN_REC | awk '{print $5}' | awk -F: '{print $1}'


List all the unique IP addresses of the node that are sending SYN_REC connection status.

netstat -ntu | awk '{print $5}' | cut -d: -f1 | sort | uniq -c | sort -n


Use netstat command to calculate and count the number of connections each IP address makes to the server.

netstat -anp |grep 'tcp\|udp' | awk '{print $5}' | cut -d: -f1 | sort | uniq -c | sort -n


List count of number of connections the IPs are connected to the server using TCP or UDP protocol.

netstat -ntu | grep ESTAB | awk '{print $5}' | cut -d: -f1 | sort | uniq -c | sort -nr


Check on ESTABLISHED connections instead of all connections, and displays the connections count for each IP.


netstat -plan|grep :80|awk {'print $5'}|cut -d: -f 1|sort|uniq -c|sort -nk 1


Show and list IP address and its connection count that connect to port 80 on the server. Port 80 is used mainly by HTTP web page request.

Examples are taken from this nice blog post


4. Check the count of esatblished connections on M$ Windows


As I'm forced to optimize a couple of Microsoft Windows DNS servers which are really slow to resolve the
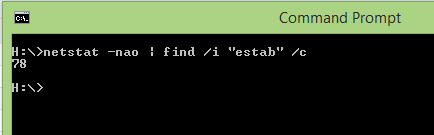
The logical question for me was how the Established and TIME_WAIT state connections then could be checked on Windows OS, after a quick investigation online I've come up with this:


C:\Users\admin> netstat -nao | find /i "estab" /c
78


netstat-check-number-of-established-ports-connections-windows


C:\Users\admin> netsatt -nao | find /i "time_wait" /c
333


If you're used to Linux watch command, then to do same on Windows OS (e.g. check the output of netstat) command every second
and print output use:


netstat –an 1 | find “3334”


Below commands will show stats for services listening on TCP port 3334

To find out which process on system sends packets to remote destination:


netstat –ano 1 | find “Dest_IP_Addr”


The -o parameter outputs the process ID (PID) responsible for the connection.
then if you need further you can find the respective process name with tasklist< cmd.
Another handy Windows netstat option is -b which will show EXE file running as long as
the related used DLL Libraries which use TCP / UDP .

Other useful netsatat Win example is to grep for a port and show all established connections for it with:


netstat –an 1 | find “8080” | find “ESTABLISHED”


5. Closure


Hopefully this article will give you some idea on what is eating your bandwidth connections or overloading your GNU / Linux – Windows systems. And will point you to the next in line logical thing to do optimization / tuning
settings to be made on your system for example if Linux with sysctl – see my previous relater article here

I'll be intested to hear from sysadm colleagoes for other useful ways to track connections perhaps with something like ss tool (a utility to investigate sockets).
Also any optimization hints that would cause servers less downtime and improve network / performance thouroughput is mostly welcome.


How to check if your Linux WebServer is under a DoS attack

Friday, July 22nd, 2011

There are few commands I usually use to track if my server is possibly under a Denial of Service attack or under Distributed Denial of Service

Sys Admins who still have not experienced the terrible times of being under a DoS attack are happy people for sure …

1. How to Detect a TCP/IP Denial of Service Attack This are the commands I use to find out if a loaded Linux server is under a heavy DoS attack, one of the most essential one is of course netstat.
To check if a server is under a DoS attack with netstat, it’s common to use:

linux:~# netstat -ntu | awk '{print $5}' | cut -d: -f1 | sort | uniq -c | sort -n|wc -l

If the output of below command returns a result like 2000 or 3000 connections!, then obviously it’s very likely the server is under a DoS attack.

To check all the IPS currently connected to the Apache Webserver and get a very brief statistics on the number of times each of the IPs connected to my server, I use the cmd:

linux:~# netstat -ntu | awk '{print $5}' | cut -d: -f1 | sort | uniq -c | sort -n
221 80.143.207.107 233 145.53.103.70 540 82.176.164.36

As you could see from the above command output the IP 80.143.207.107 is either connected 221 times to the server or is in state of connecting or disconnecting to the node.

Another possible way to check, if a Linux or BSD server is under a Distributed DoS is with the list open files command lsof
Here is how lsof can be used to list the approximate number of ESTABLISHED connections to port 80.

linux:~# lsof -i TCP:80
litespeed 241931 nobody 17u IPv4 18372655 TCP server.www.pc-freak.net:http (LISTEN)
litespeed 241931 nobody 25u IPv4 18372659 TCP 85.17.159.89:http (LISTEN)
litespeed 241931 nobody 30u IPv4 29149647 TCP server.www.pc-freak.net:http->83.101.6.41:54565 (ESTABLISHED)
litespeed 241931 nobody 33u IPv4 18372647 TCP 85.17.159.93:http (LISTEN)
litespeed 241931 nobody 34u IPv4 29137514 TCP server.www.pc-freak.net:http->83.101.6.41:50885 (ESTABLISHED)
litespeed 241931 nobody 35u IPv4 29137831 TCP server.www.pc-freak.net:http->83.101.6.41:52312 (ESTABLISHED)
litespeed 241931 nobody 37w IPv4 29132085 TCP server.www.pc-freak.net:http->83.101.6.41:50000 (ESTABLISHED)

Another way to get an approximate number of established connections to let’s say Apache or LiteSpeed webserver with lsof can be achieved like so:

linux:~# lsof -i TCP:80 |wc -l
2100

I find it handy to keep track of above lsof command output every few secs with gnu watch , like so:

linux:~# watch "lsof -i TCP:80"

2. How to Detect if a Linux server is under an ICMP SMURF attack

ICMP attack is still heavily used, even though it’s already old fashioned and there are plenty of other Denial of Service attack types, one of the quickest way to find out if a server is under an ICMP attack is through the command:

server:~# while :; do netstat -s| grep -i icmp | egrep 'received|sent' ; sleep 1; done
120026 ICMP messages received
1769507 ICMP messages sent
120026 ICMP messages received
1769507 ICMP messages sent

As you can see the above one liner in a loop would check for sent and recieved ICMP packets every few seconds, if there are big difference between in the output returned every few secs by above command, then obviously the server is under an ICMP attack and needs to hardened.

3. How to detect a SYN flood with netstat

linux:~# netstat -nap | grep SYN | wc -l
1032

1032 SYNs per second is quite a high number and except if the server is not serving let’s say 5000 user requests per second, therefore as the above output reveals it’s very likely the server is under attack, if however I get results like 100/200 SYNs, then obviously there is no SYN flood targetting the machine 😉

Another two netstat command application, which helps determining if a server is under a Denial of Service attacks are:

server:~# netstat -tuna |wc -l
10012

and

server:~# netstat -tun |wc -l
9606

Of course there also some other ways to check the count the IPs who sent SYN to the webserver, for example:

server:~# netstat -n | grep :80 | grep SYN |wc -l

In many cases of course the top or htop can be useful to find, if many processes of a certain type are hanging around.

4. Checking if UDP Denial of Service is targetting the server

server:~# netstat -nap | grep 'udp' | awk '{print $5}' | cut -d: -f1 | sort |uniq -c |sort -n

The above command will list information concerning possible UDP DoS.

The command can easily be accustomed also to check for both possible TCP and UDP denial of service, like so:

server:~# netstat -nap | grep 'tcp|udp' | awk '{print $5}' | cut -d: -f1 | sort |uniq -c |sort -n
104 109.161.198.86
115 112.197.147.216
129 212.10.160.148
227 201.13.27.137
3148 91.121.85.220

If after getting an IP that has too many connections to the server and is almost certainly a DoS host you would like to filter this IP.

You can use the /sbin/route command to filter it out, using route will probably be a better choice instead of iptables, as iptables would load up the CPU more than simply cutting the route to the server.

Here is how I remove hosts to not be able to route packets to my server:

route add 110.92.0.55 reject

The above command would null route the access of IP 110.92.0.55 to my server.

Later on to look up for a null routed IP to my host, I use:

route -n |grep -i 110.92.0.55

Well hopefully this should be enough to give a brief overview on how, one can dig in his server and find if he is under a Distributed Denial of Service, hope it’s helpful to somebody out there.
Cheers 😉

How to check the IP address of Skype (user / Contacts) on GNU / Linux with netstat and whois

Thursday, May 3rd, 2012

netstat check skype contact IP info with netstat Linux xterm Debian Linux

Before I explain how netstat and whois commands can be used to check information about a remote skype user – e.g. (skype msg is send or receved) in Skype. I will say in a a few words ( abstract level ), how skype P2P protocol is designed.
Many hard core hackers, certainly know how skype operates, so if this is the case just skip the boring few lines of explanation on how skype proto works.

In short skype transfers its message data as most people know in Peer-to-Peer "mode" (P2P)  – p2p is unique with this that it doesn't require a a server to transfer data from one peer to another. Most classical use of p2p networks in the free software realm are the bittorrents.

Skype way of connecting to peer client to other peer client is done via a so called "transport points". To make a P-to-P connection skype wents through a number of middle point destinations. This transport points (peers) are actually other users logged in Skype and the data between point A and point B is transferred via this other logged users in encrypted form. If a skype messages has to be transferred  from Peer A (point A) to Peer B (Point B) or (the other way around), the data flows in a way similar to:

 A -> D -> F -> B

or

B -> F -> D -> A

(where D and F are simply other people running skype on their PCs).
The communication from a person A to person B chat in Skype hence, always passes by at least few other IP addresses which are owned by some skype users who happen to be located in the middle geographically between the real geographic location of A (the skype peer sender) and B (The skype peer receiver)..

The exact way skypes communicate is way more complex, this basics however should be enough to grasp the basic skype proto concept for most ppl …

In order to find the IP address to a certain skype contact – one needs to check all ESTABLISHED connections of type skype protocol with netsat within the kernel network stack (connection) queue.

netstat displays few IPs, when skype proto established connections are grepped:

noah:~# netstat -tupan|grep -i skype | grep -i established| grep -v '0.0.0.0'
tcp 0 0 192.168.2.134:59677 212.72.192.8:58401 ESTABLISHED 3606/skype
tcp 0 0 192.168.2.134:49096 213.199.179.161:40029 ESTABLISHED 3606/skype
tcp 0 0 192.168.2.134:57896 87.120.255.10:57063 ESTABLISHED 3606/skype

Now, as few IPs are displayed, one needs to find out which exactly from the list of the ESTABLISHED IPs is the the Skype Contact from whom are received or to whom are sent the messages in question.

The blue colored IP address:port is the local IP address of my host running the Skype client. The red one is the IP address of the remote skype host (Skype Name) to which messages are transferred (in the the exact time the netstat command was ran.

The easiest way to find exactly which, from all the listed IP is the IP address of the remote person is to send multiple messages in a low time interval (let's say 10 secs / 10 messages to the remote Skype contact).

It is a hard task to write 10 msgs for 10 seconds and run 10 times a netstat in separate terminal (simultaneously). Therefore it is a good practice instead of trying your reflex, to run a tiny loop to delay 1 sec its execution and run the prior netstat cmd.

To do so open a new terminal window and type:

noah:~# for i in $(seq 1 10); do \
sleep 1; echo '-------'; \
netstat -tupan|grep -i skype | grep -i established| grep -v '0.0.0.0'; \
done

-------
tcp 0 0 192.168.2.134:55119 87.126.71.94:26309 ESTABLISHED 3606/skype
-------
tcp 0 0 192.168.2.134:49096 213.199.179.161:40029 ESTABLISHED 3606/skype
tcp 0 0 192.168.2.134:55119 87.126.71.94:26309 ESTABLISHED 3606/skype
-------
tcp 0 0 192.168.2.134:49096 213.199.179.161:40029 ESTABLISHED 3606/skype
tcp 0 0 192.168.2.134:55119 87.126.71.94:26309 ESTABLISHED 3606/skype
...

You see on the first netstat (sequence) exec, there is only 1 IP address to which a skype connection is established, once I sent some new messages to my remote skype friend, another IP immediatelly appeared. This other IP is actually the IP of the person to whom, I'm sending the "probe" skype messages.
Hence, its most likely the skype chat at hand is with a person who has an IP address of the newly appeared 213.199.179.161

Later to get exact information on who owns 213.199.179.161 and administrative contact info as well as address of the ISP or person owning the IP, do a RIPE  whois

noah:~# whois 213.199.179.161
% This is the RIPE Database query service.
% The objects are in RPSL format.
%
% The RIPE Database is subject to Terms and Conditions.
% See http://www.ripe.net/db/support/db-terms-conditions.pdf

% Note: this output has been filtered.
% To receive output for a database update, use the "-B" flag.
% Information related to '87.126.0.0 - 87.126.127.255'
inetnum: 87.126.0.0 - 87.126.127.255
netname: BTC-BROADBAND-NET-2
descr: BTC Broadband Service
country: BG
admin-c: LG700-RIPE
tech-c: LG700-RIPE
tech-c: SS4127-RIPE
status: ASSIGNED PA
mnt-by: BT95-ADM
mnt-domains: BT95-ADM
mnt-lower: BT95-ADM
source: RIPE # Filteredperson: Lyubomir Georgiev
.....

Note that this method of finding out the remote Skype Name IP to whom a skype chat is running is not always precise.

If for instance you tend to chat to many people simultaneously in skype, finding the exact IPs of each of the multiple Skype contacts will be a very hard not to say impossible task.
Often also by using netstat to capture a Skype Name you're in chat with, there might be plenty of "false positive" IPs..
For instance, Skype might show a remote Skype contact IP correct but still this might not be the IP from which the remote skype user is chatting, as the remote skype side might not have a unique assigned internet IP address but might use his NET connection over a NAT or DMZ.

The remote skype user might be hard or impossible to track also if skype client is run over skype tor proxy for the sake of anonymity
Though it can't be taken as granted that the IP address obtained would be 100% correct with the netstat + whois method, in most cases it is enough to give (at least approximate) info on a Country and City origin of the person you're skyping with.
 

Enabling Active FTP connections on CentOS 5.5

Tuesday, January 4th, 2011

If you experience problems with making your CentoOS 5.5 work with active ftp connections , e.g. every connection you make to the FTP needs to be in a passive mode or the file transfer or FTP directory listing doesn’t initialize at all, here is how you can solve it:

Edit the file /etc/sysconfig/iptables-config and change their the line:

IPTABLES_MODULES="ip_conntrack_netbios_ns"

to look like:

IPTABLES_MODULES=”ip_conntrack_netbios_ns ip_nat_ftp ip_conntrack_ftp”

Adding the two modules ip_nat_ftp and ip_conntrack_ftp will instruct the CentOS’s /etc/init.d/iptables firewall rules to initialize the kernel modules ip_nat_ftp and ip_conntrack_ftp

This modules solves problems with Active FTP not working caused by a host running behind a firewall router or behind a NAT.

This will hopefully resolve your issues with Active FTP not working on CentOS.

If loading this two kernel modules doesn’t solve the issues and you’re running vsftpd FTP server, then it’s likely that the Active FTP non-working problems are caused by your VSFTPD configuration.

If that’s the case something that might help is setting in /etc/vsftpd/vsftpd.conf the following variables:

pasv_enable=NO
pasv_promiscuous=YES

Of course as a final step you will need to restart the iptables firewall:

[root@centos: ~]# /etc/init.d/iptables restart
Flushing firewall rules: [ OK ]
Setting chains to policy ACCEPT: filter [ OK ]
Unloading iptables modules: [ OK ]
Applying iptables firewall rules: [ OK ]
Loading additional iptables modules: ip_conntrack_netbios_ns
ip_nat_ftp ip_conntrack_ftp [ OK ]

As you can see the two modules ip_nat_ftp and ip_conntrack_ftp are now loaded as additional modules.
Moreover if you have also modified your vsftpd.conf you need to restart the vsftpd via the init script:

[root@centos: ~]# /etc/init.d/vsftpd restart
Shutting down vsftpd: [ OK ]
Starting vsftpd for vsftpd: [ OK ]

If adding this two modules and adding this two extra variables in vsftpd configuration doesn’t help with making your FTP server to work in Active FTP mode , it’s very likely that the whole troubles comes from the firewall configuration, so an edit of /etc/sysconfig/iptables would be necessary;

To find out if the firewall is the source of the FTP not able to enter active mode, stop your firewall for a while by issuing the cmd:

[root@centos:~]# /etc/init.d/iptables stop

If iptables is the source of thepassive ftp troubles, an iptables rules similar to this should make your firewall allow active ftp connections;

*filter :INPUT ACCEPT [0:0]
:FORWARD ACCEPT [0:0]
:OUTPUT ACCEPT
[0:0] -A INPUT -i lo -j ACCEPT -A INPUT -d 127.0.0.0/255.0.0.0 -i ! lo -j REJECT –reject-with icmp-port-unreachable
-A INPUT -m state –state RELATED,ESTABLISHED -j ACCEPT
-A INPUT -p tcp -m tcp –dport 80 -j ACCEPT
-A INPUT -p tcp -m state –state NEW -m tcp –dport 44444 -j ACCEPT
-A INPUT -p tcp -m state –state NEW -m tcp –dport 21 -j ACCEPT -A INPUT -p icmp -m icmp –icmp-type 8 -j ACCEPT
-A INPUT -j REJECT –reject-with icmp-port-unreachable -A FORWARD -j REJECT –reject-with icmp-port-unreachable
-A OUTPUT -j ACCEPT -A OUTPUT -p tcp -m tcp –dport 21 -m state –state ESTABLISHED,RELATED -j ACCEPT