Posts Tagged ‘ppl’
Sunday, March 9th, 2008 
We (Me and My Family) had to stand up early in the morning around 4:30 in Saturday and we traveled to Burgas. First we had to go to a herbman to prescribe me some Herbs. The herbamn is called “bai Dimitar” where bai is a bulgarian specific title for a man on age after the middle age he is located in Kamenartzi village (a small village near Bourgas). He is a sort of strange guy and is speaking very strange things. I hope this herbs will help me. I have to boil them and drink them five times a day. After that we went to Bourgas in my aunt Galia and uncle Galen’s apartment. Everything was a sort was going smooth, Gergana my cousin which was going to merry dressed with a bride dress and waited for his future man (son-in-law). The guy appeared with a limosine and an orchestra. Some ordinary Bulgarian rituals were followed after that the ceremony continued in the council house. Where they became man and wife officially (in front of Bulgaria). After that it followed a celebration in a Bourgas Hotel called “Bulgaria”. The celebration of the marriage included again different traditional Bulgarian dances, guest also danced and ofcourse the Bulgarian familiar horos. I did eat a lot of food and drinked a lot of the meaningless of marriage and all this vanity into celebrity and a lot of empty words spokened there I also convinced myself that I would NEVER EVER allow to have a marriage celebration like this. Some 20 or 30% of the music was Chalga which ofcourse drived me mad. In somewhere 05:00 in the morning we traveled back by car with my father driving. My father is driver from some few months and I definetely can’t say he is an experiencable type of driver which may allow himself to drive with speed higher than the maximum allowed, anywayz he did and I just tried to make him aware that he is braking the driver codex rules. He instead of taking my notes which I made with the idea that I would like to be home back ALIVE, nagged him and he started yelling at me and telling me to stop to complain. That ended in again making me hate him and regret I have parents like this which was a expected to happen since I was angry at all the stupidity and the low intelectual level of most of the ppl who were invited into the Marriage ceremony (although most of them were businessman and a ppl with a high degrees, education). The thing that irritated me the most that the had a marriage ceremony in a orthodox Church and they probably did this just because this is the ordinary way most ppl in Bulgaria does. PFF.. I have slept just for a hour or two today so I probably will go to sleep soon. But first I intend to go for a Liturgy in St. George’s orthodox church. This is after 20 minutes from now. Well thats most of how I spend my saturday on “nothing”. The good thing from all that was that Niki, a.k.a. Nomen’s brother has given me his PSP for the weekend. So I had the time to examine it and generally play with it. I even used a free wifi access in the restaurant where we were and did a bit of browsing :)END—–
Tags: age, anywayz, apartment, bai, bourgas, bride dress, Bulgarian, bulgarian dances, celebrity, ceremony, chalga, church, council, council house, Cousin, Dimitar, driving, driving my father, everything, future man, galen, galia, guy, herbman, Herbs, horos, house, Kamenartzi, limosine, lot, man and wife, man son, marriage celebration, middle age, morning, ppl, quot, rituals, saturday, sort, strange guy, strange things, thing, type, vanity, village
Posted in Everyday Life, Self Healing | No Comments »
Wednesday, October 29th, 2008 Well I haven’t blog for a while so I decided to give a shot. And Glorify God! Again!At Monday I had my defense of the the Change Management project we handed in inMr. Vinke’s pigeon box. I trusted to God and prayed fervently. The Monday wentjust flawless Glory be to the Holy Trinity (The Father, The Son and the Holy Spirit)! Amen!Everything went quite well during the Management Meeting. Each 3 who constructed my groupwere able to partake at the right moment. I was really calm and peaceful during the whole meeting!Cause of God’s mercy and power who was helping me and helping us. Our teachers who pretended to bea Managers in a company gave their point on our Change Management Plan. They tried to squeezeus with unfortable questions. Happily we had a reasonable answers on most of them. What’s left now is to fix few minor things about the plan and then hand it in to the teachers.Afterwards I hope if everything is ok, each one of 3 of us will receive an individual task andwill start working on it. Am let me recall some memories from the day before. Max (a black guy),who happens to be my neighbor and a Christian also invited me to join his protestant presbetyrianChuch he attend. I accepted since I feel a need to be in the Church and the Orthodox Church missesme so much.. Well we went to a building with a hall in which the protestant Church gathered together.The reason I accepted to join that Church was that they preach in English there.I was quite stunned when I found out that the pastor is actually a female (a black one).They started with a sort of entry speech or at least it looked like this to me.The service continued as the pastor went out preaching. Oh boy, Oh boy what a preach it was,I couldn’t believe on my eyes. The pastor acted completely like a general she was screamingpassages of the Holy Bible, stressing out on some of the things. Blaming the pplthat they fail to understand the Bible she asked them that the ppl ask God for enligthmenton what this passages red. Then the service moved by as a few individuals were invitedto share testimonies of what God has done for them during the week.. A little laterthere was a sort of prayer session where everybody was praying with different prayer,it was like an uncontrolled crowd in which each one of them acted completely different.Some of them were screaming hysterically at moments I was scared to be honest.Then the pastor took the bottle of oil and started laying hands upon some of the pplof the Church, Oh God they were shaking falling down on the ground, screaming makinggrimaces, it was an awful things to see .. I was not aware if the people were pretendingor this is real. The pastor was Chasing away demons out of the ppl, or at leastshe told me later that this is what she does. It was such bad place to be I was eageringto be out of this place as fast as possible as the ppl (Church) acted like a sect.The Pastor wanted to lay hands on me either but I rejected the proposition with the words,”No, No, I’m Orthodox”. Later I tried to explain to some of the ppl my concernsabout what is wrong in this church according to me. And a woman (a real piggy one),started arguing with me with the arguments that I quote her here “i’m God”, was likeshit this guys are even blasphemous. Luckily some of the other members of the Churchcorrected the questionable lady that she is wrong although she was unwilling to acceptthe fact. Later I had a little chat with the pastor and her husband plus onemore lady. Let’s say that their belief was closer to the Faith reality than the rest.But still I was really shocked from the experience … I don’t know if they’re wrong or rightall I know and want is that God have mercy over them and me and guide us to know his truth completely.About today: Well let’s say a peaceful they it was, except the fact that one of the webservershad died. And was not acceptable for around an hour and a half. As soon as a colleagueinformed me I restarted the failed apache. I could say I haven’t done much from middaytill the early afternoon I spend in the University accompanied by Ina. We had fewtalks about stuff and so on and so on. When I came back “home” to the dorm.I worked a bit. I spend some time learning some english words in an effort to enrich my vocabulary.Since there is a Adobe Flash Player 10 for Linux for already a few weeks. I decided to installit on my laptop. Well it took me some time until I installed it correctly. Now I haveAdobe Flash 10 on my Debian machine! It seems this version of Flash includes a possibilityto use cameras with flash. I was curious about how does this new release of flash performscomparing to the old Adobe Flash 9. According to a Benchmarking made on Linux and Macit is said that Flash 10 tend to be less CPU hungry and in general peforms better than it’spredecessor. The whole article could be red on the here . Let me conclude that post with a cool thing. A friend of mine has referred me to the following “Virtual Barbershop” check it out here link . Be sure that you listen it on headphones otherwise you won’t be able to fully enjoy it! :)END—–
Tags: adobe flash player, black, Change Management Plan, cool, Flash, Linux, mercy, place, ppl, prayer, say, sort, The Tuesday, time
Posted in Everyday Life | No Comments »
Thursday, May 3rd, 2012 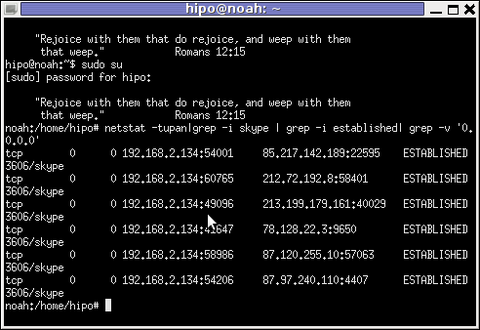
Before I explain how netstat and whois commands can be used to check information about a remote skype user – e.g. (skype msg is send or receved) in Skype. I will say in a a few words ( abstract level ), how skype P2P protocol is designed.
Many hard core hackers, certainly know how skype operates, so if this is the case just skip the boring few lines of explanation on how skype proto works.
In short skype transfers its message data as most people know in Peer-to-Peer "mode" (P2P) – p2p is unique with this that it doesn't require a a server to transfer data from one peer to another. Most classical use of p2p networks in the free software realm are the bittorrents.
Skype way of connecting to peer client to other peer client is done via a so called "transport points". To make a P-to-P connection skype wents through a number of middle point destinations. This transport points (peers) are actually other users logged in Skype and the data between point A and point B is transferred via this other logged users in encrypted form. If a skype messages has to be transferred from Peer A (point A) to Peer B (Point B) or (the other way around), the data flows in a way similar to:
A -> D -> F -> B
or
B -> F -> D -> A
(where D and F are simply other people running skype on their PCs).
The communication from a person A to person B chat in Skype hence, always passes by at least few other IP addresses which are owned by some skype users who happen to be located in the middle geographically between the real geographic location of A (the skype peer sender) and B (The skype peer receiver)..
The exact way skypes communicate is way more complex, this basics however should be enough to grasp the basic skype proto concept for most ppl …
In order to find the IP address to a certain skype contact – one needs to check all ESTABLISHED connections of type skype protocol with netsat within the kernel network stack (connection) queue.
netstat displays few IPs, when skype proto established connections are grepped:
noah:~# netstat -tupan|grep -i skype | grep -i established| grep -v '0.0.0.0'

tcp 0 0 192.168.2.134:59677 212.72.192.8:58401 ESTABLISHED 3606/skype

tcp 0 0 192.168.2.134:49096 213.199.179.161:40029 ESTABLISHED 3606/skype

tcp 0 0 192.168.2.134:57896 87.120.255.10:57063 ESTABLISHED 3606/skype
Now, as few IPs are displayed, one needs to find out which exactly from the list of the ESTABLISHED IPs is the the Skype Contact from whom are received or to whom are sent the messages in question.
The blue colored IP address:port is the local IP address of my host running the Skype client. The red one is the IP address of the remote skype host (Skype Name) to which messages are transferred (in the the exact time the netstat command was ran.
The easiest way to find exactly which, from all the listed IP is the IP address of the remote person is to send multiple messages in a low time interval (let's say 10 secs / 10 messages to the remote Skype contact).
It is a hard task to write 10 msgs for 10 seconds and run 10 times a netstat in separate terminal (simultaneously). Therefore it is a good practice instead of trying your reflex, to run a tiny loop to delay 1 sec its execution and run the prior netstat cmd.
To do so open a new terminal window and type:
noah:~# for i in $(seq 1 10); do \

sleep 1; echo '-------'; \

netstat -tupan|grep -i skype | grep -i established| grep -v '0.0.0.0'; \

done

-------

tcp 0 0 192.168.2.134:55119 87.126.71.94:26309 ESTABLISHED 3606/skype

-------

tcp 0 0 192.168.2.134:49096 213.199.179.161:40029 ESTABLISHED 3606/skype

tcp 0 0 192.168.2.134:55119 87.126.71.94:26309 ESTABLISHED 3606/skype

-------

tcp 0 0 192.168.2.134:49096 213.199.179.161:40029 ESTABLISHED 3606/skype

tcp 0 0 192.168.2.134:55119 87.126.71.94:26309 ESTABLISHED 3606/skype

...
You see on the first netstat (sequence) exec, there is only 1 IP address to which a skype connection is established, once I sent some new messages to my remote skype friend, another IP immediatelly appeared. This other IP is actually the IP of the person to whom, I'm sending the "probe" skype messages.
Hence, its most likely the skype chat at hand is with a person who has an IP address of the newly appeared 213.199.179.161
Later to get exact information on who owns 213.199.179.161 and administrative contact info as well as address of the ISP or person owning the IP, do a RIPE whois
noah:~# whois 213.199.179.161

% This is the RIPE Database query service.

% The objects are in RPSL format.

%

% The RIPE Database is subject to Terms and Conditions.

% See http://www.ripe.net/db/support/db-terms-conditions.pdf
% Note: this output has been filtered.
% To receive output for a database update, use the "-B" flag.
% Information related to '87.126.0.0 - 87.126.127.255'
inetnum: 87.126.0.0 - 87.126.127.255
netname: BTC-BROADBAND-NET-2
descr: BTC Broadband Service
country: BG
admin-c: LG700-RIPE
tech-c: LG700-RIPE
tech-c: SS4127-RIPE
status: ASSIGNED PA
mnt-by: BT95-ADM
mnt-domains: BT95-ADM
mnt-lower: BT95-ADM
source: RIPE # Filteredperson: Lyubomir Georgiev
.....
Note that this method of finding out the remote Skype Name IP to whom a skype chat is running is not always precise.
If for instance you tend to chat to many people simultaneously in skype, finding the exact IPs of each of the multiple Skype contacts will be a very hard not to say impossible task.
Often also by using netstat to capture a Skype Name you're in chat with, there might be plenty of "false positive" IPs..
For instance, Skype might show a remote Skype contact IP correct but still this might not be the IP from which the remote skype user is chatting, as the remote skype side might not have a unique assigned internet IP address but might use his NET connection over a NAT or DMZ.
The remote skype user might be hard or impossible to track also if skype client is run over skype tor proxy for the sake of anonymity
Though it can't be taken as granted that the IP address obtained would be 100% correct with the netstat + whois method, in most cases it is enough to give (at least approximate) info on a Country and City origin of the person you're skyping with.
Tags: Auto, client, connection, Draft, ESTABLISHED, explanation, few words, form, free software, geographic location, gnu linux, hackers, hard core, host, information, ip address, ip addresses, ips, level, Linux, location, message data, middle, netstat, noah, p2p, p2p networks, p2p protocol, peers, person, ppl, proto, Protocol, receiver, RIPEtech-c, sender, Skype, terminal, time, to, tupan, type, whois commands
Posted in Computer Security, Skype on Linux, System Administration | No Comments »
Thursday, January 3rd, 2008 I’m still up here. On the New Year’s eve I was on a party more than 35 ppl were there. All kind of ppls fromMetalheads to Hip Hop maniacs, (ganja addicted) and ofcourse Ja (Rasta) fans. Almost the whole days Iplayed Dune 2 (Great Game, I play with Harkonen :)). The New Year was normal. Nomen bringed a winewhich costs 100.3 lv, the wine was good. Around this celebrities I started eating a lot and I’m on a wayto get fat. BTC are terrible we don’t have internet in the office now for almost 24 hours. This Winteris fierce. There are snowstorms around, and we even have a water regime. Yesterday I was out on a coffeewith Lily :), it’s a good thing that she is around.END—–
Tags: BTC, celebrities, coffeewith, dune 2, end, eve, game, great game, hip hop, Hop, Iplayed, kind, lily, new year, nomen, Ofcourse, Office, party, ppl, Rasta, regime, water, water regime, wayto, wine, winewhich, Winteris, year, yesterday
Posted in Everyday Life | No Comments »
Saturday, August 16th, 2008 Haven’t blogged for some time so I’m going to write down few lines. Today I passed succesfully the Cisco CCNA2 Final Exam and the CCNA2 Voucher exam thanks to God :). The Voucher exam grants everybody who passed succesfully a discount of the price of the CCNA Certification exam, whi ch is pretty cool. To be honest I cheated at the 2 tests otherwise I won’t have passed but I’m really busy this days and I’m a bit of tired so this was the only option. I also made my CCNA2 (9,10,11) tests for which I used the cisco answers page :). CCNA2 The Final Exam and the Voucher wasn’t included in the blogspot cisco answers so I googled around but thanksfully I found the answers on a website in the net. This days I had a lot of fun and saw a lot of old friends (some of them studying others working in Sofia). It’s the summers holiday period in which tons of friends who are in other cities are back in Dobrich so I was able to spend nice time with a lot of them. This are ppl like: hellpain, nomen, mariana (one of my ex-girlfriend). At Wednesday I and Nomen went to the beach at Balchik, we had great fun there. We met together in front of the place we call “The Young House” at 7:30, at 8:30 we were already travelling to Balchik and in 9:35 we were on the beach. We stayed there until 12:30. Vlado and Mitko tried to learn me to be able to relax on my on back while in the water I almost did it but still I need some more tries until I’m able to make it the right way. At 13:00 we were back in Dobrich and we went to an open restaurant “Seasons”. I ate vegetarenian pizza and Vlado ate a meal called “English Breakfast”. “English Breakfast”. Right after that at 14:00 I went to the regional Red Cross building, because I had to get a course on “First Aid”, it’s required to have that course passed until you’re able to apply for a driving license after you complete both the theoretical exam and the practice exam. My driving practice exam would be at Wednesday at 9:00 to be honest I’m not still driving well and my driving course is almost over. My only hope for passing it in the Lord, only if he support me and guide me during the exam I’ll be able to pass. The same night I went out with Shanar and we later met hellpain and Alex. We had nice discussions in the city park until somewhere around 11:30. When we were going back home I met Mariana and I proposed her to have a walk together she accepted and we negotiated to meet around 30 minutes later. We spend 4 hours with her talking about stuff and drinking beer. I should say she is one of the only girls I’m able to speak for hours and still feel good and confortable. The center of our talks were mainly God the Bible and in particular my belief in Christ Jesus as Lord and Saviour. At Friday morning I had driving courses early at the morning from 8:00 o’clock, later I went to Varna with my father because I had to pick up one bag I forgot the last time when I was in Varna, Thanks God we didn’t crashed. On our way to Varna there was a very dangerous situation in which the chances to crash was pretty big but thanksfully to God’s protection and kindness we didn’t. Later when we came back in Dobrich I went to the police office to check if international passport is ready. Thanksfully it was and now I have the “red passport” home and ready :). I called to Mariana to great her because it was the great christian feast, we at the Orthodox Church believe that at that day the Eartly Mother of our Lord Jesus has resurrected in the 3rd day and ascended to heaven just like our Lord! We call that celebrity “The Maryam’s day”. Everybody who is named after Mary’s name is also celebrating this great feast. We decided to meet at night time at 11:30 and have walk. Like I said earlier I really enjoy Mariana’s company. Unfortunately an hour later we met Bino so we wasn’t able to talk much about stuff with Mariana. Bino is pretty cool guy but sometimes his company is pretty annoying :). Later I went home and after a minute of prayer I went to bed. On August 22 I’m traveling to the Netherlands to continue my studies at the HRQM stream, sometimes I feel a sort of preliminary homesickness but I believe this decision is right and it’s God’s souvereign plan for my life. Well as Bugs Bunny (my favour cartoon character) says that’s all folks!END—–
Tags: Aid, balchik, beach, blogged, ccna certification, Certification, cisco, course, Cross, dobrich, driv, english breakfast, everybody, ex girlfriend, exam, feast, Final, first aid, fun, haven, holiday period, house, mariana, nice time, nomen, old friends, option, page, place, ppl, quot, sofia, thanks to god, theoretical exam, time, vlado, voucher, Wednesday, whi, Young
Posted in Everyday Life | No Comments »
Sunday, January 28th, 2007 I’m starting to realize that there is no actually friendship in life. I’m starting realize, ppl use you time after time. I’m sick of existence. I want to go out of this Hell. Why I’m Here Why? What makes the difference with or without me? Nobody cares in general. I’m so disappointed of this miserable existence here on earth even. My life is not so bad but with or without God it’s so meaningless. I want out of this body and this universe. I want Freedom in the END. I want real things I’m sick of all this. As Buddha says everything is chaning nothing seems to be static, he is right about this! I never imagined I’ll be the person which I’m now. I hate my life. Please take my life Lord. Let me out of this miserable Place Please! Body My holding Cell …
Tags: body, Buddha, Cell, difference, earth, end, everything, existence, freedom, friendship, General, god, hell, life, miserable existence, miserable place, nobody, Nothing, person, place, ppl, time, time after time, universe, use
Posted in Everyday Life | 1 Comment »
Monday, February 5th, 2007 Yesterday I was on a birthday of a one girl Krisi she is 18 already. It was a standard teen party. Awful place, I drunk 3 beers and smoked a lot of cigaretes in general we discussed with some ppl Does the Lord exist things. Is evolution real is it possible at all things like this. There was one boy who was keen on Free Software GPL etc. I realized I’m a real psycho after I started to convince him Windows and M$ products are much better than free software :]. After 3 hours speaking like a 15 years m$ user. When walking back for home. I asked my self what the heck? What I did I’m real psycho ;]. Zuio and I broke 1 flowerpot when doing POGO on a Hipodil song. I eat some strange salad with hands ( I pretended to be a Bangla person ) :]. Nomen drunk a lot and got angry at a guy and proposed to start a fight:]. In 5:30 a.m. we were already at home. Our mood got fucked up a little when going back to home. In the morning Papi wake me up and suggested to go to a coffee, I aggreed as usual but I did misunderstood about the place where we decided to see, and waited on other place after that I realized I did a mistake and he meant we have to see each other in the Winter Theather not the Summer One (silly me). After that normal day I eat. I did some server descriptions, played mame in Nomen (I went his home). I was able to start gxmame to work in fullscreen in the end (my integrated video card is doing alot of problems about the games) but I found out the xmame -ef 1 option. That one rules.END—–
Tags: awful place, Bangla, beers, card, cigaretes, coffee, end, evolution, fight, flowerpot, Free, free software, fullscreen, games, Krisi, Lord, mame, mistake, mood, option, party, person, place, POGO, ppl, psycho, salad, software, teen party, video, video card, what the heck, xmame
Posted in Everyday Life | No Comments »
Tuesday, February 27th, 2007 It was really steressing day. All started with a lot of calls to NetInfo’s Office then to our Office in Varna to explain what is happening to one of our servers design-bg.net. In the end after 2 hours of stress and even more everything come on it’s place Praise the LORD for this he helped me. Right after design-bg.net was up mail.design.bg almost freeze with God’s help everything came to normal after a simple reboot. In 12:00 to 12:40 I drunk coffee with some friends, after that spent some time in the library. In 14:15 the management test seemed to be in a small room and I was able to copy stuff from my collegues on the test:] Yeash CopyCat :]. Mitko and Habib was my guests today and we ate spinach’s soup with green salad and plant yellow cheese. Thanks to the Lord for being merciful over my sins. Yesterday I got drunk I drunk 200 gr. of ROM and 1 beer. After that I went home singing and listening to Metallica’s songs simultaneously, there was odd movement red eyes and head banging for almost an hour :]. I spend so many things for absolutely useless things, I am ashamed of myself. I acted like an animal. I really wonder why the world still exists If it’s such an awful place to be. I really doubt about the meaning of my life. Things seems to go in a bad way for me and a lot of ppl around me. I really hope the Lord will interfere and everything will come to place but who knows the Paths the Creator has created for us? END—–
Tags: awful place, Beer, bg, Blah, coffee, collegues, CopyCat, end, everything, green salad, habib, HEAD, mail design, meaning of my life, Metallica, Mitko, movement, Netinfo, place, ppl, Praise, Reboot, red eyes, ROM, salad, singing, soup, spinach, stress, test, thanks to the lord, time, useless things, varna, Yeash, yellow cheese
Posted in Everyday Life | No Comments »
Sunday, September 23rd, 2007 The last 3 days in the college we used to have a guest from the Arnhem Business Scholl: Job Thinke.He is a teacher in HRQM (Human Resource and Quality Management). We played a simulator. We choose abusiness to be in. Job, Bozhidar, and two graduating students from Arnhem ( one black girl and one guy from South Africa )were the teachers. We choose an industry (our group was some Open cars producing company). Every peson of the teamhad to participate in taking decisions and writting down the decisions in a decision forms every form was aboutmoney we would invest in things which would lead to accomplish a specific goals we had setted in the beginning of the game,things like hiring more employees promoting some of them etc. etc. were our work. The game was played 3 days and it waslike if we had run a 2 years long business. Our group mistake was that we always thought about things in short terms.In the end of the 2nd year of the game we had a discussion meetings with our higher level employees and it turns outthat we are the poorest team because we always thought about the company in short term instead of long term.During this 3 days there was also some funny games for developing concentration and thinking and improvingcommunication skills. In general I think the whole think was a great loss of time, but I’m a strange person …Most of the ppl liked involved from IBMS and Hotel Management liked the game very much.END—–
Tags: black girl, Bozhidar, college, concentration, decision, decisions, discussion, end, funny games, game, girl, hotel management, Human, human resource, ibms, improvingcommunication, industry, job, level, loss, Management, mistake, Open, open cars, outthat, person, peson, ppl, producing company, Quality, quality management, south africa, strange person, teamhad, Thinke, time, writting, year
Posted in Everyday Life | No Comments »
Monday, April 7th, 2008 I spend the weekend with a lot of friends. God has prepared another great time for me. In Friday I was out with Alex, and we had a long discussion for who is God, because he thinks he can know the Lord without our Lord and Saviour Jesus Christ which is completely wrong and impossible like it’s written how our Lord says “I and the Father are one” and again “Noone comes to the Father except through me“. At friday I was out with Static a friend and brother in Christ 🙂 We went to the school where he lives “Dimitar Talev”. This is the second time when I visit this school but it’s so colourful and I like it so much that I wished for a second to be pupil again :). In Sunday I went to Liturgy as often I went to bed very late in Saturday so I wasn’t able to wake in the morning and I went to the Church service somewhere around 9:30. The Priest’s preach was about the gospel’s where our Lord Jesus freed and healed a boy who was very often abused by wicked spirits, he also mentioned how some of the ppl fasts only abstaining from food and how this ain’t fast at all. He gave us interesting example how the animals who ate meet are cruel and animals who eat grass are very meek and pure. For example he said look into the fox, wolf they eat meet and they’re fierce animals whether animals like sheeps and rabbits eat only grass and are mostly good. He also mentioned that the st. Ioan Zlatoust(John / James the Goldenmouth) said that the fasting gives wings to the soul. In the church I saw Stelio the man who introduced me to the Orthodox Faith and after the Service we spend some great time in the park talking about the past during the communist regime here in Bulgaria, also the current state in the country etc. etc. In 12:30 we had previously arranged meeting with two of my colleagues from the College. We had to make the SPSS project which we have to complete and pass to the teacher today. Thanks God everything just went smoothly. And we had to make just a little text to the project in order to complete it. In 09:00 we went to the Fountain with Vlado (hellpain), because he was here for the weekend. Now just after I came home I prayed I take a shower. And I intend to read a bit from the bible and go to sleep.
END—–
Tags: bed, bit, brother in christ, communist regime, country, current state, Dimitar, dimitar talev, discussion, end, everything, fasts, Father, fox, fox wolf, Goldenmouth, grass, great time, ioan zlatoust, liturgy, lord jesus, orthodox faith, ppl, pupil, quot, rabbits, regime, saviour jesus christ, second, second time, sheeps, soul, spss project, Static, Stelio, text, time, weekend, wicked spirits
Posted in Everyday Life | No Comments »


