Posts Tagged ‘default user’

Configure own Media streaming minidlna Linux server to access data from your Smart TV

Friday, February 18th, 2022

dlna-media-minidlna-server-linux-logo

If you happen to buy or already own or just have to install a Smart TV to be connected with a LAN Network to a Linux based custom built NAS (Network Attached Storage) server. You might benefit of the smart TV to Share and Watching the Disk Storage Pictures, Music, Video files from the NAS  to the Smart TV using the Media Server protocol.

You have certainly already faced the Media Server at your life on many locations in stores and Mall Buildings, because virtually any reoccuring advertisements, movies projected on the TVs, Kids entertainment or Floor and Buildings Room location schedules or timeline promition schedules are streamed using the Media Server protocol, for many years now. Thus having a brief idea about Media Server proto existence is foundamental stuff to be aware of for sysadmins and programmers.

Shortly about DLNA UPnP Media Streaming Protocol

Assuming that your Smart TV has been already connected to your Wireless Router 2.4Ghz or 5Ghz Wifi, one would think that the easiest way to share the files with the SmartTV is via something like a simple SAMBA Linux server via smb:// cifs:// protocols or via the good old NFS Server, however most of Samsung Smart TV and many other in year 2022 does not have embedded support for Samba SMB / CIFS Protocol but instead have support for the DLNA (Digital Living Network Alliance) streaming support. DLNA is part of the UPnP (Universal Plug and Play) Protocols, UPnP is also known to those using and familiar with Windows Operating Systems realm simply as UPnP AV Media server or Windows Media server.
Windows Media server for those who never heard it or used it 
 allows you to build a Playlists with Media files Video and Audio data files, that can be then later played remotely via a Local LAN or even long distance over TCP / IP remote side connected Internet network.
 

1. Set up and Stream data via Media server on  Windows PC / notebook with integrated Windows Media server 

Windows Media server configuration on Windows 7, 10 and 11 is a relatively easy to configure via:

Network and Sharing Center -> Media Streaming Options -> Turn on Media Streaming 


Then you have to define the name of the Media Library, configure whether Media server should show
on the Local Netework
for other conected devices and Allow or Block access from the other network present devices.


 2. Using a more advanced Media Server to get rid about the limitation of DLNA set of supported file codecs.
 

The Windows default embedded DLNA server is the easiest and fastest one to set up, but it’s not necessarily the best option.
Due to the way DLNA works, you can only stream certain types of media codecs supported by the server. If you have other types of media not defaultly supported and defined by DLNA win server, it just won’t work.

Thus thanksfully it was developed other DLNA servers improve this by offering real-time transcoding.
If you try to play an unsupported file, they’ll transcode it on-the-fly, streaming the video in a supported format to your DLNA device.
Just to name few of the DLNA Media Streaming servers that have supported for larger MPG Video, MP3 / MP4 and other Audio formats encodings,
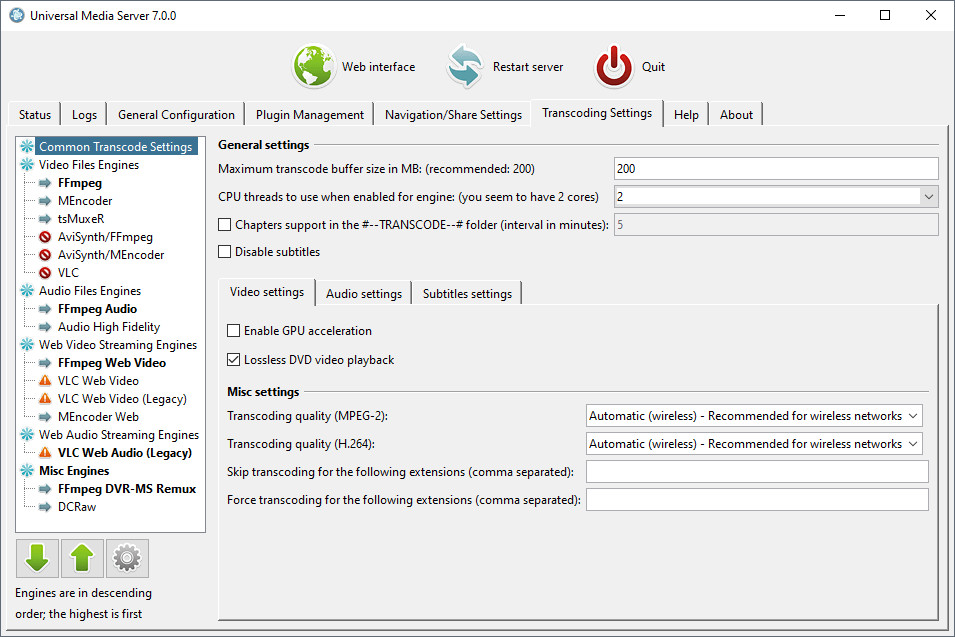
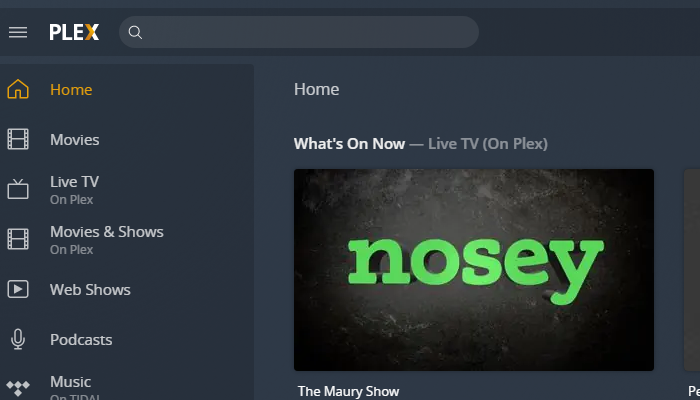
you can try Plex or the Universal Media Server both of which are free to use under freeware license and have versions for Linux and Mac OS.


Universal_media_server-windows-screenshot-stream-media-data-on-network


3. Setting up a free as in freedom DLNA server MiniDLNA (ReadyMedia) on GNU / Linux


ReadyMedia (formerly known as MiniDLNA) is a simple media server software, with the aim of being fully compliant with DLNA/UPnP-AV clients. It was originally developed by a NETGEAR employee for the ReadyNAS product line.

MiniDNLA daemon serves media files (music, pictures, and video) to clients on a network. Linux Media servers clients you can use to test or scan your network for existent Media servers are multiple perhaps the most famous ones are applications such as totem (for QT users) and Kodi (for KDE).
The devices that can be used with minidlna are devices such as portable media players (iPod), Smartphones, Televisions, Tablets, and gaming systems (such as PS3 and Xbox 360) etc.
 

ReadyMedia is a simple, lightweight, the downside of it is It does not have a web interface for administration and must be configured by editing a text file. But for a simple Video streaming in most cases does a great job.


3.1 Install the minidlna software package 

Minidlna is available out of the box on most linux distributions (Fedora / CentOS / Debian / Ubuntu etc.) as of year 2022.

  • Install on Debian Linux (Deb based distro)

media-server:~# apt install minidlna –yes

  • Install on Fedora / CentOS (other RPM based distro)

media-server:~# yum install -y minidlna


3.2 Configure minidlna

– /etc/minidlna.conf – main config file
Open with text editor and set user= ,  media_dir= ,  port=, friendly_name= ,  network_interface= variables as minimum.
To be add minidlnad support symlinks to external file locations, set also wide_links=yes

media-server:~# vim /etc/minidlna.conf

#user=minidlna
user=root
media_dir=/var/www/owncloud/data
network_interface=eth0,eth1

# Port number for HTTP traffic (descriptions, SOAP, media transfer).
# This option is mandatory (or it must be specified on the command-line using
# "-p").
port=8200
# Name that the DLNA server presents to clients.
# Defaults to "hostname: username".
#friendly_name=
friendly_name=DLNAServer Linux
# set this to yes to allow symlinks that point outside user-defined media_dirs.
wide_links=yes
# Automatic discovery of new files in the media_dir directory.
#inotify=yes

Keep in mind that it is supported to provide separete media_dir and provide different USB / External Hard Drive or SD Card sources separated only by content be it Video, Audio or Pictures short named in config as (A,V,P).

media_dir=P,/media/usb/photos
media_dir=V,/media/external-disk/videos
media_dir=A,/media/sd-card/music

You might want to diasble / ineable the inotify depending on your liking, if you don't plan to place new files automated to the NAS and don't care to get indexed and streamed from the Media server you can disable it with inotify=no otherwise keep that on.

– /etc/default/minidlna – additional startup config to set minidlnad (daemon) options such as setup to run with admin superuser root:root 
(usually it is safe to leave it empty and set the user=root, whether needed straight from /etc/minidlna.conf
That's all now go on and launch the minidlna and enable it to automatically boot on Linux boot.

media-server:~# systemctl start minidlna
media-server:~# systemctl enable minidlna
media-server:~# systemctl status minidlna


3.3 Rebuilt minidlna database with data indexed files

If you need to re- generate minidlna's database.
To do so stop the minidlna server with the
 

media-server:~# systemctop stop minidlna


 command, then issue the following command (both commands should be run as root):

media-server:~# minidlna -R

Since this command might kept in the background and keep the minidlna server running with incorrect flags, after a minute or two kill minidlna process and relaunch the server via sysctl.

media-server:~#  killall -9 minidlna
media-server:~#  systemctl start minidlna


3.4 Permission Issues / Scanning issues

If you plan to place files in /home directory. You better have a seperate partition or folder *outside* your "home" directory devoted to your media. Default user with which minidlna runs is minidlna, this could prevent some files with root or other users being red. So either run minidlna daemon as root or as other user with whom all media files should be accessible.
If service runs as root:root, and still getting some scanning issues, check permissions on your files and remove special characters from file names.
 

media-server:~# tail -10 /var/log/minidlna/minidlna.log 
[2022/02/17 22:51:36] scanner.c:489: warn: Unsuccessful getting details for /var/www/owncloud/data/Videos/Family-Videos/FILE006.MPG
[2022/02/17 22:52:08] scanner.c:819: warn: Scanning /var/www/owncloud/data finished (10637 files)!
[2022/02/17 22:52:08] playlist.c:135: warn: Parsing playlists…
[2022/02/17 22:52:08] playlist.c:269: warn: Finished parsing playlists.
minidlna.c:1126: warn: Starting MiniDLNA version 1.3.0.
minidlna.c:1186: warn: HTTP listening on port 8200
scanner.c:489: warn: Unsuccessful getting details for /var/www/owncloud/data/admin/files/origin/External SD card/media/Viber Images/IMG-4477de7b1eee273d5e6ae25236c5c223-V.jpg
scanner.c:489: warn: Unsuccessful getting details for /var/www/owncloud/data/Videos/Family-Video/FILE006.MPG
playlist.c:135: warn: Parsing playlists…
playlist.c:269: warn: Finished parsing playlists.


3.5. Fix minidlna Inotify errors

In /etc/sysctl.conf 

Add:

fs.inotify.max_user_watches=65536

in a blank line at end of file and do 

media-server:~# sysctl -p

Debugging minidlna problems, index errors, warnings etc

minidlna does write by default to /var/log/minidlna/minidlna.log inspect the log closely and you should get most of the time what is wrong with it.
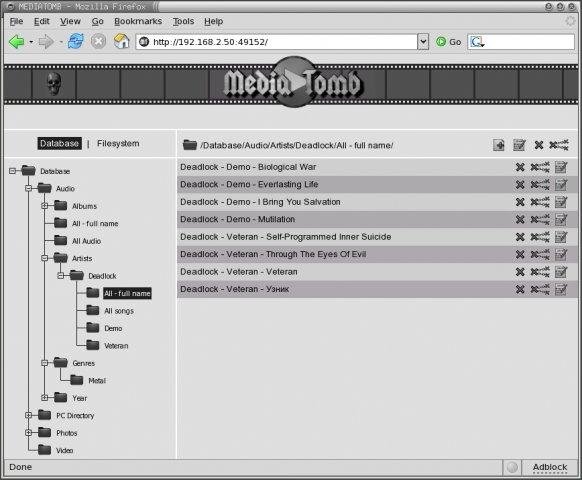
Note that some files might not get indexed because minidlna won't support the strange file codecs such as SWF encoding, if you have some important files to stream that are not indexed by minidlna, then install and try one of the more sophisticated free software Media Servers for Linux:

plex-media-streaming-server-screenshot

Note that most Linux users from my quick research shows, MediaTomb is the preferred advanced features Open Source Linux Media Server of choice for most of the guys.

mediatomb-linux-media-streaming-server-picture.jpg.webp


4. Test minidlna Linux servers works, getting information of other DLNA Servers on the network

media-server:~# lynx -dump  http://127.0.0.1:8200
MiniDLNA status

  Media library

   Audio files 0
   Video files 455
   Image files 10182

  Connected clients

   ID Type                   IP Address    HW Address        Connections
   0  Samsung Series [CDEFJ] 192.168.1.11  7C:0A:3D:88:A6:FA 0
   1  Generic DLNA 1.5       192.168.0.241 00:16:4E:1D:48:05 0
   2  Generic DLNA 1.5       192.168.1.18  00:16:3F:0D:45:05 0
   3  Unknown                127.0.0.1     FF:FF:FF:FF:FF:FF 0

   -1 connections currently open
 

Note that there is -1 connections (no active connections) currently to the server. 
The 2 Generic DLNA 1.5 IPs are another DLNA servers provided by a OpenXEN hosted Windows 7 Virtual machines, that are also broadcasting their existence in the network. The Samsung Series [CDEFJ] is the DLNA client on the Samsung TV found, used to detect and stream data from the just configured Linux dlna server.

The DLNA Protocol enabled devices on a network as you can see are quite easy to access, querying localhost on the 8200 server dumps, what minidlna knows, the rest of IPs connecting should not be able to receive this info. But anyways since the minidlna does not have a special layers of security to access it, but the only way to restrict is filtering the 8200 port, it is a very good idea to put a good iptables firewall on the machine to allow only the devices that should have access to the data.

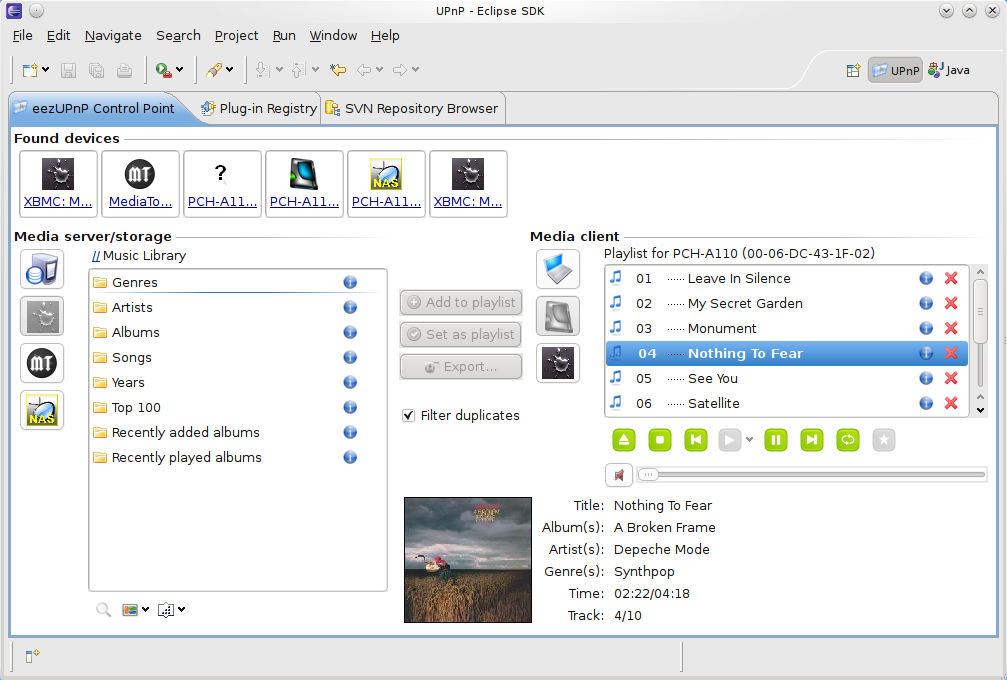
Further more if you happen to need to access the Media files on Linux from GUI you might use some client as upmentioned totem, VLC or if you need something more feature rich Java eezUPnP .

eeZUPnP-screenshot-java-client-for-media-server

That's all folks !
Enjoy your media on the TV 🙂

Defining multiple short Server Hostname aliases via SSH config files and defining multiple ssh options for it, Use passwordless authentication via public keys

Thursday, September 16th, 2021

using-ssh-host-acronym-aliases-ssh-client-explained-openssh-logo

In case you have to access multiple servers from your terminal client such as gnome-terminal, kterminal (if on Linux) or something such as mobaxterm + cygwin (if on Windows) with an opens ssh client (ssh command). There is a nifty trick to save time and keyboard typing through creating shortcuts aliases by adding few definitions inside your $HOME/.ssh/config ( ~/.ssh/config ) for your local non root user or even make the configuration system wide (for all existing local /etc/passwd users) via /etc/ssh/ssh_config.
By adding a pseudonym alias for each server it makes sysadmin life much easier as you don't have to type in each time the FQDN (Fully Qualified Domain Name) hostname of remote accessed Linux / Unix / BSD / Mac OS or even Windows sshd ready hosts accessible via remote TCP/IP port 22.


1. Adding local user remote server pointer aliases via ~/.ssh/config


The file ~/.ssh/config is read by the ssh client part of the openssh-client (Linux OS package) on each invokement of the client, and besides defining a pseudonym for the hosts you like to save you time when accessing remote host and hence increase your productivity. Moreover you can also define various other nice options through it to define specifics of remote ssh session for each desired host such as remote host default SSH port (for example if your OpenSSHD is configured to run on non-standard SSH port as lets say 2022 instead of default port TCP 22 for some reason, e.g. security through obscurity etc.).


The general syntax of .ssh/config file si simplistic, it goes like this:
 

Host MACHNE_HOSTNAME

SSH_OPTION1 value1
SSH_OPTION1 value1 value2
SSH_OPTION2 value1 value2


Host MACHNE_HOSTNAME

SSH_OPTION value
SSH_OPTION1 value1 value2

  • Another understood syntax if you prefer to not have empty whitespaces is to use ( = )
    between the parameter name and values.

Host MACHINE_HOSTNAME
SSH_config=value
SSH_config1=value1 value2

  • All empty lines and lines starting with the hash shebang sign ( # ) would be ignored.
  • All values are case-sensitive, but parameter names are not.

If you have never so far used the $HOME/.ssh/config you would have to create the file and set the proper permissions to it like so:

mkdir -p $HOME/.ssh
chmod 0700 $HOME/.ssh


Below are examples taken from my .ssh/config configuration for all subdomains for my pcfreak.org domain


# Ask for password for every subdomain under pc-freak.net for security
Host *.pcfreak.org
user hipopo
passwordauthentication yes
StrictHostKeyChecking no

# ssh public Key authentication automatic login
Host www1.pc-freak.net
user hipopo
Port 22
passwordauthentication no
StrictHostKeyChecking no

UserKnownHostsFile /dev/null

Host haproxy2
    Hostname 213.91.190.233
    User root
    Port 2218
    PubkeyAuthentication yes
    IdentityFile ~/.ssh/haproxy2.pub    
    StrictHostKeyChecking no
    LogLevel INFO     

Host pcfrxenweb
    Hostname 83.228.93.76
    User root
    Port 2218

    PubkeyAuthentication yes
    IdentityFile ~/.ssh/pcfrxenweb.key    
    StrictHostKeyChecking no

Host pcfreak-sf
    Hostname 91.92.15.51
    User root
    Port 2209
    PreferredAuthentications password
    StrictHostKeyChecking no

    Compression yes


As you can see from above configuration the Hostname could be referring either to IP address or to Hostname.

Now to connect to defined IP 91.92.15.51 you can simply refer to its alias

$ ssh pcfreak-sf -v

and you end up into the machine ssh on port 2209 and you will be prompted for a password.

$ ssh pcfrxenweb -v


would lead to IP 83.228.93.76 SSH on Port 2218 and will use the defined public key for a passwordless login and will save you the password typing each time.

Above ssh command is a short alias you can further use instead of every time typing:

$ ssh -i ~/.ssh/pcfrxenweb.key -p 2218 root@83.228.93.76

There is another nifty trick worthy to mention, if you have a defined hostname such as the above config haproxy2 to use a certain variables, but you would like to override some option for example you don't want to connet by default with User root, but some other local account, lets say ssh as devuser@haproxy2 you can type:

$ ssh -o "User=dev" devuser

StrictHostKeyChecking no

– variable will instruct the ssh to not check if the finger print of remote host has changed. Usually this finger print check sum changes in case if for example for some reason the opensshd gets updated or the default /etc/ssh/ssh_host_dsa_key /etc/ssh/sshd_host_dsa_* files have changed due to some reason.
Of course you should use this option only if you tend to access your remote host via a secured VPN or local network, otherwise the Host Key change could be an indicator someone is trying to intercept your ssh session.


Compression yes


– variable  enables compression of connection saves few bits was useful in the old modem telephone lines but still could save you few bits
It is also possible to define a full range of IP addresses to be accessed with one single public rsa / dsa key

Below .ssh/config
 

Host 192.168.5.?
     Hostname 192.168.2.18
     User admin
     IdentityFile ~/.ssh/id_ed25519.pub


Would instruct each host attemted to be reached in the IP range of 192.168.2.1-254 to be automatically reachable by default with ssh client with admin user and the respective ed25519.pub key.
 

$ ssh 192.168.1.[1-254] -v


2. Adding ssh client options system wide for all existing local or remote LDAP login users


The way to add any Host block is absolutely the same as with a default user except you need to add the configuration to /etc/ssh/ssh_config. Here is a confiugaration from mine Latest Debian Linux

$ cat /etc/ssh/ssh_config

# This is the ssh client system-wide configuration file.  See
# ssh_config(5) for more information.  This file provides defaults for
# users, and the values can be changed in per-user configuration files
# or on the command line.

# Configuration data is parsed as follows:
#  1. command line options
#  2. user-specific file
#  3. system-wide file
# Any configuration value is only changed the first time it is set.
# Thus, host-specific definitions should be at the beginning of the
# configuration file, and defaults at the end.

# Site-wide defaults for some commonly used options.  For a comprehensive
# list of available options, their meanings and defaults, please see the
# ssh_config(5) man page.

Host *
#   ForwardAgent no
#   ForwardX11 no
#   ForwardX11Trusted yes
#   PasswordAuthentication yes
#   HostbasedAuthentication no
#   GSSAPIAuthentication no
#   GSSAPIDelegateCredentials no
#   GSSAPIKeyExchange no
#   GSSAPITrustDNS no
#   BatchMode no
#   CheckHostIP yes
#   AddressFamily any
#   ConnectTimeout 0
#   StrictHostKeyChecking ask
#   IdentityFile ~/.ssh/id_rsa
#   IdentityFile ~/.ssh/id_dsa
#   IdentityFile ~/.ssh/id_ecdsa
#   IdentityFile ~/.ssh/id_ed25519
#   Port 22
#   Protocol 2
#   Ciphers aes128-ctr,aes192-ctr,aes256-ctr,aes128-cbc,3des-cbc
#   MACs hmac-md5,hmac-sha1,umac-64@openssh.com
#   EscapeChar ~
#   Tunnel no
#   TunnelDevice any:any
#   PermitLocalCommand no
#   VisualHostKey no
#   ProxyCommand ssh -q -W %h:%p gateway.example.com
#   RekeyLimit 1G 1h
    SendEnv LANG LC_*
    HashKnownHosts yes
    GSSAPIAuthentication yes

As you can see pretty much can be enabled by default such as the forwarding of the Authentication agent option ( -A ) option, necessery for some Company server environments to be anbled. So if you have to connect to remote host with enabled Agent Forwarding instead of typing

ssh -A user@remotehostname


To enable Agent Forwarding instead of

ssh -X user@remotehostname


Simply uncomment and set to yes
 

ForwardX11 yes
ForwardX11Trusted yes


Just simply uncomment above's config ForwardAgent no

As you can see ssh could do pretty much, you can configure enable SSH Tunneling or run via a Proxy with the ProxyCommand (If it is the first time you hear about ProxyCommand I warmly recommend you check my previous article – How to pass SSH traffic through a secured Corporate Proxy Server with corkscrew).

Sometimes for a defines hostname, due to changes on remote server ssh configuration, SSH encryption type or a host key removal you might end up with issues connecting, therefore to override all the previously defined options inside .ssh/config by ignoring the configuration with -F /dev/null

$ ssh -F /dev/null user@freak -v


What we learned ?

To sum it up In this article, we have learned how to easify the stressed sysadmin life, by adding Aliases with certain port numbering and configurations for different remote SSH administrated Linux / Unix, hosts via local ~/.ssh/config or global wide /etc/ssh/ssh_config configuration options, as well as how already applied configuration from ~/.ssh/config affecting each user ssh command execution, could be overriden.

How to make sure your Linux system users won’t hide or delete their .bash_history / Securing .bash_history file – Protect Linux system users shell history

Monday, July 19th, 2010

linux-bin-bash-600x600logo
If you're running multi user login Linux system, you have probably realized that there are some clever users that prefer to prevent their command line executed commands to be logged in .bash_history.
To achieve that they use a number of generally known methodologist to prevent the Linux system from logging into their $HOME/.bash_history file (of course if running bash as a default user shell).
This though nice for the user is a real nightmare for the sysadmin, since he couldn't keep track of all system command events executed by users. For instance sometimes an unprivilegd user might be responsible for executing a malicious code which crashes or breaks your server.
This is especially unpleasent, because you will find your system crashed and if it's not some of the system services that causes the issue you won’t even be able to identify which of all the users is the malicious user account and respectively the code excecuted which fail the system to the ground.
In this post I will try to tell you a basic ways that some malevolent users might use to hide their bash history from the system administrator.
I will also discuss a few possible ways to assure your users .bash_history keeps intact and possibly the commands executed by your users gets logged in in their.
The most basic way that even an unexperienced shell user will apply if he wants to prevent his .bash_history from sys admins review would be of directly wiping out the .bash_history file from his login account or alternatively emptying it with commands like:

malicious-user@server:~$ rm -f. bash_history
ormalicious-user@server:~# cat /dev/null > ~/.bash_history

In order to prevent this type of attack against cleaning the .bash_history you can use the chattr command.
To counter attack this type of history tossing method you can set your malicious-user .bash_history’s file the (append only flag) with chattr like so:

root@server:~# cd /home/malicious-user/
root@server:~# chattr +a .bash_history

It’s also recommended that the immunable flag is placed to the file ~/.profile in user home

root@server:~# chattr +i ~/.profile

It would be probably also nice to take a look at all chattr command attributes since the command is like swiss army knife for the Linux admin:
Here is all available flags that can be passed to chattr
append only (a)
compressed (c)
don~@~Yt update atime (A)
synchronous directory updates (D)
synchronous updates (S)
data journalling (j)
no dump (d)
top of directory hierarchy (T)
no tail-merging (t)
secure deletion (s)
undeletable (u)
immutable (i)

It’s also nice that setting the “append only” flag in to the user .bash_history file prevents the user to link the .bash_history file to /dev/null like so:

malicious-user@server:~$ ln -sf /dev/null ~/.bash_history
ln: cannot remove `.bash_history': Operation not permitted

malicious-user@server:~$ echo > .bash_history
bash: .bash_history: Operation not permitted

However this will just make your .bash_history append only, so the user trying to execute cat /dev/null > .bash_history won’t be able to truncate the content of .bash_history.

Unfortunately he will yet be able to delete the file with rm so this type of securing your .bash_history file from being overwritten is does not completely guarantee you that user commands will get logged.
Also in order to prevent user to play tricks and escape the .bash_history logging by changing the default bash shell variables for HISTFILE an d HISTFILESIZE, exporting them either to a different file location or a null file size.
You have to put the following bash variables to be loaded in /etc/bash.bashrc or in /etc/profile
# #Prevent unset of histfile, /etc/profile
HISTFILE=~/.bash_history
HISTSIZE=10000
HISTFILESIZE=999999
# Don't let the users enter commands that are ignored# in the history file
HISTIGNORE=""
HISTCONTROL=""
readonly HISTFILE
readonly HISTSIZE
readonly HISTFILESIZE
readonly HISTIGNORE
readonly HISTCONTROL
export HISTFILE HISTSIZE HISTFILESIZE HISTIGNORE HISTCONTROL

everytime a user logs in to your Linux system the bash commands above will be set.
The above tip is directly taken from Securing debian howto which by the way is quite an interesting and nice reading for system administrators 🙂

If you want to apply an append only attribute to all user .bash_history to all your existing Linux server system users assuming the default users directory is /home in bash you can execute the following 1 liner shell code:

#Set .bash_history as attr +a
2. find /home/ -maxdepth 3|grep -i bash_history|while read line; do chattr +a "$line"; done

Though the above steps will stop some of the users to voluntary clean their .bash_history history files it won’t a 100% guaranttee that a good cracker won’t be able to come up with a way to get around the imposed .bash_history security measures.

One possible way to get around the user command history prevention restrictions for a user is to simply using another shell from the ones available on the system:
Here is an example:

malicious-user:~$ /bin/csh
malicious-user:~>

csh shell logs by default to the file .history

Also as far as I know it should be possible for a user to simply delete the .bash_history file overwritting all the .bash_history keep up attempts up-shown.
If you need a complete statistics about accounting you’d better take a look at The GNU Accounting Utilities

In Debian the GNU Accounting Utilities are available as a package called acct, so installation of acct on Debian is as simple as:

debian:~# apt-get install acct

I won’t get into much details about acct and would probably take a look at it in my future posts.
For complete .bash_history delete prevention maybe the best practice is to useg grsecurity (grsec)

Hopefully this article is gonna be a step further in tightening up your Server or Desktop Linux based system security and will also give you some insight on .bash_history files 🙂 .

Alternative way to enter as administrator in MySQL if you forgot MySQL root password on Debian Linux

Wednesday, July 10th, 2013

Forgot MySQL password root alternative way to enter as administrator in MyQL MySQL logo with 2 dolphins

Whether you have to administrate a bunch of chaotic organized MySQL servers and amount of work is more than you can bear it is very common you make stupid mistakes, like loosing MySQL root adminsitrator password. There is way to recover password by stopping SQL server and starting it with –skip-grant-tables options via SSH , however if you do it that way there is at least few seconds of down time and as its not a good idea on productive servers Debian and Ubuntu Linux admins have better way to do it by using MySQL default user used to check whether all is fine with database on MySQL server initialization via /etc/init.d/mysql. User with GRANT PRIVILEGES, (all MySQL administrator users have grant privileges) on Debian based distributions is debian-sys-maint and whether you have root access to server you can easily obtain password with:

# grep -i -E 'user|pass' /etc/mysql/debian.cnf |uniq

user = debian-sys-maint

password = k6x6tBUBfHN3ZxHv

Using this password then you can login via mysql cli or via PhpMyAdmin, whether installed and do any normal SQL operation you do as root. Of course having this password in plain text file can be very dangerous, by default it is configured to be only red by root be careful not to change this permissions by default as anyone who has access to system can then access your SQL as administrator.
To reset MySQL root password once logged in run:

UPDATE USER set password=PASSWORD('NEW_PASS_WORD') where USER='root';
FLUSH PRIVILEGES;

Enjoy 😉
 

How to change mail sent from in Nagios on Debian GNU/Linux 6

Wednesday, August 24th, 2011

I’ve been playing with configuring a new nagios running on a Linux host which’s aim is to monitor few Windows servers.
The Linux host’s exim is configured to act as relay host to another SMTP server, so all email ending up in the Linux localhost on port 25 is forwarded to the remote SMTP.

The remote smtp only allows the Linux to send email only in case if a real existing username@theserverhostname.com is passed it, otherwise it rejects mail and does not sent properly the email.
As the newly configured Nagios installatio is supposed to do e-mail notification, I was looking for a way to change the default user with which Nagios sends mails, which is inherited directly after the username with which /usr/sbin/nagios3 and /usr/sbin/nrpe are running (on Debian this is nagios@theserverhostname.com).

Thanksfully, there is a work around, I’ve red some forum threads explaning that the username with whch nagios sends mail can be easily changed from /etc/nagios3/commands.cfg by passing the -a “From: custom_user@myserverhostname.com” to all occurance of /usr/bin/mail -s , its preferrable that the -a custom_user@myserverhostname.com is inserted before the -s “” subject option. Hence the occurance of mail command should be changed from:

| /usr/bin/mail -s "** $NOTIFICATIONTYPE$

To:

| /usr/bin/mail -a "From: custom_user@theserverhostname.com" -s "** $NOTIFICATIONTYPE$

Now to read it’s new configurations nagios requirs restart:

debian:~# /etc/init.d/nagios3 restart
...

Now in case of failed services or Hosts Down nagios will send it’s mail from the custom user custom_user@theserverhostname.com and nagios can can send mail properly via the remote relay SMTP host 😉