Posts Tagged ‘setting’

Enable Debian Linux automatic updates to keep latest OS Patches / Security Up to Date

Monday, January 13th, 2025

Enable Debian Linux automatic updates to keep latest OS Patches / Security Up to Date

Debian: Entenda a Importância Para o Mundo GNU/LINUX

I'm not a big fan of automatism on GNU / Linux as often using automatic updates could totally mess things especially with a complex and a bit chatic OS-es like is Linux nowadays. 
Nevertheless as Security is becoming more and more of a problem especially the browser security, having a scheduled way to apply updates like every normal modern Windows and MAC OS as an option is becoming essential to have a fully manageble Operating system.

As I use Debian GNU / Linux for desktop for my own personal computer and I have already a lot of Debian servers, whose OS minor level and package version maintenance takes up too big chunk of my time (a time I could dedicated to more useful activities). Thus I found it worthy at some cases to trigger Debian's way to keep the OS and security at a present level, the so called Debian "unattended upgrades".

In this article, I'll explain how to install and Enable Automatic (" Unattended " ) Updates on Debian, with the hope that other Debian users might start benefiting from it.
 

Pros of  enabling automatic updates, are:

  • Debian OS Stay secure without constant monitoring.
  • You Save much time by letting your system handle updates.
  • Presumably Enjoying more peace of mind, knowing your system is more protected.

Cons of enabling automatic updates:

  • Some exotic and bad maintained packages (might break after the update)
  • Customizations made on the OS /etc/sysctl.conf or any other very custom server configs might disappear or not work after the update
  • At worst scenario (a very rare but possible case) OS might fail to boot after update 🙂

Regular security updates patch vulnerabilities that could otherwise be exploited by attackers, which is especially important for servers and systems exposed to the internet, where threats evolve constantly.

1. Update Debian System to latest

Before applying automatic updates making any changes, run apt to update package lists and upgrade any outdated packages,to have automatic updates for a smooth configuration process.

# apt update && apt upgrade -y

2. Install the Unattended-Upgrades deb Package 

# apt install unattended-upgrades -y

Reading package lists… Done
Building dependency tree… Done
Reading state information… Done
The following additional packages will be installed:
  distro-info-data gir1.2-glib-2.0 iso-codes libgirepository-1.0-1 lsb-release python-apt-common python3-apt python3-dbus python3-distro-info python3-gi
Suggested packages:
  isoquery python-apt-doc python-dbus-doc needrestart powermgmt-base
The following NEW packages will be installed:
  distro-info-data gir1.2-glib-2.0 iso-codes libgirepository-1.0-1 lsb-release python-apt-common python3-apt python3-dbus python3-distro-info python3-gi unattended-upgrades
0 upgraded, 11 newly installed, 0 to remove and 0 not upgraded.
Need to get 3,786 kB of archives.
After this operation, 24.4 MB of additional disk space will be used.
Do you want to continue? [Y/n]


# apt install apt-listchanges
Reading package lists… Done
Building dependency tree… Done
Reading state information… Done
The following package was automatically installed and is no longer required:
  linux-image-5.10.0-30-amd64
Use 'apt autoremove' to remove it.
The following additional packages will be installed:
  python3-debconf
The following NEW packages will be installed:
  apt-listchanges python3-debconf
0 upgraded, 2 newly installed, 0 to remove and 0 not upgraded.
Need to get 137 kB of archives.
After this operation, 452 kB of additional disk space will be used.
Do you want to continue? [Y/n]
Get:1 http://deb.debian.org/debian bookworm/main amd64 python3-debconf all 1.5.82 [3,980 B]
Get:2 http://deb.debian.org/debian bookworm/main amd64 apt-listchanges all 3.24 [133 kB]
Fetched 137 kB in 0s (292 kB/s)
Preconfiguring packages …
Deferring configuration of apt-listchanges until /usr/bin/python3
and python's debconf module are available
Selecting previously unselected package python3-debconf.
(Reading database … 84582 files and directories currently installed.)
Preparing to unpack …/python3-debconf_1.5.82_all.deb …
Unpacking python3-debconf (1.5.82) …
Selecting previously unselected package apt-listchanges.
Preparing to unpack …/apt-listchanges_3.24_all.deb …
Unpacking apt-listchanges (3.24) …
Setting up python3-debconf (1.5.82) …
Setting up apt-listchanges (3.24) …

Creating config file /etc/apt/listchanges.conf with new version


Example config for apt-listchanges would be like:

# vim /etc/apt/listchanges.conf
[apt]
frontend=pager
email_address=root
confirm=0
save_seen=/var/lib/apt/listchanges.db
which=both

3. Enable Automatic unattended upgrades

Once installed, enable automatic updates with the following command, which will prompt asking if you want to enable automatic updates. Select Yes and press Enter, which will confirm that the unattended-upgrades service is active and ready to manage updates for you.

# dpkg-reconfigure unattended-upgrades

Configure-Unattended-Upgrades-on-Debian_Linux-dpkg-reconfigure-screenshot

Or non-interactively by running command:

# echo unattended-upgrades unattended-upgrades/enable_auto_updates boolean true | debconf-set-selections
dpkg-reconfigure -f noninteractive unattended-upgrades


4. Set the Schedule for Automatic Updates on Debian

By default, unattended-upgrades runs daily, to verify or modify the schedule, check the systemd timer:

# sudo systemctl status apt-daily.timer
# sudo systemctl status apt-daily-upgrade.timer
# systemctl edit apt-daily-upgrade.timer

Current apt-daily.timer config as of Debian 12 (bookworm) is as follows

root@haproxy2:/etc/apt/apt.conf.d# cat  /lib/systemd/system/apt-daily.timer
[Unit]
Description=Daily apt download activities

[Timer]
OnCalendar=*-*-* 6,18:00
RandomizedDelaySec=12h
Persistent=true

[Install]
WantedBy=timers.target
root@haproxy2:/etc/apt/apt.conf.d#


# systemctl edit apt-daily-upgrade.timer

[Timer]
OnCalendar=
OnCalendar=03:00
RandomizedDelaySec=0


At Line  num 2 above is needed to reset (empty) the default value shown below in line  num 5.
Line 4 is needed to prevent any random delays coming from the defaults.


Now both timers should be active, if not, activate them with:

# systemctl enable –now apt-daily.timer
# systemctl enable –now apt-daily-upgrade.timer


These timers ensure that updates are checked and applied regularly, without manual intervention.

5.Test one time Automatic Updates on Debian works

To ensure everything is working, simulate an unattended upgrade with a dry run:

# unattended-upgrade –dry-run


You can monitor automatic updates by checking the logs.

# less /var/log/unattended-upgrades/unattended-upgrades.log

Log shows details of installed updates and any issues that occurred. Reviewing logs periodically can help you ensure that updates are being applied correctly and troubleshoot any problems.

6. Advanced Configuration Options

If you’re a power user or managing multiple systems, you might want to explore these additional settings in the configuration file:

# vim /etc/apt/apt.conf.d/50unattended-upgrades


Configure unattended-upgrades to send you an email whenever updates are installed.

Unattended-Upgrade::Mail "your-email-address@email-address.com";


Enable automatic reboots after kernel updates
by adding the line:

Unattended-Upgrade::Automatic-Reboot "true";

To schedule reboots after package upgrade is applied  at a specific time:

Unattended-Upgrade::Automatic-Reboot-Time "02:00";

Specify packages you don’t want to be updated by editing the Unattended-Upgrade::Package-Blacklist section in the configuration file.


Here is alternative way to configure the unattended upgrade, by using apt configuration options:

# vim /etc/apt/apt.conf.d/02periodic

// Control parameters for cron jobs by /etc/cron.daily/apt-compat //


// Enable the update/upgrade script (0=disable)
APT::Periodic::Enable "1";


// Do "apt-get update" automatically every n-days (0=disable)
APT::Periodic::Update-Package-Lists "1";


// Do "apt-get upgrade –download-only" every n-days (0=disable)
APT::Periodic::Download-Upgradeable-Packages "1";


// Run the "unattended-upgrade" security upgrade script
// every n-days (0=disabled)
// Requires the package "unattended-upgrades" and will write
// a log in /var/log/unattended-upgrades
APT::Periodic::Unattended-Upgrade "1";


// Do "apt-get autoclean" every n-days (0=disable)
APT::Periodic::AutocleanInterval "21";


// Send report mail to root
//     0:  no report             (or null string)
//     1:  progress report       (actually any string)
//     2:  + command outputs     (remove -qq, remove 2>/dev/null, add -d)
//     3:  + trace on
APT::Periodic::Verbose "2";

If you have to simultaneously update multiple machines and you're on a limited connection line, configure download limits if you’re on a metered connection by setting options in /etc/apt/apt.conf.d/20auto-upgrades.

7. Stop Automatic Unattended Upgrade

Under some circumstances if it happens the unattended upgrades are no longer required and you want to revert back to manual package updates, to disable the updates you have to disable the unattended-upgrades service

# systemctl stop unattended-upgrades


8.  Stop an ongoing apt deb package set of updates applied on Debian server

Perhaps not often, but it might be you have run an automated upgrade and this has broke a server system or a service and for that reason you would like to stop the upcoming upgrade (some of whose might have started on other servers) immediately, to do so, the easiest way (not always safe thogh) is to kill the unattended-upgrades daemon.
 

# pkill –signal SIGKILL unattended-upgrades


Note that this a very brutal way to kill it and that might lead to some broken package update, that you might have to later fix manually.

If you have the unattended-upgrade process running on the OS in the process list backgrounded and you want to stop the being on the fly upgrade on the system more safely for the system, you can stop and cancel the ongoing apt upgrade  it by running the ncurses prompt interface, through dpkg-reconfigure

# dpkg-reconfigure unattended-upgrades


Then just select No, press Enter. In my case, this has promptly stopped the ongoing unattended upgrade that seemed blocked (at least as promptly as the hardware seemed to allow 🙂 ).

If you want to disable it for future, so it doesn't automatically gets enabled on next manual update, by some update script disable service as well.
 

# systemctl disable unattended-upgrades


Close up

That’s all ! Now, your Debian system will automatically handle security updates, keeping your system secure without you having to do a thing.
The same guide should be good for most Deb based distributions such as Ubuntu / Mint and there rest of other Debian derivative OS-es.
You’ve now set up a reliable way to ensure your system stays protected from vulnerabilities, but anyways it is a good practice to always login and check what the update has done to the system, otherwise expect the unexpected. 

How to install and use WSL 2 Windows native Linux emulation Debian and Ubuntu Linux on Windows 10 / Windows 11

Thursday, October 31st, 2024

start-with-wsl-windows-emulation-linux-install-and-use-easily-linux-and-windows-together-with-no-external-software-tux-penguin-logo

WSL (Windows Subsystem for Linux) is perhaps relatively rarely known to the old school sys admins rats who usually use stuff like QEMU / KVM for Windows or Virtualbox / VMWare for Host machine.
However most people most lileky heard but never used or heard about the native (container like) virtualization WSL which was introduced in Windows 10 and Windows 11  as an attempt from Microsoft to improve the interoperability between Windows and Linux.
WSL version 1 and ver 2 allows Microsoft Windows for using a Linux environment without the need for a separate virtual machine.

In Windows 10, it is existing in Windows 10 Professional version can be installed either by joining the Windows Insider program or manually via Microsoft Store or Winget.
Hence perhaps you don't know that WSL virtualization can be used by those who want to mix Linux and Windows or for example get an advantages against dual-boot (installing Linux and Windows on the same computer).
Even better most significant WSL pros is you can literally running both systems at the same time without the need to run or stop every software that’s running and reboot to another system.

Procedure to set up a WSL is simple and similar to setting up a real Linux OS, therefore this guide can also be used as a reference to Linux setup.The specifications of WSL setup procedure are mainly in Install WSL and then setup any packages you would like to use for example if you want to be able to access remotely the WSL emulated Debian / Ubuntu or other of the installable distros via OpenSSH server.

1. Requirements to install and use WSL Linux emulation

To have the wsl subsystem used on Windows 10 or Windows 11 requirements:

You must be running Windows 10 version 2004 and higher (Build 19041 and higher) or Windows 11 to use the commands below. If you are on earlier versions please see the manual install page.

2. List available installable Linux distributions
 

WSL subsystem has ported only a certain set of Linux distributions, so if you need a very specific and unique Linux distribution, you would perhaps need to use Hyper-V virtualization or Virtualbox / VMWare.
However for people like me who are mainly using Debian GNU / Linux on daily basis as well as some OracleLinux admins / SUSE it is a perfect solution.

PS C:\Windows\System32\WindowsPowerShell\v1.0> wsl –list –online
The following is a list of valid distributions that can be installed.
Install using 'wsl.exe –install <Distro>'.

NAME                            FRIENDLY NAME
Ubuntu                          Ubuntu
Debian                          Debian GNU/Linux
kali-linux                      Kali Linux Rolling
Ubuntu-18.04                    Ubuntu 18.04 LTS
Ubuntu-20.04                    Ubuntu 20.04 LTS
Ubuntu-22.04                    Ubuntu 22.04 LTS
Ubuntu-24.04                    Ubuntu 24.04 LTS
OracleLinux_7_9                 Oracle Linux 7.9
OracleLinux_8_7                 Oracle Linux 8.7
OracleLinux_9_1                 Oracle Linux 9.1
openSUSE-Leap-15.6              openSUSE Leap 15.6
SUSE-Linux-Enterprise-15-SP5    SUSE Linux Enterprise 15 SP5
SUSE-Linux-Enterprise-15-SP6    SUSE Linux Enterprise 15 SP6
openSUSE-Tumbleweed             openSUSE Tumbleweed


3. Install Linux distribution for a first time

PS C:\Windows\System32\WindowsPowerShell\v1.0> wsl –install

wsl2-windows-virtualization-install-virtual-machine-debian1

The default Linux distribution that will get installed inside WLS Virtlualization is Ubuntu.

4. Install Debian GNU / Linux distribution as a second distro


PS C:\Windows\System32\WindowsPowerShell\v1.0> wsl –install Debian

windows-wsl-linux-emulation/wsl2-windows-virtualization-install-virtual-machine-debian3

That second installed distro would make Debian now the default one to boot by WSL.

To run the fresh installed Debian GNU / Linux distribution, run only wsl command with no arguments.

# wsl


PS C:\Windows\System32\WindowsPowerShell\v1.0> wsl –set-version Debian 2
For information on key differences with WSL 2 please visit https://aka.ms/wsl2
Conversion in progress, this may take a few minutes.
The distribution is already the requested version.
Error code: Wsl/Service/WSL_E_VM_MODE_INVALID_STATE
PS C:\Windows\System32\WindowsPowerShell\v1.0> wsl –set-version 2
There is no distribution with the supplied name.
Error code: Wsl/Service/WSL_E_DISTRO_NOT_FOUND
PS C:\Windows\System32\WindowsPowerShell\v1.0>

Simply pressting CTRL + D from the actively running WSL emulated Linux (that is pretty much like a native Windows docker container if we have to compare to Linux) would stop the VM.
 

5. List runnable / installed VM Linux distributions
 

To list the available runnable Linux VMs on your Windows  status on Windows Subsystem for Linux:

PS C:\Windows\System32\WindowsPowerShell\v1.0> wsl –list –verbose
  NAME      STATE           VERSION
* Debian    Stopped         2
  Ubuntu    Stopped         2

PS C:\Windows\System32\WindowsPowerShell\v1.0>


6. Run and check recent installed Linux distribution version

wsl2-windows-virtualization-install-virtual-machine-debian4

To run the newly install Debian Virtualized Linux (which as you can see is the default set distribution to run by WSL virtualization) simply type 

PS C:\Windows\System32\WindowsPowerShell\v1.0> wsl

hipo@PC2LP3:/mnt/c/Windows/System32/WindowsPowerShell/v1.0$hipo@WL-2SLPWL3:/mnt/c/Windows/System32/WindowsPowerShell/v1.0$ cd ~
hipo@PC2LP3:~$


hipo@PC2LP3:~$ cat /etc/os-release
PRETTY_NAME="Debian GNU/Linux 12 (bookworm)"
NAME="Debian GNU/Linux"
VERSION_ID="12"
VERSION="12 (bookworm)"
VERSION_CODENAME=bookworm
ID=debian
HOME_URL="https://www.debian.org/"
SUPPORT_URL="https://www.debian.org/support"
BUG_REPORT_URL="https://bugs.debian.org/"
hipo@WL-2SLPWL3:~$


7. Update the Debian distribuion packages to latest available

hipo@PC2LP3:~$ sudo su – root
hipo@PC2LP3:~# apt update –fix-missing


8. Install openssh server to be able to connect to the WSL hosted Virtual Machine

hipo@PC2LP3:/home/hipo# apt install openssh-server –yes


windows-wsl-linux-emulation


root@PC2LP3:/home/hipo# systemctl start openssh-server telnet
System has not been booted with systemd as init system (PID 1). Can't operate.
Failed to connect to bus: Host is down
root@WL-2SLPWL3:/home/hipo# /etc/init.d/ssh start
Starting OpenBSD Secure Shell server: sshd.
root@WL-2SLPWL3:/home/hipo# ps -ef|grep -i ssh
root        30     9  0 18:19 ?        00:00:00 sshd: /usr/sbin/sshd [listener] 0 of 10-100 startups
root        32    15  0 18:20 pts/1    00:00:00 grep -i ssh


windows-wsl-linux-emulation

By default a fresh new installed VM would have a process list like below:

root@PC2LP3:/home/hipo# ps axuwef


wsl2-windows-virtualization-install-virtual-machine-debian7

To be able to have ifconfig and a number of other network tools it is useful to install net-tools package

root@PC2LP3:/home/hipo# apt install net-tools –yes

root@PC2LP3:/home/hipo# /sbin/ifconfig

Once the WSL VM and OpenSSHD is run you can try to telnet or ssh to the VM locally or remotely.

root@PC2LP3:/home/hipo# telnet localhost 22
Trying 127.0.0.1…
Connected to localhost.
Escape character is '^]'.
SSH-2.0-OpenSSH_9.2p1 Debian-2+deb12u3

9. Run commands directly from Windows command line or Powershell
 

You can also use the powershell to run commands via the virtualized Linux environment using simple syntax

# wsl [cmd-to-run]

PS C:\Windows\System32\WindowsPowerShell\v1.0> wsl ls /
bin   dev  home  lib    lost+found  mnt  proc  run   srv  tmp  var
boot  etc  init  lib64  media       opt  root  sbin  sys  usr
PS C:\Windows\System32\WindowsPowerShell\v1.0> wsl ps -ef
UID        PID  PPID  C STIME TTY          TIME CMD
root         1     0  0 18:07 hvc0     00:00:00 /init
root         5     1  0 18:07 hvc0     00:00:00 plan9 –control-socket 5 –log-level 4 –server-fd 6 –pipe-fd 8 –log-t
root         8     1  0 18:07 ?        00:00:00 /init
root         9     8  0 18:07 ?        00:00:00 /init
hipo        10     9  0 18:07 pts/0    00:00:00 ps -ef

PS C:\Windows\System32\WindowsPowerShell\v1.0>

10. Enable systemd on Linux distribution in WSL 2

Once you boot into the WSL installed distro shell edit /etc/wsl.conf:

$ vim /etc/wsl.conf

[boot]
systemd=true

11. Setting extra useful variables to boot the WSL emulated Linux VM 
 

root@debian-wsl:/home/hipo# cat /etc/wsl.conf
[boot]
systemd=true

# Automatically mount Windows drive when the distribution is launched
[automount]

# Set to true will automount fixed drives (C:/ or D:/) with DrvFs under the root directory set above. Set to false means drives won't be mounted automatically, but need to be mounted manually or with fstab.
enabled = true

# Sets the directory where fixed drives will be automatically mounted. This example changes the mount location, so your C-drive would be /c, rather than the default /mnt/c.
root = /

# DrvFs-specific options can be specified.
options = "metadata,uid=1003,gid=1003,umask=077,fmask=11,case=off"

# Sets the `/etc/fstab` file to be processed when a WSL distribution is launched.
mountFsTab = true

# Network host settings that enable the DNS server used by WSL 2. This example changes the hostname, sets generateHosts to false, preventing WSL from the default behavior of auto-generating /etc/hosts, and sets generateResolvConf to false, preventing WSL from auto-generating /etc/resolv.conf, so that you can create your own (ie. nameserver 1.1.1.1).
[network]
hostname = debian-wsl
generateHosts = true
generateResolvConf = true

# Set whether WSL supports interop processes like launching Windows apps and adding path variables. Setting these to false will block the launch of Windows processes and block adding $PATH environment variables.
[interop]
enabled = false
appendWindowsPath = false

# Set the user when launching a distribution with WSL.
[user]
default = hipo

# Set a command to run when a new WSL instance launches. This example starts the Docker container service.
#[boot]
#command = service docker start

root@debian-wsl:/home/hipo#

To learn about on Advanced settings configuration in WSL check out official Microsoft documentation here

12. Shutting down a running emulated Linux VM

If you have run a WSL VM and you want to shut it down do:

# wsl shutdown


If you at a point want to delete / uninstall the installed distribution you can do

# wsl –terminate Distro_Name
# wsl –uninstall Distro_Name


Or you if you want to do a cleanup of the stored files inside the installed distribution (if you have stored files), do:

# wsl –unregister Distro_Name


For more in depth details check out the manual
 

PS C:\Windows\System32\WindowsPowerShell\v1.0> wsl –help
Copyright (c) Microsoft Corporation. All rights reserved.
For privacy information about this product please visit https://aka.ms/privacy.

Usage: wsl.exe [Argument] [Options…] [CommandLine]

Arguments for running Linux binaries:

    If no command line is provided, wsl.exe launches the default shell.

    –exec, -e <CommandLine>
        Execute the specified command without using the default Linux shell.

    –shell-type <standard|login|none>
        Execute the specified command with the provided shell type.

    —
        Pass the remaining command line as-is.

Options:
    –cd <Directory>
        Sets the specified directory as the current working directory.
        If ~ is used the Linux user's home path will be used. If the path begins
        with a / character, it will be interpreted as an absolute Linux path.
        Otherwise, the value must be an absolute Windows path.

    –distribution, -d <Distro>
        Run the specified distribution.

    –user, -u <UserName>
        Run as the specified user.

    –system
        Launches a shell for the system distribution.

Arguments for managing Windows Subsystem for Linux:

    –help
        Display usage information.

    –debug-shell
        Open a WSL2 debug shell for diagnostics purposes.

    –install [Distro] [Options…]
        Install a Windows Subsystem for Linux distribution.
        For a list of valid distributions, use 'wsl.exe –list –online'.

        Options:
            –no-launch, -n
                Do not launch the distribution after install.

            –web-download
                Download the distribution from the internet instead of the Microsoft Store.

            –no-distribution
                Only install the required optional components, does not install a distribution.

            –enable-wsl1
                Enable WSL1 support.

    –manage <Distro> <Options…>
        Changes distro specific options.

        Options:
            –move <Location>
                Move the distribution to a new location.

            –set-sparse, -s <true|false>
                Set the vhdx of distro to be sparse, allowing disk space to be automatically reclaimed.

    –mount <Disk>
        Attaches and mounts a physical or virtual disk in all WSL 2 distributions.

        Options:
            –vhd
                Specifies that <Disk> refers to a virtual hard disk.

            –bare
                Attach the disk to WSL2, but don't mount it.

            –name <Name>
                Mount the disk using a custom name for the mountpoint.

            –type <Type>
                Filesystem to use when mounting a disk, if not specified defaults to ext4.

            –options <Options>
                Additional mount options.

            –partition <Index>
                Index of the partition to mount, if not specified defaults to the whole disk.

    –set-default-version <Version>
        Changes the default install version for new distributions.

    –shutdown
        Immediately terminates all running distributions and the WSL 2
        lightweight utility virtual machine.

    –status
        Show the status of Windows Subsystem for Linux.

    –unmount [Disk]
        Unmounts and detaches a disk from all WSL2 distributions.
        Unmounts and detaches all disks if called without argument.

    –uninstall
        Uninstalls the Windows Subsystem for Linux package from this machine.

    –update
        Update the Windows Subsystem for Linux package.

        Options:
            –pre-release
                Download a pre-release version if available.

    –version, -v
        Display version information.

Arguments for managing distributions in Windows Subsystem for Linux:

    –export <Distro> <FileName> [Options]
        Exports the distribution to a tar file.
        The filename can be – for stdout.

        Options:
            –vhd
                Specifies that the distribution should be exported as a .vhdx file.

    –import <Distro> <InstallLocation> <FileName> [Options]
        Imports the specified tar file as a new distribution.
        The filename can be – for stdin.

        Options:
            –version <Version>
                Specifies the version to use for the new distribution.

            –vhd
                Specifies that the provided file is a .vhdx file, not a tar file.
                This operation makes a copy of the .vhdx file at the specified install location.

    –import-in-place <Distro> <FileName>
        Imports the specified .vhdx file as a new distribution.
        This virtual hard disk must be formatted with the ext4 filesystem type.

    –list, -l [Options]
        Lists distributions.

        Options:
            –all
                List all distributions, including distributions that are
                currently being installed or uninstalled.

            –running
                List only distributions that are currently running.

            –quiet, -q
                Only show distribution names.

            –verbose, -v
                Show detailed information about all distributions.

            –online, -o
                Displays a list of available distributions for install with 'wsl.exe –install'.

    –set-default, -s <Distro>
        Sets the distribution as the default.

    –set-version <Distro> <Version>
        Changes the version of the specified distribution.

    –terminate, -t <Distro>
        Terminates the specified distribution.

    –unregister <Distro>
        Unregisters the distribution and deletes the root filesystem.
PS C:\Windows\System32\WindowsPowerShell\v1.0>

Once wsl is installed you can run it directly from Windows start menu, by searching for the name of the distribution you would like to run for example to run my Debian WSL running emulator::

Sum it up

What was shown up is how to run in parallel virtualized Linux distribution on Windows 10 and Windows 11 and how to install update to latest and run opensshd server to be able to ssh into the WSL Linux virtual machine remotely.
.Also i've shown you, How to test ssh is reachable and how to stop / start or destroy and cleanup any stored files for  VM if necessery, as well as how to apply some extra advanced configurations to boot VM for.

Using WSL is not the best virtualization ever but anyways it is an alternative for people employed in Domain attached Windows PCs part of Big Corporations, where VirtualBox use is blocked / prohibited and you still need to experiment or develop Shell scripts or software on Python / Perl / Ruby on Linux before you  do stuff on the PreProd or Production Linux host.

That's all folks, Enjoy ! 🙂
 

How to log every Linux executed command by every running system program to separte log via rsyslog for better server Security and audit trails

Wednesday, March 15th, 2023

snoopy-log-all-commands-on-linux-server-tux-logo

To keep a good eye on installed Debian Linux server security if you have to be PCI compliant (e.g. follow a high security) standards or you work in a company, where system security is crucial and any kind of security breach is untorrelated and in case of unexpected security holes exploited on running system processess listening on network peripherals (that malicious crackers) does to be able to easily identify what really happened e.g. do a Security RCA (Root Cause Analysis) for how this hack happened in order to mitigate it for future if possible capture the crackers and close the security hole the better, some kind of paranoid running program logging is required.

For such higher security systems, Linux / BSD / UNIX sysadmins can benefit from;

Snoopy command logger – a small library that logs all program executions on your Linux/BSD system.

Embedding snoopy into a running uptodate system is relatively easy, you either have to download the respective distribution package (in this particular article that would be Debian GNU / Linux) or for Linux distributions, that doesn't have the package integrated into the existing package repositories or externally available package repos, the code can be easily git cloned and installed from github snoopy program page following the README.md


However consider that snoopy run and logging the executed commands, make sure that if you use it you have rsyslogd configured to log to external logging server to make sure (someone did not manipulate the running system to avoid their actions being logged by snoopy, this is pointed by snoopy security disclaimer on the FAQ of official github snoopy project page, the page reads as so:

Security disclaimer
WARNING: Snoopy is not a reliable auditing solution.
Rogue users can easily manipulate environment to avoid their actions being logged by Snoopy. Consult this FAQ entry for more information.                


Most likely this warning is pointed out by the tool authors, in order to set the logging Tool creators free for any liability in case if someone uses the snoopy tool for some unauthorized logging
and sniffing of systems etc.

Before we proceed with the tool, install first for some clarity it is a good idea to know on what kind of Debian Linux you're about to install Snoopy command logger.

root@linux:~ # cat /etc/os-release
PRETTY_NAME="Debian GNU/Linux 11 (bullseye)"
NAME="Debian GNU/Linux"
VERSION_ID="11"
VERSION="11 (bullseye)"
VERSION_CODENAME=bullseye
ID=debian
HOME_URL="https://www.debian.org/"
SUPPORT_URL="https://www.debian.org/support"
BUG_REPORT_URL="https://bugs.debian.org/"


1. Prepare separate log file for snoopy that will keep log of every system command run by running processes visible by (ps -ef)

Next check the permissions user / group and read / write / executable flags with which the default generated rsyslog will be writting and set snoopy to whatever you would like it to write with

root@linux:~ # cat /etc/rsyslog.conf | grep "^\$File\|\$Umask"~
$FileOwner root
$FileGroup adm
$FileCreateMode 0640


Create Rsyslog configuration for snoopy.log

root@linux:~ # cat << EOF | sudo tee /etc/rsyslog.d/01-snoopy.conf
# Send snoopy messages to a dedicated logfile
if (\$programname startswith "snoopy") then {
  action(type="omfile" fileOwner="root" fileGroup="root" fileCreateMode="0600" file="/var/log/snoopy.log")
  stop
}

EOF


To make sure that snoopy library will be preloaded after installation on next boot:

root@linux:~ # cat << EOF | sudo debconf-set-selections
snoopy snoopy/install-ld-preload boolean true
EOF


root@linux:~ # systemctl restart rsyslog


root@linux:~ # systemctl status rsyslog
● rsyslog.service – System Logging Service
     Loaded: loaded (/lib/systemd/system/rsyslog.service; enabled; vendor preset: enabled)
     Active: active (running) since Tue 2023-03-14 12:59:05 EET; 59min ago
TriggeredBy: ● syslog.socket
       Docs: man:rsyslogd(8)
             man:rsyslog.conf(5)
             https://www.rsyslog.com/doc/
   Main PID: 713745 (rsyslogd)
      Tasks: 6 (limit: 4654)
     Memory: 1.1M
        CPU: 548ms
     CGroup: /system.slice/rsyslog.service
             └─713745 /usr/sbin/rsyslogd -n -iNONE

мар 14 12:59:05 haproxy2 systemd[1]: Started System Logging Service.
мар 14 12:59:05 haproxy2 rsyslogd[713745]: warning: ~ action is deprecated, consider using the 'stop' statement instead [v8.210>
мар 14 12:59:05 haproxy2 rsyslogd[713745]: [198B blob data]
мар 14 12:59:05 haproxy2 rsyslogd[713745]: imuxsock: Acquired UNIX socket '/run/systemd/journal/syslog' (fd 3) from systemd.  [>
мар 14 12:59:05 haproxy2 rsyslogd[713745]: [origin software="rsyslogd" swVersion="8.2102.0" x-pid="713745" x-info="https://www.>
мар 14 13:19:05 haproxy2 rsyslogd[713745]: — MARK —
мар 14 13:39:05 haproxy2 rsyslogd[713745]: — MARK —


2. Install snoopy deb package and configure it

root@linux:~ # apt install snoopy
Четене на списъците с пакети… Готово
Изграждане на дървото със зависимости… Готово
Четене на информацията за състоянието… Готово
Следните пакети са били инсталирани автоматично и вече не са необходими:
  bsdmainutils cpp-8 geoip-database libasan5 libbind9-161 libcroco3 libdns1104 libdns1110 libevent-core-2.1-6
  libevent-pthreads-2.1-6 libgdk-pixbuf-xlib-2.0-0 libgdk-pixbuf2.0-0 libgeoip1 libicu63 libisc1100 libisc1105 libisccc161
  libisccfg163 libisl19 liblwres161 libmpdec2 libmpx2 libperl5.28 libpython2-stdlib libpython2.7-minimal libpython2.7-stdlib
  libpython3.7-minimal libpython3.7-stdlib libreadline7 netcat-traditional node-ansi-align node-arrify node-bluebird
  node-boxen node-builtin-modules node-call-limit node-camelcase node-cli-boxes node-cliui node-co node-concat-stream
  node-config-chain node-cross-spawn node-cyclist node-decamelize node-decompress-response node-deep-extend node-detect-indent
  node-detect-newline node-duplexer3 node-duplexify node-editor node-end-of-stream node-errno node-execa node-find-up
  node-flush-write-stream node-from2 node-fs-vacuum node-get-caller-file node-get-stream node-got node-has-symbol-support-x
  node-has-to-string-tag-x node-import-lazy node-invert-kv node-is-buffer node-is-builtin-module node-is-npm node-is-object
  node-is-plain-obj node-is-retry-allowed node-is-stream node-isurl node-json-buffer node-kind-of node-latest-version
  node-lazy-property node-lcid node-libnpx node-locate-path node-lowercase-keys node-mem node-merge-stream node-mimic-fn
  node-mimic-response node-minimist node-mississippi node-node-uuid node-npm-run-path node-os-locale node-p-cancelable
  node-p-finally node-p-limit node-p-locate node-p-timeout node-package-json node-parallel-transform node-path-exists
  node-path-is-inside node-prepend-http node-proto-list node-prr node-pump node-pumpify node-qw node-rc
  node-registry-auth-token node-registry-url node-require-directory node-require-main-filename node-semver-diff node-sha
  node-shebang-command node-shebang-regex node-slide node-sorted-object node-stream-each node-stream-iterate node-stream-shift
  node-strip-eof node-strip-json-comments node-term-size node-through2 node-timed-out node-typedarray node-uid-number
  node-unpipe node-url-parse-lax node-url-to-options node-which-module node-widest-line node-wrap-ansi node-xdg-basedir
  node-xtend node-y18n node-yargs node-yargs-parser perl-modules-5.28 python-pkg-resources python2 python2-minimal python2.7
  python2.7-minimal python3.7-minimal

Използвайте „apt autoremove“ за да ги премахнете.
Следните НОВИ пакети ще бъдат инсталирани:
  snoopy
0 актуализирани, 1 нови инсталирани, 0 за премахване и 1 без промяна.
Необходимо е да се изтеглят 46,0 kB архиви.
След тази операция ще бъде използвано 124 kB допълнително дисково пространство.
Изт:1 http://deb.debian.org/debian bullseye/main amd64 snoopy amd64 2.4.12-1 [46,0 kB]
Изтеглени 46,0 kB за 0с (93,2 kB/сек)
Предварително настройване на пакети …


Selecting previously unselected package snoopy.
(Reading database … 56067 files and directories currently installed.)
Preparing to unpack …/snoopy_2.4.12-1_amd64.deb ...
Unpacking snoopy (2.4.12-1) …
Setting up snoopy (2.4.12-1) …
Processing triggers for libc-bin (2.31-13+deb11u5) …

root@linux:/etc# ls -al /var/log/snoopy.log
-rw——- 1 root root 14472 14 мар 13:40 /var/log/snoopy.log

Any specific configuration for snoopy can be tuned through /etc/snoopy.ini

Now you will find all the commands executed by all monitored running processes in /var/log/snoopy.

root@linux:/etc# tail -30 /var/log/snoopy.log
Mar 14 12:59:32 haproxy2 snoopy[713804]: [login:root ssh:(192.168.0.1 62796 192.168.0.210 22) sid:713792 tty:/dev/pts/2 (0/root) uid:root(0)/root(0) cwd:/]: ldconfig
Mar 14 12:59:32 haproxy2 snoopy[713806]: [login:zabbix ssh:((undefined)) sid:682168 tty:(none) ((none)/(none)) uid:zabbix(108)/zabbix(108) cwd:/]: who
Mar 14 12:59:32 haproxy2 snoopy[713807]: [login:zabbix ssh:((undefined)) sid:682168 tty:(none) ((none)/(none)) uid:zabbix(108)/zabbix(108) cwd:/]: wc -l
Mar 14 13:00:07 haproxy2 snoopy[713815]: [login:root ssh:((undefined)) sid:713815 tty:(none) ((none)/(none)) uid:root(0)/root(0) cwd:/usr/lib/sysstat]: /usr/lib/sysstat/sadc -F -L -S DISK 1 1 /var/log/sysstat
Mar 14 13:00:32 haproxy2 snoopy[713823]: [login:zabbix ssh:((undefined)) sid:682168 tty:(none) ((none)/(none)) uid:zabbix(108)/zabbix(108) cwd:/]: who
Mar 14 13:00:32 haproxy2 snoopy[713824]: [login:zabbix ssh:((undefined)) sid:682168 tty:(none) ((none)/(none)) uid:zabbix(108)/zabbix(108) cwd:/]: wc -l
Mar 14 13:01:32 haproxy2 snoopy[713834]: [login:zabbix ssh:((undefined)) sid:682168 tty:(none) ((none)/(none)) uid:zabbix(108)/zabbix(108) cwd:/]: who
Mar 14 13:01:32 haproxy2 snoopy[713835]: [login:zabbix ssh:((undefined)) sid:682168 tty:(none) ((none)/(none)) uid:zabbix(108)/zabbix(108) cwd:/]: wc -l
Mar 14 13:02:32 haproxy2 snoopy[713843]: [login:zabbix ssh:((undefined)) sid:682168 tty:(none) ((none)/(none)) uid:zabbix(108)/zabbix(108) cwd:/]: who
Mar 14 13:02:32 haproxy2 snoopy[713844]: [login:zabbix ssh:((undefined)) sid:682168 tty:(none) ((none)/(none)) uid:zabbix(108)/zabbix(108) cwd:/]: wc -l
Mar 14 13:03:32 haproxy2 snoopy[713855]: [login:zabbix ssh:((undefined)) sid:682168 tty:(none) ((none)/(none)) uid:zabbix(108)/zabbix(108) cwd:/]: who
Mar 14 13:03:32 haproxy2 snoopy[713856]: [login:zabbix ssh:((undefined)) sid:682168 tty:(none) ((none)/(none)) uid:zabbix(108)/zabbix(108) cwd:/]: wc -l
Mar 14 13:04:32 haproxy2 snoopy[713868]: [login:zabbix ssh:((undefined)) sid:682168 tty:(none) ((none)/(none)) uid:zabbix(108)/zabbix(108) cwd:/]: who


3. Set up logrotation (archiving) for snoopy logs

root@linux:/etc# vim /etc/logrotate.d/snoopy    


/var/log/snoopy.log {
        daily
        rotate 30
        compress
        delaycompress
        notifempty
        create 640 root adm

}
 

If you want to test logrotation without actually rotating the file:               

root@linux:/etc# logrotate –debug –force /etc/logrotate.d/snoopy   
  log needs rotating
rotating log /var/log/snoopy.log, log->rotateCount is 30
dateext suffix '-20230314'
glob pattern '-[0-9][0-9][0-9][0-9][0-9][0-9][0-9][0-9]'
previous log /var/log/snoopy.log.1 does not exist
renaming /var/log/snoopy.log.30.gz to /var/log/snoopy.log.31.gz (rotatecount 30, logstart 1, i 30),


renaming /var/log/snoopy.log.1.gz to /var/log/snoopy.log.2.gz (rotatecount 30, logstart 1, i 1),
renaming /var/log/snoopy.log.0.gz to /var/log/snoopy.log.1.gz (rotatecount 30, logstart 1, i 0),
log /var/log/snoopy.log.31.gz doesn't exist — won't try to dispose of it
renaming /var/log/snoopy.log to /var/log/snoopy.log.1
creating new /var/log/snoopy.log mode = 0640 uid = 0 gid = 4


4. Monitoring only selected applications  executed commands with snoopy                                                                             

By default snoopy after installed will set itself to monitor all kind of running processes on the system is done by preloading the ldconfig's (libcld.so.preload

root@haproxy2:/etc# cat /etc/ld.so.preload
/lib/x86_64-linux-gnu/libsnoopy.so

If you want to monitor a concrete application and not log everything from the running processes in process list, comment this out this line run ldconfig command

Then to any concrete application you would like to monitor with snoopy add to its init script either /etc/init.d/app_init_script or to systemctl's start script before the application binary program run:

export LD_PRELOAD=/lib/snoopy.so


  As per the README states


 Snoopy is placed in /etc/ld.so.preload to trap all occurrences of exec, if 
 you wish to monitor only certain applications you can do so through the    
 LD_PRELOAD environment variable.
Simply set it to /lib/snoopy.so before  loading the application.

For example

 # export LD_PRELOAD=/lib/snoopy.so                                           
 # lynx http://example.com/                           

 

Configure own Media streaming minidlna Linux server to access data from your Smart TV

Friday, February 18th, 2022

dlna-media-minidlna-server-linux-logo

If you happen to buy or already own or just have to install a Smart TV to be connected with a LAN Network to a Linux based custom built NAS (Network Attached Storage) server. You might benefit of the smart TV to Share and Watching the Disk Storage Pictures, Music, Video files from the NAS  to the Smart TV using the Media Server protocol.

You have certainly already faced the Media Server at your life on many locations in stores and Mall Buildings, because virtually any reoccuring advertisements, movies projected on the TVs, Kids entertainment or Floor and Buildings Room location schedules or timeline promition schedules are streamed using the Media Server protocol, for many years now. Thus having a brief idea about Media Server proto existence is foundamental stuff to be aware of for sysadmins and programmers.

Shortly about DLNA UPnP Media Streaming Protocol

Assuming that your Smart TV has been already connected to your Wireless Router 2.4Ghz or 5Ghz Wifi, one would think that the easiest way to share the files with the SmartTV is via something like a simple SAMBA Linux server via smb:// cifs:// protocols or via the good old NFS Server, however most of Samsung Smart TV and many other in year 2022 does not have embedded support for Samba SMB / CIFS Protocol but instead have support for the DLNA (Digital Living Network Alliance) streaming support. DLNA is part of the UPnP (Universal Plug and Play) Protocols, UPnP is also known to those using and familiar with Windows Operating Systems realm simply as UPnP AV Media server or Windows Media server.
Windows Media server for those who never heard it or used it 
 allows you to build a Playlists with Media files Video and Audio data files, that can be then later played remotely via a Local LAN or even long distance over TCP / IP remote side connected Internet network.
 

1. Set up and Stream data via Media server on  Windows PC / notebook with integrated Windows Media server 

Windows Media server configuration on Windows 7, 10 and 11 is a relatively easy to configure via:

Network and Sharing Center -> Media Streaming Options -> Turn on Media Streaming 


Then you have to define the name of the Media Library, configure whether Media server should show
on the Local Netework
for other conected devices and Allow or Block access from the other network present devices.


 2. Using a more advanced Media Server to get rid about the limitation of DLNA set of supported file codecs.
 

The Windows default embedded DLNA server is the easiest and fastest one to set up, but it’s not necessarily the best option.
Due to the way DLNA works, you can only stream certain types of media codecs supported by the server. If you have other types of media not defaultly supported and defined by DLNA win server, it just won’t work.

Thus thanksfully it was developed other DLNA servers improve this by offering real-time transcoding.
If you try to play an unsupported file, they’ll transcode it on-the-fly, streaming the video in a supported format to your DLNA device.
Just to name few of the DLNA Media Streaming servers that have supported for larger MPG Video, MP3 / MP4 and other Audio formats encodings,
you can try Plex or the Universal Media Server both of which are free to use under freeware license and have versions for Linux and Mac OS.


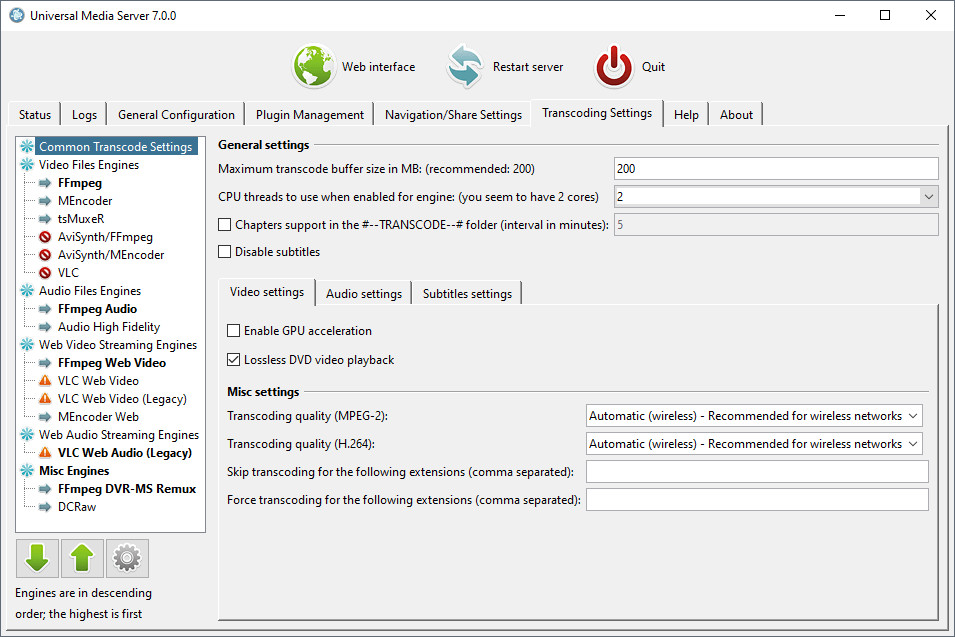
Universal_media_server-windows-screenshot-stream-media-data-on-network


3. Setting up a free as in freedom DLNA server MiniDLNA (ReadyMedia) on GNU / Linux


ReadyMedia (formerly known as MiniDLNA) is a simple media server software, with the aim of being fully compliant with DLNA/UPnP-AV clients. It was originally developed by a NETGEAR employee for the ReadyNAS product line.

MiniDNLA daemon serves media files (music, pictures, and video) to clients on a network. Linux Media servers clients you can use to test or scan your network for existent Media servers are multiple perhaps the most famous ones are applications such as totem (for QT users) and Kodi (for KDE).
The devices that can be used with minidlna are devices such as portable media players (iPod), Smartphones, Televisions, Tablets, and gaming systems (such as PS3 and Xbox 360) etc.
 

ReadyMedia is a simple, lightweight, the downside of it is It does not have a web interface for administration and must be configured by editing a text file. But for a simple Video streaming in most cases does a great job.


3.1 Install the minidlna software package 

Minidlna is available out of the box on most linux distributions (Fedora / CentOS / Debian / Ubuntu etc.) as of year 2022.

  • Install on Debian Linux (Deb based distro)

media-server:~# apt install minidlna –yes

  • Install on Fedora / CentOS (other RPM based distro)

media-server:~# yum install -y minidlna


3.2 Configure minidlna

– /etc/minidlna.conf – main config file
Open with text editor and set user= ,  media_dir= ,  port=, friendly_name= ,  network_interface= variables as minimum.
To be add minidlnad support symlinks to external file locations, set also wide_links=yes

media-server:~# vim /etc/minidlna.conf

#user=minidlna
user=root
media_dir=/var/www/owncloud/data
network_interface=eth0,eth1

# Port number for HTTP traffic (descriptions, SOAP, media transfer).
# This option is mandatory (or it must be specified on the command-line using
# "-p").
port=8200
# Name that the DLNA server presents to clients.
# Defaults to "hostname: username".
#friendly_name=
friendly_name=DLNAServer Linux
# set this to yes to allow symlinks that point outside user-defined media_dirs.
wide_links=yes
# Automatic discovery of new files in the media_dir directory.
#inotify=yes

Keep in mind that it is supported to provide separete media_dir and provide different USB / External Hard Drive or SD Card sources separated only by content be it Video, Audio or Pictures short named in config as (A,V,P).

media_dir=P,/media/usb/photos
media_dir=V,/media/external-disk/videos
media_dir=A,/media/sd-card/music

You might want to diasble / ineable the inotify depending on your liking, if you don't plan to place new files automated to the NAS and don't care to get indexed and streamed from the Media server you can disable it with inotify=no otherwise keep that on.

– /etc/default/minidlna – additional startup config to set minidlnad (daemon) options such as setup to run with admin superuser root:root 
(usually it is safe to leave it empty and set the user=root, whether needed straight from /etc/minidlna.conf
That's all now go on and launch the minidlna and enable it to automatically boot on Linux boot.

media-server:~# systemctl start minidlna
media-server:~# systemctl enable minidlna
media-server:~# systemctl status minidlna


3.3 Rebuilt minidlna database with data indexed files

If you need to re- generate minidlna's database.
To do so stop the minidlna server with the
 

media-server:~# systemctop stop minidlna


 command, then issue the following command (both commands should be run as root):

media-server:~# minidlna -R

Since this command might kept in the background and keep the minidlna server running with incorrect flags, after a minute or two kill minidlna process and relaunch the server via sysctl.

media-server:~#  killall -9 minidlna
media-server:~#  systemctl start minidlna


3.4 Permission Issues / Scanning issues

If you plan to place files in /home directory. You better have a seperate partition or folder *outside* your "home" directory devoted to your media. Default user with which minidlna runs is minidlna, this could prevent some files with root or other users being red. So either run minidlna daemon as root or as other user with whom all media files should be accessible.
If service runs as root:root, and still getting some scanning issues, check permissions on your files and remove special characters from file names.
 

media-server:~# tail -10 /var/log/minidlna/minidlna.log 
[2022/02/17 22:51:36] scanner.c:489: warn: Unsuccessful getting details for /var/www/owncloud/data/Videos/Family-Videos/FILE006.MPG
[2022/02/17 22:52:08] scanner.c:819: warn: Scanning /var/www/owncloud/data finished (10637 files)!
[2022/02/17 22:52:08] playlist.c:135: warn: Parsing playlists…
[2022/02/17 22:52:08] playlist.c:269: warn: Finished parsing playlists.
minidlna.c:1126: warn: Starting MiniDLNA version 1.3.0.
minidlna.c:1186: warn: HTTP listening on port 8200
scanner.c:489: warn: Unsuccessful getting details for /var/www/owncloud/data/admin/files/origin/External SD card/media/Viber Images/IMG-4477de7b1eee273d5e6ae25236c5c223-V.jpg
scanner.c:489: warn: Unsuccessful getting details for /var/www/owncloud/data/Videos/Family-Video/FILE006.MPG
playlist.c:135: warn: Parsing playlists…
playlist.c:269: warn: Finished parsing playlists.


3.5. Fix minidlna Inotify errors

In /etc/sysctl.conf 

Add:

fs.inotify.max_user_watches=65536

in a blank line at end of file and do 

media-server:~# sysctl -p

Debugging minidlna problems, index errors, warnings etc

minidlna does write by default to /var/log/minidlna/minidlna.log inspect the log closely and you should get most of the time what is wrong with it.
Note that some files might not get indexed because minidlna won't support the strange file codecs such as SWF encoding, if you have some important files to stream that are not indexed by minidlna, then install and try one of the more sophisticated free software Media Servers for Linux:

plex-media-streaming-server-screenshot

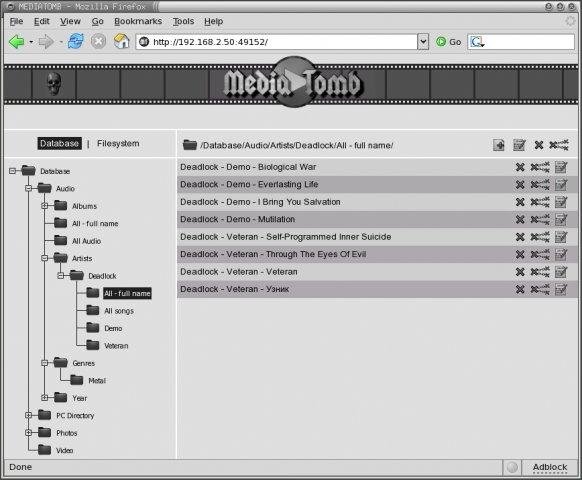
Note that most Linux users from my quick research shows, MediaTomb is the preferred advanced features Open Source Linux Media Server of choice for most of the guys.

mediatomb-linux-media-streaming-server-picture.jpg.webp


4. Test minidlna Linux servers works, getting information of other DLNA Servers on the network

media-server:~# lynx -dump  http://127.0.0.1:8200
MiniDLNA status

  Media library

   Audio files 0
   Video files 455
   Image files 10182

  Connected clients

   ID Type                   IP Address    HW Address        Connections
   0  Samsung Series [CDEFJ] 192.168.1.11  7C:0A:3D:88:A6:FA 0
   1  Generic DLNA 1.5       192.168.0.241 00:16:4E:1D:48:05 0
   2  Generic DLNA 1.5       192.168.1.18  00:16:3F:0D:45:05 0
   3  Unknown                127.0.0.1     FF:FF:FF:FF:FF:FF 0

   -1 connections currently open
 

Note that there is -1 connections (no active connections) currently to the server. 
The 2 Generic DLNA 1.5 IPs are another DLNA servers provided by a OpenXEN hosted Windows 7 Virtual machines, that are also broadcasting their existence in the network. The Samsung Series [CDEFJ] is the DLNA client on the Samsung TV found, used to detect and stream data from the just configured Linux dlna server.

The DLNA Protocol enabled devices on a network as you can see are quite easy to access, querying localhost on the 8200 server dumps, what minidlna knows, the rest of IPs connecting should not be able to receive this info. But anyways since the minidlna does not have a special layers of security to access it, but the only way to restrict is filtering the 8200 port, it is a very good idea to put a good iptables firewall on the machine to allow only the devices that should have access to the data.

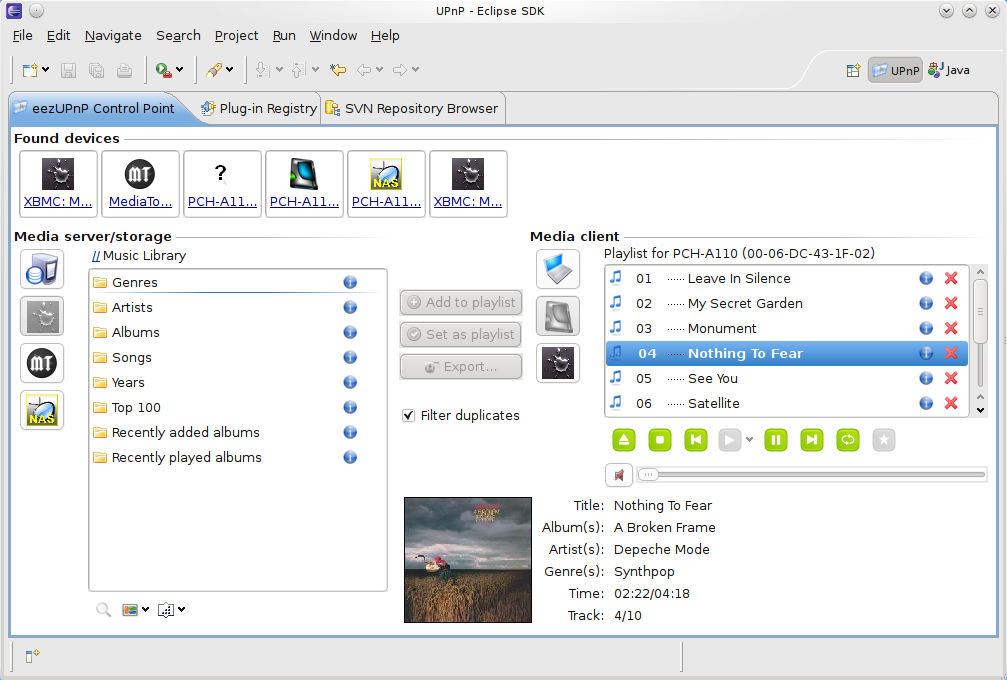
Further more if you happen to need to access the Media files on Linux from GUI you might use some client as upmentioned totem, VLC or if you need something more feature rich Java eezUPnP .

eeZUPnP-screenshot-java-client-for-media-server

That's all folks !
Enjoy your media on the TV 🙂

How to Create New Windows 10 NTFS Drive partition from new empty ( Unallocated ) space with Windows Disk Management or diskpart command

Thursday, November 18th, 2021

Windows-10-paritioning-with-disk-management-diskmgmt.msc

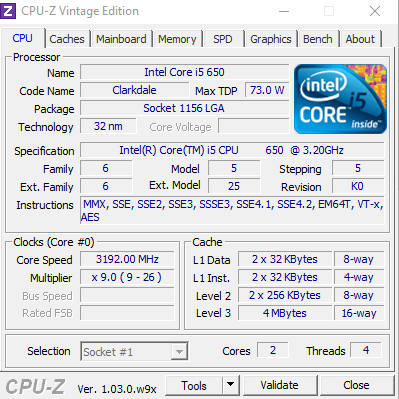
As mentioned in previous article, I've been setting up a new PC that is a bit old a 11 years old Lenovo ThinkCentre model M90P with 8 GB of Memory, Intel(R) Core(TM) i5 CPU         650  @ 3.20GHz   3.19 GHz, Intel Q57 Express Chipset.

After the installation was successful on the new Desktop PC attached SSD, I was curious to see how Windows detects the 521 GB Solid State Drive Samsung  Disk, as well as to assign all the SSD Disk space, so I don't have unused parts of the drive hanging around.

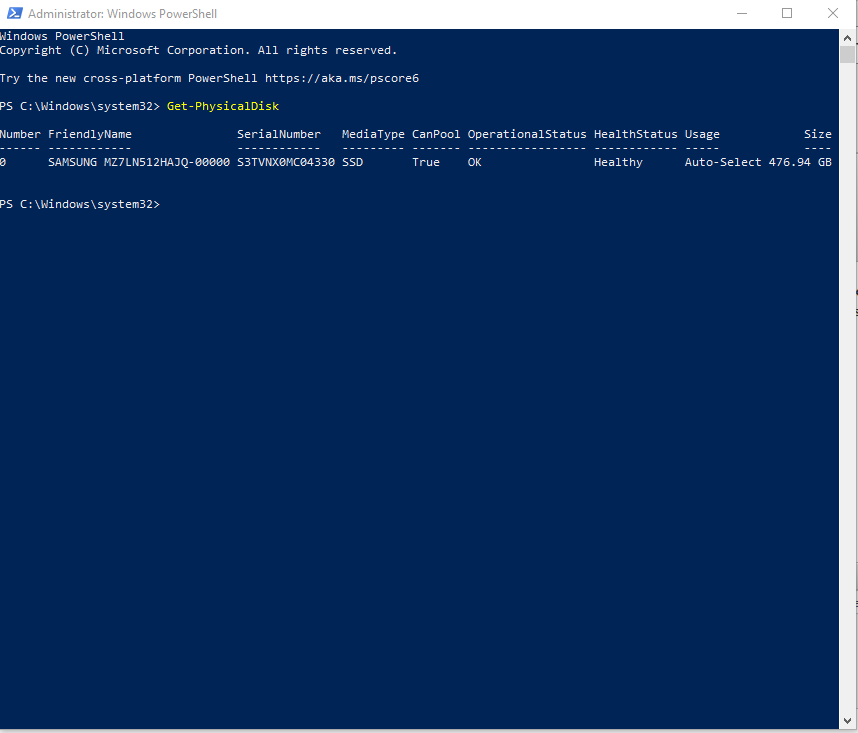
To get the exact type of SSD installed on the Lenovo ThinkCentre, it comes to a simple PowerShell command (note that the PowerShell command has to be executed as Administrator).


Windows PowerShell
Copyright (C) Microsoft Corporation. All rights reserved.

Try the new cross-platform PowerShell https://aka.ms/pscore6

PS C:\Windows\system32> Get-PhysicalDisk

Number FriendlyName               SerialNumber   MediaType CanPool OperationalStatus HealthStatus Usage            Size
—— ————               ————   ——— ——- —————– ———— —–            —-
0      SAMSUNG MZ7LN512HAJQ-00000 S3TVNX0MC04330 SSD       True    OK                Healthy      Auto-Select 476.94 GB


PS C:\Windows\system32>


PowerShell-Get-PhysicalDisk-command-print-exact-SSD-type-attached-to-a-Windows-computer 

During the Windows installation, I did installed Windows on a 110GB partition that was left behind from my attempt to copy another 120GB ssd drive as, I've described in my previous article.
Cause of that big part of the SAMSUNG MZ7LN512HAJQ-00000 SSD was left unpartitioned ( unallocated ) and respectively the space did not show in Windows, hence to work around this I was supposed to 
create new Windows Drive and format it either in VFAT (FAT32) or NTFS. Through the years when I had to do such an operations I often either booted from some bootCD and did the desired partitioning or if
partitioning had to be done on a LivePC without reboot, I've used Windows Partitioning Software, such as:

  • The Industry Standard Partition Manager ( Acronis Disk Director ) 
     
  • EaseUS Partition Manager


Using a Good partition manager is a great thing if some complicated partitioning operations needs to be done,  however for such a trivial stuff such as mine in that case – Creating a new NTFS filesystem from unallocated space is a bit of nonsense, thus this time I've decided to use the Windows Standard tool for Partitioinng
 

  • Disk Management

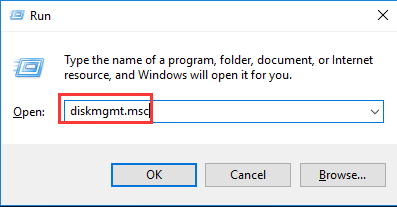
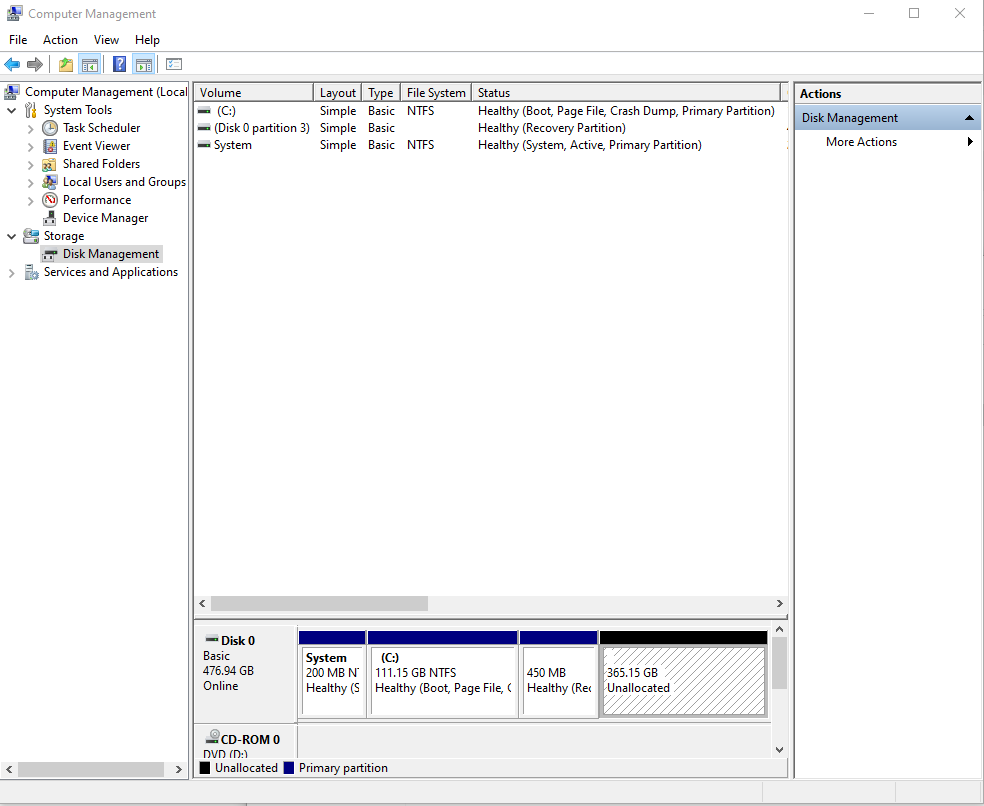
To run the tool you need to run Computer Management tool first either by just looking it up in the Search bar near Start menu (Windows 10 flag icon) or by invoking command line start window, by pressing together

Windows Button + R and runnining command:

C:\Users\Emilian> compmgmt.msc


From there on navigate to

Storage -> Disk Management

windows-computer-management-screenshot

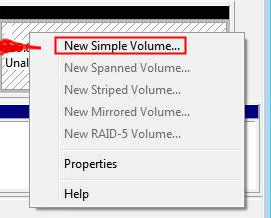
Go over box Unallocated (365.15 GB) and Press Right Mouse Button and select

-> New Simple Volume

new-simple-volume-screenshot

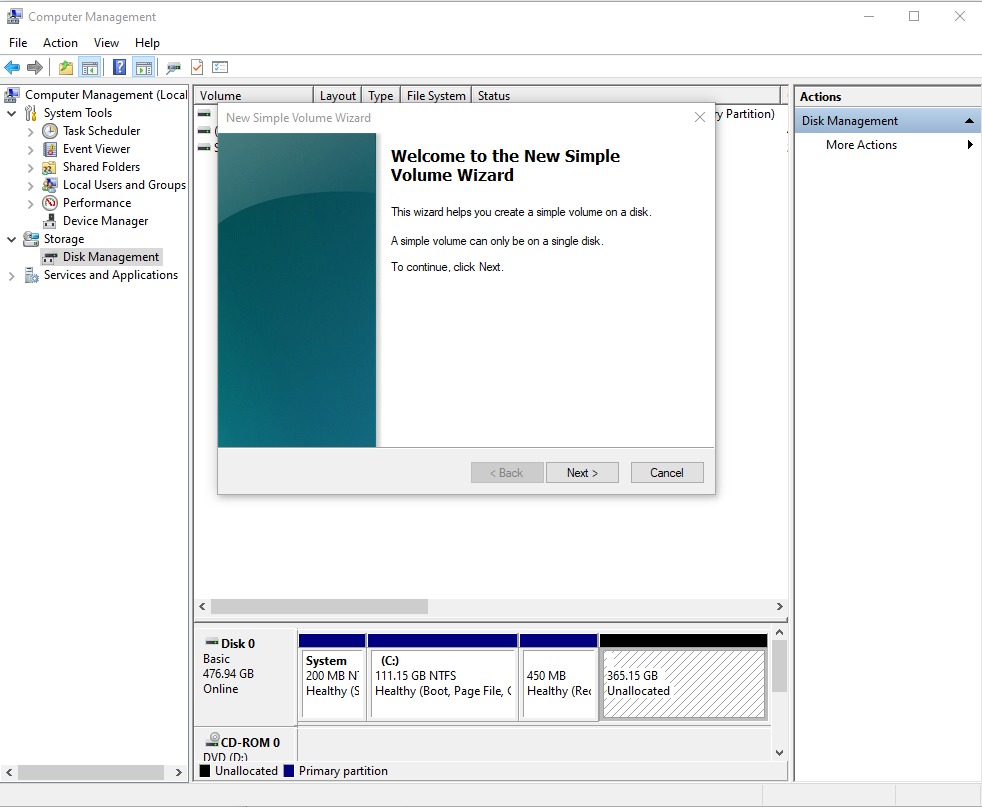
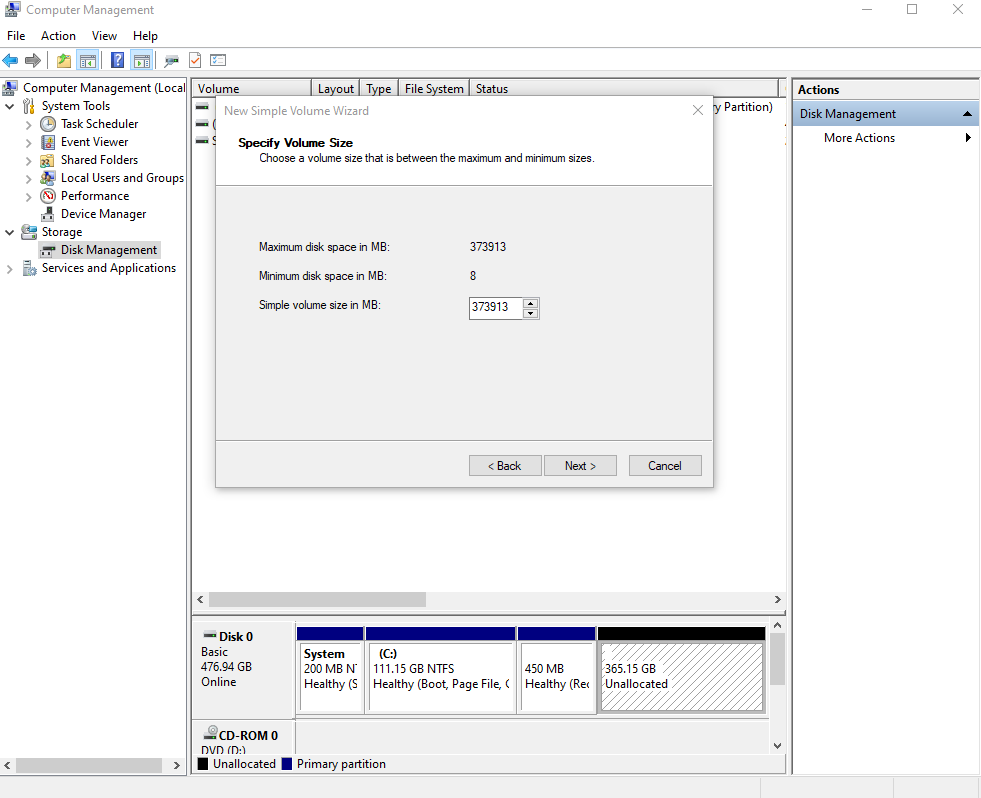
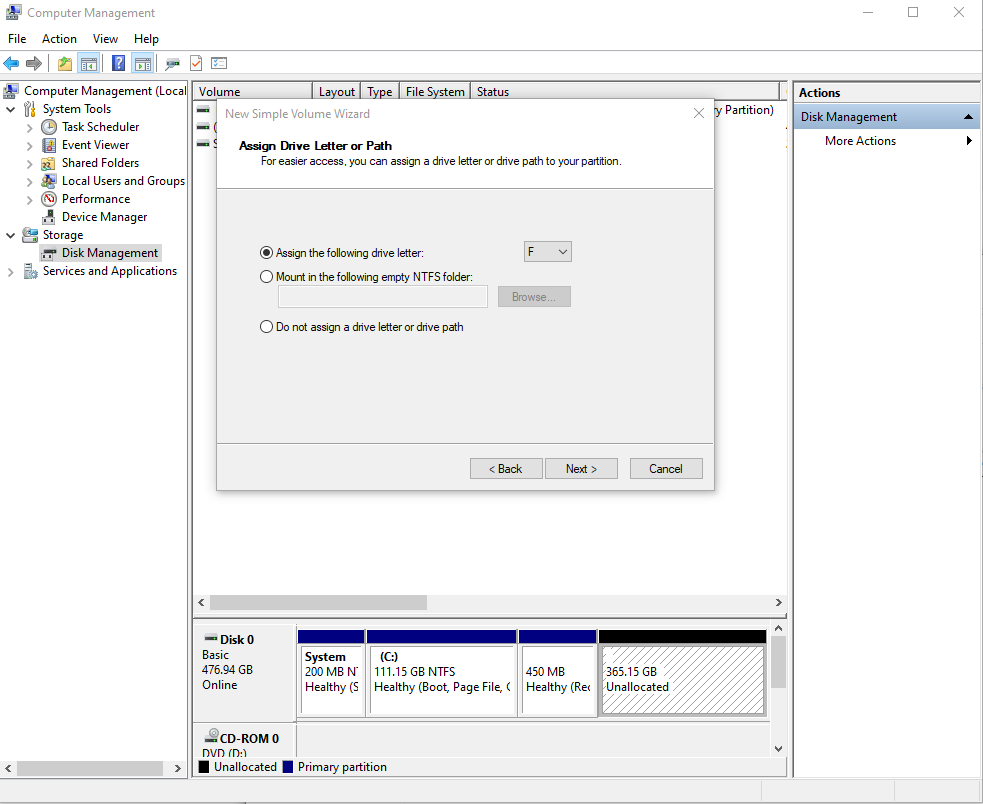
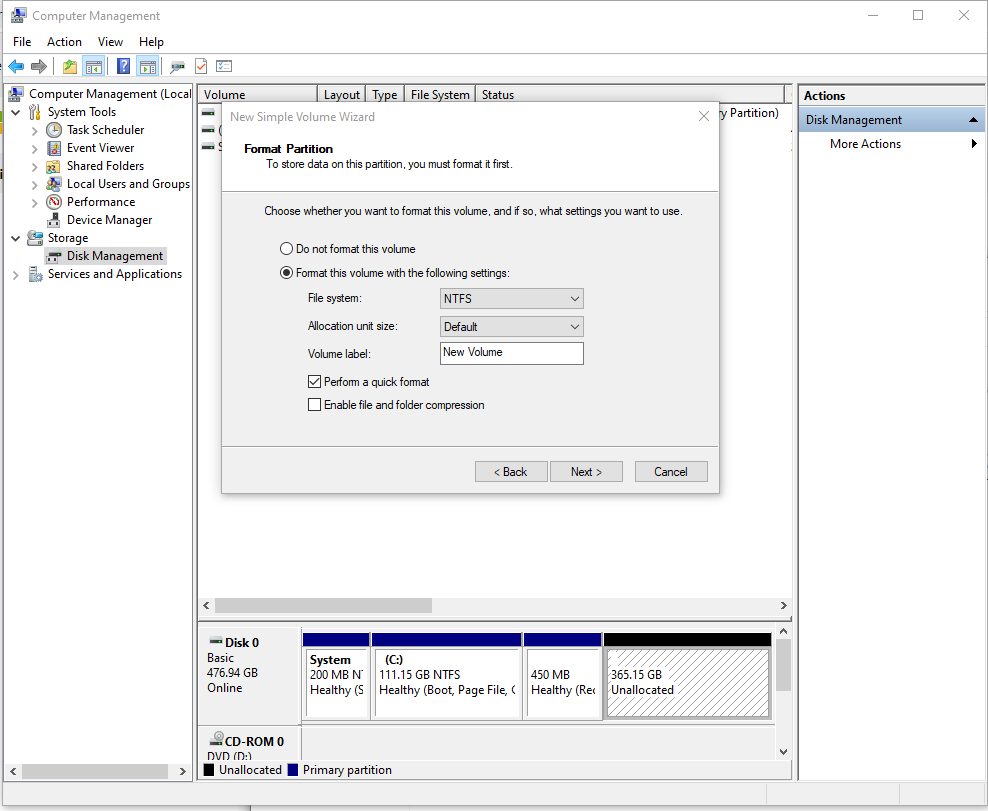
Next steps are quite self explanatory, had to just follow the New Simple Volme Wizard steps

windows-computer-management-screenshot

windows-computer-management-screenshot-3

windows-computer-management-screenshot-4

I Prefer to use NTFS because it is quicker and kinda of a standard since Windows 8+ onwards, besides that this computer will be used as a simple web browsing station and there is no plans the disk will ever have to be attached to a different OS like UNIX / LInux..However always keep in mind for compitability reasons VFAT Filesystem is usually not a bad idea. 

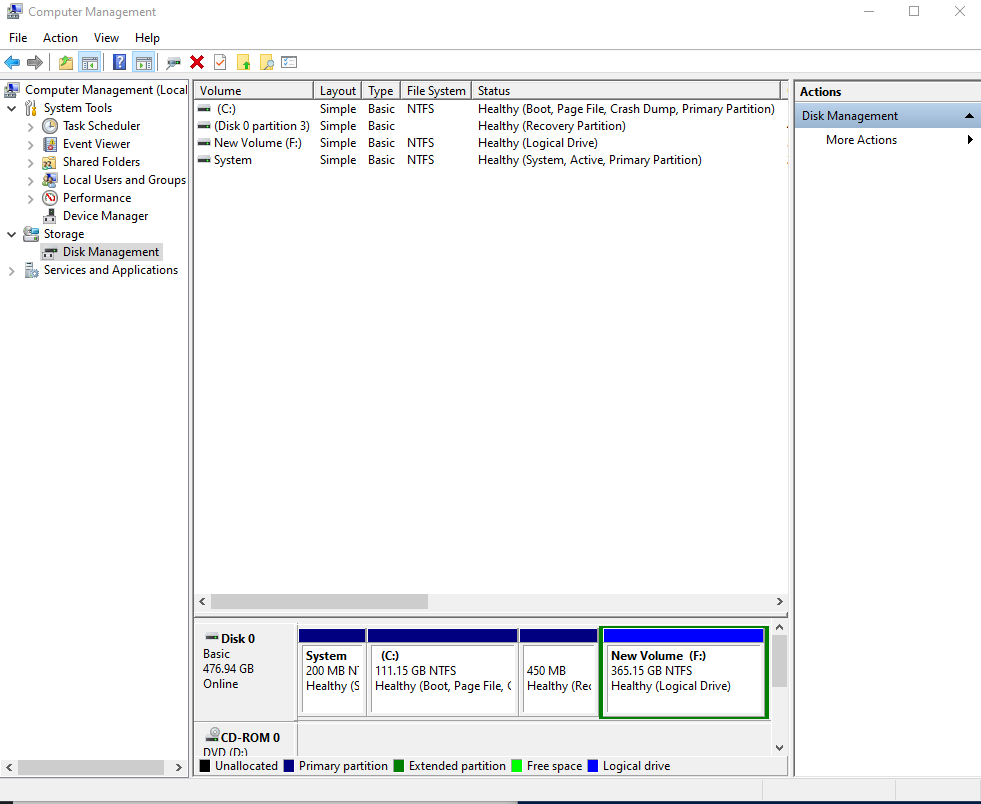
windows-computer-management-screenshot-5

https://www.pc-freak.net/images/new-ntfs-volume-F-drive-windows-10-screenshot

As you can see the drive is prepared and now accessible from Windows Explorer under Drive F:\. If you wonder why the drive is not D:\, it seems to create the D:\ the unallocated space is supposed to be be on a separate Disk which waas not the case with this PC setup.

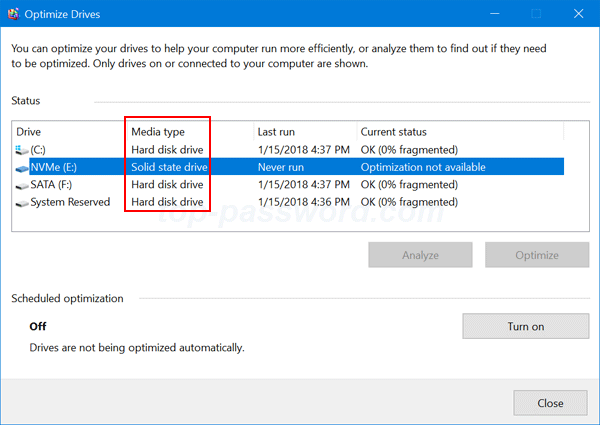
After installing the SSD drive and setting the proper partitions another good practice is to use Disk Defragmenter Win tool to optimize the Drives for speed. Another useful feature of disk degragmenter is you can use it to check what kind of hard drive you have installed e.g. SATA or SSD, as well as check if the installed SSD is NVME (Non-Volatile-Memory-Express), e.g. of a faster type.

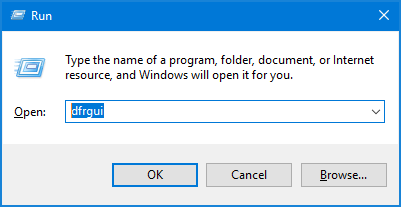
To run Disk Degrafmenter do  Win key + R


C:\Users\Emilian> dfrgui


dfrgui-command-screenshot-windows-1

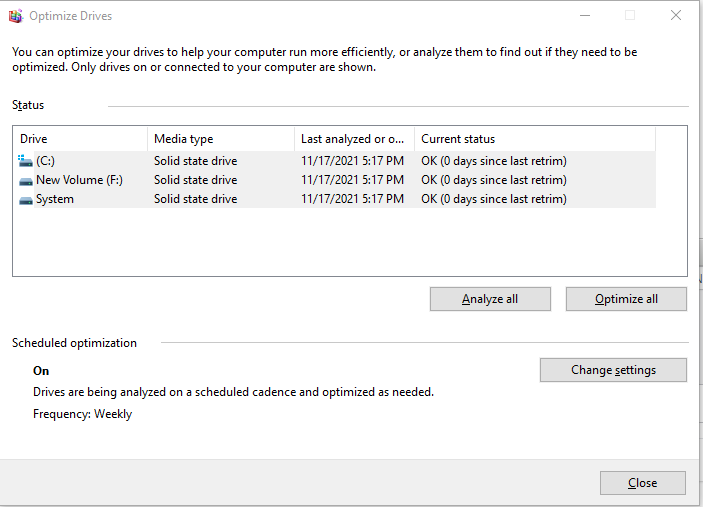
Below is what dfrgui reports on the ThinkCentre after running Disk Optimize for each Drive – (Optimize All) option.

dfrgui-partitions-on-lenovo-thinkcentre-windows-screeshot

Just to show you what you can see with dfrgui, here is the dfrgui screenshot from another PC that has attached both SATA disk and NVME SSD Drive.

dfrgui-command-screenshot-windows-2


How to do partitioning from Windows console with diskpart command (useful for scripting)


If you're coming from Linux world and you're pretty used to fdisk / cfdisk etc. to do partitioning daily, then you'll be most happy to hear about existence of the diskpart command in Windows, which is a kinda of an equivalent tool.
The tool is perfect for domain administrators which need to do some dynamic partitioning operations on multiple computers at once.

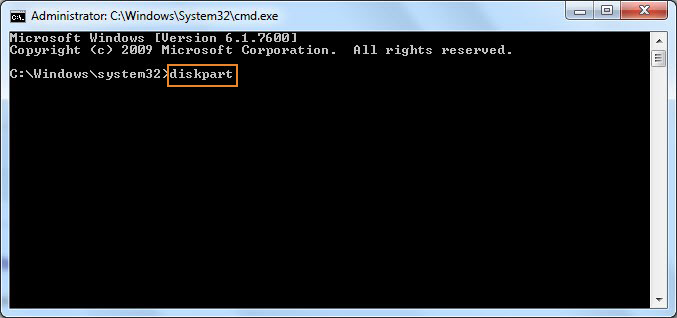
 To use diskpart you need Administrator command prompt, there is much you can do with diskpart, below is how to create another NTFS partition on a secondary

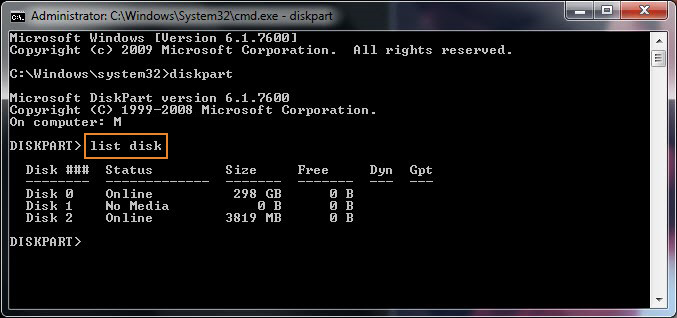
C:\Windows\System32> diskpart

diskpart-win-screenshot-1

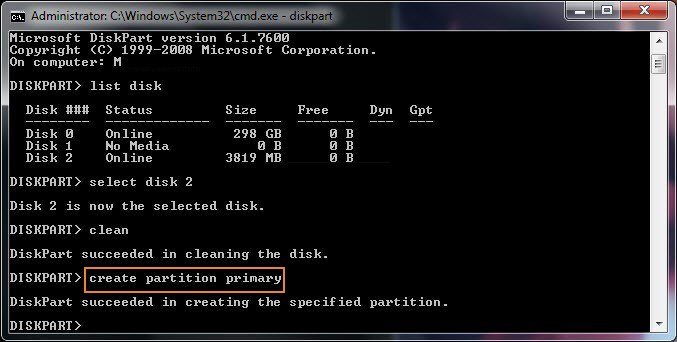
DISKPART> list disk

diskpart-win-screenshot-2

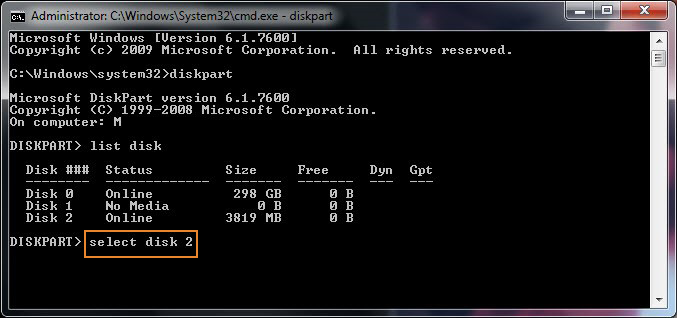
DISKPART> select disk 2

diskpart-win-screenshot-3

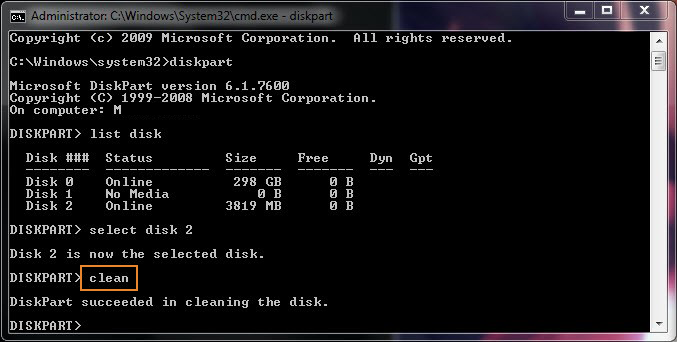
To clean all the content (e.g. delete everything on hard drive) e.g. all files and directories

!!! BEWARE NOT TO DELETE BY MISTAKE YOUR DATA DON'T BLAME ME IF YOU JUST COPY PASTE IRRESPONSIBLY WITHOUT THINKING.
AFTER ALL IT IS YOUR COMPUTER !!!

DISKPART> clean


diskpart-win-screenshot-4

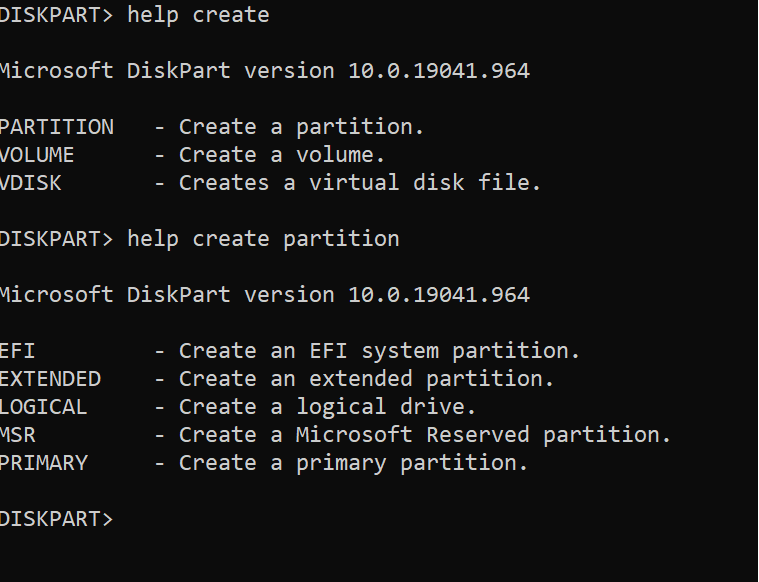
Next lets, create a partition, in below screenshot you can see how to use help and what are the supported partition types in Windows 10 as of year 2021.


/diskpart-help-create-partition-type-screenshot
 

DISKPART> create partition primary

diskpart-win-screenshot-6

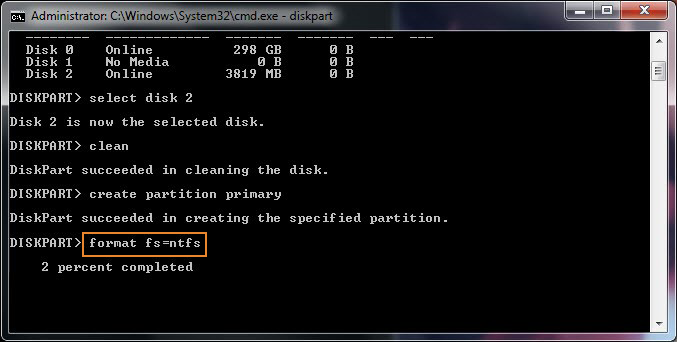
To format new assigned primary partition as NTFS

DISKPART> format fs=ntfs

diskpart-win-screenshot-7

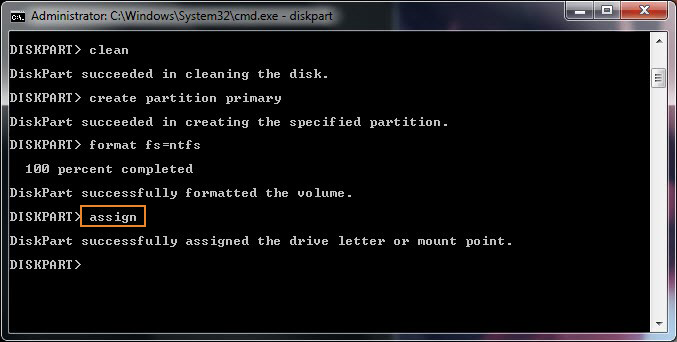
Once formatted to assign Drive letter that is the next available free one in order

DISKPART> assign


diskpart-win-screenshot-8

If instead of auto assigning a letter to new formatted partition, you would want to assign a specific Drive letter, lets say F:\> as it was in our case with the Graphical Windows Disk Management tool earlier in article.

DISKPART> assign letter=F


Using diskpart it is pretty easy to do much stuff from command line such as formatting a new attached empty unallocated drive, or formatting and setting a desired filesysteem of external attached Hard Drive. Note that the disk list arguments will list any externally attached Supported Storage and you can use disklist similarly to do quick format / repartition / wipe out data or whatever.

Further on just for fun I've run CPUID which is a great Windows freeware tool to report System Information, pretty much like the good old Everest such as exact CPU type, MainBoard, Graphics Card and Mainboard type of the certain hardware you have on running.

cpuid-screenshot-windows-10
 
That's all folks Hope this article, helped you learn something new.

Cheers 😉


Remove “Windows 7 PC is out of Support” annoying reoccuring warning popup alert

Friday, September 10th, 2021

Windows-7-End-of-life-pc-is-out-of-support-removal-rip-win-7

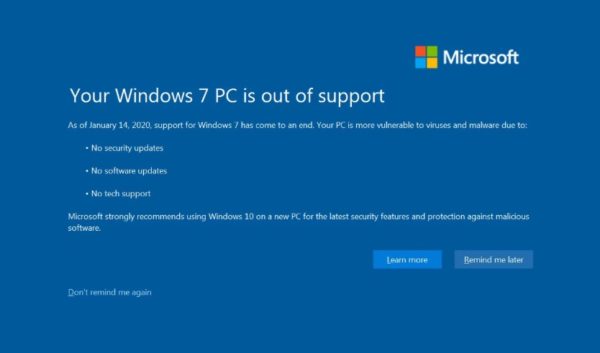
Since January 15th 2020, Windows 7 which reached its End of Life (EOL)  and is no longer Supported. Windows 7 Service Pack 1 Starter, Home Basic, Home Premium, and Professional installations will display the message


"Your Windows 7 PC is out of support".

The use of Windows 7, since 2020 is steadily declining but some hard core maniacs, who refuse to be in tune with latest fashion do still roll Windows 7 on dedicated VPS Servers (running on Xen / VMWare etc.).
With the reach of End of Support, people who still run Windows 7 have no longer the usual Operating system provided.

  • No security updates
  • No software updates
  • No tech support

Even though running End of Support system is quite dangerous and you might get hacked easily by autometed bot, still for some custom uses and if the Windows 7 Runs behind a solid firewall it could be considered relatively safe.

Microsoft hence made their Windows (remote controlled system) to have an annoying pop up window with the "YOUR WINDOWS 7 PC IS OUT OF SUPPORT" as shown in below screenshot:

windows-7-disable-pc-is-out-of-support-popup-annoying-message-screenshot.

For those who don't plan to migrate from Windows 7 to Windows 10, this message becomes quickly very annoying especially if you happen to access remotely your Windows 7 VPS and use it for simple things as browsing a few news websites or you're a marketer and you use the Windows for accessing Amazon / Ebay from a different country as many Marketers do to access General Webstores emulating access from a remote location. 


Disable "Your Windows 7 PC is out of support" popup alert
 

Luckily it is possible to disable this annoying Your Windows 7 pop-up alert by setting a value key in Windows Registry
DiscontinueEOS to 1.

To do so launch from Administrator command  line cmd.exe prompt (or start it from Windows start menu):

regedit

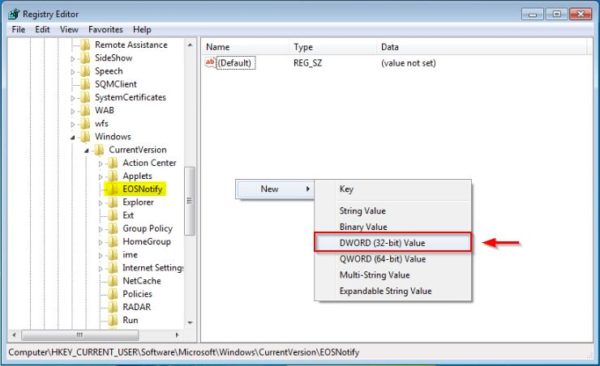
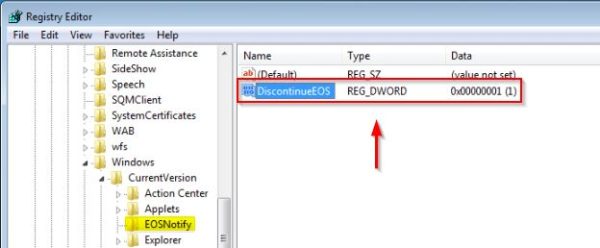
1. Open Windows Registry Editor and navigate to

HKEY_CURRENT_USER\Software\Microsoft\Windows\CurrentVersion\EOSNotify.

 You will need to set the DWORD DiscontinueEOS value to 1 in the Windows Registry
 

windows-7-disable-pc-is-out-of-support-popup-eosnotify-dword-registry-03-600x366

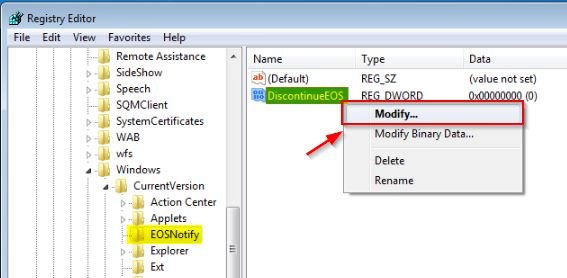
windows-7-disable-pc-is-out-of-support-popup-discontinueEOS-registry-modify

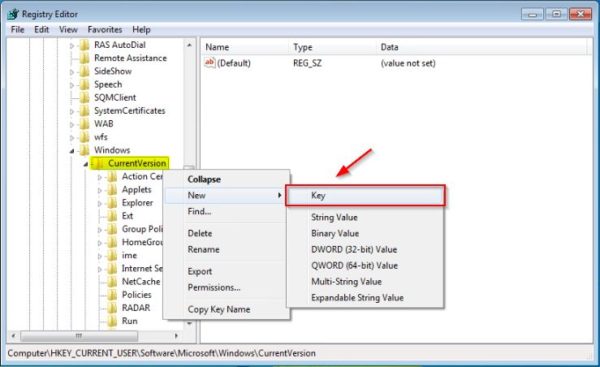
–  In case EOSNotify key is not available, right-click the CurrentVersion key and select New > Key and name it EOSNotify.

windows-7-disable-pc-is-out-of-support-popup-EOSNotify-create-new-key-600x367

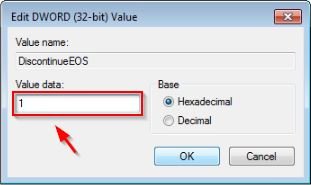
2. Right click anywhere in the right pane and select New > DWORD (32-bit) Value and name it DiscontinueEOS.

3. Set Value data to 1 and click OK.

windows-7-disable-pc-is-out-of-support-popup-edit-dword-32-bit-value-regedit-screenshot.

4. When the new value has been set, Restart the Windows7 computer / Virtual machine, to make sure registry setting take effect.

windows-7-disable-pc-is-out-of-support-popup-discontninueEOS-reg-dword-0x000000001-600x248


To automate the procedure in large environments, you can create a small script using the reg  command load the Registry key or use Windows GPO (Group Policy Object) to enforce the setting across all Active Directory PC members.
 

[HKEY_CURRENT_USER\Software\Microsoft\Windows\CurrentVersion\EOSNotify]
"DiscontinueEOS"=dword:00000001
custom GPO in Active Directory.

To avoid potential issues using a non supported OS, you should start planning to upgrade your Windows 7 clients to Windows 10.

That's it ! Out of support Windows 7  alert should no longer bug you 🙂

Remove old unused kernels and cleanup orphaned packages on CentOS / RHEL/ Fedora and Debian Linux

Friday, October 23rd, 2020

remove-old-unused-kernel-on-centos-redhat-rhel-fedora-linux-howto-delete-orphaned-packages

If you administer CentOS 7 / CentOS  8 bunch of servers it is very likely after one of the scheduled Patch days every 6 months or so, you end up with a multiple Linux OS kernels installed on the system.
In normal situation on a freshly installed CentOS machine only one rpm package is installed on the system with the kernel release shipped with CentOS / RHEL / Fedora distro:
The reason to remove the old unused kernels is very simple, you don't want to have a messy installation and after some of the updates to boot up in a revert back old kernel or if you're pedantic to simply save few megas of space.
Some people choose to have more than one kernel just to make sure, if the new installed one doesn't boot, after a restart from ILO / IDRAC remote console interface you can select to boot the proper kernel. I agree having the old kernel before the system *kernel* upgrade as backup recovery is a good thing but this is a good thing to the point the system gets booted after reboot (you know we sysadmins usually after each major system package upgrade), we like to reboot the system warmly praying and hoping it will boot up next time 🙂
 

1. Remove CentOS last XX kernels from the OS

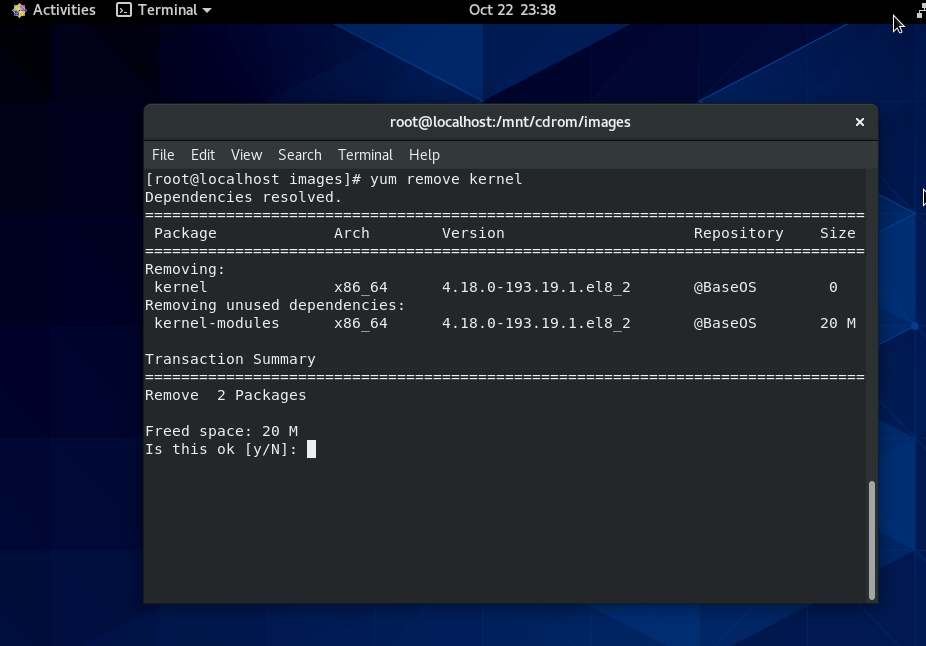
Of course removal of old kernels could be managed by a simple

yum remove kernel


yum-kernel-remove-centos-linux

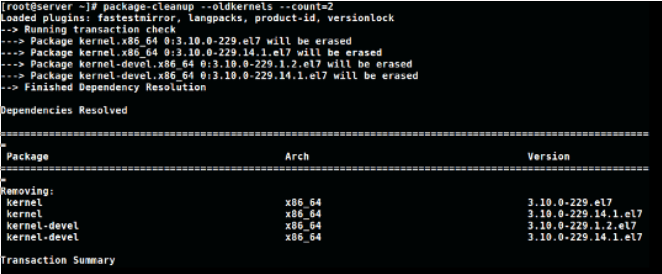
One more than one kernel is present you can hence leave only lets say the last 2 installed kernel on the CentOS host (some people prefer to have only one) but just for the sake of having a backup kernel I like more to have last two kernels installed present, to do so run package-cleanup which is contained in yum-utils rpm package CentOS – this is CentOS / Redhat ( RHEL) specific command.
 

[root@centos ~ ]:# package-cleanup –oldkernels –count=2

package-cleanup-centos-linux-screenshot-1

–count=number argument – tells how many from the  latest version kernels to get removed.

Note if you don't have the package-cleanup command install yum-utils package:

[root@centos ~ :]#  yum install -y yum-utils

cleanup-old-kernels-linux-leave-only-set-of-2-kernels-active-on-centos-rhel-fedora


2. RemoveOld kernels from Fedora Linux – leave only the latest 3 installed

This is done with dnf by setting the –-latest-limit arg to negative value to how many last kernels want to keep

[root@fedora ~ ]:# dnf remove $(dnf repoquery –installonly –latest-limit=-3 -q)


3. Set how many kernels you want to be present on system all the time after package upgrades

It is possible to tell CentOS / RHEL / Fedora's on how many kernels show be kept installed on the system, the default configured on Operating system install time is to keep the last 5 installed kernel on the OS. This is controlled from installonly_limit=5 value that is usually as of year 2020 RPM based distributions found under /etc/yum.conf (on CentOS / RHEL) and in /etc/dnf/dnf.conf (in Fedora) configuration file and sets the desired number of kernels present on system after issuing commands yum upgrade / dnf upgrade –refresh etc.
The minimum number to give to  installonly_limit is 2.
 

4. Remove orphan rpm packages from server

The next thing to do is to check the installed orphan packages to see if we can safely remove them; by orphaned packages we mean all packages which no longer serve a purpose of package dependencies.
Orphan packages are packages who left over from some old dependencies that are no longer needed on the system but just take up space and impose a possible security risk as some of them might end up with time with a public well known and hacked CVE vulnearbility.

Let me try to explain this concept with a quick example: package A is depended on package B, thus, in order to install package A the package B must also be installed. Once the package A is removed the package B might still be installed, hence the package B is now orphaned package.
Here’s how we can safely see the orphan packages we do have on our system:

[root@centos ~ :]#  package-cleanup –quiet –leaves –exclude-bin

And here’s how we can delete them:

[root@centos ~ :]# package-cleanup –quiet –leaves –exclude-bin | xargs yum remove -y


The above commands should be launched multiple times, because the packages deleted with the first batch could create additional orphan packages, and so on: be sure to perform these tasks until no orphan packages appear anymore after the first package-cleanup command.


5. Delete Old Kernels and keep only last three ones on Debian / Ubuntu Linux

To do the same on a debian based distribution there is a command is provided by a deb package byobu, if you want to clean up old kernels on Debians :

$ sudo purge-old-kernels –keep 3


That's all folks enjoy ! 🙂


Upgrade Debian Linux 9 to 10 Stretch to Buster and Disable graphical service load boot on Debian 10 Linux / Debian Buster is out

Tuesday, July 9th, 2019

howto-upgrade-debian-linux-debian-stretch-to-buster-debian-10-buster

I've just took a time to upgrade my Debian 9 Stretch Linux to Debian Buster on my old school Laptop (that turned 11 years old) Lenovo Thinkpad R61 . The upgrade went more or less without severe issues except few things.

The overall procedure followed is described n a few websites out there already and comes up to;


0. Set the proper repository location in /etc/apt/sources.list


Before update the sources.list used are:
 

deb [arch=amd64,i386] http://ftp.bg.debian.org/debian/ buster main contrib non-free
deb-src [arch=amd64,i386] http://ftp.bg.debian.org/debian/ buster main contrib non-free


deb [arch=amd64,i386] http://security.debian.org/ buster/updates main contrib non-free
deb-src [arch=amd64,i386] http://security.debian.org/ buster/updates main contrib non-free

deb [arch=amd64,i386] http://ftp.bg.debian.org/debian/ buster-updates main contrib non-free
deb-src [arch=amd64,i386] http://ftp.bg.debian.org/debian/ buster-updates main contrib non-free

deb http://ftp.debian.org/debian buster-backports main


For people that had stretch defined in /etc/apt/sources.list you should change them to buster or stable, easiest and quickest way to omit editting with vim / nano etc. is run as root or via sudo:
 

sed -i 's/stretch/buster/g' /etc/apt/sources.list
sed -i 's/stretch/buster/g' /etc/apt/sources.list.d/*.list

The minimum of config in sources.list after the modification should be
 

deb http://deb.debian.org/debian buster main
deb http://deb.debian.org/debian buster-updates main
deb http://security.debian.org/debian-security buster/updates main

Or if you want to always be with latest stable packages (which is my practice for notebooks):

deb http://deb.debian.org/debian stable main
deb http://deb.debian.org/debian stable-updates main
deb http://security.debian.org/debian-security stable/updates main


1. Getting list of hold packages if such exist and unholding them, e.g.


apt-mark showhold


Same could also be done via dpkg

dpkg –get-selections | grep hold


To unhold a package if such is found:

echo "package_name install"|sudo dpkg –set-selections

For those who don't know what hold package is this is usually package you want to keep at certain version all the time even though after running apt-get upgrade to get the latest package versions.
 

2. Use df -h and assure you have at least 5 – 10 GB free space on root directory / before proceed

df -h /

3. Update packages list to set new set repos as default

apt update


4. apt upgrade
 

apt upgrade

Here some 10 – 15 times you have to confirm what you want to do with configuration that has changed if you're unsure about the config (and it is not critical service) you're aware as such as Apache / MySQL / SMTP etc. it is best to install the latest maintainer version.

Hopefully here you will not get fatal errors that will interrupt it.

P.S. It is best to run apt-update either in VTTY (Virtual console session) with screen or tmux or via a physical tty (if this is not a remote server) as during the updates your GUI access to the gnome-terminal or konsole / xterm whatever console used might get cut. Thus it is best to do it with command:
 

screen apt upgrade


5. Run dist-upgrade to finalize the upgrade from Stertch to Buster


Once all is completed of the new installed packages, you will need to finally do, once again it is best to run via screen, if you don't have installed screen install it:


if [ $(which screen) ]; then echo 'Installed'; else apt-get install –yes screen ; fi

screen apt dist-upgrade


Here once again you should set whether old configuration to some e services has to stay or the new Debian maintainer package shipped one will overwrite the old and locally modified (due to some reason), here do wisely whatever you will otherwise some configured services might not boot as expected on next boot.


6. What if you get packages failed on update


If you get a certain package failed to configure after installed due to some reason, if it is a systemd service use:


journalctl -xe |head -n 50


or fully observer output of journalctl -xe and decide on yourself.

In most cases

dpkg-reconfigure failed-package-name


should do the trick or at least give you more hints on how to solve it.


Also if a package seems to be in inconsistent or broken state after upgrade  and simple dpkg-reconfigure doesn't help, a good command
that can help you is


dpkg-reconfigure -f package_name


or you can try to workaround a failed package setup with:
 

dpkg –configure -a

 
If dpkg-reconfigure doesn't help either as I experienced in prior of Debian from Debian 6 -> 7 an Debian 7 ->8 updates on some Computers, then a very useful thing to try is:
 

apt-get update –fix-missing 

apt-get install -f


At certain cases the only work around to be able to complete the package upgrade is to to remove the package with apt remove but due to config errors even that is not possible to work around this as final resort run:
 

dpkg –remove –force-remove-reinstreq


7. Clean up ununeeded packages


Some packages are left over due to package dependencies from Stretch and not needed in buster anymore to remove them.
 

apt autoremove


8. Reboot system once all upgrade is over


/sbin/reboot


9. Verify your just upgraded Debian is in a good state


root@noah:~# uname -a;
Linux noah 4.19.0-5-rt-amd64 #1 SMP PREEMPT RT Debian 4.19.37-5 (2019-06-19) x86_64 GNU/Linux


root@noah:~# cat /etc/issue.net
Debian GNU/Linux 10


root@noah:~# lsb_release -a
No LSB modules are available.
Distributor ID:    Debian
Description:    Debian GNU/Linux 10 (buster)
Release:    10
Codename:    buster


root@noah:~# hostnamectl
   Static hostname: noah
         Icon name: computer-laptop
           Chassis: laptop
        Machine ID: 4759d9c2f20265938692146351a07929
           Boot ID: 256eb64ffa5e413b8f959f7ef43d919f
  Operating System: Debian GNU/Linux 10 (buster)
            Kernel: Linux 4.19.0-5-rt-amd64
      Architecture: x86-64


10. Remove annoying picture short animation with debian logo looping


plymouth-debian-graphical-boot-services

By default Debian 10 boots up with annoying screen hiding all the status of loaded services state .e.g. you cannot see the services that shows in [ FAILED ] state and  which do show as [ OK ] to revert back the old behavior I'm used to for historical reasons and as it shows a lot of good Boot time debugging info, in previous Debian distributions this was possible  by setting the right configuration options in /etc/default/grub

which so far in my config was like so

GRUB_CMDLINE_LINUX_DEFAULT="quiet splash scsi_mod.use_blk_mq=y dm_mod.use_blk_mq=y zswap.enabled=1 text"


Note that zswap.enabled=1 passed option is because my notebook is pretty old machine from 2008 with 4GB of memory and zswap does accelerate performance when working with swap – especially helpful on Older PCs for more you can read more about zswap on ArchLinux wiki
After modifying this configuration to load the new config into grub the cmd is:
 

/usr/sbin/update-grub

 
As this was not working and tried number of reboots finally I found that annoying animated gif like picture shown up is caused by plymouth below is excerpts from Plymouth's manual page:


       "The plymouth sends commands to a running plymouthd. This is used during the boot process to control the display of the graphical boot splash."

Plymouth has a set of themes one can set:


# plymouth-set-default-theme -l
futureprototype
details
futureprototype
joy
lines
moonlight
softwaves
spacefun
text
tribar


I tried to change that theme to make the boot process as text boot as I'm used to historically with cmd:
 

update-alternatives –config text.plymouth

 
As after reboot I hoped the PC will start booting in text but this does not happened so the final fix to turn back to textmode service boot was to completely remove plymouth
 

apt-get remove –yes plymouth

Thursday, July 14th, 2016

use-remote-dns-on-mozilla-firefox-howto-windows-linux-logo.svg

If you're using Mozilla Firefox browser to browse the Web with Traffic Tunneling via SSH Tunnel to your own Linux server like I do in order to prevent yourself traffic to be sniffed from your Work corporate computer (as most of the corporations such as IBM / Hewlett Packard / Concentrix etc. are forcing all employee PC traffic to be  to be transported via default set Windows Corporate Proxy active for all browsers.

Then you will certainly also want to prevent the DNS requests to be not logged somewhere in your Corporate IT department thus the question arises:

How to force DNS requests to be made through the Proxy server (SSH host)?

Nomatter where you're using Firefox browser with advanced proxying plugin such as FoxyProxy FF add-on or the default Proxy FF features the DNS lookups might end up in Corporate set DNS servers often forced for the computer / notebook and impossible to be changed to a custom ones as many of the Corporation internal Sharepoints and domains are only visible from their internal networks.

Thanksfully in newer versions there is an easy way to do it directly from Visual menus via:

Tools -> Options -> Advanced -> Network -> Settings

You will get a screen like below:
 

firefox-use-proxy-remote-dns-howto-screenshot

Just tick the Remote DNS and that will force Firefox to query remote Proxy server proxy DNS


If you happen to be running older Firefox which doesn't have the Remote DNS tick you can also try to set the setting manually:


  1. In firefox type this in your address bar:

    about:config

  2. Click I'll be careful I  promise.

  3. In the filter textbox, type: proxy

  4. Find the preference name called *network.proxy.socks_remote_dns*. Double click it to set it to true.

    i-will-be-careful-i-promise-firefox-windows-screenshot-warranty


network-proxy-socks-remote_dns-firefox-screenshot

Enjoy ! 🙂

What causes the “nRRPResponseCode 531” error, A fix to the nasty “nRRPResponseCode 531” error during domain name DNS change

Tuesday, March 16th, 2010

For two days now, I’m trying to set a custom DNS server for a (.net) domain purchased by gigaspark.com . Every time I try to change the nameservers for the (.net) domain an irritating error pops up, the error reads “nRRPResponseCode 531” and I cannot set my custom configured Bind DNS server for the (.net) domain. I believe the same problem happens also with (.com) domains.

In this relation, I tried googling online searching and searching what might be the stupid cause of the “nRRPResponseCode 531” error that prevents me from setting my custom configured Bind domain name servers to mydomain.net . I also contacted the support team from gigaspark multiply until I found out what is the trouble cause.
In short the “nRRPresponseCode 531” is an error that indicates your .net or .com domain is not figuring in VeriSign’s GRS domain database .
The Verisign GRS domain database contains a list of DNS servers that are correctly configured and trustworthy enough. I’ve seen many people online suffering from the same terrible error,
who pointed out that the error is caused by misconfigurations in the Bind DNS server or the zone file for the problematic domain name, though I’ve looked through multiple times to possibly track the problem in both my major named.conf and the rest of bind’s configuration files as well as in the domain name I had registered mydomain.net ,there was nothing misconfigured or unusual.
I have to admit, this problem is really odd, because I was able to successfully set the same custom configured Bind DNS server for mydomain.info and mydomain.biz but, yet whenever trying to set the same Bind DNS for mydomain.net I came across the shitty nrRRPResponseCode 531 .
Thanks to the kind help of Gigaspark’s tech support together with some google posts on the matter I figured out Gigaspark are using ENOM – a major domain name registrar offering easy ways for an end domain providers to become their resellers.
It seems ENOM’s policy is enforces you as a domain name customer to register your full DNS domain name let’s say (ns1.mydns.com) in Verisign’s GRS domain database otherwise they refuse you the right to set yourself your ns1.mydns.com for your domain, because if the DNS domain name is not figuring in that database it’s not trust worthy!
I believe many people would agree with me this is a real shit! You pay for your domain and you should have the full rights over it.
I mean you should be allowed to set whatever DNS domain name even, if it’s not an existing one and they shouldn’t bother you with stupid DNS domain name registrations in stupid Verisign GRS databases and so on!
Now you probably wonder what is the required steps to take to be able to register the domain in that Verisign GRS database in order to be able to set your ns1.mydomain.com as a default DNS server for your mydomainname.com .
Well you have to contact your domain registrar, let’s say gigaspark.com .
You log to your account on tucowsdomains for your domain mydomain.com … then you find something similar to: “register a nameserver” among the overall menus options.
Then you have to register your nameserver ns1.mydomain.com. Then you wait between 24 up to 48h and then you have to test if your NS has already properly entered the Verisign GRS database you have to visit on Verisign GRS Whois .
Hopefully the guys from Verisign GRS would approve your DNS host to enter there database and then at last you might be able to set in your DNS host as a preferred DNS for your (.net) / (.com?) domain name.
So go back to gigaspark’s slovenian interface and try changing the DNSes once again! If you’re lucky with God’s help (for sure), you would be at last be successful in setting your BIND name server as a primary DNS.