Posts Tagged ‘swiss army knife’

How to do a port redirect to localhost service with socat or ncat commands to open temporary access to service not seen on the network

Friday, February 23rd, 2024

socat-simple-redirect-tcp-port-on-linux-bsd-logo

You know sometimes it is necessery to easily and temporary redirect network TCP ports to be able to be accessible from Internal DMZ-ed Network via some Local Network IP connection or if the computer system is Internet based and has an external "'real" Internet Class A / B address to be reachable directly from the internet via lets say a modern Internet browser such as Mozilla Firefox / Google Chrome Browser etc.

Such things are easy to be done with iptables if you need to do the IP redirect permanent with Firewall rule changes on Linux router with iptables.
One way to create a TCP port redirect using firewall would include few iptable rules  like for example:

1. Redirect port traffic from external TCP port source to internal one

# iptables -t nat -I PREROUTING -p tcp –dport 10000 -j REDIRECT –to-ports 80
# iptables -t nat -I OUTPUT -p tcp -o lo –dport 10000 -j REDIRECT –to-ports 80
# iptables -t nat -A OUTPUT -o lo -d 127.0.0.1 -p tcp –dport 80 -j DNAT  –to-destination 192.168.0.50:10000
# iptables -t nat -I OUTPUT –source 0/0 –destination 0/0 -p tcp –dport 80 -j REDIRECT –to-ports 10000


Then you will have 192.168.00.50:10000 listener (assuming that the IP is already configured on some of the host network interface, plugged in to the network).

 But as messing up with the firewall is not the best thing to do especially, if you need to just temporary redirect external listener port to a service configured on the server to only run on TCP port on loopback address 127.0.0.1, you can do it instead with another script or command for simplicy.

One simple way to do a port redirect on the fly on GNU / Linux or FreeBSD / OpenBSD is with socat command.

Lets say you have a running statistics of a web server Apache / Nginx / Haproxy frontend / backend statistics or whatever kind of web TCP service on port 80 on your server and this interface is on purpose configured to be reachable only on localhost interface port 80, so you can either access it by creating an ssh tunnel towards the service on 127.0.0.1 or by accessing it by redirecting the traffic towards another external TCP port, lets say 10000.

Here is how you can achieve

2. Redirect Local network accessible IP on all configured Server network interfaces port 10000 to 127.0.0.1 TCP 80 with socat

# socat tcp-l:10000,fork,reuseaddr tcp:127.0.0.1:80

If you need to access later the redirected port in a Browser, pick up the machine first configured IP and open it in a browser (assuming there is no firewall filter prohibiting access to redirected port).

root@pcfreak:~# ifconfig eth0
eth0: flags=4163<UP,BROADCAST,RUNNING,MULTICAST>  mtu 1500
        inet 109.104.212.130  netmask 255.255.255.0  broadcast 109.104.212.255
        ether 91:f8:51:03:75:e5  txqueuelen 1000  (Ethernet)
        RX packets 652945510  bytes 598369753019 (557.2 GiB)
        RX errors 0  dropped 10541  overruns 0  frame 0
        TX packets 619726615  bytes 630209829226 (586.9 GiB)
        TX errors 0  dropped 0 overruns 0  carrier 0  collisions 0

Then in a browser open http://102.104.212.130 or https://102.104.212.130 (depending on if remote service has SSL encryption enabled or not) and you're done, the configured listener Server service should pop-up on the screen.

3. Redirect IP Traffic from External IP to Localhost loopback interface with netcat ( ncat ) swiss army knife hackers and sysadmins tool

If you need to redirect lets say TCP / IP port 8000 to Port a server local binded service on TCP 80 with ncat, instead of socat (if lets say socat is not pre-installed on the machine), you can do it by simply running those two commands:

[root@server ~]# mkfifo svr1_to_svr2
[root@server ~]# ncat -vk -l 8000 < svr1_to_svr2 | ncat 127.0.0.1 80 > svr1_to_svr2
Ncat: Version 7.92 ( https://nmap.org/ncat )
Ncat: Listening on 0.0.0.0:10000
Ncat: Connection from 10.10.258.39.
Ncat: Connection from 10.10.258.39:51813.
Ncat: Connection from 10.10.258.39.
Ncat: Connection from 10.10.258.39:23179.


I you don't care to log what is going on the background of connection and you simply want to background the process with a one liner command you can achive that with:


[root@server /tmp]# cd tmp; mkfifo svr1_to_svr2; (ncat -vk -l 8000 < svr1_to_svr2 | ncat 127.0.0.1 80 > svr1_to_svr2 &)
 

Then you can open the Internal Machine Port 80 TCP service on 8000 in a browser as usual.

For those who want a bit of more sophisticated proxy like script I would suggest you take a look at using netcat and a few lines of shell script loop, that can simulate a raw and very primitive proxy with netcat this is exampled in my previous article Create simple proxy server with netcat ( nc ) based utility.

Hope this article is helpful to anyone, there is plenty of other ways to do a port redirect with lets say perl, python and perhaps other micro tools. If you know of one liners or small scripts, that do it please share in comments, so we can learn from each other ! 

Enjoy ! 🙂
 

Create simple proxy http server with netcat ( nc ) based tiny shell script

Tuesday, January 26th, 2021

use-Netcat_proxy-picture

The need of proxy server is inevitable nowadays especially if you have servers located in a paranoid security environments. Where virtually all is being passed through some kind of a proxy server. In my work we have recently started a  CentOS Linux release 7.9.2009 on HP Proliant DL360e Gen8 (host named rhel-testing).

HP DL360e are quite old nowadays but since we have spare servers and we can refurnish them to use as a local testing internal server Hypervisor it is okay for us. The machine is attached to a Rack that is connected to a Secured Deimilitarized Zone LAN (DMZ Network) which is so much filtered that even simple access to the local company homebrew RPM repository is not accessible from the machine.
Thus to set and remove software from the machine we needed a way to make yum repositories be available, and it seems the only way was to use a proxy server (situated on another accessible server which we use as a jump host to access the testing machine).

Since opening additional firewall request was a time consuming non-sense and the machine is just for testing purposes, we had to come with a solution where we can somehow access a Local repository RPM storage server http://rpm-package-server-repo.com/ for which we have a separate /etc/yum.repos.d/custom-rpms.repo definition file created.

This is why we needed a simplistic way to run a proxy but as we did not have the easy way to install privoxy / squid / haproxy or apache webserver configured as a proxy (to install one of those of relatively giant piece of software need to copy many rpm packages and manually satisfy dependencies), we looked for a simplistic way to run a proxy server on jump-host machine host A.

A note to make here is jump-host that was about to serve as a proxy  had already HTTP access towards the RPM repositories http://rpm-package-server-repo.com and could normally fetch packages with curl or wget via it …

For to create a simple proxy server out of nothing, I've googled a bit thinking that it should be possible either with BASH's TCP/IP capabilities or some other small C written tool compiled as a static binary, just to find out that netcat swiss army knife as a proxy server bash script is capable of doing the trick.

Jump host machine which was about to be used as a proxy server for http traffic did not have enabled access to tcp/port 8888 (port's firewall policies were prohibiting access to it).Since 8888 was the port targetted to run the proxy to allow TCP/IP port 8888 accessibility from the testing RHEL machine towards jump host, we had to issue first on jump host:

[root@jump-host: ~ ]# firewall-cmd –permanent –zone=public –add-port=8888/tcp

To run the script once placed under /root/tcp-proxy.sh on jump-host we had to run a never ending loop in a GNU screen session to make sure it runs forever:

Original tcp-proxy.sh script used taken from above article is:
 

#!/bin/sh -e


if [ $# != 3 ]
then
    echo "usage: $0 <src-port> <dst-host> <dst-port>"
    exit 0
fi

TMP=`mktemp -d`
BACK=$TMP/pipe.back
SENT=$TMP/pipe.sent
RCVD=$TMP/pipe.rcvd
trap 'rm -rf "$TMP"' EXIT
mkfifo -m 0600 "$BACK" "$SENT" "$RCVD"
sed 's/^/ => /' <"$SENT" &
sed 's/^/<=  /' <"$RCVD" &
nc -l -p "$1" <"$BACK" | tee "$SENT" | nc "$2" "$3" | tee "$RCVD" >"$BACK"


Above tcp-proxy.sh script you can download here.

I've tested the script one time and it worked, the script syntax is:

 [root@jump-host: ~ ]#  sh tcp-proxy.sh
usage: tcp-proxy.sh <src-port> <dst-host> <dst-port>


To make it work for one time connection I've run it as so:


 [root@jump-host: ~ ]# sh tcp-proxy.sh 8888 rpm-package-server-repo.com 80


To make the script work all the time I had to use one small one liner infinite bash loop which goes like this:

[root@jump-host: ~ ]#  while [ 1 ]; do sh tcp-proxy.sh 8888 rpm-package-server-repo.com 80; done​

On rhel-testing we had to configure for yum and all applications to use a proxy temporary via
 

[root@rhel-tresting: ~ ]# export http_proxy=jump-host_machine_accessibleIP:8888


And then use the normal yum check-update && yum update to apply to rhel-testing machine latest RPM package security updates.

The nice stuff about the tcp-proxy.sh with netcat in a inifite loop is you will see the binary copy of traffic flowing on the script which will make you feel like in those notorious Hackers movies ! 🙂

The stupid stuff is that sometimes some connections and RPM database updates or RPMs could be cancelled due to some kind of network issues.

To make the connection issues that are occuring to the improvised proxy server go away we finally used a slightly modified version from the original netcat script, which read like this.
 

#!/bin/sh -e


if [ $# != 3 ]
then
    echo "usage: $0 <src-port> <dst-host> <dst-port>"
        exit 0
        fi

        TMP=`mktemp -d`
        BACK=$TMP/pipe.back
        SENT=$TMP/pipe.sent
        RCVD=$TMP/pipe.rcvd
        trap 'rm -rf "$TMP"' EXIT
        mkfifo -m 0600 "$BACK" "$SENT" "$RCVD"
        sed 's/^/ => /' <"$SENT" &
        sed 's/^/<=  /' <"$RCVD" &
        nc –proxy-type http -l -p "$1" <"$BACK" | tee "$SENT" | nc "$2" "$3" | tee "$RCVD" >"$BACK"


Modified version tcp-proxy1.sh with –proxy-type http argument passed to netcat script u can download here.

With –proxy-type http yum check-update works normal just like with any normal fully functional http_proxy configured.

Next step wasto make the configuration permanent you can either add to /root/.bashrc or /etc/bashrc (if you need the setting to be system wide for every user that logged in to Linux system).

[root@rhel-tresting: ~ ]#  echo "http_proxy=http://jump-host_machine_accessibleIP:8888/" > /etc/environment


If you need to set the new built netcat TCP proxy only for yum package update tool include proxy only in /etc/yum.conf:

[root@rhel-tresting: ~ ]# vi /etc/yum.conf
proxy=http_proxy=http://jump-host_machine_accessibleIP:8888/


That's all now you have a proxy out of nothing with just a simple netcat enjoy.

How to make sure your Linux system users won’t hide or delete their .bash_history / Securing .bash_history file – Protect Linux system users shell history

Monday, July 19th, 2010

linux-bin-bash-600x600logo
If you're running multi user login Linux system, you have probably realized that there are some clever users that prefer to prevent their command line executed commands to be logged in .bash_history.
To achieve that they use a number of generally known methodologist to prevent the Linux system from logging into their $HOME/.bash_history file (of course if running bash as a default user shell).
This though nice for the user is a real nightmare for the sysadmin, since he couldn't keep track of all system command events executed by users. For instance sometimes an unprivilegd user might be responsible for executing a malicious code which crashes or breaks your server.
This is especially unpleasent, because you will find your system crashed and if it's not some of the system services that causes the issue you won’t even be able to identify which of all the users is the malicious user account and respectively the code excecuted which fail the system to the ground.
In this post I will try to tell you a basic ways that some malevolent users might use to hide their bash history from the system administrator.
I will also discuss a few possible ways to assure your users .bash_history keeps intact and possibly the commands executed by your users gets logged in in their.
The most basic way that even an unexperienced shell user will apply if he wants to prevent his .bash_history from sys admins review would be of directly wiping out the .bash_history file from his login account or alternatively emptying it with commands like:

malicious-user@server:~$ rm -f. bash_history
ormalicious-user@server:~# cat /dev/null > ~/.bash_history

In order to prevent this type of attack against cleaning the .bash_history you can use the chattr command.
To counter attack this type of history tossing method you can set your malicious-user .bash_history’s file the (append only flag) with chattr like so:

root@server:~# cd /home/malicious-user/
root@server:~# chattr +a .bash_history

It’s also recommended that the immunable flag is placed to the file ~/.profile in user home

root@server:~# chattr +i ~/.profile

It would be probably also nice to take a look at all chattr command attributes since the command is like swiss army knife for the Linux admin:
Here is all available flags that can be passed to chattr
append only (a)
compressed (c)
don~@~Yt update atime (A)
synchronous directory updates (D)
synchronous updates (S)
data journalling (j)
no dump (d)
top of directory hierarchy (T)
no tail-merging (t)
secure deletion (s)
undeletable (u)
immutable (i)

It’s also nice that setting the “append only” flag in to the user .bash_history file prevents the user to link the .bash_history file to /dev/null like so:

malicious-user@server:~$ ln -sf /dev/null ~/.bash_history
ln: cannot remove `.bash_history': Operation not permitted

malicious-user@server:~$ echo > .bash_history
bash: .bash_history: Operation not permitted

However this will just make your .bash_history append only, so the user trying to execute cat /dev/null > .bash_history won’t be able to truncate the content of .bash_history.

Unfortunately he will yet be able to delete the file with rm so this type of securing your .bash_history file from being overwritten is does not completely guarantee you that user commands will get logged.
Also in order to prevent user to play tricks and escape the .bash_history logging by changing the default bash shell variables for HISTFILE an d HISTFILESIZE, exporting them either to a different file location or a null file size.
You have to put the following bash variables to be loaded in /etc/bash.bashrc or in /etc/profile
# #Prevent unset of histfile, /etc/profile
HISTFILE=~/.bash_history
HISTSIZE=10000
HISTFILESIZE=999999
# Don't let the users enter commands that are ignored# in the history file
HISTIGNORE=""
HISTCONTROL=""
readonly HISTFILE
readonly HISTSIZE
readonly HISTFILESIZE
readonly HISTIGNORE
readonly HISTCONTROL
export HISTFILE HISTSIZE HISTFILESIZE HISTIGNORE HISTCONTROL

everytime a user logs in to your Linux system the bash commands above will be set.
The above tip is directly taken from Securing debian howto which by the way is quite an interesting and nice reading for system administrators 🙂

If you want to apply an append only attribute to all user .bash_history to all your existing Linux server system users assuming the default users directory is /home in bash you can execute the following 1 liner shell code:

#Set .bash_history as attr +a
2. find /home/ -maxdepth 3|grep -i bash_history|while read line; do chattr +a "$line"; done

Though the above steps will stop some of the users to voluntary clean their .bash_history history files it won’t a 100% guaranttee that a good cracker won’t be able to come up with a way to get around the imposed .bash_history security measures.

One possible way to get around the user command history prevention restrictions for a user is to simply using another shell from the ones available on the system:
Here is an example:

malicious-user:~$ /bin/csh
malicious-user:~>

csh shell logs by default to the file .history

Also as far as I know it should be possible for a user to simply delete the .bash_history file overwritting all the .bash_history keep up attempts up-shown.
If you need a complete statistics about accounting you’d better take a look at The GNU Accounting Utilities

In Debian the GNU Accounting Utilities are available as a package called acct, so installation of acct on Debian is as simple as:

debian:~# apt-get install acct

I won’t get into much details about acct and would probably take a look at it in my future posts.
For complete .bash_history delete prevention maybe the best practice is to useg grsecurity (grsec)

Hopefully this article is gonna be a step further in tightening up your Server or Desktop Linux based system security and will also give you some insight on .bash_history files 🙂 .

Anmap network port scanner – Nmap security scanner for your Android Mobile and Tablet

Tuesday, June 24th, 2014

Nmap-for-Android-Anmap-port-security-penetriation-and-network-hacking-from-your-mobile

Those who have to deal with network security or do periodic UNIX / Windows server security audits know  well Nmap (Network Mapper).
NMAP is the swiss army knife tool of choice of both crackers and security exports and it is a must have exploration tool.
For those who just heard of Nmap or want  to learn more on Nmap basics, I recommend my previos articles how to check Windows / Linux host port security (by examples)  and test a local network for open Windows shares.

Nmap is one of the most improtant tools for every cracker (white, grey black hat "hacker"). Nmap is a legendary hack tool and probably the prevelent networt security port scanner tool over the last 10 years on all major Operating Systems. Nmap's high portability is thanks to being open source, being ported so far for:

Window – Zen, Mac OS and Linux, FreeBSD, OpenBSD, NetBSD and even obscure proprietary operating systems like Hewlett Packard's UNIX – HP-UX, Sun Microsystems's UNIX variant Solaris. It is in an interesting fact to mention probably not much known Sun Solaris's core code base is based on Berkley's BSD 4.4 whose fork nowadays give birth to FreeBSD and rest of *BSD family OSes. 
Nmap evolved a lot through the last 7 years from only having a command line interface for hardcode console geeks like me to having a nice shiny GUI frontendinterface ZenMap.
Nmap is popular for being one of the hack tools in the famous move The Matrix (II) – Reloaded.

As hacking and security penetration is quickly moving from PC Desktops and Notebooks to more mobile and stealth variants with recent boom of smartphones – it is no strange that Nmap got ported to the most wide-spread (and very Linux compatible) – Android OS under the name ANmap (Android Map).

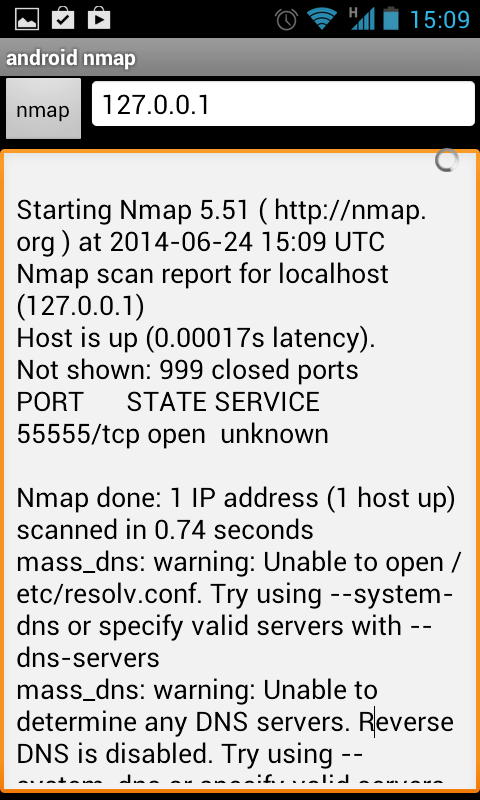
nmap-android-mobile-phone-tablet-screenshot-anmap-port-scanner-screenshot

ANMap source code and apk – (Android Package file) is on GoogleCode here.

By the way using your android device to scan your own Android device on localhost (just like on above screenshot), could be quite helpful and often could reveal some unwated services, run by malware or viruses application.

To get full use of ANmap's full functionality (Stealth Scan, Full version and port scan etc.)  just like on other operating systems ANmap has to run with super user privileges .

To be able to run applications with Super user access on Android you need to have ROOTED ANDROID  (Tablet / Phone) device – rooting android is just a simply hack that makes Android OS to run certain applciations with root (administrator privileges). Usually Rooting a device breaks ups vendor (reseller) guarantees, so if you root your device to run ANmap on it be very careful to which application you give access to run as super user!
As Anmap page reads: There are some little bugs, as domain names resolving and unroot scanning.

If you want to use Anmap only command line interface (without gui).
Download compiled nmap with data files in this tar ball or this zip archive and keep it in one folder.

Than connect to localhost via ConnectBot, untar and start scanning:

$ tar -xvf nmap-5.51-1.tar
$ su
# ./nmap 127.0.0.1

Happy scanning 🙂

Tracking I/O hard disk server bottlenecks with iostat on GNU / Linux and FreeBSD

Tuesday, March 27th, 2012

Hard disk overhead tracking on Linux and FreeBSD with iostat

I've earlier wrote an article How to find which processes are causing hard disk i/o overhead on Linux there I explained very rawly few tools which can be used to benchmark hard disk read / write operations. My prior article accent was on iotop and dstat and it just mentioned of iostat. Therefore I've wrote this short article in attempt to explain a bit more thoroughfully on how iostat can be used to track problems with excessive server I/O read/writes.

Here is the command man page description;
iostatReport Central Processing Unit (CPU) statistics and input/output statistics for devices, partitions and network filesystems

I will further proceed with few words on how iostat can be installed on various Linux distros, then point at few most common scenarious of use and a short explanation on the meaning of each of the command outputs.

1. Installing iostat on Linux

iostat is a swiss army knife of finding a server hard disk bottlenecks. Though it is a must have tool in the admin outfut, most of Linux distributions will not have iostat installed by default.
To have it on your server, you will need to install sysstat package:

a) On Debian / Ubuntu and other Debian GNU / Linux derivatives to install sysstat:

debian:~# apt-get --yes install sysstat

b) On Fedora, CentOS, RHEL etc. install is with yum:

[root@centos ~]# yum -y install sysstat

c) On Slackware Linux sysstat package which contains iostat is installed by default. 

d) In FreeBSD, there is no need for installation of any external package as iostat is part of the BSD world (bundle commands).
I should mention bsd iostat and Linux's iostat commands are not the same and hence there use to track down hard disk bottlenecks differs a bit, however the general logic of use is very similar as with most tools in BSD and Linux.

2. Checking a server hard disk for i/o disk bottlenecks on G* / Linux

Once having the sysstat installed on G* / Linux systems, the iostat command will be added in /usr/bin/iostat
a) To check what is the hard disk read writes per second (in megabytes) use:

debian:~# /usr/bin/iostat -m
Linux 2.6.32-5-amd64 (debian) 03/27/2012 _x86_64_ (8 CPU)
avg-cpu: %user %nice %system %iowait %steal %idle
15.34 0.36 2.76 2.66 0.00 78.88
Device: tps MB_read/s MB_wrtn/s MB_read MB_wrtn
sda 63.89 0.48 8.20 6730223 115541235
sdb 64.12 0.44 8.23 6244683 116039483
md0 2118.70 0.22 8.19 3041643 115528074

In the above output the server, where I issue the command is using sda and sdb configured in software RAID 1 array visible in the output as (md0)

The output of iostat should already be easily to read, for anyone who didn't used the tool here is a few lines explanation of the columns:

The %user 15.34 meaning is that 15.34 out of 100% possible i/o load is generad by system level read/write operations.
%nice – >Show the percentage of CPU utilization that occurred while executing at the user level with nice priority.
%iowait – just like the top command idle it shows the idle time when the system didn't have an outstanding disk I/O requests.
%steal – show percentage in time spent in time wait of CPU or virtual CPUs to service another virtual processor (high numbers of disk is sure sign for i/o problem).
%idle – almost the same as meaning to %iowait
tps – HDD transactions per second
MB_read/s (column) – shows the actual Disk reads in Mbytes at the time of issuing iostat
MB_wrtn/s – displays the writes p/s at the time of iostat invocation
MB_read – shows the hard disk read operations in megabytes, since the server boot 'till moment of invocation of iostat
MB_wrtn – gives the number of Megabytes written on HDD since the last server boot filesystem mount

The reason why the Read / Write values for sda and sdb are similar in this example output is because my disks are configured in software RAID1 (mirror)

The above iostat output reveals in my specific case the server is experiencing mostly Disk writes (observable in the high MB_wrtn/s 8.19 md0 in the above sample output).

It also reveals, the I/O reads experienced on that server hard disk are mostly generated as a system (user level load) – see (%user 15.34 and md0 2118.70).

For all those not familiar with system also called user / level load, this is all kind of load which is generated by running programs on the server – (any kind of load not generated by the Linux kernel or loaded kernel modules).

b) To periodically keep an eye on HDD i/o operations with iostat, there are two ways:

– Use watch in conjunction with iostat;

[root@centos ~]# watch "/usr/bin/iostat -m"
Every 2.0s: iostat -m Tue Mar 27 11:00:30 2012
Linux 2.6.32-5-amd64 (centos) 03/27/2012 _x86_64_ (8 CPU)
avg-cpu: %user %nice %system %iowait %steal %idle
15.34 0.36 2.76 2.66 0.00 78.88
Device: tps MB_read/s MB_wrtn/s MB_read MB_wrtn
sda 63.89 0.48 8.20 6730255 115574152
sdb 64.12 0.44 8.23 6244718 116072400
md0 2118.94 0.22 8.20 3041710 115560990
Device: tps MB_read/s MB_wrtn/s MB_read MB_wrtn
sda 55.00 0.01 25.75 0 51
sdb 52.50 0.00 24.75 0 49
md0 34661.00 0.01 135.38 0 270

Even though watch use and -d might appear like identical, they're not watch does refresh the screen, executing instruction similar to the clear command which clears screen on every 2 seconds, so the output looks like the top command refresh, while passing the -d 2 will output the iostat command output on every 2 secs in a row so all the data is visualized on the screen. Hence -d 2 in cases, where more thorough debug is necessery is better. However for a quick routine view watch + iostat is great too.

c) Outputting extra information for HDD input/output operations;

root@debian:~# iostat -x
Linux 2.6.32-5-amd64 (debian) 03/27/2012 _x86_64_ (8 CPU)
avg-cpu: %user %nice %system %iowait %steal %idle
15.34 0.36 2.76 2.66 0.00 78.88
Device: rrqm/s wrqm/s r/s w/s rsec/s wsec/s avgrq-sz avgqu-sz await svctm %util
sda 4.22 2047.33 12.01 51.88 977.44 16785.96 278.03 0.28 4.35 3.87 24.72
sdb 3.80 2047.61 11.97 52.15 906.93 16858.32 277.05 0.03 5.25 3.87 24.84
md0 0.00 0.00 20.72 2098.28 441.75 16784.05 8.13 0.00 0.00 0.00 0.00

This command will output extended useful Hard Disk info like;
r/s – number of read requests issued per second
w/s – number of write requests issued per second
rsec/s – numbers of sector reads per second
b>wsec/s – number of sectors wrote per second
etc. etc.

Most of ppl will never need to use this, but it is good to know it exists.

3. Tracking read / write (i/o) hard disk bottlenecks on FreeBSD

BSD's iostat is a bit different in terms of output and arguments.

a) Here is most basic use:

freebsd# /usr/sbin/iostat
tty ad0 cpu
tin tout KB/t tps MB/s us ni sy in id
1 561 45.18 44 1.95 14 0 5 0 82

b) Periodic watch of hdd i/o operations;

freebsd# iostat -c 10
tty ad0 cpu
tin tout KB/t tps MB/s us ni sy in id
1 562 45.19 44 1.95 14 0 5 0 82
0 307 51.96 113 5.73 44 0 24 0 32
0 234 58.12 98 5.56 16 0 7 0 77
0 43 0.00 0 0.00 1 0 0 0 99
0 485 0.00 0 0.00 2 0 0 0 98
0 43 0.00 0 0.00 0 0 1 0 99
0 43 0.00 0 0.00 0 0 0 0 100
...

As you see in the output, there is information like in the columns tty, tin, tout which is a bit hard to comprehend.
Thanksfully the tool has an option to print out only more essential i/o information:

freebsd# iostat -d -c 10
ad0
KB/t tps MB/s
45.19 44 1.95
58.12 97 5.52
54.81 108 5.78
0.00 0 0.00
0.00 0 0.00
0.00 0 0.00
20.48 25 0.50

The output info is quite self-explanatory.

Displaying a number of iostat values for hard disk reads can be also achieved by omitting -c option with:

freebsd# iostat -d 1 10
...

Tracking a specific hard disk partiotion with iostat is done with:

freebsd# iostat -n /dev/ad0s1a
tty cpu
tin tout us ni sy in id
1 577 14 0 5 0 81
c) Getting Hard disk read/write information with gstat

gstat is a FreeBSD tool to print statistics for GEOM disks. Its default behaviour is to refresh the screen in a similar fashion like top command, so its great for people who would like to periodically check all attached system hard disk and storage devices:

freebsd# gstat
dT: 1.002s w: 1.000s
L(q) ops/s r/s kBps ms/r w/s kBps ms/w %busy Name
0 10 0 0 0.0 10 260 2.6 15.6| ad0
0 10 0 0 0.0 10 260 2.6 11.4| ad0s1
0 10 0 0 0.0 10 260 2.8 12.5| ad0s1a
0 0 0 0 0.0 0 0 0.0 20.0| ad0s1b
0 0 0 0 0.0 0 0 0.0 0.0| ad0s1c
0 0 0 0 0.0 0 0 0.0 0.0| ad0s1d
0 0 0 0 0.0 0 0 0.0 0.0| ad0s1e
0 0 0 0 0.0 0 0 0.0 0.0| acd0

It even has colors if your tty supports colors 🙂

Another useful tool in debugging the culprit of excessive hdd I/O operations is procstat command:

Here is a sample procstat run to track (httpd) one of my processes imposing i/o hdd load:

freebsd# procstat -f 50404
PID COMM FD T V FLAGS REF OFFSET PRO NAME
50404 httpd cwd v d -------- - - - /
50404 httpd root v d -------- - - - /
50404 httpd 0 v c r------- 56 0 - -
50404 httpd 1 v c -w------ 56 0 - -
50404 httpd 2 v r -wa----- 56 75581 - /var/log/httpd-error.log
50404 httpd 3 s - rw------ 105 0 TCP ::.80 ::.0
50404 httpd 4 p - rw---n-- 56 0 - -
50404 httpd 5 p - rw------ 56 0 - -
50404 httpd 6 v r -wa----- 56 25161132 - /var/log/httpd-access.log
50404 httpd 7 v r rw------ 56 0 - /tmp/apr8QUOUW
50404 httpd 8 v r -w------ 56 0 - /var/run/accept.lock.49588
50404 httpd 9 v r -w------ 1 0 - /var/run/accept.lock.49588
50404 httpd 10 v r -w------ 1 0 - /tmp/apr8QUOUW
50404 httpd 11 ? - -------- 2 0 - -

Btw fstat is sometimes helpful in identifying the number of open files and trying to estimate which ones are putting the hdd load.
Hope this info helps someone. If you know better ways to track hdd excessive loads on Linux / BSD pls share 'em pls.
 

How to check what process is listening on network port with: lsof & fuser commands in Linux / BSD

Saturday, March 16th, 2013

It is a common thing for me as a Linux and FreeBSD sysadmin to know what process assignes to which port number? I'm sure many novice system administrators will end up sooner or later with same question. Knowing what kind of processes has listening to TCP and UDP protocol / ports is a must to have a proper configured Linux / BSD system. In Linux there are two commands ( lsof and fuser) with which you can get various extra PID information on running processes (i.e. get information which cannot otherwise be obtained via the usual ps and netstat  To use them on most Linux distributions, you will have to have them installed.

1. Install fuser / lsof on Linux / BSD

a) On RPM based Linux distros – Fedora, CentOS, RHEL, SuSE /sbin/fuser is usually part of base install psmisc rpm package, however /usr/sbin/lsof is not among standard installed rpms, so you have to manually install via yum:

[root@centos ~]# yum install -y lsof
….

b) On Deb based Linuxes (Debian, Ubuntu, Mint, ArchLinux etc.). both lsof and fuser has to be installed via a separate packages non-part of Debian base install packs.

server:~# apt-get --yes install lsof fuser
....

On Debian full path location of both is in /bin/fuser and /usr/bin/lsof.

Two tools are precious swiss army knife outfit to use, whether you doubt someone cracked into a server or in doubt you might have "hidden" cracker processes on server.

c) Install fuser on Free/Net/Open/ BSD

bsd# cd /usr/ports/sysutils/fuser
bsd# make install clean
....
bsd# cd /usr/ports/sysutils/lsof
bsd# make install clean
....

2. Using fuser and lsof to look up process PIDs assigned to port numbers

lsof name is derived from List Open Files, as we know in UNIX, GNU / Linux,  *BSD everything on the system is a file, thus to get all kind of information concerning all active files (i.e. ports, PIDs, procotols and process names;

server:~# lsof +M -i4 | less

COMMAND     PID     USER   FD   TYPE   DEVICE SIZE/OFF NODE NAME
portmap    1317   daemon    4u  IPv4     3930      0t0  UDP *:sunrpc[portmapper]
portmap    1317   daemon    5u  IPv4     3939      0t0  TCP *:sunrpc[portmapper] (LISTEN)
rpc.statd  1329    statd    4u  IPv4     3974      0t0  UDP *:657
rpc.statd  1329    statd    6u  IPv4     3983      0t0  UDP *:28530[status]
rpc.statd  1329    statd    7u  IPv4     3986      0t0  TCP *:58515[status] (LISTEN)
apache2    1625 www-data    3u  IPv4     5456      0t0  TCP *:www (LISTEN)
apache2    1625 www-data    4u  IPv4     5458      0t0  TCP *:https (LISTEN)
sshd       1918     root    3u  IPv4     4945      0t0  TCP *:ssh (LISTEN)
miniserv.  2155     root    5u  IPv4     5299      0t0  TCP *:20000 (LISTEN)
miniserv.  2155     root    6u  IPv4     5300      0t0  UDP *:20000
miniserv.  2161     root    6u  IPv4     5367      0t0  TCP *:webmin (LISTEN)
miniserv.  2161     root    7u  IPv4     5368      0t0  UDP *:10000
ntpd       2172      ntp   16u  IPv4     5395      0t0  UDP *:ntp
ntpd       2172      ntp   18u  IPv4     5402      0t0  UDP localhost:ntp
ntpd       2172      ntp   19u  IPv4     5403      0t0  UDP iqtest.soccerfame.com:ntp
ntpd       2172      ntp   20u  IPv4    16028      0t0  UDP secure.broomlake.com:ntp
apache2    4505 www-data    3u  IPv4     5456      0t0  TCP *:www (LISTEN)
apache2    4505 www-data    4u  IPv4     5458      0t0  TCP *:https (LISTEN)
apache2    4539 www-data    3u  IPv4     5456      0t0  TCP *:www (LISTEN)
apache2    4539 www-data    4u  IPv4     5458      0t0  TCP *:https (LISTEN)
apache2    4780 www-data    3u  IPv4     5456      0t0  TCP *:www (LISTEN)
apache2    4780 www-data    4u  IPv4     5458      0t0  TCP *:https (LISTEN)
apache2    4900 www-data    3u  IPv4     5456      0t0  TCP *:www (LISTEN)
apache2    4900 www-data    4u  IPv4     5458      0t0  TCP *:https (LISTEN)
apache2    4907 www-data    3u  IPv4     5456      0t0  TCP *:www (LISTEN)
apache2    4907 www-data    4u  IPv4     5458      0t0  TCP *:https (LISTEN)
apache2    4915 www-data    3u  IPv4     5456      0t0  TCP *:www (LISTEN)
apache2    4915 www-data    4u  IPv4     5458      0t0  TCP *:https (LISTEN)
apache2    5067 www-data    3u  IPv4     5456      0t0  TCP *:www (LISTEN)
apache2    5067 www-data    4u  IPv4     5458      0t0  TCP *:https (LISTEN)
apache2    5133 www-data    3u  IPv4     5456      0t0  TCP *:www (LISTEN)
apache2    5133 www-data    4u  IPv4     5458      0t0  TCP *:https (LISTEN)
apache2    5134 www-data    3u  IPv4     5456      0t0  TCP *:www (LISTEN)
apache2    5134 www-data    4u  IPv4     5458      0t0  TCP *:https (LISTEN)
apache2    5148 www-data    3u  IPv4     5456      0t0  TCP *:www (LISTEN)
apache2    5148 www-data    4u  IPv4     5458      0t0  TCP *:https (LISTEN)
apache2    5152 www-data    3u  IPv4     5456      0t0  TCP *:www (LISTEN)
apache2    5152 www-data    4u  IPv4     5458      0t0  TCP *:https (LISTEN)
apache2    5259 www-data    3u  IPv4     5456      0t0  TCP *:www (LISTEN)
apache2    5259 www-data    4u  IPv4     5458      0t0  TCP *:https (LISTEN)
apache2    5265 www-data    3u  IPv4     5456      0t0  TCP *:www (LISTEN)
apache2    5265 www-data    4u  IPv4     5458      0t0  TCP *:https (LISTEN)
apache2    5266 www-data    3u  IPv4     5456      0t0  TCP *:www (LISTEN)
apache2    5266 www-data    4u  IPv4     5458      0t0  TCP *:https (LISTEN)
apache2    5346 www-data    3u  IPv4     5456      0t0  TCP *:www (LISTEN)
apache2    5346 www-data    4u  IPv4     5458      0t0  TCP *:https (LISTEN)
apache2    5356 www-data    3u  IPv4     5456      0t0  TCP *:www (LISTEN)
apache2    5356 www-data    4u  IPv4     5458      0t0  TCP *:https (LISTEN)
apache2    5467 www-data    3u  IPv4     5456      0t0  TCP *:www (LISTEN)
apache2    5467 www-data    4u  IPv4     5458      0t0  TCP *:https (LISTEN)
apache2    5523 www-data    3u  IPv4     5456      0t0  TCP *:www (LISTEN)
apache2    5523 www-data    4u  IPv4     5458      0t0  TCP *:https (LISTEN)
apache2    5568 www-data    3u  IPv4     5456      0t0  TCP *:www (LISTEN)
apache2    5568 www-data    4u  IPv4     5458      0t0  TCP *:https (LISTEN)
apache2    5715 www-data    3u  IPv4     5456      0t0  TCP *:www (LISTEN)
apache2    5715 www-data    4u  IPv4     5458      0t0  TCP *:https (LISTEN)
apache2    5716 www-data    3u  IPv4     5456      0t0  TCP *:www (LISTEN)
apache2    5716 www-data    4u  IPv4     5458      0t0  TCP *:https (LISTEN)
apache2    5758 www-data    3u  IPv4     5456      0t0  TCP *:www (LISTEN)
apache2    5758 www-data    4u  IPv4     5458      0t0  TCP *:https (LISTEN)
apache2    5789 www-data    3u  IPv4     5456      0t0  TCP *:www (LISTEN)
apache2    5789 www-data    4u  IPv4     5458      0t0  TCP *:https (LISTEN)
apache2    6106 www-data    3u  IPv4     5456      0t0  TCP *:www (LISTEN)
apache2    6106 www-data    4u  IPv4     5458      0t0  TCP *:https (LISTEN)
apache2   16608 www-data    3u  IPv4     5456      0t0  TCP *:www (LISTEN)
apache2   16608 www-data    4u  IPv4     5458      0t0  TCP *:https (LISTEN)
apache2   16904 www-data    3u  IPv4     5456      0t0  TCP *:www (LISTEN)
apache2   16904 www-data    4u  IPv4     5458      0t0  TCP *:https (LISTEN)
apache2   17124 www-data    3u  IPv4     5456      0t0  TCP *:www (LISTEN)
apache2   17124 www-data    4u  IPv4     5458      0t0  TCP *:https (LISTEN)
apache2   17280 www-data    3u  IPv4     5456      0t0  TCP *:www (LISTEN)
apache2   17280 www-data    4u  IPv4     5458      0t0  TCP *:https (LISTEN)
apache2   20855 www-data    3u  IPv4     5456      0t0  TCP *:www (LISTEN)
apache2   20855 www-data    4u  IPv4     5458      0t0  TCP *:https (LISTEN)
apache2   20920 www-data    3u  IPv4     5456      0t0  TCP *:www (LISTEN)
apache2   20920 www-data    4u  IPv4     5458      0t0  TCP *:https (LISTEN)
apache2   21023 www-data    3u  IPv4     5456      0t0  TCP *:www (LISTEN)
apache2   21023 www-data    4u  IPv4     5458      0t0  TCP *:https (LISTEN)
apache2   22182 www-data    3u  IPv4     5456      0t0  TCP *:www (LISTEN)
apache2   22182 www-data    4u  IPv4     5458      0t0  TCP *:https (LISTEN)
apache2   23307 www-data    3u  IPv4     5456      0t0  TCP *:www (LISTEN)
apache2   23307 www-data    4u  IPv4     5458      0t0  TCP *:https (LISTEN)
apache2   23366 www-data    3u  IPv4     5456      0t0  TCP *:www (LISTEN)
apache2   23366 www-data    4u  IPv4     5458      0t0  TCP *:https (LISTEN)
apache2   23408 www-data    3u  IPv4     5456      0t0  TCP *:www (LISTEN)
apache2   23408 www-data    4u  IPv4     5458      0t0  TCP *:https (LISTEN)
apache2   23419 www-data    3u  IPv4     5456      0t0  TCP *:www (LISTEN)
apache2   23419 www-data    4u  IPv4     5458      0t0  TCP *:https (LISTEN)
apache2   23428 www-data    3u  IPv4     5456      0t0  TCP *:www (LISTEN)
apache2   23428 www-data    4u  IPv4     5458      0t0  TCP *:https (LISTEN)
apache2   23452 www-data    3u  IPv4     5456      0t0  TCP *:www (LISTEN)
apache2   23452 www-data    4u  IPv4     5458      0t0  TCP *:https (LISTEN)
apache2   23561 www-data    3u  IPv4     5456      0t0  TCP *:www (LISTEN)
apache2   23561 www-data    4u  IPv4     5458      0t0  TCP *:https (LISTEN)
apache2   23579 www-data    3u  IPv4     5456      0t0  TCP *:www (LISTEN)
apache2   23579 www-data    4u  IPv4     5458      0t0  TCP *:https (LISTEN)
apache2   23851 www-data    3u  IPv4     5456      0t0  TCP *:www (LISTEN)
apache2   23851 www-data    4u  IPv4     5458      0t0  TCP *:https (LISTEN)
apache2   24103 www-data    3u  IPv4     5456      0t0  TCP *:www (LISTEN)
apache2   24103 www-data    4u  IPv4     5458      0t0  TCP *:https (LISTEN)
apache2   24659 www-data    3u  IPv4     5456      0t0  TCP *:www (LISTEN)
apache2   24659 www-data    4u  IPv4     5458      0t0  TCP *:https (LISTEN)
sshd      25073     root    3u  IPv4 29855891      0t0  TCP iqtest.soccerfame.com:ssh->www.pc-freak.net:50176 (ESTABLISHED)
sshd      25084     hipo    3u  IPv4 29855891      0t0  TCP iqtest.soccerfame.com:ssh->www.pc-freak.net:50176 (ESTABLISHED)
apache2   25089 www-data    3u  IPv4     5456      0t0  TCP *:www (LISTEN)
apache2   25089 www-data    4u  IPv4     5458      0t0  TCP *:https (LISTEN)
apache2   26737 www-data    3u  IPv4     5456      0t0  TCP *:www (LISTEN)
apache2   26737 www-data    4u  IPv4     5458      0t0  TCP *:https (LISTEN)
apache2   27243 www-data    3u  IPv4     5456      0t0  TCP *:www (LISTEN)
apache2   27243 www-data    4u  IPv4     5458      0t0  TCP *:https (LISTEN)
apache2   27282 www-data    3u  IPv4     5456      0t0  TCP *:www (LISTEN)
apache2   27282 www-data    4u  IPv4     5458      0t0  TCP *:https (LISTEN)
apache2   27633 www-data    3u  IPv4     5456      0t0  TCP *:www (LISTEN)
apache2   27633 www-data    4u  IPv4     5458      0t0  TCP *:https (LISTEN)
apache2   28205 www-data    3u  IPv4     5456      0t0  TCP *:www (LISTEN)
apache2   28205 www-data    4u  IPv4     5458      0t0  TCP *:https (LISTEN)
apache2   29244 www-data    3u  IPv4     5456      0t0  TCP *:www (LISTEN)
apache2   29244 www-data    4u  IPv4     5458      0t0  TCP *:https (LISTEN)
apache2   29372 www-data    3u  IPv4     5456      0t0  TCP *:www (LISTEN)
apache2   29372 www-data    4u  IPv4     5458      0t0  TCP *:https (LISTEN)
apache2   29411 www-data    3u  IPv4     5456      0t0  TCP *:www (LISTEN)
apache2   29411 www-data    4u  IPv4     5458      0t0  TCP *:https (LISTEN)
apache2   29462 www-data    3u  IPv4     5456      0t0  TCP *:www (LISTEN)
apache2   29462 www-data    4u  IPv4     5458      0t0  TCP *:https (LISTEN)
apache2   29548 www-data    3u  IPv4     5456      0t0  TCP *:www (LISTEN)
apache2   29548 www-data    4u  IPv4     5458      0t0  TCP *:https (LISTEN)
apache2   30161 www-data    3u  IPv4     5456      0t0  TCP *:www (LISTEN)
apache2   30161 www-data    4u  IPv4     5458      0t0  TCP *:https (LISTEN)
apache2   31876 www-data    3u  IPv4     5456      0t0  TCP *:www (LISTEN)
apache2   31876 www-data    4u  IPv4     5458      0t0  TCP *:https (LISTEN)
apache2   31958 www-data    3u  IPv4     5456      0t0  TCP *:www (LISTEN)
apache2   31958 www-data    4u  IPv4     5458      0t0  TCP *:https (LISTEN)
apache2   32052 www-data    3u  IPv4     5456      0t0  TCP *:www (LISTEN)
apache2   32052 www-data    4u  IPv4     5458      0t0  TCP *:https (LISTEN)
apache2   32061 www-data    3u  IPv4     5456      0t0  TCP *:www (LISTEN)
apache2   32061 www-data    4u  IPv4     5458      0t0  TCP *:https (LISTEN)
apache2   32143 www-data    3u  IPv4     5456      0t0  TCP *:www (LISTEN)
apache2   32143 www-data    4u  IPv4     5458      0t0  TCP *:https (LISTEN)
apache2   32149 www-data    3u  IPv4     5456      0t0  TCP *:www (LISTEN)
apache2   32149 www-data    4u  IPv4     5458      0t0  TCP *:https (LISTEN)
apache2   32440 www-data    3u  IPv4     5456      0t0  TCP *:www (LISTEN)
apache2   32440 www-data    4u  IPv4     5458      0t0  TCP *:https (LISTEN)
apache2   32635 www-data    3u  IPv4     5456      0t0  TCP *:www (LISTEN)
apache2   32635 www-data    4u  IPv4     5458      0t0  TCP *:https (LISTEN)
apache2   32790 www-data    3u  IPv4     5456      0t0  TCP *:www (LISTEN)
apache2   32790 www-data    4u  IPv4     5458      0t0  TCP *:https (LISTEN)
apache2   40211 www-data    3u  IPv4     5456      0t0  TCP *:www (LISTEN)
apache2   40211 www-data    4u  IPv4     5458      0t0  TCP *:https (LISTEN)
apache2   40309 www-data    3u  IPv4     5456      0t0  TCP *:www (LISTEN)
apache2   40309 www-data    4u  IPv4     5458      0t0  TCP *:https (LISTEN)
apache2   40432 www-data    3u  IPv4     5456      0t0  TCP *:www (LISTEN)
apache2   40432 www-data    4u  IPv4     5458      0t0  TCP *:https (LISTEN)
apache2   40476 www-data    3u  IPv4     5456      0t0  TCP *:www (LISTEN)
apache2   40476 www-data    4u  IPv4     5458      0t0  TCP *:https (LISTEN)
apache2   46319     root    3u  IPv4     5456      0t0  TCP *:www (LISTEN)
apache2   46319     root    4u  IPv4     5458      0t0  TCP *:https (LISTEN)
apache2   46438 www-data    3u  IPv4     5456      0t0  TCP *:www (LISTEN)
apache2   46438 www-data    4u  IPv4     5458      0t0  TCP *:https (LISTEN)
apache2   46439 www-data    3u  IPv4     5456      0t0  TCP *:www (LISTEN)
apache2   46439 www-data    4u  IPv4     5458      0t0  TCP *:https (LISTEN)
apache2   46440 www-data    3u  IPv4     5456      0t0  TCP *:www (LISTEN)
apache2   46440 www-data    4u  IPv4     5458      0t0  TCP *:https (LISTEN)
apache2   46441 www-data    3u  IPv4     5456      0t0  TCP *:www (LISTEN)
apache2   46441 www-data    4u  IPv4     5458      0t0  TCP *:https (LISTEN)
apache2   46442 www-data    3u  IPv4     5456      0t0  TCP *:www (LISTEN)
apache2   46442 www-data    4u  IPv4     5458      0t0  TCP *:https (LISTEN)
apache2   46443 www-data    3u  IPv4     5456      0t0  TCP *:www (LISTEN)
apache2   46443 www-data    4u  IPv4     5458      0t0  TCP *:https (LISTEN)
apache2   46509     root    3u  IPv4     5456      0t0  TCP *:www (LISTEN)
apache2   46509     root    4u  IPv4     5458      0t0  TCP *:https (LISTEN)
apache2   46510     root    3u  IPv4     5456      0t0  TCP *:www (LISTEN)
apache2   46510     root    4u  IPv4     5458      0t0  TCP *:https (LISTEN)
apache2   46515     root    3u  IPv4     5456      0t0  TCP *:www (LISTEN)
apache2   46515     root    4u  IPv4     5458      0t0  TCP *:https (LISTEN)
apache2   51287 www-data    3u  IPv4     5456      0t0  TCP *:www (LISTEN)
apache2   51287 www-data    4u  IPv4     5458      0t0  TCP *:https (LISTEN)
apache2   51485 www-data    3u  IPv4     5456      0t0  TCP *:www (LISTEN)
apache2   51485 www-data    4u  IPv4     5458      0t0  TCP *:https (LISTEN)
apache2   51804 www-data    3u  IPv4     5456      0t0  TCP *:www (LISTEN)
apache2   51804 www-data    4u  IPv4     5458      0t0  TCP *:https (LISTEN)
named     54418     bind   20u  IPv4 31298857      0t0  TCP localhost:domain (LISTEN)
named     54418     bind   21u  IPv4 31298859      0t0  TCP iqtest.soccerfame.com:domain (LISTEN)
named     54418     bind   22u  IPv4 31298861      0t0  TCP secure.broomlake.com:domain (LISTEN)
named     54418     bind   23u  IPv4 31298865      0t0  TCP localhost:953 (LISTEN)
named     54418     bind  512u  IPv4 31298856      0t0  UDP localhost:domain
named     54418     bind  513u  IPv4 31298858      0t0  UDP iqtest.soccerfame.com:domain
named     54418     bind  514u  IPv4 31298860      0t0  UDP secure.broomlake.com:domain
named     54418     bind  515u  IPv4 31298864      0t0  UDP *:domain
proftpd   62010  proftpd    1u  IPv4 31306260      0t0  TCP *:ftp (LISTEN)
mysqld    62420    mysql   11u  IPv4 31306903      0t0  TCP *:mysql (LISTEN)
apache2   62582 www-data    3u  IPv4     5456      0t0  TCP *:www (LISTEN)
apache2   62582 www-data    4u  IPv4     5458      0t0  TCP *:https (LISTEN)
apache2   62845 www-data    3u  IPv4     5456      0t0  TCP *:www (LISTEN)
apache2   62845 www-data    4u  IPv4     5458      0t0  TCP *:https (LISTEN)
apache2   64748 www-data    3u  IPv4     5456      0t0  TCP *:www (LISTEN)
apache2   64748 www-data    4u  IPv4     5458      0t0  TCP *:https (LISTEN)

Above lsof command lists all active listening processes port number on UDP and TCP/IP 4 proto with the assigned process PID number (in second column). This is very useful if you find out to have listening service on port number and you cannot figure out what process name exactly is listening.

A classic example, where this is very helpful is if you have a listening process on SMTP port 25 and you cannot identify what kind of mail server is taking up the port? This has happened me many times on Debian Linux based hosts, which by default had priorly installed sendmail and I later removed sendmail to install Postfix or Exim SMTP.
To find out what is assigning port 25, you had to grep the protocol name from all binded host processes, like so:


server:~# lsof +M -i4 | grep -i smtp

exim4     17550     root    3u  IPv4 31577966      0t0  TCP localhost:smtp (LISTEN)

Whether you want to get information on Process ID, binding other random port lets say port 10000, following same logic you can grep it:

server:~# lsof +M -i4 |grep -i 10000
miniserv.  2161     root    7u  IPv4     5368      0t0  UDP *:10000

To get rid of a process for which you're unsure what kind of (/etc/init.d/service-name) init script is starting it, you can then use kill cmd to stop it;

server:~# kill -9 2161

Second approach to find out what kind of process is listening on a random port or socket, lets say port num 58515 is by using fuser.


server:~# netstat -ltn4
Active Internet connections (only servers)
Proto Recv-Q Send-Q Local Address           Foreign Address         State     
tcp        0      0 0.0.0.0:3306            0.0.0.0:*               LISTEN    
tcp        0      0 0.0.0.0:111             0.0.0.0:*               LISTEN    
tcp        0      0 0.0.0.0:80              0.0.0.0:*               LISTEN    
tcp        0      0 0.0.0.0:10000           0.0.0.0:*               LISTEN    
tcp        0      0 0.0.0.0:58515           0.0.0.0:*               LISTEN    
tcp        0      0 0.0.0.0:21              0.0.0.0:*               LISTEN    
tcp        0      0 77.92.85.71:53          0.0.0.0:*               LISTEN    
tcp        0      0 109.123.106.44:53       0.0.0.0:*               LISTEN    
tcp        0      0 127.0.0.1:53            0.0.0.0:*               LISTEN    
tcp        0      0 0.0.0.0:22              0.0.0.0:*               LISTEN    
tcp        0      0 127.0.0.1:953           0.0.0.0:*               LISTEN    
tcp        0      0 0.0.0.0:443             0.0.0.0:*               LISTEN    
tcp        0      0 0.0.0.0:20000           0.0.0.0:*               LISTEN    

Below netstat cmmand, lists all active listening processes on respective IP address and port for protocol TCPIP v.4.

Hence on to get more information on what process is listening on port 58515?

server:~#  fuser -v 58515/tcp

                     USER        PID ACCESS COMMAND
58515/tcp:           statd      1329 F…. rpc.statd

Once you know what is listening, whether you want to kill it this is also possible directly through fuser;


server:~# fuser -vk 58515/tcp

As a close-up, I will say fuser and lsof are two must have software tools on any productive server. It is among the critical applications admin has to install during initial server set-up. fuser and lsof helps me often in my sysadmin work, it was more than once I've used them to identify script-kiddies exploit scanners running as a standard process names, as well secretly listening on weird port number  cracker back-doors.

Hopefully this little article, helps someone learn something new. Plenty is written and will be written and if one takes the time to research he can learn much, much more. I'm sure my tiny article is nothing new under the sun for old-school admins, I still hope it will be of use to novice. I'm looking forward to hear if I'm missing some neat use or some interesting case, when lsof or fuser "saved your ass" 🙂
 

How to take area screenshots in GNOME – Take quick area selection screenshots in G* / Linux and BSD

Thursday, March 15th, 2012

Quick Area screenshot in GNOME how to make quick area selection screenshots in Linux and FreeBSD gnome-screenshot shot

Often when, you do something on your PC, you need to make a quick screenshot of a screen area.. Yes GNOME's feature to take complete screenshots of Screen with Print Screen SysRQ and consequential picture edit with GIMP is one way, but this is far away from quick. This method to chop out of a complete display screenshot usually takes from 40 secs to 1 minute to properly cut and save a selection of the whole picture.
Another common use, that I love in GNOME is the ALT + Print Screen SysRQ key combination. alt+ print scr sysrq is handy while taking a single window screenshot is desired. Anyways often you only need to make a screenshot of a tiny area of the screen. Many people might think this is not possible currently in GNOME, but they will be wrong as there are no impossible but hard things to achieve on Linux / FreeBSD 😉

There are at least two ways using a predefined command for taking quick area screen snapshot.

1. Taking quick area screenshot by using ImageMagick's import command

To use import you will need to have installed ImageMagickswiss army knife of command line image manipulation 😉
For area screenshot with import, press ALT+F2 and type inside Run Application box:
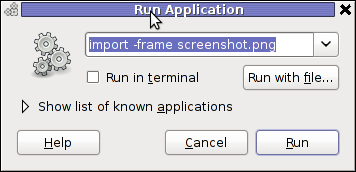
Screenshot GNOME run application GNU / Linux Debian ImageMagick import area screenshot

import -frame screenshot.png

Now make the selection of the exact screen area you would like to screeshot in file screenshot.png
Note that screenshot.png file will be saved by default in your home directory as it is read from $HOME shell variable:

hipo@noah:~$ echo $HOME/home/hipo
hipo@noah:~$ ls -al screenshot.png
-rw-r--r-- 1 hipo hipo 4950 Mar 14 21:11 screenshot.png

You see my $HOME equals /home/hipo, therefore screenshot.png just grabbed is saved in there.

One downside of taking the screenshot with import is that picture snapshot is not further edittable, if it has to be further processed with GIMP or some other graphic editor program.

In the screenshot, below I show you one screen area of my XMMS taken with import -frame screenshot.png cmd:
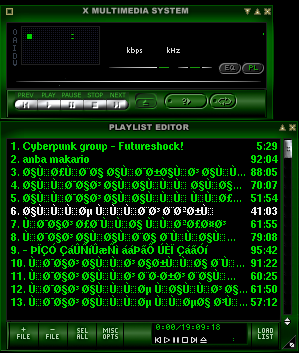
XMMS Screen Area Screenshot import screenshot

Trying to open the screenshot.png, file with GIMP displays the following error in GIMP:
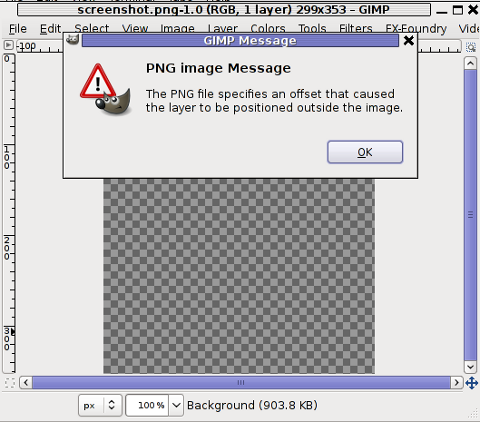
PNG image message PNG the file specifies offset that caused the layer to be positioned outiside image GIMP screenshot

Not all area snapshots taken with import -frame, create this issue sometimes screenshots are opening in GIMP but only area of the screenshot.png is visible in gimp.

Thanksfull, there is work around to this issue by converting the import generated PNG format picture to JPEG with ImageMagick's convert and then edit the .JPEG with GIMP etc.:

hipo@noah:~$ convert screenshot.png screenshot.jpg

Hence to permanently work around it, in case you intend to apply (GIMP modifications), once area snapshot is made instruct import to save its output picture in .jpeg, e.g.:

hipo@noah:~$ import -frame screenshot.jpeg

2. Taking quick area screenshot using gnome-screenshot cmd

Once again invoke the GNOME command Launcher by pressing Alt+F2 (holding alt and pressing F2) and type in the launch box:

gnome-screenshot -a
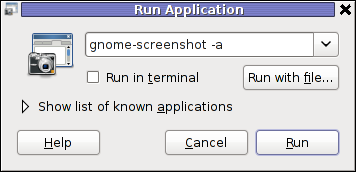
gnome-screenshot Run Application in GNOME 2.30 on Debian GNU / Linux

Below is a small area from my desktop, chopped with gnome-screenshot 🙂

GNOME desktop area chop screenshot with gnome-screenshot on my home Debian Linux

You see on above screenshot a tiny (picture) icon one of the greatest, if not the greatest bulgarian saint – saint John of Rila. St. John's lived as hermit for many years in Rila mountain and by God's grace possessed incorruptable body. His incorruptable body is still kept and can be venerated in Rila Monastery. The monastery is located 160 km from Bulgaria's capital city Sofia

St. Johns first Bulgarian established monastery Rila Monastery is currently the biggest functioing monastery in Bulgaria. The saints monastery is considered one of the most holy places in Bulgaria. If you have a travel or plan a holiday in Bulgaria, I warmly recommend you go there and venerate the saint incorruptable relics.

3. Binding keys to allow quick area screenshot taking with gnome-screenshot in GNOME

This configuration is for GNOME 2.x and is tested to work on my Debian (Squeeze 6.0), GNOME ver. 2.30.2, it should work in earlier Ubuntu versions shipped with GNOME 2.2.xx too. As I've red on the Internet it works well with Ubuntu 10.10Binding a key for screenshot area grab, should be working properly also on any GNOME 2.2.x supporting OS, including the BSD family OSes (FreeBSD, OpenBSD, NetBSD)

a) setting gnome-screenshot key binding for interactive screenshot area grab

Navigate the mouse cursor to GNOME main menus panel in left top, where you see (Applications, Places, System).
Therein use menus:

System -> Preferences -> Keybord Shortcuts -> Add ->

Alternatively if you prefer you can directly invoke the Keyboard Shortcuts configuration with command:

hipo@noah:~$ gnome-keybinding-properties

Further on, assign a shortcut by filling in something like:

name: grab-screen-area
command: gnome-screenshot -i -a
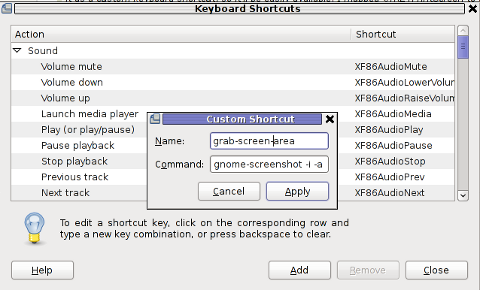
GNOME add keyboard shortcut map key for area interactive screenshot

press Apply and next map a key to the new defined key binding:
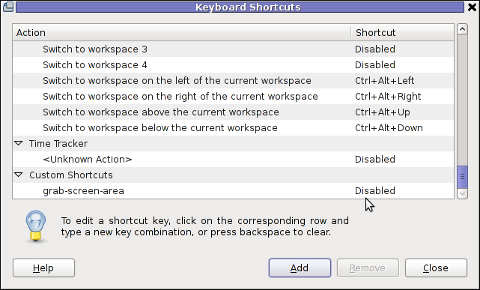
GNOME add keyboard shortcut map key

Under the Shortcut column click on Disabled and assign some key combination to invoke the cmd for example Ctrl+F4

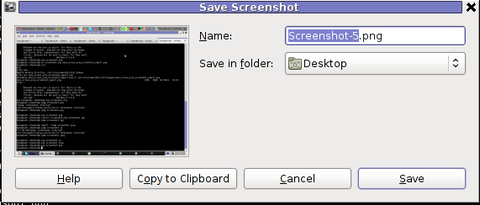
The command gnome-screenshot -i makes gnome-screenshot, show interactive make screenshot dialog like the one in below screenshot.
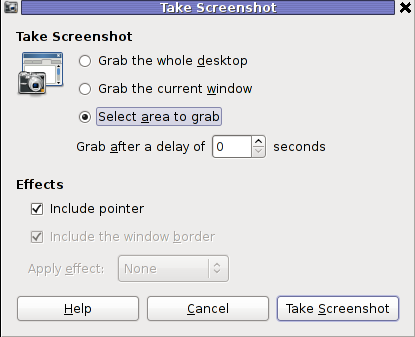
GNOME screenshot interactive screenshot select area grab shot

b) creating gnome-screenshot -a area screenshot key binding for quick area screenshots "on the fly"

The procedure is precisely the same as with adding interactive screenshot; Under Keyboard Shortcuts GNOME config assign new key binding by pressing Add button and adding:

name: grab-screen-area1
command: gnome-screenshot -a

Once again in Shortcut column in line starting with grab-screen-area1 add your desired key switch. I personally like Ctrl+Print Screen SysRQ as it is close to the default GNOME key combination assigned for taking screenshot for a Windows Alt+Print SysRq

It was logical, that this key binding should work and a direct selection mouse cursor to appear once Alt+Print SysRQ is pressed, however for some reason this is not working (hmm, maybe due to bug) ??

Thanksfully it is always possible to substitute the just assigned gnome-screenshot -a key binding with import -frame /home/hipo/Desktop/screenshot.png

If you have followed literally my article so far and you did tried to place a bind for gnome-screenshot -a, modifty grab-screen-area1 to be something like:

name: grab-screen-area1
command: import -frame /home/hipo/Desktop/screenshot.png

Where modify the path /home/hipo/Desktop/screenshot.png, to wherever you prefer the region screep capture to be stored.

c) bind keys for delayed screenshot

This also a handy binding, especially if you every now and then need to make screenshots of screen with a few secs interval.
Add one more keyboard shortcut;

name: grab-screen-area2
command: gnome-screenshot -d 5

Assign a key to make a screenshot of the active display after a delay of 5 seconds. I prefer Ctrl+F5

Onwards every time you would like to make an area screenshot, just use the defined keys:

Ctrl+F4 - will prompt you interactively for the precise type of screenshot you would like to take
Ctrl+Print SysRQ - will prompt you for a direct area to select and once selected will immediately screenshot it
Ctrl+F5 - would do delayed screenshot of entire screen after a delay of 5 seconds

4. Adding border and drop shadow effects with gnome-screenshot Actually, there is plenty of interesting things to do with Screenshots which I never thought were possible.
While reading gnome-screenshot's man page, I've stumbled to an interesting argument:

-e, --effect=EFFECT,
Add an effect to the outside of the screenshot border. EFFECT can be ``shadow'' (adding drop shadow), ``border'' (adding
rectangular space around the screenshot) or ``none'' (no effect). Default is ``none''.

This would have been a nice feature but as of time of writting this article, untofrtunately it is not working in GNOME 2.30.2. I'm not sure if this is a local Debian bug, however I suspect on other Linux distributions with different GNOME build configuration, this features might be working well. My guess here is drop shadow effect and border effect are not working because, gnome-screenshot was compiled without (support for ImageMagick?).
Anyways the way the feature is supposed to be work is by invoking commands:
:

hipo@noah:~$ gnome-screenshot --border-effect=shadow
hipo@noah:~$ nome-screenshot --border-effect=border

The same basic effects, are also available through GIMP's menus:

Image -> Effects

5. Setting default behaviour of gnome-screenshot in gconf-editor GConf (Gnome config registry db)

Experienced, GNOME users should already know about the existence of gconf-editor and the gnome registry database. For those who have don't, coming from MS-Windows background gconf-editor is GNOME (graphical environment) equivalent to Microsoft Windows registry regedit command

gconf-editor can be used to atune the way the screenshots are taken by default. To do so, launch gconf-editor cmd and follow to sub-structure:

/ -> apps -> gnome-screenshot
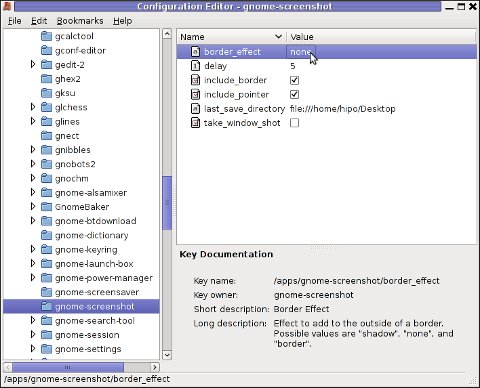
gconf-editor GNOME screenshot border effect none default gnome-screenshot gnome behaviour

The settings in above screenshot are configurations which are used by default by gnome-screenshot, right after install.
You can play with the options to change the default way PrintScreen SysRQ key press will take screenshots.
Here is one example for changing the gnome-screenshot default GNOME behaviour:
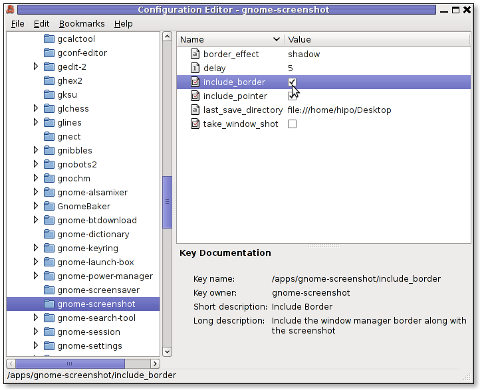
GConf Editor GNOME screenshot, border effect drop shadow and include border option set on Linux Debian

As you can see in above screenshot, I've changed my default gnome-screenshot snap taking to include a drop shadow effect:
Name | Value
border_effect | shadow include_border | (tick on)
last_save_directory | file://home/hipo/Desktop

As you see you can also control, where by default gnome-screenshot will save its screenshots, by default, its saved in $HOME/Desktop
. If you prefer some custom directory to only contain Screenshots taken for instance $HOME/Screenshots, create the directory:
hipo@noah:~$ mkdir ~/Screenshots

and then change the value for last_save_directory gconf var:

last_save_directory | file://home/hipo/Screenshots

Once settings are applied screenshots with Print Screen SysRQ key will be made with Shadow Border effect and saved in /home/hipo/Screenshots

Strangely enough, changing gnome-screenshot default screenshotting values to include screenshot effects like drop shadow or screenshot border effect works just fine.
Even though gnome-screenshot –border-effect=shadow and gnome-screenshot –border-effect=border doesn't directly affect the current screenshot to be made, I've later noticed writting this two commands in the gnome-terminal, does change the border settings for gconf-editor screenshot border.

If you enjoyed, this article and you intend to become "a professional screnshotter" :), you might also enjoy my two other articles:

Happy screenshotting 😉
How to edit, convert, join, split and re-time movie subtitle files on Linux (Fix Subtitles bad timing) / Install subtitle manipulation console tools for Linux

Tuesday, April 19th, 2011

As a Linux user I sometimes face difficulties with watching subtitled, movies. I mostly use Mplayer, Totem or VLC to watch the common video files.
The most common problems I face with subtitles are caused by bad timing, many times the solution to the bad timing issues is very simpleand comes up to changing the default movie player I use MPlayer to VLC or Totem.

However at many occasions trying to watch the movie with different kind of movie player does not help.
In this dark moments I get seriously irritated I am not a regular Windows user, where such kind of problems are almost none as many of the Windows movie player problems does fix bad timing issues automatically.

Luckily there is a work-around to this subtitles timing issues and other mishaps caused by guys who created a Movie subtitle files with a Windows subtitle editor program, subtitles timing, the Linux work-around takes a few more minutes to install a package called Subtitles

The Subtitles text utility is written in Perl and contains two executables subplay and subs .

Subtitles is the Linux subtitle Swiss Army Knife as it is capable of convert, join, split, and re-time of subtitles files

Installing Subtitles tools on Linux is a trivial job and it comes to download and installation of the 2 perl executables.
Here is how:

1. Download Subtitles.tar.gz toolsI have mirrored Linux Subtitles (Subtitles.tar.gz) here originally the binaries are to be found on URL address: http://karasik.eu.org/software/ , issue the commands:

linux:~# cd /usr/local/src
linux:/usr/local/src# wget https://www.pc-freak.net/files/Subtitles.tar.gz
...
2. Unarchive it

linux:/usr/local/src# tar -zxvvf tar -zxvvf Subtitles.tar.gz...
linux:/usr/local/src# cd Subtitles-1.0

3. Compile and install Subtitles system widePitily the Subtitles tools are not currently available as a packages in the repositories of Debian and Ubuntu Linux and thus easy installation without compilation via apt-get is unfortunately not available.

Here is the commands with which to compile and install Subtitles:

linux:/usr/local/src/Subtitles-1.0# perl Makefile.PL
...
linux:/usr/local/src/Subtitles-1.0# make
...
linux:/usr/local/src/Subtitles-1.0# make test
...

All tests successful.Files=1, Tests=17, 1 wallclock secs ( 0.05 usr 0.00 sys + 0.06 cusr 0.01 csys = 0.12 CPU)Result: PASS

linux:/usr/local/src/Subtitles-1.0# make install

Installing /usr/local/share/perl/5.10.1/Subtitles.pm
Installing /usr/local/man/man1/subplay.1p
Installing /usr/local/man/man1/subs.1p
Installing /usr/local/man/man3/Subtitles.3pm
Installing /usr/local/bin/subplay
Installing /usr/local/bin/subs
Appending installation info to /usr/local/lib/perl/5.10.1/perllocal.pod

Now as we have the subs executable installed, Let’s say your movie subtitles displays 5 seconds earlier before the movie scenes (bad timing), all you need to do to adjust your subtitles to show up in correct movie scenes is issue:

hipo@linux:/home/hipo/Movies$ subs -i -b 5 your_movie_subtitle_file_name.sub

now check out the subtitle files once again with your favourite player and the early subtitles display on your movie should be fixed.
Let’s have another scenario, say that your movie file is encoded to display 24 frames per seconds (fps) but the subtitle file is created to display the subtitles for a 25 fps, to solve this situation issue:

hipo@linux:~# subs -i -a 24/25 your_movie_subtitle_file.sub

Another possible scenario where subs command will be a precious asset is if you for example want to merge two subtitle files into one.Let’s say you have subtitles for a movie which are split over in 2 parts and the corresponding subtitles are in 2 different files, but eventually you find a better quality of the movie (DVD quality) in a single file and therefore you need the movie subtitles to be stored in one single file.
In that case to merge the subtitle files from let’s say the files movie_subtitle_file1.sub and movie_subtitle_file2.sub use the command:

subs -z movie_subtitle_file1.sub movie_subtitle_file2.sub

Some few other helpful things you can do with subs on Linux, are for example: splitting a file after a determined period of time, separating overlapped lines, and joining files into a single subtitle.

If you want to remove all the comments of gestures, facial expressions loud laughing etc. which displays usually the annoying (‘[Sneezing]’ or ‘[Music playing]) during the movie screen play, issue:

subs -e 's/[s-]*[.*]s*n*//gs' movie_subtitle_file.sub

Also other interesting Linux tool which is useful if you want to make conversions between subtitle in a (.sub) format to (.srt) format is called sub2srt perl script:

sub2srt’s home page is located on the URL address: http://www.robelix.com/sub2srt/, just to ensure it won’t just disappear with time I have created sub2srt mirror here

The most basic usage of sub2srt linux converting tool is by simply passing input sub and output srt file names like so:

linux:~# ./sub2srt 5rFF-pop.sub 5rFF-pop.srt

sub2srt supports changing of fps rate per second during conversion with the -f option as well as creationg of converted files in dos like end of file (CR+LF) with the –dos option.

Hope this article makes sense. If you find it useful, please drop me a thanks comment 😉