Posts Tagged ‘root password’
Wednesday, July 7th, 2021 
To make OpenVZ / Virtuozzo Hypervisor servers and you are not sure whether your configured container virtual machines are configured to automatically boot on Linux Physical OS host boot in case of restart after patch update set or after unexpected shutdown due to Kernel / OS bug a hang or due to some electricity Power outage.
To check what is your current configuration for Virtual Environment on CentOS Linux you need to check inside /etc/sysconfig/vz-scripts/VEID.conf
You need to check the value for inside the file
ONBOOT=""
To get the exact ID of "VEID.conf of the current openvz guest VM containers exec:
[root@openvz vz-scripts]# vzlist -a
CTID NPROC STATUS IP_ADDR HOSTNAME
300 23 running 10.10.10.1 VirtualMachine1
301 25 running 10.10.10.2 VirtualMachine2
[root@openvz ~]# cd /etc/sysconfig/vz-scripts
[root@gbapp2 vz-scripts]# pwd
/etc/sysconfig/vz-scripts
[root@openvz vz-scripts]# grep -i ONBOOT 300.conf 301.conf
300.conf:ONBOOT="yes"
301.conf:ONBOOT="yes"
If you happen to have configured ONBOOT="no" you will need to the change to respective VEID.conf:
vi /etc/sysconfig/vz-scripts/VEID.conf
search for
ONBOOT=”no”
and change to
ONBOOT=”yes”
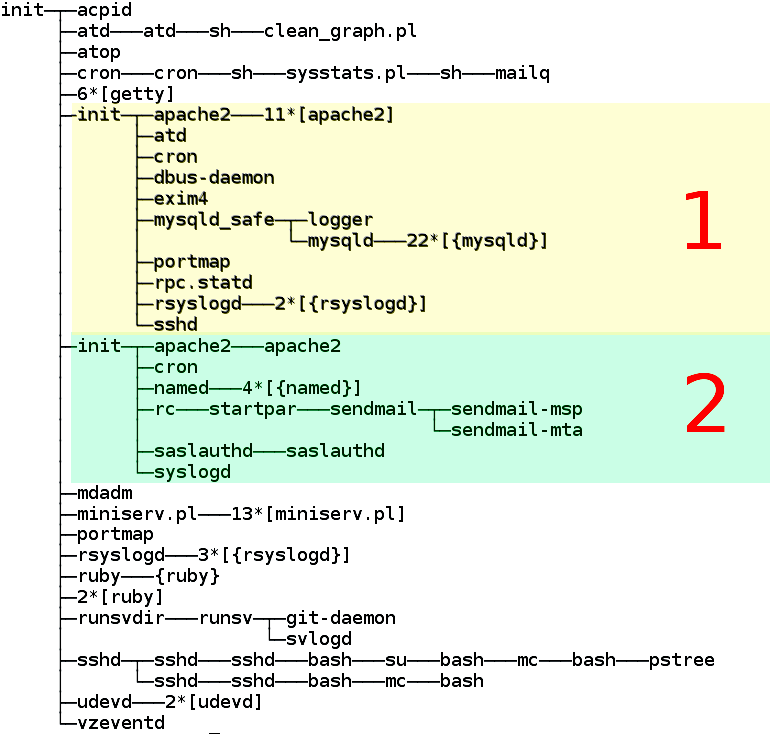
OpenVZ server process tree. The colors of the virtual severs are indicated by colors.
OpenVZ Quick cheat sheet commands
This change will auto-start the VPS container next time the host Hypervisor node is rebooted.
If you happen to have daily work with OpenVZ legacy systems like I do you might find also useful the following OpenVZ Cheatsheet pdf document.
A miniature quick cheatsheet for OpenVZ Virtualion, in case if you are like me and you have to use various virtualization technologies and tend to forget is as below:
vzlist # List running instances
vzlist -a # List all instances
vzctl stop <instance>
vzctl start <instance>
vzctl status <instance>
vzctl exec <instance> <command> # Run a command
vzctl enter <instance> # Get console
vzyum <instance> install <package> # Install a package
# Change properties
vzctl set <instance> –hostname <hostname> –save
vzctl set <instance> –ipadd <IP> –save
vzctl set <instance> –userpasswd root:<password> –save
If need to get more insight on how OpenVZ Virtualization does work on a low level and stretch out its possibilities, an old but useful document you might want to check is OpenVZ-Users-Guide PDF.
If you need it to hava e copy of it openvz_cheat_sheet.txt.
Tags: auto start, check, configured, disable, Linux Hypervisor, need, ONBOOT, root password, sysconfig, virtual machines
Posted in Linux, System Administration, Virtual Machines | No Comments »
Sunday, May 20th, 2012 
My home run machine MySQL server was suddenly down as I tried to check my blog and other sites today, the error I saw while trying to open, this blog as well as other hosted sites using the MySQL was:
Error establishing a database connection
The topology, where this error occured is simple, I have two hosts:
1. Apache version 2.0.64 compiled support externally PHP scripts interpretation via libphp – the host runs on (FreeBSD)
2. A Debian GNU / Linux squeeze running MySQL server version 5.1.61
The Apache host is assigned a local IP address 192.168.0.1 and the SQL server is running on a host with IP 192.168.0.2
To diagnose the error I've logged in to 192.168.0.2 and weirdly the mysql-server was appearing to run just fine:
debian:~# ps ax |grep -i mysql
31781 pts/0 S 0:00 /bin/sh /usr/bin/mysqld_safe
31940 pts/0 Sl 12:08 /usr/sbin/mysqld –basedir=/usr –datadir=/var/lib/mysql –user=mysql –pid-file=/var/run/mysqld/mysqld.pid –socket=/var/run/mysqld/mysqld.sock –port=3306
31941 pts/0 S 0:00 logger -t mysqld -p daemon.error
32292 pts/0 S+ 0:00 grep -i mysql
Moreover I could connect to the localhost SQL server with mysql -u root -p and it seemed to run fine. The error Error establishing a database connection meant that either something is messed up with the database or 192.168.0.2 Mysql port 3306 is not properly accessible.
My first guess was something is wrong due to some firewall rules, so I tried to connect from 192.168.0.1 to 192.168.0.2 with telnet:
freebsd# telnet 192.168.0.2 3306
Trying 192.168.0.2…
Connected to jericho.
Escape character is '^]'.
Host 'webserver' is blocked because of many connection errors; unblock with 'mysqladmin flush-hosts'
Connection closed by foreign host.
Right after the telnet was initiated as I show in the above output the connection was immediately closed with the error:
Host 'webserver' is blocked because of many connection errors; unblock with 'mysqladmin flush-hosts'Connection closed by foreign host.
In the error 'webserver' is my Apache machine set hostname. The error clearly states the problems with the 'webserver' apache host unable to connect to the SQL database are due to 'many connection errors' and a fix i suggested with mysqladmin flush-hosts
To temporary solve the error and restore my normal connectivity between the Apache and the SQL servers I logged I had to issue on the SQL host:
mysqladmin -u root -p flush-hostsEnter password:
Thogh this temporar fix restored accessibility to the databases and hence the websites errors were resolved, this doesn't guarantee that in the future I wouldn't end up in the same situation and therefore I looked for a permanent fix to the issues once and for all.
The permanent fix consists in changing the default value set for max_connect_error in /etc/mysql/my.cnf, which by default is not too high. Therefore to raise up the variable value, added in my.cnf in conf section [mysqld]:
debian:~# vim /etc/mysql/my.cnf

...

max_connect_errors=4294967295
and afterwards restarted MYSQL:
debian:~# /etc/init.d/mysql restart

Stopping MySQL database server: mysqld.

Starting MySQL database server: mysqld.

Checking for corrupt, not cleanly closed and upgrade needing tables..
To make sure the assigned max_connect_errors=4294967295 is never reached due to Apache to SQL connection errors, I've also added as a cronjob.
debian:~# crontab -u root -e

00 03 * * * mysqladmin flush-hosts
In the cron I have omitted the mysqladmin -u root -p (user/pass) input options because for convenience I have already stored the mysql root password in /root/.my.cnf
Here is how /root/.my.cnf looks like:
debian:~# cat /root/.my.cnf

[client]

user=root

password=a_secret_sql_password
Now hopefully, this would permanently solve SQL's 'failure to accept connections' due to too many connection errors for future.
Tags: apache version, Auto, basedir, bin, cnf, connection, connectionThe, daemon, database connection, debian gnu, default, Draft, due, error error, firewall rules, fix, freebsd, GNU, guess, host, host name, hostname, lib, Linux, local ip address, localhost, machine, mysql server, mysqladmin, mysqld, mysqlMoreover, nbsp, occured, password, port 3306, root, root password, running, server version, sl 12, Socket, something, SQL, sql server, squeeze, support, topology, value, webserver
Posted in MySQL, System Administration, Web and CMS | No Comments »
Monday, June 3rd, 2013 
There is plenty of software for monitoring how server performs and whether servers are correctly up and running. There is probably no Debian Linux admin who didn't already worked or at least tried Nagios and Mointor to monitor and notify whether server is unreachable or how server services operate. Nagios and Munin are play well together to prevent possible upcoming problems with Web / Db / E-mail services or get notify whether they are completely inaccessible. One similar "next-generation" and less known software is Icanga.
The reason, why to use Icinga instead of Nagios is more features a list of what does Icinga supports more than Nagios is on its site here
I recently heard of it and decided to try it myself. To try Icanga I followed Icanga's install tutorial on Wiki.Icanga.Org here
In Debian Wheezy, Icinga is already part of official repositories so installing it like in Squeeze and Lenny does not require use of external Debian BackPorts repositories.
1. Install Icinga pre-requirement packages
debian:# apt-get --yes install php5 php5-cli php-pear php5-xmlrpc php5-xsl php5-gd php5-ldap php5-mysql
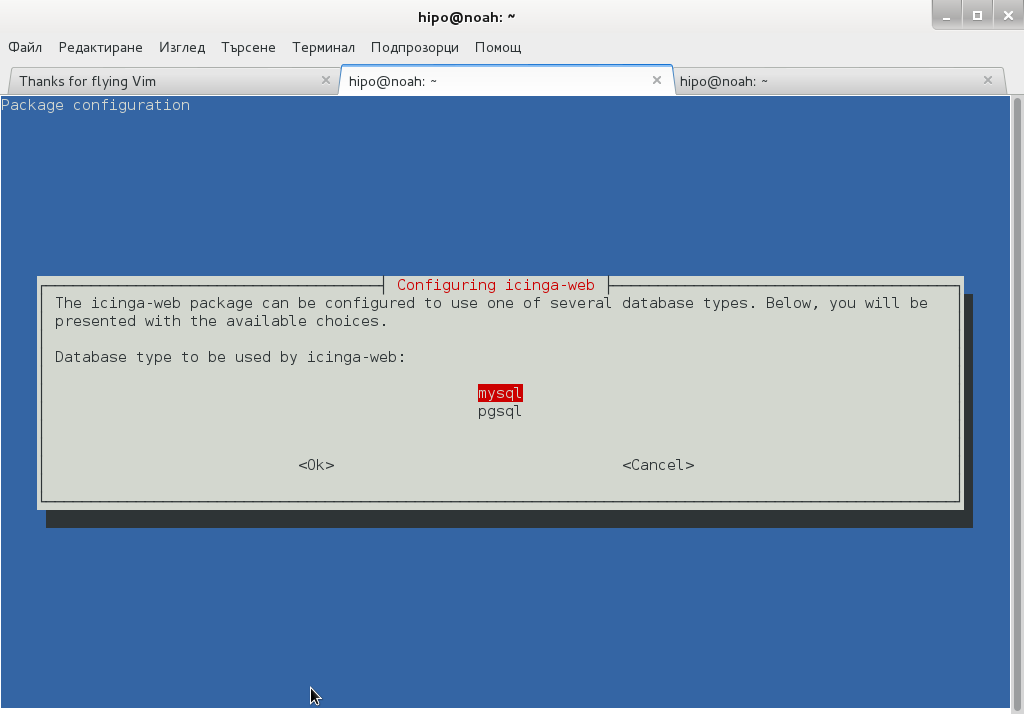
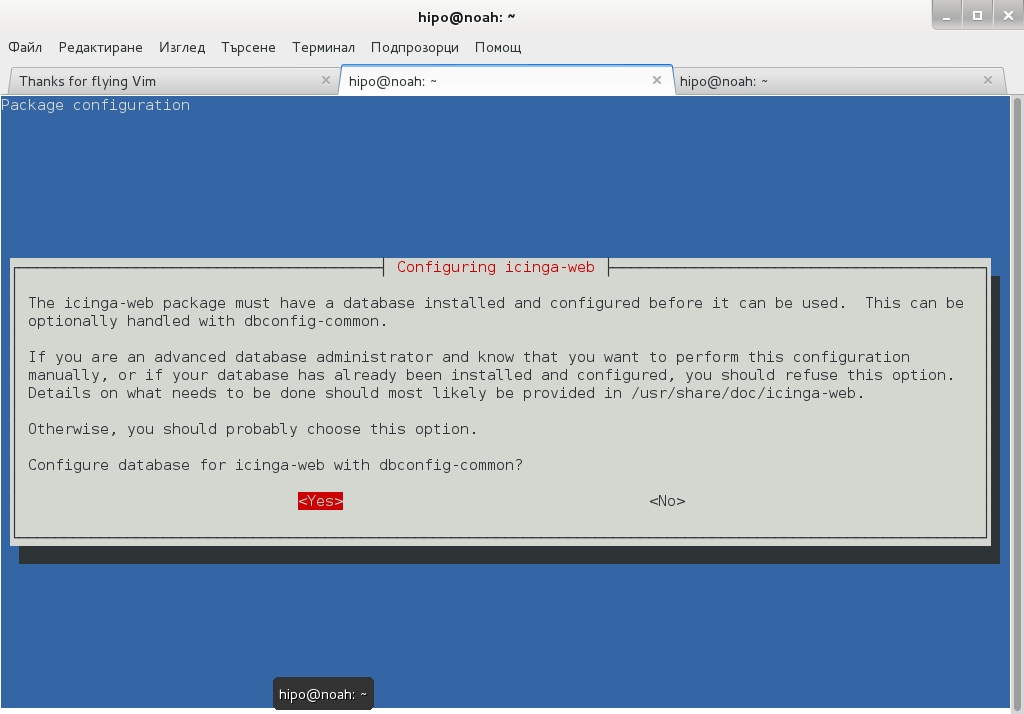
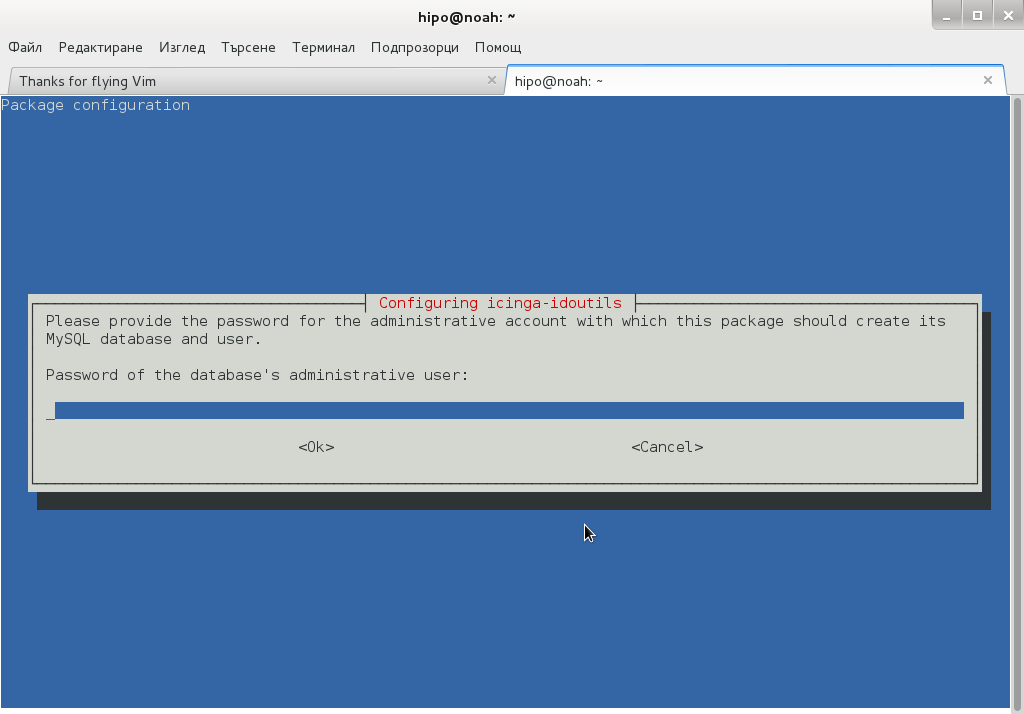
2. Install Icanga-web package
debian:~# apt-get --yes install icinga-web
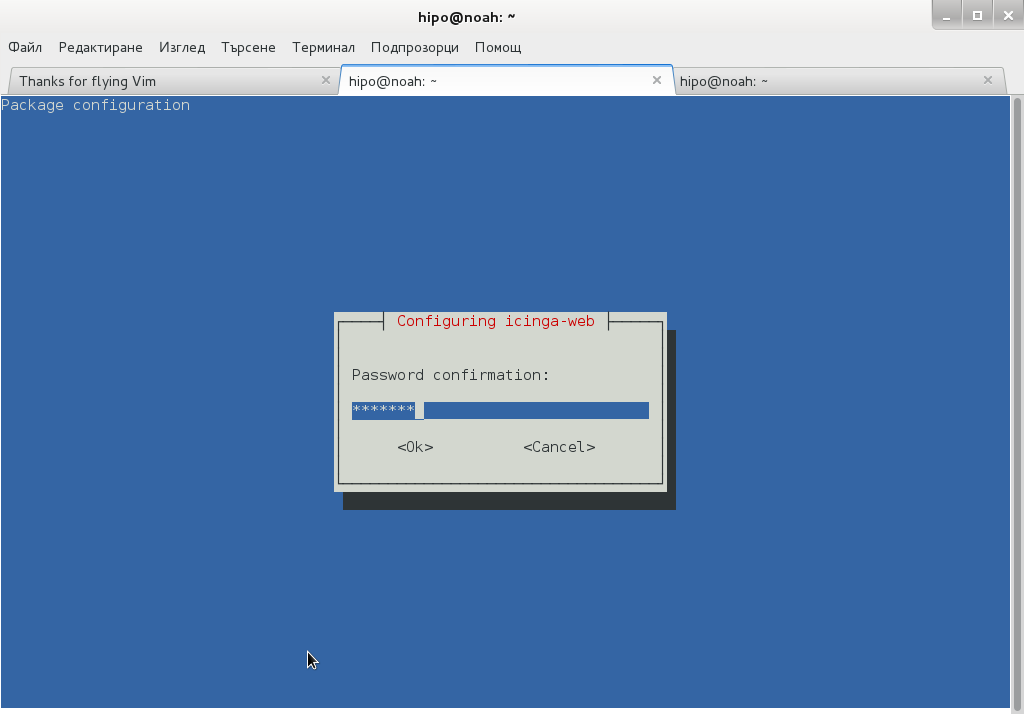
Here you will be prompted a number of times to answer few dialog questions important for security, as well as fill in MySQL server root user / password as well as SQL password that will icinga_web mySQL user use.
….
Setting up icinga-idoutils (1.7.1-6) …
dbconfig-common: writing config to /etc/dbconfig-common/icinga-idoutils.conf
granting access to database icinga for icinga-idoutils@localhost: success.
verifying access for icinga-idoutils@localhost: success.
creating database icinga: success.
verifying database icinga exists: success.
populating database via sql… done.
dbconfig-common: flushing administrative password
Setting up icinga-web (1.7.1+dfsg2-6) …
dbconfig-common: writing config to /etc/dbconfig-common/icinga-web.conf
Creating config file /etc/dbconfig-common/icinga-web.conf with new version
granting access to database icinga_web for icinga_web@localhost: success.
verifying access for icinga_web@localhost: success.
creating database icinga_web: success.
verifying database icinga_web exists: success.
populating database via sql… done.
dbconfig-common: flushing administrative password
Creating config file /etc/icinga-web/conf.d/database-web.xml with new version
database config successful: /etc/icinga-web/conf.d/database-web.xml
Creating config file /etc/icinga-web/conf.d/database-ido.xml with new version
database config successful: /etc/icinga-web/conf.d/database-ido.xml
enabling config for webserver apache2…
Enabling module rewrite.
To activate the new configuration, you need to run:
service apache2 restart
`/etc/apache2/conf.d/icinga-web.conf' -> `../../icinga-web/apache2.conf'
[ ok ] Reloading web server config: apache2 not running.
root password updates successfully!
Basedir: /usr Cachedir: /var/cache/icinga-web
Cache already purged!
3. Enable Apache mod_rewrite
debian:~# a2enmod rewrite
debian:~# /etc/init.d/apache2 restart
4. Icinga documentation files
Some key hints on Enabling some more nice Icinga features are mentioned in Icinga README files, check out, all docs files included with Icinga separate packs are into:
debian:~# ls -ld *icinga*/

drwxr-xr-x 3 root root 4096 Jun  3 10:48 icinga-common/

drwxr-xr-x 3 root root 4096 Jun  3 10:48 icinga-core/

drwxr-xr-x 3 root root 4096 Jun  3 10:48 icinga-idoutils/

drwxr-xr-x 2 root root 4096 Jun  3 10:48 icinga-web/
debian:~# less /usr/share/doc/icinga-web/README.Debian
debian:~# less /usr/share/doc/icinga-idoutils/README.Debian
5. Configuring Icinga
Icinga configurations are separated in two directories:
debian:~# ls -ld *icinga*
drwxr-xr-x 4 root root 4096 Jun 3 10:50 icinga
drwxr-xr-x 3 root root 4096 Jun 3 11:07 icinga-web
>
etc/icinga/ – (contains configurations files for on exact icinga backend server behavior)
/etc/icinga-web – (contains all kind of Icinga Apache configurations)
Main configuration worthy to look in after install is /etc/icinga/icinga.cfg.
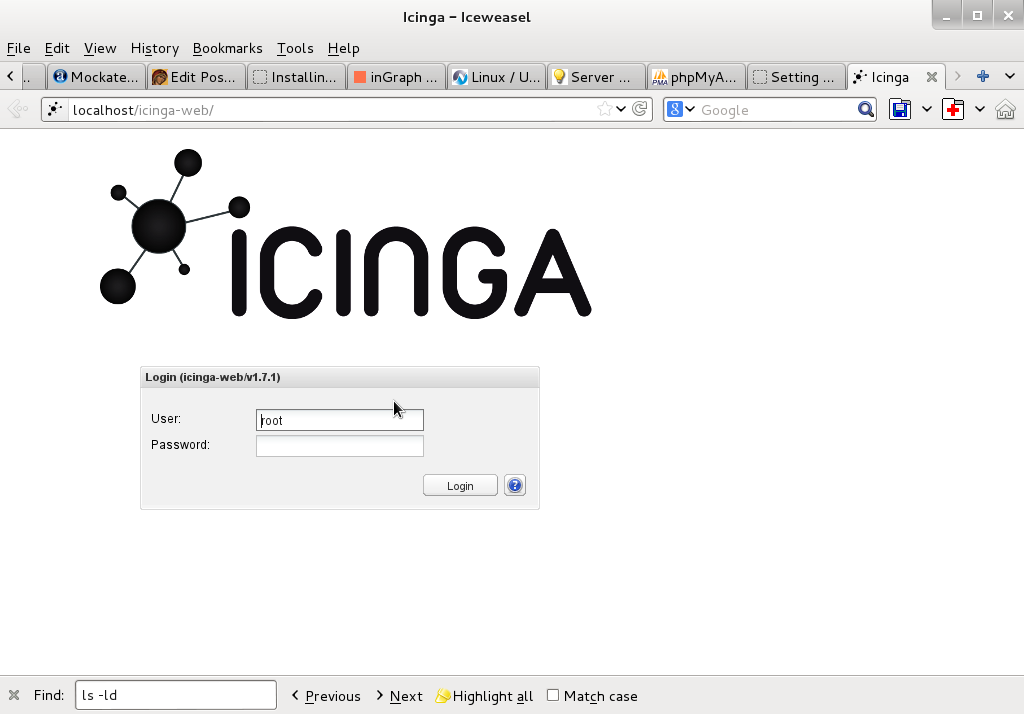
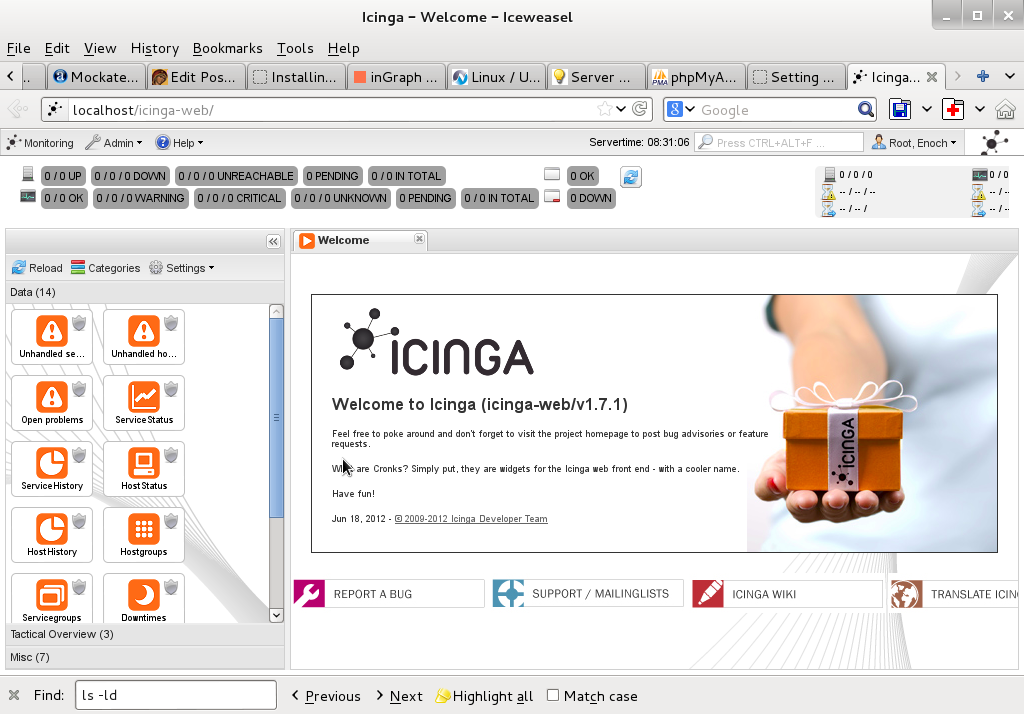
6. Accessing newly installed Icinga via web
To access just installed Icinga, open in browser URL – htp://localhost/icinga-web
7. Monitoring host services with Icinga (NRPE)
As fork of Nagios. Icinga has similar modular architecture and uses number of external plugins to Monitor external host services list of existing plugins is on Icinga's wiki here.
Just like Nagios Icinga supports NRPE protocol (Nagios Remote Plugin Executor). To setup NRPE, nrpe plugin from nagios is used (nagios-nrpe-server).
To install NRPE on any of the nodes to be tracked;
debian: ~# apt-get install –yes nagios-nrpe-server
…
Then to configure NRPE edit /etc/nagios/nrpe_local.cfg
Once NRPE is supported in Icinga, you can install on Windows or Linux hosts NRPE clients like in Nagios to report on server processes state and easily monitor if server disk space / load or service is in critical state.
Tags: apache, apache2, debian linux, Debian Linux Installing, e mail services, Icanga Nagios, known software, Linux, Monitoring, new software, NRPE, php pear, repo, repositories, repository, root password, root root, server root, server services, servers, squeeze, version, web package, xml
Posted in Everyday Life, Linux, Monitoring, System Administration, Various | 1 Comment »
Wednesday, July 10th, 2013 
Whether you have to administrate a bunch of chaotic organized MySQL servers and amount of work is more than you can bear it is very common you make stupid mistakes, like loosing MySQL root adminsitrator password. There is way to recover password by stopping SQL server and starting it with –skip-grant-tables options via SSH , however if you do it that way there is at least few seconds of down time and as its not a good idea on productive servers Debian and Ubuntu Linux admins have better way to do it by using MySQL default user used to check whether all is fine with database on MySQL server initialization via /etc/init.d/mysql. User with GRANT PRIVILEGES, (all MySQL administrator users have grant privileges) on Debian based distributions is debian-sys-maint and whether you have root access to server you can easily obtain password with:
# grep -i -E 'user|pass' /etc/mysql/debian.cnf |uniq
user = debian-sys-maint
password = k6x6tBUBfHN3ZxHv
Using this password then you can login via mysql cli or via PhpMyAdmin, whether installed and do any normal SQL operation you do as root. Of course having this password in plain text file can be very dangerous, by default it is configured to be only red by root be careful not to change this permissions by default as anyone who has access to system can then access your SQL as administrator.
To reset MySQL root password once logged in run:
 UPDATE USER set password=PASSWORD('NEW_PASS_WORD') where USER='root';

FLUSH PRIVILEGES;
Enjoy 😉
Tags: default user, distributions, Linux, mysql administrator, mysql servers, phpmyadmin, Privileges, root password, server initialization, stupid mistakes, ubuntu linux
Posted in Computer Security, Linux, MySQL, System Administration, Various | No Comments »
Saturday, June 1st, 2013 It is ultra annoying, that in newest Debian and Ubuntu releases with GNOME 3 Desktop environment on every shutdown or restart you need to type in Super User (root) password, to authorize shutdown / restart.
Generally prompting for root password on GNOME restart is obviously a good think from security point of view, but from usability one – especially on notebooks it is useless annoyance…
So after changing this behavior I came up with this tiny article on how to get rid of GNOME Shutdown / Restart password prompt.
There is a click button (on left of Auth prompt on Shutdown showing URL to XML policy rule from where this behavior is controlled. A really good hint to where to look for to change those annoying behavior…
Here is how to change this new annoying behavior to old GNOME 2 default restart with no root password prompt .
linux:~# gedit /usr/share/polkit-1/actions/org.freedesktop.consolekit.policy
Find in XML source sections:
Restart the system when multiple users are logged in System policy prevents restarting the system when other users are logged in no auth_admin_keep
Stop the system when multiple users are logged in System policy prevents stopping the system when other users are logged in no auth_admin_keep
To change Restart and Shutdown GUI behavior to not prompt for password, you need to modify in above code:
auth_admin_keep
To:
yes
After changes both sections should look like so:
<action id="org.freedesktop.consolekit.system.restart">
<description>Restart the system</description>
<message>System policy prevents restarting the system</message>
<defaults>
<allow_inactive>no</allow_inactive>
<allow_active>yes</allow_active>
</defaults>
</action>
<action id="org.freedesktop.consolekit.system.restart-multiple-users">
<description>Restart the system when multiple users are logged in</description>
<message>System policy prevents restarting the system when other users are logged in</message>
<defaults>
<allow_inactive>no</allow_inactive>
<allow_active>yes</allow_active>
</defaults>
</action>
That's all you finally get rid of the annoying prompt for root password. Enjoy 🙂
Tags: annoyance, annoying behavior, desktop environment, Gnome, Linux, multiple users, notebooks, root password, security point, source sections, tiny article, ubuntu linux, usability
Posted in Entertainment, Gnome, Linux and FreeBSD Desktop, Various | No Comments »
Wednesday, June 29th, 2011 
I’m using access to the mysql servers via localhost with mysql cli on daily basis.
With time I’ve figured out that it’s pretty unahandy to always login with my root mysql password, I mean each time to enter it, e.g.:
root@mysql-server:~# mysql -u root

Enter password:

...
Thus to make my life a way easier I decided to store my mysql root password in order to allow my root admin user to be able to login to my mysql server without asking for password. This saves time and nerves, as I’m not supposed to look up for the password file I store my server mysql root pass.
To allow my mysql cli interface, to login passwordless to the SQL server I had to create the file /root/.my.cnf readable only for my root user and store my MySQL username and password there.
Here is a sample /root/.my.cnf file:
root@mysql-server:~# cat /root/.my.cnf

[client]

user="root"

pass="mysecretMySQLPasswordgoeshere"
Now next time I use the mysql console interface to access my mysql server I don’t have to supply the password, here is how easier is the mysql login afterwards:
root@mysql-server:~# mysql -u root

Welcome to the MySQL monitor. Commands end with ; or g.

Your MySQL connection id is 3520

Server version: 5.0.77 Source distribution
Type ‘help;’ or ‘h’ for help. Type ‘c’ to clear the buffer.
mysql>
The only downside of using .my.cnf to store permanently the mysql server root and password is from security standpoint.
If for instance somebody roots my servers, where I have stored my root user/pwds in .my.cnf , he will be able immediately to get access to the MySQL server.
Another possible security flaw with using the mysql passwordless login “trick” is if somebody forgets to set proper file permissions to, .my.cnf
Once again the file should possess the permissons of:
root@mysql-server:~# ls -al /root/.my.cnf

-rw------- 1 root root 90 Apr 2 00:05 /root/.my.cnf
Any other permissons might allow non-privileged users to read the file and gain unathorized admin access to the SQL server.
Tags: Auto, basis, buffer, cat, cli, client, cnf, connection id, daily basis, distribution type, downside, Draft, file, file permissions, help, life, localhost, mysql connection, mysql servers, order, password, password file, root, root admin, root password, root root, root user, security, security flaw, security standpoint, server mysql, server root, server version, source distribution, standpoint, time, type, username, version, way
Posted in FreeBSD, Linux, MySQL, System Administration | No Comments »
Monday, July 4th, 2011 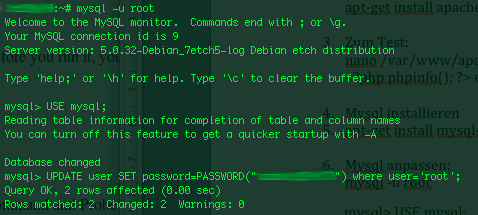
On a couple of occasions, I’ve had the issue of loosing / forgetting a MySQL password at other times I had to login to servers which contained MySQL servers with a password I don’t know.
In any of this occasions I was required to restore the ROOT access to the mysql server.
Sadly recoving a mysql lost root password is not really possible in a easy way, thus in most cases the only option one have is to stop the mysql server and run it again in a special skip-grant-tables mode, which runs the server in a sort of passwordless safe mode and makes it accessible without admin password through mysql cli .
To Omit the password check the skip-grant-table option instructs the MySQL server not to check in mysql.user while any request to connect with mysql client to the server is made.
Therefore one can login to the mysql server passwordless and reset the current (lost) password to another one.
Thease can be achived in the following four easy steps:
1. Stop the MySQL server
mysql:~# /etc/init.d/mysqld stop
2. Run the mysql server with the –skip-grant-tables option
mysql:~# mysqld_safe --skip-grant-tables &
3. Login to the mysql and change current mysql root password
mysql:~# mysq -u root

mysql> UPDATE user SET password=PASSWORD('yournewpassword')

WHERE user='root';

mysql> FLUSH privileges;
4. Stop and Start the Mysql server again
mysql:~# killall -9 mysqld_safe

mysql:~# /etc/init.d/mysqld start

..
Now the new mysql password will be identical to the yournewpassword . Cheers 😉
Tags: amp, Cheers, cli, client, couple, FLUSH, issue, killall, login, Mode, mysq, mysql password, mysql servers, mysqld, occasions, password, password check, Privileges, request, root, root password, safe mode, safemysql, server root, servermysql, Set, sort, Stop, thease, update, way, WHERE
Posted in Linux, MySQL, System Administration | No Comments »
Friday, July 29th, 2011 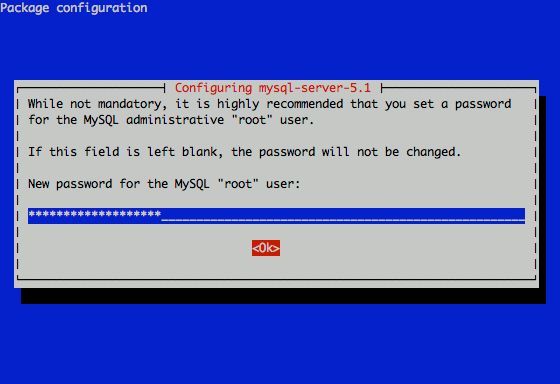
I had to change my mysql root password for one of the servers since during the install I mispasted the password in the MySQL password prompt I needed the pwd to be changed.
Here is how I changed it to my desired one:
linux:~# /usr/bin/mysqladmin -u root -p'OLD_PASSWORD_STRING' password NEW_PASSWORD_STRING

linux:~#
The password gets changed immediately 😉
If a new password has to be set to a passwordless mysql server, the command to be issued is:
linux:~# /usr/bin/mysqladmin -u root password PASSWORD_STRING
Changing the MySQL password is also possible with mysql cli, after connecting to the sql server, though this method is a bit more time consuming. Here is how to do it from mysql console:
linux:~# mysql -u root -p

Server version: 5.1.49-3 (Debian)
Copyright (c) 2000, 2010, Oracle and/or its affiliates. All rights reserved.
This software comes with ABSOLUTELY NO WARRANTY. This is free software,
and you are welcome to modify and redistribute it under the GPL v2 license
Type ‘help;’ or ‘h’ for help. Type ‘c’ to clear the current input statement.
mysql> use mysql;
mysql> update user set password=PASSWORD(“NEW_PASSWORD”) where User=’root’;mysql> flush privileges;
Of course it’s possible to do change the root pass via phpmyadmin
Cheers 😉
Tags: Cheers, cli, command, consuming, Copyright, course, free software, gpl v2, help, input statement, licenseType, Linux, mysqladmin, Old, oracle, password, password string, phpmyadmin, Privileges, pwd, root, root password, server root, servers, software, sql server, string password, time, time consuming, type, use, usr, usr bin, version, warranty
Posted in Linux, MySQL, System Administration | No Comments »
Monday, May 2nd, 2011 On each and every newly installed Linux or FreeBSD server. I’m always very cautious about three configuration directives for the ssh server.
This are X11Forwarding , Protocol and PermitRootLogin
One needs to be very watchful about this three ones, as tuning the right values surely prevents the server from many of the security issues that might rise up with the SSH server.
Many Linuxes like Debian and Ubuntu comes with X11Forwarding yes e.g. (X11Forwarding) enabled by default, this is an useless option in most of the cases as the servers I do administrate does not run a X environment.
Some older Linux distributions I have dealt with has the ssh Protocol 1 enabled by default and therefore, whether I do inherit an old server I have to start administrating the first thing I do is to check if the /etc/ssh/sshd_config‘s Protocol 1 option is enabled and if it is enabled I disable it.
PermitRootLogin is also an option which I often turn off as logging in via remote ssh is potentially dangerous as root password might get sniffed.
In overall the 3 sshd option’s I do check out in /etc/sshd/sshd_config on each newly installed Linux server are:
X11Forwarding yes

PermitRootLogin yes

Protocol 1
I always change this three options in my /etc/sshd/sshd_config
to:
X11Forwarding no

PermitRootLogin no

Protocol 2
One other options sshd server options which is good to be tuned is:
LoginGraceTime 120
Decreasing it to:
LoginGraceTime 60
is generally a good idea.
Of course after the changes I do restart the ssh daemon in order for the new configuration to take place:
linux:~# /etc/init.d/sshd restart

...
Tags: administrate, config, configuration directives, course, Debian, Forwarding, freebsd, idea, init, Linux, linux distributions, linuxes, noProtocol, old server, option, order, password, PermitRootLogin, PermitRootLoginOne, place, Protocol, root, root password, security, security issues, security tips, server options, server security, servers, ssh, ssh daemon, ssh protocol, ssh server, sshd server, Ubuntu, yesPermitRootLogin
Posted in FreeBSD, Linux, System Administration | No Comments »


