Posts Tagged ‘sshd’

Defining multiple short Server Hostname aliases via SSH config files and defining multiple ssh options for it, Use passwordless authentication via public keys

Thursday, September 16th, 2021

using-ssh-host-acronym-aliases-ssh-client-explained-openssh-logo

In case you have to access multiple servers from your terminal client such as gnome-terminal, kterminal (if on Linux) or something such as mobaxterm + cygwin (if on Windows) with an opens ssh client (ssh command). There is a nifty trick to save time and keyboard typing through creating shortcuts aliases by adding few definitions inside your $HOME/.ssh/config ( ~/.ssh/config ) for your local non root user or even make the configuration system wide (for all existing local /etc/passwd users) via /etc/ssh/ssh_config.
By adding a pseudonym alias for each server it makes sysadmin life much easier as you don't have to type in each time the FQDN (Fully Qualified Domain Name) hostname of remote accessed Linux / Unix / BSD / Mac OS or even Windows sshd ready hosts accessible via remote TCP/IP port 22.


1. Adding local user remote server pointer aliases via ~/.ssh/config


The file ~/.ssh/config is read by the ssh client part of the openssh-client (Linux OS package) on each invokement of the client, and besides defining a pseudonym for the hosts you like to save you time when accessing remote host and hence increase your productivity. Moreover you can also define various other nice options through it to define specifics of remote ssh session for each desired host such as remote host default SSH port (for example if your OpenSSHD is configured to run on non-standard SSH port as lets say 2022 instead of default port TCP 22 for some reason, e.g. security through obscurity etc.).


The general syntax of .ssh/config file si simplistic, it goes like this:
 

Host MACHNE_HOSTNAME

SSH_OPTION1 value1
SSH_OPTION1 value1 value2
SSH_OPTION2 value1 value2


Host MACHNE_HOSTNAME

SSH_OPTION value
SSH_OPTION1 value1 value2

  • Another understood syntax if you prefer to not have empty whitespaces is to use ( = )
    between the parameter name and values.

Host MACHINE_HOSTNAME
SSH_config=value
SSH_config1=value1 value2

  • All empty lines and lines starting with the hash shebang sign ( # ) would be ignored.
  • All values are case-sensitive, but parameter names are not.

If you have never so far used the $HOME/.ssh/config you would have to create the file and set the proper permissions to it like so:

mkdir -p $HOME/.ssh
chmod 0700 $HOME/.ssh


Below are examples taken from my .ssh/config configuration for all subdomains for my pcfreak.org domain


# Ask for password for every subdomain under pc-freak.net for security
Host *.pcfreak.org
user hipopo
passwordauthentication yes
StrictHostKeyChecking no

# ssh public Key authentication automatic login
Host www1.pc-freak.net
user hipopo
Port 22
passwordauthentication no
StrictHostKeyChecking no

UserKnownHostsFile /dev/null

Host haproxy2
    Hostname 213.91.190.233
    User root
    Port 2218
    PubkeyAuthentication yes
    IdentityFile ~/.ssh/haproxy2.pub    
    StrictHostKeyChecking no
    LogLevel INFO     

Host pcfrxenweb
    Hostname 83.228.93.76
    User root
    Port 2218

    PubkeyAuthentication yes
    IdentityFile ~/.ssh/pcfrxenweb.key    
    StrictHostKeyChecking no

Host pcfreak-sf
    Hostname 91.92.15.51
    User root
    Port 2209
    PreferredAuthentications password
    StrictHostKeyChecking no

    Compression yes


As you can see from above configuration the Hostname could be referring either to IP address or to Hostname.

Now to connect to defined IP 91.92.15.51 you can simply refer to its alias

$ ssh pcfreak-sf -v

and you end up into the machine ssh on port 2209 and you will be prompted for a password.

$ ssh pcfrxenweb -v


would lead to IP 83.228.93.76 SSH on Port 2218 and will use the defined public key for a passwordless login and will save you the password typing each time.

Above ssh command is a short alias you can further use instead of every time typing:

$ ssh -i ~/.ssh/pcfrxenweb.key -p 2218 root@83.228.93.76

There is another nifty trick worthy to mention, if you have a defined hostname such as the above config haproxy2 to use a certain variables, but you would like to override some option for example you don't want to connet by default with User root, but some other local account, lets say ssh as devuser@haproxy2 you can type:

$ ssh -o "User=dev" devuser

StrictHostKeyChecking no

– variable will instruct the ssh to not check if the finger print of remote host has changed. Usually this finger print check sum changes in case if for example for some reason the opensshd gets updated or the default /etc/ssh/ssh_host_dsa_key /etc/ssh/sshd_host_dsa_* files have changed due to some reason.
Of course you should use this option only if you tend to access your remote host via a secured VPN or local network, otherwise the Host Key change could be an indicator someone is trying to intercept your ssh session.


Compression yes


– variable  enables compression of connection saves few bits was useful in the old modem telephone lines but still could save you few bits
It is also possible to define a full range of IP addresses to be accessed with one single public rsa / dsa key

Below .ssh/config
 

Host 192.168.5.?
     Hostname 192.168.2.18
     User admin
     IdentityFile ~/.ssh/id_ed25519.pub


Would instruct each host attemted to be reached in the IP range of 192.168.2.1-254 to be automatically reachable by default with ssh client with admin user and the respective ed25519.pub key.
 

$ ssh 192.168.1.[1-254] -v


2. Adding ssh client options system wide for all existing local or remote LDAP login users


The way to add any Host block is absolutely the same as with a default user except you need to add the configuration to /etc/ssh/ssh_config. Here is a confiugaration from mine Latest Debian Linux

$ cat /etc/ssh/ssh_config

# This is the ssh client system-wide configuration file.  See
# ssh_config(5) for more information.  This file provides defaults for
# users, and the values can be changed in per-user configuration files
# or on the command line.

# Configuration data is parsed as follows:
#  1. command line options
#  2. user-specific file
#  3. system-wide file
# Any configuration value is only changed the first time it is set.
# Thus, host-specific definitions should be at the beginning of the
# configuration file, and defaults at the end.

# Site-wide defaults for some commonly used options.  For a comprehensive
# list of available options, their meanings and defaults, please see the
# ssh_config(5) man page.

Host *
#   ForwardAgent no
#   ForwardX11 no
#   ForwardX11Trusted yes
#   PasswordAuthentication yes
#   HostbasedAuthentication no
#   GSSAPIAuthentication no
#   GSSAPIDelegateCredentials no
#   GSSAPIKeyExchange no
#   GSSAPITrustDNS no
#   BatchMode no
#   CheckHostIP yes
#   AddressFamily any
#   ConnectTimeout 0
#   StrictHostKeyChecking ask
#   IdentityFile ~/.ssh/id_rsa
#   IdentityFile ~/.ssh/id_dsa
#   IdentityFile ~/.ssh/id_ecdsa
#   IdentityFile ~/.ssh/id_ed25519
#   Port 22
#   Protocol 2
#   Ciphers aes128-ctr,aes192-ctr,aes256-ctr,aes128-cbc,3des-cbc
#   MACs hmac-md5,hmac-sha1,umac-64@openssh.com
#   EscapeChar ~
#   Tunnel no
#   TunnelDevice any:any
#   PermitLocalCommand no
#   VisualHostKey no
#   ProxyCommand ssh -q -W %h:%p gateway.example.com
#   RekeyLimit 1G 1h
    SendEnv LANG LC_*
    HashKnownHosts yes
    GSSAPIAuthentication yes

As you can see pretty much can be enabled by default such as the forwarding of the Authentication agent option ( -A ) option, necessery for some Company server environments to be anbled. So if you have to connect to remote host with enabled Agent Forwarding instead of typing

ssh -A user@remotehostname


To enable Agent Forwarding instead of

ssh -X user@remotehostname


Simply uncomment and set to yes
 

ForwardX11 yes
ForwardX11Trusted yes


Just simply uncomment above's config ForwardAgent no

As you can see ssh could do pretty much, you can configure enable SSH Tunneling or run via a Proxy with the ProxyCommand (If it is the first time you hear about ProxyCommand I warmly recommend you check my previous article – How to pass SSH traffic through a secured Corporate Proxy Server with corkscrew).

Sometimes for a defines hostname, due to changes on remote server ssh configuration, SSH encryption type or a host key removal you might end up with issues connecting, therefore to override all the previously defined options inside .ssh/config by ignoring the configuration with -F /dev/null

$ ssh -F /dev/null user@freak -v


What we learned ?

To sum it up In this article, we have learned how to easify the stressed sysadmin life, by adding Aliases with certain port numbering and configurations for different remote SSH administrated Linux / Unix, hosts via local ~/.ssh/config or global wide /etc/ssh/ssh_config configuration options, as well as how already applied configuration from ~/.ssh/config affecting each user ssh command execution, could be overriden.

Update reverse sshd config with cronjob to revert if sshd reload issues

Friday, February 12th, 2021

Update-reverse-sshd-config-with-cronjob-to-revert-if-sshd-reload-issues

Say you're doing ssh hardening modifying /etc/ssh/sshd_config for better system security or just changing options in sshd due to some requirements. But you follow the wrong guide and you placed some ssh variable which is working normally on newer SSH versions ssh OpenSSH_8.0p1 / or 7 but the options are applied on older SSH server and due to that restarting sshd via /etc/init.d/… or systemctl restart sshd cuts your access to remote server located in a DC and not attached to Admin LAN port, and does not have a working ILO or IDRAC configured and you have to wait for a couple of hours for some Support to go to the server Room / Rack / line location to have access to a Linux physical tty console and fix it by reverting the last changes you made to sshd and restarting.

Thus logical question comes what can you do to assure yourself you would not cut your network access to remote machine after modifying OpenSSHD and normal SSHD restart?

There is an old trick, I'm using for years now but perhaps if you're just starting with Linux as a novice system administrator or a server support guy you would not know it, it is as simple as setting a cron job for some minutes to periodically overwrite the sshd configuration with a copy of the old working version of sshd before modification.

Here is this nice nify trick which saved me headache of call on technical support line to ValueWeb when I was administering some old Linux servers back in the 2000s

root@server:~# crontab -u root -e

# create /etc/ssh/sshd_config backup file
cp -rpf /etc/ssh/sshd_config /etc/ssh/sshd_config_$(date +%d-%m-%y)
# add to cronjob to execute every 15 minutes and ovewrite sshd with the working version just in case
*/15 * * * * /bin/cp -rpf /etc/ssh/sshd_config_$(date +%d-%m-%y) /etc/ssh/sshd_config && /bin/systemctl restart sshd
# restart sshd 
cp -rpf /etc/ssh/sshd_config_$(date +%d-%m-%y) /etc/ssh/sshd_config && /bin/systemctl restart sshd


Copy paste above cron definitions and leave them on for some time. Do the /etc/ssh/sshd_config modifications and once you're done restart sshd by lets say

root@server:~#  killall -HUP sshd 


If the ssh connectivity continues to work edit the cron job again and delete all lines and save again.
If you're not feeling confortable with vim as a text editor (in case you're a complete newbie and you don't know) how to get out of vim. Before doing all little steps you can do on the shell with  export EDITOR=nano or export EDITOR=mcedit cmds,this will change the default text editor on the shell. 

Hope this helps someone… Enjoy 🙂

Howto Pass SSH traffic through a Secured Corporate Proxy server with corkscrew, using sshd as a standalone proxy service with no proxy installed on remote Linux server or VPS

Tuesday, November 19th, 2019

howto pass ssh traffic through proxy to remote server use remote machine as a proxy for connecting to the Internet

Working in the big bad corporate world (being employed in  any of the Fortune 500) companies, especially in an IT delivery company is a nasty thing in terms of User Personal Data Privacy because usually when employeed in any of a corporation, the company ships you with a personal Computer with some kind of pre-installed OS (most often this is Windows) and the computer is not a standalone one but joined in Active Directory (AD) belonging to Windows Domain and centrally administered by whoever.

As part of the default deplyed configuration in this pre-installed OS and software is that part or all your network traffic and files is being monitored in some kind of manner as your pre-installed Windows or Linux notebook given by the Corporation is having a set of standard software running in the background, and even though you have Windows Administrator there are many things you have zero control or even if you have changed it once the Domain Policy is triggered your custom made changes / Installed Programs that happen to be against the company policy are being automatically deleted, any registry changes made are being rewinded etc. Sometimes even by trying to manually clean up your PC from the corporate crapware,  you might breaks access to the corporate DMZ firewalled network. A common way to secure their employee PC data large companies have a Network seperation, your PC when not connected to the Corporate VPN is having a certain IP configuration and once connected to the Demilitarized Zone VPN those configuration changes and the PC have access to internal company infrastructure servers / router / switches / firewalls / SANs etc. Access to corporate Infrastructure is handled via crypted VPN clinet such as Cisco AnyConnect Secure Mobility Client which is perhaps one of the most used ones out there.

Part of the common software installed to Monitor your PC for threats / viruses / trojans among which is MCafee / EMET (Enhandced Mitigation Experience Toolkit) the PC is often prebundled with some kind of anti-malware (crapware) :). But the tip of the iceberg on user surveillance where most of surveillance happens is the default installed proxy on the PC which usually does keep track of all your remote accessed HTTP Website URLs accessed in plain text – traffic flowing on Port 80 and crypted one on standard (SSL) Port 443. This Web Traffic is handled by the Central Corporate proxy that is being deployed via some kind of Domain policy, every time the Computer joins the Windows domain. 

This of course is a terrible thing for your Browsing security and together with the good security practice to run your browser in Incognito mode, which makes all your browsing activity such as access URLs History or Saved Cookies data to be cleared up on a Browser close it is important to make sure you run your own personal traffic via a separate browser which you will use only for your own concern browsing such as Accessing your Bank Money Accounts to check your Monthly Sallary / Purchase things online via Amazon.com / Ebay.com, whether all of the rest traffic company related is trafficed via the default set corporate central proxy.
This is relatively easy sometimes in companies, where security is not of a top concern but in corporations with tightened security accessing remote proxy, or accessing even common daily news and Public Email websites or social media sites  Gmail.com / Twitter / Youtube will be filtered so the only way to reach them will be via some kind of Proxy and often this proxy is the only way out to the Free world from the corporate jail.

Here is where the good old SSH comes as a saving grace as it turns out SSH traffic could be trafficed over a proxy. In below article I will give you a short insight on how Proxy through SSH could be achieved to Secure your dailty web traffic and use SSH to reach your own server on the Internet as well as how you can copy securely data via SSH through corporate Proxy. 
 

1. How to view your corporate used (default) proxy / Check Proxy.pac file definitions


To get an idea what is the used proxy on your Corporate PC (as most corporate employee given notebooks are running some kind of M$ Windows)  you can go to:

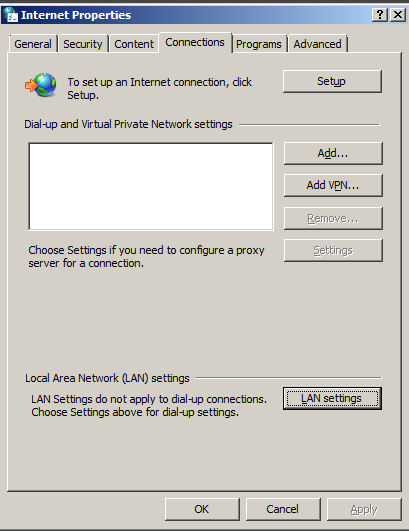
Windows Control Panel -> Internet Options -> Connections -> Lan Settings


internet-properties-microsoft-windows-screenshot

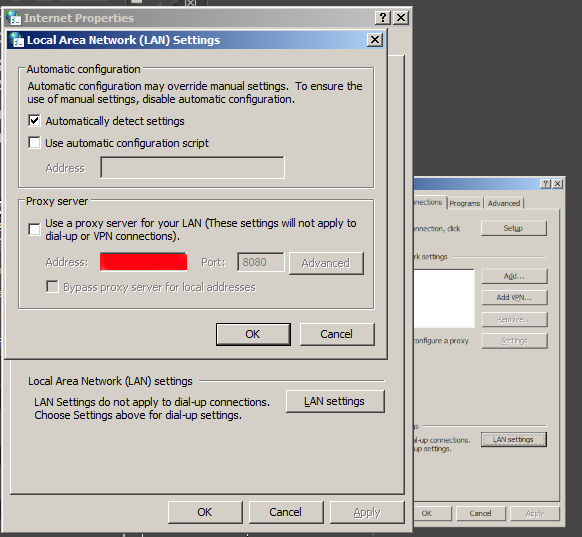
Under the field Proxy server (check out the Proxy configured Address and Port number )

local-area-network-lan-settings-screenshot-windows-1
 

Having that as browsers venerate the so-called Proxy.pac file, to be rawly aware on some general Company Proxy configured definitions you can access in a browser the proxy itself fething the proxy.pac file for example.


http://your-corporate-firewall-rpoxy-url:8080/proxy.pac


This is helpful as some companies Proxies have some proxy rules that reveal some things about its Internet architecture and even some have some badly configured proxy.pac files which could be used to fool the proxy under some circumstances 🙂
 

2. Few of the reasons corporations proxy all their employee's work PC web traffic


The corporate proxying of traffic has a number of goals, some of which are good hearted and others are for mostly spying on the users.


1. Protect Corporate Employees from malicious Viruses / Trojans Horses / Malware / Badware / Whatever ware – EXCELLENT
2. Prevent users from acessing a set of sources that due to the corporate policy are considered harmful (e.g. certain addresses 
of information or disinformation of competitors, any Internet source that might preach against the corporation, hacking ralated websites etc.) – NOT GOOD (for the employee / user) and GOOD for the company
3.Spy on the users activity and be able to have evidence against the employee in case he decided to do anything harmful to the company evidences from proxy could even later be used in court if some kind of corpoate infringment occurs due to misbehave of the employee. – PERFECT FOR COMPANY and Complete breach of User privacy and IMHO totally against European Union privacy legislation such as GDRP
4. In companies that are into the field of Aritificial Intelligence / Users behavior could even be used to advance Self-learning bots and mechanisms – NASTY ! YAECKES


3. Run SSH Socks proxy to remote SSHd server running on common SSL 443 port


Luckily sysadmins who were ordered the big bosses to sniff on your Web behaviour and preferences could be outsmarted with some hacks.

To protect your Browsing behaviours and Secure your privacy perhaps the best option is to use the Old but gold practice o Securing your Networkf traffic using SSH Over Proxy and SSH Dynamic tunnel as a Proxy as explained in my previous article here.

how-to-use-sshd-server-as-a-proxy-without-a-real-proxy-ssh-socks5_proxy_linux
 

In short the quest way to have your free of charge SOCKS  Remote proxy to your Home based Linux installed OS server / VPN with a Public Internet address is to use ssh as so:


ssh -D 3128 UserName@IP-of-Remote-SSHD-Host -p 443


This will start the SOCKS Proxy tunnel from Corporate Work PC to your Own Home brew server.

For some convenience it is useful to set up an .alias (for cygwin) / linux users in .bashrc file:


alias proxy='ssh -D 3128 UserName@IP-of-Remote-SSHD-Host -p 443';


To start using the Proxy from browser, I use a plugin called FoxyProxy in Chrome and Firefox browsers
set-up to connect to localhost – 127.0.0.1:3128 for All Protocols as a SOCKs v5 Proxy.

The sshd Socks proxy can be used for multiple others for example, using it you can also pass on traffic from Mail client such as Thunderbird to your Email server if you're behind a firewall prohibiting access to the common POP3 port 110 or IMAP port TCP 143. 

4. How to access SSH through Proxy using jumphost SSH hop


If you're like me and you have on your Home Linux machine only one Internet address and you have already setupped an SSL enabled service (lets say Webmail) to listen to that Public Internet IP and you don't have the possibility to run another instance of /usr/bin/sshd on port 443 via configuration or manually one time by issuing:


/usr/sbin/sshd -p 443


Then you can use another ssh another Linux server as a jump host to your own home Linux sshd server. This can be done even by purchasing a cheap VPS server for lets say 3 dollars month etc. or even better if you have a friend with another Linux home server, you can ask him to run you sshd on TCP port 443 and add you an ssh account.
Once you have the second Linux machine as JumpHost to reach out to your own machine use:


ssh -J Your-User@Your-jump-host.com:443 hipo@your-home-server.com -v


To easify this a bit long line it is handy to use some kind of alias like:


alias sshhome='ssh -J Your-User@Your-jump-host.com:443 hipo@your-home-server.com -v'


The advantage here is just by issuing this sshd tunnel and keeping it open in a terminal or setting it up as Plink Putty tunnel you have all your Web Traffic Secured
between your Work Corporate PC and your Home Brew Server, keeping the curious eyes of your Company Security Officers from your own Web traffic, hence
separating the corporate privacy from your own personal privacy. Using the just established own SSH Proxy Tunnel to home for your non-work stuff browsing habits
from the corporate systems which are accessed by switching with a button click in FoxyProxy to default proxy settings.
 

5. How to get around paranoid corporate setup where only remote access to Corporate proxy on TCP Port 80 and TCP 443 is available in Browser only


Using straight ssh and to create Proxy will work in most of the cases but it requires SSH access to your remote SSH running server / VPS on TCP Port 22, however under some Fort-Nox like financial involved institutions and companies for the sake of tightened security, it is common that all Outbound TCP Ports are prohibited except TCP Port 80 and SSL 443 as prior said, so what can you do then to get around this badful firewall and access the Internet via your own server Proxy? 
The hack to run SSH server either on tcp port 80 or tcp port 443 on remote Host and use 443 / 80 to acess SSHD should work, but then even for the most paranoid corporations the ones who are PCI Compliant – PCI stands for (Payment Card Industry), e.g. works with Debit and Credit Card data etc, accessing even 80 or 443  ports with something like telnet client or netcat will be impossible. 
Once connected to the corporate VPN,  this 2 two ports firewall exceptions will be only accessible via the Corporate Proxy server defined in a Web Browser (Firefox / IE / Chrome etc.) as prior explained in article.

The remedy here is to use a 3rd party tools such as httptunnel or corkscrew that  are able to TUNNEL SSH TRAFFIC VIA CORPORATE PROXY SERVER and access your own resource out of the DMZ.

Both httptunnel and corkscrew are installable both on most Linux distros or for Windows users via CygWin for those who use MobaXterm.

Just to give you better idea on what corkscrew and (hts) httptunnel does, here is Debian packages descriptions.

# apt-cache show​ corkscrew
" corkscrew is a simple tool to tunnel TCP connections through an HTTP
 proxy supporting the CONNECT method. It reads stdin and writes to
 stdout during the connection, just like netcat.
 .
 It can be used for instance to connect to an SSH server running on
 a remote 443 port through a strict HTTPS proxy.
"


# apt-cache show httptunnel|grep -i description -A 7
Description-en: Tunnels a data stream in HTTP requests
 Creates a bidirectional virtual data stream tunnelled in
 HTTP requests. The requests can be sent via a HTTP proxy
 if so desired.
 .
 This can be useful for users behind restrictive firewalls. If WWW
 access is allowed through a HTTP proxy, it's possible to use
 httptunnel and, say, telnet or PPP to connect to a computer

Description-md5: ed96b7d53407ae311a6c5ef2eb229c3f
Homepage: http://www.nocrew.org/software/httptunnel.html
Tag: implemented-in::c, interface::commandline, interface::daemon,
 network::client, network::server, network::vpn, protocol::http,
 role::program, suite::gnu, use::routing
Section: net
Priority: optional
Filename: pool/main/h/httptunnel/httptunnel_3.3+dfsg-4_amd64.deb

Windows cygwin users can install the tools with:
 

apt-cyg install –yes corkscrew httptunnel


Linux users respectively with:

apt-get install –yes corkscrew httptunnel

or 

yum install -y corkscrew httptunnel


You will then need to have the following configuration in your user home directory $HOME/.ssh/config file
 

Host host-addrs-of-remote-home-ssh-server.com
ProxyCommand /usr/bin/corkscrew your-corporate-firewall-rpoxy-url 8080 %h %p


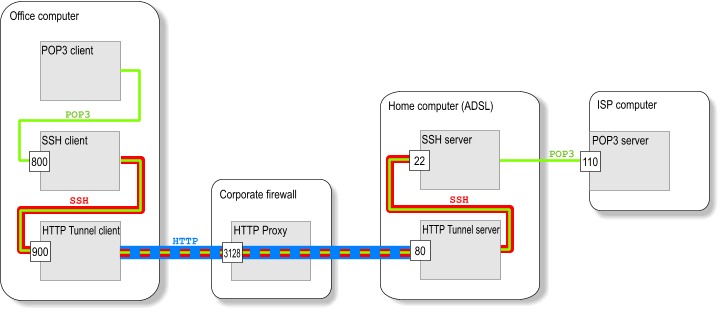
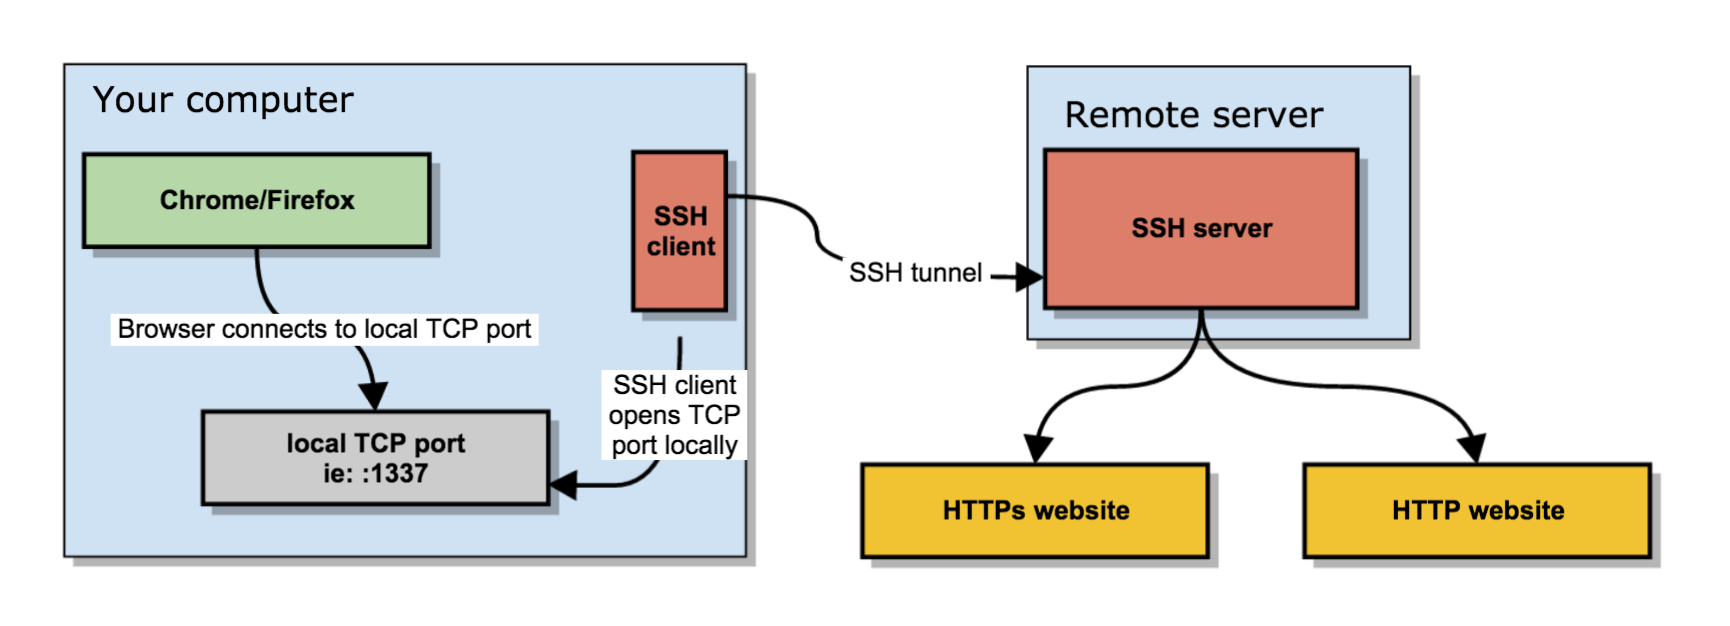
howto-transfer-ssh-traffic-over-proxy

Picture Copyright by Daniel Haxx

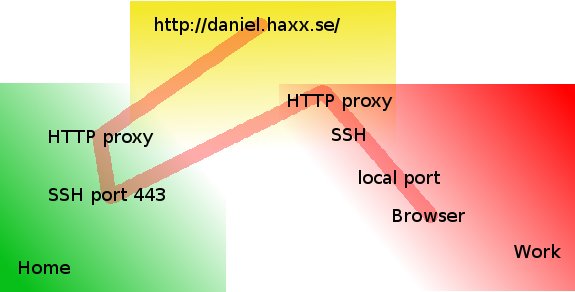
The best picture on how ssh traffic is proxied is the one found on Daniel Haxx's website which is a great quick tutorial which originally helped to get the idea of how corkscrew works in proxying traffic I warmly recommend you take a quick look at his SSH Through or over Proxy article.

Host-addrs-of-remote-home-ssh-server.com could be also and IP if you don't have your own domain name in case if using via some cheap VPN Linux server with SSH, or alternatively
if you don't want to spend money on buying domain for SSH server (assuming you don't have such yet) you can use Dyn DNS or NoIP.

Another thing is to setup the proper http_proxy / https_proxy / ftp_proxy variable exports in $HOME/.bashrc in my setup I have the following:
 

export ftp_proxy="http://your-corporate-firewall-rpoxy-url:8080"
export https_proxy="https://your-corporate-firewall-rpoxy-url:8080"
export http_proxy="http://your-corporate-firewall-rpoxy-url:8080"
export HTTP_PROXY="http://your-corporate-firewall-rpoxy-url:8080"
export HTTPS_PROXY="http://your-corporate-firewall-rpoxy-url:8080"


6. How to Transfer Files / Data via SSH Protocol through  Proxy with SCP and SFTP


Next logical question is how to Transfer your own personal encrypted files (that contains no corporate sensitive information) between your Work laptop and home brew Linux ssh server or cheap VPN.

It took me quite a lot of try-outs until finally I got it how Secure Copy (scp) command can be used toto transfer files between my Work Computer and my Home brew server using JumpHost, here is how:
 

scp -o 'ProxyJump Username@Jumpt-Host-or-IP.com:443' ~/file-or-files-to-copy* Username@home-ssh-server.com:/path/where/to/copy/files


I love using sftp (Secure FTP) command Linux client to copy files and rarely use scp so I have a lot of try-outs to connect interacitvely via the Corporate Proxy server over a Jump-Host:443 to my Destination home machine, 


I've tried using netcat as it was pointed in many articles online, like so to traffic my sftp traffic via my localhost binded SSH Socks proxy on :3128 together with netcat as shown in article prior example, using following line:
 

sftp -oProxyCommand='/bin/nc -X connect -x 127.0.0.1:3128 %h %p' Username@home-ssh-server.com 22


Also tried proxy connect like this:


sftp -o ProxyCommand="proxy-connect -h localhost -p 3128 %h %p" Username@home-ssh-server.com


Moreover, tried to use the ssh  command (-s) argument capability to invoke SSH protocol subsystem feature which is used to facilitiate use of SSH secure transport for other application
 

ssh -v -J hipo@Jump-Host:443 -s sftp root@home-ssh-server.com -v

open failed: administratively prohibited: open failed


Finally decided to give a try to the same options arguments as in scp and thanks God it worked and I can even access via the Corporate Proxy through the Jump Host SSH interactively via Secure FTP 🙂

!! THE FINAL WORKING SFTP THROUGH PROXY VIA SSH JUMPHOST !!
 

sftp -o 'ProxyJump Username@Jumpt-Host-or-IP.com:443' Username@home-ssh-server.com


To save time from typing this long line every time, I've setup the following alias to ~/.bashrc
 

alias sftphome='sftp -o 'ProxyJump Username@Jumpt-Host-or-IP.com:443' Username@home-ssh-server.com'


Conclusion

Of course using own Proxy via your Home brew SSH Machine as well as transferring your data securely from your Work PC (notebook) to Home does not completely make you Surveillance free, as the Corporate Windows installed OS image is perhaps prebundled with its own integrated Keylogger as well as the Windows Domain administrators have certainly access to connect to your PC and run various commands, so this kind of Security is just an attempt to make company has less control and know less on your browsing habits and the best solution where possible to secure your privacy and separate your Personal Space form Work space by using a second computer (if having the ability to work from home) with a KVM Switch device and switch over your Work PC and Home PC via it or in some cases (where companies) allows it, setup something like VNC server (TightVNC / RealVNC) on work PC and leave it all time running in office and connect remotely with vncviewer from your own controlled secured computer.

In article I've explained shortly common scenario found in corporate Work computers proxy setup, designed to Surveil all your move, mentioned few common softwares running by default to protect from Viruses and aimed to Protect user from malicious hacking tools, explained how to view your work notebook configured Proxy, shortly mentioned on Proxy.pac and hinted how to view proxy.pac config as well as gave few of the reasons why all web traffic is being routed over central proxy.

That's all folks, Enjoy the Freedom to be less surveilled !

Linux: Understanding uptime command Load Avarage statistics / When load avarage is high?

Wednesday, May 8th, 2013

GNU / Linux load avarage explained load avarage from top command

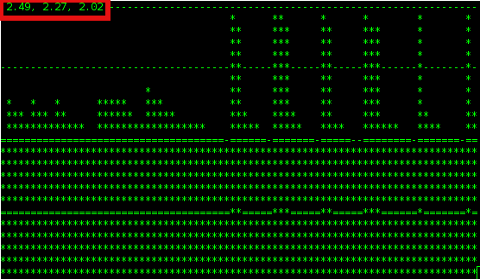
There is probably no Linux system administrator who, don't have idea about system  Load Avarage. Most of admins however does have some brought idea about what kind of load avarage is critical but doesn't have good understanding on the 3 digits returned as a load avarage i.e. – load average: 2.47, 2.27, 2.02 shown in above ascii graphs ( generated by tload command).
 

What is Load Avarage ?

  •  The number of blocking processes in the run queue averaged over a certain time period.

A blocking process is a process that is waiting for something to continue. Typically, a process is waiting to use:
 

  •  CPU Time,  Disk Input / Output oper. or Network I / O

Thus logically the higher the Load Avarage, the more processes has to wait for access to CPU, HDD and Network I/O.

The most two common commands used where load avarage appear are;
 

w – who

and

uptime

mx:/home/hipo# w
 11:07:56 up 513 days,  1:04,  1 user,  load average: 1.92, 1.95, 1.84
USER     TTY      FROM              LOGIN@   IDLE   JCPU   PCPU WHAT
hipo     pts/0    www.pc-freak.net     Thu19    0.00s  0.06s  0.02s sshd: hipo [priv]

mail:/home/hipo# uptime
 11:03:59 up 513 days,  1:00,  2 users,  load average: 2.11, 1.91, 1.81

Other common place to check load avarage is in top cmd:

mail:/home/hipo# top

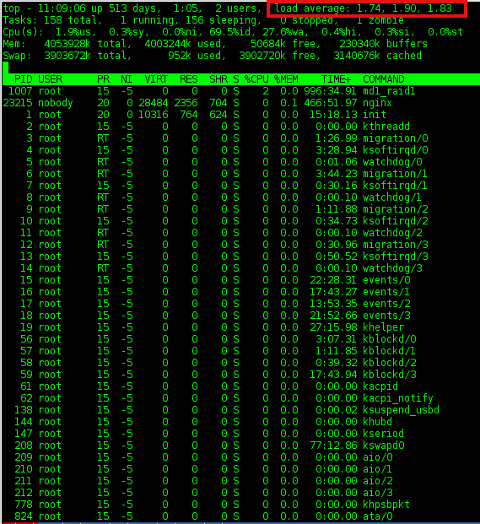
Linux top command load avarage showing server system load 3 digits of load avarage explained

a) Optimum machine use – Load Avarage 1 

So what does load avarage: 1.74, 1.90, 1.83 really means? The 3 digits are showing system load avarage over the last 1, 5 and 15 minutes time. Meaning;


– before 1 minute system had a load of 1.74
– 5 minutes before it was 1.90
– and 15 minutes back 1.83

Usually Load Avarage of more than 1 is considered critical. If a system is working with a load avarage of 1 this means the system is working capacity. In best cases in terms of optimizing processes on server with hardware it is good the system is working in load of 0.70 or 0.80. Whether a traffic the machine gets is planned in most cases a load avarage of exactly 1 means machine hardware is properly utilized. However whether the load avarage is hitting over 1 this usually means you have to think about moving server to new hardware. It is general rule of thumb that if system load is exceeeding 0.70 it is time to migrate to better hardware.

b) Load avarage on Multi-core / Multiprocessor servers

Load avarage of 4 on 4 CPU cores server hardware is optimum one. Each core / CPU on machine should get maximum of load avarage 1. Load avarage of 1 means CPU is utilized in 100%. Load avarage of 4 on 4 CPU server hardware means all 4 processors are working in their maximum power of 100%. For people who have multi processor server the best way to show utilization is by running htop. There all 4 CPUs will show idle of 0%.

Hence rule to calculate normal load avarage for server is;

1 Load Avarage per CPU. Therefore for 24 CPU Intel Xeon hardware. Load Avarage under 1*24.00 = 24.00 is considered normal. On such a server whether load avarage jumps to 50.00 / 70.00 or above server becomes totally irresponsive and it is very likely to hang because of over-heating. Even if it continues working it will work extremely slow and even simply operations like ssh to it will become hardly possible and sometimes even access via ssh will be not possible.

Therefore Rule of Thumb for calculating which load avarage is okay for a server is;

Number of CPU / Cores should not exceed digit returned in Load Avarage stats

c) Critical – Load avarage >5 – A sure sign for unresponsive or soon to hang server

On Computers with just 1 CPU, load avarage of 5 is sure sign running services will lag brutally and server will become inaccessible. For multicore / multiprocessor servers big troubles can be expected, whether load avarage is about  1/2 of the maximum number of of Load Avarage; (for 8 CPU Multicore hardware). A load avarage of 8 + ( 1/2 * 8 ) = 12 is sure sign system is stoned and running services inaccessible.

d) load avarage: 1.74, 1.90, 1.83 – Is 1 / 5 or 15 minutes LA numbers more important to consider?

All are important however 5 and 15 minutes load avg. give better indication on what's happening with machine as current load can peak for just a second to a higher number, being misleading.

To get number of CPU / Cores use cmd;

mail:/home/hipo# grep 'model name' /proc/cpuinfo | wc -l
24

For more precise info on CPU type and model use;

mail:/home/hipo# cat /proc/cpuinfo

processor       : 0
vendor_id       : GenuineIntel
cpu family      : 6
model           : 44
model name      : Intel(R) Xeon(R) CPU           E5645  @ 2.40GHz
stepping        : 2
cpu MHz         : 2400.094
cache size      : 12288 KB
physical id     : 0
siblings        : 12
core id         : 0
cpu cores       : 6
apicid          : 0
initial apicid  : 0
fpu             : yes
fpu_exception   : yes
cpuid level     : 11
wp              : yes
flags           : fpu vme de pse tsc msr pae mce cx8 apic sep mtrr pge mca cmov pat pse36 clflush dts acpi mmx fxsr sse sse2 ss ht tm pbe syscall nx pdpe1gb rdtscp lm constant_tsc arch_perfmon pebs bts rep_good xtopology nonstop_tsc aperfmperf pni dtes64 monitor ds_cpl vmx smx est tm2 ssse3 cx16 xtpr pdcm dca sse4_1 sse4_2 popcnt lahf_lm ida arat tpr_shadow vnmi flexpriority ept vpid
bogomips        : 4800.18
clflush size    : 64
cache_alignment : 64
address sizes   : 40 bits physical, 48 bits virtual
power management:
……
………
 

If you hit abnormal high load avarage, it is useful to check in top process list what is top process / processes causing highest system load. It is useful to run ps with following arguments

mail:/home/hipo# ps axuwwf

Look in STAT column. Processes in STAT have 3 states;

  • R – Running
  • S – Sleeping
  • D – Waiting for something

Usually processes with status of D – are ones causing problems. If you get D STAT-ed processes check further what's wrong with them and fix it. If there are none,  simply, number of clients using machine pop-ed up meaning you need to quickly move to better hardware host.

e) Getting notified via email whether load avarage exceeds certain value

A good way to get notified or do certain action like restarting Apache WebServer or other common process causing high loads is through monit. Monit is very usefukl for notifying on high load avarages or even better for Restarting processes imposing high loads.

You can always use a few liners shell script to mail to email or SMS2Email mailbox similar to this tiny shell script to restart apache on high load.There is also a Ruby lang tool – Scout to monitor and report high load avarages

How to change hostname permanently on Debian and Ubuntu Linux

Thursday, March 14th, 2013

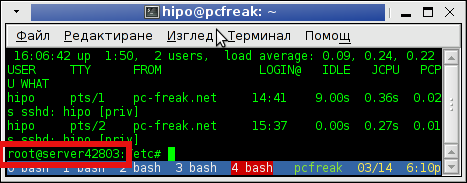
Change hostname on Debian and Ubuntu Linux terminal hostname screenshot

I had to configure a newly purchased dedicated server from UK2. New servers cames shipped with some random assigned node hostname  like server42803. This is pretty annoying, and has to be changed especially if your company has a naming server policy in some format like; company-s1#, company-s2#, company-sN#.

Changing hostname via hosts definition file /etc/hosts to assign the IP address of the host to the hostname is not enough for changing the hostname shown in shell via SSH user login.

To display full hostname on Debian and Ubuntu, had to type:

server42803:~# hostname
server42803.uk2net.com

To change permanently server host to lets say company-s5;

server42803:~# cat /etc/hostname | \
sed -e 's#server42803.uk2net.com#company-s5#' > /etc/hostname

To change for current logged in SSH session:

server42803:~# hostname company-s5
company-s5:~#

Finally because already old hostname is red by sshd, you have to also restart sshd for new hostname to be visible on user ssh:

company-s5:~# /etc/init.d/ssh restart
...

As well as run script:

company-s5:~# /etc/init.d/hostname.sh

Mission change host accomplished, Enjoy 🙂