Posts Tagged ‘RAM’

How to test RAM Memory for errors in Linux / UNIX OS servers. Find broken memory RAM banks

Friday, December 3rd, 2021

test-ram-memory-for-errors-linux-unix-find-broken-memory-logo


1. Testing the memory with motherboard integrated tools
 

Memory testing has been integral part of Computers for the last 50 years. In the dawn of computers those older perhaps remember memory testing was part of the computer initialization boot. And this memory testing was delaying the boot with some seconds and the user could see the memory numbers being counted up to the amount of memory. With the increased memory modern computers started to have and the annoyance to wait for a memory check program to check the computer hardware memory on modern computers this check has been mitigated or completely removed on some hardware.
Thus under some circumstances sysadmins or advanced computer users might need to check the memory, especially if there is some suspicion for memory damages or if for example a home PC starts crashing with Blue screens of Death on Windows without reason or simply the PC or some old arcane Linux / UNIX servers gets restarted every now and then for now apparent reason. When such circumstances occur it is an idea to start debugging the hardware issue with a simple memory check.

There are multiple ways to test installed memory banks on a server laptop or local home PC both integrated and using external programs.
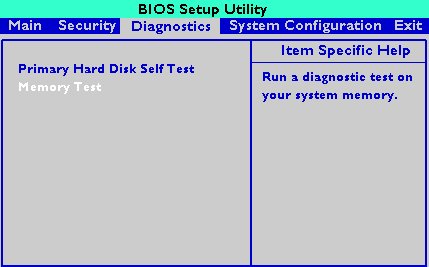
On servers that is usually easily done from ILO or IPMI or IDRAC access (usually web) interface of the vendor, on laptops and home usage from BIOS or UEFI (Unified Extensible Firmware Interface) acces interface on system boot that is possible as well.
memtest-hp
HP BIOS Setup

An old but gold TIP, more younger people might not know is the


Prolonged SHIFT key press which once held with the user instructs the machine to initiate a memory test before the computer starts reading what is written in the boot loader.

So before anything else from below article it might be a good idea to just try HOLD SHIFT for 15-20 seconds after a complete Shut and ON from the POWER button.

If this test does not triggered or it is triggered and you end up with some corrupted memory but you're not sure which exact Memory bank is really crashing and want to know more on what memory Bank and segments are breaking up you might want to do a more thorough testing. In below article I'll try to explain shortly how this can be done.


2. Test the memory using a boot USB Flash Drive / DVD / CD 
 

Say hello to memtest86+. It is a Linux GRUB boot loader bootable utility that tests physical memory by writing various patterns to it and reading them back. Since memtest86+ runs directly off the hardware it does not require any operating system support for execution. Perhaps it is important to mention that memtest86 (is PassMark memtest86)and memtest86+ (An Advanced Memory diagnostic tool) are different tools, the first is freeware and second one is FOSS software.

To use it all you'll need is some version of Linux. If you don't already have some burned in somewhere at your closet, you might want to burn one.
For Linux / Mac users this is as downloading a Linux distribution ISO file and burning it with

# dd if=/path/to/iso of=/dev/sdbX bs=80M status=progress


Windows users can burn a Live USB with whatever Linux distro or download and burn the latest versionof memtest86+ from https://www.memtest.org/  on Windows Desktop with some proggie like lets say UnetBootIn.
 

2.1. Run memtest86+ on Ubuntu

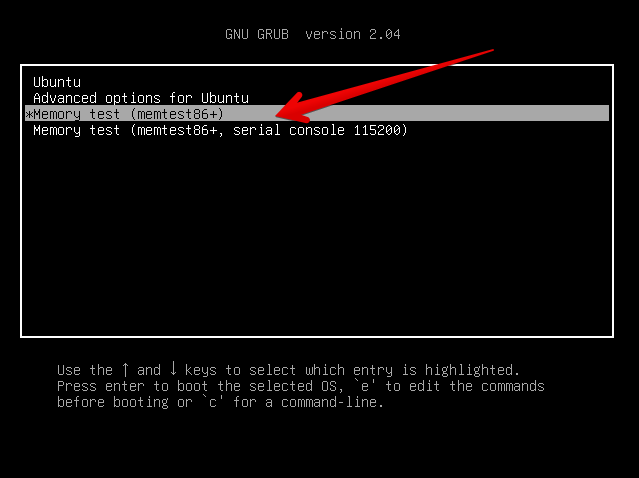
Many Linux distributions such as Ubuntu 20.0 comes together with memtest86+, which can be easily invoked from GRUB / GRUB2 Kernel boot loader.
Ubuntu has a separate menu pointer for a Memtest.
ubuntu-grub-2-04-boot-loader-memtest86-menu-screenshot

Other distributions RPM based distributions such as CentOS, Fedora Linux, Redhat things differ.

2.2. memtest86+ on Fedora


Fedora used to have the memtest86+ menu at the GRUB boot selection prompt, but for some reason removed it and in newest Fedora releases as of time such as Fedora 35 memtest86+ is preinstalled and available but not visible, to start on  already and to start a memtest memory test tool:

  •   Boot a Fedora installation or Rescue CD / USB. At the prompt, type "memtest86".

boot: memtest86

2.3 memtest86+ on RHEL Linux

The memtest86+tool is available as an RPM package from Red Hat Network (RHN) as well as a boot option from the Red Hat Enterprise Linux rescue disk.
And nowadays Red Hat Enterprise Linux ships by default with the tool.

Prior redhat (now legacy) releases such as on RHEL 5.0 it has to be installed and configure it with below 3 commands.

[root@rhel ~]# yum install memtest86+
[root@rhel ~]# memtest-setup
[root@rhel ~]# grub2-mkconfig -o /boot/grub2/grub.cfg


    Again as with CentOS to boot memtest86+ from the rescue disk, you will need to boot your system from CD 1 of the Red Hat Enterprise Linux installation media, and type the following at the boot prompt (before the Linux kernel is started):

boot: memtest86
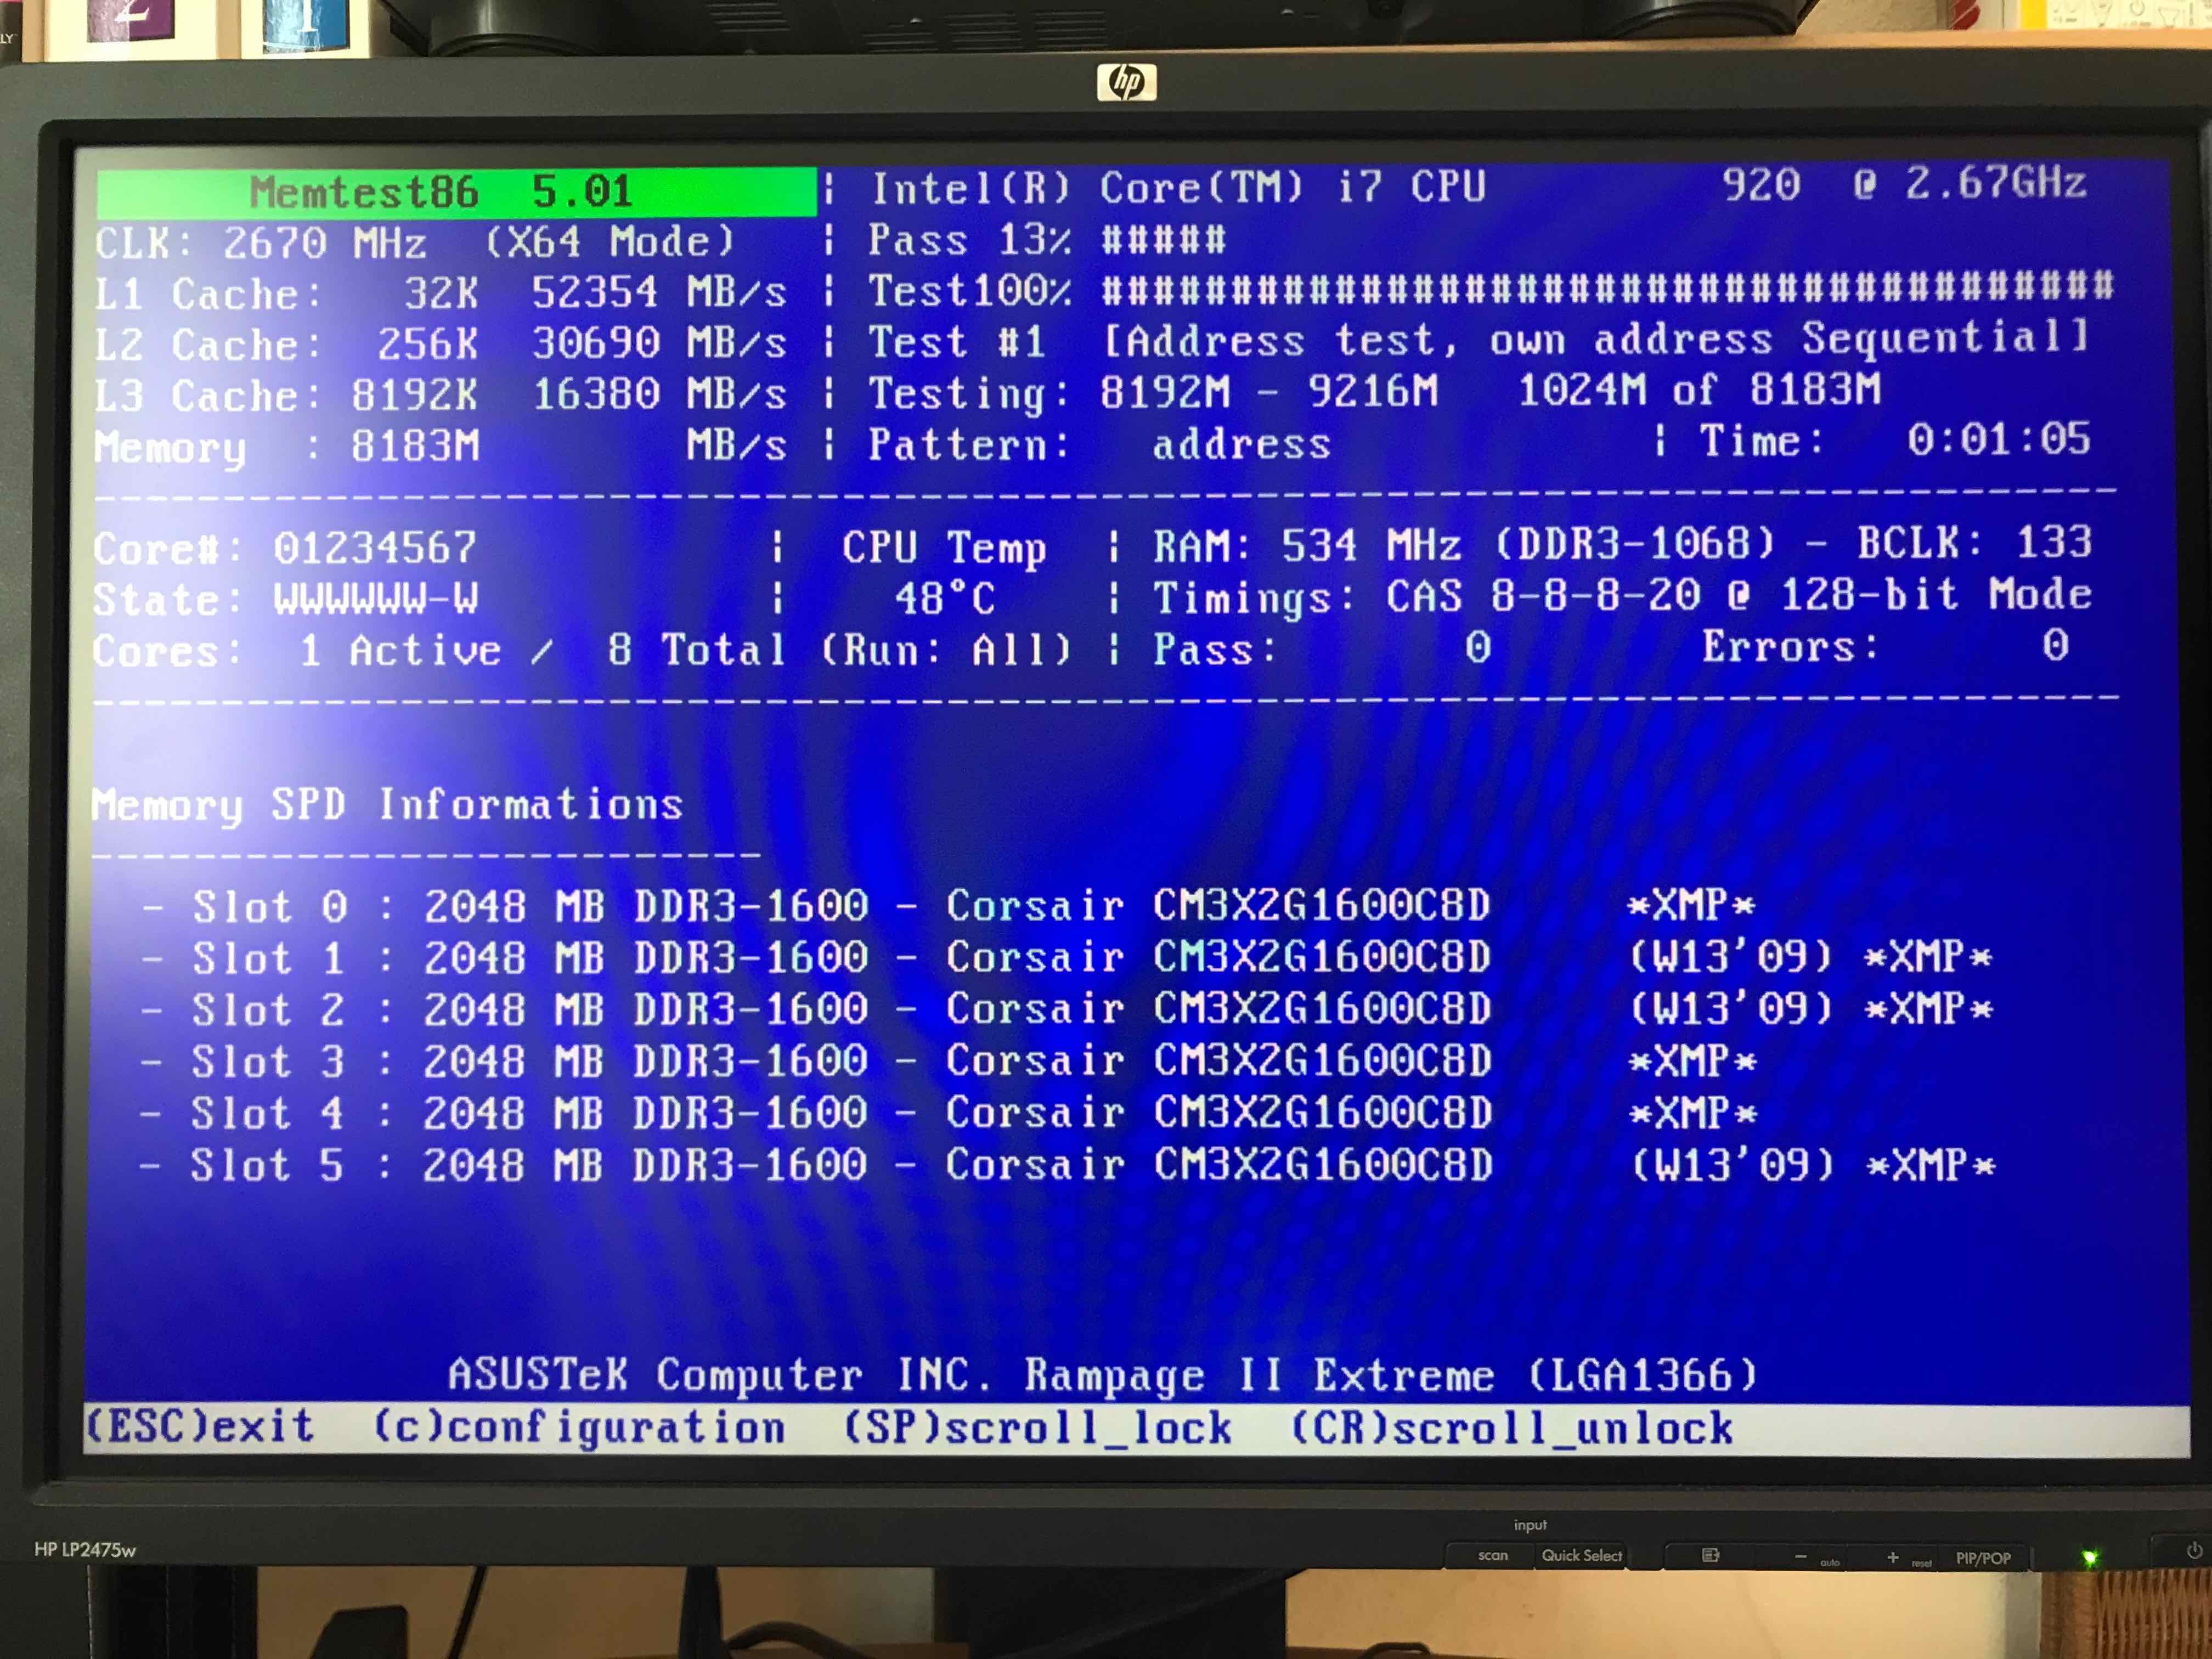
memtestx86-8gigabytes-of-memory-boot-screenshot
memtest86+ testing 5 memory slots

As you see all on above screenshot the Memory banks are listed as Slots. There are a number of Tests to be completed until
it can be said for sure memory does not have any faulty cells. 
The

Pass: 0
Errors: 0 

Indicates no errors, so in the end if memtest86 does not find anything this values should stay at zero.
memtest86+ is also usable to detecting issues with temperature of CPU. Just recently I've tested a PC thinking that some memory has defects but it turned out the issue on the Computer was at the CPU's temperature which was topping up at 80 – 82 Celsius.

If you're unfortunate and happen to get some corrupted memory segments you will get some red fields with the memory addresses found to have corrupted on Read / Write test operations:
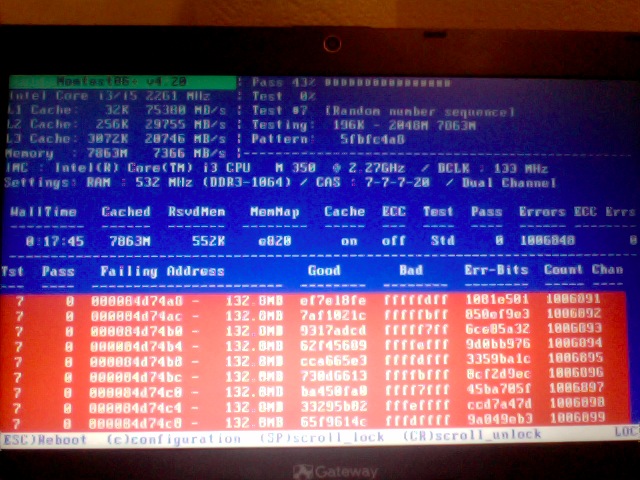
memtest86-returning-memory-address-errors-screenshot


2.4. Install and use memtest and memtest86+ on Debian / Mint Linux

You can install either memtest86+ or just for the fun put both of them and play around with both of them as they have a .deb package provided out of debian non-free /etc/apt/sources.list repositories.


root@jeremiah:/home/hipo# apt-cache show memtest86 memtest86+
Package: memtest86
Version: 4.3.7-3
Installed-Size: 302
Maintainer: Yann Dirson <dirson@debian.org>
Architecture: amd64
Depends: debconf (>= 0.5) | debconf-2.0
Recommends: memtest86+
Suggests: hwtools, memtester, kernel-patch-badram, grub2 (>= 1.96+20090523-1) | grub (>= 0.95+cvs20040624), mtools
Description-en: thorough real-mode memory tester
 Memtest86 scans your RAM for errors.
 .
 This tester runs independently of any OS – it is run at computer
 boot-up, so that it can test *all* of your memory.  You may want to
 look at `memtester', which allows testing your memory within Linux,
 but this one won't be able to test your whole RAM.
 .
 It can output a list of bad RAM regions usable by the BadRAM kernel
 patch, so that you can still use you old RAM with one or two bad bits.
 .
 This is the last DFSG-compliant version of this software, upstream
 has opted for a proprietary development model starting with 5.0.  You
 may want to consider using memtest86+, which has been forked from an
 earlier version of memtest86, and provides a different set of
 features.  It is available in the memtest86+ package.
 .
 A convenience script is also provided to make a grub-legacy-based
 floppy or image.

Description-md5: 0ad381a54d59a7d7f012972f613d7759
Homepage: http://www.memtest86.com/
Section: misc
Priority: optional
Filename: pool/main/m/memtest86/memtest86_4.3.7-3_amd64.deb
Size: 45470
MD5sum: 8dd2a4c52910498d711fbf6b5753bca9
SHA256: 09178eca21f8fd562806ccaa759d0261a2d3bb23190aaebc8cd99071d431aeb6

Package: memtest86+
Version: 5.01-3
Installed-Size: 2391
Maintainer: Yann Dirson <dirson@debian.org>
Architecture: amd64
Depends: debconf (>= 0.5) | debconf-2.0
Suggests: hwtools, memtester, kernel-patch-badram, memtest86, grub-pc | grub-legacy, mtools
Description-en: thorough real-mode memory tester
 Memtest86+ scans your RAM for errors.
 .
 This tester runs independently of any OS – it is run at computer
 boot-up, so that it can test *all* of your memory.  You may want to
 look at `memtester', which allows to test your memory within Linux,
 but this one won't be able to test your whole RAM.
 .
 It can output a list of bad RAM regions usable by the BadRAM kernel
 patch, so that you can still use your old RAM with one or two bad bits.
 .
 Memtest86+ is based on memtest86 3.0, and adds support for recent
 hardware, as well as a number of general-purpose improvements,
 including many patches to memtest86 available from various sources.
 .
 Both memtest86 and memtest86+ are being worked on in parallel.
Description-md5: aa685f84801773ef97fdaba8eb26436a
Homepage: http://www.memtest.org/

Tag: admin::benchmarking, admin::boot, hardware::storage:floppy,
 interface::text-mode, role::program, scope::utility, use::checking
Section: misc
Priority: optional
Filename: pool/main/m/memtest86+/memtest86+_5.01-3_amd64.deb
Size: 75142
MD5sum: 4f06523532ddfca0222ba6c55a80c433
SHA256: ad42816e0b17e882713cc6f699b988e73e580e38876cebe975891f5904828005


root@jeremiah:/home/hipo# apt-get install –yes memtest86+

root@jeremiah:/home/hipo# apt-get install –yes memtest86

Reading package lists… Done
Building dependency tree       
Reading state information… Done
Suggested packages:
  hwtools kernel-patch-badram grub2 | grub
The following NEW packages will be installed:
  memtest86
0 upgraded, 1 newly installed, 0 to remove and 21 not upgraded.
Need to get 45.5 kB of archives.
After this operation, 309 kB of additional disk space will be used.
Get:1 http://ftp.de.debian.org/debian buster/main amd64 memtest86 amd64 4.3.7-3 [45.5 kB]
Fetched 45.5 kB in 0s (181 kB/s)     
Preconfiguring packages …
Selecting previously unselected package memtest86.
(Reading database … 519985 files and directories currently installed.)
Preparing to unpack …/memtest86_4.3.7-3_amd64.deb …
Unpacking memtest86 (4.3.7-3) …
Setting up memtest86 (4.3.7-3) …
Generating grub configuration file …
Found background image: saint-John-of-Rila-grub.jpg
Found linux image: /boot/vmlinuz-4.19.0-18-amd64
Found initrd image: /boot/initrd.img-4.19.0-18-amd64
Found linux image: /boot/vmlinuz-4.19.0-17-amd64
Found initrd image: /boot/initrd.img-4.19.0-17-amd64
Found linux image: /boot/vmlinuz-4.19.0-8-amd64
Found initrd image: /boot/initrd.img-4.19.0-8-amd64
Found linux image: /boot/vmlinuz-4.19.0-6-amd64
Found initrd image: /boot/initrd.img-4.19.0-6-amd64
Found linux image: /boot/vmlinuz-4.19.0-5-amd64
Found initrd image: /boot/initrd.img-4.19.0-5-amd64
Found linux image: /boot/vmlinuz-4.9.0-8-amd64
Found initrd image: /boot/initrd.img-4.9.0-8-amd64
Found memtest86 image: /boot/memtest86.bin
Found memtest86+ image: /boot/memtest86+.bin
Found memtest86+ multiboot image: /boot/memtest86+_multiboot.bin
File descriptor 3 (pipe:[66049]) leaked on lvs invocation. Parent PID 22581: /bin/sh
done
Processing triggers for man-db (2.8.5-2) …


After this both memory testers memtest86+ and memtest86 will appear next to the option of booting a different version kernels and the Advanced recovery kernels, that you usually get in the GRUB boot prompt.

2.5. Use memtest embedded tool on any Linux by adding a kernel variable
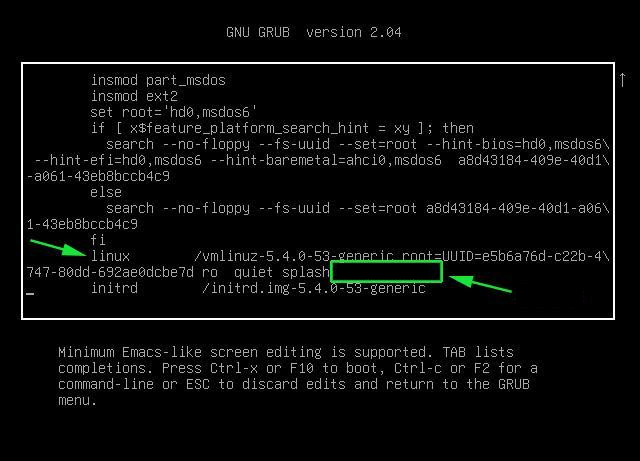
Edit-Grub-Parameters-add-memtest-4-to-kernel-boot

2.4.1. Reboot your computer

# reboot

2.4.2. At the GRUB boot screen (with UEFI, press Esc).

2.4.3 For 4 passes add temporarily the memtest=4 kernel parameter.
 

memtest=        [KNL,X86,ARM,PPC,RISCV] Enable memtest
                Format: <integer>
                default : 0 <disable>
                Specifies the number of memtest passes to be
                performed. Each pass selects another test
                pattern from a given set of patterns. Memtest
                fills the memory with this pattern, validates
                memory contents and reserves bad memory
                regions that are detected.


3. Install and use memtester Linux tool
 

At some condition, memory is the one of the suspcious part, or you just want have a quick test. memtester  is an effective userspace tester for stress-testing the memory subsystem.  It is very effective at finding intermittent and non-deterministic faults.

The advantage of memtester "live system check tool is", you can check your system for errors while it's still running. No need for a restart, just run that application, the downside is that some segments of memory cannot be thoroughfully tested as you already have much preloaded data in it to have the Operating Sytstem running, thus always when possible try to stick to rule to test the memory using memtest86+  from OS Boot Loader, after a clean Machine restart in order to clean up whole memory heap.

Anyhow for a general memory test on a Critical Legacy Server  (if you lets say don't have access to Remote Console Board, or don't trust the ILO / IPMI Hardware reported integrity statistics), running memtester from already booted is still a good idea.


3.1. Install memtester on any Linux distribution from source

wget http://pyropus.ca/software/memtester/old-versions/memtester-4.2.2.tar.gz
# tar zxvf memtester-4.2.2.tar.gz
# cd memtester-4.2.2
# make && make install

3.2 Install on RPM based distros


On Fedora memtester is available from repositories however on many other RPM based distros it is not so you have to install it from source.

[root@fedora ]# yum install -y memtester


3.3. Install memtester on Deb based Linux distributions from source
 

To install it on Debian / Ubuntu / Mint etc. , open a terminal and type:
 

root@linux:/ #  apt install –yes memtester

The general run syntax is:

memtester [-p PHYSADDR] [ITERATIONS]


You can hence use it like so:

hipo@linux:/ $ sudo memtester 1024 5

This should allocate 1024MB of memory, and repeat the test 5 times. The more repeats you run the better, but as a memtester run places a great overall load on the system you either don't increment the runs too much or at least run it with  lowered process importance e.g. by nicing the PID:

hipo@linux:/ $ nice -n 15 sudo memtester 1024 5


  • If you have more RAM like 4GB or 8GB, it is upto you how much memory you want to allocate for testing.
  • As your operating system, current running process might take some amount of RAM, Please check available Free RAM and assign that too memtester.
  • If you are using a 32 Bit System, you cant test more than 4 GB even though you have more RAM( 32 bit systems doesnt support more than 3.5 GB RAM as you all know).
  • If your system is very busy and you still assigned higher than available amount of RAM, then the test might get your system into a deadlock, leads to system to halt, be aware of this.
  • Run the memtester as root user, so that memtester process can malloc the memory, once its gets hold on that memory it will try to apply lock. if specified memory is not available, it will try to reduce required RAM automatically and try to lock it with mlock.
  • if you run it as a regular user, it cant auto reduce the required amount of RAM, so it cant lock it, so it tries to get hold on that specified memory and starts exhausting all system resources.


If you have 8 Gigas of RAM plugged into the PC motherboard you have to multiple 1024*8 this is easily done with bc (An arbitrary precision calculator language) tool:

root@linux:/ # bc -l
bc 1.07.1
Copyright 1991-1994, 1997, 1998, 2000, 2004, 2006, 2008, 2012-2017 Free Software Foundation, Inc.
This is free software with ABSOLUTELY NO WARRANTY.
For details type `warranty'. 
8*1024
8192


 for example you should run:

root@linux:/ # memtester 8192 5

memtester version 4.3.0 (64-bit)
Copyright (C) 2001-2012 Charles Cazabon.
Licensed under the GNU General Public License version 2 (only).

pagesize is 4096
pagesizemask is 0xfffffffffffff000
want 8192MB (2083520512 bytes)
got  8192MB (2083520512 bytes), trying mlock …Loop 1/1:
  Stuck Address       : ok        
  Random Value        : ok
  Compare XOR         : ok
  Compare SUB         : ok
  Compare MUL         : ok
  Compare DIV         : ok
  Compare OR          : ok
  Compare AND         : ok
  Sequential Increment: ok
  Solid Bits          : ok        
  Block Sequential    : ok        
  Checkerboard        : ok        
  Bit Spread          : ok        
  Bit Flip            : ok        
  Walking Ones        : ok        
  Walking Zeroes      : ok        
  8-bit Writes        : ok
  16-bit Writes       : ok

Done.


4. Shell Script to test server memory for corruptions
 

If for some reason the machine you want to run a memory test doesn't have connection to the external network such as the internet and therefore you cannot configure a package repository server and install memtester, the other approach is to use a simple memory test script such as memtestlinux.sh
 

#!/bin/bash
# Downloaded from https://www.srv24x7.com/memtest-linux/
echo "ByteOnSite Memory Test"
cpus=`cat /proc/cpuinfo | grep processor | wc -l`
if [ $cpus -lt 6 ]; then
threads=2
else
threads=$(($cpus / 2))
fi
echo "Detected $cpus CPUs, using $threads threads.."
memory=`free | grep 'Mem:' | awk {'print $2'}`
memoryper=$(($memory / $threads))
echo "Detected ${memory}K of RAM ($memoryper per thread).."
freespace=`df -B1024 . | tail -n1 | awk {'print $4'}`
if [ $freespace -le $memory ]; then
echo You do not have enough free space on the current partition. Minimum: $memory bytes
exit 1
fi
echo "Clearing RAM Cache.."
sync; echo 3 > /proc/sys/vm/drop_cachesfile
echo > dump.memtest.img
echo "Writing to dump file (dump.memtest.img).."
for i in `seq 1 $threads`;
do
# 1044 is used in place of 1024 to ensure full RAM usage (2% over allocation)
dd if=/dev/urandom bs=$memoryper count=1044 >> dump.memtest.img 2>/dev/null &
pids[$i]=$!
echo $i
done
for pid in "${pids[@]}"
do
wait $pid
done

echo "Reading and analyzing dump file…"
echo "Pass 1.."
md51=`md5sum dump.memtest.img | awk {'print $1'}`
echo "Pass 2.."
md52=`md5sum dump.memtest.img | awk {'print $1'}`
echo "Pass 3.."
md53=`md5sum dump.memtest.img | awk {'print $1'}`
if [ “$md51” != “$md52” ]; then
fail=1
elif [ “$md51” != “$md53” ]; then
fail=1
elif [ “$md52” != “$md53” ]; then
fail=1
else
fail=0
fi
if [ $fail -eq 0 ]; then
echo "Memory test PASSED."
else
echo "Memory test FAILED. Bad memory detected."
fi
rm -f dump.memtest.img
exit $fail

Nota Bene !: Again consider the restults might not always be 100% trustable if possible restart the server and test with memtest86+

Consider also its important to make sure prior to script run,  you''ll have enough disk space to produce the dump.memtest.img file – file is created as a test bed for the memory tests and if not scaled properly you might end up with a full ( / ) root directory!


4.1 Other memory test script with dd and md5sum checksum

I found this solution on the well known sysadmin site nixCraft cyberciti.biz, I think it makes sense and quicker.

First find out memory site using free command.
 

# free
             total       used       free     shared    buffers     cached
Mem:      32867436   32574160     293276          0      16652   31194340
-/+ buffers/cache:    1363168   31504268
Swap:            0          0          0


It shows that this server has 32GB memory,
 

# dd if=/dev/urandom bs=32867436 count=1050 of=/home/memtest


free reports by k and use 1050 is to make sure file memtest is bigger than physical memory.  To get better performance, use proper bs size, for example 2048 or 4096, depends on your local disk i/o,  the rule is to make bs * count > 32 GB.
run

# md5sum /home/memtest; md5sum /home/memtest; md5sum /home/memtest


If you see md5sum mismatch in different run, you have faulty memory guaranteed.
The theory is simple, the file /home/memtest will cache data in memory by filling up all available memory during read operation. Using md5sum command you are reading same data from memory.


5. Other ways to test memory / do a machine stress test

Other good tools you might want to check for memory testing is mprime – ftp://mersenne.org/gimps/ 
(https://www.mersenne.org/ftp_root/gimps/)

  •  (mprime can also be used to stress test your CPU)

Alternatively, use the package stress-ng to run all kind of stress tests (including memory test) on your machine.
Perhaps there are other interesting tools for a diagnosis of memory if you know other ones I miss, let me know in the comment section.
Speed up WordPress / Joomla CMS and MySQL server on Linux with tmpfs ram file system / Decrease Website pageload times with RAM caching

Wednesday, March 4th, 2015

speed-up-accelerate-wordpress-joomla-drupal-cms-and-mysql-server-with-tmpfs_ramfs_decrease-pageload-times-with-ram-caching
As a WordPress blog owner and an sys admin that has to deal with servers running a lot of WordPress / Joomla / Droopal and other custom CMS installed on servers, performoing slow or big enough to put a significant load on servers
and I love efficiency and hardware cost saving is essential for my daily job, I'm constantly trying to find new ways to optimize Customer Website (WordPress) and rest of sites in order to utilize better our servers and improve our clients sites speed (and hence satisfaction). 

There is plenty of little things to do on servers but probably among the most crucial ones which we use nowadays that save us a lot of money is tmpfs, and earlier (ramfs) – previously known as shmfs).
TMPFS is a (Temporary File Storage Facility) Linux kernel technology based on ramfs (used by Linux kernel initrd / initramfs on boot time in order to load and store the Linux kernel in memory, before system hard disk partition file systems are mounted) which is heavily used by virtually all modern popular Linux distributions. 

Using ramfs (cramfs variation – Compressed ROM filesystem) has been used to store different system environment kernel and Desktop components of many Linux environment / applications and used by a lot of the Linux BootCD such as the most famous (Klaus Knopper's) KNOPPIX LiveCD and Trinity Rescue Kit Linux (TRK uses /dev/shm which btw can be seen on most modern Linux distros and is actually just another mounted tmpfs).
If you haven't tried Live Linux yet try it out as me and a lot of sysadmins out there use some kind of LiveLinux at least few times on yearly basis  to Recover Unbootable Linux servers after some applied remote Updates as well as for Rescuing (Save) Data from Linux server failing to properly boot because of hard disk (bad blocks) failures. As I said earlier TMPFS is also used on almost any distribution for the /dev/ filesystem which is kept in memory.

You can see which tmpfs partitions is used on your Linux server with:


debian-server:~# mount |grep -i tmpfs
tmpfs on /lib/init/rw type tmpfs (rw,nosuid,mode=0755)
udev on /dev type tmpfs (rw,mode=0755)
tmpfs on /dev/shm type tmpfs (rw,nosuid,nodev)


Above is an output from a standard Debian Linux server. On CentOS 7 standard mounted tmpfs are as follows:


[root@centos ~]# mount |grep -i tmpfs
devtmpfs on /dev type devtmpfs (rw,nosuid,seclabel,size=1016332k,nr_inodes=254083,mode=755)
tmpfs on /dev/shm type tmpfs (rw,nosuid,nodev,seclabel)
tmpfs on /run type tmpfs (rw,nosuid,nodev,seclabel,mode=755)
tmpfs on /sys/fs/cgroup type tmpfs (rw,nosuid,nodev,noexec,seclabel,mode=755)


[root@centos ~]# df -h|grep -i tmpfs
devtmpfs                 993M     0  993M   0% /dev
tmpfs                   1002M   92K 1002M   1% /dev/shm
tmpfs                   1002M  8.8M  993M   1% /run
tmpfs                   1002M     0 1002M   0% /sys/fs/cgroup

The /run tmpfs mounted directory is also to be seen also on latest Ubuntus and Fedoras and is actually the good old /var/run ( where applications keep there pids and some small app related files) stored in tmpfs filesystem stored in memory.

If you're wondering what is /dev/shm and why it appears mounted on every single Linux Server / Desktop you've ever used this is a special filesystem shared memory which various running programs (processes) can use to transfer data quick and efficient between each other to preven the slow disk swapping. People using Linux for the rest 15 years should remember /dev/shm has been a target of a lot of kernel exploits as historically it had a lot of security issues.

While writting this article I've just checked about KNOPPIX developed amd just for info as of time of writting this distro has already 1000+ programs on CD version and 2600+ packages / application on DVD version.
Nowadays Knoppix is mostly used mostly as USB Live Flash drive as a lot of people are dropping CD / DVD use (many servers doesn't have a CD / DVD Drive) and for USB Live Flash Linux distros tmpfs is also key technology used as this gives the end user an amazing fast experience (Desktop applications run much fasten on Live USBs when tmpfs is used than when the slow 7200 RPM HDDs are used).

Loading big parts of the distribution within RAM (with tmpfs from Linux Kernel 2.4+ onwards) is also heavily used by a lot of Cluster vendors in most of Clustered (Cloud) Linux based environemnts, cause TMPFS gives often speeds up improvements to x30 times and decreases greatly I/O HDD. FreeBSD users will be happy to know that TMPFS is already ported and could be used on from FreeBSD 7.0+ onward.

In this small article I will give you example use on how I use tmpfs to speed up our WordPress Websites which use WP Caching plugins such as W3 Total Cache and WP Super Cache
and Hyper Cache / WP Super Cache disk caching and MySQL server as a Database backend.
Below example is wordpress specific but since it can be easily applied to JoomlaDrupal or any other CMS out there that uses mySQL server to make a lot of CPU expensive memory hungry (LEFT JOIN) queries which end up using a slow 7200 RPM hard disk.


1. Preparing tmpfs partitions for WordPress File Cache directory
 

If you want to give tmpfs a test drive, I recommend you try to create / mount a 20 Megabyte partition. To create a tmpfs partition you don't need to use a tool like mkfs.ext3 / mkfs.ext4 as TMPFS is in reality a virtual filesystem that is mapped in the server system physical RAM (volatile memory). TMPFS is very nice because if you run out of free RAM system starts a combination of RAM use + some Hard disk SWAP 
The great thing about TMPFS is it never uses all of the available RAM and SWAP, which would not halt your server if TMPFS partition gets filled, but instead you will start getting the usual "Insufficient Disk Space", just like with a physical HDD parititon. RAMFS cares much less about server compared to TMPFS, because if RAMFS is historically older.

ramfs file systems cannot be limited in size like a disk base file system which is limited by it’s capacity, thus ramfs will continue using memory storage until the system runs out of RAM and likely crashes or becomes unresponsive. This is a problem if the application writing to the file system cannot be limited in total size, so in my opinion you better stay away from RAMFS except you have a good idea what you're doing. Another disadvantage of RAMFS compared to TMPFS is you cannot see the size of the file system in df and it can only be estimated by looking at the cached entry in free.

Note that before proceeding to use TMPFS or RAMFS you should know besides having advantages, there are certain serious disadvantage that if the server using tmpfs (in RAM) to store files crashes the customer might loose his data, therefore using RAM filesystems on Production servers is best to be used just for caching folders which are regularly synchronized with (rsync) to some folder to assure no data will be lost on server reboot or crash.

Memory of fast storage areas are ideally suited for applications which need repetitively small data areas for caching or using as temporary space such as Jira (Issue and Proejct Tracking Software) Indexing  As the data is lost when the machine reboots the tmpfs stored data must not be data of high importance as even scheduling backups cannot guarantee that all the data will be replicated in the even of a system crash.

To test mounting a tmpfs virtual (memory stored) filesystem issue:
 

mount -t tmpfs tmpfs -o size=256m /mnt/tmpfs


If you want to test mount a ramfs instead:


 mount -t ramfs -o size=256m ramfs /mnt/ramfs


debian-server:~#  mount |grep -i -E "ramfs|tmpfs"
tmpfs on /lib/init/rw type tmpfs (rw,nosuid,mode=0755)
udev on /dev type tmpfs (rw,mode=0755)
tmpfs on /dev/shm type tmpfs (rw,nosuid,nodev)
tmpfs on /mnt/tmpfs type tmpfs (rw,size=256m)
ramfs on /mnt/ramfs type tmpfs (rw,size=256m)


Once mounted tmpfs can be used in the same way as any ext4 / reiserfs filesystem. In the same way to make mounts permanent, its necessery to add a line to /etc/fstab

To illustrate better a tmpfs use case on my blog running WordPress with W3TotalCache (W3TC) plugin cache folder in /var/www/blog/wp-content/w3tc to get advantage of tmpfs to store w3tc files.

a) Stop Apache

On Debian
 

debian-server:~# /etc/init.d/apache stop


On CentOS 
 

[root@centos ~]# /etc/init.d/httpd stop


b) Move w3tc dir to w3tc-bak


debian-server:~# cd /var/www/blog/wp-content/
debian-server:~# mv w3tc w3tc-bak


c) Create w3tc directory
 

debian-server:/var/www/blog/wp-content# mkdir w3tc
debian-server:/var/www/blog/wp-content# chown -R www-data:www-data w3tc


d) Add tmpfs record to /etc/fstab

My W3TC Cache didn't grow bigger than 2Gigabytes so I create a 2Giga directory for it by adding following in /etc/fstab 
 

debian-server:~# vim /etc/fstab


tmpfs /var/www/blog/wp-content/w3tc tmpfs defaults,size=2g,noexec,nosuid,uid=33,gid=33,mode=1755 0 0


You might also want to add the nr_inodes (option) to tmpfs while mounting. nr_inodes is the maximum inode for instance. Default is half the number of your physical RAM pages, (on a machine with highmem) the number of lowmem RAM page, some common option that should work is nr_inodes=5k, if you're unsure what this option does you can safely skip it 🙂

e) Mount new added tmpfs folder

Then to mount the newly added filesystem issue:
 

mount -a


Or if you're on a CentOS / RHEL server use httpd Apache user instead and whenever you have docroot and wordpress installed.


[root@centos ~]# chown -R apache:apache: w3tc


If you're using Apache SuPHP use whatever the UID / GID is proper.

On CentOS you will need to set proper UID and GID (UserID / GroupID), to find out which ones to to use check in /etc/passwd:
 

[root@centos ~]# grep -i apache /etc/passwd
apache:x:48:48:Apache:/var/www:/sbin/nologin


f) Move old w3tc cache from w3tc-bak to w3tc


debian-server:/var/www/blog/wp-content# mv w3tc-bak/* w3tc/


g) Start again Apache

On Debian:


debian-server:~# /etc/init.d/apache2 start


On CentOS:
 

[root@centos~]# /etc/init.d/httpd start

h) Keeping w3tc cache site folder synced

As I said earlier the biggest problem with caching (the reason why many hosting providers) and site admins refuse to use it is they might loose some data, to prevent data loss or at least mitigate the data loss to few minutes intervals it is a good idea to synchronize tmpfs kept folders somewhere to disk with rsync.

To achieve that use a cronjob like this:
 

debian-server:~# crontab -u root -e
*/5 * * * * /usr/bin/ionice -c3 -n7 /usr/bin/nice -n 19 /usr/bin/rsync -ah –stats –delete /var/www/blog/wp-content/w3tc/ /backups/tmpfs/cache/ 1>/dev/null


Note that you will need to have the /backups/tmpfs/cache folder existing, create it with:


debian-server:~# mkdir -p /backups/tmpfs/cache


You will also need to add a rsync synchronization from backupped folder to tmpfs (in case if the server gets accidently rebooted because it hanged or power outage), place in

/etc/rc.local


ionice -c3 -n7 nice -n 19 rsync -ahv –stats –delete /backups/tmpfs/cache/ /var/www/blog/wp-content/w3tc/ 1>/dev/null


(somewhere before exit 0) line
 

0 05 * * * /usr/bin/ionice -c3 -n7 /bin/nice -n 19 /usr/bin/rsync -ah –stats –delete /var/www/blog/wp-content/w3tc/ /backups/tmpfs/cache/ 1>/dev/null


2. Preparing tmpfs partitions for MySQL server temp File Cache directory


Its common that MySQL servers had to serve a lot of long and heavy SQL JOIN Queries mostly by related posts WP plugins such as (Zemanta Related Posts) and Contextual Related posts though MySQLs are well optimized  to work as much as efficient using mysql tuner (tuning primer) still often SQL servers get a lot of temp tables created to disk (about 25% to 30%) of all SQL queries use somehow HDD to serve queries and as this is very slow and there is file lock created the overall MySQL performance becomes sluggish at times to fix (resolve) that without playing with SQL code to optimize the slow queries the best way I found is by using TMPFS as MySQL temp folder.

To do so I create a TMPFS usually the size of 256 MB because this is usually enough for us, but other hosting companies might want to add bigger virtual temp disk:

a) Add tmpfs new dir to /etc/fstab

In /etc/fstab add below record with vim editor:
 

debian-server:~# vim /etc/fstab


tmpfs /var/mysqltmp tmpfs rw,gid=111,uid=108,size=256M,nr_inodes=10k,mode=0700 0 0


Note that the uid / and gid 105 and 114 are taken again from /etc/passwd

On Debian

debian-server:~# grep -i mysql /etc/passwd
mysql:x:108:111:MySQL Server,,,:/var/lib/mysql:/bin/false


On CentOS
 

[root@centos ~]# grep -i mysql /etc/passwd
mysql:x:27:27:MySQL Server:/var/lib/mysql:/bin/bash


b) Create folder /var/mysqltmp or whenever you want to place the tmpfs memory kept SQL folder


debian-server:~# mkdir /var/mysqltmp
debian-server:~# chown mysql:mysql /var/mysqltmp


debian-server:~# mount|grep -i tmpfs
tmpfs on /lib/init/rw type tmpfs (rw,nosuid,mode=0755)
udev on /dev type tmpfs (rw,mode=0755)
tmpfs on /dev/shm type tmpfs (rw,nosuid,nodev)
tmpfs on /var/www/blog/wp-content/w3tc type tmpfs (rw,noexec,nosuid,size=2g,uid=33,gid=33,mode=1755)
tmpfs on /var/mysqltmp type tmpfs (rw,gid=108,uid=111,size=256M,nr_inodes=10k,mode=0700)


c) Add new path to tmpfs created folder in my.cnf 

Then  edit /etc/mysql/my.cnf


debian-server:~# vim /etc/mysql/my.cnf

[mysqld]
#
# * Basic Settings
#
user        = mysql
pid-file    = /var/run/mysqld/mysqld.pid
socket      = /var/run/mysqld/mysqld.sock
port        = 3306
basedir     = /usr
datadir     = /var/lib/mysql
tmpdir      = /var/mysqltmp


On CentOS edit and change tmpdir in same way within /etc/my.cnf


d) Finally Restart Apache and MySQL to make mysql start using new set tmpfs memory kept folder

On Debian:
 

debian-server:~# /etc/init.d/apache2 stop; /etc/init.d/mysql restart; /etc/init.d/apache2 start

On CentOS:
 

[root@centos ~]# /etc/init.d/httpd stop; /etc/init.d/mysqld restart; /etc/initd/httpd start


Now monitor your server and check your pagespeed increase for me such an optimization usually improves site performance so site becomes +50% faster, to see the difference you can test your website before applying tmpfs caching for site and after that by using Google PageInsight (PageSpeed) Online Test. Though this example is for MySQL and WordPress you can easily adopt the same for Joomla if you have Joomla Caching enabled to some folder, same goes for any other CMS such as Drupal that can take use of Disk Caching. Actually its a small secret of many Hosting providers that allow clients to create sites via CPanel and Kloxo this tmpfs optimizations are already used for sites and by this the provider is able to offer better website service on lower prices. VPS hosting providers also use heavy caching. A lot of people are using TMPFS also to accelerate Sites that have enabled Google Pagespeed as Cacher and accelerator, as PageSpeed module puts a heavy HDD I/O load that can easily stone the server. Many admins also choose to use TMPFS for  /tmp, /var/run, and /var/lock directories as this leads often to significant overall server services operations improvement.
Once you have tmpfs enabled, It is a good idea to periodically monitor your SWAP used space with (df -h), because if you allocate bigger tmpfs partitions than your physical memory and tmpfs's full size starts to be used your machine will start swapping heavily and this could have a very negative performance affect.
 

debian-server:~# df -h|grep -i tmpfs
tmpfs            3,9G     0   3,9G   0% /lib/init/rw
tmpfs            3,9G     0   3,9G   0% /dev/shm
tmpfs            2,0G  1,4G   712M  66% /var/www/blog/wp-content/w3tc
tmpfs            256M     0   256M   0% /mnt/tmpfs
tmpfs            256M  236K   256M   1% /var/mysqltmp

The applications of tmpfs to accelerate services is up to your imagination, so I will be glad to hear from other admins on any interesting other application or problems faced while using TMPFS.

 Enjoy! 🙂

How to tune MySQL Server to increase MySQL performance using mysqltuner.pl and Tuning-primer.sh

Tuesday, August 9th, 2011

MySQL Easy performance tuning with mysqltuner.pl and Tuning-primer.sh scripts

Improving MySQL performance is crucial for improving a website responce times, reduce server load and improve overall work efficiency of a mysql database server.

I’ve seen however many Linux System administrators who does belittle or completely miss the significance of tuning a newly installed MySQL server installation.
The reason behind that is probably caused by fact that many people think MySQL config variables, would not significantly improve performance and does not pay back for optimization efforts. Moreover there are a bunch of system admins who has to take care for numerous services so they don’t have time to get good knowledge to optimize MySQL servers.
Thus many admins and webmasters nowdays, think optimizations depend mostly on the side of the website programmers.
It’s also sometimes falsely believed that optimizing a MySQL server could reduce the overall server stability.

With the boom of Internet website building and internet marketing, many webmasters emerged and almost anybody with almost no knowledge on GNU/Linux or minimal or no knowledge on PHP can start his Online store, open a blog or create a website powered by some CMS like joomla.
Thus nowdays many servers even doesn’t have a hired system administrators but are managed by people whose knowledge on *Nix is almost next to zero, this is another reason why dozens of MySQL installations online are a default ones and are not taking a good advantage of the server hardware.

The incrase of website visitors leads people servers expectations for hardware also to grow, thus many companies simply buy a new hardware instead of taking the few time to investigate on how current server hardware can be utilized better.
In that manner of thought I though it will be a good idea to write this small article on Tuning mysql servers with two scripts Tuning-primer.sh and mysqltuner.pl.
The scripts are ultra easy to use and does not require only a minimal knowledge on MySQL, Linux or (*BSD *nix if sql is running on BSD).
Tuning-primer.sh and mysqltuner.pl are therefore suitable for a quick MySQL server optimizations to even people who are no computer experts.

I use this two scripts for MySQL server optimizations on almost every new configured GNU/Linux with a MySQL backend.
Use of the script comes to simply download with wget, lynx, curl or some other web client and execute it on the server host which is already running the MySQL server.

Here is an example of how simple it is to run the scripts to Optimize MySQL:

debian:~# perl mysqltuner.pl
>> MySQLTuner 1.2.0 - Major Hayden >major@mhtx.net<
>> Bug reports, feature requests, and downloads at http://mysqltuner.com/
>> Run with '--help' for additional options and output filtering

——– General Statistics ————————————————–
[–] Skipped version check for MySQLTuner script
[OK] Currently running supported MySQL version 5.1.49-3
[OK] Operating on 64-bit architecture

——– Storage Engine Statistics ——————————————-
[–] Status: +Archive -BDB -Federated +InnoDB -ISAM -NDBCluster
[–] Data in MyISAM tables: 6G (Tables: 952)
[!!] InnoDB is enabled but isn’t being used
[!!] Total fragmented tables: 12

——– Security Recommendations ——————————————-
[OK] All database users have passwords assigned

——– Performance Metrics ————————————————-
[–] Up for: 1d 2h 3m 35s (68M q [732.193 qps], 610K conn, TX: 49B, RX: 11B)
[–] Reads / Writes: 76% / 24%
[–] Total buffers: 512.0M global + 2.8M per thread (2000 max threads)
[OK] Maximum possible memory usage: 6.0G (25% of installed RAM)
[OK] Slow queries: 0% (3K/68M)
[OK] Highest usage of available connections: 7% (159/2000)
[OK] Key buffer size / total MyISAM indexes: 230.0M/1.7G
[OK] Key buffer hit rate: 97.8% (11B cached / 257M reads)
[OK] Query cache efficiency: 76.6% (46M cached / 61M selects)
[!!] Query cache prunes per day: 1822075
[OK] Sorts requiring temporary tables: 0% (1K temp sorts / 2M sorts)
[!!] Joins performed without indexes: 63635
[OK] Temporary tables created on disk: 1% (26K on disk / 2M total)
[OK] Thread cache hit rate: 99% (159 created / 610K connections)
[!!] Table cache hit rate: 4% (1K open / 43K opened)
[OK] Open file limit used: 17% (2K/16K)
[OK] Table locks acquired immediately: 99% (36M immediate / 36M locks)

——– Recommendations —————————————————–
General recommendations:
Add skip-innodb to MySQL configuration to disable InnoDB
Run OPTIMIZE TABLE to defragment tables for better performance
Enable the slow query log to troubleshoot bad queries
Increasing the query_cache size over 128M may reduce performance
Adjust your join queries to always utilize indexes
Increase table_cache gradually to avoid file descriptor limits
Variables to adjust:
query_cache_size (> 256M) [see warning above] join_buffer_size (> 256.0K, or always use indexes with joins) table_cache (> 7200)

You see there are plenty of things, the script reports, for the unexperienced most of the information can be happily skipped without need to know the cryptic output, the section of importance here is Recommendations for some clarity, I’ve made this section to show up bold.

The most imporant things from the Recommendations script output is actually the lines who give suggestions for incrase of certain variables for MySQL.In this example case this are the last three variables:
query_cache_size,
join_buffer_size and
table_cache

All of these variables are tuned from /etc/mysql/my.cnf (on Debian) and derivatives distros and from /etc/my.cnf on RHEL, CentOS, Fedora and the other RPM based Linux distributions.

On some custom server installs my.cnf is also located in /usr/local/mysql/etc/ or some other a bit more unstandard location 😉

Anyways now having the Recommendation from the script, it’s necessery to edit my.cnf and try to double the values for the suggested variables.

First, I check if all the suggested variables are existent in my config with grep , if they’re not then I’ll simply add the variable with doubled size of the suggested values.
P.S: One note here is sometimes some values which are configured, are the default value for the MySQL server and does not have a record in my.cnf

debian:~# grep -E 'query_cache_size|join_buffer_size|table_cache' /etc/mysql/my.cnf table_cache = 7200
query_cache_size = 256M
join_buffer_size = 262144

All of my variables are in the config so, now edit my.cnf and set values to:
table_cache = 14400
query_cache_size = 512M
join_buffer_size = 524288

I always, however preserve the old variable’s value, because sometimes raising the value might create problem and the MySql server might be unable to restart properly.
Thus before going with adding the new values make sure the old ones are commented with # , e.g.:
#table_cache = 7200
#query_cache_size = 256M
#join_buffer_size = 262144

I would recommend vim as editor of choice while editing my.cnf as vim completely rox 😉 If you’re not acquainted to vim use nano or mcedit or your editor of choice 😉 :

debian:~# vim /etc/mysql/my.cnf
...

Assuming that the changes are made, it’s time to restart MySQL to make sure the new values are read by the SQL server.

debian:~# /etc/init.d/mysql restart
* Stopping MySQL database server mysqld [ OK ]
* Starting MySQL database server mysqld [ OK ]
Checking for tables which need an upgrade, are corrupt or were not closed cleanly.

If mysql server fails, however to restart, make sure immediately you reverse back the changed variables to the commented values and restart once again via mysql init script to make server load.

Afterwards start adding the values one by one until find out which one is causing the mysqld to fail.

Now the second script (Tuning-primer.sh) is also really nice for MySQL performance optimizations are necessery. However it’s less portable (as it’s written in bash scripting language).
Consider running this script among different GNU/Linux distributious (especially the newer ones) might produce errors.
Tuning-primer.sh requires some minor code changes to be able to run on FreeBSD, NetBSD and OpenBSD *nices.

The way Tuning-primer.sh works is precisely like mysqltuner.pl , one runs it it gives some info about current running MySQL server and based on certain factors gives suggestions on how increasing or decresing certain my.cnf variables could reduce sql query bottlenecks, solve table locking issues as well as generally improve INSERT, UPDATE query times.

Here is an example output from tuning-primer.sh run on another server:

server:~# wget https://www.pc-freak.net/files/Tuning-primer.sh
...
server:~# sh Tuning-primer.sh
-- MYSQL PERFORMANCE TUNING PRIMER --
- By: Matthew Montgomery -

MySQL Version 5.0.51a-24+lenny5 x86_64

Uptime = 8 days 10 hrs 19 min 8 sec
Avg. qps = 179
Total Questions = 130851322
Threads Connected = 1

Server has been running for over 48hrs.
It should be safe to follow these recommendations

To find out more information on how each of these
runtime variables effects performance visit:
http://dev.mysql.com/doc/refman/5.0/en/server-system-variables.html

SLOW QUERIES
Current long_query_time = 1 sec.
You have 16498 out of 130851322 that take longer than 1 sec. to complete
The slow query log is NOT enabled.
Your long_query_time seems to be fine

MAX CONNECTIONS
Current max_connections = 2000
Current threads_connected = 1
Historic max_used_connections = 85
The number of used connections is 4% of the configured maximum.
Your max_connections variable seems to be fine.

WORKER THREADS
Current thread_cache_size = 128
Current threads_cached = 84
Current threads_per_sec = 0
Historic threads_per_sec = 0
Your thread_cache_size is fine

MEMORY USAGE
Tuning-primer.sh: line 994: let: expression expected
Max Memory Ever Allocated : 741 M
Configured Max Memory Limit : 5049 M
Total System Memory : 23640 M

KEY BUFFER
Current MyISAM index space = 1646 M
Current key_buffer_size = 476 M
Key cache miss rate is 1 / 56
Key buffer fill ratio = 90.00 %
You could increase key_buffer_size
It is safe to raise this up to 1/4 of total system memory;
assuming this is a dedicated database server.

QUERY CACHE
Query cache is enabled
Current query_cache_size = 64 M
Current query_cache_used = 38 M
Current Query cache fill ratio = 59.90 %

SORT OPERATIONS
Current sort_buffer_size = 2 M
Current record/read_rnd_buffer_size = 256.00 K
Sort buffer seems to be fine

JOINS
Current join_buffer_size = 128.00 K
You have had 111560 queries where a join could not use an index properly
You have had 91 joins without keys that check for key usage after each row
You should enable “log-queries-not-using-indexes”
Then look for non indexed joins in the slow query log.
If you are unable to optimize your queries you may want to increase your
join_buffer_size to accommodate larger joins in one pass.

TABLE CACHE
Current table_cache value = 3600 tables
You have a total of 798 tables
You have 1904 open tables.
The table_cache value seems to be fine

TEMP TABLES
Current tmp_table_size = 128 M
1% of tmp tables created were disk based
Created disk tmp tables ratio seems fine

TABLE SCANS
Current read_buffer_size = 128.00 K
Current table scan ratio = 797 : 1
read_buffer_size seems to be fine

TABLE LOCKING
Current Lock Wait ratio = 1 : 1782
You may benefit from selective use of InnoDB.

As seen from script output, there are certain variables which might be increased a bit for better SQL performance, one such variable as suggested is key_buffer_size(You could increase key_buffer_size)

Now the steps to make the tunings to my.cnf are precisely the same as with mysqltuner.pl, e.g.:
1. Preserve old config variables which will be changed by commenting them
2. Double value of current variables in my.cnf suggested by script
3. Restart Mysql server via /etc/init.d/mysql restart cmd.
4. If mysql runs fine monitor mysql performance with mtop or mytop for at least 15 mins / half an hour.

if all is fine run once again the tuning scripts to see if there are no further improvement suggestions, if there are more follow the 4 steps described procedure once again.

It’s also a good idea that these scripts are periodically re-run on the server like once per few months as changes in SQL queries amounts and types will require changes in MySQL operational variables.
The authors of these nice scripts has done great job and have saved us a tons of nerves time, downtimes and money spend on meaningless hardware. So big thanks for the awesome scripts guys 😉
Finally after hopefully succesful deployment of changes, enjoy the incresed SQL server performance 😉

Strained day

Saturday, March 31st, 2007

Yesterday the day was quite strained. We were prepairing for few weeks to host the new website of pozvanete.bgcreated by our firm Design.BG, so yesterday in 9:40, our project manager has called and said pozvanete.bg’s DNSrecord is already changed to point to our server, but there is a problem while http://www.pozvanete.bg opensnormally, http://pozvanete.bg opens DBG’s 404 error page. I remembered that this is due to a configuration of theserver cause there was some SEO stuff in the past on the server, so I was able to fix the problem quickly.The problems started to come after that. The machine where we hosted the site (and it was the only site there was1.6ghz AMD with 1 giga of RAM). Unfortunately 30 minutes after it started to open from our server I observed themachine’s cpu stays idle 0.0 all the time and the site responds very slowly to browser requests. I tried to tinkerit changing things from the webserver configuration file with no luck. I spoke with my boss explained him the situationso he decided we’ll move the site on another machine which is ( 3.0 Ghz Intel ), and the next week we’ll move the siteagain to a rack machine colocated in Sofia in Evo Link. It took a lot of conversations over the phone and talk with Vladibefore we moved completely the site on the new machine before that I have to recompile the machine’s current httpd and php to match the requirements of the site but Praise the Lord in the everything went smoothly and we were able to move the site completely the site to the new location. I’ve speak with Pozvanete’s administrator to change the DNS records to point to the new machine and in 6:00 o’clock the site could be seen from the new server. In the mean time Bobb has bought an IBM rack he quickly packed it and send it to Sofia. Among all this a lot of collegues from the office found me urgent work, I got a complaint about a problem with the mails of propertyinvestld the guy claimed our webmail sent the .doc files as winmail.dat which as I suspected was not true. But Praise the Lord everything went smoothly in the end. In 8:00 o’clock we go out of home with Nomen and decided to go to the Mino’s coffee to see Sami cause he’s has come back from Sofia. Mino’s coffee was a lot of fuller than usual, and it was very smoky, Tsetso speak a lot about art and history as usual, I was bored as usual etc. etc.After that we had the idea to watch a film in Nomen’s home but my Aunt called and said if I have time it will be good to see my grandma cause she is not feeling well (they made her eye surgery 3 days ago). I went to his home and stayed with her it’s awful she is such a nice lady and she’s suffering so much. She said how bad she felt nobody went to the hospital to see her for 3 days ( First I was angry to my mother .. then I calmed down ). I realized all the world is in birth pains as written in the Bible so I praid a lot to the Creator to have mercy over my grandma. Then I tried reading The Bible for some time but I was too sleepy and I went to bed. END—–

Create PNG, JPG, GIF pictures / images from PDF on Linux

Saturday, February 25th, 2012

I've received a PDF file with a plan for development of a bundle of projects, My task was to evaluate this plan and give feeback on the 44 pages PDF document.

Since don't know of program to directly be able edit PDF files on GNU / Linux ?, my initial idea was to open and convert the PDF to ODT / DOC with OpenOffice (Libre Office) and then edit the ODT file.
Unfortunately Open Office oowrite program was unable to open / visualize the PDF file. My assumption is OO failure to open the PDF is because the PDF was generated on Microsoft Windows with Adobe illustrator or smth.

The idea that came to my mind as alternative, way to edit the PDF file was to convert it in pictures edit and then convert the pictures to PDF.
In other words to follow these 3 steps:
1. Convert the PDF document to multiple images
2. Edit each of the images with GIMP or Inkscape
3. Convert back all images to a single PDF file

Some time ago, I've written an article how to create PDF file from many image files in JPEG, PNG or GIF on Linux

. This prior article was exactly describing how to complete Step 3.Therefore all left was to find a way to convert the PDF file to multiple JPEG / PNG / GIF images.

convert command to convert PDF document to multiple pictures which you can take from my earlier article is:

$ convert *.jpg outputpdffile.pdf
Actually in Step 1 I was aiming to do the opposite of what I've previously done.

Hence, in order to convert the singe Project.PDF file to multiple PNG images, I just switched convert IN / OUT arguments order.

hipo@noah:~/project-pdf-to-images$ convert Project.pdf Project.png
...

I've done the PDF to pictures conversion on my notebook running Debian Squeeze (6.0.2) GNU / Linux.Convertion of the PDF file to 44 images, took 25 seconds on my dual core 1.8 Ghz / 2GB RAM Thinkpad r61.
Afterwards, I've had at hand 44 PNG files generated, e.g.:

hipo@noah:~/project-pdf-to-images$ ls -al Project-*.png |wc -l
44

convert was also smart enough to produce correct file naming. The output file names were:
Project-1.png
Project-2.png
etc.

Nicely each number (-1.png) was corresponding to the respective PDF page. For instance Project-10.png was corresponding to page 10 of the Projects.PDF file

Rather ironically, after convertion of the PDF to pictures, while opening the Project-1.png, I've noticed The GIMP – (The GNU Image Manipulation Program) is capable of directly reading PDF files. GIMP has both the option to open files in layers or separate images 😉
Anyways even if GIMP is used to modify the different PDF pages as layers, once completed GIMP doesn't have the ability to save the file as PDF and therefore once saved the file if merging of layers is done the resulting picture becomes ONE BIG MESS.
Therefore it seems my the 3 steps way e.g.:

1. convertion PDF to pictures
2. picture edit with GIMP or Inkscape
3. convertion of pictures back to PDF

is still the only way to "modify PDF" in Linux or BSDs. I will be glad to hear if someone has come up with a better solution?


How to install Nvidia GeForce FX 5500 on Ubuntu 11.04

Tuesday, July 19th, 2011

Nvidia Tux GeForce GNU / Linux

Yesterday I was at a friend of mine who has recently installed Ubuntu 11.04 to his already oldish Desktop computer.

The system was 1.4Ghz (amd) with 512 RAM and some kind of Dell Trinitron 19 inch monitor
Even though he tried hard to make his NVIDIA GeForce FX 5500 ‘s drive to work properly with Ubuntu Natty Narwhal, he just has messed it even more.
As I always like helping people and I’m joyful for people who want to migrate to Linux, I took some time to make his NVIDIA GeForce work with this Ubuntu release.

First I tried to make it work by using some of the official NVIDIA Linux drivers located on nvidia.com following some online tutorial for Ubuntu claiming that it works but actually it didn’t, so finally after a bit of experimentation I found a way to make this video card work.
Here is how:

1. Install the following Ubuntu packages

root@ubuntu:~# apt-get install nouveau-firmware nvidia-173 nvidia-173-kernel-source
nvidia-cg-toolkit nvidia-common nvidia-current nvidia-glx-173 nvidia-settings
...

2. Load in the kernel and set to be auto loaded on boot nvidia’s driver kernel module nvidia-173

root@ubuntu:~# depmod -a;
root@ubutnu:~# modprobe nvidia-173
root@ubuntu:~# echo nvidia-173 >> /etc/modules

3. Stop temporary (Gnome dipsplay manager) gdm

root@ubuntu:~# service gdm stop
...

4. Use nvidia-xconfig to generate a working version of /etc/X11/xorg.conf for Nvidia

root@ubuntu:~# nvidia-xconfig
..

nvidia-xconfig will generate new /etc/X11/xorg.conf configuration corresponding to the Nvidia GeForce Fx 5500 and will move the old xorg.conf to xorg.conf.backup.

5. Start the gdm manager to be running again

root@ubuntu:~# service gdm start
...

Now the Xserver will start in a terrible mode of 640×480, probably because Ubuntu was unable to define correct VerticalSync and HorizontalSync for the 19 inch Dell Trinitron monitor or for some other weird reason, to fix this it’s quite easy though.
The fix to the NVIDIA GeForce 5500 running in 640×480 mode is done straigh via Gnome menus.

6. Use Gnome’s System -> Preferences -> Monitors to set raise up the Xserver resolution

Navigate to Gnome’s menus:

System -> Preferences -> Monitors

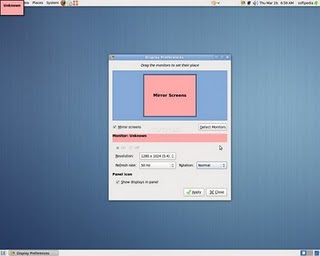
Gnome System Preferences Monitors Nvidia GeForce 5500 Ubuntu

Here you will have to select more appropriate resolution and a different refresh rate, which in my case was 1024×768 and further on to store the settings press the Apply button.

One oddity here was that according to the Monitor Preferences the refresh rate was running on 54 Hz which I don’t believe was the case as I guess it’s some kind of Gnome or Ubuntu bug. I changed the 54 Hz Refresh Rate to 50 Hz as using the 54 Hz refresh rate as the screen had a minor vibrations observable if one takes a thorough look on the screen.

Setting the NVIDIA GeForce 5500 driver to work with 50 Hz Refresh Rate in Gnome loooked like the Windows’s 85 Hz RR and looked quite nice so I left it this way.

Finally to test the newly installed driver 3D acceleration I used glxgears.

7. Install glxgears in order to be able to test that 3D acceleration on Nvidia works fine

root@ubuntu:~# apt-get install mesa-utils

After installing mesa-utils which nowdays contains glxgears executable one needs to execute the glxgears binary.

root@ubuntu:~# glxgears

Immediately after a window containing the glxgears should popup on the screen, like shown in below screenshot
Benchmark 3d Acceleration Linu glxgears

glxgears showed 3d acceleration works fine as the performance for 3d rendering shown was quite good and therefore 3D acceleration was running fine.

And that was it now the video works like and my friends, can enjoy the fun to have a generally virus Free OS 😉