Archive for March, 2011

Increase your wordpress blog subscribers with (What Would Set Godin Do [WWSGD]) (Possibly, Maybe?)

Sunday, March 20th, 2011

I’m running my blog www.pc-freak.net/blog for almost two years. Though beforehand I used to use the nanoblogger as my primary blog and this wordpress blog was just an experiment. Since almost a year and a bit more I’ve copmletely migrated to wordpress blogging platform.

I would say that I’m quite an active blogger and most of the days of the year I blog at least one post.
By so far I have blogged 715 times and my blog is starting to become massive, less that the amount of my blog subscribers is staying to the shocking number of 5 .
I believe my blog content is not that boring that for about a year and a half time just 5 people would get interested into receiving RSS notification whether I put online a new blog post.

As I took some time to consider what might be the cause I came to the conclusion that my current set up for blog RSS subscription via the Add-To-Any wordpress plugin is not that intuitive, and users needs to click at least 3 times before they could have added themselves as a new subscriber.

Therefore logically enough I needed a quick and easy way to improve my current situation with subscribers and increase the current critically low number of subscribers to a bit better one (let’s say few subscribers per week or month).

I took the time to research online about what kind of options do I have in my situation for an easy and silly way to install some kind of wordpress plugin which will have positive effect on my subscriptions.

After a while of useless googling, thankfully I came across something that looks promising for my set task.
The plugin which is supposed to do the trick is called What Would Seth Godin Do or as it’s shortly abbreviated WWSGD 😉

The plugin’s idea is actually very simple, if a new user comes across my wordpress powered blog, he is recognized as a referrer who is accessing the blog for a first time and therefore offered the option to subscribe in two intuitive simple clicks.

The offered default user message which could easily be changed via the What Would Set Godin Do options reads as follows:

If you're new here, you may want to subscribe to my RSS feed. Thanks for visiting!

If a visitor visits your webpage 5 times, the message will automatically disappear from the screen.

The WWSGD plugin allows you to choose where do you want to position the RSS above shown text (e.g. you can set the text location to appear before or after your posts). It also gives some options to play with the plugin css styling via the configuration.

I just installed the plugin and it will take a while until I find out if it will provide my blog with some more subsribers but anyhow the plugin idea is good so I hope it will work out.

Here is a quick few liners which describes how to install the WWSGD plugin on your wordpress

1. Download the plugin What Would Set Godin Do plugin in your blog wp-content/plugins directoryI’ve made a mirror copy of the plugin so you can choose either to download it directly from wordpress extensions website.

linux:~# cd /var/www/blog/wp-content/plugins
linux:~# wget what-would-seth-godin-do.zip
...
linux:~# unzip what-would-seth-godin-do.zip

2. Login to wordpress administrator and go to;

Plugins -> Active

Look over the list of your installed wordpress plugins and find and enable the WWSGD plugin

3. Configure the WWSGD extension
Navigate to

Settings -> WWSGD
There set the options which fits you well. The WWSGD wordpress plugin works fine on my just updated wordpress 3.1 install even though it’s intitially prepared to run on older versions of wordpress.

Note that the What Would Set Godin Do extension will require you to have your browser cookies enabled in order to be able to distinguish between old and new site visitors.

Will the plugin really boost up my blog subscribers, I don’t know! Only time will tell. I’ll be glad if somebody already has experience with the plugin and can share if he has a positive results in increseing the count of blog subscribers.
I’ll be testing it and further comment back if the plugin is really useful in fulfilling my goal of increasing my blog subscriptions.
Feedback on any others who tried my article to install and set the plugin will be very much appreciated!

Install (Compile) PHP5 from deb source to increase php performance on Debian Lenny Linux / Install php from source the debian way

Saturday, March 19th, 2011

If you’re looking for one further way to increase your Apache+PHP performance. You should definitely think about recompiling the lib php from the php’s source code.
Building from source your php library is a great way to decrease your php scripts execution time and therefore increase the responce time of your webserver server.
Recompiling will speed up your websites and make the user feel more interactivity when using them.

Of course there are two ways to go to compile a php library on your node. One is to install it directly downloading the latest source from php.net which if you’re on a Debian Linux platform is not recommended and the other method is to use the debian provided source bundled package (e.g. deb package) – the recommended one

As I prefer to do my system installs the straight debian way I choose the path to build and install the php library from a previously prepared version with build scripts for Debian, (e.g. to compile and install the php library from source the debian way.)

Here is exactly what commands you need to issue to properly build a php library from the php sources;
First you need to install the pre-requirement packages which will be further necessary for the php library compliation;

1. Install the build-essential debhelper and fakeroot through apt debian:~# apt-get install build-essential debhelper fakeroot

If you have the above 3 packages already installed you can skip further to the next step.

2. Use apt-get to fetch all the required libraries and programs necessary for the php compilation

debian:~# apt-get build-dep php5

The build-dep apt option causes apt-get to install/remove packages in an attempt to satisfy the build dependencies for a source package.

3. Download the php5 source code with apt-get debian:~# cd /usr/src/
debian:~# apt-get source php5

After the completion of apt-get source php5, you should have the php5 programming language source code, stored in /usr/src;

The files which should reside in /usr/src are:

php5_5.2.6.dfsg.1-1+lenny9.diff.gz
php5_5.2.6.dfsg.1-1+lenny9.dsc
php5_5.2.6.dfsg.1.orig.tar.gz

apt-get source php5 command will also extract the php from php5_5.2.6.dfsg.1.orig.tar.gz and apply the php5_5.2.6.dfsg.1-1+lenny9.diff.gz patch file.

4.cd to the php directory;

debian:~# cd php5-5.2.6.dfsg.1/

5. Now let’s compile the php library the debian way

debian:~# dpkg-buildpackage -rfakeroot
....

Now go and make yourself a coffee and have a cigarette if you’re a smoker. In about 10/20 minutes (depending on your computer CPU) your php should have been built.

You should have the php packages now built, if you get any error messages, don’t blame me. Blame Microsoft! 🙂

6. Switch back one directory back

debian:~# cd ../

You should have the following debian packages built and ready to be installed;

libapache2-mod-php5_5.2.6.dfsg.1-1+lenny9_amd64.deb
libapache2-mod-php5filter_5.2.6.dfsg.1-1+lenny9_amd64.deb
php5_5.2.6.dfsg.1-1+lenny9_all.deb
php5-cgi_5.2.6.dfsg.1-1+lenny9_amd64.deb
php5-cli_5.2.6.dfsg.1-1+lenny9_amd64.deb
php5-common_5.2.6.dfsg.1-1+lenny9_amd64.deb
php5-curl_5.2.6.dfsg.1-1+lenny9_amd64.deb
php5-dbg_5.2.6.dfsg.1-1+lenny9_amd64.deb
php5-dev_5.2.6.dfsg.1-1+lenny9_amd64.deb
php5-gd_5.2.6.dfsg.1-1+lenny9_amd64.deb
php5-gmp_5.2.6.dfsg.1-1+lenny9_amd64.deb
php5-imap_5.2.6.dfsg.1-1+lenny9_amd64.deb
php5-interbase_5.2.6.dfsg.1-1+lenny9_amd64.deb
php5-ldap_5.2.6.dfsg.1-1+lenny9_amd64.deb
php5-mcrypt_5.2.6.dfsg.1-1+lenny9_amd64.deb
php5-mhash_5.2.6.dfsg.1-1+lenny9_amd64.deb
php5-mysql_5.2.6.dfsg.1-1+lenny9_amd64.deb
php5-odbc_5.2.6.dfsg.1-1+lenny9_amd64.deb
php5-pgsql_5.2.6.dfsg.1-1+lenny9_amd64.deb
php5-pspell_5.2.6.dfsg.1-1+lenny9_amd64.deb
php5-recode_5.2.6.dfsg.1-1+lenny9_amd64.deb
php5-snmp_5.2.6.dfsg.1-1+lenny9_amd64.deb
php5-sqlite_5.2.6.dfsg.1-1+lenny9_amd64.deb
php5-sybase_5.2.6.dfsg.1-1+lenny9_amd64.deb
php5-tidy_5.2.6.dfsg.1-1+lenny9_amd64.deb
php5-xmlrpc_5.2.6.dfsg.1-1+lenny9_amd64.deb
php5-xsl_5.2.6.dfsg.1-1+lenny9_amd64.deb
php-pear_5.2.6.dfsg.1-1+lenny9_all.deb

7. Install the newly built php libraries

debian:/usr/src# for i in *.deb; do dpkg -i $i; done

Now if you need something to be configured in the way your apache interprets php scripts go and edit your /etc/php5/apache2/php.ini

Now as you should have installed and configured your libapache2-mod-php5 from source, the last thing to do before you can benefit from the improved performance is to restart apache.
8. Restart Apache server

debian:~# /etc/init.d/apache2 restart

I hope my article is helpful to somebody. If it works for you or it doesn’t give me your feedback 😉

Howto add adsense ads to Elgg user blog/s

Saturday, March 19th, 2011

I wanted to add google adsense on my Elgg powered experimental social network mockateacher.com

There are plenty of ways described which enables a user to add a google adsense code to elgg, however none of the ones I've red online worked for me for my elgg site user blog section

One of the promising ways to add the adsense code to all sections of an elgg enpowered website is described to be achieved through Elgg Google Adverts in the spotlight plugin.
I gave this suggested method for adsense inclusion to elgg by installing and setting it up but it worked not.

There was a blog which described a procedure which gaves a possibility the adsense code to be embedded on every user dashboard's right widget right below the elgg's Edit Page

This method seems to work but wasn't exactly enabling me to place google advertisements only on the elgg's blogs and therefore was useless to me.

Thus I played a bit with the files in the mod/blog located under the elgg's install root directory and hooray I found out a way to add my adsense code to my elgg user blog section.

Here is how:

1. Edit the file mod/blog/views/default/blog/object/blog.php

In the file look for the line:

<div class="blog_post">

This is located nearbly line 51 in the file on my elgg version 1.7.7, with latest available blog plugin at this time, on prior version this might be located on different line.

After this line just place your Adsense code obtained from your Adsense Google account and you're done.
The google adsense advertisements will start appearing in the head of your elgg's users blog pages 😉

Tracking graphically MySQL, Apache and Network performance in web with Munin on Debian Linux

Saturday, March 19th, 2011

munin_monitor_cpu_network_hard_drive_apache_mysql_performance-in-web-on-linux_logo

Munin is great software for surveillance software for your MySQL, Apache, Qmail, Postfix and many other of the classical daemon services which most of the Linux, BSD servers online are running on.

1. Munin on Debian Linux is really easy to be installed and comes to executing:

debian:~# apt-get install munin munin-node munin-plugins-extra

2. Link /var/www/munin/ to some VirtualHost or ServerHost
For instance if your munin is to be placed on the domain www.pc-freak.net.net which has the DocumentRoot of /var/www

debian:~# cd /var/www
debian:/var/www# ln -sf /var/www/munin munin

3. Add some extra MySQL related plugins

To check whole list of pmunin plugins you can enable check in /etc/munin/plugins directory

Lets say our Munin will be providing statistics mainly for MySQL, enable this bunch of plugins:

cd /etc/munin/plugins
ln -s /usr/share/munin/plugins/mysql_ mysql_
ln -s /usr/share/munin/plugins/mysql_bytes mysql_bytes
ln -s /usr/share/munin/plugins/mysql_innodb mysql_innodb
ln -s /usr/share/munin/plugins/mysql_isam_space_ mysql_isam_space_
ln -s /usr/share/munin/plugins/mysql_queries mysql_queries
ln -s /usr/share/munin/plugins/mysql_slowqueries mysql_slowqueries
ln -s /usr/share/munin/plugins/mysql_threads mysql_threads


Though above command would enable mysql monitoring it will be not working out of the box. You will find in munin logs error like:

Missing dependency Cache::Cache at /usr/share/munin/plugins/mysql_ line 716."

To fix this install libcache-perl and libcache-cache-perl

apt-get install --yes libcache-perl libcache-cache-perl
 

Then regenerate munin plugin configuration issue cmd:

munin-node-configure --suggest --shell | sh

and restart Munin-node server

service munin-node restart
 

Munin Node should be able login to the MySQL server using the Debian System Maintenance user however if you should need to create a custom user you can add the following configuration to:
 

/etc/munin/plugin-conf.d/munin-node


[mysql*]
    user root
    env.mysqluser muninmonitor
    env.mysqlpassword Your-Secret-Password

4. Edit Munin config

Make sure you have at least the following variables enabled in /etc/munin/munin.conf
 

 dbdir  /var/lib/munin
 htmldir /var/cache/munin/www
 logdir /var/log/munin
 rundir  /var/run/munin

 tmpldir    /etc/munin/templates

includedir /etc/munin/munin-conf.d

[localhost.localdomain]
    address 127.0.0.1
    use_node_name yes


5. Add Munin Alias or Virtualhost

To make Munin Accessible from Webserver you need to at least add an alias create a file
/etc/apache2/conf.d/munin with following content:

vim /etc/apache2/conf.d/munin

Alias /munin /var/cache/munin/www

<Directory /var/cache/munin/www>
        Order allow,deny
        #Allow from localhost 127.0.0.0/8 ::1
        Allow from all
        Options None
        php_value engine off

    <IfModule mod_expires.c>
        ExpiresActive On
        ExpiresDefault M310
    </IfModule>

</Directory>


If you want to access Munin from Apache subdomain create it lets say you want to access it via stats.www.pc-freak.net, use following config file:

vi /etc/apache2/sites-enabled/stats.www.pc-freak.net
 

<VirtualHost *>
   ServerAdmin hipo@www.pc-freak.net
   ServerName stats.www.pc-freak.net
   DocumentRoot /var/cache/munin/www
   <Directory />
       Options FollowSymLinks
       #AllowOverride All
       php_value engine off
   </Directory>
   LogLevel debug
   CustomLog /var/log/apache2/munin/access.log combined
   ErrorLog /var/log/apache2/munin/error.log
   ServerSignature On
<Directory /var/cache/munin/www>
        Order allow,deny
        #Allow from localhost 127.0.0.0/8 ::1
        Allow from all
        Options FollowSymlinks
        #AllowOverride All
        php_value engine off

</Directory>

</VirtualHost>


6. Restart Apache;

debian:~# /etc/init.d/apache2 restart

Now to access the newly installed munin point your favorite browser to (either the subdirectory configured for access or the Virtualhost subdomain):

https://www.pc-freak.net/munin/
or
http://munin.www.pc-freak.net

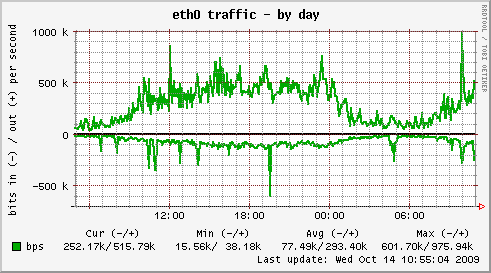
eth0-network-traffic-munin-server-statistics

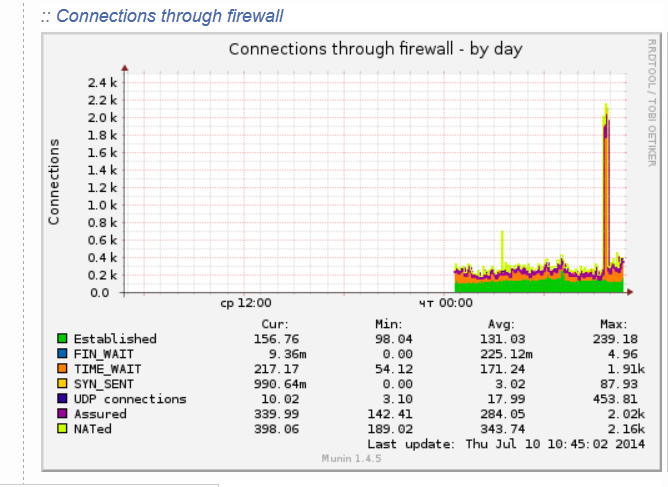
connections_through_firewall-statistics-munin-debian-linux
7. Protecting Munin with a password

As it could be a security leak to expose statistics regarding your server (Disk I/O, Memory, Load Avarage, Apache, MySQL Postfix) operations it is good security practice to protect munin with a password.

I've earlied blogged on how to protect your server munin web-statistics wtih an htaccess password (read it here)


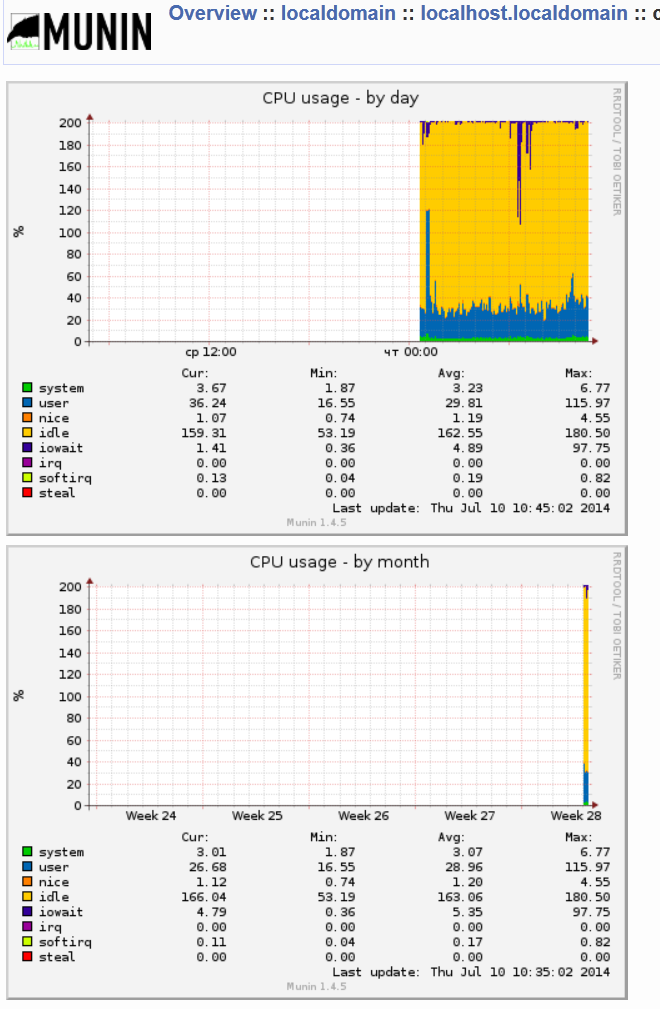
munin-cup-statistics-by-day-and-by-month-screenshot

Happy Monitoring

Speeding up Apache through apache2-mpm-worker and php5-cgi on Debian / How to improve Apache performance and decrease server memory consumption

Friday, March 18th, 2011

speeding up apache through apache2-mpm-worker and php5-cgi on Debian Linux / how to improve apache performance and decrease server responce time
By default most Apache running Linux servers on the Internet are configured to use with the mpm prefork apache module
Historically prefork apache module is the predecessor of the worker module therefore it's believed to be a way more tested and reliable, if you need a critical reliable webserver configuration.

However from my experience by so far with the Apache MPM Worker I can boldly say that many of the rumors concerning the unreliabity of apache2-mpm-worker are just myths.

The old way Apache handles connections e.g. the mod prefork is the well known way that high amount of the daemons on Linux and BSD are still realying on.
When prefork is a used by Apache, every new TCP/IP connection arriving at your Linux server on the Apache configured port let's say on port 80 is being served by Apache in a way that the Apache process (mother process) parent does fork a new Apache parent copy in order to serve the new request.
Thus by using the prefork Apache needs to fork new process (if it doesn't have already an empty forked one waiting for connections) and serve the HTTP request of the new client, after the request of the client is completed the newly forked Apache usually dies (even though it again depends on the way the Apache server is configured via the Apache configuration – apache2.conf / httpd.conf etc.).

Now you can imagine how slow and memory consuming it is that all the time the parent Apache process spawns new processes, kills old ones etc. in order to fulfill the client requests.

Now just to compare the Apace mpm prefork does not use the old forking way, but relies on a few Apache processes which handles all the requests without constantly being destroyed and recreated like with the prefork module.
This saves operations and system resources, threaded programming has already been proven to be more efficient way to handle tasks and is heavily adopted in GUI programming for instance in Microsoft Windows, Mac OS X, Linux Gnome, KDE etc.

There is plenty of information and statistical data which compares Apache running with prefork and respectively worker modules online.
As the goal of this article is not to went in depths with this kind of information I would not say more on it but let you explore online a bit more about them in case if you're interested.

The purpose of this article is to explain in short how to substitute the Apache2-MPM-Prefork and how your server performance could benefit out of the use of Apache2-MPM-Worker.
On Debian the default Apache process serving module in Apache 1.3x,Apache 2.0x and 2.2x is prefork thus the installation of apache2-mpm-worker is not "a standard way" to install Apache

Deciding to swith from the default Debian apache-mpm-prefork to apache-mpm-worker is quite a serious and responsible decision and in some cases might cause troubles, if you have decided to follow my article be sure to consider all the possible negative consequences of switching to the apache worker !

Now after having said a bunch of info which might be not necessary with the experienced system admin I'll continue on with the steps to install the apache2-mpm-worker.

1. Install the apache2-mpm-worker

debian:~# apt-get install apache2-mpm-worker php5-cgi
Reading state information... Done
The following packages were automatically installed and are no longer required:
The following packages will be REMOVED apache2-mpm-prefork libapache2-mod-php5
The following NEW packages will be installed apache2-mpm-worker
0 upgraded, 1 newly installed, 2 to remove and 46 not upgraded.
Need to get 0B/259kB of archives.After this operation, 6193kB disk space will be freed.

As you can notice in below's text confirmation which will appear you will have to remove the apache2-mpm-prefork and the apache2-mpm-worker modules before you can proceed to install the apache2-mpm-prefork.

You might ask yourself if I remove my installed libphp how would I be able to use my Apache with my PHP based websites? And why does the apt package manager requires the libapache2-mod-php5 to get removed.
The explanation is simple apache2-mpm-worker is not thread safe, in other words scripts which does use the php fork(); function would not work correctly with the Apache worker module and will probably be leading to PHP and Apache crashes.
Therefore in order to install the apache mod worker it's necessary that no libapache2-mod-php5 is existent on the system.
In order to have a PHP installed on the server again you will have to use the php5-cgi deb package, this is the reason in the above apt-get command I'm also requesting apt to install the php5-cgi package next to apache2-mpm-worker.

2. Enable the cgi and cgid apache modules

debian:~# a2enmod cgi
debian:~# a2enmod cgid

3. Activate the mod_actions apache modules

debian:~# cd /etc/apache2/mods-enabled
debian:~# ln -sf ../mods-available/actions.load
debian:~# ln -sf ../mods-available/actions.conf

4. Add configuration options in order to enable mod worker to use the newly installed php5-cgi

Edit /etc/apache2/mods-available/actions.conf vim, mcedit or nano (e.g. your editor of choice and add inside:

&ltIfModule mod_actions.c>
Action application/x-httpd-php /cgi-bin/php5
</IfModule>

After completing all the above instructions, you might also need to edit your /etc/apache2/apache2.conf to tune up, how your Apache mpm worker will serve client requests.
Configuring the <IfModule mpm_worker_module> in apache2.conf is necessary to optimize your newly installed mpm_worker module for performance.

5. Configure the mod_worker_module in apache2.conf One example configuration for the mod worker is:

<IfModule mpm_worker_module>
StartServers 2
MaxClients 150
MinSpareThreads 25
MaxSpareThreads 75
ThreadsPerChild 25
MaxRequestsPerChild 0
</IfModule>

Consider the fact that this configuration is just a sample and it's in no means configured for serving Apache requests for high load Apache servers and you need to further play with the values to have a good results on your server.

6. Check that all is fine with your Apache configurations and no syntax errors are encountered

debian:~# /usr/sbin/apache2ctl -t
Syntax OK

If you get something different from Syntax OK track the error and fix it before you're ready to restart the Apache server.

7. Now restart the Apache server

debian:~# /etc/init.d/apache2 restart

All should run fine and hopefully your PHP scripts should be interpreted just fine through the php5-cgi instead of the libapache2-mod-php5.
Using the /usr/bin/php5-cgi will increase with some percentage your server CPU load but on other hand will drasticly decrease the Webserver memory consumption.
That's quite logical because the libapache2-mod-hp5 is loaded once during apache server whether a new instance of /usr/bin/php5-cgi is invoked during each of Apache requests via the mod worker.

There is one serious security flow coming with php5-cgi, DoS against a server processing scripts through php5-cgi is much easier to be achieved.
An example for a denial attack which could affect a website running with mod worker and php5-cgi, could be simulated from a simple user with a web browser which holds up the f5 or ctrl + r browser page refresh buttons.
In that case whenever php5-cgi is used the CPU load would rise drastic, one possible solution to this denial of service issues is by installing and using libapache2-mod-evasive like so:

8. Install libapache2-mod-evasive

debian:~# apt-get install libapache2-mod-evasive
The Apache mod evasive module is a nice apache module to minimize HTTP DoS and brute force attacks.
Now with mod worker through the php5-cgi, your apache should start serving requests more efficiently than before.
For some performance reasons some might even want to try out the fastcgi with the worker to boost the Apache performance but as I have never tried that I can't say how reliable a a mod worker with a fastcgi would be.

N.B. ! If you have some specific php configurations within /etc/php5/apache2/php.ini you will have to set them also in /etc/php5/cgi/php.ini before you proceed with the above instructions to install Apache otherwise your PHP scripts might not work as expected.

Mod worker is also capable to work with the standard mod php5 Apache module, but if you decide to go this route you will have to recompile your PHP lib manually from source as in Debian this option is not possible with the default php library.
This installation worked fine on Debian Lenny but suppose the same installation should work fine on Debian Squeeze as well as Debian testing/unstable.
Feedback on the afore-described mod worker installation is very welcome!

How to fix PHP “Fatal error: Call to undefined function bcmod()” and “Fatal error: Call to undefined function bcdiv()” on FreeBSD

Thursday, March 17th, 2011

After some php updates on my 7.2-RELEASE-p4, my lessnmore suddenly stopped working with the following error messages:

Fatal error: Call to undefined function bcmod()
Fatal error: Call to undefined function bcdiv()

A bit of investigation has led me to the root of the problem which was a missing php5-bcmath php extension to solve the error messages and get back my lessnmore shortener to normal I had to issue:

freebsd# cd /usr/ports/math/php52-bcmath
freebsd# make install clean
Hooray it works all now again, Hallelujah!

Monitoring multi core / (multiple CPUs) servers with top, tload and on Linux

Thursday, March 17th, 2011

The default GNU / Linux top command does allow to see statistics on servers and systems with multiple CPUs.
This is quite beneficial especially on Linux systems which are not equipped with htop which does show statistics to the multiple-core system load.

To examine the multiple CPUs statistics with the default top command available on every Linux system and part of the procps/proc file system utilities

1. Start top:

linux:~# top

When the top system load statistics screen starts up refreshing,

2. press simply 1
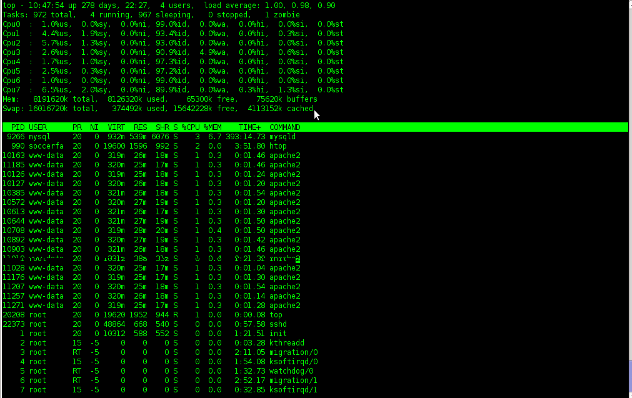
You will notice all your system cpus to show up in the top head:

8 cpu top screen statistics on Linux

As I have started talking about top, a very useful way to use top to track processes which are causing a system high loads is:

linux:~# top -b -i

This command will run top in batch mode interactively and will show you statistics about the most crucial processes which does cause a server load, look over the output and you will get an idea about what is causing you server troubles.
Moreover if you’re a Linux console freak as me you will also probably want to take a look at tload

tload command is a part of the procps – /proc file system utilities and as you can read in the tload manual tload – graphic representation of system load average

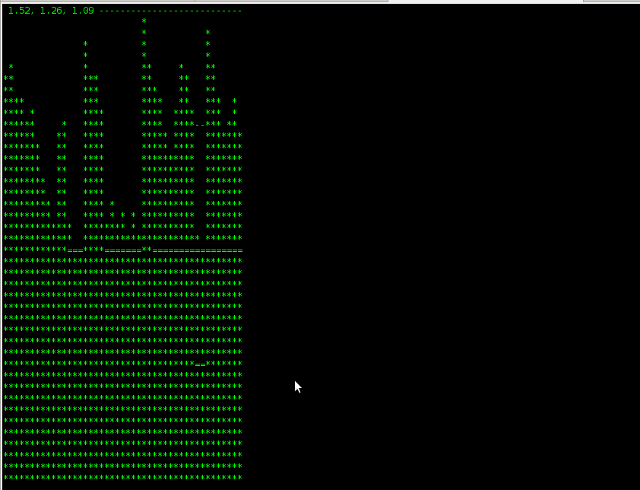
Here is a picture to give you an idea on the console output of tload :

tload console/terminal system load statistics on Linux screenshot

Another tool that you might find very usefel is slabtop it’s again a part of the procps linux package.
slabtop – displays a listing of the top caches sorted by one of the listed sort criteria., in most of the cases the slabtop kernel cache monitoring tool won’t be necessary for the regular administrator, however on some servers it might help up to the administrator to resolve performance issues which are caused by the kernel as a bottleneck.
slabtop is also used as a tool by kernel developers to write and debug the Linux kernel.

How to fix php “Uncaught exception ‘PDOException’ with message ‘could not find driver'” on FreeBSD

Wednesday, March 16th, 2011

After some upgrades of PHP, My Less’n More URL suddenly stopped working with an error:

Uncaught exception 'PDOException' with message 'could not find driver'

After a bit of investigation I’ve figured out the error is caused by a missing php5-pdo and php5-pdo_mysql

Of course if you’re using php52 you will need to install respectively the ports php52-pdo and php5-pdo_mysql :

To resolve the issues issue the commands:

freebsd# cd /usr/ports/databases/php5-pdo
freebsd# make install clean
freebsd# cd /usr/ports/databases/php5-pdo_mysql
freebsd# make install clean

How to fix configure: error: gd library not found.. please install libgd during webalizer port make on FreeBSD

Wednesday, March 16th, 2011

I’ve done a couple of updates these days on my tiny FreeBSD server system. I’ve updated Apache and PHP to version:

pcfreak# pkg_info |grep -i php5-5; pkg_info |grep -i apache-2.0.64
php5-5.3.5 PHP Scripting Language
apache-2.0.64 Version 2.0.x of Apache web server with prefork MPM.

As a requirement for the php5-5.3.5 update it was necessary that I update a number of modules the whole list of php modules which I’ve updated can be seen in my previous blog post named core dump after PHP5 and php5-extensions recompile (rebuild) from ports on FreeBSD – cause and solution

Some further updates I’ve done manually on the BSD in order to be able to properly compile my support libgd in Apache and PHP were in the system ports:

pcfreak# pkg_info |grep -i gd-
gd-2.0.35_7,1 A graphics library for fast creation of images
php5-gd-5.3.5 The gd shared extension for php

One night after all the updates I’ve realized my installed version of webalizer was not showing / generating properly the images of the webalizer daily generated statistics via cron.

Logically to fix that it was necessary that the /usr/ports/www/webalizer port to be rebuilt through make install clean

I’ve jumped on and executed the well known:

freebsd# cd /usr/ports/www/webalizer;
freebsd# make install clean
The download compile of the webalizer started as expected but just in a couple of seconds it failed with:

ecking for main in -lgd… noconfigure: error: gd library not found.. please install libgd

What was strange was that the gd-2.0.35_7,1 port was properly installed and therefore I could see no reason for the webalizer build failure.
I’ve spend about an two hours to look online in forums about somebody who got the same error with no luck.
As I couldn’t find anything that could help me up online, I’ve decided to drop by the good old irc.freenod.net ##freebsd channel to ask for help.

Luckily enough the guy with a nickname Mystique has suggested a solution of using the freebsdportmaster in order to solve the gdlib issues.

He suggested something might be broken with my gd-2.0.35_7,1 – gdlib install and adviced me to rebuild the gdlib port with:

freebsd# cd /usr/ports/graphics/gd
freebsd# portmaster .

Anyways what I did was a bit different I used his postmaster . suggestion but applyed it directly for the webalizer port with:

freebsd# cd /usr/ports/www/webalizer
freebsd# portmaster .

All worked like a charm and just about few minutes later my webalizer was compiled fine and working with the gdlib support, e.g. showing me the webalizer statistical data pictures 😉

How to add adsense to Elgg / Inserting adsense code in Elgg community network

Tuesday, March 15th, 2011

To continue further with my recent experiments with the Elgg GLP social network I looked online if Elgg supports Google adsense via some add-on plugin etc.

Pitily there is just one plugin for elgg which enables Google Analytics and Google Adsense support but it costs money 😐

Luckily there is a very easy way to add an adsense code to your elgg installation, it’s manual but it works.
So to add the your adsense banner to your Elgg website, you need to edit the file:

mod/custom_index/views/default/canvas/layouts/new_index.php

The file is located in elgg’s installation document root.

After you have the new_index.php file in some text editor look up for the line:

<!-- latest members -->

The <!– latest members –> should be located on line 85 on elgg 1.7.x, if not it should somewhere nearby;
After can place your adsense code in the following html tags:

<div align="center">
<table border="1">
<tr>
<td>
your adsense code goes here
</tr>
</td>
</table>
</div>

That’s all, the adsense advertisements should appear on your elgg website immediately, if they don’t show up immediately and you are using an adsense code which is just issued via google.com/adsense/ wait for about 10 minutes and the ads should start appearing.