Posts Tagged ‘Virtualhost’
Saturday, September 11th, 2010 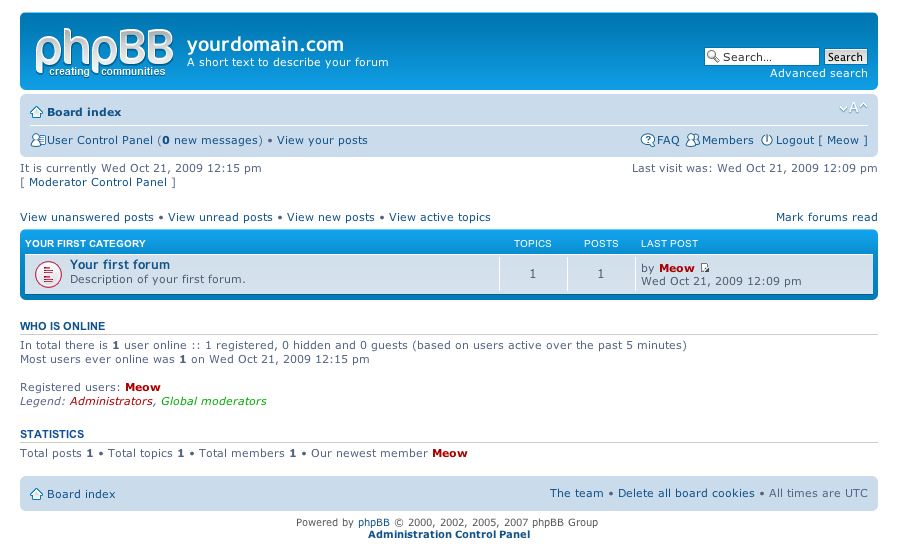
I've just installed the phpbb forum on a Debian Linux because we needed a goodquick to install communication media in order to improve our internal communication in a student project in Strategic HR we're developing right now in Arnhem Business School.
Here are the exact steps I followed to have a properly it properly instlled:
1. Install the phpbb3 debian package
This was pretty straight forward:
debian:~# apt-get install phpbb3
At this point of installation I've faced a dpkg-reconfigure phpbb deb package configuration issue:
I was prompted to pass in the credentials for my MySQL password right after I've selected the MySQL as my preferred database back engine.
I've feeded my MySQL root password as well as my preferred forum database name, however the database installation failed because, somehow the configuration procedure tried to connect to my MySQL database with the htcheck user.
I guess this has to be a bug in the package itself or something from my previous installation misconfigured the way the debian database backend configuration was operating.
My assumption is that my previously installed htcheck package or something beforehand I've done right after the htcheck and htcheck-php packages installation.
after the package configuration failed still the package had a status of properly installed when I reviewed it with dpkg
I've thought about trying to manually reconfigure it using the dpkg-reconfigure debian command and I gave it a try like that:
debian:~# dpkg-reconfigure phpbb3
This time along with the other fields I've to fill in the ncurses interface I was prompted for a username before the password prompted appeared.
Logically I tried to fill in the root as it's my global privileges MySQL allowed user.
However that didn't helped at all and again the configuration tried to send the credentials with user htcheck to my MySQL database server.
To deal with the situation I had to approach it in the good old manual way.
2. Manually prepare / create the required phpbb forum database
To completet that connected to the MySQL server with the mysql client and created the proper database like so:
debian:~# mysql -u root -p

mysql>

CREATE database phpbb3forum;
3. Use phpmyadmin or the mysql client command line to create a new user for the phpbb forum
Here since adding up the user using the phpmyadmin was a way easier to do I decided to go that route, anyways using the mysql cli is also an option.
From phpmyadmin It's pretty easy to add a new user and grant privileges to a certain database, to do so navigate to the following database:
Privileges -> -> Add a new user ->
Now type your User name: , Host , Password , Re-type password , also for a Host: you have to choose Local from the drop down menu.
Leave the Database for user field empty as we have already previously created our desired database in step 2 of this article
Now press the "Go" button and the user will get created.
Further after choose the Privileges menu right on the bottom of the page once again, select through the checkbox the username you have just created let's say the previously created user is phpbb3
Go to Action (There is a picture with a man and a pencil on the right side of this button
Scroll down to the page part saying Database-specific privileges and in the field Add privileges on the following database: fill in your previosly created database name in our case it's phpbb3forum
and then press the "Go" button once again.
A page will appear where you will have to select the exact privileges you would like to grant on the specific selected database.
For some simplicity just check all the checkbox to grant as many privilegs to your database as you could.
Then again you will have to press the "Go" button and there you go you should have already configured an username and database ready to go with your new phpbb forum.
4. Create a virtualhost if you would like to have the forum as a subdomain or into a separate domain
If you decide to have the forum on a separate sub-domain or domain as I did you will have to add some kind of Virtualhost into either your Apache configuration /etc/apache2/apache2.conf or into where officially the virutualhosts are laid in Debian Linux in /etc/apache2/sites-available
I've personally created a new file like for instance /etc/apache2/sites-available/mysubdomain.mydomain.com
Here is an example content of the new Virtualhost:
<VirtualHost *>

ServerAdmin admin-email@domain.com

ServerName mysubdomain.domain.com
# Indexes + Directory Root.
DirectoryIndex index.php index.php5 index.htm index.html index.pl index.cgi index.phtml index.jsp index.py index.asp
DocumentRoot /usr/share/phpbb3/www/
# Logfiles
ErrorLog /var/log/apache2/yourdomain/error.log
CustomLog /var/log/apache2/yourdomain/access.log combined
# CustomLog /dev/null combined
<Directory /usr/share/phpbb3/www/>
Options FollowSymLinks MultiViews -Includes ExecCGI
AllowOverride All
Order allow,deny
allow from all </Directory>
</VirtualHost>
In above Virtualhost just change the values for ServerAdmin , ServerName , DocumentRoot , ErrorLog , CustomLog and Directory declaration to adjust it to your situation.
5. Restart the Apache webserver for the new Virtualhost to take affect
debian:~# /etc/init.d/apache2 restart
Now accessing your http://mysubdomain.domain.com should display the installed phpbb3 forum
The default username and password for your forum you can use straight are:
username: admin
password: admin
So far so good you by now have the PHPBB3 forum properly installed and running, however if you try to Register a new user in the forum you will notice that it's impossible because of a terrible ugly message reading:
Sorry but this board is currently unavailable.
I've spend few minutes online to scrape through the forums before I can understand what I have to stop that annoying message from appearing and allow new users to register in the phpbb forum
The solution came natural and was a setting that had to be changed with the forum admin account, thus login as admin and look at the bottom of the page, below the text reading Powered by phpBB © 2000, 2002, 2005, 2007 phpBB Group you will notice a link with Administration Control Panel
just press there a whole bunch of menus will appear on the screen allowing you to do numerous things, however what you will have to do is go to
Board Settings -> Disable Board
and change the radio button there to say No
That's all now your forum will be ready to go and your users can freely register and if the server where the forum is installed has an already running mail server, they will receive an emails with a registration data concerning their new registrations in your new phpbb forum.
Cheers and Enjoy your new shiny phpbb Forum 🙂
Tags: apache, apache2, assumption, business school, Button, client, com, communication media, configuration issue, configuration procedure, credentials, CustomLog, database backend, database installation, database name, deb package, debian linux, debian package, Debian Squeeze Sid Linux, dpkg, exact steps, forum database, host, Install, installation, Installing, internal communication, mysql database server, mysubdomain, ncurses interface, package, page, password, php, phpbb forum, phpmyadmin, Privileges, Restart, right, root, ServerName, something, squeeze, strategic hr, student, username, Virtualhost
Posted in Linux, System Administration | 12 Comments »
Monday, March 30th, 2015 
If you're a Webhosting company sysadmin like me and you already have configured directory listing for certain websites / Vhosts and those files are mirrored from other development webserver location but some of the uploaded developer files extensions which are allowed to be interptered such as php include files .inc / .htaccess mod_rewrite rules / .phps / .html / .txt need to be working on the dev / test server but needs to be disabled (excluded) from delivery or interpretting for some directory on the prod server.
Open Separate host VirtualHost file or Apache config (httpd.conf / apache2.conf) if all Vhosts for which you want to disable certain file extensions and add inside:
<Directory "/var/www/sploits">
AllowOverride All
…
</Directory>
Extension Deny Rules such as:
For disabling .inc files from inclusion from other PHP sources:
<Files ~ "\.inc$">
Order allow,deny
Deny from all
</Files>
To Disable access to .htaccess single file only
<Files ~ "^\.htaccess">
Order allow,deny
Deny from all
</Files>
To Disable .txt from being served by Apache and delivered to requestor browser:
<Files ~ "\.txt$">
Order allow,deny
Deny from all
</Files>
To Disable any left intact .html from being delivered to client:
<Files ~ "\.html$">
Order allow,deny
Deny from all
</Files>
Do it for as many extensions as you need.
Finally to make changes affect restart Apache as usual:
If on Deb based Linux issue:
/etc/init.d/apach2 restart
On CentOS / RHEL and other Redhats / RedHacks 🙂
/etc/init.d/httpd restart
Tags: apache webserver, client, development, httpd, init, left, Linux, make, need, php, Virtualhost, www
Posted in System Administration, Various, Web and CMS | 1 Comment »
Saturday, August 21st, 2010 
In my previous post I've blogged how to install and configure Trac on Debian
The next logical question for me was how to use trac with multiple user accounts.
Thanksfully this happened to be very easy. All I had to do to setup different trac users was to add different Apache htaccess authentication accounts.
Consequently you will be logged in in Trac's interface after you login with your Apache htaccess user and password with the same user as provided in the Apache authentication dialog.
Of course to create the required Trac login accounts, you need to first have setup an Apache AuthType Basic declaration.
For example you will have to add something similar to:
<Location "/">

AuthType Basic

AuthName "Trac - projects"

AuthUserFile /etc/apache2/trac.passwd

Require valid-user

</Location>
your Apache virtualhost or domain configuration file.
In order to add the two users user1 and user2 then I simply had to add the users with the htpasswd Apache password tool.
debian:~# htpasswd -c /etc/apache2/trac.passwd user1

debian:~# htpasswd -c /etc/apache2/trac.passwd user2
Thanks God this was easy 🙂
Tags: apache, apache authentication, apache htaccess, apache password, apache virtualhost, apache2, authentication dialog, AuthType, AuthUserFile, configuration file, configure, course, dialog, domain, domain configuration, file, god, How to, How to add/create user accounts to be used with Trac (issue tracking system) on Linux, htaccess authentication, htpasswd, interface, issue, Linux, logical question, login, lt, order, passwd, password, password tool, question, quot, setup, something, system, Thanksfully, tool, trac, user accounts, Virtualhost
Posted in Linux, System Administration, Web and CMS | No Comments »
Saturday, March 19th, 2011 
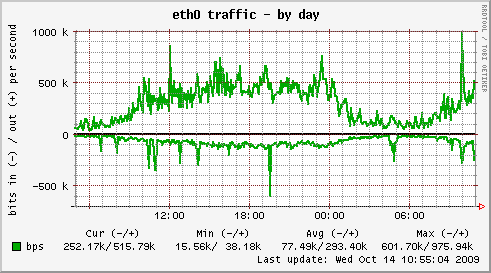
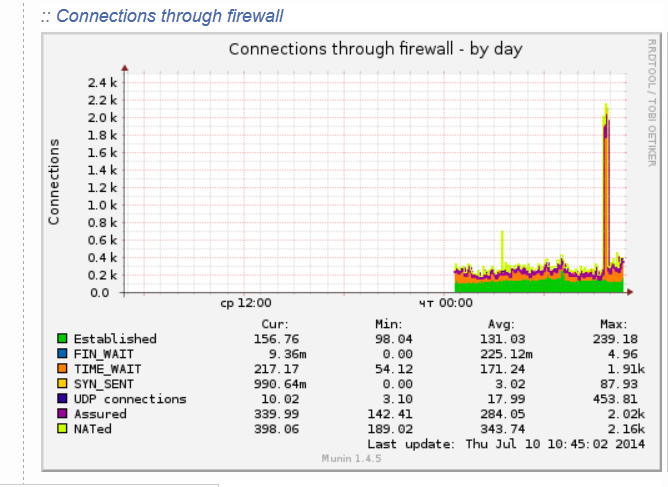
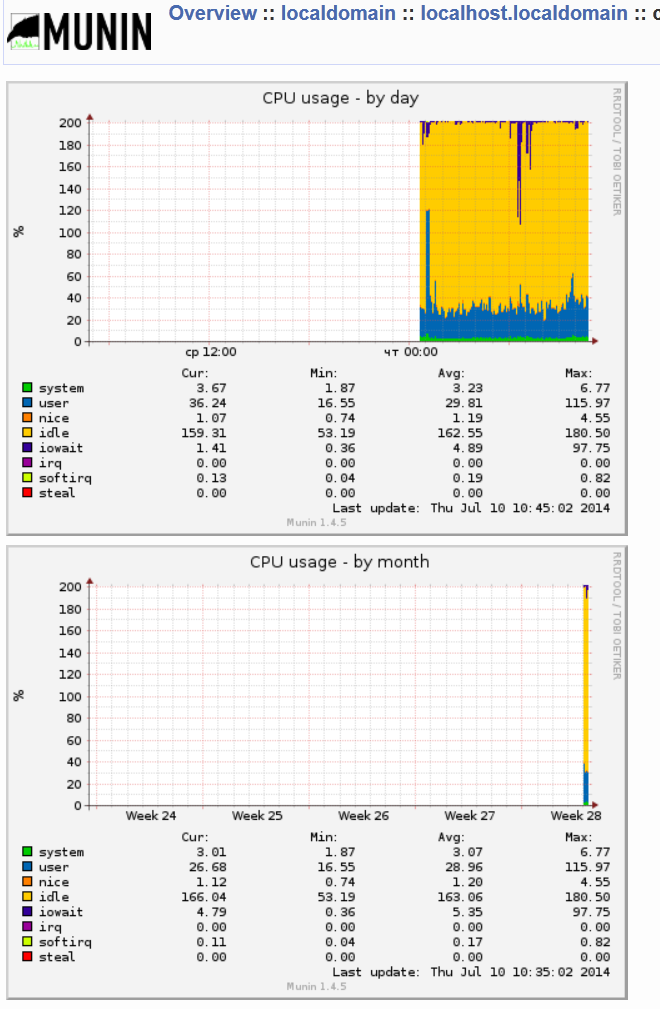
Munin is great software for surveillance software for your MySQL, Apache, Qmail, Postfix and many other of the classical daemon services which most of the Linux, BSD servers online are running on.
1. Munin on Debian Linux is really easy to be installed and comes to executing:
debian:~# apt-get install munin munin-node munin-plugins-extra
2. Link /var/www/munin/ to some VirtualHost or ServerHost
For instance if your munin is to be placed on the domain www.pc-freak.net.net which has the DocumentRoot of /var/www
debian:~# cd /var/www

debian:/var/www# ln -sf /var/www/munin munin
3. Add some extra MySQL related plugins
To check whole list of pmunin plugins you can enable check in /etc/munin/plugins directory
Lets say our Munin will be providing statistics mainly for MySQL, enable this bunch of plugins:
cd /etc/munin/plugins

ln -s /usr/share/munin/plugins/mysql_ mysql_

ln -s /usr/share/munin/plugins/mysql_bytes mysql_bytes

ln -s /usr/share/munin/plugins/mysql_innodb mysql_innodb

ln -s /usr/share/munin/plugins/mysql_isam_space_ mysql_isam_space_

ln -s /usr/share/munin/plugins/mysql_queries mysql_queries

ln -s /usr/share/munin/plugins/mysql_slowqueries mysql_slowqueries

ln -s /usr/share/munin/plugins/mysql_threads mysql_threads
Though above command would enable mysql monitoring it will be not working out of the box. You will find in munin logs error like:
Missing dependency Cache::Cache at /usr/share/munin/plugins/mysql_ line 716."
To fix this install libcache-perl and libcache-cache-perl
apt-get install --yes libcache-perl libcache-cache-perl
Then regenerate munin plugin configuration issue cmd:
munin-node-configure --suggest --shell | sh
and restart Munin-node server
service munin-node restart
Munin Node should be able login to the MySQL server using the Debian System Maintenance user however if you should need to create a custom user you can add the following configuration to:
/etc/munin/plugin-conf.d/munin-node
[mysql*]
user root
env.mysqluser muninmonitor
env.mysqlpassword Your-Secret-Password
4. Edit Munin config
Make sure you have at least the following variables enabled in /etc/munin/munin.conf
dbdir /var/lib/munin
htmldir /var/cache/munin/www
logdir /var/log/munin
rundir /var/run/munin
tmpldir /etc/munin/templates
includedir /etc/munin/munin-conf.d
[localhost.localdomain]
address 127.0.0.1
use_node_name yes
5. Add Munin Alias or Virtualhost
To make Munin Accessible from Webserver you need to at least add an alias create a file
/etc/apache2/conf.d/munin with following content:
vim /etc/apache2/conf.d/munin
Alias /munin /var/cache/munin/www
<Directory /var/cache/munin/www>
Order allow,deny
#Allow from localhost 127.0.0.0/8 ::1
Allow from all
Options None
php_value engine off
<IfModule mod_expires.c>
ExpiresActive On
ExpiresDefault M310
</IfModule>
</Directory>
If you want to access Munin from Apache subdomain create it lets say you want to access it via stats.www.pc-freak.net, use following config file:
vi /etc/apache2/sites-enabled/stats.www.pc-freak.net
<VirtualHost *>
ServerAdmin hipo@www.pc-freak.net
ServerName stats.www.pc-freak.net
DocumentRoot /var/cache/munin/www
<Directory />
Options FollowSymLinks
#AllowOverride All
php_value engine off
</Directory>
LogLevel debug
CustomLog /var/log/apache2/munin/access.log combined
ErrorLog /var/log/apache2/munin/error.log
ServerSignature On
<Directory /var/cache/munin/www>
Order allow,deny
#Allow from localhost 127.0.0.0/8 ::1
Allow from all
Options FollowSymlinks
#AllowOverride All
php_value engine off
</Directory>
</VirtualHost>
6. Restart Apache;
debian:~# /etc/init.d/apache2 restart
Now to access the newly installed munin point your favorite browser to (either the subdirectory configured for access or the Virtualhost subdomain):
https://www.pc-freak.net/munin/
or
http://munin.www.pc-freak.net
7. Protecting Munin with a password
As it could be a security leak to expose statistics regarding your server (Disk I/O, Memory, Load Avarage, Apache, MySQL Postfix) operations it is good security practice to protect munin with a password.
I've earlied blogged on how to protect your server munin web-statistics wtih an htaccess password (read it here)
Happy Monitoring
Tags: apache performance, apache2, bsd servers, configuration issue, CustomLog, documentroot, domain pc, freak, great software, Linux, munin, net, node, password, postfix, Qmail, restart apache, security practice, share, surveillance software, Tracking graphically MySQL and Apache performance in web with Munin on Debian, Virtualhost, web, www
Posted in Monitoring, MySQL, System Administration, Web and CMS | 1 Comment »
Monday, July 29th, 2013 
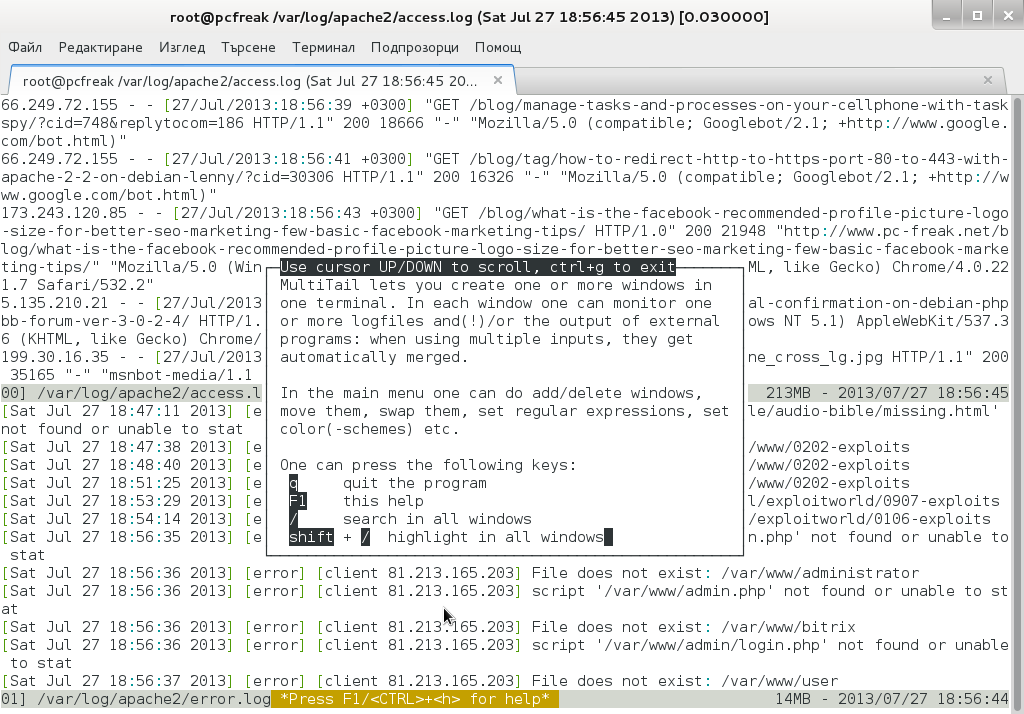
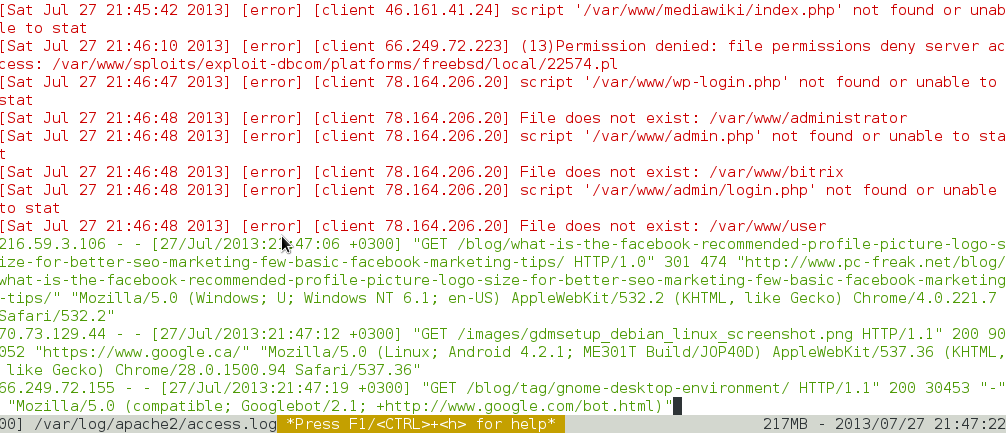
Whether you have to administer Apache, Nginx or Lighttpd, or whatever other kind of daemon which interactively logs user requests or errors you probably already know well of tail command (tail -f /var/log/apache2/access.log) is something Webserver Linux admin can't live without. Sometimes however you have number of Virtualhost (domains) each configured to log site activity in separate log file. One solution to the problem is to use GNU Screen (screen – terminal emulator) to launch multiple screen session and launch separate tail -f /var/log/apache2/domain1/access.log , tail -f /var/log/apache2/domain2/access.log etc. This however is a bit of hack and except configuring screen to show multiple windows on one Virtual Terminal (tty or vty in gnome), you can't really see output simultaneously in one separated window.
Here is where multitail comes handy. MultiTail is tool to visualize in real time log records output of multiple logs (tails) in one shared terminal Window. MultiTail is written to use ncurses library used by a bunch of other useful tools like Midnight Command so output is colorful and very nice looking.
Here is MultiTail package description on Debian Linux:
linux:~# apt-cache show multitail|grep -i description -A 1
Description-en: view multiple logfiles windowed on console
multitail lets you view one or multiple files like the original tail
—
Description-md5: 5e2f688efb214b063bdc418a705860a1
Tag: interface::text-mode, role::program, scope::utility, uitoolkit::ncurses,
root@noah:/home/hipo# apt-cache show multitail|grep -i description -A 1
Description-en: view multiple logfiles windowed on console
multitail lets you view one or multiple files like the original tail
—
Description-md5: 5e2f688efb214b063bdc418a705860a1
Tag: interface::text-mode, role::program, scope::utility, uitoolkit::ncurses,
Multiple Tail is available across most Linux distributions to install on Debian / Ubuntu / Mint etc. Linux:
 debian:~# apt-get install --yes multitail

...
On recent Fedora / RHEL / CentOS etc. RPM based Linuces to install:
 [root@centos ~]# yum -y install multitail

...
On FreeBSD multitail is available to install from ports:
 freebsd# cd /usr/ports/sysutils/multitail

freebsd# make install clean

...
Once installed to display records in multiple files lets say Apache domain name access.log and error.log
debian:~# multitail -f /var/log/apache2/access.log /var/log/apache2/error.log
…
It has very extensive help invoked by simply pressing h while running
Even better multitail is written to already have integrated color schemes for most popular Linux services log files
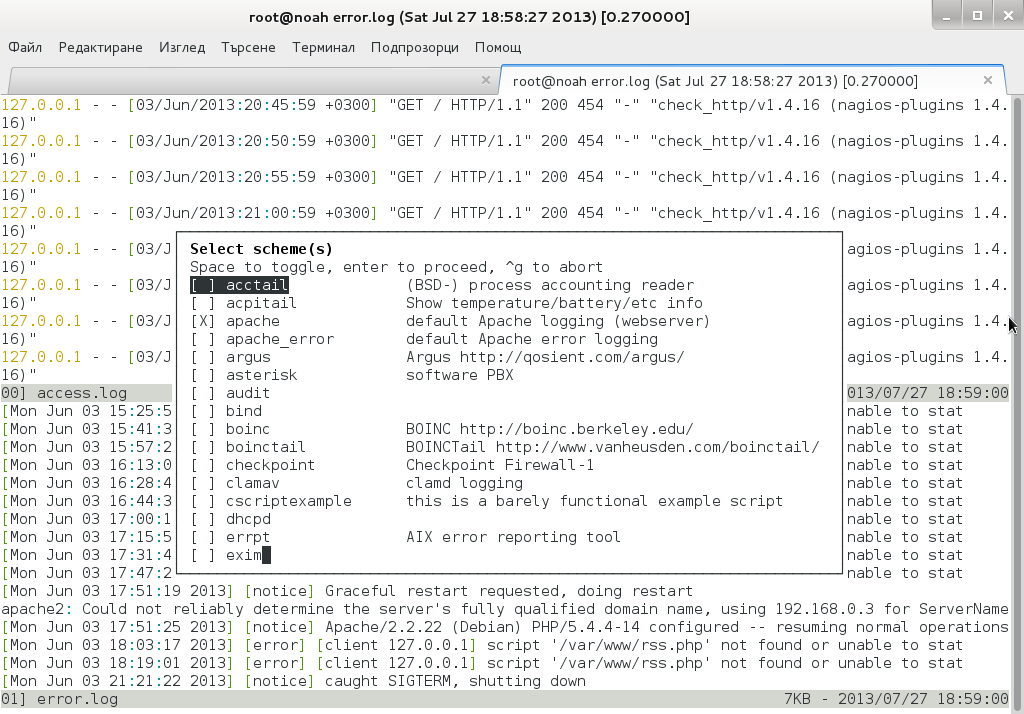
List of supported MulLog Color schemes as of time of writting article is:
acctail, acpitail, apache, apache_error, argus, asterisk, audit, bind, boinc, boinctail ,checkpoint, clamav, cscriptexample, dhcpd, errrpt, exim, httping, ii, inn, kerberos, lambamoo, liniptfw, log4j, mailscanner, motion, mpstat, mysql, nagtail, netscapeldap, netstat, nttpcache, ntpd, oracle, p0f, portsentry, postfix, pptpd, procmail, qmt-clamd, qmt-send, qmt-smtpd, qmt-sophie, qmt-spamassassin, rsstail, samba, sendmail, smartd, snort spamassassin, squid, ssh, strace, syslog, tcpdump, vmstat, vnetbr, websphere, wtmptail
To tell it what kind of log Color scheme to use from cmd line use:
debian:~# multitail -Csapache /var/log/apache2/access.log /var/log/apache2/error.log
Useful feature is to run command display in separate Windows while still following log output, i.e.:
  [root@centos:~]# multitail /var/log/httpd.log -l "netstat -nat"

...
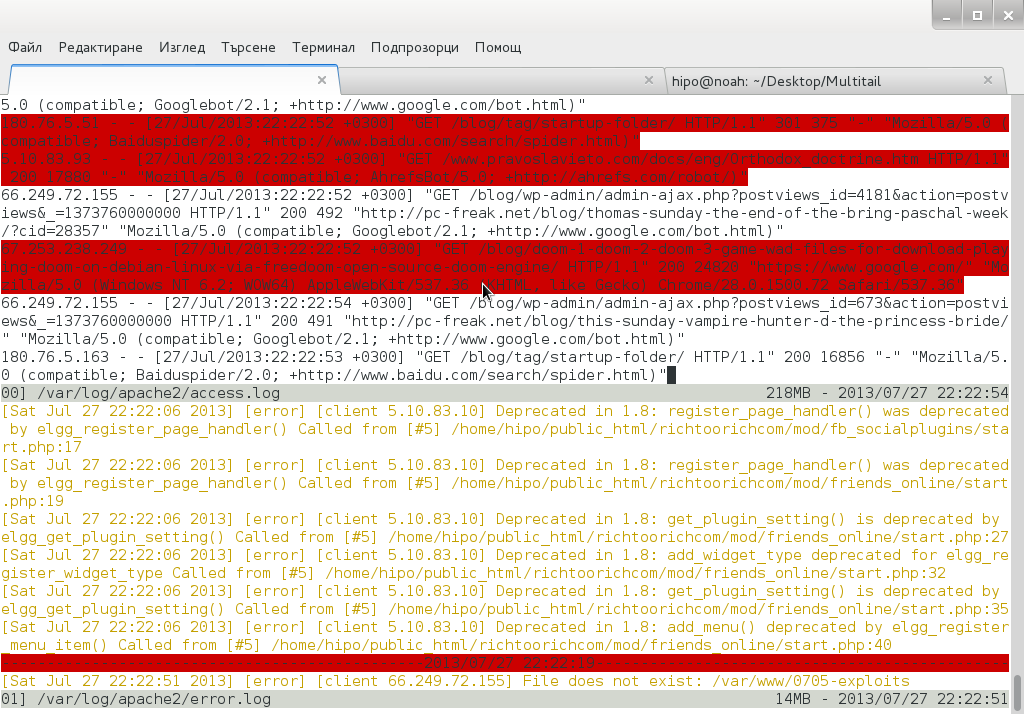
Multitail can also merge output from files in one Window, while in second window some other log or command output is displayed. To merge output from Apache access.log and error.log:
debian:~# multitail /var/log/apache2/access.log -I /var/log/apache2/error.log
When merging two log files output to show in one Window it is useful to display each file output in different color for the sake of readability
For example:
debian:~# multitail -ci green /var/log/apache/access.log -ci red -I /var/log/apache/error.log
To display output from 3 log files in 3 separate shared Windows in console use:
linux:~# multitail -s 2 /var/log/syslog /var/log/apache2/access.log /var/log/apache2/error.log
For some more useful examples, check out MultiTail's official page examples
There is plenty of other useful things to do with multitail, for more RTFM 🙂
Tags: configured, daemon, Gnome, gnu screen, hack, lighttpd, logs, multiple files, nginx, package description, screen session, terminal emulator, terminal window, time log, useful tools, Virtualhost
Posted in Everyday Life, FreeBSD, Linux, System Administration | No Comments »
Wednesday, May 16th, 2012 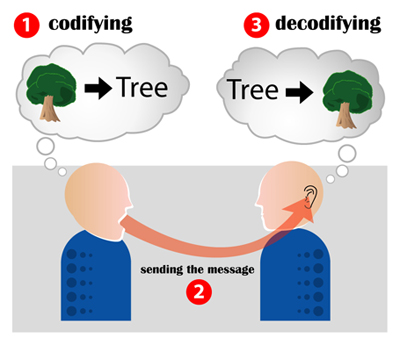
I have a bunch of old html files all encoded in the historically obsolete Windows-cp1251. Windows-CP1251 used to be common used 7 years ago and therefore still big portions of the web content in Bulgarian / Russian Cyrillic is still transferred to the end users in this encoding.
This was just before the "UTF-8 revolution", where massively people started using UTF-8,
Well it was clear the specific national country text encoding standards will quickly be moved by to UTF-8 – Universal Encoding format which abbreviation stands for (Unicode Transformation Format).
Though UTF-8 was clear to be "the future", many web developers mostly because of their incompetency or using an old sources of learning how to writen in HTML continued to use windows-cp1251 in HTMLs. I'm even convinced, there are still developers out there who are writting websites for Bulgarian / Russian / Macedonian customers using obsolete encodings …
The smarter developers of those accustomed to windows-cp1251, KOI-8R etc. etc., were using the meta tag to specify the type of charset of the web page content with:
<meta http-equiv="content-type" content="text/html;charset=windows-cp1251">
or
<meta http-equiv="content-type" content="text/html;charset=koi-8r">
Anyhow, still many devs even didn't placed the windows-cp1251 in the head of the HTML …
The result for the system administrator is always a mess – a lot of webpages that are showing like unreadable signs and tons of unhappy customers.
As always the system administrator is considered responsible, for the programmer mistakes :). So instead of programmers fix their bad cooking, the admin has to fix it all!
One quick work around me as admin has applied to failing to display pages in Cyrillic using the Windows-cp1251 character encoding was to force windows-cp1251 as a default encoding for the whole virtualhost or Apache directory with Apache directives like:
<VirtualHost *:80>

ServerAdmin some_user@some_host.com

DocumentRoot /var/www/html

AddDefaultCharset windows-cp1251

ServerName the_host_name.com

ServerAlias www.the_host_name.com

....

....

<Directory>

AddDefaultCharset windows-cp1251

>/Directory>

</VirtualHost>
Though this mostly would, work there are some occasions, where only a particular html files from all the content served by Apache is encoded in windows-cp1251, if most of the content is already written in UTF-8, this could be a big issues as you cannot just change the UTF-8 globally to windows-cp1251, just because few pages are written in archaic encoding….
Since most of the content is displayed to the client by Apache (as prior explained) just fine, only particular htmls lets's ay single.html, single2.html etc. etc. are displayed with some question marks or some non-human readable "hieroglyphs".
Below is a screenshot from two pages returned to my browser in wrongly set htmls charset:

Improper Windows CP1251 delivered page in UTF-8 browser view
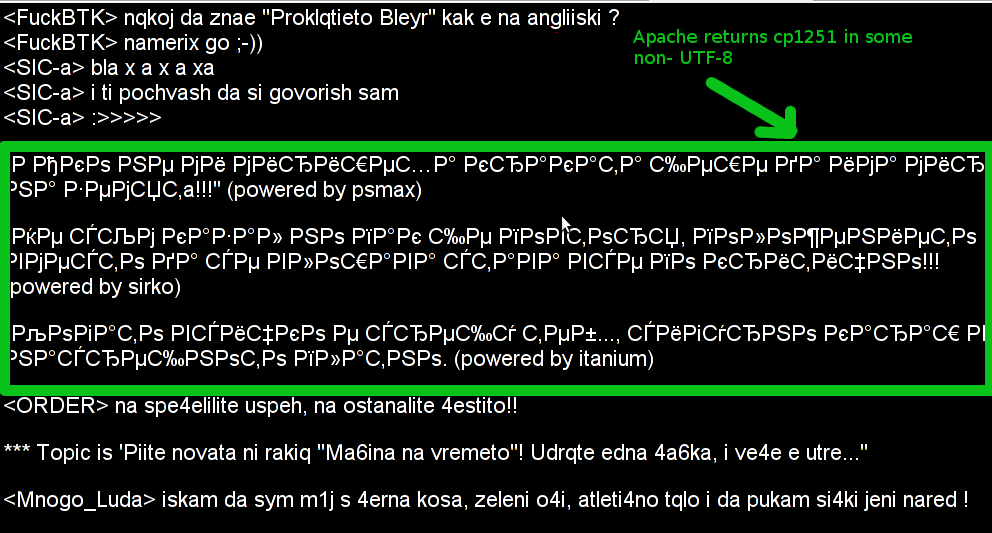
Improperly served encoding CP1251 delivered by Apache in non-utf-8 encoding
When this kind of issues occur, the only solution is to simply login to the server and use iconv command to convert all files returning unreadable content from whatever the non UTF-8 encoding is lets say in my case Bulgarian typeset of cp1251 to UTF-8
Here is how the iconv command to convert between windows-cp1251 to utf-8 the two sample files named single1.html and single2.html
server:/web# /usr/bin/iconv -f WINDOWS-1251 -t UTF-8 single1.html > single1.html.utf8

server:/web# mv single1.html single1.html.bak;

server:/web# mv single1.html.utf8 single1.html

server:/web# /usr/bin/iconv -f WINDOWS-1251 -t UTF-8 single2.html > single2.html.utf8

server:/web# mv single2.html single2.html.bak;

server:/web# mv single2.html.utf8 single2.html
I always, make copies of the original cp1251 encoded files (as you see mv single1.html single1.html.bak), because if something goes wrong with convertion I can easily revert back.
If there are 10 files with consequential numbers naming they can be converted using a short for loop, like so:
server:/web# for i $(seq 1 10); do

/usr/bin/iconv -f WINDOWS-1251 -t UTF-8 single$i.html > single$i.html.utf8;mv single$i.html single$i.html.bak

mv single$i.html.utf8 single$i.html

done
Just as earlier mentioned if single1.html, single2.html … has in the html <head>:
<meta http-equiv="Content-Type" content="text/html; charset=windows-1251">
You should open, each of the files in question and wipe out the line either by hand or use sed to wipe it in one loop if it has to be done for lets say 10 files named (single{1..10})
server:/web# for i in $(seq 1 10); do

sed '/<meta http-equiv="Content-Type" content="text\/html; charset=windows-1251>/d' single$i.txt > single$i.txt.new;

mv single$i.txt single$i.txt.bak;

mv single$i.txt.new single$i.txt
Well now,
Tags: Anyhow, apac, Auto, bak, character encoding, charset, charset windows, content type, Draft, end users, format, HEAD, host, html files, htmls, incompetency, mess, meta tag, page, programmer, programmers, quot, revolution, Russian, russian cyrillic, system administrator, tag, text, text html, Transformation, transformation format, type, unhappy customers, Universal, UTF, utf 8, Virtualhost, web content, web developers, web page content, work, writen
Posted in System Administration, Various, Web and CMS | 1 Comment »
Wednesday, July 18th, 2012 
At security critical hosts running Apache + PHP based sites it is recommended functions like:
system();

exec();shell_exec();.....
to be disabled. The reason is to mainly harden against script kiddies who might exploit your site/s and upload some shitty SK tool like PHP WebShell, PHP Shell and the probably thousands of “hacker” variations that exist nowdays.
In latest Debian stable Squeeze, suhosin – advanced protection module for php5 is being installed and enabled in Apache (by default).
Simply disabling a number of functions using suhosin, could prevent multiple of future headaches and hours of pondering on who 0wn3d your server ….
Disabling the basic PHP system(); and other similar functions which allows shell spawn is not always possible, since some websites or CMS platforms depends on them for proper runnig, anyways whether it is possible disabling ’em is a must.
There are two ways to disable system(); functions; One is through using /etc/php5/apache2/conf.d/suhosin.ini and 2nd by adding a list of functions that has to be disabled directly in Website Virtualhost file or in apache2.conf (/etc/apache2/apache2.conf;
For people hosting multiple virtualhost websites on the same server using the custom domain Virtualhost method is probably better, since on a global scale the functions could be enabled if some of the websites hosted on the server requires exec(); to work OK. In any case using /etc/php5/apache2/conf.d/suhosin.ini to disable system(); functions in PHP is less messy …
1. Disabling PHP system(); fuctions through /etc/apache2/apache2.conf and custom site Vhosts
Place somewhere (I prefer near the end of config);;;
php_admin_flag safe_mode on

php_admin_value disable_functions "system, exec, shell_exec, passthru , ini_alter, dl, pfsockopen, openlog, syslog, readlink, symlink, link, leak, fsockopen, popen, escapeshellcmd, apache_child_terminate apache_get_modules, apache_get_version, apache_getenv, apache_note,apache_setenv,virtual"
Disabling it for custom virtualhost is done by simply adding above Apache directvies (before the closing tag in /etc/apache2/sites-enabled/custom-vhost.com
2. Disabling PHP system();, exec(); shell spawn with suhosin.ini
In /etc/php5/apache2/conf.d/suhosin.ini add;;
suhosin.executor.func.blacklist =system, exec, shell_exec, passthru, ini_alter, dl,

pfsockopen, openlog, syslog, readlink, symlink, link, leak, fsockopen, popen,

escapeshellcmd, apache_child_terminate apache_get_modules, apache_get_version,

apache_getenv, apache_note,apache_setenv,virtual
To do it directly via shell issue;;;
server: conf.d/# cd /etc/php5/apache2/conf.d/

server: conf.d# echo 'suhosin.executor.func.blacklist =system, exec, shell_exec, passthru, ini_alter, dl,' >> suhosin.ini

server: conf.d# echo 'pfsockopen, openlog, syslog, readlink, symlink, link, leak, fsockopen, popen,' >> suhosin.ini

server: conf.d# echo escapeshellcmd, apache_child_terminate apache_get_modules, apache_get_version,' >> suhosin.ini

server: conf.d# echo 'apache_getenv, apache_note,apache_setenv,virtual' >> suhosin.ini
Then to re-load the memory loaded Apache libphp library an Apache restart is necessary;
server: conf.d# /etc/init.d/apache2 restart

Restarting web server: apache2 ... waiting .

server: conf.d#
Tadam, this should be quite a good security against annoying automated script attacks. Cheers 😉
Tags: apache security, apache2, Auto, custom, custom domain, debian gnu, Draft, escapeshellcmd, exec, func, global scale, GNU, gnu linux, harden, headaches, ini, Linux, number, passthru, php admin, php5, popen, protection, reason, runnig, safe mode, script, script kiddies, Shell, squeeze, suhosin, symlink, syslog, system, system functions, tool, two ways, VhostsPlace, Virtualhost, WebShell
Posted in Computer Security, System Administration, Web and CMS | 3 Comments »
Thursday, April 5th, 2012 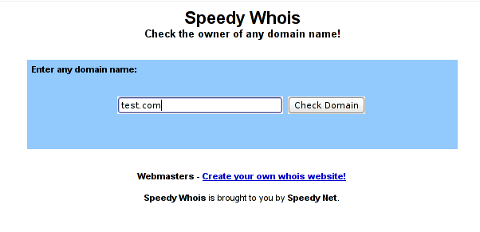
I've been planning to run my own domain WHOIS service, for quite sime time and I always postpone or forgot to do it.
If you wonder, why would I need a (personal) web whois service, well it is way easier to use and remember for future use reference if you run it on your own URL, than wasting time in search for a whois service in google and then using some other's service to get just a simple DOMAIN WHOIS info.
So back to my post topic, I postpopned and postponed to run my own web whois, just until yesterday, whether I have remembered about my idea to have my own whois up and running and proceeded wtih it.
To achieve my goal I checked if there is free software or (open source) software that easily does this.
I know I can write one for me from scratch, but since it would have cost me some at least a week of programming and testing and I didn't wanted to go this way.
To check if someone had already made an easy to install web whois service, I looked through in the "ultimate source for free software" sourceforge.net
Looking for the "whois web service" keywords, displayed few projects on top. But unfortunately many of the projects sources was not available anymore from http://sf.net and the project developers pages..
Thanksfully in a while, I found a project called SpeedyWhois, which PHP source was available for download.
With all prior said about project missing sources, Just in case if SpeedyWhois source disappears in the future (like it probably) happened with, some of the other WHOIS web service projects, I've made SpeedyWhois mirror for download here
Contrary to my idea that installing the web whois service might be a "pain in the ass", (like is the case with so many free software php scripts and apps) – the installation went quite smoothly.
To install it I took the following 4 steps:
1. Download the source (zip archive) with wget
# cd /var/www/whois-service;
/var/www/whois-service# wget -q https://www.pc-freak.net/files/speedywhois-0.1.4.zip
2. Unarchive it with unzip command
/var/www/whois-service# unzip speedywhois-0.1.4.zip
…
3. Set the proper DNS records My NS are using Godaddy, so I set my desired subdomain record from their domain name manager.
4. Edit Apache httpd.conf to create VirtualHost
This step is not mandatory, but I thought it is nice if I put the whois service under a subdomain, so add a VirtualHost to my httpd.conf
The Virtualhost Apache directives, I used are:
<VirtualHost *:80>
ServerAdmin hipo_aT_www.pc-freak.net
DocumentRoot /var/www/whois-service
ServerName whois.www.pc-freak.net
<Directory /var/www/whois-service
AllowOverride All
Order Allow,Deny
Allow from All
</Directory>
</VirtualHost>
Onwards to take effect of new Webserver configs, I did Apache restart
# /usr/local/etc/rc.d/apache2 restart
Whenever I have some free time, maybe I will work on the code, to try to add support for logging of previous whois requests and posting links pointing to the previous whois done via the web WHOIS service on the main whois page.
One thing that I disliked about how SpeedyWHOIS is written is, if there is no WHOIS information returned for a domain request (e.g.) a:
# whois domainname.com
returns an empty information, the script doesn't warn with a message there is no WHOIS data available for this domain or something.
This is not so important as this kind of behaviour of 'error' handling can easily be changed with minimum changes in the php code.
If you wonder, why do I need the web whois service, the answer is it is way easier to use.
I don't have more time to research a bit further on the alternative open source web whois services, so I would be glad to hear from anyone who tested other web whois service that is free comes under a FOSS license.
In the mean time, I'm sure people with a small internet websites like mine who are looking to run their OWN (personal) whois service SpeedyWHOIS does a great job.
Tags: Auto, code, contrary, domain, domain web, domain whois, download, Draft, free software, goal, google, idea, info, information, installation, minute, mirror, nbsp, open source software, pain in the ass, personal domain, personal web, programming, project, project developers, quot, scratch, scripts, Search, service projects, sime, software, software php, someone, SpeedyWHOIS, Thanksfully, time, top, topic, Virtualhost, wasting, wasting time, way, web service, web whois, wget, while, whois, whois web, yesterday
Posted in Everyday Life, System Administration, Web and CMS | 5 Comments »
Thursday, December 2nd, 2010 It’s actually very easy in order to enable this authentication via your website VirtualHost find the;
<Directory /var/www/yourwebsite>

....

</Directory>
Substitute the /var/www/yourwebsite with your correct website location in between the opening and closing Directory apache directive place something similar to the following lines:
AllowOverride All
AuthName “Add your login message here.”
AuthType Basic
AuthUserFile /etc/apache2/.htpasswd
AuthGroupFile /dev/null
require user name-of-user
Eventually your Directory directive in your let’s say /etc/apache2/apache2.conf should look something like the example in below
<Directory /var/www/yourwebsite>

AllowOverride All

AuthName "Add your login message here."

AuthType Basic

AuthUserFile /etc/apache2/.htpasswd

AuthGroupFile /dev/null

require user name-of-user

</Directory>
Of course in this example you need to set the name-of-user to an actual user name let’s say you want your login user to be admin, then substitute the name-of-user with admin
Of course set the desirable location for your .htpasswd in the AuthUserFile. Just in case if you decide to keep the same location as in my example you will further need to create the /etc/apache2/.htpasswd file.
Note here that in the above exapmle the AllowOverride All could also be substituted for AllowOverride AuthConfig , you might need to put this one if you don’t want that all .htaccess directives are recognized by Apache.
To create the .htpasswd issue the command:
debian~:# htpasswd -c /etc/apache2/.htpasswd admin

New password:

Re-type new password:
In the passwords prompts just type in your password of choice. Now we’re almost ready to have the website apache authentication working, only thing left is to reastart Apache.
I’m using Debian so restarting my apache is done via:
debian:~# /etc/init.d/apache2 restart
In other Linux distributions exec the respective script for Apache restart.
Now access your website and the password protection dialog asking for your credentials to login should popup.
Tags: Allowoverride, apache authentication, apache configuration, AuthConfig, AuthType, AuthUserFile, course, desirable location, directive, file, How to secure site with htpassword using Apache configuration instead of through external .htaccess file, htpasswd, init, Linux, location, login, login user, lt, opening, password, passwords, place, protection, quot, script, something, type, Virtualhost, website location, working
Posted in Linux, System Administration, Web and CMS | No Comments »
Thursday, December 8th, 2011 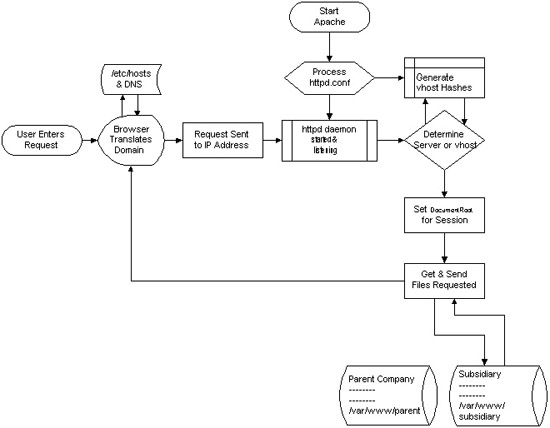
I decided to start this post with this picture I found on onlamp.com article called “Simplify Your Life with Apache VirtualHosts .I put it here because I thing it illustrates quite well Apache’s webserver internal processes. The picture gives also a good clue when Virtual Hosts gets loaded, anways I’ll go back to the main topic of this article, hoping the above picture gives some more insight on how Apache works.;
Here is how to list all the enabled virtualhosts in Apache on Debian GNU / Linux serving pages:
server:~# /usr/sbin/ apache2ctl -S

VirtualHost configuration:

wildcard NameVirtualHosts and _default_ servers:

*:* is a NameVirtualHost

default server exampleserver1.com (/etc/apache2/sites-enabled/000-default:2)

port * namevhost exampleserver2.com (/etc/apache2/sites-enabled/000-default

port * namevhost exampleserver3.com (/etc/apache2/sites-enabled/exampleserver3.com:1)

port * namevhost exampleserver4.com (/etc/apache2/sites-enabled/exampleserver4.com:1)

...

Syntax OK
The line *:* is a NameVirtualHost, means the Apache VirtualHosts module will be able to use Virtualhosts listening on any IP address (configured on the host), on any port configured for the respective Virtualhost to listen on.
The next output line:
port * namevhost exampleserver2.com (/etc/apache2/sites-enabled/000-default
Shows requests to the domain on any port will be accepted (port *) by the webserver as well as indicates the <VirtualHost> in the file /etc/apache2/sites-enabled/000-default:2 is defined on line 2 (e.g. :2).
To see the same all enabled VirtualHosts on FreeBSD the command to be issued is:
freebsd# pcfreak# /usr/local/sbin/httpd -S VirtualHost configuration:

wildcard NameVirtualHosts and _default_ servers:

*:80 is a NameVirtualHost

default server www.pc-freak.net (/usr/local/etc/apache2/httpd.conf:1218)

port 80 namevhost www.pc-freak.net (/usr/local/etc/apache2/httpd.conf:1218)

port 80 namevhost pcfreak.afraid.org (/usr/local/etc/apache2/httpd.conf:1353)

...

Syntax OK
On Fedora and the other Redhat Linux distributions, the apache2ctl -S should be displaying the enabled Virtualhosts.
One might wonder, what might be the reason for someone to want to check the VirtualHosts which are loaded by the Apache server, since this could be also checked if one reviews Apache / Apache2’s config file. Well the main advantage is that checking directly into the file might sometimes take more time, especially if the file contains thousands of similar named virtual host domains. Another time using the -S option is better would be if some enabled VirtualHost in a config file seems to not be accessible. Checking directly if Apache has properly loaded the VirtualHost directives ensures, there is no problem with loading the VirtualHost. Another scenario is if there are multiple Apache config files / installs located on the system and you’re unsure which one to check for the exact list of Virtual domains loaded.
Tags: apache, apache2, clue, com, config, configured, ctl, debian gnu, default port, default server, exampleserver, file, freak, freebsd, gnu linux, host, hosts, insight, ip address, life, Linux, lt, namevhost, NameVirtualHosts, onlamp, option, pcfreak, quot, reason, sbin, server pc, servers, someone, syntax, time, topic, Virtual, virtual hosts, Virtualhost, virtualhost configuration, VirtualHosts
Posted in Linux, System Administration | No Comments »


