Posts Tagged ‘Monitoring’

How to log every Linux executed command by every running system program to separte log via rsyslog for better server Security and audit trails

Wednesday, March 15th, 2023

snoopy-log-all-commands-on-linux-server-tux-logo

To keep a good eye on installed Debian Linux server security if you have to be PCI compliant (e.g. follow a high security) standards or you work in a company, where system security is crucial and any kind of security breach is untorrelated and in case of unexpected security holes exploited on running system processess listening on network peripherals (that malicious crackers) does to be able to easily identify what really happened e.g. do a Security RCA (Root Cause Analysis) for how this hack happened in order to mitigate it for future if possible capture the crackers and close the security hole the better, some kind of paranoid running program logging is required.

For such higher security systems, Linux / BSD / UNIX sysadmins can benefit from;

Snoopy command logger – a small library that logs all program executions on your Linux/BSD system.

Embedding snoopy into a running uptodate system is relatively easy, you either have to download the respective distribution package (in this particular article that would be Debian GNU / Linux) or for Linux distributions, that doesn't have the package integrated into the existing package repositories or externally available package repos, the code can be easily git cloned and installed from github snoopy program page following the README.md


However consider that snoopy run and logging the executed commands, make sure that if you use it you have rsyslogd configured to log to external logging server to make sure (someone did not manipulate the running system to avoid their actions being logged by snoopy, this is pointed by snoopy security disclaimer on the FAQ of official github snoopy project page, the page reads as so:

Security disclaimer
WARNING: Snoopy is not a reliable auditing solution.
Rogue users can easily manipulate environment to avoid their actions being logged by Snoopy. Consult this FAQ entry for more information.                


Most likely this warning is pointed out by the tool authors, in order to set the logging Tool creators free for any liability in case if someone uses the snoopy tool for some unauthorized logging
and sniffing of systems etc.

Before we proceed with the tool, install first for some clarity it is a good idea to know on what kind of Debian Linux you're about to install Snoopy command logger.

root@linux:~ # cat /etc/os-release
PRETTY_NAME="Debian GNU/Linux 11 (bullseye)"
NAME="Debian GNU/Linux"
VERSION_ID="11"
VERSION="11 (bullseye)"
VERSION_CODENAME=bullseye
ID=debian
HOME_URL="https://www.debian.org/"
SUPPORT_URL="https://www.debian.org/support"
BUG_REPORT_URL="https://bugs.debian.org/"


1. Prepare separate log file for snoopy that will keep log of every system command run by running processes visible by (ps -ef)

Next check the permissions user / group and read / write / executable flags with which the default generated rsyslog will be writting and set snoopy to whatever you would like it to write with

root@linux:~ # cat /etc/rsyslog.conf | grep "^\$File\|\$Umask"~
$FileOwner root
$FileGroup adm
$FileCreateMode 0640


Create Rsyslog configuration for snoopy.log

root@linux:~ # cat << EOF | sudo tee /etc/rsyslog.d/01-snoopy.conf
# Send snoopy messages to a dedicated logfile
if (\$programname startswith "snoopy") then {
  action(type="omfile" fileOwner="root" fileGroup="root" fileCreateMode="0600" file="/var/log/snoopy.log")
  stop
}

EOF


To make sure that snoopy library will be preloaded after installation on next boot:

root@linux:~ # cat << EOF | sudo debconf-set-selections
snoopy snoopy/install-ld-preload boolean true
EOF


root@linux:~ # systemctl restart rsyslog


root@linux:~ # systemctl status rsyslog
● rsyslog.service – System Logging Service
     Loaded: loaded (/lib/systemd/system/rsyslog.service; enabled; vendor preset: enabled)
     Active: active (running) since Tue 2023-03-14 12:59:05 EET; 59min ago
TriggeredBy: ● syslog.socket
       Docs: man:rsyslogd(8)
             man:rsyslog.conf(5)
             https://www.rsyslog.com/doc/
   Main PID: 713745 (rsyslogd)
      Tasks: 6 (limit: 4654)
     Memory: 1.1M
        CPU: 548ms
     CGroup: /system.slice/rsyslog.service
             └─713745 /usr/sbin/rsyslogd -n -iNONE

мар 14 12:59:05 haproxy2 systemd[1]: Started System Logging Service.
мар 14 12:59:05 haproxy2 rsyslogd[713745]: warning: ~ action is deprecated, consider using the 'stop' statement instead [v8.210>
мар 14 12:59:05 haproxy2 rsyslogd[713745]: [198B blob data]
мар 14 12:59:05 haproxy2 rsyslogd[713745]: imuxsock: Acquired UNIX socket '/run/systemd/journal/syslog' (fd 3) from systemd.  [>
мар 14 12:59:05 haproxy2 rsyslogd[713745]: [origin software="rsyslogd" swVersion="8.2102.0" x-pid="713745" x-info="https://www.>
мар 14 13:19:05 haproxy2 rsyslogd[713745]: — MARK —
мар 14 13:39:05 haproxy2 rsyslogd[713745]: — MARK —


2. Install snoopy deb package and configure it

root@linux:~ # apt install snoopy
Четене на списъците с пакети… Готово
Изграждане на дървото със зависимости… Готово
Четене на информацията за състоянието… Готово
Следните пакети са били инсталирани автоматично и вече не са необходими:
  bsdmainutils cpp-8 geoip-database libasan5 libbind9-161 libcroco3 libdns1104 libdns1110 libevent-core-2.1-6
  libevent-pthreads-2.1-6 libgdk-pixbuf-xlib-2.0-0 libgdk-pixbuf2.0-0 libgeoip1 libicu63 libisc1100 libisc1105 libisccc161
  libisccfg163 libisl19 liblwres161 libmpdec2 libmpx2 libperl5.28 libpython2-stdlib libpython2.7-minimal libpython2.7-stdlib
  libpython3.7-minimal libpython3.7-stdlib libreadline7 netcat-traditional node-ansi-align node-arrify node-bluebird
  node-boxen node-builtin-modules node-call-limit node-camelcase node-cli-boxes node-cliui node-co node-concat-stream
  node-config-chain node-cross-spawn node-cyclist node-decamelize node-decompress-response node-deep-extend node-detect-indent
  node-detect-newline node-duplexer3 node-duplexify node-editor node-end-of-stream node-errno node-execa node-find-up
  node-flush-write-stream node-from2 node-fs-vacuum node-get-caller-file node-get-stream node-got node-has-symbol-support-x
  node-has-to-string-tag-x node-import-lazy node-invert-kv node-is-buffer node-is-builtin-module node-is-npm node-is-object
  node-is-plain-obj node-is-retry-allowed node-is-stream node-isurl node-json-buffer node-kind-of node-latest-version
  node-lazy-property node-lcid node-libnpx node-locate-path node-lowercase-keys node-mem node-merge-stream node-mimic-fn
  node-mimic-response node-minimist node-mississippi node-node-uuid node-npm-run-path node-os-locale node-p-cancelable
  node-p-finally node-p-limit node-p-locate node-p-timeout node-package-json node-parallel-transform node-path-exists
  node-path-is-inside node-prepend-http node-proto-list node-prr node-pump node-pumpify node-qw node-rc
  node-registry-auth-token node-registry-url node-require-directory node-require-main-filename node-semver-diff node-sha
  node-shebang-command node-shebang-regex node-slide node-sorted-object node-stream-each node-stream-iterate node-stream-shift
  node-strip-eof node-strip-json-comments node-term-size node-through2 node-timed-out node-typedarray node-uid-number
  node-unpipe node-url-parse-lax node-url-to-options node-which-module node-widest-line node-wrap-ansi node-xdg-basedir
  node-xtend node-y18n node-yargs node-yargs-parser perl-modules-5.28 python-pkg-resources python2 python2-minimal python2.7
  python2.7-minimal python3.7-minimal

Използвайте „apt autoremove“ за да ги премахнете.
Следните НОВИ пакети ще бъдат инсталирани:
  snoopy
0 актуализирани, 1 нови инсталирани, 0 за премахване и 1 без промяна.
Необходимо е да се изтеглят 46,0 kB архиви.
След тази операция ще бъде използвано 124 kB допълнително дисково пространство.
Изт:1 http://deb.debian.org/debian bullseye/main amd64 snoopy amd64 2.4.12-1 [46,0 kB]
Изтеглени 46,0 kB за 0с (93,2 kB/сек)
Предварително настройване на пакети …


Selecting previously unselected package snoopy.
(Reading database … 56067 files and directories currently installed.)
Preparing to unpack …/snoopy_2.4.12-1_amd64.deb ...
Unpacking snoopy (2.4.12-1) …
Setting up snoopy (2.4.12-1) …
Processing triggers for libc-bin (2.31-13+deb11u5) …

root@linux:/etc# ls -al /var/log/snoopy.log
-rw——- 1 root root 14472 14 мар 13:40 /var/log/snoopy.log

Any specific configuration for snoopy can be tuned through /etc/snoopy.ini

Now you will find all the commands executed by all monitored running processes in /var/log/snoopy.

root@linux:/etc# tail -30 /var/log/snoopy.log
Mar 14 12:59:32 haproxy2 snoopy[713804]: [login:root ssh:(192.168.0.1 62796 192.168.0.210 22) sid:713792 tty:/dev/pts/2 (0/root) uid:root(0)/root(0) cwd:/]: ldconfig
Mar 14 12:59:32 haproxy2 snoopy[713806]: [login:zabbix ssh:((undefined)) sid:682168 tty:(none) ((none)/(none)) uid:zabbix(108)/zabbix(108) cwd:/]: who
Mar 14 12:59:32 haproxy2 snoopy[713807]: [login:zabbix ssh:((undefined)) sid:682168 tty:(none) ((none)/(none)) uid:zabbix(108)/zabbix(108) cwd:/]: wc -l
Mar 14 13:00:07 haproxy2 snoopy[713815]: [login:root ssh:((undefined)) sid:713815 tty:(none) ((none)/(none)) uid:root(0)/root(0) cwd:/usr/lib/sysstat]: /usr/lib/sysstat/sadc -F -L -S DISK 1 1 /var/log/sysstat
Mar 14 13:00:32 haproxy2 snoopy[713823]: [login:zabbix ssh:((undefined)) sid:682168 tty:(none) ((none)/(none)) uid:zabbix(108)/zabbix(108) cwd:/]: who
Mar 14 13:00:32 haproxy2 snoopy[713824]: [login:zabbix ssh:((undefined)) sid:682168 tty:(none) ((none)/(none)) uid:zabbix(108)/zabbix(108) cwd:/]: wc -l
Mar 14 13:01:32 haproxy2 snoopy[713834]: [login:zabbix ssh:((undefined)) sid:682168 tty:(none) ((none)/(none)) uid:zabbix(108)/zabbix(108) cwd:/]: who
Mar 14 13:01:32 haproxy2 snoopy[713835]: [login:zabbix ssh:((undefined)) sid:682168 tty:(none) ((none)/(none)) uid:zabbix(108)/zabbix(108) cwd:/]: wc -l
Mar 14 13:02:32 haproxy2 snoopy[713843]: [login:zabbix ssh:((undefined)) sid:682168 tty:(none) ((none)/(none)) uid:zabbix(108)/zabbix(108) cwd:/]: who
Mar 14 13:02:32 haproxy2 snoopy[713844]: [login:zabbix ssh:((undefined)) sid:682168 tty:(none) ((none)/(none)) uid:zabbix(108)/zabbix(108) cwd:/]: wc -l
Mar 14 13:03:32 haproxy2 snoopy[713855]: [login:zabbix ssh:((undefined)) sid:682168 tty:(none) ((none)/(none)) uid:zabbix(108)/zabbix(108) cwd:/]: who
Mar 14 13:03:32 haproxy2 snoopy[713856]: [login:zabbix ssh:((undefined)) sid:682168 tty:(none) ((none)/(none)) uid:zabbix(108)/zabbix(108) cwd:/]: wc -l
Mar 14 13:04:32 haproxy2 snoopy[713868]: [login:zabbix ssh:((undefined)) sid:682168 tty:(none) ((none)/(none)) uid:zabbix(108)/zabbix(108) cwd:/]: who


3. Set up logrotation (archiving) for snoopy logs

root@linux:/etc# vim /etc/logrotate.d/snoopy    


/var/log/snoopy.log {
        daily
        rotate 30
        compress
        delaycompress
        notifempty
        create 640 root adm

}
 

If you want to test logrotation without actually rotating the file:               

root@linux:/etc# logrotate –debug –force /etc/logrotate.d/snoopy   
  log needs rotating
rotating log /var/log/snoopy.log, log->rotateCount is 30
dateext suffix '-20230314'
glob pattern '-[0-9][0-9][0-9][0-9][0-9][0-9][0-9][0-9]'
previous log /var/log/snoopy.log.1 does not exist
renaming /var/log/snoopy.log.30.gz to /var/log/snoopy.log.31.gz (rotatecount 30, logstart 1, i 30),


renaming /var/log/snoopy.log.1.gz to /var/log/snoopy.log.2.gz (rotatecount 30, logstart 1, i 1),
renaming /var/log/snoopy.log.0.gz to /var/log/snoopy.log.1.gz (rotatecount 30, logstart 1, i 0),
log /var/log/snoopy.log.31.gz doesn't exist — won't try to dispose of it
renaming /var/log/snoopy.log to /var/log/snoopy.log.1
creating new /var/log/snoopy.log mode = 0640 uid = 0 gid = 4


4. Monitoring only selected applications  executed commands with snoopy                                                                             

By default snoopy after installed will set itself to monitor all kind of running processes on the system is done by preloading the ldconfig's (libcld.so.preload

root@haproxy2:/etc# cat /etc/ld.so.preload
/lib/x86_64-linux-gnu/libsnoopy.so

If you want to monitor a concrete application and not log everything from the running processes in process list, comment this out this line run ldconfig command

Then to any concrete application you would like to monitor with snoopy add to its init script either /etc/init.d/app_init_script or to systemctl's start script before the application binary program run:

export LD_PRELOAD=/lib/snoopy.so


  As per the README states


 Snoopy is placed in /etc/ld.so.preload to trap all occurrences of exec, if 
 you wish to monitor only certain applications you can do so through the    
 LD_PRELOAD environment variable.
Simply set it to /lib/snoopy.so before  loading the application.

For example

 # export LD_PRELOAD=/lib/snoopy.so                                           
 # lynx http://example.com/                           


Monitoring chronyd time service is synchronized, get additional time server values with Zabbix userparameter script

Monday, March 21st, 2022

monitoring-chronyc-time-server-synchronization-zabbix-logo

If you''re running a server infrastructure and your main monitoring system is Zabbix. Then a vital check you might want to setup is to monitor the server time synchronization to a central server. In newer Linux OS-es ntpd time server is started to be used lesser and many modern Linux distributions used in the corporate realm are starting to recommend using chrony as a time synchronization client / server.

In this article, I'll show you how you can quickly setup monitoring of chronyd process and monitoring whether the time is successfully synchronizing with remote Chronyd time server. This will be done with a tiny one liner shell script setup as userparameter It is relatively easy then to setup an Action Alert


1. Create userparameter script to send parsed chronyd time synchronization to Zabbix Server

chronyc tracking provides plenty of useful data which can give many details about info such as offset, skew, root delay, stratum, update interval.

[root@server: ~]# chronyc tracking
Reference ID    : 0A32EF0B (fkf-intp01.intcs.meshcore.net)
Stratum         : 3
Ref time (UTC)  : Fri Mar 18 12:42:31 2022
System time     : 0.000032544 seconds fast of NTP time
Last offset     : +0.000031102 seconds
RMS offset      : 0.000039914 seconds
Frequency       : 3.037 ppm slow
Residual freq   : +0.000 ppm
Skew            : 0.023 ppm
Root delay      : 0.017352410 seconds
Root dispersion : 0.004285847 seconds
Update interval : 1041.6 seconds
Leap status     : Normal

[root@server zabbix_agentd.d]# cat userparameter_chrony.conf 
UserParameter=chrony.json,chronyc -c tracking | sed -e s/'^'/'{"chrony":[“‘/g -e s/’$’/'”]}'/g -e s/','/'","'/g
[root@server zabbix_agentd.d]#

The -c option passed to chronyc is printing the chronyc tracking command ouput data in comma-separated values ( CSV ) format.

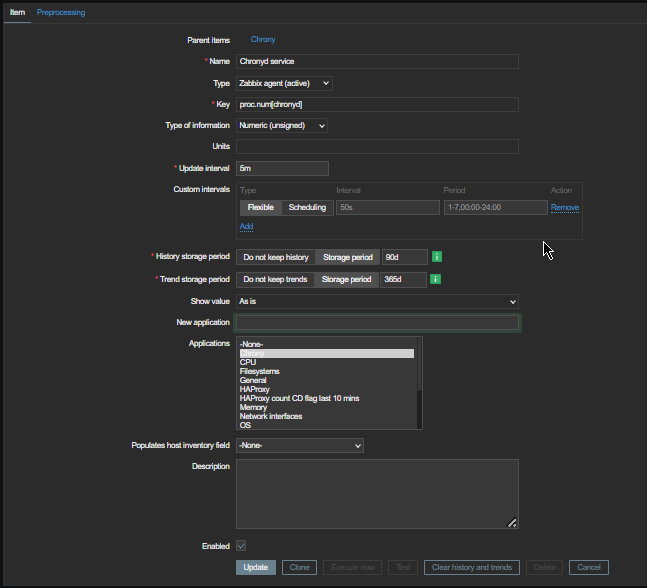
2. Create Necessery Item key to get chronyd processes and catch the userparameter data


  • First lets create a an Item key to calculate the chronyd daemon proc.num
    proc.num – simply returns the number of processes in the process list just like a simple
    pgrep servicename command does.


monitroing-chronyc_zabbix_item_report_to-zabbix

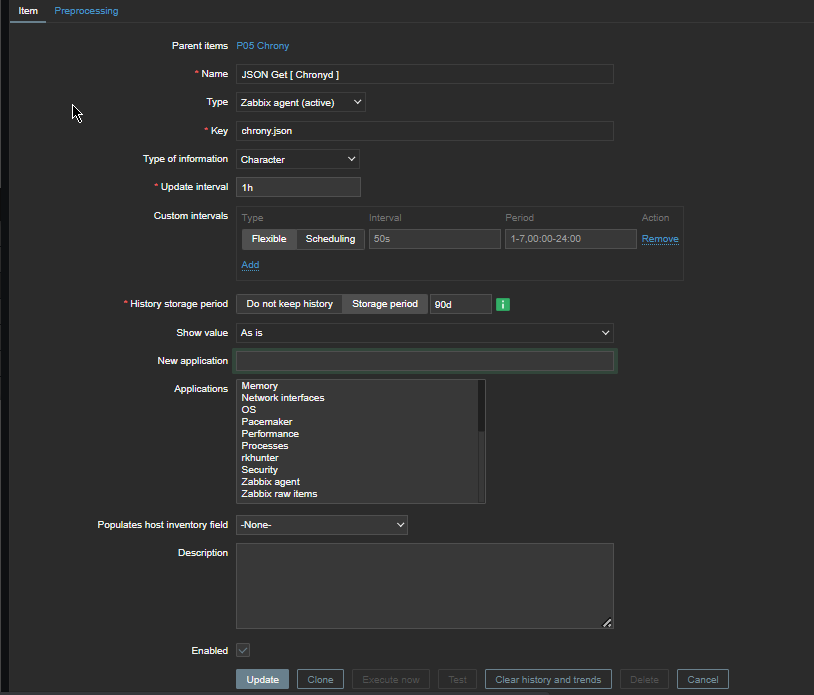
Second lets create the Item for the userparameter script, the chrony.json key should be the same as the key given in the userparameter script.

obtain-chronyc-statistic-variables-from-remote-chronyd-to-zabbix-windows

Create Chrony Zabbix Triggers 
 

Expression 

{server-host:proc.num[chronyd].last()}<1


will be triggered if the process of chronyd on the server is less than 1


chronyc_monitoring_process-is-not-running-screenshot

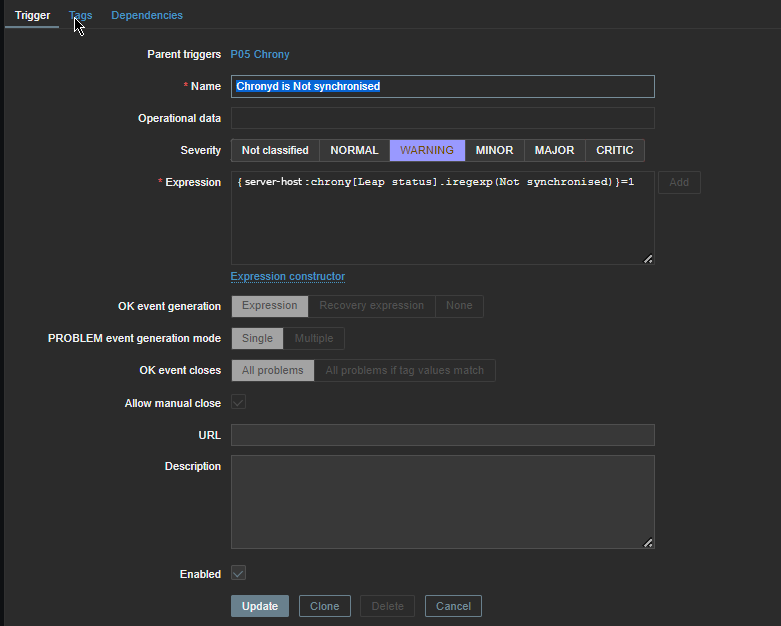
Next configure

{server-host:chrony[Leap status].iregexp[Not synchronised) ]=1


to trigger Alert Chronyd is Not synchronized if the Expression check occurs.

chronyd-is-not-synchronized-trigger-iregexp

Reload the zabbix-agent on the server
 

To make zabbix-agent locally installed on the machine read the userparameter into memory  (in my case this is zabbix-agent-4.0.28-1.el8.x86_64) installed on Redhat 8.3 (Ootpa), you have to restart it.

[root@server: ~]# systemctl restart zabbix-agent
[root@server: ~]# systemctl status zabbix-agent

● zabbix-agent.service – Zabbix Agent
   Loaded: loaded (/usr/lib/systemd/system/zabbix-agent.service; enabled; vendor preset: disabled)
   Active: active (running) since Thu 2021-12-16 16:41:02 CET; 3 months 0 days ago
 Main PID: 862165 (zabbix_agentd)
    Tasks: 6 (limit: 23662)
   Memory: 20.6M
   CGroup: /system.slice/zabbix-agent.service
           ├─862165 /usr/sbin/zabbix_agentd -c /etc/zabbix/zabbix_agentd.conf
           ├─862166 /usr/sbin/zabbix_agentd: collector [idle 1 sec]
           ├─862167 /usr/sbin/zabbix_agentd: listener #1 [waiting for connection]
           ├─862168 /usr/sbin/zabbix_agentd: listener #2 [waiting for connection]
           ├─862169 /usr/sbin/zabbix_agentd: listener #3 [waiting for connection]
           └─862170 /usr/sbin/zabbix_agentd: active checks #1 [idle 1 sec]

Warning: Journal has been rotated since unit was started. Log output is incomplete or unavailable.


In a short while you should be seeing in the chrony.json key History data fed by the userparameter Script.

In Zabbix Latest data, you will see plenty of interesting time synchronization data get reported such as Skew, Stratum, Root Delay, Update Interval, Frequency etc.

chronyd-zabbix-reported-time-synchronization-offset-leap-residual-freq-root-delay-screenshot

To have an email Alerting further, go and setup a new Zabbix Action based on the Trigger with your likings and you're done. 
The tracked machine will be in zabbix to make sure your OS clock is not afar from the time server. Repeat the same steps if you need to track chronyd is up running and synchronized on few machines, or if you have to make it for dozens setup a Zabbix template.

How to filter dhcp traffic between two networks running separate DHCP servers to prevent IP assignment issues and MAC duplicate addresses

Tuesday, February 8th, 2022

how-to-filter-dhcp-traffic-2-networks-running-2-separate-dhcpd-servers-to-prevent-ip-assignment-conflicts-linux
Tracking the Problem of MAC duplicates on Linux routers
 

If you have two networks that see each other and they're not separated in VLANs but see each other sharing a common netmask lets say 255.255.254.0 or 255.255.252.0, it might happend that there are 2 dhcp servers for example (isc-dhcp-server running on 192.168.1.1 and dhcpd running on 192.168.0.1 can broadcast their services to both LANs 192.168.1.0.1/24 (netmask 255.255.255.0) and Local Net LAN 192.168.1.1/24. The result out of this is that some devices might pick up their IP address via DHCP from the wrong dhcp server.

Normally if you have a fully controlled little or middle class home or office network (10 – 15 electronic devices nodes) connecting to the LAN in a mixed moth some are connected via one of the Networks via connected Wifi to 192.168.1.0/22 others are LANned and using static IP adddresses and traffic is routed among two ISPs and each network can see the other network, there is always a possibility of things to go wrong. This is what happened to me so this is how this post was born.

The best practice from my experience so far is to define each and every computer / phone / laptop host joining the network and hence later easily monitor what is going on the network with something like iptraf-ng / nethogs  / iperf – described in prior  how to check internet spepeed from console and in check server internet connectivity speed with speedtest-cliiftop / nload or for more complex stuff wireshark or even a simple tcpdump. No matter the tools network monitoring is only part on solving network issues. A very must have thing in a controlled network infrastructure is defining every machine part of it to easily monitor later with the monitoring tools. Defining each and every host on the Hybrid computer networks makes administering the network much easier task and  tracking irregularities on time is much more likely. 

Since I have such a hybrid network here hosting a couple of XEN virtual machines with Linux, Windows 7 and Windows 10, together with Mac OS X laptops as well as MacBook Air notebooks, I have followed this route and tried to define each and every host based on its MAC address to pick it up from the correct DHCP1 server  192.168.1.1 (that is distributing IPs for Internet Provider 1 (ISP 1), that is mostly few computers attached UTP LAN cables via LiteWave LS105G Gigabit Switch as well from DHCP2 – used only to assigns IPs to servers and a a single Wi-Fi Access point configured to route incoming clients via 192.168.0.1 Linux NAT gateway server.

To filter out the unwanted IPs from the DHCPD not to propagate I've so far used a little trick to  Deny DHCP MAC Address for unwanted clients and not send IP offer for them.

To give you more understanding,  I have to clear it up I don't want to have automatic IP assignments from DHCP2 / LAN2 to DHCP1 / LAN1 because (i don't want machines on DHCP1 to end up with IP like 192.168.0.50 or DHCP2 (to have 192.168.1.80), as such a wrong IP delegation could potentially lead to MAC duplicates IP conflicts. MAC Duplicate IP wrong assignments for those older or who have been part of administrating large ISP network infrastructures  makes the network communication unstable for no apparent reason and nodes partially unreachable at times or full time …

However it seems in the 21-st century which is the century of strangeness / computer madness in the 2022, technology advanced so much that it has massively started to break up some good old well known sysadmin standards well documented in the RFCs I know of my youth, such as that every electronic equipment manufactured Vendor should have a Vendor Assigned Hardware MAC Address binded to it that will never change (after all that was the idea of MAC addresses wasn't it !). 
Many mobile devices nowadays however, in the developers attempts to make more sophisticated software and Increase Anonimity on the Net and Security, use a technique called  MAC Address randomization (mostly used by hackers / script kiddies of the early days of computers) for their Wi-Fi Net Adapter OS / driver controlled interfaces for the sake of increased security (the so called Private WiFi Addresses). If a sysadmin 10-15 years ago has seen that he might probably resign his profession and turn to farming or agriculture plant growing, but in the age of digitalization and "cloud computing", this break up of common developed network standards starts to become the 'new normal' standard.

I did not suspected there might be a MAC address oddities, since I spare very little time on administering the the network. This was so till recently when I accidently checked the arp table with:

Hypervisor:~# arp -an
192.168.1.99     5c:89:b5:f2:e8:d8      (Unknown)
192.168.1.99    00:15:3e:d3:8f:76       (Unknown)

..


and consequently did a network MAC Address ARP Scan with arp-scan (if you never used this little nifty hacker tool I warmly recommend it !!!)
If you don't have it installed it is available in debian based linuces from default repos to install

Hypervisor:~# apt-get install –yes arp-scan


It is also available on CentOS / Fedora / Redhat and other RPM distros via:

Hypervisor:~# yum install -y arp-scan


Hypervisor:~# arp-scan –interface=eth1 192.168.1.0/24

192.168.1.19    00:16:3e:0f:48:05       Xensource, Inc.
192.168.1.22    00:16:3e:04:11:1c       Xensource, Inc.
192.168.1.31    00:15:3e:bb:45:45       Xensource, Inc.
192.168.1.38    00:15:3e:59:96:8e       Xensource, Inc.
192.168.1.34    00:15:3e:d3:8f:77       Xensource, Inc.
192.168.1.60    8c:89:b5:f2:e8:d8       Micro-Star INT'L CO., LTD
192.168.1.99     5c:89:b5:f2:e8:d8      (Unknown)
192.168.1.99    00:15:3e:d3:8f:76       (Unknown)

192.168.x.91     02:a0:xx:xx:d6:64        (Unknown)
192.168.x.91     02:a0:xx:xx:d6:64        (Unknown)  (DUP: 2)

N.B. !. I found it helpful to check all available interfaces on my Linux NAT router host.

As you see the scan revealed, a whole bunch of MAC address mess duplicated MAC hanging around, destroying my network topology every now and then 
So far so good, the MAC duplicates and strangely hanging around MAC addresses issue, was solved relatively easily with enabling below set of systctl kernel variables.
 

1. Fixing Linux ARP common well known Problems through disabling arp_announce / arp_ignore / send_redirects kernel variables disablement


Linux answers ARP requests on wrong and unassociated interfaces per default. This leads to the following two problems:

ARP requests for the loopback alias address are answered on the HW interfaces (even if NOARP on lo0:1 is set). Since loopback aliases are required for DSR (Direct Server Return) setups this problem is very common (but easy to fix fortunately).

If the machine is connected twice to the same switch (e.g. with eth0 and eth1) eth2 may answer ARP requests for the address on eth1 and vice versa in a race condition manner (confusing almost everything).

This can be prevented by specific arp kernel settings. Take a look here for additional information about the nature of the problem (and other solutions): ARP flux.

To fix that generally (and reboot safe) we  include the following lines into


Hypervisor:~# cp -rpf /etc/sysctl.conf /etc/sysctl.conf_bak_07-feb-2022
Hypervisor:~# cat >> /etc/sysctl.conf

# LVS tuning
net.ipv4.conf.lo.arp_ignore=1
net.ipv4.conf.lo.arp_announce=2
net.ipv4.conf.all.arp_ignore=1
net.ipv4.conf.all.arp_announce=2

net.ipv4.conf.all.send_redirects=0
net.ipv4.conf.eth0.send_redirects=0
net.ipv4.conf.eth1.send_redirects=0
net.ipv4.conf.default.send_redirects=0

Press CTRL + D simultaneusly to Write out up-pasted vars.


To read more on Load Balancer using direct routing and on LVS and the arp problem here


2. Digging further the IP conflict / dulicate MAC Problems

Even after this arp tunings (because I do have my Hypervisor 2 LAN interfaces connected to 1 switch) did not resolved the issues and still my Wireless Connected devices via network 192.168.1.1/24 (ISP2) were randomly assigned the wrong range IPs 192.168.0.XXX/24 as well as the wrong gateway 192.168.0.1 (ISP1).
After thinking thoroughfully for hours and checking the network status with various tools and thanks to the fact that my wife has a MacBook Air that was always complaining that the IP it tried to assign from the DHCP was already taken, i"ve realized, something is wrong with DHCP assignment.
Since she owns a IPhone 10 with iOS and this two devices are from the same vendor e.g. Apple Inc. And Apple's products have been having strange DHCP assignment issues from my experience for quite some time, I've thought initially problems are caused by software on Apple's devices.
I turned to be partially right after expecting the logs of DHCP server on the Linux host (ISP1) finding that the phone of my wife takes IP in 192.168.0.XXX, insetad of IP from 192.168.1.1 (which has is a combined Nokia Router with 2.4Ghz and 5Ghz Wi-Fi and LAN router provided by ISP2 in that case Vivacom). That was really puzzling since for me it was completely logical thta the iDevices must check for DHCP address directly on the Network of the router to whom, they're connecting. Guess my suprise when I realized that instead of that the iDevices does listen to the network on a wide network range scan for any DHCPs reachable baesd on the advertised (i assume via broadcast) address traffic and try to connect and take the IP to the IP of the DHCP which responds faster !!!! Of course the Vivacom Chineese produced Nokia router responded DHCP requests and advertised much slower, than my Linux NAT gateway on ISP1 and because of that the Iphone and iOS and even freshest versions of Android devices do take the IP from the DHCP that responds faster, even if that router is not on a C class network (that's invasive isn't it??). What was even more puzzling was the automatic MAC Randomization of Wifi devices trying to connect to my ISP1 configured DHCPD and this of course trespassed any static MAC addresses filtering, I already had established there.

Anyways there was also a good think out of tthat intermixed exercise 🙂 While playing around with the Gigabit network router of vivacom I found a cozy feature SCHEDULEDING TURNING OFF and ON the WIFI ACCESS POINT  – a very useful feature to adopt, to stop wasting extra energy and lower a bit of radiation is to set a swtich off WIFI AP from 12:30 – 06:30 which are the common sleeping hours or something like that.
 

3. What is MAC Randomization and where and how it is configured across different main operating systems as of year 2022?

Depending on the operating system of your device, MAC randomization will be available either by default on most modern mobile OSes or with possibility to have it switched on:

  • Android Q: Enabled by default 
  • Android P: Available as a developer option, disabled by default
  • iOS 14: Available as a user option, disabled by default
  • Windows 10: Available as an option in two ways – random for all networks or random for a specific network

Lately I don't have much time to play around with mobile devices, and I do not my own a luxury mobile phone so, the fact this ne Androids have this MAC randomization was unknown to me just until I ended a small mess, based on my poor configured networks due to my tight time constrains nowadays.

Finding out about the new security feature of MAC Randomization, on all Android based phones (my mother's Nokia smartphone and my dad's phone, disabled the feature ASAP:


4. Disable MAC Wi-Fi Ethernet device Randomization on Android

MAC Randomization creates a random MAC address when joining a Wi-Fi network for the first time or after “forgetting” and rejoining a Wi-Fi network. It Generates a new random MAC address after 24 hours of last connection.

Disabling MAC Randomization on your devices. It is done on a per SSID basis so you can turn off the randomization, but allow it to function for hotspots outside of your home.

  1. Open the Settings app
  2. Select Network and Internet
  3. Select WiFi
  4. Connect to your home wireless network
  5. Tap the gear icon next to the current WiFi connection
  6. Select Advanced
  7. Select Privacy
  8. Select "Use device MAC"
     

5. Disabling MAC Randomization on MAC iOS, iPhone, iPad, iPod

To Disable MAC Randomization on iOS Devices:

Open the Settings on your iPhone, iPad, or iPod, then tap Wi-Fi or WLAN


  1. Tap the information button next to your network
  2. Turn off Private Address
  3. Re-join the network


Of course next I've collected their phone Wi-Fi adapters and made sure the included dhcp MAC deny rules in /etc/dhcp/dhcpd.conf are at place.

The effect of the MAC Randomization for my Network was terrible constant and strange issues with my routings and networks, which I always thought are caused by the openxen hypervisor Virtualization VM bugs etc.

That continued for some months now, and the weird thing was the issues always started when I tried to update my Operating system to the latest packetset, do a reboot to load up the new piece of software / libraries etc. and plus it happened very occasionally and their was no obvious reason for it.


6. How to completely filter dhcp traffic between two network router hosts
IP 192.168.0.1 / 192.168.1.1 to stop 2 or more configured DHCP servers
on separate networks see each other

To prevent IP mess at DHCP2 server side (which btw is ISC DHCP server, taking care for IP assignment only for the Servers on the network running on Debian 11 Linux), further on I had to filter out any DHCP UDP traffic with iptables completely.
To prevent incorrect route assignments assuming that you have 2 networks and 2 routers that are configurred to do Network Address Translation (NAT)-ing Router 1: 192.168.0.1, Router 2: 192.168.1.1.

You have to filter out UDP Protocol data on Port 67 and 68 from the respective source and destination addresses.

In firewall rules configuration files on your Linux you need to have some rules as:

# filter outgoing dhcp traffic from 192.168.1.1 to 192.168.0.1
-A INPUT -p udp -m udp –dport 67:68 -s 192.168.1.1 -d 192.168.0.1 -j DROP
-A OUTPUT -p udp -m udp –dport 67:68 -s 192.168.1.1 -d 192.168.0.1 -j DROP
-A FORWARD -p udp -m udp –dport 67:68 -s 192.168.1.1 -d 192.168.0.1 -j DROP

-A INPUT -p udp -m udp –dport 67:68 -s 192.168.0.1 -d 192.168.1.1 -j DROP
-A OUTPUT -p udp -m udp –dport 67:68 -s 192.168.0.1 -d 192.168.1.1 -j DROP
-A FORWARD -p udp -m udp –dport 67:68 -s 192.168.0.1 -d 192.168.1.1 -j DROP

-A INPUT -p udp -m udp –sport 67:68 -s 192.168.1.1 -d 192.168.0.1 -j DROP
-A OUTPUT -p udp -m udp –sport 67:68 -s 192.168.1.1 -d 192.168.0.1 -j DROP
-A FORWARD -p udp -m udp –sport 67:68 -s 192.168.1.1 -d 192.168.0.1 -j DROP


You can download also filter_dhcp_traffic.sh with above rules from here


Applying this rules, any traffic of DHCP between 2 routers is prohibited and devices from Net: 192.168.1.1-255 will no longer wrongly get assinged IP addresses from Network range: 192.168.0.1-255 as it happened to me.


7. Filter out DHCP traffic based on MAC completely on Linux with arptables

If even after disabling MAC randomization on all devices on the network, and you know physically all the connecting devices on the Network, if you still see some weird MAC addresses, originating from a wrongly configured ISP traffic router host or whatever, then it is time to just filter them out with arptables.

## drop traffic prevent mac duplicates due to vivacom and bergon placed in same network – 255.255.255.252
dchp1-server:~# arptables -A INPUT –source-mac 70:e2:83:12:44:11 -j DROP


To list arptables configured on Linux host

dchp1-server:~# arptables –list -n


If you want to be paranoid sysadmin you can implement a MAC address protection with arptables by only allowing a single set of MAC Addr / IPs and dropping the rest.

dchp1-server:~# arptables -A INPUT –source-mac 70:e2:84:13:45:11 -j ACCEPT
dchp1-server:~# arptables -A INPUT  –source-mac 70:e2:84:13:45:12 -j ACCEPT


dchp1-server:~# arptables -L –line-numbers
Chain INPUT (policy ACCEPT)
1 -j DROP –src-mac 70:e2:84:13:45:11
2 -j DROP –src-mac 70:e2:84:13:45:12

Once MACs you like are accepted you can set the INPUT chain policy to DROP as so:

dchp1-server:~# arptables -P INPUT DROP


If you later need to temporary, clean up the rules inside arptables on any filtered hosts flush all rules inside INPUT chain, like that
 

dchp1-server:~#  arptables -t INPUT -F

Monitoring Linux hardware Hard Drives / Temperature and Disk with lm_sensors / smartd / hddtemp and Zabbix Userparameter lm_sensors report script

Thursday, April 30th, 2020

monitoring-linux-hardware-with-software-temperature-disk-cpu-health-zabbix-userparameter-script

I'm part of a  SysAdmin Team that is partially doing some minor Zabbix imrovements on a custom corporate installed Zabbix in an ongoing project to substitute the previous HP OpenView monitoring for a bunch of Legacy Linux hosts.
As one of the necessery checks to have is regarding system Hardware, the task was to invent some simplistic way to monitor hardware with the Zabbix Monitoring tool.  Monitoring Bare Metal servers hardware of HP / Dell / Fujituse etc. servers  in Linux usually is done with a third party software provided by the Hardware vendor. But as this requires an additional services to run and sometimes is not desired. It was interesting to find out some alternative Linux native ways to do the System hardware monitoring.
Monitoring statistics from the system hardware components can be obtained directly from the server components with ipmi / ipmitool (for more info on it check my previous article Reset and Manage intelligent  Platform Management remote board article).
With ipmi
 hardware health info could be received straight from the ILO / IDRAC / HPMI of the server. However as often the Admin-Lan of the server is in a seperate DMZ secured network and available via only a certain set of routed IPs, ipmitool can't be used.

So what are the other options to use to implement Linux Server Hardware Monitoring?

The tools to use are perhaps many but I know of two which gives you most of the information you ever need to have a prelimitary hardware damage warning system before the crash, these are:
 

1. smartmontools (smartd)

Smartd is part of smartmontools package which contains two utility programs (smartctl and smartd) to control and monitor storage systems using the Self-Monitoring, Analysis and Reporting Technology system (SMART) built into most modern ATA/SATA, SCSI/SAS and NVMe disks

Disk monitoring is handled by a special service the package provides called smartd that does query the Hard Drives periodically aiming to find a warning signs of hardware failures.
The downside of smartd use is that it implies a little bit of extra load on Hard Drive read / writes and if misconfigured could reduce the the Hard disk life time.


linux:~#  /usr/sbin/smartctl -a /dev/sdb2
smartctl 6.6 2017-11-05 r4594 [x86_64-linux-4.19.0-5-amd64] (local build)
Copyright (C) 2002-17, Bruce Allen, Christian Franke, www.smartmontools.org

=== START OF INFORMATION SECTION ===
Device Model:     KINGSTON SA400S37240G
Serial Number:    50026B768340AA31
LU WWN Device Id: 5 0026b7 68340aa31
Firmware Version: S1Z40102
User Capacity:    240,057,409,536 bytes [240 GB]
Sector Size:      512 bytes logical/physical
Rotation Rate:    Solid State Device
Device is:        Not in smartctl database [for details use: -P showall]
ATA Version is:   ACS-3 T13/2161-D revision 4
SATA Version is:  SATA 3.2, 6.0 Gb/s (current: 3.0 Gb/s)
Local Time is:    Thu Apr 30 14:05:01 2020 EEST
SMART support is: Available – device has SMART capability.
SMART support is: Enabled

=== START OF READ SMART DATA SECTION ===
SMART overall-health self-assessment test result: PASSED

General SMART Values:
Offline data collection status:  (0x00) Offline data collection activity
                                        was never started.
                                        Auto Offline Data Collection: Disabled.
Self-test execution status:      (   0) The previous self-test routine completed
                                        without error or no self-test has ever
                                        been run.
Total time to complete Offline
data collection:                (  120) seconds.
Offline data collection
capabilities:                    (0x11) SMART execute Offline immediate.
                                        No Auto Offline data collection support.
                                        Suspend Offline collection upon new
                                        command.
                                        No Offline surface scan supported.
                                        Self-test supported.
                                        No Conveyance Self-test supported.
                                        No Selective Self-test supported.
SMART capabilities:            (0x0002) Does not save SMART data before
                                        entering power-saving mode.
                                        Supports SMART auto save timer.
Error logging capability:        (0x01) Error logging supported.
                                        General Purpose Logging supported.
Short self-test routine
recommended polling time:        (   2) minutes.
Extended self-test routine
recommended polling time:        (  10) minutes.

SMART Attributes Data Structure revision number: 1
Vendor Specific SMART Attributes with Thresholds:
ID# ATTRIBUTE_NAME          FLAG     VALUE WORST THRESH TYPE      UPDATED  WHEN_FAILED RAW_VALUE
  1 Raw_Read_Error_Rate     0x0032   100   100   000    Old_age   Always       –       100
  9 Power_On_Hours          0x0032   100   100   000    Old_age   Always       –       2820
 12 Power_Cycle_Count       0x0032   100   100   000    Old_age   Always       –       21
148 Unknown_Attribute       0x0000   100   100   000    Old_age   Offline      –       0
149 Unknown_Attribute       0x0000   100   100   000    Old_age   Offline      –       0
167 Unknown_Attribute       0x0000   100   100   000    Old_age   Offline      –       0
168 Unknown_Attribute       0x0012   100   100   000    Old_age   Always       –       0
169 Unknown_Attribute       0x0000   100   100   000    Old_age   Offline      –       0
170 Unknown_Attribute       0x0000   100   100   010    Old_age   Offline      –       0
172 Unknown_Attribute       0x0032   100   100   000    Old_age   Always       –       0
173 Unknown_Attribute       0x0000   100   100   000    Old_age   Offline      –       0
181 Program_Fail_Cnt_Total  0x0032   100   100   000    Old_age   Always       –       0
182 Erase_Fail_Count_Total  0x0000   100   100   000    Old_age   Offline      –       0
187 Reported_Uncorrect      0x0032   100   100   000    Old_age   Always       –       0
192 Power-Off_Retract_Count 0x0012   100   100   000    Old_age   Always       –       16
194 Temperature_Celsius     0x0022   034   052   000    Old_age   Always       –       34 (Min/Max 19/52)
196 Reallocated_Event_Count 0x0032   100   100   000    Old_age   Always       –       0
199 UDMA_CRC_Error_Count    0x0032   100   100   000    Old_age   Always       –       0
218 Unknown_Attribute       0x0032   100   100   000    Old_age   Always       –       0
231 Temperature_Celsius     0x0000   097   097   000    Old_age   Offline      –       97
233 Media_Wearout_Indicator 0x0032   100   100   000    Old_age   Always       –       2104
241 Total_LBAs_Written      0x0032   100   100   000    Old_age   Always       –       1857
242 Total_LBAs_Read         0x0032   100   100   000    Old_age   Always       –       1141
244 Unknown_Attribute       0x0000   100   100   000    Old_age   Offline      –       32
245 Unknown_Attribute       0x0000   100   100   000    Old_age   Offline      –       107
246 Unknown_Attribute       0x0000   100   100   000    Old_age   Offline      –       15940

SMART Error Log Version: 1
No Errors Logged

SMART Self-test log structure revision number 1
No self-tests have been logged.  [To run self-tests, use: smartctl -t]

Selective Self-tests/Logging not supported


2. hddtemp


Usually if smartd is used it is useful to also use hddtemp which relies on smartd data.
 The hddtemp program monitors and reports the temperature of PATA, SATA
 or SCSI hard drives by reading Self-Monitoring Analysis and Reporting
 Technology (S.M.A.R.T.)
information on drives that support this feature.
 

linux:~# /usr/sbin/hddtemp /dev/sda1
/dev/sda1: Hitachi HDS721050CLA360: 31°C
linux:~# /usr/sbin/hddtemp /dev/sdc6
/dev/sdc6: KINGSTON SV300S37A120G: 25°C
linux:~# /usr/sbin/hddtemp /dev/sdb2
/dev/sdb2: KINGSTON SA400S37240G: 34°C
linux:~# /usr/sbin/hddtemp /dev/sdd1
/dev/sdd1: WD Elements 10B8: S.M.A.R.T. not available


3. lm-sensors / i2c-tools 

 Lm-sensors is a hardware health monitoring package for Linux. It allows you
 to access information from temperature, voltage, and fan speed sensors.
i2c-tools
was historically bundled in the same package as lm_sensors but has been seperated cause not all hardware monitoring chips are I2C devices, and not all I2C devices are hardware monitoring chips.

The most basic use of lm-sensors is with the sensors command


linux:~# sensors
i350bb-pci-0600
Adapter: PCI adapter
loc1:         +55.0 C  (high = +120.0 C, crit = +110.0 C)


coretemp-isa-0000
Adapter: ISA adapter
Physical id 0:  +28.0 C  (high = +78.0 C, crit = +88.0 C)
Core 0:         +26.0 C  (high = +78.0 C, crit = +88.0 C)
Core 1:         +28.0 C  (high = +78.0 C, crit = +88.0 C)
Core 2:         +28.0 C  (high = +78.0 C, crit = +88.0 C)
Core 3:         +28.0 C  (high = +78.0 C, crit = +88.0 C)


On CentOS Linux useful tool is also  lm_sensors-sensord.x86_64 – A Daemon that periodically logs sensor readings to syslog or a round-robin database, and warns of sensor alarms.

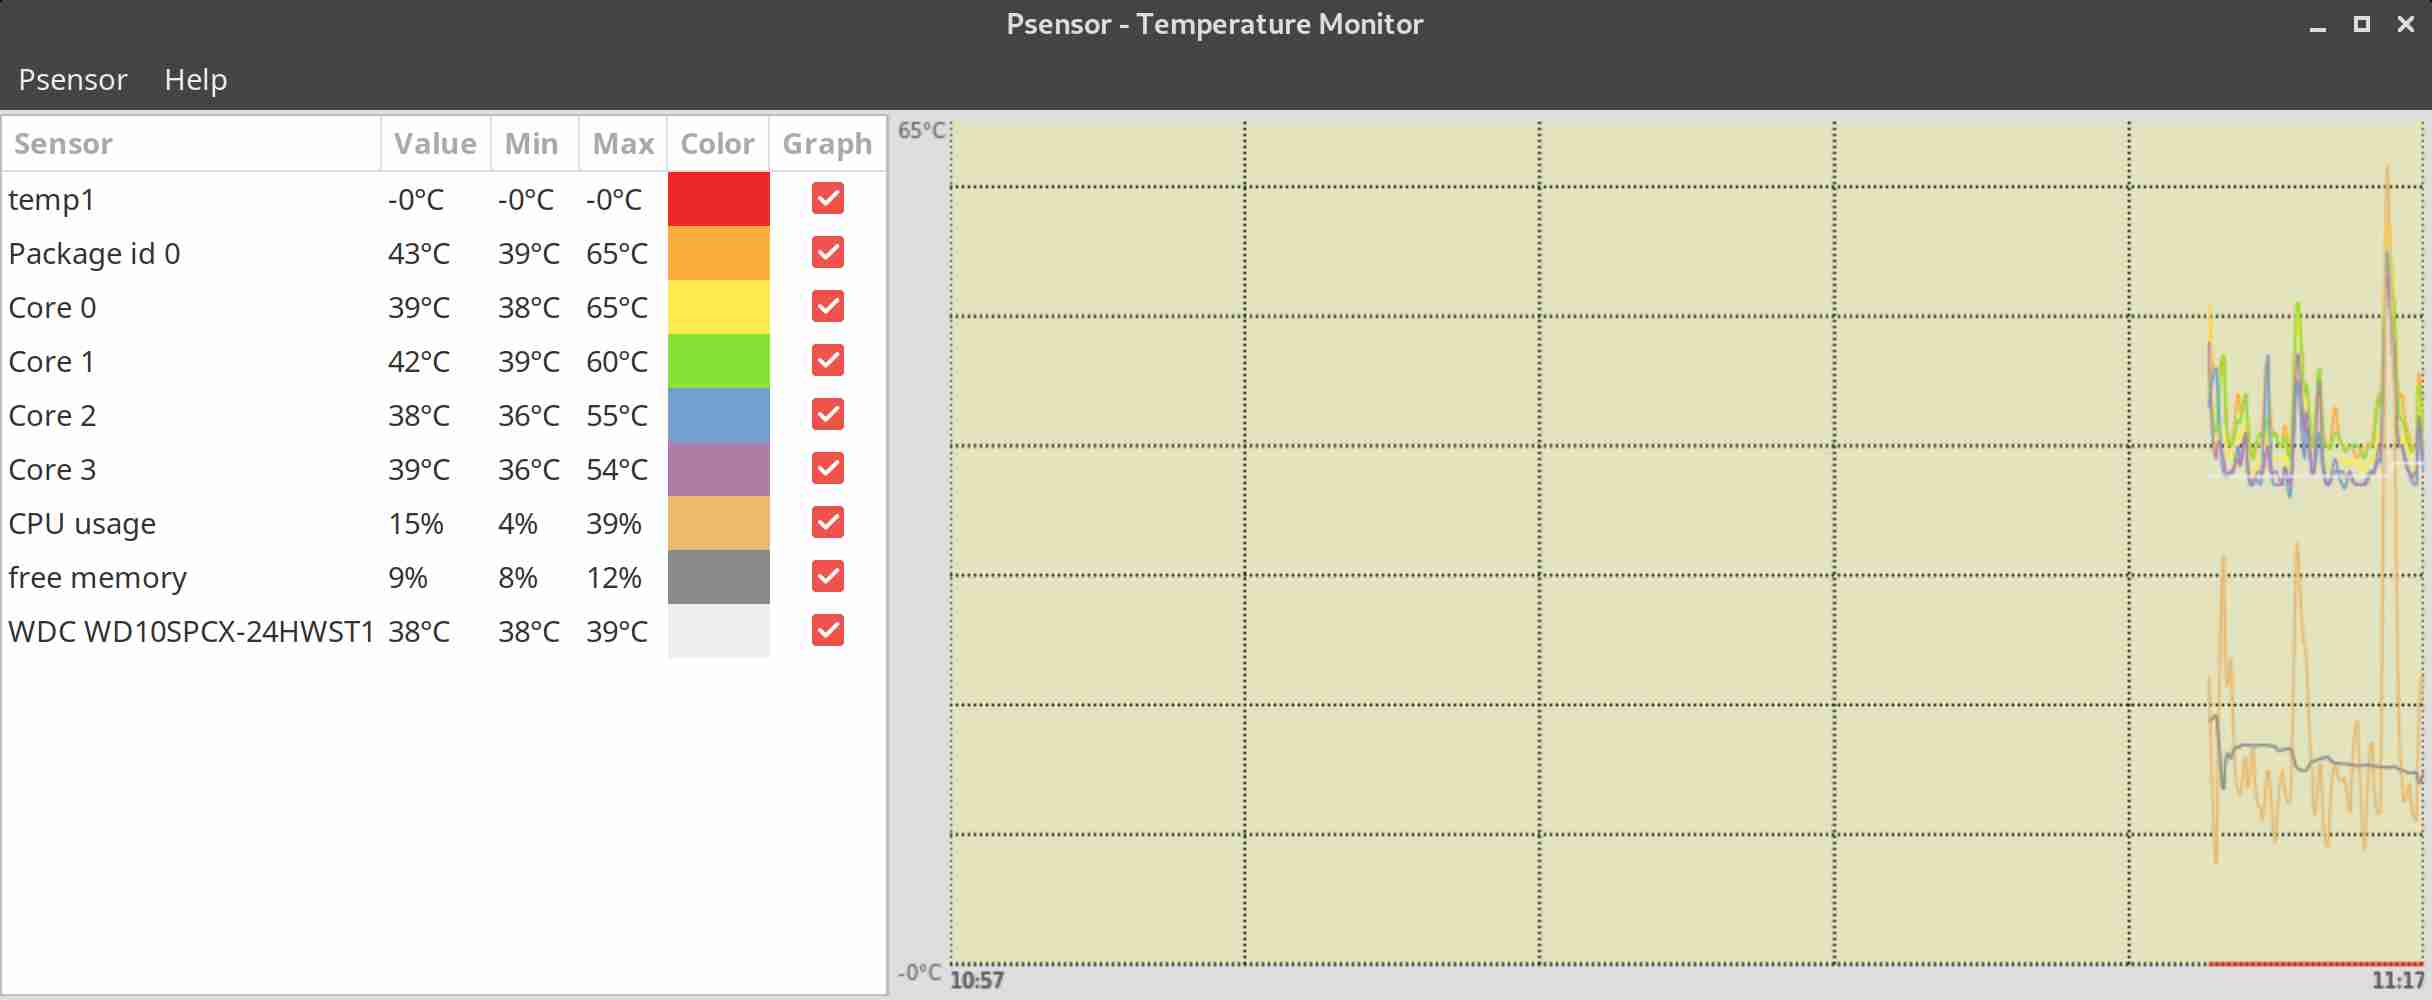
In Debian Linux there is also the psensors-server (an HTTP server providing JSON Web service which can be used by GTK+ Application to remotely monitor sensors) useful for developers
psesors-server

psensor-linux-graphical-tool-to-check-cpu-hard-disk-temperature-unix

If you have a Xserver installed on the Server accessed with Xclient or via VNC though quite rare,
You can use xsensors or Psensora GTK+ (Widget Toolkit for creating Graphical User Interface) application software.

With this 3 tools it is pretty easy to script one liners and use the Zabbix UserParameters functionality to send hardware report data to a Company's Zabbix Sserver, though Zabbix has already some templates to do so in my case, I couldn't import this templates cause I don't have Zabbix Super-Admin credentials, thus to work around that a sample work around is use script to monitor for higher and critical considered temperature.
Here is a tiny sample script I came up in 1 min time it can be used to used as 1 liner UserParameter and built upon something more complex.

SENSORS_HIGH=`sensors | awk '{ print $6 }'| grep '^+' | uniq`;
SENSORS_CRIT=`sensors | awk '{ print $9 }'| grep '^+' | uniq`; ;SENSORS_STAT=`sensors|grep -E 'Core\s' | awk '{ print $1" "$2" "$3 }' | grep "$SENSORS_HIGH|$SENSORS_CRIT"`;
if [ ! -z $SENSORS_STAT ]; then
echo 'Temperature HIGH';
else 
echo 'Sensors OK';
fi 

Of course there is much more sophisticated stuff to use for monitoring out there


Below script can be easily adapted and use on other Monitoring Platforms such as Nagios / Munin / Cacti / Icinga and there are plenty of paid solutions, but for anyone that wants to develop something from scratch just like me I hope this
article will be a good short introduction.
If you know some other Linux hardware monitoring tools, please share.

Monitoring multi core / (multiple CPUs) servers with top, tload and on Linux

Thursday, March 17th, 2011

The default GNU / Linux top command does allow to see statistics on servers and systems with multiple CPUs.
This is quite beneficial especially on Linux systems which are not equipped with htop which does show statistics to the multiple-core system load.

To examine the multiple CPUs statistics with the default top command available on every Linux system and part of the procps/proc file system utilities

1. Start top:

linux:~# top

When the top system load statistics screen starts up refreshing,

2. press simply 1
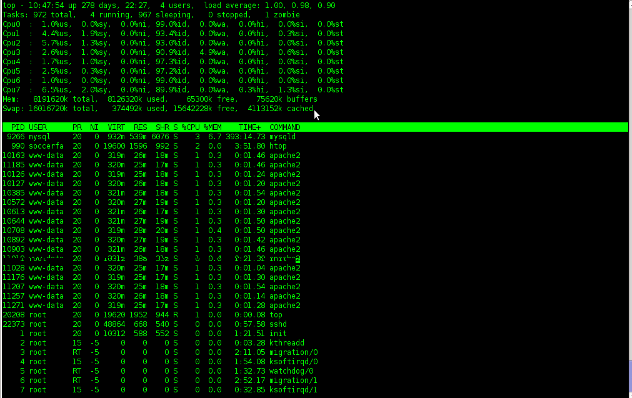
You will notice all your system cpus to show up in the top head:

8 cpu top screen statistics on Linux

As I have started talking about top, a very useful way to use top to track processes which are causing a system high loads is:

linux:~# top -b -i

This command will run top in batch mode interactively and will show you statistics about the most crucial processes which does cause a server load, look over the output and you will get an idea about what is causing you server troubles.
Moreover if you’re a Linux console freak as me you will also probably want to take a look at tload

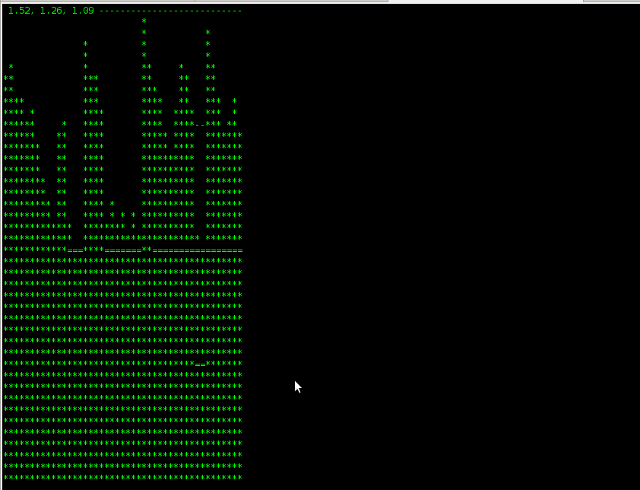
tload command is a part of the procps – /proc file system utilities and as you can read in the tload manual tload – graphic representation of system load average

Here is a picture to give you an idea on the console output of tload :

tload console/terminal system load statistics on Linux screenshot

Another tool that you might find very usefel is slabtop it’s again a part of the procps linux package.
slabtop – displays a listing of the top caches sorted by one of the listed sort criteria., in most of the cases the slabtop kernel cache monitoring tool won’t be necessary for the regular administrator, however on some servers it might help up to the administrator to resolve performance issues which are caused by the kernel as a bottleneck.
slabtop is also used as a tool by kernel developers to write and debug the Linux kernel.

Debian Linux: Installing and monitoring servers with Icanga (Nagios fork soft)

Monday, June 3rd, 2013

icinga-monitoring-processes-and-servers-linux-logo

There is plenty of software for monitoring how server performs and whether servers are correctly up and running. There is probably no Debian Linux admin who didn't already worked or at least tried Nagios and Mointor to monitor and notify whether server is unreachable or how server services operate. Nagios and Munin are play well together to prevent possible upcoming problems with Web / Db / E-mail services or get notify whether they are completely inaccessible. One similar "next-generation" and less known software is Icanga.
The reason, why to use Icinga  instead of Nagios is  more features a list of what does Icinga supports more than Nagios is on its site here
I recently heard of it and decided to try it myself. To try Icanga I followed Icanga's install tutorial on Wiki.Icanga.Org here
In Debian Wheezy, Icinga is already part of official repositories so installing it like in Squeeze and Lenny does not require use of external Debian BackPorts repositories.

1. Install Icinga pre-requirement packages

debian:# apt-get --yes install php5 php5-cli php-pear php5-xmlrpc php5-xsl php5-gd php5-ldap php5-mysql

2. Install Icanga-web package

debian:~# apt-get --yes install icinga-web

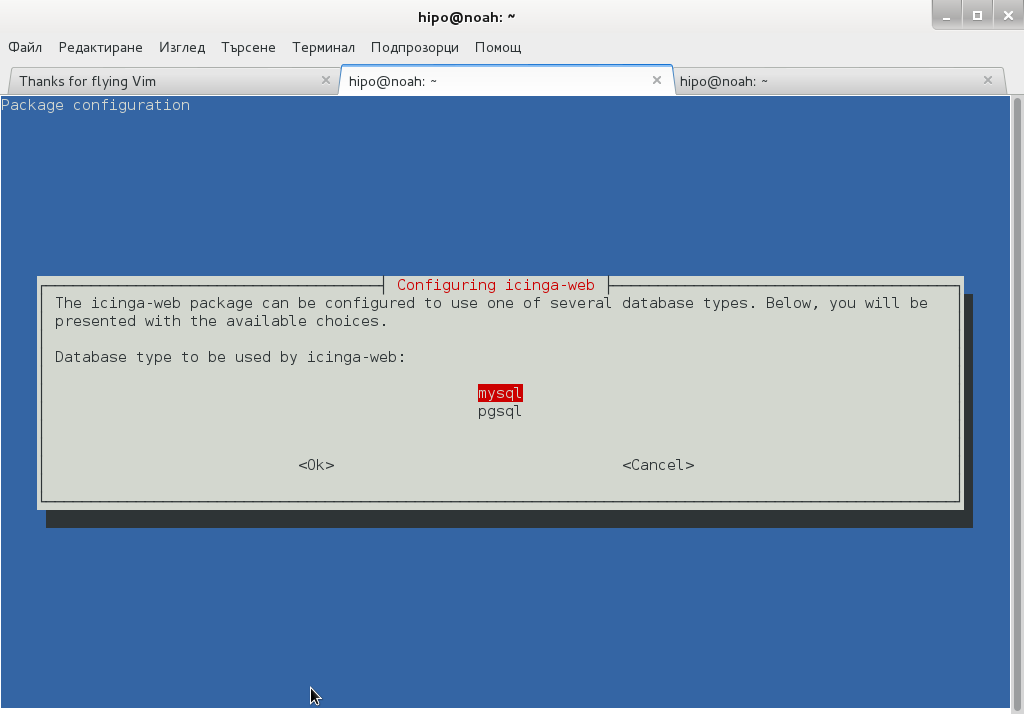
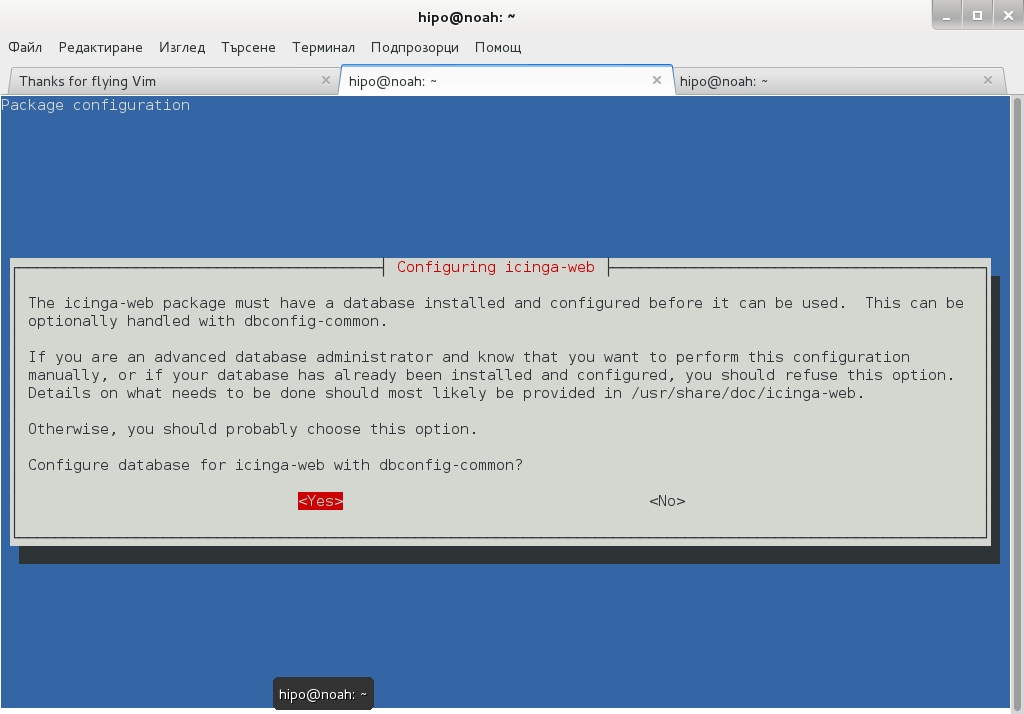
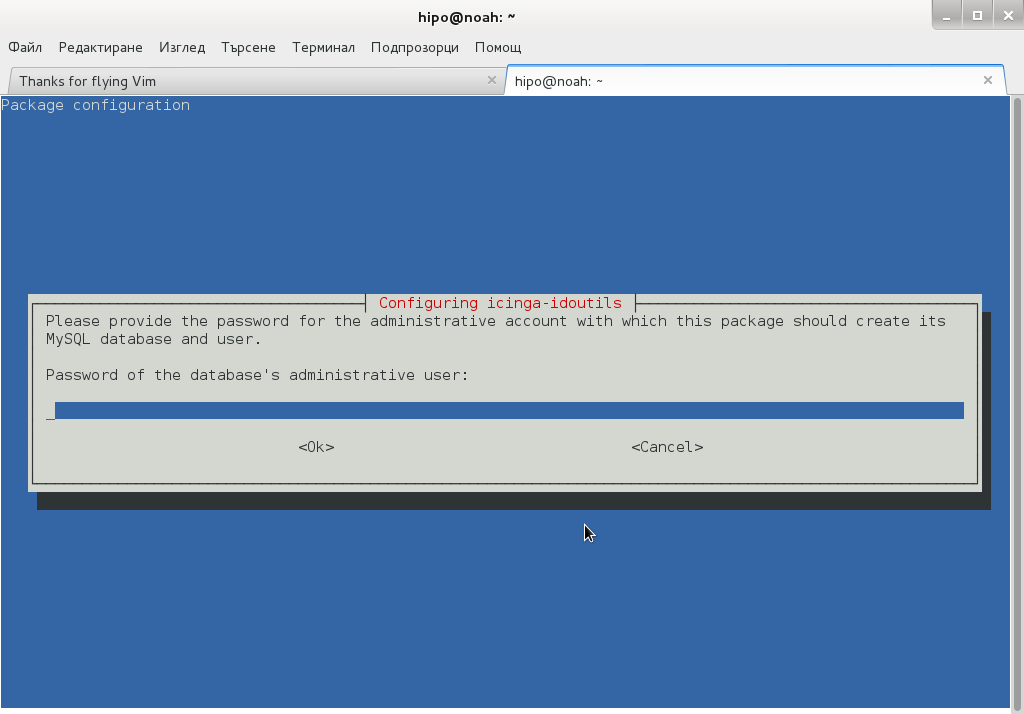
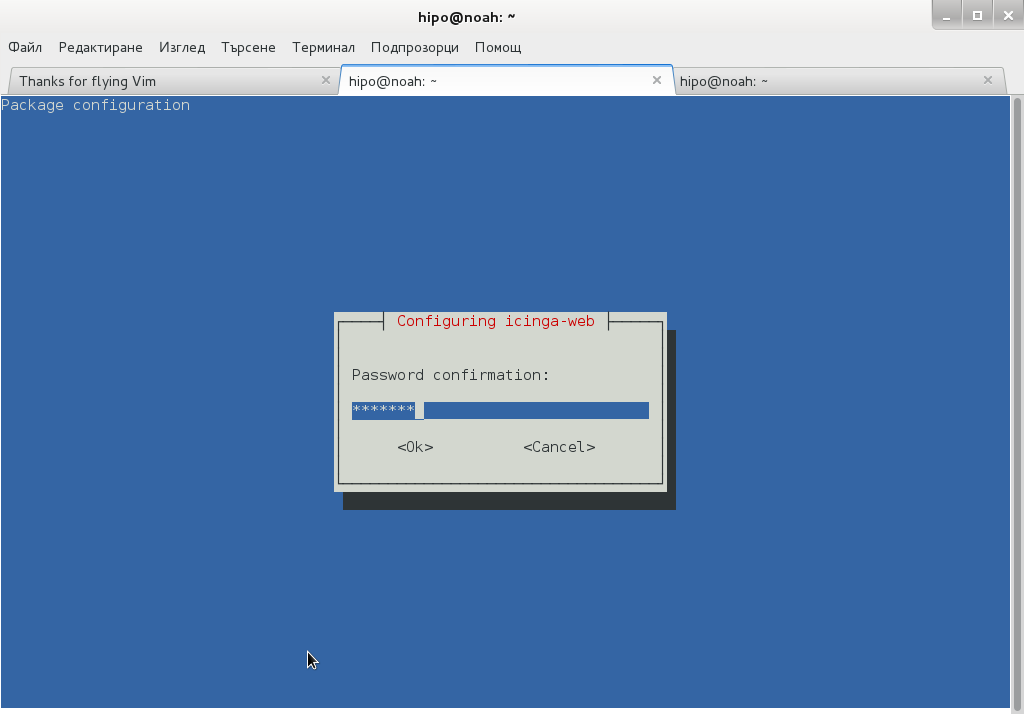
Here you will be prompted a number of times to answer few dialog questions important for security, as well as fill in MySQL server root user / password as well as SQL password that will icinga_web mySQL user use.

icinga-choosing-database-type

configuring-icinga-web-debian-linux-configuring-database-shot

debian-config-screenshot-configuring-icinga-idoutils

icinga-password-confirmation-debian-linux
….

Setting up icinga-idoutils (1.7.1-6) …
dbconfig-common: writing config to /etc/dbconfig-common/icinga-idoutils.conf
granting access to database icinga for icinga-idoutils@localhost: success.
verifying access for icinga-idoutils@localhost: success.
creating database icinga: success.
verifying database icinga exists: success.
populating database via sql…  done.
dbconfig-common: flushing administrative password
Setting up icinga-web (1.7.1+dfsg2-6) …
dbconfig-common: writing config to /etc/dbconfig-common/icinga-web.conf

Creating config file /etc/dbconfig-common/icinga-web.conf with new version
granting access to database icinga_web for icinga_web@localhost: success.
verifying access for icinga_web@localhost: success.
creating database icinga_web: success.
verifying database icinga_web exists: success.
populating database via sql…  done.
dbconfig-common: flushing administrative password

Creating config file /etc/icinga-web/conf.d/database-web.xml with new version
database config successful: /etc/icinga-web/conf.d/database-web.xml

Creating config file /etc/icinga-web/conf.d/database-ido.xml with new version
database config successful: /etc/icinga-web/conf.d/database-ido.xml
enabling config for webserver apache2…
Enabling module rewrite.
To activate the new configuration, you need to run:
  service apache2 restart
`/etc/apache2/conf.d/icinga-web.conf' -> `../../icinga-web/apache2.conf'
[ ok ] Reloading web server config: apache2 not running.
root password updates successfully!
Basedir: /usr Cachedir: /var/cache/icinga-web
Cache already purged!

3. Enable Apache mod_rewrite


debian:~# a2enmod rewrite
debian:~# /etc/init.d/apache2 restart


4. Icinga documentation files

Some key hints on Enabling some more nice Icinga features are mentioned in Icinga README files, check out, all docs files included with Icinga separate packs are into:
 

debian:~# ls -ld *icinga*/
drwxr-xr-x 3 root root 4096 Jun  3 10:48 icinga-common/
drwxr-xr-x 3 root root 4096 Jun  3 10:48 icinga-core/
drwxr-xr-x 3 root root 4096 Jun  3 10:48 icinga-idoutils/
drwxr-xr-x 2 root root 4096 Jun  3 10:48 icinga-web/

debian:~# less /usr/share/doc/icinga-web/README.Debian debian:~# less /usr/share/doc/icinga-idoutils/README.Debian

5. Configuring Icinga

Icinga configurations are separated in two directories:

debian:~# ls -ld *icinga*

drwxr-xr-x 4 root root 4096 Jun  3 10:50 icinga
drwxr-xr-x 3 root root 4096 Jun  3 11:07 icinga-web

>

etc/icinga/ – (contains configurations files for on exact icinga backend server behavior)


/etc/icinga-web – (contains all kind of Icinga Apache configurations)
Main configuration worthy to look in after install is /etc/icinga/icinga.cfg.

6. Accessing newly installed Icinga via web

To access just installed Icinga, open in browser URL – htp://localhost/icinga-web

icinga web login screen in browser debian gnu linux

logged in inside Icinga / Icinga web view and control frontend


7. Monitoring host services with Icinga (NRPE)

As fork of Nagios. Icinga has similar modular architecture and uses number of external plugins to Monitor external host services list of existing plugins is on Icinga's wiki here.
Just like Nagios Icinga supports NRPE protocol (Nagios Remote Plugin Executor). To setup NRPE, nrpe plugin from nagios is used (nagios-nrpe-server). 

To install NRPE on any of the nodes to be tracked;
debian: ~# apt-get install –yes nagios-nrpe-server

 Then to configure NRPE edit /etc/nagios/nrpe_local.cfg


Once NRPE is supported in Icinga, you can install on Windows or Linux hosts NRPE clients like in Nagios to report on server processes state and easily monitor if server disk space / load or service is in critical state.

How to disable ACPI (power saving) support in FreeBSD / Disable acpi on BSD kernel boot time

Tuesday, May 15th, 2012

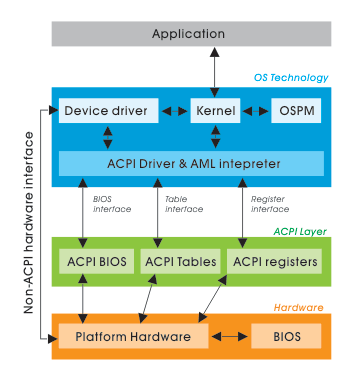
FreeBSD disable ACPI how ACPI Basic works basic diagram

On FreeBSD the default kernel is compiled to support ACPI. Most of the modern PCs has already embedded support for ACPI power saving instructions.
Therefore a default installed FreeBSD is trying to take advantage of this at cases and is trying to save energy.
This is not too useful on servers, because saving energy could have at times a bad impact on server performance if the server is heavy loaded at times and not so loaded at other times of the day.

Besides that on servers saving energy shouldn't be the main motivator but server stability and productivity is. Therefore in my personal view on FreeBSD used on servers it is better to disable complete the ACPI in order to disable CPU fan control to change rotation speeds all the time from low to high rotation cycles and vice versa at times of low / high server load.

Another benefit of removing the ACPI support on a server is this would probably increase the CPU fan life span and possibly prevent the CPU to be severely heated at times.

Moreover, some piece of hardware might have troubles in properly supporting ACPI specifications and thus ACPI could be a reason for unexpected machine hang ups.

With all said I would recommend to anyone willing to use BSD for a server to disable the ACPI (Advanced Configuration and Power Interface), just like I did.

Here is how;

1. Quick review on how ACPI is handled on FreeBSD

acpi support is being handled on FreeBSD by a number of loadable kernel modules, here is a complete list of all the kernel modules dealins with acpi:

freebsd# cd /boot
freebsd# find . -iname '*acpi*.ko'
./kernel/acpi.ko
./kernel/acpi_aiboost.ko
./kernel/acpi_asus.ko
./kernel/acpi_fujitsu.ko
./kernel/acpi_ibm.ko
./kernel/acpi_panasonic.ko
./kernel/acpi_sony.ko
./kernel/acpi_toshiba.ko
./kernel/acpi_video.ko
./kernel/acpi_dock.ko

By default on FreeBSD, if hardware has some support for ACPI the acpi gets activated by acpi.ko kernel module. The specific type of vendors specific ACPI like IBM, ASUS, Fujitsu are controlled by the respective kernel module from the list …

Hence, to control if ACPI is loaded or not on a FreeBSD system with no need to reboot one can use kldload, kldunload module management BSD cmds.

a) Check if acpi is loaded on a BSD

freebsd# kldstatkldstat | grep -i acpi
9 1 0xc9260000 57000 acpi.ko

b) unload kernel enabled ACPI support

freebsd# kldunload acpi

c) Load acpi support (not the case with me but someone might need it, if for instance BSD is running on laptop)

freebsd# kldload acpi

2. Disabling ACPI to load on bootup on BSD

a) In /boot/loader.conf add the following variables:

hint.acpi.0.disabled="1"
hint.p4tcc.0.disabled=1
hint.acpi_throttle.0.disabled=1


b) in /boot/device.hints add:

hint.acpi.0.disabled="1"

c) in /boot/defaults/loader.conf make sure:

##############################################################
### ACPI settings ##########################################
##############################################################
acpi_dsdt_load="NO" # DSDT Overriding
acpi_dsdt_type="acpi_dsdt" # Don't change this
acpi_dsdt_name="/boot/acpi_dsdt.aml"
# Override DSDT in BIOS by this file
acpi_video_load="NO" # Load the ACPI video extension driver

d) disable ACPI thermal monitoring

It is generally a good idea to disable the ACPI thermal monitoring, as many machines hardware does not support it.

To do so in /boot/loader.conf add

debug.acpi.disabled="thermal"

If you want to learn more on on how ACPI is being handled on BDSs check out:

freebsd# man acpi

Other alternative method to permanently wipe out ACPI support is by not compiling ACPI support in the kernel.
If that's the case in /usr/obj/usr/src/sys/GENERIC make sure device acpi is commented, e.g.:

##device acpi


How to find out all programs bandwidth use with (nethogs) top like utility on Linux

Friday, September 30th, 2011

Just run across across a super nice top like, program for system administrators, its called nethogs and is definitely entering my “l337” admin outfit next to tools like iftop, nettop, ettercap, darkstat htop, iotop etc.

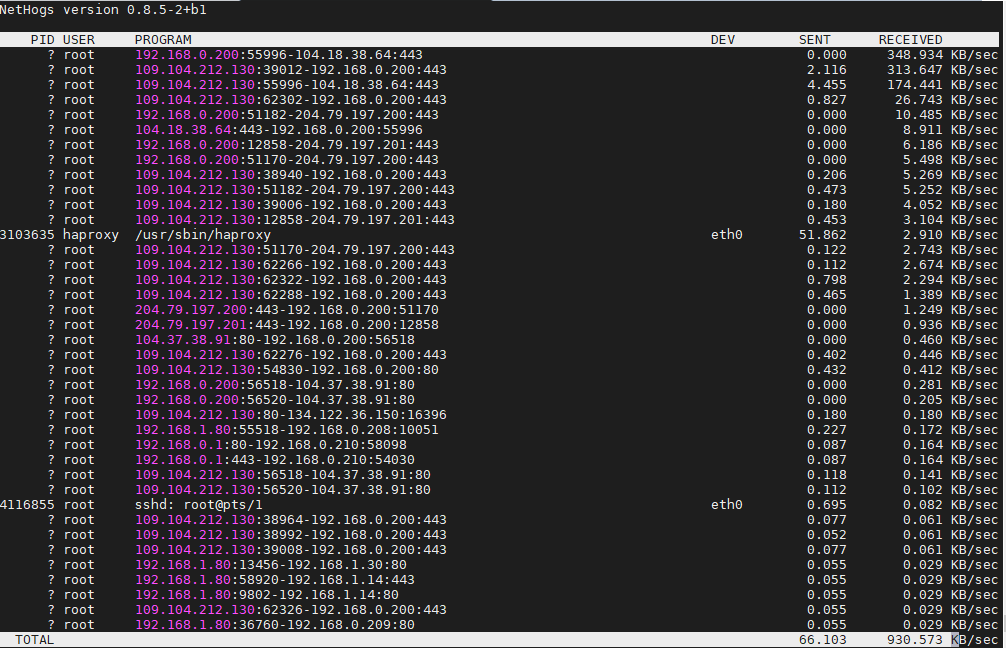
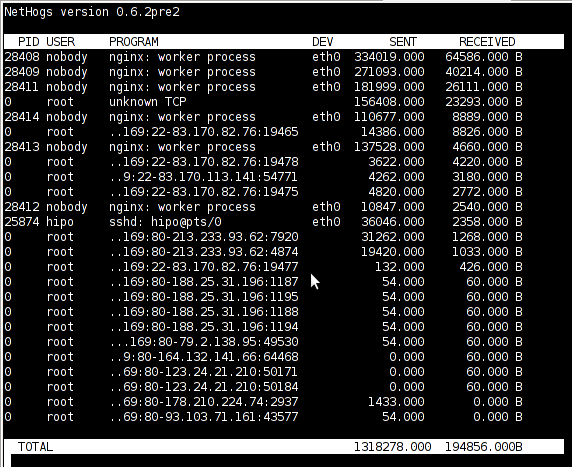
nethogs is ultra easy to use, to get immediately in console statistics about running processes UPLOAD and DOWNLOAD bandwidth consumption just run it:

linux:~# nethogs

Nethogs screenshot on Linux Server with Nginx
Nethogs running on Debian GNU/Linux serving static web content with Nginx

If you need to check what program is using what amount of network bandwidth, you will definitely love this tool. Having information of bandwidth consumption is also viewable partially with iftop, however iftop is unable to track the bandwidth consumption to each process using the network thus it seems nethogs is unique at what it does.

Nethogs supports IPv4 and IPv6 as well as supports network traffic over ppp. The tool is available via package repositories for Debian GNU/Lenny 5 and Debian Squeeze 6.

To install Nethogs on CentOS and Fedora distributions, you will have to install it from source. On CentOS 5.7, latest nethogs which as of time of writting this article is 0.8.0 compiles and installs fine with make && make install commands.

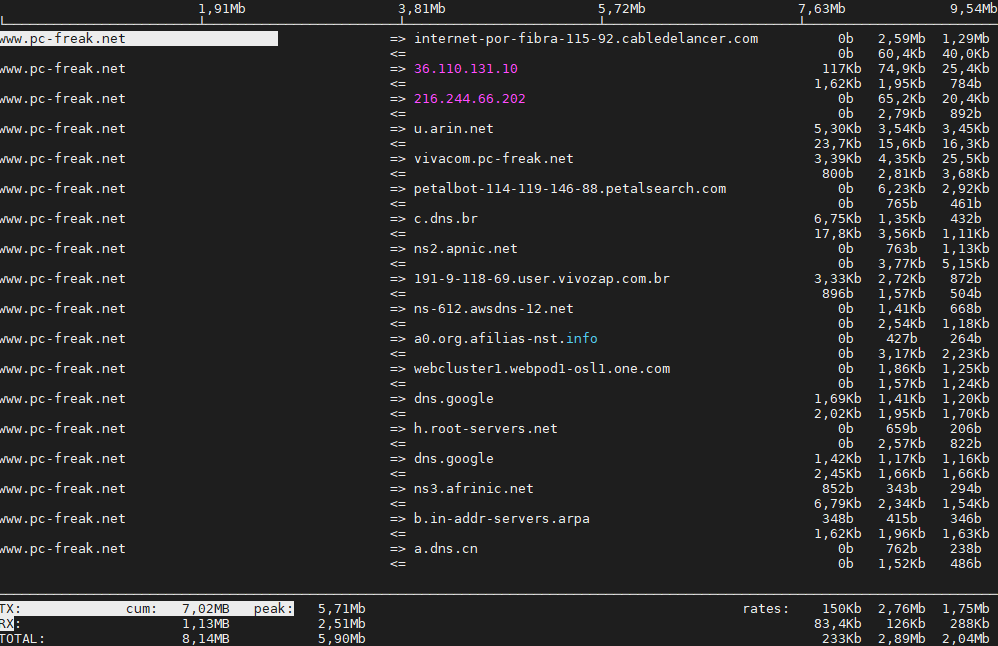
In the manner of thoughts of network bandwidth monitoring, another very handy tool to add extra understanding on what kind of traffic is crossing over a Linux server is jnettop
jnettop shows which hosts/ports is taking up the most network traffic.
It is available for install via apt in Debian 5/6).

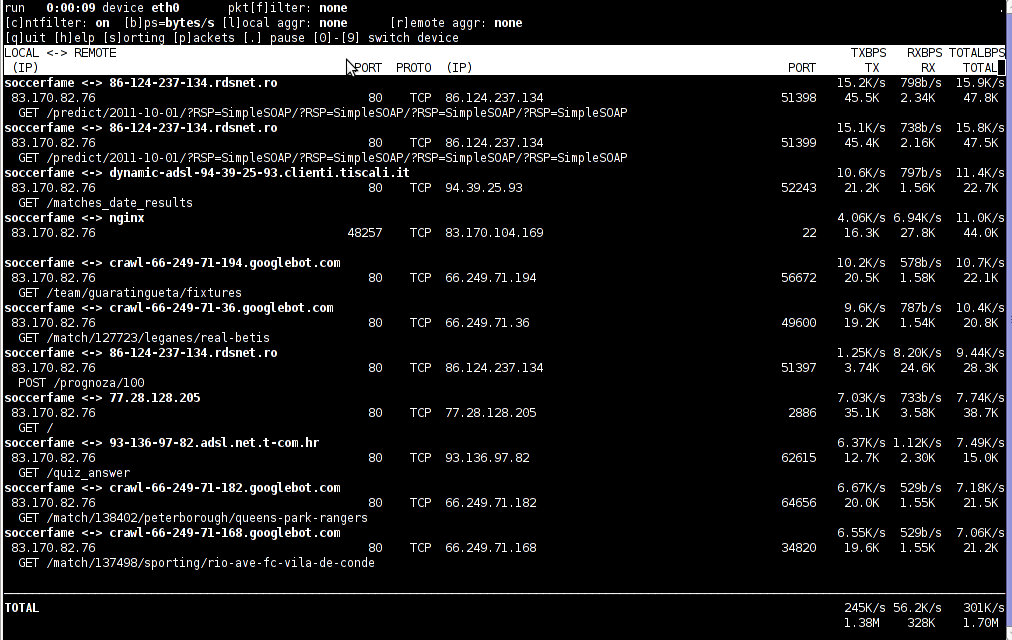
Here is a screenshot on jnettop in action:

Jnettop check network traffic in console

To install jnettop on latest Fedoras / CentOS / Slackware Linux it has to be download and compiled from source via jnettop’s official wiki page
I’ve tested jnettop install from source on CentOS release 5.7 and it seems to compile just fine using the usual compile commands:

[root@prizebg jnettop-0.13.0]# ./configure
...
[root@prizebg jnettop-0.13.0]# make
...
[root@prizebg jnettop-0.13.0]# make install

If you need to have an idea on the network traffic passing by your Linux server distringuished by tcp/udp/icmp network protocols and services like ssh / ftp / apache, then you will definitely want to take a look at nettop (if of course not familiar with it yet).
Nettop is not provided as a deb package in Debian and Ubuntu, where it is included as rpm for CentOS and presumably Fedora?
Here is a screenshot on nettop network utility in action:

Nettop server traffic division by protocol screenshot
FreeBSD users should be happy to find out that jnettop and nettop are part of the ports tree and the two can be installed straight, however nethogs would not work on FreeBSD, I searched for a utility capable of what Nethogs can, but couldn’t find such.
It seems the only way on FreeBSD to track bandwidth back and from originating process is using a combination of iftop and sockstat utilities. Probably there are other tools which people use to track network traffic to the processes running on a hos and do general network monitoringt, if anyone knows some good tools, please share with me.