Posts Tagged ‘linux servers’

Get Hardware System info on Debian Linux / How to detecting hardware and servers model on GNU / Linux

Wednesday, December 12th, 2012

hardware-info-getting-on-linux-howto

Users who are novice to Linux should be probably interested on how to get a decent Hardware System Information. Getting system info on Windows is quite straight forward, however on Linux and especially on Linux servers it is a bit confusing at first and even for people who spend years administrating Linux servers, or even have a Linux desktop it is very likely after a period of time to forget how exactly last time got the hardware system information. I'm administrating Linux servers and running a linux desktop for already almost 11 years and often it happened I'm away from configuring a new server for a year, or even when configuring a new server I don't need to get exact system information from command line, as I know it already from the server hardware manual. However whether managing a bunch of dedicated servers or purchasing new systems which are physically away and someone pre-configured the server with some basis Linux install, often a very raw info is provided by the Dedicated Provider on exact server metrics. Other situation, where it is good idea to have a precise system hardware vendor information on a server, is if you just joined a company with a bunch of existing dedicated servers, whose exact hardware configuration is no documented anywhere and suddenly some RAID or piece of hardware located on 1 of the 100 dedicated servers starts misbehaving causing hour down-times and client important data loss.

In any of those cases it always takes me few times of research to find out what exact methodology I used to get the hardware info last time. To make my life for future times easier and not loose the few minutes of research and reading on how to get Linux server system information I decided to write this short article, which might hopefully be useful to others out there who face similar periodic questioning on what was the command to get hardware system info.

Of course the general commands to get some general overview on a Linux server as anyone knows are:

a. dmesg
b. cat /proc/cpuinfo
c. lspci
d. lsusb
c. free -m

A note to make here is that in order to have lsusb and lspci commands present you will have to have installed the deb packs lsusb and pciutils.

However as I prior said, this tools output is not enough or the output is not enough systematic and hard to read and understand especially for lazy or short memory admins like me. Thus it is worthy to mention few others which can be installed as a separate packages and gives more structured and very precised information on what kind of machine hardware you're accessing through ssh.

Here is the list of all of profiled hardware detection progs and scripts:

1. dmidecode

2. lshw

3. x86info

4. hwinfo

5. hardinfo

6. biosdecode


To install all of them in a raw with apt-get do:

debian:~# apt-get install --yes dmidecode lshw x86info hwinfo hardinfo superiotool
Reading package lists... Done
Building dependency tree      
Reading state information... Done
dmidecode is already the newest version.
hardinfo is already the newest version.
lshw is already the newest version.
The following extra packages will be installed:
  libhd16
The following NEW packages will be installed:
  hwinfo libhd16 superiotool x86info
0 upgraded, 4 newly installed, 0 to remove and 9 not upgraded.
Need to get 827 kB of archives.
After this operation, 4,506 kB of additional disk space will be used.
Get:1 http://ftp.uk.debian.org/debian/ squeeze/main libhd16 amd64 16.0-2 [696 kB]
Get:2 http://ftp.uk.debian.org/debian/ squeeze/main hwinfo amd64 16.0-2 [46.6 kB]
Get:3 http://ftp.uk.debian.org/debian/ squeeze/main superiotool amd64 0.0+r5050-1 [43.0 kB]
Get:4 http://ftp.uk.debian.org/debian/ squeeze/main x86info amd64 1.25-1 [40.9 kB]
Fetched 827 kB in 2s (378 kB/s)  
Selecting previously deselected package libhd16.
(Reading database ... 85783 files and directories currently installed.)
Unpacking libhd16 (from .../libhd16_16.0-2_amd64.deb) ...
Selecting previously deselected package hwinfo.
Unpacking hwinfo (from .../hwinfo_16.0-2_amd64.deb) ...
Selecting previously deselected package superiotool.
Unpacking superiotool (from .../superiotool_0.0+r5050-1_amd64.deb) ...
Selecting previously deselected package x86info.
Unpacking x86info (from .../x86info_1.25-1_amd64.deb) ...
Processing triggers for man-db ...
Setting up libhd16 (16.0-2) ...
Setting up hwinfo (16.0-2) ...
Setting up superiotool (0.0+r5050-1) ...
Setting up x86info (1.25-1) ...

Next just try to launch the tools one by one and check the content of the output, in my view  the most useful one and maybe also the most popular is dmidecode, the rest however might be useful to get specific hardware debug info.

1.  hwinfo

debian:~# hwinfo |tee -a server-hardware-info.txt
....

hwinfo will provide you a very long list of very thoroughful information on hardware. A lot of the info it shows however is not so useful for regular admins, but will be of high value to people who need to develop a new Linux driver for respective hardware.

2. lswh

debian:~# lshw > linux-hw-info.txt

lshw provides long list of debug information and if the output is not redirected to a file the screen gets flooded, if not piped to less. For that reason I will not paste output here.

3. x86info

debian:~# x86info

x86info v1.25.  Dave Jones 2001-2009
Feedback to <davej@redhat.com>.

Found 2 CPUs
————————————————————————–
CPU #1

EFamily: 0 EModel: 2 Family: 6 Model: 42 Stepping: 7
CPU Model: Unknown model.
Processor name string: Intel(R) Pentium(R) CPU G630 @ 2.70GHz
Type: 0 (Original OEM)    Brand: 0 (Unsupported)
Number of cores per physical package=8
Number of logical processors per socket=16
Number of logical processors per core=2
APIC ID: 0x0    Package: 0  Core: 0   SMT ID 0
————————————————————————–
CPU #2
EFamily: 0 EModel: 2 Family: 6 Model: 42 Stepping: 7
CPU Model: Unknown model.
Processor name string: Intel(R) Pentium(R) CPU G630 @ 2.70GHz
Type: 0 (Original OEM)    Brand: 0 (Unsupported)
Number of cores per physical package=8
Number of logical processors per socket=16
Number of logical processors per core=2
APIC ID: 0x2    Package: 0  Core: 0   SMT ID 2
————————————————————————–
WARNING: Detected SMP, but unable to access cpuid driver.
Used Uniprocessor CPU routines. Results inaccurate.

As you see x86info, mainly provides information on CPU Cache, exact model, family AND APIC (don't mix it with ACPI – advanced power management interface)
APIC is a chip that remaps IOs and IRQs of your computer to the CPU(s), thus in most cases it is more of not so needed debug information.

4. biosdecode

debian:~#  biosdecode
# biosdecode 2.9
ACPI 2.0 present.
    OEM Identifier: LENOVO
    RSD Table 32-bit Address: 0xBCD9C028
    XSD Table 64-bit Address: 0x00000000BCD9C068
SMBIOS 2.6 present.
    Structure Table Length: 2233 bytes
    Structure Table Address: 0x000EBB70
    Number Of Structures: 59
    Maximum Structure Size: 184 bytes
PNP BIOS 1.0 present.
    Event Notification: Not Supported
    Real Mode 16-bit Code Address: F000:BC66
    Real Mode 16-bit Data Address: F000:0000
    16-bit Protected Mode Code Address: 0x000FBC8E
    16-bit Protected Mode Data Address: 0x000F0000
PCI Interrupt Routing 1.0 present.
    Router ID: 00:1f.0
    Exclusive IRQs: None
    Compatible Router: 8086:27b8
    Slot Entry 1: ID 00:1f, on-board
    Slot Entry 2: ID 00:1b, on-board
    Slot Entry 3: ID 00:16, on-board
    Slot Entry 4: ID 00:1c, on-board
    Slot Entry 5: ID 02:00, slot number 21
    Slot Entry 6: ID 00:01, on-board
    Slot Entry 7: ID 00:06, on-board
    Slot Entry 8: ID 00:1d, on-board
    Slot Entry 9: ID 00:1a, on-board
    Slot Entry 10: ID 03:00, on-board
    Slot Entry 11: ID 00:02, on-board
    Slot Entry 12: ID 00:00, on-board

As you see biosdecode, also provides a lot of hex addresses, also reports on the exact CPU architecture on the system.

The line   XSD Table 64-bit Address: 0x00000000BCD9C068, indicated the host is running a 64 bit CPU, most of the rest info like Slot entries IDs etc. is not so useful.

The most useful info that biosdecode provides is the exact type of BIOS (Basic Input Output System) bundled with the system in my case the BIOS is running on a Lenovo host and is vendored by Lenovo, thus it shows in the cmd output:

OEM Identifier: LENOVO

5. hardinfo

debian:~# hardinfo | tee -a hardware-info.txt
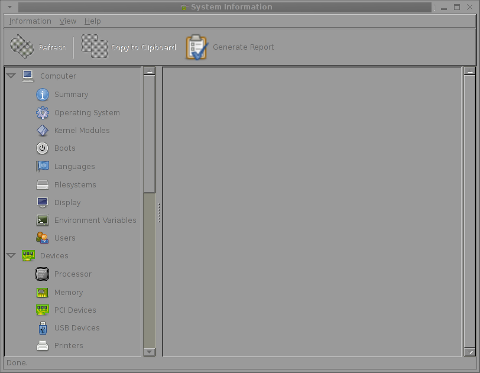

hardinfo gnome screenshot debian gnu / linux

HardInfo is the GNOME GTK+ program which displays robust and thouroughful info in same was as Windows System Info does on  GNOME Desktop. If however you run it under console or via ssh it does display what it detects as: 

Computer hardware, operating system, kernel modules, supported system languages, existing filesystems, Display, set environment variables, Existing system users, Processor type, Memory, PCI and USB devices, Printers (if attached), Battery type (if run on laptop), Storage, Other Input devices

hardinfo, does a few benchmarking tests using CPU stress test algorithms to do Blowfish encryption, CryptoHash, Fibonacci, N-Queens, FPU FFT and FPU raytracing. This benchmark values, if run on a couple of hosts can be used to compare different hardware performances.

6. dmidecode

debian: # dmidecode > system-hware-info.txt

The output from dmidecode is very very detailed and verbose. Though along with the useful info there is plenty of debug information, the debug information it provides is much user friendly / user comprehensible than the rest of tools, thus I guess dmidecode is nowadays preferred by me and probably most of the Linux sys admins.

debian:~# dmidecode |head -n 34
# dmidecode 2.9
SMBIOS 2.6 present.
59 structures occupying 2233 bytes.
Table at 0x000EBB70.

Handle 0x0000, DMI type 0, 24 bytes
BIOS Information
    Vendor: LENOVO
    Version: 9QKT37AUS
    Release Date: 02/14/2012
    Address: 0xF0000
    Runtime Size: 64 kB
    ROM Size: 2560 kB
    Characteristics:
        PCI is supported
        BIOS is upgradeable
        BIOS shadowing is allowed
        Boot from CD is supported
        Selectable boot is supported
        BIOS ROM is socketed
        EDD is supported
        5.25"/1.2 MB floppy services are supported (int 13h)
        3.5"/720 KB floppy services are supported (int 13h)
        3.5"/2.88 MB floppy services are supported (int 13h)
        Print screen service is supported (int 5h)
        8042 keyboard services are supported (int 9h)
        Serial services are supported (int 14h)
        Printer services are supported (int 17h)
        ACPI is supported
        USB legacy is supported
        BIOS boot specification is supported
        Targeted content distribution is supported
    BIOS Revision: 0.37
 

Though it is the most useful tool on some hardware configurations it might not display any data because the BIOS is lacking a DMI implementation.

In almost all cases dmidecode is enough to check what kind of hardware you have ssh-ed to. dmidecode is available also not only on Debian but on Fedora and almost all (if not all Linux distros), through default repositories.

Optimizing Linux TCP/IP Networking to increase Linux Servers Performance

Tuesday, April 8th, 2008

optimize-linux-servers-for-network-performance-to-increase-speed-and-decrease-hardware-costs-_tyan-exhibits-hpc-optimized-server-platforms-featuring-intel-xeon-processor-e7-4800-v3-e5-2600-supercomputing-15_full

Some time ago I thought of ways to optimize my Linux Servers network performance.

Even though there are plenty of nice articles on the topic on how to better optimize Linux server performance by tunning up the kernel sysctl (variables).

Many of the articles I found was not structed in enough understandable way so I decided togoogle around and  found few interesting websites which gives a good overview on how one can speed up a bit and decrease overall server loads by simply tuning few basic kernel sysctl variables.

Below article is a product of my research on the topic on how to increase my GNU / Linux servers performance which are mostly running LAMP (Linux / Apache / MySQL / PHP) together with Qmail mail servers.

The article is focusing on Networking as networking is usual bottleneck for performance.
Below are the variables I found useful for optimizing the Linux kernel Network stack.

Implementing the variables might reduce your server load or if not decrease server load times and CPU utilization, they would at lease increase thoroughput so more users will be able to access your servers with (hopefully) less interruptions.
That of course would save you some Hardware costs and raise up your Servers efficiency.

Here are the variables themselves and some good example:
 

# values.net.ipv4.ip_forward = 0 ( Turn off IP Forwarding )

net.ipv4.conf.default.rp_filter = 1

# ( Control Source route verification )
net.ipv4.conf.default.accept_redirects = 0

# ( Disable ICMP redirects )
net.ipv4.conf.all.accept_redirects = 0 ( same as above )
net.ipv4.conf.default.accept_source_route = 0

# ( Disable IP source routing )
net.ipv4.conf.all.accept_source_route = 0
( - || - )net.ipv4.tcp_fin_timeout = 40

# ( Decrease FIN timeout ) - Useful on busy/high load
serversnet.ipv4.tcp_keepalive_time = 4000 ( keepalive tcp timeout )
net.core.rmem_default = 786426 - Receive memory stack size ( a good idea to increase it if your server receives big files )
net.ipv4.tcp_rmem = "4096 87380 4194304"
net.core.wmem_default = 8388608 ( Reserved Memory per connection )
net.core.wmem_max = 8388608
net.core.optmem_max = 40960
( maximum amount of option memory buffers )

# like a homework investigate by yourself what the variables below stand for :)
net.ipv4.tcp_max_tw_buckets = 360000
net.ipv4.tcp_reordering = 5
net.core.hot_list_length = 256
net.core.netdev_max_backlog = 1024


# Below are newly added experimental
#net.core.rmem_max = 16777216
#net.core.wmem_max = 16777216
##kernel.msgmni = 1024
##kernel.sem = 250 256000 32 1024
##vm.swappiness=0
kernel.sched_migration_cost=5000000


Also a good sysctl.conf file which one might want to substitite or use as a skele for some productive server is ready for download here


Even if you can't reap out great CPU reduction benefits from integrating above values or similar ones, your overall LAMP performance to end customers should increase – at some occasions dramatically, at others little bit but still noticable.

If you're unsure on exact kernel variable values to use check yourself what should be the best values that fits you according to your server Hardware – usually this is done by experimenting and reading the kernel documentation as provided for each one of uplisted variables.

Above sysctl.conf is natively created to run on Debian and on other distributions like CentOS, Fedora Slackware some values might either require slight modifications.

Hope this helps and gives you some idea of how network optimization in Linux is usually done. Happy (hacking) tweakening !

Speeding up Apache through apache2-mpm-worker and php5-cgi on Debian / How to improve Apache performance and decrease server memory consumption

Friday, March 18th, 2011

speeding up apache through apache2-mpm-worker and php5-cgi on Debian Linux / how to improve apache performance and decrease server responce time
By default most Apache running Linux servers on the Internet are configured to use with the mpm prefork apache module
Historically prefork apache module is the predecessor of the worker module therefore it's believed to be a way more tested and reliable, if you need a critical reliable webserver configuration.

However from my experience by so far with the Apache MPM Worker I can boldly say that many of the rumors concerning the unreliabity of apache2-mpm-worker are just myths.

The old way Apache handles connections e.g. the mod prefork is the well known way that high amount of the daemons on Linux and BSD are still realying on.
When prefork is a used by Apache, every new TCP/IP connection arriving at your Linux server on the Apache configured port let's say on port 80 is being served by Apache in a way that the Apache process (mother process) parent does fork a new Apache parent copy in order to serve the new request.
Thus by using the prefork Apache needs to fork new process (if it doesn't have already an empty forked one waiting for connections) and serve the HTTP request of the new client, after the request of the client is completed the newly forked Apache usually dies (even though it again depends on the way the Apache server is configured via the Apache configuration – apache2.conf / httpd.conf etc.).

Now you can imagine how slow and memory consuming it is that all the time the parent Apache process spawns new processes, kills old ones etc. in order to fulfill the client requests.

Now just to compare the Apace mpm prefork does not use the old forking way, but relies on a few Apache processes which handles all the requests without constantly being destroyed and recreated like with the prefork module.
This saves operations and system resources, threaded programming has already been proven to be more efficient way to handle tasks and is heavily adopted in GUI programming for instance in Microsoft Windows, Mac OS X, Linux Gnome, KDE etc.

There is plenty of information and statistical data which compares Apache running with prefork and respectively worker modules online.
As the goal of this article is not to went in depths with this kind of information I would not say more on it but let you explore online a bit more about them in case if you're interested.

The purpose of this article is to explain in short how to substitute the Apache2-MPM-Prefork and how your server performance could benefit out of the use of Apache2-MPM-Worker.
On Debian the default Apache process serving module in Apache 1.3x,Apache 2.0x and 2.2x is prefork thus the installation of apache2-mpm-worker is not "a standard way" to install Apache

Deciding to swith from the default Debian apache-mpm-prefork to apache-mpm-worker is quite a serious and responsible decision and in some cases might cause troubles, if you have decided to follow my article be sure to consider all the possible negative consequences of switching to the apache worker !

Now after having said a bunch of info which might be not necessary with the experienced system admin I'll continue on with the steps to install the apache2-mpm-worker.

1. Install the apache2-mpm-worker

debian:~# apt-get install apache2-mpm-worker php5-cgi
Reading state information... Done
The following packages were automatically installed and are no longer required:
The following packages will be REMOVED apache2-mpm-prefork libapache2-mod-php5
The following NEW packages will be installed apache2-mpm-worker
0 upgraded, 1 newly installed, 2 to remove and 46 not upgraded.
Need to get 0B/259kB of archives.After this operation, 6193kB disk space will be freed.

As you can notice in below's text confirmation which will appear you will have to remove the apache2-mpm-prefork and the apache2-mpm-worker modules before you can proceed to install the apache2-mpm-prefork.

You might ask yourself if I remove my installed libphp how would I be able to use my Apache with my PHP based websites? And why does the apt package manager requires the libapache2-mod-php5 to get removed.
The explanation is simple apache2-mpm-worker is not thread safe, in other words scripts which does use the php fork(); function would not work correctly with the Apache worker module and will probably be leading to PHP and Apache crashes.
Therefore in order to install the apache mod worker it's necessary that no libapache2-mod-php5 is existent on the system.
In order to have a PHP installed on the server again you will have to use the php5-cgi deb package, this is the reason in the above apt-get command I'm also requesting apt to install the php5-cgi package next to apache2-mpm-worker.

2. Enable the cgi and cgid apache modules

debian:~# a2enmod cgi
debian:~# a2enmod cgid

3. Activate the mod_actions apache modules

debian:~# cd /etc/apache2/mods-enabled
debian:~# ln -sf ../mods-available/actions.load
debian:~# ln -sf ../mods-available/actions.conf

4. Add configuration options in order to enable mod worker to use the newly installed php5-cgi

Edit /etc/apache2/mods-available/actions.conf vim, mcedit or nano (e.g. your editor of choice and add inside:

&ltIfModule mod_actions.c>
Action application/x-httpd-php /cgi-bin/php5
</IfModule>

After completing all the above instructions, you might also need to edit your /etc/apache2/apache2.conf to tune up, how your Apache mpm worker will serve client requests.
Configuring the <IfModule mpm_worker_module> in apache2.conf is necessary to optimize your newly installed mpm_worker module for performance.

5. Configure the mod_worker_module in apache2.conf One example configuration for the mod worker is:

<IfModule mpm_worker_module>
StartServers 2
MaxClients 150
MinSpareThreads 25
MaxSpareThreads 75
ThreadsPerChild 25
MaxRequestsPerChild 0
</IfModule>

Consider the fact that this configuration is just a sample and it's in no means configured for serving Apache requests for high load Apache servers and you need to further play with the values to have a good results on your server.

6. Check that all is fine with your Apache configurations and no syntax errors are encountered

debian:~# /usr/sbin/apache2ctl -t
Syntax OK

If you get something different from Syntax OK track the error and fix it before you're ready to restart the Apache server.

7. Now restart the Apache server

debian:~# /etc/init.d/apache2 restart

All should run fine and hopefully your PHP scripts should be interpreted just fine through the php5-cgi instead of the libapache2-mod-php5.
Using the /usr/bin/php5-cgi will increase with some percentage your server CPU load but on other hand will drasticly decrease the Webserver memory consumption.
That's quite logical because the libapache2-mod-hp5 is loaded once during apache server whether a new instance of /usr/bin/php5-cgi is invoked during each of Apache requests via the mod worker.

There is one serious security flow coming with php5-cgi, DoS against a server processing scripts through php5-cgi is much easier to be achieved.
An example for a denial attack which could affect a website running with mod worker and php5-cgi, could be simulated from a simple user with a web browser which holds up the f5 or ctrl + r browser page refresh buttons.
In that case whenever php5-cgi is used the CPU load would rise drastic, one possible solution to this denial of service issues is by installing and using libapache2-mod-evasive like so:

8. Install libapache2-mod-evasive

debian:~# apt-get install libapache2-mod-evasive
The Apache mod evasive module is a nice apache module to minimize HTTP DoS and brute force attacks.
Now with mod worker through the php5-cgi, your apache should start serving requests more efficiently than before.
For some performance reasons some might even want to try out the fastcgi with the worker to boost the Apache performance but as I have never tried that I can't say how reliable a a mod worker with a fastcgi would be.

N.B. ! If you have some specific php configurations within /etc/php5/apache2/php.ini you will have to set them also in /etc/php5/cgi/php.ini before you proceed with the above instructions to install Apache otherwise your PHP scripts might not work as expected.

Mod worker is also capable to work with the standard mod php5 Apache module, but if you decide to go this route you will have to recompile your PHP lib manually from source as in Debian this option is not possible with the default php library.
This installation worked fine on Debian Lenny but suppose the same installation should work fine on Debian Squeeze as well as Debian testing/unstable.
Feedback on the afore-described mod worker installation is very welcome!

Auto restart Apache on High server load (bash shell script) – Fixing Apache server temporal overload issues

Saturday, March 24th, 2012

auto-restart-apache-on-high-load-bash-shell-script-fixing-apache-temporal-overload-issues

I've written a tiny script to check and restart, Apache if the server encounters, extremely high load avarage like for instance more than (>25). Below is an example of a server reaching a very high load avarage:;

server~:# uptime
13:46:59 up 2 days, 18:54, 1 user, load average: 58.09, 59.08, 60.05
load average: 0.09, 0.08, 0.08

Sometimes high load avarage is not a problem, as the server might have a very powerful hardware. A high load numbers is not always an indicator for a serious problems. Some 16 CPU dual core (2.18 Ghz) machine with 16GB of ram could probably work normally with a high load avarage like in the example. Anyhow as most servers are not so powerful having such a high load avarage, makes the machine hardly do its job routine.

In my specific, case one of our Debian Linux servers is periodically reaching to a very high load level numbers. When this happens the Apache webserver is often incapable to serve its incoming requests and starts lagging for clients. The only work-around is to stop the Apache server for a couple of seconds (10 or 20 seconds) and then start it again once the load avarage has dropped to less than "3".

If this temporary fix is not applied on time, the server load gets increased exponentially until all the server services (ssh, ftp … whatever) stop responding normally to requests and the server completely hangs …

Often this server overloads, are occuring at night time so I'm not logged in on the server and one such unexpected overload makes the server unreachable for hours.
To get around the sudden high periodic load avarage server increase, I've written a tiny bash script to monitor, the server load avarage and initiate an Apache server stop and start with a few seconds delay in between.

#!/bin/sh
# script to check server for extremely high load and restart Apache if the condition is matched
check=`cat /proc/loadavg | sed 's/\./ /' | awk '{print $1}'`
# define max load avarage when script is triggered
max_load='25'
# log file
high_load_log='/var/log/apache_high_load_restart.log';
# location of inidex.php to overwrite with temporary message
index_php_loc='/home/site/www/index.php';
# location to Apache init script
apache_init='/etc/init.d/apache2';
#
site_maintenance_msg="Site Maintenance in progress - We will be back online in a minute";
if [ $check -gt "$max_load" ]; then>
#25 is load average on 5 minutes
cp -rpf $index_php_loc $index_php_loc.bak_ap
echo "$site_maintenance_msg" > $index_php_loc
sleep 15;
if [ $check -gt "$max_load" ]; then
$apache_init stop
sleep 5;
$apache_init restart
echo "$(date) : Apache Restart due to excessive load | $check |" >> $high_load_log;
cp -rpf $index_php_loc.bak_ap $index_php_loc
fi
fi

The idea of the script is partially based on a forum thread – Auto Restart Apache on High Loadhttp://www.webhostingtalk.com/showthread.php?t=971304Here is a link to my restart_apache_on_high_load.sh script

The script is written in a way that it makes two "if" condition check ups, to assure 100% there is a constant high load avarage and not just a temporal 5 seconds load avarage jump. Once the first if is matched, the script first tries to reduce the server load by overwritting a the index.php, index.html script of the website with a one stating the server is ongoing a maintenance operations.
Temporary stopping the index page, often reduces the load in 10 seconds of time, so the second if case is not necessery at all. Sometimes, however this first "if" condition cannot decrease enough the load and the server load continues to stay too high, then the script second if comes to play and makes apache to be completely stopped via Apache init script do 2 secs delay and launch the apache server again.

The script also logs about, the load avarage encountered, while the server was overloaded and Apache webserver was restarted, so later I can check what time the server overload occured.
To make the script periodically run, I've scheduled the script to launch every 5 minutes as a cron job with the following cron:

# restart Apache if load is higher than 25
*/5 * * * * /usr/sbin/restart_apache_on_high_load.sh >/dev/null 2>&1

I have also another system which is running FreeBSD 7_2, which is having the same overload server problems as with the Linux host.
Copying the auto restart apache on high load script on FreeBSD didn't work out of the box. So I rewrote a little chunk of the script to make it running on the FreeBSD host. Hence, if you would like to auto restart Apache or any other service on FreeBSD server get /usr/sbin/restart_apache_on_high_load_freebsd.sh my script and set it on cron on your BSD.

This script is just a temporary work around, however as its obvious that the frequency of the high overload will be rising with time and we will need to buy new server hardware to solve permanently the issues, anyways, until this happens the script does a great job 🙂

I'm aware there is also alternative way to auto restart Apache webserver on high server loads through using monit utility for monitoring services on a Unix system. However as I didn't wanted to bother to run extra services in the background I decided to rather use the up presented script.

Interesting info to know is Apache module mod_overload exists – which can be used for checking load average. Using this module once load avarage is over a certain number apache can stop in its preforked processes current serving request, I've never tested it myself so I don't know how usable it is. As of time of writting it is in early stage version 0.2.2
If someone, have tried it and is happy with it on a busy hosting servers, please share with me if it is stable enough?

Linux PHP Disable chmod() and chown() functions for better Apache server security

Monday, July 15th, 2013

php_tighten_security_by_enabling_safe_mode-php-ini-function-prevent-crackers-break-in-your-server
I have to administer few inherited Linux servers with Ubuntu and Debian Linux. The servers hosts mainly websites with regularly un-updated Joomlas and some custom developed websites which were developed pretty unsecure. To mitigate hacked websites I already disabled some of most insecure functions like system(); eval etc. – I followed literally my previous tutorial PHP Webhosting security disable exec();, system();, open(); and eval();
Still in logs I see shits like:
 

[error] [client 66.249.72.100] PHP Warning:  mkdir(): No such file or directory in /var/www/site/plugins/system/jfdatabase/intercept.jdatabasemysql.php on line 161

Hence to prevent PHP mkdir(); and chown(); functiosn being active, I had to turn on in /etc/php5/apache2/php.ini – safe_mode . For some reason whoever configured Apache leave it off.

safe_mode = on

Hopefully by disabling this functions will keep cracker bot scripts to not create some weird directory structures on HDD or use it as mean to DoS overflow servers filesystem.

Hope this help others stabilize their servers too. Enjoy ! 🙂

Maldetect – Malware web content file scanner for GNU / Linux – Keep your hosting servers Malware clean

Tuesday, June 4th, 2013

Linux malware detect scan for malware from commandline / Fedora, CentOS, Debian, Ubuntu 

It is so common nowadays that Shared hosting clients upload PHP / Javascript / Ajax scripts carelessly downloaded from somewhere containing malicious features or infected by third party script kiddie tools which replicate themselves after succesfully exploit some common PHP or Perl vulnerability. I'm sure even as time of writing this post probably millions of old un-updated Hosting Linux servers are silent Malware hives.
Therefore For Shared Hosting server servers it is useful to know about the existence of Maldetect – Linux Malware scanner also known under the name LMD.

Linux Maldetect – in what it does is very similar to Windows good Spyware Detect and Clean tool Malware Bytes. LMD uses Spyware definition database collected from network edge Intrusion detection systems who caught Web bugs commonly exploited as well as from custom user submissions of Malicious stuff. Maldetect's database can easily be exported and plays well together with ClamAV antivirus. LMD is very precious and is one of the must have outfits for hosting admins, as its use allows you to determine succesful cracking before system is rootkited and you have to audit for Backdoors or Rookit with rkhunter and chkroot

1. Install Linux MalDetect

LMD is young project so it does not still have a package deb and rpm package builds. Installation is done from source;

debian:~# wget http://www.rfxn.com/downloads/maldetect-current.tar.gz
debian:~# tar -xzf maldetect-current.tar.gz
debian:~# cd maldetect-*
debian:~# ./install.sh

Linux Malware Detect v1.4.1
            (C) 2002-2013, R-fx Networks <proj@r-fx.org>
            (C) 2013, Ryan MacDonald <ryan@r-fx.org>
inotifywait (C) 2007, Rohan McGovern <rohan@mcgovern.id.au>
This program may be freely redistributed under the terms of the GNU GPL

installation completed to /usr/local/maldetect
config file: /usr/local/maldetect/conf.maldet
exec file: /usr/local/maldetect/maldet
exec link: /usr/local/sbin/maldet
exec link: /usr/local/sbin/lmd
cron.daily: /etc/cron.daily/maldet

maldet(3143): {sigup} performing signature update check…
maldet(3143): {sigup} local signature set is version 201205035915
maldet(3143): {sigup} new signature set (2013060217799) available
maldet(3143): {sigup} downloaded http://www.rfxn.com/downloads/md5.dat
maldet(3143): {sigup} downloaded http://www.rfxn.com/downloads/hex.dat
maldet(3143): {sigup} downloaded http://www.rfxn.com/downloads/rfxn.ndb
maldet(3143): {sigup} downloaded http://www.rfxn.com/downloads/rfxn.hdb
maldet(3143): {sigup} downloaded http://www.rfxn.com/downloads/maldet-clean.tgz
maldet(3143): {sigup} signature set update completed
maldet(3143): {sigup} 11509 signatures (9641 MD5 / 1868 HEX)

2. Maldetect configs and binaries

Config is default installed in –  /usr/local/maldetect/conf.maldet
Main executed binary is placed in –  /usr/local/maldetect/maldet
There is a cron skele file placed in /etc/cron.daily/maldet. Its useful to run maldet via cron to check all sites on server and get e-mail reports.

3. Keep maldet up2date

debian:~# maldet --update-ver

Linux Malware Detect v1.4.2
            (C) 2002-2013, R-fx Networks <proj@r-fx.org>
            (C) 2013, Ryan MacDonald <ryan@r-fx.org>
inotifywait (C) 2007, Rohan McGovern <rohan@mcgovern.id.au>
This program may be freely redistributed under the terms of the GNU GPL v2

maldet(3511): {update} checking for available updates...
maldet(3511): {update} hashing install files and checking against server...
maldet(3511): {update} latest version already installed.

4. Update Maldetect definitions manually

Maldetect Malware definitions are designed to auto-update via cron. For people who don't like to waste CPU time and scrape on HDD with cronjob;

debian:~# maldet --update

5. Configure LMD

Tune according to your needs in config (/usr/local/maldetect/conf.maldet)

maxfilesize="768k"
email_alert=1
email_subj="Attention Malware found! Check your server!"
email_addr="hipo@www.pc-freak.net"

6. Scanning for Malware manually

debian:~# maldet -a /home,/var/www/blog,/sbin,/opt
....
Linux Malware Detect v1.4.2
(C) 2002-2013, R-fx Networks <proj@r-fx.org>
(C) 2013, Ryan MacDonald <ryan@r-fx.org>
inotifywait (C) 2007, Rohan McGovern <rohan@mcgovern.id.au>
This program may be freely redistributed under the terms of the GNU GPL v2

maldet(21709): {scan} signatures loaded: 11509 (9641 MD5 / 1868 HEX)
maldet(21709): {scan} building file list for /var/www/blog, this might take awhile...
maldet(21709): {scan} file list completed, found 6814 files...
maldet(21709): {scan} found ClamAV clamscan binary, using as scanner engine...
maldet(21709): {scan} scan of /var/www/blog (6814 files) in progress...

maldet(21709): {scan} scan completed on /var/www/blog: files 6814, malware hits 0, cleaned hits 0
maldet(21709): {scan} scan report saved, to view run: maldet --report 062813-1012.21709
...

As you see from above output  you can view Maldet report by issuing:

debian:~# maldet --report 062813-1012.21709

malware detect scan report for pcfreak:

SCAN ID: 070113-1223.7481

TIME: Jul  1 12:24:20 +0300

PATH: .

TOTAL FILES: 9164

TOTAL HITS: 326

TOTAL CLEANED: 0


NOTE: quarantine is disabled! set quar_hits=1 in conf.maldet or to quarantine results run:

debian:~# maldet -q 070113-1223.7481

FILE HIT LIST:

{CAV}Exploit.SafariCrash-1 : ./osX/dos/1715.html

{CAV}Exploit.PPC : ./osX/local/1973.pl

{CAV}Exploit.Perl.Sadmin : ./solaris/remote/101.pl

{CAV}Exploit.FirefoxCrash : ./multiple/dos/1716.html

{HEX}exp.linux.setuid.13 : ./multiple/local/7129.sh

{CAV}HTML.Shellcode : ./multiple/remote/2082.html


In case some badware is captured by Maldet to quarantine files run suggested command:

debian:~# maldet -q 070113-1223.7481

Linux Malware Detect v1.4.2

            (C) 2002-2013, R-fx Networks <proj@r-fx.org>

            (C) 2013, Ryan MacDonald <ryan@r-fx.org>

inotifywait (C) 2007, Rohan McGovern <rohan@mcgovern.id.au>

This program may be freely redistributed under the terms of the GNU GPL v2


maldet(21341): {quar} malware quarantined from './php/remote/2008.php' to '/usr/local/maldetect/quarantine/2008.php.19608'

maldet(21341): {clean} restoring /usr/local/maldetect/quarantine/2008.php.19608 for cleaning attempt

maldet(21341): {clean} trying to clean ./php/remote/2008.php with base64.inject.unclassed rule

maldet(21341): {clean} rescanning ./php/remote/2008.php for malware hits

maldet(21341): {clean} clean successful on ./php/remote/2008.php


Just for a close up below is a list of common 60 Malwares found on Hosting servers (taken from Maldetect Website);

base64.inject.unclassed     perl.ircbot.xscan
bin.dccserv.irsexxy         perl.mailer.yellsoft
bin.fakeproc.Xnuxer         perl.shell.cbLorD
bin.ircbot.nbot             perl.shell.cgitelnet
bin.ircbot.php3             php.cmdshell.c100
bin.ircbot.unclassed        php.cmdshell.c99
bin.pktflood.ABC123         php.cmdshell.cih
bin.pktflood.osf            php.cmdshell.egyspider
bin.trojan.linuxsmalli      php.cmdshell.fx29
c.ircbot.tsunami            php.cmdshell.ItsmYarD
exp.linux.rstb              php.cmdshell.Ketemu
exp.linux.unclassed         php.cmdshell.N3tshell
exp.setuid0.unclassed       php.cmdshell.r57
gzbase64.inject             php.cmdshell.unclassed
html.phishing.auc61         php.defash.buno
html.phishing.hsbc          php.exe.globals
perl.connback.DataCha0s     php.include.remote
perl.connback.N2            php.ircbot.InsideTeam
perl.cpanel.cpwrap          php.ircbot.lolwut
perl.ircbot.atrixteam       php.ircbot.sniper
perl.ircbot.bRuNo           php.ircbot.vj_denie
perl.ircbot.Clx             php.mailer.10hack
perl.ircbot.devil           php.mailer.bombam
perl.ircbot.fx29            php.mailer.PostMan
perl.ircbot.magnum          php.phishing.AliKay
perl.ircbot.oldwolf         php.phishing.mrbrain
perl.ircbot.putr4XtReme     php.phishing.ReZulT
perl.ircbot.rafflesia       php.pktflood.oey
perl.ircbot.UberCracker     php.shell.rc99
perl.ircbot.xdh             php.shell.shellcomm


Create Easy Data Backups with Rsnapshot back-up tool on GNU / Linux

Monday, April 15th, 2013


rsnapshot Linux and FreeBSD easy data backup tool logo
Backing up information on Linux servers is essential part of routine system adminsitrator job. Thus I decided to write for those interested in how one can easily create backups of important data through a tiny tool called rsnapshot which I prior used to make periodic data incremental backups on few of Debian Linux servers I manage. In case you wonder why use rsnapshot and not just rsync – the reasons are 2.
a. Rsnapshot is very easy to configure and use and you don't need to have deep understanding on  rsync numerous options to use it.
b. Rsnapshot does support incremental data backups – saving a lot of disk space on backup host.


Mentioning  incremental data backups for some those term might be a news so I will in short explain here what is Incremental Data Backups?

Incremental Data Backups are such backups which only create new backup of system scheduled files to backup only whether there are changes in files to backup or new ones are added to directory/directories set to be routinely backed up. Incremental backups are often desirable as they consume minimum storage space and are quicker to perform than normal periodic whole data archiving (differential backups). rsync has also support for incremental backups but configuring it to do so takes time and requires extra time on reading and understanding how they work, so I personally prefer simplicity rsnapshot brings.

1. Installing rsnapshot with apt-get

Here is rsnapshot debian package description;

debian:~#  apt-cache show rsnapshot|grep -i description -A 5


Description: local and remote filesystem snapshot utility
 rsnapshot is an rsync-based filesystem snapshot utility. It can take
 incremental backups of local and remote filesystems for any number of
 machines. rsnapshot makes extensive use of hard links, so disk space is
 only used when absolutely necessary.
Homepage: http://www.rsnapshot.org/

As you can read from description, rsnapshot is a frontend command using rsync to make data backups.

Install of rsnapshot is done through;

 debian:~# apt-get install --yes rsnapshot

Reading package lists… Done
Building dependency tree      
Reading state information… Done
The following NEW packages will be installed:
  rsnapshot
0 upgraded, 1 newly installed, 0 to remove and 0 not upgraded.
Need to get 0 B/140 kB of archives.
After this operation, 598 kB of additional disk space will be used.
Selecting previously deselected package rsnapshot.
(Reading database … 87026 files and directories currently installed.)
Unpacking rsnapshot (from …/rsnapshot_1.3.1-1_all.deb) … –
Processing triggers for man-db …
Setting up rsnapshot (1.3.1-1) …

2. Rsnapshot  package content and Documentation

Once installed here is file content of rsnapshot deb package;

debian:~# dpkg -L rsnapshot


/.
/usr
/usr/share
/usr/share/doc-base
/usr/share/doc-base/rsnapshot
/usr/share/doc
/usr/share/doc/rsnapshot
/usr/share/doc/rsnapshot/TODO
/usr/share/doc/rsnapshot/changelog.gz
/usr/share/doc/rsnapshot/Upgrading_from_1.1.gz
/usr/share/doc/rsnapshot/examples
/usr/share/doc/rsnapshot/examples/rsnapshot.conf.default.gz
/usr/share/doc/rsnapshot/examples/utils
/usr/share/doc/rsnapshot/examples/utils/backup_mysql.sh
/usr/share/doc/rsnapshot/examples/utils/mysqlbackup.pl
/usr/share/doc/rsnapshot/examples/utils/random_file_verify.sh
/usr/share/doc/rsnapshot/examples/utils/rsnapreport.pl.gz
/usr/share/doc/rsnapshot/examples/utils/make_cvs_snapshot.sh
/usr/share/doc/rsnapshot/examples/utils/backup_pgsql.sh
/usr/share/doc/rsnapshot/examples/utils/rsnapshotdb
/usr/share/doc/rsnapshot/examples/utils/rsnapshotdb/CHANGES.txt
/usr/share/doc/rsnapshot/examples/utils/rsnapshotdb/rsnapshotDB.pl.gz
/usr/share/doc/rsnapshot/examples/utils/rsnapshotdb/INSTALL.txt
/usr/share/doc/rsnapshot/examples/utils/rsnapshotdb/TODO.txt
/usr/share/doc/rsnapshot/examples/utils/rsnapshotdb/rsnapshotDB.xsd
/usr/share/doc/rsnapshot/examples/utils/rsnapshotdb/rsnapshotDB.conf.sample
/usr/share/doc/rsnapshot/examples/utils/rsnapshotdb/README.txt
/usr/share/doc/rsnapshot/examples/utils/rsnapshot-copy
/usr/share/doc/rsnapshot/examples/utils/backup_rsnapshot_cvsroot.sh
/usr/share/doc/rsnapshot/examples/utils/backup_dpkg.sh
/usr/share/doc/rsnapshot/examples/utils/sign_packages.sh
/usr/share/doc/rsnapshot/examples/utils/mkmakefile.sh
/usr/share/doc/rsnapshot/examples/utils/rsnaptar
/usr/share/doc/rsnapshot/examples/utils/rsnapshot_invert.sh
/usr/share/doc/rsnapshot/examples/utils/rsnapshot_if_mounted.sh
/usr/share/doc/rsnapshot/examples/utils/README
/usr/share/doc/rsnapshot/examples/utils/debug_moving_files.sh
/usr/share/doc/rsnapshot/examples/utils/backup_smb_share.sh
/usr/share/doc/rsnapshot/README.gz
/usr/share/doc/rsnapshot/changelog.Debian.gz
/usr/share/doc/rsnapshot/copyright
/usr/share/doc/rsnapshot/README.Debian
/usr/share/doc/rsnapshot/html
/usr/share/doc/rsnapshot/html/rsnapshot-HOWTO.en.html
/usr/share/doc/rsnapshot/NEWS.Debian.gz
/usr/share/lintian
/usr/share/lintian/overrides
/usr/share/lintian/overrides/rsnapshot
/usr/share/man
/usr/share/man/man1
/usr/share/man/man1/rsnapshot.1.gz
/usr/share/man/man1/rsnapshot-diff.1.gz
/usr/bin
/usr/bin/rsnapshot-diff
/usr/bin/rsnapshot
/var
/var/cache
/var/cache/rsnapshot
/etc
/etc/cron.d
/etc/cron.d/rsnapshot
/etc/rsnapshot.conf
/etc/logrotate.d
/etc/logrotate.d/rsnapshot

To get basic idea, on rsnapshot and how it can be configured and run manually as well as how it can be set-up to run periodic via a cronjob README shipped with package is a good start point.

debian:~# zless /usr/share/doc/rsnapshot/README.gz
....

It is also useful to check program documentation in HTML, whether you have some text browser installed – i.e. lynx or links:

debian:~# links /usr/share/doc/rsnapshot/html/rsnapshot-HOWTO.en.html

Note that many of information in rsnapshot-HOWTO is related to how rsnapshot is installed manually from source, so for Deb based distro users reading these sections can be safely skipped. For Debian users hence it is useful to read howto from section 4.A onwards. man rsnapshot's Examle section is very good reading too as it gives a lot of use scenarios necessary in more complicated backup situations.

3. Configuring Rsnapshot – Setting Data Directories to Backup

Configuration of Rsnapshot is done through /etc/rsnapshot.conf file. There is plenty of comments in file, so opening in text editor and taking few minutes to read commented lines is necessery. Configuration options just like with most Linux tool config files is done through config directives, not commented.

debian:~# cat /etc/rsnapshot.conf |grep -v "#"|uniq


config_version    1.2

snapshot_root    /var/cache/rsnapshot/

cmd_rm        /bin/rm

cmd_rsync    /usr/bin/rsync

cmd_logger    /usr/bin/logger

interval    hourly    6
interval    daily    7
interval    weekly    4

verbose        2

loglevel    3

lockfile    /var/run/rsnapshot.pid

backup    /home/        localhost/
backup    /etc/        localhost/
backup    /usr/local/    localhost/


Above config options are clear to understand, there is interval of backups to set (hourly, daily, weekly), verbose level of rsnapshot backup operation log file, lockfile which will be used by rsnapshot to prevent duplicate rsnapshot runs and last backup directive in which you need to specify what needs to be backed up. In config file there is also commented variable for creating rsnapshot backup once a month

#interval   monthly 3

If you need to create backups once a month uncomment it.

In backup directive add all directories from filesystem which need to have routine backup, for example I keep my Apache Web server files in /var/www/, store various install software in
/root/

and keep backup of Qmail (Vpopmail) old emails kept in
/var/vpopmail
.
To make rsnapshot backup those I add after rest of backup directives:

backup  /var/www/   localhost/
backup  /var/vpopmail/  localhost/
backup  /root/  localhost/


It is good practice to change snapshot_root directive to /root/.backups or whether you prefer to keep snapshot_root to default /var/cache/rsnapshot at least link with ln command /root/.backups to -> /root/.backups.

debian:~# ln -sf /var/cache/rsnapshot /root/.backups

If you change snapshot_root to /root/.backups, don't forget to create /root/.backups and set chmod  dir persmissions only readable to owner, i.e.:

debian:~# mkdir /root/.rsnapshot
debian:~# chmod -R 700 /root/.backups

Note that, it is important to use tab delimiters, everywhere in /etc/rsnapshot.conf, if you use space key delimiter instead of Tab you will end up with errors preventing rsnapshot to run.

4. Testing rsnapshot configuration and launching it first time

I will say it once again use Tab key for delimiters in config. It was my mistake on first time Rsnapshot launch to use spaces to delimiter my config options, thus testing my configuration, rsnapshot print an error and failed:

debian:~# rsnapshot configtest


———————————————————
rsnapshot encountered an error! The program was invoked with these options: /usr/bin/rsnapshot configtest ———————————————————
ERROR: /etc/rsnapshot.conf on line 199: ERROR: backup /var/www/ localhost/
ERROR: ———————————————————
ERROR: Errors were found in /etc/rsnapshot.conf, ERROR: rsnapshot can not continue. If you think an entry looks right, make
ERROR: sure you don't have spaces where only tabs should be.  

After changing, Space delimiters with Tabs and re-running rsnapshot configtest if all fine you get:

debian:~# rsnapshot configtest
Syntax OK

Once all good with config to launch Rsnapshot do its first complete incremental data backup, to display what rsnapshot will backup and what exact rsync invocations will it use type:


debian:~# rsnapshot -t hourly

echo 5644 > /var/run/rsnapshot.pid
mv /var/cache/rsnapshot/hourly.2/ /var/cache/rsnapshot/hourly.3/
mv /var/cache/rsnapshot/hourly.1/ /var/cache/rsnapshot/hourly.2/
native_cp_al("/var/cache/rsnapshot/hourly.0", \
    "/var/cache/rsnapshot/hourly.1")
/usr/bin/rsync -a –delete –numeric-ids –relative –delete-excluded /home \
    /var/cache/rsnapshot/hourly.0/localhost/
/usr/bin/rsync -a –delete –numeric-ids –relative –delete-excluded /etc \
    /var/cache/rsnapshot/hourly.0/localhost/
/usr/bin/rsync -a –delete –numeric-ids –relative –delete-excluded \
    /usr/local /var/cache/rsnapshot/hourly.0/localhost/
/usr/bin/rsync -a –delete –numeric-ids –relative –delete-excluded \
    /var/www /var/cache/rsnapshot/hourly.0/localhost/
/usr/bin/rsync -a –delete –numeric-ids –relative –delete-excluded \
    /var/vpopmail /var/cache/rsnapshot/hourly.0/localhost/
/usr/bin/rsync -a –delete –numeric-ids –relative –delete-excluded /root \
    /var/cache/rsnapshot/hourly.0/localhost/
touch /var/cache/rsnapshot/hourly.0/

To launch backup first time manually:

debian:~# rsnapshot hourly

Depending on backupped data (Mega/Giga/Terabytes) size and the number of files which had to be backed up, backup takes from minutes to hours.
Note that it is always good idea to create backups on separate hard disk configured in some kind of RAID array, preferrably (RAID 1 or RAID 5). Creating backups on separate hard disk has numerous advantages, the most important one is it doesn't put too much Input / Output (I/O) stress on hard disk and thus will not create server downtimes on High traffic – Busy servers slow old Hard Disks or servers with Big amount of I/O HDD read/writes .

5. Enabling Rsnapshot to create backups via scheduled cron job

On package install Rsnapshot creates a skele file for running via cronjob in /etc/cron.d/rsnapshot.

debian:~# cat /etc/cron.d/rsnapshot


# This is a sample cron file for rsnapshot.
# The values used correspond to the examples in /etc/rsnapshot.conf.
# There you can also set the backup points and many other things.
#
# To activate this cron file you have to uncomment the lines below.
# Feel free to adapt it to your needs.

# 0 */4        * * *        root    /usr/bin/rsnapshot hourly
# 30 3      * * *        root    /usr/bin/rsnapshot daily
# 0  3      * * 1        root    /usr/bin/rsnapshot weekly
# 30 2      1 * *        root    /usr/bin/rsnapshot monthly
 

To make hourly, daily, weekly, monthly backup uncomment one of above 4 lines. For paranoid admins scared to loose even a bit of data, hourly data is a good solution. For me personally I prefer configuring weekly backups for the reason I routinely monitor servers – keeping an eye regularly on dmesg and checking Linux smard / smartmontools logs to find out whether a hard disk or RAID has bad blocks

6. Checking backup size / backup difference and backup structure

Checking size of backups can be done by using standard du command on backup directory:

debian:~# du -hsc /var/cache/rsnapshot/*
4.3G /var/cache/rsnapshot/hourly.0
4.5M /var/cache/rsnapshot/hourly.1
68M /var/cache/rsnapshot/hourly.2
4.4G total

rsnapshot also has du argument via which backup size can be viewed:

debian:~# rsnapshot du 4.3G /var/cache/rsnapshot/hourly.0/
4.5M /var/cache/rsnapshot/hourly.1/
68M /var/cache/rsnapshot/hourly.2/
4.4G total

As you can see each new incremental backup is with new number after hourly{0,1,2} etc.

To check difference between two different backups:

debian:~# rsnapshot diff /var/cache/rsnapshot/hourly.0/ /var/cache/rsnapshot/hourly.1/
Comparing /var/cache/rsnapshot/hourly.1 to /var/cache/rsnapshot/hourly.0
Between /var/cache/rsnapshot/hourly.1 and /var/cache/rsnapshot/hourly.0:
660 were added, taking 3728377727 bytes;
492 were removed, saving 17623 bytes;

Structure of backed up files is identical to normal copy of files without any compression:

debian:~# cd /root/.backups/hourly.0/localhost/
debian:~/.backups/hourly.0/localhost# ls

etc/ home/ root/ usr/ var/


7. Restoing files or directory from rsnapshot backup

To restore lets say /var directory cd into it:

debian:~/.backups/hourly.0/localhost# cd var
debian:~/.backups/hourly.0/localhost/var#

Then use rsync as follows:

debian:~/.backups/hourly.0/localhost/var# rsync -avr * /


8. Creating rsnapshot backups from remote server via SSH protocol

In /etc/rsnapshot.conf you should have set SSH port on which remote server is accepting SSH connections. Standard port is 22, however it is wise to configure on backup server SSH to listen to some other non standard port.

In config variables to look on are:

ssh_args -p 22

and

Onwards to enable remote login via ssh uncomment in /etc/rsnapshot.conf :

# cmd_ssh /usr/bin/ssh

to

cmd_ssh /usr/bin/ssh

Before starting rsnapshot to create backups on remote host2 you need to Configure automatic SSH passwordless login by generating DSA or RSA key pair between host1 and host2. Where host1 is machine on which rsnapshot is run and to which backups will be copied from host2
Once passwordless ssh to remote host is active, to force rsnapshot create backups from host1 you will need to add near end of /etc/rsnapshot.conf .

backup  root@host2.com:/root/ host2.com/

The same way you can add a number of remote hosts from which periodic backups will be created to central host1. Only condition is on each node – host3, host4, host5.

backup  root@host3.com:/root/root/ host3.com
backup  root@host4.com:/home/ host4.com
backup  root@host4.com:/var/ host4.com

To create on host1 public key (id_dsa.pub) file with command:

debian:~# ssh-keygen -t dsa
...
....
debian:~# ssh-copy-id -i ~/.ssh/id_dsa.pub root@host3

Once all hosts that needs to get backed up to central backup host – host1. To test if backups gets uploaded manually issue:

debian:~# rsnapshot -v hourly
...

Rsnapshot has a number of other scripts which can be easily integrated with it in /usr/share/doc/rsnapshot/examples/utils.
Inside you can find example scripts on how to create MySQL / PostgreSQL database backup, Samba Share backups, backup CVS repositories and so on. The scripts can be easily modified and work with mostly any data or protocol with a bit of tweaking. Short description of each of example scripts can be found in /usr/share/doc/rsnapshot/examples/utils/README

How to disable ACPI on productive Linux servers to decrease kernel panics and increase CPU fan lifespan

Tuesday, May 15th, 2012

Linux TUX ACPI logo / Tux Hates ACPI logohttps://www.pc-freak.net/images/linux_tux_acpi_logo-tux-hates-acpi.png

Why would anyone disable ACPI support on a server machine??
Well  ACPI support kernel loaded code is just another piece of code constantly being present in the memory,  that makes the probability for a fatal memory mess up leading to  a fatal bug resulting in system crash (kernel panic) more likely.

Many computers ship with buggy or out of specifications ACPI firmware which can cause a severe oddities on a brand new bought piece of comp equipment.

One such oddity related to ACPI motherboard support problems is if you notice your machine randomly powering off or failing to boot with a brand new Linux installed on it.

Another reason to switch off ACPI code will would to be prevent the CPU FAN rotation from being kernel controlled.

If the kernel controls the CPU fan on  high CPU heat up it will instruct the fan to rotate quickly and on low system loads it will bring back the fan to loose speed.
 This frequent switch of FAN from high speed to low speed  increases the probability for a short fan damage due to frequent changes of fan speed. Such a fan damage leads often to  system outage due to fan failure to rotate properly.

Therefore in my view it is better ACPI support is switched off completely on  servers. On some servers ACPI is useful as it can be used to track CPU temperature with embedded motherboard sensors with lm_sensors or any piece of hardwre vendor specific software provided. On many machines, however lm_sensors will not properly recognize the integrated CPU temperature sensors and hence ACPI is mostly useless.

There are 3 ways to disable fully or partially ACPI support.

- One is to disable it straight for BIOS (best way IMHO)
- Disable via GRUB or LILO passing a kernel parameter
- Partial ACPI off-ing - /disabling the software that controls the CPU fan/

1. Disable ACPI in BIOS level

Press DEL, F1, F2, F10 or whatever the enter bios key combination is go through all the different menus (depending on the vios BENDOR) and make sure every occurance of ACPI is set to off / disable whatever it is called.

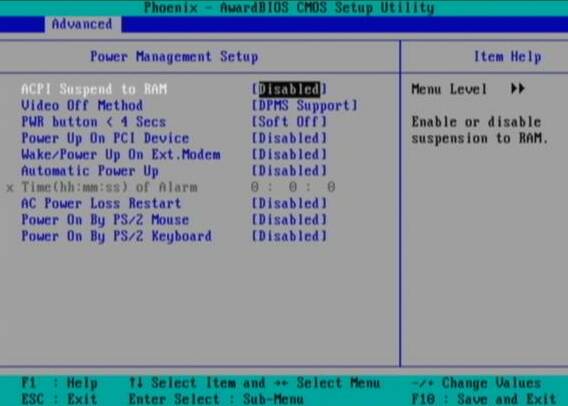
Below is a screenshot of menus with ACPI stuff on a motherboard equipped with Phoenix AwardBIOS:

BIOS ACPI Disable power Off Phoenix BIOS

This is the in my opinon best and safest way to disable ACPI power saving, Unfortunately some newer PCs lack the functionality to disable ACPI; (probably due to the crazy "green" policy the whole world is nowdays mad of).

If that's the case with you, thanksfully there is a "software way" to disable ACPI via passing kernel options via GRUB and LILO boot loaders.

2. Disabling ACPI support on kernel boot level through GRUB boot loader config

There is a tiny difference in command to pass in order to disable  ACPI depending on the Linux installed  GRUB ver. 1.x or GRUB 2.x.

a) In GRUB 0.99 (GRUB version 1)

Edit file /etc/grub/menu.lst or /etc/grub/grub.conf (location differs across Linux distribution). Therein append:

acpi=off

to the end of kernel command line.

Here is an example of a kernel command line with ACPI not disabled (example taken from CentOS server grub.conf):

[root@centos ~]# grep -i title -A 4 /etc/grub/grub.conf
title Red Hat Enterprise Linux Server (2.6.18-36.el5)
root (hd0,0)
kernel /vmlinuz-2.6.18-36.el5 ro root=/dev/VolGroup00/LogVol00 console=ttyS0,115200n8
initrd /initrd-2.6.18-36.el5.img

The edited version of the file with acpi=off included should look like so:

title Red Hat Enterprise Linux Server (2.6.18-36.el5)
root (hd0,0)
kernel /vmlinuz-2.6.18-36.el5 ro root=/dev/VolGroup00/LogVol00 console=ttyS0,115200n8 acpi=off
initrd /initrd-2.6.18-36.el5.img

The kernel option root=/dev/VolGroup00/LogVol00 means the the server is configured to use LVM (Logical Volume Manager).

b) Disabling ACPI on GRUB version 1.99 +

This version is by default installed on newer Ubuntu and Debian Linux-es.

In grub 1.99 on latest Debian Squeeze, the file to edit is located in /boot/grub/grub.cfg. The file is more messy than with its predecessor menu.lst (grub 0.99).
Thanks God there is no need to directly edit the file (though this is possible), but on newer Linuces (as of time of writting the post), there is another simplied grub config file /etc/grub/config

Hence to add the acpi=off to 1.99 open /etc/grub/config find the line reading:

GRUB_CMDLINE_LINUX_DEFAULT="quiet"

and append the "acpi=off" option, e.g. the line has to change to:

GRUB_CMDLINE_LINUX_DEFAULT="quiet acpi=off"

On some servers it might be better to also disable APIC along with ACPI:

Just in case you don't know what is the difference between ACPI and APIC, here is a short explanation:

ACPI = Advanced Configuration and Power Interface

APIC = Advanced Programmable Interrupt Controllers

ACPI is the system that controls your dynamic speed fans, the power button behavior, sleep states, etc.

APIC is the replacement for the old PIC chip that used to come imbedded on motherboards that allowed you to setup interrupts for your soundcard, ide controllers, etc.

Hence on some machines experiencing still problems with even ACPI switched off, it is helpful  to disable the APIC support too, by using:

acpi=off noapic noacpi

Anyways, while doing the changes, be very very cautious or you might end up with un-boot-able server. Don't blame me if this happens :); be sure you have a backup option if server doesn't boot.

To assure faultless kernel boot, GRUB has ability to be configured to automatically load up a second kernel if 1st one fails to boot, if you need that read the grub documentation on that.

To load up the kernel with the new setting, give it a restart:

[root@centos ~]# shutdown -r now
....

3. Disable ACPI support on kernel boot time on Slackware or other Linuxes still booting kernel with LILO

Still, some Linux distros like Slackware, decided to keep the old way and use LILO (LInux LOader) as a default boot loader.

Disabling ACPI support in LILO is done through /etc/lilo.conf

By default in /etc/lilo.conf, there is a line:

append= acpi=on

it should be changed to:

append= acpi=off

Next to load up the new acpi disabled setting, lilo has to be reloaded:

slackware:~# /sbin/lilo -c /etc/lilo.conf
....

Finally a reboot is required:

slackware:~# reboot
....

(If you don't have a physical access or someone near the server you better not 🙂 )

4. Disable ACPI fan control support on a running Linux server without restart

This is the most secure work-around, to disabling the ACPI control over the machine CPU fan, however it has a downside that still the ACPI code will be loaded in the kernel and could cause kernel issues possibly in the long run – lets say the machine has uptime of more than 2 years…

The acpi support on a user level  is controlled by acpid or haldaemon (depending on the Linux distro), hence to disable the fan control on servers this services has to be switched off:

a) disabling ACPI on Debian and deb based Linux-es

As of time of writting on Debian Linux servers acpid (Advanced Configuration and Power Interface event daemon) is there to control how power management will be handled. To disable it stop it as a service (if running):

debian:~# /etc/init.d/acpid stop

To permanently remove acpid from boot up on system boot disable it with update-rc.d:

debian:~# update-rc.d acpid disable 2 3 4 5
update-rc.d: using dependency based boot sequencing
insserv: Script iptables is broken: incomplete LSB comment.
insserv: missing `Required-Start:' entry: please add even if empty.
insserv: warning: current start runlevel(s) (empty) of script `acpid' overwrites defaults (2 3 4 5).
insserv: warning: current stop runlevel(s) (2 3 4 5) of script `acpid' overwrites defaults (empty).
insserv: missing `Required-Start:' entry: please add even if empty.

b) disabling ACPI on RHEL, Fedora and other Redhat-s (also known as RedHacks 🙂 )

I'm not sure if this is safe,as many newer rpm based server system services,  might not work properly with haldaemon disabled.

Anyways you can give it a try if when it is stopped there are issues just bring it up again.

[root@rhel ~]# /etc/init.d/haldaemon stop

If all is fine with the haldaemon switched off (hope so), you can completely disable it to load on start up with:

[root@centos ~]# /sbin/chkconfig --level 2 3 4 5 haldaemon off

Disabling ACPI could increase a bit your server bills, but same time decrease losses from downtimes, so I guess it worths its costs 🙂


Some Apache performance optimizations to do on brand new installed Linux servers – Apache performance tuning tips

Wednesday, December 12th, 2012

good tips to optimize Apache webserver on Debian CentOS and RHEL Linux for better performance and faster website openings

It is a good idea, on any productive server which is supposed to run Apache + PHP on Linux to do some initial Apache configurations which will guarantee a better WebServer performance and improved Apache client thoroughput. On every each and other new configured Linux server planned to server as an Apache + some database backend, I routinely make this tune ups even without thinking. The reason I do it is time and experience proofed this optimizations works like a charm and almost in 100% of cases they can only improve situation with the server, decrease the general expected load and thus save costs for potential hardware. Besides that the few config options which I'm about to suggest in this article guarantee improved WebPage opening times and most of times overall Apache response times. The consequence of embedding the optimizations has a straight influence on Google / Yahoo PageRanking as it is not a secret most (if not all) Search Engines, rank with a Higher PageRank webpages which load up for lower opening times.


1. Change values for KeepAlive, Timeout and KeepAliveTimeout

First thing to change in Apache default config is reduce the default value set for KeepAliveTimeout and KeepAlive and TimeOut

a. Reducing  KeepAliveTimeout

  a.In Debian, Ubuntu servers this value has to be changed in /etc/apache2/apache2.conf

b. in RHEL, Fedora and other RPM based distros check in /etc/httpd/conf/httpd.conf

By default KeepAliveTimeout is set to 15 – KeepAliveTimeout 15. 15 Seconds is a long delay and on a by Apache servers it is very likely you will have hundreds if not thousands of Apache forks or internal threads, keeping still open for clients which already navigated off from the website or websites hosted and served by Apache.

Taking this in consideration, most of the times I prefer setting the KeepAliveTimeout value to 7 secs – i.e.;

KeepAliveTimeout 7

even to some hosts, where you have a well tested PHP Code or just serving static files it is a good idea to decrease it to 5 secs (this is much more risky and likely to create problems, I set it to 5 secs in a vary rare occasions, anyhow you might want to experiment)

Bear in mind that in some cases, where page execution (lets say a PHP script) takes longer to execute than 7 seconds clients might end up with empty pages as Apache will drop off the opened TCP / IP connection to remote client. Thus for some people who run badly written websites with PHP scripts which take long time to execute lowering default KeepAliveTimeout might have negative results. Therefore as a rule of thumb if you reduce the KeepAliveTimeout, be sure to monitor closely with the website testers team or via some website feedback form if the website continues to perform okay for end clients, if not just tune up KeepAliveTimeout to a value with which the website works fine. Other reason why KeepAliveTimeout is so good in almost all cases to reduce is by simply closing quicker opened network connections, less Apache childs keeps loaded in memory and therefore more memory is available for eventual new clients  connecting.

Here is also KeepAliveTimeout explained as pasted from a Debian apache2.conf:

#
# KeepAliveTimeout: Number of seconds to wait for the next request from the
# same client on the same connection.
#
#KeepAliveTimeout 15
KeepAliveTimeout 5

b. Turn on KeepAlive

By default most Linux distros came with KeepAlive setting turned off, switch it on;

#
# KeepAlive: Whether or not to allow persistent connections (more than
# one request per connection). Set to "Off" to deactivate.
#
# KeepAlive Off
KeepAlive On

c. Reduce the amount for TimeOut of client inactivity

Default TimeOut setting is set to 300 seconds!
A good value to reduce it to is 40 or 80. 80 value is less likely to create content serving unexpected interrupts. On most servers I just set to 40 as so far this value works well for me.
 

#
# Timeout: The number of seconds before receives and sends time out.
#
#Timeout 300
Timeout 40
 

2. Enable Apache mod-expires – WebServer content caching

debian:~# ln -sf /etc/apache2/mods-available/expires.load /etc/apache2/mods-enabled/expires.load

Depending on Deb or RPM based Linux distro in Apache config (apache2.conf or httpd.conf), add following mod_expires directives;

<IfModule mod_expires.c>
ExpiresActive On
ExpiresDefault A86400
ExpiresByType image/x-icon A2592000
ExpiresByType application/x-javascript A2592000
ExpiresByType text/css A2592000
ExpiresByType image/gif A604800
ExpiresByType image/png A604800
ExpiresByType image/jpeg A604800
</IfModule>

One note to make, here that on some websites based on Smarty, Zend PHP Framework etc. PHP frameworks mod_expires might cause some troubles, however in 70-80% of the cases just enabling it causes no harm to the overall website functionality. Be sure to test it well if you enable it and don't blame me if it cause you issues.


3. Set ServerRoot and  Raise-up ServerLimit and MaxKeepAliveRequests  directives

By default the value set for ServerLimit is too low for productive servers (256 mpm_prefork Apache childs maximum), thus for servers which are expected to get in parallel few hundreds of unique IP clients I usually set it along with ServerRoot like so;

#
# ServerRoot: The top of the directory tree under which the server's
# configuration, error, and log files are kept.
#
# NOTE!  If you intend to place this on an NFS (or otherwise network)
# mounted filesystem then please read the LockFile documentation (available
# at <URL:http://httpd.apache.org/docs/2.2/mod/mpm_common.html#lockfile>);
# you will save yourself a lot of trouble.
#
# Do NOT add a slash at the end of the directory path.
#
#ServerRoot "/etc/apache2"
ServerRoot "/etc/apache2"
ServerLimit 10600

Another good practice is to set MaxKeepAliveRequests which will be handled by Apache forked child to a high value but not to 0 (which will make once forked Apache childs to never die – making them likely to mess up assigned memory due to memory leaks or Apache bugs). On a productive servers I set values from  5000 to 50000.

#
# MaxKeepAliveRequests: The maximum number of requests to allow
# during a persistent connection. Set to 0 to allow an unlimited amount.
# We recommend you leave this number high, for maximum performance.
#
MaxKeepAliveRequests 50000

4. Enable mod_rewrite Apache support

This step is not optimizing Apache performance but it is useful to enable mod_rewrite, as there is almost no website today which doesn't use mod_rewrite via .htaccess passed directives.

debian:~# ln -sf  /etc/apache2/mods-available/rewrite.load /etc/apache2/mods-enabled/rewrite.load

5. Adjusting default values of StartServers, MinSpareServers, MaxSpareServers, MaxClients and MaxRequestsPerChild  for mpm_prefork

Default config values set for mpm_prefork, are for a tiny home server, depending on  the server amount of memory and CPU power – StartServers, MinSpareServers, MaxSpareServers, MaxClients and MaxRequestsPerChild – should be carefully tailored and tested with Apache Benchmark little tool and Siege or any other benchmarking tool before WebServer is made publicly accessible.

Default values from apache2.conf are like so:

<IfModule mpm_prefork_module>
    StartServers          5
    MinSpareServers       5
    MaxSpareServers      10
    MaxClients          150
    MaxRequestsPerChild   0
</IfModule>

A good configuration for a productive server with 24GB of Memory and 8 CPUs x 2.13 Ghz (about 17Ghz Computing Power) would be for exmpl.:

<IfModule mpm_prefork_module>
    StartServers          2000
    MinSpareServers       600
    MaxSpareServers      800
    MaxClients          3600
    MaxRequestsPerChild   10000
</IfModule>

5. Intall and Enable Eaccelerator

On almost all servers I install I install immediately after basic Apache + PHP + MySQL packages, Eaccelerator. Eaccelerator helps utilizing better server free memory and significantly accelerates Apache pages serve time

I've earlier blogged on How to install Eaccelerator to decrease server CPU load and increase page serving performance here

6. Disable Server Side Includes ( SSI ) support

I've earlier blogged how to disable Apache SSI on Debian Linux – you can read here. The change SSI will make whether off is not so big so even leaving it on  is not a big deal.

7. Remove and Purge Suhosin apache module

suhosin is useful module that tightens Apache security, however for me it has earlier create a lot of issues and it is my personal view that life is better without suhosin. I've earlier stumbled on a weird issue causing Apache to mysteriously crash – removing suhosin solved it all. I'm not sure if suhosin is installed by default on Debian, but it is often installed a a package dependency to some php-devel packages, so I find it wise always to check if it is present on the system and remove it if it is.
 

8. Enable Apache mod_deflate (gzip) compression to speed up delivery of CSS and Javascripts

Archiving with gzip and de-archiving CSS, JS and HTML is very useful, as it reduces the size of transferred content. This however might impose a bit of higher CPU load, so I only enable this one whether I target increase in network thoroughput, however for people concerned of CPU load it is better to keep it off as it is by default.

For a bit more on how mod_deflate is enabled on Debian check my previous article – Speeding Apache hosted websites with mod_deflate gzip compression

CentOS and RHEL users who need to enable mod_deflate – check here

9. Change the way logrotate handles log rotation (disable log gzip compession) or disable Apache logging completely

On Linux servers with Apache where 30000 to 50000 of unique IP visitors requests are served, the access.log becomes enormous. Things become even worser as by default Apache logs are configured to be rotated once a week instead of daily. Thus once logrotation takes place, a huge log has to be processed – for instance 20 GB. This puts extra load on the server and often makes the normal Apache operation bloated. To get rid of this problem I suggest you check my previous article – Recommended access.log logrotate practices on heavy loaded servers

Alternatively it is sometimes, better to completely disable Apache access.log logging to reduce a bit the Apache load – though from security and statistical point of view it is bad practice. I've disabled it however, as on some servers logging is implemented on PHP scripts level instead. I've earlier blogged how disabling access.log and error.log is done here

10. Disable Apache version reporting

This is more of a security than performance optimization, but also has neglectful effect, as on requests one line less is reported by Apache 🙂
To disable Apache version reporting check my previous article here

11. Switch from mpm_prefork to  mpm_worker Apache (threaded) engine

For some new Apache configurations, which doesn't need exec(); or system(); or any other PHP embedded external code execution functions, from performance point of view it is much better to just switch to the much more sophisticated performance efficient and less memory hungry Apache2  mpm-worker engine – the downside of it is you will have to configure PHP to be executed via php5-cgi apache module.

12. Tune up (increase) PHP memory_limit variable

This is not Apache optimization, but most servers need it as they run Apache and PHP in a line. Default PHP memory_limit is set to the low 16 Mb it is good to raise it to 64 or 128MB (but be careful as this might make Apache easier to DoS or DDoS)
I've blogged on the topic of memory_limit and timezone issues I experienced earlier here

13. Make sure you have a good quick DNS set in /etc/resolv.conf

An usual /etc/resolv.conf which I use for new servers with Apache looks like so:

debian:~# cat /etc/resolv.conf
nameserver 127.0.0.1
nameserver 8.8.8.8
nameserver 8.8.4.4
nameserver 208.67.222.222
nameserver 208.67.220.220
 

The first line is set to use 127.0.0.1, as I find it very useful and to improve overall system efficiency and make it much fail proof, if the server is configured to run a custom DJBDNS server on localhost.

As you see further DNS set in my usual resolv.conf's are Google's Public DNS 8.8.8.8 and 8.8.4.4 and OpenDNS's 208.67.222.222 and 208.67.220.220

I highly recommend you follow my practice and install DJBDNS local caching DNS to speed up resolving efficiency and hence speed up Apache client interactions (of course this is useful only if Apache or some PHP scripts use DNS requests, but as most do it is a  good practice)

After all changes, to take affect I do the usual Apache restart with;

debian:~# apache2ctl -k restart
.....

That's it, if you know of other optimization tips, Please drop a comment 🙂

How to copy / clone installed packages from one Debian server to another

Friday, April 13th, 2012

1. Dump all installed server packages from Debian Linux server1

First it is necessery to dump a list of all installed packages on the server from which the intalled deb packages 'selection' will be replicated.

debian-server1:~# dpkg --get-selections \* > packages.txt

The format of the produced packages.txt file will have only two columns, in column1 there will be the package (name) installed and in column 2, the status of the package e.g.: install or deinstall

Note that you can only use the –get-selections as root superuser, trying to run it with non-privileged user I got:

hipo@server1:~$ dpkg --set-selections > packages.txt
dpkg: operation requires read/write access to dpkg status area

2. Copy packages.txt file containing the installed deb packages from server1 to server2

There is many way to copy the packages.txt package description file, one can use ftp, sftp, scp, rsync … lftp or even copy it via wget if placed in some Apache directory on server1.

A quick and convenient way to copy the file from Debian server1 to server2 is with scp as it can also be used easily for an automated script to do the packages.txt file copying (if for instance you have to implement package cloning on multiple Debian Linux servers).

root@debian-server1:~# scp ./packages.txt hipo@server-hostname2:~/packages.txt
The authenticity of host '83.170.97.153 (83.170.97.153)' can't be established. RSA key fingerprint is 38:da:2a:79:ad:38:5b:64:9e:8b:b4:81:09:cd:94:d4. Are you sure you want to continue connecting (yes/no)? yes Warning: Permanently added '83.170.97.153' (RSA) to the list of known hosts. hipo@83.170.97.153's password:
packages.txt

As this is the first time I make connection to server2 from server1, I'm prompted to accept the host RSA unique fingerprint.

3. Install the copied selection from server1 on server2 with apt-get or dselect

debian-server2:/home/hipo# apt-get update
...
debian-server2:/home/hipo# apt-get upgrade
Reading package lists... Done
Building dependency tree
Reading state information... Done
debian-server2:/home/hipo# dpkg --set-selections < packages.txt
debian-server2:/home/hipo# apt-get -u dselect-upgrade --yes

The first apt-get update command assures the server will have the latest version of the packages currently installed, this will save you from running an outdated versions of the installed packages on debian-server2

Bear in mind that using apt-get sometimes, might create dependency issues. This is depending on the exact package names, being replicated in between the servers

Therefore it is better to use another approach with bash for loop to "replicate" installed packages between two servers, like so:

debian-server2:/home/hipo# for i in $(cat packages.txt |awk '{ print $1 }'); do aptitude install $i; done

If you want to automate the questioning about aptitude operations pass on the -y

debian-server2:/home/hipo# for i in $(cat packages.txt |awk '{ print $1 }'); do aptitude -y install $i; done

Be cautious if the -y is passed as sometimes some packages might be removed from the server to resolve dependency issues, if you need this packages you will have to again install them manually.

4. Mirroring package selection from server1 to server2 using one liner

A quick one liner, that does replicate a set of preselected packages from server1 to server2 is also possible with either a combination of apt, ssh, awk and dpkg or with ssh + dpkg + dselect :

a) One-liner code with apt-get unifying the installed packages between 2 or more servers

debian-server2:~# apt-get --yes install `ssh root@debian-server1 "dpkg -l | grep -E ^ii" | awk '{print $2}'`
...

If it is necessery to install on more than just debian-server2, copy paste the above code to all servers you want to have identical installed packages as with debian-server1 or use a shor for loop to run the commands for each and every host of multiple servers group.

In some cases it might be better to use dselect instead as in some situations using apt-get might not correctly solve the package dependencies, if encountering problems with dependencies better run:

debian-server2:/home/hipo# ssh root@debian-server1 'dpkg --get-selections' | dpkg --set-selections && dselect install

As you can see using this second dselect installed "package" mirroring is also way easier to read and understand than the prior "cryptic" method with apt-get, hence I personally think using dselect method is a better.

Well that's basically it. If you need to synchronize also configurations, either an rsync/scp shell script, should be used with all defined server1 config files or in case if a cloning of packages between identical server machines is necessery dd or some other tool like Norton Ghost could be used.
Hope this helps, someone.