Posts Tagged ‘postfix’

Install and configure rkhunter for improved security on a PCI DSS Linux / BSD servers with no access to Internet

Wednesday, November 10th, 2021

install-and-configure-rkhunter-with-tightened-security-variables-rkhunter-logo

rkhunter or Rootkit Hunter scans systems for known and unknown rootkits. The tool is not new and most system administrators that has to mantain some good security servers perhaps already use it in their daily sysadmin tasks.

It does this by comparing SHA-1 Hashes of important files with known good ones in online databases, searching for default directories (of rootkits), wrong permissions, hidden files, suspicious strings in kernel modules, commmon backdoors, sniffers and exploits as well as other special tests mostly for Linux and FreeBSD though a ports for other UNIX operating systems like Solaris etc. are perhaps available. rkhunter is notable due to its inclusion in popular mainstream FOSS operating systems (CentOS, Fedora,Debian, Ubuntu etc.).

Even though rkhunter is not rapidly improved over the last 3 years (its last Official version release was on 20th of Febuary 2018), it is a good tool that helps to strengthen even further security and it is often a requirement for Unix servers systems that should follow the PCI DSS Standards (Payment Card Industry Data Security Standards).

Configuring rkhunter is a pretty straight forward if you don't have too much requirements but I decided to write this article for the reason there are fwe interesting options that you might want to adopt in configuration to whitelist any files that are reported as Warnings, as well as how to set a configuration that sets a stricter security checks than the installation defaults. 

1. Install rkhunter .deb / .rpm package depending on the Linux distro or BSD

  • If you have to place it on a Redhat based distro CentOS / Redhat / Fedora

[root@Centos ~]# yum install -y rkhunter


  • On Debian distros the package name is equevallent to install there exec usual:

root@debian:~# apt install –yes rkhunter

  • On FreeBSD / NetBSD or other BSD forks you can install it from the BSD "World" ports system or install it from a precompiled binary.

freebsd# pkg install rkhunter

One important note to make here is to have a fully functional Alarming from rkhunter, you will have to have a fully functional configured postfix / exim / qmail whatever mail server to relay via official SMTP so you the Warning Alarm emails be able to reach your preferred Alarm email address. If you haven't installed postfix for example and configure it you might do.

– On Deb based distros 

[root@Centos ~]#yum install postfix


– On RPM based distros

root@debian:~# apt-get install –yes postfix


and as minimum, further on configure some functional Email Relay server within /etc/postfix/main.cf
 

# vi /etc/postfix/main.cf
relayhost = [relay.smtp-server.com]

2. Prepare rkhunter.conf initial configuration


Depending on what kind of files are present on the filesystem it could be for some reasons some standard package binaries has to be excluded for verification, because they possess unusual permissions because of manual sys admin monification this is done with the rkhunter variable PKGMGR_NO_VRFY.

If remote logging is configured on the system via something like rsyslog you will want to specificly tell it to rkhunter so this check as a possible security issue is skipped via ALLOW_SYSLOG_REMOTE_LOGGING=1. 

In case if remote root login via SSH protocol is disabled via /etc/ssh/sshd_config
PermitRootLogin no variable, the variable to include is ALLOW_SSH_ROOT_USER=no

It is useful to also increase the hashing check algorithm for security default one SHA256 you might want to change to SHA512, this is done via rkhunter.conf var HASH_CMD=SHA512

Triggering new email Warnings has to be configured so you receive, new mails at a preconfigured mailbox of your choice via variable
MAIL-ON-WARNING=SetMailAddress


# vi /etc/rkhunter.conf

PKGMGR_NO_VRFY=/usr/bin/su

PKGMGR_NO_VRFY=/usr/bin/passwd

ALLOW_SYSLOG_REMOTE_LOGGING=1

# Needed for corosync/pacemaker since update 19.11.2020

ALLOWDEVFILE=/dev/shm/qb-*/qb-*

# enabled ssh root access skip

ALLOW_SSH_ROOT_USER=no

HASH_CMD=SHA512

# Email address to sent alert in case of Warnings

MAIL-ON-WARNING=Your-Customer@Your-Email-Server-Destination-Address.com

MAIL-ON-WARNING=Your-Second-Peronsl-Email-Address@SMTP-Server.com

DISABLE_TESTS=os_specific


Optionally if you're using something specific such as corosync / pacemaker High Availability cluster or some specific software that is creating /dev/ files identified as potential Risks you might want to add more rkhunter.conf options like:
 

# Allow PCS/Pacemaker/Corosync
ALLOWDEVFILE=/dev/shm/qb-attrd-*
ALLOWDEVFILE=/dev/shm/qb-cfg-*
ALLOWDEVFILE=/dev/shm/qb-cib_rw-*
ALLOWDEVFILE=/dev/shm/qb-cib_shm-*
ALLOWDEVFILE=/dev/shm/qb-corosync-*
ALLOWDEVFILE=/dev/shm/qb-cpg-*
ALLOWDEVFILE=/dev/shm/qb-lrmd-*
ALLOWDEVFILE=/dev/shm/qb-pengine-*
ALLOWDEVFILE=/dev/shm/qb-quorum-*
ALLOWDEVFILE=/dev/shm/qb-stonith-*
ALLOWDEVFILE=/dev/shm/pulse-shm-*
ALLOWDEVFILE=/dev/md/md-device-map
# Needed for corosync/pacemaker since update 19.11.2020
ALLOWDEVFILE=/dev/shm/qb-*/qb-*

# tomboy creates this one
ALLOWDEVFILE="/dev/shm/mono.*"
# created by libv4l
ALLOWDEVFILE="/dev/shm/libv4l-*"
# created by spice video
ALLOWDEVFILE="/dev/shm/spice.*"
# created by mdadm
ALLOWDEVFILE="/dev/md/autorebuild.pid"
# 389 Directory Server
ALLOWDEVFILE=/dev/shm/sem.slapd-*.stats
# squid proxy
ALLOWDEVFILE=/dev/shm/squid-cf*
# squid ssl cache
ALLOWDEVFILE=/dev/shm/squid-ssl_session_cache.shm
# Allow podman
ALLOWDEVFILE=/dev/shm/libpod*lock*


3. Set the proper mirror database URL location to internal network repository


Usually  file /var/lib/rkhunter/db/mirrors.dat does contain Internet server address where latest version of mirrors.dat could be fetched, below is how it looks by default on Debian 10 Linux.

root@debian:/var/lib/rkhunter/db# cat mirrors.dat 
Version:2007060601
mirror=http://rkhunter.sourceforge.net

As you can guess a machine that doesn't have access to the Internet neither directly, neither via some kind of secure proxy because it is in a Paranoic Demilitarized Zone (DMZ) Network with many firewalls. What you can do then is setup another Mirror server (Apache / Nginx) within the local PCI secured LAN that gets regularly the database from official database on http://rkhunter.sourceforge.net/ (by installing and running rkhunter –update command on the Mirror WebServer and copying data under some directory structure on the remote local LAN accessible server, to keep the DB uptodate you might want to setup a cron to periodically copy latest available rkhunter database towards the http://mirror-url/path-folder/)

# vi /var/lib/rkhunter/db/mirrors.dat

local=http://rkhunter-url-mirror-server-url.com/rkhunter/1.4/


A mirror copy of entire db files from Debian 10.8 ( Buster ) ready for download are here.

Update entire file property db and check for rkhunter db updates


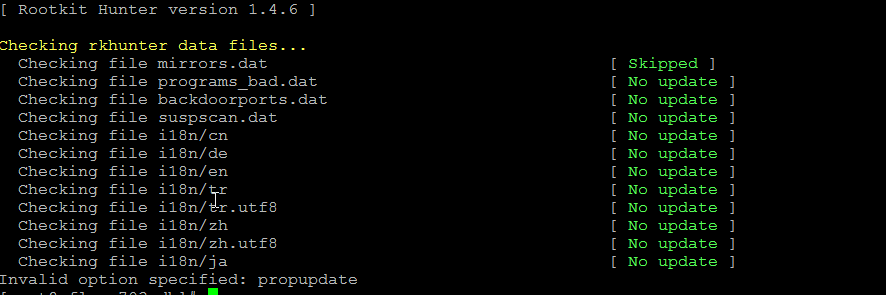
# rkhunter –update && rkhunter –propupdate

[ Rootkit Hunter version 1.4.6 ]

Checking rkhunter data files…
  Checking file mirrors.dat                                  [ Skipped ]
  Checking file programs_bad.dat                             [ No update ]
  Checking file backdoorports.dat                            [ No update ]
  Checking file suspscan.dat                                 [ No update ]
  Checking file i18n/cn                                      [ No update ]
  Checking file i18n/de                                      [ No update ]
  Checking file i18n/en                                      [ No update ]
  Checking file i18n/tr                                      [ No update ]
  Checking file i18n/tr.utf8                                 [ No update ]
  Checking file i18n/zh                                      [ No update ]
  Checking file i18n/zh.utf8                                 [ No update ]
  Checking file i18n/ja                                      [ No update ]


rkhunter-update-propupdate-screenshot-centos-linux


4. Initiate a first time check and see whether something is not triggering Warnings

# rkhunter –check

rkhunter-checking-for-rootkits-linux-screenshot

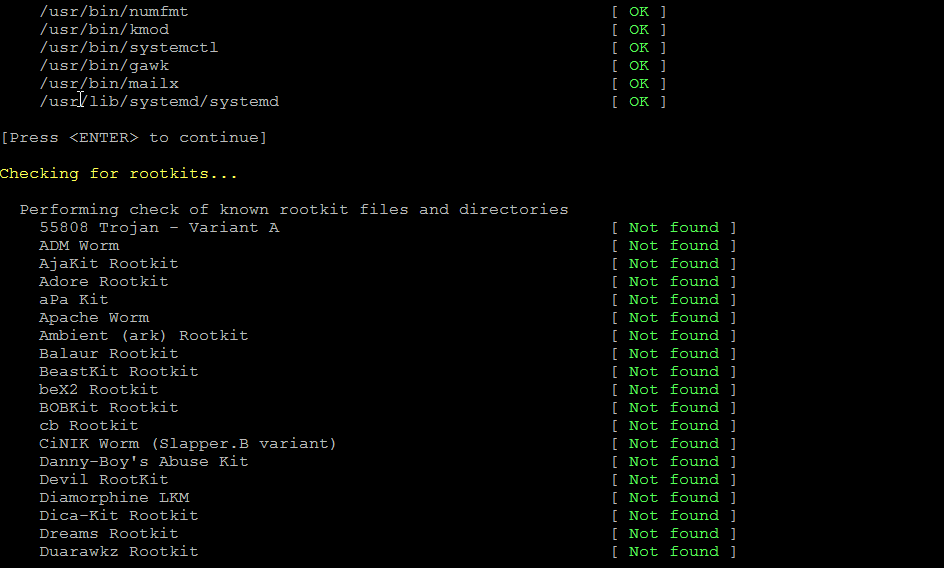
As you might have to run the rkhunter multiple times, there is annoying Press Enter prompt, between checks. The idea of it is that you're able to inspect what went on but since usually, inspecting /var/log/rkhunter/rkhunter.log is much more easier, I prefer to skip this with –skip-keypress option.

# rkhunter –check  –skip-keypress


5. Whitelist additional files and dev triggering false warnings alerts


You have to keep in mind many files which are considered to not be officially PCI compatible and potentially dangerous such as lynx browser curl, telnet etc. might trigger Warning, after checking them thoroughfully with some AntiVirus software such as Clamav and checking the MD5 checksum compared to a clean installed .deb / .rpm package on another RootKit, Virus, Spyware etc. Clean system (be it virtual machine or a Testing / Staging) machine you might want to simply whitelist the files which are incorrectly detected as dangerous for the system security.

Again this can be achieved with

PKGMGR_NO_VRFY=

Some Cluster softwares that are preparing their own /dev/ temporary files such as Pacemaker / Corosync might also trigger alarms, so you might want to suppress this as well with ALLOWDEVFILE

ALLOWDEVFILE=/dev/shm/qb-*/qb-*


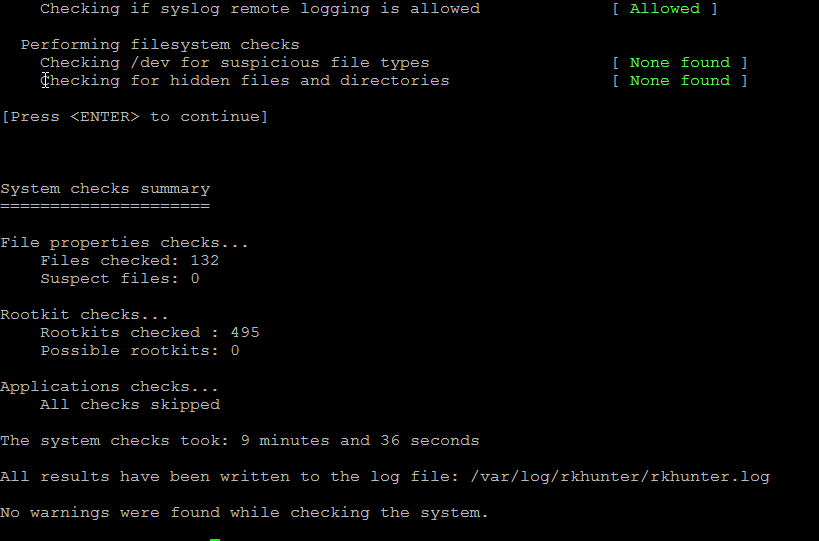
If Warnings are found check what is the issue and if necessery white list files due to incorrect permissions in /etc/rkhunter.conf .

rkhunter-warnings-found-screenshot

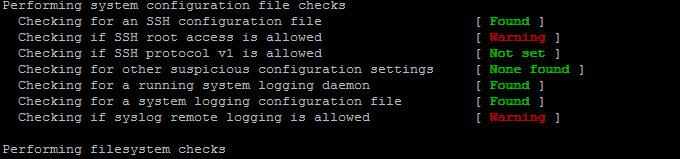
Re-run the check until all appears clean as in below screenshot.

rkhunter-clean-report-linux-screenshot

Fixing Checking for a system logging configuration file [ Warning ]

If you happen to get some message like, message appears when rkhunter -C is done on legacy CentOS release 6.10 (Final) servers:

[13:45:29] Checking for a system logging configuration file [ Warning ]
[13:45:29] Warning: The 'systemd-journald' daemon is running, but no configuration file can be found.
[13:45:29] Checking if syslog remote logging is allowed [ Allowed ]

To fix it, you will have to disable SYSLOG_CONFIG_FILE at all.
 

SYSLOG_CONFIG_FILE=NONE

Linux: logrotate fix log file permissions on newly created logs after rotation

Monday, July 5th, 2021

fix logrotate permission issues of newly logrotated files, howto chown chmod logrotate linux logo

If you have to administer a bunch of Web or Application servers you will definetely end up with some machines that has some logrotate misconfiguration.

Perhaps the most common one sysadmin faces is when you have rotated webserver, proxy, mail server logs that gets gzipped with a date timestamp of the rotation and a brand new files is created by logrotate. Such a thing could be seen on various Linux distributions and even a more corporate prodcution ready Linux – es like CentOS and Fedora occasionally end up with issues caused by improperly created user / group permissions (usually root:root) of logrotate. 

The wrong permissions of usually normally logging to file by a service, happens when the log file will get filled (or matches some thresholds) configured by logrotate respective config, the log rotate mechanism will rename this file gzip / bzip it depending on how it is prepared to behave and opens a new one, however the newly produced log file will not have the  read write  permission which are necessery for the respective service because the service is not running as administrator (root), lets say there is a haproxy daemon running with user / group haproxy, haproxy, like it happeed today on one of our legacy CentOS 6.5 servers.

The sad result is /var/log/haproxy.log or whatever log file stays empty forever even though the service is normally working and you end up blind not seeing what's going on …

To solve the empty file due to logrotate dumping the original file permissions to a wrong one due to misconfiguration or a lack of special configuration it is as easy as setting up the logrotated file to write down the new rotated file to a specic user, this is done with a one line addition of code with a syntax like:

create mode owner group

Below is extract from logrotate man page (man logrotate)

Immediately after rotation (before the postrotate script is run) the log file is created (with the same name as the log file just rotated).  mode  specifies the mode for the log file in octal (the same as chmod(2)), owner specifies the user name who will own the log file, and group specifies the group the log file will belong to. Any of the log file attributes may be omitted, in which case those attributes for the new file will use the same values as the original log file for the omitted attributes. This option can be disabled using the nocreate option.

 Lets say you have following /etc/logrotate.d/haproxy configuration that is instructing logrotate to do the rotation and this will create empty file with root:root after rotate:

root@haproxy2:/etc/logrotate.d# cat haproxy

/var/log/haproxy.log {
    daily
    rotate 52
    missingok
    notifempty
    compress
    delaycompress
    postrotate
        /usr/lib/rsyslog/rsyslog-rotate
    endscript
}

To make /var/log/haproxy.log be owned by haproxy user and group and chmod to certain owner permissions hence, do add inside the block something like: 


/var/log/haproxy.log {
….
        create 664 user group
….
}


i.e. :

/var/log/haproxy.log {
….
        create 644 haproxy hapoxy
….
}

To test the configuration do a logrotate config dry run do:

root@haproxy2:/etc/logrotate.d# logrotate -v -d -f /etc/logrotate.d/haproxy
WARNING: logrotate in debug mode does nothing except printing debug messages!  Consider using verbose mode (-v) instead if this is not what you want.

reading config file /etc/logrotate.d/haproxy
Reading state from file: /var/lib/logrotate/status
Allocating hash table for state file, size 64 entries
Creating new state
Creating new state
Creating new state
Creating new state
Creating new state
Creating new state
Creating new state
Creating new state
Creating new state
Creating new state
Creating new state
Creating new state


Handling 1 logs

rotating pattern: /var/log/haproxy.log  forced from command line (52 rotations)
empty log files are not rotated, old logs are removed
considering log /var/log/haproxy.log
  Now: 2021-07-05 21:51
  Last rotated at 2021-07-05 00:00
  log needs rotating
rotating log /var/log/haproxy.log, log->rotateCount is 52
dateext suffix '-20210705'
glob pattern '-[0-9][0-9][0-9][0-9][0-9][0-9][0-9][0-9]'
compressing log with: /bin/gzip

renaming /var/log/haproxy.log.8.gz to /var/log/haproxy.log.9.gz (rotatecount 52, logstart 1, i 8),
renaming /var/log/haproxy.log.7.gz to /var/log/haproxy.log.8.gz (rotatecount 52, logstart 1, i 7),
renaming /var/log/haproxy.log.6.gz to /var/log/haproxy.log.7.gz (rotatecount 52, logstart 1, i 6),
renaming /var/log/haproxy.log.5.gz to /var/log/haproxy.log.6.gz (rotatecount 52, logstart 1, i 5),
renaming /var/log/haproxy.log.4.gz to /var/log/haproxy.log.5.gz (rotatecount 52, logstart 1, i 4),
renaming /var/log/haproxy.log.3.gz to /var/log/haproxy.log.4.gz (rotatecount 52, logstart 1, i 3),
renaming /var/log/haproxy.log.2.gz to /var/log/haproxy.log.3.gz (rotatecount 52, logstart 1, i 2),
renaming /var/log/haproxy.log.1.gz to /var/log/haproxy.log.2.gz (rotatecount 52, logstart 1, i 1),
renaming /var/log/haproxy.log.0.gz to /var/log/haproxy.log.1.gz (rotatecount 52, logstart 1, i 0),
log /var/log/haproxy.log.53.gz doesn't exist — won't try to dispose of it
renaming /var/log/haproxy.log to /var/log/haproxy.log.1
creating new /var/log/haproxy.log mode = 0644 uid = 106 gid = 112
running postrotate script
running script with arg /var/log/haproxy.log: "
        /usr/lib/rsyslog/rsyslog-rotate
"


root@haproxy2:/etc/logrotate.d# grep -Ei '106|112' /etc/passwd
haproxy:x:106:112::/var/lib/haproxy:/usr/sbin/nologin

You do it for any other service respectively by editting whatever /etc/logrotate.d/file, lets say postfix's /var/log/maillog should be owned with 644 by postfix:postfix.
 

# cat /etc/logrotate/postfix
/var/log/maillog {
….
        create 664 postfix postfix
….
}

How to redirect / forward all postfix emails to one external email address?

Thursday, October 29th, 2020

Postfix_mailserver-logo-howto-forward-email-with-regular-expression-or-maildrop

Lets say you're  a sysadmin doing email migration of a Clustered SMTP and due to that you want to capture for a while all incoming email traffic and redirect it (forward it) towards another single mailbox, where you can review the mail traffic that is flowing for a few hours and analyze it more deeper. This aproach is useful if you have a small or middle sized mail servers and won't be so useful on a mail server that handels few  hundreds of mails hourly. In below article I'll show you how.

How to redirect all postfix mail for a specific domain to single external email address?

There are different ways but if you don't want to just intercept the traffic and a create a copy of email traffic using the always_bcc integrated postfix option (as pointed in my previous article postfix copy every email to a central mailbox).  You can do a copy of email flow via some custom written dispatcher script set to be run by the MTA on each mail arriva, or use maildrop filtering functionality below is very simple example with maildrop in case if you want to filter out and deliver to external email address only email targetted to specific domain.

If you use maildrop as local delivery agent to copy email targetted to specifidc domain to another defined email use rule like:

if ( /^From:.*domain\.com/:h ) {
  cc "!someothermail@domain2.com"
}


To use maildrop to just forward email incoming from a specific sender towards local existing email address on the postfix to an external email address  use something like:

if ( /^From: .*linus@mail.example.com.*/ )
{
        dotlock "forward.lock" {
          log "Forward mail"
          to "|/usr/sbin/sendmail linuxbox@collector.example.com"
        }
}

Then to make the filter active assuming the user has a physical unix mailbox, paste above to local user's  $HOME/.mailfilter.

What to do if your mail delivered via your Email-Server.com are sent from a monitoring and alarming scripts that are sending towards many mailboxes that no longer exist after the migration?

To achive capturing all normal attempted to be sent traffic via the mail server, we can forward all served mails towards a single external mail address you can use the nice capability of postfix to understand PCRE perl compatible regular expressions. Regular expressions in postfix of course has its specific I recommend you take a look to the postfix regexp table documentation here, as well as check the Postfix Regex / Tester / Debugger online tool – useful to validate a regexp you want to implement.

How to use postfix regular expression to do a redirect of all sent emails via your postfix mail relayhost towards external mail servers?


In main.cf /etc/postfix/main.cf include this line near bottom or as a last line:

virtual_maps = hash:/etc/postfix/virtual, regexp:/etc/postfix/virtual-regexp

One defines the virtual file which can be used to define any of your virtual domains you want to simulate as present on the local postfix, the regexp: does load the file which is read by postfix where you can type the regular expression applied to every incoming email via SMTP port 25 or encrypted MTA ports 385 / 995 etc.

So how to redirect all postfix mail to one external email address for later analysis?

Create file /etc/postfix/virtual-regexp

/.+@.+/ external-forward-email@gmail.com

Next build the mapfile (this will generate /etc/postfix/virtual-regexp.db )
 

# postmap /etc/postfix/virtual-regexp

This also requires a virtual.db to exist. If it doesn't create an empty file called virtual and run again postmap postfix .db generator

# touch /etc/postfix/virtual && postmap /etc/postfix/virtual


Note in /etc/postfix/virtual you can add your postfix mail domains for which you want the MTA to accept mail as a local mail.

In case you need to view all postfix defined virtual domains configured to accept mail locally on the mail server.
 

$ postconf -n | grep virtual
virtual_alias_domains = mydomain.com myanotherdomain.com
virtual_alias_maps = hash:/etc/postfix/virtual


The regexp /.+@.+/ external-forward-email@gmail.com applied will start forwarding mails immediately after you reload the MTA with:

# systemctl restart postfix


If you want to exclude target mail domains to not be captured by above regexp, in /etc/postfix/virtual-regexp place:

/.+@exclude-domain1.com/ @exclude-domain1.com
/.+@exclude-domain2.com/ @exclude-domain2.com

Time for a test. Send a test email


Next step is to Test it mail forwarding works as expected
 

# echo -e "Tseting body" | mail -s "testing subject" -r "testing@test.com" whatevertest-user@mail-recipient-domain.com

Get daily E-Mail Reports statistics on postfix Linux mail server

Tuesday, July 14th, 2020

https://www.pc-freak.net/images/Postfix-email-server-logo.svg-1

I've had today a task at work to monitor a postfix mail send and received emails (MAIL FROM / RPCT TO) and get out a simple statistics on what kind of emails are coming and going out from the Postfix SMTP on a server?

Below is shortly explained how I did it plus you will learn how you can use something more advanced to get server mail count, delivery status, errors etc. daily.
 

1. Using a simple script to process /var/log/messages

For that I made a small script to do the trick, the script simply checks mail delivery logged information from /var/log/maillog process a bit sort and logs in a separate log daily.

#!/bin/sh
# Process /var/log/maillog extract from= and to= mails sort
# And log mails to $LOGF
# Author Georgi Georgiev 14.07.2020

DATE_FORM=$(date +'%m_%d_%y_%H_%M_%S_%h_%m');
LOG='/home/gge/mail_from_to-mails';
LOGF="$LOG.$DATE_FORM.log";
CUR_DATE=$(date +'%m_%d_%y_%T');
echo "Processing /var/log/maillog";
echo "Processing /var/log/maillog" > $LOGF;
echo >>$LOGF
echo "!!! $CUR_DATE # Sent MAIL FROM: addresses: !!!" >> $LOGF;
grep -E 'from=' /var/log/maillog|sed -e 's#=# #g'|awk '{ print $8 }'|sed -e 's#<# #g' -e 's#># #g' -e 's#\,##'|sort -rn|uniq >> $LOGF;

echo "!!! $CUR_DATE # Receive RCPT TO: addresses !!!" >>$LOGF;
grep -E 'to=' /var/log/maillog|sed -e 's#=# #g'|awk '{ print $8 }'|sed -e 's#<# #g' -e 's#># #g' -e 's#\,##'|sort -rn|uniq >> $LOGF;


You can get a copy of the mail_from_to_collect_mails_postfix.sh script here.

I've set the script to run via a crond scheduled job once early in the mornthing and I'll leave it like that for 5 days or so to get a good idea on what are the mailboxes that are receiving incoming mail.

The cron I've set to use is as follows:

# crontab -u root -l 
05 03 * * *     sh /home/gge/mail_from_to.sh >/dev/null 2>&1


This will be necessery later for a Email Server planned migration to relay its mail via another MTA host.


2. Getting More Robust Postifx Mail Statistics from logs


My little script is of course far from best solution to get postfix mail statistics from logs.

If you want something more professional and you need to have a daily report on what mails sent to mail server and mails sent from the MTA to give you information about the Email delivery queue status, number of successful and failed emails from a mail sender / recipient and a whole bunch of useful info you can use something more advanced such as pflogsumm perl script to get daily / weekly monthly mail delivery statistics.

What can pflogsumm do for you ?


Pflogsumm is a log analyzer/summarizer for the Postfix MTA. It is
designed to provide an overview of Postfix activity, with just enough
detail to give the administrator a “heads up” for potential trouble
spots and fixing any SMTP and email related issues.

Pflogsumm generates summaries and, in some cases, detailed reports of
mail server traffic volumes rejected and bounced email and server
warnings, errors, and panics.

At the time of writting this article it is living on jimsun.linxnet.com just in case if pflogsumm.pl's official download location disappears at some time in future here is pflogsumm-1.1.3.tar.gz mirror stored on www.pc-freak.net

– Install pflogsumm

Use of pflogsumm is pretty straight forward, you download unarchive the script to some location such as /usr/local/bin/pflogsumm.pl  add the script executable flag and you run it to create a Postfix Mail Log statistics report for you

wget http://jimsun.linxnet.com/downloads/pflogsumm-1.1.3.tar.gz -O /usr/local/src/pflogsumm-1.1.3.tar.gz


# mkdir -p /usr/local/src/
# cd /usr/local/src/
# tar -zxvf pflogsumm-1.1.3.tar.gz
# cd pflogsumm-1.1.3/

# mv /usr/local/pflogsumm-1.1.3/pflogsumm.pl /usr/local/bin/pflogsumm
# chmod a+x /usr/local/bin/pflogsumm


That's all, assuming you have perl installed on the system with some standard modules, we're now good to go: 

To give it a test report to the command line:

# /usr/local/bin/pflogsumm -d today /var/log/maillog

pflogsumm-log-summary-screenshot-linux-received-forwarded-bounced-rejected

To generate mail server use report and launch to some email of choice do:

# /usr/local/bin/pflogsumm -d today /var/log/maillog | mail -s Mailstats your-mail@your-domain.com


To make pflogsumm report everyday various interesting stuff such as (message deferrals, message bounce, details, smtp delivery failures, fatal errors, recipients by message size etc. add some cronjob like below to the server:

# /usr/sbin/pflogsumm -d yesterday /var/log/maillog | mail -s Mailstats | mail -s Mailstats your-mail@your-domain.com

If you need a GUI graphical mail monitoring in a Web Browser, you will need to install a webserver with a perl / cgi support,  RRDTools and MailGraph.

linux-monitoring-mail-server-with-mailgraph.cgi

Linux Send Monitoring Alert Emails without Mail Server via relay SMTP with ssmtp / msmtp

Friday, July 10th, 2020

ssmtp-linux-server-sending-email-without-a-local-mail-server-mta-relay-howto

If you have to setup a new Linux server where you need to do a certain local running daemons monitoring with a custom scripts on the local machine Nagios / Zabbix / Graphana etc. that should notify about local running custom programs or services in case of a certain criteria is matched or you simply want your local existing UNIX accounts to be able to send outbound Emails to the Internet.

Then usually you need to install a fully functional SMTP Email server that was Sendmail or QMAIL in old times in early 21st century andusually postfix or Exim in recent days and configure it to use as as a Relay mail server some Kind of SMTP.

The common Relay smtp setting would be such as Google's smtp.gmail.com, Yahoo!'s  smtp.mail.yahoo.com relay host, mail.com or External configured MTA Physical server with proper PTR / MX records or a SMTP hosted on a virtual machine living in Amazon's AWS or m$ Azure that is capable to delivere EMails to the Internet.

Configuring the local installed Mail Transport Agent (MTA) as a relay server is a relatively easy task to do but of course why should you have a fully stacked MTA service with a number of unnecessery services such as Email Queue, Local created mailboxes, Firewall rules, DNS records, SMTP Auth, DKIM keys etc. and even the ability to acccept any emails back in case if you just want to simply careless send and forget with a confirmation that remote email was send successfully?

This is often the case for some machines and especially with the inclusion of technologies such as Kubernettes / Clustered environments / VirtualMachines small proggies such as ssmtp / msmtp that could send mail without a Fully functional mail server installed on localhost ( 127.0.0.1 ) is true jams.

ssmtp program is Simple Send-only sendMail emulator  has been around in Debian GNU / Linux, Ubuntu, CentOS and mostly all Linuxes for quite some a time but recently the Debian package has been orphaned so to install it on a deb based server host you need to use instead msmtp.
 

1. Install ssmtp on CentOS / Fedora / RHEL Linux

In RPM distributions you can't install until epel-release repository is enabled.

[root@centos:~]# yum –enablerepo=extras install epel-release

[root@centos:~]# yum install ssmtp


2. Install ssmp / msmtp Debian / Ubuntu Linux

If you run older version of Debian based distribution the package to install is ssmtp, e.g.:

root@debian:~# apt-get install –yes ssmtp


On Newer Debians as of Debian 10.0 Buster onwards install instead

root@debian:~# apt install –yes msmtp-mta

can save you a lot of effort to keep an eye on a separately MTA hanging around and running as a local service eating up resources that could be spared.
 

3. Configure Relay host for ssmtp


A simple configuration to make ssmtp use gmail.com SMTP servers as a relay host below:

linux:~# cat << EOF > /etc/ssmtp/ssmtp.conf
# /etc/ssmtp/ssmtp.conf
# The user that gets all the mails (UID < 1000, usually the admin)
root=user@host.name
# The full hostname.  Must be correctly formed, fully qualified domain name or GMail will reject connection.
hostname=host.name
# The mail server (where the mail is sent to), both port 465 or 587 should be acceptable
# See also https://support.google.com/mail/answer/78799
mailhub=smtp.gmail.com:587
#mailhub=smtp.host.name:465

# The address where the mail appears to come from for user authentication.
rewriteDomain=gmail.com
# Email 'From header's can override the default domain?

FromLineOverride=YES

# Username/Password
AuthUser=username@gmail.com
AuthPass=password
AuthMethod=LOGIN
# Use SSL/TLS before starting negotiation
UseTLS=YES
UseTLS=Yes
UseSTARTTLS=Yes
logfile        ~/.msmtp.log

EOF

This configuration is very basic and it is useful only if you don't want to get delivered mails back as this functionality is also supported even though rarely used by most.

One downside of ssmtp is mail password will be plain text, so make sure you set proper permissions to /etc/ssmtp/ssmtp.conf
 

– If your Gmail account is secured with two-factor authentication, you need to generate a unique App Password to use in ssmtp.conf. You can do so on your App Passwords page. Use Gmail username (not the App Name) in the AuthUser line and use the generated 16-character password in the AuthPass line, spaces in the password can be omitted.

– If you do not use two-factor authentication, you need to allow access to unsecure apps.
 

4. Configuring different msmtp for separate user profiles


SSMTP is capable of respecting multiple relays for different local UNIX users assuming each of whom has a separate home under /home/your-username

To set a certain user lets say georgi to relay smtp sent emails with mail or mailx command create ~/.msmtprc


linux:~# vim ~/.msmtprc


Append configuration like:

# Set default values for all following accounts.
defaults
port 587
tls on
tls_trust_file /etc/ssl/certs/ca-certificates.crt
account gmail
host smtp.gmail.com
from <user>@gmail.com
auth on
user <user>
passwordeval gpg –no-tty -q -d ~/.msmtp-gmail.gpg
# Set a default account

account default : gmail


To add it for any different user modify the respective fields and set the different Mail hostname etc.
 

5. Using mail address aliases


msmtp also supports mail aliases, to make them work you will need to have file /etc/msmptrc with
 

aliases               /etc/aliases


Standard aliasses them should work 

linux:~# cat /etc/aliases
# Example aliases file
     
# Send root to Joe and Jane
root: georgi_georgiev@example.com, georgi@example.com
   
# Send everything else to admin
default: admin@domain.example


6. Get updated when your Debian servers have new packages to update 

msmpt can be used for multiple stuff one example use would be to use it together with cron to get daily updates if there are new debian issued security or errata update pending packages, to do so you can use the apticron shell script.

To use it on debian install the apticron pack:
 

root@debian:~# apt-get install –yes apticron

apticron has the capability to:

 * send daily emails about pending upgrades in your system;
 * give you the choice of receiving only those upgrades not previously notified;
 * automatically integrate to apt-listchanges in order to give you by email the
   new changes of the pending upgrade packages;
 * handle and warn you about packages put on hold via aptitude/dselect,
   avoiding unexpected package upgrades (see #137771);
 * give you all these stuff in a simple default installation;


To configure it you have to place a config copy the one from /usr/lib/apticron/apticron.conf to /etc/apticron/apticron.conf

The only important value to modify in the config is the email address to which an apt-listchanges info for new installable debs from the apt-get dist-upgrade command. Output from them will be be send to the configured EMAIL field  in apticron.conf.
 

EMAIL="<your-user@email-addr-domain.com>"


The timing at which the offered new pending package update reminder will be sent is controlled by /etc/cron.d/apticron
 

debian:~# cat /etc/cron.d/apticron
# cron entry for apticron

48 * * * * root if test -x /usr/sbin/apticron; then /usr/sbin/apticron –cron; else true; fi

apticron will use the local previous ssmtp / msmpt program to deliver to configured mailbox.
To manually trigger apticron run:
 

root@debian:~# if test -x /usr/sbin/apticron; then /usr/sbin/apticron –cron; else true; fi


7. Test whether local mail send works to the Internet

To test mail sent we can use either mail / mailx or sendmail command or some more advanced mailer as alpine or mutt.

Below is few examples.

linux:~$ echo -e "Subject: this is the subject\n\nthis is the body" | mail user@your-recipient-domain.com

To test attachments to mail also works run:

linux:~$ mail -s "Subject" recipient-email@domain.com < mail-content-to-attach.txt

or

Prepare the mail you want to send and send it with sendmail

linux:~$ vim test-mail.txt
To:username@example.com
From:youraccount@gmail.com
Subject: Test Email
This is a test mail.

linux:~$ sendmail -t < test-mail.txt

Sending encoded atacchments with uuencode is also possible but you will need sharutils Deb / RPM package installed.

To attach lets say 2 simple text files uuencoded:

linux:~$ uuencode file.txt myfile.txt | sendmail user@example.com

echo "

To: username@domain.com From: username@gmail.com Subject: A test Hello there." > test.mail

linux:~$ cat test.mail | msmtp -a default <username>@domain.com


That's all folks, hope you learned something, if you know of some better stuff like ssmtp please shar e it.

Tracking graphically MySQL, Apache and Network performance in web with Munin on Debian Linux

Saturday, March 19th, 2011

munin_monitor_cpu_network_hard_drive_apache_mysql_performance-in-web-on-linux_logo

Munin is great software for surveillance software for your MySQL, Apache, Qmail, Postfix and many other of the classical daemon services which most of the Linux, BSD servers online are running on.

1. Munin on Debian Linux is really easy to be installed and comes to executing:

debian:~# apt-get install munin munin-node munin-plugins-extra

2. Link /var/www/munin/ to some VirtualHost or ServerHost
For instance if your munin is to be placed on the domain www.pc-freak.net.net which has the DocumentRoot of /var/www

debian:~# cd /var/www
debian:/var/www# ln -sf /var/www/munin munin

3. Add some extra MySQL related plugins

To check whole list of pmunin plugins you can enable check in /etc/munin/plugins directory

Lets say our Munin will be providing statistics mainly for MySQL, enable this bunch of plugins:

cd /etc/munin/plugins
ln -s /usr/share/munin/plugins/mysql_ mysql_
ln -s /usr/share/munin/plugins/mysql_bytes mysql_bytes
ln -s /usr/share/munin/plugins/mysql_innodb mysql_innodb
ln -s /usr/share/munin/plugins/mysql_isam_space_ mysql_isam_space_
ln -s /usr/share/munin/plugins/mysql_queries mysql_queries
ln -s /usr/share/munin/plugins/mysql_slowqueries mysql_slowqueries
ln -s /usr/share/munin/plugins/mysql_threads mysql_threads


Though above command would enable mysql monitoring it will be not working out of the box. You will find in munin logs error like:

Missing dependency Cache::Cache at /usr/share/munin/plugins/mysql_ line 716."

To fix this install libcache-perl and libcache-cache-perl

apt-get install --yes libcache-perl libcache-cache-perl
 

Then regenerate munin plugin configuration issue cmd:

munin-node-configure --suggest --shell | sh

and restart Munin-node server

service munin-node restart
 

Munin Node should be able login to the MySQL server using the Debian System Maintenance user however if you should need to create a custom user you can add the following configuration to:
 

/etc/munin/plugin-conf.d/munin-node


[mysql*]
    user root
    env.mysqluser muninmonitor
    env.mysqlpassword Your-Secret-Password

4. Edit Munin config

Make sure you have at least the following variables enabled in /etc/munin/munin.conf
 

 dbdir  /var/lib/munin
 htmldir /var/cache/munin/www
 logdir /var/log/munin
 rundir  /var/run/munin

 tmpldir    /etc/munin/templates

includedir /etc/munin/munin-conf.d

[localhost.localdomain]
    address 127.0.0.1
    use_node_name yes


5. Add Munin Alias or Virtualhost

To make Munin Accessible from Webserver you need to at least add an alias create a file
/etc/apache2/conf.d/munin with following content:

vim /etc/apache2/conf.d/munin

Alias /munin /var/cache/munin/www

<Directory /var/cache/munin/www>
        Order allow,deny
        #Allow from localhost 127.0.0.0/8 ::1
        Allow from all
        Options None
        php_value engine off

    <IfModule mod_expires.c>
        ExpiresActive On
        ExpiresDefault M310
    </IfModule>

</Directory>


If you want to access Munin from Apache subdomain create it lets say you want to access it via stats.www.pc-freak.net, use following config file:

vi /etc/apache2/sites-enabled/stats.www.pc-freak.net
 

<VirtualHost *>
   ServerAdmin hipo@www.pc-freak.net
   ServerName stats.www.pc-freak.net
   DocumentRoot /var/cache/munin/www
   <Directory />
       Options FollowSymLinks
       #AllowOverride All
       php_value engine off
   </Directory>
   LogLevel debug
   CustomLog /var/log/apache2/munin/access.log combined
   ErrorLog /var/log/apache2/munin/error.log
   ServerSignature On
<Directory /var/cache/munin/www>
        Order allow,deny
        #Allow from localhost 127.0.0.0/8 ::1
        Allow from all
        Options FollowSymlinks
        #AllowOverride All
        php_value engine off

</Directory>

</VirtualHost>


6. Restart Apache;

debian:~# /etc/init.d/apache2 restart

Now to access the newly installed munin point your favorite browser to (either the subdirectory configured for access or the Virtualhost subdomain):

https://www.pc-freak.net/munin/
or
http://munin.www.pc-freak.net

eth0-network-traffic-munin-server-statistics

connections_through_firewall-statistics-munin-debian-linux
7. Protecting Munin with a password

As it could be a security leak to expose statistics regarding your server (Disk I/O, Memory, Load Avarage, Apache, MySQL Postfix) operations it is good security practice to protect munin with a password.

I've earlied blogged on how to protect your server munin web-statistics wtih an htaccess password (read it here)


munin-cup-statistics-by-day-and-by-month-screenshot

Happy Monitoring

Installation and Configuration of Clamav antivirus on Debian GNU / Linux

Monday, September 9th, 2013

Clamav logo installing Clamav antivirus to scan periodically Debian server websites for viruses

Clamav Antivirus is one of must have packages installed on a new Debian Linux server. It is not only necessary whether configuring a new Mail server be it Qmail or Postfix but is good to have to always check files on a Webserver. Until few years infecting of Sites with Viruses / Installing WebShells or Backdooring for further access using Perl or PHP vulnerable PHP code was not so common, However nowadays with increase of complexity of languages and increase of not security minded programmers this possibility dramatically increaed. Thus nowadays, whether I configure a new Apache + PHP + CGI support server I always install Clamav AV. Some might argue that Clamav Virus definitions are still too little compared to proprietary solutions like BitDefender / AVG or Avast but since my experience with this under Linux is not so bright as well as Clamav captures essential Viruses and Backdoors I still prefer to keep on with Clamav.  Even on home Desktops with Linux clamav is of use as there are plenty of free-ware software for Linux which come only distributed only in a binary form and hence its good to check them with clamav before use whether they don't contain some well known Rootkit or Virus. Over the years Clamav has done great job for me whether I had to clean up "hacked" hosts containing  script kiddie exploit scanners or Virus infected ELF binaries
.
1. Installing ClamAV in Debian Wheezy Linux

Before time there was a separate Debian repository called Volatille providing latest version release of Clamav, since Debian Squeeze Volatille project is discontinued, thus installing on Wheezy as a deb package is only available via standard Debian repositories.

apt-get update && apt-get --yes upgrade
...

apt-get install --yes clamav clamav-daemon

As package dependencies you get installed:

clamav clamav-base clamav-freshclam libbz2-1.0 libclamav1 libcurl3 libidn11 ucf

Clamav-Daemon will launch immediately after packages are installed and is available as process name /usr/sbin/clamd

# ps ax |grep -i clam
 2641 ?        Ssl    6:39 /usr/sbin/clamd
 2791 ?        Ss    12:04 /usr/bin/freshclam -d --quiet
12300 pts/0    S+     0:00 grep -i clam

2. Updating Clamav Antivirus Definitions

Its worthy say few words on clamav-freshclam as it is part of ClamAV which is used to update Clamav Virus definitions. Update of ClamAV vir definitions are updating automatically through /usr/bin/freshclam daemon which is started automatically by Debian postconfiguration scripts right after Clamav install.

Manual update of AV definitions can be done also with freshclam.

# freshclam
ClamAV update process started at Sun Sep  8 17:48:36 2013
main.cvd is up to date (version: 54, sigs: 1044387, f-level: 60, builder: sven)
daily.cvd is up to date (version: 17830, sigs: 1696886, f-level: 63, builder: neo)
bytecode.cld is up to date (version: 225, sigs: 42, f-level: 63, builder: dgoddard)


To keep an eye on definition auto-updates (useful to check where something fails), check out in /var/log/clamav/freshclam.log

A sure indication that Anvirus updates are conducting fine should be log records like:
 

Sun Sep  8 16:27:44 2013 -> ————————————–
Sun Sep  8 17:27:44 2013 -> Received signal: wake up
Sun Sep  8 17:27:44 2013 -> ClamAV update process started at Sun Sep  8 17:27:44 2013
Sun Sep  8 17:27:44 2013 -> main.cvd is up to date (version: 54, sigs: 1044387, f-level: 60, builder: sven)
Sun Sep  8 17:27:44 2013 -> daily.cld is up to date (version: 17830, sigs: 1696886, f-level: 63, builder: neo)
Sun Sep  8 17:27:44 2013 -> bytecode.cld is up to date (version: 225, sigs: 42, f-level: 63, builder: dgoddard)
Sun Sep  8 17:27:47 2013 -> ————————————–


3. Configuring ClamAV

For Desktop use clamav default config is pretty good. However for servers its good to raise  2 up MaxThreads:

By default MaxThreads is 12

MaxThreads 12

Change to from 30 to 80 depending on how powerful machine ClamAV runs, even on some servers more Clamav threads might be necessary

MaxThreads 30

Other value I like changing is SelfCheck 3600 is too long time for clamav Virus definitions integrity I prefer to set it to 600, i.e.

SelfCheck 600

By default ClamAV is also configured to scan archive files as well. However for this to work you will have to have previously installed unzip and unrar on system. If still you don't have them installed run:

# apt-get install --yes unrar unzip
...

Note that you will need to have non-free part of Debian deb repositories to /etc/apt/sources.list

Here is one of my sources.list
 

deb http://ftp.uk.debian.org/debian squeeze main contrib non-free
deb http://security.debian.org/ squeeze/updates main contrib non-free
deb-src http://security.debian.org/ squeeze/updates main contrib non-free

deb http://ftp.debian.skynet.be/ftp/debian/ squeeze main contrib non-free
deb-src http://ftp.debian.skynet.be/ftp/debian/ stable main contrib non-free

deb http://security.debian.org squeeze/updates main contrib non-free
deb-src http://security.debian.org/ squeeze/updates main contrib non-free

3. Scanning with ClamAV

# clamscan -r /tmp/
./dos-58.160.208.43: OK
./dos-108.18.38.140: OK
./dos-188.194.80.100: OK
./dos-91.224.160.135: OK
./dos-128.253.117.70: OK
./dos-128.172.143.110: OK
./dos-77.92.102.34: OK
./dos-195.230.5.12: OK
...

....
----------- SCAN SUMMARY -----------
Known viruses: 2735887
Engine version: 0.97.8
Scanned directories: 1
Scanned files: 129
Infected files: 0
Data scanned: 0.00 MB
Data read: 0.00 MB (ratio 0.00:1)
Time: 4.769 sec (0 m 4 s)


-r flag stands for recursive scan – e.g. scan all sub-directories in directory and its content

To not flood your console / ssh connection one very useful option is -i (print only whetherinfected files are matched). Here is one more sample case:

# clamscan -r -i /var/tmp/
----------- SCAN SUMMARY -----------
Known viruses: 2735887
Engine version: 0.97.8
Scanned directories: 1
Scanned files: 2
Infected files: 0
Data scanned: 0.26 MB
Data read: 0.13 MB (ratio 1.97:1)
Time: 4.824 sec (0 m 4 s)


Whether you're on a physical server console and it has pc speaker or sound blaster use –bell option to ring a bell every time a Virus infection is found, for exmpl.

# clamscan -r -i --bell /var/www/

4. Scanning periodically and reporting with ClamAV directories with websites

A very common use of ClamAV is to just setup a scheduled cronjob once a month to scan, whether server folder containing a bunch of websites in separate Virtualhosts contain some viruses or malicious stuff. Then as administrator check those logs once a month to make sure server site or group of sites does not become banned in search engine (blocked by Google Chrome and Firefox as Virus hotbed) …
# crontab -u root -e
00 02 01 * * clamscan -r /var/www -l /var/log/websites-scan.log

Then once a month check out /var/log/websites-scan.log

Fix CREATE command denied to user ‘mailuser’@’localhost’ for table ‘virtual_domains’

Saturday, July 13th, 2013

I'm doing a new postfix + dovecot installation and after following workaround.org guide, to create MySQL databases and testing by logging in with mysql cli and trying to create databases as pointed by guide I stubmed on error:

CREATE command denied to user 'mailuser'@'localhost' for table 'virtual_domains'

The error is because, mailuser doesn't have permissions to create tables in mailserver DB to fix that: I had to login in MySQL server as root and issue GRANT PRIVILEGES on table, i.e.:

mysql -u root -p
password:
mysql> GRANT ALL PRIVILEGES ON `mailserver`.* TO 'mailuser'@'localhost';


Problem Solved! 😉

How to list and delete mail queue on Qmail / Sendmail / Postfix and Exim SMTP server

Wednesday, April 3rd, 2013

How to list and manage delete Qmail Postfix Sendmail Exim mail SMTP queue View-and delete manage Linux and FreeBSD mail server queue

I have to administrate different kind of mail servers. Different clients has different requirements so in daily job I had to take care for all major mail server platforms our there. Often I have to fix problems with mail servers one very useful thing is to check the mail server queue to see what is there holding to be delivered. Often problems with busy mail servers are rooted in overfilled queues with undelivered mails so checking the queue on Postfix / Exim / Sendmail and Qmail is among the first thing to do to diagnose a problem with improperly working SMTP. In this little article I will show how one can check what is in the queue even if he didn't have the technical background on how each of those mail delivery agents works.

1. How to check and manage queue of Qmail Mail Server

Essential info on how many messages are in the queue and to list this messages in Qmail are done with qmail-qstat and qmail-qread.

a) Checking how many messages are in Qmail queue undelivered to remote SMTPs

root@mail:~# qmail-qstat
messages in queue: 1
messages in queue but not yet preprocessed: 0

b) Listing undelivered e-mails held in Qmail queue

root@mail:~# qmail-qread
26 Mar 2013 01:33:07 GMT  #9609259  748  <info@pomoriemonastery.com>
    remote    bpfejd@gprizm.com
root@mail:~#

One other useful command in dealing with Qmail queue is qmail-qread type it and see for yourself what it does.
c) Flushing qmail queue

Use a tiny shell script ( flush_qmail_queue.sh ), deleting all files in /var/qmail/queue/mess – directory where qmail stores undelivered messages in queue.

# ./flush_qmail_queue.sh

Though above script should be working in some cases, where there are permission problems with Queue or some other mess it is better to use more sophisticated Qmail Queue cleaining tool Qmail MailRemove. To use its necessary to have a working version of Python programming language. Once downloaded Qmail MailRemove, mkdir  /var/qmail/queue/filter (a directory needed for MailRemove to work). Then run script

# ./mailRemove.py email_to_remove

Other variant to clean messed qmail queue is to use qmailHandle.

2. How to check and delete mails from queue in Postfix SMTP

On postfix queue is checked using both postqueue command which is postfix's specific tool for viewing the queue or the standard sendmail mailq. mailq is actually – Postfix to sendmail compitability interface, i.e. this command is not the native way to view queue in Postfix but is just a wrapper binary which invokes postqueue with an option to visualize what is in queue for SMTP admins accustomed to work with sendmail.

a) Checking list of undelivered e-mails

Below is an examples:

mail:~# mailq

-Queue ID- –Size– —-Arrival Time—- -Sender/Recipient——-
4A22BBE1A3*     657 Mon Apr  1 18:46:01  www-data@debian.uk2net.com
                                         csacpabb@nasvalke.com

25824BE18B*     660 Thu Mar 28 18:15:03  www-data@debian.uk2net.com
                                         Aliermarl@fmailxc.com.com

D2AA7BE1BF      652 Sun Mar 31 04:30:21  www-data@debian.uk2net.com
(host mail.drugsellr.com[37.1.218.81] refused to talk to me: 421 Too many concurrent SMTP connections; please try again later.)
                                         Erudge@drugsellr.com

mail:~# postfix -p
-Queue ID- –Size– —-Arrival Time—- -Sender/Recipient——-
36911BE18D*     662 Mon Mar 25 11:08:01  www-data@debian.uk2net.com
                                         lutuaslenty@fmailxc.com.com

C2439BE207*     662 Fri Mar 22 14:59:45  www-data@debian.uk2net.com
                                         Gavepolla@fmailxc.com.com

4A22BBE1A3*     657 Mon Apr  1 18:46:01  www-data@debian.uk2net.com
                                         csacpabb@nasvalke.com

b) Checking the  number of undelivered mails living in Postfix queue

postfix:~#  postqueue -p|wc -l
433

c) Viewing content of specific mail held in Postfix queue

Whether you need to check content of specific undelivered mail kept in queue you should do it by its ID, to view last mail from earlier postfix -p example:

postfix:~# postcat -q 4A22BBE1A3

*** ENVELOPE RECORDS deferred/A/4A22BBE1A3 ***
message_size:             656             187               1               0             656
message_arrival_time: Tue Apr  2 14:25:34 2013
create_time: Tue Apr  2 14:25:35 2013
named_attribute: rewrite_context=local
sender_fullname: www-data
sender: www-data@debian.uk2net.com
*** MESSAGE CONTENTS deferred/A/4A22BBE1A3 ***
Received: by postfix (Postfix, from userid 33)
        id AA379BE07A; Tue,  2 Apr 2013 14:25:34 +0100 (BST)
To: hawtiene@drugsellr.com
Subject: =?UTF8?B?QWNjb3VudCBpbmZvcm1hdGlvbiBmb3IgU09DQ0VSRkFNRQ==?=
X-PHP-Originating-Script: 1000:register_login_functions.php
From: SOCCERFAME <no-reply@mail.host.com>
Content-type:text/plain; charset=UTF8
Message-Id: <20130402132535.AA379BE07A@mail.host.com>
Date: Tue,  2 Apr 2013 14:25:34 +0100 (BST)

Please keep that email. It contains your username and password for postfix.
—————————-
nick : hawtiene
pass : 1v7Upjw3nT
—————————-

*** HEADER EXTRACTED deferred/A/4A22BBE1A3 ***
original_recipient: hawtiene@drugsellr.com
recipient: hawtiene@drugsellr.com
*** MESSAGE FILE END deferred/A/4A22BBE1A3 ***

d) Deleting mails in Postfix queue

To delete all mails in Postfix queue run:

postfix:~# postsuper -d ALL

If Postfix cannot deliver a message to a recipient it is placed in the deferred queue.  The queue manager will scan the deferred queue to see it if can place mail back into the active queue.  How often this scan occurs is determined by the queue_run_delay.
The queue_run_delay is by default 300s or 300 seconds. If you have a very busy mail server you may see a large deferred queue.
To delete all mails in deferred queue.

postfix:~# postsuper -d ALL deferred

3. How to check mail queue of Exim mail server

Viewing number of messages and list of undelivered messages in Exim queue is done using exim command by specifying arguments.

a) Checking the list of undelivered mails kept undelivered in Exim SMTP Queue


root@iqtestfb:/etc/exim4# exim -bp

4d 416 1UI1fS-00021I-1s <root@ETC_MAILNAME> *** frozen *** hipo@www.pc-freak.net 4d 746 1UI1gc-00023T-0S <root@ETC_MAILNAME> *** frozen *** root@ETC_MAILNAME 4d 752 1UI1lR-0003H0-89 <root@ETC_MAILNAME> *** frozen *** root@ETC_MAILNAME 4d 894 1UI1lR-0003H5-I6 <www-data@ETC_MAILNAME> *** frozen *** www-data@ETC_MAILNAME

b) Counting number of Exim undelivered messages kept in Mail Queue
exim-smtp:/etc/exim4# exim -bpc 2063 c) Getting a summary of all messages in Exim Queue (Count, Volume, Oldest, Newest, Destination Domain)
exim-smtp:/etc/exim4# exim -bp| exiqsumm

Count Volume Oldest Newest Domain —– —— —— —— —— 1 862 22h 22h 126.com 2 1751 12h 5h 163.com 21 3111KB 4d 3h abv.bg 2 766KB 42h 7h alice.it 1 383KB 7h 7h aol.com 1 383KB 4d 4d att.net 1 383KB 3d 3d beotel.net 2 766KB 20h 19h bih.net.ba 1685 3291KB 4d 1m etc_mailname 1 383KB 70h 70h facebook.com 1 383KB 66h 66h gaaa 81 22MB 4d 15m gmail.com 1 564 3d 3d gmaill.com 1 383KB 3d 3d googlemail.com 1 383KB 64h 64h hotmai.rs 33 10MB 4d 2h hotmail.com 25 9193KB 4d 79m hotmail.it 1 383KB 4d 4d hotmailcom 2 1128 24h 20h icloud.com 2 766KB 67h 67h inwind.it 11 3831KB 3d 7h libero.it 1 383KB 20h 20h live.co.uk 3 767KB 37h 3h live.com 6 1916KB 67h 45h live.it 1 552 28h 28h live.no 1 383KB 67h 67h llle.it 1 383KB 67h 67h lllle.it 1 383KB 33m 33m luigimori.it 2 389KB 56h 4h mail.bg 1 383KB 66h 66h mailmetrash.com 1 383KB 39h 39h malltron.it 1 562 7h 7h me.com 1 383KB 4d 4d msn.com 2 1116 49h 47h net.hr 1 383KB 28h 28h orion.rs 1 383KB 3d 3d paskaa.com 75 31KB 4d 3d www.pc-freak.net 1 572 3d 3d prismamedia.ro 1 383KB 71h 71h rediffmail.com 1 383KB 28h 28h seznam.cz 1 383KB 14m 14m siol.net 36 11KB 4d 3d sms.mtel.net 1 557 53h 53h t-com.hr 1 383KB 23h 23h tecnobagno.191.it 1 383KB 4d 4d teol.net 2 766KB 67h 44h virgilio.it 1 383KB 42h 42h windwslive.com 1 549 3d 3d yahoo 43 9213KB 4d 74m yahoo.com 2 766KB 70h 46h yahoo.it 1 383KB 71h 71h ymail.com ————————————————————— 2068 76MB 4d 1m TOTAL


c)  List Exim queued messages sorted by recipient address and sender address

  To list e-mails in queue sorted by recipient address

exim-smtp:/etc/exim4# exim -bpr|grep -Eo "^\s*[^ ]*@[^ ]*$" |sort | uniq -c

To List queued messages grouped by address of sender
exim-smtp:/etc/exim4# exim -bpr | grep -Eo "<[^ ]*@[^ ]*>" | sort | uniq -c  

d) Forcing Exim  to attempt re-send e-mails kept inside
queue

As Exim is relatively new SMTP its authors thought deeply before writting it and included options to do queue e-mail sent whether server is not under extremely high loads as well as send, regardless of load. Make Exim start sending queue e-mails if server is not overloaded (no extra-high server load)
exim-smtp:/etc/exim4# exim -q -v

  To make Exim force a queue run regardless of system load exim-smtp:/etc/exim4# exim -qf -v  

To make Exim deliver only e-mails sent from server to server (usually e-mails from local server monitoring software and log reports)
exim-smtp:/etc/exim4# exim -ql -v

e) Deleting e-mails from Exim mail queue

To Remove a message from queue identify by ID

exim-smtp:/etc/exim4# exim -Mrm <message-id>     Force Exim delivery of a message regardless of Frozen status

exim-smtp:/etc/exim4# exim -M<message-id >  

f) Removing Exim mails older than certain seconds or hours To remove all mails older than 12hrs (43000 seconds) exim-smtp:~# exiqgrep -o 43000 -i | xargs exim -Mrm

Deleting all frozen mails from queue is done with:

exim-smtp:~# exiqgrep -z -i | xargs exim -Mrm  

Removing all e-mails belonging to particular sender

exim-smtp:~# exiqgrep -i -f user@domain.com | xargs exim -Mrm

  Removing all mails from a sender that are older than 12hrs

exim-smtp:~# exiqgrep -o 43000 -i -f user@domain.com | xargs exim -Mrm
 

g) Flushing Exim mail queue
Use

exim-smtp:~# runq
  or

exim-smtp:~# exim -q

4. How to view and manage sendmail SMTP queue

a) Listing all e-mails stored in Sendmail queue

To list the mail queue in sendmail

sendmail:~# sendmail -bp
/var/spool/mqueue is empty
        Total requests: 0

or

sendmail:~# mailq
 

/var/spool/mqueue (3 requests) —–Q-ID—– –Size– —–Q-Time—– ————Sender/Recipient———– m9TMLQHG012749 1103 Thu Oct 30 11:21 <apache@localhost.localdomain> (host map: lookup (electrictoolbox.com): deferred) <test@electrictoolbox.com> m9TMLRB9012751 37113 Thu Oct 30 11:21 <apache@localhost.localdomain> (host map: lookup (electrictoolbox.com): deferred) <test@electrictoolbox.com> m9TMLPcg012747 240451 Thu Oct 30 11:21 <apache@localhost.localdomain> (host map: lookup (electrictoolbox.com): deferred) <test@electrictoolbox.com> Total requests: 3

b) Checking queue for specific mail sender or recipient

sendmail:~# mailq | grep -i email@domain-name.com -A 2 -B 2
....

c) Removing all e-mails from Sendmail queue

To delete everything stored in Sendmail queue delete files from directory where sendmail stores still undelivered mails. In sendmail this is /var/spool/mqueue and /var/mqueue

sendmail:~# rm /var/spool/mqueue/*.*
sendmail:~# rm /var/mqueue/*.*

Deleting all pending mails from queue

To remove / delete e-mails originating from certain domain / user or recipient

sendmail:~# sendmail -qS -v domain-name.com

To delete e-mail from certain user or recipieint

sendmail:~# sendmail -qR -v yahoo.co.uk


Install Sendmail mail server on Debian GNU / Linux

Sunday, March 31st, 2013

Installing sendmail on Debian Linux is something not so common these days. As sendmail has been overshadowed by his competitors Exim and Postfix. By default Debian Linux comes with Exim (light) installed as Exim is tiny and perfectly suitable for dealing with small and mid-sized SMTP needs. The reason why sendmail has been moved out by its competitors over the last 15 years is sendmail configuration is one big hell and besides that sendmail has been well known for its many security remote exploit holes – making it a famous target for crackers. Well anyways in some cases sendmail is necessary to install especially if you have a client which wants to have it set up. In this short article I will show how very basic sendmail installation on Debian host is done.

 blackstar:~# apt-get install sendmail-bin sensible-mda

Reading package lists… Done
Building dependency tree      
Reading state information… Done

The following extra packages will be installed:
  sendmail-base sendmail-cf sensible-mda
Suggested packages:
  sendmail-doc logcheck resolvconf sasl2-bin
The following packages will be REMOVED:
  exim4 exim4-base exim4-config exim4-daemon-light sa-exim task-mail-server
The following NEW packages will be installed:
  sendmail-base sendmail-bin sendmail-cf
0 upgraded, 3 newly installed, 6 to remove and 26 not upgraded.
Need to get 1,626 kB of archives.
After this operation, 592 kB disk space will be freed.
Do you want to continue [Y/n]? Y
Get:1 http://ftp.bg.debian.org/debian/ wheezy/main sendmail-base all 8.14.4-2.1 [362 kB]
Get:2 http://ftp.bg.debian.org/debian/ wheezy/main sendmail-cf all 8.14.4-2.1 [300 kB]
Get:3 http://ftp.bg.debian.org/debian/ wheezy/main sendmail-bin i386 8.14.4-2.1 [964 kB]
Fetched 1,626 kB in 0s (3,057 kB/s)  
(Reading database … 199577 files and directories currently installed.)
Removing task-mail-server …
Selecting previously unselected package sendmail-base.
(Reading database … 199577 files and directories currently installed.)
Unpacking sendmail-base (from …/sendmail-base_8.14.4-2.1_all.deb) …
Selecting previously unselected package sendmail-cf.
Unpacking sendmail-cf (from …/sendmail-cf_8.14.4-2.1_all.deb) …
Processing triggers for man-db …
(Reading database … 199939 files and directories currently installed.)
Removing sa-exim …
[….] Reloading exim4 configuration files:invoke-rc.d: initscript exim4, action "reload" failed.
dpkg: exim4-config: dependency problems, but removing anyway as you requested:
 exim4-base depends on exim4-config (>= 4.30) | exim4-config-2; however:
  Package exim4-config is to be removed.
  Package exim4-config-2 is not installed.
  Package exim4-config which provides exim4-config-2 is to be removed.
 exim4-base depends on exim4-config (>= 4.30) | exim4-config-2; however:
  Package exim4-config is to be removed.
  Package exim4-config-2 is not installed.
  Package exim4-config which provides exim4-config-2 is to be removed.

Removing exim4-config …
dpkg: exim4-daemon-light: dependency problems, but removing anyway as you requested:
 exim4 depends on exim4-daemon-light | exim4-daemon-heavy | exim4-daemon-custom; however:
  Package exim4-daemon-light is to be removed.
  Package exim4-daemon-heavy is not installed.
  Package exim4-daemon-custom is not installed.
 bsd-mailx depends on default-mta | mail-transport-agent; however:
  Package default-mta is not installed.
  Package exim4-daemon-light which provides default-mta is to be removed.
  Package mail-transport-agent is not installed.
  Package exim4-daemon-light which provides mail-transport-agent is to be removed.

Removing exim4-daemon-light …
[ ok ] Stopping MTA:.
ALERT: exim paniclog /var/log/exim4/paniclog has non-zero size, mail system possibly broken
dpkg: exim4-base: dependency problems, but removing anyway as you requested:
 exim4 depends on exim4-base (>= 4.80).

Removing exim4-base …
Processing triggers for man-db …
Selecting previously unselected package sendmail-bin.
(Reading database … 199786 files and directories currently installed.)
Unpacking sendmail-bin (from …/sendmail-bin_8.14.4-2.1_i386.deb) …
Processing triggers for man-db …
Setting up sendmail-base (8.14.4-2.1) …
adduser: Warning: The home directory `/var/lib/sendmail' does not belong to the user you are currently creating.
Setting up sendmail-cf (8.14.4-2.1) …
Setting up sendmail-bin (8.14.4-2.1) …
update-rc.d: warning: default stop runlevel arguments (0 1 6) do not match sendmail Default-Stop values (1)
update-alternatives: using /usr/lib/sm.bin/sendmail to provide /usr/sbin/sendmail-mta (sendmail-mta) in auto mode
update-alternatives: using /usr/lib/sm.bin/sendmail to provide /usr/sbin/sendmail-msp (sendmail-msp) in auto mode
update-alternatives: warning: not replacing /usr/share/man/man8/sendmail.8.gz with a link

You are doing a new install, or have erased /etc/mail/sendmail.mc.
If you've accidentaly erased /etc/mail/sendmail.mc, check /var/backups.

I am creating a safe, default sendmail.mc for you and you can
run sendmailconfig later if you need to change the defaults.

[ ok ] Stopping Mail Transport Agent (MTA): sendmail.
Updating sendmail environment …
Validating configuration.
Writing configuration to /etc/mail/sendmail.conf.
Writing /etc/cron.d/sendmail.
Could not open /etc/mail/databases(No such file or directory), creating it.
Could not open /etc/mail/sendmail.mc(No such file or directory)
Reading configuration from /etc/mail/sendmail.conf.
Validating configuration.
Writing configuration to /etc/mail/sendmail.conf.
Writing /etc/cron.d/sendmail.
Turning off Host Status collection
Could not open /etc/mail/databases(No such file or directory), creating it.
Reading configuration from /etc/mail/sendmail.conf.
Validating configuration.
Creating /etc/mail/databases…

Checking filesystem, this may take some time – it will not hang!
  …   Done.
 
Checking for installed MDAs…
Adding link for newly extant program (mail.local)
Adding link for newly extant program (procmail)
sasl2-bin not installed, not configuring sendmail support.

To enable sendmail SASL2 support at a later date, invoke "/usr/share/sendmail/update_auth"

 
Creating/Updating SSL(for TLS) information
Creating /etc/mail/tls/starttls.m4…
Creating SSL certificates for sendmail.
Generating DSA parameters, 2048 bit long prime
This could take some time
…+………………..+.+..+..+++
..+.+………….+.++++++++++++++++++++++++++++++*
Generating RSA private key, 2048 bit long modulus
………………..+++
…………………+++
e is 65537 (0x10001)

*** *** *** WARNING *** WARNING *** WARNING *** WARNING *** *** ***

Everything you need to support STARTTLS (encrypted mail transmission
and user authentication via certificates) is installed and configured
but is *NOT* being used.

To enable sendmail to use STARTTLS, you need to:
1) Add this line to /etc/mail/sendmail.mc and optionally
   to /etc/mail/submit.mc:
  include(`/etc/mail/tls/starttls.m4')dnl
2) Run sendmailconfig
3) Restart sendmail

 
Updating /etc/hosts.allow, adding "sendmail: all".

Please edit /etc/hosts.allow and check the rules location to
make sure your security measures have not been overridden –
it is common to move the sendmail:all line to the *end* of
the file, so your more selective rules take precedence.
Checking {sendmail,submit}.mc and related databases…
Reading configuration from /etc/mail/sendmail.conf.
Validating configuration.
Creating /etc/mail/databases…
Reading configuration from /etc/mail/sendmail.conf.
Validating configuration.
Creating /etc/mail/databases…
Reading configuration from /etc/mail/sendmail.conf.
Validating configuration.
Creating /etc/mail/Makefile…
Reading configuration from /etc/mail/sendmail.conf.
Validating configuration.
Writing configuration to /etc/mail/sendmail.conf.
Writing /etc/cron.d/sendmail.
Disabling HOST statistics file(/var/lib/sendmail/host_status).
Creating /etc/mail/sendmail.cf…
*** ERROR: FEATURE() should be before MAILER()
*** MAILER(`local') must appear after FEATURE(`always_add_domain')*** ERROR: FEATURE() should be before MAILER()
*** MAILER(`local') must appear after FEATURE(`allmasquerade')*** ERROR: FEATURE() should be before MAILER()
 
Creating /etc/mail/submit.cf…
Informational: confCR_FILE file empty: /etc/mail/relay-domains
Warning: confCT_FILE source file not found: /etc/mail/trusted-users
 it was created
Informational: confCT_FILE file empty: /etc/mail/trusted-users
Warning: confCW_FILE source file not found: /etc/mail/local-host-names
 it was created
Warning: access_db source file not found: /etc/mail/access
 it was created
Updating /etc/mail/access…
Linking /etc/aliases to /etc/mail/aliases
Updating /etc/mail/aliases…

WARNING: local host name (blackstar) is not qualified; see cf/README: WHO AM I?
/etc/mail/aliases: 13 aliases, longest 10 bytes, 145 bytes total
 
Warning: 3 database(s) sources
    were not found, (but were created)
    please investigate.
 
Warning: These messages were issued while creating sendmail.cf
    make sure they are benign before starting sendmail!
 
Errors in generating sendmail.cf
*** ERROR: FEATURE() should be before MAILER()
*** MAILER(`local') must appear after FEATURE(`always_add_domain')*** ERROR: FEATURE() should be before MAILER()
*** MAILER(`local') must appear after FEATURE(`allmasquerade')*** ERROR: FEATURE() should be before MAILER()
 
[ ok ] Starting Mail Transport Agent (MTA): sendmail.
(Reading database … 199837 files and directories currently installed.)
Removing exim4 …
 

Right after packages gets installed it is good idea to get rid of any remains of previous exim SMTP install, run;

blackstar:~# dpkg --purge exim4
blackstar:~# dpkg --purge exim4-base
blackstar:~# dpkg --purge exim4-config
blackstar:~# dpkg --purge exim4-daemon-light
blackstar:~# dpkg --purge sa-exim

blackstar:~# grep -i sendmail /etc/passwd
smmta:x:121:128:Mail Transfer Agent,,,:/var/lib/sendmail:/bin/false
smmsp:x:124:129:Mail Submission Program,,,:/var/lib/sendmail:/bin/false
blackstar:~# grep -i -E "smmta|smmsp" /etc/passwd
smmta:x:121:128:Mail Transfer Agent,,,:/var/lib/sendmail:/bin/false
smmsp:x:124:129:Mail Submission Program,,,:/var/lib/sendmail:/bin/false

Sendmail install does create two new users smmta and smmsp in /etc/passwd and /etc/group

As you see from earlier apt-get output sendmail is provided on Debian via 4 packs:

root@blackstar:~# dpkg -l |grep -i sendmail
ii  libmail-sendmail-perl                0.79.16-1                          all          Send email from a perl script
ii  sendmail-base                        8.14.4-2.1                         all          powerful, efficient, and scalable Mail Transport Agent
ii  sendmail-bin                         8.14.4-2.1                         i386         powerful, efficient, and scalable Mail Transport Agent
ii  sendmail-cf                          8.14.4-2.1                         all          powerful, efficient, and scalable Mail Transport Agent

libmail-sendmail-perl installs a perl module (class)  /usr/share/perl5/Mail/Sendmail.pm.

sendmail-bin contains main sendmail components binary files, cron bindings related to sendmail, some manual pages and creates structure necessary for sendmail to process email queue. sendmail-cf provides a multitude of sendmail configurations in macroses and few documentation files on the macros configuration. All sendmail configuration macros are stored in /usr/share/sendmail/* – there are pleny of .m4 configs so for people who never installed sendmail it is really confusing.

sendmail-base package contains some bindings on how to to log rotate sendmail log files, few more sendmail binaries who deal with sendmail architecture, few files whether sendmail is run via PPP or DHCP connection, some documentation and example files. Sendmail documentation is installed in /usr/share/doc/sendmail*,  unfortunately documentation there is scarce so for extended documentation it is good to check Sendmail's Official site

To check if sendmail is running you should have it visible  in the list of running processes;

root@blackstar:~# ps xa|grep sendmail|grep -v grep
  468 ?        Ss     0:00 sendmail: MTA: accepting connections        

Further on it should be accepting connections on localhost / 25, i.e.

root@blackstar:~# telnet localhost 25
Trying ::1...
Trying 127.0.0.1...
Connected to localhost.
Escape character is '^]'.
220 blackstar ESMTP Sendmail 8.14.4/8.14.4/Debian-2.1; Sat, 30 Mar 2013 19:09:47 +0200; (No UCE/UBE) logging access from: localhost(OK)-localhost [127.0.0.1] ^]
telnet> quit


Sendmail's configuration is being generated using a macro file using a macro processor via m4 command. There are few files, used as a basis for generation the final m4 most important of course is /etc/mail/sendmail.mc and sendmail.cf  –  /etc/mail/sendmail.cf, sendmail.mc after processed with the mambo-jambo with m4 generates the complex and about 15 times larger by size sendmail.cf.
All configs related to generating files instructing how sendmail will operate are stored in /etc/mail;

blackstar:~#  ls -1
access
access.db
address.resolve
aliases
aliases.db
databases
helpfile
local-host-names
m4
Makefile
peers
sasl
sendmail.cf
sendmail.cf.errors
sendmail.conf
sendmail.mc
service.switch
service.switch-nodns
smrsh
spamassassin
submit.cf
submit.mc
tls

sendmail.cf.errors
– contains errors during processing of macros config files.


root@blackstar:/etc/mail# cat sendmail.cf.errors
*** ERROR: FEATURE() should be before MAILER()
*** MAILER(`local') must appear after FEATURE(`always_add_domain')*** ERROR: FEATURE() should be before MAILER()
*** MAILER(`local') must appear after FEATURE(`allmasquerade')*** ERROR: FEATURE() should be before MAILER()

This errors, are not fatal as sendmail.cf is there and sendmail is from now on ready to send mails via localhost.

To check if sendmail delivers mails onwards, use mail cmd;
 

hipo@blackstar:~$ mail -s "testing" test@www.pc-freak.net
this is a simple test email
Do you get it?
.
Cc:

To see all is fine with mail delivery check out /var/log/mail.log

blackstar:~# tail -f /var/log/mail/log
Mar 30 21:23:05 blackstar sm-msp-queue[1495]: unable to qualify my own domain name (blackstar) -- using short name
Mar 30 21:23:09 blackstar sm-mta[1499]: STARTTLS=client, relay=mail.www.pc-freak.net., version=TLSv1/SSLv3, verify=FAIL, cipher=AES256-SHA, bits=256/256
Mar 30 21:23:11 blackstar sm-mta[1524]: r2UJN8x2001524: localhost [127.0.0.1] did not issue MAIL/EXPN/VRFY/ETRN during connection to MTA-v4
Mar 30 21:23:13 blackstar sm-mta[1499]: r2UJKwqR001412: to=<hipo@www.pc-freak.net>, ctladdr=<root@blackstar> (0/0), delay=00:02:15, xdelay=00:00:10, mailer=esmtp, pri=210313, relay=mail.www.pc-freak.net. [83.228.93.76], dsn=2.0.0, stat=Sent (ok 1364671405 qp 7492)
Mar 30 21:24:28 blackstar sendmail[1532]: My unqualified host name (blackstar) unknown; sleeping for retry
Mar 30 21:27:16 blackstar sendmail[1633]: My unqualified host name (blackstar) unknown; sleeping for retry

As you see there is an error in mail.log
 

blackstar sendmail[1532]: My unqualified host name (blackstar) unknown; sleeping for retry


This is because blackstar is not assigned as a a host recognized to 127.0.0.1 in /etc/hosts. To solve it on my host I had to change /etc/hosts which looked like so:

blackstar:~# cat /etc/hosts
127.0.0.1    localhost
127.0.1.1    blackstar
# The following lines are desirable for IPv6 capable hosts
::1     localhost ip6-localhost ip6-loopback
ff02::1 ip6-allnodes
ff02::2 ip6-allrouters

to

blackstar:~# vim /etc/hosts

127.0.0.1    localhost localhost.localdomain blackstar
127.0.1.1    blackstar

# The following lines are desirable for IPv6 capable hosts
::1     localhost ip6-localhost ip6-loopback
ff02::1 ip6-allnodes
ff02::2 ip6-allrouters


Then restart sendmail to reread /etc/hosts
 

root@blackstar:/etc/mail# /etc/init.d/sendmail restart
[ ok ] Restarting Mail Transport Agent (MTA): sendmail.