Archive for November, 2011

Hello I’m Mr. GNU. Let me make your business go free!

Tuesday, November 8th, 2011

Mr. GNU in a suit

Did you ever think, the tons of money your business has spend paying for buggy and unreliable non-free software?
Having problems with your Windows Network, being tortured by Viruses, a failure after windows upgrade, unexpected system crashes? Don’t worry MR. GNU will help you to change your business go free ;))

How to make wicd systray to appear in GNOME on Ubuntu 11.10 / How to fix missing wicd network manager systray on Ubuntu

Monday, November 7th, 2011

After upgrading my sis’s notebook from Ubuntu 11.04 to Ubuntu 11.10 on her Acer Aspire 5736Z the default gnome wireless network manager started behaving oddly.
The Network Manager did not show any networks, even though the network drivers showed that are loaded properly on the Linux host and using the normal commands like iwlist or iwconfig I could list and see the networks and even connect to a network.

As my sister is not a console geek like me it was necessery of course to have an easy way to connect herself to the Internet with nice GUI application. I personally love WICD Network Manager and as the default gnome manager was misbehaving I immediately installed her wicd.
With wicd , the wireless networks were properly listed and there was no connection issues to the wireless networks, however the wicd system tray was missing and hence everytime she wanted to connect to a wireless network, she had to keep wicd-client running active in the Dock or run it manually every time on connect, when she had to change her physical location and connect to another wireless network.
This of course is quite unhandy and gives her a bad image of Linux and I definitely want to make her love free software and GNU / Linux. Thus I want to give her a GNU / Linux she will be easy to use.

To make her more satisfied with her Ubuntu I googled around to see what causes the wicd systray to be missing after some research online I found out, its probably due to either wicd bug or some kind of interface changes in unity newer versions of Ubuntu. Some people online suggested a fix via changing values in gconf-editor but this work around by changing the values in gconf-editor:

'desktop' -> 'unity' -> 'panel'

I tried this suggested fix which was reported to work on Ubuntu 11.04 but the gconf registry suggested pathway was missing at all so this solution did not worked.

I further read some other suggested solution using wicd-client by invoking it with two args like so:

stanimira@ubuntu:~$ wicd-client -n &
...stanimira@ubuntu:~$ wicd-client -a &

This proposed solution did not worked either, then I found in one of the Ubuntu bugs reports, a little shell script (add-wicd-to-whitelist.sh) that changes some values in gconf so I proceeded downloaded and give it a try:

stanimira@ubuntu:~$ wget https://www.pc-freak.net/files/add-wicd-to-whitelist.sh
...
stanimira@ubuntu:~$ sh add-wicd-to-whitelist.sh
...

For my surprise running the script doesn’t immediately changed nothing and wicd wireless connectivity indicator was still missing from the tray.
I thought it might need to reload gnome so I give it a restart and HOORAY! after the restart the WICD connected wireless strength show up, like you can see in the screenshot below 😉

Wicd indicator running in systray on GNOME in Ubuntu 11.10

Now hope this fix will, help out there experiencing the same issues to work around his wireless network connectivity issues 😉 Cheers.

How to connect to WiFi network using console or terminal on GNU / Linux

Wednesday, November 2nd, 2011

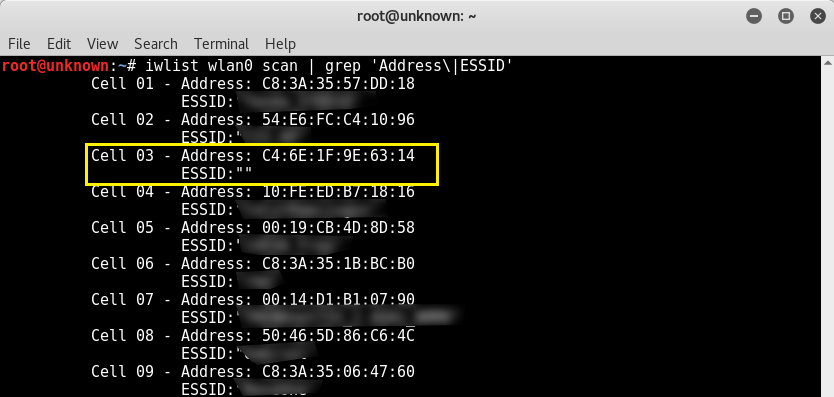
iwlist-screenshot-howto-connect-to-wifi-in-text-console-linux-wpasupplicant

Sometimes its useful to connect to Wireless Networks using console . The reasons for that might be many, one possible reason is to be able to debug, Wireless connection failures or simply omit the use of the many available GUI wifi connection programs.

As a first step before connecting in terminal is to look up for the wifi networks available for connection, this is done with cmd:

linux:~# iwlist wlan0 scanning
wlan0 Scan completed :
Cell 01 - Address: 00:24:01:90:8F:38
Channel:7
Frequency:2.442 GHz (Channel 7)
Quality=70/70 Signal level=-39 dBm
Encryption key:on
ESSID:"magdanoz"
Bit Rates:1 Mb/s; 2 Mb/s; 5.5 Mb/s; 11 Mb/s
Bit Rates:6 Mb/s; 9 Mb/s; 12 Mb/s; 48 Mb/s; 18 Mb/s
24 Mb/s; 36 Mb/s; 54 Mb/s
Mode:Master
Extra:tsf=000000034f5c786b
Extra: Last beacon: 68ms ago
IE: Unknown: 00086D616764616E6F7A
IE: Unknown: 010482848B96
IE: Unknown: 030107
IE: Unknown: 32080C1218602430486C
IE: Unknown: CC0700CC020000018A
IE: Unknown: CC0700CC0300000100
IE: WPA Version 1
Group Cipher : TKIP
Pairwise Ciphers (2) : TKIP CCMP
Authentication Suites (1) : PSK
IE: IEEE 802.11i/WPA2 Version 1
Group Cipher : TKIP
Pairwise Ciphers (2) : TKIP CCMP
Authentication Suites (1) : PSK
Cell 02 - Address: 00:1E:2A:60:5E:DC
Channel:1
...

To just list the ESSID s of the wifi networks:

linux:~# iwlist wlan0 scanning|grep -i 'essid'
ESSID:"magdanoz"
ESSID:"default"
ESSID:"todorov"
ESSID:"BTC-ADSL"
ESSID:"Zahari"
ESSID:"Drago"

1. Connecting to Open Wireless Network

Now from the above output it is clear 6 wifi networks are available for connection. The default wifi network from the list is an Open network (e.g. without pass). To connect to it I use cmd:

linux:~# /sbin/iwconfig wlan0 essid 'default'
linux:~# /sbin/iwconfig wlan0 key open

After connected to configure IP, Gateway and DNS from a DHCP server running on the WIFI router, dhclient cmd is used:

linux:~# /sbin/dhclient wlan0

2. Connecting to WEP 64bit / 128bit encrypted network

linux:~# /sbin/iwconfig wlan0 key 1234-5678-9101-1213

3. Connecting to WPA / WPA2 encrypted wifi network

To connect to WPA or WPA2 encrypted network its necessery to have installed wpasupplicant package. The name of the package might vary in different distributions on Debian and Ubuntu, the name of the package is wpasupplicant, on Fedora, CentOS and RHEL the package that has to be in is wpa_supplicant :
After having installed the wpa_supplicant to connect to the network with ESSID name magdanoz , wpa_passphrase is used first:

linux:~# /usr/bin/wpa_passphrase magdanoz Secret_Wifi_Password | tee -a /etc/wpa_supplicant.conf
network={
ssid="magdanoz"
#psk="Secret_Wifi_Password"
psk=6f7590250c4496ff7bf8dd25199ac3bb5a614d4bc069975aa884bcf084da73bc
}

As you see in above command the secret password key is generated printed on the screen and then added to /etc/wpa_supplicant.conf , necessery to establish the wireless connection with wpa_supplicant with cmd:

linux:~# /sbin/wpa_supplicant wpa_supplicant -d wext -i wlan0 -c /etc/wpa_supplicant.conf -B

-d wext instructs wpa_supplicant to use (Linux wireless extension driver).
-B tells wpa_supplicant to background the connection to prevent the wireless connection to drop off, if the console / terminal from which it is launched gets closed.

In case of succesful connection with wpa_supplicant , once again IP, Gateway and DNS is configured fetching the settings from the wifi hotspot dhcp server:

linux:~# /sbin/dhclient wlan0

General information about the wireless network and info related to the established connection can be obtained with /usr/bin/iwconfig :

linux:~# /sbin/iwconfig
lo no wireless extensions.
eth0 no wireless extensions.
wlan0 IEEE 802.11abg ESSID:"magdanoz"
Mode:Managed Frequency:2.442 GHz Access Point: 00:24:00:90:8F:38
Bit Rate=54 Mb/s Tx-Power=15 dBm
Retry long limit:7 RTS thr:off Fragment thr:off
Encryption key:off
Power Management:off
Link Quality=70/70 Signal level=-39 dBm
Rx invalid nwid:0 Rx invalid crypt:0 Rx invalid frag:0
Tx excessive retries:0 Invalid misc:0 Missed beacon:0

To configure the exact channel over which the wireless connection will be established again is done with iwconfig, for instance to configure wlan0 wifi connection established to be on wifi channel 7:

linux:~# /sbin/iwconfig wlan0 channel 11

By default iwconfig is set to automatically set the channel based on connected network ESSID , if the channel is modified to some specific number to revert it back use:

linux:~# /sbin/iwconfig wlan0 channel auto
 

How to exclude sorbs.net for a particular IP address in Qmail Mail server install / Fix to Thunderbird mail sent error (Exploitable Server See: http://www.sorbs.net/lookup.shtml?xx.xx.xx.xx) error

Tuesday, November 1st, 2011

In the office, some of my colleagues has started receiving error messages, while trying to send mail with Thunderbird and Outlook Express
The exact error they handed to me reads like this:

An error occured while sending mail. The mail server responded: Exploitable Server See:
http://www.sorbs.net/lookup?xx.xx.xx.xx. Please check the message recipient

Here is also a screenshot, I’ve been sent via Skype with the error poping up on a Thunderbird installed on Windows host.

Typing the url http://www.sorbs.net/lookup?xx.xx.xx.xx lead me to sorbs.net to a page saying that the IP address of the mail client which is trying to send mail is blacklisted . This is not strange at all condireng that many of the office computers are running Windows and periodically get infected with Viruses and Spyware which does sent a number of Unsolicated Mail (SPAM).

The sorbs.net record for the IP seems to be an old one, since at the present time the office network was reported to be clear from malicious SMTP traffic.

The error sorbs.net disallowing the mail clients to send from the office continued for already 3 days, so something had to be done.

We asked the ISP to change the blacklisted IP address of xx.xx.xx.xx , to another one but they said it will take some time and they can’t do it in a good timely matter, hence to make mail sending work again with POP3 and IMAP protocols from the blacklisted IPs I had to set in the Qmail install to not check the xx.xx.xx.xx IP against mail blacklisting databases.

On qmail install disabling an IP check in RBLSMTPD is done through editting /etc/tcp.smtp and following recreate of /etc/tcp.smtp.cdb – red by qmailctl script start.
The exact line I put in the end of /etc/tcp.smtp to disable the RBLSMTPD check is:

xx.xx.xx.xx:allow,RBLSMTPD="",RELAYCLIENT="",QS_SPAMASSASSIN="0"

Further on to recreate /etc/tcp.smtp.cdb and reload the new cdb db records:

qmail:~# qmailctl cdb
qmail:~# qmailctl restart
...

Onwards, the sorbs.net IP blacklist issue was solved and all office computers from xx.xx.xx.xx succeeded in sending mails via SMTP.

List and get rid of obsolete program core dump files and completely disable core files on FreeBSD

Tuesday, November 1st, 2011

My FreeBSD router has started running out of space, I looked for ways to clean up some space. So I remembered some programs are generating core files while they crash. Some of these files are really huge and ban be from 1Mb to > 1G.

I used find to first list all my produced core files starting from root directory (/) , like so:

find / -name core -exec du -hsc {} ;
....

Having a list of my core files with the respective core file size and after reviewing, I deleted one by one the cores which were there just taking up space.
It’s a wise idea that core dumps file generation on program crash is completely disabled, however I forgot to disable cores, so I had plenty of the cores – (crash files which are handy for debug purposes and fixing the bug that caused the crash).

Further on I used an /etc/rc.confdumpdev=NO , variable which instructs the kernel to not generate core files on program crash:

freebsd# echo 'dumpdev=NO' >> /etc/rc.conf

Next, to make dumpdev=NO , take affect I rebooted the server:

freebsd# shutdown -r now
...

There is a way to instruct every server running daemon to know about the newly set dumpdev=NO by restarting each of the services with their init scripts individually, but I was too lazy to do that.