Just wanted to say that I'm quite satisfied with Godaddy's SSL certificate generation.
SSL certs generation with Godaddy is dramatically more easy and intuitive than with certs bought from Enom.com.
To generate a new certificate with Godaddy, login to your godaddy account, press My Account -> SSL Certificates
Godaddy does grant you new credits whenever you have purchased a new ssl certificate for them, 1 credit is equal to one certificate.
You later use this credit to get your SSL certificate which will appear in the list of ssl certificates.
To manage the new certificate I had to press over Manage Certificate Next over 3 steps it's necessery to place a newly generated CSR file to generate the CSR file I issued:
/usr/bin/openssl genrsa -des3 -out www.domain.com.key 2048

Enter pass phrase for www.domain.com.key:
There is a field which requires you to paste in the newly generates csr file with the above command in Godaddy's SSL generation step 2.
Step 3 does not require anything special.
After this steps if the domain for which an SSL cert is generated doesn't contain some specific banned words which prohibits automatic approval of a certificate an email is received in the email set for the godaddy account.
After Godaddy approves the generation of the respective ssl cert it starts appearing in the menu: Manage Certificates -> Certificates tick over to choose the common name of your certificate and a button a bit above with a green down arrow will turn green. Press over it and you will be offered a menu whether you can choose the version of the webserver for which you will need the newly generated SSL certificate to install on.
In my case it was Apache so I choose Apache, gt the certificate put it and install it to apache and restart Apache and you're done.
I faced the task of generating official Validated SSL Certificates by in mydaily duties as a System Administrator atcadiaholding.com . Though generating self-signedSSL certificate is comparatively easy task. It was a pain in the ass setting Apache version 2.2.9-10+lenny6to correctly serve pages through https:// protocol over openssl version 0.9.8g-15+lenny6.I’ll try to go through the whole process of Generating the certificate in order to help some other Debianusers out there to face less setbacks in such a simple task as installing a Trusted SSL Certificate issued(bought) by RapidSSL. Even though this article will mostly deal with SSL certificate issued by RapidSSL,it should be not a problem to apply this methodogy with Verisign or some of the other Geotrust issuedSecure Socket Layer certificates.
In generating the Validated certficate I used enom which is a domain name,ssl certificates, email and hosting company whole-saler. Fron emon’s website after logging in and using the web interface, there are two major things required to fill inin order to issue your Trusted SSL certificate.
1. Fill in in a form a CSR file, this is usually generated on the Linux server using the openssl. To issue the CSR file required by Enom use the following commands:
a. First we generate an DES3 RSA encrypted key which we will use next to generate the opeensl CSR file required by ENOM. debian:~# /usr/bin/openssl genrsa -des3 -out www.domain.com.key 2048
Enter pass phrase for www.domain.com.key:
You’ll be required to fill in a pass-phrase that will be later be required to fill in before Apache servers starts or restarts,so make sure you fill something you either remember or you keep the password stored in a file. You have to change also the www.domain.com.key in accordance with your domain name. Now as we already have a proper generated DES3 RSA key afterwards it’s necessery to generate the CSR file with the openssl command line frontend. So here is how:
Again in the above example change all the paths and file names as you wish. It’s necessery that the end user fill in a number of questions related to the Certificate Signing Request. Herein I’ll list what kind of prompts will emerge after executing the above command:
Enter pass phrase for /home/hipo/www.domain.com.key:

You are about to be asked to enter information that will be incorporated

into your certificate request.

What you are about to enter is what is called a Distinguished Name or a DN.

There are quite a few fields but you can leave some blank

For some fields there will be a default value,

If you enter '.', the field will be left blank.

-----

Country Name (2 letter code) [AU]:

State or Province Name (full name) [Some-State]:

Locality Name (eg, city) []:

Organization Name (eg, company) [Internet Widgits Pty Ltd]:

Organizational Unit Name (eg, section) []:

Common Name (eg, YOUR name) []:

Email Address []:

Please enter the following 'extra' attributes

to be sent with your certificate request

A challenge password []:

An optional company name []:
2. Hopefully following the above instructions you’ll now have a file named www.domain.csrJust open the www.domain.scr and copy paste it’s content to the ENOM website CSR * webform.
3. Further on select your Webserver type on Enom’s website:In our case we have to select Apache + ApacheSSL
4. What follows next is filling in your company contact information This is also required for proper certificate generation, you have to think twice before you fill in this data, take a note this can’t be changed later on without issuing a brand SSL new certificate.
Apart from the 3 major above requirements to fill in Enom there are some few more radio buttons to use to make some selections according to your personal preferences, however I won’t take time to dig in that and I’ll leave this to you. After all the above is fulfilled you’ll have to submit your certificate details and choose an email address to which you will receive in a minute a RapidSSL Certificate Request Confirmation
Following a link from the email, will show you some basic information about the certificate about to be generated. That’s your final chance to cancel the issued Trusted Certificated. If you’re absolutely sure the information about to enter the certificate is correct then you’ll have to follow a link and approve the certificate.
You’ll be informed that you’ll receive your certificate either through Certifier website (e.g. Enom’s website) or via another email. I thought it’s more probable I receive it via email but anyways I was wrong. More thank 4 hours has passed since the certificate was issued and is available via Enom’s interface but I haven’t received nothing on my mail. Therefore my friendly advice is to check about your brand new shiny Trusted Certificate on Emom’s website. I had mine ready in about 10 minutes after the CSR was issued.
Assuming that you’ve succesfully obtained the SSL Trusted certificate from RapidSSL what follows is setting up the certificate. Initially I tried using documentation from RapidSSL website called Installing your SSL Certificate / Web Server Certificate / Secure Server Certificate from RapidSSL.com I tried to configure one of my Virtualhost as shown in their example inserting in my /etc/apache/sites-available/www.domain.com file, few directives within the VirtualHost something like the shown below
SSLEngine on

# domain.com.crt cointains the Trusted SSL certificate generated and obtained by you from RapidSSL

SSLCertificateFile /etc/apache2/ssl/www.domain.com.crt

# www.domain.com.key contains the file used to generate the CSR file as described earlier in this post

SSLCertificateKeyFile /etc/apache2/ssl/www.domain.com.key
It is also possible insetad of using the SSLCertificateFile and SSLCertificateKeyFile directvies directives in Apache config to use:
The key file is the one generated earlier on the server and handed to the SSL regisrar, the files:
your-domain-name.crt and gd_bundle.crt files are provided by RapidSSL or from whatever SSL registrater the SSL was purchased.
After trying the above configuration and restarting apache with:
/etc/init.d/apache2 restart
Apache failed to start, it might be helpful to somebody out there the error I had in my apache error.log: The error.log red the following:
[warn] RSA server certificate is a CA certificate (BasicConstraints: CA == TRUE !?)
After some 30 minutes or an hour of Googling on the error I came to the conclusion that the error is caused, becauseApache is supposed to work with .PEM files instead of the classical .CRT and .KEY files asnormally approached in most of the other Unix operating systems.
It took me a bit more of reading on the internet to find out that actually the .pem files so widely adopted in Debian simply contain both the www.domain.com.key file and the www.domain.com.crt key simply pasted one after another, this I also observed from the default Apache self-signed certificate that I believe comes with debian /etc/apache2/ssl/apache.pem . So I copied both the content of my www.domain.com.key and www.domain.com.crt and store it in one file: /etc/apache2/ssl/www.domain.com.pem
Also the following configuration: SSLEngine on
SSLCertificateFile /etc/apache2/ssl/www.domain.com.pem had to go in your /etc/apache2/sites-enabled/www.domain.com
Last thing that’s left is to restart your Apache;
/etc/init.d/apache2 restart
Apache will prompt you for your certificate password entered by you during the www.domain.com.key generation. Type your password and with a bit of luck and hopefully with God’s help you’ll be having a Trusted Certificate on your webserver.
Last step is to check if the certificate is okay accessing your domain https://www.domain.com.
Well this is the end of the article, hope you enjoy.If you do please leave your comments, any corrections are also welcomed 🙂
If you have to administrate a heterogenous network with Linuxand FreeBSD or other UNIX like OSes you should sooner or later need for scripting purposes to have a way to list how much memory separate users take up on your system. Listing memory usage per user is very helpful for admins who manager free-shells or for companies where you have developers, developing software directly on the server via ssh. Being able to check which process eats up most memory is essential for every UNIX / Linux sysadmin, because often we as admins setup (daemons) on servers and we forgot about their existence, just to remember they exist 2 years later and see the server is crashing because of memory exhaustion. Tracking server bottlenecks where RAM memory and Swapping is the bottleneck is among the main swiss amry knives of admins. Checking which user occupies all server memory is among the routine tasks we're forced to do as admins, but because nowdays servers have a lot of memory and we put on servers often much more memory than ever will be used many admins forget to routinely track users / daemons memory consumption or even many probably doesn't know how. Probably all are aware of the easiest wy to get list of all users memory in console non interactively with free command, e.g.:
but unfortunately free command only shows overall situation with memory and doesn't divide memory usage by user
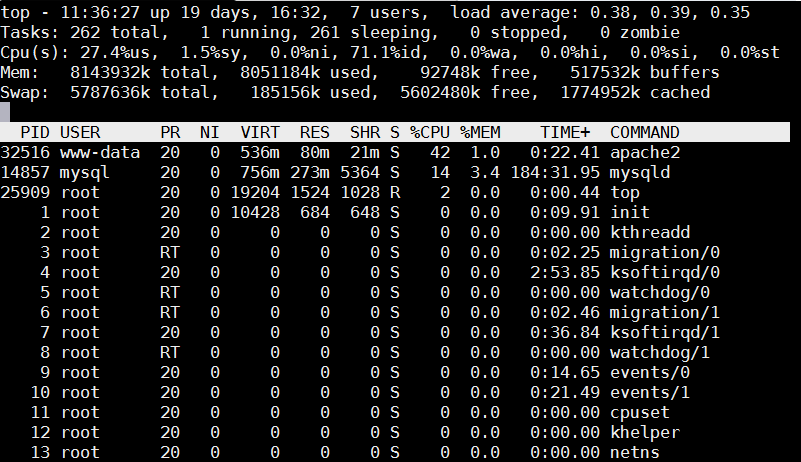
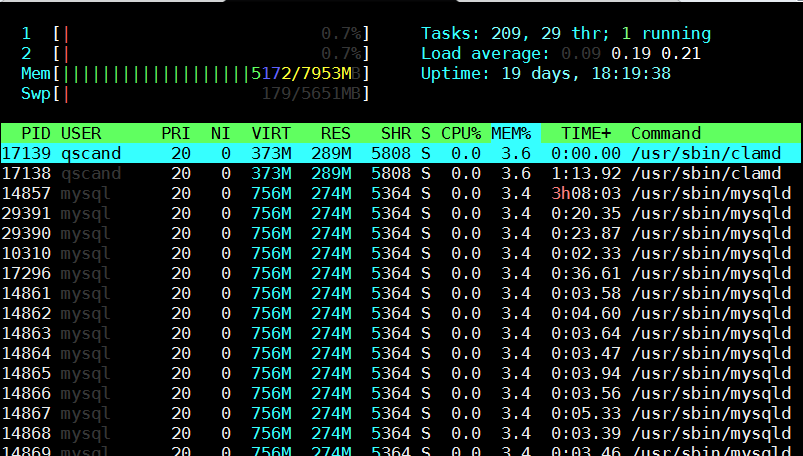
Thus probably to track memory users the only known way for most pepole is to (interactively) use good oldtop command or if you like modern (colorful) visualization with htop:
debian:~# top
Once top runs interactive press 'm' to get ordered list of processes which occupy most system memory on Linux server.Top process use status statistics will refresh by default every '3.0' seconds to change that behavior to '1' second press s and type '1.0'. To get Sort by Memory Use in htop also press 'm'
[root@mail-server ~]# htop
However if you need to be involved in scripting and setting as a cron job tasks to be performed in case if high memroy consumption by a service you will need to use few lines of code. Below are few examples on how Linux user memory usage can be shown with ps cmd.
Probably the most universal way to see memory usage by users on Debian / Ubuntu / CentOS / RHEL and BSDs (FreeBSD / NetBSD) is with below one liner:
Below is output from machine where this blog is running, the system runs ( Apache + PHP + MySQL Webserver + Qmail Mail server and Tor) on Debian GNU / Linux.
To get more human readable (but obscure to type – useful for scripting) output list of which user takes how much memory use on deb / rpm etc. based Linux :
You see from below output user running with www-data (this is Apache Webserver user in Debian) is eating 86.48% of overall system memory and MySQL server user is using only 4.79% of available memory
Output is shown in Megabytes per username memory usage, and user memory usage is ordered (stepping-down / descentive) from top to bottom
Getting more thoroughful and easier to read reporting without beeing a 31337 bash coder you can install and use on Linux smem – memory reporting tool .
SMEM can provide you with following memory info:
system overview listing
listings by process, mapping, user
filtering by process, mapping, or user
configurable columns from multiple data sources
configurable output units and percentages
configurable headers and totals
reading live data from /proc
reading data snapshots from directory mirrors or compressed tarballs
lightweight capture tool for embedded systems
built-in chart generation
Installing smem on Debian 6 / 7 / Ubuntu 14.04 / Turnkey Linux etc. servers is done with standard:
debian:~# apt-get install –yes smem ….
To install smem on CentOS 6 / 7:
[root@centos ~ ]# yum -y install smem ….
On Slackware and other Linux-es where smem is not available as a package you can install it easily from binary archive with:
cd /tmp/ wget http://www.selenic.com/smem/download/smem-1.3.tar.gz tar xvf smem-1.3.tar.gz sudo cp /tmp/smem-1.3/smem /usr/local/bin/ sudo chmod +x /usr/local/bin/smem
It is also useful sometimes when you want to debug system overloads caused by external hardware drivers loaded into kernel causing issues to get list of system wide memory use sorted by user
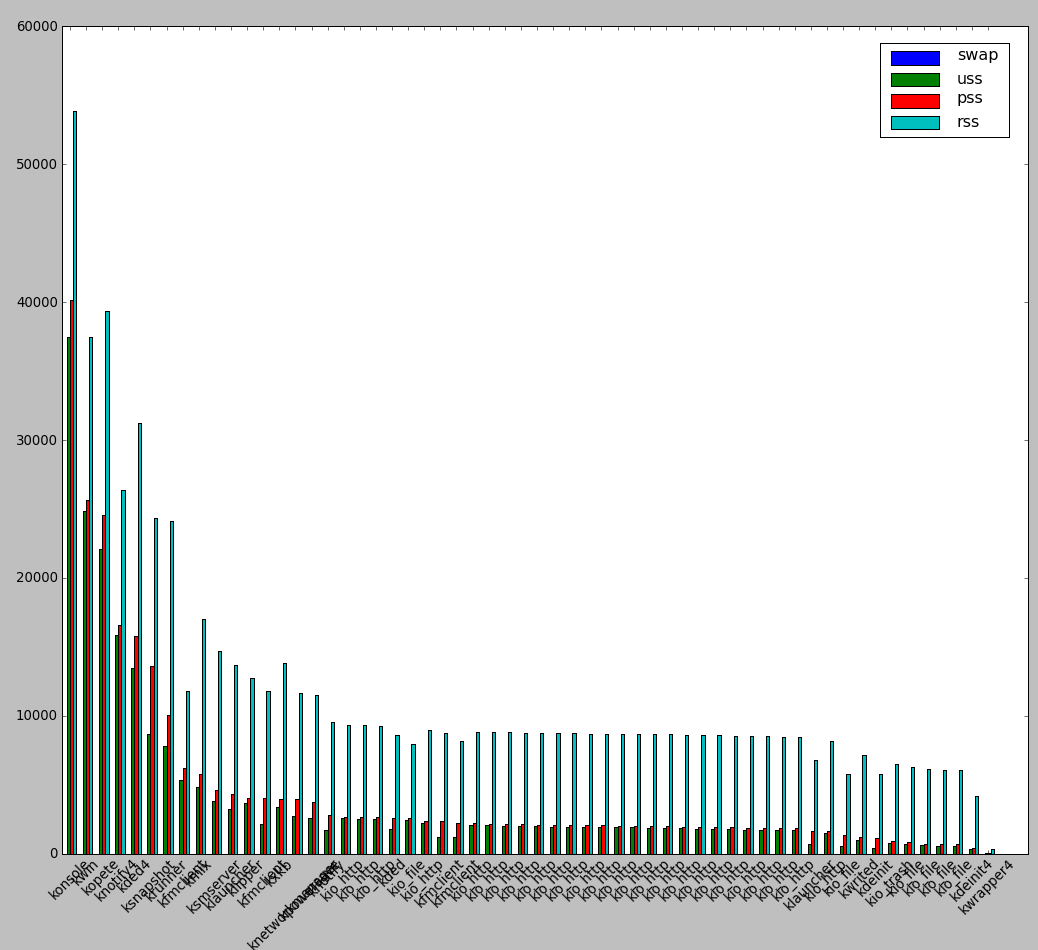
smem is very nice as if you're running it on a Desktop Linux system with Xserver installed you can see also graphical output of memory use by application:
root@desktop-pc:~# smem –bar pid -c "pss uss"
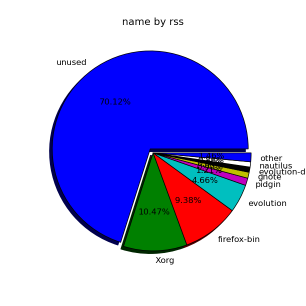
smemcan even generate graphical pie charts to visualize better memory use
root@desktop-pc:~# smem -P '^k' –pie=name
If there is a high percentage shown in firmware/hardware this means some buggy module is loaded in kernel eating up memory, to fix it debug further and remove the problematic module. userspace memory actually shows the percantage of memory out of all server available RAM that is being consumed by applications (non kernel and other system processes which make the system move). You see in above example the kernel itself is consuming about 40% of system overall available memory.
We all know the SWAP field stands for hard disk drive used as a memory when system is out, but there are 3 fields which smem will report which will be probably unclear for most here is also explanation on what USS / PSS / RSS means?
RSS is the Resident Set Size and is used to show how much memory is allocated to that process and is in RAM. It does not include memory that is swapped out. It does include memory from shared libraries as long as the pages from those libraries are actually in memory. It does include all stack and heap memory too.
There is also PSS (proportional set size). This is a newer measure which tracks the shared memory as a proportion used by the current process. So if there were two processes using the same shared library from before.
USS stands for Unique set size, USS is just the unshared page count, i.e. memory returned when process is killed
PSS = Proportional set size, (PSS), is a more meaningful representation of the amount of memory used by libraries and applications in a virtual memory system. Because large portions of physical memory are typically shared among multiple applications, the standard measure of memory usage known as resident set size (RSS) will significantly overestimate memory usage. The parameter PSS instead measures each application’s “fair share” of each shared area to give a realistic measure. For most admins checking out the output from RSS (output) should be enough, it will indicate which user and therefore which daemon is eating up all your memory and will help you to catch problematic services which are cause your server to run out of RAM and start swapping to disk.
The plugins included in the compilation are quite various, some of the plugins aims at easy post sharing via the general social networks and main websites used by users today, others significantly helps in increasing the blog ranking in major search engines, there are some that adds like button to the blog.
These plugins also strenghthen the easy blog RSS file sharing, some post straight to twitter all your blog posts, generate tags automatically, puts a better features to the default wordpress commenting mechanism, prevent from spam comments, add features for easily adding Google adsense to the wordpress installation to help you advertise on your blog.
There are also plugins which delete duplicate posts (if you have such), puts better wordpress blog search bar, generates a sitemap to the blog, add an option to include php codes straight into your posts, adds wordpress an option to easily put mod rewrite rules straight from the wordpress interface, boost wordpress speed by adding static html generation cache, boost performance etc. etc.
Here is the complete list of wordpress plugins which I have currently installed on my wordpress blog:
I do have enabled most of the plugins, though some are disabled but still might be helpful somewhere in the close-future thus I still keep them installed. I would skip the time to describe one by one what each of the above list of plugins will do for your wordpress, since the list is quite long.
Note that the versions of the plugins which are included in this must have wordpress plugins collection might not be the latest as the included ones are the ones I do have installed at the time of writting of this article.
Also be aware that some of the plugins might create some issues with newer versions of wordpress (your blog might beak up!), however most of the plugins should work out of the box by just enabling each one of them from the wordpress interface via the menus:
Settings -> Plugins -> Inactive
To straight install my bundled package of plugins you have to issue the commands:
linux:~# cd /var/www/blog/wp-content/plugins

linux:/var/www/blog/wp-content/plugins# wget https://www.pc-freak.net/files/a_must_have_wordpress_plugins_collection.tar.gz

linux:/var/www/blog/wp-content/plugins# tar -zxvf a_must_have_wordpress_plugins_collection.tar.gz

...

linux:/var/www/blog/wp-content/plugins# unzip *.zip
Now as they should be installed under the plugins directory go and enable the plugins. Further on many of the plugins will require configuration from the menus:
Settings
or in the menu
Tools
After being setup up your new wordpress installation will look significantly better, you will notice a tons of useful features which you might have previously missing and desperately needed 😉
Most of the bundled package of wordpress plugins works fine with wordpress version 3.1, if you’re trying to install enable and configure the plugins on some other versions of wordpress, there might be problems!
If you experience problems by trying out my bunch of wordpress plugins please drop me a comment. I hope you enjoyed this improvised article, if these bunch of plugins are useful to you please give me a thanks 🙂 Thanks!
We're living at a times, where information has become more valuable than money and gold. Though we're living in a such a wild changing times, still it is not easy to answer in onefold clear way what is information. The more the world and humanity developed the more meanings information word accepted. While checking some interesting videos on the net, I've come across a video representing in a very brief form the history of information.
The Story of Information and how we come to be at where we are now
We're living at a times, where information has become more valuable than money and gold. Lest that living in a such a wild changing times, still it is not easy to answer in onefold clear way what is information. As you can see from the video, the more the world and humanity developed the more meanings information word took up.
At the end end of the short presentational video there are few questions asked:
Who coined the term MEME
How many zeros are in yottabyte?
What is a one thing that can escape a black hole?
I did a quick research on the newly heard words and came to know meme concept. A meme is an "an idea, behavior or style that spreads from person to person within a culture.". The theory lists some interesting information like replication of personality (propagation) from one person to another etc. etc. However the general content of meme's theory puts Christian faith, religions and all kind of people beliefs in the graph of being just a continuous meme's patterns which are transferred from a person to person (generation to generation). Therefore according to memetics (as the meme's science is called), Christian faith and even my Orthodox Christian faith is just an informtion transmitted similarly to genetics information and the laws against:; sexual morality, bestiality, adultery, castration etc. are just a taboo and makes not sense and is just they claim is a information transferred from family generation to next generation until today.
Obviously the whole "theory" of memetics as a science is not true and is just a world view of Mr. Richard Dawkins in a book called The Selfish Gene (1976). It is well to be said Dawkins a follower of the fairy tales of Charle's Darwin's Darwinism. Modern science however is seriously questioning Darwin's materialist world view. There are plenty of scientific researches which has prooved the existence of spiritual realm and hence some of the claims memetics are standing on a shaky grounds.
Concerning the second question in the video how many zeros are in an yottabyte the answer according to FreeFactFinder.com is:
So having in mind the yottabyte equals 1,208,925,819,614,629,174,706,176 bytes if in bytes it would have 2 zeros 🙂
But if by zero is meant the number of values which could become zeroes then the answer would be 24 zeroes. This of course is in bytes in zettabytes the zeroes are only 0 or 3i.e.(1024 zettabytes) 🙂
Moving back to the 3rd video question What is a one thing that can escape a black hole?. The answer is "WHO KNOWS ??". The BlackHoles are a matter of science based on a huge theory base, there are plenty of discussions by some scientists still doubting if black holes really exist ,,, even if we assume blackholes exist noone can tell if the blackhole would suck up all matter (including light) or some specific kind of still un-researched matter or energy can get out… In short the question imposed is completely ridiculously funny 😉
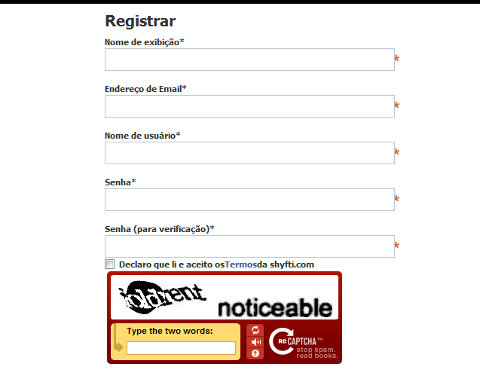
There are four major plugins as of writting of this that can be used to reduce significantly the amount of registration spam in Elgg 1.8.x <= (1.8.3) Probably there are other plugins to protect against spam in elgg, however I personally tried just this ones to work with elgg 1.8.3..
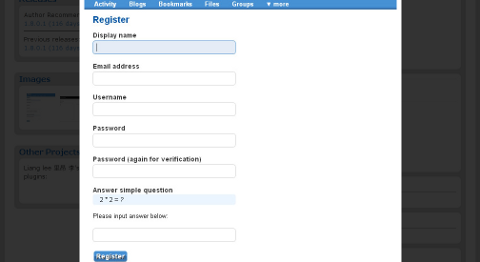
1. Elgg Anti bot spam registartions with Text Captcha
As you can see in the picture this plugin requires, skills in maths 😉 For serious websites it also looks a bit ridiculous, besides that is actually an easy one to handle by spam bots, probably plenty of the nowdays spam bots crawling the net could trespass it.
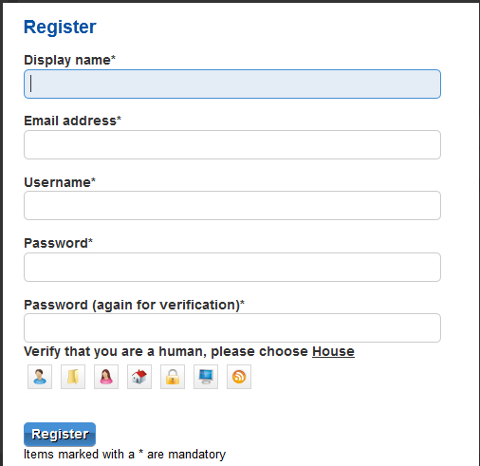
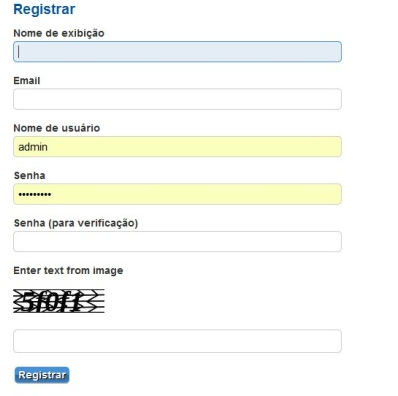
2. Protecting elgg registration formw tih Image Capcha
One note to make here is the 4 Captchas did not work together if enabled from elgg administration panel. You will have to use one at a piece. I haven't tested to I don't know which one is the most efficient. Anyhow I really think Image Captcha is looking best from all of them and more intuitive to the user. I'm quite happy Image Captcha is available and works fine in 1.8.3 in prior version 1.6.x generation, I couldn't find any decent plugin to filter login spam and my experimental social network based on elgg, got quickly filled with Spam. Now will wait and see if the Image Captcha will stop the drones.
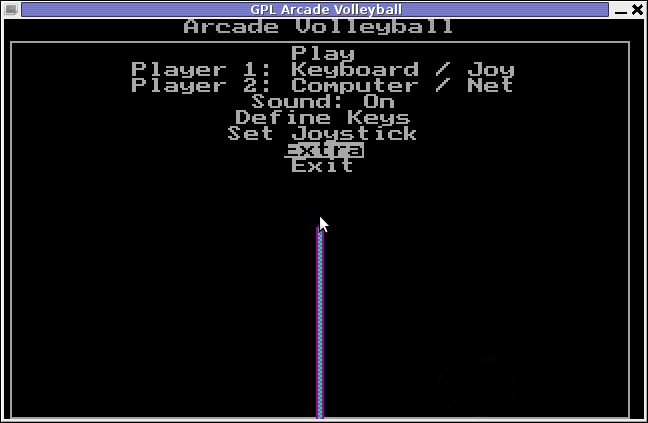
Do you remember that oldschool Arcade VolleyBall game which was so popular on 16 bit (8086 XT) computers. I remember this game from the years I was 12 years old, back in the days where we the gamers distributed all the DOS games on 360 KB 5.25" diskettes
I was looking over the games available to install on my Debian GNU / Linux today just to be happily suprised to find GPL Arcade Volleyball an identical game remake of the old Arcade Volleyball 8086 classic freeware game.
I remember we spend many hours with friends playing on the old Manifactured in Bulgaria Pravetz 16! computers During communism and post communism Pravetz was the only computer brand we could buy from the market, as there was limitations on the exported and imported tech equipment within the USSR union. Pravetz computers are a literal remake of 16 bit IBM 8086 computers and the computer design and integrals was stolen from IBM 16 bit 8086 / 8088 PC architecture
Arcade Volleyball has set a mark on my generation and I believe many people will remember the times this game was a hit with a bit of Nostalgia 😉
Besides being an identical remake of PC Arcade Volleyball , GPL Arcade Volleyball is even expanded as it includes extra features which the original game lacked. Game includes:
Network Volleyball client / server Game (up to 4 players)
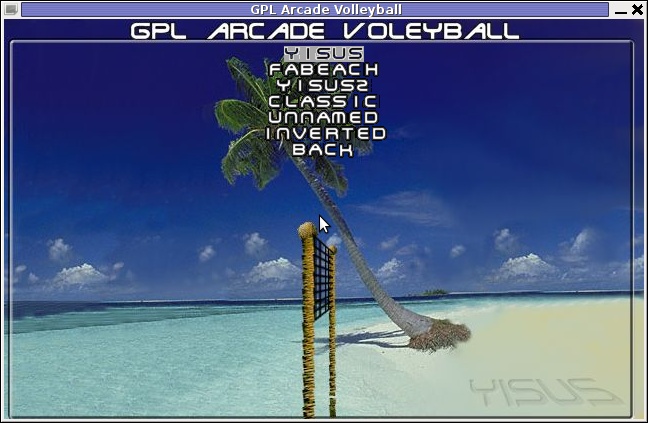
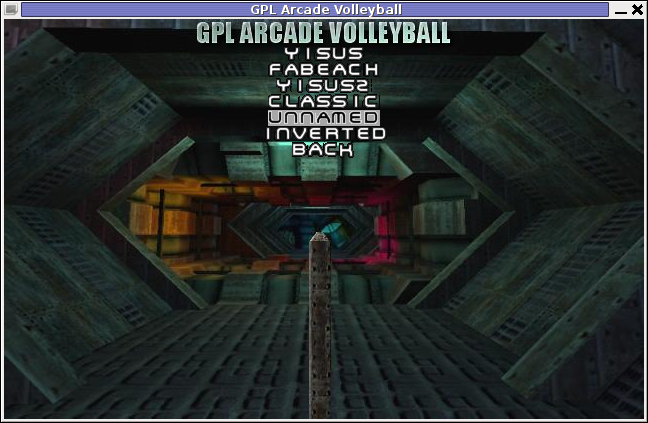
6 Game Themes which completely change the game look & feel to be modernistic
Here are few GAV screenshots of the different existing game Themes:
Yisus GAV Theme gameplay screenshot
GAV – Unnamed Theme Gameplay
GAV – FaBeach Theme Gameplay
GAV supports both Window and fullscreen modes. To enable Fullscreen mode, while inside the game use:
Extra -> Fullscreen (Yes)
Saving preferences is also something which I if I recall correctly the original game lacked. This is done by navigating to:
Extra -> Save Preferences
GAV is said to support Joystick in resemblance to the original DOS game, though I've never tested it with a joy.
One of the greatest GAV game (hacks) is the Inverted Theme. Selecting it inverts the order in the game, where the game player becomes the volleyball ball and the ball becomes the player 😉
GAV does not yet not have a Free / Open / Net BSD port as far as I currently see, anyways since the game is Free Software probably soon a port will be available for BSDs as well. The default GAV game controls are a bit untraditional. By default the one player game starts you play Volleyball game player positioned on the left.
For left player the default control keys are:
z – move player left
c – move player right
left shift – jump
Right player controls are:
Left – left (arrow key)
right – right (arrow key)
jump – up cursor key
GAV supports also a shortcut key for switching between windowed and full screen game mode by pressing F10 Installing the game on Debian and Ubuntu Linuces is done with:
linux:~# apt-get --yes install gav
Unfortunately gav does not have a definition to be added to GNOME or KDE Applications menus, thus to start the game after installed one has to do it manually by typing either in gnome RUN (Alt+F2) or on command line:
My FreeBSD router has started running out of space, I looked for ways to clean up some space. So I remembered some programs are generating core files while they crash. Some of these files are really huge and ban be from 1Mb to > 1G.
I used find to first list all my produced core files starting from root directory (/) , like so:
find / -name core -exec du -hsc {} ;

....
Having a list of my core files with the respective core file size and after reviewing, I deleted one by one the cores which were there just taking up space. It’s a wise idea that core dumps file generation on program crash is completely disabled, however I forgot to disable cores, so I had plenty of the cores – (crash files which are handy for debug purposes and fixing the bug that caused the crash).
Further on I used an /etc/rc.conf – dumpdev=NO , variable which instructs the kernel to not generate core files on program crash:
freebsd# echo 'dumpdev=NO' >> /etc/rc.conf
Next, to make dumpdev=NO , take affect I rebooted the server:
freebsd# shutdown -r now

...
There is a way to instruct every server running daemon to know about the newly set dumpdev=NO by restarting each of the services with their init scripts individually, but I was too lazy to do that.
If you're looking for a command line utility to generate PDF file out of any webpage located online you are looking for Wkhtmltopdf The conversion of webpages to PDF by the tool is done using Apple's Webkit open source render. wkhtmltopdf is something very useful for web developers, as some webpages has a requirement to produce dynamically pdfs from a remote website locations. wkhtmltopdf is shipped with Debian Squeeze 6 and latest Ubuntu Linux versions and still not entered in Fedora and CentOS repositories.
To use wkhtmltopdf on Debian / Ubuntu distros install it via apt;
If the web page to be snapshotted in long few pages a few pages PDF will be generated by wkhtmltopdf wkhtmltopdf also supports to create the website snapshot with a specified orientation Landscape / Portrait
Debian and Ubuntu version of wkhtmltopdf does not support TOC generation and Adding headers and footers, to support it one has to download and install the static version of wkhtmltopdf Using the static version of the tool is also the only option for anyone on Fedora or any other RPM based Linux distro.
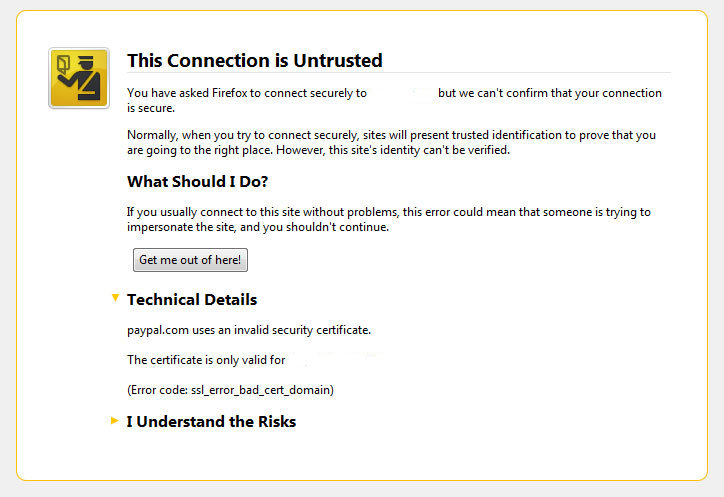
I’ve been issuing new wildcard multiple SSL certificate to renew an expiring ones. After I completed the new certificate setup manually on the server (a CentOS 5.5 Final running SoluSVM Pro – Virtual Private Manager), I launched Firefox to give a try if the certificate is properly configured.
Instead of my expectations that the browser would just accept the certificate without spitting any error messages and all will be fine, insetad I got error with the just installed certificate and thus the browser failed to report the SSL cert is properly authenticated.
The company used to issue the SSL certificate is GlobeSSL – http://globessl.com , it was quite “hassle”, with the tech support as the first certficate generated by globessl was generation based on SSL key file with 4096 key encryption.
As the first issued Authenticated certificate generated by GlobeSSL was not good further on about a week time was necessery to completethe required certificate reissuing ….
It wasn’t just GlobeSSL’s failure, as there were some spam filters on my side that was preventing some of GlobeSSL emails to enter normally, however what was partially their fault as they haven’t made their notification and confirmation emails to pass by a mid-level strong anti-spam filter…
Anyways my overall experience with GlobeSSL certificate reissue and especially their technical support is terrible. To make a parallel, issuing certificates with GoDaddy is a way more easier and straight forward.
Now let me come back to the main certificate error I got in Firefox …
A bit of further investigation with the cert failure, has led me to the error message which tracked back to the newly installed SSL certificate issues. In order to find the exact cause of the SSL certificate failure in Firefox I followed to the menus:
Tools -> Page Info -> Security -> View Certificate
Doing so in the General browser tab, there was the following error:
Could not verify this certificate for unknown reasons
The information on Could not verify this certificate for unknown reasons on the internet was very mixed and many people online suggested many possible causes of the issue, so I was about to loose myself.
Everything with the certificate seemed to be configured just fine in lighttpd, all the GlobeSSL issued .cer and .key file as well as the ca bundle were configured to be read used in lighttpd in it’s configuration file: /etc/lighttpd/lighttpd.conf
Here is a section taken from lighttpd.conf file which did the SSL certificate cert and key file configuration:
The file /etc/lighttpd/ssl/wildcard.mydomain.bundle was containing the content of both the .key (generated on my server with openssl) and the .cer file (issued by GlobeSSL) as well as the CA bundle (by GlobeSSL).
Even though all seemed to be configured well the SSL error Could not verify this certificate for unknown reasons was still present in the browser.
GlobeSSL tech support suggested that I try their Web key matcher interface – https://confirm.globessl.com/key-matcher.html to verify that everything is fine with my certificate and the cert key. Thanks to this interface I figured out all seemed to be fine with the issued certificate itself and something else should be causing the SSL oddities. I was further referred by GlobeSSL tech support for another web interface to debug errors with newly installed SSL certificates. These interface is called Verify and Validate Installed SSL Certificate and is found here
Even though this SSL domain installation error report and debug tool did some helpful suggestions, it wasn’t it that helped me solve the issues.
What helped was First the suggestion made by one of the many tech support guy in GlobeSSL who suggested something is wrong with the CA Bundle and on a first place the documentation on SolusVM’s wiki – http://wiki.solusvm.com/index.php/Installing_an_SSL_Certificate . Cccording to SolusVM’s documentation lighttpd.conf‘s file had to have one extra line pointing to a seperate file containing the issued CA bundle (which is a combined version of the issued SSL authority company SSL key and certificate). The line I was missing in lighttpd.conf (described in dox), looked like so:
Where server.bundle.crt contains an exact paste from the certificate (CA Bundle) mailed by GlobeSSL.
There was a couple of other ports on which an SSL was configured so I had to include these configuration directive everywhere in my conf I had anything related to SSL.
Finally to make the new settings take place I did a lighttpd server restart.
[root@centos ssl]# /etc/init.d/lighttpd restart

Stopping lighttpd: [ OK ]

Starting lighttpd: [ OK ]
After lighttpd reinitiated the error was gone! Cheers ! 😉
And shall not uncircumcision which is by nature, if it fulfil the law, judge thee, who by the letter and circumcision dost transgress the law? -- Romans 2:27


A must have collection of WordPress plugins that enpowers your blog and improves SEO
Tuesday, April 5th, 2011Since I’m using wordpress as a blogging platform for about two years now and I’m constantly experimenting with valueable wordpress plugins.
I’ve decided to publish a compilation of wordpress plugins that empowers my blog
The plugins included in the compilation are quite various, some of the plugins aims at easy post sharing via the general social networks and main websites used by users today, others significantly helps in increasing the blog ranking in major search engines, there are some that adds like button to the blog.
These plugins also strenghthen the easy blog RSS file sharing, some post straight to twitter all your blog posts, generate tags automatically, puts a better features to the default wordpress commenting mechanism, prevent from spam comments, add features for easily adding Google adsense to the wordpress installation to help you advertise on your blog.
There are also plugins which delete duplicate posts (if you have such), puts better wordpress blog search bar, generates a sitemap to the blog, add an option to include php codes straight into your posts, adds wordpress an option to easily put mod rewrite rules straight from the wordpress interface, boost wordpress speed by adding static html generation cache, boost performance etc. etc.
Here is the complete list of wordpress plugins which I have currently installed on my wordpress blog:
ad-squares-widgetadd-to-any-subscribe
advertising-manager
ajax-comments
akismet
all-in-one-adsense-and-ypn
all-in-one-seo-pack
askapache-google-404
auto-tag
bm-custom-login
commentluv
comments-statistics
cyr2lat-slugs
delete-duplicate-posts
easy-adsenser
extended-search-plugin
facebook-share-new
favourite-bible-verse
feedburner-plugin
feedburner-widget
feedburner_feedsmith_plugin_2.3
feedlist
force-publish-schedule
google-analytics-for-wordpress
google-sitemap-generator
headspace2
my-link-order
php-code-widget
platinum-seo-pack
post-plugin-library
post-to-twitter
profile-pic
profile-pics
redirection
rss-atom-avatar
seo-automatic-links
seo-slugs
share-on-facebook
share-this
similar-posts
simple-tags
subscribe-to-comments-reloaded
subscribe-to-comments
subscribe2
text-control
tidy-up
tinymce-advanced
what-would-seth-godin-do
wordbook
wordpress-23-related-posts-plugin
wordpress-mobile-edition
wordpress-thread-comment
wp-codebox
wp-keiths-easy-rss
wp-likes
wp-o-matic
wp-postviews
wp-super-cache
wp-syntax
yourls-wordpress-to-twitter
I do have enabled most of the plugins, though some are disabled but still might be helpful somewhere in the close-future thus I still keep them installed.
I would skip the time to describe one by one what each of the above list of plugins will do for your wordpress, since the list is quite long.
However I defnitely think this is a list of plugins you might want to have installed in a newly established wordpress blog for sure.
Note that the versions of the plugins which are included in this must have wordpress plugins collection might not be the latest as the included ones are the ones I do have installed at the time of writting of this article.
Also be aware that some of the plugins might create some issues with newer versions of wordpress (your blog might beak up!), however most of the plugins should work out of the box by just enabling each one of them from the wordpress interface via the menus:
Settings -> Plugins -> InactiveTo straight install my bundled package of plugins you have to issue the commands:
linux:~# cd /var/www/blog/wp-content/pluginslinux:/var/www/blog/wp-content/plugins# wget https://www.pc-freak.net/files/a_must_have_wordpress_plugins_collection.tar.gz
linux:/var/www/blog/wp-content/plugins# tar -zxvf a_must_have_wordpress_plugins_collection.tar.gz
...
linux:/var/www/blog/wp-content/plugins# unzip *.zip
Now as they should be installed under the plugins directory go and enable the plugins.
Further on many of the plugins will require configuration from the menus:
Settingsor in the menu
Tools
After being setup up your new wordpress installation will look significantly better, you will notice a tons of useful features which you might have previously missing and desperately needed 😉
Most of the bundled package of wordpress plugins works fine with wordpress version 3.1, if you’re trying to install enable and configure the plugins on some other versions of wordpress, there might be problems!
If you experience problems by trying out my bunch of wordpress plugins please drop me a comment.
I hope you enjoyed this improvised article, if these bunch of plugins are useful to you please give me a thanks 🙂
Thanks!
Tags: adsense, advertising manager, aims, ajax, analytics, auto tag, bible, bible verse, blog, boost, Button, collection, commentluv, compilation, complete list, configure, custom login, cyr, drop, extended search, generation, google, google sitemap generator, html generation, Inactive, installation, interface, major search engines, mechanism, mod, option, package, php, platform, plugin, post, Search, search bar, search plugin, SEO, Settingsor, Slugs, social networks, squares, time, twitter, wget, widget, wordbook, Wordpress, wordpress blog, wordpress plugins, ypn
Posted in SEO, Web and CMS, Wordpress | 8 Comments »