I needed to add to a wordpress based website Google maps location pictures with Google Maps Zoom In / Out controls.
I've seen plenty of plugins available that said to to this but none of them really worked fine for me. Either the plugins I checked in wordperss.org was too complex to set up and required a Google API registration or was marked as Broken (not working).
Finally to add the geographic locations taken from maps.google.com I used the embed code generated directly from maps.google.com.
But that was not the end of my WordPress Google Maps struggles. What followed was rather ridiculous, it seems since some time Google removed the pinning of a location searched for. Moreover the easy old way to simply pin a location on the map is also, gone.
Hence here is what I had to do to pinpoint location on the Google map of my searched country destination:
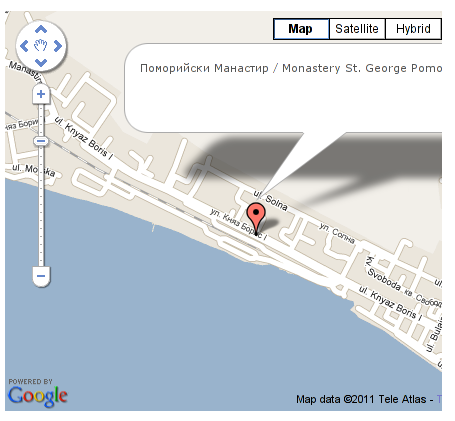
1. To be able to pinpoint the location, I had to login to my gmail 2. Go to http://maps.google.com in browser 3. Press on My Places button 4. Click on Create map and fill in the Title and Description dialogs 5. The Privacy and Sharing radio button should be selected 6. Click on Done and Save buttons 7. From the left top corner inside the Google map image to select the baloon picture (Add a Placemark) 8. Choose the exact desired placemark type and color from the next appearing dialog 9. Choose the location I want to pin on the map
I've created also a small Video tutorial just for fun for all those who want to see the pin a location with a baloon 😉 on the google map tutorial, here is the video as well:
For all people who can't properly see the .mov video here is link to the video created with recordmydesktop on my Linux showing how the baloon pinning inside a map can be done.
If you're running a newly configured Postfix SMTP server and you get in /var/log/maillog errors like:
Relay access denied
i.e. in log whenever you try to deliver a mail to the mail server you get something like:
Jan 29 10:05:04 600h postfix/smtpd[4624]: NOQUEUE: reject: RCPT from mxtb-pws3.mxtoolbox.com[64.20.227.133]: 554 5.7.1 <test@example.com>: Relay access denied; from=<supertool@mxtoolbox.com> to=<test@example.com> proto=ESMTP helo=<please-read-policy.mxtoolbox.com>
This is to because the virtualdomain to which postfix is trying to deliver is not added among the domains for which relaying is allowed.
To fix it edit /etc/postfix/main.cf ; find line
relay_domains = $mydestination
and add all domains, for which relaying should be allowed. Let's say you have virtual domains example.com and example1.com to enable relaying, add to conf:
It’s a wise idea that every website has a address location map on it’s website, for that reason Google maps is just great. To install Google maps capability to joomla one can use a plugin called Google Maps .
Afterwards use Extension Manager to install the plugin e.g. follow:
Extensions -> Install/Uninstall (Choose File)
and click on Upload File & Install button.
To further enable and configure the Joomla Googlemap plugin you will have to go to the location:
Extensions -> Plugin Manager
Therein you will have to find and enable the Google Maps plugin which is to be found in the column named Plugin Manager On my Joomla installation the plugin was located in the second page with modules, so if you don’t find the module on the listing with modules on the first page, make sure you scroll to the bottom of the page and click on Next button.
Therein in the list you will most likely notice Google Maps use the Enable button to enable it.
Next step is to configure the plugin, to do so press on the plugin name Google Maps All configuration necessery here is to place Googlemaps API Key in the respective field (you will see it among config options).
Issuing a new Google Maps api key takes just few seconds, if you already have a gmail account just go to http://code.google.com/apis/maps/signup.html and take few seconds to issue the key.
You will get the key right on your gmail account after being issued (to repeat myself issuing takes few seconds so no worrier here).
Once having the key place it in the Googlemaps API Key field and configuring Address (which is one of the list of many options the plugin provides) you will be done with configuration.
To display a google map the location you just configured go to the Article Manager , select the article where you want the google mapslocation picture of your address to appear and type in the Article something like:
{mosmap|text='Exact street address location'|zoom='15'|zoomType='Large'|zoomNew='0'}
After you saved the article a very nice Google map showing you the location’s streets will appear on your web page in the article link where placed. You can further conifgure a number of things related to the google maps just embedded into joomla, one thing you might want to play with is the zoom level.You see in below’s code is equal to 15, e.g. zoom=’15’ Set it to another one if you want to regulate your googlemaps zoom level. For more thoroughful options take a look at the extensive plugin documentation and play with the many settings
One of the contact forms running on a FreeBSD server configured to work on top of Apache+MySQL suddenly stopped working.
The errors that appeared on the webpage during a page request to the form url was:
Fatal error: Class 'SimpleXMLElement' not found in /var/www/joomla/plugins/system/plugin_googlemap2_helper.php on line 2176 Fatal error: Class 'JLoader' not found in /var/www/joomla/plugins/libraries/loader.php on line 161
As you see in the output the website which was causing the issues was running a Joomla version 1.5.23 Stable configured with RSForm!ver 1.5.x (as a contact form solution) and Google Maps version 2.13b plugins.
The Google Map from Google Maps plugin and the RSform were configured to appear on one physical configured article in Joomla and seemed to work just until now. However yesterday suddenly the error messages: Fatal error: Class ‘SimpleXMLElement’ not found Fatal error: Class ‘JLoader’ not found
came out of nothing, it’s really strange as I don’t remember doing any changes to either Joomla or the PHP installation on this server. There is one more guy who has access to the Joomla installation which I suspect might have changed something in the Joomla, but this scenario is not very likely.
Anyways as the problem was there I had to fix it up. Obviously as the error message Fatal error: Class ‘SimpleXMLElement’ not found reported the server php simplexml was missing!
Just to assure myself the php simplexml extension is not present on the server I used the classical method of setting up a php file with phpinfo(); in it to check all the installed php extensions on the server.
Finally to solve the issue I had to install the module from ports php5-simplexml , e.g.:
freebsd# cd /usr/ports/textproc/php5-simplexml

freebsd# make install clean
Afterwards to make the new settings take place I did restart of my Apache server:
freebsd# /usr/local/etc/rc.d/apache2 restart

Syntax OK

Stopping apache2.

Waiting for PIDS: 63883.

Performing sanity check on apache2 configuration:

Syntax OK

Starting apache2.
Now my Joomla contact form is back to normal 😉
If someone has any idea why this error occured without any php or server modifications, and how comes that all worked fine beforehand even though I did not have the simplexml module instlaled on the server o_O, I would be enormously greatful.
And shall not uncircumcision which is by nature, if it fulfil the law, judge thee, who by the letter and circumcision dost transgress the law? -- Romans 2:27