I've noticed in /var/log/apache2/error.log on one of the Debian servers I manage a lot of warnings and errors produced by tidy – HTML syntax checker and reformatter program.
There were actually quite plenty frequently appearing messages in the the log like:
...

To learn more about HTML Tidy see http://tidy.sourceforge.net

Please fill bug reports and queries using the "tracker" on the Tidy web site.

Additionally, questions can be sent to html-tidy@w3.org

HTML and CSS specifications are available from http://www.w3.org/

Lobby your company to join W3C, see http://www.w3.org/Consortium

line 1 column 1 - Warning: missing <!DOCTYPE> declaration

line 1 column 1 - Warning: plain text isn't allowed in <head> elements

line 1 column 1 - Info: <head> previously mentioned

line 1 column 1 - Warning: inserting implicit <body>

line 1 column 1 - Warning: inserting missing 'title' element

Info: Document content looks like HTML 3.2

4 warnings, 0 errors were found!

...
I did a quick investigation on where from this messages are logged in error.log, and discovered few .php scripts in one of the websites containing the tidy string. I used Linux find + grep cmds find in all php files the "tidy "string, like so:
As you see the PHP programmers who wrote this website, made a bigtidy mess. Instead of using php5's tidy module, they hard coded tidy external command to be invoked via php's exec(); external tidy command invocation. This is extremely bad practice, since it spawns the command via a pseudo limited apache shell. I've notified about the issue, but I don't know when, the external tidy calls will be rewritten.
Until the external tidy invocations are rewritten to use the php tidy module, I decided to at least remove the tidy warnings and errors output.
To remove the warning and error messages I've changed:
exec('/usr/bin/tidy --show-warnings no --show-errors no -q -e -ashtml -utf8 '.$tmp_name,$rett);
The extra switches meaning is like so:
q – instructs tidy to produce quiet output -e – show only errors and warnings –show warnings no && –show errors no, completely disable warnings and error output
Onwards tidy no longer logs junk messages in error.log Not logging all this useless warnings and errors has positive effect on overall server performance especially, when the scripts, running /usr/bin/tidy are called as frequently as 1000 times per sec. or more
In my previous post I've blogged how to install and configure Trac on Debian The next logical question for me was how to use trac with multiple user accounts. Thanksfully this happened to be very easy. All I had to do to setup different trac users was to add different Apache htaccess authentication accounts.
Consequently you will be logged in in Trac's interface after you login with your Apache htaccess user and password with the same user as provided in the Apache authentication dialog.
Of course to create the required Trac login accounts, you need to first have setup an Apache AuthType Basic declaration.
For example you will have to add something similar to:
your Apache virtualhost or domain configuration file. In order to add the two users user1 and user2 then I simply had to add the users with the htpasswd Apache password tool.
debian:~# htpasswd -c /etc/apache2/trac.passwd user1

debian:~# htpasswd -c /etc/apache2/trac.passwd user2
Thanks God this was easy 🙂
Do you wonder How to change <meta name="Generator" content="Joomla! – Copyright (C) 2005 – 2007 Open Source Matters. All rights reserved." /> in Joomla 1.5
If yes, Here is how I've just found to remove the:
in my Joomla installation.
I need to remove that as a part of making my website not to leak out that it runs on top of Joomla.
So here is how:
1. Go to your Joomla website main root directory 2. Edit /libraries/joomla/document/html/renderer/head.php Look for line: 83 in the /libraries/joomla/document/html/renderer/head.php There you will notice the code:
In order to remove the <meta name="generator" content="Joomla …." /> change the above code to something like:
$strHtml .= $tab.'<meta name="generator" content="My Custom Web site Generator name" />'.$lnEnd;
That's all now next time you refresh your website the content="Joomla! – Copyright (C) 2005 – 2009 Open Source Matters. All rights reserved." will be no more. Cheers! 🙂
I needed to add to a wordpress based website Google maps location pictures with Google Maps Zoom In / Out controls.
I've seen plenty of plugins available that said to to this but none of them really worked fine for me. Either the plugins I checked in wordperss.org was too complex to set up and required a Google API registration or was marked as Broken (not working).
Finally to add the geographic locations taken from maps.google.com I used the embed code generated directly from maps.google.com.
But that was not the end of my WordPress Google Maps struggles. What followed was rather ridiculous, it seems since some time Google removed the pinning of a location searched for. Moreover the easy old way to simply pin a location on the map is also, gone.
Hence here is what I had to do to pinpoint location on the Google map of my searched country destination:
1. To be able to pinpoint the location, I had to login to my gmail 2. Go to http://maps.google.com in browser 3. Press on My Places button 4. Click on Create map and fill in the Title and Description dialogs 5. The Privacy and Sharing radio button should be selected 6. Click on Done and Save buttons 7. From the left top corner inside the Google map image to select the baloon picture (Add a Placemark) 8. Choose the exact desired placemark type and color from the next appearing dialog 9. Choose the location I want to pin on the map
I've created also a small Video tutorial just for fun for all those who want to see the pin a location with a baloon 😉 on the google map tutorial, here is the video as well:
For all people who can't properly see the .mov video here is link to the video created with recordmydesktop on my Linux showing how the baloon pinning inside a map can be done.
A friend of mine has Fujitsu Siemens Amilo laptop and is full time using his computer with Slackware Linux.
He is quite happy with Slackware Linux 13.37 on the laptop, but unfortunately sometimes his screen brightness lowers. One example when the screen gets darkened is when he switch the computer on without being plugged in the electricity grid. This lowered brightness makes the screen un-user friendly and is quite tiring for the eye …
By default the laptop has the usual function keys and in theory pressing Function (fn) + F8 / F7 – should increase / decrease the brightness with no problems, however on Slackware Linux (and probably on other Linuxes too?), the function keys are not properly recognized and not responding whilst pressed. I used to have brigtness issues on my Lenovo notebook too and remember how irritating this was. After a bit of recalling memories on how I solved this brightness issues I remembered the screen brigthness on Linux is tunable through /proc virtual (memory) filesystem.
I took a quick look in /proc and found few files called brightness:
/proc/acpi/video/GFX0/DD01/brightness
/proc/acpi/video/GFX0/DD02/brightness
/proc/acpi/video/GFX0/DD03/brightness
/proc/acpi/video/GFX0/DD04/brightness
/proc/acpi/video/GFX0/DD05/brightness
cat-ting /proc/acpi/video/GFX0/DD01/brightness, /proc/acpi/video/GFX0/DD03/brightness, /proc/acpi/video/GFX0/DD04/brightness all shows not supported and therefore, they cannot be used to modify brightness:
bash-4.1# for i in $(/proc/acpi/video/GFX0/DD0{1,3,4,5}/brightness); do \

cat $i;

done

<not supported>

<not supported>

<not supported>

<not supported>
After a bit of testing I finally succeeded in increasing the brightness. Increasing the brightness on the notebook Intel GM965 video card model is done, through file:
/proc/acpi/video/GFX0/DD02/brightness
To see all the brightness levels the Fujitsu LCD display supports:
As you can see the dark screen was caused cause the current: brightness is set to a low value of 25. To light up the LCD screen and make the screen display fine again, I increased the brightness to the maximum level 100, e.g.:
Here is also a tiny program that reduces and increases the notebook laptop brightness written in C. My friend Dido, coded it in just few minutes just for the fun 🙂 To permanently solve the issues with darkened screen on boot time it is a good idea to include echo '100' > /proc/acpi/video/GFX0/DD02/brigthness in /etc/rc.local:
I've also written another Universal Linux Increase laptop screen brightness Shell script which should be presumable also working for all Laptop models running Linux 🙂
I’ve been assigned the task to add on one of the qmail powered servers I administrate about 50 email addresses via command line.
Each email addresses was required to be configured to have the same mail password. Adding the email addresses via an interface would be a killing time consuming task and will probably require at least 1 hour of time to add the emails with qmailwebmin, qadmin, qubit or the other vpopmail qmail web administration interfaces available nowdays.
To solve the task, I’ve used a line oner bash shell script which reads all my 80 emails from a file and adds them with vpopmail’s command line tool vpasswd on the mail server.
Here is the one liner shell script I’ve written to solve the task:
debian:~# while read line; do vadduser $line Email_Pass_Phrase; done < email_list_file.txt
In above’s code I’ve used the email_list_file.txt file is a text file on the server and contains list of all my 50 email addresses, where each line in the file contains one email. The Email_Pass_Phrase is actually the password I’ve set for all the new email addresses being created with vpasswd
That’s all now the 50 email addresses on the server are created and I’ve saved at least one hour of boring repeating actions in the browser 😉
Substitute the /var/www/yourwebsite with your correct website location in between the opening and closing Directory apache directive place something similar to the following lines:
AllowOverride All AuthName “Add your login message here.” AuthType Basic AuthUserFile /etc/apache2/.htpasswd AuthGroupFile /dev/null require user name-of-user
Eventually your Directory directive in your let’s say /etc/apache2/apache2.conf should look something like the example in below
<Directory /var/www/yourwebsite>

AllowOverride All

AuthName "Add your login message here."

AuthType Basic

AuthUserFile /etc/apache2/.htpasswd

AuthGroupFile /dev/null

require user name-of-user

</Directory>
Of course in this example you need to set the name-of-user to an actual user name let’s say you want your login user to be admin, then substitute the name-of-user with admin
Of course set the desirable location for your .htpasswd in the AuthUserFile. Just in case if you decide to keep the same location as in my example you will further need to create the /etc/apache2/.htpasswd file.
Note here that in the above exapmle the AllowOverride All could also be substituted for AllowOverride AuthConfig , you might need to put this one if you don’t want that all .htaccess directives are recognized by Apache.
To create the .htpasswd issue the command:
debian~:# htpasswd -c /etc/apache2/.htpasswd admin

New password:

Re-type new password:
In the passwords prompts just type in your password of choice. Now we’re almost ready to have the website apache authentication working, only thing left is to reastart Apache. I’m using Debian so restarting my apache is done via:
debian:~# /etc/init.d/apache2 restart
In other Linux distributions exec the respective script for Apache restart.
Now access your website and the password protection dialog asking for your credentials to login should popup.
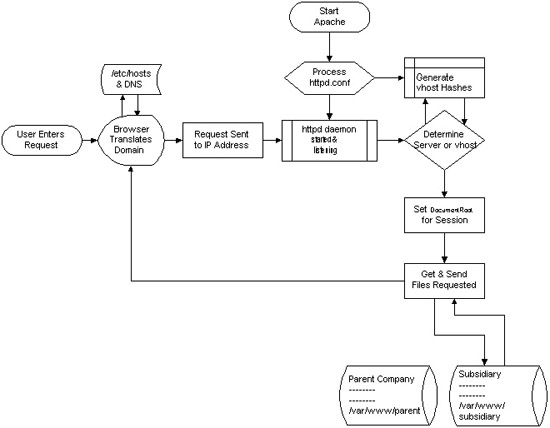
I decided to start this post with this picture I found on onlamp.com article called “Simplify Your Life with Apache VirtualHosts .I put it here because I thing it illustrates quite well Apache’s webserver internal processes. The picture gives also a good clue when Virtual Hosts gets loaded, anways I’ll go back to the main topic of this article, hoping the above picture gives some more insight on how Apache works.; Here is how to list all the enabled virtualhosts in Apache on Debian GNU / Linux serving pages:
server:~# /usr/sbin/ apache2ctl -S

VirtualHost configuration:

wildcard NameVirtualHosts and _default_ servers:

*:* is a NameVirtualHost

default server exampleserver1.com (/etc/apache2/sites-enabled/000-default:2)

port * namevhost exampleserver2.com (/etc/apache2/sites-enabled/000-default

port * namevhost exampleserver3.com (/etc/apache2/sites-enabled/exampleserver3.com:1)

port * namevhost exampleserver4.com (/etc/apache2/sites-enabled/exampleserver4.com:1)

...

Syntax OK
The line *:* is a NameVirtualHost, means the Apache VirtualHosts module will be able to use Virtualhosts listening on any IP address (configured on the host), on any port configured for the respective Virtualhost to listen on.
The next output line: port * namevhost exampleserver2.com (/etc/apache2/sites-enabled/000-default
Shows requests to the domain on any port will be accepted (port *) by the webserver as well as indicates the <VirtualHost> in the file /etc/apache2/sites-enabled/000-default:2 is defined on line 2 (e.g. :2).
To see the same all enabled VirtualHosts on FreeBSD the command to be issued is:
freebsd# pcfreak# /usr/local/sbin/httpd -S VirtualHost configuration:

wildcard NameVirtualHosts and _default_ servers:

*:80 is a NameVirtualHost

default server www.pc-freak.net (/usr/local/etc/apache2/httpd.conf:1218)

port 80 namevhost www.pc-freak.net (/usr/local/etc/apache2/httpd.conf:1218)

port 80 namevhost pcfreak.afraid.org (/usr/local/etc/apache2/httpd.conf:1353)

...

Syntax OK
On Fedora and the other Redhat Linux distributions, the apache2ctl -S should be displaying the enabled Virtualhosts.
One might wonder, what might be the reason for someone to want to check the VirtualHosts which are loaded by the Apache server, since this could be also checked if one reviews Apache / Apache2’s config file. Well the main advantage is that checking directly into the file might sometimes take more time, especially if the file contains thousands of similar named virtual host domains. Another time using the -S option is better would be if some enabled VirtualHost in a config file seems to not be accessible. Checking directly if Apache has properly loaded the VirtualHost directives ensures, there is no problem with loading the VirtualHost. Another scenario is if there are multiple Apache config files / installs located on the system and you’re unsure which one to check for the exact list of Virtual domains loaded.
For a number of time I’ve been planning to change my blog comments placement. Until this very day however I’ve kept the default wordpress theme’s Comments button placement.
I realize the default Comments button placement is a bit hard to see and not that much intuitive for the user that enters my blog for a first time.
My first guess was that there might be somewhere a wordpress plugin which will allow me to adjust my comments button placement. After some research online and a realization that probably there is no such plugin existing yet. I’ve forced myself to tune it up myself.
It was clear to me that in order to change the it will be necessery to edit the WordPress templates files. I’m not a designer and when I hear about templates I usually get scared, however I took the time to take a look at the default wordpress template and find out actually that template modifications is actually rather easier than I thought.
My previous idea was that in order to edit templates you have to be some kind of CSS and HTML guru (which I’m not). Nevertheless it seems that in order to play and adjust in a good way the templates you don’t need ot be a pro. Even an uneducated fool like myself can easily do almost everything he thinks of throughout few lines of code in the wp templates.
To get back to the major topic thanks God after a bit of review and reading of wordpress.org documentation and some user forums. I’ve figured out that in order to change my Comments placement you need to modify the file:
blog/wp-content/themes/default/index.php
In index.php find the line starting with:
You will notice within this opened paragraph the php code:
This is the actual default theme php code that makes the wordpress Comments or No Comments that maes the comments appear on the blog.
Now I’ve decided to let this be as it is but add one more Comment button to wordpress on a different location that is more appealing to my blog visitors
After quick evaluation I’ve determined that probably the best location that the Comments button should have is right after the end of the post text
If you think my idea for button placement is appropriate, to set this location for the Comments button, you will have to find the follwoing code in index.php:
<div class="entry">

<?php the_content('Read the rest of this entry »'); ?>

</div>
Right after the end of this code place the following code:
By the default wordpress does not have support for changing the exact font, therefore copying and pasting a text made in Open Office or MS Word often places in the Post or Page wp edit fonts different from the default one set for articles. Hence some articles after being published on a wordpress blog show up with improper font and the only way to fix that is to change the font first in Open Office and then copy back to wordpress instead of simply being able to change the font from within the wordpress article.
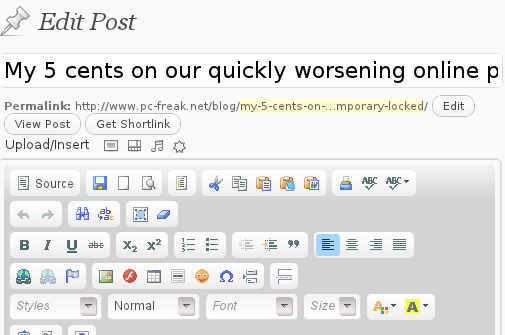
To get around this problem, there is a nice plugin fckeditor-for-wordpress-plugin which aids wordpress with an awesome Word like edit functionalities. , downhload location for FCKEdit for WordPress is here
Here is a screenshot of the extra nice functionality the FCKEditor for wordpress providces.
Installing the plugin is like installing any other wordpress plugin and comes easily to:
debian:/~# cd /var/www/blog/wp-content/plugins

debian:/plugins# wget http://downloads.wordpress.org/plugin/fckeditor-for-wordpress-plugin.3.3.1.zip

...

debian:/plugins# unzip fckeditor-for-wordpress-plugin.3.3.1.zip

...

debian:/plugins# cd fckeditor-for-wordpress-plugin/
And further enabling the plugin from:
Plugins -> Inactive -> (Dean's FCKEditor For WordPress) Enable
fckeditor for wordpress will replace the default wordpress editor TinyMCE straight after being enabled. I’ve done also a mirror of the current version as of time of writting of this article, one can download the fckeditor for wordpress mirrored here Now really file editting inside wordpress admin panel is way easier and convenient 😉 Cheers
And shall not uncircumcision which is by nature, if it fulfil the law, judge thee, who by the letter and circumcision dost transgress the law? -- Romans 2:27


How to change default Comments and No Comments location in WordPress in wordpress default theme
Tuesday, April 5th, 2011For a number of time I’ve been planning to change my blog comments placement. Until this very day however I’ve kept the default wordpress theme’s Comments button placement.
I realize the default Comments button placement is a bit hard to see and not that much intuitive for the user that enters my blog for a first time.
My first guess was that there might be somewhere a wordpress plugin which will allow me to adjust my comments button placement.
After some research online and a realization that probably there is no such plugin existing yet. I’ve forced myself to tune it up myself.
It was clear to me that in order to change the it will be necessery to edit the WordPress templates files. I’m not a designer and when I hear about templates I usually get scared, however I took the time to take a look at the default wordpress template and find out actually that template modifications is actually rather easier than I thought.
My previous idea was that in order to edit templates you have to be some kind of CSS and HTML guru (which I’m not). Nevertheless it seems that in order to play and adjust in a good way the templates you don’t need ot be a pro.
Even an uneducated fool like myself can easily do almost everything he thinks of throughout few lines of code in the wp templates.
To get back to the major topic thanks God after a bit of review and reading of wordpress.org documentation and some user forums. I’ve figured out that in order to change my Comments placement you need to modify the file:
In index.php find the line starting with:
You will notice within this opened paragraph the php code:
<?php the_tags('Tags: ', ', ', ''); ?> Posted in <?php the_category(', ') ?>
| <?php edit_post_link('Edit', '', ' | '); ?>
<?php comments_popup_link('No Comments »', '1 Comment »', '% Comments »'); ?>
This is the actual default theme php code that makes the wordpress Comments or No Comments that maes the comments appear on the blog.
Now I’ve decided to let this be as it is but add one more Comment button to wordpress on a different location that is more appealing to my blog visitors
After quick evaluation I’ve determined that probably the best location that the Comments button should have is right after the end of the post text
If you think my idea for button placement is appropriate, to set this location for the Comments button, you will have to find the follwoing code in index.php:
<div class="entry"><?php the_content('Read the rest of this entry »'); ?>
</div>
Right after the end of this code place the following code:
<?php comments_popup_link('No Comments »', '1 Comment »', '% Comments »'); ?></div>
Tags: amp, Auto, blog, Button, button placement, code lt, Comment, content themes, CSS, default theme, Draft, everything, file, fool, god, guess, guru, HTML, idea, index, kind, line, link, location, lt, nbsp, necessery, online, order, org, paragraph, php, php code, place, placement, plugin, quot, reading, realization, right, template, text, textIf, time, topic, way, Wordpress, wordpress plugin, wordpress templates
Posted in Various, Web and CMS, Wordpress | 1 Comment »