Posts Tagged ‘Done’

Enable Debian Linux automatic updates to keep latest OS Patches / Security Up to Date

Monday, January 13th, 2025

Enable Debian Linux automatic updates to keep latest OS Patches / Security Up to Date

Debian: Entenda a Importância Para o Mundo GNU/LINUX

I'm not a big fan of automatism on GNU / Linux as often using automatic updates could totally mess things especially with a complex and a bit chatic OS-es like is Linux nowadays. 
Nevertheless as Security is becoming more and more of a problem especially the browser security, having a scheduled way to apply updates like every normal modern Windows and MAC OS as an option is becoming essential to have a fully manageble Operating system.

As I use Debian GNU / Linux for desktop for my own personal computer and I have already a lot of Debian servers, whose OS minor level and package version maintenance takes up too big chunk of my time (a time I could dedicated to more useful activities). Thus I found it worthy at some cases to trigger Debian's way to keep the OS and security at a present level, the so called Debian "unattended upgrades".

In this article, I'll explain how to install and Enable Automatic (" Unattended " ) Updates on Debian, with the hope that other Debian users might start benefiting from it.
 

Pros of  enabling automatic updates, are:

  • Debian OS Stay secure without constant monitoring.
  • You Save much time by letting your system handle updates.
  • Presumably Enjoying more peace of mind, knowing your system is more protected.

Cons of enabling automatic updates:

  • Some exotic and bad maintained packages (might break after the update)
  • Customizations made on the OS /etc/sysctl.conf or any other very custom server configs might disappear or not work after the update
  • At worst scenario (a very rare but possible case) OS might fail to boot after update 🙂

Regular security updates patch vulnerabilities that could otherwise be exploited by attackers, which is especially important for servers and systems exposed to the internet, where threats evolve constantly.

1. Update Debian System to latest

Before applying automatic updates making any changes, run apt to update package lists and upgrade any outdated packages,to have automatic updates for a smooth configuration process.

# apt update && apt upgrade -y

2. Install the Unattended-Upgrades deb Package 

# apt install unattended-upgrades -y

Reading package lists… Done
Building dependency tree… Done
Reading state information… Done
The following additional packages will be installed:
  distro-info-data gir1.2-glib-2.0 iso-codes libgirepository-1.0-1 lsb-release python-apt-common python3-apt python3-dbus python3-distro-info python3-gi
Suggested packages:
  isoquery python-apt-doc python-dbus-doc needrestart powermgmt-base
The following NEW packages will be installed:
  distro-info-data gir1.2-glib-2.0 iso-codes libgirepository-1.0-1 lsb-release python-apt-common python3-apt python3-dbus python3-distro-info python3-gi unattended-upgrades
0 upgraded, 11 newly installed, 0 to remove and 0 not upgraded.
Need to get 3,786 kB of archives.
After this operation, 24.4 MB of additional disk space will be used.
Do you want to continue? [Y/n]


# apt install apt-listchanges
Reading package lists… Done
Building dependency tree… Done
Reading state information… Done
The following package was automatically installed and is no longer required:
  linux-image-5.10.0-30-amd64
Use 'apt autoremove' to remove it.
The following additional packages will be installed:
  python3-debconf
The following NEW packages will be installed:
  apt-listchanges python3-debconf
0 upgraded, 2 newly installed, 0 to remove and 0 not upgraded.
Need to get 137 kB of archives.
After this operation, 452 kB of additional disk space will be used.
Do you want to continue? [Y/n]
Get:1 http://deb.debian.org/debian bookworm/main amd64 python3-debconf all 1.5.82 [3,980 B]
Get:2 http://deb.debian.org/debian bookworm/main amd64 apt-listchanges all 3.24 [133 kB]
Fetched 137 kB in 0s (292 kB/s)
Preconfiguring packages …
Deferring configuration of apt-listchanges until /usr/bin/python3
and python's debconf module are available
Selecting previously unselected package python3-debconf.
(Reading database … 84582 files and directories currently installed.)
Preparing to unpack …/python3-debconf_1.5.82_all.deb …
Unpacking python3-debconf (1.5.82) …
Selecting previously unselected package apt-listchanges.
Preparing to unpack …/apt-listchanges_3.24_all.deb …
Unpacking apt-listchanges (3.24) …
Setting up python3-debconf (1.5.82) …
Setting up apt-listchanges (3.24) …

Creating config file /etc/apt/listchanges.conf with new version


Example config for apt-listchanges would be like:

# vim /etc/apt/listchanges.conf
[apt]
frontend=pager
email_address=root
confirm=0
save_seen=/var/lib/apt/listchanges.db
which=both

3. Enable Automatic unattended upgrades

Once installed, enable automatic updates with the following command, which will prompt asking if you want to enable automatic updates. Select Yes and press Enter, which will confirm that the unattended-upgrades service is active and ready to manage updates for you.

# dpkg-reconfigure unattended-upgrades

Configure-Unattended-Upgrades-on-Debian_Linux-dpkg-reconfigure-screenshot

Or non-interactively by running command:

# echo unattended-upgrades unattended-upgrades/enable_auto_updates boolean true | debconf-set-selections
dpkg-reconfigure -f noninteractive unattended-upgrades


4. Set the Schedule for Automatic Updates on Debian

By default, unattended-upgrades runs daily, to verify or modify the schedule, check the systemd timer:

# sudo systemctl status apt-daily.timer
# sudo systemctl status apt-daily-upgrade.timer
# systemctl edit apt-daily-upgrade.timer

Current apt-daily.timer config as of Debian 12 (bookworm) is as follows

root@haproxy2:/etc/apt/apt.conf.d# cat  /lib/systemd/system/apt-daily.timer
[Unit]
Description=Daily apt download activities

[Timer]
OnCalendar=*-*-* 6,18:00
RandomizedDelaySec=12h
Persistent=true

[Install]
WantedBy=timers.target
root@haproxy2:/etc/apt/apt.conf.d#


# systemctl edit apt-daily-upgrade.timer

[Timer]
OnCalendar=
OnCalendar=03:00
RandomizedDelaySec=0


At Line  num 2 above is needed to reset (empty) the default value shown below in line  num 5.
Line 4 is needed to prevent any random delays coming from the defaults.


Now both timers should be active, if not, activate them with:

# systemctl enable –now apt-daily.timer
# systemctl enable –now apt-daily-upgrade.timer


These timers ensure that updates are checked and applied regularly, without manual intervention.

5.Test one time Automatic Updates on Debian works

To ensure everything is working, simulate an unattended upgrade with a dry run:

# unattended-upgrade –dry-run


You can monitor automatic updates by checking the logs.

# less /var/log/unattended-upgrades/unattended-upgrades.log

Log shows details of installed updates and any issues that occurred. Reviewing logs periodically can help you ensure that updates are being applied correctly and troubleshoot any problems.

6. Advanced Configuration Options

If you’re a power user or managing multiple systems, you might want to explore these additional settings in the configuration file:

# vim /etc/apt/apt.conf.d/50unattended-upgrades


Configure unattended-upgrades to send you an email whenever updates are installed.

Unattended-Upgrade::Mail "your-email-address@email-address.com";


Enable automatic reboots after kernel updates
by adding the line:

Unattended-Upgrade::Automatic-Reboot "true";

To schedule reboots after package upgrade is applied  at a specific time:

Unattended-Upgrade::Automatic-Reboot-Time "02:00";

Specify packages you don’t want to be updated by editing the Unattended-Upgrade::Package-Blacklist section in the configuration file.


Here is alternative way to configure the unattended upgrade, by using apt configuration options:

# vim /etc/apt/apt.conf.d/02periodic

// Control parameters for cron jobs by /etc/cron.daily/apt-compat //


// Enable the update/upgrade script (0=disable)
APT::Periodic::Enable "1";


// Do "apt-get update" automatically every n-days (0=disable)
APT::Periodic::Update-Package-Lists "1";


// Do "apt-get upgrade –download-only" every n-days (0=disable)
APT::Periodic::Download-Upgradeable-Packages "1";


// Run the "unattended-upgrade" security upgrade script
// every n-days (0=disabled)
// Requires the package "unattended-upgrades" and will write
// a log in /var/log/unattended-upgrades
APT::Periodic::Unattended-Upgrade "1";


// Do "apt-get autoclean" every n-days (0=disable)
APT::Periodic::AutocleanInterval "21";


// Send report mail to root
//     0:  no report             (or null string)
//     1:  progress report       (actually any string)
//     2:  + command outputs     (remove -qq, remove 2>/dev/null, add -d)
//     3:  + trace on
APT::Periodic::Verbose "2";

If you have to simultaneously update multiple machines and you're on a limited connection line, configure download limits if you’re on a metered connection by setting options in /etc/apt/apt.conf.d/20auto-upgrades.

7. Stop Automatic Unattended Upgrade

Under some circumstances if it happens the unattended upgrades are no longer required and you want to revert back to manual package updates, to disable the updates you have to disable the unattended-upgrades service

# systemctl stop unattended-upgrades


8.  Stop an ongoing apt deb package set of updates applied on Debian server

Perhaps not often, but it might be you have run an automated upgrade and this has broke a server system or a service and for that reason you would like to stop the upcoming upgrade (some of whose might have started on other servers) immediately, to do so, the easiest way (not always safe thogh) is to kill the unattended-upgrades daemon.
 

# pkill –signal SIGKILL unattended-upgrades


Note that this a very brutal way to kill it and that might lead to some broken package update, that you might have to later fix manually.

If you have the unattended-upgrade process running on the OS in the process list backgrounded and you want to stop the being on the fly upgrade on the system more safely for the system, you can stop and cancel the ongoing apt upgrade  it by running the ncurses prompt interface, through dpkg-reconfigure

# dpkg-reconfigure unattended-upgrades


Then just select No, press Enter. In my case, this has promptly stopped the ongoing unattended upgrade that seemed blocked (at least as promptly as the hardware seemed to allow 🙂 ).

If you want to disable it for future, so it doesn't automatically gets enabled on next manual update, by some update script disable service as well.
 

# systemctl disable unattended-upgrades


Close up

That’s all ! Now, your Debian system will automatically handle security updates, keeping your system secure without you having to do a thing.
The same guide should be good for most Deb based distributions such as Ubuntu / Mint and there rest of other Debian derivative OS-es.
You’ve now set up a reliable way to ensure your system stays protected from vulnerabilities, but anyways it is a good practice to always login and check what the update has done to the system, otherwise expect the unexpected. 

How to remove GNOME environment and Xorg server on CentOS 7 / 8 / 9 Linux

Wednesday, April 13th, 2022

centos-linux-remove-gnome-gui-remove-howto-logo

If you have installed recent version of CentOS, you have noticed by default the Installator did setup Xserver and GNOME as Graphical Environment as well the surrounding GUI Administration tools. That's really not needed on "headless" monitorless Linux servers as this wastes up for nothing a very tiny amount of the machine CPU and RAM and Disk resource on keeping services up and running. Even worse a Graphical Environment on a Production server poses a security breach as their are much more services running on the OS that could be potentially hacked.

Removal of GUI across CentOS is similar but slightly differs. Hence in this article, I'll show how it can be removed on CentOS Linux 7 / 8 and 9. Removal of Graphics is usual operation for sysadmins thus there is plenty of info on the net,how this is done on CentOS 7 and COS 8 but unfortunately as of time of writting this article, couldn't find anything on the net on how to Remove GUI environment on CentOS 9.

The reason for this article is mostly for documentation purposes for myself

First list the available meta-package groups installed on the OS:

1. List machine installed package groups


yum-groupinstall-gnome

[root@centos ~]# yum grouplist
Last metadata expiration check: 3:55:48 ago on Mon 11 Apr 2022 03:26:06 AM EDT.
Available Environment Groups:
   Server
   Minimal Install
   Workstation
   KDE Plasma Workspaces
   Custom Operating System
   Virtualization Host
Installed Environment Groups:
   Server with GUI
Installed Groups:
   Container Management
   Headless Management
Available Groups:
   Legacy UNIX Compatibility
   Console Internet Tools
   Development Tools
   .NET Development
   Graphical Administration Tools
   Network Servers
   RPM Development Tools
   Scientific Support
   Security Tools
   Smart Card Support
   System Tools
   Fedora Packager


On CentOS 8 and CentOS 9 to list the installed package groups, you can use also:

[root@centos ~]# dnf grouplist

Installed Environment Groups:
   Server with GUI

2. Remove GNOME and Xorg GUIs on CentOS 7

[root@centos ~]# yum groupremove "Server with GUI" –skip-broken

[root@centos ~]# yum groupremove "GNOME Desktop" -y

3. Remove GNOME and X on CentOS 8

[root@centos ~]# dnf groupremove 'X Window System' 'GNOME' -y

4. Remove Graphical Environment on CentOS 9


centos9-linux-groupremove-command-screenshot

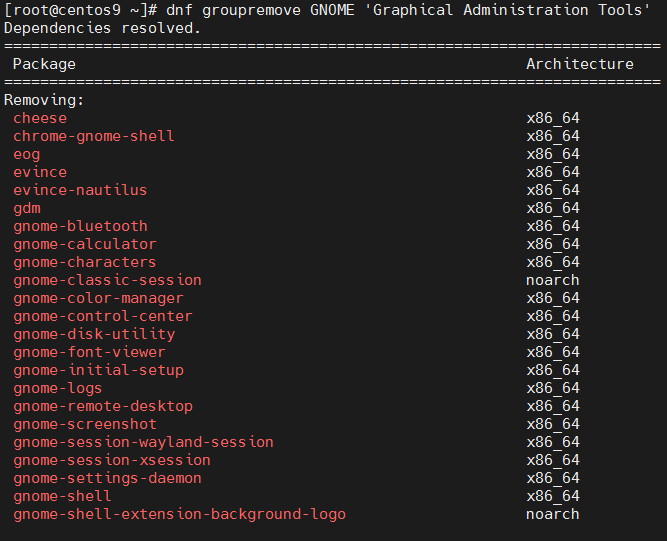
[root@centos ~]# yum groupremove GNOME 'Graphical Administration Tools' -y


Removing Groups:
 GNOME

Transaction Summary
====================================================
Remove  123 Packages

Freed space: 416 M
Is this ok [y/N]: y
Is this ok [y/N]: y
Running transaction check
Transaction check succeeded.
Running transaction test
Transaction test succeeded.


  xorg-x11-drv-libinput-1.0.1-3.el9.x86_64
  xorg-x11-server-Xorg-1.20.11-10.el9.x86_64
  xorg-x11-server-Xwayland-21.1.3-2.el9.x86_64
  xorg-x11-server-common-1.20.11-10.el9.x86_64
  xorg-x11-server-utils-7.7-44.el9.x86_64
  xorg-x11-xauth-1:1.1-10.el9.x86_64
  xorg-x11-xinit-1.4.0-11.el9.x86_64

Complete!


Graphical Administration Tools – is a group of tools that 

Or alternatively you can do

[root@centos ~]# yum remove gnome* xorg* -y


5. Change the Graphical boot to text multiuser

[root@centos ~]# systemctl set-default multi-user.target


6. Install GNOME / X GUI on the CentOS 7 / 8 / 9

Sometimes GNOME Desktop environment and Xorg are missing on previously delpoyed installs but you need it back for some reason.For example it was earlier removed a year ago on the server as it was not needed, but the machine use type changes and now you need to have installed an Oracle Server / Oracle Client which usually depends on having at least a minimal working version of X environment ont the Linux.


To install back the GNOME and X back on the machine:

[root@centos ~]# yum groupistall "Server with GUI" –skip-broken

[root@centos9 network-scripts]# yum groupinstall "Server with GUI" –skip-broken
Last metadata expiration check: 0:09:26 ago on Mon 11 Apr 2022 07:43:11 AM EDT.
No match for group package "insights-client"
No match for group package "redhat-release"
No match for group package "redhat-release-eula"
Dependencies resolved.
===================================================
 Package                                       Arch       Version              Repository     Size
===================================================
Installing group/module packages:
 NetworkManager-wifi                           x86_64     1:1.37.2-1.el9       baseos         75 k
 cheese                                        x86_64     2:3.38.0-6.el9       appstream      96 k
 chrome-gnome-shell                            x86_64     10.1-14.el9          appstream      33 k
 eog                                           x86_64     40.3-2.el9           appstream     3.6 M
 evince                                        x86_64     40.4-4.el9           appstream     2.8 M
 evince-nautilus                               x86_64     40.4-4.el9           appstream      20 k
 gdm                                           x86_64     1:40.1-13.el9        appstream     894 k
 gnome-bluetooth                               x86_64     1:3.34.5-3.el9       appstream      44 k
 gnome-calculator                              x86_64     40.1-2.el9           appstream     1.4 M
 gnome-characters                              x86_64     40.0-3.el9           appstream     236 k
 gnome-classic-session                         noarch     40.6-1.el9           appstream      36 k
 gnome-color-manager                           x86_64     3.36.0-7.el9         appstream     1.1 M
 gnome-control-center                          x86_64     40.0-22.el9          appstream     5.7 M
 gnome-disk-utility                            x86_64     40.2-2.el9           appstream     1.1 M
 gnome-font-viewer                             x86_64     40.0-3.el9           appstream     233 k
 gnome-initial-setup                           x86_64     40.1-2.el9           appstream     1.1 M
 gnome-logs                                    x86_64     3.36.0-6.el9         appstream     416 k

Installing dependencies:
 cheese-libs                                   x86_64     2:3.38.0-6.el9       appstream     941 k
 clutter                                       x86_64     1.26.4-7.el9         appstream     1.1 M
 clutter-gst3                                  x86_64     3.0.27-7.el9         appstream      85 k
 clutter-gtk                                   x86_64     1.8.4-13.el9         appstream      47 k
 cogl                                          x86_64     1.22.8-5.el9         appstream     505 k
 colord-gtk                                    x86_64     0.2.0-7.el9          appstream      33 k
 dbus-daemon                                   x86_64     1:1.12.20-5.el9      appstream     202 k
 dbus-tools                                    x86_64     1:1.12.20-5.el9      baseos         52 k
 evince-previewer                              x86_64     40.4-4.el9           appstream      29 k

Installing weak dependencies:
 gnome-tour                                    x86_64     40.1-1.el9           appstream     722 k
 nm-connection-editor                          x86_64     1.26.0-1.el9         appstream     838 k
 p11-kit-server                                x86_64     0.24.1-2.el9         appstream     199 k
 pinentry-gnome3                               x86_64     1.1.1-8.el9          appstream      41 k
Installing Environment Groups:
 Server with GUI
Installing Groups:
 base-x
 Container Management
 core
 fonts
 GNOME
 guest-desktop-agents
 Hardware Monitoring Utilities
 hardware-support
 Headless Management
 Internet Browser
 multimedia
 networkmanager-submodules
 print-client
 Server product core
 standard

Transaction Summary
=======================================================
Install  114 Packages

Total download size: 96 M
Installed size: 429 M
Is this ok [y/N]: y

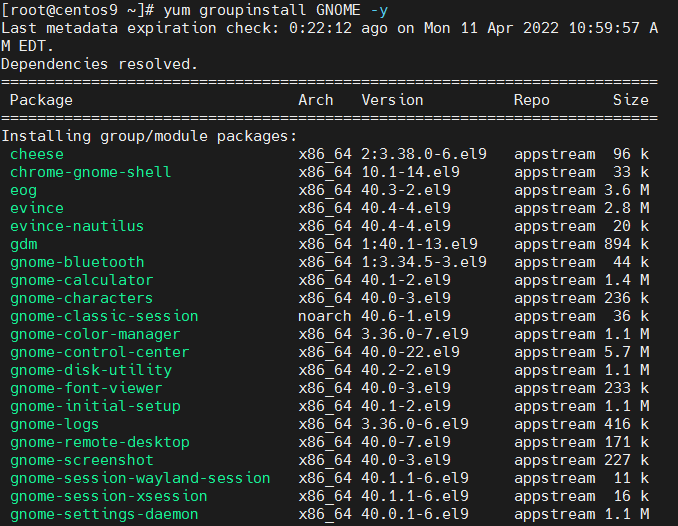
or yum groupinstall GNOME

[root@centos9 ~]# yum grouplist
Last metadata expiration check: 3:55:48 ago on Mon 11 Apr 2022 03:26:06 AM EDT.
Available Environment Groups:

Installed Environment Groups:
   Server with GUI

Next you should change the OS default run level to 5 to make CentOS automatically start the Xserver and gdm.

To see the list of available default Login targets do:


[root@centos ~]# find / -name "runlevel*.target"
/usr/lib/systemd/system/runlevel0.target
/usr/lib/systemd/system/runlevel1.target
/usr/lib/systemd/system/runlevel2.target
/usr/lib/systemd/system/runlevel3.target
/usr/lib/systemd/system/runlevel4.target
/usr/lib/systemd/system/runlevel5.target
/usr/lib/systemd/system/runlevel6.target

The meaning of each runlevel is as follows:

Run Level Target Units Description
0 runlevel0.target, poweroff.target Shut down and power off
1 runlevel1.target, rescue.target Set up a rescue shell
2,3,4 runlevel[234].target, multi- user.target Set up a nongraphical multi-user shell
5 runlevel5.target, graphical.target Set up a graphical multi-user shell
6 runlevel6.target, reboot.target Shut down and reboot the system


If this does not work you can try:

yum-groupinstall-gnome

[root@centos ~]#  yum -y groups install "GNOME Desktop"


7. To check the OS configured boot target
 

[root@centos ~]# systemctl get-default
multi-user.target


multi-user.target is a mode of operation that is text mode only with multiple logins supported on tty and remotely.

To change it to graphical

[root@centos ~]# systemctl set-default graphical.target


or simply link it yourself
 

[root@centos ~]# ln -sf /lib/systemd/system/runlevel5.target /etc/systemd/system/default.target

[root@centos ~]# reboot


If the X was not used so far ever, you will get a few graphial screens to accept the License Information and Finish the configuration,i .e.

1. Accept the license by clicking on the “LICENSE INFORMATION“.

2. Tick mark the “accept the license agreement” and click on “Done“.

3. Click on “FINISH CONFIGURATION” to complete the setup.
And voila GDM (Graphical Login) Greater should shine up.
 

You could also go the manual route by adding an .xinitrc file in your home directory (instead of making the graphical login screen the default, as done above with the sudo systemctl set-default graphical.target command). To do this, issue the command:

[root@centos ~]# echo "exec gnome-session" >> ~/.xinitrc


How to calculate connections from IP address with shell script and log to Zabbix graphic

Thursday, March 11th, 2021

We had to test the number of connections incoming IP sorted by its TCP / IP connection state.

For example:

TIME_WAIT, ESTABLISHED, LISTEN etc.


The reason behind is sometimes the IP address '192.168.0.1' does create more than 200 connections, a Cisco firewall gets triggered and the connection for that IP is filtered out. To be able to know in advance that this problem is upcoming. a Small userparameter script is set on the Linux servers, that does print out all connections from IP by its STATES sorted out.


The script is calc_total_ip_match_zabbix.sh is below:

#!/bin/bash
#  check ESTIMATED / FIN_WAIT etc. netstat output for IPs and calculate total
# UserParameter=count.connections,(/usr/local/bin/calc_total_ip_match_zabbix.sh)
CHECK_IP='192.168.0.1';
f=0; 


for i in $(netstat -nat | grep "$CHECK_IP" | awk '{print $6}' | sort | uniq -c | sort -n); do

echo -n "$i ";
f=$((f+i));
done;
echo
echo "Total: $f"


root@pcfreak:/bashscripts# ./calc_total_ip_match_zabbix.sh 
1 TIME_WAIT 2 ESTABLISHED 3 LISTEN 

Total: 6


root@pcfreak:/bashscripts# ./calc_total_ip_match_zabbix.sh 
2 ESTABLISHED 3 LISTEN 
Total: 5


images/zabbix-webgui-connection-check1

To make process with Zabbix it is necessery to have an Item created and a Depedent Item.


webguiconnection-check1

webguiconnection-check1
 

webgui-connection-check2-item

images/webguiconnection-check1

Finally create a trigger to trigger alarm if you have more than or eqaul to 100 Total overall connections.


images/zabbix-webgui-connection-check-trigger

The Zabbix userparameter script should be as this:

[root@host: ~]# cat /etc/zabbix/zabbix_agentd.d/userparameter_webgui_conn.conf
UserParameter=count.connections,(/usr/local/bin/webgui_conn_track.sh)


Some collleagues suggested more efficient shell script solution for suming the overall number of connections, below is less time consuming version of script, that can be used for the calculation.
 

#!/bin/bash -x
# show FIN_WAIT2 / ESTIMATED etc. and calcuate total
count=$(netstat -n | grep "192.168.0.1" | awk ' { print $6 } ' | sort -n | uniq -c | sort -nr)
total=$((${count// /+}))
echo "$count"
echo "Total:" "$total"

      2 ESTABLISHED
      1 TIME_WAIT
Total: 3


Below is the graph built with Zabbix showing all the fluctuations from connections from monitored IP. ebgui-check_ip_graph


How to deb upgrade PHP 5.3.3-7 / MySQL Server 5.1 to PHP 5.4.37 MySQL 5.5 Server on Debian 6.0 / 7.0 Squeeze / Wheezy GNU / Linux

Thursday, February 12th, 2015

how-to-deb-upgrade-mysql-server-5.1-to-mysql-5.5-php-5.3-to-php-5.4-5.5-upgrade-howto-on-old-stable-debian-squeeze-wheezy

I've been still running Debian Squeeze 6.0 GNU / Linux on few of the Linux / Apache / MySQL servers I'm administrating and those servers are running few Wordperss / Joomla websites which lately face severe MySQL performance issues. I tried to optimize using various mysql performance optimization scripts such as mysql-tuner.pl, Tuning-primer.sh and Percona Toolkit – a collection of advanced command-line tools for system administrators and tech / support staff to perform a variety of MySQL and system tasks that are too difficult or complex to perform manually. Though with above tools and some my.cnf tunizations I managed to achieve positive performance improvement results with above optimizations, still I didn't like how MyQSL served queries and since the SQL server is already about 5 years old (running version 5.1) and the PHP on sever is still at 5.3 branch, I was advised by my dear colleague Anatoliy to try version update as a mean to improve SQLserver performance. I took seriously the suggestion to try upgrade as a mean to resolve performance issues in this article I will explain in short what I had to do to make MySQL upgrade a success

Of course to try keep deb installed software versions as fresh as possible possible deb packagse, I'm already using Debian Back Ports (for those who hear it a first time Debian Backports is a special repository for Stable versioned Debian Desktop and Servers  – supporting stable releases of Debian Linux) which allows you to keep install packages versions less outdated (than default installable software which usually are way behind latest stable package versions with 2-5 years).

If you happen to administer Stable Debian servers and you never used BackPorts I warmly recommend it as it often includes security patches of packages part of Debian stable releases that reached End Of Support (EOS) and already too old even for security updates to be issued by respective Debian Long Term Suport (LTS) repositories.

If you're like me and still in situation to manage remotely Debian 6.0 Squeeze and its the first time you hear about BackPorts and Debian LTShttps://wiki.debian.org/LTS/ to start using those two add to your /etc/apt/sources.list below 3 lines

Open with vim editor and press shift+G to go to last line of file and then press I to enter INSERT mode, once you're done to save, press (ESC) then press : and type x! in short key combination for exit and save setting in vim is 
 

Esc + :x! 


debian-server:~# vim /etc/apt/sources.list
deb http://http.debian.net/debian squeeze-lts main contrib non-free
deb-src http://http.debian.net/debian squeeze-lts main contrib non-free
deb http://http.debian.net/debian-backports squeeze-backports main

If you haven't been added a security updates line in /etc/apt/sources.list make sure you add also:


deb http://security.debian.org/ squeeze/updates main contrib non-free
deb-src http://security.debian.org/ squeeze/updates main contrib non-free


Then to apply latest security updates and packages from LTS / Backports repository run the usual:


debian-server:~# apt-get update && apt-get –yes upgrade
….

If you need to search a package or install something from just added backports repository use:


debian-server:~# apt-cache -t squeeze-backports search "mysql-server"
auth2db – Powerful and eye-candy IDS logger, log viewer and alert generator
torrentflux – web based, feature-rich BitTorrent download manager
cacti – Frontend to rrdtool for monitoring systems and services
mysql-server-5.1 – MySQL database server binaries and system database setup
mysql-server-core-5.1 – MySQL database server binaries
mysql-server – MySQL database server (metapackage depending on the latest version)


To install specific packages only with all their dependencies from Backports while keeping rest of packages from Debian Stable:


debian-server:~# apt-get install -t squeeze-backports "package_name"

In same way you can also search or install specific packages from LTS repo:


debian-server:~# apt-get search -t squeeze-lts "package_name"

debian-server:~# apt-get install -t squeeze-lts "package_name"

Latest mysql available from Debian BackPorts and LTS is still quite old 5.1.73-1+deb6u1 therefore I made an extensive research online on how can I easily update MySQL 5.1 to MySQL 5.5 / 5.6 on Debian Stable Linux.
 

Luckily there were already DotDeb deb repositories for Debian LAMP (Linux / Apache  / MySQL / PHP / Nginx ) running servers prepared in order to keep the essential Webserver services up2date even long after distro official support is over. I learned about existence of this repo thanks to a Ryan Tate's post who updates his LAMP stack on TurnKey Linux which by the way is based on slightly modified official stable Debian Linux releases packages

To start using DotDeb repos add in /etc/apt/sources.list (depending whereh you're on Squeeze or Wheeze Debian):


deb http://packages.dotdeb.org squeeze all
deb-src http://packages.dotdeb.org squeeze all

or for Debian Wheezy add repos:


deb http://packages.dotdeb.org wheezy all
deb-src http://packages.dotdeb.org wheezy all


I was updating my DebianLatest MySQL / PHP / Apache release to Latest ones on (6.0.4) Squeeze so added above squeeze repos:

Before refreshing list of package repositories, to authenticate repos issue:


debian-server:~# wget -q http://www.dotdeb.org/dotdeb.gpg
debian-server:~# apt-key add dotdeb.gpg

Once again to update my packages from newly added DodDeb repository


debian-server:~# apt-get update

Before running the SQL upgrade to insure myself, I dumped all databases with:


debian-server:~# mysqldump -u root -p -A > /root/dump.sql

Finally I was brave enough to run apt-get dist-upgrade to update with latest LAMP packages


debian-server:~# apt-get dist-upgrade
Reading package lists… Done
Building dependency tree
Reading state information… Done
Calculating upgrade… Done
The following packages will be REMOVED:
  mysql-client-5.1 mysql-server mysql-server-5.1
The following NEW packages will be installed:
  libaio1 libmysqlclient18 mysql-client-5.5 mysql-client-core-5.5 python-chardet python-debian
The following packages will be upgraded:
  curl krb5-multidev libapache2-mod-php5 libc-bin libc-dev-bin libc6 libc6-dev libc6-i386 libcurl3 libcurl3-gnutls libcurl4-openssl-dev libevent-1.4-2
  libgssapi-krb5-2 libgssrpc4 libjasper1 libk5crypto3 libkadm5clnt-mit7 libkadm5srv-mit7 libkdb5-4 libkrb5-3 libkrb5-dev libkrb53 libkrb5support0 libmysqlclient-dev
  libxml2 libxml2-dev locales mysql-client mysql-common ntp ntpdate php-pear php5 php5-cgi php5-cli php5-common php5-curl php5-dev php5-gd php5-imagick php5-mcrypt
  php5-mysql php5-odbc php5-recode php5-sybase php5-xmlrpc php5-xsl python-reportbug reportbug unzip

50 upgraded, 6 newly installed, 3 to remove and 0 not upgraded.
Need to get 51.7 MB of archives.
After this operation, 1,926 kB of additional disk space will be used.
Do you want to continue [Y/n]? Y

As you see from above output above command updates Apache webservers / PHP and PHP related modules, however it doesn't update MySQL installed version, to update also MySQL server 5.1 to MySQL server 5.5


debian-server:~#  apt-get install –yes mysql-server mysql-server-5.5

You will be prompted with the usual Debian ncurses text blue interface to set a root password to mysql server, just set it the same as it used to be on old upgraded MySQL 5.1 server.

Well now see whether mysql has properly restarted with ps auxwwf


debian-server:~#  ps axuwwf|grep -i sql
root     22971  0.0  0.0 112360   884 pts/11   S+   15:50   0:00  |                   \_ grep -i sql
root     19436  0.0  0.0 115464  1556 pts/1    S    12:53   0:00 /bin/sh /usr/bin/mysqld_safe
mysql    19837  4.0  2.3 728192 194552 pts/1   Sl   12:53   7:12  \_ /usr/sbin/mysqld –basedir=/usr –datadir=/var/lib/mysql –plugin-dir=/usr/lib/mysql/plugin –user=mysql –pid-file=/var/run/mysqld/mysqld.pid –socket=/var/run/mysqld/mysqld.sock –port=3306
root     19838  0.0  0.0 110112   700 pts/1    S    12:53   0:00  \_ logger -t mysqld -p daemon.error

In my case it was running, however if it fails to run try to debug what is going wrong on initialization by manually executing init script /etc/init.d/mysql stop; /etc/init.d/mysql start and look for errors. You can also manually try to run mysqld_safe from console if it is not running run:


debian-server:~# /usr/bin/mysqld_safe &

This should give you a good hint on why it is failing to run
 

One more thing left is to check whether php modules load correctly to do so issue:


debian-server:~# php -v
Failed loading /usr/lib/php5/20090626/xcache.so:  /usr/lib/php5/20090626/xcache.so: cannot open shared object file: No such file or directory

Failed loading /usr/lib/php5/20090626/xdebug.so:  /usr/lib/php5/20090626/xdebug.so: cannot open shared object file: No such file or directory


You will likely get an exception (error) like above.
To solve the error, reinstall xcache and xcache-debug debs


debian-server:~# apt-get purge php5-xcache php5-xdebug

Now PHP + MySQL + Apache environment should be running much smootly.

debian-squeeze-wheeze-update-install-mysql-sevver5.55-620x344-howto

Upgrading the MySQL server / PHP library to MySQL server 5.6 / PHP 5.5 on Wheeze Linux is done in very much analogous ways all you have to do is change the repositories with above wheeze 7.0 ones and to follow the process as described in this article. I haven't tested update on Wheezy yet, so if you happen to try my article with wheezy reports and got a positive upgrade result please drop a comment.