![]()
I've been given a very tedious task to Copy music from Audio CD Drive to MP3 / MP4 file format and then copy the content to external Flash drive.
Doing so is pretty trivial, you just need to have a CD / DVD rom on your computer something that becomes rare nowadays and then you need to have installed a bunch of software, if you don't already have it as i've pointed in my previous article Howto craete Music Audio CD from MP3 files, create playable WAV format audio CD Albums from MP3s.
Creating a Audio CD from an MP3 collection is exactly the opposite to what is aim't now (to copy the content of a CD to a computer and prepare it for A Car MP3 player).
1. RIPing audio CDs to WAV and Conver to MP3 from terminal
On Linux there is many ways to do it and many tools that can do it for your both graphical and command line.
But as I prefer command line to do stuff, in this article I'll mention the quickest and most elementary one which is done in 2 steps.
1. Use a tool to dump the CD Audio music to Tracks in WAV format
2. Convert the WAV to MP3 format
We'll need cdparanoia tool installed as well as ffmpeg.
If you don't have them installed do:
# apt-get install –yes cdparanoia dvd+rw-tools cdw cdrdao audiotools cdlabelgen dvd+rw-tools wodim ffmpeg lame normalize-audio libavcodec58
Next create the directory where you want to dump the .wav files.
# mkdir /home/hipo/audiorip/cd1
# cd /home/hipo/audiorip/cd1
Next assumng the Audio CD is plugged in the CD reader, dump its full content into track*.WAV files with cmd:
# paranoia -B
This will produce you the dumped songs into .wav files.
hipo@noah:~/audiorip/cd1$ ls -al *.wav
-rw-r–r– 1 root root 10278284 мар 25 22:49 track01.cdda.wav
-rw-r–r– 1 root root 21666668 мар 25 22:50 track02.cdda.wav
-rw-r–r– 1 root root 88334108 мар 25 22:53 track03.cdda.wav
-rw-r–r– 1 root root 53453948 мар 25 22:55 track04.cdda.wav
-rw-r–r– 1 root root 100846748 мар 25 22:58 track05.cdda.wav
-rw-r–r– 1 root root 41058908 мар 25 22:59 track06.cdda.wav
-rw-r–r– 1 root root 105952940 мар 25 23:02 track07.cdda.wav
-rw-r–r– 1 root root 50074124 мар 25 23:03 track08.cdda.wav
-rw-r–r– 1 root root 92555948 мар 25 23:06 track09.cdda.wav
-rw-r–r– 1 root root 61939964 мар 25 23:07 track10.cdda.wav
-rw-r–r– 1 root root 8521340 мар 25 23:07 track11.cdda.wav
Then you can use a simple for loop with ffmpeg command to conver the .wav files to .mp3s.
hipo@noah:~/audiorip/cd1$ for i in $( ls -1 *); do ffmpeg -i $i $i.wav.mp3; done
ffmpeg version 1.2.12 Copyright (c) 2000-2015 the FFmpeg developers
built on Feb 12 2015 18:03:16 with gcc 4.7 (Debian 4.7.2-5)
configuration: –prefix=/usr –extra-cflags='-g -O2 -fstack-protector –param=ssp-buffer-size=4 -Wformat -Werror=format-security ' –extra-ldflags='-Wl,-z,relro' –cc='ccache cc' –enable-shared –enable-libmp3lame –enable-gpl –enable-nonfree –enable-libvorbis –enable-pthreads –enable-libfaac –enable-libxvid –enable-postproc –enable-x11grab –enable-libgsm –enable-libtheora –enable-libopencore-amrnb –enable-libopencore-amrwb –enable-libx264 –enable-libspeex –enable-nonfree –disable-stripping –enable-libvpx –enable-libschroedinger –disable-encoder=libschroedinger –enable-version3 –enable-libopenjpeg –enable-librtmp –enable-avfilter –enable-libfreetype –enable-libvo-aacenc –disable-decoder=amrnb –enable-libvo-amrwbenc –enable-libaacplus –libdir=/usr/lib/x86_64-linux-gnu –disable-vda –enable-libbluray –enable-libcdio –enable-gnutls –enable-frei0r –enable-openssl –enable-libass –enable-libopus –enable-fontconfig –enable-libpulse –disable-mips32r2 –disable-mipsdspr1 –dis libavutil 52. 18.100 / 52. 18.100
libavcodec 54. 92.100 / 54. 92.100
libavformat 54. 63.104 / 54. 63.104
libavdevice 54. 3.103 / 54. 3.103
libavfilter 3. 42.103 / 3. 42.103
libswscale 2. 2.100 / 2. 2.100
libswresample 0. 17.102 / 0. 17.102
libpostproc 52. 2.100 / 52. 2.100
[wav @ 0x66c900] max_analyze_duration 5000000 reached at 5015510 microseconds
Guessed Channel Layout for Input Stream #0.0 : stereo
Input #0, wav, from 'track01.cdda.wav':
Duration: 00:00:23.19, bitrate: 1411 kb/s
Stream #0:0: Audio: pcm_s16le ([1][0][0][0] / 0x0001), 44100 Hz, stereo, s16, 1411 kb/s
Output #0, mp3, to 'track01.cdda.wav.wav.mp3':
Metadata:
TSSE : Lavf54.63.104
Stream #0:0: Audio: mp3, 44100 Hz, stereo, s16p
Stream mapping:
Stream #0:0 -> #0:0 (pcm_s16le -> libmp3lame)
Press [q] to stop, [?] for help
size= 363kB time=00:00:23.19 bitrate= 128.2kbits/s
video:0kB audio:363kB subtitle:0 global headers:0kB muxing overhead 0.058402%
ffmpeg version 1.2.12 Copyright (c) 2000-2015 the FFmpeg developers
built on Feb 12 2015 18:03:16 with gcc 4.7 (Debian 4.7.2-5)
configuration: –prefix=/usr –extra-cflags='-g -O2 -fstack-protector –param=ssp-buffer-size=4 -Wformat -Werror=format-security ' –extra-ldflags='-Wl,-z,relro' –cc='ccache cc' –enable-shared –enable-libmp3lame –enable-gpl –enable-nonfree –enable-libvorbis –enable-pthreads –enable-libfaac –enable-libxvid –enable-postproc –enable-x11grab –enable-libgsm –enable-libtheora –enable-libopencore-amrnb –enable-libopencore-amrwb –enable-libx264 –enable-libspeex –enable-nonfree –disable-stripping –enable-libvpx –enable-libschroedinger –disable-encoder=libschroedinger –enable-version3 –enable-libopenjpeg –enable-librtmp –enable-avfilter –enable-libfreetype –enable-libvo-aacenc –disable-decoder=amrnb –enable-libvo-amrwbenc –enable-libaacplus –libdir=/usr/lib/x86_64-linux-gnu –disable-vda –enable-libbluray –enable-libcdio –enable-gnutls –enable-frei0r –enable-openssl –enable-libass –enable-libopus –enable-fontconfig –enable-libpulse –disable-mips32r2 –disable-mipsdspr1 –dis libavutil 52. 18.100 / 52. 18.100
libavcodec 54. 92.100 / 54. 92.100
libavformat 54. 63.104 / 54. 63.104
libavdevice 54. 3.103 / 54. 3.103
libavfilter 3. 42.103 / 3. 42.103
libswscale 2. 2.100 / 2. 2.100
libswresample 0. 17.102 / 0. 17.102
libpostproc 52. 2.100 / 52. 2.100
[mp3 @ 0x66c900] max_analyze_duration 5000000 reached at 5015510 microseconds
Input #0, mp3, from 'track01.cdda.wav.mp3':
Metadata:
encoder : Lavf54.63.104
Duration: 00:00:23.22, start: 0.000000, bitrate: 128 kb/s
Stream #0:0: Audio: mp3, 44100 Hz, stereo, s16p, 128 kb/s
File 'track01.cdda.wav.mp3.wav.mp3' already exists. Overwrite ? [y/N] y
Output #0, mp3, to 'track01.cdda.wav.mp3.wav.mp3':
Metadata:
TSSE : Lavf54.63.104
Stream #0:0: Audio: mp3, 44100 Hz, stereo, s16p
Stream mapping:
Stream #0:0 -> #0:0 (mp3 -> libmp3lame)
Press [q] to stop, [?] for help
Trying to remove 1152 samples, but the queue is emptys
size= 363kB time=00:00:23.24 bitrate= 128.1kbits/s
video:0kB audio:363kB subtitle:0 global headers:0kB muxing overhead 0.058336%
ffmpeg version 1.2.12 Copyright (c) 2000-2015 the FFmpeg developers
built on Feb 12 2015 18:03:16 with gcc 4.7 (Debian 4.7.2-5)
configuration: –prefix=/usr –extra-cflags='-g -O2 -fstack-protector –param=ssp-buffer-size=4 -Wformat -Werror=format-security ' –extra-ldflags='-Wl,-z,relro' –cc='ccache cc' –enable-shared –enable-libmp3lame –enable-gpl –enable-nonfree –enable-libvorbis –enable-pthreads –enable-libfaac –enable-libxvid –enable-postproc –enable-x11grab –enable-libgsm –enable-libtheora –enable-libopencore-amrnb –enable-libopencore-amrwb –enable-libx264 –enable-libspeex –enable-nonfree –disable-stripping –enable-libvpx –enable-libschroedinger –disable-encoder=libschroedinger –enable-version3 –enable-libopenjpeg –enable-librtmp –enable-avfilter –enable-libfreetype –enable-libvo-aacenc –disable-decoder=amrnb –enable-libvo-amrwbenc –enable-libaacplus –libdir=/usr/lib/x86_64-linux-gnu –disable-vda –enable-libbluray –enable-libcdio –enable-gnutls –enable-frei0r –enable-openssl –enable-libass –enable-libopus –enable-fontconfig –enable-libpulse –disable-mips32r2 –disable-mipsdspr1 –dis libavutil 52. 18.100 / 52. 18.100
libavcodec 54. 92.100 / 54. 92.100
libavformat 54. 63.104 / 54. 63.104
libavdevice 54. 3.103 / 54. 3.103
libavfilter 3. 42.103 / 3. 42.103
libswscale 2. 2.100 / 2. 2.100
libswresample 0. 17.102 / 0. 17.102
libpostproc 52. 2.100 / 52. 2.100
[mp3 @ 0x66c900] max_analyze_duration 5000000 reached at 5015510 microseconds
Input #0, mp3, from 'track01.cdda.wav.mp3.wav.mp3':
Metadata:
encoder : Lavf54.63.104
Duration: 00:00:23.25, start: 0.000000, bitrate: 128 kb/s
Stream #0:0: Audio: mp3, 44100 Hz, stereo, s16p, 128 kb/s
Output #0, mp3, to 'track01.cdda.wav.mp3.wav.mp3.wav.mp3':
Metadata:
TSSE : Lavf54.63.104
Stream #0:0: Audio: mp3, 44100 Hz, stereo, s16p
Stream mapping:
Stream #0:0 -> #0:0 (mp3 -> libmp3lame)
Press [q] to stop, [?] for help
Trying to remove 1152 samples, but the queue is emptys
size= 364kB time=00:00:23.27 bitrate= 128.1kbits/s
video:0kB audio:364kB subtitle:0 global headers:0kB muxing overhead 0.058271%
ffmpeg version 1.2.12 Copyright (c) 2000-2015 the FFmpeg developers
built on Feb 12 2015 18:03:16 with gcc 4.7 (Debian 4.7.2-5)
configuration: –prefix=/usr –extra-cflags='-g -O2 -fstack-protector –param=ssp-buffer-size=4 -Wformat -Werror=format-security ' –extra-ldflags='-Wl,-z,relro' –cc='ccache cc' –enable-shared –enable-libmp3lame –enable-gpl –enable-nonfree –enable-libvorbis –enable-pthreads –enable-libfaac –enable-libxvid –enable-postproc –enable-x11grab –enable-libgsm –enable-libtheora –enable-libopencore-amrnb –enable-libopencore-amrwb –enable-libx264 –enable-libspeex –enable-nonfree –disable-stripping –enable-libvpx –enable-libschroedinger –disable-encoder=libschroedinger –enable-version3 –enable-libopenjpeg –enable-librtmp –enable-avfilter –enable-libfreetype –enable-libvo-aacenc –disable-decoder=amrnb –enable-libvo-amrwbenc –enable-libaacplus –libdir=/usr/lib/x86_64-linux-gnu –disable-vda –enable-libbluray –enable-libcdio –enable-gnutls –enable-frei0r –enable-openssl –enable-libass –enable-libopus –enable-fontconfig –enable-libpulse –disable-mips32r2 –disable-mipsdspr1 –dis libavutil 52. 18.100 / 52. 18.100
libavcodec 54. 92.100 / 54. 92.100
libavformat 54. 63.104 / 54. 63.104
libavdevice 54. 3.103 / 54. 3.103
libavfilter 3. 42.103 / 3. 42.103
libswscale 2. 2.100 / 2. 2.100
libswresample 0. 17.102 / 0. 17.102
libpostproc 52. 2.100 / 52. 2.100
[wav @ 0x66c900] max_analyze_duration 5000000 reached at 5015510 microseconds
Guessed Channel Layout for Input Stream #0.0 : stereo
Input #0, wav, from 'track02.cdda.wav':
Duration: 00:02:21.28, bitrate: 1411 kb/s
Stream #0:0: Audio: pcm_s16le ([1][0][0][0] / 0x0001), 44100 Hz, stereo, s16, 1411 kb/s
Output #0, mp3, to 'track02.cdda.wav.wav.mp3':
Metadata:
TSSE : Lavf54.63.104
Stream #0:0: Audio: mp3, 44100 Hz, stereo, s16p
Stream mapping:
Stream #0:0 -> #0:0 (pcm_s16le -> libmp3lame)
Press [q] to stop, [?] for help
…
Finally remove the old unneded .wav files and enjoy the mp3s with vlc / mplayer / mpg123 or whatever player you like.
hipo@noah:~/audiorip/cd1$ rm -f *.wav
Now mount the flash drive and copy th files into it.
# mkdir /media/usb-drive
# mount /dev/sdc1 /media/usb-drive/
# mkdir -p /media/usb-drive/cd1
# fdisk -l |grep -i sdc1
/dev/sdc1 on /media/usb-drive type vfat (rw,relatime,fmask=0022,dmask=0022,codepage=437,iocharset=utf8,shortname=mixed,errors=remount-ro
# cp -rpf ~/audiorip/cd1*.mp3 /mnt/usb-drive/cd1
# umount /dev/sdc1
2. RIPping audio CD on Linux with rip-audio-cds-linux.sh script
#!/bin/bash
# A simple shell script to rip audio cd and create mp3 using lame
# and cdparanoia utilities.
# —————————————————————————-
# Written by Vivek Gite <http://www.cyberciti.biz/>
# (c) 2006 nixCraft under GNU GPL v2.0+
# —————————————————————————-
read -p "Starting in 5 seconds ( to abort press CTRL + C ) " -t 5
cdparanoia -B
for i in *.wav
do
lame –vbr-new -b 360 "$i" "${i%%.cdda.wav}.mp3"
rm -f "$i"
done
If you need to automate the task of dumping the audio CDs to WAV and convert them to MP3s you can do it via a small shell script like the one provided by cyberciti.biz that uses paranoia and lame commands in a shell script loop. Script rip-audio-cds-linux.sh is here
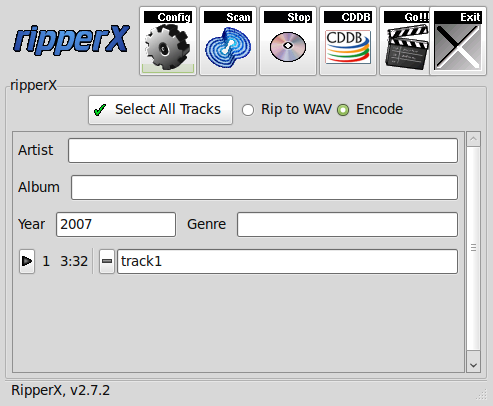
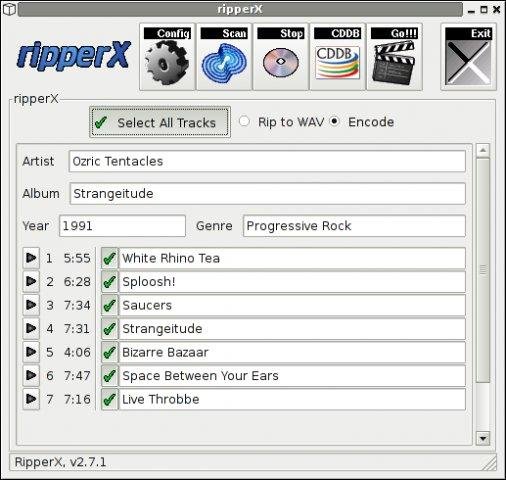
3. Dump Audio CD to MP3 with Graphical program ( ripperx )
By default most modern Linux distributions including the Debian GNU / Linux based ones has the ripperx in the default repositories, as well as the tool is downloadable and compilable from source from sourceforge.net
# apt-cache show ripperx|grep -i descript -A3 -B3
Architecture: amd64
Depends: cdparanoia, vorbis-tools (>= 1.0beta3), libatk1.0-0 (>= 1.12.4), libc6 (>= 2.14), libcairo2 (>= 1.2.4), libfontconfig1 (>= 2.12.6), libfreetype6 (>= 2.2.1), libgcc1 (>= 1:3.0), libgdk-pixbuf2.0-0 (>= 2.22.0), libglib2.0-0 (>= 2.16.0), libgtk2.0-0 (>= 2.8.0), libpango-1.0-0 (>= 1.14.0), libpangocairo-1.0-0 (>= 1.14.0), libpangoft2-1.0-0 (>= 1.14.0), libstdc++6 (>= 5.2), libtag1v5 (>= 1.9.1-2.2~)
Suggests: sox, cdtool, mpg321, flac, toolame
Description-en: GTK-based audio CD ripper/encoder
ripperX is a graphical interface for ripping CD audio tracks (using
cdparanoia) and then encoding them into the Ogg, FLAC, or MP2/3
formats using the vorbis tools, FLAC, toolame or other available
MP3 encoders.
.
It includes support for CDDB lookups and ID3v2 tags.
Description-md5: cdeabf4ef72c33d57aecc4b4e2fd5952
Homepage: http://sourceforge.net/projects/ripperx/
Tag: hardware::storage, hardware::storage:cd, interface::graphical,
interface::x11, role::program, scope::application, uitoolkit::gtk,
# apt install –yes ripperx
That's all folks.
Enjoy !