Posts Tagged ‘url’

How to yum Install Gnome GUI, Latest Guest Addition Tools, Google Chrome latest version and rdesktop / xfreerdp / remmina remote RDP VNC clients On CentOS 7 / 8

Thursday, July 29th, 2021

centos7-logo

I've just reinstalled my CentOS 7 Virtual Machine since after I tried to migrate a .vdi Virtual Box image to the new company laptop using a copy of Virtualbox VM via Microsoft OneDrive was a failure.
Thus I have rebuild all my CentOS Linux programs preinstalled on the old Virtual Machines from scratch, I use this virtual machine for a very simple tasks, so basicly most imporant tools I use is a plain SSH and VNC and Remote Desktop clients just to be able to remotely connect to remote Home based server.


1.Install GNOME Graphical Environment from command line on CentOS 7 with yum and configure it to start GUI on next OS boot


I've used a minimal CentOS installation – ISO CentOS-7-x86_64-DVD-1908.iso and this brings up the OS with a text mode only as usually CentOS is used to roll on Servers and rarely and many times admins did not want to have GUI at all, however my case is different since I do like to use Graphical Environment as I use my CentOS for all kind of testing that can be later applied to a Production machines that doesn't have a GUI, hence to install GNOME on CentOS run below cmds:
 

[root@centos ~ ]# yum group list
Loaded plugins: fastestmirror
There is no installed groups file.
Maybe run: yum groups mark convert (see man yum)
Loading mirror speeds from cached hostfile
Available Environment Groups:
 Minimal Install
 Compute Node
 Infrastructure Server
 File and Print Server
 Basic Web Server
 Virtualization Host
 Server with GUI
 GNOME Desktop
 KDE Plasma Workspaces
 Development and Creative Workstation
Available Groups:
 Compatibility Libraries
 Console Internet Tools
 Development Tools
 Graphical Administration Tools
 Legacy UNIX Compatibility
 Scientific Support
 Security Tools
 Smart Card Support
 System Administration Tools
 System Management
Done


[root@centos ~ ]# yum groupinstall "GNOME Desktop" "Graphical Administration Tools" -y


Enable GUI to be automatically start on CentOS VM boot in systemd this is configured with the "targets" instead of the well known classical runlevels (the well known /etc/inittab) is now obsolete in newer Linux distros.

[root@centos ~ ]# ln -sf /lib/systemd/system/runlevel5.target /etc/systemd/system/default.target


2. Install Guest Additions Tools on CentOS


The most basic thing to do once I've had the CentOS Linux release 7.7.1908 (Core) rolled out on the VirtualBox is of course to enable Guest Additions Tools

First I had to install of course Guest Additions Tools to allow myself to have a copy paste in clip board via the Host Machine (Windows 10) and the Guest Machine.
To do I had to:

[root@centos ~ ]# yum install kernel-headers.x86_64 -y

[root@centos ~ ]# rpm -Uvh https://dl.fedoraproject.org/pub/epel/epel-release-latest-7.noarch.rpm

[root@centos ~ ]#  yum install perl gcc dkms kernel-devel kernel-headers make bzip2

To check the required VBoxLinuxAdditions.run script kernel headers are at place:

[root@centos ~ ]# ls -l /usr/src/kernels/$(uname -r)


You should get a list of kernel header files

Then once I've done the Insert Guest Additions CD Image from the VirtualBox VM upper menu. I've had to mount and load the guest additions via the script:
 

[root@centos ~ ]# mkdir /mnt/cdrom
[root@centos ~ ]# mount /dev/cdrom /mnt/cdrom
[root@centos ~ ]# sh VBoxLinuxAdditions.run

After rebooting the Virtual Machine, I've used the full screen functionality to test and configured immediately Shared Clipboard and Drag and Drop to be both set to (Bidirectional) as well as configured a Shared folder to provide my Windows Desktop under /mnt/shared_folder (as read write) as I usually do to be able to easily copy files from the VM and to the Windows.

3. Install Google Chrome on the CentOS Virtual Machine with yum
 

Next I've installed the chrome browser that was pretty trivial it is up to fetching the required 32 or 64 bit latest chrome binary this is usually on URL:

[root@centos ~ ]# wget https://dl.google.com/linux/direct/google-chrome-stable_current_x86_64.rpm

and installing Google Chrome with superuser with command:

[root@centos ~ ]# yum install ./google-chrome-stable_current_*.rpm -y


Loaded plugins: fastestmirror, langpacks
Examining ./google-chrome-stable_current_x86_64.rpm: google-chrome-stable-92.0.4515.107-1.x86_64
Marking ./google-chrome-stable_current_x86_64.rpm to be installed
Resolving Dependencies
–> Running transaction check
—> Package google-chrome-stable.x86_64 0:92.0.4515.107-1 will be installed
–> Processing Dependency: liberation-fonts for package: google-chrome-stable-92.0.4515.107-1.x86_64
Loading mirror speeds from cached hostfile
 * base: mirror.digitalnova.at
 * epel: fedora.ipacct.com
 * extras: mirror.digitalnova.at
 * updates: mirror.digitalnova.at
–> Processing Dependency: libvulkan.so.1()(64bit) for package: google-chrome-stable-92.0.4515.107-1.x86_64
–> Running transaction check
—> Package liberation-fonts.noarch 1:1.07.2-16.el7 will be installed
–> Processing Dependency: liberation-narrow-fonts = 1:1.07.2-16.el7 for package: 1:liberation-fonts-1.07.2-16.el7.noarch
—> Package vulkan.x86_64 0:1.1.97.0-1.el7 will be installed
–> Processing Dependency: vulkan-filesystem = 1.1.97.0-1.el7 for package: vulkan-1.1.97.0-1.el7.x86_64
–> Running transaction check
—> Package liberation-narrow-fonts.noarch 1:1.07.2-16.el7 will be installed
—> Package vulkan-filesystem.noarch 0:1.1.97.0-1.el7 will be installed
–> Finished Dependency Resolution

Dependencies Resolved

================================================================================
 Package                 Arch   Version         Repository                 Size
================================================================================
Installing:
 google-chrome-stable    x86_64 92.0.4515.107-1 /google-chrome-stable_current_x86_64
                                                                          259 M
Installing for dependencies:
 liberation-fonts        noarch 1:1.07.2-16.el7 base                       13 k
 liberation-narrow-fonts noarch 1:1.07.2-16.el7 base                      202 k
 vulkan                  x86_64 1.1.97.0-1.el7  base                      3.6 M
 vulkan-filesystem       noarch 1.1.97.0-1.el7  base                      6.3 k

Transaction Summary
================================================================================
Install  1 Package (+4 Dependent packages)

Total size: 263 M
Total download size: 3.8 M
Installed size: 281 M
Is this ok [y/d/N]: y
Downloading packages:
(1/4): liberation-fonts-1.07.2-16.el7.noarch.rpm           |  13 kB   00:00     
(2/4): liberation-narrow-fonts-1.07.2-16.el7.noarch.rpm    | 202 kB   00:00     
(3/4): vulkan-filesystem-1.1.97.0-1.el7.noarch.rpm         | 6.3 kB   00:00     
(4/4): vulkan-1.1.97.0-1.el7.x86_64.rpm                    | 3.6 MB   00:00     
——————————————————————————–
Total                                              3.0 MB/s | 3.8 MB  00:01     
Running transaction check
Running transaction test
Transaction test succeeded
Running transaction
  Installing : vulkan-filesystem-1.1.97.0-1.el7.noarch                      1/5 
  Installing : vulkan-1.1.97.0-1.el7.x86_64                                 2/5 
  Installing : 1:liberation-narrow-fonts-1.07.2-16.el7.noarch               3/5 
  Installing : 1:liberation-fonts-1.07.2-16.el7.noarch                      4/5 
  Installing : google-chrome-stable-92.0.4515.107-1.x86_64                  5/5 
  Verifying  : vulkan-1.1.97.0-1.el7.x86_64                                 1/5 
  Verifying  : 1:liberation-narrow-fonts-1.07.2-16.el7.noarch               2/5 
  Verifying  : 1:liberation-fonts-1.07.2-16.el7.noarch                      3/5 
  Verifying  : google-chrome-stable-92.0.4515.107-1.x86_64                  4/5 
  Verifying  : vulkan-filesystem-1.1.97.0-1.el7.noarch                      5/5 

Installed:
  google-chrome-stable.x86_64 0:92.0.4515.107-1                                 

Dependency Installed:
  liberation-fonts.noarch 1:1.07.2-16.el7                                       
  liberation-narrow-fonts.noarch 1:1.07.2-16.el7                                
  vulkan.x86_64 0:1.1.97.0-1.el7                                                
  vulkan-filesystem.noarch 0:1.1.97.0-1.el7             


4. Install usable Windows VNC and remote desktop (RDP Client) for CentOS Linux


There is a plenty of clients to choice from if you need to have an RDP client for Linux, but perhaps the most useful ones I usually use are remmina / rdesktop and freerdp. Usually I use remmina on Debian Linux, but under the VM somehow I was not able to make remmina work in Full Screen mode while connected to remote Windows 7 VPS server, thus I've first tried xfreerdp (that comes from default CentOS repositories) and is open source alternative to rdesktop (which is non free distributed binary).
 

[root@centos ~ ]$ sudo yum -y install freerdp


The basic use is:

[hipo@centos ~ ]$ xfreerdp –toggle-fullscreen <remote-server-address>


Unfortunately I did not succeeded to make xfreerdp be able to show me remote desktop in FullScreen mode so had to use additional repository package called nux-dextop to have rdesktop at my disposal.

To install it had to run:

[root@centos ~ ]# rpm –import http://li.nux.ro/download/nux/RPM-GPG-KEY-nux.ro 
[root@centos ~ ]# rpm -Uvh http://li.nux.ro/download/nux/dextop/el7/x86_64/nux-dextop-release-0-1.el7.nux.noarch.rpm    
[root@centos ~ ]# yum install rdesktop

To connect to the remote RDP host in Fullscreen with rdesktop :
 

rdesktop -f <remote-server-address>

windows-7-remote-desktop-screenshot-connected-with-rdesktop

As telnet is not installed by default and it is so useful to check ports

5. Install GNU Image Manipulation Program for better screnshotting and Graphic edits


I usually do install GIMP (GNU Image Manipulation Program) since this is my favourite tool to make screenshot on Linux as well as do some minor graphic edits whenever necessery. I warmly recommend gimp to anyone. If you don't have basic GIMP tool and you plan to be daily working a lot with Linux sooner or later some skills with the program will be of a major use even for the most advanced sysadmin :)_

root@centos ~ ]# yum install -y gimp


6. Install useful administration tools for daily sysadmin work – telnet, nmap, iftop, htop, iotop, iptraf-ng, tcpdump


Having basic analys tools and remote communication port testing, DNS, resolving and connection, cpu, mem statistics I find mostly useful. 

[root@centos .ssh]# yum install telnet nmap iftop htop vnstat sysstat iptraf-ng bind-utils -y


7. Set Open Explorer and SHOW Desktop key binding shortcuts for GNOME (to make daily work easier)


Another useful I do use in my newly installed Virtual Machines is the key combination of Windows (button key) + E – to easily open the GNOME equivalent of Windows Explorer (Nautilus) and Windows (key) + D to hide the active selected Window and Show Desktop. This is configured pretty easy in GNOME through:
 

gnome-control-center

Keyboard (Section)

Perhaps there is other stuff I need to add on the freshly installed Operating System if I remember something else interesting
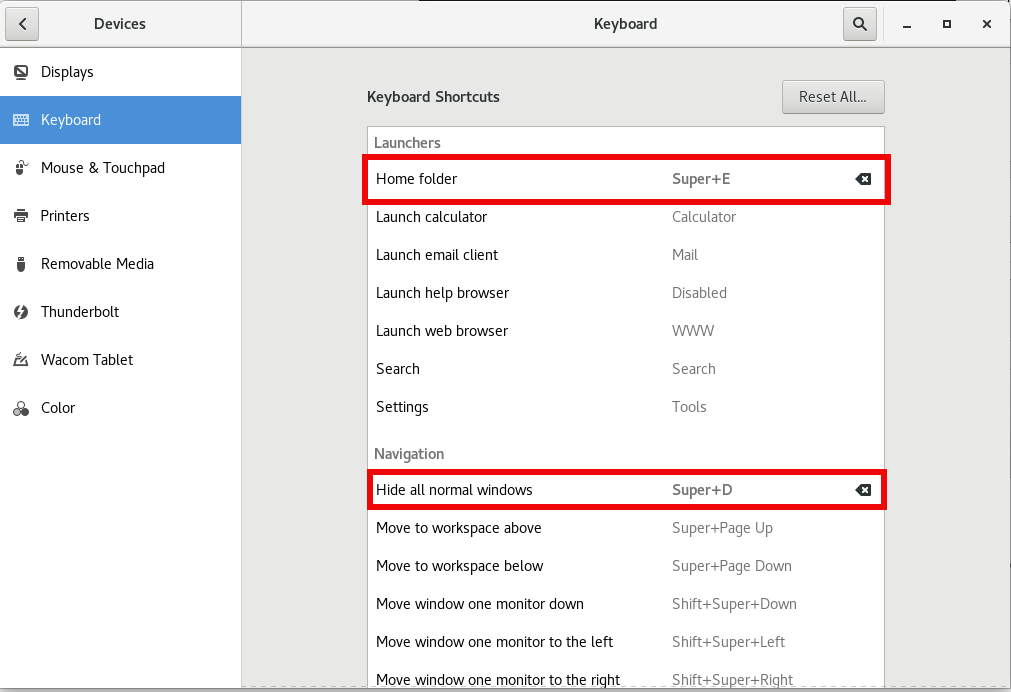
configure-home-folder-and-hide-all-normal-windows-gnome-key-binding-howto-screenshot


8. Install gnome-tweaks to tweak a bit the desktop icon positionsing and additional gnome-shell extras

[root@centos hipo]# yum install -y gnome-shell-extension-workspace-indicator.noarch gnome-shell-extension-workspace-indicator.noarch gnome-shell-extension-suspend-button.noarch gnome-shell-extension-refresh-wifi.noarch gnome-shell-extension-updates-dialog.noarch gnome-shell-extension-windowoverlay-icons.noarch gnome-shell-extension-places-menu.noarch gnome-shell-extension-drive-menu.noarch gnome-shell-extension-apps-menu.noarch gnome-shell-extension-auto-move-windows.noarch gnome-tweaks gnome-shell-extension-systemMonitor.noarch gnome-shell-extension-openweather.noarch gnome-shell-extension-user-theme.noarch gnome-shell-extension-topicons-plus.noarch


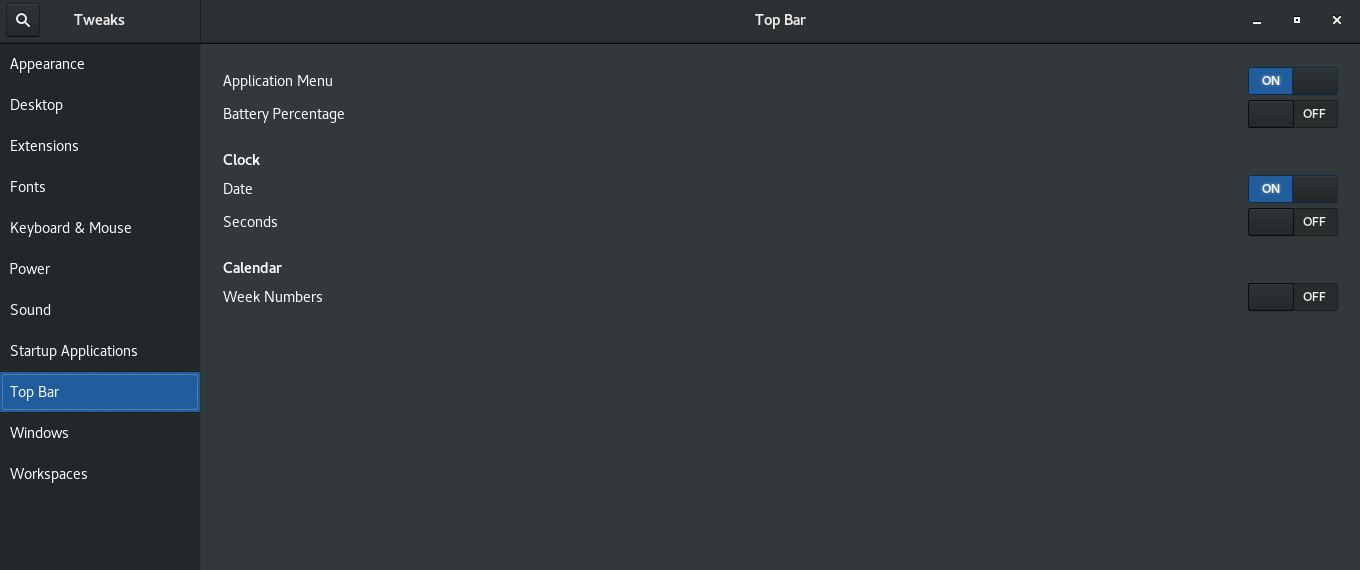
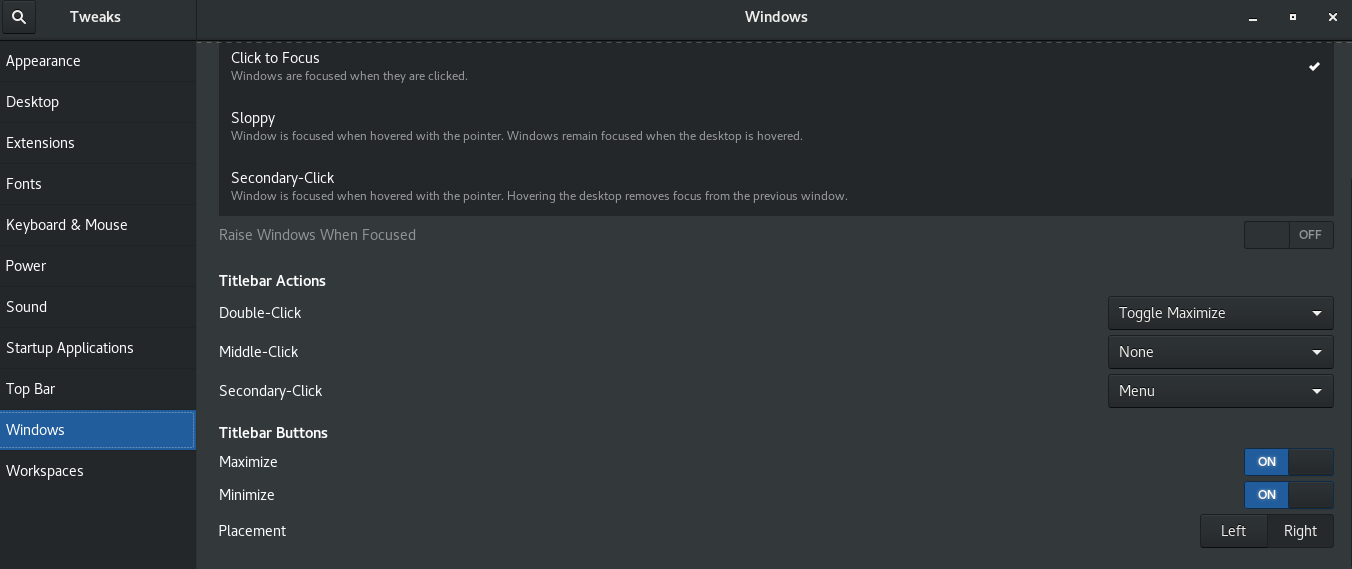
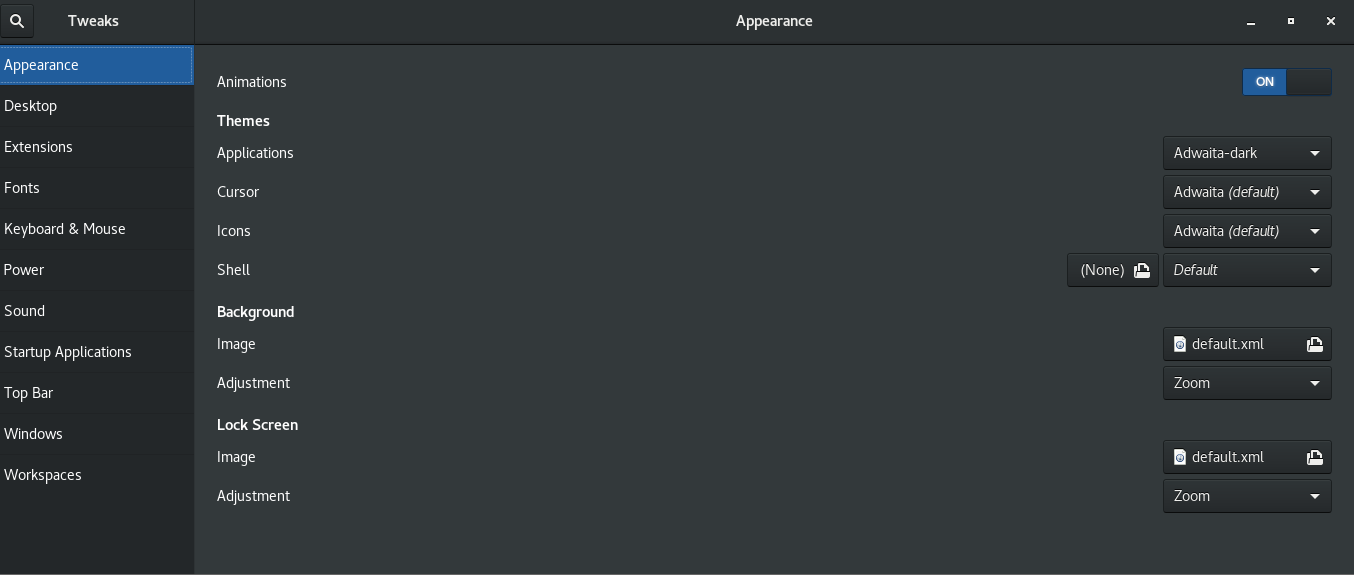
Next step is to use gnome-tweaks to set multiple custom preference stuff you like on the gnome 3.28 GUI 
 

gnome-tweak-tool1

gnome-tweak-tool2

gnome-tweak-tool3

9. Change ( Fix) timezone to correct time on the Virtual Machine

[root@localhost ~]# timedatectl 
      Local time: Fri 2021-07-30 12:20:51 CEST
  Universal time: Fri 2021-07-30 10:20:51 UTC
        RTC time: Fri 2021-07-30 10:20:48
       Time zone: Europe/Berlin (CEST, +0200)
     NTP enabled: yes
NTP synchronized: yes
 RTC in local TZ: no
      DST active: yes
 Last DST change: DST began at
                  Sun 2021-03-28 01:59:59 CET
                  Sun 2021-03-28 03:00:00 CEST
 Next DST change: DST ends (the clock jumps one hour backwards) at
                  Sun 2021-10-31 02:59:59 CEST
                  Sun 2021-10-31 02:00:00 CET

[root@localhost ~]# ls -l /etc/localtime
lrwxrwxrwx. 1 root root 35 Jul 29 14:03 /etc/localtime -> ../usr/share/zoneinfo/Europe/Berlin


To change to correct timezone, you need to find out the long name for the timezone you want to use. The timezone naming convention usually uses “Region/City” format.

To list all available time zones, you can either list the files in the /usr/share/zoneinfo directory or use the timedatectl command.

[root@centos ~]# timedatectl list-timezones|tail -n 10
Pacific/Pohnpei
Pacific/Port_Moresby
Pacific/Rarotonga
Pacific/Saipan
Pacific/Tahiti
Pacific/Tarawa
Pacific/Tongatapu
Pacific/Wake
Pacific/Wallis
UTC


As I'm situated in Sofia Bulgaria to set the correct timezone to UTC (Universal Time Clock)  + 2 Hrs, i've checked the correct Continent/Country like so:

[root@centos ~]# timedatectl list-timezones|grep -i Sofia
Europe/Sofia

Once I've my Capital / Country time location  identified to set to it:

[root@centos ~]# timedatectl set-timezone your_time_zone


10. Configure remote connection hostname SSH aliases via ssh config ( ~/.ssh/config)


I'm having separate Virtual Machines running on my OpenXen virtualization Hypervisor server at different ports which I remember by heart under different hostnames, this saves me time to always type on command line long commands such as:


#  ssh long-hostname -p Port_number

 to make accessibility to remote machines via a simple Hostname Aliases, that forwards to remote port (that gets forwarded via a Local Network configure Netwrork Address Translation), I use the .ssh/config nice Host / Hostname / User / Port directives like below samples:

[hipo@centos .ssh]$ cat config 
Host pcfreak
User root
Port 2248
HostName 83.228.93.76

Host freak
User root
Port 2249
HostName 213.91.190.233


Host pcfrxenweb
User root
Port 2251
Hostname 83.228.93.76

Host pcfrxen
User root
Port 2250
Hostname 213.91.190.233

Now to connect to pcfrxen for example I simply type:

ssh pcfrxen

type in the password to remote VM and I'm in 🙂

The same could be achieved also with Adding Custom Hostname IP Aliases via ~/.bashrc or iteration script as I've explained earlier that fakes like custom /etc/hosts, but I usuaully prefer to use .ssh/config instead like explained above.

Note that above steps should work also on RHEL / Fedora Linux with a minor modifications, as usually this two distros share the RPM package manager. If someone tries to follow the guide and have success on any of this distros please drop a comment with feedback.

How to check who is flooding your Apache, NGinx Webserver – Real time Monitor statistics about IPs doing most URL requests and Stopping DoS attacks with Fail2Ban

Wednesday, August 20th, 2014

check-who-is-flooding-your-apache-nginx-webserver-real-time-monitoring-ips-doing-most-url-requests-to-webserver-and-protecting-your-webserver-with-fail2ban

If you're Linux ystem administrator in Webhosting company providing WordPress / Joomla / Drupal web-sites hosting and your UNIX servers suffer from periodic denial of service attacks, because some of the site customers business is a target of competitor company who is trying to ruin your client business sites through DoS or DDOS attacks, then the best thing you can do is to identify who and how is the Linux server being hammered. If you find out DoS is not on a network level but Apache gets crashing because of memory leaks and connections to Apache are so much that the CPU is being stoned, the best thing to do is to check which IP addresses are causing the excessive GET / POST / HEAD requests in logged.
 

There is the Apachetop tool that can give you the most accessed webserver URLs in a refreshed screen like UNIX top command, however Apachetop does not show which IP does most URL hits on Apache / Nginx webserver. 


1. Get basic information on which IPs accesses Apache / Nginx the most using shell cmds


Before examining the Webserver logs it is useful to get a general picture on who is flooding you on a TCP / IP network level, with netstat like so:
 

# here is howto check clients count connected to your server
netstat -ntu | awk '{print $5}' | cut -d: -f1 | sort | uniq -c | sort -n


If you get an extensive number of connected various IPs / hosts (like 10000 or something huge as a number), depending on the type of hardware the server is running and the previous scaling planned for the system you can determine whether the count as huge as this can be handled normally by server, if like in most cases the server is planned to serve a couple of hundreds or thousands of clients and you get over 10000 connections hanging, then your server is under attack or if its Internet server suddenly your website become famous like someone posted an article on some major website and you suddenly received a tons of hits.


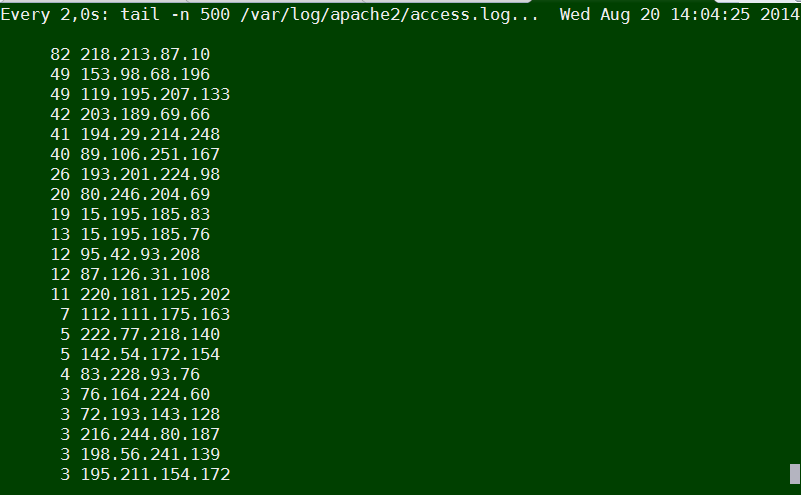
There is a way using standard shell tools, to get some basic information on which IP accesses the webserver the most with:

tail -n 500 /var/log/apache2/access.log | cut -d' ' -f1 | sort | uniq -c | sort -gr

Or if you want to keep it refreshing periodically every few seconds run it through watch command:

watch "tail -n 500 /var/log/apache2/access.log | cut -d' ' -f1 | sort | uniq -c | sort -gr"

monioring-access-hits-to-webserver-by-ip-show-most-visiting-apache-nginx-ip-with-shell-tools-tail-cut-uniq-sort-tools-refreshed-with-watch-cmd


Another useful combination of shell commands is to Monitor POST / GET / HEAD requests number in access.log :
 

 awk '{print $6}' access.log | sort | uniq -c | sort -n

     1 "alihack<%eval
      1 "CONNECT
      1 "fhxeaxb0xeex97x0fxe2-x19Fx87xd1xa0x9axf5x^xd0x125x0fx88x19"x84xc1xb3^v2xe9xpx98`X'dxcd.7ix8fx8fxd6_xcdx834x0c"
      1 "x16x03x01"
      1 "xe2
      2 "mgmanager&file=imgmanager&version=1576&cid=20
      6 "4–"
      7 "PUT
     22 "–"
     22 "OPTIONS
     38 "PROPFIND
   1476 "HEAD
   1539 "-"
  65113 "POST
 537122 "GET


However using shell commands combination is plenty of typing and hard to remember, plus above tools does not show you, approximately how frequenty IP hits the webserver


2. Real-time monitoring IP addresses with highest URL reqests with logtop


Real-time monitoring on IP addresses with highest URL requests is possible with no need of "console ninja skills"  through – logtop.


2.1 Install logtop on Debian / Ubuntu and deb derivatives Linux


a) Installing Logtop the debian way

LogTop is easily installable on Debian and Ubuntu in newer releases of Debian – Debian 7.0 and Ubuntu 13/14 Linux it is part of default package repositories and can be straightly apt-get-ed with:

apt-get install –yes logtop

b) Installing Logtop from source code (install on older deb based Linuxes)

On older Debian – Debian 6 and Ubuntu 7-12 servers to install logtop compile from source code – read the README installation instructions or if lazy copy / paste below:

cd /usr/local/src
wget https://github.com/JulienPalard/logtop/tarball/master
mv master JulienPalard-logtop.tar.gz
tar -zxf JulienPalard-logtop.tar.gz

cd JulienPalard-logtop-*/
aptitude install libncurses5-dev uthash-dev

aptitude install python-dev swig

make python-module

python setup.py install

make

make install


mkdir -p /usr/bin/
cp logtop /usr/bin/


2.2 Install Logtop on CentOS 6.5 / 7.0 / Fedora / RHEL and rest of RPM based Linux-es

b) Install logtop on CentOS 6.5 and CentOS 7 Linux

– For CentOS 6.5 you need to rpm install epel-release-6-8.noarch.rpm
 

wget http://dl.fedoraproject.org/pub/epel/6/x86_64/epel-release-6-8.noarch.rpm
rpm -ivh epel-release-6-8.noarch.rpm
links http://dl.fedoraproject.org/pub/epel/6/SRPMS/uthash-1.9.9-6.el6.src.rpm
rpmbuild –rebuild
uthash-1.9.9-6.el6.src.rpm
cd /root/rpmbuild/RPMS/noarch
rpm -ivh uthash-devel-1.9.9-6.el6.noarch.rpm


– For CentOS 7 you need to rpm install epel-release-7-0.2.noarch.rpm


links http://download.fedoraproject.org/pub/epel/beta/7/x86_64/repoview/epel-release.html
 

Click on and download epel-release-7-0.2.noarch.rpm

rpm -ivh epel-release-7-0.2.noarch
rpm –import /etc/pki/rpm-gpg/RPM-GPG-KEY-EPEL-7
yum -y install git ncurses-devel uthash-devel
git clone https://github.com/JulienPalard/logtop.git
cd logtop
make
make install


2.3 Some Logtop use examples and short explanation


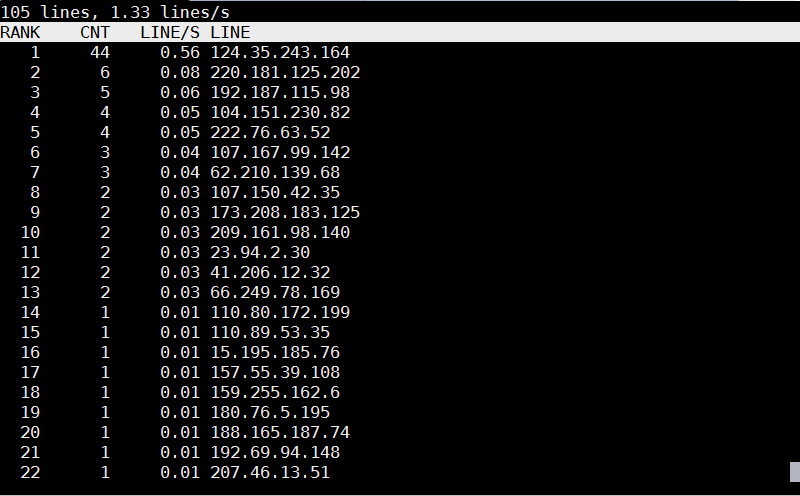
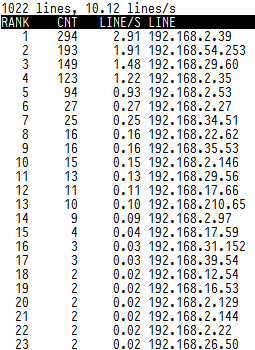
logtop shows 4 columns as follows – Line number, Count, Frequency, and Actual line


The quickest way to visualize which IP is stoning your Apache / Nginx webserver on Debian?


tail -f access.log | awk {'print $1; fflush();'} | logtop


logtop-check-which-ip-is-making-most-requests-to-your-apache-nginx-webserver-linux-screenshot

On CentOS / RHEL

tail -f /var/log/httpd/access_log | awk {'print $1; fflush();'} | logtop


Using LogTop even Squid Proxy caching server access.log can be monitored.
To get squid Top users by IP listed:


tail -f /var/log/squid/access.log | awk {'print $1; fflush();'} | logtop


logtop-visualizing-top-users-using-squid-proxy-cache
 

Or you might visualize in real-time squid cache top requested URLs
 

tail -f /var/log/squid/access.log | awk {'print $7; fflush();'} | logtop


visualizing-top-requested-urls-in-squid-proxy-cache-howto-screenshot


3. Automatically Filter IP addresses causing Apache / Nginx Webservices Denial of Service with fail2ban
 

Once you identify the problem if the sites hosted on server are target of Distributed DoS, probably your best thing to do is to use fail2ban to automatically filter (ban) IP addresses doing excessive queries to system services. Assuming that you have already installed fail2ban as explained in above link (On Debian / Ubuntu Linux) with:
 

apt-get install –yes fail2ban


To make fail2ban start filtering DoS attack IP addresses, you will have to set the following configurations:
 

vim /etc/fail2ban/jail.conf


Paste in file:
 

[http-get-dos]
 
enabled = true
port = http,https
filter = http-get-dos
logpath = /var/log/apache2/WEB_SERVER-access.log
# maxretry is how many GETs we can have in the findtime period before getting narky
maxretry = 300
# findtime is the time period in seconds in which we're counting "retries" (300 seconds = 5 mins)
findtime = 300
# bantime is how long we should drop incoming GET requests for a given IP for, in this case it's 5 minutes
bantime = 300
action = iptables[name=HTTP, port=http, protocol=tcp]


Before you paste make sure you put the proper logpath = location of webserver (default one is /var/log/apache2/access.log), if you're using multiple logs for each and every of hosted websites, you will probably want to write a script to automatically loop through all logs directory get log file names and automatically add auto-modified version of above [http-get-dos] configuration. Also configure maxtretry per IP, findtime and bantime, in above example values are a bit low and for heavy loaded websites which has to serve thousands of simultaneous connections originating from office networks using Network address translation (NAT), this might be low and tuned to prevent situations, where even the customer of yours can't access there websites 🙂

To finalize fail2ban configuration, you have to create fail2ban filter file:

vim /etc/fail2ban/filters.d/http-get-dos.conf


Paste:
 

# Fail2Ban configuration file
#
# Author: http://www.go2linux.org
#
[Definition]
 
# Option: failregex
# Note: This regex will match any GET entry in your logs, so basically all valid and not valid entries are a match.
# You should set up in the jail.conf file, the maxretry and findtime carefully in order to avoid false positives.
 
failregex = ^<HOST> -.*"(GET|POST).*
 
# Option: ignoreregex
# Notes.: regex to ignore. If this regex matches, the line is ignored.
# Values: TEXT
#
ignoreregex =


To make fail2ban load new created configs restart it:
 

/etc/init.d/fail2ban restart


If you want to test whether it is working you can use Apache webserver Benchmark tools such as ab or siege.
The quickest way to test, whether excessive IP requests get filtered – and make your IP banned temporary:
 

ab -n 1000 -c 20 http://your-web-site-dot-com/

This will make 1000 page loads in 20 concurrent connections and will add your IP to temporary be banned for (300 seconds) = 5 minutes. The ban will be logged in /var/log/fail2ban.log, there you will get smth like:

2014-08-20 10:40:11,943 fail2ban.actions: WARNING [http-get-dos] Ban 192.168.100.5
2013-08-20 10:44:12,341 fail2ban.actions: WARNING [http-get-dos] Unban 192.168.100.5

Install and make Apache + PHP to work with PosgreSQL database server on Debian Linux and set up server Web Posgre interface Pgpadmin howto

Wednesday, June 15th, 2016

make-apache-php-work-with-postgresql-pgsql-and-install-postgresql-db-web-admin-interface

In previous article I've wrote on how to install postgresql on Debian Linux using the deb repository this was necessery to import some PostGres DBs, however this was not enough to run the posgresql php based website aimed as connection from Apache / PHP module to PostGre was failing after a bit of investigation and a check in phpinfo(); I've realized the module PHP module for postgres pgsql.so was missing, here is what I did in order to install it:
 

debian:~# apt-get install php5-pgsql phppgadmin libapache2-mod-auth-pgsql 

PHP sessions enable configuration

As it is common a common problem with PHP applications written to use PostGres is to loose sessions and by default PHP does not have configured sessions.save_path it is a very good practice to directly enable it in /etc/php5/apache2/php.ini open the file in text editor:
 

debian:~# vim /etc/php5/apache2/php.ini


Find the commented directive line:
 

;session.save_path = “/tmp”


and uncomment it, i.e.:
 

session.save_path = “/tmp”


Quit saving vim with the usual :wq!

The 3 modules provides pgsql.so for PHP and mod_auth_pgsql.so for Apache2, the 3rd packae phpgadmin provides a Web administration interface for installed PostgreSQL servers Databases, for those experienced with MySQL Database its the same as PHPMyAdmin.


 Here is quick configuration for use of PostgreAdmin interface:

By default PHPPGADMIN installation process configure the Apache2 server' /etc/phppgadmin/apache.conf  to use  /etc/apache2/conf.d/phppgadmin


Here is the default my server package instaleld  file content:


Alias /phppgadmin /usr/share/phppgadmin

<Directory /usr/share/phppgadmin>

DirectoryIndex index.php
AllowOverride None

order deny,allow
deny from all
allow from 127.0.0.0/255.0.0.0 ::1/128
# allow from all

<IfModule mod_php5.c>
  php_flag magic_quotes_gpc Off
  php_flag track_vars On
  #php_value include_path .
</IfModule>
<IfModule !mod_php5.c>
  <IfModule mod_actions.c>
    <IfModule mod_cgi.c>
      AddType application/x-httpd-php .php
      Action application/x-httpd-php /cgi-bin/php
    </IfModule>
    <IfModule mod_cgid.c>
      AddType application/x-httpd-php .php
      Action application/x-httpd-php /cgi-bin/php
    </IfModule>
  </IfModule>
</IfModule>

</Directory>

It is generally a good practice to change the default Alias location of phppgadmin, so edit the file and change it to something like:
 

Alias /phppostgresgadmin /usr/share/phppgadmin


  • Then phpPgAdmin is available at http://servername.com/phppostgresadmin (only from localhost, however in my case I wanted to be able to access it also from other hosts so allowed PostgresGadmin from every hosts, to do so, I've commented in above config


# allow from 127.0.0.0/255.0.0.0 ::1/128


and uncommented #allow from all line, e.g.:
 

allow from all


Also another thing here is in your VirtualHost whenever you plan to access the PHPPGADMIN is to include in config ( in my case this is the file /etc/apache2/sites-enabled/000-default before (</VirtualHost> end line) following Alias:
 

Alias /phpposgreadmin /usr/share/phppgadmin


Then to access PostGreSQL PHP Admin interface in Firefox / Chrome open URL:


http://your-default-domain.com/phpposgreadmin

phpPgAdmin-postgresql-php-web-interface-debian-linux-screenshot


Configure access to a remote PostgreSQL Server

With PhpPgAdmin, you can manage many PostgreSQL servers locally (on the localhost) or on remote hosts.

First, you have to make sure that the distant PostgreSQL server can handle your request, that you can connect to it. You can do this by modifying the /etc/postgresql/9.5/main/filepg_hba.conf and adding a line like:

# PhpPgAdmin server access host all db_admin xx.xx.xx.xx 255.255.255.255 md5

Then, you need to add your distant PostgreSQL server into the config file for PhpPgAdmin. This file is  /etc/phppgadmin/config.inc.php the default postgresql port is 5432, however you might have configured it already to use some different port if you're not sure about the port number the postgresql is listening check it out:


debian:~# grep -i port /etc/postgresql/*/main/postgresql.conf
etc/postgresql/9.5/main/postgresql.conf:port = 5433                # (change requires restart)
/etc/postgresql/9.5/main/postgresql.conf:                    # supported by the operating system:
/etc/postgresql/9.5/main/postgresql.conf:# ERROR REPORTING AND LOGGING


To login to phppgadmin interface there is no root administrator user such as in PHP so you will need to priorly create some user and later use it for connection from Postgres Web interface.

To create from console new user in postgres:
 

debian:~# su – postgres
posgres@debian:~$ psql template1
posgres@debian:~$ psql -d template1 -U postgres


Welcome to psql 9.5, the PostgreSQL interactive terminal. Type: \copyright for distribution terms \h for help with SQL commands \? for help on internal slash commands \g or terminate with semicolon to execute query \q to quit template1=#

template1=# CREATE USER MyNewUser WITH PASSWORD 'myPassword';


To add a new database to postgres from shell:

template1=# CREATE DATABASE NewDatabase;
 

template1=# GRANT ALL PRIVILEGES ON DATABASE NewDatabase to MyNewUser;


template1=# q

Last command instructs it to quit if you want to get more info about possible commands do type instead of q ? for general help or for database / table commands only h
If you need to connect to NewDatabase just to test first it works in console before trying it from postgrepgadmin


posgres@debian:~$ psql -d NewDatabase -U MyNewUser


How to Remove Firefox TABS all time Moving Backward / Forward (Waiting) Wheel cursor – Browser and OS Wheel Ring cursor might affect hypnotically

Monday, September 7th, 2015

remove-firefox-tabs-all-time-annoying-moving-back-forward-waiting-wheel-cursor-browser-and-ring-cursor-might-affect-you-hypnotically

I've been annoying for quite a long time by the the Clockwise moving backward and Forward Wheel (Ring) on Top of browser Tabs everytime I navigate to a new Internet domain or request a resource on the Net.

I'm aware that seeing the wheel all the time move back and forward is a very bad manipulation technique that is often used in advertisements in old movies and some advertisements in the start of the video . I'm talking about the infamous backward counting technique in a Circle (it was moer commonly used in the dawn of Television) aiming to induce watchers mind into hypnotic state …

back-counting-10-9-8-7-manipulation-technique-to-make-your-mind-susceptible

Those who have a degree in psychology or have been into marketing or human resources fields or any field involved where you have to influence the masses are already aware of the backward counting methology which has been practiced heavily by hypnosis practisioners such as Sigmund Freud, to induce any kind of hypnotic state the hypnotist always asks the object of hypnotism to watch closely into a moving back and forwards clock, often accompanied by counting backwards …

Well my Theory here is that the same techniques is well aware of those who planned Windows OS in which if you remember the Sand Clock has been substituted in Windows 7 / 8 and Windows 10 with the rotating back and foward Wheel for the reason that this aims to influence people mind to go into Alpha state from Beta state and thus make them feel more relaxed while doing stuff on the PC.

One thing to mention here is Back and Forward wheel is not only into OS level it has been heavily adopted by leading Software as a Service (SAS) UIs such as Google's and probably more importantly Youtube (have you noticed the Cycling Wheel when waiting for a Youtube movie to Load), the Wheel is also heavily incoruprated in most if not all biggest Websites on the Net. Even If you have noticed these days Google's Cycling (Waiting) Wheel is not only Cycling but has the colorful programming incorporated.

google-wheel-color-programming-example

Well probably many people who use computers daily did not really realize that the Computer OS and Programs GUI Interface they're using is influencing their mind and some famous psychological methods such as color programming and hypnotic tricks could be used more or less.

In that regard as a Firefox user I decided to change tne Back and Forward Wheel with another one which will not trigger my subconsciousness / mind all the time while browing on the Net into Alpha State. As I'm not a Firefox expert and my quick research on search Engines on how to achieve changing or removing the Browser Tabs all time turning wheel did not led me to nothing positive, I've consulted the experts in irc.freenode.net #firefox.

As always the guys were helpful and pointed me out to UserStyles.org website's Static-Throbbler CSS. I've mirrored the CSS script under a name remove-firefox-tab-wheel-script.css in case if UserSpace.org disappears in future, below is also a paste of the script:

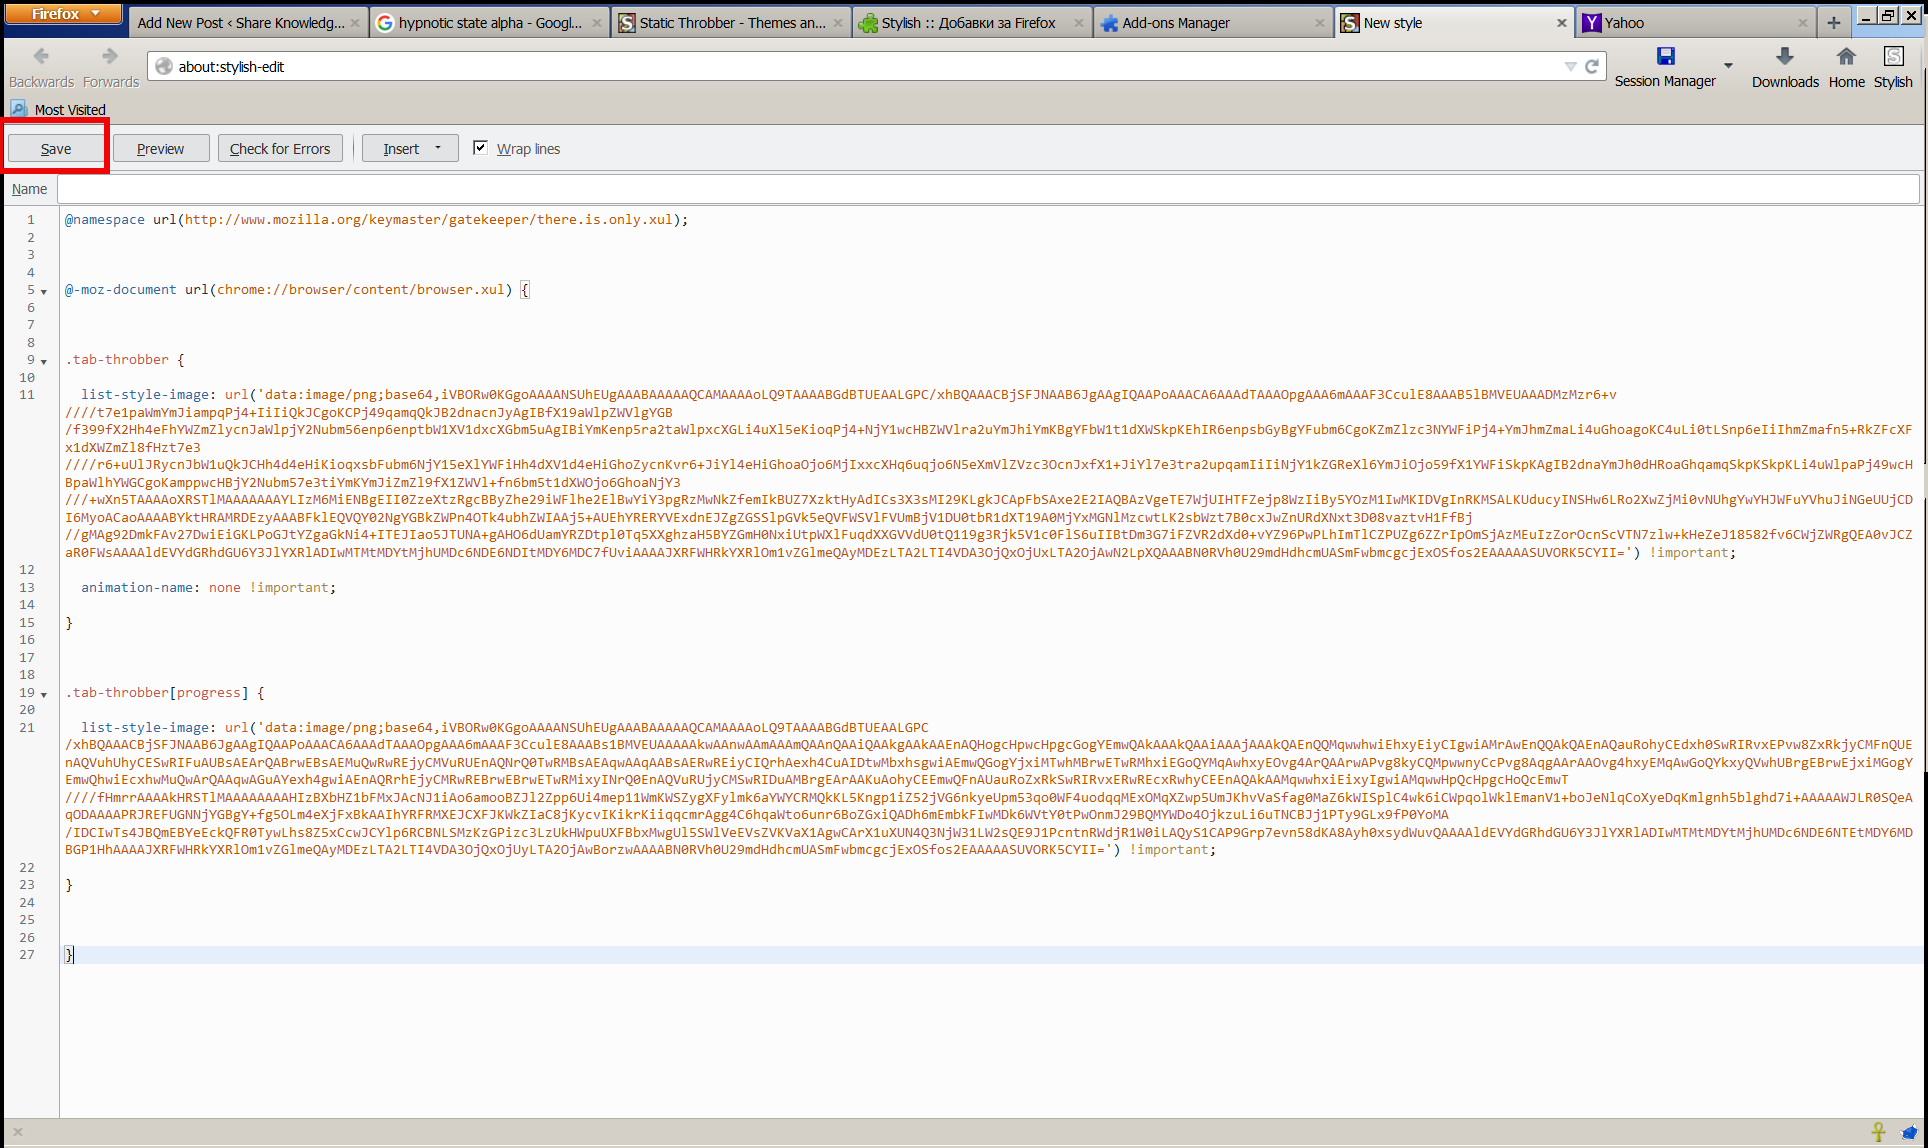
@namespace url(https://www.mozilla.org/keymaster/gatekeeper/there.is.only.xul); @-moz-document url(chrome://browser/content/browser.xul) { .tab-throbber { list-style-image: url('data:image/png;base64,iVBORw0KGgoAAAANSUhEUgAAABAAAAAQCAMAAAAoLQ9TAAAABGdBTUEAALGPC/xhBQAAACBjSFJNAAB6JgAAgIQAAPoAAACA6AAAdTAAAOpgAAA6mAAAF3CculE8AAAB5lBMVEUAAADMzMzr6+v////t7e1paWmYmJiampqPj4+IiIiQkJCgoKCPj49qamqQkJB2dnacnJyAgIBfX19aWlpZWVlgYGB/f399fX2Hh4eFhYWZmZlycnJaWlpjY2Nubm56enp6enptbW1XV1dxcXGbm5uAgIBiYmKenp5ra2taWlpxcXGLi4uXl5eKioqPj4+NjY1wcHBZWVlra2uYmJhiYmKBgYFbW1t1dXWSkpKEhIR6enpsbGyBgYFubm6CgoKZmZlzc3NYWFiPj4+YmJhmZmaLi4uGhoagoKC4uLi0tLSnp6eIiIhmZmafn5+RkZFcXFx1dXWZmZl8fHzt7e3////r6+uUlJRycnJbW1uQkJCHh4d4eHiKioqxsbFubm6NjY15eXlYWFiHh4dXV1d4eHiGhoZycnKvr6+JiYl4eHiGhoaOjo6MjIxxcXHq6uqjo6N5eXmVlZVzc3OcnJxfX1+JiYl7e3tra2upqamIiIiNjY1kZGReXl6YmJiOjo59fX1YWFiSkpKAgIB2dnaYmJh0dHRoaGhqamqSkpKSkpKLi4uWlpaPj49wcHBpaWlhYWGCgoKamppwcHBjY2Nubm57e3tiYmKYmJiZmZl9fX1ZWVl+fn6bm5t1dXWOjo6GhoaNjY3///+wXn5TAAAAoXRSTlMAAAAAAAYLIzM6MiENBgEII0ZzeXtzRgcBByZhe29iWFlhe2ElBwYiY3pgRzMwNkZfemIkBUZ7XzktHyAdICs3X3sMI29KLgkJCApFbSAxe2E2IAQBAzVgeTE7WjUIHTFZejp8WzIiBy5YOzM1IwMKIDVgInRKMSALKUducyINSHw6LRo2XwZjMi0vNUhgYwYHJWFuYVhuJiNGeUUjCDI6MyoACaoAAAABYktHRAMRDEzyAAABFklEQVQY02NgYGBkZWPn4OTk4ubhZWIAAj5+AUEhYRERYVExdnEJZgZGSSlpGVk5eQVFWSVlFVUmBjV1DU0tbR1dXT19A0MjYxMGNlMzcwtLK2sbWzt7B0cxJwZnURdXNxt3D08vaztvH1FfBj//gMAg92DmkFAv27DwiEiGKLPoGJtYZgaGkNi4+ITEJIao5JTUNA+gAHO6dUamYRZDtpl0Tq5XXghzaH5BYZGmH0NxiUtpWXlFuqdXXGVVdU0tQ119g3Rjk5V1c0FlS6uIIBtDm3G7iFZVR2dXd0+vYZ96PwPLhImTlCZPUZg6ZZrIpOmSjAzMEuIzZorOcnScVTN7zlw+kHeZeJ18582fv6CWjZWRgQEA0vJCZaR0FWsAAAAldEVYdGRhdGU6Y3JlYXRlADIwMTMtMDYtMjhUMDc6NDE6NDItMDY6MDC7fUviAAAAJXRFWHRkYXRlOm1vZGlmeQAyMDEzLTA2LTI4VDA3OjQxOjUxLTA2OjAwN2LpXQAAABN0RVh0U29mdHdhcmUASmFwbmcgcjExOSfos2EAAAAASUVORK5CYII=') !important; animation-name: none !important; } .tab-throbber[progress] { list-style-image: url('data:image/png;base64,iVBORw0KGgoAAAANSUhEUgAAABAAAAAQCAMAAAAoLQ9TAAAABGdBTUEAALGPC/xhBQAAACBjSFJNAAB6JgAAgIQAAPoAAACA6AAAdTAAAOpgAAA6mAAAF3CculE8AAABs1BMVEUAAAAAkwAAnwAAmAAAmQAAnQAAiQAAkgAAkAAEnAQHogcHpwcHpgcGogYEmwQAkAAAkQAAiAAAjAAAkQAEnQQMqwwhwiEhxyEiyCIgwiAMrAwEnQQAkQAEnAQauRohyCEdxh0SwRIRvxEPvw8ZxRkjyCMFnQUEnAQVuhUhyCESwRIFuAUBsAEArQABrwEBsAEMuQwRwREjyCMVuRUEnAQNrQ0TwRMBsAEAqwAAqAABsAERwREiyCIQrhAexh4CuAIDtwMbxhsgwiAEmwQGogYjxiMTwhMBrwETwRMhxiEGoQYMqAwhxyEOvg4ArQAArwAPvg8kyCQMpwwnyCcPvg8AqgAArAAOvg4hxyEMqAwGoQYkxyQVwhUBrgEBrwEjxiMGogYEmwQhwiEcxhwMuQwArQAAqwAGuAYexh4gwiAEnAQRrhEjyCMRwREBrwEBrwETwRMixyINrQ0EnAQVuRUjyCMSwRIDuAMBrgEArAAKuAohyCEEmwQFnAUauRoZxRkSwRIRvxERwREcxRwhyCEEnAQAkAAMqwwhxiEixyIgwiAMqwwHpQcHpgcHoQcEmwT////fHmrrAAAAkHRSTlMAAAAAAAAHIzBXbHZ1bFMxJAcNJ1iAo6amooBZJl2Zpp6Ui4mep11WmKWSZygXFylmk6aYWYCRMQkKL5Kngp1iZ52jVG6nkyeUpm53qo0WF4uodqqMExOMqXZwp5UmJKhvVaSfag0MaZ6kWISplC4wk6iCWpqolWklEmanV1+boJeNlqCoXyeDqKmlgnh5blghd7i+AAAAAWJLR0SQeAqODAAAAPRJREFUGNNjYGBgY+fg5OLm4eXjFxBkAAIhYRFRMXEJCXFJKWkZIaC8jKycvIKikrKiiqqcmrAgg4C6hqaWto6unr6BoZGxiQADh6mEmbkFIwMDk6WVtY0tPwOnmJ29BQMYWDo4OjkzuLi6uTNCBJj1PTy9GLx9fP0YoMA/IDCIwTs4JBQmEBYeEckQFR0TywLhs8Z5xCcwJCYlp6RCBNLSMzKzGPizc3LzUkHWpuUXFBbxMwgUl5SWlVeEVsZVKVaX1AgwCArX1uXUN4Q3NjW31LW2sQE9J1PcntnRWdjR1W0iLAQyS1CAP9Grp7evn58dKA8Ayh0xsydWuvQAAAAldEVYdGRhdGU6Y3JlYXRlADIwMTMtMDYtMjhUMDc6NDE6NTEtMDY6MDBGP1HhAAAAJXRFWHRkYXRlOm1vZGlmeQAyMDEzLTA2LTI4VDA3OjQxOjUyLTA2OjAwBorzwAAAABN0RVh0U29mdHdhcmUASmFwbmcgcjExOSfos2EAAAAASUVORK5CYII=') !important; } }

To use the script you will first need to install the Stylish FF plugin, then:

Stylish-FireFox-plugin-screenshot-Windows-7-OS
 

1. Enable Stylish plugin and Restart firefox when prompted
2. Click on Write New Style
3. Paste above CSS script and click on Save button


stylish-static-throbbler-css-script-change-back-forward-rotating-tab-wheel-on-Firefox-howto

Now instead of the moving wheel you will get just a circle appearing as a static image while the page is loading.

If you want to absolutely remove any circles or images and show nothing when loading, e.g. not have any mean to monitor whether page is loaded or not, but also make it easier for the eye I even finally decided to completely remove the all time moving Wheel from Firefox Tabs even the static picture out using below CSS script with Stylish:
 

@namespace url(https://www.mozilla.org/keymaster/gatekeeper/there.is.only.xul); @-moz-document url(chrome://browser/content/browser.xul) { .tab-throbber { list-style-image: none !important; animation-name: none !important; } .tab-throbber[progress] { list-style-image: none !important; } }

After all even after removing the FF Tabs wheel, there is the Status being printed down the webpage, showing text based the connection status. I find this kind of page loading status much less agressive and preferrable, than the current verions Firefox 4 onwards ..

One other thing I do to prevent the annoying Windows OS default Theme wheel is to change it to the old fashioned sand clock as well as bring back the theme of Windows 7 / 8 to Classic Theme of Win 2000, as I believe this reduced the level of zoombification the PC imposes on self 🙂

Enjoy!

BSD tips

Thursday, February 7th, 2008

On one of my previous posts I give an url to a great wiki. Unfortunately I have seen I have given a wrong linkhere is the mediawiki bsdtips.utcorp.net Today I have to go to a German classes. I’m in doubt what kind of laptop to take I doubt between IBM Thinkpad and Dell. IBM’s has ati where I prefer having nvidia. On the other hand I know not all of Dell’s hardware would probably work correctly in Linux and BSD. Another problem is IBM is being selled with preinstalled XP … END—–

Preserve domain name after redirect with mod_rewrite and some useful mod rewrite redirect and other examples – Redirect domain without changing URL

Friday, July 11th, 2014

redirect_domain_name_without_changing_url_apache_rewrite_rule_preventing_host_in_ip_mod_rewrite
If you're a webhosting company sysadmin, sooner or later you will be asked by application developer or some client to redirect from an Apache webserver to some other webserver / URL's IP, in a way that the IP gets preserved after the redirect.

I'm aware of two major ways to do the redirect on webserver level:

1. To redirect From Apache host A to Webserver on host B using ReverseProxy mod_proxy

2. To use Mod Rewrite to redirect all client requests on host A to host B.

There is quite a lot to be said and is said and written online on using mod_rewrite to redirect URLs.
So in this article I will not say nothing new but just present some basic scenarios on Redirecting with mod rewrite and some use cases.
Hope this examples, will help some colleague sys-admin to solve some his crazy boss redirection tasks 🙂 I'm saying crazy boss because I already worked for a  start-up company which was into internet marketing and the CEO has insane SEO ideas, often impossible to achieve …

a) Dynamic URL Redirect from Apache host A to host B without changing domain name in browser URL and keeping everything after the query in

Lets say you want to redirect incoming traffic to DomainA to DomainB keeping whole user browser request, i.e.

Redirect:

http://your-domainA.com/whole/a/lot/of/sub/directory/query.php


Passthe the whole request including /whole/a/lot/of/sub/directory/query.php

so when Apache redirects to redirect to:

http://your-domainB.com/whole/a/lot/of/sub/directory/query.php

In browser 
To do it with Mod_Rewrite either you have to add in .htaccess mod_rewite rules:

RewriteEngine On
RewriteCond %{HTTP_HOST} ^your-domainA.com [OR]
RewriteCond %{HTTP_HOST} ^http://your-domainA.com
RewriteRule ^(.*) http://your-domainB.com/$1 [P]

or include this somewhere in VirtualHost configuration of your domain
 

Above mod_rewrite will make any request to your-domainA.com to forward to your-domainB.com while preserving the hostname in browser URL bar to old domain http://your-domainA.com, however still contet will be served by http://your-domainB.com
 

http://yourdomainA.com/YOUR-CUSTOM-REQUEST-ADDRESS


to redirect to

http://yourdomainB.com/YOUR-CUSTOM-REQUEST-ADDRESS


WARNING !!  If you're concerned about your SEO well positioning in search Engines, be sure to never ever use such redirects. Making such redirects will cause two domains to show up duplicate content
and will make Search Engines to reduce your Google, Yahoo, Yandex etc. Pagerank !!

Besides that such, redirect will use mod_rewrite on each and every redirect so from performance stand point it is a CPU killer (for such redirect using native mod_proxy ProxyPass is much more efficient – on websites with hundred of thousands of requests daily using such redirects will cause you to spend your  hardware badly  …)

P.S. ! Mod_Rewrite and Proxy modules needs to be previously enabled
On Debian Linux, make sure following links are existing and pointing to proper existing files from /etc/apache2/mods-available/ to /etc/apache2/mods-enabled

debian:~#  ls -al /etc/apache2/mods-available/*proxy*
-rw-r–r– 1 root root  87 Jul 26  2011 /etc/apache2/mods-available/proxy_ajp.load
-rw-r–r– 1 root root 355 Jul 26  2011 /etc/apache2/mods-available/proxy_balancer.conf
-rw-r–r– 1 root root  97 Jul 26  2011 /etc/apache2/mods-available/proxy_balancer.load
-rw-r–r– 1 root root 803 Jul 26  2011 /etc/apache2/mods-available/proxy.conf
-rw-r–r– 1 root root  95 Jul 26  2011 /etc/apache2/mods-available/proxy_connect.load
-rw-r–r– 1 root root 141 Jul 26  2011 /etc/apache2/mods-available/proxy_ftp.conf
-rw-r–r– 1 root root  87 Jul 26  2011 /etc/apache2/mods-available/proxy_ftp.load
-rw-r–r– 1 root root  89 Jul 26  2011 /etc/apache2/mods-available/proxy_http.load
-rw-r–r– 1 root root  62 Jul 26  2011 /etc/apache2/mods-available/proxy.load
-rw-r–r– 1 root root  89 Jul 26  2011 /etc/apache2/mods-available/proxy_scgi.load

debian:/etc/apache2/mods-avaialble:~# ls *proxy*
proxy.conf@  proxy_connect.load@  proxy_http.load@  proxy.load@


If it is is not enabled to enable proxy support in Apache on Debian / Ubuntu Linux, either create the symbolic links as you see them from above paste or issue with root:
 

a2enmod proxy_http
a2enmod proxy


b) Redirect Main Domain requests to other Domain specific URL
 

RewriteEngine On
RewriteCond %{HTTP_HOST} ^your-domainA.com
RewriteRule ^(.*) http://your-domainB.com/YOUR-CUSTOM-URL [P]

Note that no matter what kind of subdirectory you request on http://your-domain.com (lets say you type in http://your-domainA.com/My-monkey-sucks ) it will get redirected to:

http://your-domainB.com/YOUR-CUSTOM-URL

Sometimes this is convenient for SEO, because it can make you to redirect any requests (including mistakenly typed requests by users or Bot Crawlers to real existing landing page).

c) Redirecting an IP address to a Domain Name

This probably a very rare thing to do as usually a Domain Name is redirected to an IP, however if you ever need to redirect IP to Domain Name:

RewriteCond %{HTTP_HOST} ^##.##.##.##
RewriteRule (.*) http://your-domainB.com/$1 [R=301,L]

Replace ## with digits of your IP address, the is used to escape the (.) – dots are normally interpreted by mod_rewrite.

d) Rewritting URL extensions from .htm to .php, doc to docx etc.

Lets say you're updating an old website with .htm or .html to serve .php files with same names as old .htmls use following rewrite rules:. Or all your old .doc files are converted and replaced with .docx and you need to make Apache redirect all .doc requests to .docx.
 

Options +FollowSymlinks
RewriteEngine on
RewriteRule ^(.*).html$ $1.php [NC]

Options +FollowSymlinks
RewriteEngine on
RewriteRule ^(.*).doc$ $1.docx [NC]

The [NC] flag at the end means "No Case", or "case-insensitive"; Meaning it will not matter whether files are requested with capital or small letters, they will just show files if file under requested name is matched.

Using such a redirect will not cause Apache to redirect old files .html, .htm, .doc and they will still be accessible again creating duplicate content which will have a negavite impact on Search Engine Optimization.

The better way to do old extensioned files redirect is by using:

Options +FollowSymlinks
RewriteEngine on
RewriteRule ^(.+).htm$ http://your-domainB.com/$1.php [R,NC]

[R] flag would tell make mod_rewrite send HTTP "MOVED TEMPORARILY" redirection, aka, "302" to browser. This would cause search engines and other spidering entities will automatically update their links to the new locations.

e) Grabbing content from URL with Mod Rewrite and passing it to another domain

Lets say you want zip files contained in directory files/ to be redirected from your current webserver on domainA to domainB's download.php script and be passed as argument to the script

Options +FollowSymlinks
RewriteEngine on
RewriteRule ^files/([^/]+)/([^/]+).zip https://www.pc-freak.net/download.php?section=$1&file=$2 [R,NC]


f) Shortening URLs with mod_rewrite

This is ueful If you have a long URL address accessible via some fuzzy long hard to remember URL address and you want to make it acessible via a shorter URL without phyisally moving the files within a short named directory, do:

Options +FollowSymlinks
RewriteEngine On
RewriteRule ^james-brown /james-brown/files/download/download.php

Above rule would make requests coming to http://your-domain.com/james-brown?file=my.zip be opened via http://mysite/public/james-brown/files/download/download.php?file=my.zip

g) Get rid of the www in your domain name

Nowdays many people are used to typing www.your-domain.com, if this annoys you and you want them not to see in served URLs the annoying www nonsense, use this:

Options +FollowSymlinks
RewriteEngine on
RewriteCond %{http_host} ^www.your-domain.com [NC]
RewriteRule ^(.*)$ http://your-domain.com/$1 [R=301,NC]

That's mostly some common uses of mod rewrite redirection, there are thousands of nice ones. If you know others, please share?


References and thanks to:

How to redirect domain without changing the URL

More .htaccess tips and tricks – part 2


Make Apache webserver fix spelling mistyped URL errors and serve files case insensitive with mod_speling

Wednesday, July 16th, 2014

make_apache_fix_mistyped_spelling_urls_errors_and_serve_files_case_insensitive_mod_speling_logo
On most if not all modern GNU / Linux distributions, Apache webserver comes preinstalled with mod_speling.

What mod_speling does is it tries to find and serve files and directories for non-existing  (404 return code) urls with a similar name to passed URL. Other thing mod_speling does is it serves files case-insensitive, even though the UNIX / Linux filesystems are built to understand files case-sensitive.

mod_speling is a very useful module especially when files are being pushed (synchronized) to Apache visible from web document folder from operating systems like Windows whose filesystem doesn't store files case sensitive.

Let me give you a small example on M$ Windows a create file NewFile.html, NEWFILE.HTML, NeWfIlE.Html etc. are one and the same file newfile.html and not 3 different files like it is usually on UNIX / Linux filesystems.

If you happen to migrate old static Websites from Microsoft Internet Information Services (IIS) to UNIX / Linux based hosting. Often Html coders which create websites on Windows platform doesn't respect in website hyperlinks case-sensitive, because anyways Windows FS is case-insetive, thus moving the website to Linux host with Apache the website/s will end up with many 404 error pages, whose fixing for big static websites will be a real pain in the ass.

Also there might be need for mod_speling module enabled, for PHP / Python / Perl websites developed on MS Windows platform and tested on Windows host and then officially to be deployed on Linux.

Note that mod_speling name as a funny thing as actually the module is also converting mis-pelled / mis-typed Apache URLs:

If for example, someone tried to link to your website from a forum mistyping the URL address with mod_speling the mistyped URL could still be handled to open the real existing URL:

Lets say you have URL:
 

http://your-domain.com/files/what-Ever-fle.php


and the actual URL is:

http://your-domain.com/files/what-Ever-file.php


mod_speling will make Apache scan in /files/ for any files with similar name to what-Ever-fle.php and will open any similar matched file name, preventing you from the normal 404 error and therefore often serving exactly what it has to. Of course such a behavior could be unwanted in same cases for CMSes, which depend on 404 error code for proper operating, so be very sure when configuring mod_speling that this is exactly what you need.

mod_speling can be also useful sometimes for Search Engine Optimization – SEO, as it will show less 404 pages to Crawler search engine bots.

1. Enable mod_speling module on Debian GNU / Linux and Ubuntu

Enabling mod_speling in Apache in Debian / Ubuntu etc. debian based Linuxes is done with either creating symlink from /etc/apache2/mods-available/speling.load to /etc/apache2/mods-enabled/speling.load :
 

ln -sf /etc/apache2/mods-available/speling.load /etc/apache2/mods-enabled/speling.load

Or by using a2enmodDebian apache module enabling script:
 

a2ensite sitename


To enable mod_speling mis-speling resolve feature config directive is:


CheckSpelling on


To disable case sensitivity – as I said earlier helpful for migrations from Microsoft Windows hosts to Linux, use directive:

CheckCaseOnly on


To enable both use:

<IfModule mod_speling.c>
    CheckCaseOnly on
    CheckSpelling on
</IfModule>

Enabling mod_speling case-insensitivity and fixing mistypes in URL could be done from .htaccess, for any <Directory> (vhost) with enabled .htaccess with

AllowOverride All

To enable it for default set host in new Apache install place it in /etc/apache2/apache2.conf and /etc/apache2/sites-enabled/000-default

Then as usual to make the configuration changes take affect, restart Apache:
 

/etc/init.d/apache2 restart


2. Enablig mod_speling on CentOS, RHEL and Fedora Linux


Most of RPM based Linux distributions have already mod_speling by default in Apache, so there will be no need to explicitly enable the module within HTTPD.

To check whether mod_speling is already enabled in httpd issue:
 

/usr/sbin/httpd -M |grep -i mod_speling


If you don't get no output from command this means the module is not enabled. This is the case with CentOS Linux 6.5 for example …

To enable mod_speling on Apache level add in /etc/httpd/conf/httpd.conf

LoadModule speling_module modules/mod_speling.so

and restart webserver
 

/etc/init.d/httpd restart


If you get instead
 

/usr/sbin/httpd -M |grep -i mod_speling
speling_module (shared)


Then it is already loaded in HTTPD to enable the module for default domain add to /etc/httpd/conf/httpd.conf – within (<Directory "/var/www/html">),

<IfModule mod_speling.c>
    CheckCaseOnly on
    CheckSpelling on
</IfModule>

Or if you want to make it active for specific directories within /var/www/html/whatever-dir use either new <Directory ..> directive within Apache config, or enable .htaccess processing with AllowOverride All and place them in .htaccess . For complete mod_speling reference check on Apache's official website

How to remove parameters from URL on Apache (Reverse Proxy) with .htaccess and mod_rewrite – Remove query string from Link

Thursday, December 11th, 2014

Desktop/How_to_remove_parameters_from_URL_on_Apache_with_htaccess_and_SAP
Recently I had a task to delete number of set variables (listed parameters) from URL address on a Apache webserver serving as Reverse Proxy. 
To make it more clear exact task was when customers call the URL https://companywebsite-url.com (all subdomains included) the following URL parameters should always be deleted by the reverse proxy

– ebppMode 
– ebppObjectKey 
– ebppObjectType 
– ebppSystem 
– logSys 

The paramets are part of SAP Biller Direct in a Portal (based on the famous SAP database) which is often deployed as a component of Internet Sales (ISA) / Supplier Relationship Management (SRM) / CRM
, if a user is logged in with his Credentials (KID (Key ID) / Admin KID)  into the system. The EBPP part of most variables stands for (Electronic Bill Presentment and Payment).

 By passing above parameters to Website, modes of use, user accounts switched with which user is logged into the system system logs read and other stuff which can turn to be a severe security hole.
As most of Big Companies, does pass there web traffic via a "transparent" Reverse Proxy,it is a good security practice for SAP Biller Direct (including CRM systems( to wipe out this variables

Here is the mod_rewrite working rules that I used to achieve the delete variable from URL address task:
 

   RewriteEngine On
   RewriteCond %{QUERY_STRING} ^(.*)bebppMode=(w*)b(.*)
   RewriteRule (.*) $1?%1%3

   RewriteCond %{QUERY_STRING} ^(.*)bebppObjectKey=(w*)b(.*)
   RewriteRule (.*) $1?%1%3

   RewriteCond %{QUERY_STRING} ^(.*)bebppObjectType=(w*)b(.*)
   RewriteRule (.*) $1?%1%3

   RewriteCond %{QUERY_STRING} ^(.*)bebppSystem=(w*)b(.*)
   RewriteRule (.*) $1?%1%3

   RewriteCond %{QUERY_STRING} ^(.*)logSys=(w*)b(.*)
   RewriteRule (.*) $1?%1%3

   RewriteCond %{QUERY_STRING} ^(.*)&&(.*)
   RewriteRule (.*) $1?%1%3


P.S. I've implemented above Rewrite rules into all Virtualhosts of Applications (in that case all living in the same httpd.conf on SuSE (SLES) 11 SP1 Enterprise Linux server).
To make changes affective, restarted HTTPD Webserver:
 

/etc/init.d/httpd restart


The sesult is:

https://companywebsite-url.com/start.html?page=start&ebppMode=A&ebppSystem=Test

leads to a internal URL redirection

https://companywebsite-url.com/start.html?page=start

without parameters ebppSystem, ebppMode, ebppObjectKey, ebppSystem,   logSys .

Other mod_rewrite rule that works but is too ugly and when I tried it on Debian Linux host was behaving strange (including in the rewrited URL address the directory address of the PHP twice):

RewriteCond %{QUERY_STRING} (.*)(^|&|%26|%20)ebppMode(=|%3D)([^&]+)(.*)$ [OR]
RewriteCond %{QUERY_STRING} (.*)(^|&|%26|%20)ebppObjectKey(=|%3D)([^&]+)(.*)$ [OR]
RewriteCond %{QUERY_STRING} (.*)(^|&|%26|%20)ebppObjectType(=|%3D)([^&]+)(.*)$ [OR]
RewriteCond %{QUERY_STRING} (.*)(^|&|%26|%20)ebppSystem(=|%3D)([^&]+)(.*)$ [OR]
RewriteCond %{QUERY_STRING} (.*)(^|&|%26|%20)logSys(=|%3D)([^&]+)(.*)$

RewriteRule (.*) /$1?%1%5 [R=307]

 Well anyways, with the first bunch of mod_rewrite rule it works fine.

Thanks God Problem Solved 🙂

Redirect http URL folder to https e.g. redirect (http:// to https://) with mod_rewrite – redirect port 80 to port 443 Rewrite rule

Saturday, July 17th, 2010

There is a quick way to achieve a a full url redirect from a normal unencrypted HTTP request to a SSL crypted HTTPS

This is achieved through mod_rewrite using the RedirectMatch directive.

For instance let’s say we’d like to redirect https://www.pc-freak.net/blog to https://www.pc-freak.net/blog.
We simply put in our .htacess file the following rule:

Redirect permanent /blog https://www.cadiabank.com/login

Of course this rule assumes that the current working directory where the .htacess file is stored is the main domain directory e.g. / .
However this kind of redirect is a way inflexible so for more complex redirect, you might want to take a look at mod rewrite’s RedirectMatch directive.

For instance if you inted to redirect all urls (https://www.pc-freak.net/blog/something/asdf/etc.) which as you see includes the string blog/somestring/asdf/etc. to (https://www.pc-freak.net/blog/something/asdf/etc then you might use some htaccess RedirectMatch rule like:

RedirectMatch permanent ^/blog/(.*)$ https://www.pc-freak.net.net$1
or
RedirectMatch permanent ^/blog/(.*)$ https://www.pc-freak.net.net/$1

Hopefully your redirect from the http protocol to https protocol with mod_rewrite rule should be completed.
Also consider that the Redirect directive which by the way is an Apache directive should be faster to process requests, so everywhere you can I recommend using instead of RedirectMatch which calls the external Apache mod_rewrite and will probably be times slower.

Adding Listing and Deleting SSL Certificates in keystore Tomcat Application server / What is keystore

Thursday, December 5th, 2013

Apache Tomcat keystore delete import list logo

 I work on ongoing project where Tomtat Application servers configured to run Clustered located behind Apache with mod_proxy configured to use ReverseProxy are used. One of customers which required a java application deployment experienced issues with application's capability to connect to SAP database.

After some investigation I figured out, the application is unable to connect to the SAP db server becuse remote host webserver running some SAP related stuff was not connecting due to expired certificate in Tomcat Keystore known also as JKS / Java Keystore– (.keystore) – which is a file containing multiple remote hosts imported certificates.

The best and shortest definition of keystore is:

Keystore entry = private + public key pair = identified by an alias

The keystore protects each private key with its individual password, and also protects the integrity of the entire keystore with a (possibly different) password.

Managing Java imported certificates later used by Tomcat is done with a command line tool part of JDK (Java Development Kit) called keystore. Keystore is usually located under /opt/java/jdk/bin/keytool. My Java VM is installed in /opt/ anyways usual location of keytool is $JAVA_HOME/bin/

Keytool has capabilities to create / modify / delete or import new SSL certificates and then Java applications can access remote applications which requires Secure Socket Layer handshake . Each certificate kept in .keystore file (usually located somewhere under Tomcat web app server directory tree), lets say – /opt/tomcat/current/conf/.keystore

1. List current existing imported SSL certificates into Java's Virtual Machine

tomcat-server:~# /opt/java/jdk/bin/keytool -list -keystore /opt/tomcat/current/conf/.keystore
password:
Command returns output similar to;

Entry type: trustedCertEntry

Owner: CN=www.yourhost.com, OU=MEMBER OF E.ON GROUP, OU=DEVICES, O=E.GP AG, C=DE
Issuer: CN=E.ON Internal Devices Sub CA V2, OU=CA, O=EGP, C=DE
Serial number: 67460001001c6aa51fd25c0e8320
Valid from: Mon Dec 27 07:05:33 GMT 2010 until: Fri Dec 27 07:05:22 GMT 2013
Certificate fingerprints:
         MD5:  D1:AA:D5:A9:A3:D2:95:28:F1:79:57:25:D3:6A:16:5E
         SHA1: 73:CE:ED:EC:CA:18:E4:E4:2E:AA:25:58:E0:2B:E4:D4:E7:6E:AD:BF
         Signature algorithm name: SHA1withRSA
         Version: 3

Extensions:

#1: ObjectId: 2.5.29.15 Criticality=true
KeyUsage [
  DigitalSignature
  Key_Encipherment
  Key_Agreement
]

#2: ObjectId: 2.5.29.19 Criticality=true
BasicConstraints:[
  CA:false
  PathLen: undefined
]

#3: ObjectId: 1.3.6.1.5.5.7.1.1 Criticality=false
AuthorityInfoAccess [
  [
   accessMethod: 1.3.6.1.5.5.7.48.2
   accessLocation: URIName: http://yourhost.com/cacerts/egp_internal_devices_sub_ca_v2.crt,
   accessMethod: 1.3.6.1.5.5.7.48.2
   accessLocation: URIName: http://www.yourhost1.com/certservices/cacerts/egp_internal_devices_sub_ca_v2.crt]
]

#4: ObjectId: 2.5.29.14 Criticality=false
SubjectKeyIdentifier [
KeyIdentifier [
0000: D3 52 C7 63 0F 98 BF 6E   FE 00 56 5C DF 35 62 22  .R.c…n..V\.5b"
0010: F2 B9 5B 8F                                        ..[.
]

Note that password that will be promtped has is by default changeit (in case if you don't have explicitly changed it from Tomcat's default config server.xml).

2. Delete Old expired SSL host Certificate from Java Keystore
It is good practice to always make backup of old .keystore before modifying, so I ran:

tomcat-server:~# cp -rpf /opt/tomcat/current/conf/.keystore /opt/tomcat/current/conf/.keystore-05-12-2013

In my case first I had to delete old expired SSL certificate with:

tomcat-server:~# /opt/java/jdk/bin/keytool -delete -alias "your-hostname" -v -keystore /opt/tomcat/current/conf/.keystore

Then to check certificate is no longer existent in keystore chain;
tomcat-server:~# /opt/java/jdk/bin/keytool -list -keystore /opt/tomcat/current/conf/.keystore

-keystore – option is obligitory it does specify where keystore file is located
-list – does list the certificate
-v – stands for verbose


3. Finally to import new SSL from already expored via a browser url in keystore

tomcat-server:~# /opt/java/jdk/bin/keytool -importcert -file /tmp/your-hostname.cer -alias your-hostname.com -keystore /opt/tomcat/current/conf/.keystore

More complete information on how to deal with keystore is available from Apache Tomcat's SSL Howto – a must read documentation for anyone managing Tomcat.