Posts Tagged ‘proxy settings’

Debugging Jitsi Meet Server Problems: A Practical Guide

Saturday, April 26th, 2025

Jitsi Meet is a powerful open-source video conferencing platform. But like any real-time communication system, it can run into issues—from video/audio glitches to full-blown connection failures. Debugging Jitsi Meet can be tricky due to its multi-component architecture. This guide walks you through a systematic approach to identify and resolve common server-side issues.

1. Understand the Architecture

Before diving into logs, it's important to understand Jitsi Meet's core components:
 

  • Jitsi Meet (Web UI) – The front-end interface.
  • Jicofo (Focus component) – Manages conference sessions.
  • Prosody (XMPP Server) – Handles user authentication and signaling.
  • JVB (Jitsi Videobridge) – Routes video/audio streams.
  • Nginx or Apache – Web server proxy (often with HTTPS and WebSocket forwarding).


Knowing how these interact helps pinpoint the failing layer.

2. Check Logs in the Right Places

Each component has its own logs. Check them in the following order:

Prosody Logs

Location: /var/log/prosody/prosody.log and prosody.err
​Look for: Authentication issues, connection denials, or component registration problems.
 

Jicofo Logs

Location:  /var/log/jitsi/jicofo.log
Look for: Room creation errors, XMPP connection failures, conference creation attempts.
 

JVB Logs

Location: /var/log/jitsi/jvb.log
​Look for: ICE failures, STUN/TURN issues, packet loss, and bridge reachability.
 

Web Server Logs (Nginx/Apache)

Location (Nginx): /var/log/nginx/error.log and access.log
Look for: HTTP errors (404, 502), WebSocket connection problems.
 

Browser Console Logs
 

Tools: Press F12 in browser → Console/Network tabs.
Look for: WebSocket failures, CORS issues, or media permission problems.
 

3. Common Problems & Fixes

"Failed to join conference"

  • Cause: Prosody may not be running or not configured correctly.​

Fix: Restart Prosody and check domain configuration in /etc/prosody/conf.avail/


No Audio or Video
 

Usual Cause: Media not reaching the bridge or blocked by firewall

Fix:

  • Verify JVB is listening on correct ports (UDP 10000).
  • ​Check firewall/NAT settings (especially on cloud VMs).
  • Use tcpdump or ss to check traffic flow.
     

WebSocket Connection Fails


Usual Cause: Web server (Proxy) misconfiguration.

Fix:

Ensure Nginx is forwarding WebSocket requests to /xmpp-websocket/ .
Add proper proxy settings in nginx.conf
 

Authentication Not Working


Cause: Misconfigured JWT or internal authentication.

Fix:

  • Check Prosody's config for authentication method.
  • If using JWT, verify token structure and shared secret.
     

4. Use Debugging Tools

  • Jitsi Meet in debug mode:


​Add #config.debug=true to your meeting URL.
 

  • ICE Debugging:


    Check about:webrtc (Firefox) or WebRTC Internals (Chrome).
    Look at ICE candidate gathering and connectivity checks.
    Test TURN/STUN:

    • Use tools like trickle-ice to validate your server's ICE configuration.

5. Networking and Firewall Checks

Make sure these ports are open:
 

  • TCP 443 – HTTPS
  • UDP 10000 – Media (JVB)
  • TCP 4443 – (Optional, fallback media)
  • TCP 5222 – XMPP (if not using BOSH/WebSocket)
     

# ss -tuln ufw status


6. Component Health Checks

Do 
# systemctl status for each main jitsi component services:

# systemctl status prosody
# systemctl status jicofo
# systemctl status jitsi-videobridge2

Check uptime, errors, or failure restarts.

7. Enable More Verbose Logs

Increase logging levels for deeper debugging:
 

  • Prosody: Edit /etc/prosody/prosody.cfg.lua → set log = { ... debug = "*" }.
  • Jicofo/JVB: Edit /etc/jitsi/jicofo/logging.properties and /etc/jitsi/videobridge/logging.properties
    → change log level to FINE or ALL .


8. Update & Restart Services

Sometimes updates or configs don’t apply until services are restarted:
 

# apt update && apt upgrade systemctl restart prosody jicofo jitsi-videobridge2 nginx


Final Closure Thoughts

Debugging Jitsi Meet requires a structured approach, start from the user-facing symptoms, trace through each service, and verify network and authentication configurations.
Debug the status of prosody, jicofo and jitsi-videobridge2, check the firewall openings are okay to the jitsi server
With some log analysis and a bit of patience, experimentation and the help of forums or Artificial Intelligence tool like ChatGPT, the Jitsi server errors will get solved.

Set proxy only for apt, apt-get, aptitude package manager on Debian / Ubuntu Linux

Wednesday, December 22nd, 2021

debian-package-manager-run-via-a-proxy


Intro

Main console package install apt-get / apt and / aptitude did not use the HTTP Proxy environment variables by default as there is no default proxy set on Debian / Ubuntu / Mint and other deb based distros after OS Install. Under some circunstances for DMZ placed or firewall secured servers, direct access to internet address or even Package repository is only allowed via a proxy and hence the package manager needs to have a proxy host set.
 Setting a global wide proxy on Linux is easily possible by setting http_proxy="http://yourhost.com:8080" and https_proxy or if FTP connection via ftp_proxy somewhere in /etc/profile , /etc/bashrc or via /etc/environment but as using this Shell variables set it global wide for all applications lynx / links / wget / curl, sometimes it is useful to set the Proxy host only for deb package management tools.

Note that if you want to set a proxy host for deb operations this can be done during initial OS install installation, the Apt configuration file would have been automatically updated then. 

Creating  an Apt Proxy Conf File

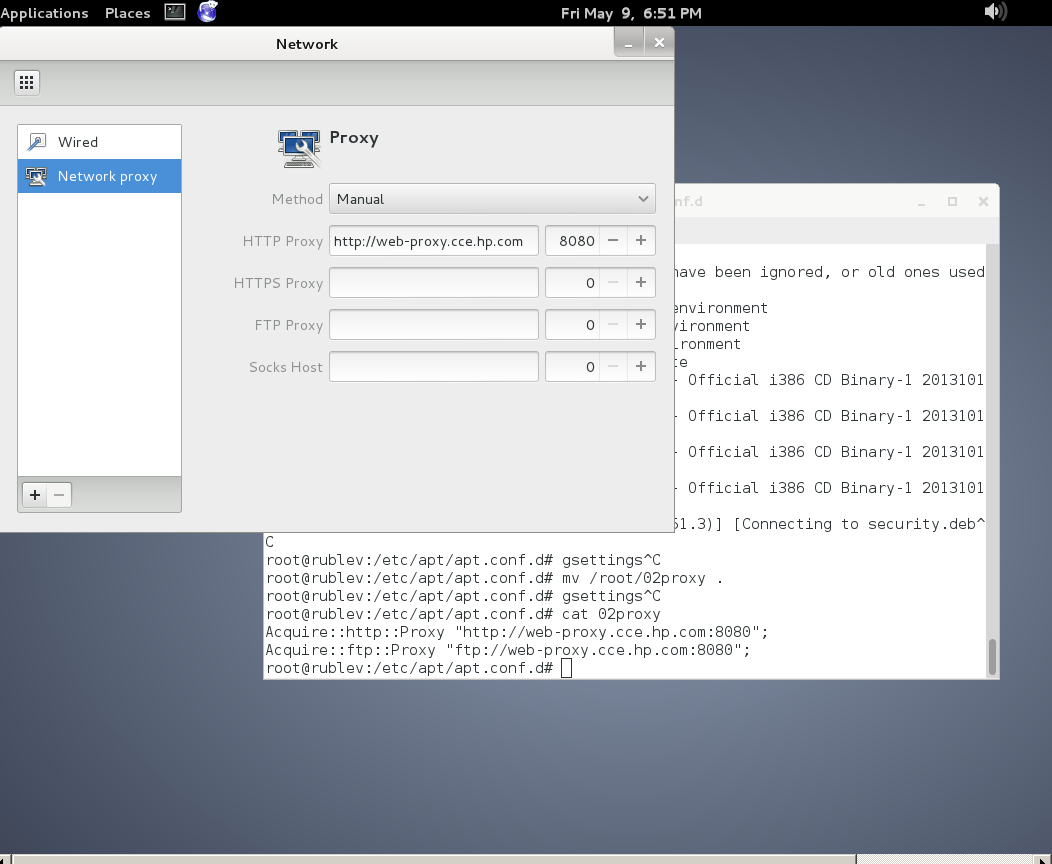
Apt loads all configuration files under /etc/apt/apt.conf.d. We can create a configuration specifically for our proxy there, keeping it separate from all other configurations.

  1. Create a new configuration file named proxy.conf.


    # touch /etc/apt/apt.conf.d/proxy.conf
    
  2. Open the proxy.conf file in a text editor.


    # vi /etc/apt/apt.conf.d/proxy.conf
    
  3. Add the following line to set your HTTP proxy for apt.


    Acquire::http::Proxy "http://username:password@proxy.server:port/";
    
  4. Add the following line to set your HTTPS proxy.


    Acquire::https::Proxy "http://username:passw0rd@proxy.server:port/";
    
  5. Save your changes and exit the text editor.
     

Your proxy settings will be applied the next time you run Apt.

Simplifying the Configuration

As mentioned by a user in the comments below, there is an alternative way for defining the proxy settings. While similar, it removes some redundancy.

Just like in the first example, create a new file under the /etc/apt/apt.conf.d directory for example /etc/apt/apt.conf.d/proxies, and then add the lines as.

Acquire {
HTTP::proxy "http://127.0.0.1:8080";
HTTPS::proxy "http://127.0.0.1:8080";
}


Use apt-get with Proxy howto – Set Proxy system-wide in Linux shell and Gnome

Friday, May 16th, 2014

linux-apt-get-configure-proxy-howto-set-proxy-systemwide-in-linux

I juset setup a VMWare Virtual Machine on my HP notebook and installed Debian 7.0 stable Wheezy. Though VMWare identified my Office Internet and configured automatically NAT, I couldn't access the internet from a browser until I remembered all HP traffic is going through a default set browser proxy.
After setting a proxy to Iceweasel, Internet pages started opening normally, however as every kind of traffic was also accessible via HP's proxy, package management with apt-get (apt-get update, apt-get install etc. were failing with errors):


# apt-get update

Ign cdrom://[Debian GNU/Linux 7.2.0 _Wheezy_ – Official i386 CD Binary-1 20131012-12:56] wheezy Release.gpg
Ign cdrom://[Debian GNU/Linux 7.2.0 _Wheezy_ – Official i386 CD Binary-1 20131012-12:56] wheezy Release
Ign cdrom://[Debian GNU/Linux 7.2.0 _Wheezy_ – Official i386 CD Binary-1 20131012-12:56] wheezy/main i386 Packages/DiffIndex
Ign cdrom://[Debian GNU/Linux 7.2.0 _Wheezy_ – Official i386 CD Binary-1 20131012-12:56] wheezy/main Translation-en_US
Err http://ftp.by.debian.org wheezy Release.gpg
  Could not connect to ftp.by.debian.org:80 (86.57.151.3). – connect (111: Connection refused)
Err http://ftp.by.debian.org wheezy-updates Release.gpg
  Unable to connect to ftp.by.debian.org:http:
Err http://security.debian.org wheezy/updates Release.gpg
  Cannot initiate the connection to security.debian.org:80 (2607:ea00:101:3c0b:207:e9ff:fe00:e595). – connect (101: Network is unreachable) [IP: 2607:ea00:101:3c0b:207:e9ff:fe00:e595 80]
Reading package lists…


This error is caused because apt-get is trying to directly access above http URLs and because port 80 is filtered out from HP Office, it fails in order to make it working I had to configure apt-get to use Proxy host – here is how:

a) Create /etc/apt/apt.conf.d/02proxy file (if not already existing)
and place inside:
 

Acquire::http::proxy::Proxy "https://web-proxy.cce.hp.com";
Acquire::ftp::proxy::Proxy "ftp://web-proxy.cce.hp.com";


To do it from console / gnome-terminal issue:
echo ''Acquire::http::Proxy "https://web-proxy.cce.hp.com:8088";' >> /etc/apt/apt.conf.d/02proxy
echo ''Acquire::ftp::Proxy "https://web-proxy.cce.hp.com:8088";' >> /etc/apt/apt.conf.d/02proxy

That's all now apt-get will tunnel all traffic via HTTP and FTP proxy host web-proxy.cce.hp.com and apt-get works again.

Talking about Proxyfing Linux's apt-get, its possible to also set proxy shell variables, which are red and understood by many console programs like Console browsers lynx, links, elinks  as well as wget and curl commands, e.g.:


export http_proxy=http://192.168.1.5:5187/
export https_proxy=$http_proxy
export ftp_proxy=$http_proxy
export rsync_proxy=$http_proxy
export no_proxy="localhost,127.0.0.1,localaddress,.localdomain.com"

For proxies protected with username and password export variables should look like so: echo -n "username:"
read -e username
echo -n "password:"
read -es password
export http_proxy="http://$username:$password@proxyserver:8080/"
export https_proxy=$http_proxy
export ftp_proxy=$http_proxy
export rsync_proxy=$http_proxy
export no_proxy="localhost,127.0.0.1,localaddress,.localdomain.com"

To make this Linux proxy settings system wide on Debian / Ubuntu there is the /etc/environment file add to it:
 

http_proxy=http://proxy.server.com:8080/
https_proxy=http://proxy.server.com:8080/
ftp_proxy=http://proxy.server.com:8080/
no_proxy="localhost,127.0.0.1,localaddress,.localdomain.com"
HTTP_PROXY=http://proxy.server.com:8080/
HTTPS_PROXY=http://proxy.server.com:8080/
FTP_PROXY=http://proxy.server.com:8080/
NO_PROXY="localhost,127.0.0.1,localaddress,.localdomain.com"


To make proxy global (systemwide) for most (non-Debian specific) Linux distributions shell environments create new file /etc/profile.d/proxy.sh and place something like:

function proxy(){
echo -n "username:"
read -e username
echo -n "password:"
read -es password
export http_proxy="http://$username:$password@proxyserver:8080/"
export https_proxy=$http_proxy
export ftp_proxy=$http_proxy
export rsync_proxy=$http_proxy
export no_proxy="localhost,127.0.0.1,localaddress,.localdomain.com"
echo -e "nProxy environment variable set."
}
function proxyoff(){
unset HTTP_PROXY
unset http_proxy
unset HTTPS_PROXY
unset https_proxy
unset FTP_PROXY
unset ftp_proxy
unset RSYNC_PROXY
unset rsync_proxy
echo -e "nProxy environment variable removed."
}

To set Global Proxy (make Proxy Systemwide) for a user in GNOME Desktop environment launch gnome-control-center

And go to Network -> Network Proxy

/images/gnome-configure-systemwide-proxy-howto-picture1

/images/gnome-configure-systemwide-proxy-howto-picture2

To make proxy settings also system wide for some GUI Gnome GTK3 applications

gsettings set org.gnome.system.proxy mode 'manual'
gsettings set org.gnome.system.proxy.http host 'your-proxy.server.com'
gsettings set org.gnome.system.proxy.http port 8080