Posts Tagged ‘vim’

Virtual Keyboard for Linux and other Freedom respecting operating Systems

Monday, July 30th, 2018

How to install and Use Linux Virtual Keyboard and other freedom respecting Operating Systems

  •  Looking for a quick way to use VIRTUAL KEYBOARD ON LINUX COMPUTER OPERATING SYSTEM, you can do it just this 1 task in 3 simple steps  ???
    – Logical question emerges, WHY ??? would you need a virtual keyboard on Free Software OS such as Linux?
    Well, just because sometimes it is much more secure to use a Virtual Keyboard, especially if you have doubt that your keyboard has been tapped or a Key Logger (Sniffer), intercepting the Keyboard IN / OUT jacks, is installed on the computer or you might have sit on a computer of ,a friend running Linux, and you want to make sure he did not install sniffer to intercept your ,SSH login passwords and ,later hack into your Servers, after stealing, the password


  • Assuming you're on : – Debian / Ubuntu Linux, or other of the numerous IT systems such as ,FreeBSD / OpeBSD etc. out there, you can run simply this commands:


  •  apt-get install –yes florence
    * A. To make it, easily invokable for laters, create a small bash, shell script in directory; – location /usr/bin/virtual-keyboard like, the one below:

    vim /usr/bin/virtual-keyboard

    * B.. INside the file Place following 1 liner code
     

    #!/bin/sh
    /usr/bin/florence


    * C… To later invoke it any time:
    Press ALT + F2 (or use Run Command Dialog in GNOME / KDE / Windomaker / IceWM whatever or any other crazy graphic environment of your choice and run:

    /usr/bin/virtual-keyboard


Remove \r (Carriage Return) from string with standard bash shell / sed / tr / vim or awk – Replace \r hidden messy characters from files

Tuesday, February 10th, 2015

remove_r_carriage_return_from_string_with-standard-bash_shell_sed_tr_or_awk_replace_annoying_hidden_messy_characters_from_files

I've been recently writting this Apache webserver / Tomcat / JBoss / Java decomissioning bash script. Part of the script includes extraction from httpd.conf of DocumentRoot variable configured for Apache host.
I was using following one liner to grep and store DocumentRoot set directory into new variable:

documentroot=$(grep -i documentroot /usr/local/apache/conf/httpd.conf | awk '{ print $2 }' |sed -e 's#"##g');

Above line greps for documentroot prints 2nd column of the matchi (which is the Apache server set docroot and then removes any " chars).

However I faced the issue that parsed string contained in $documentroot variable there was mysteriously containing r – return carriage – this is usually Carriage Return (CR) sent by Mac OS and Apple computers. For those who don't know the End of Line of files in UNIX / Linux OS-es is LF – often abreviated as n – often translated as return new line), while Windows PCs use for EOF CR + LF – known as the infamous  rn. I was running the script from the server which is running SuSE SLES 11 Linux, meaning the CR + LF end of file is standardly used, however it seem someone has editted the httpd.conf earlier with a text editor from Mac OS X (Terminal). Thus I needed a way to remove the r from CR character out of the variable, because otherwise I couldn't use it to properly exec tar to archive the documentroot set directory, cause the documentroot directory was showing unexistent.

Opening the httpd.conf in standard editor didn't show the r at the end of
"directory", e.g. I could see in the file when opened with vim

DocumentRoot "/usr/local/apache/htdocs/site/www"

However obviously the r character was there to visualize it I had to use cat command -v option (–show-nonprinting):

cat -v /usr/local/apache/conf/httpd.conf

DocumentRoot "/usr/local/apache/htdocs/site/wwwr"


1. Remove the r CR with bash

To solve that with bash, I had to use another quick bash parsing that scans through $directory and removes r, here is how:

documentroot=${documentroot%$'r'}

It is also possible to use same example to remove "broken" Windows rn Carriage Returns after file is migrated from Windows to Liunx /  FreeBSD host:

documentroot=${documentroot%$'rn'}


2. Remove r Carriage Return character with sed

Other way to do remove (del) Windows / Mac OS Carriage Returns in case if Migrating to UNIX is with sed (stream editor).

sed -i s/r// filename >> filename_out.txt


3. Remove r CR character with tr

There is a third way also to do it with (tr) – translate or delete characters old shool *nix command:

tr -d 'r' < file_with_carriagereturns > file_without_carriage_returns


4. Remove r CRs with awk (pattern scanning and processing language)

 awk 'sub("$", "r")' inputf_with_crs.txt > outputf_without_crs.txt


5. Delete r CR with VIM editor

:%s/r//g


6. Converting  file DOS / UNIX OSes with dos2unix and unix2dos command line tools

For sysadmins who don't want to bother with writting code to convert CR when moving files between Windows and UNIX hosts there are dos2unix and unix2dos installable commands.

All done Cheers ! 🙂

Linux Bond network interfaces to merge multiple interfaces ISPs traffic – Combine many interfaces NIC into one on Debian / Ubuntu / CentOS / Fedora / RHEL Linux

Tuesday, December 16th, 2014

how-to-create-bond-linux-agregated-network-interfaces-for-increased-network-thoroughput-debian-ubuntu-centos-fedora-rhel
Bonding Network Traffic
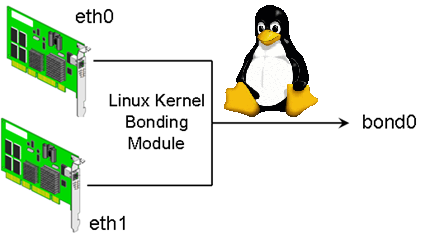
 (link aggregation) or NIC teaming is used to increase connection thoroughput and as a way to provide redundancy for a services / applications in case of some of the network connection (eth interfaces) fail. Networking Bonding is mostly used in large computer network providers (ISPs), infrastructures, university labs or big  computer network accessible infrastructures or even by enthusiatst to run home-server assuring its >= ~99% connectivity to the internet by bonding few Internet Providers links into single Bonded Network interface. One of most common use of Link Aggreegation nowadays is of course in Cloud environments.  

 Boding Network Traffic is a must know and (daily use) skill for the sys-admin of both Small Company Office network environment up to the large Professional Distributed Computing networks, as novice GNU /  Linux sys-admins would probably have never heard it and sooner or later they will have to, I've created this article as a quick and dirty guide on configuring Linux bonding across most common used Linux distributions.

It is assumed that the server where you need network boding to be configured has at least 2 or more PCI Gigabyte NICs with hardware driver for Linux supporting Jumbo Frames and some relatively fresh up2date Debian Linux >=6.0.*, Ubuntu 10+ distro, CentOS 6.4, RHEL 5.1, SuSE etc.
 

1. Bond Network ethernet interfaces on Debian / Ubutnu and Deb based distributions

To make network bonding possible on Debian and derivatives you need to install support for it through ifenslave package (command).

apt-cache show ifenslave-2.6|grep -i descript -A 8
Description: Attach and detach slave interfaces to a bonding device
 This is a tool to attach and detach slave network interfaces to a bonding
 device. A bonding device will act like a normal Ethernet network device to
 the kernel, but will send out the packets via the slave devices using a simple
 round-robin scheduler. This allows for simple load-balancing, identical to
 "channel bonding" or "trunking" techniques used in switches.
 .
 The kernel must have support for bonding devices for ifenslave to be useful.
 This package supports 2.6.x kernels and the most recent 2.4.x kernels.


apt-get –yes install ifenslave-2.6


Bonding interface works by creating a "Virtual" network interface on a Linux kernel level, it sends and receives packages via special
slave devices using simple round-robin scheduler. This makes possible a very simple network load balancing also known as "channel bonding" and "trunking"
supported by all Intelligent network switches

Below is a text diagram showing tiny Linux office network router configured to bond ISPs interfaces for increased thoroughput:


Internet
 |                  204.58.3.10 (eth0)
ISP Router/Firewall 10.10.10.254 (eth1)
   
                              | -----+------ Server 1 (Debian FTP file server w/ eth0 & eth1) 10.10.10.1
      +------------------+ --- |
      | Gigabit Ethernet       |------+------ Server 2 (MySQL) 10.10.10.2
      | with Jumbo Frame       |
      +------------------+     |------+------ Server 3 (Apache Webserver) 10.10.10.3
                               |
                               |------+-----  Server 4 (Squid Proxy / Qmail SMTP / DHCP) 10.10.10.4
                               |
                               |------+-----  Server 5 (Nginx CDN static content Webserver) 10.10.10.5
                               |
                               |------+-----  WINDOWS Desktop PCs / Printers & Scanners, Other network devices 


Next to configure just installed ifenslave Bonding  
 

vim /etc/modprobe.d/bonding.conf

alias bond0 bonding
  options bonding mode=0 arp_interval=100 arp_ip_target=10.10.10.254, 10.10.10.2, 10.10.10.3, 10.10.10.4, 10.10.10.5


Where:

  1. mode=0 : Set the bonding policies to balance-rr (round robin). This is default mode, provides load balancing and fault tolerance.
  2. arp_interval=100 : Set the ARP link monitoring frequency to 100 milliseconds. Without option you will get various warning when start bond0 via /etc/network/interfaces
  3. arp_ip_target=10.10.10.254, 10.10.10.2, … : Use the 10.10.10.254 (router ip) and 10.10.10.2-5 IP addresses to use as ARP monitoring peers when arp_interval is > 0. This is used determine the health of the link to the targets. Multiple IP addresses must be separated by a comma. At least one IP address must be given (usually I set it to router IP) for ARP monitoring to function. The maximum number of targets that can be specified is 16.

Next to make bonding work its necessery to load the bonding kernel module:

modprobe -v bonding mode=0 arp_interval=100 arp_ip_target=10.10.10.254, 10.10.10.2, 10.10.10.3, 10.10.10.4, 10.10.10.5


Loading the bonding module should spit some good output in /var/log/messages (check it out with tail -f /var/log/messages)

Now to make bonding active it is necessery to reload networking (this is extremely risky if you don't have some way of Console Web Java / VPN Access such as IPKVM / ILO / IDRAC), so reloading the network be absolutely sure to either do it through a cronjob which will automatically do the network restart with new settings and revert back to old configuration whether network is inaccessible or assure physical access to the server console if the server is at your disposal.

Whatever the case make sure you backup:

 cp /etc/network/interfaces /etc/network/interfaces.bak

vim /etc/network/interfaces

############ WARNING ####################
# You do not need an "iface eth0" nor an "iface eth1" stanza.
# Setup IP address / netmask / gateway as per your requirements.
#######################################
auto lo
iface lo inet loopback
 
# The primary network interface
auto bond0
iface bond0 inet static
    address 10.10.10.1
    netmask 255.255.255.0
    network 192.168.1.0
    gateway 10.10.10.254
    slaves eth0 eth1
    # jumbo frame support
    mtu 9000
    # Load balancing and fault tolerance
    bond-mode balance-rr
    bond-miimon 100
    bond-downdelay 200
    bond-updelay 200
    dns-nameservers 10.10.10.254
    dns-search nixcraft.net.in


As you can see from config there are some bond specific configuration variables that can be tuned, they can have positive / negative impact in some cases on network thoroughput. As you can see bonding interfaces has slaves (this are all other ethXX) interfaces. Bonded traffic will be available via one single interface, such configuration is great for webhosting providers with multiple hosted sites as usually hosting thousand websites on the same server or one single big news site requires a lot of bandwidth and of course requires a redundancy of data (guarantee it is up if possible 7/24h.

Here is what of configs stand for

 
  • mtu 9000 : Set MTU size to 9000. This is related to Jumbo Frames.
  • bond-mode balance-rr : Set bounding mode profiles to "Load balancing and fault tolerance". See below for more information.
  • bond-miimon 100 : Set the MII link monitoring frequency to 100 milliseconds. This determines how often the link state of each slave is inspected for link failures.
  • bond-downdelay 200 : Set the time, t0 200 milliseconds, to wait before disabling a slave after a link failure has been detected. This option is only valid for the bond-miimon.
  • bond-updelay 200 : Set the time, to 200 milliseconds, to wait before enabling a slave after a link recovery has been detected. This option is only valid for the bond-miimon.
  • dns-nameservers 192.168.1.254 : Use 192.168.1.254 as dns server.
  • dns-search nixcraft.net.in : Use nixcraft.net.in as default host-name lookup (optional).

To get the best network thorougput you might want to play with different bounding policies. To learn more and get the list of all bounding policies check out Linux ethernet Bounding driver howto

To make the new bounding active restart network:
 

/etc/init.d/networking stop
sleep 5;
/etc/init.d/networking start


2. Fedora / CentOS RHEL Linux network Bond 

Configuring eth0, eth1, eth2 into single bond0 NIC network virtual device is with few easy steps:

a) Create following bond0 configuration file:
 

vim /etc/sysconfig/network-scripts/ifcfg-bond0


DEVICE=bond0
IPADDR=10.10.10.20
NETWORK=10.10.10.0
NETMASK=255.255.255.0
GATEWAY=10.10.10.1
USERCTL=no
BOOTPROTO=none
ONBOOT=yes


b) Modify ifcfg-eth0 and ifcfg-eth0 files /etc/sysconfig/network-scripts/

– Edit ifcfg-eth0

vim /etc/sysconfig/network-scripts/ifcfg-eth0

DEVICE=eth0
USERCTL=no
ONBOOT=yes
MASTER=bond0
SLAVE=yes
BOOTPROTO=none

– Edit ifcfg-eth1

vim /etc/sysconfig/network-scripts/ifcfg-eth1

DEVICE=eth0
USERCTL=no
ONBOOT=yes
MASTER=bond0
SLAVE=yes
BOOTPROTO=none


c) Load bond driver through modprobe.conf

vim /etc/modprobe.conf

alias bond0 bonding
options bond0 mode=balance-alb miimon=100


Manually load the bonding kernel driver to make it affective without server reboot:
 

modprobe bonding

d) Restart networking to load just configured bonding 
 

service network restart


3. Testing Bond Success / Fail status

Periodically if you have to administrate a bonded interface Linux server it is useful to check Bonds Link Status:

cat /proc/net/bonding/bond0
 

Ethernet Channel Bonding Driver: v3.5.0 (November 4, 2008)

Bonding Mode: fault-tolerance (active-backup)
Primary Slave: None
Currently Active Slave: eth0
MII Status: up
MII Polling Interval (ms): 100
Up Delay (ms): 0
Down Delay (ms): 0

Slave Interface: eth0
MII Status: up
Link Failure Count: 0
Permanent HW addr: 00:1e:0b:d6:6c:8f

Slave Interface: eth1
MII Status: up
Link Failure Count: 0
Permanent HW addr: 00:1e:0b:d6:6c:8c

To check out which interfaces are bonded you can either use (on older Linux kernels)
 

/sbin/ifconfig -a


If ifconfig is not returning IP addresses / interfaces of teamed up eths, to check NICs / IPs:

/bin/ip a show
1: lo: <LOOPBACK,UP,LOWER_UP> mtu 16436 qdisc noqueue state UNKNOWN
    link/loopback 00:00:00:00:00:00 brd 00:00:00:00:00:00
    inet 127.0.0.1/8 brd 127.255.255.255 scope host lo
    inet 127.0.0.2/8 brd 127.255.255.255 scope host secondary lo
    inet6 ::1/128 scope host
       valid_lft forever preferred_lft forever
2: eth0: <BROADCAST,MULTICAST,SLAVE,UP,LOWER_UP> mtu 1500 qdisc mq master bond0 state UP qlen 1000
    link/ether 00:1e:0b:d6:6c:8c brd ff:ff:ff:ff:ff:ff
3: eth1: <BROADCAST,MULTICAST,SLAVE,UP,LOWER_UP> mtu 1500 qdisc mq master bond0 state UP qlen 1000
    link/ether 00:1e:0b:d6:6c:8c brd ff:ff:ff:ff:ff:ff
7: bond0: <BROADCAST,MULTICAST,MASTER,UP,LOWER_UP> mtu 1500 qdisc noqueue state UP
    link/ether 00:1e:0b:d6:6c:8c brd ff:ff:ff:ff:ff:ff
    inet 10.239.15.173/27 brd 10.239.15.191 scope global bond0
    inet 10.239.15.181/27 brd 10.239.15.191 scope global secondary bond0:7156web
    inet6 fe80::21e:bff:fed6:6c8c/64 scope link
       valid_lft forever preferred_lft forever


In case of Bonding interface failure you will get output like:

Ethernet Channel Bonding Driver: v3.5.0 (November 4, 2008)
Bonding Mode: load balancing (round-robin)
MII Status: up
MII Polling Interval (ms): 100
Up Delay (ms): 200
Down Delay (ms): 200
Slave Interface: eth0
MII Status: up
Link Failure Count: 0
Permanent HW addr: 00:xx:yy:zz:tt:31
Slave Interface: eth1
MII Status: down
Link Failure Count: 1
Permanent HW addr: 00:xx:yy:zz:tt:30

Failure to start / stop bonding is also logged in /var/log/messages so its a good idea to check there too once launched:
 

tail -f /var/log/messages
Dec  15 07:18:15 nas01 kernel: [ 6271.468218] e1000e: eth1 NIC Link is Down
Dec 15 07:18:15 nas01 kernel: [ 6271.548027] bonding: bond0: link status down for interface eth1, disabling it in 200 ms.
Dec  15 07:18:15 nas01 kernel: [ 6271.748018] bonding: bond0: link status definitely down for interface eth1, disabling it

On bond failure you will get smthing like:

Dec  15 04:19:15 micah01 kernel: [ 6271.468218] e1000e: eth1 NIC Link is Down
Dec  15 04:19:15 micah01 kernel: [ 6271.548027] bonding: bond0: link status down for interface eth1, disabling it in 200 ms.
Dec  15 04:19:15 micah01 kernel: [ 6271.748018] bonding: bond0: link status definitely down for interface eth1, disabling it


4. Adding removing interfaces to the bond interactively
 

You can set the mode through sysfs virtual filesystem with:

echo active-backup > /sys/class/net/bond0/bonding/mode

If you want to try adding an ethernet interface to the bond, type:

echo +ethN > /sys/class/net/bond0/bonding/slaves

To remove an interface type:

echo -ethN > /sys/class/net/bond0/bonding/slaves


In case if you're wondering how many bonding devices you can have, well the "sky is the limit" you can have, it is only limited by the number of NIC cards Linux kernel / distro support and ofcourse how many physical NIC slots are on your server.

To monitor (in real time) adding  / removal of new ifaces to the bond use:
 

watch -n 1 ‘cat /proc/net.bonding/bond0′

 

Windows add command to PATH variable – Adding (Putty, VIM) new binaries folder to windows %PATH%

Friday, June 27th, 2014

windows-add-to-path-location-of-new-binaries-putty-vim-etc-system-properties-environment-variable-screenshot
I want to use vim (text editor) on my Windows 7 work computer and hence installed VIM (VI Improved) port for Windows GVim.
VIM works perfect on Windows and for those coming from UNIX background having it installed is a must, however vim doesn't include a PATH location to its (vim) executable in Windows %PATH%.
PATH command line variable stores path locations to all binaries that could be executed directly from cmd line with no need to type full directory path to binary.

To illustrate what PATH is lets say you want to make Putty accessible straight from Windows command line (cmd.exe), you can add Putty's installation Path Folder to global Windows %PATH%. On my 64-bit Windows PC Putty binary is installed in C:Program Files (x86)PuTTY.

echo %PATH%
 

C:Perl64sitebin;C:Perl64bin;C:Program FilesRA2HP;C:Windowssystem32;C:
Windows;C:WindowsSystem32Wbem;C:WindowsSystem32WindowsPowerShellv1.0;C:
Program FilesWIDCOMMBluetooth Software;C:Program FilesWIDCOMMBluetooth Sof
twaresyswow64;C:Program Files (x86)Hewlett-PackardHP ProtectTools Security M
anagerBin;C:Program FilesActivIdentityActivClient;C:Program Files (x86)A
ctivIdentityActivClient;C:Program Files (x86)QuickTimeQTSystem


To make Putty accessible only by typing Putty instead of typing C:Program Files (x86)PuTTYPutty.exe, it has to be included in PATH, normally from Win command line (cmd.exe). This is done with:


set PATH=%PATH%;C:Program Files (x86)PuTTY


echo %PATH%


C:Usersggeorgi7Desktop>echo %PATH%
C:Perl64sitebin;C:Perl64bin;C:Program FilesRA2HP;C:Windowssystem32;C:
Windows;C:WindowsSystem32Wbem;C:WindowsSystem32WindowsPowerShellv1.0;C:
Program FilesWIDCOMMBluetooth Software;C:Program FilesWIDCOMMBluetooth Sof
twaresyswow64;C:Program Files (x86)Hewlett-PackardHP ProtectTools Security M
anagerBin;C:Program FilesActivIdentityActivClient;C:Program Files (x86)A
ctivIdentityActivClient;C:Program Files (x86)QuickTimeQTSystem;C:Program
Files (x86)PuTTY

To check all the exported variables, use SET command, here is my default SET variables:

C:> SET
 

ALLUSERSPROFILE=C:ProgramData
APPDATA=C:UsersgeorgiAppDataRoaming
CLASSPATH=.;C:Program Files (x86)Javajre6libextQTJava.zip
CommonProgramFiles=C:Program FilesCommon Files
CommonProgramFiles(x86)=C:Program Files (x86)Common Files
CommonProgramW6432=C:Program FilesCommon Files
COMPUTERNAME=GEORGI
ComSpec=C:Windowssystem32cmd.exe
DEFLOGDIR=C:ProgramDataMcAfeeDesktopProtection
FP_NO_HOST_CHECK=NO
HOMEDRIVE=C:
HOMEPATH=Usersggeorgi7
LOCALAPPDATA=C:Usersggeorgi7AppDataLocal
LOGONSERVER=G1W4730
NUMBER_OF_PROCESSORS=4
OS=Windows_NT

To make inclusion of VIM, Putty or other binary directory) into PATH variable permanent:


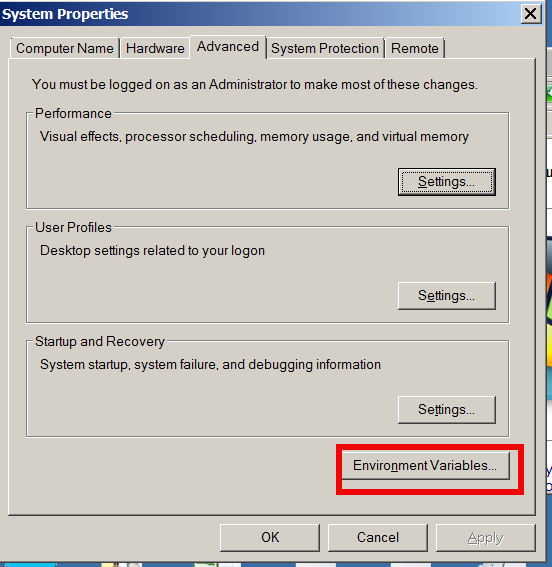
From Windows desktop, right-click My Computer and click Properties.
In the Advanced system settings click on Properties window, click on the Advanced tab.
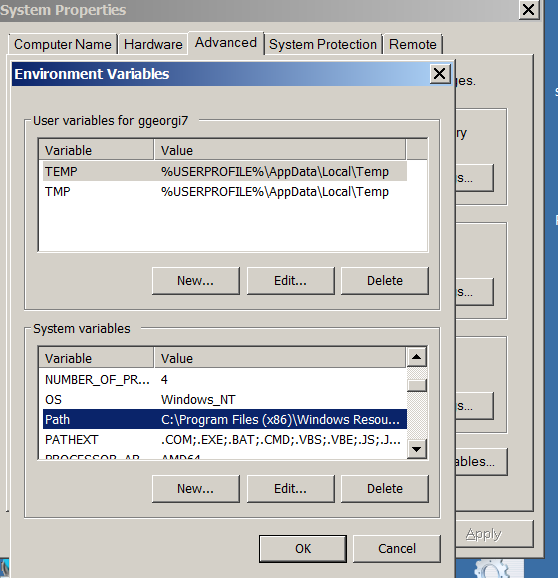
In the Advanced System section, click the Environment Variables button.


windows-add-command-to-path-variable-adding-new-folder-to-windows-path-add-putty-vim-to-easy-execute
Finally, in the Environment Variables window, search for the Path variable in Systems Variable section and click the Edit button.
Add or modify the path lines including the paths to binaries you wish to be easy access.
Note that each different directory should be separated with a semicolon (;), e.g.
 

C:Program Files;C:Winnt;C:WinntSystem32; C:Perl64bin


Useful VIM editor tip colorscheme evening – make your configurations look brighter in VI

Monday, February 24th, 2014

I just learned about cool VIM option from a collegue:

:colorscheme evening

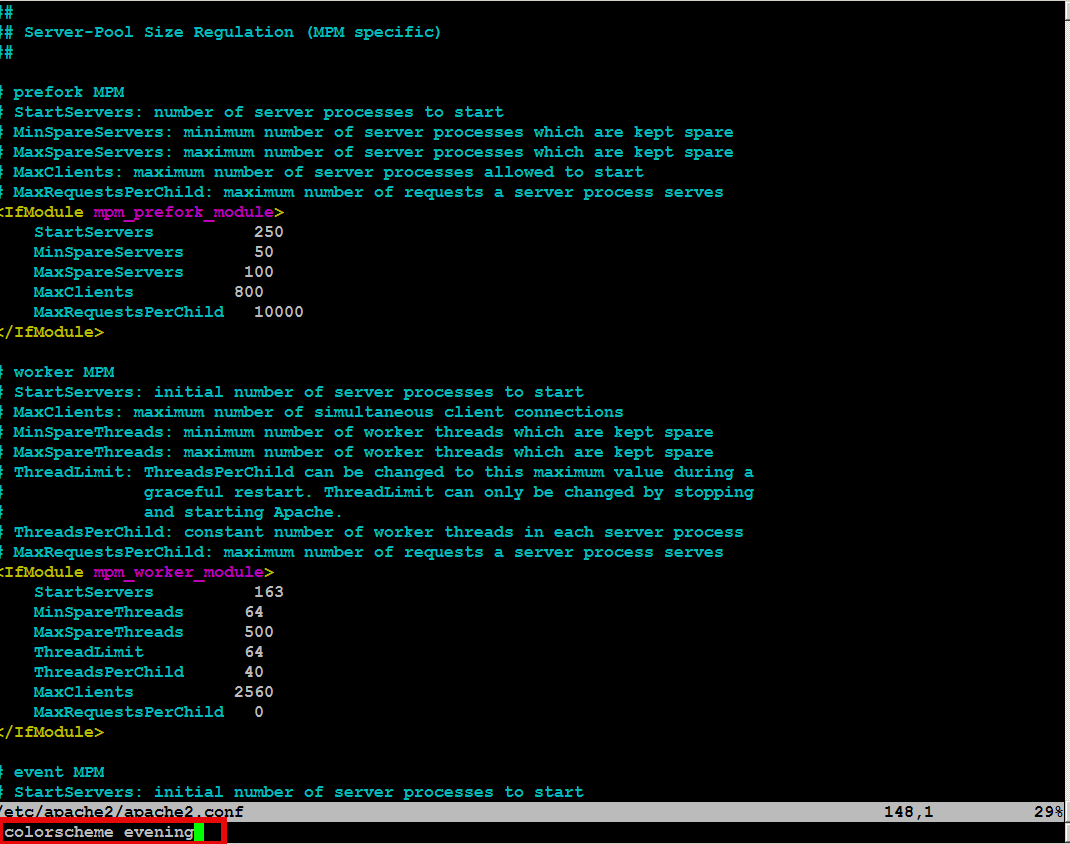
What it does it makes configurations in vim edit look brighter like you seen in below screenshots.

– Before :colorscheme evening vim command

colorscheme_vim-linux-editor-options-screenshot

– After :colorscheme evening

colorscheme2_vim-linux-editor-options-screenshot

The option is really useful as often editing a config in vim on a random server is too dark and in order to read the config you have to strain your eyes in long term leading to eye damage.

Any other useful vim options, you use daily?

VIM and VI UNIX text editor syntax highlighting and howto add remove code auto indent

Tuesday, February 4th, 2014

vim-vi-linux-text-editor-logo-vim-highlighting how to turn vim syntax highlighting on linux

For my daily system administration job I have to login to many SuSE Linux servers and do various configugration edits.
The systems are configured in different ways and the only text editors available across all servers I can use are VI and VIM (VI Improved).

As I usually had to edit configuration files and scripts and I'm on SSH color terminal its rather annoying that on some of the servers opening a file with VIM is not displayed with SYNTAX HIGHLIGHTING. Not having syntax highlighting is ugly and makes editting ugly and unreadable.
Thus it is useful to enable VI syntax highlighting straight into the file being editted. I suspect many novice sysadmins might not know how to turn syntax highlighting in vi so here is how.
 

Turn Syntax Highlighting in VIM


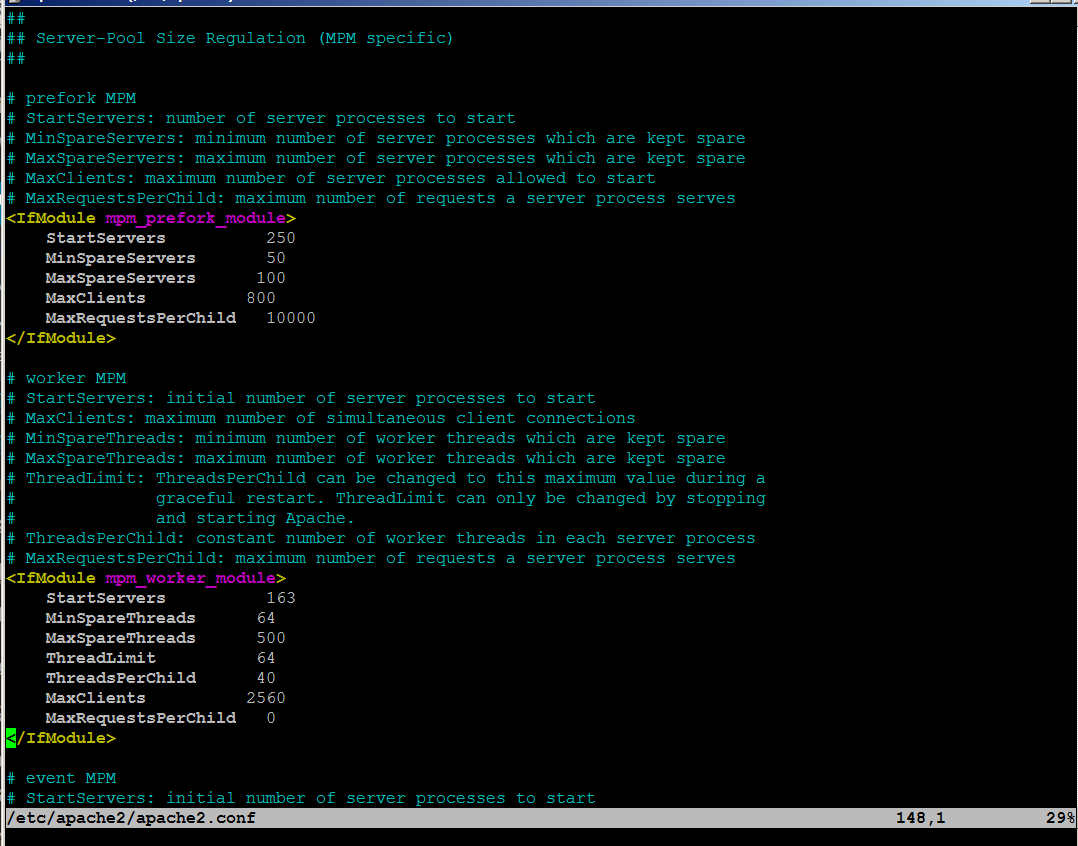
1. Open file with vim lets say Apache configuration

# vim /etc/apache2/apache2.conf

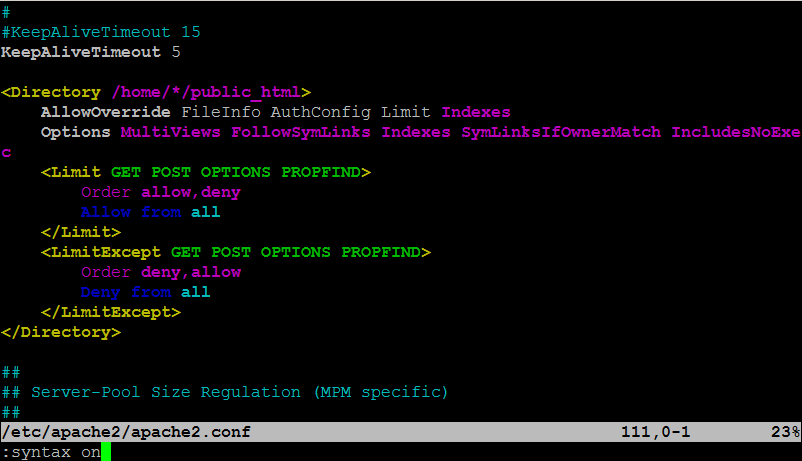
2. Press (Esc) Escape and ":" from kbd and then type in syntax on

:syntax on

vim-syntax-highlighting-howto-syntax-on-picture-screenshot-apache-config

To Turn On / Off VI Syntax Highlighting permanent add ":syntax on"
into ~/.vimrc

~/.vimrc file is red automatically on VIM start, so right after :syntax on is appended in it on relaunch vim will start showing colorfully.

Enjoy ! 🙂


Set up Modsecurity on Debian 7 GNU / Linux to mitigate websites virus infections / Cross Site Scripting and SQL Injects

Friday, September 6th, 2013

mod security raise up your Apache webserver security and protect against cross site scripting javascript hacks and viruses

There are plenty of tutorials around on how to install and configure modsecurity  So This tutorial is nothing new, but I decided to write it since, I had to install mod_security on Debian Wheezy to protect a Debian Linux server websites from being periodically infected with Viruses / XSS / Backdoored Javascripts and Trojan horses.

Everyone who used Debian stable distribution knows the packages included in it are usually about 2 years older than latest available. Situation with latest Debian stable Wheezy  is same, but anyways even a bit outdated my experience so far is mod_security does a great job of protecting Apache sites …

1. Install libapache-mod-security and other libraries (not obligitory), but useful on most Apache + PHP servers

  Run below commands to add xml and rest of useful Apache stuff:


apt-get install libxml2 libxml2-dev libxml2-utils
apt-get install libaprutil1 libaprutil1-dev

Above commands will install a bunch of other dependency packages.

Next install mod-security deb. Run below command, to install and activate modsecurity. Note that installing libapache-mod-security will also automatically restart the Apache server.
 

apt-get install libapache-mod-security

Next to enable all functionality of modsecurity headers Apache module is required as well, activate it with:

 
a2enmod headers
service apache2 restart

2. Make sure mod_security Apache config looks like


<IfModule security2_module>
# Default Debian dir for modsecurity's persistent data
SecDataDir /var/cache/modsecurity
# Include all the *.conf files in /etc/modsecurity.
# Keeping your local configuration in that directory
# will allow for an easy upgrade of THIS file and
# make your life easier
Include "/etc/modsecurity/*.conf"
</IfModule>

Important part of conf is  "Include "/etc/modsecurity/*.conf"" line. /etc/modsecurity directory is main place to set up and configure modsecurity. This configuration file, combined with mod-security.load, do everything necessary to load the modsecurity into Apache server.

3.Enable and Load modsecurity default configuration rules:

So far, modsecurity is loaded into the apache server, but isn't stopping any attempts of hack scripts / Viruses / or automated tools to exploit Vulnerabilities in Web Applications. To make modsecurity start filtering requests, should activate  modsecurity specific configuration and load some regular expression rules.
First to do is enable "recommended" modsecurity configuration file:
 

Code:
cd /etc/modsecurity
mv modsecurity.conf-recommended modsecurity.conf

Default configuration from recommended conf enables modsecurity in an "examine only" mode. In order to make full use of the module, we have to make a few changes. With  favorite text editor open modsecurity.conf (mine is vim)and make the following change:

Code:
SecRuleEngine On

This makes modsecurity to block requests based on its (pre-written) developer rules. Other settings in this file that are useful to know about are the debug controls, very useful, whether you have to debug problems with sites not properly opening due to server enabled mod_security.
 

Code:
#SecDebugLog /opt/modsecurity/var/log/debug.log
#SecDebugLogLevel 3

This controls how much information is stored in modsecurity's "audit log as well as keeps track of attacks launched to server. Default debug level of 3 is pretty much and stores "everything". This is dangerous as a huge logs are produces on  busy servers.
 

Code:
SecAuditLogParts ABIJDEFHZ

4. Enable extra modsecurity prevention rules

Modsecurity works by using rules by pre-defined patterns used to recognize when your website/s is being probed or attacked. Once installed modsecurity base package as a dependency modsecurity-crs package is installed. modsecurity-crs contains addition free core rule set. Current Core rule from modsecurity.org are newer than version included with wheezy,  thus rules lack a bit behind but this is only option whether using default debian bundled packge otherwise manual modsecurity recompile is required. We all know how bad it is to custom compile software on production machines, so custom compile experiments are really bad idea.

CRS (Core Rule Set) is installed in /usr/share/modsecurity-crs. This directory contains an "activated_rules" directory present also in /etc/modsecurity

Quickest way to activate rules is by symlinking from the actual config and rule files into the /etc/modsecurity config directory.

We'll be making links from the /usr/share/modsecurity location into /etc/modsecurity to activate some other useful modsec useful rules. First link main crs config file:
 

ln -s /usr/share/modsecurity-crs/modsecurity_crs_10_setup.conf /etc/modsecurity/modsecurity_crs_10_setup.conf

This file provides some basic configuration directives for crs.

Futher on, link each rule file in the base_rules and optional_rules directories using 2 tiny bash loops.


cd /usr/share/modsecurity-crs/base_rules
for f in * ; do sudo ln -s /usr/share/modsecurity-crs/base_rules/$f /etc/modsecurity/$f ; done
cd /usr/share/modsecurity-crs/optional_rules
for f in * ; do sudo ln -s /usr/share/modsecurity-crs/optional_rules/$f /etc/modsecurity/$f ; done

With that done, there's one more edit to check if modsecurity blocking works as expected. Open the /etc/modsecurity/modsecurity.conf file and add the following lines at the end (this is from the free, modsecurity pdf book, link provided below)


SecRule ARGS "MY_UNIQUE_TEST_STRING"\
"phase:1,log,deny,status:503"

Finally after all configuration rules are loaded to modsec, Usual Apache restart is required:

 
/etc/init.d/apache2 restart

Whether no fatal errors pop up and Apache starts normally, now modsecurity should be properly running.

5. Verify if modsecurity is set-up and kicking ass

To verify installation, open a browser and access some of hosted websites  like this:
http://www.your-server-domain.com/?test=MY_UNIQUE_TEST_STRING

A sure sign that modsec works is  503 "Service Temporarily Unavailable" message from Apache. Alternatively  examine server's modsec audit log file (default location in /var/log/apache2/modsec_audit.log) (grep the string MY_UNIQUE_TEST_STRING. You should see full transcript of the communication between your browser and server logged. Depending on amount of site traffic gets make sure to monitor  size of file for some minutes to make sure it doesn't grow too big and it doesn't fill up quickly your HDD.

Well now all fine your Apache server security is better for sure and by God's grace you should not have to deal with hundreds of hours of sites recovery after a bunch of client's websites are hacked.

Feedback and comments are mostly welcome. Enjoy 😉

How to permanently enable Cookies in Lynx text browser – Disable accept cookies prompt in lynx console browser

Wednesday, April 18th, 2012

lynx-text-browser-logo
The default behaviour of lynx console text browser on Linuces, BSD and other free OSes is to always ask, for the accept cookies prompt once an internet web page is opened that requires browser cookies to be enabled.

I should admin, having this "secure by default" (always ask for new cookies) behaviour in lynx was a good practice from a security point of view.

Another reason, why this cookies prompt is enabled by default is back in the days, when lynx was actively developed by programmers the websites with cookies support was not that many and even cookies was mostly required for user/pass authentication (all those who still remember this days the websites that requires authentication was a way less than today) …
With this said the current continuing security cautious behaviour in the browser, left from its old days is understandable.

Screenshot Google Accept cookies Lynx dialog FreeBSD

However I personally sometimes, need to use lynx more frequently and this behaviour of always opening a new website in text mode in console to prompts me for a cookie suddenly becomes a big waste of time if you use lynx to browser more than few sites. Hence I decided to change the default way lynx handles cookies and make them enabled by default instead.
Actually even in the past, when I was mainly using internet in console on every new server or home Linux install, I was again making the cookies to be permanently accepted.
Everyone who used lynx a few times already knows its "annoying" to all time accept cookie prompts … This provoked me to write this short article to explain how enabling of constant cookie accepting in lynx is done

To enable the persistent cookies in lynx, one needs to edit lynx.cfg on different GNU / Linux and BSD* distributions lynx.cfg is located in different directory.

Most of the lynx.cfg usual locations are /etc/lynx/lynx.cfg or /etc/lynx.cfg as of time of writting this post in Debian Squeeze GNU / Linux the lynx.cfg is located in /etc/lynx-cur/lynx.cfg, whether for FreeBSD / NetBSD / OpenBSD users the file is located in /usr/local/etc/lynx.cfg

What I did to allow all cookies is open lynx.cfg in vim edit and change the following lines:

a)

#FORCE_SSL_COOKIES_SECURE:FALSE

with

FORCE_SSL_COOKIES_SECURE:TRUE

b)

#SET_COOKIES:TRUE

uncomment it to:

SET_COOKIES:TRUE

c) next, change

ACCEPT_ALL_COOKIES:FALSE

ACCEPT_ALL_COOKIES:TRUE

Onwards opening any website with lynx auto-accepts the cookies.

lynx Always allowing from domain cookies Linux screenshot

Google in Bulgarian Lynx browser screenshot

For people who care about there security (who still browse in console (surely not many anymore)), permanently allowing the cookies is not a good idea. But for those who are ready to drop off little security for convenience its ok.