Posts Tagged ‘blog’

Debug and Fix QMAIL Mail Server qmail-inject: fatal: qq temporary problem (#4.3.0) and ‘reformime[1648048]: segfault at 0 ip 00007fea608bef28 sp 00007fff3c8d4bc0 error 4’ errors after update from Debian 11 to Debian 12

Monday, September 2nd, 2024

finding-qmail-install-problems-common-reasons-for-unworking-qmail-debugging-qmail

For a legacy reasons and lack of time and fact once Qmail is run on a server it works almost forever if you don't do very major upgrades and you still to the same version I have few Qmail SMTP servers that are nowadays are there for historical reasons.

After the last major version upgrade from Debian 11 to Debian 12, I've got the qmail smtpd not completely running fine and I have to follow some of my previous blog notes on how to recover in that situations as well as some common logic to resolve it.

After the upgrade I started getting every few minutes a repeating really annoying error due to reformime crashing in /var/log/messages as well as in qmail logs, the exact error was as so

Sep  1 22:15:34 pcfr_hware_local_ip kernel: [366799.585663] Code: eb e1 48 8d 15 31 96 13 00 e9 04 00 00 00 0f 1f 40 00 41 55 49 89 d5 41 54 49 89 f4 55 53 48 89 fb 48 83 ec 08 48 85 ff 74 58 <80> 3b 00 74 46 4c 89 e6 48 89 df e8 58 61 f8 ff 48 8d 2c 03 80 7d
Sep  1 22:17:50 pcfr_hware_local_ip kernel: [366935.524185] reformime[1647438]: segfault at 0 ip 00007f0b9beeff28 sp 00007fff4ffd5850 error 4 in libc.so.6[7f0b9be76000+155000] likely on CPU 1 (core 1, socket 0)
Sep  1 22:17:50 pcfr_hware_local_ip kernel: [366935.524207] Code: eb e1 48 8d 15 31 96 13 00 e9 04 00 00 00 0f 1f 40 00 41 55 49 89 d5 41 54 49 89 f4 55 53 48 89 fb 48 83 ec 08 48 85 ff 74 58 <80> 3b 00 74 46 4c 89 e6 48 89 df e8 58 61 f8 ff 48 8d 2c 03 80 7d
Sep  1 22:18:44 pcfr_hware_local_ip kernel: [366989.796532] reformime[1647577]: segfault at 0 ip 00007fe8e14bef28 sp 00007ffc000e9040 error 4 in libc.so.6[7fe8e1445000+155000] likely on CPU 1 (core 1, socket 0)
Sep  1 22:18:44 pcfr_hware_local_ip kernel: [366989.796554] Code: eb e1 48 8d 15 31 96 13 00 e9 04 00 00 00 0f 1f 40 00 41 55 49 89 d5 41 54 49 89 f4 55 53 48 89 fb 48 83 ec 08 48 85 ff 74 58 <80> 3b 00 74 46 4c 89 e6 48 89 df e8 58 61 f8 ff 48 8d 2c 03 80 7d
Sep  1 22:20:08 pcfr_hware_local_ip kernel: [367072.889786] reformime[1647888]: segfault at 0 ip 00007efcaa6bef28 sp 00007ffdfe793560 error 4 in libc.so.6[7efcaa645000+155000] likely on CPU 1 (core 1, socket 0)
Sep  1 22:20:08 pcfr_hware_local_ip kernel: [367072.889809] Code: eb e1 48 8d 15 31 96 13 00 e9 04 00 00 00 0f 1f 40 00 41 55 49 89 d5 41 54 49 89 f4 55 53 48 89 fb 48 83 ec 08 48 85 ff 74 58 <80> 3b 00 74 46 4c 89 e6 48 89 df e8 58 61 f8 ff 48 8d 2c 03 80 7d
Sep  1 22:21:14 pcfr_hware_local_ip kernel: [367139.010116] reformime[1648048]: segfault at 0 ip 00007fea608bef28 sp 00007fff3c8d4bc0 error 4 in libc.so.6[7fea60845000+155000] likely on CPU 1 (core 1, socket 0)
Sep  1 22:21:14 pcfr_hware_local_ip kernel: [367139.010139] Code: eb e1 48 8d 15 31 96 13 00 e9 04 00 00 00 0f 1f 40 00 41 55 49 89 d5 41 54 49 89 f4 55 53 48 89 fb 48 83 ec 08 48 85 ff 74 58 <80> 3b 00 74 46 4c 89 e6 48 89 df e8 58 61 f8 ff 48 8d 2c 03 80 7d
Sep  1 22:22:43 pcfr_hware_local_ip rsyslogd: — MARK —

To debug more concretely what exactly was happening with reformime and why it was crashing with the libc segfault error, I've used the journalctl log with this cmd:

# journalctl -p 3 -xb

сеп 01 22:10:27 pcfrxen qmail-scanner-queue.pl[2170438]: X-Qmail-Scanner-2.10st:[pcfrxen17252178278122170438] d_m: output spotted from /usr/bin/reformime  -x/var/spool/qscan/tmp/pcfrxen17252178278122170438/ (Segmentation fau>
                                                            ) – that shouldn't happen!
сеп 01 22:11:11 pcfrxen qmail-scanner-queue.pl[2170631]: X-Qmail-Scanner-2.10st:[pcfrxen17252178718122170631] d_m: output spotted from /usr/bin/reformime  -x/var/spool/qscan/tmp/pcfrxen17252178718122170631/ (Segmentation fau>
                                                            ) – that shouldn't happen!
сеп 01 22:15:32 pcfrxen qmail-scanner-queue.pl[2171777]: X-Qmail-Scanner-2.10st:[pcfrxen17252181328122171777] d_m: output spotted from /usr/bin/reformime  -x/var/spool/qscan/tmp/pcfrxen17252181328122171777/ (Segmentation fau>
                                                            ) – that shouldn't happen!
сеп 01 22:15:35 pcfrxen qmail-scanner-queue.pl[2171793]: X-Qmail-Scanner-2.10st:[pcfrxen17252181358122171793] d_m: output spotted from /usr/bin/reformime  -x/var/spool/qscan/tmp/pcfrxen17252181358122171793/ (Segmentation fau>
                                                            ) – that shouldn't happen!
сеп 01 22:21:21 pcfrxen qmail-scanner-queue.pl[2173427]: X-Qmail-Scanner-2.10st:[pcfrxen17252184788122173427] d_m: output spotted from /usr/bin/reformime  -x/var/spool/qscan/tmp/pcfrxen17252184788122173427/ (Segmentation fau>
                                                            ) – that shouldn't happen!


As you can see this showed that the problem is with reformime's passing on -x argument, and some temporary directory, thus to make sure the crash is not a cause of some mixed permissions, I've had to check the /var/spool/qscan permissions, and clamd permissions and few other permissions of the qmail install, and the wrong permissions (perhaps after the update of clamav after the Debian Linux migration was with /var/lib/clamav which was incorrectly owned by user clamav group clamav instead of the qscand / qscand user group, thus to resolve, I've run:

chown qscand:qscand /var/lib/clamav/ -R


Another thing I've had to correct was the /var/log/qmail permissions which was too permissive (perhaps due to some old install time hurry up stupidity done), so to correct, them:

# chmod 750 /var/log/qmail/


First thing i tried to resolve is of course to reinstall maildrop debian package that provides /usr/bin/reformime binary. 

root@pcfreak:/usr/local/bin# dpkg -l |grep -i maildrop
rc  courier-maildrop                      0.68.2-1                                                                   amd64        Courier mail server – mail delivery agent
ii  maildrop                              2.9.3-2.1                                                                  amd64        mail delivery agent with filtering abilities (set-GID=mail)

In an old post of mine on a similar error Fixing Qmail 451 qq temporary problem (#4.3.0) / @4000000050587780174c60dc status: qmail-todo stop processing asap / status: exiting, part of the solution was to reinstall maildrop, so tried this one:

root@pcfreak:/usr/local/bin# apt install –reinstall maildrop


Of course to try it out restarted qmail with the usual 

# qmailctl restart

Sadly enough this doesn't solve it, so I had to look up for other solutions and spend about 3 / 4 hours reading online just to convince myself that finding any meaningful in the classical human way, is becoming pretty much impossible task. As the content of information on the Internet has grown tremendously over the last years, it seems the quality of posts and commited data is exponentially detereorating. So the only way to solve crashes of binaries is either to stick to a debugger such as gdb or simply try rebuild the .deb binary from scratch and see whether a recompile from source might makes a difference.

After even more digging up online, found out some Gentoo forums threads, where people described thethe issue was also connected to the failing reformime libc use bug, with an applied C patch, found threads on Ubuntu and Debian users complaining about mysterious errors with libc with maildrop and even a bug report that this is some kind of libc bug, related to the precompiled version of maildrop shipped by default deb based repos.

Hence, My approach to resolve it was to recompile maildrop from source code, which even though looking a tedious task came with plenty of dependencies, I had to install plenty of developlment libraries and tools, compilers etc. as well as the following libs.

# apt install pcre2-utils
# apt install libpcre2-dev
# apt install libidn11
# apt install libidn2-dev
# apt install libcourier-unicode-dev
# apt install libcourier-unicode4

Then had to download and install from source the latest available versions of courier-authlib and its dependencies courier-unicode and once having those two recompiled with

# links https://sourceforge.net/projects/courier/files/courier/1.3.12/courier-1.3.12.tar.bz2/download
# links https://sourceforge.net/projects/courier/files/maildrop/3.1.8/maildrop-3.1.8.tar.bz2/download
# links https://sourceforge.net/projects/courier/files/authlib/0.72.3/courier-authlib-0.72.3.tar.bz2/download
# links https://sourceforge.net/projects/courier/files/courier-unicode/2.3.1/courier-unicode-2.3.1.tar.bz2/download

# tar -jxvf courier-unicode-2.3.1.tar.bz2
# tar -jxvvf courier-authlib-0.72.3.tar.bz2
# tar -jxvvf maildrop-3.1.8.tar.bz2

# cd courier-unicode-2.0/
# ./configure && make && make install

# cd ..
# cd courier-authlib-0.72.3
​# ./configure && make && make install
# cd ..

# cd maildrop-3.1.8/
​# ./configure && make && make install

I've took the time to also preinstall a bunch of perl modules deb packages which rawly are the ones found in file, i've built with the binaries perl-modules-for-qmail-needed.txt

To reinstall the binaries, run a small shell loop:

# for i in $(cat perl-modules-for-qmail-needed.txt); do apt install –reinstall $i –yes; done


Have to say also identified an issue with /var/qmail/bin/qmail-scanner-queue.pl with qmail-inject failing after testing qmail-scanner-queue installation with:

# /downloads/qmail-scanner-2.11st/contrib/test_installation.sh -doit
 

# ./test_installation.sh -doit

Sending standard test message – no viruses… 1/4
qmail-inject: fatal: qq temporary problem (#4.3.0)
Bad error. qmail-inject died


Anyone who ever administrated Qmail Mail server knows pretty well, about the Terrible error:

qmail-inject: fatal: qq temporary problem (#4.3.0)


and that it could be mostly anything, thus anyways to find out what might be the cause I've continued to Debug.

# ldd qmail-inject
        linux-vdso.so.1 (0x00007ffc43f5a000)
        libc.so.6 => /lib/x86_64-linux-gnu/libc.so.6 (0x00007fcc2099b000)
        /lib64/ld-linux-x86-64.so.2 (0x00007fcc20ba1000)


To succed debug the QMAIL issues with qmail I found as very useful something from another old post of mine on debugging qmail errors – Testing Qmail installation for problems: Common reasons for unworking qmail / How to debug Qmail mail server failing to delivery or send emails, the following log debug loop:

# for i in $(ls -d /var/log/qmail/*qmail*/); do tail -n 10 $i/current|tai64nlocal; sleep 5; done


Finally the last step resolve the qmail-inject error, was to modify /var/qmail/bin/qmail-scanner-queue.pl and exchange PATH of /usr/bin/reformime default shipped debian repository to new custom built /usr/local/bin/reformime.


After retesting the qmail-scanner installation all seemed fine onwards:
 

# /downloads/qmail-scanner-2.11st/contrib/test_installation.sh -doit

Sending standard test message – no viruses… 1/4
done!

Sending eicar test virus – should be caught by perlscanner module… 2/4
done!

Sending eicar test virus with altered filename – should only be caught by commercial anti-virus modules (if you have any)… 3/4
done!

Sending bad spam message for anti-spam testing – In case you are using SpamAssassin… 4/4


If you have enabled $sa_quarantine, $sa_delete or $sa_reject the
spam-message wont't arrive to the recipients. But if you have enabled
(good idea!) 'debug' you should check
/var/spool/qscan/qmail-queue.log (or where ever you have the log).


        Done!

Finished test. Now go and check Email sent to postmaster@mail.pc-freak.net and/or the log..

Thibs Qmail install qmr_inst_check script also reported my server qmail install scripts as in good state:
 

# /downloads/scripts/qmr_inst_check
! vpopmail database do not exist!

So Hip Hip Hooray my Qmails works again ! Me fixed it again ! 
if you need help with fixing your company Professional Mail QMAIL server or Postfix, contact me via the contact form. Enjoy


DNS Monitoring: Check and Alert if DNS nameserver resolver of Linux machine is not properly resolving shell script. Monitor if /etc/resolv.conf DNS runs Okay

Thursday, March 14th, 2024

linux-monitor-check-dns-is-resolving-fine

If you happen to have issues occasionally with DNS resolvers and you want to keep up an eye on it and alert if DNS is not properly resolving Domains, because sometimes you seem to have issues due to network disconnects, disturbances (modifications), whatever and you want to have another mean to see whether a DNS was reachable or unreachable for a time, here is a little bash shell script that does the "trick".

Script work mechacnism is pretty straight forward as you can see we check what are the configured nameservers if they properly resolve and if they're properly resolving we write to log everything is okay, otherwise we write to the log DNS is not properly resolvable and send an ALERT email to preconfigured Email address.

Below is the check_dns_resolver.sh script:


#!/bin/bash
# Simple script to Monitor DNS set resolvers hosts for availability and trigger alarm  via preset email if any of the nameservers on the host cannot resolve
# Use a configured RESOLVE_HOST to try to resolve it via available configured nameservers in /etc/resolv.conf
# if machines are not reachable send notification email to a preconfigured email
# script returns OK 1 if working correctly or 0 if there is issue with resolving $RESOLVE_HOST on $SELF_HOSTNAME and mail on $ALERT_EMAIL
# output of script is to be kept inside DNS_status.log

ALERT_EMAIL='your.email.address@email-fqdn.com';
log=/var/log/dns_status.log;
TIMEOUT=3; DNS=($(grep -R nameserver /etc/resolv.conf | cut -d ' ' -f2));  

SELF_HOSTNAME=$(hostname –fqdn);
RESOLVE_HOST=$(hostname –fqdn);

for i in ${DNS[@]}; do dns_status=$(timeout $TIMEOUT nslookup $RESOLVE_HOST  $i); 

if [[ “$?” == ‘0’ ]]; then echo "$(date "+%y.%m.%d %T") $RESOLVE_HOST $i on host $SELF_HOST OK 1" | tee -a $log; 
else 
echo "$(date "+%y.%m.%d %T")$RESOLVE_HOST $i on host $SELF_HOST NOT_OK 0" | tee -a $log; 

echo "$(date "+%y.%m.%d %T") $RESOLVE_HOST $i DNS on host $SELF_HOST resolve ERROR" | mail -s "$RESOLVE_HOST /etc/resolv.conf $i DNS on host $SELF_HOST resolve ERROR";

fi

 done

Download check_dns_resolver.sh here set the script to run via a cron job every lets say 5 minutes, for example you can set a cronjob like this:
 

# crontab -u root -e
*/5 * * * *  check_dns_resolver.sh 2>&1 >/dev/null


Then Voila, check the log /var/log/dns_status.log if you happen to run inside a service downtime and check its output with the rest of infrastructure componets, network switch equipment, other connected services etc, that should keep you in-line to proof during eventual RCA (Root Cause Analysis) if complete high availability system gets down to proof your managed Linux servers was not the reason for the occuring service unavailability.

A simplified variant of the check_dns_resolver.sh can be easily integrated to do Monitoring with Zabbix userparameter script and DNS Check Template containing few Triggers, Items and Action if I have time some time in the future perhaps, I'll blog a short article on how to configure such DNS zabbix monitoring, the script zabbix variant of the DNS monitor script is like this:

[root@linux-server bin]# cat check_dns_resolver.sh 
#!/bin/bash
TIMEOUT=3; DNS=($(grep -R nameserver /etc/resolv.conf | cut -d ' ' -f2));  for i in ${DNS[@]}; do dns_status=$(timeout $TIMEOUT nslookup $(hostname –fqdn) $i); if [[ “$?” == ‘0’ ]]; then echo "$i OK 1"; else echo "$i NOT OK 0"; fi; done

[root@linux-server bin]#


Hope this article, will help someone to improve his Unix server Infrastucture monitoring.

Enjoy and Cheers !

How to count number of ESTABLISHED state TCP connections to a Windows server

Wednesday, March 13th, 2024

count-netstat-established-connections-on-windows-server-howto-windows-logo-debug-network-issues-windows

Even if you have the background of a Linux system administrator, sooner or later you will have have to deal with some Windows hosts, thus i'll blog in this article shortly on how the established TCP if it happens you will have to administarte a Windows hosts or help a windows sysadmin noobie 🙂

In Linux it is pretty easy to check the number of established conenctions, because of the wonderful command wc (word count). with a simple command like:
 

$ netstat -etna |wc -l


Then you will get the number of active TCP connections to the machine and based on that you can get an idea on how busy the server is.

But what if you have to deal with lets say a Microsoft Windows 2012 /2019 / 2020 or 2022 Server, assuming you logged in as Administrator and you see the machine is quite loaded and runs multiple Native Windows Administrator common services such as IIS / Active directory Failover Clustering, Proxy server etc.
How can you identify the established number of connections via a simple command in cmd.exe?

1.Count ESTABLISHED TCP connections from Windows Command Line

Here is the answer, simply use netstat native windows command and combine it with find, like that and use the /i (ignores the case of characters when searching the string) /c (count lines containing the string) options

C:\Windows\system32>netstat -p TCP -n|  find /i "ESTABLISHED" /c
1268

Voila, here are number of established connections, only 1268 that is relatively low.
However if you manage Windows servers, and you get some kind of hang ups as part of the monitoring, it is a good idea to setup a script based on this simple command for at least Windows Task Scheduler (the equivallent of Linux's crond service) to log for Peaks in Established connections to see whether Server crashes are not related to High Rise in established connections.
Even better if company uses Zabbix / Nagios, OpenNMS or other  old legacy monitoring stuff like Joschyd even as of today 2024 used in some big of the TOP IT companies such as SAP (they were still using it about 4 years ago for their SAP HANA Cloud), you can set the script to run and do a Monitoring template or Alerting rules to draw you graphs and Trigger Alerts if your connections hits a peak, then you at least might know your Windows server is under a "Hackers" Denial of Service attack or there is something happening on the network, like Cisco Network Infrastructure Switch flappings or whatever.

Perhaps an example script you can use if you decide to implement the little nestat established connection checks Monitoring in Zabbix is the one i've writen about in the previous article "Calculate established connection from IP address with shell script and log to zabbix graphic".

2. Few Useful netstat options for the Windows system admin
 

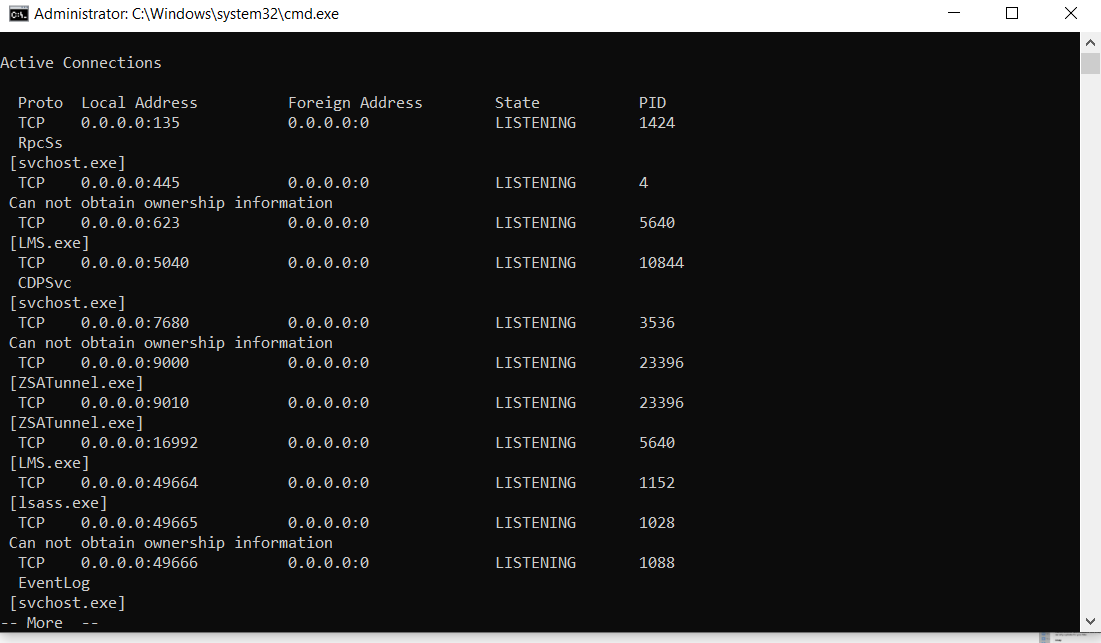
C:\Windows\System32> netstat -bona


netstat-useful-arguments-for-the-windows-system-administrator

Cmd.exe will lists executable files, local and external IP addresses and ports, and the state in list form. You immediately see which programs have created connections or are listening so that you can find offenders quickly.

b – displays the executable involved in  creating the connection.
o – displays the owning process ID.
n – displays address and port numbers.
a – displays all connections and listening ports.

As you can see in the screenshot, by using netstat -bona you get which process has binded to which local address and the Process ID PID of it, that is pretty useful in debugging stuff.

3. Use a Third Party GUI tool to debug more interactively connection issues

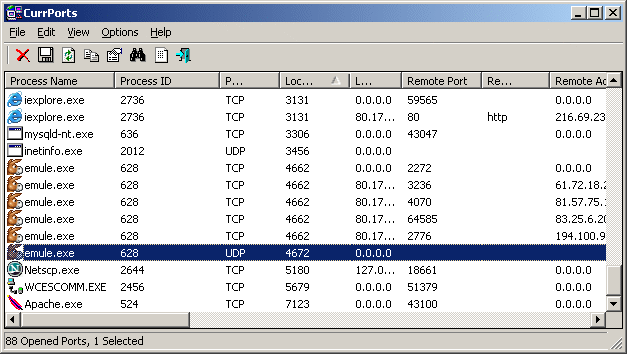
If you need to keep an eye in interactive mode, sometimes if there are issues CurrPorts tool can be of a great help

currports-windows-network-connections-diagnosis-cports

CurrPorts Tool own Description

CurrPorts is network monitoring software that displays the list of all currently opened TCP/IP and UDP ports on your local computer. For each port in the list, information about the process that opened the port is also displayed, including the process name, full path of the process, version information of the process (product name, file description, and so on), the time that the process was created, and the user that created it.
In addition, CurrPorts allows you to close unwanted TCP connections, kill the process that opened the ports, and save the TCP/UDP ports information to HTML file , XML file, or to tab-delimited text file.
CurrPorts also automatically mark with pink color suspicious TCP/UDP ports owned by unidentified applications (Applications without version information and icons).

Sum it up

What we learned is how to calculate number of established TCP connections from command line, useful for scripting, how you can use netstat to display the process ID and Process name that relates to a used Local / Remote TCP connections, and how eventually you can use this to connect it to some monitoring tool to periodically report High Peaks with TCP established connections (usually an indicator of servere system issues).
 

Webserver farm behind Load Balancer Proxy or how to preserve incoming internet IP to local net IP Apache webservers by adding additional haproxy header with remoteip

Monday, April 18th, 2022

logo-haproxy-apache-remoteip-configure-and-check-to-have-logged-real-ip-address-inside-apache-forwarded-from-load-balancer

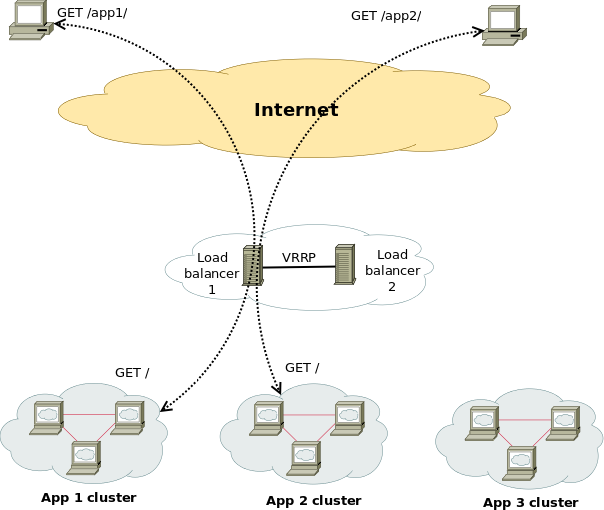
Having a Proxy server for Load Balancing is a common solutions to assure High Availability of Web Application service behind a proxy.
You can have for example 1 Apache HTTPD webservers serving traffic Actively on one Location (i.e. one city or Country) and 3 configured in the F5 LB or haproxy to silently keep up and wait for incoming connections as an (Active Failure) Backup solution

Lets say the Webservers usually are set to have local class C IPs as 192.168.0.XXX or 10.10.10.XXX and living in isolated DMZed well firewalled LAN network and Haproxy is configured to receive traffic via a Internet IP 109.104.212.13 address and send the traffic in mode tcp via a NATTed connection (e.g. due to the network address translation the source IP of the incoming connections from Intenet clients appears as the NATTed IP 192.168.1.50.

The result is that all incoming connections from haproxy -> webservers will be logged in Webservers /var/log/apache2/access.log wrongly as incoming from source IP: 192.168.1.50, meaning all the information on the source Internet Real IP gets lost.
load-balancer-high-availailibility-haproxy-apache
 

How to pass Real (Internet) Source IPs from Haproxy "mode tcp" to Local LAN Webservers  ?
 

Usually the normal way to work around this with Apache Reverse Proxies configured is to use HTTP_X_FORWARDED_FOR variable in haproxy when using HTTP traffic application that is proxied (.e.g haproxy.cfg has mode http configured), you have to add to listen listener_name directive or frontend Frontend_of_proxy

option forwardfor
option http-server-close

However unfortunately, IP Header preservation with X_FORWADED_FOR  HTTP-Header is not possible when haproxy is configured to forward traffic using mode tcp.

Thus when you're forced to use mode tcp to completely pass any traffic incoming to Haproxy from itself to End side, the solution is to
 

  • Use mod_remoteip infamous module that is part of standard Apache installs both on apache2 installed from (.deb) package  or httpd rpm (on redhats / centos).


1. Configure Haproxies to send received connects as send-proxy traffic


The idea is very simple all the received requests from outside clients to Haproxy are to be send via the haproxy to the webserver in a PROXY protocol string, this is done via send-proxy

             send-proxy  – send a PROXY protocol string

Rawly my current /etc/haproxy/haproxy.cfg looks like this:
 

global
        log /dev/log    local0
        log /dev/log    local1 notice
        chroot /var/lib/haproxy
        user haproxy
        group haproxy
        daemon
        maxconn 99999
        nbproc          1
        nbthread 2
        cpu-map         1 0
        cpu-map         2 1


defaults
        log     global
       mode    tcp


        timeout connect 5000
        timeout connect 30s
        timeout server 10s

    timeout queue 5s
    timeout tunnel 2m
    timeout client-fin 1s
    timeout server-fin 1s

                option forwardfor

    retries                 15


frontend http-in
                mode tcp

                option tcplog
        log global

                option logasap
                option forwardfor
                bind 109.104.212.130:80
    fullconn 20000
default_backend http-websrv
backend http-websrv
        balance source
                maxconn 3000

stick match src
    stick-table type ip size 200k expire 30m
        stick on src


        server ha1server-1 192.168.0.205:80 check send-proxy weight 254 backup
        server ha1server-2 192.168.1.15:80 check send-proxy weight 255
        server ha1server-3 192.168.2.30:80 check send-proxy weight 252 backup
        server ha1server-4 192.168.1.198:80 check send-proxy weight 253 backup
                server ha1server-5 192.168.0.1:80 maxconn 3000 check send-proxy weight 251 backup


frontend https-in
                mode tcp

                option tcplog
                log global

                option logasap
                option forwardfor
        maxconn 99999
           bind 109.104.212.130:443
        default_backend https-websrv
                backend https-websrv
        balance source
                maxconn 3000
        stick on src
    stick-table type ip size 200k expire 30m


                server ha1server-1 192.168.0.205:443 maxconn 8000 check send-proxy weight 254 backup
                server ha1server-2 192.168.1.15:443 maxconn 10000 check send-proxy weight 255
        server ha1server-3 192.168.2.30:443 maxconn 8000 check send-proxy weight 252 backup
        server ha1server-4 192.168.1.198:443 maxconn 10000 check send-proxy weight 253 backup
                server ha1server-5 192.168.0.1:443 maxconn 3000 check send-proxy weight 251 backup

listen stats
    mode http
    option httplog
    option http-server-close
    maxconn 10
    stats enable
    stats show-legends
    stats refresh 5s
    stats realm Haproxy\ Statistics
    stats admin if TRUE


After preparing your haproxy.cfg and reloading haproxy in /var/log/haproxy.log you should have the Real Source IPs logged in:
 

root@webserver:~# tail -n 10 /var/log/haproxy.log
Apr 15 22:47:34 pcfr_hware_local_ip haproxy[2914]: 159.223.65.16:58735 [15/Apr/2022:22:47:34.586] https-in https-websrv/ha1server-2 1/0/+0 +0 — 7/7/7/7/0 0/0
Apr 15 22:47:34 pcfr_hware_local_ip haproxy[2914]: 20.113.133.8:56405 [15/Apr/2022:22:47:34.744] https-in https-websrv/ha1server-2 1/0/+0 +0 — 7/7/7/7/0 0/0
Apr 15 22:47:35 pcfr_hware_local_ip haproxy[2914]: 54.36.148.248:15653 [15/Apr/2022:22:47:35.057] https-in https-websrv/ha1server-2 1/0/+0 +0 — 7/7/7/7/0 0/0
Apr 15 22:47:35 pcfr_hware_local_ip haproxy[2914]: 185.191.171.35:26564 [15/Apr/2022:22:47:35.071] https-in https-websrv/ha1server-2 1/0/+0 +0 — 8/8/8/8/0 0/0
Apr 15 22:47:35 pcfr_hware_local_ip haproxy[2914]: 213.183.53.58:42984 [15/Apr/2022:22:47:35.669] https-in https-websrv/ha1server-2 1/0/+0 +0 — 6/6/6/6/0 0/0
Apr 15 22:47:35 pcfr_hware_local_ip haproxy[2914]: 159.223.65.16:54006 [15/Apr/2022:22:47:35.703] https-in https-websrv/ha1server-2 1/0/+0 +0 — 7/7/7/7/0 0/0
Apr 15 22:47:36 pcfr_hware_local_ip haproxy[2914]: 192.241.113.203:30877 [15/Apr/2022:22:47:36.651] https-in https-websrv/ha1server-2 1/0/+0 +0 — 4/4/4/4/0 0/0
Apr 15 22:47:36 pcfr_hware_local_ip haproxy[2914]: 185.191.171.9:6776 [15/Apr/2022:22:47:36.683] https-in https-websrv/ha1server-2 1/0/+0 +0 — 5/5/5/5/0 0/0
Apr 15 22:47:36 pcfr_hware_local_ip haproxy[2914]: 159.223.65.16:64310 [15/Apr/2022:22:47:36.797] https-in https-websrv/ha1server-2 1/0/+0 +0 — 6/6/6/6/0 0/0
Apr 15 22:47:36 pcfr_hware_local_ip haproxy[2914]: 185.191.171.3:23364 [15/Apr/2022:22:47:36.834] https-in https-websrv/ha1server-2 1/1/+1 +0 — 7/7/7/7/0 0/0


2. Enable remoteip proxy protocol on Webservers

Login to each Apache HTTPD and to enable remoteip module run:
 

# a2enmod remoteip


On Debians, the command should produce a right symlink to mods-enabled/ directory
 

# ls -al /etc/apache2/mods-enabled/*remote*
lrwxrwxrwx 1 root root 31 Mar 30  2021 /etc/apache2/mods-enabled/remoteip.load -> ../mods-available/remoteip.load


3. Modify remoteip.conf file and allow IPs of haproxies or F5s


Configure RemoteIPTrustedProxy for every Source IP of haproxy to allow it to send X-Forwarded-For header to Apache,

Here are few examples, from my apache working config on Debian 11.2 (Bullseye):
 

webserver:~# cat remoteip.conf
RemoteIPHeader X-Forwarded-For
RemoteIPTrustedProxy 192.168.0.1
RemoteIPTrustedProxy 192.168.0.205
RemoteIPTrustedProxy 192.168.1.15
RemoteIPTrustedProxy 192.168.0.198
RemoteIPTrustedProxy 192.168.2.33
RemoteIPTrustedProxy 192.168.2.30
RemoteIPTrustedProxy 192.168.0.215
#RemoteIPTrustedProxy 51.89.232.41

On RedHat / Fedora other RPM based Linux distrubutions, you can do the same by including inside httpd.conf or virtualhost configuration something like:
 

<IfModule remoteip_module>
      RemoteIPHeader X-Forwarded-For
      RemoteIPInternalProxy 192.168.0.0/16
      RemoteIPTrustedProxy 192.168.0.215/32
</IfModule>


4. Enable RemoteIP Proxy Protocol in apache2.conf / httpd.conf or Virtualhost custom config
 

Modify both haproxy / haproxies config as well as enable the RemoteIP module on Apache webservers (VirtualHosts if such used) and either in <VirtualHost> block or in main http config include:

RemoteIPProxyProtocol On


5. Change default configured Apache LogFormat

In Domain Vhost or apache2.conf / httpd.conf

Default logging Format will be something like:
 

LogFormat "%h %l %u %t \"%r\" %>s %O \"%{Referer}i\" \"%{User-Agent}i\"" combined


or
 

LogFormat "%v:%p %h %l %u %t \"%r\" %>s %O \"%{Referer}i\" \"%{User-Agent}i\"" combined


Once you find it in /etc/apache2/apache2.conf / httpd.conf or Vhost, you have to comment out this by adding shebang infont of sentence make it look as follows:
 

LogFormat "%v:%p %a %l %u %t \"%r\" %>s %O \"%{Referer}i\" \"%{User-Agent}i\"" vhost_combined
LogFormat "%a %l %u %t \"%r\" %>s %O \"%{Referer}i\" \"%{User-Agent}i\"" combined
LogFormat "%a %l %u %t \"%r\" %>s %O" common
LogFormat "%{Referer}i -> %U" referer
LogFormat "%{User-agent}i" agent


The Changed LogFormat instructs Apache to log the client IP as recorded by mod_remoteip (%a) rather than hostname (%h). For a full explanation of all the options check the official HTTP Server documentation page apache_mod_config on Custom Log Formats.

and reload each Apache server.

on Debian:

# apache2ctl -k reload

On CentOS

# systemctl restart httpd


6. Check proxy protocol is properly enabled on Apaches


remoteip module will enable Apache to expect a proxy connect header passed to it otherwise it will respond with Bad Request, because it will detect a plain HTML request instead of Proxy Protocol CONNECT, here is the usual telnet test to fetch the index.htm page.

root@webserver:~# telnet localhost 80
Trying 127.0.0.1…
Connected to localhost.
Escape character is '^]'.
GET / HTTP/1.1

HTTP/1.1 400 Bad Request
Date: Fri, 15 Apr 2022 19:04:51 GMT
Server: Apache/2.4.51 (Debian)
Content-Length: 312
Connection: close
Content-Type: text/html; charset=iso-8859-1

<!DOCTYPE HTML PUBLIC "-//IETF//DTD HTML 2.0//EN">
<html><head>
<title>400 Bad Request</title>
</head><body>
<h1>Bad Request</h1>
<p>Your browser sent a request that this server could not understand.<br />
</p>
<hr>
<address>Apache/2.4.51 (Debian) Server at grafana.pc-freak.net Port 80</address>
</body></html>
Connection closed by foreign host.


root@webserver:~# telnet localhost 80
Trying 127.0.0.1…
Connected to localhost.
Escape character is '^]'.
HEAD / HTTP/1.1

HTTP/1.1 400 Bad Request
Date: Fri, 15 Apr 2022 19:05:07 GMT
Server: Apache/2.4.51 (Debian)
Connection: close
Content-Type: text/html; charset=iso-8859-1

Connection closed by foreign host.


To test it with telnet you can follow the Proxy CONNECT syntax and simulate you're connecting from a proxy server, like that:
 

root@webserver:~# telnet localhost 80
Trying 127.0.0.1…
Connected to localhost.
Escape character is '^]'.
CONNECT localhost:80 HTTP/1.0

HTTP/1.1 301 Moved Permanently
Date: Fri, 15 Apr 2022 19:13:38 GMT
Server: Apache/2.4.51 (Debian)
Location: https://zabbix.pc-freak.net
Cache-Control: max-age=900
Expires: Fri, 15 Apr 2022 19:28:38 GMT
Content-Length: 310
Connection: close
Content-Type: text/html; charset=iso-8859-1

<!DOCTYPE HTML PUBLIC "-//IETF//DTD HTML 2.0//EN">
<html><head>
<title>301 Moved Permanently</title>
</head><body>
<h1>Moved Permanently</h1>
<p>The document has moved <a href="https://zabbix.pc-freak.net">here</a>.</p>
<hr>
<address>Apache/2.4.51 (Debian) Server at localhost Port 80</address>
</body></html>
Connection closed by foreign host.

You can test with curl simulating the proxy protocol CONNECT with:

root@webserver:~# curl –insecure –haproxy-protocol https://192.168.2.30

<!DOCTYPE HTML PUBLIC "-//W3C//DTD HTML 4.01 Transitional//EN"
"http://w3.org/TR/html4/loose.dtd">
<html>
<head>
<meta name="generator" content="pc-freak.net tidy">
<script src="https://ssl.google-analytics.com/urchin.js" type="text/javascript">
</script>
<script type="text/javascript">
_uacct = "UA-2102595-3";
urchinTracker();
</script>
<script type="text/javascript">
var gaJsHost = (("https:" == document.location.protocol) ? "https://ssl." : "http://");
document.write(unescape("%3Cscript src='" + gaJsHost + "google-analytics.com/ga.js' type='text/javascript'%3E%3C/script%3E"));
</script>
<script type="text/javascript">
try {
var pageTracker = _gat._getTracker("UA-2102595-6");
pageTracker._trackPageview();
} catch(err) {}
</script>


      –haproxy-protocol
              (HTTP) Send a HAProxy PROXY protocol v1 header at the beginning of the connection. This is used by some load balancers and reverse proxies
              to indicate the client's true IP address and port.

              This option is primarily useful when sending test requests to a service that expects this header.

              Added in 7.60.0.


7. Check apache log if remote Real Internet Source IPs are properly logged
 

root@webserver:~# tail -n 10 /var/log/apache2/access.log

213.183.53.58 – – [15/Apr/2022:22:18:59 +0300] "GET /proxy/browse.php?u=https%3A%2F%2Fsteamcommunity.com%2Fmarket%2Fitemordershistogram%3Fcountry HTTP/1.1" 200 12701 "https://www.pc-freak.net" "Mozilla/5.0 (Windows NT 10.0; Win64; x64; rv:98.0) Gecko/20100101 Firefox/98.0"
88.198.48.184 – – [15/Apr/2022:22:18:58 +0300] "GET /blog/iq-world-rank-country-smartest-nations/?cid=1330192 HTTP/1.1" 200 29574 "-" "Mozilla/5.0 (compatible; DataForSeoBot/1.0; +https://dataforseo.com/dataforseo-bot)"
213.183.53.58 – – [15/Apr/2022:22:19:00 +0300] "GET /proxy/browse.php?u=https%3A%2F%2Fsteamcommunity.com%2Fmarket%2Fitemordershistogram%3Fcountry
HTTP/1.1" 200 9080 "https://www.pc-freak.net" "Mozilla/5.0 (Windows NT 10.0; Win64; x64; rv:98.0) Gecko/20100101 Firefox/98.0"
159.223.65.16 – – [15/Apr/2022:22:19:01 +0300] "POST //blog//xmlrpc.php HTTP/1.1" 200 5477 "-" "Mozilla/5.0 (Windows NT 10.0; Win64; x64) AppleWebKit/537.36 (KHTML, like Gecko) Chrome/89.0.4389.114 Safari/537.36"
159.223.65.16 – – [15/Apr/2022:22:19:02 +0300] "POST //blog//xmlrpc.php HTTP/1.1" 200 5477 "-" "Mozilla/5.0 (Windows NT 10.0; Win64; x64) AppleWebKit/537.36 (KHTML, like Gecko) Chrome/89.0.4389.114 Safari/537.36"
213.91.190.233 – – [15/Apr/2022:22:19:02 +0300] "POST /blog/wp-admin/admin-ajax.php HTTP/1.1" 200 1243 "https://www.pc-freak.net/blog/wp-admin/post.php?post=16754&action=edit" "Mozilla/5.0 (Windows NT 6.1; Win64; x64; rv:89.0) Gecko/20100101 Firefox/89.0"
46.10.215.119 – – [15/Apr/2022:22:19:02 +0300] "GET /images/saint-Paul-and-Peter-holy-icon.jpg HTTP/1.1" 200 134501 "https://www.google.com/" "Mozilla/5.0 (Windows NT 10.0; Win64; x64) AppleWebKit/537.36 (KHTML, like Gecko) Chrome/100.0.4896.75 Safari/537.36 Edg/100.0.1185.39"
185.191.171.42 – – [15/Apr/2022:22:19:03 +0300] "GET /index.html.latest/tutorials/tutorials/penguins/vestnik/penguins/faith/vestnik/ HTTP/1.1" 200 11684 "-" "Mozilla/5.0 (compatible; SemrushBot/7~bl; +http://www.semrush.com/bot.html)"

116.179.37.243 – – [15/Apr/2022:22:19:50 +0300] "GET /blog/wp-content/cookieconsent.min.js HTTP/1.1" 200 7625 "https://www.pc-freak.net/blog/how-to-disable-nginx-static-requests-access-log-logging/" "Mozilla/5.0 (compatible; Baiduspider-render/2.0; +http://www.baidu.com/search/spider.html)"
116.179.37.237 – – [15/Apr/2022:22:19:50 +0300] "GET /blog/wp-content/plugins/google-analytics-dashboard-for-wp/assets/js/frontend-gtag.min.js?ver=7.5.0 HTTP/1.1" 200 8898 "https://www.pc-freak.net/blog/how-to-disable-nginx-static-requests-access-log-logging/" "Mozilla/5.0 (compatible; Baiduspider-render/2.0; +http://www.baidu.com/search/spider.html)"


You see from above output remote Source IPs in green are properly logged, so haproxy Cluster is correctly forwarding connections passing on in the Haproxy generated Initial header the Real IP of its remote connect IPs.


Sum it up, What was done?


HTTP_X_FORWARD_FOR is impossible to set, when haproxy is used on mode tcp and all traffic is sent as received from TCP IPv4 / IPv6 Network stack, e.g. modifying any HTTP sent traffic inside the headers is not possible as this might break up the data.

Thus Haproxy was configured to send all its received data by sending initial proxy header with the X_FORWARDED usual Source IP data, then remoteip Apache module was used to make Apache receive and understand haproxy sent Header which contains the original Source IP via the send-proxy functionality and example was given on how to test the remoteip on Webserver is working correctly.

Finally you've seen how to check configured haproxy and webserver are able to send and receive the End Client data with the originator real source IP correctly and those Internet IP is properly logged inside both haproxy and apaches.

Improve wordpress admin password encryption authentication keys security with WordPress Unique Authentication Keys and Salts

Friday, October 9th, 2020

wordpress-improve-security-logo-linux

Having a wordpress blog or website with an admistrator and access via a Secured SSL channel is common nowadays. However there are plenty of SSL encryption leaks already out there and many of which are either slow to be patched or the hosting companies does not care enough to patch on time the libssl Linux libraries / webserver level. Taking that in consideration many websites hosted on some unmaintained one-time run not-frequently updated Linux servers are still vulneable and it might happen that, if you paid for some shared hosting in the past and someone else besides you hosted the website and forget you even your wordpress installation is still living on one of this SSL vulnerable hosts. In situations like that malicious hackers could break up the SSL security up to some level or even if the SSL is secured use MITM (MAN IN THE MIDDLE) attack to simulate your well secured and trusted SSID Name WIFi network to  redirects the network traffic you use (via an SSL transparent Proxy) to connect to WordPress Administrator Dashbiard via https://your-domain.com/wp-admin. Once your traffic is going through the malicious hax0r even if you haven't used the password to authenticate every time, e.g. you have saved the password in browser and WordPress Admin Panel authentication is achieved via a Cookie the cookies generated and used one time by Woddpress site could be easily stealed one time and later from the vicious 1337 h4x0r and reverse the hash with an interceptor Tool and login to your wordpress …

Therefore to improve the wordpress site security it very important to have configured WordPress Unique Authentication Keys and Salts (known also as the WordPress security keys).

They're used by WordPress installation to have a uniquely generated different key and Salt from the default one to the opened WordPress Blog / Site Admin session every time.

So what are the Authentication Unique Keys and Salts and why they are Used?

Like with almost any other web application, when PHP session is opened to WordPress, the code creates a number of Cookies stored locally on your computer.

Two of the cookies created are called:

 wordpress_[hash]
wordpress_logged_in_[hash]

First  cookie is used only in the admin pages (WordPress dashboard), while the second cookie is used throughout WordPress to determine if you are logged in to WordPress or not. Note: [hash] is a random hashed value typically assigned to your session, therefore in reality the cookies name would be named something like wordpress_ffc02f68bc9926448e9222893b6c29a9.

WordPress session stores your authentication details (i.e. WordPress username and password) in both of the above mentioned cookies.

The authentication details are hashed, hence it is almost impossible for anyone to reverse the hash and guess your password through a cookie should it be stolen. By almost impossible it also means that with today’s computers it is practically unfeasible to do so.

WordPress security keys are made up of four authentication keys and four hashing salts (random generated data) that when used together they add an extra layer to your cookies and passwords. 

The authentication details in these cookies are hashed using the random pattern specified in the WordPress security keys. I will not get into too much details but as you might have heard in Cryptography Salts and Keys are important – an indepth explanation on Salts Cryptography (here). A good reading for those who want to know more on how does the authentication based and salts work is on stackexchange.

How to Set up Salt and Key Authentication on WordPress
 

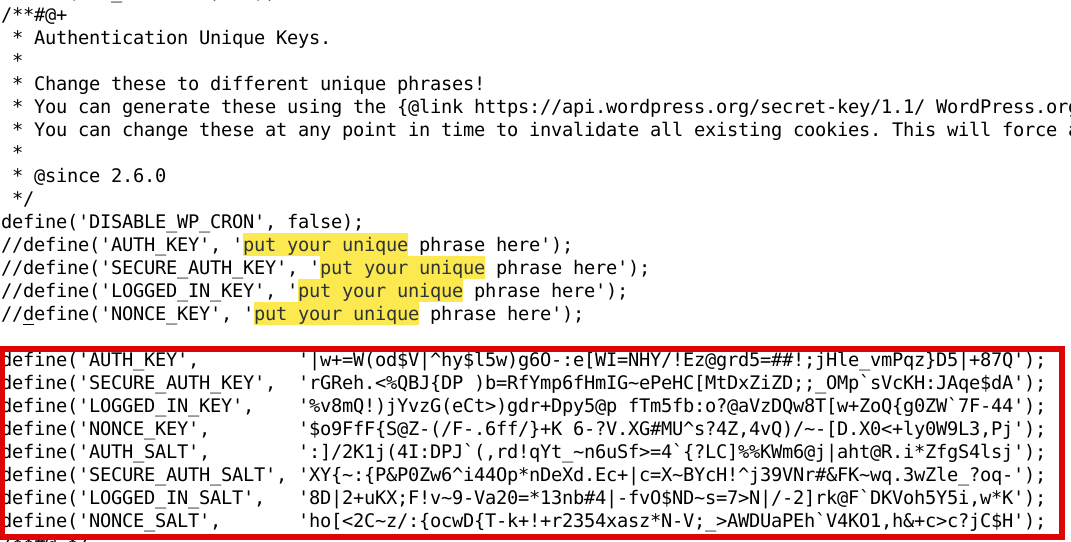
To be used by WP Salts and Key should be configured under wp-config.php usually they look like so:

wordpress-website-blog-salts-keys-wp-config-screenshot-linux

!!! Note !!!  that generating (manually or generated via a random generator program), the definition strings you have to use a random string value of more than 60 characters to prevent predictability 

The default on any newly installed WordPress Website is to have the 4 definitions with _KEY and the four _SALTs to be unconfigured strings looks something like:

default-WordPress-security-keys-and-salts-entries-in-wordPress-wp-config-php-file

Most people never ever take a look at wp-config.php as only the Web GUI Is used for any maintainance, tasks so there is a great chance that if you never heard specifically by some WordPress Security Expert forum or some Security plugin (such as WP Titan Anti Spam & Security) installed to report the WP KEY / SALT you might have never noticed it in the config.

There are 8 WordPress security keys in current WP Installs, but not all of them have been introduced at the same time.
Historically they were introduced in WP versions in below order:

WordPress 2.6: AUTH_KEY, SECURE_AUTH_KEY, LOGGED_IN_KEY
WordPress 2.7: NONCE_KEY
WordPress 3.0: AUTH_SALT, SECURE_AUTH_SALT, LOGGED_IN_SALT, NONCE_SALT

Setting a custom random generated values is an easy task as there is already online Wordpress Security key Random generator.
You can visit above address and you will get an automatic randomly generated values which could be straight copy / pasted to your wp-config.php.

Howeever if you're a paranoic on the guessability of the random generator algorithm, I would advice you use the generator and change some random values yourself on each of the 8 line, the end result in the configuration should be something similar to:


define('AUTH_KEY',         '|w+=W(od$V|^hy$F5w)g6O-:e[WI=NHY/!Ez@grd5=##!;jHle_vFPqz}D5|+87Q');
define('SECURE_AUTH_KEY',  'rGReh.<%QBJ{DP )p=BfYmp6fHmIG~ePeHC[MtDxZiZD;;_OMp`sVcKH:JAqe$dA');
define('LOGGED_IN_KEY',    '%v8mQ!)jYvzG(eCt>)bdr+Rpy5@t fTm5fb:o?@aVzDQw8T[w+aoQ{g0ZW`7F-44');
define('NONCE_KEY',        '$o9FfF{S@Z-(/F-.6fC/}+K 6-?V.XG#MU^s?4Z,4vQ)/~-[D.X0<+ly0W9L3,Pj');
define('AUTH_SALT',        ':]/2K1j(4I:DPJ`(,rK!qYt_~n8uSf>=4`{?LC]%%KWm6@j|aht@R.i*ZfgS4lsj');
define('SECURE_AUTH_SALT', 'XY{~:{P&P0Vw6^i44Op*nDeXd.Ec+|c=S~BYcH!^j39VNr#&FK~wq.3wZle_?oq-');
define('LOGGED_IN_SALT',   '8D|2+uKX;F!v~8-Va20=*d3nb#4|-fv0$ND~s=7>N|/-2]rk@F`DKVoh5Y5i,w*K');
define('NONCE_SALT',       'ho[<2C~z/:{ocwD{T-w+!+r2394xasz*N-V;_>AWDUaPEh`V4KO1,h&+c>c?jC$H');


Wordpress-auth-key-secure-auth-salt-Linux-wordpress-admin-security-hardening

Once above defines are set, do not forget to comment or remove old AUTH_KEY / SECURE_AUTH_KEY / LOGGED_IN_KEY / AUTH_SALT / SECURE_AUTH_SALT / LOGGED_IN_SALT /NONCE_SALT keys.

The values are configured one time and never have to be changed, WordPress installation automatic updates or Installed WP Plugins will not tamper the value with time.
You should never expand or show your private generated keys to anyone otherwise this could be used to hack your website site.
It is also a good security practice to change this keys, especially if you have some suspects someone has somehow stolen your wp-onfig keys. 
 

Closure

Having AUTH KEYs and Properly configured is essential step to improve your WordPress site security. Anytime having any doubt for a browser hijacked session (or if you have logged in) to your /wp-admin via unsecured public Computer with a chance of a stolen site cookies you should reset keys / salts to a new random values. Setting the auth keys is not a panacea and frequent WP site core updates and plugins should be made to secure your install. Always do frequent audits to WP owned websites with a tool such as WPScan is essential to keep your WP Website unhacked.


Fix qmail-scanner-queue.pl: X-Qmail-Scanner-2.08st:[] cannot create /var/spool/qscan/tmp – Permission denied – Finally a working solution and what causes the error

Wednesday, July 22nd, 2015


qmail-fixing-clamdscan-errors-and-qq-errors-qmail-binary-migration-few-things-to-check-out
I've lost a whole day and was angry and irritated after moving (migrating) a Working Qmail installation in a binary form from a Debian Lenny 5.0 to a Debian 7.0 Wheezy Linux. The whole migration exercise was quite of a crazy move and I can tell you it didn't worth the effort as I lost much more time than even if I went on installing the server following Thibs Great Qmail Tutorial.

Yes I know many would say why do you still bother with an old and unsupported Qmail Mail server and not go with Postfix, the logic is correct however the whole issue is the previous installation has a number of domains already running VirtualMail hosting using VPopMail, so migrating all the old mailboxes from Qmail to Postfix are not worthy IMHO. Plus I honestly love qmail for being so stable even today (even without support). After all most of Qmail is secure enough already 🙂
And to be honest I don't so much care about security as in the old days as I know NSA, does already have access to any server on planet 🙂

Almost always when a Qmail migration happens I end up swearing and sweating and generally getting crazy, but anyways …

The overall migration of binaries went quite OK I just copied every binary and all the related libraries from the old Debian 5.0 to Debian 7.0 and installed the following long list of perl deb binaries using apt-get:
 

dh-make-perl
libalgorithm-c3-perl
libalgorithm-diff-perl
libalgorithm-diff-xs-perl
libalgorithm-merge-perl
libapparmor-perl
libapt-pkg-perl
libarray-unique-perl
libclass-accessor-chained-perl
libclass-accessor-perl
libclass-c3-perl
libclass-c3-xs-perl
libclass-factory-util-perl
libclass-inspector-perl
libclass-isa-perl
libclass-load-perl
libclass-singleton-perl
libconfig-file-perl
libconvert-binhex-perl
libcrypt-openssl-bignum-perl
libcrypt-openssl-random-perl
libcrypt-openssl-rsa-perl
libcrypt-passwdmd5-perl
libcrypt-ssleay-perl
libdata-optlist-perl
libdata-section-perl
libdate-manip-perl
libdatetime-format-builder-perl
libdatetime-format-iso8601-perl
libdatetime-format-strptime-perl
libdatetime-locale-perl
libdatetime-perl
libdatetime-timezone-perl
libdbd-mysql-perl
libdbi-perl
libdevel-symdump-perl
libdigest-hmac-perl
libdigest-sha-perl
libdpkg-perl
libemail-address-perl
libemail-date-format-perl
libencode-detect-perl
libencode-locale-perl
libenv-sanctify-perl
liberror-perl
libexporter-lite-perl
libfcgi-perl
libfile-chdir-perl
libfile-fcntllock-perl
libfile-find-rule-perl
libfile-listing-perl
libfile-which-perl
libfont-afm-perl
libhtml-form-perl
libhtml-format-perl
libhtml-parser-perl
libhtml-tagset-perl
libhtml-template-perl
libhtml-tree-perl
libhttp-cookies-perl
libhttp-daemon-perl
libhttp-date-perl
libhttp-message-perl
libhttp-negotiate-perl
libhttp-server-simple-perl
libio-multiplex-perl
libio-socket-inet6-perl
libio-socket-ip-perl
libio-socket-ssl-perl
libio-string-perl
libio-stringy-perl
libip-country-perl
liblist-moreutils-perl
liblocale-gettext-perl
liblwp-mediatypes-perl
liblwp-protocol-https-perl
libmail-dkim-perl
libmail-sendmail-perl
libmail-spf-perl
libmailtools-perl
libmath-round-perl
libmime-tools-perl
libmodule-depends-perl
libmodule-implementation-perl
libmodule-runtime-perl
libmro-compat-perl
libnet-cidr-lite-perl
libnet-cidr-perl
libnet-daemon-perl
libnet-dns-perl
libnet-http-perl
libnet-ident-perl
libnet-ip-perl
libnet-server-perl
libnet-snmp-perl
libnet-ssleay-perl
libnetaddr-ip-perl
libnumber-compare-perl
libossp-uuid-perl
libpackage-deprecationmanager-perl
libpackage-stash-perl
libpackage-stash-xs-perl
libparams-classify-perl
libparams-util-perl
libparams-validate-perl
libparse-debcontrol-perl
libparse-debianchangelog-perl
libparse-syslog-perl
libpcre-ocaml-dev
libpcre3:amd64
libpcre3-dev
libpcrecpp0:amd64
libperl-dev
libperl5.14
libpod-coverage-perl
libregexp-assemble-perl
librpc-xml-perl
librrds-perl
libsoap-lite-perl
libsocket-perl
libsocket6-perl
libsoftware-license-perl
libsub-exporter-perl
libsub-install-perl
libsub-name-perl
libswitch-perl
libsys-hostname-long-perl
libsys-syslog-perl
libtask-weaken-perl
libterm-readkey-perl
libtest-distribution-perl
libtest-pod-coverage-perl
libtest-pod-perl
libtext-charwidth-perl
libtext-glob-perl
libtext-iconv-perl
libtext-template-perl
libtext-wrapi18n-perl
libtie-ixhash-perl
libtimedate-perl
libtry-tiny-perl
liburi-perl
libwww-mechanize-perl
libwww-perl
libwww-robotrules-perl
libxml-namespacesupport-perl
libxml-parser-perl
libxml-sax-base-perl
libxml-sax-expat-perl
libxml-sax-perl
libxml-simple-perl
libyaml-perl
libyaml-syck-perl
perl
perl-base
perl-doc
perl-modules
spamassassin
spf-tools-perl


I've also installed with apt-get daemontools and daemontools-run ucspi and some others to get all the necessery binaries qmail needs the whole list of apt installed packages is here

I've also copied all the old binaries from /usr/local/lib from server1 to server2, some others from /usr/local/share and /usr/share as well as /usr/lib/courier /usr/lib/courier-authlib /usr/local/libexec /usr/local/sbin also had to link a couple of libraries such as /usr/lib/libcrypto* , link  /usr/lib/libperl.so.5.10 to /usr/lib/libperl.so.5.14 and copy /usr/lib/libltdl.so.3 and few others which i don't exactly remember.

Well anyways once I've copied everything Qmail looked fined except I had a couple of permission issues and had to clean up and fix the queue with qfixq, I've also used qmail-scanner*/contrib/test_installation.sh script to test whether qmail-scanner was running fine, e.g.:
 

./test_installation.sh -doit


As well as


qmr_inst_check


script, thanks to which I've captured and resolved few of permission problems 

Finally I've stuck upon this shitty errors (appearing) in /var/log/syslog and /var/log/messages


Jul 21 22:04:19 vps186637 qmail-scanner-queue.pl: X-Qmail-Scanner-2.08st:[] cannot create /var/spool/qscan/tmp – Permission denied
Jul 21 22:08:27 vps186637 qmail-scanner-queue.pl: X-Qmail-Scanner-2.08st:[] cannot create /var/spool/qscan/tmp – Permission denied
Jul 21 22:08:38 vps186637 qmail-scanner-queue.pl: X-Qmail-Scanner-2.08st:[] cannot create /var/spool/qscan/tmp – Permission denied
Jul 21 22:11:17 vps186637 qmail-scanner-queue.pl: X-Qmail-Scanner-2.08st:[] cannot create /var/spool/qscan/tmp – Permission denied
Jul 21 22:16:09 vps186637 qmail-scanner-queue.pl: X-Qmail-Scanner-2.08st:[] cannot create /var/spool/qscan/tmp – Permission denied
Jul 21 22:19:15 vps186637 qmail-scanner-queue.pl: X-Qmail-Scanner-2.08st:[] cannot create /var/spool/qscan/tmp – Permission denied
Jul 21 22:38:59 ns2 qmail-scanner-queue.pl: X-Qmail-Scanner-2.08st:[] cannot create /var/spool/qscan/tmp – Permission denied
Jul 21 22:42:33 ns2 qmail-scanner-queue.pl: X-Qmail-Scanner-2.08st:[] cannot create /var/spool/qscan/tmp – Permission denied
Jul 21 22:43:49 ns2 qmail-scanner-queue.pl: X-Qmail-Scanner-2.08st:[] cannot create /var/spool/qscan/tmp – Permission denied
Jul 21 22:46:05 ns2 qmail-scanner-queue.pl: X-Qmail-Scanner-2.08st:[] cannot create /var/spool/qscan/tmp – Permission denied
Jul 21 22:50:40 ns2 qmail-scanner-queue.pl: X-Qmail-Scanner-2.08st:[] cannot create /var/spool/qscan/tmp – Permission denied
Jul 21 22:53:08 ns2 qmail-scanner-queue.pl: X-Qmail-Scanner-2.08st:[] cannot create /var/spool/qscan/tmp – Permission denied


There is plenty of things written about this:
 

qmail-scanner-queue.pl: X-Qmail-Scanner-2.08st:[] cannot create /var/spool/qscan/tmp – Permission denied


But all written is too obscure and too old already somewhere between 2004 and 2010, I've been digging through Gentoo Forums, Fedora Debian and other Linux installs and everyone used to be pointing a permission issue with /var/spool/qscan/ said theoretically to be causing the error, however all looked perfectly fine with my /var/spool/qscan , e.g.:


roo@ns2:/usr/local/src# ls -ld /var/spool/qscan/
drwxr-s— 6 qscand qscand 4096 Jul 21 23:07 /var/spool/qscan/


ls -al /var/spool/qscan/
total 244904
drwxr-s— 6 qscand qscand      4096 Jul 21 23:07 .
drwxr-xr-x 4 root   root        4096 Jul 20 21:17 ..
drwxrwx— 5 qscand qscand      4096 Oct 12  2011 archives
-rwxr-x— 1 qscand qscand      1434 Oct 12  2011 log-report.sh
-rw——- 1 qscand qscand 249731919 Jul 21 23:11 qmail-queue.log
-rw——- 1 qscand qscand    398225 Oct 28  2011 qmail-queue.log.1
-rw-rw—- 1 root   qscand        74 Jul 21 23:07 qmail-scanner-queue-version.txt
lrwxrwxrwx 1 root   qscand        16 Jul 21 23:07 qscan -> /var/spool/qscan
drwxrwx— 5 qscand qscand      4096 Oct 12  2011 quarantine
-rw-r—– 1 root   qscand     12288 Jul 21 23:07 quarantine-events.db
-rw-r—– 1 qscand qscand     10443 Oct 12  2011 quarantine-events.txt
-rw-rw—- 1 qscand qscand    580033 Jul 21 23:07 quarantine.log
-rw-r—– 1 qscand qscand      2739 Oct 12  2011 settings_per_domain.txt
drwxr-x— 3 qscand qscand      4096 Jul 21 23:11 tmp
drwxrwx— 5 qscand qscand      4096 Oct 12  2011 working


Some suggested that /var/spool/qscan should be owned by qscand:clamav instead so I tried this but it didn't help,
others recommended adding clamav groupid into qscand's but this didn't help either:
 

root@ns2:/usr/local/src# grep -i clamav /etc/group
qscand:x:163:clamav,vpopmail
clamav:x:105:


Besides that I was getting also this shitty error:


Jul 21 20:05:42 vps186637 qmail-scanner-queue.pl: X-Qmail-Scanner-2.08st:[ns2143750194279012466] clamdscan: corrupt or unknown clamd scanner error or memory/resource/perms problem – exit status -1/72057594037927935
Jul 21 20:06:51 vps186637 qmail-scanner-queue.pl: X-Qmail-Scanner-2.08st:[ns2143750201179013125] clamdscan: corrupt or unknown clamd scanner error or memory/resource/perms problem – exit status -1/72057594037927935
Jul 21 20:15:42 vps186637 qmail-scanner-queue.pl: X-Qmail-Scanner-2.08st:[ns214375025407906015] clamdscan: corrupt or unknown clamd scanner error or memory/resource/perms problem – exit status -1/72057594037927935
Jul 21 20:16:06 vps186637 qmail-scanner-queue.pl: X-Qmail-Scanner-2.08st:[ns2143750256579011980] clamdscan: corrupt or unknown clamd scanner error or memory/resource/perms problem – exit status -1/72057594037927935
Jul 21 20:18:54 vps186637 qmail-scanner-queue.pl: X-Qmail-Scanner-2.08st:[ns2143750273479014847] clamdscan: corrupt or unknown clamd scanner error or memory/resource/perms problem – exit status -1/72057594037927935
Jul 21 20:21:03 vps186637 qmail-scanner-queue.pl: X-Qmail-Scanner-2.08st:[ns2143750286379028491] clamdscan: corrupt or unknown clamd scanner error or memory/resource/perms problem – exit status -1/72057594037927935
Jul 21 22:07:47 vps186637 qmail-scanner-queue.pl: X-Qmail-Scanner-2.08st:[ns2143750926779010097] clamdscan: corrupt or unknown clamd scanner error or memory/resource/perms problem – exit status 512/2


All the time in logs, so I thought something might be wrong with clamdscan and followed and tried some suggestions from qms1.net as described here, however none of the fixes described there worked for me …

I also tried to reinstall clamav from source using a bit of modified version of this tutorial

This didn't help either … I saw some suggestions online that the permission issues are caused by some wrong clamd.conf and freshclamd.conf configuration options – failing clamdscan, but this didn't work either. I also tried to remove clamdscan and substitute it with clamscan  as a suggested workaround but this didn't work either …

I spend about 6 hours trying to catch what is causing this issues so finally I went on and re-installed bigger part of Qmail using Thibs tutorial over the old installation.

I've also tried in mean time multiple time to rebuild qmail scanner database with:
 

setuidgid qscand /var/qmail/bin/qmail-scanner-queue.pl -g


Played around with permissions in /etc/clamav e.g.


chown -R qscand:clamav /var/log/clamav /var/lib/clamav /var/run/clamav
chown qscand:qscand /etc/clamav/freshclam.conf


Created:

/etc/cron.daily/qmail-scanner with following content


cat /etc/cron.daily/qmail-scanner
setuidgid qscand /var/qmail/bin/qmail-scanner-queue.pl -z


However in /var/log/qmail/qmail-smtpd/current and /var/log/qmail-send/current I continously got:

Qmail 451 qq temporary problem (#4.3.0) error

Interestingly during looking for a solution to the 451 qq temporary problem and:

status: qmail-todo stop processing asap / status: exiting – I've stumbled to my own blog post here 🙂


Finally, I tried to reinstall qmail-scanner and in mean time update it to  Version: 2.11 – st – patch – 20130319
Just to realized something was wrong with suidperl, e.g. in Debian 7.0.* Wheezy perl-suid binary is no longer in repositories so only way to have suidperl there is either to re-compile perl from source manually which is too much work and I think in most cases not worthy the effort or to use a small suid-wrapper:
 

#include <unistd.h>
#include <errno.h>
 

main( int argc, char ** argv, char ** envp )
{
              if( setgid(getegid()) ) perror( "setgid" );
              if( setuid(geteuid()) ) perror( "setuid" );
              envp = 0; /* blocks IFS attack on non-bash shells */
              system( "/usr/bin/perl", argv, envp );
              perror( argv[0] );
              return errno;
}


Create it into a file lets say suid-wrapperc and compile the file with GNU C Compiler:
 

$ gcc -o suid-wrapper suid-wrapper.c


Then move the suid-wrapper produced binary into /usr/bin/suidperl e.g.


$ mv suid-wrapper /usr/bin/suidperl


Last you will need to edit /var/qmail/bin/qmail-scanner-queue.pl


# vim /var/qmail/bin/qmail-scaner-queue.pl


And substitute


#!/usr/bin/perl -T


with:


#!/usr/bin/suidperl


Note!!! that qmail-scanner-queue.pl permissions should be suid and owned by qscand:qscand as follows:


ls -al /var/qmail/bin/qmail-scanner-queue.pl
-rwsr-sr-x 1 qscand qscand 159727 Jul 21 23:11 /var/qmail/bin/qmail-scanner-queue.pl


Finally to resolve the error I had to restart qmail via qmailctl start / stop script:


root@ns2:/var/qmail/bin# qmailctl restart
Restarting qmail:
* Stopping qmail-smtpdssl.
* Stopping qmail-smtpd.
* Sending qmail-send SIGTERM and restarting.
* Restarting qmail-smtpd.
* Restarting qmail-smtpdssl.


Finally to test emails are sent and receiver properly I used good old mail command part of bsd-mailx deb package


# mail -s "testing 12345678" testemail1234@gmail.com
asdfadf
.
Cc:


I've also tested with plain telnet to verify no errors because often the mail command doesn't return (show) errors on email sent and errors are written only in /var/log/mail.log or /var/log/qmail/* logs


# telnet localhost 25
Trying 127.0.0.1…
Connected to localhost.
Escape character is '^]'.
220 servername.localdomain.tld ESMTP
mail from: <testmail@test.com>
250 ok
rcpt to: <nospam@test.com>
250 ok
data
354 go ahead
From: Test_sender <testmail@test.com>
To: Test_receiver <nospam@test.com>
Subject: Just a stupid SMTP test


Just a test !
.
250 ok 1279384489 qp 3711
quit
221 servername.localdomain.tld
Connection closed by foreign host.

One other thing which probably helped I did was:

# qmailctl doqueue


Thanks God this time, it worked out without any QQ errors 🙂 !


Finding top access IPs in Webserver or how to delay connects from Bots (Web Spiders) to your site to prevent connect Denial of Service

Friday, September 15th, 2017

analyze-log-files-most-visited-ips-and-find-and-stopwebsite-hammering-bot-spiders-neo-tux

If you're a sysadmin who has to deal with cracker attemps for DoS (Denial of Service) on single or multiple servers (clustered CDN or standalone) Apache Webservers, nomatter whether working for some web hosting company or just running your private run home brew web server its very useful thing to inspect Web Server log file (in Apache HTTPD case that's access.log).

Sometimes Web Server overloads and the follow up Danial of Service (DoS) affect is not caused by evil crackers (mistkenly often called hackers but by some data indexing Crawler Search Engine bots who are badly configured to aggressively crawl websites and hence causing high webserver loads flooding your servers with bad 404 or 400, 500 or other requests, just to give you an example of such obstructive bots.

1. Dealing with bad Search Indexer Bots (Spiders) with robots.txt

Just as I mentioned hackers word above I feel obliged to expose the badful lies the press and media spreading for years misconcepting in people's mind the word cracker (computer intruder) with a hacker, if you're one of those who mistakenly call security intruders hackers I recommend you read Dr. Richard Stallman's article On Hacking to get the proper understanding that hacker is an cheerful attitude of mind and spirit and a hacker could be anyone who has this kind of curious and playful mind out there. Very often hackers are computer professional, though many times they're skillful programmers, a hacker is tending to do things in a very undstandard and weird ways to make fun out of life but definitelely follow the rule of do no harm to the neighbor.

Well after the short lirical distraction above, let me continue;

Here is a short list of Search Index Crawler bots with very aggressive behaviour towards websites:


# mass download bots / mirroring utilities
1. webzip
2. webmirror
3. webcopy
4. netants
5. getright
6. wget
7. webcapture
8. libwww-perl
9. megaindex.ru
10. megaindex.com
11. Teleport / TeleportPro
12. Zeus
….

Note that some of the listed crawler bots are actually a mirroring clients tools (wget) etc., they're also included in the list of server hammering bots because often  websites are attempted to be mirrored by people who want to mirror content for the sake of good but perhaps these days more often mirror (duplicate) your content for the sake of stealing, this is called in Web language Content Stealing in SEO language.


I've found a very comprehensive list of Bad Bots to block on Mike's tech blog his website provided example of bad robots.txt file is mirrored as plain text file here

Below is the list of Bad Crawler Spiders taken from his site:


# robots.txt to prohibit bad internet search engine spiders to crawl your website
# Begin block Bad-Robots from robots.txt
User-agent: asterias
Disallow:/
User-agent: BackDoorBot/1.0
Disallow:/
User-agent: Black Hole
Disallow:/
User-agent: BlowFish/1.0
Disallow:/
User-agent: BotALot
Disallow:/
User-agent: BuiltBotTough
Disallow:/
User-agent: Bullseye/1.0
Disallow:/
User-agent: BunnySlippers
Disallow:/
User-agent: Cegbfeieh
Disallow:/
User-agent: CheeseBot
Disallow:/
User-agent: CherryPicker
Disallow:/
User-agent: CherryPickerElite/1.0
Disallow:/
User-agent: CherryPickerSE/1.0
Disallow:/
User-agent: CopyRightCheck
Disallow:/
User-agent: cosmos
Disallow:/
User-agent: Crescent
Disallow:/
User-agent: Crescent Internet ToolPak HTTP OLE Control v.1.0
Disallow:/
User-agent: DittoSpyder
Disallow:/
User-agent: EmailCollector
Disallow:/
User-agent: EmailSiphon
Disallow:/
User-agent: EmailWolf
Disallow:/
User-agent: EroCrawler
Disallow:/
User-agent: ExtractorPro
Disallow:/
User-agent: Foobot
Disallow:/
User-agent: Harvest/1.5
Disallow:/
User-agent: hloader
Disallow:/
User-agent: httplib
Disallow:/
User-agent: humanlinks
Disallow:/
User-agent: InfoNaviRobot
Disallow:/
User-agent: JennyBot
Disallow:/
User-agent: Kenjin Spider
Disallow:/
User-agent: Keyword Density/0.9
Disallow:/
User-agent: LexiBot
Disallow:/
User-agent: libWeb/clsHTTP
Disallow:/
User-agent: LinkextractorPro
Disallow:/
User-agent: LinkScan/8.1a Unix
Disallow:/
User-agent: LinkWalker
Disallow:/
User-agent: LNSpiderguy
Disallow:/
User-agent: lwp-trivial
Disallow:/
User-agent: lwp-trivial/1.34
Disallow:/
User-agent: Mata Hari
Disallow:/
User-agent: Microsoft URL Control – 5.01.4511
Disallow:/
User-agent: Microsoft URL Control – 6.00.8169
Disallow:/
User-agent: MIIxpc
Disallow:/
User-agent: MIIxpc/4.2
Disallow:/
User-agent: Mister PiX
Disallow:/
User-agent: moget
Disallow:/
User-agent: moget/2.1
Disallow:/
User-agent: mozilla/4
Disallow:/
User-agent: Mozilla/4.0 (compatible; BullsEye; Windows 95)
Disallow:/
User-agent: Mozilla/4.0 (compatible; MSIE 4.0; Windows 95)
Disallow:/
User-agent: Mozilla/4.0 (compatible; MSIE 4.0; Windows 98)
Disallow:/
User-agent: Mozilla/4.0 (compatible; MSIE 4.0; Windows NT)
Disallow:/
User-agent: Mozilla/4.0 (compatible; MSIE 4.0; Windows XP)
Disallow:/
User-agent: Mozilla/4.0 (compatible; MSIE 4.0; Windows 2000)
Disallow:/
User-agent: Mozilla/4.0 (compatible; MSIE 4.0; Windows ME)
Disallow:/
User-agent: mozilla/5
Disallow:/
User-agent: NetAnts
Disallow:/
User-agent: NICErsPRO
Disallow:/
User-agent: Offline Explorer
Disallow:/
User-agent: Openfind
Disallow:/
User-agent: Openfind data gathere
Disallow:/
User-agent: ProPowerBot/2.14
Disallow:/
User-agent: ProWebWalker
Disallow:/
User-agent: QueryN Metasearch
Disallow:/
User-agent: RepoMonkey
Disallow:/
User-agent: RepoMonkey Bait & Tackle/v1.01
Disallow:/
User-agent: RMA
Disallow:/
User-agent: SiteSnagger
Disallow:/
User-agent: SpankBot
Disallow:/
User-agent: spanner
Disallow:/
User-agent: suzuran
Disallow:/
User-agent: Szukacz/1.4
Disallow:/
User-agent: Teleport
Disallow:/
User-agent: TeleportPro
Disallow:/
User-agent: Telesoft
Disallow:/
User-agent: The Intraformant
Disallow:/
User-agent: TheNomad
Disallow:/
User-agent: TightTwatBot
Disallow:/
User-agent: Titan
Disallow:/
User-agent: toCrawl/UrlDispatcher
Disallow:/
User-agent: True_Robot
Disallow:/
User-agent: True_Robot/1.0
Disallow:/
User-agent: turingos
Disallow:/
User-agent: URLy Warning
Disallow:/
User-agent: VCI
Disallow:/
User-agent: VCI WebViewer VCI WebViewer Win32
Disallow:/
User-agent: Web Image Collector
Disallow:/
User-agent: WebAuto
Disallow:/
User-agent: WebBandit
Disallow:/
User-agent: WebBandit/3.50
Disallow:/
User-agent: WebCopier
Disallow:/
User-agent: WebEnhancer
Disallow:/
User-agent: WebmasterWorldForumBot
Disallow:/
User-agent: WebSauger
Disallow:/
User-agent: Website Quester
Disallow:/
User-agent: Webster Pro
Disallow:/
User-agent: WebStripper
Disallow:/
User-agent: WebZip
Disallow:/
User-agent: WebZip/4.0
Disallow:/
User-agent: Wget
Disallow:/
User-agent: Wget/1.5.3
Disallow:/
User-agent: Wget/1.6
Disallow:/
User-agent: WWW-Collector-E
Disallow:/
User-agent: Xenu’s
Disallow:/
User-agent: Xenu’s Link Sleuth 1.1c
Disallow:/
User-agent: Zeus
Disallow:/
User-agent: Zeus 32297 Webster Pro V2.9 Win32
Disallow:/
Crawl-delay: 20
# Begin Exclusion From Directories from robots.txt
Disallow: /cgi-bin/

Veryimportant variable among the ones passed by above robots.txt is
 

Crawl-Delay: 20


You might want to tune that variable a Crawl-Delay of 20 instructs all IP connects from any Web Spiders that are respecting robots.txt variables to delay crawling with 20 seconds between each and every connect client request, that is really useful for the Webserver as less connects means less CPU and Memory usage and less degraded performance put by aggressive bots crawling your site like crazy, requesting resources 10 times per second or so …

As you can conclude by the naming of some of the bots having them disabled would prevent your domain/s clients from Email harvesting Spiders and other not desired activities.


2. Listing IP addresses Hits / How many connects per IPs used to determine problematic server overloading a huge number of IPs connects

After saying few words about SE bots and I think it it is fair to also  mention here a number of commands, that helps the sysadmin to inspect Apache's access.log files.
Inspecting the log files regularly is really useful as the number of malicious Spider Bots and the Cracker users tends to be
raising with time, so having a good way to track the IPs that are stoning at your webserver and later prohibiting them softly to crawl either via robots.txt (not all of the Bots would respect that) or .htaccess file or as a last resort directly form firewall is really useful to know.
 

– Below command Generate a list of IPs showing how many times of the IPs connected the webserver (bear in mind that commands are designed log fields order as given by most GNU / Linux distribution + Apache default logging configuration;


webhosting-server:~# cd /var/log/apache2 webhosting-server:/var/log/apache2# cat access.log| awk '{print $1}' | sort | uniq -c |sort -n


Below command provides statistics info based on whole access.log file records, sometimes you will need to have analyzed just a chunk of the webserver log, lets say last 12000 IP connects, here is how:
 

webhosting-server:~# cd /var/log/apache2 webhosting-server:/var/log/apache2# tail -n 12000 access.log| awk '{print $1}' | sort | uniq -c |sort -n


You can combine above basic bash shell parser commands with the watch command to have a top like refresh statistics every few updated refreshing IP statistics of most active customers on your websites.

Here is an example:


webhosting-server:~# watch "cat access.log| awk '{print $1}' | sort | uniq -c |sort -n";


Once you have the top connect IPs if you have a some IP connecting with lets say 8000-10000 thousand times in a really short interval of time 20-30 minues or so. Hence it is a good idea to investigate further where is this IP originating from and if it is some malicious Denial of Service, filter it out either in Firewall (with iptables rules) or ask your ISP or webhosting to do you a favour and drop all the incoming traffic from that IP.

Here is how to investigate a bit more about a server stoner IP;
Lets assume that you found IP: 176.9.50.244 to be having too many connects to your webserver:
 

webhosting-server:~# grep -i 176.9.50.244 /var/log/apache2/access.log|tail -n 1
176.9.50.244 – – [12/Sep/2017:07:42:13 +0300] "GET / HTTP/1.1" 403 371 "-" "Mozilla/5.0 (compatible; MegaIndex.ru/2.0; +http://megaindex.com/crawler)"


webhosting-server:~# host 176.9.50.244
244.50.9.176.in-addr.arpa domain name pointer static.244.50.9.176.clients.your-server.de.


webhosting-server:~# whois 176.9.50.244|less


The outout you will get would be something like:

% This is the RIPE Database query service.
% The objects are in RPSL format.
%
% The RIPE Database is subject to Terms and Conditions.
% See http://www.ripe.net/db/support/db-terms-conditions.pdf

% Note: this output has been filtered.
%       To receive output for a database update, use the "-B" flag.

% Information related to '176.9.50.224 – 176.9.50.255'

% Abuse contact for '176.9.50.224 – 176.9.50.255' is 'abuse@hetzner.de'

inetnum:        176.9.50.224 – 176.9.50.255
netname:        HETZNER-RZ15
descr:          Hetzner Online GmbH
descr:          Datacenter 15
country:        DE
admin-c:        HOAC1-RIPE
tech-c:         HOAC1-RIPE
status:         ASSIGNED PA
mnt-by:         HOS-GUN
mnt-lower:      HOS-GUN
mnt-routes:     HOS-GUN
created:        2012-03-12T09:45:54Z
last-modified:  2015-08-10T09:29:53Z
source:         RIPE

role:           Hetzner Online GmbH – Contact Role
address:        Hetzner Online GmbH
address:        Industriestrasse 25
address:        D-91710 Gunzenhausen
address:        Germany
phone:          +49 9831 505-0
fax-no:         +49 9831 505-3
abuse-mailbox:  abuse@hetzner.de
remarks:        *************************************************
remarks:        * For spam/abuse/security issues please contact *
remarks:        * abuse@hetzner.de, not this address. *
remarks:        * The contents of your abuse email will be *
remarks:        * forwarded directly on to our client for *
….


3. Generate list of directories and files that are most called by clients
 

webhosting-server:~# cd /var/log/apache2; webhosting-server:/var/log/apache2# awk '{print $7}' access.log|cut -d? -f1|sort|uniq -c|sort -nk1|tail -n10

( take in consideration that this info is provided only on current records from /var/log/apache2/ and is short term for long term statistics you have to merge all existing gzipped /var/log/apache2/access.log.*.gz )

To merge all the old gzipped files into one single file and later use above shown command to analyize run:


cd /var/log/apache2/
cp -rpf *access.log*.gz apache-gzipped/
cd apache-gzipped
for i in $(ls -1 *access*.log.*.gz); do gzip -d $i; done
rm -f *.log.gz;
for i in $(ls -1 *|grep -v access_log_complete); do cat $i >> access_log_complete; done


Though the accent of above article is Apache Webserver log analyzing, the given command examples can easily be recrafted to work properly on other Web Servers LigHTTPD, Nginx etc.

Above commands are about to put a higher load to your server during execution, so on busy servers it is a better idea, to first go and synchronize the access.log files to another less loaded servers in most small and midsized companies this is being done by a periodic synchronization of the logs to the log server used usually only to store log various files and later used to do various analysis our run analyse software such as Awstats, Webalizer, Piwik, Go Access etc.

Worthy to mention one great text console must have Apache tool that should be mentioned to analyze in real time for the lazy ones to type so much is Apache-top but those script will be not installed on most webhosting servers and VPS-es, so if you don't happen to own a self-hosted dedicated server / have webhosting company etc. – (have root admin access on server), but have an ordinary server account you can use above commands to get an overall picture of abusive webserver IPs.

logstalgia-visual-loganalyzer-in-reali-time-windows-linux-mac
 

If you have a Linux with a desktop GUI environment and have somehow mounted remotely the weblog server partition another really awesome way to visualize in real time the connect requests to  web server Apache / Nginx etc. is with Logstalgia

Well that's all folks, I hope that article learned you something new. Enjoy

Thanks for article neo-tux picture to segarkshtri.com.np)

How to show country flag, web browser type and Operating System in WordPress Comments

Wednesday, February 15th, 2012

!!! IMPORTANT UPDATE COMMENT INFO DETECTOR IS NO LONGER SUPPORTED (IS OBSOLETE) AND THE COUNTRY FLAGS AND OPERATING SYSTEM WILL BE NOT SHOWING INSTEAD,

!!!! TO MAKE THE COUNTRY FLAGS AND OS WP FUNCTIONALITY WORK AGAIN YOU WILL NEED TO INSTALL WP-USERAGENT !!!

I've come across a nice WordPress plugin that displays country flag, operating system and web browser used in each of posted comments blog comments.
Its really nice plugin, since it adds some transperancy and colorfulness to each of blog comments 😉
here is a screenshot of my blog with Comments Info Detector "in action":

Example of Comments Info Detector in Action on wordpress blog comments

Comments Info Detector as of time of writting is at stable ver 1.0.5.
The plugin installation and configuration is very easy as with most other WP plugins. To install the plugin;

1. Download and unzip Comments Info Detector

linux:/var/www/blog:# cd wp-content/plugins
linux:/var/www/blog/wp-content/plugins:# wget http://downloads.wordpress.org/plugin/comment-info-detector.zip
...
linux:/var/www/blog/wp-content/plugins:# unzip comment-info-detector.zip
...

Just for the sake of preservation of history, I've made a mirror of comments-info-detector 1.0.5 wp plugin for download here
2. Activate Comment-Info-Detector

To enable the plugin Navigate to;
Plugins -> Inactive -> Comment Info Detector (Activate)

After having enabled the plugin as a last 3rd step it has to be configured.

3. Configure comment-info-detector wp plugin

By default the plugin is disabled. To change it to enabled (configure it) by navigating to:

Settings -> Comments Info Detector

Next a a page will appear with variout fields and web forms, where stuff can be changed. Here almost all of it should be left as it is the only change should be in the drop down menus near the end of the page:

Display Country Flags Automatically (Change No to Yes)
Display Web Browsers and OS Automatically (Change No to Yes

Comments Info Detector WordPress plugin configuration Screenshot

After the two menus are set to "Yes" and pressing on Save Changes the plugin is enabled it will immediately start showing information inside each comment the GeoIP country location flag of the person who commented as well as OS type and Web Browser 🙂

No space left on device with free disk space / Why no space left on device while there is plenty of disk space on drive – Running out of Inodes

Tuesday, November 17th, 2015

no_space_left-on-device-while-there-is-disk-space-running-out-of-file-inodes-unix_linux_file_system_diagram.gif


On one of the servers, I'm administrating the websites started showing some Mysql database table corrup errors like:


Table './database_name/site_news_list_com' is marked as crashed and last (automatic?) repair failed

The server is using Oracle MySQL server community stable edition on Debian GNU / Linux 6.0, so I first thought during work the server crashed either due to some bug issue in MySQL or it crashed due to some PHP cron job that did something messy. Thus to solve the crashed tables, tried using mysqlcheck tool which helped pretty fine, at many times whether there were database / table corruptions. I've run the following set of mysqlcheck commands with root (superuser) in a bash shell after logging in through SSH:

:

server:~# /usr/bin/mysqlcheck –defaults-extra-file=/etc/mysql/debian.cnf \–check –all-databases -u root -p`grep -i password /root/.my.cnf |sed -e 's#password=##g'`>> /var/log/cronwork.log
server:~# /usr/bin/mysqlcheck –defaults-extra-file=/etc/mysql/debian.cnf –analyze –all-databases -u root -p`grep -i password /root/.my.cnf |sed -e 's#password=##g'`>> /var/log/cronwork.log
server:~# /usr/bin/mysqlcheck –defaults-extra-file=/etc/mysql/debian.cnf \–auto-repair –optimize –all-databases -u root -p`grep -i password /root/.my.cnf |sed -e 's#password=##g'`>> /var/log/cronwork.log
server:~# /usr/bin/mysqlcheck –defaults-extra-file=/etc/mysql/debian.cnf \–optimize –all-databases -u root -p`grep -i password /root/.my.cnf |sed -e 's#password=##g'`>> /var/log/cronwork.log


In order for above commands to work, I've created the /root/.my.cnf containing my root (mysql CLI) mysql username and password, e.g. file has content like below:


[client]
user=root
password=MySecretPassword8821238


Btw a good note here is its generally a good idea (if you want to have consistent mysql databases) to automatically execute via a cron job 2 times a month, I've in root cronjob the following:


crontab -u root -l |grep -i mysqlcheck
04 06 5,10,15,20,25,1 * * /usr/bin/mysqlcheck –defaults-extra-file=/etc/mysql/debian.cnf \–check –all-databases –silent -u root -p`grep -i password /root/.my.cnf |sed -e 's#password=##g'`>> /var/log/cronwork.log 07 06 5,10,15,20,25,1 * * /usr/bin/mysqlcheck –defaults-extra-file=/etc/mysql/debian.cnf –analyze –all-databases –silent -u root -p`grep -i password /root/.my.cnf |sed -e 's#password=##g'`>> /var/log/cronwork.log 12 06 5,10,15,20,25,1 * * /usr/bin/mysqlcheck –defaults-extra-file=/etc/mysql/debian.cnf \–auto-repair –optimize –all-databases –silent -u root -p`grep -i password /root/.my.cnf |sed -e 's#password=##g'`>> /var/log/cronwork.log 17 06 5,10,15,20,25,1 * * /usr/bin/mysqlcheck –defaults-extra-file=/etc/mysql/debian.cnf \–optimize –all-databases –silent -u root -p`grep -i password /root/.my.cnf |sed -e 's#password=##g'`>> /var/log/cronwork.log


Strangely I got a lot of errors that some .MYI / .MYD .frm temp files, necessery for the mysql tables recovery can't be written inside /home/mysql/database_name

That was pretty weird and I thought there might be some issues with permissions, causing the inability to write, due to some bug or something so I went straight and checked /home/mysql/database_name permissions, e.g.::


server:/home/mysql/database_name# ls -ld soccerfame
drwx—— 2 mysql mysql 36864 Nov 17 12:00 soccerfame
server:/home/mysql/database_name# ls -al1|head -n 10
total 1979012
drwx—— 2 mysql mysql 36864 Nov 17 12:00 .
drwx—— 36 mysql mysql 4096 Nov 17 11:12 ..
-rw-rw—- 1 mysql mysql 8712 Nov 17 10:26 1_campaigns_diez.frm
-rw-rw—- 1 mysql mysql 14672 Jul 8 18:57 1_campaigns_diez.MYD
-rw-rw—- 1 mysql mysql 1024 Nov 17 11:38 1_campaigns_diez.MYI
-rw-rw—- 1 mysql mysql 8938 Nov 17 10:26 1_campaigns.frm
-rw-rw—- 1 mysql mysql 8738 Nov 17 10:26 1_campaigns_logs.frm
-rw-rw—- 1 mysql mysql 883404 Nov 16 22:01 1_campaigns_logs.MYD
-rw-rw—- 1 mysql mysql 330752 Nov 17 11:38 1_campaigns_logs.MYI


As seen from above output, all was perfect with permissions, so it should have been something else, so I decided to try to create a random file with touch command inside /home/mysql/database_name directory:


touch /home/mysql/database_name/somefile-to-test-writtability.txt touch: cannot touch ‘/scr1/data/somefile-to-test-writtability.txt‘: No space left on device


Then logically I thought the /home/mysql/ mounted ext4 partition got filled, because of crashed SQL database or a bug thus, checked with disk free command df whether there is enough space on server:

server:~# df -h
Filesystem Size Used Avail Use% Mounted on
/dev/md1 20G 7.6G 11G 42% /
udev 10M 0 10M 0% /dev
tmpfs 13G 1.3G 12G 10% /run
tmpfs 32G 0 32G 0% /dev/shm
tmpfs 5.0M 0 5.0M 0% /run/lock
tmpfs 32G 0 32G 0% /sys/fs/cgroup
/dev/md2 256G 134G 110G 55% /home

Well that's weird? Obviously only 55% of available disk space is used and available 134G which was more than enough so I got totally puzzled why, files can't be written.

Then very logically, I thought it might be that /home directory has remounted as read only, because the SSD memory disk on server is failing and checked for errors in dmesg, i.e.:


server:~# dmesg|grep -i error


Also checked how exactly was partition mounted, to check whether it is (RO) read-only:


server:~# mount -l|grep -i /home
/dev/md2 on /home type ext4 (rw,relatime,discard,data=ordered)


Now everything become even more weirder, as obviously the disk continued to be claiming no space left on device, while in reality there was plenty of disk space.

Then after running a quick research on the internet for the no space left on device with free disk space, I've come across this great superuser.com thread which let me realize the partition run out of inodes and that's why no new file inodes could be assigned and therefore, the linux kernel is refusing to write the file on ext4 partition.

For those who haven't heard of Linux Partition Inodes here is link to Wikipedia and a quick quote:


In a Unix-style file system, the inode is a data structure used to represent a filesystem object, which can be one of various things including a file or a directory. Each inode stores the attributes and disk block location(s) of the filesystem object's data.[1] Filesystem object attributes may include manipulation metadata (e.g. change,[2] access, modify time), as well as owner and permission data (e.g. group-id, user-id, permissions).[3]
Directories are lists of names assigned to inodes. The directory contains an entry for itself, its parent, and each of its children.


Once I understood it is the inodes, I checked how many of them are occupied with cmd:


server:~# df -i /home
Filesystem Inodes IUsed IFree IUse% Mounted on
/dev/md2 17006592 17006592 0 100% /home


You see, there were 0 (zero) free file inodes on server and that was the reason for no space left on device while there was actually free disk space

To clean up (free) some inodes on partition, first thing I did is to delete all old logs which were inside /home and files I positively know not to be necessery, then to find which directories allocating most innodes used:


server:~# find . -xdev -type f | cut -d "/" -f 2 | sort | uniq -c | sort -n


If you're on a regular old fashined IDE Hard Drive and not SSD or you have too much files inside this command will take really long …:

Therefore a better solution might be to frist:

a) Try to find root folders with large inodes count:

for i in /home/*; do echo $i; find $i |wc -l; done
Try to find specific folders:


You should get output like:


/home/new_website
606692
/home/common
73
/home/pcfreak
5661
/home/hipo
33
/home/blog
13570
/home/log
123
/home/lost+found
1

b) Then once you know the directory allocating most inodes, run the command again to see the sub-directories with most files (eating) partition innodes:


for i in /home/webservice/*; do echo $i; find $i |wc -l; done


One usual large folder which could free you some nodes is the linux source headers, but in my case it was simply a lot of tiny old logs being logged on the system for few years in the past without cleaning:

After deleting the log dirs and cache folder in my case /home/new_website/{log,cache}:

server:~# rm -rf /home/new_website/log/*
server:~# rm -rf /home/new_website/cache/*


a) Then, stopping Apache webserver to check prevent Apache to use MySQl databases while running database repair and restaring MySQL:
 

server:~# /etc/init.d/apache2 stop Restarting MySQL server
..
server:~# /etc/init.d/mysql restart
..


b) And re-issuing MySQL Check / Repair / Optimize database commands:


mysqlcheck –defaults-extra-file=/etc/mysql/debian.cnf \–check –all-databases -u root -p`grep -i password /root/.my.cnf |sed -e 's#password=##g'`>> /var/log/cronwork.log

mysqlcheck –defaults-extra-file=/etc/mysql/debian.cnf –analyze –all-databases -u root -p`grep -i password /root/.my.cnf |sed -e 's#password=##g'`>> /var/log/cronwork.log

mysqlcheck –defaults-extra-file=/etc/mysql/debian.cnf \–auto-repair –optimize –all-databases -u root -p`grep -i password /root/.my.cnf |sed -e 's#password=##g'`>> /var/log/cronwork.log

mysqlcheck –defaults-extra-file=/etc/mysql/debian.cnf \–optimize –all-databases -u root -p`grep -i password /root/.my.cnf |sed -e 's#password=##g'`>> /var/log/cronwork.log

c) And finally starting the Apache Webserver again:
 

server:~# /etc/init.d/apache2 start


Some innodse got freed up:
 

server:~# df -i /home Filesystem Inodes IUsed IFree IUse% Mounted on
/dev/md2 17006592 16797196 209396 99% /home


And hooray by God's Grace and with help of prayers of The most Holy Theotokos (Virgin) Mary, websites started again !

Fix MySQL ibdata file size – ibdata1 file growing too large, preventing ibdata1 from eating all your server disk space

Thursday, April 2nd, 2015

fix-solve-mysql-ibdata-file-size-ibdata1-file-growing-too-large-and-preventing-ibdata1-from-eating-all-your-disk-space-innodb-vs-myisam

If you're a webhosting company hosting dozens of various websites that use MySQL with InnoDB  engine as a backend you've probably already experienced the annoying problem of MySQL's ibdata1 growing too large / eating all server's disk space and triggering disk space low alerts. The ibdata1 file, taking up hundreds of gigabytes is likely to be encountered on virtually all Linux distributions which run default MySQL server <= MySQL 5.6 (with default distro shipped my.cnf). The excremental ibdata1 raise appears usually due to a application software bug on how it queries the database. In theory there are no limitation for ibdata1 except maximum file size limitation set for the filesystem (and there is no limitation option set in my.cnf) meaning it is quite possible that under certain conditions ibdata1 grow over time can happily fill up your server LVM (Storage) drive partitions.

Unfortunately there is no way to shrink the ibdata1 file and only known work around (I found) is to set innodb_file_per_table option in my.cnf to force the MySQL server create separate *.ibd files under datadir (my.cnf variable) for each freshly created InnoDB table.
 

1. Checking size of ibdata1 file

On Debian / Ubuntu and other deb based Linux servers datadir is /var/lib/mysql/ibdata1

server:~# du -hsc /var/lib/mysql/ibdata1
45G     /var/lib/mysql/ibdata1
45G     total


2. Checking info about Databases and Innodb storage Engine

server:~# mysql -u root -p
password:

mysql> SHOW DATABASES;
+——————–+
| Database           |
+——————–+
| information_schema |
| bible              |
| blog               |
| blog-sezoni        |
| blogmonastery      |
| daniel             |
| ezmlm              |
| flash-games        |


Next step is to get some understanding about how many existing InnoDB tables are present within Database server:


mysql> SELECT COUNT(1) EngineCount,engine FROM information_schema.tables WHERE table_schema NOT IN ('information_schema','performance_schema','mysql') GROUP BY engine;
+————-+——–+
| EngineCount | engine |
+————-+——–+
|         131 | InnoDB |
|           5 | MEMORY |
|         584 | MyISAM |
+————-+——–+
3 rows in set (0.02 sec)

To get some more statistics related to InnoDb variables set on the SQL server:
 

mysqladmin -u root -p'Your-Server-Password' var | grep innodb


Here is also how to find which tables use InnoDb Engine

mysql> SELECT table_schema, table_name
    -> FROM INFORMATION_SCHEMA.TABLES
    -> WHERE engine = 'innodb';

+————–+————————–+
| table_schema | table_name               |
+————–+————————–+
| blog         | wp_blc_filters           |
| blog         | wp_blc_instances         |
| blog         | wp_blc_links             |
| blog         | wp_blc_synch             |
| blog         | wp_likes                 |
| blog         | wp_wpx_logs              |
| blog-sezoni  | wp_likes                 |
| icanga_web   | cronk                    |
| icanga_web   | cronk_category           |
| icanga_web   | cronk_category_cronk     |
| icanga_web   | cronk_principal_category |
| icanga_web   | cronk_principal_cronk    |


3. Check and Stop any Web / Mail / DNS service using MySQL

server:~# ps -efl |grep -E 'apache|nginx|dovecot|bind|radius|postfix'

Below cmd should return empty output, (e.g. Apache / Nginx / Postfix / Radius / Dovecot / DNS etc. services are properly stopped on server).

4. Create Backup dump all MySQL tables with mysqldump

Next step is to create full backup dump of all current MySQL databases (with mysqladmin):

server:~# mysqldump –opt –allow-keywords –add-drop-table –all-databases –events -u root -p > dump.sql
server:~# du -hsc /root/dump.sql
940M    dump.sql
940M    total


If you have free space on an external backup server or remotely mounted attached (NFS or SAN Storage) it is a good idea to make a full binary copy of MySQL data (just in case something wents wrong with above binary dump), copy respective directory depending on the Linux distro and install location of SQL binary files set (in my.cnf).
To check where are MySQL binary stored database data (check in my.cnf):

server:~# grep -i datadir /etc/mysql/my.cnf
datadir         = /var/lib/mysql

If server is CentOS / RHEL Fedora RPM based substitute in above grep cmd line /etc/mysql/my.cnf with /etc/my.cnf

if you're on Debian / Ubuntu:

server:~# /etc/init.d/mysql stop
server:~# cp -rpfv /var/lib/mysql /root/mysql-data-backup

Once above copy completes, DROP all all databases except, mysql, information_schema (which store MySQL existing user / passwords and Access Grants and Host Permissions)

5. Drop All databases except mysql and information_schema

server:~# mysql -u root -p
password:


mysql> SHOW DATABASES;

DROP DATABASE blog;
DROP DATABASE sessions;
DROP DATABASE wordpress;
DROP DATABASE micropcfreak;
DROP DATABASE statusnet;

          etc. etc.

ACHTUNG !!! DON'T execute!DROP database mysql; DROP database information_schema; !!! – cause this might damage your User permissions to databases

6. Stop MySQL server and add innodb_file_per_table and few more settings to prevent ibdata1 to grow infinitely in future

server:~# /etc/init.d/mysql stop

server:~# vim /etc/mysql/my.cnf
[mysqld]
innodb_file_per_table
innodb_flush_method=O_DIRECT
innodb_log_file_size=1G
innodb_buffer_pool_size=4G

Delete files taking up too much space – ibdata1 ib_logfile0 and ib_logfile1

server:~# cd /var/lib/mysql/
server:~#  rm -f ibdata1 ib_logfile0 ib_logfile1
server:~# /etc/init.d/mysql start
server:~# /etc/init.d/mysql stop
server:~# /etc/init.d/mysql start
server:~# ps ax |grep -i mysql


You should get no running MySQL instance (processes), so above ps command should return blank.
 

7. Re-Import previously dumped SQL databases with mysql cli client

server:~# cd /root/
server:~# mysql -u root -p < dump.sql

Hopefully import should went fine, and if no errors experienced new data should be in.

Altearnatively if your database is too big and you want to import it in less time to mitigate SQL downtime, instead import the database with:

server:~# mysql -u root -p
password:
mysql>  SET FOREIGN_KEY_CHECKS=0;
mysql> SOURCE /root/dump.sql;
mysql> SET FOREIGN_KEY_CHECKS=1;


If something goes wrong with the import for some reason, you can always copy over sql binary files from /root/mysql-data-backup/ to /var/lib/mysql/
 

8. Connect to mysql and check whether databases are listable and re-check ibdata file size

Once imported login with mysql cli and check whther databases are there with:

server:~# mysql -u root -p
SHOW DATABASES;

Next lets see what is currently the size of ibdata1, ib_logfile0 and ib_logfile1
 

server:~# du -hsc /var/lib/mysql/{ibdata1,ib_logfile0,ib_logfile1}
19M     /var/lib/mysql/ibdata1
1,1G    /var/lib/mysql/ib_logfile0
1,1G    /var/lib/mysql/ib_logfile1
2,1G    total

Now ibdata1 will grow, but only contain table metadata. Each InnoDB table will exist outside of ibdata1.
To better understand what I mean, lets say you have InnoDB table named blogdb.mytable.
If you go into /var/lib/mysql/blogdb, you will see two files
representing the table:

  •     mytable.frm (Storage Engine Header)
  •     mytable.ibd (Home of Table Data and Table Indexes for blogdb.mytable)

Now construction will be like that for each of MySQL stored databases instead of everything to go to ibdata1.
MySQL 5.6+ admins could relax as innodb_file_per_table is enabled by default in newer SQL releases.


Now to make sure your websites are working take few of the hosted websites URLs that use any of the imported databases and just browse.
In my case ibdata1 was 45GB after clearing it up I managed to save 43 GB of disk space!!!

Enjoy the disk saving! 🙂