Posts Tagged ‘Cheers’
Wednesday, January 5th, 2022 
Christ is Born ! – Image Source: Holy Cross Monastery
Happy Nativity Christ was born 2022 years ago ! I wish a happy Nativity (Christmas).
ILet with the birth of Christ, his light and eternal dominion is born in us and lights us, as the star lighted the Magis who followed the Christmas star.
I wish my dear readers Peace, Love, Hope, Faith Good spiritual and bodily health and God's mercy by the prayers of the Holy Mother of God.

Saint Alexander Nevsky Largest Cathedral, Sofia Bulgaria. Tallest (53 m) and largest (by area and volume) cathedral in the Balkans and one of the 3 largest Eastern Orthodox Churches in Europe.
I wish you also a Happy New 2022 year ! Let the new year bring you new power to fight evil and do more good. Let the new year be peaceful, full of Grace and kindness to each of my dear readers ! Let the new year bring you more wisdom and understanding on everyone's life destination and bring you understanding on what is the proper things to do that would bring more joy and for our family, colleagues at work and people who surround is over the coming 12 months time.
Let each those who were sorrowful become joyful, those who hurted, get healed and those who worked hard find fruits out of their hard labor. Let those who hunger find food and those who are in pain find relief !
Use your obtained knowledge wisely and not only work on the mind but work on the soul so they both become better !
Cheers and Happy New Successful Year 2022 !!!
Tags: Cheers, coming, everyone, find, food, fruits, Happy New Successful Year, hunger, knowledge, new year, reading, things, wisdom, work
Posted in Christianity, Everyday Life, Rant | No Comments »
Monday, July 16th, 2012 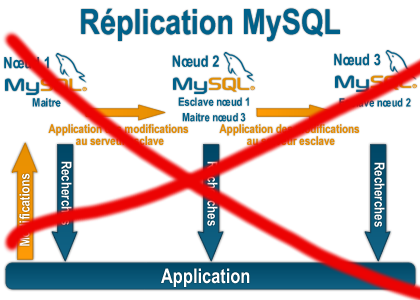
Some time ago on one of the Database MySQL servers, I've configured replication as it was required to test somethings. Eventually it turned out replication will be not used (for some reason) it was too slow and not fitting our company needs hence we needed to disable it.
It seemed logical to me that, simply removing any replication related directives from my.cnf and a restart of the SQL server will be enough to turn replication off on the Debian Linux host. Therefore I proceeded removed all replication configs from /etc/my/my.cnf and issued MySQL restart i. e.:
sql-server:~# /etc/init.d/mysql restart

....
This however didn't turned off replication,as I thought and in phpmyadminweb frontend interface, replication was still appearing to be active in the replication tab.
Something was still making the SQL server still act as an Replication Slave Host, so after a bit of pondering and trying to remember, the exact steps I took to make the replication work on the host I remembered that actually I issued:
mysql> START SLAVE;
Onwards I run:
mysql> SHOW SLAVE STATUS;

....
and found in the database the server was still running in Slave Replication mode
Hence to turn off the db host run as a Slave, I had to issue in mysql cli:
mysql> STOP SLAVE;

Query OK, 0 rows affected, 1 warning (0.01 sec)

mysql> RESET SLAVE;

Query OK, 0 rows affected, 1 warning (0.01 sec)
Then after a reload of SQL server in memory, the host finally stopped working as a Slave Replication host, e.g.
sql-server:~# /etc/init.d/mysql restart

....
After the restart, to re-assure myself the SQL server is no more set to run as MySQL replication Slave host:
mysql> SHOW SLAVE STATUS;

Empty set (0.00 sec)
Cheers 😉
Tags: Cheers, cli, cnf, Database, debian gnu, debian linux, exact steps, frontend, host, How to, init, interface, Linux, memory, Mysql, Onwards, phpmyadminweb, Query, reason, replication, reset, run, running, servers, Slave, Slave Replication, slave status, something, SQL, sql server, status, Stop, tab, time, turn, work, working
Posted in MySQL, System Administration | 1 Comment »
Thursday, December 30th, 2010 
Do you wonder How to change <meta name="Generator" content="Joomla! – Copyright (C) 2005 – 2007 Open Source Matters. All rights reserved." /> in Joomla 1.5
If yes, Here is how I've just found to remove the:
in my Joomla installation.
I need to remove that as a part of making my website not to leak out that it runs on top of Joomla.
So here is how:
1. Go to your Joomla website main root directory
2. Edit /libraries/joomla/document/html/renderer/head.php
Look for line: 83 in the /libraries/joomla/document/html/renderer/head.php
There you will notice the code:
$strHtml .= $tab.'<meta name="generator" content="'.$document->getGenerator().'" />'.$lnEnd;
In order to remove the <meta name="generator" content="Joomla …." /> change the above code to something like:
$strHtml .= $tab.'<meta name="generator" content="My Custom Web site Generator name" />'.$lnEnd;
That's all now next time you refresh your website the content="Joomla! – Copyright (C) 2005 – 2009 Open Source Matters. All rights reserved." will be no more.
Cheers! 🙂
Tags: change, Cheers, content, Copyright, custom web, document, generator, generator content, generator name, getGenerator, HEAD, How to remove the meta generator Content (Joomla! - Copyright) in Joomla 1.5, installation, Joomla, libraries, line, look, lt, meta, meta generator, name, name generator, Open, open source, Open Source Matters, order, php, root, root directory, something, tab, time, website
Posted in Joomla, Linux, System Administration, Various | No Comments »
Tuesday, April 8th, 2014 An useful thing on GNU / Linux sometimes is to list last or oldest modified files in directory.
Lets say you want to list last 10 modified files with ls from today / yesterday. Here is how:
ls -1t | head -10

my.cnf

wordperss_enabled_plugins.txt

newcerts/

mysql-hipo_pcfreakbiz.dump

NewArchive-Jan-10-15.zip

hipo_pcfreakbiz-mysqldb-any-out-1389361234.tgz

Tisho_Snimki/

wordpress/

wp-cron.php?doing_wp_cron=1.1

wp-cron.php
To list 10 oldest modified files on Linux:
ls -1t | tail -10

    my.cnf

    pcfreak_sql-15_10_05_2012

    mysql-tuning-primer*

    tuning-primer.sh*

    system-administration-services.html

    blog_backup_15_07_2012.tar.gz

    www-files/

    dump.sql

    courier-imap*

    djbdns-1.05.tar.gz
Cheers 😉
Tags: Cheers, cnf, cron, directory, dump, gz, last, Linux, Linux List, list, php, say, tail, tar, thing, today, wp, yesterday
Posted in System Administration | No Comments »
Saturday, August 20th, 2011 I’ve recently had to build a Linux server with some other servers behind the router with NAT.
One of the hosts behind the Linux router was running a Window GRE encrypted tunnel service. Which had to be accessed with the Internet ip address of the server.
In order < б>to make the GRE tunnel accessible, a bit more than just adding a normal POSTROUTING DNAT rule and iptables FORWARD is necessery.
As far as I’ve read online, there is quite of a confusion on the topic of how to properly configure the GRE tunnel accessibility on Linux , thus in this very quick tiny tutorial I’ll explain how I did it.
1. Load the ip_nat_pptp and ip_conntrack_pptp kernel module
linux-router:~# modprobe ip_nat_pptp

linux-router:~# modprobe ip_conntrack_pptp
These two modules are an absolutely necessery to be loaded before the remote GRE tunnel is able to be properly accessed, I’ve seen many people complaining online that they can’t make the GRE tunnel to work and I suppose in many of the cases the reason not to be succeed is omitting to load this two kernel modules.
2. Make the ip_nat_pptp and ip_nat_pptp modules to load on system boot time
linux-router:~# echo 'ip_nat_pptp' >> /etc/modules

linux-router:~# echo 'ip_conntrack_pptp' >> /etc/modules
3. Insert necessery iptables PREROUTING rules to make the GRE tunnel traffic flow
linux-router:~# /sbin/iptables -A PREROUTING -d 111.222.223.224/32 -p tcp -m tcp --dport 1723 -j DNAT --to-destination 192.168.1.3:1723

linux-router:~# /sbin/iptables -A PREROUTING -p gre -j DNAT --to-destination 192.168.1.3
In the above example rules its necessery to substitute the 111.222.223.224 ip address withe the external internet (real IP) address of the router.
Also the IP address of 192.168.1.3 is the internal IP address of the host where the GRE host tunnel is located.
Next it’s necessery to;
4. Add iptables rule to forward tcp/ip traffic to the GRE tunnel
linux-router:~# /sbin/iptables -A FORWARD -p gre -j ACCEPT
Finally it’s necessery to make the above iptable rules to be permanent by saving the current firewall with iptables-save or add them inside the script which loads the iptables firewall host rules.
Another possible way is to add them from /etc/rc.local , though this kind of way is not recommended as rules would add only after succesful bootup after all the rest of init scripts and stuff in /etc/rc.local is loaded without errors.
Afterwards access to the GRE tunnel to the local IP 192.168.1.3 using the port 1723 and host IP 111.222.223.224 is possible.
Hope this is helpful. Cheers 😉
Tags: bootup, Cheers, configure, confusion, dport, encrypted tunnel, external internet, flow, Forward, GRE, gre tunnel, Hope, host, hosts, How to, init, init scripts, Insert, internal ip address, internet ip address, ip nat, iptables, iptables firewall, kernel module, kernel modules, linux router, linux server, Load, make, modprobe, module linux, necessery, POSTROUTING, pptp, reason, redirect, sbin, system boot, tcp, topic, traffic flow, tutorial, window
Posted in Linux, System Administration | 6 Comments »
Monday, July 4th, 2011 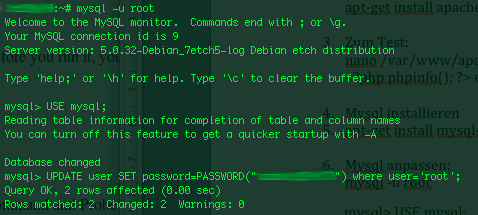
On a couple of occasions, I’ve had the issue of loosing / forgetting a MySQL password at other times I had to login to servers which contained MySQL servers with a password I don’t know.
In any of this occasions I was required to restore the ROOT access to the mysql server.
Sadly recoving a mysql lost root password is not really possible in a easy way, thus in most cases the only option one have is to stop the mysql server and run it again in a special skip-grant-tables mode, which runs the server in a sort of passwordless safe mode and makes it accessible without admin password through mysql cli .
To Omit the password check the skip-grant-table option instructs the MySQL server not to check in mysql.user while any request to connect with mysql client to the server is made.
Therefore one can login to the mysql server passwordless and reset the current (lost) password to another one.
Thease can be achived in the following four easy steps:
1. Stop the MySQL server
mysql:~# /etc/init.d/mysqld stop
2. Run the mysql server with the –skip-grant-tables option
mysql:~# mysqld_safe --skip-grant-tables &
3. Login to the mysql and change current mysql root password
mysql:~# mysq -u root

mysql> UPDATE user SET password=PASSWORD('yournewpassword')

WHERE user='root';

mysql> FLUSH privileges;
4. Stop and Start the Mysql server again
mysql:~# killall -9 mysqld_safe

mysql:~# /etc/init.d/mysqld start

..
Now the new mysql password will be identical to the yournewpassword . Cheers 😉
Tags: amp, Cheers, cli, client, couple, FLUSH, issue, killall, login, Mode, mysq, mysql password, mysql servers, mysqld, occasions, password, password check, Privileges, request, root, root password, safe mode, safemysql, server root, servermysql, Set, sort, Stop, thease, update, way, WHERE
Posted in Linux, MySQL, System Administration | No Comments »
Friday, July 29th, 2011 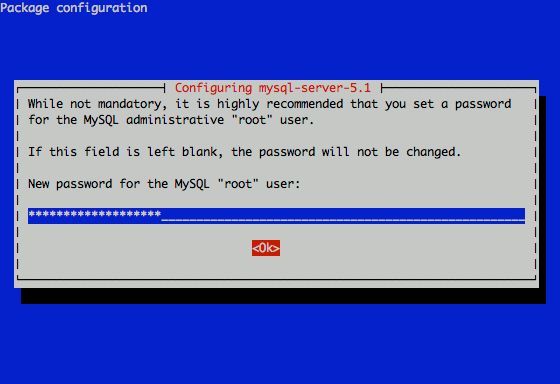
I had to change my mysql root password for one of the servers since during the install I mispasted the password in the MySQL password prompt I needed the pwd to be changed.
Here is how I changed it to my desired one:
linux:~# /usr/bin/mysqladmin -u root -p'OLD_PASSWORD_STRING' password NEW_PASSWORD_STRING

linux:~#
The password gets changed immediately 😉
If a new password has to be set to a passwordless mysql server, the command to be issued is:
linux:~# /usr/bin/mysqladmin -u root password PASSWORD_STRING
Changing the MySQL password is also possible with mysql cli, after connecting to the sql server, though this method is a bit more time consuming. Here is how to do it from mysql console:
linux:~# mysql -u root -p

Server version: 5.1.49-3 (Debian)
Copyright (c) 2000, 2010, Oracle and/or its affiliates. All rights reserved.
This software comes with ABSOLUTELY NO WARRANTY. This is free software,
and you are welcome to modify and redistribute it under the GPL v2 license
Type ‘help;’ or ‘h’ for help. Type ‘c’ to clear the current input statement.
mysql> use mysql;
mysql> update user set password=PASSWORD(“NEW_PASSWORD”) where User=’root’;mysql> flush privileges;
Of course it’s possible to do change the root pass via phpmyadmin
Cheers 😉
Tags: Cheers, cli, command, consuming, Copyright, course, free software, gpl v2, help, input statement, licenseType, Linux, mysqladmin, Old, oracle, password, password string, phpmyadmin, Privileges, pwd, root, root password, server root, servers, software, sql server, string password, time, time consuming, type, use, usr, usr bin, version, warranty
Posted in Linux, MySQL, System Administration | No Comments »
Monday, March 21st, 2011 I’m trying to install subscribe-to-comments wordpress plugin in order to make my users to easily set a tick and receive new emails if somebody replies to their comments in my blog. Pitily downloading and trying to install the subscribe-to-comments wordpress plugin was failing after it’s activation with an error message:
PHP Fatal error: Cannot redeclare show_subscription_checkbox() (previously declared in /var/www/blog/wp-content/plugins/subscribe-to-comments/subscribe-to-comments.php:12) in /var/www/blog/wp-content/plugins/subscribe-to-comments.php on line 58"
I did my best to edit the subscribe-to-comments.php to fix up the fatal error but it was no go, so after a bunch of research I’ve found out somebody created a new version of the plugin under the name subscribe-to-comments-reloaded .
I’ve proceeded and gave a try to subscribe-to-comments-reloaded as a substitute to the old broken subscribe-to-comments .
Enabling the subscribe-to-commets-reloaded worked out of the box and the plugin now works perfectly fine and even better is enabling all the functionaity of the subscribe-to-comments
Cheers 🙂
Tags: activation, blog, bunch, Cheers, ERROR, error message, fatal error, fine, functionaity, line, name, order, php, plugin, quot, redeclare, show, Solving "Cannot redeclare show_subscription_checkbox() (previously declared in .. wp-content/plugins/subscribe-to-comments/subscribe-to-comments.php", Subscription, substitute, tick, var, version, www
Posted in Various, Web and CMS, Wordpress | 3 Comments »
Sunday, January 22nd, 2012 Accidently I've removed the Gnome Volume Control while trying to remove an applet nearby from the GNOME main menu panel. Unfortunately in GNOME 2, I couldn't find a way to to return back (restore) Gnome Volume Control to the main panel. After a bit of pondering, I've managed to find a way.
Here is how I managed to restore it back:
1. Navigate to:
System > Preference > Startup Applications
2. Click on Add, then add and type the following:
 Name: Volume control

Command: gnome-volume-control-applet

Comment: Launch volume control applet
Adding the gnome-volume-control-applet will launch it every time a new gnome session (with the same user) is initiated. On next gnome login you will see the icon to appear again in the notification area. Cheers 😉
Tags: applet, area, Auto, Cheers, Click, command, Comment, control, Draft, Gnome, gnu linux, icon, launch, Linux, login, menu, menu panel, Navigate, notification, notification area, panel, preference, startup, startup applications, system, time, type, volume control, way
Posted in FreeBSD, Gnome, Linux, Linux and FreeBSD Desktop | No Comments »
Tuesday, March 15th, 2011 Just in case if you are looking for a quick way to set Google Analytics on newly installed Joomla powered site, here is how:
1. Download the Google Analytics Tracking Module
The module is available from Joomla Extensions on joomla.org
At the current time of writting you need to download the analytics_tracking15,zip file
2. Install the Google Analytics Tracking Module;
Login as joomla admin and navigate to;
Extensions -> Install
Place the analytics_tracking15.zip url to the Install URL: field.
Again as of time of writting you need to place https://www.pc-freak.net/files/analytics_tracking15.zip;
3. Open the Module Manager
Extensions -> Module Manager
4. Click over Google Analytics Tracking Module
On the right pane you will notice in the Module Parameters the Analytics_uacct_code field. In the uacct_code field you need to paste your UA obtained from your created google-analytics account.
This code is usually something like UA-2101595-10
Now place your code their and press the save green button located near the right top of the screen. You should see the text in blue Item Saved which would indicate your UA code is stored already in the Google Analytics Tracking Module, now press the Cancel button located again on the right top.
As a last step before the Google analytics is set-up on the Joomla you need to enable the plugin to do you need to press over the tick left sided from the text reading Google Analytics Tracking Module in the Module Manager
5. Click over the Enabled button in Module Manager;
Google Analytics Tracking Module -> Enabled
Cheers! Now, your Joomla website visitors count will start logging to Google Analytics.
Tags: analytics, Button, Cancel, cancel button, Cheers, Click, current time, Enabled, file, freak, google, google analytics, green button, How to easy place Google Analytics to track website visitors on Joomla, Install, Item, login, Module, module parameters, Open, org, Parameters, plugin, Press, reading, something, text reading, tick, time, ua, uacct, way, website visitors, writting, zip file
Posted in Joomla, Linux, SEO, System Administration, Various, Web and CMS | 1 Comment »


Solving “Cannot redeclare show_subscription_checkbox() (previously declared in .. wp-content/plugins/subscribe-to-comments/subscribe-to-comments.php”
Monday, March 21st, 2011I’m trying to install subscribe-to-comments wordpress plugin in order to make my users to easily set a tick and receive new emails if somebody replies to their comments in my blog. Pitily downloading and trying to install the subscribe-to-comments wordpress plugin was failing after it’s activation with an error message:
PHP Fatal error: Cannot redeclare show_subscription_checkbox() (previously declared in /var/www/blog/wp-content/plugins/subscribe-to-comments/subscribe-to-comments.php:12) in /var/www/blog/wp-content/plugins/subscribe-to-comments.php on line 58"I did my best to edit the subscribe-to-comments.php to fix up the fatal error but it was no go, so after a bunch of research I’ve found out somebody created a new version of the plugin under the name subscribe-to-comments-reloaded .
I’ve proceeded and gave a try to subscribe-to-comments-reloaded as a substitute to the old broken subscribe-to-comments .
Enabling the subscribe-to-commets-reloaded worked out of the box and the plugin now works perfectly fine and even better is enabling all the functionaity of the subscribe-to-comments
Cheers 🙂
Tags: activation, blog, bunch, Cheers, ERROR, error message, fatal error, fine, functionaity, line, name, order, php, plugin, quot, redeclare, show, Solving "Cannot redeclare show_subscription_checkbox() (previously declared in .. wp-content/plugins/subscribe-to-comments/subscribe-to-comments.php", Subscription, substitute, tick, var, version, www
Posted in Various, Web and CMS, Wordpress | 3 Comments »