Posts Tagged ‘bin’

How to set up Notify by email expiring local UNIX user accounts on Linux / BSD with a bash script

Thursday, August 24th, 2023

password-expiry-linux-tux-logo-script-picture-how-to-notify-if-password-expires-on-unix

If you have already configured Linux Local User Accounts Password Security policies Hardening – Set Password expiry, password quality, limit repatead access attempts, add directionary check, increase logged history command size and you want your configured local user accounts on a Linux / UNIX / BSD system to not expire before the user is reminded that it will be of his benefit to change his password on time, not to completely loose account to his account, then you might use a small script that is just checking the upcoming expiry for a predefined users and emails in an array with lslogins command like you will learn in this article.

The script below is written by a colleague Lachezar Pramatarov (Credit for the script goes to him) in order to solve this annoying expire problem, that we had all the time as me and colleagues often ended up with expired accounts and had to bother to ask for the password reset and even sometimes clearance of account locks. Hopefully this little script will help some other unix legacy admin systems to get rid of the account expire problem.

For the script to work you will need to have a properly configured SMTP (Mail server) with or without a relay to be able to send to the script predefined email addresses that will get notified. 

Here is example of a user whose account is about to expire in a couple of days and who will benefit of getting the Alert that he should hurry up to change his password until it is too late 🙂

[root@linux ~]# date
Thu Aug 24 17:28:18 CEST 2023

[root@server~]# chage -l lachezar
Last password change                                    : May 30, 2023
Password expires                                        : Aug 28, 2023
Password inactive                                       : never
Account expires                                         : never
Minimum number of days between password change          : 0
Maximum number of days between password change          : 90
Number of days of warning before password expires       : 14

Here is the user_passwd_expire.sh that will report the user

# vim  /usr/local/bin/user_passwd_expire.sh

#!/bin/bash

# This script will send warning emails for password expiration 
# on the participants in the following list:
# 20, 15, 10 and 0-7 days before expiration
# ! Script sends expiry Alert only if day is Wednesday – if (( $(date +%u)==3 )); !

# email to send if expiring
alert_email='alerts@pc-freak.net';
# the users that are admins added to belong to this group
admin_group="admins";
notify_email_header_customer_name='Customer Name';

declare -A mails=(
# list below accounts which will receive account expiry emails

# syntax to define uid / email
# [“account_name_from_etc_passwd”]="real_email_addr@fqdn";

#    [“abc”]="abc@fqdn.com"
#    [“cba”]="bca@fqdn.com"
    [“lachezar”]="lachezar.user@gmail.com"
    [“georgi”]="georgi@fqdn-mail.com"
    [“acct3”]="acct3@fqdn-mail.com"
    [“acct4”]="acct4@fqdn-mail.com"
    [“acct5”]="acct5@fqdn-mail.com"
    [“acct6”]="acct6@fqdn-mail.com"
#    [“acct7”]="acct7@fqdn-mail.com"
#    [“acct8”]="acct8@fqdn-mail.com"
#    [“acct9”]="acct9@fqdn-mail.com"
)

declare -A days

while IFS="=" read -r person day ; do
  days[“$person”]="$day"
done < <(lslogins –noheadings -o USER,GROUP,PWD-CHANGE,PWD-WARN,PWD-MIN,PWD-MAX,PWD-EXPIR,LAST-LOGIN,FAILED-LOGIN  –time-format=iso | awk '{print "echo "$1" "$2" "$3" $(((($(date +%s -d \""$3"+90 days\")-$(date +%s)))/86400)) "$5}' | /bin/bash | grep -E " $admin_group " | awk '{print $1 "=" $4}')

#echo ${days[laprext]}
for person in "${!mails[@]}"; do
     echo "$person ${days[$person]}";
     tmp=${days[$person]}

#     echo $tmp
# each person will receive mails only if 20th days / 15th days / 10th days remaining till expiry or if less than 7 days receive alert mail every day

     if  (( (${tmp}==20) || (${tmp}==15) || (${tmp}==10) || ((${tmp}>=0) && (${tmp}<=7)) )); 
     then
         echo "Hello, your password for $(hostname -s) will expire after ${days[$person]} days.” | mail -s “$notify_email_header_customer_name $(hostname -s) server password expiration”  -r passwd_expire ${mails[$person]};
     elif ((${tmp}<0));
     then
#          echo "The password for $person on $(hostname -s) has EXPIRED before{days[$person]} days. Please take an action ASAP.” | mail -s “EXPIRED password of  $person on $(hostname -s)”  -r EXPIRED ${mails[$person]};

# ==3 meaning day is Wednesday the day on which OnCall Person changes

        if (( $(date +%u)==3 ));
        then
             echo "The password for $person on $(hostname -s) has EXPIRED. Please take an action." | mail -s "EXPIRED password of  $person on $(hostname -s)"  -r EXPIRED $alert_email;
        fi
     fi  
done


To make the script notify about expiring user accounts, place the script under some directory lets say /usr/local/bin/user_passwd_expire.sh and make it executable and configure a cron job that will schedule it to run every now and then.

# cat /etc/cron.d/passwd_expire_cron

# /etc/cron.d/pwd_expire
#
# Check password expiration for users
#
# 2023-01-16 LPR
#
02 06 * * * root /usr/local/bin/user_passwd_expire.sh >/dev/null

Script will execute every day morning 06:02 by the cron job and if the day is wednesday (3rd day of week) it will send warning emails for password expiration if 20, 15, 10 days are left before account expires if only 7 days are left until the password of user acct expires, the script will start sending the Alarm every single day for 7th, 6th … 0 day until pwd expires.

If you don't have an expiring accounts and you want to force a specific account to have a expire date you can do it with:

# chage -E 2023-08-30 someuser


Or set it for new created system users with:

# useradd -e 2023-08-30 username


That's it the script will notify you on User PWD expiry.

If you need to for example set a single account to expire 90 days from now (3 months) that is a kind of standard password expiry policy admins use, do it with:

# date -d "90 days" +"%Y-%m-%d"
2023-11-22


Ideas for user_passwd_expire.sh script improvement
 

The downside of the script if you have too many local user accounts is you have to hardcode into it the username and user email_address attached to and that would be tedios task if you have 100+ accounts. 

However it is pretty easy if you already have a multitude of accounts in /etc/passwd that are from UID range to loop over them in a small shell loop and build new array from it. Of course for a solution like this to work you will have to have defined as user data as GECOS with command like chfn.
 

[georgi@server ~]$ chfn
Changing finger information for test.
Name [test]: 
Office []: georgi@fqdn-mail.com
Office Phone []: 
Home Phone []: 

Password: 

[root@server test]# finger georgi
Login: georgi                       Name: georgi
Directory: /home/georgi                   Shell: /bin/bash
Office: georgi@fqdn-mail.com
On since чт авг 24 17:41 (EEST) on :0 from :0 (messages off)
On since чт авг 24 17:43 (EEST) on pts/0 from :0
   2 seconds idle
On since чт авг 24 17:44 (EEST) on pts/1 from :0
   49 minutes 30 seconds idle
On since чт авг 24 18:04 (EEST) on pts/2 from :0
   32 minutes 42 seconds idle
New mail received пт окт 30 17:24 2020 (EET)
     Unread since пт окт 30 17:13 2020 (EET)
No Plan.

Then it should be relatively easy to add the GECOS for multilpe accounts if you have them predefined in a text file for each existing local user account.

Hope this script will help some sysadmin out there, many thanks to Lachezar for allowing me to share the script here.
Enjoy ! 🙂

Zabbix: Monitor Linux rsyslog configured central log server is rechable with check_log_server_status.sh userparameter script

Wednesday, June 8th, 2022

zabbix-monitor-central-log-server-is-reachable-from-host-with-a-userparamater-script-zabbix-logo

On modern Linux OS servers on Redhat / CentOS / Fedora and Debian based distros log server service is usually running on the system  such as rsyslog (rsyslogd) to make sure the logging from services is properly logged in separate logs under /var/log.

A very common practice on critical server machines in terms of data security, where logs produced by rsyslog daermon needs to be copied over network via TCP or UDP protocol immediately is to copy over the /var/log produced logs to another configured central logging server. Then later every piece of bit generated by rsyslogd could be  overseen by a third party auditor person and useful for any investigation in case of logs integrity is required or at worse case if there is a suspicion that system in question is hacked by a malicious hax0r and logs have been "cleaned" up from any traces leading to the intruder (things usually done locally by hackers) or by any automated script exploit tools since yesr.

This doubled logging of system events to external log server  ipmentioned is very common practice by companies to protect their log data and quite useful for logs to be recovered easily later on from the central logging server machine that could be also setup for example to use rsyslogd to receive logs from other Linux machines in circumstances where some log disappears just like that (things i've seen happen) for any strange reason or gets destroyed by the admins mistake locally on machine / or by any other mean such as filesystem gets damaged. a very common practice by companies to protect their log data.  

Monitor remote logging server is reachable with userparameter script

Assuming that you already have setup a logging from the server hostname A towards the Central logging server log storepool and everything works as expected the next logical step is to have at least some basic way to monitor remote logging server configured is still reachable all the time and respectively rsyslog /var/log/*.* logs gets properly produced on remote side for example with something like a simple TCP remote server port check and reported in case of troubles in zabbix.

To solve that simple task for company where I'm employed, I've developed below check_log_server_status.sh:
 

#!/bin/bash
# @@ for TCP @ for UDP
# check_log_server_status.sh Script to check if configured TCP / UDP logging server in /etc/rsyslog.conf is rechable
# report to zabbix
DELIMITER='@@';
GREP_PORT='5145';
CONNECT_TIMEOUT=5;

PORT=$(grep -Ei "*.* $DELIMITER.*:$GREP_PORT" /etc/rsyslog.conf|awk -F : '{ print $2 }'|sort -rn |uniq);

#for i in $(grep -Ei "*.* $DELIMITER.*:$GREP_PORT" /etc/rsyslog.conf |grep -v '\#'|awk -F"$DELIMITER" '{ print $2 }' | awk -F ':' '{ print $1 }'|sort -rn); do
HOST=$(grep -Ei "*.* $DELIMITER.*:$GREP_PORT" /etc/rsyslog.conf |grep -v '\#'|awk -F"$DELIMITER" '{ print $2 }' | awk -F ':' '{ print $1 }'|sort -rn)

# echo $PORT

if [[ ! -z $PORT ]] && [[ ! -z $HOST ]]; then
SSH_RETURN=$(/bin/ssh $HOST -p $PORT -o ConnectTimeout=$CONNECT_TIMEOUT 2>&1);
else
echo "PROBLEM Port $GREP_PORT not defined in /etc/rsyslog.conf";
fi

##echo SSH_RETURN $SSH_RETURN;
#exit 1;
if [[ $(echo $SSH_RETURN |grep -i ‘Connection timed out during banner exchange’ | wc -l) -eq ‘1’ ]]; then
echo "rsyslogd $HOST:$PORT OK";
fi

if [[ $(echo $SSH_RETURN |grep -i ‘Connection refused’ | wc -l) -eq ‘1’ ]]; then
echo "rsyslogd $HOST:$PORT PROBLEM";
fi

#sleep 2;
#done


You can download a copy of the script check_log_server_status.sh here

Depending on the port the remote rsyslogd central logging server is using configure it in the script with respective port through the DELIMITER='@@', GREP_PORT='5145', CONNECT_TIMEOUT=5 values.

The delimiter is setup as usually in /etc/rsyslog.conf this the remote logging server for TCP IP is configured with @@ prefix to indicated TCP mode should be used.

Below is example from /etc/rsyslog.conf of how the rsyslogd server is configured:

[root@Server-hostA /root]# grep -i @@ /etc/rsyslogd.conf
# central remote Log server IP / port
*.* @@10.10.10.1:5145

To use the script on a machine, where you have a properly configured zabbix-agentd service host connected and reporting data to a zabbix-server monitoring server.

1. Set up the script under /usr/local/bin/check_log_server_status.sh

[root@Server-hostA /root ]# vim /usr/local/bin/check_log_server_status.sh

[root@Server-hostA /root ]# chmod +x /usr/local/bin/check_log_server_status.sh

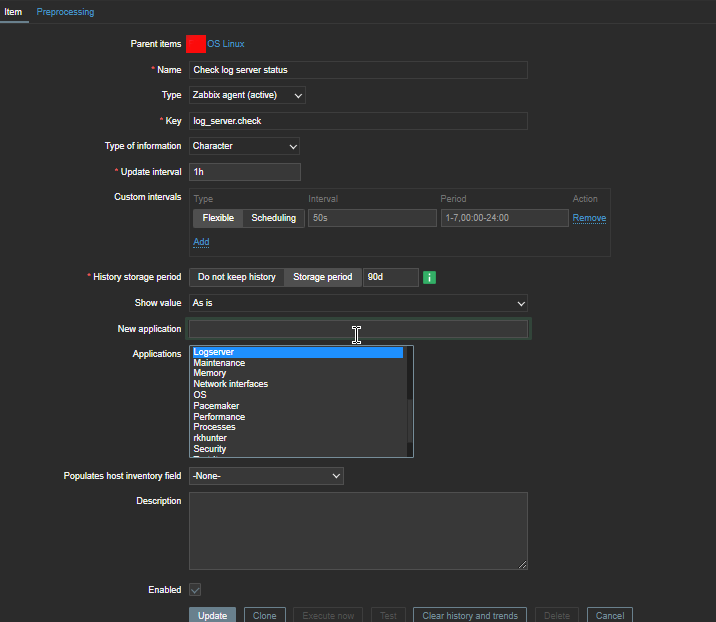
2. Prepare userparameter_check_log_server.conf with log_server.check Item key

[root@Server-hostA zabbix_agentd.d]# cat userparameter_check_log_server.conf 
UserParameter=log_server.check, /usr/local/bin/check_log_server_status.sh

3. Set in Zabbix some Item such as on below screenshot


check-log-server-status-screenshot-linux-item-zabbix.png4. Create a Zabbix trigger 

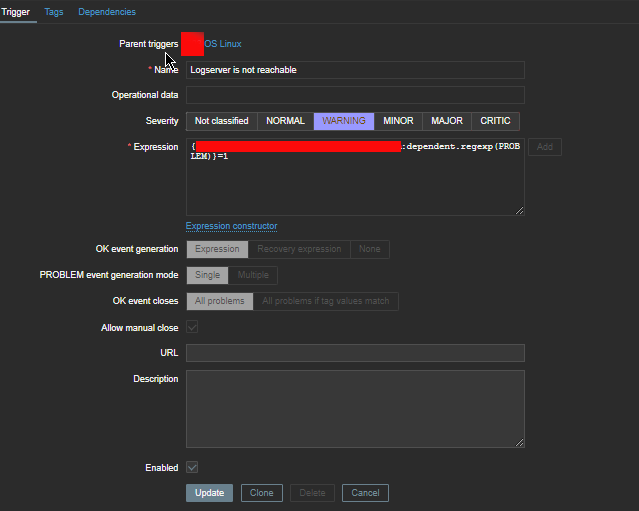
check-log-server-status-trigger-logserver-is-unreachable-zabbix


The redded hided field in Expression field should be substituted with your actual hostname on which the monitor script will run.

Get dmesg command kernel log report with human date / time timestamp on older Linux distributions

Friday, June 18th, 2021

how-to-get-dmesg-human-readable-timestamp-kernel-log-command-linux-logo

If you're a sysadmin you surely love to take a look at dmesg kernel log output. Usually on many Linux distributions there is a setup that dmesg keeps logging to log files /var/log/dmesg or /var/log/kern.log. But if you get some inherited old Linux servers it is quite possible that the previous machine maintainer did not enable the output of syslog to get logged in /var/log/{dmesg,kern.log,kernel.log}  or even have disabled the kernel log for some reason. Even though that in dmesg output you might find some interesting events reporting issues with Hard drives on its way to get broken / a bad / reads system processes crashing or whatever of other interesting information that could help you prevent severe servers downtimes or problems earlier but due to an old version of Linux distribution lets say Redhat 5 / Debian 6 or old CentOS / Fedora, the version of dmesg command shipped does not support the '-T' option that is present in util-linux package shipped with newer versions of  Redhat 7.X  / 8.X / SuSEs etc.  

 -T, –ctime
              Print human readable timestamps.  The timestamp could be inaccurate!

To illustrate better what I mean, here is an example from the non-human readable timestamp provided by older dmesg command

root@web-server~:# dmesg |tail -n 5
[4505913.361095] hid-generic 0003:1C4F:0002.000E: input,hidraw1: USB HID v1.10 Device [SIGMACHIP USB Keyboard] on usb-0000:00:1d.0-1.3/input1
[4558251.034024] Process accounting resumed
[4615396.191090] r8169 0000:03:00.0 eth1: Link is Down
[4615397.856950] r8169 0000:03:00.0 eth1: Link is Up – 100Mbps/Full – flow control rx/tx
[4644650.095723] Process accounting resumed

Thanksfully using below few lines of shell or perl scripts the dmesg -T  functionality could be added to the system , so you can easily get the proper timestamp out of the obscure default generated timestamp in the same manner as on newer distros.

Here is how to do with it with bash script:

#!/bin/sh paste in .bashrc and use dmesgt to get human readable timestamp
dmesg_with_human_timestamps () {
    FORMAT="%a %b %d %H:%M:%S %Y"


    now=$(date +%s)
    cputime_line=$(grep -m1 "\.clock" /proc/sched_debug)

    if [[ $cputime_line =~ [^0-9]*([0-9]*).* ]]; then
        cputime=$((BASH_REMATCH[1] / 1000))
    fi

    dmesg | while IFS= read -r line; do
        if [[ $line =~ ^\[\ *([0-9]+)\.[0-9]+\]\ (.*) ]]; then
            stamp=$((now-cputime+BASH_REMATCH[1]))
            echo "[$(date +”${FORMAT}” –date=@${stamp})] ${BASH_REMATCH[2]}"
        else
            echo "$line"
        fi
    done
}

Copy the script somewhere under lets say /usr/local/bin or wherever you like on the server and add into your HOME ~/.bashrc some alias like:
 

alias dmesgt=dmesg_with_timestamp.sh


You can get a copy dmesg_with_timestamp.sh of the script from here

Or you can use below few lines perl script to get the proper dmeg kernel date / time


#!/bin/perl
# on old Linux distros CentOS 6.0 etc. with dmesg (part of util-linux-ng-2.17.2-12.28.el6_9.2.x86_64) etc. dmesg -T not available
# workaround is little pl script below
dmesg_with_human_timestamps () {
    $(type -P dmesg) "$@" | perl -w -e 'use strict;
        my ($uptime) = do { local @ARGV="/proc/uptime";<>}; ($uptime) = ($uptime =~ /^(\d+)\./);
        foreach my $line (<>) {
            printf( ($line=~/^\[\s*(\d+)\.\d+\](.+)/) ? ( “[%s]%s\n", scalar localtime(time – $uptime + $1), $2 ) : $line )
        }'
}


Again to make use of the script put it under /usr/local/bin/check_dmesg_timestamp.pl

alias dmesgt=dmesg_with_human_timestamps

root@web-server:~# dmesgt | tail -n 20

[Sun Jun 13 15:51:49 2021] usb 2-1.3: USB disconnect, device number 9
[Sun Jun 13 15:51:50 2021] usb 2-1.3: new low-speed USB device number 10 using ehci-pci
[Sun Jun 13 15:51:50 2021] usb 2-1.3: New USB device found, idVendor=1c4f, idProduct=0002, bcdDevice= 1.10
[Sun Jun 13 15:51:50 2021] usb 2-1.3: New USB device strings: Mfr=1, Product=2, SerialNumber=0
[Sun Jun 13 15:51:50 2021] usb 2-1.3: Product: USB Keyboard
[Sun Jun 13 15:51:50 2021] usb 2-1.3: Manufacturer: SIGMACHIP
[Sun Jun 13 15:51:50 2021] input: SIGMACHIP USB Keyboard as /devices/pci0000:00/0000:00:1d.0/usb2/2-1/2-1.3/2-1.3:1.0/0003:1C4F:0002.000D/input/input25
[Sun Jun 13 15:51:50 2021] hid-generic 0003:1C4F:0002.000D: input,hidraw0: USB HID v1.10 Keyboard [SIGMACHIP USB Keyboard] on usb-0000:00:1d.0-1.3/input0
[Sun Jun 13 15:51:50 2021] input: SIGMACHIP USB Keyboard Consumer Control as /devices/pci0000:00/0000:00:1d.0/usb2/2-1/2-1.3/2-1.3:1.1/0003:1C4F:0002.000E/input/input26
[Sun Jun 13 15:51:50 2021] input: SIGMACHIP USB Keyboard System Control as /devices/pci0000:00/0000:00:1d.0/usb2/2-1/2-1.3/2-1.3:1.1/0003:1C4F:0002.000E/input/input27
[Sun Jun 13 15:51:50 2021] hid-generic 0003:1C4F:0002.000E: input,hidraw1: USB HID v1.10 Device [SIGMACHIP USB Keyboard] on usb-0000:00:1d.0-1.3/input1
[Mon Jun 14 06:24:08 2021] Process accounting resumed
[Mon Jun 14 22:16:33 2021] r8169 0000:03:00.0 eth1: Link is Down
[Mon Jun 14 22:16:34 2021] r8169 0000:03:00.0 eth1: Link is Up – 100Mbps/Full – flow control rx/tx

How to calculate connections from IP address with shell script and log to Zabbix graphic

Thursday, March 11th, 2021

We had to test the number of connections incoming IP sorted by its TCP / IP connection state.

For example:

TIME_WAIT, ESTABLISHED, LISTEN etc.


The reason behind is sometimes the IP address '192.168.0.1' does create more than 200 connections, a Cisco firewall gets triggered and the connection for that IP is filtered out. To be able to know in advance that this problem is upcoming. a Small userparameter script is set on the Linux servers, that does print out all connections from IP by its STATES sorted out.


The script is calc_total_ip_match_zabbix.sh is below:

#!/bin/bash
#  check ESTIMATED / FIN_WAIT etc. netstat output for IPs and calculate total
# UserParameter=count.connections,(/usr/local/bin/calc_total_ip_match_zabbix.sh)
CHECK_IP='192.168.0.1';
f=0; 


for i in $(netstat -nat | grep "$CHECK_IP" | awk '{print $6}' | sort | uniq -c | sort -n); do

echo -n "$i ";
f=$((f+i));
done;
echo
echo "Total: $f"


root@pcfreak:/bashscripts# ./calc_total_ip_match_zabbix.sh 
1 TIME_WAIT 2 ESTABLISHED 3 LISTEN 

Total: 6


root@pcfreak:/bashscripts# ./calc_total_ip_match_zabbix.sh 
2 ESTABLISHED 3 LISTEN 
Total: 5


images/zabbix-webgui-connection-check1

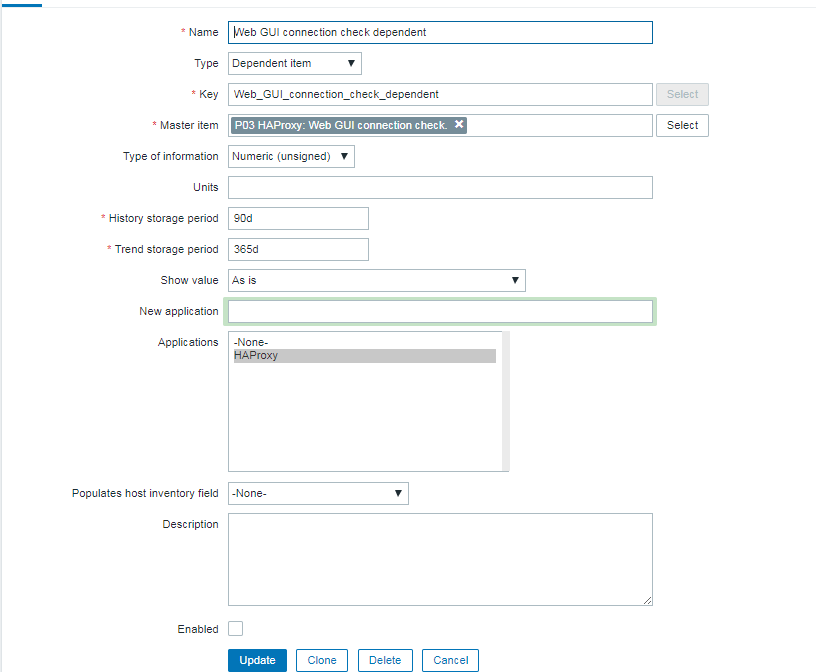
To make process with Zabbix it is necessery to have an Item created and a Depedent Item.


webguiconnection-check1

webguiconnection-check1
 

webgui-connection-check2-item

images/webguiconnection-check1

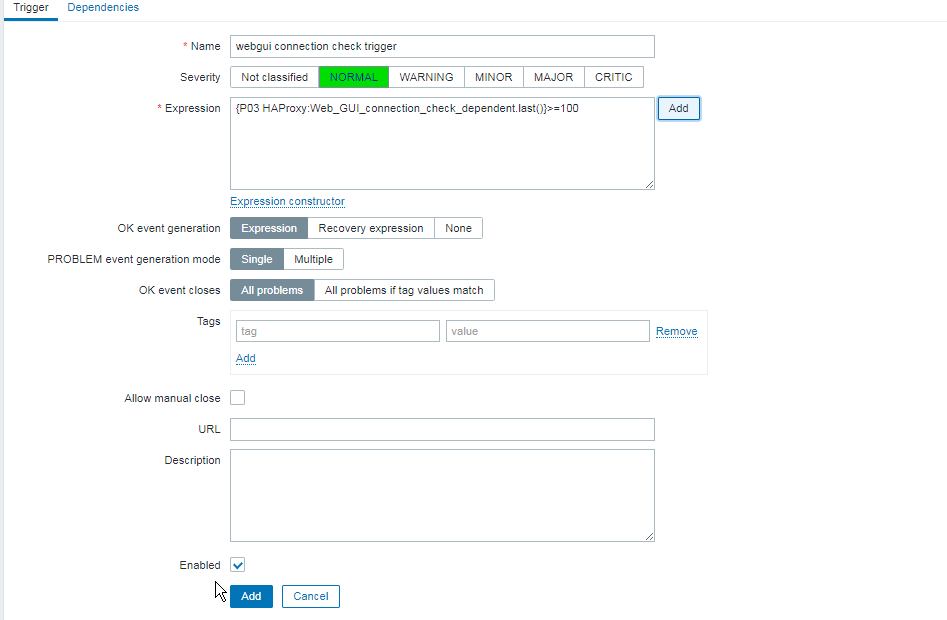
Finally create a trigger to trigger alarm if you have more than or eqaul to 100 Total overall connections.


images/zabbix-webgui-connection-check-trigger

The Zabbix userparameter script should be as this:

[root@host: ~]# cat /etc/zabbix/zabbix_agentd.d/userparameter_webgui_conn.conf
UserParameter=count.connections,(/usr/local/bin/webgui_conn_track.sh)


Some collleagues suggested more efficient shell script solution for suming the overall number of connections, below is less time consuming version of script, that can be used for the calculation.
 

#!/bin/bash -x
# show FIN_WAIT2 / ESTIMATED etc. and calcuate total
count=$(netstat -n | grep "192.168.0.1" | awk ' { print $6 } ' | sort -n | uniq -c | sort -nr)
total=$((${count// /+}))
echo "$count"
echo "Total:" "$total"

      2 ESTABLISHED
      1 TIME_WAIT
Total: 3


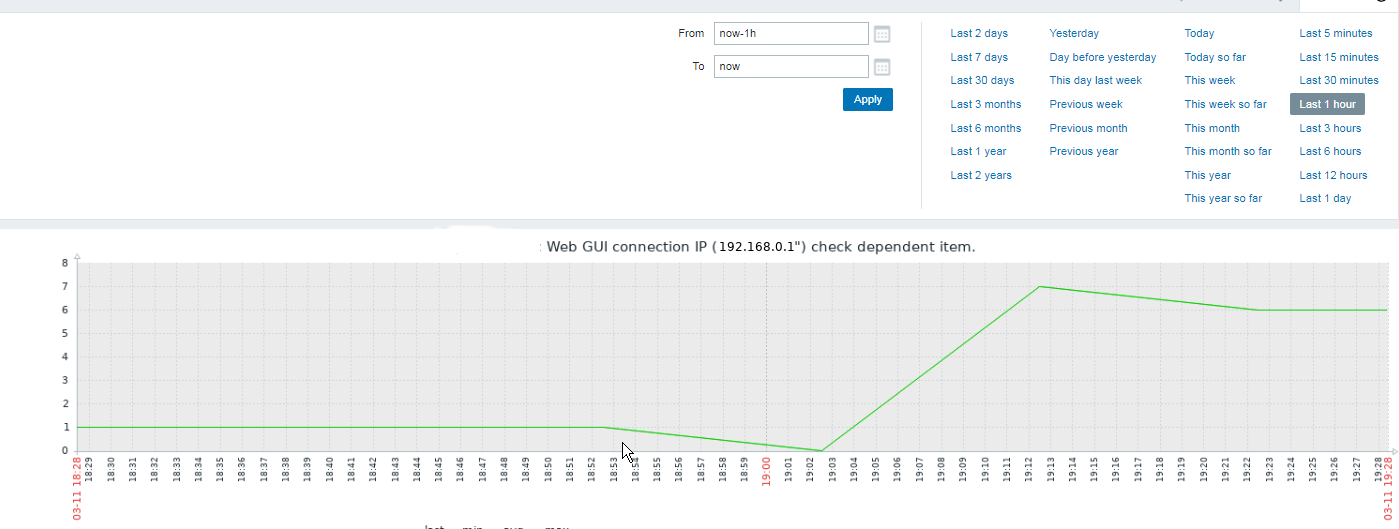
Below is the graph built with Zabbix showing all the fluctuations from connections from monitored IP. ebgui-check_ip_graph


Rsync copy files with root privileges between servers with root superuser account disabled

Tuesday, December 3rd, 2019


rsync-copy-files-between-two-servers-with-root-privileges-with-root-superuser-account-disabled

Sometimes on servers that follow high security standards in companies following PCI Security (Payment Card Data Security) standards it is necessery to have a very weird configurations on servers,to be able to do trivial things such as syncing files between servers with root privileges in a weird manners.This is the case for example if due to security policies you have disabled root user logins via ssh server and you still need to synchronize files in directories such as lets say /etc , /usr/local/etc/ /var/ with root:root user and group belongings.

Disabling root user logins in sshd is controlled by a variable in /etc/ssh/sshd_config that on most default Linux OS
installations is switched on, e.g. 

grep -i permitrootlogin /etc/ssh/sshd_config
PermitRootLogin yes


Many corporations use Vulnerability Scanners such as Qualys are always having in their list of remote server scan for SSH Port 22 to turn have the PermitRootLogin stopped with:


PermitRootLogin no


In this article, I'll explain a scenario where we have synchronization between 2 or more servers Server A / Server B, whatever number of servers that have already turned off this value, but still need to
synchronize traditionally owned and allowed to write directories only by root superuser, here is 4 easy steps to acheive it.


1. Add rsyncuser to Source Server (Server A) and Destination (Server B)


a. Execute on Src Host:


groupadd rsyncuser
useradd -g 1000 -c 'Rsync user to sync files as root src_host' -d /home/rsyncuser -m rsyncuser


b. Execute on Dst Host:


groupadd rsyncuser
useradd -g 1000 -c 'Rsync user to sync files dst_host' -d /home/rsyncuser -m rsyncuser


2. Generate RSA SSH Key pair to be used for passwordless authentication


a. On Src Host
 

su – rsyncuser

ssh-keygen -t rsa -b 4096


b. Check .ssh/ generated key pairs and make sure the directory content look like.


[rsyncuser@src-host .ssh]$ cd ~/.ssh/;  ls -1

id_rsa
id_rsa.pub
known_hosts


3. Copy id_rsa.pub to Destination host server under authorized_keys


scp ~/.ssh/id_rsa.pub  rsyncuser@dst-host:~/.ssh/authorized_keys


Next fix permissions of authorized_keys file for rsyncuser as anyone who have access to that file (that exists as a user account) on the system
could steal the key and use it to run rsync commands and overwrite remotely files, like overwrite /etc/passwd /etc/shadow files with his custom crafted credentials
and hence hack you 🙂
 

Hence, On Destionation Host Server B fix permissions with:
 

su – rsyncuser; chmod 0600 ~/.ssh/authorized_keys
[rsyncuser@dst-host ~]$


An alternative way for the lazy sysadmins is to use the ssh-copy-id command


$ ssh-copy-id rsyncuser@192.168.0.180
/usr/bin/ssh-copy-id: INFO: Source of key(s) to be installed: "/root/.ssh/id_rsa.pub"
/usr/bin/ssh-copy-id: INFO: attempting to log in with the new key(s), to filter out any that are already installed
/usr/bin/ssh-copy-id: INFO: 1 key(s) remain to be installed — if you are prompted now it is to install the new keys
root@192.168.0.180's password: 


For improved security here to restrict rsyncuser to be able to run only specific command such as very specific script instead of being able to run any command it is good to use little known command= option
once creating the authorized_keys


4. Test ssh passwordless authentication works correctly


For that Run as a normal ssh from rsyncuser

On Src Host


[rsyncuser@src-host ~]$ ssh rsyncuser@dst-host


Perhaps here is time that for those who, think enabling a passwordless authentication is not enough secure and prefer to authorize rsyncuser via a password red from a secured file take a look in my prior article how to login to remote server with password provided from command line as a script argument / Running same commands on many servers 

5. Enable rsync in sudoers to be able to execute as root superuser (copy files as root)


For this step you will need to have sudo package installed on the Linux server.

Then, Execute once logged in as root on Destionation Server (Server B)


[root@dst-host ~]# grep 'rsyncuser ALL' /etc/sudoers|wc -l || echo ‘rsyncuser ALL=NOPASSWD:/usr/bin/rsync’ >> /etc/sudoers


Note that using rsync with a ALL=NOPASSWD in /etc/sudoers could pose a high security risk for the system as anyone authorized to run as rsyncuser is able to overwrite and
respectivle nullify important files on Destionation Host Server B and hence easily mess the system, even shell script bugs could produce a mess, thus perhaps a better solution to the problem
to copy files with root privileges with the root account disabled is to rsync as normal user somewhere on Dst_host and use some kind of additional script running on Dst_host via lets say cron job and
will copy gently files on selective basis.

Perhaps, even a better solution would be if instead of granting ALL=NOPASSWD:/usr/bin/rsync in /etc/sudoers is to do ALL=NOPASSWD:/usr/local/bin/some_copy_script.sh
that will get triggered, once the files are copied with a regular rsyncuser acct.


6. Test rsync passwordless authentication copy with superuser works


Do some simple copy, lets say copy files on Encrypted tunnel configurations located under some directory in /etc/stunnel on Server A to /etc/stunnel on Server B

The general command to test is like so:
 

rsync -aPz -e 'ssh' '–rsync-path=sudo rsync' /var/log rsyncuser@$dst_host:/root/tmp/


This will copy /var/log files to /root/tmp, you will get a success messages for the copy and the files will be at destination folder if succesful.


On Src_Host run:


[rsyncuser@src-host ~]$ dst=FQDN-DST-HOST; user=rsyncuser; src_dir=/etc/stunnel; dst_dir=/root/tmp;  rsync -aP -e 'ssh' '–rsync-path=sudo rsync' $src_dir  $rsyncuser@$dst:$dst_dir;


7. Copying files with root credentials via script


The simlest file to use to copy a bunch of predefined files  is best to be handled by some shell script, the most simple version of it, could look something like this.
 

#!/bin/bash
# On server1 use something like this
# On server2 dst server
# add in /etc/sudoers
# rsyncuser ALL=NOPASSWD:/usr/bin/rsync

user='rsyncuser';

dst_dir="/root/tmp";
dst_host='$dst_host';
src[1]="/etc/hosts.deny";
src[2]="/etc/sysctl.conf";
src[3]="/etc/samhainrc";
src[4]="/etc/pki/tls/";
src[5]="/usr/local/bin/";


for i in $(echo ${src[@]}); do
rsync -aPvz –delete –dry-run -e 'ssh' '–rsync-path=sudo rsync' "$i" $rsyncuser@$dst_host:$dst_dir"$i";
done


In above script as you can see, we define a bunch of files that will be copied in bash array and then run a loop to take each of them and copy to testination dir.
A very sample version of the script rsync_with_superuser-while-root_account_prohibited.sh 
 

Conclusion


Lets do short overview on what we have done here. First Created rsyncuser on SRC Server A and DST Server B, set up the key pair on both copied the keys to make passwordless login possible,
set-up rsync to be able to write as root on Dst_Host / testing all the setup and pinpointing a small script that can be used as a backbone to develop something more complex
to sync backups or keep system configurations identicatial – for example if you have doubts that some user might by mistake change a config etc.
In short it was pointed the security downsides of using rsync NOPASSWD via /etc/sudoers and few ideas given that could be used to work on if you target even higher
PCI standards.


Install simscan on Qmail for better Mail server performance and get around unexisting suid perl in newer Linux Debian / Ubuntu servers

Tuesday, August 18th, 2015

qmail-fixing-clamdscan-errors-and-qq-errors-qmail-binary-migration-few-things-to-check-outclamav_logo-installing-clamav-antivirus-to-scan-periodically-debian-server-websites-for-viruses

I've been stuck with qmail-scanner-queue for a while on each and every new Qmail Mail server installation, I've done, this time it was not different but as time evolves and Qmail and Qmail Scanner Wrapper are not regularly updated it is getting, harder and harder to make a fully functional Qmail on newer Linux server distribution releases.

I know many would argue QMAIL is already obsolete but still I have plenty of old servers running QMAIL whose migration might cause more troubles than just continuing to use QMAIL. Moreover QMAIL once set-upped works like a charm.

I've been recently experiencing severe issues with clamdscan errors and I tried to work around this with compiling and using a suid wrapper, however still the clamdscan errors continued and as qmail-scanner is not actively developed and it is much slower than simscan, I've finally decided to give simscan as a mean to fix the clamdscan errors and thanksfully this worked as a solution.

Here is what I did "rawly" to make simscan work on this install:
 

Make sure simscan is properly installed on Debian Linux 7 or Ubuntu servers and probably (should work) on other Deb based Linuxes by following below steps:
 

a) Configure simscan with following compile time options as root (superuser)

./configure \
–enable-user=qscand \
–enable-clamav \
–enable-clamdscan=/usr/local/bin/clamdscan \
–enable-custom-smtp-reject=y \
–enable-per-domain=y \
–enable-attach=y \
–enable-dropmsg=n \
–enable-spam=y \
–enable-spam-hits=5 \
–enable-spam-passthru=y \
–enable-qmail-queue=/var/qmail/bin/qmail-queue \
–enable-ripmime=/usr/local/bin/ripmime \
–enable-sigtool-path=/usr/local/bin/sigtool \
–enable-received=y


b) Compile it


 make && make install-strip

c) Fix any wrong permissions of simscan queue directory


chmod g+s /var/qmail/simscan/

chown -R qscand:qscand /var/qmail/simscan/
chmod -R 777 simscan/chown -R qscand:qscand simscan/
chown -R qscand:qscand simscan/

d) Add some additional simscan options (how simscan is how to perform scans)

The restart qmail to make mailserver start using simscan instead of qmail-scanner, run below command (again as root):

echo ":clam=yes,spam=yes,spam_hits=8.5,attach=.vbs:.lnk:.scr:.wsh:.hta:.pif" > /var/qmail/control/simcontrol


e) Run /var/qmail/bin/simscanmk in order to convert /var/qmail/control/simcontrol into the /var/qmail/control/simcontrol.cdb database

/var/qmail/bin/simscanmk
/var/qmail/bin/simscanmk -g

f) Modify /service/qmail-smtpd/run to set simscan to be default Antivirus Wrapper Scanner

vim /service/qmail-smtpd/run

I'm using thibs's run script so I've uncommented the line there:

QMAILQUEUE="$VQ/bin/simscan"

Below two lines should stay commented as qmail-scanner is no longer used:

##QMAILQUEUE="$VQ/bin/qmail-scanner-queue"
##QMAILQUEUE="$VQ/bin/qmail-scanner-queue.pl"
export QMAILQUEUE

qmailctl restart
* Stopping qmail-smtpdssl.
* Stopping qmail-smtpd.
* Sending qmail-send SIGTERM and restarting.
* Restarting qmail-smtpd.
* Restarting qmail-smtpdssl.

g) Test whether simscan is properly sending / receiving emails:

echo "Testing Email" >> /tmp/mailtest.txt
env QMAILQUEUE=/var/qmail/bin/simscan SIMSCAN_DEBUG=3 /var/qmail/bin/qmail-inject hipo@my-mailserver.com < /tmp/mailtest.txt

Besides that as I'm using qscand:qscand as a user for my overall Qmail Thibs install I had to also do:

chown -R qscand:qscand /var/qmail/simscan/
chmod -R 777 simscan/
chown -R qscand:qscand simscan/


It might be a good idea to also place that lines in /etc/rc.local to auto change permissions on Linux boot, just in case something wents wrong with permissions.

Yeah, I know 777 is unsecure but without this permissions, I was still getting errors, plus the server doesn't have any accounts except the administrator, so I do not worry other system users might sniff on email 🙂

h) Test whether Qmail mail server send / receives fine with simscan

After that I've used another mail server with mail command to test whether mail is received:
 

mail -s "testing email1234" hipo@new-configured-qmail-server.com
asdfadsf
.
Cc:

Then it is necessery to also install latest clamav daemon from source in my case that's on Debian GNU / Linux 7, because somehow the Debian shipped binary version of clamav 0.98.5+dfsg-0+deb7u2 does fail to scan any incoming or outgoing email with error:
 

clamdscan: corrupt or unknown clamd scanner error or memory/resource/perms problem – exit status -1/72057594037927935

So to fix it you will have to install clamav on Debian Linux from source.


Voilla, that's all finally it worked !

‘host-name’ is blocked because of many connection errors; unblock with ‘mysqladmin flush-hosts’

Sunday, May 20th, 2012

mysql-logo-host-name-blocked-because-of-many-connection-errors
My home run machine MySQL server was suddenly down as I tried to check my blog and other sites today, the error I saw while trying to open, this blog as well as other hosted sites using the MySQL was:

Error establishing a database connection

The topology, where this error occured is simple, I have two hosts:

1. Apache version 2.0.64 compiled support externally PHP scripts interpretation via libphp – the host runs on (FreeBSD)

2. A Debian GNU / Linux squeeze running MySQL server version 5.1.61

The Apache host is assigned a local IP address 192.168.0.1 and the SQL server is running on a host with IP 192.168.0.2

To diagnose the error I've logged in to 192.168.0.2 and weirdly the mysql-server was appearing to run just fine:
 

debian:~# ps ax |grep -i mysql
31781 pts/0 S 0:00 /bin/sh /usr/bin/mysqld_safe
31940 pts/0 Sl 12:08 /usr/sbin/mysqld –basedir=/usr –datadir=/var/lib/mysql –user=mysql –pid-file=/var/run/mysqld/mysqld.pid –socket=/var/run/mysqld/mysqld.sock –port=3306
31941 pts/0 S 0:00 logger -t mysqld -p daemon.error
32292 pts/0 S+ 0:00 grep -i mysql

Moreover I could connect to the localhost SQL server with mysql -u root -p and it seemed to run fine. The error Error establishing a database connection meant that either something is messed up with the database or 192.168.0.2 Mysql port 3306 is not properly accessible.

My first guess was something is wrong due to some firewall rules, so I tried to connect from 192.168.0.1 to 192.168.0.2 with telnet:
 

freebsd# telnet 192.168.0.2 3306
Trying 192.168.0.2…
Connected to jericho.
Escape character is '^]'.
Host 'webserver' is blocked because of many connection errors; unblock with 'mysqladmin flush-hosts'
Connection closed by foreign host.

Right after the telnet was initiated as I show in the above output the connection was immediately closed with the error:

Host 'webserver' is blocked because of many connection errors; unblock with 'mysqladmin flush-hosts'Connection closed by foreign host.

In the error 'webserver' is my Apache machine set hostname. The error clearly states the problems with the 'webserver' apache host unable to connect to the SQL database are due to 'many connection errors' and a fix i suggested with mysqladmin flush-hosts

To temporary solve the error and restore my normal connectivity between the Apache and the SQL servers I logged I had to issue on the SQL host:

mysqladmin -u root -p flush-hostsEnter password:

Thogh this temporar fix restored accessibility to the databases and hence the websites errors were resolved, this doesn't guarantee that in the future I wouldn't end up in the same situation and therefore I looked for a permanent fix to the issues once and for all.

The permanent fix consists in changing the default value set for max_connect_error in /etc/mysql/my.cnf, which by default is not too high. Therefore to raise up the variable value, added in my.cnf in conf section [mysqld]:

debian:~# vim /etc/mysql/my.cnf
...
max_connect_errors=4294967295

and afterwards restarted MYSQL:

debian:~# /etc/init.d/mysql restart
Stopping MySQL database server: mysqld.
Starting MySQL database server: mysqld.
Checking for corrupt, not cleanly closed and upgrade needing tables..

To make sure the assigned max_connect_errors=4294967295 is never reached due to Apache to SQL connection errors, I've also added as a cronjob.

debian:~# crontab -u root -e
00 03 * * * mysqladmin flush-hosts

In the cron I have omitted the mysqladmin -u root -p (user/pass) input options because for convenience I have already stored the mysql root password in /root/.my.cnf

Here is how /root/.my.cnf looks like:

debian:~# cat /root/.my.cnf
[client]
user=root
password=a_secret_sql_password

Now hopefully, this would permanently solve SQL's 'failure to accept connections' due to too many connection errors for future.