Posts Tagged ‘control’

How to debug failing service in systemctl and add a new IP network alias in CentOS Linux

Wednesday, January 15th, 2020

linux-debug-failing-systemctl-systemd-service--add-new-IP-alias-network-cable

If you get some error with some service that is start / stopped via systemctl you might be pondering how to debug further why the service is not up then then you'll be in the situation I was today.
While on one configured server with 8 eth0 configured ethernet network interfaces the network service was reporting errors, when atempted to restart the RedHat way via:
 

service network restart


to further debug what the issue was as it was necessery I had to find a way how to debug systemctl so here is how:


How to do a verbose messages status for sysctlct?


linux:~# systemctl status network

linux:~# systemctl status network


Another useful hint is to print out only log messages for the current boot, you can that with:

# journalctl -u service-name.service -b


if you don't want to have the less command like page separation ( paging ) use the –no-pager argument.


# journalctl -u network –no-pager

Jan 08 17:09:14 lppsq002a network[8515]: Bringing up interface eth5:  [  OK  ]

    Jan 08 17:09:15 lppsq002a network[8515]: Bringing up interface eth6:  [  OK  ]
    Jan 08 17:09:15 lppsq002a network[8515]: Bringing up interface eth7:  [  OK  ]
    Jan 08 17:09:15 lppsq002a systemd[1]: network.service: control process exited, code=exited status=1
    Jan 08 17:09:15 lppsq002a systemd[1]: Failed to start LSB: Bring up/down networking.
    Jan 08 17:09:15 lppsq002a systemd[1]: Unit network.service entered failed state.
    Jan 08 17:09:15 lppsq002a systemd[1]: network.service failed.
    Jan 15 11:04:45 lppsq002a systemd[1]: Starting LSB: Bring up/down networking…
    Jan 15 11:04:45 lppsq002a network[55905]: Bringing up loopback interface:  [  OK  ]
    Jan 15 11:04:45 lppsq002a network[55905]: Bringing up interface eth0:  RTNETLINK answers: File exists
    Jan 15 11:04:45 lppsq002a network[55905]: [  OK  ]
    Jan 15 11:04:45 lppsq002a network[55905]: Bringing up interface eth1:  RTNETLINK answers: File exists
    Jan 15 11:04:45 lppsq002a network[55905]: [  OK  ]
    Jan 15 11:04:46 lppsq002a network[55905]: Bringing up interface eth2:  ERROR     : [/etc/sysconfig/network-scripts/ifup-eth] Device eth2 has different MAC address than expected, ignoring.
    Jan 15 11:04:46 lppsq002a network[55905]: [FAILED]
    Jan 15 11:04:46 lppsq002a network[55905]: Bringing up interface eth3:  RTNETLINK answers: File exists
    Jan 15 11:04:46 lppsq002a network[55905]: [  OK  ]
    Jan 15 11:04:46 lppsq002a network[55905]: Bringing up interface eth4:  ERROR     : [/etc/sysconfig/network-scripts/ifup-eth] Device eth4 does not seem to be present, delaying initialization.
    Jan 15 11:04:46 lppsq002a network[55905]: [FAILED]
    Jan 15 11:04:46 lppsq002a network[55905]: Bringing up interface eth5:  RTNETLINK answers: File exists
    Jan 15 11:04:46 lppsq002a network[55905]: [  OK  ]
    Jan 15 11:04:46 lppsq002a network[55905]: Bringing up interface eth6:  RTNETLINK answers: File exists
    Jan 15 11:04:47 lppsq002a network[55905]: [  OK  ]
    Jan 15 11:04:47 lppsq002a network[55905]: Bringing up interface eth7:  RTNETLINK answers: File exists
    Jan 15 11:04:47 lppsq002a network[55905]: [  OK  ]
    Jan 15 11:04:47 lppsq002a network[55905]: RTNETLINK answers: File exists
    Jan 15 11:04:47 lppsq002a network[55905]: RTNETLINK answers: File exists
    Jan 15 11:04:47 lppsq002a network[55905]: RTNETLINK answers: File exists
    Jan 15 11:04:47 lppsq002a network[55905]: RTNETLINK answers: File exists
    Jan 15 11:04:47 lppsq002a network[55905]: RTNETLINK answers: File exists
    Jan 15 11:04:47 lppsq002a network[55905]: RTNETLINK answers: File exists
    Jan 15 11:04:47 lppsq002a network[55905]: RTNETLINK answers: File exists
    Jan 15 11:04:47 lppsq002a network[55905]: RTNETLINK answers: File exists
    Jan 15 11:04:47 lppsq002a network[55905]: RTNETLINK answers: File exists
    Jan 15 11:04:47 lppsq002a systemd[1]: network.service: control process exited, code=exited status=1
    Jan 15 11:04:47 lppsq002a systemd[1]: Failed to start LSB: Bring up/down networking.
    Jan 15 11:04:47 lppsq002a systemd[1]: Unit network.service entered failed state.
    Jan 15 11:04:47 lppsq002a systemd[1]: network.service failed.
    Jan 15 11:08:22 lppsq002a systemd[1]: Starting LSB: Bring up/down networking…
    Jan 15 11:08:22 lppsq002a network[56841]: Bringing up loopback interface:  [  OK  ]
    Jan 15 11:08:22 lppsq002a network[56841]: Bringing up interface eth0:  RTNETLINK answers: File exists
    Jan 15 11:08:22 lppsq002a network[56841]: [  OK  ]
    Jan 15 11:08:26 lppsq002a network[56841]: Bringing up interface eth1:  RTNETLINK answers: File exists
    Jan 15 11:08:26 lppsq002a network[56841]: [  OK  ]
    Jan 15 11:08:26 lppsq002a network[56841]: Bringing up interface eth2:  ERROR     : [/etc/sysconfig/network-scripts/ifup-eth] Device eth2 has different MAC address than expected, ignoring.
    Jan 15 11:08:26 lppsq002a network[56841]: [FAILED]
    Jan 15 11:08:26 lppsq002a network[56841]: Bringing up interface eth3:  RTNETLINK answers: File exists
    Jan 15 11:08:27 lppsq002a network[56841]: [  OK  ]
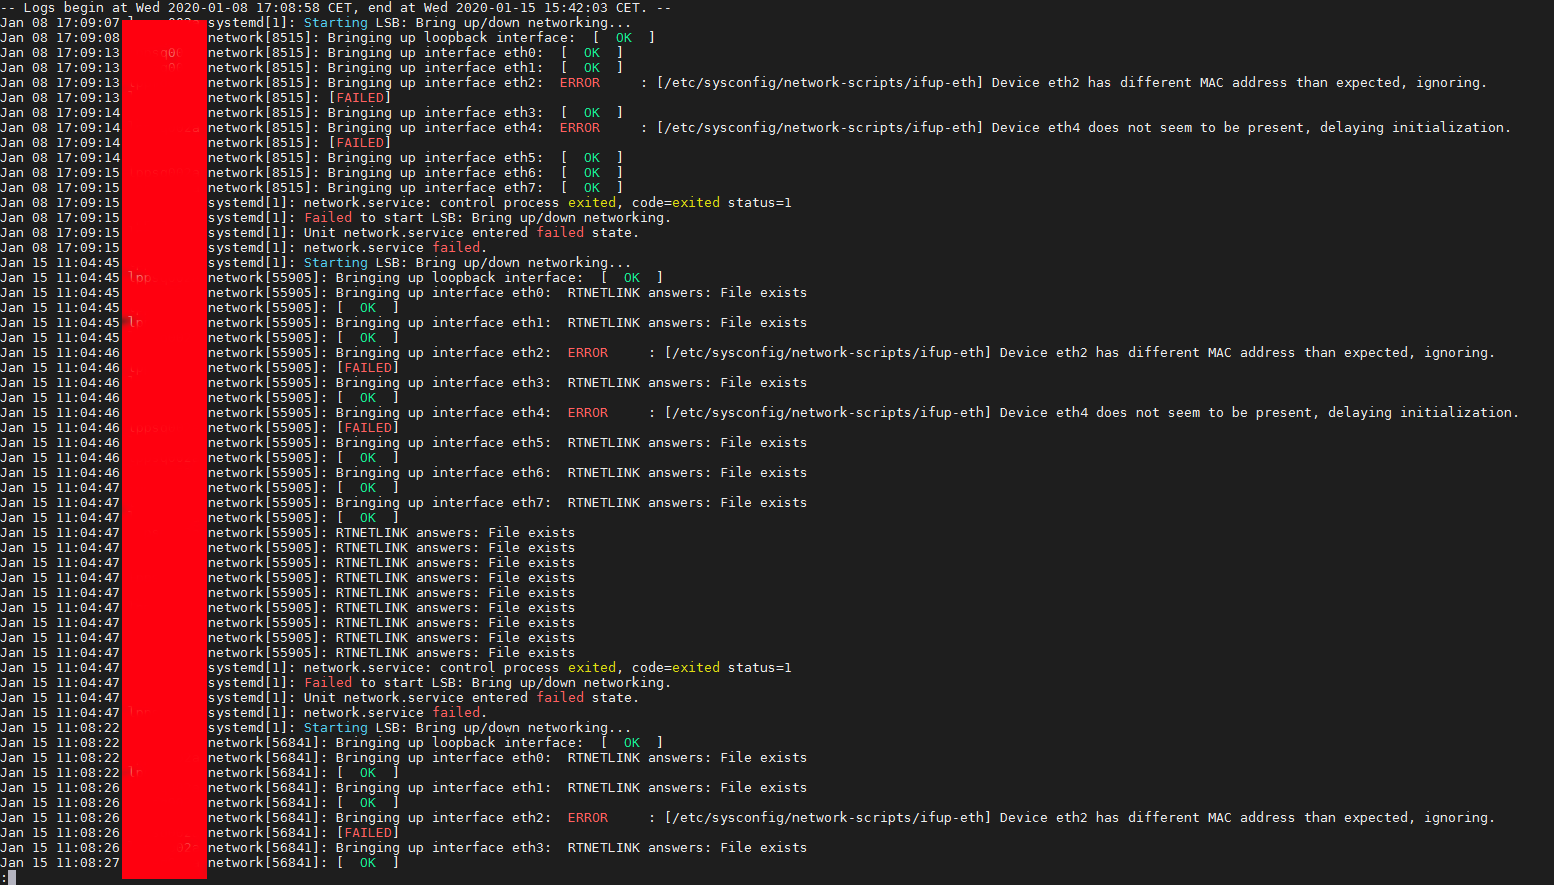

2020-01-15-15_42_11-root-server


Another useful thing debug arguments is the -xe to do:

# journalctl -xe –no-pager


  • -x (– catalog)
    Augment log lines with explanation texts from the message catalog.
    This will add explanatory help texts to log messages in the output
    where this is available.
  •  -e ( –pager-end )  Immediately jump to the end of the journal inside the implied pager
      tool.
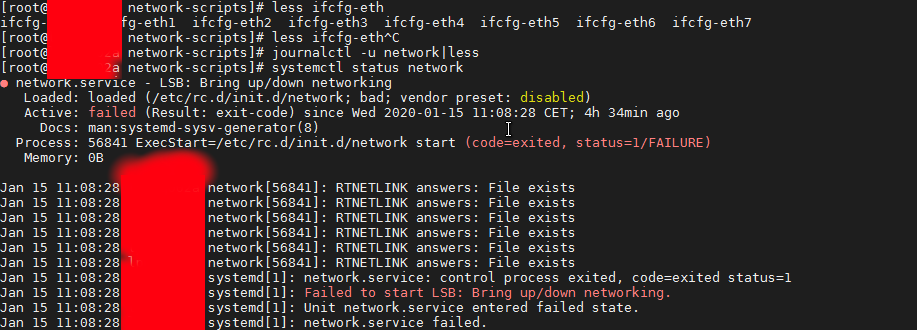
2020-01-15-15_42_32-root-server

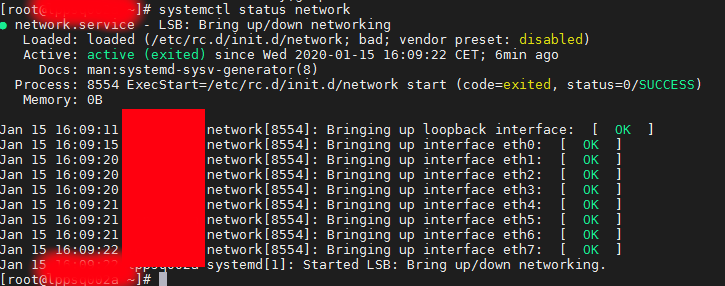
Finally after fixing the /etc/sysconfig/networking-scripts/* IP configuration issues I had all the 8 Ethernet interfaces to work as expected
 

# systemctl status network

2020-01-15-16_15_38-root-server


2. Adding a new IP alias to eth0 interface


Further on I had  to add an IP Alias on the CenOS via its networking configuration, this is done by editing /etc/sysconfig/network-scripts/ifcfg* files.
To create an IP alias for first lan interface eth0, I've had to created a new file named ifcfg-eth0:0
 

linux:~# cd /etc/sysconfig/network-scripts/
linux:~# vim ifcfg-eth0:0


with below content

NAME="eth0:0"
ONBOOT="yes"
BOOTPROTO="none"
IPADDR="10.50.10.5"
NETMASK="255.255.255.0"


Adding this IP address network alias works across all RPM based distributions and should work also on Fedora and Open SuSE as well as Suse Enterprise Linux.
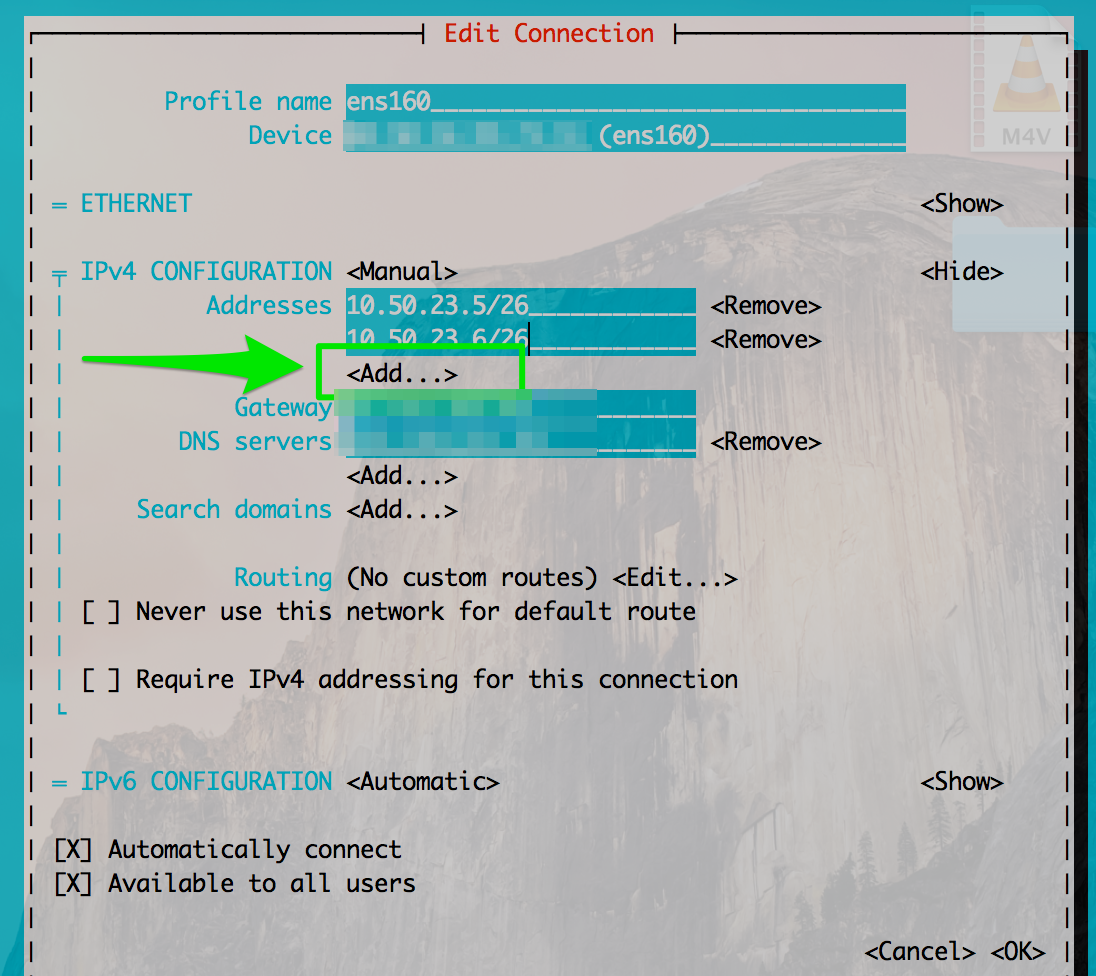
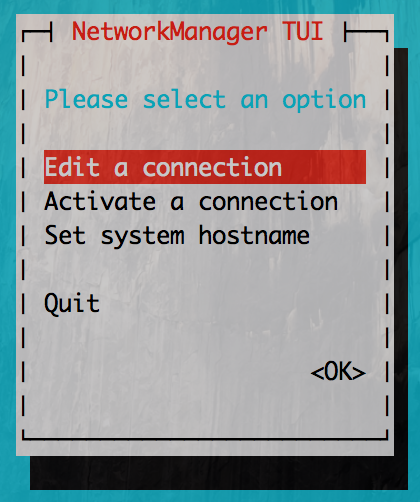
If you however prefer to use a text GUI and do it the CentOS server administration way you can use nmtui (Text User Interface for controlling NetworkManager). tool.
 

linux:~# nmtui
 

centos7_nmtui-ncurses-network-configuration-sysadmin-tool

nmtui_add_alias_interface-screenshot

Putty load as default session another session – Save other Putty session configuration to default howto

Thursday, November 29th, 2018

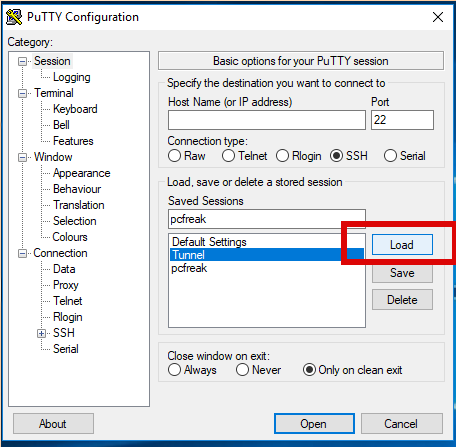
putty-load-button-screenshot

Recently I had to use PuTTY which I haven't used for years to open a number of SSH Pernanent Tunnels necessery for my daily work as a SAP Consultant.

I've saved them under a certain new profile and saved the set SSH Tunnel configuration not in the default Session but in separate named one, therefore had to press Load button every time after clicking over my Putty shortcut icon. 

That was annoying and took few seconds out of my life every next morning for about a week, so finally I found osme time to google it and it seemed it is pretty easy to have any Putty sessoin loaded you like.

Here is how:

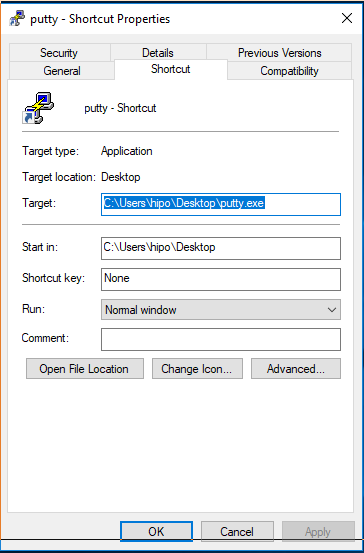
1. Create a new Putty Shortcut

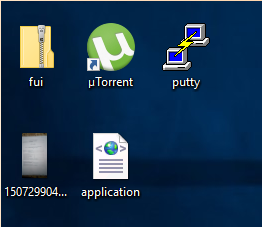
putty-screenshot1

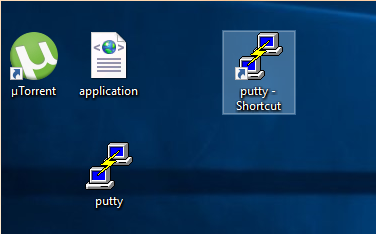
putty-shortcut-screenshot-windows

Click over Putty icon while holding CTRL + SHIFT (Control SHIFT keys simultaneously ) and move the mouse somewhere on the desktop to create the shortcut.
 

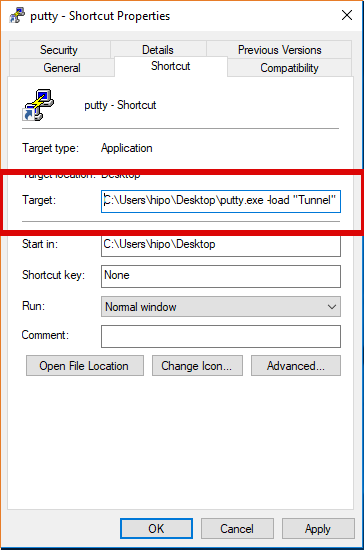
2. Right click on Putty Shortcut

putty-target-screenshot-windows1

putty-target-screenshot-windows2


"C:\Program Files\PuTTY\putty.exe" -load "your_saved_session" "username@your_server_address" -pw "your_password"


fill out "target" field of shortcut using above code (alter to your own properties).
click Apply button.

If you need to pass a user and password from Shortcut itself (which is a bad practice for security but sometimes useful, for not so important Tunnels – for example a tunnel to an Open Proxy), do it by typing in the target field like so:
 

"C:\Program Files\PuTTY\putty.exe" -load "your_saved_session" "username@your_server_address" -pw "your_password"


And Hooray !!! After that when you click on PuTTy shortcut it loads your session automatically using given username and password.

Pavlov Experiments in Conditioning, B.F. Skinner’s Operant Conditioning

Friday, May 18th, 2012

pavlov-dog-conditioning-experiment-operant-conditioning

The facts concerning, how mind works has advanced severely through the years. Maybe the most significant scientists a fore-fathers of modern psychology are Ivan Pavlov and B. B. Skinner

Both of this guys has made a number of experiments, that prooved that programming a person through sensory neuro input through hearing sounds and seeing pictures is possible.

The Russian Pavlov's experiments gave a birth to a new era in science and made the further research on mind control and how mind works possible. He made a number of dog experiments, later repeated with kids, indicating that nervous and mind conditioning in both animals and humans is possible.

Later his research was reconfirmed many times by many scientists and even can be re-peated in home if you want to test it, I've seen people in youtube who tested Pavov experiments recorded the experiment and it is evident it works.

it was a little after the Operand conditioning existence by BF Skinner was discovered. The operand conditioning show that a complex behaviours in both animals and people can be programmed.

The videos above literally show a revolution in science and I'm convinced this experiments should be mostly anyone involved in academic activities. It is rather unexplainable to me, I never heard of University, College or School that shows this videos to  students …

Ivan Pavlov – experiments in Conditioning (dog food timing experiment)

B. F. Skinner's 's Operant Conditioning Chamber – Saieed Hasnoo – What is Operant Conditioning

Why so less is spoken about the existence, of such a proofs that mind control and people programming is possible. How far this kind of experiments went to?? And how far humanity can go in their insane look for knowledge? Looking over the civilization we have today, not too far from now. Right now I mosty see in the street people without direction a lost sheeps without a shepherd. Lets hope situation will be better soon and people will realize this experiments proove that God made the universe to work in order and this kind of facts concerning how matter works are just a proof for the God's order and the wonderful way we're made.


What is predictive programming and how it is used to manipulate our ideas about the future

Sunday, May 20th, 2012

what-is-predictive-programming

What is Predictive Programming?

Predictive programming is a subtle form of psychological conditioning provided by the media to acquaint the public with planned societal changes to be implemented. If and when these changes are put through, the public will already be familiarized with them and will accept them as 'natural progressions'; thus lessening any possible public resistance and commotion. Predictive programming therefore may be considered as a veiled form of preemptive mass manipulation or mind control.

Here are few youtube videos pretty well showing some major all main stream youth culture know movies like the Matrix, Fight Club and Star Trek that has a rich predictive programming embedded:


Predictive Programming of Mind Control by Media


Hollywood's Agenda 1 – Predictive Programing and Hidden in Plain Sight

The propaganda in the movies is clear:

New World Order, dictatorship, an upcoming human saviour Messiah and everything we know prophecies in the Holy Bible by the elders and the saints and the saint Living Orthodox Christian books.

Predictive programming is not only in the hollywood produced high budget movies, its also widely used in the TV news and games like X Factor and many many more …
There is plenty of interesting info on the subject, but be careful as it is very addictive. At the end nomatter what kind of secret agenda lays in all this mass medias to imply us ideas on possible future events or possible future gadgets economic systems or whatever it is still up to God to allow any of the agendas to come to reality.

One major methodology used in almost all brainwashing pre-conditoning, predictive programming is the so called Hegelian Dialectics claiming the foruma ( A + B = C)

Thesis + Antithesis = Synthesis

The Hegelian Dialectic visual Diagram Thesis and Anthisis equals Synthesis

The scenarios in most movie or news is like that.

First they show you something making a Thesis (Let's say – The Dolly ship first cloned animal), then they show develop an Anti-Thesis (Big money are paid for people to criticize on the dangers of mass animal cloning), then after a while there is synthesis = (The mass animal cloning is dangerous but necessery and therefore OKAY so we will clone.). The same scenario is repeated again and again myriad of times. For the unknowing observer, all the 'trial' looks perfectly legid…

Communism was one good example of a Regime that people thought will continue forever and every country sooner or later could become communist. The facts years after is clear Communism is pure Utopia and even though the regime was so strong it failed 🙂 So we should not worry too much and 'we should not our hearts be  troubled' by this unwalful stuff being around, but we should be aware of it and next time we're told this in school or university and claimed as being okay we should oppose it as TRUE CHRISTIANS. At the end God is in control as we read in the Holy Bible, so nomatter happens if we trust God and pray for his mercies, he will never forsake us.


How to renew self signed QMAIL toaster and QMAIL rocks expired SSL pem certificate

Friday, September 2nd, 2011

qmail_toaster_logo-fix-qmail-rocks-expired-ssl-pem-certificate

One of the QMAIL server installs, I have installed very long time ago. I've been notified by clients, that the certificate of the mail server has expired and therefore I had to quickly renew the certificate.

This qmail installation, SSL certificates were located in /var/qmail/control under the names servercert.key and cervercert.pem

Renewing the certificates with a new self signed ones is pretty straight forward, to renew them I had to issue the following commands:

1. Generate servercert encoded key with 1024 bit encoding

debian:~# cd /var/qmail/control
debian:/var/qmail/control# openssl genrsa -des3 -out servercert.key.enc 1024
Generating RSA private key, 1024 bit long modulus
...........++++++
.........++++++
e is 65537 (0x10001)
Enter pass phrase for servercert.key.enc:
Verifying - Enter pass phrase for servercert.key.enc:

In the Enter pass phrase for servercert.key.enc I typed twice my encoded key password, any password is good, here though using a stronger one is better.

2. Generate the servercert.key file

debian:/var/qmail/control# openssl rsa -in servercert.key.enc -out servercert.key
Enter pass phrase for servercert.key.enc:
writing RSA key

3. Generate the certificate request

debian:/var/qmail/control# openssl req -new -key servercert.key -out servercert.csr
debian:/var/qmail/control# openssl rsa -in servercert.key.enc -out servercert.key
Enter pass phrase for servercert.key.enc:writing RSA key
root@soccerfame:/var/qmail/control# openssl req -new -key servercert.key -out servercert.csr
You are about to be asked to enter information that will be incorporated
into your certificate request.
What you are about to enter is what is called a Distinguished Name or a DN.
There are quite a few fields but you can leave some blank
For some fields there will be a default value,
If you enter '.', the field will be left blank.
-----
Country Name (2 letter code) [AU]:UK
State or Province Name (full name) [Some-State]:London
Locality Name (eg, city) []:London
Organization Name (eg, company) [Internet Widgits Pty Ltd]:My Company
Organizational Unit Name (eg, section) []:My Org
Common Name (eg, YOUR name) []:
Email Address []:admin@adminmail.com

Please enter the following 'extra' attributes
to be sent with your certificate request
A challenge password []:
An optional company name []:

In the above prompts its necessery to fill in the company name and location, as each of the prompts clearly states.

4. Sign the just generated certificate request

debian:/var/qmail/control# openssl x509 -req -days 9999 -in servercert.csr -signkey servercert.key -out servercert.crt

Notice the option -days 9999 this option instructs the newly generated self signed certificate to be valid for 9999 days which is quite a long time, the reason why the previous generated self signed certificate expired was that it was built for only 365 days

5. Fix the newly generated servercert.pem permissions debian:~# cd /var/qmail/control
debian:/var/qmail/control# chmod 640 servercert.pem
debian:/var/qmail/control# chown vpopmail:vchkpw servercert.pem
debian:/var/qmail/control# cp -f servercert.pem clientcert.pem
debian:/var/qmail/control# chown root:qmail clientcert.pem
debian:/var/qmail/control# chmod 640 clientcert.pem

Finally to load the new certificate, restart of qmail is required:

6. Restart qmail server

debian:/var/qmail/control# qmailctl restart
Restarting qmail:
* Stopping qmail-smtpd.
* Sending qmail-send SIGTERM and restarting.
* Restarting qmail-smtpd.

Test the newly installed certificate

To test the newly installed SSL certificate use the following commands:

debian:~# openssl s_client -crlf -connect localhost:465 -quiet
depth=0 /C=UK/ST=London/L=London/O=My Org/OU=My Company/emailAddress=admin@adminmail.com
verify error:num=18:self signed certificate
verify return:1
...
debian:~# openssl s_client -starttls smtp -crlf -connect localhost:25 -quiet
depth=0 /C=UK/ST=London/L=London/O=My Org/OU=My Company/emailAddress=admin@adminmail.com
verify error:num=18:self signed certificate
verify return:1
250 AUTH LOGIN PLAIN CRAM-MD5
...

If an error is returned like 32943:error:140770FC:SSL routines:SSL23_GET_SERVER_HELLO:unknown protocol:s23_clnt.c:607: this means that SSL variable in the qmail-smtpdssl/run script is set to 0.

To solve this error, change SSL=0 to SSL=1 in /var/qmail/supervise/qmail-smtpdssl/run and do qmailctl restart

The error verify return:1 displayed is perfectly fine and it's more of a warning than an error as it just reports the certificate is self signed.

Qmail’s Voodoo spells and magics ! Workarounds to some common problems, QMAIL HELL!

Friday, October 2nd, 2009

It's one of this days, when you'd wish to be dead and never born ever!

I experienced terrible problems with Qmail once AGAIN!

Most of the qmail administrators out there are probably aware, Everytime qmail stops working it's like

walking in a dark room without a light torch before you fix it up.

To fix a broken qmail your only friend could be patience. It's fucking insane seriously I more and more start hating qmail when it's broken.

I've experienced the following error messages today on our corporate qmail:

delivery xx: failure: Sorry._Although_I'm_listed_as_a_best-preference_MX_or_A_for_that_host,/it_isn't_in_my_control/locals_file,_so_I_don't_treat_it_as_local.
as well as:
delivery 232: deferral: Sorry,_I_wasn't_able_to_establish_an_SMTP_connection._(#4.4.1)/

A lot of this junk filled the qmail logs. I still am not completely sure the exact reasons

what caused the problems. However I fixed the situation tweakening some of the common

qmail and vpopmail configuration files and respectively their cdb files.

Here is the list of files I got to rebuild and the things I've did to resolve the qmail issues:

cd /home/vpopmail/domains;
for i in *; do echo +$i-:$i:89:89:/home/vpopmail/domains/$i:-:: >>assign; done
# backup old assign file just in case something goes wrong
cp -rpf /var/qmail/users/assign /var/qmail/users/assign.bak
mv assign /var/qmail/users/assign
# backup virtualdomains list file
cp -rpf /var/qmail/control/virtualdomains /var/qmail/control/virtualdomains.bak
for i in *; do echo $i:$i >>virtualdomains; done
mv virtualdomains /var/qmail/control/
# Make sure your /var/qmail/control/rcpthosts contains all the vpopmail domains
# backup rcpthosts for laters
cp -rpf /var/qmail/control/rcpthosts /var/qmail/control/rcpthosts.bak
for i in *; do echo $i >>rcpthosts; done
cp -rpf rcpthosts /var/qmail/control/
# backup morercpthosts
cp -rpf morercpthosts /var/qmail/control/morercpthosts.bak
# overwrite the old morercpthosts
# in my case morercpthosts was missing all the vpopmail virtual domains
# thus the domains missing the file wasn't able to receive mail
cp -rpf rcpthosts /var/qmail/control/morercpthosts
# Another problem if you're using qmail check user patch might be in /var/qmail/users/recipients
# Thus rebuilding the recipients file is a good idea.
# Rebuilding it might be done through qmail-vpopmail2recipients script
# the script has a bug the last if statement, where two if's have to be commented to make it wokring
# Below I'll put a link to a working version of the qmail-vpopmail2-recipients script
# Another possible problem could be in /var/qmail/users/cdb
# Therefore it might be a good idea to rebuild it with
/var/qmail/bin/qmail-newu
# Another thing to do is to rebuild the /var/qmail/control/morercpthosts.cdb file with the command
/var/qmail/bin/qmail-newmrh
# Other things I did was
# to assure myself that /var/qmail/control/me contains my mail server host name
# /var/qmail/control/locals should contain "localhost" as well as the FQDN (Fully Qualified Domain Name) (e.g. your domain name)
# Also I checked my /etc/tcp.smtp and assured myself everything is correct there.
# After which I executed
qmailctl cdb
# That rebuilded my /etc/tcp.smtp.cdb file
# Well that was mostly what I did to fix my problems.
# Another think that might be a good idea is to try
cd /home/vpopmail/domains;
for i in *; do /home/vpopmail/bin/vdominfo $i; done
# If you observe some domain's domain info cannot be shown
# then that might be due to some problem with your vpopmail
# It might be a good idea to check your
/var/qmail/bin/qmail-showctl
# qmail-showctl is a handy diagnosis qmail tool
# While looking over the command output
# I had to make sure my cdb files are "Modified Recently"
# and my virtualdomains are all showing up
# THat's mostly what fixed qmail for me
# Next I executed
qmailctl stop; sleep 10; qmailctl start
# that restarted my qmail
# However qmail doesn't always start logging to /var/log/qmail directory right away
# after restart
# SOmetimes the qmail server needs a couple of restarts before it starts serving mail
# Thus restarting it is always full of uncertancies and a lot of broken nerves!

I love qmail it absolutely works brilliant as long as it works, quite often

if you do even minor changes that usually means a broken qmail and qmail hell again!

I truly hope this post could be helpful to somebody out there

Here is a link to a working version of qmail-vpopmail2-recipients

How to resolve network issues with Java 6 JRE on Debian / Java proxy spawn on Debian sid not working by default – A Small tip on running WebScarab and Paros local Proxy on Debian’s Java

Wednesday, April 28th, 2010

In an attempt to use Paros Proxy and WebScarab on Debian I faced a shitty issues with Java’s Networking.

Neither of the forementioned Security Applications’s Local Proxy to be spawned by the Java server won’t work.

I assured my self there is nothing running on the ports 8080 on which the two Java applications attempted to run their local proxy server.
Being sure that nothing is listening on the 8080 port. I suspected that there is something wrong with Debian’s Java networking.
A quick search in Google pointed me to the Debian.Net’s forums where the issue was described as serious proxy error after updates .

The error that was returned by the ParosProxy Server on my Desktop Debian can be reviewed below:

hipo@noah:~/paros$ /usr/lib/jvm/java-6-sun-1.6.0.17/jre/bin/java -jar paros.jar
file:/home/hipo/paros/paros.jar
java.net.SocketException: Invalid argument
at java.net.PlainSocketImpl.socketBind(Native Method)
at java.net.PlainSocketImpl.bind(PlainSocketImpl.java:365)
at java.net.ServerSocket.bind(ServerSocket.java:319)
at java.net.ServerSocket.<init>(ServerSocket.java:185)
at org.parosproxy.paros.core.proxy.ProxyServer.createServerSocket(Unknown Source)
at org.parosproxy.paros.core.proxy.ProxyServer.startServer(Unknown Source)
at org.parosproxy.paros.control.Proxy.startServer(Unknown Source)
at org.parosproxy.paros.control.Control.init(Unknown Source)
at org.parosproxy.paros.control.Control.<init>(Unknown Source)
at org.parosproxy.paros.control.Control.initSingletonWithView(Unknown Source)
at org.parosproxy.paros.Paros.runGUI(Unknown Source)
at org.parosproxy.paros.Paros.run(Unknown Source)
at org.parosproxy.paros.Paros.main(Unknown Source)

All a man can grasp from the Error is that there is something wrong with running the Paros Proxy server.
So far so good since the last release of Paros Proxy originates back to the year 2006 and it’s not really supported this days at first I thought this could be causing the error.
By the way the paros proxy is available via the debian packaging system. So I use the packaged version of paros to install the Debian packaged version of Paros Proxy issue the cmd:

root@noah:~# apt-get install paros

In that manner of thoughts I decided to try out the newer more modern HTTP and HTTPS Security Analysing Application WebScarab

I followed the start up instructions on WebScarab’s Website in order to run the application.
It was really simple. All I had to do is download the webscarab-current.zip which of the time of writting this post is webscarab-20100414-0036 and then launch the Java Debian Virtual machine.

However though my hopes that WebScarab’s local Proxy server will be running fine I was unpleasently suprised by the error which shown below:

hipo@noah:~/webscarab-20100414-0036$ java -jar webscarab.jar
Help set not found
11:43:36 main(Proxy.parseListenerConfig): No proxies configured!?
11:43:39 Proxy(Proxy.run): Unable to start listener 127.0.0.1:8008

Ain’t pretty heh?! … Even nasty !

However I was lucky to find the solution in some 20 minutes, so hopefully it took you less to find this post.

The solution to the above Proxy Spawn Error with Paros and Webscarab on Debian Lenny’s Java 6 Sun Server is really simple and it comes to this:

1. edit /etc/sysctl.d/bindv6only.conf and change the value

net.ipv6.bindv6only = 1
# to
net.ipv6.bindv6only = 0

2. Restart procps

root@noah:/home/hipo/webscarab-20100414-0036# invoke-rc.d procps restart

Now launch once again either Paros Proxy or Webscarab, the Local Proxy Server by each of them will bind to either port 8008 (WebScarab) or port 8008 (Paros Proxy).

Install TorrentFlux Bit Torrent Web management interface on Debian / Ubuntu Linux

Tuesday, July 15th, 2014

torrent flux logo
Torrentflux
is web based, feature-rich BitTorrent download manager.
Torrentflux is a must have installed server software for anyone who does regular torrent downloads and want to access the downloads from anywhere on the internet.

TorrentFlux is a PHP based BitTorrent controller that runs on a web
 server. It can manage all of your BitTorrent downloads from anywhere
 through a convenient and easy-to-use web interface.
 .
 TorrentFlux uses a MySQL database to manage the downloads.

 TorrentFlux enables you to run BitTorrent downloads unattended on a monitor-less or remote server 24 hours a day, while still maintaining complete control from any web browser. Now you can control your  downloading on your firewall, or keep up with downloads while on  vacation. It uses the BitTornado client to download files, and also  requires a web server with PHP.
 
 Some of the Torrentflux features:

   * Upload Torrents via URL or File Upload
   * Start, Stop, and Delete Torrents with ease
   * Advanced Torrent start options (ports, speeds, etc.)
   * Multi-user interface
   * RSS Feeds, download Torrents files with a click
   * Run several torrents at once
   * View Download Progress of all torrents at a glance
   * View drive space at a glance
   * View Torrent file meta information
   * Built-in User management and Security
   * Private Messaging
   * Themes (selectable per user)
   * Upload History


Before installing Bittorrent you will need to have a running version of Debian, Ubuntu or any other debian derivative (though it can easily be run on any Linux distro). To install AMP (Apache MySQL Server, PHP) you can follow first part of my previous article Installing Usual PHP Apache MySQL for new Debian GNU / Linux installs.

So what for is TorrentFlux Useful?
Torrenflux is precious and must have if you have to access filtered torrent from outside of your homecountry and you have a running server already in your home country in that I was using TorrentFlux to access Bulgarian Zamunda.Net Torrent Tracker from Holland and was downloading first movies from the Bulgarian Torrent Tracker to my Fluxbox installed on my Dobrich home router and then used FTP to transfer movies to the Netherlands. Talking about many people choose to also install VSFTP and use it together with Torrentflux …

1. Install TorrentFlux and its dependencies (BitTornado, Bittorrent, Zip, Unzip, Bzip etc.) the "Debian Way"


On my Debian 7 Wheezy home machine  I run

apt-get install –yes bzip2 php5-gd php5-cli unrar-free grep python net-tools mawk wget unzip cksfv vlc-nox uudeview python-crypto libxml-simple-perl libxml-dom-perl libdbd-mysql-perl bittorrent bittornado


a) Install TorrentFlux the Debian Way

apt-get install –yes torrentflux


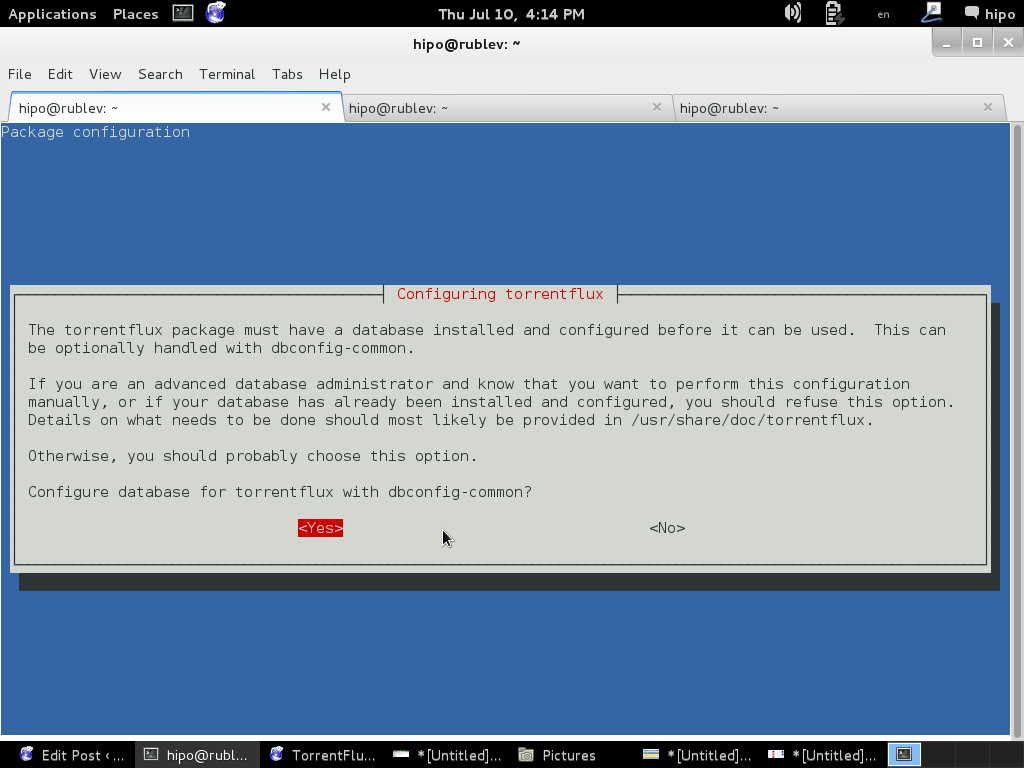
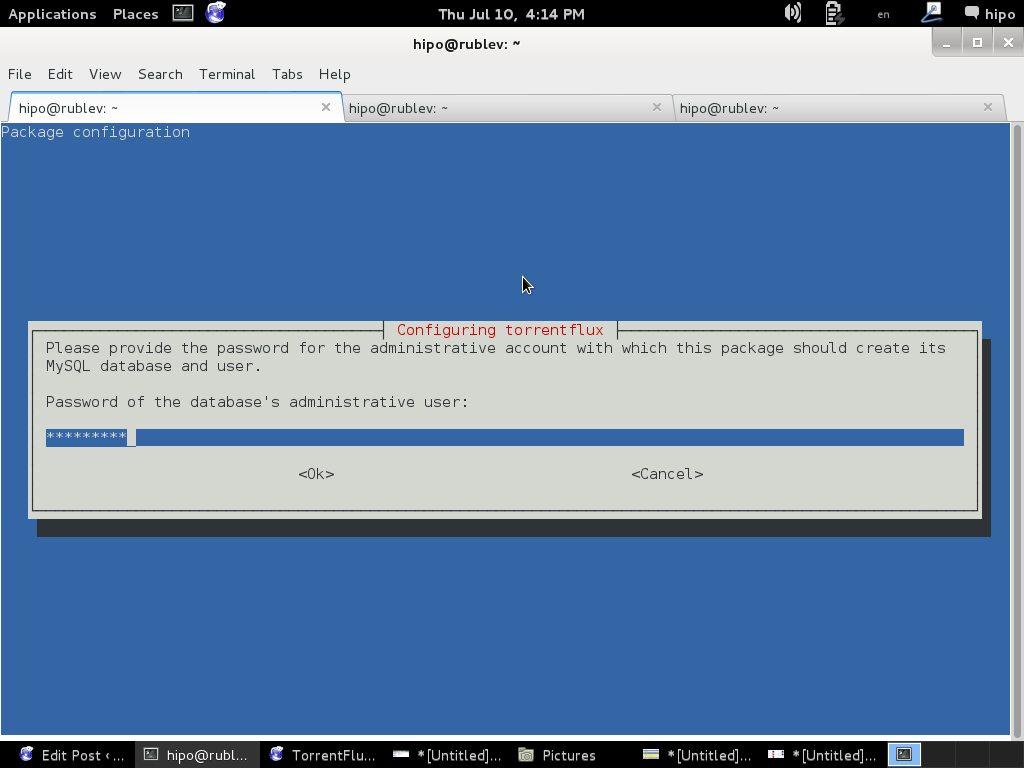
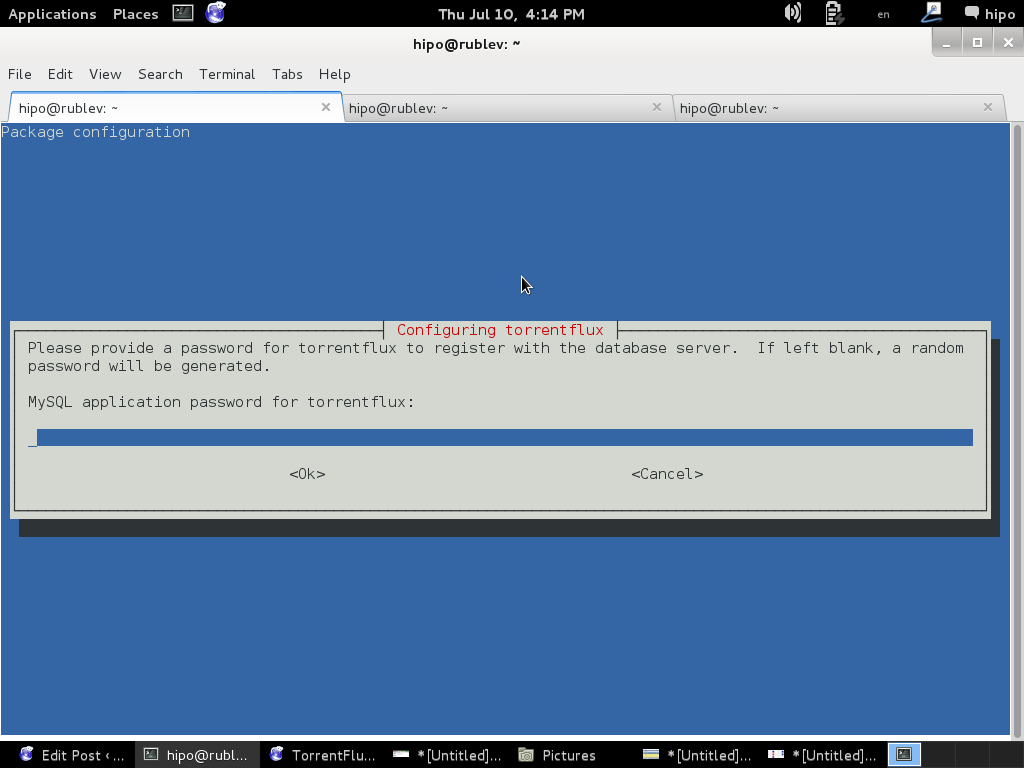
You will be prompted with a coule of screens, to set a new MySQL database user and password and SQL database, as well as offered to restart Apache to make Torrentflux accessible like as on below screenshots.

configuring-torrentflux-debian-linux-screenshot-2


configuring-torrentflux-debian-linux-screenshot 3

configuring-torrentflux-debian-linux-screenshot-4

To make new installed torrentflux accessible from web you will either have to configure it via some new Apache VirtualHost or make a symbolic link to /usr/share/torrentflux/www :
 

cd /var/www/
ln -sf /usr/share/torrentflux/www/ torrentflux


That's all you're all done to access torrentflux either access it via your default configured webserver domain name or via localhost if you're logged in to same pc where installing.

http://www.your-domain.com/torrentflux

or

http://127.0.0.1/torrentflux

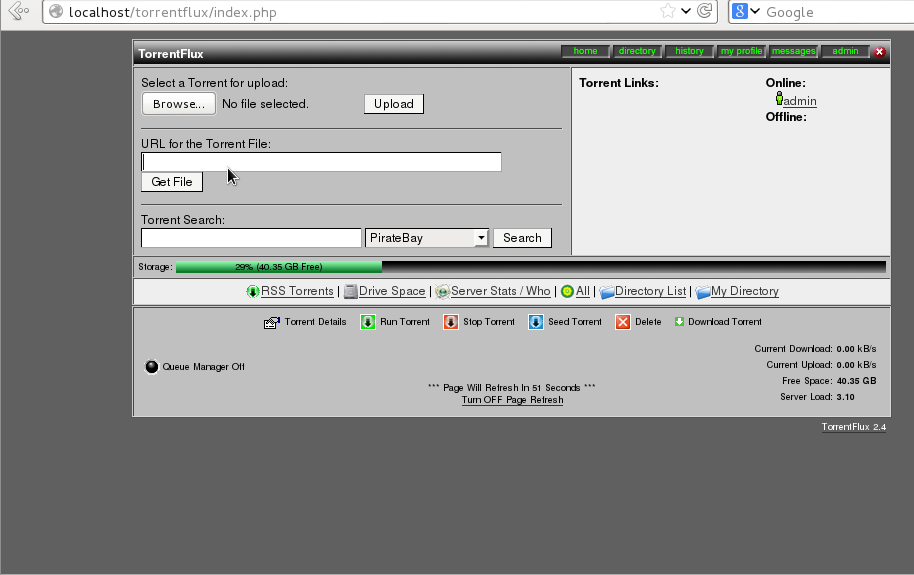
configuring-torrentflux-after-first-login-in-web-debian-linux

2. Install latest Torrentflux version from source

Alternatively if you want to have the latest version (because the Debian version is part of the stable distribution is a little bit outdated you will have to fetch Torrentflux-b4rt and unarchive it:

cd /tmp/
wget http://download.berlios.de/tf-b4rt/torrentflux-b4rt_1.0-beta2.tar.bz2

tar -xjf torrentflux-b4rt_1.0-beta2.tar.bz2

mv torrentflux-b4rt_1.0-beta2 /opt/torrentflux

Then to make torrentflux visible from web server I had to create a symbolic link to installation directory:
 

ln -sf /opt/torrentflux/html /var/www/torrentflux

For further initial configuration its necessery to make Torrentflux config writtable by www-data (the user with which Apache is running on Debian).


chown -R www-data:www-data /var/www/torrentflux/inc/config/


Next it its required to create somewhere download folder where TorrentFlux will keep downloaded Torrents

mkdir /var/lib/torrentflux


Apache HTTP server will have to have write ther:

chown -R www-data:www-data /var/lib/torrentflux


If you already haven't restarted Apache earlier in installing TorrentFlux pre-requirements, you will have to do it now:


/etc/init.d/apache2 restart


As TorrentFlux depends on its MySQL backend, we need to also create manually TorrentFlux database username and a password
 

export SQL_DB='torrentflux';
TFLUXSQL_USERNAME='torrentflux';
TFLUX_SQL_PWD='any-secret-password';

echo "CREATE DATABASE IF NOT EXISTS $SQL_DB DEFAULT CHARACTER SET utf8 DEFAULT COLLATE utf8_unicode_ci"
| mysql –user=root –password

echo "GRANT ALL PRIVILEGES ON $SQL_DB.*
TO $TFLUXSQL_USERNAME@localhost
IDENTIFIED BY $TFLUX_SQL_PWD;" | mysql –user=root –password


Substitute with your Database, Username and Password above shell variables – $SQL_DB, $TFLUX_USERNAME, $TFLUX_SQL_PWD

To configure TorrentFlux access it in browser:

http://your-domain.com/torrentflux
 

By accessing it for a first time, you will redirected to setup.php, in case something goes wrong and yuo're not redirected (probably some mod_rewrite issues add setup.php to url – e.g., acess –

http://your-domain.com/torrentflux/setup.php

I will not enter details, about Web config, because everything there is pretty clear.

Just in short – you will have to now choose:

Choose Database
Choose Database Information of database (put in the exact name of TorrentFlux databse previously created)
Uncheck the box for "Create new database"
Choose as a download location upper created directory – /var/lib/torrentflux

If you get an error on software dependencies screen for missing unrar – just install it
VLC may show an error as well, that's not a problem because VLC is probably not to be used.
Finally after completion of all, you will get an error that setup.php cannot be deleted.
 

To prevent, someone to re-configure it through http://your-domain/torrentflux/setup.php URL remove setup.php


rm /var/www/torrentflux/setup.php

To prevent someone rewrite anything in config file from web we have to revert back config/ folder not to be writable by Apache


chown -R root:root /var/www/torrentflux/inc/config/

Now in browser to access torrentflux type:


http://ipofyourbox/torrentflux

/torrentflux should redirect you to login.php if for some reason it doesn't type it manually in URL.

First account you will login is the super user account, you can allow multiple users to use it by adding multiple accounts.

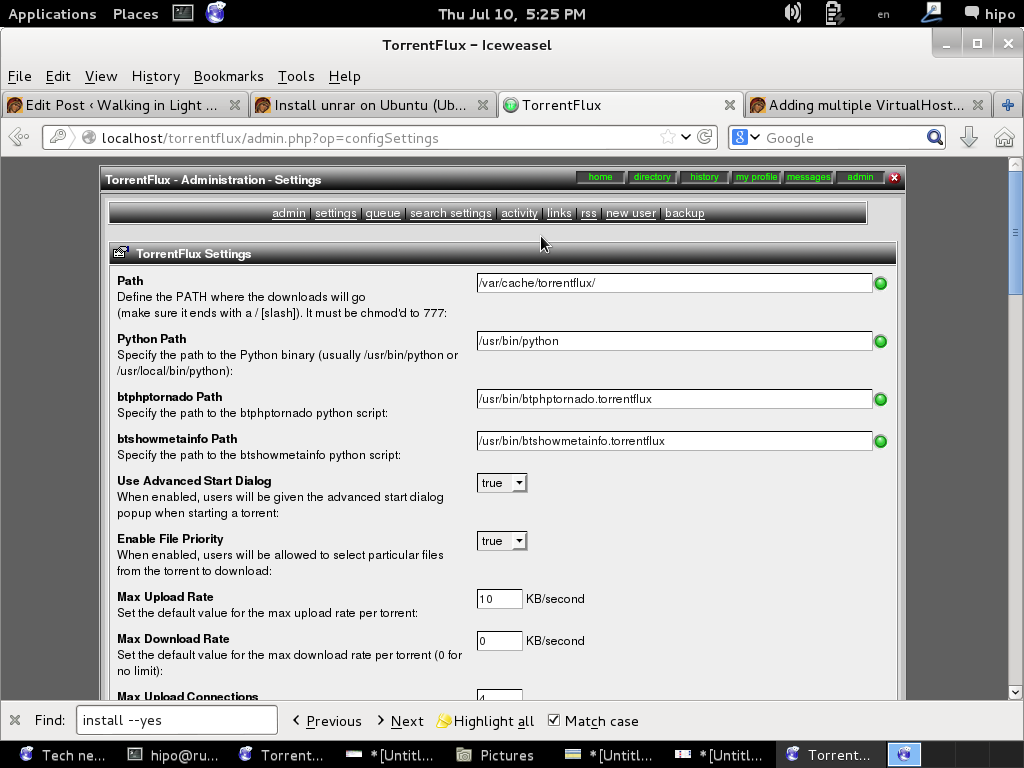
torrentflux-install-on-debian-ubuntu-gnu-linux-web-management-torrent-interface

As you will see there is plety of configuration options to play with.

You will definitely want to look in Server Page, some very important page to look is the Transfer Page – from there you can adjust the bandwidth of your connection on 100Mbit network this would be 12500 – to use the maximum possible connection provided by your ISP set the max bandwidth to 0. You have the option to also set a default bittorrent client, by default this will be bittornado.


If you have troubles downloading from TorrentTrackers make sure your router is configured to forward port 49160 to 49300

Now if you have a lot of storage create accounts also for your friends and enjoy torrentflux 🙂


Windows key Shortcuts and Commands List every Win admin / support must know

Tuesday, November 25th, 2014

windows-XP-vista-7-8-server-2003-rc2-2012--full-complete-keyboard-shortcuts-list
If you're a system administrator of Windows Servers or or just a PC support in a small company and you have to fix PCs running Microsoft Windows XP / 7 / 8  daily, sooner or later you will be interested into how to optimize your windows maintainance work to be able to do more adminsitration work for less time.

M$ Windows OS has evolved a lot over the past 10+ years and many of the features available GUI are now either possibile to be done via a standard commands and the GUI interfaces. Various adminsitration and common daily work simplification goodies are now accessible through quick access shortcuts and commands.

Virtually all Windows operating system environment could be now customized by using such shortcuts, this reduces the multitude of annoying double clicks which are truely pissing off sysadmins and tech-supports involved in  Windows Ticket solving.

Win Shortcuts and Commands helps to:

  • Quickly invoke almost all System Settings available from Windows Control Panel
  • Access all admins tools GUIs throguh command
  • Speed up Opening Video, Pictures, Documents, Downloads folders start Windows Update, Configure Printers / Fax / Add Sharings

etc..

A lot of the commands were new to me thus I decided to try out all of the commands in command prompt (cmd). Many of the tools down-mentioned were news to me and let me understand better on Windows Internals, so if you time try them out.
 

Function Comand
Open Documents Folder Start menu -> Search (Type documents)
Open Videos folder Start -> Search (Type videos)
Open Downloads Folder Start -> Search (Type downloads)
Open Favorites Folder favorites
View Recent messages of your PC Start menu -> Search (Type recent)
Open Recent Folder N/A
Open Pictures Folder Start menu -> Search (Type pictures)
Windows Sideshow control.exe /name Microsoft.WindowsSideshow
Windows CardSpace (Windows ID Manager) control.exe /name Microsoft.cardspace
Windows Anytime Upgrade Start menu -> Search dialog (Type WindowsUpdate)
Taskbar and Start Menu control.exe /name Microsoft.TaskbarandStartMenu
Troubleshooting control.exe /name Microsoft.Troubleshooting
User Accounts (Run user accounts Interface) control.exe /name Microsoft.UserAccounts
Adding a new Device devicepairingwizard
Add Hardware Wizard hdwwiz
Advanced User Accounts Management netplwiz
Advanced User Accounts (Authorization Mgr) azman.msc
Windows Backup and Restore sdclt
Bluetooth File Transfer fsquirt
Calculator calc
Certificates Manager certmgr.msc
Change Computer Performance Settings systempropertiesperformance (Remove visual effects)
Change Data Execution Prevention Settings systempropertiesdataexecutionprevention
Change Data Execution Prevention Settings printui
Character Map charmap
ClearType Tuner cttune (Make text onscreen more readable)
Color Management colorcpl
Command Prompt cmd
Component Services comexp.msc
Component Services dcomcnfg
Computer Management Interface compmgmt.msc
Computer Management Interface compmgmtlauncher
Connect to Network Project via Network netproj
Connect to a Projector displayswitch (Alias for Fn key + F4)
Run Control Panel command control
Create A Shared Folder Wizard shrpubw
Create a System Repair Disc recdisc
Credential Backup and Restore Wizard credwiz
Data Execution Prevention systempropertiesdataexecutionprevention
Date and Time timedate.cpl
Default Location locationnotifications
Device Manager devmgmt.msc
Device Manager hdwwiz.cpl
Device Pairing Wizard devicepairingwizard
Diagnostics Troubleshooting Wizard msdt
Digitizer Calibration Tool tabcal
DirectX Diagnostic Tool dxdiag
Disk Cleanup cleanmgr
Disk Defragmenter dfrgui
Disk Management diskmgmt.msc
Display (Change font size of text onscreen) dpiscaling
Display Color Calibration dccw
Display Switch displayswitch
DPAPI Key Migration Wizard dpapimig
Driver Verifier Manager verifier
Ease of Access Center utilman
EFS Wizard rekeywiz
Event Viewer eventvwr.msc
Fax Cover Page Editor fxscover
File Signature Verification sigverif
Font Viewer fontview
Game Controllers joy.cpl
Windows Getting Started Iface gettingstarted
IExpress Wizard iexpress
Another alias for Getting Started irprops.cpl
Install or Uninstall Display Languages lusrmgr
Internet Explorer iexplore
Run Internet Explorer Internet Options inetcpl.cpl
iSCSI Initiator Configuration Tool iscsicpl
Language Pack Installer lpksetup
Local Group Policy Editor gpedit.msc
Local Security Policy secpol.msc
Local Users and Groups lusrmgr.msc
Location Activity locationnotifications
Magnifier magnify
Malicious Software Removal Tool mrt (Might be not existent on some Windows versions)
Manage Your File Encryption Certificates rekeywiz
Math Input Panel mip
Microsoft Management Console mmc
Microsoft Support Diagnostic Tool msdt
Mouse main.cpl
NAP Client Configuration napclcfg.msc
Narrator narrator
Network Connections ncpa.cpl
New Scan Wizard wiaacmgr
Notepad notepad
ODBC Data Source Administrator odbcad32
ODBC Driver Configuration odbcconf
On-Screen Keyboard osk
Paint mspaint
Pen and Touch tabletpc.cpl
People Near Me collab.cpl
Performance Monitor perfmon.msc
Performance Options systempropertiesperformance
Phone and Modem telephon.cpl
Phone Dialer dialer
Power Options powercfg.cpl
Presentation Settings presentationsettings
Print Management printmanagement.msc
Printer Migration printbrmui
Printer User Interface printui
Private Character Editor eudcedit
Problem Steps Recorder psr
Programs and Features (Install / Uninstall) appwiz.cpl
Protected Content Migration dpapimig
Region and Language intl.cpl
Registry Editor regedit
Registry Editor 32 regedt32
Remote Access Phonebook rasphone
Remote Desktop Connection mstsc
Resource Monitor resmon
Resultant Set of Policy rsop.msc
SAM Lock Tool syskey
Screen Resolution desk.cpl
Securing the Windows Account Database syskey
Services services.msc
Set Program Access and Computer Defaults computerdefaults
Share Creation Wizard shrpubw
Shared Folders fsmgmt.msc
Snipping Tool snippingtool
Sound mmsys.cpl
Sound recorder soundrecorder
SQL Server Client Network Utility cliconfg
Sticky Notes stikynot
Stored User Names and Passwords credwiz
Sync Center mobsync
System Configuration msconfig
System Configuration Editor sysedit
System Information msinfo32
System Properties sysdm.cpl
System Properties (Advanced Tab) systempropertiesadvanced
System Properties (Computer Name Tab) systempropertiescomputername
System Properties (Hardware Tab) systempropertieshardware
System Properties (Remote Tab) systempropertiesremote
System Properties (System Protection Tab) systempropertiesprotection
System Restore rstrui
Task Manager taskmgr
Task Scheduler taskschd.msc
Trusted Platform Module (TPM) Management tpm.msc
User Account Control Settings useraccountcontrolsettings
Utility Manager utilman
Version Reporter Applet winver
Volume Mixer sndvol
Windows Action Center wscui.cpl
Windows Activation Client slui (Runs on Windows license activation time)
Windows Anytime Upgrade Results windowsanytimeupgraderesults
Windows CardSpace infocardcpl.cpl
Windows Disc Image Burning Tool isoburn (Command line tool to burn images)
Windows DVD Maker dvdmaker (N/A on Windows 7, 8)
Windows Easy Transfer migwiz (N/A on many Windows versions)
Run Windows Explorer explorer
Windows Fax and Scan wfs
Windows Features optionalfeatures
Windows Firewall firewall.cpl
Windows Firewall with Advanced Security wf.msc
Windows Journal journal (N/A on Windows 7)
Windows Media Player wmplayer (N/A on many Windows releases)
Windows Memory Diagnostic Scheduler mdsched (Check your PC memory on next boot)
Windows Mobility Center (Stats) mblctr
Windows Picture Acquisition Wizard wiaacmgr
Windows PowerShell powershell
Windows PowerShell ISE powershell_ise
Windows Remote Assistance msra
Windows Repair Disc recdisc
Windows Script Host wscript
Windows Update wuapp
Windows Update Standalone Installer wusa
Show Windows Version winver
WMI Management wmimgmt.msc
WordPad write
XPS Viewer xpsrchvw


Most of above commands works fine with Windows XP, Vista and Windows 7 / 8, Windows 2003 / 2012, however some cmds are missing across some win versions.

Here is list of other useful Windows shortcut keys:
 

General keyboard shortcuts

  • Ctrl+C (Copy)
  • Ctrl+X (Delete selected item and save a copy to the clipboard)
  • Ctrl+V (Paste)
  • Ctrl+Z (Undo)
  • Delete (Delete) 
  • Shift+Delete (Delete the selected item permanently without moving the item to the Recycle Bin) 
  • Ctrl while dragging an item (Copy the selected item)
  • Ctrl+Shift while dragging an item (Create a shortcut to the selected item)
  • F2 key (Rename the selected item)
  • Ctrl+Right Arrow (Move the cursor to the beginning of the next word) 
  • Ctrl+Left Arrow (Move the cursor to the beginning of the previous word) 
  • Ctrl+Down Arrow (Move the cursor to the beginning of the next paragraph) 
  • Ctrl+Up Arrow (Move the cursor to the beginning of the previous paragraph) 
  • Ctrl+Shift with any arrow key (Highlight a block of text) 
  • Shift with any arrow key (Select more than one item in a window or on the desktop, or select text in a document) 
  • Ctrl+A (Select all) 
  • F3 key (Search for a file or a folder)
  • Alt+Enter (View the properties for the selected item) 
  • Alt+F4 (Close the active item, or exit the active program) 
  • Alt+Enter (Display the properties of the selected object) 
  • Alt+Spacebar (Open the shortcut menu for the active window) 
  • Ctrl+F4 (Close the active document in programs that enable multiple documents to be open at the same time) 
  • Alt+Tab (Switch between the open items) 
  • Alt+Esc (Cycle through items in the order in which they were opened) 
  • F6 key (Cycle through the screen elements in a window or on the desktop)
  • F4 key (Display the Address bar list in My Computer or in Windows Explorer) 
  • Shift+F10 (Display the shortcut menu for the selected item)
  • Alt+Spacebar (Display the System menu for the active window) 
  • Ctrl+Esc (Display the Start menu) 
  • Alt+Underlined letter in a menu name (Display the corresponding menu)
  • Underlined letter in a command name on an open menu (Perform the corresponding command)
  • F10 key (Activate the menu bar in the active program)
  • Right Arrow  (Open the next menu to the right, or open a submenu)
  • Left Arrow  (Open the next menu to the left, or close a submenu)
  • F5 key (Update the active window)
  • Backspace (View the folder one level up in My Computer or Windows Explorer) 
  • Esc (Cancel the current task)
  • Shift when you insert a CD into the CD drive (Prevent the CD from automatically playing)
  • Ctrl+Shift+Esc (Open Task Manager) 

Dialog box keyboard shortcuts

  • Ctrl+Tab (Move forward through the tabs)
  • Ctrl+Shift+Tab (Move backward through the tabs)
  • Tab (Move forward through the options)
  • Shift+Tab (Move backward through the options)
  • Alt+Underlined letter (Perform the corresponding command, or select the corresponding option)
  • Enter (Perform the command for the active option or button)
  • Spacebar (Select or clear the check box if the active option is a check box)
  • Arrow keys (Select a button if the active option is a group of option buttons)
  • F1 key (Display Help)
  • F4 key (Display the items in the active list)
  • Backspace (Open a folder one level up if a folder is selected in the Save As or Open dialog box)

Microsoft natural keyboard shortcuts

  • Windows Logo (Display or hide the Start menu)
  • Windows Logo+Break (Display the System Properties dialog box)
  • Windows Logo+D (Display the desktop)
  • Windows Logo+M (Minimize all the windows)
  • Windows Logo+Shift+M (Restore the minimized windows)
  • Windows Logo+E (Open My Computer)
  • Windows Logo+F (Search for a file or a folder)
  • Ctrl+Windows Logo+F (Search for computers)
  • Windows Logo+F1 (Display Windows Help)
  • Windows Logo+ L (Lock the keyboard)
  • Windows Logo+R (Open the Run dialog box)
  • Windows Logo+U (Open Utility Manager)

Accessibility keyboard shortcuts

  • Right Shift for eight seconds (Switch FilterKeys on or off)
  • Left Alt+left Shift+Print Screen (Switch High Contrast on or off)
  • Left Alt+left Shift+Num Lock (Switch the MouseKeys on or off)
  • Shift five times (Switch the StickyKeys on or off)
  • Num Lock for five seconds (Switch the ToggleKeys on or off)
  • Windows Logo +U (Open Utility Manager)

Windows Explorer keyboard shortcuts


  • End (Display the bottom of the active window)
  • Home (Display the top of the active window)
  • Num Lock+Asterisk sign (*) (Display all the subfolders that are under the selected folder)
  • Num Lock+Plus sign (+) (Display the contents of the selected folder)
  • Num Lock+Minus sign (-) (Collapse the selected folder)
  • Left Arrow  (Collapse the current selection if it is expanded, or select the parent folder)
  • Right Arrow  (Display the current selection if it is collapsed, or select the first subfolder) 

Keyboard Shortcuts for Character Map


After you double-click a character on the grid of characters, you can move through the grid by using the keyboard shortcuts:

  • Right Arrow  (Move to the right or to the beginning of the next line)
  • Left Arrow  (Move to the left or to the end of the previous line) 
  • Up Arrow (Move up one row)
  • Down Arrow (Move down one row)
  • Page Up  (Move up one screen at a time)
  • Page Down (Move down one screen at a time)
  • Home (Move to the beginning of the line)
  • End (Move to the end of the line)
  • Ctrl+Home (Move to the first character)
  • Ctrl+End (Move to the last character)
  • Spacebar (Switch between Enlarged and Normal mode when a character is selected) 

Microsoft Management Console (MMC) main window keyboard shortcuts


  • Ctrl+O (Open a saved console)
  • Ctrl+N (Open a new console)
  • Ctrl+S (Save the open console)
  • Ctrl+M (Add or remove a console item)
  • Ctrl+W (Open a new window)
  • F5 key (Update the content of all console windows)
  • Alt+Spacebar (Display the MMC window menu)
  • Alt+F4 (Close the console)
  • Alt+A (Display the Action menu)
  • Alt+V (Display the View menu)
  • Alt+F (Display the File menu)
  • Alt+O (Display the Favorites menu) 

Microsoft Management Console (MMC) window keyboard shortcuts

  • Ctrl+P (Print the current page or active pane)
  • Alt+Minus sign (-) (Display the window menu for the active console window)
  • Shift+F10 (Display the Action shortcut menu for the selected item)
  • F1 key (Open the Help topic, if any, for the selected item)
  • F5 key (Update the content of all console windows)
  • Ctrl+F10 (Maximize the active console window)
  • Ctrl+F5 (Restore the active console window)
  • Alt+Enter (Display the Properties dialog box, if any, for the selected item)
  • F2 key (Rename the selected item)
  • Ctrl+F4 (Close the active console window. When a console has only one console window, this shortcut closes the console)

Remote desktop connection navigation


  • Ctrl+Alt+End (Open the Microsoft Windows NT Security dialog box)
  • Alt+Page Up (Switch between programs from left to right)
  • Alt+Page Down (Switch between programs from right to left)
  • Alt+Insert (Cycle through the programs in most recently used order)
  • Alt+Home (Display the Start menu)
  • Ctrl+Alt+Break (Switch the client computer between a window and a full-screen display)
  • Alt+Delete (Display the Windows menu)
  • Ctrl+Alt+Minus sign (-) (Put a snapshot of the complete client window area on the Terminal server clipboard and provide the same functionality as pressing Alt+Print Screen on a local computer)
  • Ctrl+Alt+Plus sign (+) (Put a snapshot of the active window in the client on the Terminal server clipboard and provide the same functionality as pressing Print Screen on a local computer.) 

Microsoft Internet Explorer navigation


  • Ctrl+B (Open the Organize Favorites dialog box)
  • Ctrl+E (Open the Search bar)
  • Ctrl+F (Start the Find utility)
  • Ctrl+H (Open the History bar)
  • Ctrl+I (Open the Favorites bar)
  • Ctrl+L (Open the Open dialog box)
  • CtrlL+N (Start another instance of the browser with the same web address)
  • Ctrl+O (Open the Open dialog box, the same as CTRL+L)
  • Ctrl+P (Open the Print dialog box)
  • Ctrl+R (Update the current webpage)
  • Ctrl+W (Close the current window) 

Complete list of Windows Keyboard Shorcuts is on Microsoft website

How to disable spammer domain in QMAIL mail server with badmailto variable

Thursday, July 12th, 2012

I've recently noticed one of the qmail SMTP servers I adminster had plenty of logged spammer emails originating from yahoo.com.tw destined to reache some random looking like emails (probably unexisting) again to *@yahoo.com.tw

The spam that is tried by the spammer is probably a bounce spam, since it seems there is no web-form or anything wrong with the qmail server that might be causing the spam troubles.
As a result some of the emails from the well configured qmail (holding SPF checks), having a correct existing MX, PTR record and even having configured Domain Keys (DKIM) started being marked, whether emails are sent to *@yahoo.com legit emails.

To deal with the shits, since we don't have any Taiwanese (tw) clients, I dediced to completely prohibit any emails destined to be sent via the mail server to *@yahoo.com.tw. This is done via /var/qmail/control/badmailto qmail control variable;

Here is content of /var/qmail/control/badmailto after banning outgoing emails to yahoo.com.tw;;;

qmail:~# cat /var/qmail/control/badmailto
[!%#:\*\^]
[\(\)]
[\{\}]
@.*@
*@yahoo.com.tw

The first 4 lines are default rules, which are solving a lot of badmailto common sent emails. Thanks God after a qmail restart:

qmail:~# qmailct restart
....

Checking in /var/log/qmail-sent/current, there are no more outgoing *@yahoo.com.tw destined emails. Problem solved …