Posts Tagged ‘without’

How to update expiring OpenSSL certificates without downtime on haproxy Pacemaker / Corosync PCS Cluster

Tuesday, July 19th, 2022

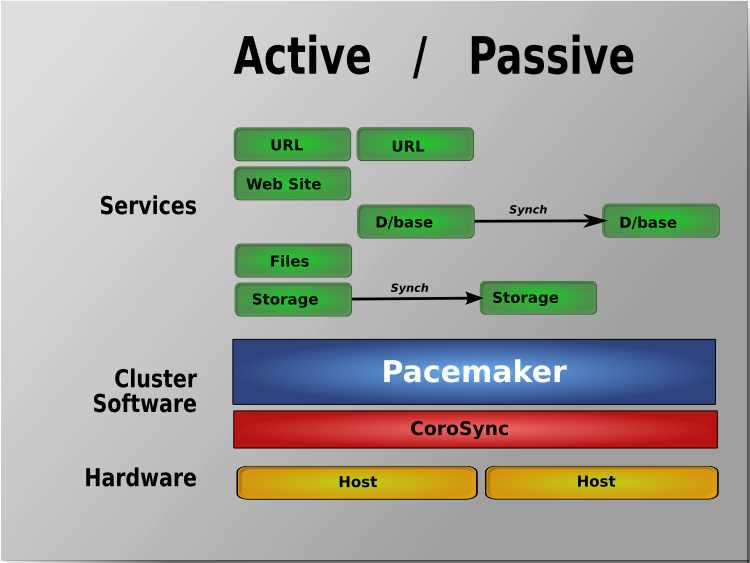
pcm-active-passive-scheme-corosync-pacemaker-openssl-renew-fix-certificate

Lets say you have a running PCS Haproxy cluster with 2 nodes and you have already a configuration in haproxy with a running VIP IP and this proxies
are tunneling traffic to a webserver such as Apache or directly to an Application and you end up in the situation where the configured certificates,
are about to expire soon. As you can guess having the cluster online makes replacing the old expiring SSL certificate with a new one relatively easy
task. But still there are a couple of steps to follow which seems easy but systemizing them and typing them down takes some time and effort.
In short you need to check the current certificates installed on the haproxy inside the Haproxy configuration files,
in my case the haproxy cluster was running 2 haproxy configs haproxyprod.cfg and haproxyqa.cfg and the certificates configured are places inside this
configuration.

Hence to do the certificate update, I had to follow few steps:

A. Find the old certificate key or generate a new one that will be used later together with the CSR (Certificate Request File) to generate the new Secure Socket Layer
certificate pair.
B. Either use the old .CSR (this is usually placed inside the old .CRT certificate file) or generate a new one
C. Copy those .CSR file to the Copy / Paste buffer and place it in the Website field on the step to fill in a CSR for the new certificate on the Domain registrer
such as NameCheap / GoDaddy / BlueHost / Entrust etc.
D. Registrar should then be able to generate files like the the new ServerCertificate.crt, Public Key Root Certificate Authority etc.
E. You should copy and store these files in some database for future perhaps inside some database such as .xdb
for example you can se the X – Certificate and Key management xca (google for xca download).
F. Copy this certificate and place it on the top of the old .crt file that is configured on the haproxies for each domain for which you have configured it on node2
G. standby node1 so the cluster sends the haproxy traffic to node2 (where you should already have the new configured certificate)
H. Prepare the .crt file used by haproxy by including the new ServerCertificate.crt content on top of the file on node1 as well
I. unstandby node1
J. Check in browser by accessing the URL the certificate is the new one based on the new expiry date that should be extended in future
K. Check the status of haproxy
L. If necessery check /var/log/haproxy.log on both clusters to check all works as expected

haserver_cluster_sample

Below are the overall commands to use to complete below jobs

Old extracted keys and crt files are located under /home/username/new-certs

1. Check certificate expiry start / end dates


[root@haproxy-serv01 certs]# openssl s_client -connect 10.40.18.88:443 2>/dev/null| openssl x509 -noout -enddate
notAfter=Aug 12 12:00:00 2022 GMT

2. Find Certificate location taken from /etc/haproxy/haproxyprod.cfg / /etc/haproxy/haproxyqa.cfg

# from Prod .cfg
   bind 10.40.18.88:443 ssl crt /etc/haproxy/certs/www.your-domain.com.crt ca-file /etc/haproxy/certs/ccnr-ca-prod.crt 
 

# from QA .cfg

    bind 10.50.18.87:443 ssl crt /etc/haproxy/certs/test.your-domain.com.crt ca-file /etc/haproxy/certs

3. Check  CRT cert expiry


# for haproxy-serv02 qa :443 listeners

[root@haproxy-serv01 certs]# openssl s_client -connect 10.50.18.87:443 2>/dev/null| openssl x509 -noout -enddate 
notAfter=Dec  9 13:24:00 2029 GMT


[root@haproxy-serv01 certs]# openssl x509 -enddate -noout -in /etc/haproxy/certs/www.your-domain.com.crt
notAfter=Aug 12 12:00:00 2022 GMT

[root@haproxy-serv01 certs]# openssl x509 -noout -dates -in /etc/haproxy/certs/www.your-domain.com.crt 
notBefore=May 13 00:00:00 2020 GMT
notAfter=Aug 12 12:00:00 2022 GMT


[root@haproxy-serv01 certs]# openssl x509 -noout -dates -in /etc/haproxy/certs/other-domain.your-domain.com.crt 
notBefore=Dec  6 13:52:00 2019 GMT
notAfter=Dec  9 13:52:00 2022 GMT

4. Check public website cert expiry in a Chrome / Firefox or Opera browser

In a Chrome browser go to updated URLs:

https://www.your-domain/login

https://test.your-domain/login

https://other-domain.your-domain/login

and check the certs

5. Login to one of haproxy nodes haproxy-serv02 or haproxy-serv01

Check what crm_mon (the cluster resource manager) reports of the consistancy of cluster and the belonging members
you should get some output similar to below:

[root@haproxy-serv01 certs]# crm_mon
Stack: corosync
Current DC: haproxy-serv01 (version 1.1.23-1.el7_9.1-9acf116022) – partition with quorum
Last updated: Fri Jul 15 16:39:17 2022
Last change: Thu Jul 14 17:36:17 2022 by root via cibadmin on haproxy-serv01

2 nodes configured
6 resource instances configured

Online: [ haproxy-serv01 haproxy-serv02 ]

Active resources:

 ccnrprodlbvip  (ocf::heartbeat:IPaddr2):       Started haproxy-serv01
 ccnrqalbvip    (ocf::heartbeat:IPaddr2):       Started haproxy-serv01
 Clone Set: haproxyqa-clone [haproxyqa]
     Started: [ haproxy-serv01 haproxy-serv02 ]
 Clone Set: haproxyprod-clone [haproxyprod]
     Started: [ haproxy-serv01 haproxy-serv02 ]


6. Create backup of existing certificates before proceeding to regenerate expiring
On both haproxy-serv01 / haproxy-serv02 run:


# cp -vrpf /etc/haproxy/certs/ /home/username/etc-haproxy-certs_bak_$(date +%d_%y_%m)/


7. Find the .key file etract it from latest version of file CCNR-Certificates-DB.xdb

Extract passes from XCA cert manager (if you're already using XCA if not take the certificate from keypass or wherever you have stored it.

+ For XCA cert manager ccnrlb pass
Find the location of the certificate inside the .xdb place etc.

+++++ www.your-domain.com.key file +++++

—–BEGIN PUBLIC KEY—–

—–END PUBLIC KEY—–


# Extracted from old file /etc/haproxy/certs/www.your-domain.com.crt
 

—–BEGIN RSA PRIVATE KEY—–

—–END RSA PRIVATE KEY—–


+++++

8. Renew Generate CSR out of RSA PRIV KEY and .CRT

[root@haproxy-serv01 certs]# openssl x509 -noout -fingerprint -sha256 -inform pem -in www.your-domain.com.crt
SHA256 Fingerprint=24:F2:04:F0:3D:00:17:84:BE:EC:BB:54:85:52:B7:AC:63:FD:E4:1E:17:6B:43:DF:19:EA:F4:99:L3:18:A6:CD

# for haproxy-serv01 prod :443 listeners

[root@haproxy-serv02 certs]# openssl x509 -x509toreq -in www.your-domain.com.crt -out www.your-domain.com.csr -signkey www.your-domain.com.key


9. Move (Standby) traffic from haproxy-serv01 to ccnrl0b2 to test cert works fine

[root@haproxy-serv01 certs]# pcs cluster standby haproxy-serv01


10. Proceed the same steps on haproxy-serv01 and if ok unstandby

[root@haproxy-serv01 certs]# pcs cluster unstandby haproxy-serv01


11. Check all is fine with openssl client with new certificate


Check Root-Chain certificates:

# openssl verify -verbose -x509_strict -CAfile /etc/haproxy/certs/ccnr-ca-prod.crt -CApath  /etc/haproxy/certs/other-domain.your-domain.com.crt{.pem?)
/etc/haproxy/certs/other-domain.your-domain.com.crt: OK

# openssl verify -verbose -x509_strict -CAfile /etc/haproxy/certs/thawte-ca.crt -CApath  /etc/haproxy/certs/www.your-domain.com.crt
/etc/haproxy/certs/www.your-domain.com.crt: OK

################# For other-domain.your-domain.com.crt ##############
Do the same

12. Check cert expiry on /etc/haproxy/certs/other-domain.your-domain.com.crt

# for haproxy-serv02 qa :15443 listeners
[root@haproxy-serv01 certs]# openssl s_client -connect 10.40.18.88:15443 2>/dev/null| openssl x509 -noout -enddate
notAfter=Dec  9 13:52:00 2022 GMT

[root@haproxy-serv01 certs]#  openssl x509 -enddate -noout -in /etc/haproxy/certs/other-domain.your-domain.com.crt 
notAfter=Dec  9 13:52:00 2022 GMT


Check also for 
+++++ other-domain.your-domain.com..key file +++++
 

—–BEGIN PUBLIC KEY—–

—–END PUBLIC KEY—–


# Extracted from /etc/haproxy/certs/other-domain.your-domain.com.crt
 

—–BEGIN RSA PRIVATE KEY—–

—–END RSA PRIVATE KEY—–


+++++

13. Standby haproxy-serv01 node 1

[root@haproxy-serv01 certs]# pcs cluster standby haproxy-serv01

14. Renew Generate CSR out of RSA PRIV KEY and .CRT for second domain other-domain.your-domain.com

# for haproxy-serv01 prod :443 renew listeners
[root@haproxy-serv02 certs]# openssl x509 -x509toreq -in other-domain.your-domain.com.crt  -out domain-certificate.com.csr -signkey domain-certificate.com.key


And repeat the same steps e.g. fill the CSR inside the domain registrer and get the certificate and move to the proxy, check the fingerprint if necessery
 

[root@haproxy-serv01 certs]# openssl x509 -noout -fingerprint -sha256 -inform pem -in other-domain.your-domain.com.crt
SHA256 Fingerprint=60:B5:F0:14:38:F0:1C:51:7D:FD:4D:C1:72:EA:ED:E7:74:CA:53:A9:00:C6:F1:EB:B9:5A:A6:86:73:0A:32:8D


15. Check private key's SHA256 checksum

# openssl pkey -in terminals-priv.KEY -pubout -outform pem | sha256sum
# openssl x509 -in other-domain.your-domain.com.crt -pubkey -noout -outform pem | sha256sum

# openssl pkey -in  www.your-domain.com.crt-priv-KEY -pubout -outform pem | sha256sum

# openssl x509 -in  www.your-domain.com.crt -pubkey -noout -outform pem | sha256sum


16. Check haproxy config is okay before reload cert


# haproxy -c -V -f /etc/haproxy/haproxyprod.cfg
Configuration file is valid


# haproxy -c -V -f /etc/haproxy/haproxyqa.cfg
Configuration file is valid

Good so next we can the output of status of certificate

17.Check old certificates are reachable via VIP IP address

Considering that the cluster VIP Address is lets say 10.40.18.88 and running one of the both nodes cluster to check it do something like:
 

# curl -vvI https://10.40.18.88:443|grep -Ei 'start date|expire date'


As output you should get the old certificate


18. Reload Haproxies for Prod and QA on node1 and node2

You can reload the haproxy clusters processes gracefully something similar to kill -HUP but without loosing most of the current established connections with below cmds:

Login on node1 (haproxy-serv01) do:

# /usr/sbin/haproxy -f /etc/haproxy/haproxyprod.cfg -D -p /var/run/haproxyprod.pid  -sf $(cat /var/run/haproxyprod.pid)
# /usr/sbin/haproxy -f /etc/haproxy/haproxyqa.cfg -D -p /var/run/haproxyqa.pid  -sf $(cat /var/run/haproxyqa.pid)

repeat the same commands on haproxy-serv02 host

19.Check new certificates online and the the haproxy logs

# curl -vvI https://10.50.18.88:443|grep -Ei 'start date|expire date'

*       start date: Jul 15 08:19:46 2022 GMT
*       expire date: Jul 15 08:19:46 2025 GMT


You should get the new certificates Issueing start date and expiry date.

On both nodes (if necessery) do:

# tail -f /var/log/haproxy.log

Fix “init: Id “ad” respawning too fast: disabled for 5 minutes” – Reload /etc/inittab changes in memory apply without rebooting Linux server

Thursday, April 15th, 2021

inittab-logo-reload-inittab-without-reboot

During my daily sysadmin tasks I've been contacted by a colleague, reporting issues with missing logs in rsyslog on a very old Redhat Server release 5.11.
Exact version is:

root@linux-server:~# cat /etc/redhat-release
Red Hat Enterprise Linux Server release 5.11 (Tikanga)

After checking the logs, I have confirmed his finding that in reality since about more than a year logs were not produced and al I could find multiple messages in /var/log/messages reading like:

init: Id "ad" respawning too fast: disabled for 5 minutes

I've checked the status of rsyslog which seemed to be fine

root@linux-server:~# /etc/init.d/rsyslog status
rsyslogd (pid  13709) is running…

The redhat version on the system was

root@linux-server:~# rpm -qa |grep -i rsyslog
rsyslog-3.22.1-7.el5


root@linux-server:~# tail -n 16 /var/log/messages
Apr 15 17:21:25 linux-server init: Id "ad" respawning too fast: disabled for 5 minutes
Apr 15 17:26:26 linux-server init: Id "ad" respawning too fast: disabled for 5 minutes
Apr 15 17:31:27 linux-server init: Id "ad" respawning too fast: disabled for 5 minutes
Apr 15 17:36:28 linux-server init: Id "ad" respawning too fast: disabled for 5 minutes
Apr 15 17:41:29 linux-server init: Id "ad" respawning too fast: disabled for 5 minutes
Apr 15 17:46:30 linux-server init: Id "ad" respawning too fast: disabled for 5 minutes
Apr 15 17:51:31 linux-server init: Id "ad" respawning too fast: disabled for 5 minutes
Apr 15 17:56:32 linux-server init: Id "ad" respawning too fast: disabled for 5 minutes
Apr 15 18:01:33 linux-server init: Id "ad" respawning too fast: disabled for 5 minutes
Apr 15 18:06:34 linux-server init: Id "ad" respawning too fast: disabled for 5 minutes
Apr 15 18:11:35 linux-server init: Id "ad" respawning too fast: disabled for 5 minutes
Apr 15 18:16:38 linux-server init: Id "ad" respawning too fast: disabled for 5 minutes
Apr 15 18:21:39 linux-server init: Id "ad" respawning too fast: disabled for 5 minutes


root@linux-server:~# /etc/init.d/rsyslog status
rsyslogd (pid  13709) is running…

Since the system is so old and I've seen this message and experienced this "respawning too fast: disabled for 5 minutes" myself in the past on some old Redhat 6.0 before RHEL was born as well as on Slackware Linux. The /etc/inittab which is nowadays obsoleted in newer Linux distributions was used to keep respawing a processes which have the chance to die out for some reason. 

For those unfamiliar with inittab there is a short extract from man inittab to get idea what it is.


NAME
       inittab  –  format of the inittab file used by the sysv-compatible init
       process

DESCRIPTION
       The inittab file describes which processes are started  at  bootup  and
       during  normal  operation  (e.g. /etc/init.d/boot, /etc/init.d/rc, get-
       tys…).  Init(8) distinguishes multiple runlevels, each of  which  can
       have  its  own  set of processes that are started.  Valid runlevels are
       0-6 plus A, B, and C for ondemand entries.  An  entry  in  the  inittab
       file has the following format:

              id:runlevels:action:process
 

So for example the use of /etc/inittab was very handy to configure a separate TTY12 (physical console) in the text environment of Linux to log all your messages. Another good use if you had a bash / perl / python script that you wanted to respawn (resurrect itself if it does out) on OS level without adding additional software like Dan Bernstein's all famous daemontools inittab was the right thing to use. It is a pity nowadays inittab is obsoleted in modern Linux OSes but the most likely reason to remove it is if you put some broken script that overeats CPU or memory if it runs multiple times you can easily get into a hung system.

Thus the logical thing to do is to check /etc/inittab content for any strange issues with less /etc/inittab and near the end of file found the problematic process which was triggering a never ending error messages to rsyslog and the module to protect from such messages in rsyslog by values $SystemLogRateLimitInterval and $SystemLogRateLimitBurst

# configure rsyslog rate limiting
# Rate-limiting
$SystemLogRateLimitInterval 5
$SystemLogRateLimitBurst 50000

The problem causing respawning too fast: disabled for 5 minutes

Was an old version of TivSM IBM Tivoli Service Manager /opt/tivoli/tsm/client/ba/bin/dsmc, set in the past in /etc/inittab it seems some colleague after updating to a more recent version has either changed the location of dsmc binary either the architecture of old tsm itself required a record in /etc/inittab in case if for some reasons or bugs the dsmc during backup creation was dying.

root@linux-server:~# tail -8 /etc/inittab
6:2345:respawn:/sbin/mingetty tty6

# Run xdm in runlevel 5
x:5:respawn:/etc/X11/prefdm -nodaemon

#ad:2345:respawn:/opt/tivoli/tsm/client/ba/bin/dsmc sched >/dev/null 2>&1

root@linux-server:~# rpm -qa |grep -i tivsm
TIVsm-API-5.3.4-0
TIVsm-stagent-5.3.4-0
TIVsm-BA-5.3.4-0
TIVsm-API64-5.3.4-0


The logical thing to do was to check whether this binary exist at all here is the result:

root@linux-server:~$ ls -al /opt/tivoli/tsm/client/ba/bin/dsmc
ls: /opt/tivoli/tsm/client/ba/bin/dsmc: No such file or directory

Obviously someone decided to comment out the inittab support for /opt/tivoli/tsm/client/ba/bin/dsmc as the binary was not present and the dsmc backup was executed via a separate one time cron job or the service itself was configured to run continue, but forgot to reread its configuration so in the kernel memory inittab was still having the instruction to loop over the dsmc binary, since the Linux machine was not rebooted ages (1472 days) or 4.8 years time.

root@linux-server:~#  uname -a; echo; uptime
Linux linux-server2.6.18-419.el5 #1 SMP Wed Feb 22 22:40:57 EST 2017 x86_64 x86_64 x86_64 GNU/Linux

 19:04:34 up 1472 days,  5:20,  1 user,  load average: 0.12, 0.07, 0.06


So what really happens is <b>inittab</b> is trying to kind of re-run all the time dsmc process in a similar way like it would in a bash never ending loop;


while [ 1 ]; do 
/opt/tivoli/tsm/client/ba/bin/dsmc sched
done

Since the $PATH location to the binary returns 'No such file or directory' message this message floods up the rsyslog every second which triggers the LimitBurst protection of rsyslog causing rsyslog to disable completely logging for 5 minutes. The next 5 minutes when the time expires for blocking out logging due to reached limit burst.
dsmc binary sends again few ten thousand of messages for few seconds which are already waiting in a queue of rsyslog and the LimitBurst anti DDoS protection activates again. The reason for the LimitBurst is simply because if it logging is not disabled quickly the repeating message is going to fill the hard drive of the system and noone will be able to login. So rsyslog activated the good protection.

It seems noone from support colleagues, never ever noticed this init: Id "ad" respawning too fast: disabled for 5 minutes in /var/log/messages. So since the syslog was continuesly blocked by overflow of non-sense messages, systems  normal logging was interruped and respectively prevented any other meaningful error messages and warnings from the system to get properly logged  and perhaps flooed the remote rsyslog logging servers @logging-servers:514 in /etc/rsyslog.conf


Fix to respawning too fast: disabled for 5 minutes

Very simply make /etc/inittab get reloaded in memory with:

root@linux-server:~# /sbin/init q

or with the linked telnet, which was so much used by us sys admins in the past

root@linux-server:~# /sbin/telinit q

To make the rsyslog suspension disabled of course we need to restart it again.

root@linux-server:~# /etc/init.d/rsyslog restart

root@linux-server:~# /etc/init.d/rsyslog status
rsyslogd (pid  13710) is running…

And Voila logs from services are being delivered normally via configured stuff in /etc/rsyslog.conf, to make sure this is so:

root@linux-server:~# tail -8 /var/log/messages
Apr 15 14:36:29 linux-serverinit: Id "ad" respawning too fast: disabled for 5 minutes
Apr 15 14:41:37 linux-serverinit: Id "ad" respawning too fast: disabled for 5 minutes
Apr 15 14:51:22 linux-serverinit: Id "ad" respawning too fast: disabled for 5 minutes
Apr 15 14:56:30 linux-serverinit: Id "ad" respawning too fast: disabled for 5 minutes
Apr 15 15:01:38 linux-serverinit: Id "ad" respawning too fast: disabled for 5 minutes
Apr 15 15:06:45 linux-serverinit: Id "ad" respawning too fast: disabled for 5 minutes
Apr 15 18:21:49 linux-server init: Re-reading inittab
Apr 15 18:21:54 linux-server kernel: imklog 3.22.1, log source = /proc/kmsg started.
Apr 15 18:21:54 linux-server rsyslogd: [origin software=”rsyslogd” swVersion=”3.22.1″ x-pid=”13709″ x-info=”http://www.rsyslog.com”] (re)start
Apr 15 18:41:54 linux-server rsyslogd: — MARK —
Apr 15 19:01:54 linux-server rsyslogd: — MARK —
Apr 15 19:21:54 linux-server rsyslogd: — MARK —
Apr 15 19:41:54 linux-server rsyslogd: — MARK —
Apr 15 20:01:54 linux-server rsyslogd: — MARK —

Reinstall all Debian packages with a copy of apt deb package list from another working Debian Linux installation

Wednesday, July 29th, 2020

Reinstall-all-Debian-packages-with-copy-of-apt-packages-list-from-another-working-Debian-Linux-installation

Few days ago, in the hurry in the small hours of the night, I've done something extremely stupid. Wanting to move out a .tar.gz binary copy of qmail installation to /var/lib/qmail with all the dependent qmail items instead of extracting to admin user /root directory (/root), I've extracted it to the main Operating system root / directrory.
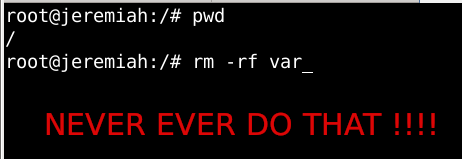
Not noticing this, I've quickly executed rm -rf var with the idea to delete all directory tree under /root/var just 3 seconds later, I've realized I'm issuing the rm -rf var with the wrong location WITH a root user !!!! Being scared on what I've done, I've quickly pressed CTRL+C to immedately cancel the deletion operation of my /var.

wrong-system-var-rm-linux-dont-do-that-ever-or-your-system-will-end-up-irreversably-damaged

But as you can guess, since the machine has an Slid State Drive drive and SSD memory drive are much more faster in I/O operations than the classical ATA / SATA disks. I was not quick enough to cancel the operation and I've noticed already some part of my /var have been R.I.P-pped in the heaven of directories.

This was ofcourse upsetting so for a while I rethinked the situation to get some ideas on what I can do to recover my system ASAP!!! and I had the idea of course to try to reinstall All my installed .deb debian packages to restore system closest to the normal, before my stupid mistake.

Guess my unpleasent suprise when I have realized dpkg and respectively apt-get apt and aptitude package management tools cannot anymore handle packages as Debian Linux's package dependency database has been damaged due to missing dpkg directory 


/var/lib/dpkg 


Oh man that was unpleasent, especially since I've installed plenty of stuff that is custom on my Mate based desktop and, generally reinstalling it updating the sytem to the latest Debian security updates etc. will be time consuming and painful process I wanted to omit.

So of course the logical thing to do here was to try to somehow recover somehow a database copy of /var/lib/dpkg  if that was possible, that of course led me to the idea to lookup for a way to recover my /var/lib/dpkg from backup but since I did not maintained any backup copy of my OS anywhere that was not really possible, so anyways I wondered whether dpkg does not keep some kind of database backups somewhere in case if something goes wrong with its database.
This led me to this nice Ubuntu thred which has pointed me to the part of my root rm -rf dpkg db disaster recovery solution.
Luckily .deb package management creators has thought about situation similar to mine and to give the user a restore point for /var/lib/dpkg damaged database

/var/lib/dpkg is periodically backed up in /var/backups

A typical /var/lib/dpkg on Ubuntu and Debian Linux looks like so:
 

hipo@jeremiah:/var/backups$ ls -l /var/lib/dpkg
total 12572
drwxr-xr-x 2 root root    4096 Jul 26 03:22 alternatives
-rw-r–r– 1 root root      11 Oct 14  2017 arch
-rw-r–r– 1 root root 2199402 Jul 25 20:04 available
-rw-r–r– 1 root root 2199402 Oct 19  2017 available-old
-rw-r–r– 1 root root       8 Sep  6  2012 cmethopt
-rw-r–r– 1 root root    1337 Jul 26 01:39 diversions
-rw-r–r– 1 root root    1223 Jul 26 01:39 diversions-old
drwxr-xr-x 2 root root  679936 Jul 28 14:17 info
-rw-r—– 1 root root       0 Jul 28 14:17 lock
-rw-r—– 1 root root       0 Jul 26 03:00 lock-frontend
drwxr-xr-x 2 root root    4096 Sep 17  2012 parts
-rw-r–r– 1 root root    1011 Jul 25 23:59 statoverride
-rw-r–r– 1 root root     965 Jul 25 23:59 statoverride-old
-rw-r–r– 1 root root 3873710 Jul 28 14:17 status
-rw-r–r– 1 root root 3873712 Jul 28 14:17 status-old
drwxr-xr-x 2 root root    4096 Jul 26 03:22 triggers
drwxr-xr-x 2 root root    4096 Jul 28 14:17 updates

Before proceeding with this radical stuff to move out /var/lib/dpkg/info from another machine to /var mistakenyl removed oned. I have tried to recover with the well known:

  • extundelete
  • foremost
  • recover
  • ext4magic
  • ext3grep
  • gddrescue
  • ddrescue
  • myrescue
  • testdisk
  • photorec

Linux file deletion recovery tools from a USB stick loaded with a Number of LiveCD distributions, i.e. tested recovery with:

  • Debian LiveCD
  • Ubuntu LiveCD
  • KNOPPIX
  • SystemRescueCD
  • Trinity Rescue Kit
  • Ultimate Boot CD


but unfortunately none of them couldn't recover the deleted files … 

The reason why the standard file recovery tools could not recover ?

My assumptions is after I've done by rm -rf var; from sysroot,  issued the sync (- if you haven't used it check out man sync) command – that synchronizes cached writes to persistent storage and did a restart from the poweroff PC button, this should have worked, as I've recovered like that in the past) in a normal Sys V System with a normal old fashioned blocks filesystem as EXT2 . or any other of the filesystems without a journal, however as the machine run a EXT4 filesystem with a journald and journald, this did not work perhaps because something was not updated properly in /lib/systemd/systemd-journal, that led to the situation all recently deleted files were totally unrecoverable.

1. First step was to restore the directory skele of /var/lib/dpkg

# mkdir -p /var/lib/dpkg/{alternatives,info,parts,triggers,updates}


2. Recover missing /var/lib/dpkg/status  file

The main file that gives information to dpkg of the existing packages and their statuses on a Debian based systems is /var/lib/dpkg/status

# cp /var/backups/dpkg.status.0 /var/lib/dpkg/status


3. Reinstall dpkg package manager to make package management working again

Say a warm prayer to the Merciful God ! and do:

# apt-get download dpkg
# dpkg -i dpkg*.deb


4. Reinstall base-files .deb package which provides basis of a Debian system

Hopefully everything will be okay and your dpkg / apt pair will be in normal working state, next step is to:

# apt-get download base-files
# dpkg -i base-files*.deb


5. Do a package sanity and consistency check and try to update OS package list

Check whether packages have been installed only partially on your system or that have missing, wrong or obsolete control  data  or  files.  dpkg  should suggest what to do with them to get them fixed.

# dpkg –audit

Then resynchronize (fetch) the package index files from their sources described in /etc/apt/sources.list

# apt-get update


Do apt db constistency check:

#  apt-get check


check is a diagnostic tool; it updates the package cache and checks for broken dependencies.
 

Take a deep breath ! …

Do :

ls -l /var/lib/dpkg
and compare with the above list. If some -old file is not present don't worry it will be there tomorrow.

Next time don't forget to do a regular backup with simple rsync backup script or something like Bacula / Amanda / Time Vault or Clonezilla.
 

6. Copy dpkg database from another Linux system that has a working dpkg / apt Database

Well this was however not the end of the story … There were still many things missing from my /var/ and luckily I had another Debian 10 Buster install on another properly working machine with a similar set of .deb packages installed. Therefore to make most of my programs still working again I have copied over /var from the other similar set of package installed machine to my messed up machine with the missing deleted /var.

To do so …
On Functioning Debian 10 Machine (Working Host in a local network with IP 192.168.0.50), I've archived content of /var:

linux:~# tar -czvf var_backup_debian10.tar.gz /var

Then sftped from Working Host towards the /var deleted broken one in my case this machine's hostname is jericho and luckily still had SSHD and SFTP running processes loaded in memory:

jericho:~# sftp root@192.168.0.50
sftp> get var_backup_debian10.tar.gz

Now Before extracting the archive it is a good idea to make backup of old /var remains somewhere for example somewhere in /root 
just in case if we need to have a copy of the dpkg backup dir /var/backups

jericho:~# cp -rpfv /var /root/var_backup_damaged

 
jericho:~# tar -zxvf /root/var_backup_debian10.tar.gz 
jericho:/# mv /root/var/ /

Then to make my /var/lib/dpkg contain the list of packages from my my broken Linux install I have ovewritten /var/lib/dpkg with the files earlier backupped before  .tar.gz was extracted.

jericho:~# cp -rpfv /var /root/var_backup_damaged/lib/dpkg/ /var/lib/


7. Reinstall All Debian  Packages completely scripts


I then tried to reinstall each and every package first using aptitude with aptitude this is done with

# aptitude reinstall '~i'

However as this failed, tried using a simple shell loop like below:

for i in $(dpkg -l |awk '{ print $2 }'); do echo apt-get install –reinstall –yes $i; done

Alternatively, all .deb package reninstall is also possible with dpkg –get-selections and with awk with below cmds:

dpkg –get-selections | grep -v deinstall | awk '{print $1}' > list.log;
awk '$1=$1' ORS=' ' list.log > newlist.log
;
apt-get install –reinstall $(cat newlist.log)

It can also be run as one liner for simplicity:

dpkg –get-selections | grep -v deinstall | awk '{print $1}' > list.log; awk '$1=$1' ORS=' ' list.log > newlist.log; apt-get install –reinstall $(cat newlist.log)

This produced a lot of warning messages, reporting "package has no files currently installed" (virtually for all installed packages), indicating a severe packages problem below is sample output produced after each and every package reinstall … :

dpkg: warning: files list file for package 'iproute' missing; assuming package has no files currently installed
dpkg: warning: files list file for package 'brscan-skey' missing; assuming package has no files currently installed
dpkg: warning: files list file for package 'libapache2-mod-php7.4' missing; assuming package has no files currently installed
dpkg: warning: files list file for package 'libexpat1:amd64' missing; assuming package has no files currently installed
dpkg: warning: files list file for package 'libexpat1:i386' missing; assuming package has no files currently installed
dpkg: warning: files list file for package 'php5.6-readline' missing; assuming package has no files currently installed
dpkg: warning: files list file for package 'linux-headers-4.19.0-5-amd64' missing; assuming package has no files currently installed
dpkg: warning: files list file for package 'libgraphite2-3:amd64' missing; assuming package has no files currently installed
dpkg: warning: files list file for package 'libgraphite2-3:i386' missing; assuming package has no files currently installed
dpkg: warning: files list file for package 'libbonoboui2-0:amd64' missing; assuming package has no files currently installed
dpkg: warning: files list file for package 'libxcb-dri3-0:amd64' missing; assuming package has no files currently installed
dpkg: warning: files list file for package 'libxcb-dri3-0:i386' missing; assuming package has no files currently installed
dpkg: warning: files list file for package 'liblcms2-2:amd64' missing; assuming package has no files currently installed
dpkg: warning: files list file for package 'liblcms2-2:i386' missing; assuming package has no files currently installed
dpkg: warning: files list file for package 'libpixman-1-0:amd64' missing; assuming package has no files currently installed
dpkg: warning: files list file for package 'libpixman-1-0:i386' missing; assuming package has no files currently installed
dpkg: warning: files list file for package 'gksu' missing; assuming package has no files currently installed
dpkg: warning: files list file for package 'liblogging-stdlog0:amd64' missing; assuming package has no files currently installed
dpkg: warning: files list file for package 'mesa-vdpau-drivers:amd64' missing; assuming package has no files currently installed
dpkg: warning: files list file for package 'mesa-vdpau-drivers:i386' missing; assuming package has no files currently installed
dpkg: warning: files list file for package 'libzvbi0:amd64' missing; assuming package has no files currently installed
dpkg: warning: files list file for package 'libzvbi0:i386' missing; assuming package has no files currently installed
dpkg: warning: files list file for package 'libcdparanoia0:amd64' missing; assuming package has no files currently installed
dpkg: warning: files list file for package 'libcdparanoia0:i386' missing; assuming package has no files currently installed
dpkg: warning: files list file for package 'python-gconf' missing; assuming package has no files currently installed
dpkg: warning: files list file for package 'php5.6-cli' missing; assuming package has no files currently installed
dpkg: warning: files list file for package 'libpaper1:amd64' missing; assuming package has no files currently installed
dpkg: warning: files list file for package 'mixer.app' missing; assuming package has no files currently installed

After some attempts I found a way to be able to work around the warning message, for each package by simply reinstalling the package reporting the issue with

apt –reinstall $package_name


Though reinstallation started well and many packages got reinstalled, unfortunately some packages such as apache2-mod-php5.6 and other php related ones  started failing during reinstall ending up in unfixable states right after installation of binaries from packages was successfully placed in its expected locations on disk. The failures occured during the package setup stage ( dpkg –configure $packagename) …

The logical thing to do is a recovery attempt with something like the usual well known by any Debian admin:

apt-get install –fix-missing

As well as Manual requesting to reconfigure (issue re-setup) of all installed packages also did not produced a positive result

dpkg –configure -a

But many packages were still failing due to dpkg inability to execute some post installation scripts from respective .deb files.
To work around that and continue installing the rest of packages I had to manually delete all files related to the failing package located under directory 

/var/lib/dpkg/info#

For example to omit the post installation failure of libapache2-mod-php5.6 and have a succesful install of the package next time I tried reinstall, I had to delete all /var/lib/dpkg/info/libapache2-mod-php5.6.postrm, /var/lib/dpkg/info/libapache2-mod-php5.6.postinst scripts and even sometimes everything like libapache2-mod-php5.6* that were present in /var/lib/dpkg/info dir.

The problem with this solution, however was the package reporting to install properly, but the post install script hooks were still not in placed and important things as setting permissions of binaries after install or applying some configuration changes right after install was missing leading to programs failing to  fully behave properly or even breaking up even though showing as finely installed …

The final solution to this problem was radical.
I've used /var/lib/dpkg database (directory) from ther other working Linux machine with dpkg DB OK found in var_backup_debian10.tar.gz (linux:~# host with a working dpkg database) and then based on the dpkg package list correct database responding on jericho:~# to reinstall each and every package on the system using Debian System Reinstaller script taken from the internet.
Debian System Reinstaller works but to reinstall many packages, I've been prompted again and again whether to overwrite configuration or keep the present one of packages.
To Omit the annoying [Y / N ] text prompts I had made a slight modification to the script so it finally looked like this:
 

#!/bin/bash
# Debian System Reinstaller
# Copyright (C) 2015 Albert Huang
# Copyright (C) 2018 Andreas Fendt

# This program is free software: you can redistribute it and/or modify
# it under the terms of the GNU General Public License as published by
# the Free Software Foundation, either version 3 of the License, or
# (at your option) any later version.

# This program is distributed in the hope that it will be useful,
# but WITHOUT ANY WARRANTY; without even the implied warranty of
# MERCHANTABILITY or FITNESS FOR A PARTICULAR PURPOSE.  See the
# GNU General Public License for more details.

# You should have received a copy of the GNU General Public License
# along with this program.  If not, see <http://www.gnu.org/licenses/>.

# —
# This script assumes you are using a Debian based system
# (Debian, Mint, Ubuntu, #!), and have sudo installed. If you don't
# have sudo installed, replace "sudo" with "su -c" instead.

pkgs=`dpkg –get-selections | grep -w 'install$' | cut -f 1 |  egrep -v '(dpkg|apt)'`

for pkg in $pkgs; do
    echo -e "\033[1m   * Reinstalling:\033[0m $pkg"    

    apt-get –reinstall -o Dpkg::Options::="–force-confdef" -o Dpkg::Options::="–force-confold" -y install $pkg || {
        echo "ERROR: Reinstallation failed. See reinstall.log for details."
        exit 1
    }
done


 debian-all-packages-reinstall.sh working modified version of Albert Huang and Andreas Fendt script  can be also downloaded here.

Note ! Omitting the text confirmation prompts to install newest config or keep maintainer configuration is handled by the argument:


-o Dpkg::Options::="–force-confold


I however still got few NCurses Console selection prompts during the reinstall of about 3200+ .deb packages, so even with this mod the reinstall was not completely automatic.

Note !  During the reinstall few of the packages from the list failed due to being some old unsupported packages this was ejabberd, ircd-hybrid and a 2 / 3 more.
This failure was easily solved by completely purging those packages with the usual

# dpkg –purge $packagename

and reruninng  debian-all-packages-reinstall.sh on each of the failing packages.

Note ! The failing packages were just old ones left over from Debian 8 and Debian 9 before the apt-get dist-upgrade towards 10 Duster.
Eventually I got a success by God's grance, after few hours of pains and trials, ending up in a working state package database and a complete set of freshly reinstalled packages.

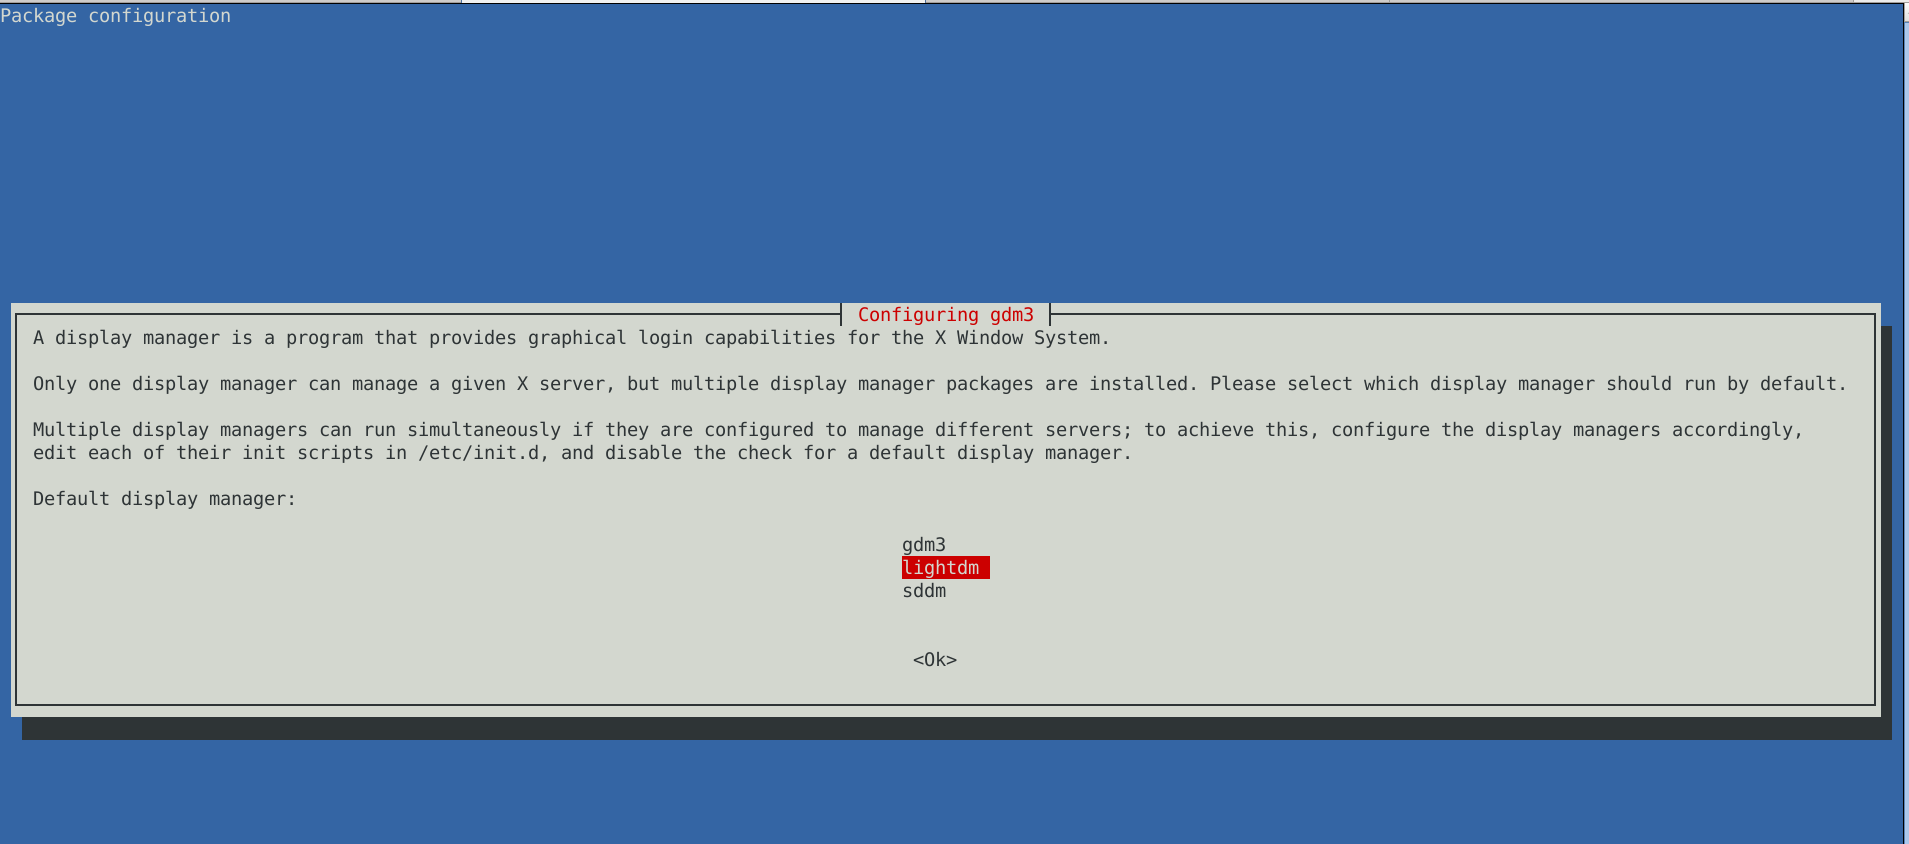
The only thing I had to do finally is 2 hours of tampering why GNOME did not automatically booted after the system reboot due to failing gdm
until I fixed that I've temprary used ligthdm (x-display-manager), to do I've

dpkg –reconfigure gdm3

lightdm-x-display-manager-screenshot-gdm3-reconfige

 to work around this I had to also reinstall few libraries, reinstall the xorg-server, reinstall gdm and reinstall the meta package for GNOME, using below set of commands:
 

apt-get install –reinstall libglw1-mesa libglx-mesa0
apt-get install –reinstall libglu1-mesa-dev
apt install –reinstallgsettings-desktop-schemas
apt-get install –reinstall xserver-xorg-video-intel
apt-get install –reinstall xserver-xorg
apt-get install –reinstall xserver-xorg-core
apt-get install –reinstall task-desktop
apt-get install –reinstall task-gnome-desktop


As some packages did not ended re-instaled on system because on the original host from where /var/lib/dpkg db was copied did not have it I had to eventually manually trigger reinstall for those too:


apt-get install –reinstall –yes vlc
apt-get install –reinstall –yes thunderbird
apt-get install –reinstall –yes audacity
apt-get install –reinstall –yes gajim
apt-get install –reinstall –yes slack remmina
apt-get install –yes k3b
pt-get install –yes gbgoffice
pt-get install –reinstall –yes skypeforlinux
apt-get install –reinstall –yes vlc
apt-get install –reinstall –yes libcurl3-gnutls libcurl3-nss
apt-get install –yes virtualbox-5.2
apt-get install –reinstall –yes vlc
apt-get install –reinstall –yes alsa-tools-gui
apt-get install –reinstall –yes gftp
apt install ./teamviewer_15.3.2682_amd64.deb –yes


Note that some of above packages requires a properly configured third party repositories, other people might have other packages that are missing from the dpkg list and needs to be reinstalled so just decide according to your own case of left aside working system present binaries that doesn't belong to any dpkg installed package.

After a bit of struggle everything is back to normal Thanks God! 🙂 !


A year has passed without our beloved friend Nikolay Paskalev (Shanar)

Tuesday, July 13th, 2010

A whole sad year has passed without our beloved friend and brother in Christ, Nikolay Paskalev on 13.07.2010 !
Recently some of the people who loved or knew Niki in his earth life, gathered together to remember him.
The people who attended were no more than 10, quite modest as the whole earthly life of Niki …

Nikolay Paskalev – Shanar also known under the pseudonim (LunarStill)

Recently some of the people who loved or knew Niki in his earth life, gathered together to remember him.
The people who attended were no more than 10, quite modest as the whole earthly life of Niki …
Nick as I used to call me often was a big fan of computers, technology, all kind of SCI-FI movies.
A true IT Geek an unique close friend. He was also a notable joker, he always knew how to make somebody laugh.
I also remember his wild fantasies and his sharp mind. Niki was also a Christian and we every now and then talked about our common faith and hope in God, he was also a great and glorious gamer !
He spend some two years time or even more playing World of Warcraft
Though he was pissed off of WoW at the end of his wordly life.
He also loved to drink beer every now and then and was absolutely crazy about pop corns 🙂

I sometimes regret that I didn’t took more of my personal time to spend with him.
His sudden departure was a big and unexpected loss for all of us who loved him and still loves him.
I believe now he is in a better place in Heaven with God.

Let all of us his friends and relatives remember his memory and his gracious light he has shed on all of us while he was on earth.
Let us who know him pray to God that the Lord Jesus Christ has mercy on Nikolay’s soul and grant him rest and eternal bliss in the Kingdon of Heaven.
Will be seing you again someday dear Niki! 🙁

Changing ’33 days has gone without being checked’ automated fsck filesystem check on Debian Linux Desktops – Reduce FS check waiting on Linux notebooks

Saturday, November 17th, 2012

Increasing default setting of automatic disk scheck on Debian Linux to get rid of annoying fsck waiting on boot / Less boot waiting by disabling automated fsck root FS checks

The periodic scheduled file system check that is set as a default behavior in Debian GNU / Linux is something very wise in terms of data security. However in terms of Desktop usability (especially for highly mobile users wtih notebooks like me) it's very inconvenient.

If you're a Linux laptop user with Debian GNU / Linux or other Linux distro, you certainly many times have experienced the long waiting on boot because of the routine scheduled fsck check:

/dev/sda5 has gone 33 days without being checked, check forced
/dev/sda5 |====== .....

In this little article, I will explain how to change the 33 mount times automated fsck filesystem  check on Debian GNU / Linux to avoid frequent fsck waitings. As long as I know this behaviour is better tailored on Ubuntu as Ubuntu developers, make Ubuntu to be targeting users and they have realized the 33 mounts auto check is quite low for 'em.

1. Getting information about current file system partitions with fdisk and mount

a) First it is good practice to check out all present system mountable ex3 / reiserfs file systems, just to give you an idea what you're doing:

noah:~#  fdisk -l

Disk /dev/sda: 160.0 GB, 160041885696 bytes
255 heads, 63 sectors/track, 19457 cylinders
Units = cylinders of 16065 * 512 = 8225280 bytes
Sector size (logical/physical): 512 bytes / 512 bytes
I/O size (minimum/optimal): 512 bytes / 512 bytes
Disk identifier: 0x2d92834c

   Device Boot      Start         End      Blocks   Id  System
/dev/sda1               1         721     5786624   27  Unknown
Partition 1 does not end on cylinder boundary.
/dev/sda2   *         721        9839    73237024    7  HPFS/NTFS
/dev/sda3            9839       19457    77263200    5  Extended
/dev/sda5            9839       12474    21167968+  83  Linux
/dev/sda6           12474       16407    31593208+  83  Linux
/dev/sda7           16407       16650     1950448+  82  Linux swap / Solaris
/dev/sda8           16650       19457    22551448+  83  Linux


Second, find out which one is your primary root filesystem, and  whether the system is partitioned to have /usr , /var and /home in separate partitions or not.

b) finding the root directory mount point ( / ):

noah:~ # mount |head -n 1
/dev/sda8 on / type ext3 (rw,errors=remount-ro)

c) looking up if /usr /var and /home in separate partitions exist or all is on the / partition

noah:~# mount |grep -i -E '/usr|/var/|/home'
/dev/sda5 on /home type ext3 (rw,errors=remount-ro)

2. Getting information about Linux mounted partitions filesystem parameters ( tune2fs )
 

noah:~# /sbin/tune2fs -l /dev/sda8

tune2fs 1.41.12 (17-May-2010)
Filesystem volume name:   <none>
Last mounted on:          <not available>
Filesystem UUID:          8e0901b1-d569-45b2-902d-e159b104e330
Filesystem magic number:  0xEF53
Filesystem revision #:    1 (dynamic)
Filesystem features:      has_journal ext_attr resize_inode dir_index filetype needs_recovery sparse_super large_file
Filesystem flags:         signed_directory_hash
Default mount options:    (none)
Filesystem state:         clean
Errors behavior:          Continue
Filesystem OS type:       Linux
Inode count:              1411680
Block count:              5637862
Reserved block count:     281893
Free blocks:              578570
Free inodes:              700567
First block:              0
Block size:               4096
Fragment size:            4096
Reserved GDT blocks:      1022
Blocks per group:         32768
Fragments per group:      32768
Inodes per group:         8160
Inode blocks per group:   510
Filesystem created:       Sun Jun 22 16:47:48 2008
Last mount time:          Thu Nov 15 14:13:10 2012
Last write time:          Tue Nov 13 13:39:56 2012
Mount count:              6
Maximum mount count:      33
Last checked:             Tue Nov 13 13:39:56 2012
Check interval:           15552000 (6 months)
Next check after:         Sun May 12 14:39:56 2013
Reserved blocks uid:      0 (user root)
Reserved blocks gid:      0 (group root)
First inode:              11
Inode size:              256
Journal inode:            8
First orphan inode:       595996
Default directory hash:   tea
Directory Hash Seed:      2f96db3d-9134-492b-a361-a873a0c8c3c4
Journal backup:           inode blocks


noah:~# /sbin/tune2fs /dev/sda5

tune2fs 1.41.12 (17-May-2010)
Filesystem volume name:   <none>
Last mounted on:          <not available>
Filesystem UUID:          26aa6017-e675-4029-af28-7d346a7b6b00
Filesystem magic number:  0xEF53
Filesystem revision #:    1 (dynamic)
Filesystem features:      has_journal ext_attr resize_inode dir_index filetype needs_recovery sparse_super large_file
Filesystem flags:         signed_directory_hash
Default mount options:    (none)
Filesystem state:         clean
Errors behavior:          Continue
Filesystem OS type:       Linux
Inode count:              1324512
Block count:              5291992
Reserved block count:     264599
Free blocks:              412853
Free inodes:              1247498
First block:              0
Block size:               4096
Fragment size:            4096
Reserved GDT blocks:      1022
Blocks per group:         32768
Fragments per group:      32768
Inodes per group:         8176
Inode blocks per group:   511
Filesystem created:       Thu Jul 15 18:46:03 2010
Last mount time:          Thu Nov 15 14:13:12 2012
Last write time:          Thu Nov 15 14:13:12 2012
Mount count:              12
Maximum mount count:      27
Last checked:             Sat Nov 10 22:43:33 2012
Check interval:           15552000 (6 months)
Next check after:         Thu May  9 23:43:33 2013
Reserved blocks uid:      0 (user root)
Reserved blocks gid:      0 (group root)
First inode:              11
Inode size:              256
Required extra isize:     28
Desired extra isize:      28
Journal inode:            8
First orphan inode:       1032306
Default directory hash:   half_md4
Directory Hash Seed:      8ef0fe5a-43e3-42bf-a1b9-ae6e1606ecd4
Journal backup:           inode blocks
 

As you see from above paste from my notebook, there is a plenty of options you can tweak in a filesystem.. However as the aim of my article is not to be a FS tweaking guide I will stick only to the important for me  which is Mount Count:

noah:~#  tune2fs -l /dev/sda5|grep -i -E 'mount count|Last checked'
Mount count:              12
Maximum mount count:      27
Last checked:             Sat Nov 10 22:43:33 2012

As you see 'Mount Count: 12', indicates there are 12 mounts of filesystem /dev/sda5 since the last time it was fsck-ed.
'Maximum mount count: 27' set for this filesystem indicates that after 27 times mount is done more than 27 times, a fsck check has to be issued. In other words after 27 mounts or re-mounts of /dev/sda5 which mostly occur after system reboot on system boot time.

Restarting system is not a common on servers but with the increased number of mobile devices like notebooks Android tablets whatever 27 restarts until fsck is too low. On the other hand filesystem check every now and then is a necessity as mobility increases the possibility for a physical damage of the Hard Disk Drive.

Thus my person view is increasing 'Maximum mount count:' 27 to 80 is much better for people who move a lot and restart laptop at least few times a day. Increasing to 80 or 100 times, means you will not have to wait for a file system fsck every week (6, 7 days),. for about at 8-10 minutes (whether on newer hard disks notebooks with 500 GB space and more), it might even take 15 – 20 minutes.
I switch on and off my computer 2 to 3 times a day, because I move from location to location. Whether maximum mount count is 80, this means a FSCK will be ensued every 40/2 = 40 days or so which is quite a normal timing for a Scheduled filesystem integrity check.

noah:~# tune2fs -c 80 -i 80 /dev/sda8
tune2fs 1.41.12 (17-May-2010)
Setting maximal mount count to 80
Setting interval between checks to 6912000 seconds
 

-c argument sets (-c max-mount-counts)

-i sets interval betweenchecks (-i  interval-between-checks[d|m|w] - days, months, weeks)

You can consequentially, check approximately, when the next ext3 FS check will happen with:

noah:~# tune2fs -l /dev/sda8 |grep -i 'check'
Last checked:             Tue Nov 13 13:39:56 2012
Check interval:           6912000 (2 months, 2 weeks, 6 days)
Next check after:         Fri Feb  1 13:39:56 2013
 

For people, who want to completely disable periodic Linux FSCK chcks and already use some kind of Backup automated solution (Dropbox, Ubuntu One …), that makes a backup copy of their data on a Cluster / Cloud – as Clusters are fuzzy called nowadays):

noah:~# tune2fs -c 0 -i 0 /dev/sda8
tune2fs 1.41.12 (17-May-2010)
Setting maximal mount count to -1
Setting interval between checks to 0 seconds

Again if you don't do a regular backup of your filesystem NEVER EVER do this BEWARE !

To be 100% sure, /dev/sda8 periodic filesystem will not happen again issue:

tune2fs -l /dev/sda8 |grep -i -E 'mount|check'
Last mounted on:          <not available>
Default mount options:    (none)
Last mount time:          Thu Nov 15 14:13:10 2012
Mount count:              6
Maximum mount count:      -1
Last checked:             Tue Nov 13 13:39:56 2012
Check interval:           0 (<none>)
 

By the way it is intestesting to mention Mount Count and Maximum Mount Count FS variables are set during initial creation of the filesystem with mkfs.ext3, in Debian and derivative distros this is done by the Debian Installer program. On Fedora and CentOS and most of other RPM based distros except SuSE by Anaconda Installer prog.

As of time of writing this article, for custom created filesystems with mkfs.ext3 Maximum mount count is     27.

BTW on CentOS, developers has by default set the Maximum mount count to beset to infinitive value:

/sbin/tune2fs -l /dev/sda1|grep -i 'mount count'
Mount count:              39

Maximum mount count:      -1
The same 'deskop wise' behavior of Maximum mount count: -1 is set by default also on Fedora and RHEL. Meaning RPM distro users are free of this annoyance.

3. Remove fsck filesystem check on boot in /etc/fstab
 

Usually Desktop and laptop Linux users, would not need do that but it is a good information to know.

/etc/fstab by default sets  the filesystems to be checked for bad blocks in case  if the system was shutdown due to electricity failure or hang-up, left without proper un-mounting. Though, sometimes this is very helpful as it fixes improperly complete writing on the HDD, those who administrate servers knows how annoying it is to be asked for a root password input on the physical console, whether the system fails to boot waiting for password input.
In remotely administrated servers it makes things even worser as you have to bother a tech support guy to go to the system and input the root password and type fsck /dev/whatever command manually. With notebooks and other Desktops like my case it is not such a problem to just enter root password but it still takes time. Thus it is much better to just make this fsck test filesystem on errors to be automatically invoked on filesystem errors.

A standard default records in /etc/fstab concerning root filesystem and others is best to be something like this:

/dev/sda8       /               ext3    errors=remount-ro 0       1
UUID=26aa6017-e675-4029-af28-7d346a7b6b00       /home           ext3    errors=remount-ro 0     1

The 1's in the end of each line instruct filesystems to be automatically checked with no need for user interaction in case of FS mount errors.

Some might want to completely disable, remount read only and drop into single user mode though this is usually not a good idea, to do so:

/dev/sda8       /               ext3    errors=remount-ro 0       0
UUID=26aa6017-e675-4029-af28-7d346a7b6b00       /home           ext3    errors=remount-ro 0     0


4. Forcing check on next reboot in case you suspect (bad blocks) or inode problems with filesystem

If you're on Linux hosts which for some reason you have disabled routine fsck it is useful to know about the existence of:

 /forcefcsk file

Scheduling a reboot nomatter, what settings you have for FS can be achieved by simply creating forcefsck in / i.e.:

noah:~# touch /forcefsck


5. Force the server to not fsck on next reboot

noah:~# /sbin/shutdown -rf now

The -f flag  tells to skip the fsck for all file systems defined in /etc/fstab during the next reboot.Unlike using tune2fs to set permanent reboot behavior it only takes effect during next boot. 

Rsync copy files with root privileges between servers with root superuser account disabled

Tuesday, December 3rd, 2019


rsync-copy-files-between-two-servers-with-root-privileges-with-root-superuser-account-disabled

Sometimes on servers that follow high security standards in companies following PCI Security (Payment Card Data Security) standards it is necessery to have a very weird configurations on servers,to be able to do trivial things such as syncing files between servers with root privileges in a weird manners.This is the case for example if due to security policies you have disabled root user logins via ssh server and you still need to synchronize files in directories such as lets say /etc , /usr/local/etc/ /var/ with root:root user and group belongings.

Disabling root user logins in sshd is controlled by a variable in /etc/ssh/sshd_config that on most default Linux OS
installations is switched on, e.g. 

grep -i permitrootlogin /etc/ssh/sshd_config
PermitRootLogin yes


Many corporations use Vulnerability Scanners such as Qualys are always having in their list of remote server scan for SSH Port 22 to turn have the PermitRootLogin stopped with:


PermitRootLogin no


In this article, I'll explain a scenario where we have synchronization between 2 or more servers Server A / Server B, whatever number of servers that have already turned off this value, but still need to
synchronize traditionally owned and allowed to write directories only by root superuser, here is 4 easy steps to acheive it.


1. Add rsyncuser to Source Server (Server A) and Destination (Server B)


a. Execute on Src Host:


groupadd rsyncuser
useradd -g 1000 -c 'Rsync user to sync files as root src_host' -d /home/rsyncuser -m rsyncuser


b. Execute on Dst Host:


groupadd rsyncuser
useradd -g 1000 -c 'Rsync user to sync files dst_host' -d /home/rsyncuser -m rsyncuser


2. Generate RSA SSH Key pair to be used for passwordless authentication


a. On Src Host
 

su – rsyncuser

ssh-keygen -t rsa -b 4096


b. Check .ssh/ generated key pairs and make sure the directory content look like.


[rsyncuser@src-host .ssh]$ cd ~/.ssh/;  ls -1

id_rsa
id_rsa.pub
known_hosts


3. Copy id_rsa.pub to Destination host server under authorized_keys


scp ~/.ssh/id_rsa.pub  rsyncuser@dst-host:~/.ssh/authorized_keys


Next fix permissions of authorized_keys file for rsyncuser as anyone who have access to that file (that exists as a user account) on the system
could steal the key and use it to run rsync commands and overwrite remotely files, like overwrite /etc/passwd /etc/shadow files with his custom crafted credentials
and hence hack you 🙂
 

Hence, On Destionation Host Server B fix permissions with:
 

su – rsyncuser; chmod 0600 ~/.ssh/authorized_keys
[rsyncuser@dst-host ~]$


An alternative way for the lazy sysadmins is to use the ssh-copy-id command


$ ssh-copy-id rsyncuser@192.168.0.180
/usr/bin/ssh-copy-id: INFO: Source of key(s) to be installed: "/root/.ssh/id_rsa.pub"
/usr/bin/ssh-copy-id: INFO: attempting to log in with the new key(s), to filter out any that are already installed
/usr/bin/ssh-copy-id: INFO: 1 key(s) remain to be installed — if you are prompted now it is to install the new keys
root@192.168.0.180's password: 


For improved security here to restrict rsyncuser to be able to run only specific command such as very specific script instead of being able to run any command it is good to use little known command= option
once creating the authorized_keys


4. Test ssh passwordless authentication works correctly


For that Run as a normal ssh from rsyncuser

On Src Host


[rsyncuser@src-host ~]$ ssh rsyncuser@dst-host


Perhaps here is time that for those who, think enabling a passwordless authentication is not enough secure and prefer to authorize rsyncuser via a password red from a secured file take a look in my prior article how to login to remote server with password provided from command line as a script argument / Running same commands on many servers 

5. Enable rsync in sudoers to be able to execute as root superuser (copy files as root)


For this step you will need to have sudo package installed on the Linux server.

Then, Execute once logged in as root on Destionation Server (Server B)


[root@dst-host ~]# grep 'rsyncuser ALL' /etc/sudoers|wc -l || echo ‘rsyncuser ALL=NOPASSWD:/usr/bin/rsync’ >> /etc/sudoers


Note that using rsync with a ALL=NOPASSWD in /etc/sudoers could pose a high security risk for the system as anyone authorized to run as rsyncuser is able to overwrite and
respectivle nullify important files on Destionation Host Server B and hence easily mess the system, even shell script bugs could produce a mess, thus perhaps a better solution to the problem
to copy files with root privileges with the root account disabled is to rsync as normal user somewhere on Dst_host and use some kind of additional script running on Dst_host via lets say cron job and
will copy gently files on selective basis.

Perhaps, even a better solution would be if instead of granting ALL=NOPASSWD:/usr/bin/rsync in /etc/sudoers is to do ALL=NOPASSWD:/usr/local/bin/some_copy_script.sh
that will get triggered, once the files are copied with a regular rsyncuser acct.


6. Test rsync passwordless authentication copy with superuser works


Do some simple copy, lets say copy files on Encrypted tunnel configurations located under some directory in /etc/stunnel on Server A to /etc/stunnel on Server B

The general command to test is like so:
 

rsync -aPz -e 'ssh' '–rsync-path=sudo rsync' /var/log rsyncuser@$dst_host:/root/tmp/


This will copy /var/log files to /root/tmp, you will get a success messages for the copy and the files will be at destination folder if succesful.


On Src_Host run:


[rsyncuser@src-host ~]$ dst=FQDN-DST-HOST; user=rsyncuser; src_dir=/etc/stunnel; dst_dir=/root/tmp;  rsync -aP -e 'ssh' '–rsync-path=sudo rsync' $src_dir  $rsyncuser@$dst:$dst_dir;


7. Copying files with root credentials via script


The simlest file to use to copy a bunch of predefined files  is best to be handled by some shell script, the most simple version of it, could look something like this.
 

#!/bin/bash
# On server1 use something like this
# On server2 dst server
# add in /etc/sudoers
# rsyncuser ALL=NOPASSWD:/usr/bin/rsync

user='rsyncuser';

dst_dir="/root/tmp";
dst_host='$dst_host';
src[1]="/etc/hosts.deny";
src[2]="/etc/sysctl.conf";
src[3]="/etc/samhainrc";
src[4]="/etc/pki/tls/";
src[5]="/usr/local/bin/";


for i in $(echo ${src[@]}); do
rsync -aPvz –delete –dry-run -e 'ssh' '–rsync-path=sudo rsync' "$i" $rsyncuser@$dst_host:$dst_dir"$i";
done


In above script as you can see, we define a bunch of files that will be copied in bash array and then run a loop to take each of them and copy to testination dir.
A very sample version of the script rsync_with_superuser-while-root_account_prohibited.sh 
 

Conclusion


Lets do short overview on what we have done here. First Created rsyncuser on SRC Server A and DST Server B, set up the key pair on both copied the keys to make passwordless login possible,
set-up rsync to be able to write as root on Dst_Host / testing all the setup and pinpointing a small script that can be used as a backbone to develop something more complex
to sync backups or keep system configurations identicatial – for example if you have doubts that some user might by mistake change a config etc.
In short it was pointed the security downsides of using rsync NOPASSWD via /etc/sudoers and few ideas given that could be used to work on if you target even higher
PCI standards.


Mail send from command line on Linux and *BSD servers – useful for scripting

Monday, September 10th, 2018

mail-send-email-from-command-line-on-linux-and-freebsd-operating-systems-logo

Historically Email sending has been very different from what most people use it in the Office, there was no heavy Email clients such as Outlook Express no MX Exchange, no e-mail client capabilities for Calendar and Meetings schedule as it is in most of the modern corporate offices that depend on products such as Office 365 (I would call it a connectedHell 365 days a year !).

There was no free webmail and pop3 / imap providers such as Mail.Yahoo.com, Gmail.com, Hotmail.com, Yandex.com, RediffMail, Mail.com the innumerous lists goes and on.
Nope back in the day emails were doing what they were originally supposed to like the post services in real life simply send and receive messages.

For those who remember that charming times, people used to be using BBS-es (which were basicly a shared set-up home system as a server) or some of the few University Internal Email student accounts or by crazy sysadmins who received their notification and warnings logs about daemon (services) messages via local DMZ-ed network email servers and it was common to read the email directly with mail (mailx) text command or custom written scripts … It was not uncommon also that mailx was used heavily to send notification messages on triggered events from logs. Oh life was simple and clear back then, and even though today the email could be used in a similar fashion by hard-core old school sysadmins and Dev Ops / simple shell scriptings tasks or report cron jobs such usage is already in the deep history.

The number of ways one could send email in text format directly from the GNU / Linux / *BSD server to another remote mail MTA node (assuming it had properly configured Relay server be it Exim or Postifix) were plenty.

In this article I will try to rewind back some of the UNIX history by pinpointing a few of the most common ways, one used to send quick emails directly from a remote server connection terminal or lets say a cheap VPS few cents server, through something like (SSH or Telnet) etc.
 

1. Using the mail command client (part of bsd-mailx on Debian).
 

In my previous article Linux: "bash mail command not found" error fix
I ended the article with a short explanation on how this is done but I will repeat myself one more time here for the sake of clearness of this article.

root@linux:~# echo "Your Sample Message Body" | mail -s "Whatever … Message Subject" remote_receiver@remote-server-email-address.com


The mail command will connect to local server TCP PORT 25 on local configured MTA and send via it. If the local MTA is misconfigured or it doesn't have a proper MX / PTR DNS records etc. or not configure as a relay SMTP remote mail will not get delivered. Sent Email should be properly delivered at remote recipient address.

How to send HTML formatted emails using mailx command on Linux console / terminal shell using remote server through SSH ?

Connect to remote SSH server (VPS), dedicated server, home Linux router etc. and run:


root@linux:~# mailx -a 'Content-Type: text/html'
      -s "This is advanced mailx indeed!" < email_content.html
      "first_email_to_send_to@gmail.com, mail_recipient_2@yahoo.com"


email_content.html should be properly formatted (at best w3c standard compliant) HTML.

Here is an example email_content.html (skeleton file)


    To: your_customer@gmail.com
    Subject: This is an HTML message
    From: marketing@your_company.com
    Content-Type: text/html; charset="utf8"

    <html>
    <body>
    <div style="
        background-color:
        #abcdef; width: 300px;
        height: 300px;
        ">
    </div>
Whatever text mixed with valid email HTML tags here.
    </body>
    </html>


Above command sends to two email addresses however if you have a text formatted list of recipients you can easily use that file with a bash shell script for loop and send to multiple addresses red from lets say email_addresses_list.txt .

To further advance the one liner you can also want to provide an email attachment, lets say the file email_archive.rar by using the -A email_archive.rar argument.


root@linux:~# mailx -a 'Content-Type: text/html'
      -s "This is advanced mailx indeed!" -A ~/email_archive.rar < email_content.html
      "first_email_to_send_to@gmail.com, mail_recipient_2@yahoo.com"


For those familiar with Dan Bernstein's Qmail MTA (which even though a bit obsolete is still a Security and Stability Beast across email servers) – mailx command had to be substituted with a custom qmail one in order to be capable to send via qmail MTA daemon.
 

2. Using sendmail command to send email
 

Do you remember that heavy hard to configure MTA monster sendmail ? It was and until this very day is the default Mail Transport Agent for Slackware Linux.

Here is how we were supposed to send mail with it:


[root@sendmail-host ~]# vim email_content_to_be_delivered.txt


Content of file should be something like:

Subject: This Email is sent from UNIX Terminal Email

Hi this Email was typed in a file and send via sendmail console email client
(part of the sendmail mail server)

It is really fun to go back in the pre-history of Mail Content creation 🙂


[root@sendmail-host ~]# sendmail -v user_name@remote-mail-domain.com  < /tmp/email_content_to_be_delivered.txt


-v argument provided, will make the communication between the mail server and your mail transfer agent visible.
 

3. Using ssmtp command to send mail
 

ssmtp MTA and its included shell command was used historically as it was pretty straight forward you just launch it on the command line type on one line all your email and subject and ship it (by pressing the CTRL + D key combination).

To give it a try you can do:


root@linux:~# apt-get install ssmtp
Reading package lists… Done
Building dependency tree       
Reading state information… Done
The following additional packages will be installed:
  libgnutls-openssl27
The following packages will be REMOVED:
  exim4-base exim4-config exim4-daemon-heavy
The following NEW packages will be installed:
  libgnutls-openssl27 ssmtp
0 upgraded, 2 newly installed, 3 to remove and 1 not upgraded.
Need to get 239 kB of archives.
After this operation, 3,697 kB disk space will be freed.
Do you want to continue? [Y/n] Y
Get:1 http://ftp.us.debian.org/debian stretch/main amd64 ssmtp amd64 2.64-8+b2 [54.2 kB]
Get:2 http://ftp.us.debian.org/debian stretch/main amd64 libgnutls-openssl27 amd64 3.5.8-5+deb9u3 [184 kB]
Fetched 239 kB in 2s (88.5 kB/s)         
Preconfiguring packages …
dpkg: exim4-daemon-heavy: dependency problems, but removing anyway as you requested:
 mailutils depends on default-mta | mail-transport-agent; however:
  Package default-mta is not installed.
  Package mail-transport-agent is not installed.
  Package exim4-daemon-heavy which provides mail-transport-agent is to be removed.


(Reading database … 169307 files and directories currently installed.)
Removing exim4-daemon-heavy (4.89-2+deb9u3) …
dpkg: exim4-config: dependency problems, but removing anyway as you requested:
 exim4-base depends on exim4-config (>= 4.82) | exim4-config-2; however:
  Package exim4-config is to be removed.
  Package exim4-config-2 is not installed.
  Package exim4-config which provides exim4-config-2 is to be removed.
 exim4-base depends on exim4-config (>= 4.82) | exim4-config-2; however:
  Package exim4-config is to be removed.
  Package exim4-config-2 is not installed.
  Package exim4-config which provides exim4-config-2 is to be removed.

Removing exim4-config (4.89-2+deb9u3) …
Selecting previously unselected package ssmtp.
(Reading database … 169247 files and directories currently installed.)
Preparing to unpack …/ssmtp_2.64-8+b2_amd64.deb …
Unpacking ssmtp (2.64-8+b2) …
(Reading database … 169268 files and directories currently installed.)
Removing exim4-base (4.89-2+deb9u3) …
Selecting previously unselected package libgnutls-openssl27:amd64.
(Reading database … 169195 files and directories currently installed.)
Preparing to unpack …/libgnutls-openssl27_3.5.8-5+deb9u3_amd64.deb …
Unpacking libgnutls-openssl27:amd64 (3.5.8-5+deb9u3) …
Processing triggers for libc-bin (2.24-11+deb9u3) …
Setting up libgnutls-openssl27:amd64 (3.5.8-5+deb9u3) …
Setting up ssmtp (2.64-8+b2) …
Processing triggers for man-db (2.7.6.1-2) …
Processing triggers for libc-bin (2.24-11+deb9u3) …


As you see from above output local default Debian Linux Exim is removed …

Lets send a simple test email …


hipo@linux:~# ssmtp user@remote-mail-server.com
Subject: Simply Test SSMTP Email
This Email was send just as a test using SSMTP obscure client
via SMTP server.
^d


What is notable about ssmtp is that even though so obsolete today it supports of STARTTLS (email communication encryption) that is done via its config file


/etc/ssmtp/ssmtp.conf


4. Send Email from terminal using Mutt client
 

Mutt was and still is one of the swiff army of most used console text email clients along with Alpine and Fetchmail to know more about it read here

Mutt supports reading / sending mail from multiple mailboxes and capable of reading IMAP and POP3 mail fetch protocols and was a serious step forward over mailx. Its syntax pretty much resembles mailx cmds.


root@linux:~# mutt -s "Test Email" user@example.com < /dev/null


Send email including attachment a 15 megabytes MySQL backup of Squirrel Webmail


root@linux:~# mutt  -s "This is last backup small sized database" -a /home/backups/backup_db.sql user@remote-mail-server.com < /dev/null


5. Using simple telnet to test and send email (verify existence of email on remote SMTP)
 

As a Mail Server SysAdmin this is one of my best ways to test whether I had a server properly configured and even sometimes for the sake of fun I used it as a hack to send my mail 🙂
telnet is and will always be a great tool for doing SMTP issues troubleshooting.
 

It is very useful to test whether a remote SMTP TCP port 25 is opened or a local / remote server firewall prevents connections to MTA.

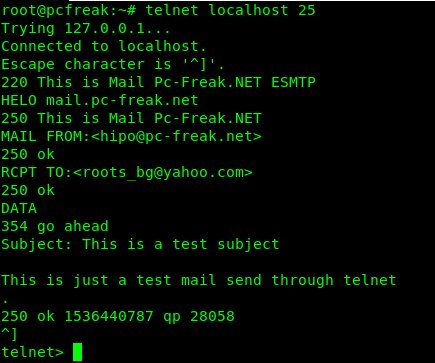
Below is an example connect and send example using telnet to my local SMTP on www.pc-freak.net (QMail powered (R) 🙂 )

sending-email-using-telnet-command-howto-screenshot


root@pcfreak:~# telnet localhost 25
Trying 127.0.0.1…
Connected to localhost.
Escape character is '^]'.
220 This is Mail Pc-Freak.NET ESMTP
HELO mail.www.pc-freak.net
250 This is Mail Pc-Freak.NET
MAIL FROM:<hipo@www.pc-freak.net>
250 ok
RCPT TO:<roots_bg@yahoo.com>
250 ok
DATA
354 go ahead
Subject: This is a test subject


This is just a test mail send through telnet
.
250 ok 1536440787 qp 28058
^]
telnet>


Note that the returned messages are native to qmail, a postfix would return a slightly different content, here is another test example to remote SMTP running sendmail or postfix.


root@pcfreak:~# telnet mail.servername.com 25
Trying 127.0.0.1…
Connected to localhost.localdomain (127.0.0.1).
Escape character is '^]'.
220 mail.servername.com ESMTP Sendmail 8.13.8/8.13.8; Tue, 22 Oct 2013 05:05:59 -0400
HELO yahoo.com
250 mail.servername.com Hello mail.servername.com [127.0.0.1], pleased to meet you
mail from: systemexec@gmail.com
250 2.1.0 hipo@www.pc-freak.net… Sender ok
rcpt to: hip0d@yandex.ru
250 2.1.5 hip0d@yandex.ru… Recipient ok
data
354 Enter mail, end with "." on a line by itself
Hey
This is test email only


Thanks
.
250 2.0.0 r9M95xgc014513 Message accepted for delivery
quit
221 2.0.0 mail.servername.com closing connection
Connection closed by foreign host.


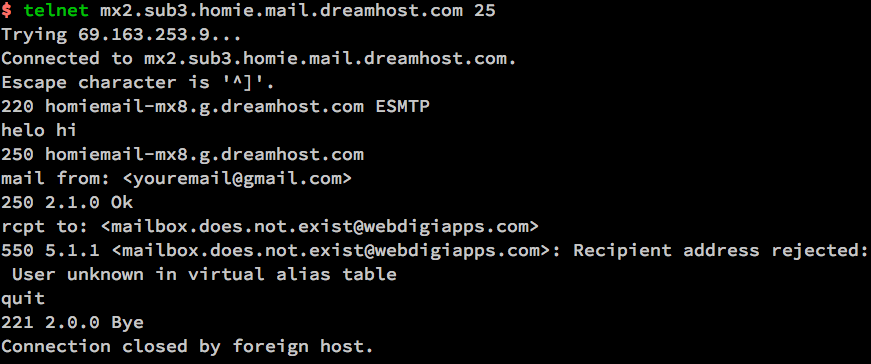
It is handy if you want to know whether remote MTA server has a certain Emailbox existing or not with telnet by simply trying to send to a certian email and checking the Email server returned output (note that the message returned depends on the remote MTA version and many qmails are configured to not give information on the initial SMTP handshake but returns instead a MAILER DAEMON failure error sent back to your sender address. Some MX servrers are still vulnerable to this attack yet, historically dreamhost.com. Below attack screenshot is made at the times before dreamhost.com fixed the brute force email issue.

Terminal-Verify-existing-Email-with-telnet

6. Using simple netcat TCP/IP Swiss Army Knife to test and send email in console

netcat-logo-a-swiff-army-knife-of-the-hacker-and-security-expert-logo
Other tool besides telnet of testing remote / local SMTP is netcat tool (for reading and writting data across TCP and UDP connections).

The way to do it is analogous but since netcat is not present on most Linux OSes by default you need to install it through the package manager first be it apt or yum etc.

# apt-get –yes install netcat


First lets create a new file test_email_content.txt using bash's echo cmd.


# echo 'EHLO hostname
MAIL FROM: hip0d@yandex.ru
RCPT TO:   solutions@www.pc-freak.net
DATA
From: A tester <hip0d@yandex.ru>
To:   <solutions@www.pc-freak.net>
Date: date
Subject: A test message from test hostname


Delete me, please
.
QUIT
' >>test_email_content.txt


# netcat -C localhost 25 < test_email_content.txt


220 This is Mail Pc-Freak.NET ESMTP
250-This is Mail Pc-Freak.NET
250-STARTTLS
250-SIZE 80000000
250-PIPELINING
250 8BITMIME
250 ok
250 ok
354 go ahead
451 See http://pobox.com/~djb/docs/smtplf.html.

Because of its simplicity and the fact it has a bit more capabilities in reading / writing data over network it was no surprise it was among the favorite tools not only of crackers and penetration testers but also a precious debug tool for the avarage sysadmin. netcat's advantage over telnet is you can push-pull over the remote SMTP port (25) a non-interactive input.


7. Using openssl to connect and send email via encrypted channel


root@linux:~# openssl s_client -connect smtp.gmail.com:465 -crlf -ign_eof

    ===
               Certificate negotiation output from openssl command goes here
        ===

        220 smtp.gmail.com ESMTP j92sm925556edd.81 – gsmtp
            EHLO localhost
        250-smtp.gmail.com at your service, [78.139.22.28]
        250-SIZE 35882577
        250-8BITMIME
        250-AUTH LOGIN PLAIN XOAUTH2 PLAIN-CLIENTTOKEN OAUTHBEARER XOAUTH
        250-ENHANCEDSTATUSCODES
        250-PIPELINING
        250-CHUNKING
        250 SMTPUTF8
            AUTH PLAIN *passwordhash*
        235 2.7.0 Accepted
            MAIL FROM: <hipo@pcfreak.org>
        250 2.1.0 OK j92sm925556edd.81 – gsmtp
            rcpt to: <systemexec@gmail.com>
        250 2.1.5 OK j92sm925556edd.81 – gsmtp
            DATA
        354  Go ahead j92sm925556edd.81 – gsmtp
            Subject: This is openssl mailing

            Hello nice user
            .
        250 2.0.0 OK 1339757532 m46sm11546481eeh.9
            quit
        221 2.0.0 closing connection m46sm11546481eeh.9
        read:errno=0


8. Using CURL (URL transfer) tool to send SSL / TLS secured crypted channel emails via Gmail / Yahoo servers and MailGun Mail send API service


Using curl webpage downloading advanced tool for managing email send might be  a shocking news to many as it is idea is to just transfer data from a server.
curl is mostly used in conjunction with PHP website scripts for the reason it has a Native PHP implementation and many PHP based websites widely use it for download / upload of user data.
Interestingly besides support for HTTP and FTP it has support for POP3 and SMTP email protocols as well
If you don't have it installed on your server and you want to give it a try, install it first with apt:
 

root@linux:~# apt-get install curl


To learn more about curl capabilities make sure you check cURL –manual arg.
 

root@linux:~# curl –manual


a) Sending Emails via Gmail and other Mail Public services

Curl is capable to send emails from terminal using Gmail and Yahoo Mail services, if you want to give that a try.

gmail-settings-google-allow-less-secure-apps-sign-in-to-google-screenshot

Go to myaccount.google.com URL and login from the web interface choose Sign in And Security choose Allow less Secure Apps to be -> ON and turn on access for less secure apps in Gmail. Though I have not tested it myself so far with Yahoo! Mail, I suppose it should have a similar security settings somewhere.

Here is how to use curl to send email via Gmail.

Gmail-password-Allow-less-secure-apps-ON-screenshot-howto-to-be-able-to-send-email-with-text-commands-with-encryption-and-outlook


root@linux:~# curl –url 'smtps://smtp.gmail.com:465' –ssl-reqd \
  –mail-from 'your_email@gmail.com' –mail-rcpt 'remote_recipient@mail.com' \
  –upload-file mail.txt –user 'your_email@gmail.com:your_accout_password'


b) Sending Emails using Mailgun.com (Transactional Email Service API for developers)

To use Mailgun to script sending automated emails go to Mailgun.com and create account and generate new API key.

Then use curl in a similar way like below example:


curl -sv –user 'api:key-7e55d003b…f79accd31a' \
    https://api.mailgun.net/v3/sandbox21a78f824…3eb160ebc79.mailgun.org/messages \
    -F from='Excited User <developer@yourcompany.com>' \
    -F to=sandbox21a78f824…3eb160ebc79.mailgun.org \
    -F to=user_acc@gmail.com \
    -F subject='Hello' \
    -F text='Testing Mailgun service!' \
   –form-string html='<h1>EDMdesigner Blog</h1><br /><cite>This tutorial helps me understand email sending from Linux console</cite>' \
    -F attachment=@logo_picture.jpg


The -F option that is heavy present in above command lets curl (Emulate a form filled in button in which user has pressed the submit button).
For more info of the options check out man curl.


9. Using swaks command to send emails from


root@linux:~# apt-cache show swaks|grep "Description" -B 10
Package: swaks
Version: 20170101.0-1
Installed-Size: 221
Maintainer: Andreas Metzler <ametzler@debian.org>
Architecture: all
Depends: perl
Recommends: libnet-dns-perl, libnet-ssleay-perl
Suggests: perl-doc, libauthen-sasl-perl, libauthen-ntlm-perl
Description-en: SMTP command-line test tool
 swaks (Swiss Army Knife SMTP) is a command-line tool written in Perl
 for testing SMTP setups; it supports STARTTLS and SMTP AUTH (PLAIN,
 LOGIN, CRAM-MD5, SPA, and DIGEST-MD5). swaks allows one to stop the
 SMTP dialog at any stage, e.g to check RCPT TO: without actually
 sending a mail.
 .
 If you are spending too much time iterating "telnet foo.example 25"
 swaks is for you.
Description-md5: f44c6c864f0f0cb3896aa932ce2bdaa8


root@linux:~# apt-get instal –yes swaks

root@linux:~# swaks –to mailbox@example.com -s smtp.gmail.com:587
      -tls -au <user-account> -ap <account-password>


The -tls argument (in order to use gmail encrypted TLS channel on port 587)

If you want to hide the password not to provide the password from command line so (in order not to log it to user history) add the -a options.

10. Using qmail-inject on Qmail mail servers to send simple emails

Create new file with content like:
 

root@qmail:~# vim email_file_content.text
To: user@mail-example.com
Subject: Test


This is a test message.
 

root@qmail:~# cat email_file_content.text | /var/qmail/bin/qmail-inject


qmail-inject is part of ordinary qmail installation so it is very simple it even doesn't return error codes it just ships what ever given as content to remote MTA.
If the linux host where you invoke it has a properly configured qmail installation the email will get immediately delivered. The advantage of qmail-inject over the other ones is it is really lightweight and will deliver the simple message more quickly than the the prior heavy tools but again it is more a Mail Delivery Agent (MDA) for quick debugging, if MTA is not working, than for daily email writting.

It is very useful to simply test whether email send works properly without sending any email content by (I used qmail-inject to test local email delivery works like so).
 

root@linux:~# echo 'To: mailbox_acc@mail-server.com' | /var/qmail/bin/qmail-inject


11. Debugging why Email send with text tool is not being send properly to remote recipient

If you use some of the above described methods and email is not delivered to remote recipient email addresses check /var/log/mail.log (for a general email log and postfix MTAs – the log is present on many of the Linux distributions) and /var/log/messages or /var/log/qmal (on Qmail installations) /var/log/exim4 (on servers running Exim as MTA).

https://www.pc-freak.net/images/linux-email-log-debug-var-log-mail-output

 Closure

The ways to send email via Linux terminal are properly innumerous as there are plenty of scripted tools in various programming languages, I am sure in this article,  also missing a lot of pre-bundled installable distro packages. If you know other interesting ways / tools to send via terminal I would like to hear it.

Hope you enjoyed, happy mailing !

phpMyAdmin – Error “Cannot start session without errors, please check errors given in your PHP and/or webserver log file and configure your PHP installation properly.”

Monday, February 8th, 2010

I’ve encountered a shitty problem while trying to access my phpmyadmin.
Here is the error:
phpMyAdmin - Error "Cannot start session without errors, please check errors given
in your PHP and/or webserver log file and configure your PHP installation properly.

After some time spend in investigation I’ve figured out something wrong is happening with my
php sessions, therefore I had to spend some time assuring myself php sessions are working correctly.
To achieve that I used a php code taken from the Internet.

Here is a link to the PHP code which checks, if sessions are correctly configured on a server .
Executing the code proove my sessions, are working okay, however still the problem remained.
Everytime I tried accessing phpMyAdmin I was unpleasently suprised by by:

phpmyadmin session error picture
After reconsidering the whole situation I remembered that since some time I’m using varnishd
therefore the problem could have something to do with the varnish-cache.
After checking my default.vcl file and recognizing a problem there I had to remove the following piece
of code from the default.vcl file:

#sub vcl_fetch {
# if( req.request != "POST" )
# {
# unset obj.http.set-cookie;
# }

# set obj.ttl = 600s;
# set obj.prefetch = -30s;
# deliver;
#}

Now after restarting varnishd with:

/usr/local/etc/rc.d/varnishd restart

All is back to normal I can login to PhpMyAdmin and everything is fine!
Thanks God.