![]()
Earlier I've blogged in about howto build KVM Virtual Machine RHEL 8.3 Linux install on Redhat 8.3 Linux Hypervisor with custom tailored kickstart.cfg as one of the Projects i was involved in my work duty as system administrator, we had the task to build
a KVM virtual machines and build a High Availability Linux PCS Corosync / Pacemaker / haproxy cluster on it to save some money for the company from purchasing VMWare licenses.
The setup of the KVM Virtual machine on a first glimpse is relatively simple and I thought, this can be done just for 2 / 3 days but it turned out to take up 2 weeks or so to properly prepare the kickstarter file and learn a bit about basic virt-install KVM options and experiment with them until
we can produce a noral working Virtual machines.
The original developed simple script that I used to bring up a new KVM virtual machines in a bit easier way virt-install-kvm.sh looked like so:
#!/bin/sh
# Script to build a new VM based on a kickstart.cfg file template
# with virt-install
# Author Georgi Georgiev hip0
# hipo@Pc-freak.netKS_FILE='kickstart.cfg';
VM_NAME='RHEL8_3-VirtualMachine';
VM_DESCR='CentOS 8.3 Virtual Machine';
RAM='8192';
CPUS='8';
# size is in Gigabytes
VM_IMG_SIZE='70';
ISO_LOCATION='/vmprivate/rhel-server-8.3-x86_64-dvd.iso';
VM_IMG_FILE_LOC='/vmprivate/RHEL8_3-VirtualMachine.img';virt-install -n "$VMNAME" –description "$VM_DESCR" –os-type=Linux –os-variant=rhel8.3 –ram=8192 –vcpus=8 –location="$ISO_LOCATION" –disk path=$VM_IMG_FILE,bus=virtio,size=$IMG_VM_SIZE –graphics none –initrd-inject=/root/$KS_FILE –extra-args "console=ttyS0 ks=file:/$KS_FILE"
The script basicly did what it was aimed for but modifying the kickstarter ks.cfg every time with multiple additional parameters, like network configurations as well some additional modifications to ks.cfg for VM parameters was annoying.
Recently as we had to repeat the same task again in order to migrate old customer containing a Linux OpenVZ Virtual machines to a newer OS installed RHEL versionb with KVM virtual machines, i've took some hours and scripted a small script that would easiy our task to build new KVM Virtual Machines
from scratch relatively easy, if we have to repeat the Linux OS build operation again and again.
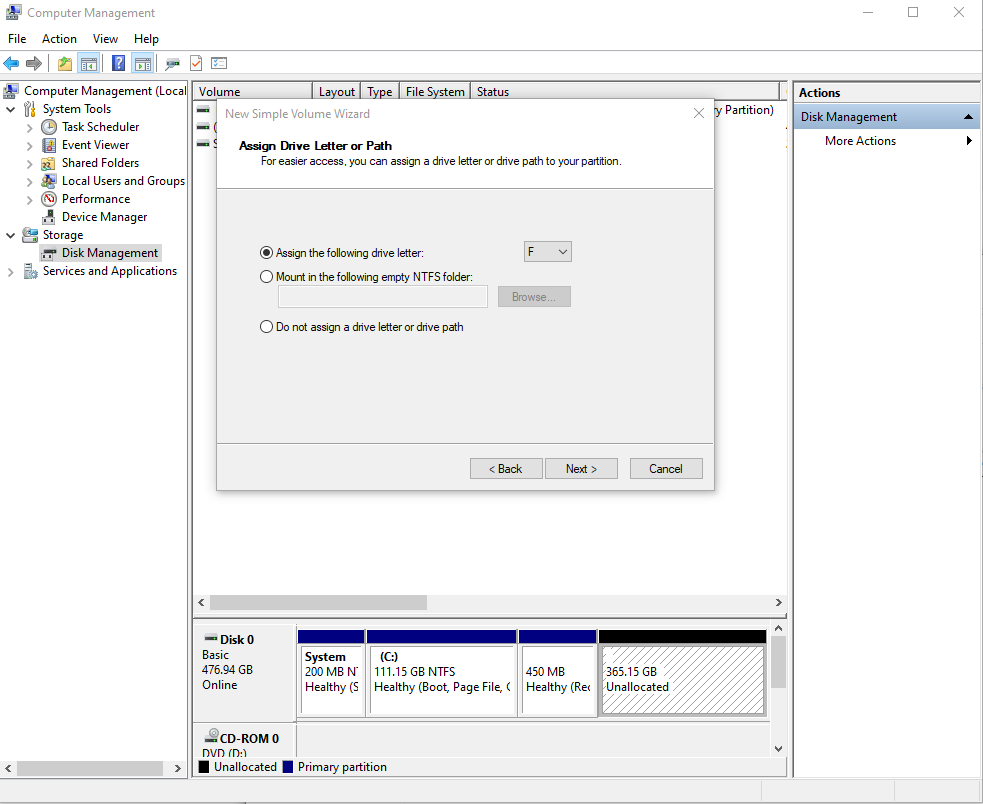
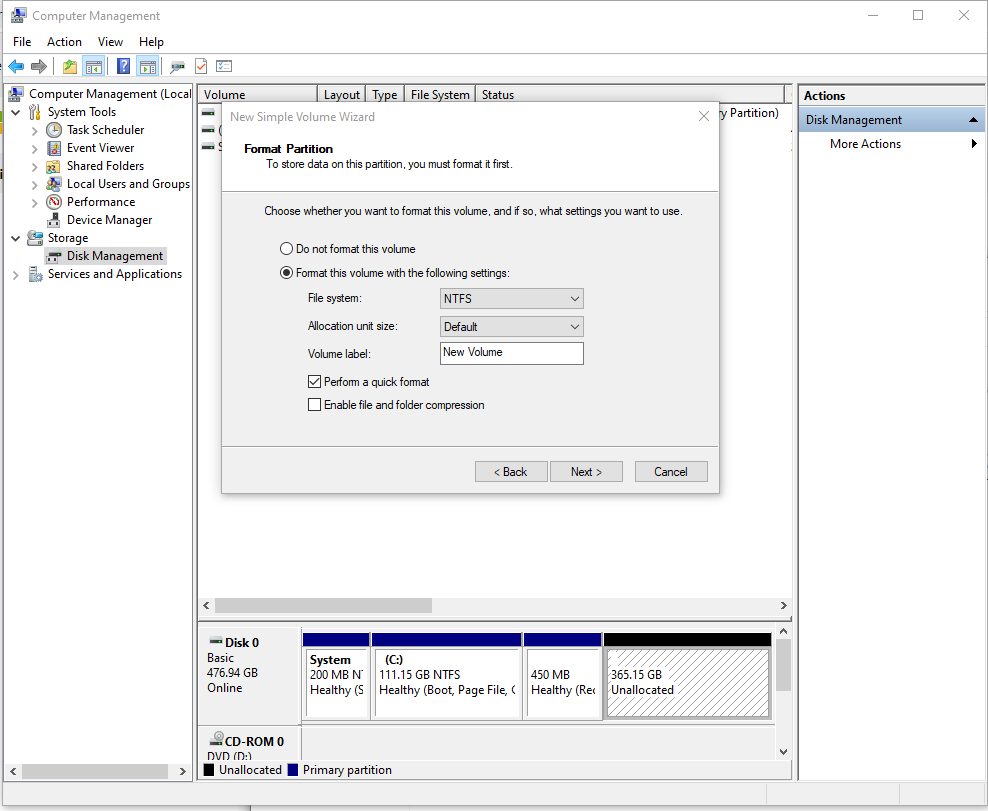
Before proceeding to use the script of course one has to use LVM and setup the partitions on the Host which will be the Hypervisor where the KVM VMs will be installed as well you need to download an ISO image of Redhat Enterprise Linux / CentOS / Fedora or whatever kind of RPM based Linux
you would like to setup as well as do the basic configurations regarding the emulated Hardware node "Power" of the new Virtual Machine (CPU / Memory / Disk Partition) as well as choose a proper meaningful VM name (preferrably following some good meaningful crafted naming convention, that will talk a bit about what is inside the KVM VM container).
The script that automates a bit the KVM VM installation which you find below you can also download from here virt-install.sh
#!/bin/bash
virt_install_path=$(which virt-install);
vm_host='vmname01';
boot_iso='/vmprivate/rhel-8.7-x86_64-dvd.iso';
os_version='rhel8.7';
vm_cpus_count='4';
vm_ram='6144';
vm_img_location='/vmprivate/NAME-of-VM.img';
vm_machine_description='Name Production system';
ks_file_location_template='/root/ks.cfg.templ';
ks_file_location='/root/ks.cfg';
ks_vm_read_loc=$(echo $ks_file_location |sed -e 's#root/##g');
vm_main_ip='192.168.23.52';
vm_netmask='255.255.255.192';
vm_gateway='192.168.23.33';
vm_nameserver='172.30.50.2';
#–ip=192.168.233.52 –netmask=255.255.255.192 –gateway=192.168.233.33 –nameserver=172.20.88.2echo "Checking if defined $vm_host image $vm_img_location is not already present";
if [ ! -f $vm_img_location ]; then
echo
else
echo 'Exiting $vm_img_location is present';
echo "To destroy exiting VM image $vm_img_location run manually cmds:";
echo 'virsh list; virsh destroy $vm_host; virsh undefine $vm_host –remove-all-storage';
exit 1;
fialias cp='cp -f';
/usr/bin/cp -rpf $ks_file_location_template $ks_file_location;echo "Setting VM Main IP: $vm_main_ip";
echo "Setting VM netmask: $vm_netmask";
echo "Setting VM Gateway: $vm_gateway";
echo "Setting VM Nameserver $vm_nameserver";
/usr/bin/perl -pi -e "s/ip=a1.a2.a3.a4/ip=$vm_main_ip/" $ks_file_location
/usr/bin/perl -pi -e "s/netmask=b1.b2.b3.b4/netmask=$vm_netmask/" $ks_file_location
/usr/bin/perl -pi -e "s/gateway=c1.c2.c3.c4/nameserver=$vm_nameserver/" $ks_file_location
/usr/bin/perl -pi -e "s/nameserver=d1.d2.d3.d4/gateway=$vm_gateway/" $ks_file_location
/usr/bin/perl -pi -e "s/vm-hostname/$vm_host/" $ks_file_locationecho "Running VM install:";
echo $virt_install_path -n $vm_host –description "$vm_machine_description" –os-type=Linux –os-variant=$os_version –ram=$vm_ram –vcpus=$vm_cpus_count –location=$boot_iso –disk path=$vm_img_location,bus=virtio,size=90 –graphics none –initrd-inject=$ks_file_location –extra-args "console=ttyS0 ks=file:$ks_vm_read_loc"$virt_install_path -n $vm_host –description "$vm_machine_description" –os-type=Linux –os-variant=$os_version –ram=$vm_ram –vcpus=$vm_cpus_count –location=$boot_iso –disk path=$vm_img_location,bus=virtio,size=90 –graphics none –initrd-inject=$ks_file_location –extra-args "console=ttyS0 ks=file:$ks_vm_read_loc"
Modify the script to insert the required parameters of the new VM in the script header session, you will have to provide below options.
vm_host='vmname01';
boot_iso='/vmprivate/rhel-8.7-x86_64-dvd.iso';
os_version='rhel8.7';
vm_cpus_count='4';
vm_ram='6144';
vm_img_location='/vmprivate/NAME-of-VM.img';
vm_machine_description='Name Production system';
ks_file_location_template='/root/ks.cfg.templ';
ks_file_location='/root/ks.cfg';
ks_vm_read_loc=$(echo $ks_file_location |sed -e 's#root/##g');
vm_main_ip='192.168.23.52';
vm_netmask='255.255.255.192';
vm_gateway='192.168.23.33';
vm_nameserver='172.30.50.2';
The automatic Build virtual machine script is tested and works with Redhat Enterprise Linux and of course is pretty primitive as there is so much available online that would do similar, but still I like it because it works for me 🙂
You will need also the ks.cfg.templ file which has the basic kickstarter configuration that will bring up the Virtual machines according to predefined configurations.
Here is the ks.cfg.templ and ks.cfg files as well, you will have to place them under /root/ or some other directory.
Of course this script is just a basic one, it can be easily updated to accept its variable options as arguments if you need to bring up a multitude of virtual machines relatively quickly with few minor modifications.
Hope the script is helpful to some sysadmin out there. If so don't forget to donate me for a beer in my Patreon account found in the widgets section 🙂


Report haproxy node switch script useful for Zabbix or other monitoring
Tuesday, June 9th, 2020For those who administer corosync clustered haproxy and needs to build monitoring in case if the main configured Haproxy node in the cluster is changed, I've developed a small script to be integrated with zabbix-agent installed to report to a central zabbix server via a zabbix proxy.
The script is very simple it assumed DC1 variable is the default used haproxy node and DC2 and DC3 are 2 backup nodes. The script is made to use crm_mon which is not installed by default on each server by default so if you'll be using it you'll have to install it first, but anyways the script can easily be adapted to use pcs cmd instead.
Below is the bash shell script:
To configure it with zabbix monitoring it can be configured via UserParameterScript.
The way I configured it in Zabbix is as so:
1. Create the userpameter_active_node.conf
Below script is 3 nodes Haproxy cluster
Once pasted to save the file press CTRL + D
The version of the script with 2 nodes slightly improved is like so:
The haproxy_active_DC_zabbix.sh script with a bit of more comments as explanations is available here
2. Configure access for /usr/sbin/crm_mon for zabbix user in sudoers
3. Configure in Zabbix for active.dc key Trigger and Item
Tags: access, ALL, and, Anyways, are, available, awk, bash shell, bash shell script, Below, bit, case, cat, Central, check, Cluster, cmd, Comments, conf, configure
Posted in Linux, Monitoring, Zabbix | No Comments »