Posts Tagged ‘Rename’

How to Fix Windows Update Problems: A Complete Guide

Friday, July 11th, 2025

fix-windows-update-problems-howto-picture

Windows Update is essential for keeping your Windows system secure, stable, and up to date to be on track with latest security patches and (for those working in large corporations) for the PC to be compliant to Company / Corporation / Domain security defined policies and standards. However, users often encounter issues like updates failing to install, being stuck at a certain percentage, or causing error messages. Whether you're using Windows 10 or Windows 11, this guide walks you through proven steps to fix Windows Update problems.

Common Symptoms of Windows Update Issues

Before diving into the solutions, it helps to identify typical signs of update problems:

  • Updates stuck at 0%, 35%, or 100%
  • Update error codes like 0x800700020x800f081f, or 0x8024a105
  • "Windows Update Failed" or "There were problems installing updates"
  • PC crashes or slowdowns after an update
  • Restart loops or repeated update attempts

Step-by-Step Guide to Fix Windows Update Problems

 1. Restart Your PC and rerun updates

Sometimes (very rarely) a simple reboot clears temporary glitches in the update process.

Steps:

  • Click Start > Power > Restart
  • Try running Windows Update again

 2. Run the Windows Update Troubleshooter

Windows includes a built-in tool that can automatically detect and fix common update problems.

Steps:

  1. Open Settings > System > Troubleshoot > Other troubleshooters

  2. Find Windows Update and click Run

  3. Follow the prompts and apply any fixes it suggests

 3. Check Your Internet Connection

A slow or intermittent connection can prevent updates from downloading or installing.

Tips:

  • Ensure a stable connection
  • Avoid using mobile hotspots during large updates
  • Try a wired Ethernet connection if possible

4. Free Up Disk Space

Windows Update needs adequate space to download and install updates.

To free space:

  • Open Settings > System > Storage
  • Use Storage Sense or manually delete:

    • Temporary files
    • Old downloads
    • Unused programs

5. Manually Restart Windows Update Services

Windows Update relies on several background services. Restarting them can resolve stuck updates.

Steps:

  1. Press 

    Windows + R

    , type 

    services.msc

     and press Enter

  2. Find and restart the following:

    • Windows Update
    • Background Intelligent Transfer Service (BITS)
    • Cryptographic Services
  3. Right-click each > Restart

6. Clear the Windows Update Cache (SoftwareDistribution Folder)

Corrupted update files in the SoftwareDistribution folder can cause problems.

Steps:

  1. Press 

    Windows + R (key)

    type 

    Right-click > Run as Administrator


  2. Stop update services:

    net stop wuauserv
    net stop bits


  3. Delete the update cache:  

    Cmd line

    del /f /s /q %windir%\SoftwareDistribution\

  4. Restart services:  

    net start wuauserv net start bits

  5. Try updating again

7. Use the System File Checker (SFC) and DISM Tools

Corrupt system files can interfere with updates.

Steps:

  1. Open Command Prompt as Administrator

  2. Run SFC from cmd line:  

    sfc /scannow

  3. After it completes, run DISM:  

    DISM /Online /Cleanup-Image /RestoreHealth

These commands check for system corruption and repair it.

 8. Install Updates Manually via Microsoft Update Catalog

If a specific update keeps failing, download and install it manually.

Steps:

  1. Go to: https://www.catalog.update.microsoft.com/

  2. Search the KB number of the failed update

  3. Download the correct version for your system

  4. Run the installer

 9. Pause and Resume Updates

This can force Windows to reattempt updates cleanly.

Steps:

  1. Open Settings > Windows Update

  2. Click Pause updates for 1 week

  3. Restart your PC
  4. Go back and click Resume updates

10. Perform an In-Place Upgrade (Repair Install)

If nothing else works, a repair install reinstalls Windows while keeping your files and apps.

Steps:

  1. Download the Media Creation Tool from Microsoft

  2. Choose Upgrade this PC now

  3. Follow prompts and select Keep personal files and apps

This replaces system files and refreshes Windows Update components.

11. Use WuFix.bat script that refreshes services

wufix.bat

SC config trustedinstaller start=auto
net stop bits
net stop wuauserv
net stop msiserver
net stop cryptsvc
net stop appidsvc
Ren %Systemroot%\SoftwareDistribution SoftwareDistribution.old
Ren %Systemroot%\System32\catroot2 catroot2.old
regsvr32.exe /s atl.dll
regsvr32.exe /s urlmon.dll
regsvr32.exe /s mshtml.dll
netsh winsock reset
netsh winsock reset proxy
rundll32.exe pnpclean.dll,RunDLL_PnpClean /DRIVERS /MAXCLEAN
dism /Online /Cleanup-image /ScanHealth
dism /Online /Cleanup-image /CheckHealth
dism /Online /Cleanup-image /RestoreHealth
dism /Online /Cleanup-image /StartComponentCleanup
Sfc /ScanNow
net start bits
net start wuauserv
net start msiserver
net start cryptsvc
net start appidsvc

12. Contact Microsoft or other tech guru Help

If problems persist even after trying the above methods, consider:

  • Contacting Microsoft Support
  • Consulting with a local technician
  • Performing a clean install (as a last resort)

13. Few Final Tips for Smooth Windows Updates

  • Always back up important data before major updates
  • Keep drivers and antivirus software up to date
  • Avoid interrupting the PC during updates
  • Check for known issues on Microsoft’s support site before installing major feature updates

14. Advanced Commands and Additional Ways to Fix Windows Update Problems

These methods go deeper into system-level repairs and are ideal when the basic fixes fail.

14.1. Reset Windows Update Components Manually (Full Command Script)

Instead of just clearing the cache, reset all update-related services and components.

Steps:

Open Command Prompt as Administrator, and run these commands one at a time:

net stop wuauserv
net stop cryptSvc
net stop bits
net stop msiserver

Rename update-related folders:

ren C:/\Windows/\SoftwareDistribution SoftwareDistribution.old ren C:/\Windows/\System32/\catroot2 catroot2.old

Restart the services:

net start wuauserv
net start cryptSvc
net start bits
net start msiserver

This fully resets the update components.

 14.2. Use PowerShell to Re-register Update DLLs

Sometimes DLLs (Dynamic Link Libraries) related to updates become unregistered.

Run this in PowerShell (Admin):

regsvr32 wuaueng.dll regsvr32 wups.dll regsvr32 wups2.dll regsvr32 wuwebv.dll regsvr32 wucltui.dll

 14.3. Use PowerShell to Force Update Scan and Install

Open PowerShell as Administrator, and run:

Install-Module PSWindowsUpdate -Force Import-Module PSWindowsUpdate Get-WindowsUpdate Install-WindowsUpdate -AcceptAll -AutoReboot

 You may be prompted to install NuGet or trust the repository—accept these prompts.

 14.4. Enable Update Services via Registry Editor (Caution)

If your update services are being disabled by group policy or a third-party app, you can reset the registry settings.

Steps:

  1. Press 

    Win + R

     → type 

    regedit

     → Enter

  2. Navigate to:

    HKEY_LOCAL_MACHINE\SOFTWARE\Policies\Microsoft\Windows\WindowsUpdate\AU

  3. Delete values like NoAutoUpdateAUOptions, etc.

  4. Also check:

    HKEY_LOCAL_MACHINE\SYSTEM\CurrentControlSet\Services\wuauserv

    • Ensure Start is set to 2 (automatic)

 Always back up your registry before editing!


 14.5. Check Group Policy Settings (Windows Pro or Enterprise)

Group Policy can block updates.

Steps:

  1. Press 

    Win + R

     → type 

    gpedit.msc

     → Enter

  2. Navigate to:

    Computer Configuration > Administrative Templates > Windows Components > Windows Update

  3. Check and disable any restrictive settings like:

    • No auto-restart with logged on users
    • Configure Automatic Updates
    • Do not connect to any Windows Update Internet locations

 14.6. Use the Windows Update Assistant

Download the latest Windows Update Assistant from the Microsoft website or Windows 11 equivalent.

  • This tool bypasses built-in update problems
  • It can force the latest feature update or build version

 14.7. Delete Windows Update Pending.xml File

Sometimes updates fail due to a corrupted 

Pending.xml

 file.

Steps:

  1. Open Command Prompt as Administrator

  2. Run:

    del %windir%\winsxs\pending.xml

 This is advanced; use only if you're stuck with a failed update loop.

 14.8. Use Event Viewer to Identify Update Errors

Event Viewer can show exactly which update or process is failing.

Steps:

  1. Press 

    Win + X

     → Event Viewer

  2. Navigate to:

    Windows Logs > System

  3. Filter by Error and Warning

  4. Look for sources like:

    • WindowsUpdateClient
    • CBS (Component-Based Servicing)
    • WUSA

Note any error codes or update KB numbers.

 14.9. Use Deployment Image Servicing and Management (DISM) from ISO

DISM can be more powerful when pointed to a known good source like an ISO image.

Steps:

  1. Mount a Windows ISO (right-click > Mount)

  2. Note the drive letter (e.g., D:)

  3. Run in CMD (Admin):

    cmd.exe

    DISM /Online /Cleanup-Image /RestoreHealth /Source:D:\Sources\install.wim /LimitAccess

Replace 

D:\

 with the correct drive.

 14.10. Revert Problematic Updates Using Recovery or Uninstall

If an update caused system problems:

Option A: Uninstall via Settings

  • Go to Settings > Windows Update > Update History > Uninstall updates

Option B: From Advanced Startup

  • Hold 


     while clicking Restart

  • Go to Troubleshoot > Advanced Options > Uninstall Updates 

15.How to install Windows 11 without losing files (Re-install windows with keeping All stored files)

15.1. Download and Use the Media Creation Tool:

  • Download the Media Creation Tool from Microsoft's website.

    a) Go to this website:
    www.microsoft.com/en-us/software-download/windows11

    b) Click Download Now.

    c) Open the file you downloaded.
    Double-click it.

    d) Accept everything.
    Click Accept and Install.

    e) Important:
    When it asks about keeping files, select:

    f) Keep personal files and apps

    Wait until it finishes.

    Your PC will restart many times.

    g) After install:
    Your files and programs will still be there.

  • Run the tool and choose to create installation media for another PC.
  • Select your language, architecture, and edition of Windows.
  • Choose to create either a USB flash drive or an ISO file.
  • Follow the on-screen instructions to complete the process. 

15.2 Perform a Clean Install or In-place Upgrade:

  • Clean Install: This will erase all your personal files, apps, and settings, so be sure to back up your data if you choose this option.
  • In-place Upgrade: This will keep your files, apps, and settings while reinstalling Windows. This is a good option if you want to try and preserve your existing setup.
  • To perform an in-place upgrade, boot from the installation media and choose the "Upgrade" option, according to Microsoft Support

1️⃣ Go to this website:
https://www.microsoft.com/en-us/software-download/windows11

2️⃣ Download “Installation Assistant.
Click Download Now.

3️⃣ Open the file you downloaded.
Double-click it.

4️⃣ Accept everything.
Click Accept and Install.

5️⃣ Important:
When it asks about keeping files, select:
✅ Keep personal files and apps

6️⃣ Wait until it finishes.

Your PC will restart many times.

It can take 1–2 hours.

After install, Your files and programs will still be there. But anyways just in case don't forget to create a full backup of everything important before you started.

Summary of Useful Commands

Purpose Command or Tool
Stop Update Services net stop wuauserv etc.
Delete Update Cache del %windir%\SoftwareDistribution\*.* /s /q
Run SFC sfc /scannow
Run DISM DISM /Online /Cleanup-Image /RestoreHealth
PowerShell Update Module Install-Module PSWindowsUpdate
Force Install Updates Install-WindowsUpdate -AcceptAll
Reset Update Components (Full) See above command sequence
Manual Update via Catalog

Conclusion

Windows Update problems can be frustrating, but they’re usually fixable with a methodical approach. From restarting services to clearing cache and running built-in tools, this guide covers all essential fixes. Staying updated ensures your PC remains secure, efficient, and compatible with the latest software.

Fix Oracle virtualbox Virtual Machine inacessible error in Linux / Windows Host OS

Monday, November 2nd, 2020

Fix Oracle virtualbox Virtual Machine inacessible error in Linux / Windows Host OS

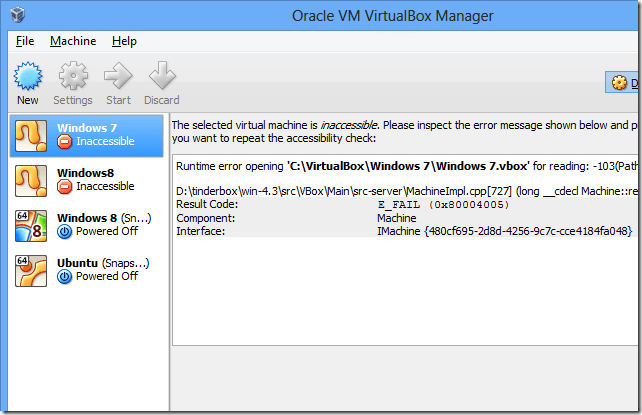
Say you have installed a Virtual Machine on a Host OS be it Windows 7 / 10 or some GNU / Linux / FreeBSD OS and suddenly after a PC shutdown / restart the Virtual machine shows as it couldn't be run by Ora Virtualbox anymore with a message of VM Machine "inaccessible", what is causing this and how to fix it?

Virtualbox-virtual-machine-in-inaccessible-state-screenshot
This error is usually caused by the Guest Operating System's forceful behavior or an OS system crash such as sudden hang due to kernel error or due to sudden electricity drop. Whatever the reason if improper sending of termination process signals to Oracle Vbox are not properly handled this is causing the VBox to not recreate its own files and kill (close) the application of Oracle Virtualbox program in gracious way.

On Windows Virtualization Host OS the common files that needs to be tampered by Virtualbox are found under Virtualbox VMs\Name-of-VM:

virtualbox-vm-inacessible-_error-screenshot.png

For example if you have a Ubuntu installed

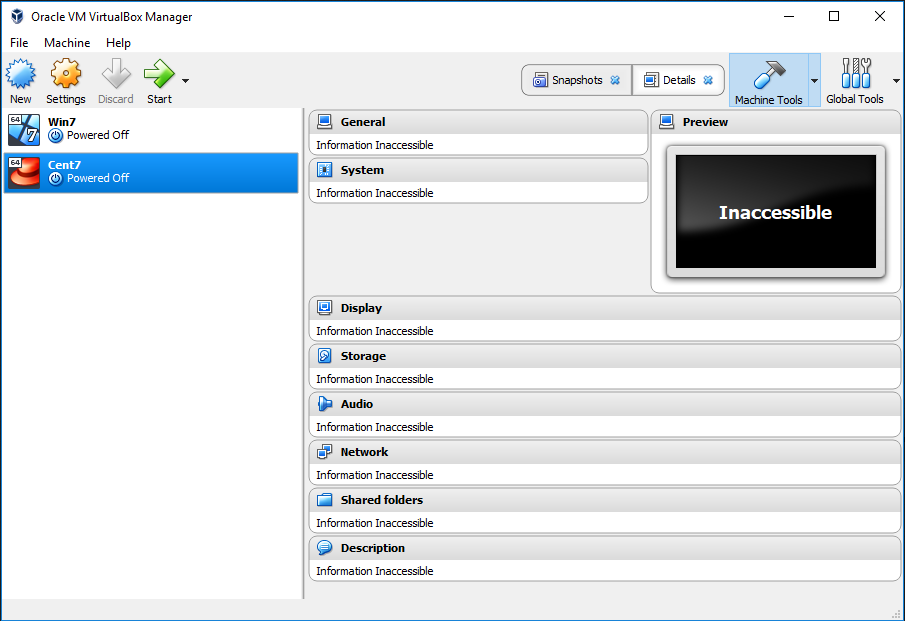
Virtualbox-virtual-machine-in-inaccessible-state-screenshot.png
C:\Users\\VirtualBox VMs\Ubuntu

If you have CentOS7 installed instead it will be under

C:\Users\\VirtualBox VMs\CentOS7

Usually under this dir you will find files which are with .vbox extension.

The virtual box files with extension .vbox contain metadata the virtualbox hypervisor requires to resolve the guest virtual OS' configuration.
If the main .vbox file is corrupted (i.e. reporting that it is empty) then use the backup .vbox-prev file to recover the contents of the original file.

How to solve the Virtualbox inacessible weird error:

Usually under the Virtualbox VMs\VM_name you'll find a directory / filestructure like:
 

Logs/
Snapshot/
VM_Name.vbox
VM_Name.vbox-prev
VM_Name.vbox-tmp


1. Considering .vbox is empty Rename the empty .vbox files a temporary name (e.g. rename VM_Name.vbox to VM_Name-empty.vbox). If you're unsure whether it is empty you can check by opening the file in a text editor and make sure it is empty.

2. Then make a copy of the backup file VM_Name.vbox-prev, where the copy will have the same name as the original but with the word "copy" appended to it (i.e. VM_Name.vbox-prev is renamed to VM_Name_copy.vbox-prev) as well as copy VM_Name.vbox-tmp to VM_Name_copy.vbox-tmp.

! Note that it is important to retain the original backup .vbox-prev file it should not be altered or itself renamed.

3. Now go rename the copy of the newly created .vbox-prev file VM_Name.vbox-prev to the name of the empty .vbox file (VM_Name.vbox).

Now that this is done you may add the .vbox file (guest os) back into the VBOX hypervisor.

If for some reason this did not work and you have a proper working copy of the Virtual Machine under VM_Name.vbox-tmp another approach to try is:
 

1.  Go to your Virtualbox folder i.e. C:\Users\hipo\VirtualBox VMs\Ubuntu

2. Check for file extensions files Ubuntu.vbox-tmp or Ubuntu.vbox-prev needed are there.

3. Overwrite Ubuntu.vbox file with the -tmp one, Just rename file from Ubuntu.vbox-tmp to Ubuntu.vbox

4.  Exit from Virtual Machine and Power it on again.

Hopefully this should recovered the state and snapshot of the "inaccessible" guest VM and
you should now see error gone away and VM will work as before.


How to change Outlook Signature – modify and delete Microsoft Outlook email signatures

Monday, February 17th, 2014

I'm using Mozilla Thunderbird over the last 5 years in my life. Just now in my new job place in Hewlett Packard, in order to have well functional mail (with exchange server) – I started using Microsoft Outlook.
Logically a little while after I started my work I have to update my Outlook E-mail signature to reflect my contact details (job position title, email, stand-alone / mobile phone, office address etc.). As of moment of writting I'm using Microsoft Outlook 14.0.6123.5001 (32 bit) part of Microsoft Office Professional Plus 2010.

Its a kind of irony that I had to use Microsoft products after all these years trying my best to avoid using Microsoft technologies but heh, this is life … Though this article will be a bit trivial I decided to blog it because already I had to change email signature for a 3rd time over the last 3 months and every now and then after a month time I tend to forget how I did it last time.

Here is how I changed Email Signature in Outlook:

1. Click on "New-Email" (located below File menu)

2. Click on "Insert" (menu tab)

3. Click on "Signature"

microsoft-outlook-pop3-mail-client-change-signature-screenshot

4. Click on "New" button

As you see Outlook is written in very intelligent manner 🙂
It is possible to have more than one signature and change them every now and then (I guess that's made for Schizophrenic people who like changing their signature a couple of times a day accepting different personalities 🙂 🙂 🙂
For already existing signatures just edit the old one – click on Edit Signature

microsoft-outlook-exchange-how-to-change-email-signature
http://www.clarion.edu/273437/
 

  • Rename Signatures:

        Perform steps 1-4 in ('Create Signatures') except click "Rename button instead of 'New' and begin typing new name.

  • Delete Signatures:

        Perform steps 1-4 in ('Create Signatures') except click 'Delete" button instead of 'New'.

  • Modify Signatures:

        Highlight signature name you wish to modify under

  1. "Select Signature to Edit" then modify signature.

  2. Click "Save" button to save any signature changes made.

Linux: Rename all files extension from upper to lower cases

Friday, February 14th, 2014

Lets say you're an admin involved in webhosting and due to a programmer's mistake, you end up with directory full with files with extension in upper cases but for actual version of website (all pictures are red only in lower cases), hence would like to transform these to lower cases.
To give an example, to illustrate what I mean, lets say you have in a directory files like;

filename.JPG, picture.PNG, new-picture.GIF

and you would like all files to be renamed to lower extension characters, i.e.:

filename.jpg, picture.png, new-picture.gif.
 

# find . -name '*.*' -exec sh -c 'a=$(echo {} | sed -r "s/([^.]*)\$/\L\1/"); [ "$a" != "{}" ] && mv "{}" "$a" ' \;

That's all enjoy 🙂

Mysql: How to disable single database without dropping or renaming it

Wednesday, January 22nd, 2014

mysql rename forbid disable database howto logo, how to disable single database without dropping it
A colleague of mine working on MySQL database asked me How it is possible to disable a MySQL database. He is in situation where the client has 2 databases and application and is not sure which of the two databases the application uses. Therefore the client asked one of the database is disabled and wait for few hours and see if something will break / stop working and in that way determine which of the two database is used by application.

My first guess was to backup both databases and drop one of them, then if it is the wrong one to restore from the SQL dump backup, however this wasn't acceptable solution. So second I though of RENAME of database to another one and then reverting the name, however as it is written in MySQL documentation RENAME database function was removed from MySQL (found to be dangerous) since version 5.1.23 onwards. Anyhow there is a quick hack to rename mysql database using a for loop shell script one below:

mysql -e "CREATE DATABASE \`new_database\`;"
for table in `mysql -B -N -e "SHOW TABLES;" old_database`
do
  mysql -e "RENAME TABLE \`old_database\`.\`$table\` to \`new_database\`.\`$table\`"
  done
  mysql -e "DROP DATABASE \`old_database\`;"

Other possible solution was to change permissions of Application used username, however this was also complicated from mysql cli, hence I thought of installing and using PHPMyAdmin to make modify of db user permissions easier but on this server there wasn't Apache installed and MySQL is behind a firewall and only accessible via java tomcat host.

Finally after some pondering what can be done I came with solution to request to disable mysql database using chmod in /var/lib/mysql/data/, i.e.:

sql-server:~# chmod 0 /var/lib/mysql/databasename

Where databasename is the same as the database is named listable via mysql cli.

After doing it that way with no need to restart MySQL server database stopped to appear in show databases; and client confirmed that disabled database is no longer needed so we proceeded dropping it.

Hope this little article will help someone out there. Cheers :

How to change users quota to NO QUOTA on Qmail with Vpopmail Mail server install / Qmail mail over quota issue

Monday, February 20th, 2012


Qmail Vpopmail quota exceeded Dolphin Logo

Already on a couple of mail boxes located on one of the qmail powered mail servers I adminiter, there is an over QUOTA reached problem encountered.

Filling up the mailbox quota is not nice as mails starts get bounced back to the sender with a message QUOTA FULL or EXCEEDED MESSAGE, if this is a crucial mail waiting for some important data etc. the data is never received.
Below is a copy of the mail quota waarning notification message:

Delivered-To: email_use@my-mail-domain.net
Date: Wed, 15 Feb 2012 17:40:36 +0000
X-Comment: Rename/Copy this file to ~vpopmail/domains/.quotawarn.msg, and make appropriate changes
X-Comment: See README.quotas for more information
From: Mail Delivery System <Mailer-Daemon@different.bg>
Reply-To: email@www.pc-freak.net
To: Valued Customer:;
Subject: Mail quota warning
Mime-Version: 1.0
Content-Type: text/plain; charset=iso-8859-1
Content-Transfer-Encoding: 7bit
>
Your mailbox on the server is now more than 90% full. So that you can continue
to receive mail you need to remove some messages from your mailbox.

As you can read from the copy of the mail message above, the message content sent to the mail owner whose quota is getting full is red from /var/vpopmail/domains/.quotawarn.msg

The mail reaching quota problem is very likely to appear in cases like low mailbox quota set, but sometimes also occurs due to bugs in vpopmail quota handling.

Various interesting configuration settings for mail quotas etc. are in /home/vpopmail/etc/vlimits.default file, (assuming vpopmail is installed in /home).

In my specific case, the default vpopmail mailbox quota size was set to only 40 Megabytes.
40MB is too low if compared to todays mailbox size standards which in Gmail and Yahoo  mail services are already a couple of gigabytes.
Hence to get around the quota troubles, I  removed the quota for the mail.
To remove the quota size in vpopmail set for address (email_user@my-mail-domain.net) used cmd:

qmail-server:~# vmoduser -q NOQUOTA email_user@my-mail-domain.net

To save myself from future quota issues, I decided to apply a permanent fix to all those over quota size VPOPMAIL mailbox problems by removing completely quota restriction for all mailboxes in my vpopmail existent mail domain.

To do so, I wrote a quick simple bash loop one-liner script:

qmail-server:~# cd /home/vpopmail/domains
qmail-server:~/vpopmail/domains# cd my-mail-domain.net
qmail-server:~/vpopmail/domains/my-mail-domain.net# for i in *; do \
vmoduser -q NOQUOTA $(echo $i|grep -v vpasswd)@my-mail-domain.net; \
done

This works only on vpopmail installations which are configured to store the mail messages directly on the filesystem. Therefore this approach will not work for people who during vpopmail install had configured it to store mailboxes in MySQL or in other kind of SQL db engine.

Anyways for Vpopmail installed to use SQL backend, the script can be changed to read directly a list with all the mailboxes obtained from databasae (SQL query) and then, loop over each of the mail addresses apply the vmoduser -q NOQUOTA mail@samplemaildomain.net.

I've written also a few lines shell script (remove_vpopmail_emails_domain_quota.sh), it accepts one argument which is a vpopmail domain to which the admin would like to reset all applied mailbox quotas. The script is useful, if you have to often remove all quotas for vpopmail domainsor have to do quota wipe out simultaneously for multiple email domain names  located on different servers.