Posts Tagged ‘databases’

Howto Fix “sysstat Cannot open /var/log/sysstat/sa no such file or directory” on Debian / Ubuntu Linux

Monday, February 15th, 2016

sysstast-no-such-file-or-directory-fix-Debian-Ubuntu-Linux-howto
I really love sysstat and as a console maniac I tend to install it on every server however by default there is some <b>sysstat</b> tuning once installed to make it work, for those unfamiliar with <i>sysstat</i> I warmly recommend to check, it here is in short the package description:<br /><br />
 

server:~# apt-cache show sysstat|grep -i desc -A 15
Description: system performance tools for Linux
 The sysstat package contains the following system performance tools:
  – sar: collects and reports system activity information;
  – iostat: reports CPU utilization and disk I/O statistics;
  – mpstat: reports global and per-processor statistics;
  – pidstat: reports statistics for Linux tasks (processes);
  – sadf: displays data collected by sar in various formats;
  – nfsiostat: reports I/O statistics for network filesystems;
  – cifsiostat: reports I/O statistics for CIFS filesystems.
 .
 The statistics reported by sar deal with I/O transfer rates,
 paging activity, process-related activities, interrupts,
 network activity, memory and swap space utilization, CPU
 utilization, kernel activities and TTY statistics, among
 others. Both UP and SMP machines are fully supported.
Homepage: http://pagesperso-orange.fr/sebastien.godard/


If you happen to install sysstat on a Debian / Ubuntu server with:

server:~# apt-get install –yes sysstat


, and you try to get some statistics with sar command but you get some ugly error output from:


server:~# sar Cannot open /var/log/sysstat/sa20: No such file or directory


And you wonder how to resolve it and to be able to have the server log in text databases periodically the nice sar stats load avarages – %idle, %iowait, %system, %nice, %user, then to FIX that Cannot open /var/log/sysstat/sa20: No such file or directory

You need to:

server:~# vim /etc/default/sysstat


By Default value you will find out sysstat stats it is disabled, e.g.:

ENABLED="false"

Switch the value to "true"

ENABLED="true"


Then restart sysstat init script with:

server:~# /etc/init.d/sysstat restart

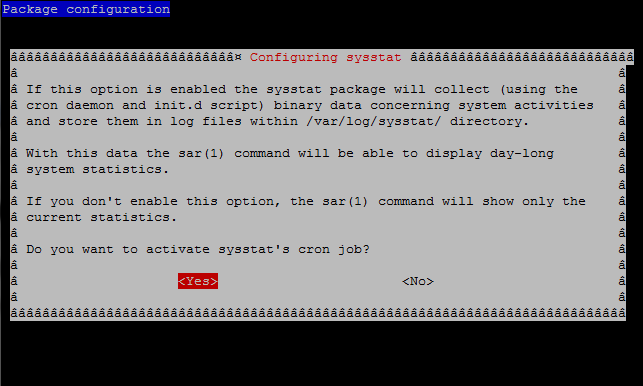
However for those who prefer to do things from menu Ncurses interfaces and are not familiar with Vi Improved, the easiest way is to run dpkg reconfigure of the sysstat:

server:~# dpkg –reconfigure


sysstat-reconfigure-on-gnu-linux


root@server:/# sar
Linux 2.6.32-5-amd64 (pcfreak) 15.02.2016 _x86_64_ (2 CPU)

0,00,01 CPU %user %nice %system %iowait %steal %idle
0,15,01 all 24,32 0,54 3,10 0,62 0,00 71,42
1,15,01 all 18,69 0,53 2,10 0,48 0,00 78,20
10,05,01 all 22,13 0,54 2,81 0,51 0,00 74,01
10,15,01 all 17,14 0,53 2,44 0,40 0,00 79,49
10,25,01 all 24,03 0,63 2,93 0,45 0,00 71,97
10,35,01 all 18,88 0,54 2,44 1,08 0,00 77,07
10,45,01 all 25,60 0,54 3,33 0,74 0,00 69,79
10,55,01 all 36,78 0,78 4,44 0,89 0,00 57,10
16,05,01 all 27,10 0,54 3,43 1,14 0,00 67,79


Well that's it now sysstat error resolved, text reporting stats data works again, Hooray! 🙂

Fix MySQL ibdata file size – ibdata1 file growing too large, preventing ibdata1 from eating all your server disk space

Thursday, April 2nd, 2015

fix-solve-mysql-ibdata-file-size-ibdata1-file-growing-too-large-and-preventing-ibdata1-from-eating-all-your-disk-space-innodb-vs-myisam

If you're a webhosting company hosting dozens of various websites that use MySQL with InnoDB  engine as a backend you've probably already experienced the annoying problem of MySQL's ibdata1 growing too large / eating all server's disk space and triggering disk space low alerts. The ibdata1 file, taking up hundreds of gigabytes is likely to be encountered on virtually all Linux distributions which run default MySQL server <= MySQL 5.6 (with default distro shipped my.cnf). The excremental ibdata1 raise appears usually due to a application software bug on how it queries the database. In theory there are no limitation for ibdata1 except maximum file size limitation set for the filesystem (and there is no limitation option set in my.cnf) meaning it is quite possible that under certain conditions ibdata1 grow over time can happily fill up your server LVM (Storage) drive partitions.

Unfortunately there is no way to shrink the ibdata1 file and only known work around (I found) is to set innodb_file_per_table option in my.cnf to force the MySQL server create separate *.ibd files under datadir (my.cnf variable) for each freshly created InnoDB table.
 

1. Checking size of ibdata1 file

On Debian / Ubuntu and other deb based Linux servers datadir is /var/lib/mysql/ibdata1

server:~# du -hsc /var/lib/mysql/ibdata1
45G     /var/lib/mysql/ibdata1
45G     total


2. Checking info about Databases and Innodb storage Engine

server:~# mysql -u root -p
password:

mysql> SHOW DATABASES;
+——————–+
| Database           |
+——————–+
| information_schema |
| bible              |
| blog               |
| blog-sezoni        |
| blogmonastery      |
| daniel             |
| ezmlm              |
| flash-games        |


Next step is to get some understanding about how many existing InnoDB tables are present within Database server:


mysql> SELECT COUNT(1) EngineCount,engine FROM information_schema.tables WHERE table_schema NOT IN ('information_schema','performance_schema','mysql') GROUP BY engine;
+————-+——–+
| EngineCount | engine |
+————-+——–+
|         131 | InnoDB |
|           5 | MEMORY |
|         584 | MyISAM |
+————-+——–+
3 rows in set (0.02 sec)

To get some more statistics related to InnoDb variables set on the SQL server:
 

mysqladmin -u root -p'Your-Server-Password' var | grep innodb


Here is also how to find which tables use InnoDb Engine

mysql> SELECT table_schema, table_name
    -> FROM INFORMATION_SCHEMA.TABLES
    -> WHERE engine = 'innodb';

+————–+————————–+
| table_schema | table_name               |
+————–+————————–+
| blog         | wp_blc_filters           |
| blog         | wp_blc_instances         |
| blog         | wp_blc_links             |
| blog         | wp_blc_synch             |
| blog         | wp_likes                 |
| blog         | wp_wpx_logs              |
| blog-sezoni  | wp_likes                 |
| icanga_web   | cronk                    |
| icanga_web   | cronk_category           |
| icanga_web   | cronk_category_cronk     |
| icanga_web   | cronk_principal_category |
| icanga_web   | cronk_principal_cronk    |


3. Check and Stop any Web / Mail / DNS service using MySQL

server:~# ps -efl |grep -E 'apache|nginx|dovecot|bind|radius|postfix'

Below cmd should return empty output, (e.g. Apache / Nginx / Postfix / Radius / Dovecot / DNS etc. services are properly stopped on server).

4. Create Backup dump all MySQL tables with mysqldump

Next step is to create full backup dump of all current MySQL databases (with mysqladmin):

server:~# mysqldump –opt –allow-keywords –add-drop-table –all-databases –events -u root -p > dump.sql
server:~# du -hsc /root/dump.sql
940M    dump.sql
940M    total


If you have free space on an external backup server or remotely mounted attached (NFS or SAN Storage) it is a good idea to make a full binary copy of MySQL data (just in case something wents wrong with above binary dump), copy respective directory depending on the Linux distro and install location of SQL binary files set (in my.cnf).
To check where are MySQL binary stored database data (check in my.cnf):

server:~# grep -i datadir /etc/mysql/my.cnf
datadir         = /var/lib/mysql

If server is CentOS / RHEL Fedora RPM based substitute in above grep cmd line /etc/mysql/my.cnf with /etc/my.cnf

if you're on Debian / Ubuntu:

server:~# /etc/init.d/mysql stop
server:~# cp -rpfv /var/lib/mysql /root/mysql-data-backup

Once above copy completes, DROP all all databases except, mysql, information_schema (which store MySQL existing user / passwords and Access Grants and Host Permissions)

5. Drop All databases except mysql and information_schema

server:~# mysql -u root -p
password:


mysql> SHOW DATABASES;

DROP DATABASE blog;
DROP DATABASE sessions;
DROP DATABASE wordpress;
DROP DATABASE micropcfreak;
DROP DATABASE statusnet;

          etc. etc.

ACHTUNG !!! DON'T execute!DROP database mysql; DROP database information_schema; !!! – cause this might damage your User permissions to databases

6. Stop MySQL server and add innodb_file_per_table and few more settings to prevent ibdata1 to grow infinitely in future

server:~# /etc/init.d/mysql stop

server:~# vim /etc/mysql/my.cnf
[mysqld]
innodb_file_per_table
innodb_flush_method=O_DIRECT
innodb_log_file_size=1G
innodb_buffer_pool_size=4G

Delete files taking up too much space – ibdata1 ib_logfile0 and ib_logfile1

server:~# cd /var/lib/mysql/
server:~#  rm -f ibdata1 ib_logfile0 ib_logfile1
server:~# /etc/init.d/mysql start
server:~# /etc/init.d/mysql stop
server:~# /etc/init.d/mysql start
server:~# ps ax |grep -i mysql


You should get no running MySQL instance (processes), so above ps command should return blank.
 

7. Re-Import previously dumped SQL databases with mysql cli client

server:~# cd /root/
server:~# mysql -u root -p < dump.sql

Hopefully import should went fine, and if no errors experienced new data should be in.

Altearnatively if your database is too big and you want to import it in less time to mitigate SQL downtime, instead import the database with:

server:~# mysql -u root -p
password:
mysql>  SET FOREIGN_KEY_CHECKS=0;
mysql> SOURCE /root/dump.sql;
mysql> SET FOREIGN_KEY_CHECKS=1;


If something goes wrong with the import for some reason, you can always copy over sql binary files from /root/mysql-data-backup/ to /var/lib/mysql/
 

8. Connect to mysql and check whether databases are listable and re-check ibdata file size

Once imported login with mysql cli and check whther databases are there with:

server:~# mysql -u root -p
SHOW DATABASES;

Next lets see what is currently the size of ibdata1, ib_logfile0 and ib_logfile1
 

server:~# du -hsc /var/lib/mysql/{ibdata1,ib_logfile0,ib_logfile1}
19M     /var/lib/mysql/ibdata1
1,1G    /var/lib/mysql/ib_logfile0
1,1G    /var/lib/mysql/ib_logfile1
2,1G    total

Now ibdata1 will grow, but only contain table metadata. Each InnoDB table will exist outside of ibdata1.
To better understand what I mean, lets say you have InnoDB table named blogdb.mytable.
If you go into /var/lib/mysql/blogdb, you will see two files
representing the table:

  •     mytable.frm (Storage Engine Header)
  •     mytable.ibd (Home of Table Data and Table Indexes for blogdb.mytable)

Now construction will be like that for each of MySQL stored databases instead of everything to go to ibdata1.
MySQL 5.6+ admins could relax as innodb_file_per_table is enabled by default in newer SQL releases.


Now to make sure your websites are working take few of the hosted websites URLs that use any of the imported databases and just browse.
In my case ibdata1 was 45GB after clearing it up I managed to save 43 GB of disk space!!!

Enjoy the disk saving! 🙂

Make MySQL existing users to have access from any or particular host after SQL migration

Tuesday, July 1st, 2014

make_mysql_existing_users_have-access-from-any-or-particular-host-after-SQL-migration
Recently I've done a migration of MySQL server from host A (running and configured to serve requests on (localhost – 127.0.0.1) to host B (server2.host.com)
There are already existing users in mysql which are allowed to only access the database server from localhost as until now the applciation was sending SQL queries straight on localhost. Now the architecture has to change to use the MySQL Database remotely.

Hence I've migrated the MySQL server by dumping all the existing the databases on MySQL host A  with:

mysqldump -u root -p --all-databases > alldbs_dump.sql


And then importing the databases on host B with

mysql -u root -p < alldbs_dump.sql

Though this migrated the data from Host A to Host B, still the application on Host A was failing to succesfully use its data from database on Host B, because of inability to properly authenticate. It couldn't authenticate because MySQL on Host B's users are not configured to have access from IP address of Host A, but only allowed the application users to be able to connect on localhost..

I've used following SQL CLI query to check Hosts allowed to connect to MySQL (in this case localhost):

# mysql -u root -p
mysql> use mysql;
mysql> select * from user where user like '%eameiotest%' and Host='localhost';


To fix that I logged on MySQL server on Host B with mysql cli and issued for each of the users the application was using:

UPDATE mysql.user SET Host='%' WHERE Host='localhost' AND User='eameiotest';
 

UPDATE mysql.user SET Host='%' WHERE Host='localhost' AND User='eameiotest2';
 

UPDATE mysql.user SET Host='%' WHERE Host='localhost' AND User='eameiotest3';


On execution, If you get errors like:
 

ERROR 1062 (23000): Duplicate entry '%-eameiotest' for key 'PRIMARY'


Don't think that there is no solution, as I've read some threads online claiming the only way to get around this issue is to dump mysql database and re-import it, this is not necessery. There is a work around to this MySQL bug.

To work-around the error, you will first have to set the user allowed access host to empty – ' ' :


UPDATE mysql.user SET Host='' WHERE Host='localhost' AND User='eameiotest';
 

UPDATE mysql.user SET Host='' WHERE Host='localhost' AND User='eameiotest2';
 

UPDATE mysql.user SET Host='' WHERE Host='localhost' AND User='eameiotest3';


And re-issue again commands:
 

UPDATE mysql.user SET Host='%' WHERE Host='localhost' AND User='eameiotest';
 

UPDATE mysql.user SET Host='%' WHERE Host='localhost' AND User='eameiotest2';
 

UPDATE mysql.user SET Host='%' WHERE Host='localhost' AND User='eameiotest3';


You might want to also issue:
 

GRANT ALL PRIVILEGES ON yourdatabase-name.* TO 'eameiotest1'@'server-host';

GRANT ALL PRIVILEGES ON yourdatabase-name.* TO 'eameiotest2'@'server-host';

GRANT ALL PRIVILEGES ON yourdatabase-name.* TO 'eameiotest3'@'server-host';
 

This should have solve the app connection issues, Cheers 🙂


Mysql: How to disable single database without dropping or renaming it

Wednesday, January 22nd, 2014

mysql rename forbid disable database howto logo, how to disable single database without dropping it
A colleague of mine working on MySQL database asked me How it is possible to disable a MySQL database. He is in situation where the client has 2 databases and application and is not sure which of the two databases the application uses. Therefore the client asked one of the database is disabled and wait for few hours and see if something will break / stop working and in that way determine which of the two database is used by application.

My first guess was to backup both databases and drop one of them, then if it is the wrong one to restore from the SQL dump backup, however this wasn't acceptable solution. So second I though of RENAME of database to another one and then reverting the name, however as it is written in MySQL documentation RENAME database function was removed from MySQL (found to be dangerous) since version 5.1.23 onwards. Anyhow there is a quick hack to rename mysql database using a for loop shell script one below:

mysql -e "CREATE DATABASE \`new_database\`;"
for table in `mysql -B -N -e "SHOW TABLES;" old_database`
do
  mysql -e "RENAME TABLE \`old_database\`.\`$table\` to \`new_database\`.\`$table\`"
  done
  mysql -e "DROP DATABASE \`old_database\`;"

Other possible solution was to change permissions of Application used username, however this was also complicated from mysql cli, hence I thought of installing and using PHPMyAdmin to make modify of db user permissions easier but on this server there wasn't Apache installed and MySQL is behind a firewall and only accessible via java tomcat host.

Finally after some pondering what can be done I came with solution to request to disable mysql database using chmod in /var/lib/mysql/data/, i.e.:

sql-server:~# chmod 0 /var/lib/mysql/databasename

Where databasename is the same as the database is named listable via mysql cli.

After doing it that way with no need to restart MySQL server database stopped to appear in show databases; and client confirmed that disabled database is no longer needed so we proceeded dropping it.

Hope this little article will help someone out there. Cheers :

MySQL SSL Configure Howto – How to Make MySQL communication secured

Wednesday, January 15th, 2014

mysql-over-ssl-how-to-configure-logo how to configure ssl on mysql server

Recently I've been asked How to make communication to MySQL database encrypted. The question was raised by a fellow developer who works on developing a Desktop standalone application in Delphi Programming Language with DevArt an (SQL Connection Component capable to connect Delphi applications to multiple databases like MySQL, Oracle, PostgreSQL, Interbase, Firebird etc.

Communicating in Secured form to MySQL database is not common task to do, as MySQL usually communicates to applications hosted on same server or applications to communicate to MySQL are in secured DMZ or administrated via phpMyAdmin web interface.

MySQL supports encrypted connections to itself using Secure Socket Layer (SSL) encryption. Setting up MySQL db to be communicated encrypted is a must for standalone Desktop applications which has to extract / insert data via remote SQL.
Configuring SQL to support communicated queries encrpytion is supported by default and easily configured on most standard Linux version distributions (Debian, RHEL, Fedora) with no need to recompile it.
1. Generate SSL Certificates

$ mkdir /etc/mysql-ssl && cd mysql-ssl

# Create CA certificate
$ openssl genrsa 2048 > ca-key.pem
$ openssl req -new -x509 -nodes -days 3600 \
         -key ca-key.pem -out ca-cert.pem

Create server certificate, remove passphrase, and sign it
server-cert.pem is public key, server-key.pem is private key
$ openssl req -newkey rsa:2048 -days 3600 \
         -nodes -keyout server-key.pem -out server-req.pem

$ openssl rsa -in server-key.pem -out server-key.pem
$ openssl x509 -req -in server-req.pem -days 3600 \
         -CA ca-cert.pem -CAkey ca-key.pem -set_serial 01 -out server-cert.pem

Create client certificate, remove passphrase, and sign it
client-cert.pem is public key and client-key.pem is private key
$ openssl req -newkey rsa:2048 -days 3600 \
         -nodes -keyout client-key.pem -out client-req.pem

$ openssl rsa -in client-key.pem -out client-key.pem
$ openssl x509 -req -in client-req.pem -days 3600 \
         -CA ca-cert.pem -CAkey ca-key.pem -set_serial 01 -out client-cert.pem

After generating the certificates, verify them:

$ openssl verify -CAfile ca-cert.pem server-cert.pem client-cert.pem
 

2. Add SSL support variables to my.cnf

Once SSL key pair files are generated in order to active SSL encryption support in MySQL server, add to (/etc/my.cnf,  /etc/mysql/my.cnf, /usr/local/etc/my.cnf … ) or wherever config is depending on distro

# SSL
ssl-ca=/etc/mysql-ssl/ca-cert.pem
ssl-cert=/etc/mysql-ssl/server-cert.pem
ssl-key=/etc/mysql-ssl/server-key.pem

3. Restart MySQL server

/etc/init.d/mysqld restart
...

4. Create SQL user to require SSL login

Create new user with access to database;

GRANT ALL ON Sql_User_DB.* TO Sql_User@localhost;
FLUSH PRIVILEGES;

To create administrator privileges user:

GRANT ALL PRIVILEGES ON *.* TO ‘ssluser’@'%’ IDENTIFIED BY ‘pass’ REQUIRE SSL;
FLUSH PRIVILEGES;

5. Test SSL Connection with MySQL CLI client or with few lines of PHP

To use mysql cli for testing whether SSL connection works:

$ mysql -u ssluser -p'pass' –ssl-ca /etc/mysql-ssl/client-cert.pem –ssl-cert /etc/mysql-ssl/client-key.pem

Once connected to MySQL to verify SSL connection works fine:

mysql> SHOW STATUS LIKE 'Ssl_Cipher';
 +---------------+--------------------+
| Variable_name | Value              |
 +---------------+--------------------+
| Ssl_cipher    | DHE-RSA-AES256-SHA |
+---------------+--------------------+

If you get this output this means MySQL SSL Connection is working as should.

Alternative way is to use test-mysqli-ssl.php script to test availability to mysql over SSL.

$conn=mysqli_init();
mysqli_ssl_set($conn, '/etc/mysql-ssl/client-key.pem', '/etc/mysql-ssl/client-cert.pem', NULL, NULL, NULL);
if (!mysqli_real_connect($conn, '127.0.0.1', 'ssluser', 'pass')) { die(); }
$res = mysqli_query($conn, 'SHOW STATUS like "Ssl_cipher"');
print_r(mysqli_fetch_row($res));
mysqli_close($conn);

Note: Change username password according to your user / pass before using the script

That's all now you have mysql communicating queries data over SSL


How to revoke user global privileges in MySQL

Saturday, August 14th, 2010

I’ve recently realized one of the users I have added to one of the MySQL servers I do managehas actually some included a list of some of the global privileges.
This extra privileges the user had was actually something that was to be removed since theuser is not supposed to be able to list all existent databases on the MySQL server and things alike:

You can see below the excact SQL queries I had to issue to revoke the granted global privileges for the username.
Note to change the username before you execute the below queries:

REVOKE ALL PRIVILEGES ON * . * FROM 'username'@'localhost';
REVOKE GRANT OPTION ON * . * FROM 'username'@'localhost';
GRANT USAGE ON * . * TO 'username'@'localhost' WITH MAX_QUERIES_PER_HOUR 0 MAX_CONNECTIONS_PER_HOUR 0 MAX_UPDATES_PER_HOUR 0 MAX_USER_CONNECTIO


WordPress blog MySQL data maintainance valuable plugin WP-OPTIMIZE

Tuesday, April 12th, 2011

The more my blog is growing the slower it becomes, this is a tendency I’ve noticed since a couple of weeks.

Very fortunately while reading some random articles online I’ve came across a super valuable wordpress plugin called WP-OPTIMIZE

I think it’s best if I present instead of taking the time to explain what the WP-optimize does for a wordpress powered blog:

WP-Optimize is a WordPress 2.9++ database cleanup and optimization tool. It doesn’t require PhpMyAdmin to optimize your database tables. It allows you to remove post revisions, comments in the spam queue, un-approved comments within few clicks.

Additionally you can rename any username to another username too.

For example: If you want to rename default ‘admin’ username to ‘someothername’; just put ‘admin’ (without quotes) to the Old username field and the new username to the New username field, then click “PROCESS”)

Now in short to rephrase above text, during MySQL database requests a lot of database starts needing the so called MySQL optimization , this operation becomes necessery especially for databases which are very actively used and is related to the basic design of the mysql server.

Very often many tables starts having a lot of garbage (repetitive) data and therefore read and writes from the SQL server gets slower and slower day by day.

Thus the MySQL server has it’s famous OPTIMIZE TABLE command which does wipe out all the garbage unnecessery data stored in a tables/s and hence seriously impacts the later read/write table operations.

Now to go back to wordpress the same optimization issues, very often are a cause for a performance bottleneck and some smart guy has came with the great idea to create a specific wordpress plugin to fix such an optimize table issues

The WP-Optimize plugin has 5 major options which somehow could have a positive impact on blog’s performance, these are:
 

  • Remove all Post revisions
  • Remove all auto draft posts
  • Clean marked Spam comments
  • lean Unapproved comments
  • Optimize database tables

Apart from the nice performance boost applicaiton the wp-optimize plugin has one super valuable function, it could change the default wordpress blog administrator user admin to some other desired username, for example rename the default blog administrator username “admin” user to “john”.

From a security perspective this is another must have feature in every wordpress blog as it can kill many of the possible brute force attacks with some web brute force softwares like Hydra

Installing and using wp-optimize is a real piece of cake, here is a very quick few command lines to install it:

host:~# cd /var/www/blog/wp-content/plugins/
host:/var/www/blog/wp-content/plugins:# wget https://www.pc-freak.net/files/wp-optimize.0.9.2.zip
host:/var/www/blog/wp-content/plugins:# unzip wp-optimize.0.9.2.zip
...

To launch WP-OPTIMIZE and fix many speed bottlenecks caused by unoptimized tables, or just hanging around in database old spam comments, go and login with your adminsitrator to wordpress.

In the left pane menu starting up with Dashboard somewhere near the end of the vertical menu you will notice a button reading WP-Optimize .
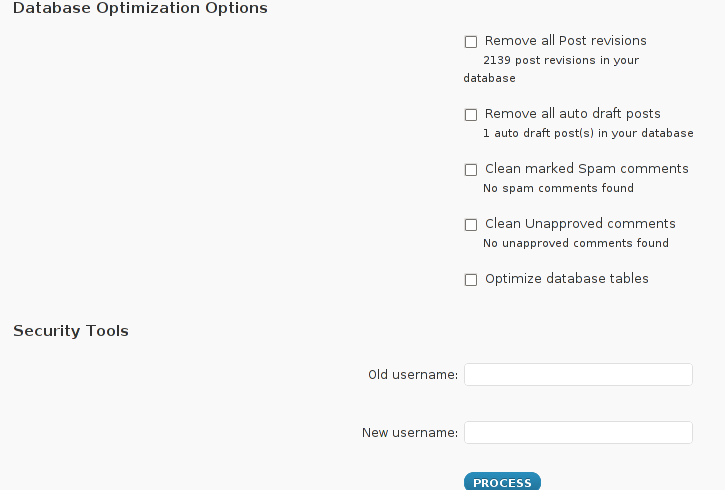
Click over the Wp-Optimize button and a screen like the one in below’s screenshot will appear in your browser screen:

wp optimize plugin database optimization options screen

I have personally decided to use just 2 of all the 5 available primary plugin options, I decided to select only:
 

  • Clean marked Spam comments
  • Optimize database tables

Scrolling below the PROCEED button I could also notice a number of tables which were missing optimization and hence required an optimize table to be executed on each one of them.
Further on I pressed the PROCESS button and after a couple of minutes (2, 3 minutes) of waiting the wp-optimize plugin was done it’s selected tasks:

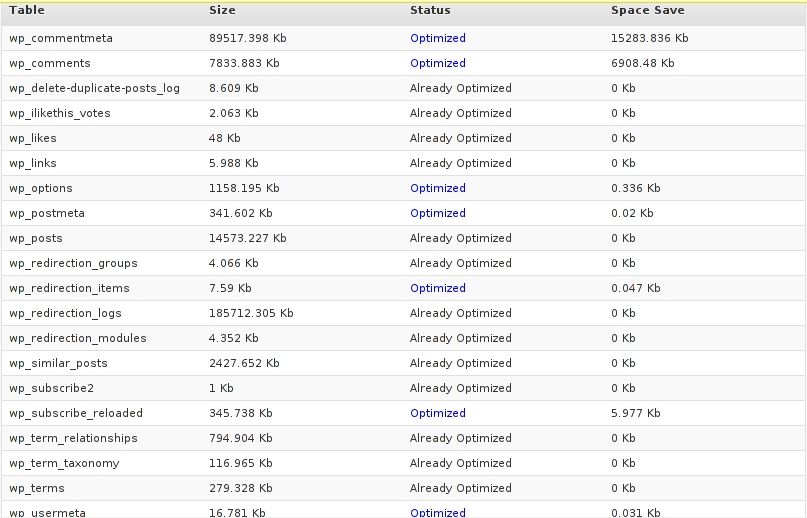
In the screenshot below, you see all my blog tables which were optimized by the plugin:
WP-Optimize optimized blog tables screenshot

It’s interesting to say few words about the Remove All Posts revisions plugin option, as many might be wondering what this plugin option really means.

When writting posts, wordpress has an option to restore to a certain point of the write out and makes a sort of different versions in time of each of it’s written posts.

Therefore later restoration if something gots deleted by mistake is facilitated, this is actually the all meaning of Remove All Posts revisions

With time and the increase wp posts the amount of Posts Revisions is growing on and on and just taking space and possibly making the access to the database entries slower, thus it might be a good idea to also remove them as, it’s absolutely rare to use the wp post restoration function.
However I’ve personally decided to not wipe out the old posts revisions as someday i might need it and I’m a bit scared that it might cause me some database issues.

I’ll be glad if somebody has tried the Posts Revisions wp-Optimize funciton and is happy with the results.

swap_pager_getswapspace: failed, MySQL troubles on FreeBSD 7.2 cause and solution

Tuesday, May 3rd, 2011

Every now and then my FreeBSD router dmesg ( /var/log/dmesg.today ) logs, gets filled with error messages like:

pid 86369 (httpd), uid 80, was killed: out of swap space
swap_pager_getswapspace(14): failed
swap_pager_getswapspace(16): failed
swap_pager_getswapspace(11): failed
swap_pager_getswapspace(12): failed
swap_pager_getswapspace(16): failed
swap_pager_getswapspace(14): failed
swap_pager_getswapspace(16): failed
swap_pager_getswapspace(8): failed

Using swapinfo during the swap_pager_getswapspace(16): failed messages were logged in, I figured out that definitely the swap memory over-use is the bottleneck for the troubles, to find this I used the command:

freebsd# swapinfo
Device 1K-blocks Used Avail Capacity Type
/dev/ad0s1b 49712 45920 3792 92% Interleaved

After some investigation, I’ve figured out that the MySQL server is causing the kernel exceeded swap troubles.

My current MySQL server version is installed from the ports tree, whether I’m using the bsd port /usr/ports/databases/mysql51-server/ and it appears to work just fine.

However I have noticed that the mysql-server is missing a my.cnf file!, which means the mysql server is running under a mode with some kind of default configurations.

Strangely in the system process list it appeared it is using a default my.cnf file located in /var/db/mysql/my.cnf

Below you see the paste from the ps command:

ps axuww freebsd# ps axuww | grep -i my.cnf | grep -v grep
mysql 7557 0.0 0.1 3464 1268 p1 I 12:03PM 0:00.01 /bin/sh /usr/local/bin/mysqld_safe --defaults-extra-file=/var/db/mysql/my.cnf --user=mysql --datadir=/var/db/mysql --pid-file=/var/db/mysql/pcfreak.pidmysql 7589 0.0 5.1 93284 52852 p1 I 12:03PM 0:59.01 /usr/local/libexec/mysqld --defaults-extra-file=/var/db/mysql/my.cnf --basedir=/usr/local --datadir=/var/db/mysql --user=mysql --pid-file=/var/db/mysql/pcfreak.pid --port=3306 --socket=/tmp/mysql.sock

Nevertheless it appeared the sql server is running the file /var/db/mysql/my.cnf conf was not existing! This was really weird for me as I’m used to have the default my.cnf from my previous experience with Linux servers!

Thus the next logical thing I did was to create my.cnf conf file in order to be able to have a proper limiting configuration for the sql server.

The FreeBSD my.cnf skele files are found in /usr/local/share/mysql/, here are the 4 files one can use as a starting basis for further configuration of the mysql-server.

freebsd# ls -al /usr/local/share/mysql/my-*.cnf
-r--r--r-- 1 root wheel 4948 Aug 12 2009 /usr/local/share/mysql/my-huge.cnf
-r--r--r-- 1 root wheel 20949 Aug 12 2009 /usr/local/share/mysql/my-innodb-heavy-4G.cnf
-r--r--r-- 1 root wheel 4924 Aug 12 2009 /usr/local/share/mysql/my-large.cnf
-r--r--r-- 1 root wheel 4931 Aug 12 2009 /usr/local/share/mysql/my-medium.cnf
-r--r--r-- 1 root wheel 2502 Aug 12 2009 /usr/local/share/mysql/my-small.cnf

I have chosen to use the my-medium.cnf as a skele to tune up, as my server is not high iron one e.g. the host I run the mysql is a (simple dual core 1.2Ghz system).

Further on I copied the /usr/local/share/mysql/my-medium.cnf to /var/db/mysql/my.cnf e.g.:

freebsd# cp -rpf /usr/local/share/mysql/my-medium.cnf /var/db/mysql/my.cnf

As a next step to properly tune up the default values of the newly copied my.cnf to my specific server I used the Tuning-Primer MySQL tuning script

Using tuning-primer.sh is really easy as all I did is download, launch it and follow the script suggestions to correct some of the values already in my.cnf

I have finally ended up with the following my.cnf after using tuning-primer.sh to optimize mysql server to work with my bsd host

Now I really hope the shitty swap_pager_getswapspace: failed errors would not haunt me once again by crashing my server and causing mem overheads.

Still I wonder why the port developer Alex Dupre – ale@FreeBSD.org choose not to provide the default mysql51-server conf with some kind of my.cnf file? I hope he had a good reason.

How to check and repair broken MySQL ISAM tables

Monday, July 11th, 2011

MySQL repair artistic picture

If you are stuffed with errors in /var/log/mysqld.log similar to:

110711 11:00:48 [ERROR] /usr/libexec/mysqld: Incorrect information in file: './anyboots_moncler_spaccio/zen_seo_cache.frm'
110711 11:00:48 [ERROR] /usr/libexec/mysqld: Incorrect information in file: './anyboots_moncler_spaccio/zen_sessions.frm'

This is a sure sign something terrible has happened with your mysql database tables that lead to corruption.
Having corrupt table in mysql installation can severely lead to data loss as well as significantly reduce the speed and performance of a MySQL server in this awful times mysqlcheck is the best friend of the administrator, here is how you can check and repair broken tables in MySQL server:

mysql-server:~# mysqlcheck --all-databases -u root -p
chillor_hjbgl.vn_users OK
chillor_lul.mybb_adminlog OK
chillor_lul.mybb_adminoptions OK
chillor_lul.mybb_adminsessions OK
chillor_lul.mybb_adminviews OK
chillor_lul.mybb_announcements OK
...

You will notice the corrupt sql tables will be reported as corrupt by the tool and mysqlcheck will try it’s best to recover the corrupt tables.

In most cases this should be enough to recover corrupt tables.