Posts Tagged ‘root admin’

Check your Server Download / Upload Internet Speed from Console on Linux / BSD / Unix howto

Tuesday, March 17th, 2015

tux-check-internet-network-download-upload-speed-on-linux-console-terminal-linux-bsd-unix
If you've been given a new dedicated server from a New Dedicated-Server-Provider or VPS with Linux and you were told that a certain download speed to the Server is guaranteed from the server provider, in order to be sure the server's connection to the Internet told by service provider is correct it is useful to run a simple measurement console test after logging in remotely to the server via SSH.

Testing connection from Terminal is useful because as you probably know most of Linux / UNIX servers doesn't have a GUI interface and thus it is not possible to test Internet Up / Down Bandwidth through speedtest.net.
 

1. Testing Download Internet Speed given by ISP / Dedi-Server Provider from Linux Console

For the download speed (internet) test the historical approach was to just try downloading the Linux kernel source code from www.kernel.org with some text browser such as lynx or links count the seconds for which the download is completed and then multiple the kernel source archive size on the seconds to get an approximate bandwidth per second, however as nowdays internet connection speeds are much higher, thus it is better to try to download some Linux distribution iso file, you can still use kernel tar archive but it completed too fast to give you some good (adequate) statistics on Download bandwidth.

If its a fresh installed Linux server probably you will probably not have links / elinks and lynx text internet browers  installed so install them depending on deb / rpm distro with:

If on Deb Linuz distro:


root@pcfreak:/root# apt-get install –yes links elinks lynx


On RPM Based Linuz distro:


[root@fedora ~]# yum install -y lynx elinks links


Conduct Internet  Download Speed with links
root@pcfreak:/root# links https://www.kernel.org/pub/linux/kernel/v3.x/linux-3.19.1.tar.xz
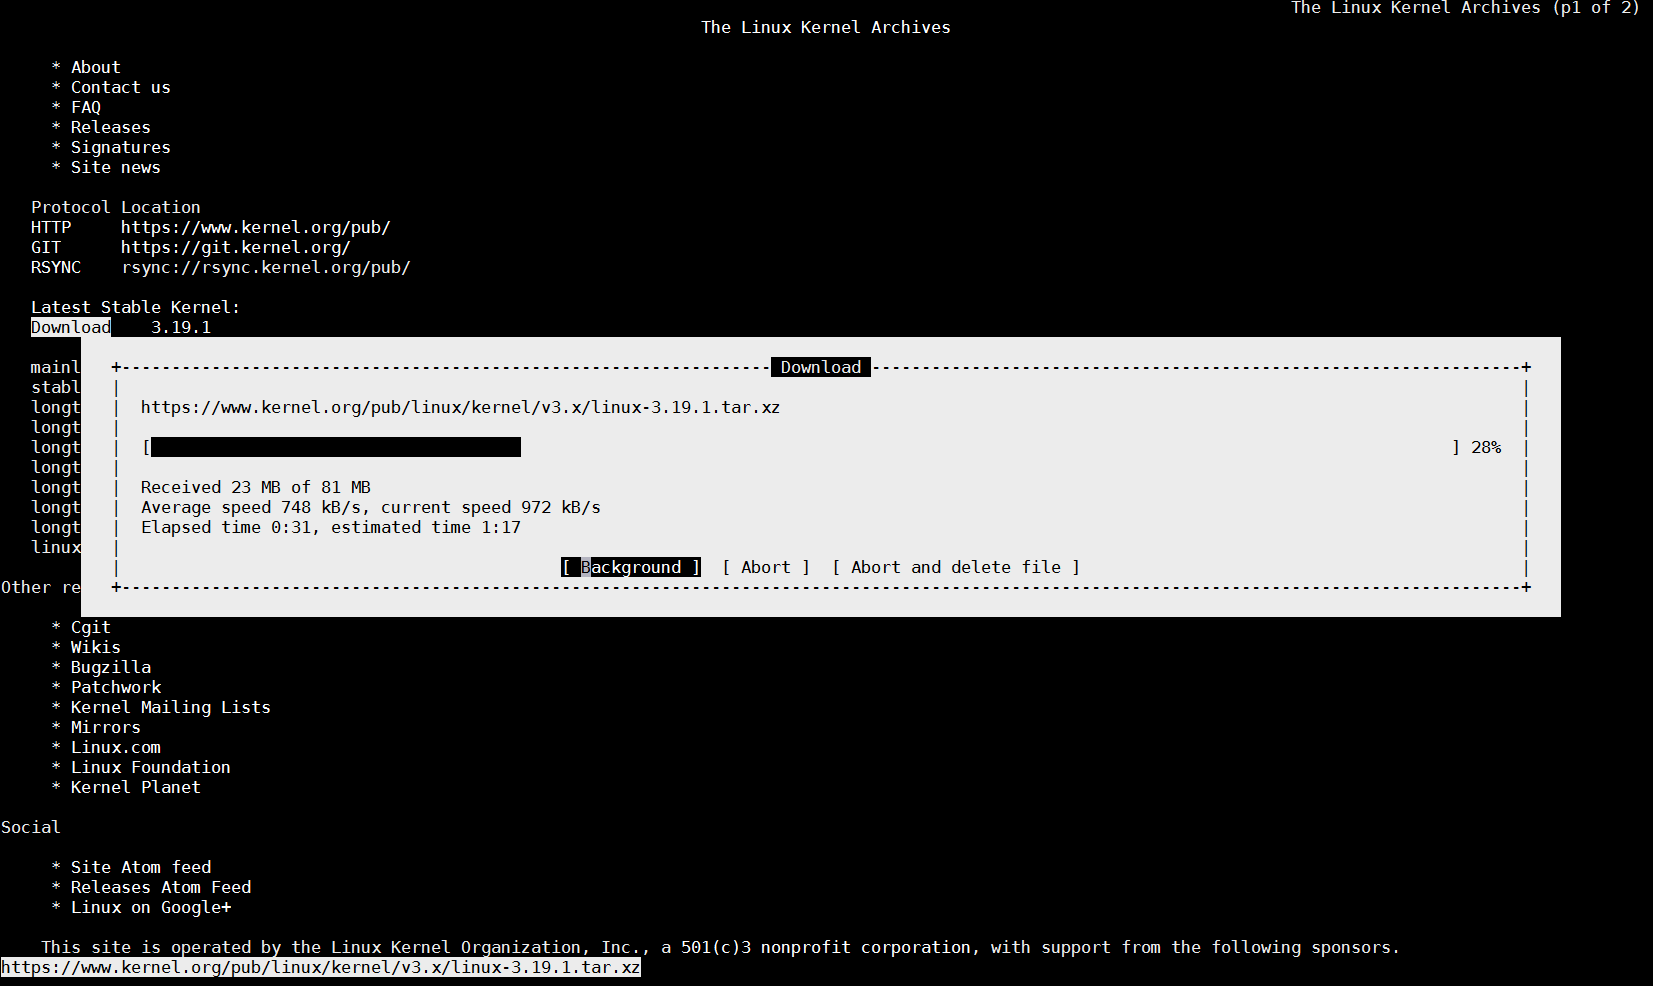
check_your_download_speed-from-console-linux-with-links-text-browser

(Note that the kernel link is current latest stable Kernel source code archive in future that might change, so try with latest archive.)

You can also use non-interactive tool such as wget curl or lftp to measure internet download speed

To test Download Internet Speed with wget without saving anything to disk set output to go to /dev/null 


root@pcfreak:~# wget -O /dev/null https://www.pc-freak.net//~hipo/hirens-bootcd/HirensBootCD15/Hirens.BootCD.15.0.zip


check_bandwidth_download-internet-speed-with-wget-from-console-non-interactively-on-linux

You see the Download speed is 104 Mbit/s this is so because I'm conducting the download from my local 100Mbit network.

For the test you can use my mirrored version of Hirens BootCD

2. Testing Uplink Internet speed provided by ISP / Server Provider from Linux (SSH) Console

To test your uplink speed you will need lftp or iperf command tool.


root@pcfreak:~# apt-cache show lftp|grep -i descr -A 12
Description: Sophisticated command-line FTP/HTTP client programs
 Lftp is a file retrieving tool that supports FTP, HTTP, FISH, SFTP, HTTPS
 and FTPS protocols under both IPv4 and IPv6. Lftp has an amazing set of
 features, while preserving its interface as simple and easy as possible.
 .
 The main two advantages over other ftp clients are reliability and ability
 to perform tasks in background. It will reconnect and reget the file being
 transferred if the connection broke. You can start a transfer in background
 and continue browsing on the ftp site. It does this all in one process. When
 you have started background jobs and feel you are done, you can just exit
 lftp and it automatically moves to nohup mode and completes the transfers.
 It has also such nice features as reput and mirror. It can also download a
 file as soon as possible by using several connections at the same time.


root@pcfreak:/root# apt-cache show iperf|grep -i desc -A 2
Description: Internet Protocol bandwidth measuring tool
 Iperf is a modern alternative for measuring TCP and UDP bandwidth performance,
 allowing the tuning of various parameters and characteristics.


To test Upload Speed to Internet connect remotely and upload any FTP file:


root@pcfreak:/root# lftp -u hipo www.pc-freak.net -e 'put Hirens.BootCD.15.0.zip; bye'
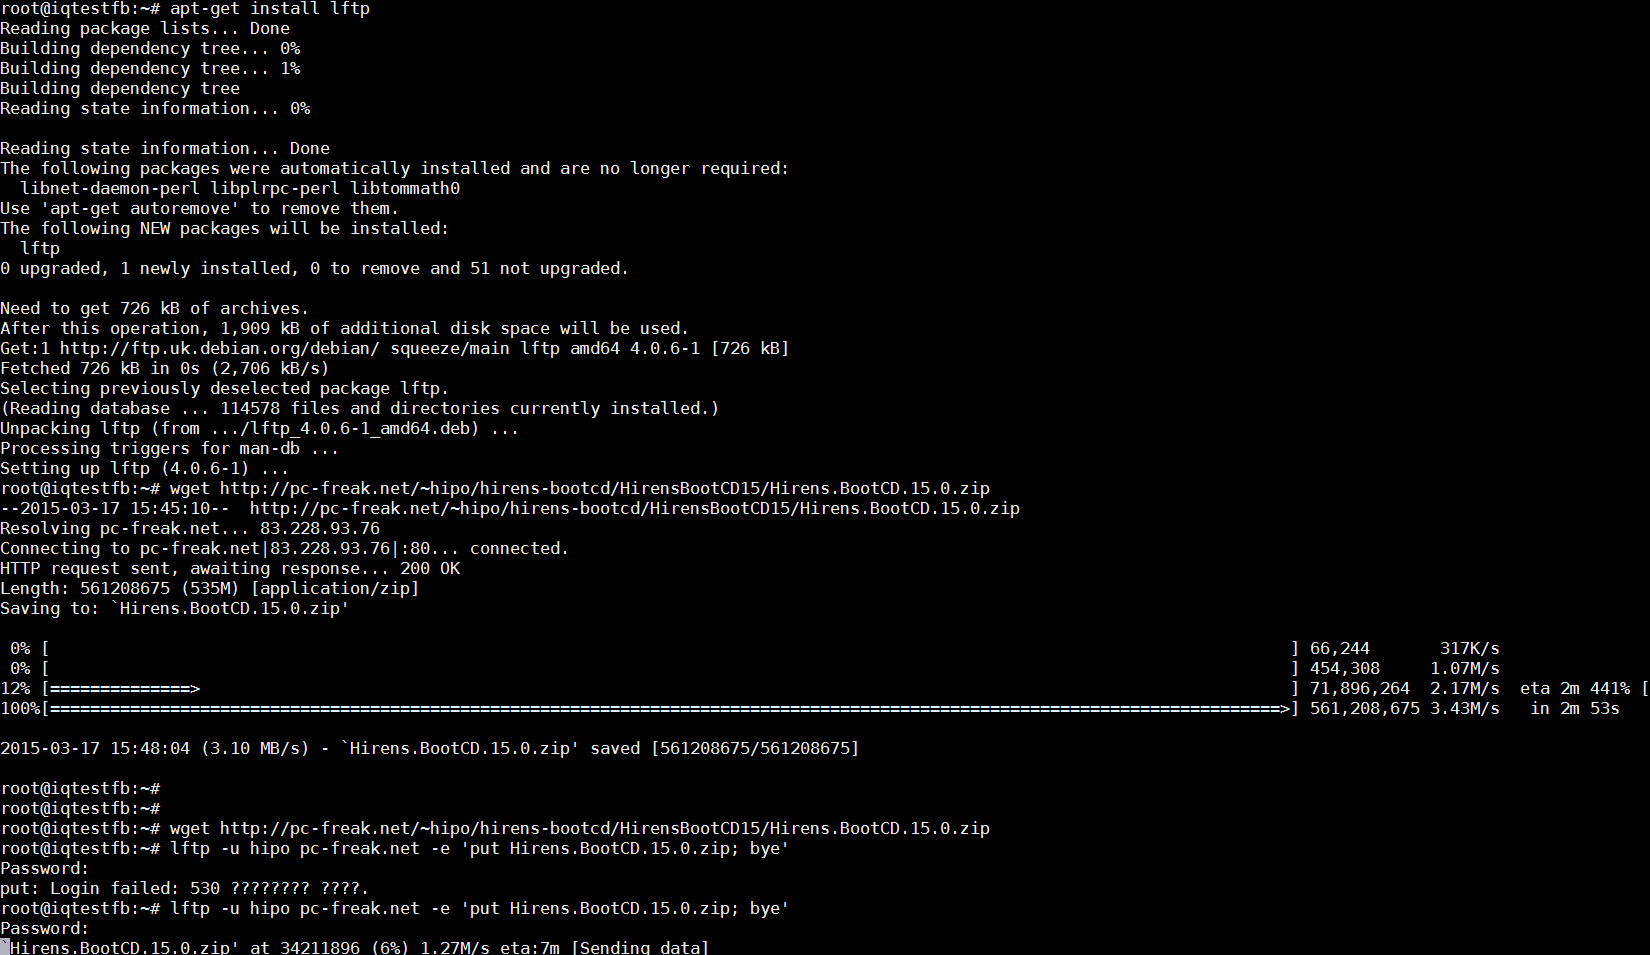
 

uploading-file-with-lftp-screenshot-test-upload-internet-speed-linux

On Debian Linux to install iperf:


root@pcfreak:/root# apt-get install –yes iperf


On latest CentOS 7 and Fedora (and other RPM based) Linux, you will need to add RPMForge repository and install with yum


[root@centos ~]# rpm -ivh  rpmforge-release-0.5.3-1.el7.rf.x86_64.rpm

[root@centos ~]# yum -y install iperf


Once having iperf on the server the easiest way currently to test it is to use
serverius.net speedtest server –  located at the Serverius datacenters, AS50673 and is running on a 10GE connection with 5GB cap.


root@pcfreak:/root# iperf -c speedtest.serverius.net -P 10
————————————————————
Client connecting to speedtest.serverius.net, TCP port 5001
TCP window size: 16.0 KByte (default)
————————————————————
[ 12] local 83.228.93.76 port 54258 connected with 178.21.16.76 port 5001
[  7] local 83.228.93.76 port 54252 connected with 178.21.16.76 port 5001
[  5] local 83.228.93.76 port 54253 connected with 178.21.16.76 port 5001
[  9] local 83.228.93.76 port 54251 connected with 178.21.16.76 port 5001
[  3] local 83.228.93.76 port 54249 connected with 178.21.16.76 port 5001
[  4] local 83.228.93.76 port 54250 connected with 178.21.16.76 port 5001
[ 10] local 83.228.93.76 port 54254 connected with 178.21.16.76 port 5001
[ 11] local 83.228.93.76 port 54255 connected with 178.21.16.76 port 5001
[  6] local 83.228.93.76 port 54256 connected with 178.21.16.76 port 5001
[  8] local 83.228.93.76 port 54257 connected with 178.21.16.76 port 5001
[ ID] Interval       Transfer     Bandwidth
[  9]  0.0-10.2 sec  4.05 MBytes  3.33 Mbits/sec
[ 10]  0.0-10.2 sec  3.39 MBytes  2.78 Mbits/sec
[ 11]  0.0-10.3 sec  3.75 MBytes  3.06 Mbits/sec
[  4]  0.0-10.3 sec  3.43 MBytes  2.78 Mbits/sec
[ 12]  0.0-10.3 sec  3.92 MBytes  3.18 Mbits/sec
[  3]  0.0-10.4 sec  4.45 MBytes  3.58 Mbits/sec
[  5]  0.0-10.5 sec  4.06 MBytes  3.24 Mbits/sec
[  6]  0.0-10.5 sec  4.30 MBytes  3.42 Mbits/sec
[  8]  0.0-10.8 sec  3.92 MBytes  3.03 Mbits/sec
[  7]  0.0-10.9 sec  4.03 MBytes  3.11 Mbits/sec
[SUM]  0.0-10.9 sec  39.3 MBytes  30.3 Mbits/sec


You see currently my home machine has an Uplink of 30.3 Mbit/s per second, that's pretty nice since I've ordered a 100Mbits from my ISP (Unguaranteed Bandwidth Connection Speed) and as you might know it is a standard practice for many Internet Proviers to give Uplink speed of 1/4 from the ISP provided overall bandwidth 1/4 would be 25Mbi/s, meaning my ISP (Bergon.NET) is doing pretty well providing me with even more than promised (ordered) bandwidth.

Iperf is probably the choice of most sysadmins who have to do regular bandwidth in local networks speed between 2 servers or test  Internet Bandwidth speed on heterogenous network with Linux / BSDs / AIX / HP-UX (UNIXes). On HP-UX and AIX and other UNIXes for which iperf doesn't have port you have to compile it yourself.

If you don't have root /admin permissions on server and there is python language enterpreter installed you can use speedtest_cli.py script to test internet throughput connectivity
speedtest_cli uses speedtest.net to test server up / down link just in case if script is lost in future I've made ownload mirror of speedtest_cli.py is here

Quickest way to test net speed with speedtest_cli.py:


$ lynx -dump https://raw.github.com/sivel/speedtest-cli/master/speedtest_cli.py > speedtest_cli.py
$ chmod +x speedtest_cli.py
python speedtest_cli.py
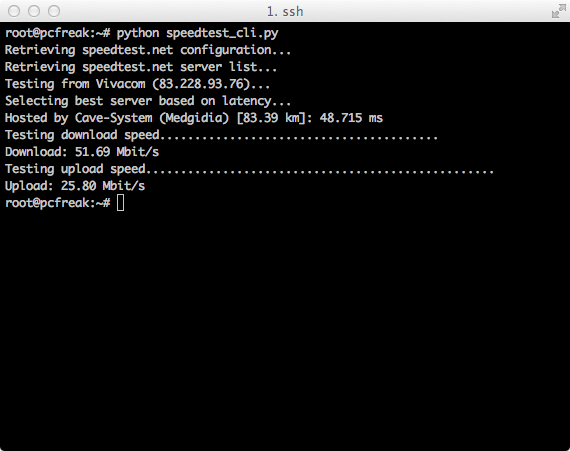
speedtest_cli_pyhon_script_screenshot-on-gnu-linux-test-internet-network-speed-on-unix

MySQL: How to check user privileges and allowed hosts to connect with mysql cli

Wednesday, April 2nd, 2014

how-to-check-user-privileges-and-allowed-hosts-to-connect-with-mysql-cli

On a project there are some issues with root admin user unable to access the server from remote host and the most probable reason was there is no access to the server from that host thus it was necessary check mysql root user privilegse and allowed hosts to connect, here SQL query to do it:
 

mysql> select * from `user` where  user like 'root%';
+——————————–+——+——————————————-+————-+————-+————-+————-+————-+———–+————-+—————+————–+———–+————+—————–+————+————+————–+————+———————–+——————+————–+—————–+——————+——————+—————-+———————+——————–+——————+————+————–+———-+————+————-+————–+—————+————-+—————–+———————-+
| Host                           | User | Password                                  | Select_priv | Insert_priv | Update_priv | Delete_priv | Create_priv | Drop_priv | Reload_priv | Shutdown_priv | Process_priv | File_priv | Grant_priv | References_priv | Index_priv | Alter_priv | Show_db_priv | Super_priv | Create_tmp_table_priv | Lock_tables_priv | Execute_priv | Repl_slave_priv | Repl_client_priv | Create_view_priv | Show_view_priv | Create_routine_priv | Alter_routine_priv | Create_user_priv | Event_priv | Trigger_priv | ssl_type | ssl_cipher | x509_issuer | x509_subject | max_questions | max_updates | max_connections | max_user_connections |
+——————————–+——+——————————————-+————-+————-+————-+————-+————-+———–+————-+—————+————–+———–+————+—————–+————+————+————–+————+———————–+——————+————–+—————–+——————+——————+—————-+———————+——————–+——————+————+————–+———-+————+————-+————–+—————+————-+—————–+———————-+
| localhost                      | root | *5A07790DCF43AC89820F93CAF7B03DE3F43A10D9 | Y           | Y           | Y           | Y           | Y           | Y         | Y           | Y             | Y            | Y         | Y          | Y               | Y          | Y          | Y            | Y          | Y                     | Y                | Y            | Y               | Y                | Y                | Y              | Y                   | Y                  | Y                | Y          | Y            |          |            |             |              |             0 |           0 |               0 |                    0 |
| server737                        | root | *5A07790DCF43AC89820F93CAF7B03DE3F43A10D9 | Y           | Y           | Y           | Y           | Y           | Y         | Y           | Y             | Y            | Y         | Y          | Y               | Y          | Y          | Y            | Y          | Y                     | Y                | Y            | Y               | Y                | Y                | Y              | Y                   | Y                  | Y                | Y          | Y            |          |            |             |              |             0 |           0 |               0 |                    0 |
| 127.0.0.1                      | root | *5A07790DCF43AC89820F93CAF7B03DE3F43A10D9 | Y           | Y           | Y           | Y           | Y           | Y         | Y           | Y             | Y            | Y         | Y          | Y               | Y          | Y          | Y            | Y          | Y                     | Y                | Y            | Y               | Y                | Y                | Y              | Y                   | Y                  | Y                | Y          | Y            |          |            |             |              |             0 |           0 |               0 |                    0 |
| server737.server.myhost.net | root | *5A07790DCF43FC89820A93CAF7B03DE3F43A10D9 | Y           | Y           | Y           | Y           | Y           | Y         | Y           | Y             | Y            | Y         | Y          | Y               | Y          | Y          | Y            | Y          | Y                     | Y                | Y            | Y               | Y                | Y                | Y              | Y                   | Y                  | Y                | Y          | Y            |          |            |             |              |             0 |           0 |               0 |                    0 |
| server4586                        | root | *5A07790DCF43AC89820F93CAF7B03DE3F43A10D9 | N           | N           | N           | N           | N           | N         | N           | N             | N            | N         | N          | N               | N          | N          | N            | N          | N                     | N                | N            | N               | N                | N                | N              | N                   | N                  | N                | N          | N            |          |            |             |              |             0 |           0 |               0 |                    0 |
| server4586.myhost.net              | root | *5A07790DCF43AC89820F93CAF7B03DE3F43A10D9 | N           | N           | N           | N           | N           | N         | N           | N             | N            | N         | N          | N               | N          | N          | N            | N          | N                     | N                | N            | N               | N                | N                | N              | N                   | N                  | N                | N          | N            |          |            |             |              |             0 |           0 |               0 |                    0 |
+——————————–+——+——————————————-+————-+————-+————-+————-+————-+———–+————-+—————+————–+———–+————+—————–+————+————+————–+————+———————–+——————+————–+—————–+——————+——————+—————-+———————+——————–+——————+————+————–+———-+————+————-+————–+—————+————-+—————–+———————-+
6 rows in set (0.00 sec)

mysql> exit


Here is query explained:

select * from `user` where  user like 'root%'; query means:

select * – show all
from `user` – from user database
where user like 'root%' – where there is match in user column to any string starting with 'root*',
 

Weblogic – How to change / remove IP/hostname quick and dirty howto

Wednesday, March 11th, 2015

Oracle-Weblogic-Server-logo-how-to-change-ip-hostname-weblogic-quick-and-dirty-howto

This is just quick & dirty doc on how to change/remove IP/host on Oracle WebLogic Application server

– In logs the Error message will be message like:


<Oct 21, 2013 1:06:51 AM SGT> <Warning> <Security> <BEA-090504> <Certificate chain received from cluster2.yourdomain.com – 192.168.1.41 failed hostname verification check. Certificate contained cluster1.yourdomain.com but check expected cluster2.yourdomain.com>


Solution:

On web console – change/remove IP/hostname


As root / admin supersuser:


– Stop Weblogic Webserver 

As this is RHEL Linux, to stop WLS use standard init script start / stop service command


service wls stop


– As Application user create directory where new key will be created


mkdir /home/uwls11pp/tmp_key
cd /home/uwls11pp/tmp_key


– Make backup of current JKS (Keystore File)


cp /WLS/app/oracle/wls1036/wlserver_10.3/server/lib/DemoIdentity.jks /WLS/app/oracle/wls1036/wlserver_10.3/server/lib/DemoIdentity.jks_11032015


– Execute set env . script


/WLS/app/oracle/wls1036/wlserver_10.3/server/bin/setWLSEnv.sh


– Copy & paste output from script above and export variables


export CLASSPATH;
export PATH;


– Check old certificate in keystore


/WLS/app/oracle/jdk1.7.0_25/bin/keytool -list -v -keystore /WLS/app/oracle/wls1036/wlserver_10.3/server/lib/DemoIdentity.jks  -storepass DemoIdentityKeyStorePassPhrase


– Delete old Weblogic keystore JKS file


/WLS/app/oracle/jdk1.7.0_25/bin/keytool -delete -alias demoidentity -keystore /WLS/app/oracle/wls1036/wlserver_10.3/server/lib/DemoIdentity.jks -storepass DemoIdentityKeyStorePassPhrase


– Check wether proper Java version is used


java -version


– Get hostname from hosts file


cat /etc/hosts


#Replace weblogic1 with your FQDN (Fully Qualified Domain Name) – this step will create new certificate with new hostname


java utils.CertGen -cn weblogic1 -keyfilepass DemoIdentityPassPhrase -certfile newcert -keyfile newkey


#Import certificate to “official” keystore


java utils.ImportPrivateKey -keystore /WLS/app/oracle/wls1036/wlserver_10.3/server/lib/DemoIdentity.jks -storepass DemoIdentityKeyStorePassPhrase -keyfile newkey.pem -keyfilepass DemoIdentityPassPhrase -certfile newcert.pem -alias demoidentity


#Recheck once again if correct certificate is in use


/WLS/app/oracle/jdk1.7.0_25/bin/keytool -list -v -keystore /WLS/app/oracle/wls1036/wlserver_10.3/server/lib/DemoIdentity.jks  -storepass DemoIdentityKeyStorePassPhrase


– Finally issue as root user restart Weblogic server again


service wls start

Create SSH Tunnel to MySQL server to access remote filtered MySQL port 3306 host through localhost port 3308

Friday, February 27th, 2015

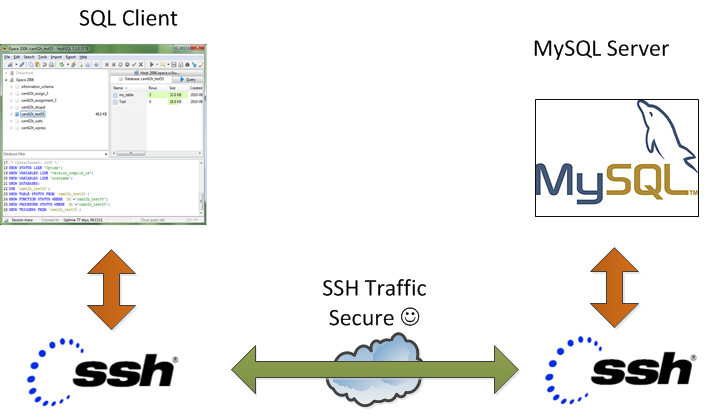
create_ssh_tunnel_to-mysql_server-to-access-remote-filtered-mysql-on-port-3306-secure_ssh_traffic
On our Debian / CentOS / Ubuntu Linux and Windows servers we're running multiple MySQL servers and our customers sometimes need to access this servers.
This is usually problem because MySQL Db  servers are running in a DMZ Zone with a strong firewall and besides that for security reasons SQLs are configured to only listen for connections coming from localhost, I mean in config files across our Debian Linux servers and CentOS / RHEL Linux machines the /etc/mysql/my.cnf and /etc/my.cnf the setting for bind-address is 127.0.0.1:
 

[root@centos ~]# grep -i bind-address /etc/my.cnf 
bind-address            = 127.0.0.1
##bind-address  = 0.0.0.0


For source code developers which are accessing development SQL servers only through a VPN secured DMZ Network there are few MySQL servers witha allowed access remotely from all hosts, e.g. on those I have configured:
 

[root@ubuntu-dev ~]# grep -i bind-address /etc/my.cnf 

bind-address  = 0.0.0.0


However though clients insisted to have remote access to their MySQL Databases but since this is pretty unsecure, we decided not to configure MySQLs to listen to all available IP addresses / network interfaces. 
MySQl acess is allowed only through PhpMyAdmin accessible via Cleint's Web interface which on some servers is CPanel  and on other Kloxo (This is open source CPanel like very nice webhosting platform).

For some stubborn clients which wanted to have a mysql CLI and MySQL Desktop clients access to be able to easily analyze their databases with Desktop clients such as MySQL WorkBench there is a "hackers" like work around to create and use a MySQL Tunnel to SQL server from their local Windows PCs using standard OpenSSH Linux Client from Cygwin,  MobaXterm which already comes with the SSH client pre-installed and has easy GUI interface to create SSH tunnels or eventually use Putty's Plink (Command Line Interface) to create the tunnel

Anyways the preferred and recommended (easiest) way to achieve a tunnel between MySQL and local PC (nomatter whether Windows or Linux client system) is to use standard ssh client and below command:
 

ssh -o ServerAliveInterval=10 -M -T -M -N -L 3308:localhost:3306 your-server.your-domain.com


By default SSH tunnel will keep opened for 3 minutes and if not used it will automatically close to get around this issue, you might want to raise it to (lets say 15 minutes). To do so in home directory user has to add in:
 

~/.ssh/config

ServerAliveInterval 15
ServerAliveCountMax 4


Note that sometimes it is possible ven though ssh tunnel timeout value is raised to not take affect if there is some NAT (Network Adress Translation) with low timeout setting on a firewall level. If you face constant SSH Tunnel timeouts you can use below bash few lines code to auto-respawn SSH tunnel connection (for Windows users use MobaXterm or install in advance bash shell cygwin package):
 

while true
do
 
ssh -o ServerAliveInterval=10 -M -T -M -N -L 3308:localhost:3306 your-server.your-domain.com
  sleep 15
done


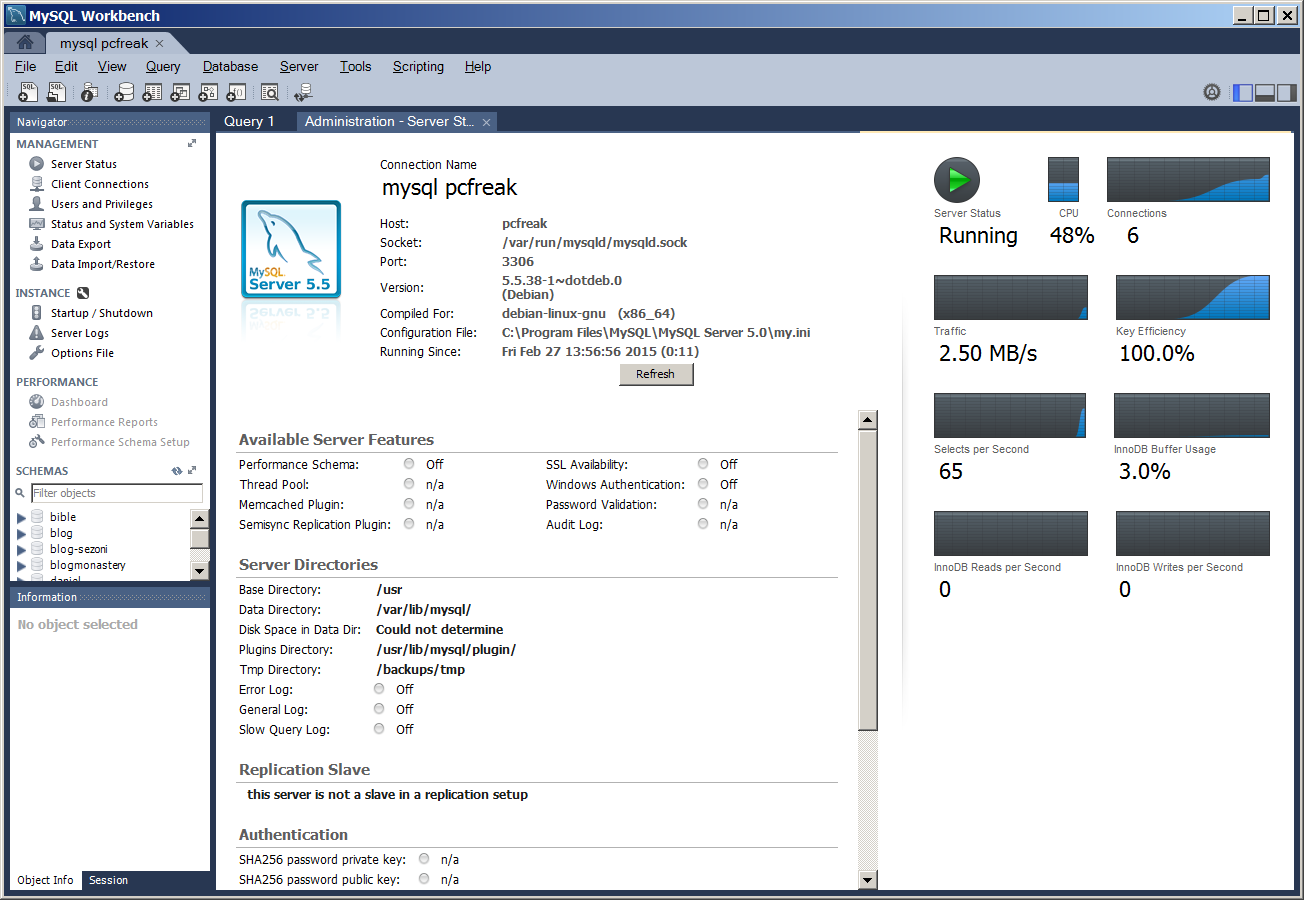
Below is MySQLBench screenshot connected through server where this blog is located after establishing ssh tunnel to remote mysql server on port 3308 on localhost

mysql-workbench-database-analysis-and-management-gui-tool-convenient-for-data-migratin-and-queries-screenshot-

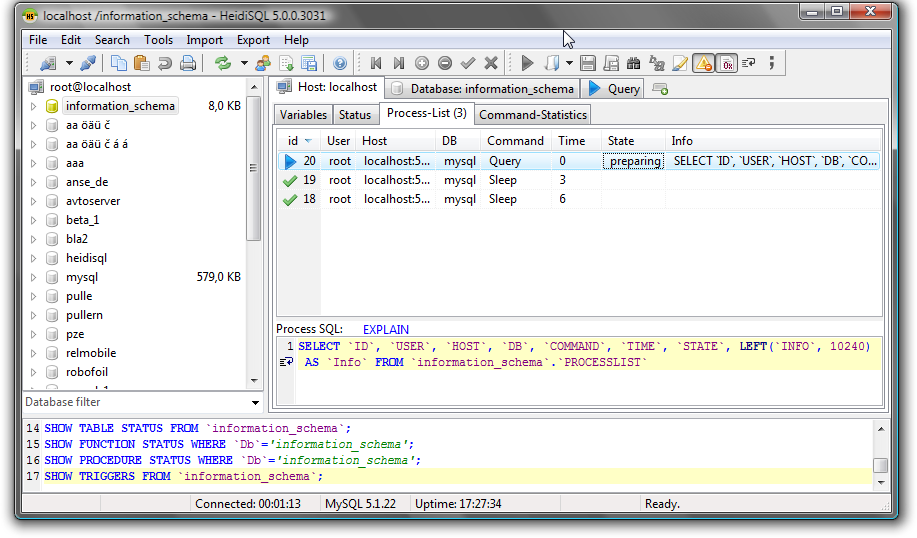
There is also another alternative way to access remote firewall filtered mysql servers without running complex commands to Run a tunnel which we recommend for clients (sql developers / sql designers) by using HeidiSQL (which is a useful tool for webdevelopers who has to deal with MySQL and MSSQL hosted Dbs).

heidisql-show-host_processlist-screenshot

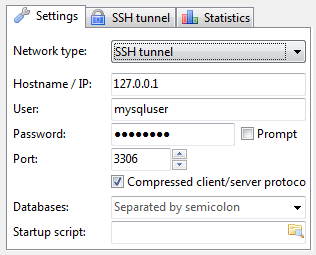
To connect to remote MySQL server through a Tunnel using Heidi:

mysql_connection_configuration-heidi-mysql-gui-connect-tool


In the ‘Settings’ tab

1. In the dropdown list of ‘Network type’, please select SSH tunnel

2. Hostname/IP: localhost (even you are connecting remotely)

3. Username & Password: your mysql user and password

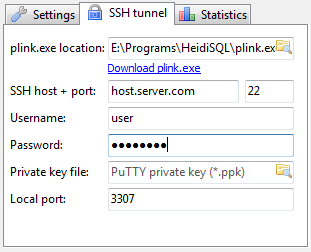
Next, in the tab SSH Tunnel:

1. specify plink.exe or you need to download it and specify where it’s located

2. Host + port: the remote IP of your SSH server(should be MySQL server as well), port 22 if you don’t change anything

3. Username & password: SSH username (not MySQL user)


heidi-connection_ssh_tunnel_configuration-heidi-sql-tool-screenshot
 

Creating multi-part zip archives in Linux with 7zip command to transfer large zip files data in parts

Monday, December 1st, 2014

creating-multi-part-zip-archives-in-Linux-debian-ubuntu-fedora-centos-rhel-with-7z-command-to-transfer-large-files-data-in-parts
Recently, I've blogged on how to move large files from source to destination server in parts on a slow / restricted networks or whenever the media is limtied in size. This is not a common scenario but it happens so if you're admin sooner or later you will need that. I give example with UNIX's split and unrar. However strip's file naming can get you insane (in case if you don't want to use cstrip command – split a file into sections determined by context lines instead) plus normal split Linux / *nix command doesn't support compression and encryption. On the other side on many Company internal Networks with Windows server hosts running – Winblows (2003, 2008, 1012) for security purposes it might be that WinRar is not installed, thus you might need to transfer the file parted between the GNU / Linux server and Windows server in standard OS supported by Windows ZIP format. Assuming that you have root (admin) access to the Linux host you can then archive your file in parts using ZIP encryption algorithm with 7zip.

1. Installing 7zip on CentOS / Fedora / RHEL and other Redhat based Linuces

If the Linux server is running:
Fedora / CentOS  / RHEL and you don't have 7zip installed yet install it with:

yum -y install p7zip

According to distros version  it might be the name could be a bit different if p7zip is different to find the one you need search with:

yum search p7zip

and install whatever you need
 

2. Installing 7zip on Debian / Ubuntu and other Debian based servers

apt-get install –yes p7zip-full

Depending on Deb based distro just like with fedora if p7zip-full pack is not installable, check 7zip's package distro version:

apt-cache search p7zip


3. Archiving ZIP file in multiple (sized) parts on GNU / Linux

7z a -v512m Large-file-separated-in-multi-parts.zip Large-Many-Gigabytes-File.SQL

This would output multiple files:

Large-file-separated-in-multi-parts.zip.001, Large-file-separated-in-multi-parts.zip.002, Large-file-separated-in-multi-parts.zip.003, Large-file-separated-in-multi-parts.004 etc.

If you want to add security to the transferred file to protect newly created ZIP archive with password use following command:

7z a -v512m Large-file-separated-in-multi-parts.zip Large-Many-Gigabytes-File.SQL


7-Zip [64] 9.20  Copyright (c) 1999-2010 Igor Pavlov  2010-11-18
p7zip Version 9.20 (locale=bg_BG.UTF-8,Utf16=on,HugeFiles=on,2 CPUs)
Scanning

Creating archive Large-file-separated-in-multi-parts.zip


Enter password (will not be echoed) :

Once you have transferred all the many parts via (SSH/ FTPS or not preferrably HTTP / HTTPS / FTP) place them in the same folder and use Windows standard ZIP to unarchive.

If the archived 7zip files are to be unarchived on another Linux host (in case if multi part zip transfer is between Linux -> Linux hosts) to unarchive, parted files:

7z x Large-file-separated-in-multi-parts.zip.*

How to create ssh tunnels / ssh tunneling on Linux and FreeBSD with openssh

Saturday, November 26th, 2011

ssh-tunnels-port-forwarding-windows-linux-bypassing-firewall-diagram
SSH tunneling
allows to send and receive traffic using a dedicated port. Using an ssh traffic can have many reasons one most common usage reason is to protect the traffic from a host to a remote server or to access port numbers which are by other means blocked by firewall, e.g.: (get around firewall filtering)
SSH tunneling works only with TCP traffic. The way to make ssh tunnel is with cmds:

host:/root# ssh -L localhost:deshost:destport username@remote-server.net
host:/root# ssh -R restport:desthost:localport username@remote-server.net
host:/root# ssh -X username@remote-server.net

This command will make ssh to bind a port on localhost of the host host:/root# machine to the host desthost:destport (destination host : destinationport). Important to say deshost is the host destination visible from the remote-server.net therefore if the connection is originating from remote-server.net this means desthost will be localhost.
Mutiple ssh tunnels to multiple ports using the above example commands is possible. Here is one example of ssh tunneling
Let’s say its necessery to access an FTP port (21) and an http port (80), listening on remote-server.net In that case desthost will be localhost , we can use locally the port (8080) insetad of 80, so it will be no necessery to make the ssh tunnel with root (admin privileges). After the ssh session gets opened both services will be accessible on the local ports.

host:/home/user$ ssh -L 21:localhost:21 -L 8080:localhost:80 user@remote-server.net

That’s all enjoy 😉

How to make a mysql root user to login interactive with mysql cli passwordless

Wednesday, June 29th, 2011

MySQL Logo Passwordless root login .my.cnf

I’m using access to the mysql servers via localhost with mysql cli on daily basis.
With time I’ve figured out that it’s pretty unahandy to always login with my root mysql password, I mean each time to enter it, e.g.:

root@mysql-server:~# mysql -u root
Enter password:
...

Thus to make my life a way easier I decided to store my mysql root password in order to allow my root admin user to be able to login to my mysql server without asking for password. This saves time and nerves, as I’m not supposed to look up for the password file I store my server mysql root pass.

To allow my mysql cli interface, to login passwordless to the SQL server I had to create the file /root/.my.cnf readable only for my root user and store my MySQL username and password there.

Here is a sample /root/.my.cnf file:

root@mysql-server:~# cat /root/.my.cnf
[client]
user="root"
pass="mysecretMySQLPasswordgoeshere"

Now next time I use the mysql console interface to access my mysql server I don’t have to supply the password, here is how easier is the mysql login afterwards:

root@mysql-server:~# mysql -u root
Welcome to the MySQL monitor. Commands end with ; or g.
Your MySQL connection id is 3520
Server version: 5.0.77 Source distribution

Type ‘help;’ or ‘h’ for help. Type ‘c’ to clear the buffer.

mysql>

The only downside of using .my.cnf to store permanently the mysql server root and password is from security standpoint.
If for instance somebody roots my servers, where I have stored my root user/pwds in .my.cnf , he will be able immediately to get access to the MySQL server.

Another possible security flaw with using the mysql passwordless login “trick” is if somebody forgets to set proper file permissions to, .my.cnf

Once again the file should possess the permissons of:

root@mysql-server:~# ls -al /root/.my.cnf
-rw------- 1 root root 90 Apr 2 00:05 /root/.my.cnf

Any other permissons might allow non-privileged users to read the file and gain unathorized admin access to the SQL server.