Posts Tagged ‘card’

How to install Nvidia GeForce FX 5500 on Ubuntu 11.04

Tuesday, July 19th, 2011

Nvidia Tux GeForce GNU / Linux

Yesterday I was at a friend of mine who has recently installed Ubuntu 11.04 to his already oldish Desktop computer.

The system was 1.4Ghz (amd) with 512 RAM and some kind of Dell Trinitron 19 inch monitor
Even though he tried hard to make his NVIDIA GeForce FX 5500 ‘s drive to work properly with Ubuntu Natty Narwhal, he just has messed it even more.
As I always like helping people and I’m joyful for people who want to migrate to Linux, I took some time to make his NVIDIA GeForce work with this Ubuntu release.

First I tried to make it work by using some of the official NVIDIA Linux drivers located on nvidia.com following some online tutorial for Ubuntu claiming that it works but actually it didn’t, so finally after a bit of experimentation I found a way to make this video card work.
Here is how:

1. Install the following Ubuntu packages

root@ubuntu:~# apt-get install nouveau-firmware nvidia-173 nvidia-173-kernel-source
nvidia-cg-toolkit nvidia-common nvidia-current nvidia-glx-173 nvidia-settings
...

2. Load in the kernel and set to be auto loaded on boot nvidia’s driver kernel module nvidia-173

root@ubuntu:~# depmod -a;
root@ubutnu:~# modprobe nvidia-173
root@ubuntu:~# echo nvidia-173 >> /etc/modules

3. Stop temporary (Gnome dipsplay manager) gdm

root@ubuntu:~# service gdm stop
...

4. Use nvidia-xconfig to generate a working version of /etc/X11/xorg.conf for Nvidia

root@ubuntu:~# nvidia-xconfig
..

nvidia-xconfig will generate new /etc/X11/xorg.conf configuration corresponding to the Nvidia GeForce Fx 5500 and will move the old xorg.conf to xorg.conf.backup.

5. Start the gdm manager to be running again

root@ubuntu:~# service gdm start
...

Now the Xserver will start in a terrible mode of 640×480, probably because Ubuntu was unable to define correct VerticalSync and HorizontalSync for the 19 inch Dell Trinitron monitor or for some other weird reason, to fix this it’s quite easy though.
The fix to the NVIDIA GeForce 5500 running in 640×480 mode is done straigh via Gnome menus.

6. Use Gnome’s System -> Preferences -> Monitors to set raise up the Xserver resolution

Navigate to Gnome’s menus:

System -> Preferences -> Monitors

Gnome System Preferences Monitors Nvidia GeForce 5500 Ubuntu

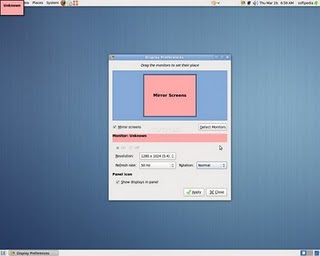
Here you will have to select more appropriate resolution and a different refresh rate, which in my case was 1024×768 and further on to store the settings press the Apply button.

One oddity here was that according to the Monitor Preferences the refresh rate was running on 54 Hz which I don’t believe was the case as I guess it’s some kind of Gnome or Ubuntu bug. I changed the 54 Hz Refresh Rate to 50 Hz as using the 54 Hz refresh rate as the screen had a minor vibrations observable if one takes a thorough look on the screen.

Setting the NVIDIA GeForce 5500 driver to work with 50 Hz Refresh Rate in Gnome loooked like the Windows’s 85 Hz RR and looked quite nice so I left it this way.

Finally to test the newly installed driver 3D acceleration I used glxgears.

7. Install glxgears in order to be able to test that 3D acceleration on Nvidia works fine

root@ubuntu:~# apt-get install mesa-utils

After installing mesa-utils which nowdays contains glxgears executable one needs to execute the glxgears binary.

root@ubuntu:~# glxgears

Immediately after a window containing the glxgears should popup on the screen, like shown in below screenshot
Benchmark 3d Acceleration Linu glxgears

glxgears showed 3d acceleration works fine as the performance for 3d rendering shown was quite good and therefore 3D acceleration was running fine.

And that was it now the video works like and my friends, can enjoy the fun to have a generally virus Free OS 😉

How to configure networking in CentOS, Fedora and other Redhat based distros

Wednesday, June 1st, 2011

On Debian Linux I’m used to configure the networking via /etc/network/interfaces , however on Redhat based distributions to do a manual configuration of network interfaces is a bit different.

In order to configure networking in CentOS there is a special file for each interface and some values one needs to fill in to enable networking.

These network adapters configuration files for Redhat based distributions are located in the files:

/etc/sysconfig/network-scripts/ifcfg-*

Just to give you and idea on the content of this network configuration file, here is how it looks like:

[root@centos:~ ]# cat /etc/sysconfig/network-scripts/ifcfg-eth0
# Broadcom Corporation NetLink BCM57780 Gigabit Ethernet PCIe
DEVICE=eth0
BOOTPROTO=static
DHCPCLASS=
HWADDR=00:19:99:9C:08:3A
IPADDR=192.168.0.1
NETMASK=255.255.252.0
ONBOOT=yes

This configuration is of course just for eth0 for other network card names and devices, one needs to look up for the proper file name which corresponds to the network interface visible with the ifconfig command.
For instance to list all network interfaces via ifconfig use:

[root@centos:~ ]# /sbin/ifconfig |grep -i 'Link encap'|awk '{ print $1 }'
eth0
eth1
lo

In this case there are only two network cards on my host.
The configuration files for the ethernet network devices eth0 and eth1 from below example are located in files /etc/sysconfig/network-scripts/ifcfg-eth{1,2}

/etc/sysconfig/network-scripts/ directory contains plenty of shell scripts related to Fedora networking.
This directory contains actually the networking boot time load up rules for fedora and CentOS hosts.

The complete list of options available which can be used in /etc/sysconfig/network-scripts/ifcfg-ethx is located in:
/usr/share/doc/initscripts-*/sysconfig.txt

, to quickly observe the documentation:

[root@centos:~ ]# less /usr/share/doc/initscripts-*/sysconfig.txt

One typical example of configuring a CentOS based host to possess a static IP address (192.168.1.5) and a gateway (192.168.1.1), which will be assigned in boot time during the /etc/init.d/network is loaded is:

[root@centos:~ ]# cat /etc/sysconfig/network-scripts/ifcfg-eth0
# Broadcom Corporation NetLink BCM57780 Gigabit Ethernet PCIe
IPV6INIT=no
BOOTPROTO=static
ONBOOT=yes
USERCTL=yes
TYPE=Ethernet
DEVICE=eth0
IPADDR=192.168.1.5
NETWORK=192.168.1.0
GATEWAY=192.168.1.1
BROADCAST=192.168.1.255
NETMASK=255.255.255.0

After some changes to the network configuration files are made, to load up the new rules a /etc/init.d/network script restart is necessery with the command:

[root@centos:~ ]# /etc/init.d/network restart

Of course one can always use /etc/rc.local script as universal way to configure network rules on a Redhat based host, however using methods like rc.local to load up, ifconfig or route rules in a Fedora would break the distribution logic and therefore is not recommended.

There is also a serious additional reason against using /etc/rc.local post init commands load up script.
If one uses rc.local to load up and configure the networing, the network will get initialized only after all the other scripts in /etc/init.d/ gets started.

Therefore using /etc/rc.local might also be DANGEROUS!, if used remotely via (ssh), supposedly it might completely fail to load the networking, if all bringing the server interfaces relies on it.

Here is an example, imagine that some of the script set in to load up during a CentOS boot up hangs and does continue to load forever (for example after some crucial software upate), as a consequence the /etc/rc.local script will never get executed as it only starts up after all the rest init scripts had succesfully completed execution.

A network eth1 interface configuration for a Fedora host which has to fetch it’s network settings automatically via DHCP is as follows:

[root@fedora:/etc/network:]# cat /etc/sysconfig/network-scripts/ifcfg-eth1
# Intel Corporation 82557/8/9 [Ethernet Pro 100]DEVICE=eth1
BOOTPROTO=dhcp
HWADDR=00:0A:E4:C9:7B:51
ONBOOT=yes

To sum it up I think Fedora’s /etc/sysconfig/network-scripts methodology to configure ethernet devices is a way inferior if compared to Debian.

In GNU/Debian Linux configuration of all networking is (simpler)!, everything related to networking is in one single file ( /etc/network/interfaces ), moreover getting all the thorough documentation for the network configurations options for the interfaces is available as a system wide manual (e.g. man interfaces).

Partially Debian interfaces configuration is a bit more complicated in terms of syntax if matched against Redhat’s network-scripts/ifcfg-*, lest that generally I still find Debian’s manual network configuration interface to be easier to configure networking manually vicommand line.

Universal way to configure a static IP address on ethernet lan (eth0) interface in Linux

Friday, April 29th, 2011

One of the most precious commands I ever learned to use in Linux is ifconfig and route .

They have saved my life in configuring the static IP based internet of numerous Desktop Linux computers & notebooks.

Though the usage is very much known by most of the people who are into Linux, I believe it’s likely that the newer people who entered the world of Linux or some Unix system administrators are still lacking the knowledge on how to manually configure their eth0 lan card, thus I thought it might be handy for someone to share it, I know that for most unix users & admins especially the advanced ones this post might be funny, so if you’re an advanced administrator just skip the post and don’t laught at it 😉

Now the universal commands (works on each and every Linux host) to configure manually static IP internet connection on Linux are:

linux:~# /sbin/ifconfig eth0 192.168.0.3 netmask 255.255.255.0
linux:~# /sbin/route add default gw 192.168.0.1
linux:~# echo 'nameserver 192.168.0.1' >> /etc/resolv.conf

I’ve used this simple commands on thousands ot Linux hosts and it’s still handy 🙂

In above example 192.168.0.3 is the static IP address provided by the ISP, netmask is the netmask and the second /sbin/route add default gw would set the default gateway to the example ip 192.168.0.1

The third final line would add up a resolver nameserver the Linux host would use.

Cheers 😉

How to configure static IP address on Lan card eth0 on Ubuntu and Debian Linux

Wednesday, April 27th, 2011

Does your provider provides you with a connection to the internet via a static IP address? Are you an Ubuntu or Debian user like me? Are you looking for a way to configure your eth0 Linux network card with the static ISP provided IP address? That was the scenario with me and in this article I will explain, how you can configure your Home internet access with your Ubuntu/Debian based Linux.

Both Ubuntu and Debian does have a graphic tools, which also can be used to set a static IP address to your network interface, however I find it easier to do it straight from the command line.

To configure your internet static IP via a command line, what you will need to modify is the file:

/etc/network/interfaces

In order to configure a static IP address, your provider should have equipped you with few IP addresses like let’s say the example values below:

Host IP Address: 192.168.0.5
Netmask Address: 255.255.255.0
Gateway: 192.168.0.1
Primary DNS Server: 192.168.0.1
Secondary DNS Server: 192.168.0.2

Now edit with vim, nano or mcedit /etc/network/interfaces e.g.:

root@ubuntu:~# mcedit /etc/network/interfaces

A plain /etc/network/interfaces file should contain something similar to:

auto lo
iface lo inet loopback

In order to be able to set your static IP address, Netmask, Gateway and DNS servers you will have to append in the interfaces file, the settings:

iface eth0 inet static
address 192.168.0.1
netmask 255.255.255.0
network 192.168.0.0
gateway 192.168.0.1

The eth0 sets the lan card on which the values will be assigned, address variable is the IP address assigned by your ISP, netmask is logically the netmask, network should always be configured same as the value set for address but the last ip block should be always .0 , gateway as you already know is the gateway (the ISP router).

One more thing you need to do is to configure your DNS servers by including the DNS ip addresses to /etc/resolv.conf , just issue something like:

root@ubuntu:~# echo 'nameserver 192.168.0.1' >> /etc/resolv.conf
root@ubuntu:~# echo 'nameserver 192.168.0.2' >> /etc/resolv.conf

To test that your new Linux static ip configuration is correct exec:

root@ubuntu:~# /etc/init.d/networking restart

Next use ping or (if ping is disabled by ISP), use matt’s traceroute (mtr) or a browser to test if the Linux is connected to the net.

ubuntu:~# ping google.com
...
ubuntu:~# mtr google.com

If none of the two are not able to show either ping requests flowing around, or routes to google, then something is either wrong with your internet configuration or you forgot to pay your internet bill 😉