Posts Tagged ‘interface’
Wednesday, January 15th, 2020 
If you get some error with some service that is start / stopped via systemctl you might be pondering how to debug further why the service is not up then then you'll be in the situation I was today.
While on one configured server with 8 eth0 configured ethernet network interfaces the network service was reporting errors, when atempted to restart the RedHat way via:
service network restart
to further debug what the issue was as it was necessery I had to find a way how to debug systemctl so here is how:
How to do a verbose messages status for sysctlct?
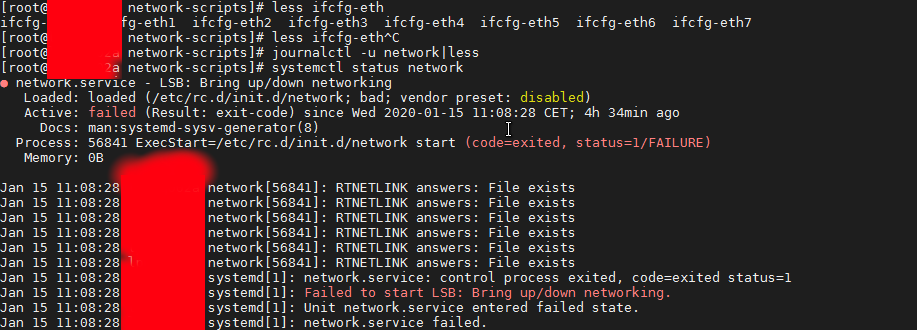
linux:~# systemctl status network
linux:~# systemctl status network
Another useful hint is to print out only log messages for the current boot, you can that with:
# journalctl -u service-name.service -b
if you don't want to have the less command like page separation ( paging ) use the –no-pager argument.
# journalctl -u network –no-pager
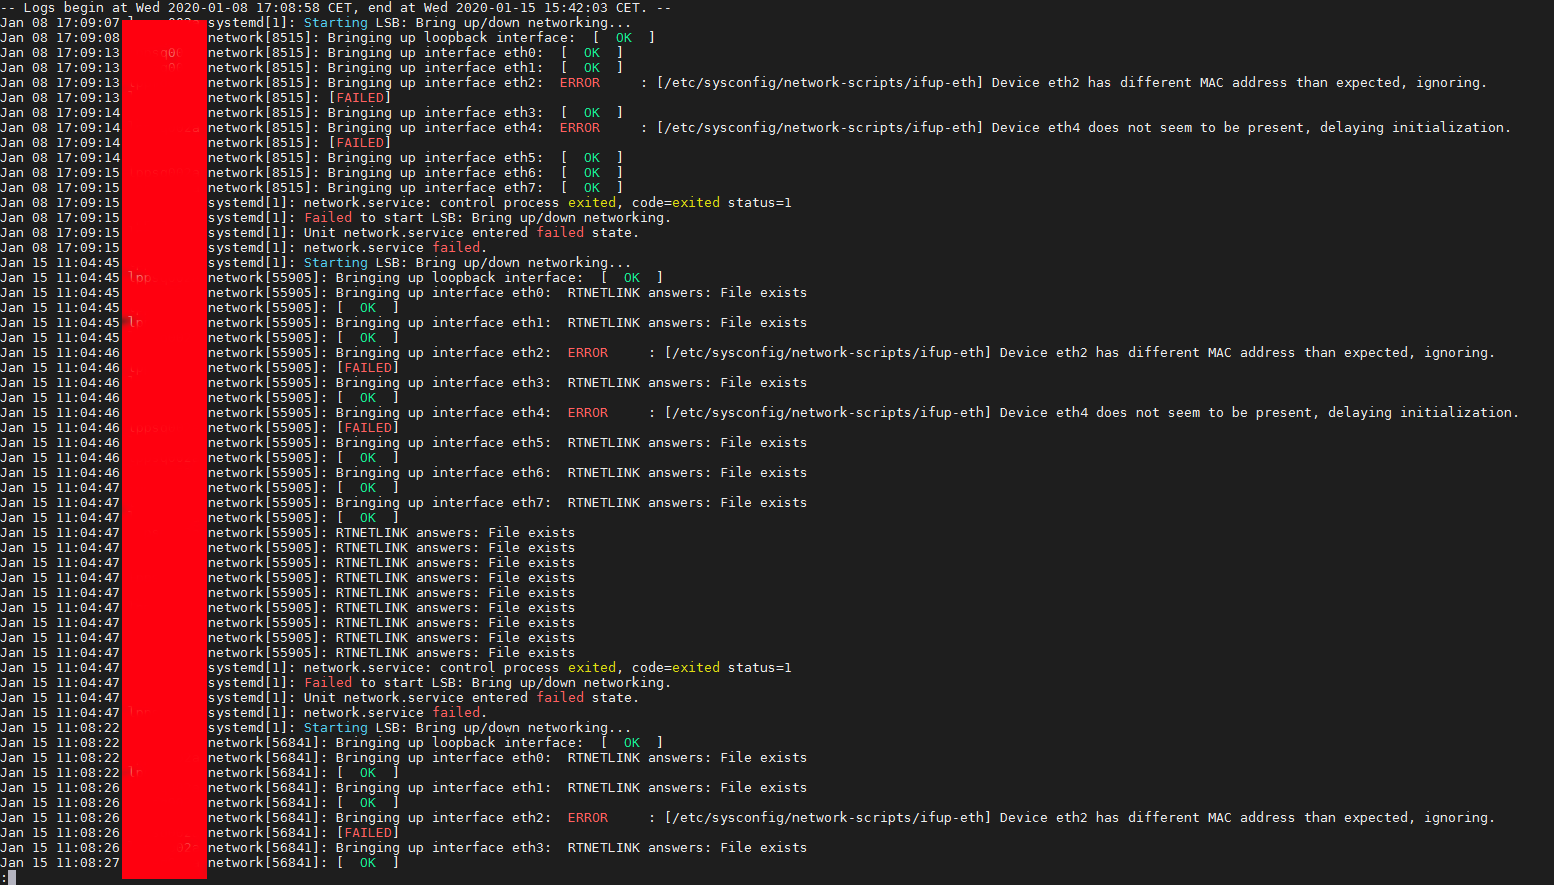
Jan 08 17:09:14 lppsq002a network[8515]: Bringing up interface eth5: [ OK ]
Jan 08 17:09:15 lppsq002a network[8515]: Bringing up interface eth6: [ OK ]
Jan 08 17:09:15 lppsq002a network[8515]: Bringing up interface eth7: [ OK ]
Jan 08 17:09:15 lppsq002a systemd[1]: network.service: control process exited, code=exited status=1
Jan 08 17:09:15 lppsq002a systemd[1]: Failed to start LSB: Bring up/down networking.
Jan 08 17:09:15 lppsq002a systemd[1]: Unit network.service entered failed state.
Jan 08 17:09:15 lppsq002a systemd[1]: network.service failed.
Jan 15 11:04:45 lppsq002a systemd[1]: Starting LSB: Bring up/down networking…
Jan 15 11:04:45 lppsq002a network[55905]: Bringing up loopback interface: [ OK ]
Jan 15 11:04:45 lppsq002a network[55905]: Bringing up interface eth0: RTNETLINK answers: File exists
Jan 15 11:04:45 lppsq002a network[55905]: [ OK ]
Jan 15 11:04:45 lppsq002a network[55905]: Bringing up interface eth1: RTNETLINK answers: File exists
Jan 15 11:04:45 lppsq002a network[55905]: [ OK ]
Jan 15 11:04:46 lppsq002a network[55905]: Bringing up interface eth2: ERROR : [/etc/sysconfig/network-scripts/ifup-eth] Device eth2 has different MAC address than expected, ignoring.
Jan 15 11:04:46 lppsq002a network[55905]: [FAILED]
Jan 15 11:04:46 lppsq002a network[55905]: Bringing up interface eth3: RTNETLINK answers: File exists
Jan 15 11:04:46 lppsq002a network[55905]: [ OK ]
Jan 15 11:04:46 lppsq002a network[55905]: Bringing up interface eth4: ERROR : [/etc/sysconfig/network-scripts/ifup-eth] Device eth4 does not seem to be present, delaying initialization.
Jan 15 11:04:46 lppsq002a network[55905]: [FAILED]
Jan 15 11:04:46 lppsq002a network[55905]: Bringing up interface eth5: RTNETLINK answers: File exists
Jan 15 11:04:46 lppsq002a network[55905]: [ OK ]
Jan 15 11:04:46 lppsq002a network[55905]: Bringing up interface eth6: RTNETLINK answers: File exists
Jan 15 11:04:47 lppsq002a network[55905]: [ OK ]
Jan 15 11:04:47 lppsq002a network[55905]: Bringing up interface eth7: RTNETLINK answers: File exists
Jan 15 11:04:47 lppsq002a network[55905]: [ OK ]
Jan 15 11:04:47 lppsq002a network[55905]: RTNETLINK answers: File exists
Jan 15 11:04:47 lppsq002a network[55905]: RTNETLINK answers: File exists
Jan 15 11:04:47 lppsq002a network[55905]: RTNETLINK answers: File exists
Jan 15 11:04:47 lppsq002a network[55905]: RTNETLINK answers: File exists
Jan 15 11:04:47 lppsq002a network[55905]: RTNETLINK answers: File exists
Jan 15 11:04:47 lppsq002a network[55905]: RTNETLINK answers: File exists
Jan 15 11:04:47 lppsq002a network[55905]: RTNETLINK answers: File exists
Jan 15 11:04:47 lppsq002a network[55905]: RTNETLINK answers: File exists
Jan 15 11:04:47 lppsq002a network[55905]: RTNETLINK answers: File exists
Jan 15 11:04:47 lppsq002a systemd[1]: network.service: control process exited, code=exited status=1
Jan 15 11:04:47 lppsq002a systemd[1]: Failed to start LSB: Bring up/down networking.
Jan 15 11:04:47 lppsq002a systemd[1]: Unit network.service entered failed state.
Jan 15 11:04:47 lppsq002a systemd[1]: network.service failed.
Jan 15 11:08:22 lppsq002a systemd[1]: Starting LSB: Bring up/down networking…
Jan 15 11:08:22 lppsq002a network[56841]: Bringing up loopback interface: [ OK ]
Jan 15 11:08:22 lppsq002a network[56841]: Bringing up interface eth0: RTNETLINK answers: File exists
Jan 15 11:08:22 lppsq002a network[56841]: [ OK ]
Jan 15 11:08:26 lppsq002a network[56841]: Bringing up interface eth1: RTNETLINK answers: File exists
Jan 15 11:08:26 lppsq002a network[56841]: [ OK ]
Jan 15 11:08:26 lppsq002a network[56841]: Bringing up interface eth2: ERROR : [/etc/sysconfig/network-scripts/ifup-eth] Device eth2 has different MAC address than expected, ignoring.
Jan 15 11:08:26 lppsq002a network[56841]: [FAILED]
Jan 15 11:08:26 lppsq002a network[56841]: Bringing up interface eth3: RTNETLINK answers: File exists
Jan 15 11:08:27 lppsq002a network[56841]: [ OK ]
Another useful thing debug arguments is the -xe to do:
# journalctl -xe –no-pager
- -x (– catalog)
Augment log lines with explanation texts from the message catalog.
This will add explanatory help texts to log messages in the output
where this is available. - -e ( –pager-end ) Immediately jump to the end of the journal inside the implied pager
tool.
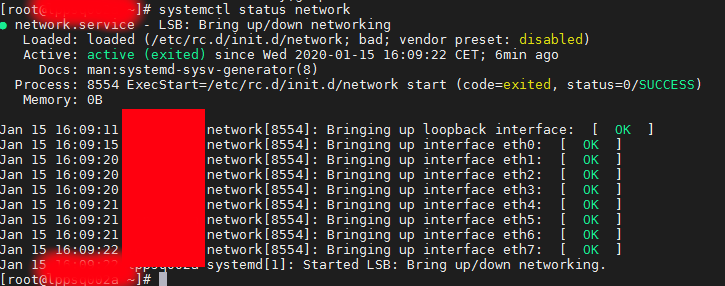
Finally after fixing the /etc/sysconfig/networking-scripts/* IP configuration issues I had all the 8 Ethernet interfaces to work as expected
# systemctl status network
2. Adding a new IP alias to eth0 interface
Further on I had to add an IP Alias on the CenOS via its networking configuration, this is done by editing /etc/sysconfig/network-scripts/ifcfg* files.
To create an IP alias for first lan interface eth0, I've had to created a new file named ifcfg-eth0:0
linux:~# cd /etc/sysconfig/network-scripts/
linux:~# vim ifcfg-eth0:0
with below content
NAME="eth0:0"
ONBOOT="yes"
BOOTPROTO="none"
IPADDR="10.50.10.5"
NETMASK="255.255.255.0"
Adding this IP address network alias works across all RPM based distributions and should work also on Fedora and Open SuSE as well as Suse Enterprise Linux.
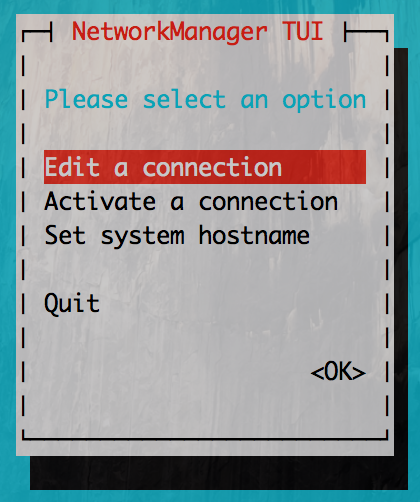
If you however prefer to use a text GUI and do it the CentOS server administration way you can use nmtui (Text User Interface for controlling NetworkManager). tool.
linux:~# nmtui
Tags: code, command, configured, control, down, How to, interface, IPADDR, linux?, loopback, lsb, MAC, network, network interfaces, ONBOOT, RTNETLINK, state, status, sysconfig
Posted in Everyday Life, Linux, Networking, System Administration | 2 Comments »
Monday, February 22nd, 2016 
I'm forced to use Windows on my workbook and I found it really irritating, that I can't easily share files in a DropBox, Google Drive, MS OneDrive, Amazon Storage or other cloud-storage free remote service. etc.
I don't want to use DropBox like non self-hosted Data storage because I want to keep my data private and therefore the only and best option for me was to make possible share my Linux harddisk storage
dir remotely to the Windows notebook.
I didn't wanted to setup some complex environment such as Samba Share Server (which used to be often a common option to share file from Linux server to Windows), neither wanted to bother with installing FTP service and bother with FTP clients, or configuring some other complex stuff such as WebDav – which BTW is an accepted and heavily used solution across corporate clients to access read / write files on a remote Linux servers.
Hence, I made a quick research what else besides could be used to easily share files and data from Windows PC / notebook to a home brew or professional hosting Linux server.
It turned out, there are few of softwares that gives a similar possibility for a home lan small network Linux / Windows hybrid network users such, here is few of the many:
- SyncThing – Syncthing is an open-source file synchronization client/server application, written in Go, implementing its own, equally free Block Exchange Protocol. The source code's content-management repository is hosted on GitHub

- OwnCloud – ownCloud provides universal access to your files via the web, your computer or your mobile devices

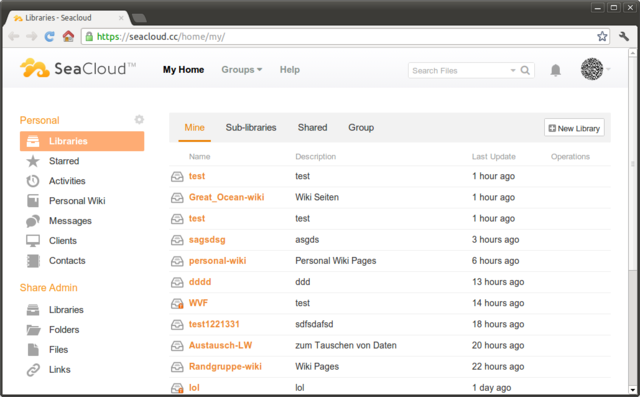
- Seafile – Seafile is a file hosting software system. Files are stored on a central server and can be synchronized with personal computers and mobile devices via the Seafile client. Files can also be accessed via the server's web interface
I've checked all of them and give a quick try of Syncthing which is really easy to start, just download the binary launch it and configure it under https://Localhost:8385 URL from a browser on the Linux server.
Syncthing seemed to be nice and easy to configure solution to be able to Sync files between Server A (Windows) and Server B(Linux) and guess many would enjoy it, if you want to give it a try you can follow this short install syncthing article.
However what I didsliked in both SyncThing and OwnCloud and Seafile and all of the other Sync file solutions was, they only supported synchronization via web and didn't seemed to have a Windows Explorer integration and did required
the server to run more services, posing another security hole in the system as such third party softwares are not easily to update and maintain.
Because of that finally after rethinking about some other ways to copy files to a locally mounted Sync directory from the Linux server, I've decided to give SSHFS a try. Mounting SSHFS between two Linux / UNIX hosts is
quite easy task with SSHFS tool
In Windows however the only way I know to transfer files to Linux via SSHFS was with WinSCP client and other SCP clients as well as the experimental:
As well as few others such as ExpandDrive, Netdrive, Dokan SSHFS (mirrored for download here)
I should say that I first decided to try copying few dozen of Gigabyte movies, text, books etc. using WinSCP direct connection, but after getting a couple of timeouts I was tired of WinSCP and decided to look for better way to copy to remote Linux SSHFS.
However the best solution I found after a bit of extensive turned to be:
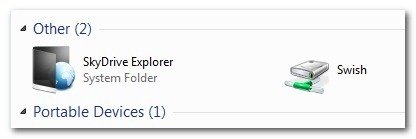
SWISH – Easy SFTP for Windows
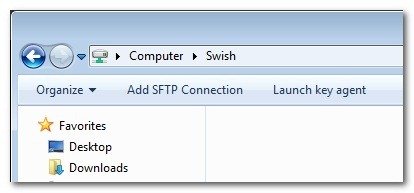
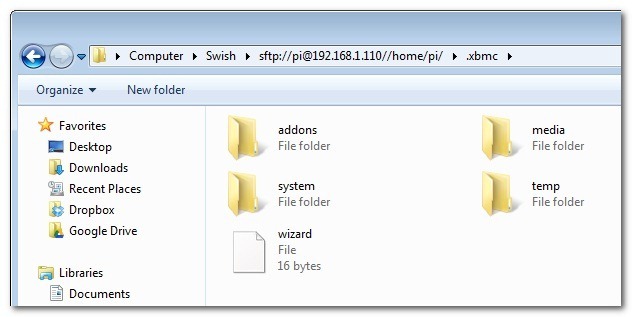
Swish is very straight forward to configure compared to all of them you download the .exe which as of time of writting is at version 0.8.0 install on the PC and right in My Computer you will get a New Device called Swish next to your local and remote drives C:/ D:/ , USBs etc.
As you see in below screenshot two new non-standard buttons will Appear in Windows Explorer that lets you configure SWISH
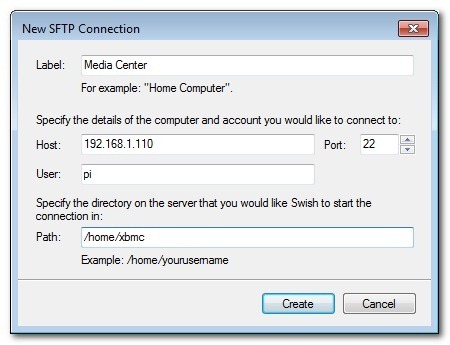
Next and final step before you have the SSHFS remote Linux filesystem visible on Windows Xp / 7 / 8 / 10 is to fill in remote Linux hostname address (or even better fill in IP to get rid of possible DNS issues), UserName (UserID) and Direcory to mount.
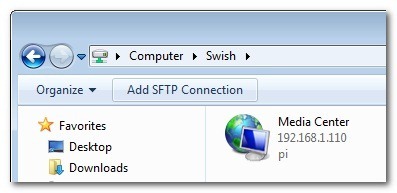
Then you will see the SSHFS moutned:
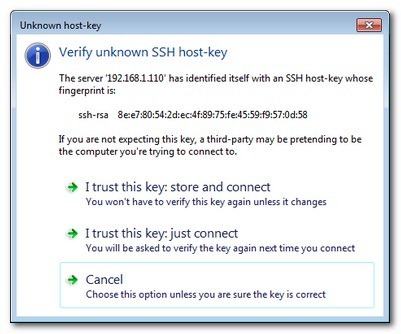
You will be asked to accept the SSH host-key as it used to be unknown so far
That's it now you will see straight into Windows Explorer the remote Linux SSHFS mounted:
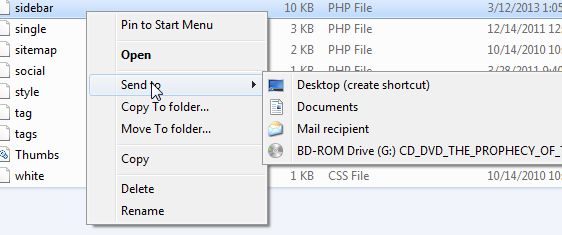
Once setupped a Swish connection to copy files directly to it you can use the Send to Embedded Windows dialog, as in below screenshot
The only 3 problem with SWISH are:
1. It doesn't support Save password, so on every Windows PC reboot when you want to connect to remote Linux SSHFS, you will have to retype remote login user pass.
Fron security stand point this is not such a bad thing, but it is a bit irritating to everytime type the password without an option to save permanently.
The good thing here is you can use Launch Key Agent as visible in above screenshot and set in Putty Key Agent your remote host SSH key so the passwordless login will work without any authentication at
all however, this might open a security hole if your Win PC gets infected by virus, which might delete something on remote mounted SSHFS filesystem so I personally prefer to retype password on every boot.
2. it is a bit slow so if you're planning to Transfer large amounts of Data as hundreds of megabytes, expect a very slow transfer rate, even in a Local 10Mbit Network to transfer 20 – 30 GB of data, it took me about 2-3 hours or so.
SWISH is not actively supported and it doesn't have new release since 20th of June 2013, but for the general work I need it is just perfect, as I don't tent to be Synchronizing Dozens of Gigabytes all the time between my notebook PC and the Linux server.
3. If you don't use the established mounted connection for a while or your computer goes to sleep mode after recovering your connection to remote Linux HDD if opened in Windows File Explorer will probably be dead and you will have to re-enable it.
For Mac OS X users who want to mount / attach remote directory from a Linux partitions should look in fugu – A Mac OS X SFTP, SCP and SSH Frontend
I'll be glad to hear from people on other good ways to achieve same results as with SWISH but have a better copy speed while using SSHFS.
Tags: bit, com, configure, connection, data, download, interface, Linux, linux windows, Samba Share Server, something, SSHFS, SWISH, transfer, web, web interface, Windows, windows explorer, www
Posted in Linux and FreeBSD Desktop, Networking, Remote System Administration, System Administration, Various, Windows | No Comments »
Wednesday, February 17th, 2016 
If you are working in a large corporation such as (HP or HPE – Hewlett Packard Enterprise (HPE is the new splitted company brand name for the Software and Servers division of ex-HP) / IBM / Dell or any other company with the size of top fortune companies and you Computer Domain admistrator has forced your work PC to already use Skype for Business instead of the good tested Lync Client along with the goodies and PROS of having the newer Skype for Business (S4B) as usual for old fashened users like me and the avarage employee the New S4B interface will turn into nightmare with all this circled names and more buttons and the annoying Skype Blue Theme.
For anyone who has even basic idea of design and aesthetics, I believe the default Theme of Skype For Business will be evaluated as a serious "interface downgrade" compared to the simple looking Interface and White Skin of Lync Client.
With this said it will be logical for the end user like me to desire to customize a bit default S4B Skin to make it more elegant looking like Lync 2013 client but guess what there is a Surprise if you google around, Skype For Business just like the regular Skype client doesn't have integrated support for Skins / Themes.
To make the horror complete, many big corporations are choosing to migrate their Email infrastructure from the classical and well tested Windows Domain with Exchange Server to Microsoft Office 365 (Cloud services),
which makes the dependency on M$ products even bigger and in the long run control and spying on people's email and information (people's data security even worsers) as you know how hackable Windows prooved to be over the years.
Well for those who remember the good old times of IRC (Internet Relay Chat) and ICQ (I seek you) 🙂 and even Jabber when chatting emerged and boomed into popularity all the chat clients nomatter whether it was a free software under GPL / BSD license or it was a Proprietary licensed software, there was always alternative on the Interface Outlook of the Chat clients and on practically all popular Chat / Audio / Video communication Standards / Protocols, there used to be some option for the users to use either a different client or to customize the outook of the program.
Well now the big surprise with Skype Protocol which was purchased by Microsoft some years ago back is this terrible already M$ program doesn't have any option for changing the Theme and even basic customization besides the ones provided by default by Microsoft. For my surprise such a trivial and everybody used program like Skype with perhaps already 1.5 or 2 Billion or even more users doesn't have even basic support for customization !!!
To make the Skype program use horror story even worser Microsoft does upgrade the Skype client agressively and for the last 3 or 4 years Skype is owned by Microsoft the interface gets changing slightly or even completely with every next release.
Now with latest Skype versions since a 1.5 year or so the agressiveness of the program even increased further as it wants you to automatically upgrade, every time you run Skype.
With this in mind and the fact, I have to spend about 8 to 10 years on the PC with Skype for Business switched on on my notebook with no option to use Lync for communication because of the Domain Exchange forcing the changes to all of the users within our EMEA.
So after some serious digging on the Internet, the only work around to change the Skype For Business Theme available by a couple of sources is to Revert Back the Skype User Interface to Lync 2013 Client by changing a value to the Windows registry and get back the good old elegant Lync interface instead of S4B.
The Windows registry value that needs to be changed is:
[HKEY_CURRENT_USER\Software\Microsoft\Office\Lync]
The default value there is:
Windows Registry Editor Version 5.00
[HKEY_CURRENT_USER\Software\Microsoft\Office\Lync]
"CanSharePptInCollab"=dword:00000001
"CanAppShareInCollab"=dword:00000001
"CanShareOneNoteInCollab"=dword:00000001
"EnableSkypeUI"=hex:01,00,00,00
The value has to be changed to:
Windows Registry Editor Version 5.00
[HKEY_CURRENT_USER\Software\Microsoft\Office\Lync]
"CanSharePptInCollab"=dword:00000001
"CanAppShareInCollab"=dword:00000001
"CanShareOneNoteInCollab"=dword:00000001
"EnableSkypeUI"=hex:00,00,00,00
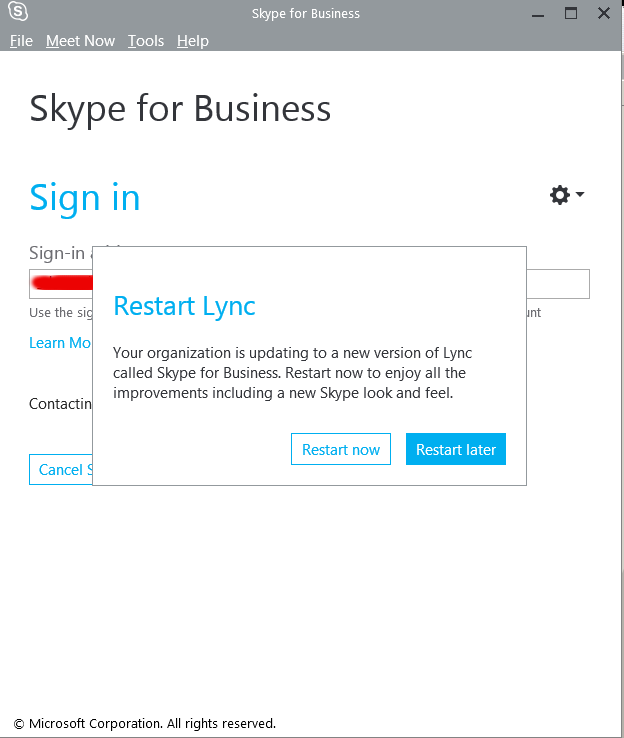
The value "EnableSkypeUI"=hex:01,00,00,00 – instructs so Skype for Business UI is used:
"EnableSkypeUI"=hex:00,00,00,00 – instructs S4B to revert back to Old Lync interface
For a little bit more on the value check out also articles – Alternate Between The Microsoft Lync and Skype for Business
and Managing the Skype Client UI in Skype for Business.
To modify about registry setting you will either have to manually run regedit from Start -> Run -> cmd.exe or use Windows button + R and type inside run box:
regedit
Or even better just use and Run (Click over twice) on this skype.reg (download) sciprt which will modify registry
Because the Domain administrator has forced a policy to automatically offer Change of Lync Interface to Skype for Business on every notebook boot to disable EnableSkypeUI registry value and make Skype appear in the good old Lync UI, I've created also a tiny Batch script lync_ui.bat with following content:
cd \
cd \Users\georgi\scripts
regedit /s skype.reg
exit
You can download lync_ui.bat from here
Note that both skype.reg and lync_ui.bat should be existing in my case in C:\Users\georgi\scipts , change this path to whatever your username is and create scripts folder in your User Home dir.
If unsure about the home directory name you can check it from command prompt with:
C:\Users\georgi> echo %HOMEPATH%
\Users\georgi
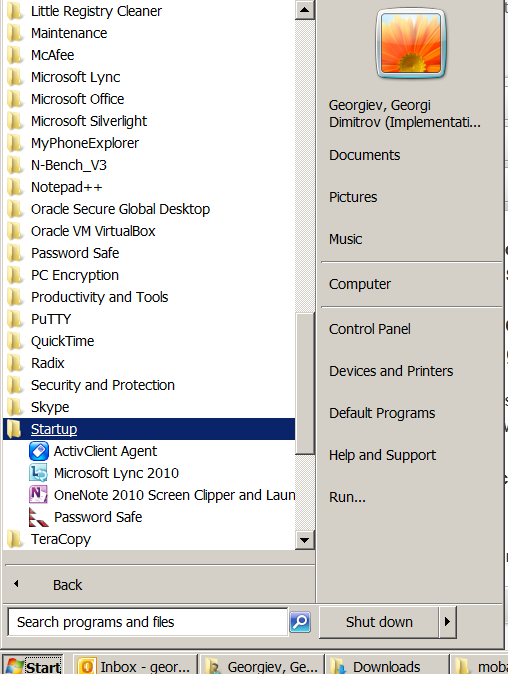
To make the lync_ui.bat (script invoking skype.reg) be executed on every PC boot, you need to add it to:
Start -> All Programs -> StartUp
Well this is it now you will have back the Lync UI, Enjoy! 🙂
Tags: basic, Business, com, interface, make, Microsoft, option, Pc, Run Click, Skype, UI, username, value
Posted in Everyday Life, Outlook, System Administration, Various, Windows | 2 Comments »
Thursday, April 12th, 2012 
One of our company SSL (https) Certificates recently expired so I needed to renew the SSL certificate.
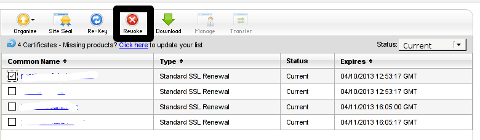
I was in a hurry doing plenty of other stuffs so it seemed logical for me to Revoke the Certificate. I thought revoking the certificate will simply cancel it and afterwards, in Godaddy's SSL (Manager Certificates) interface the Revoked – Cancelled certificate will re-appear in the menu, ready to be generated in the same way as earlier I initially generated the Godaddy's bought SSL certificate
Hence I proceeded and used Revoke button:
Well guess what my calculations, were wrong.
Revoking, just cancel it. The revoked domain SSL certificate did not show up again in Godaddy's Cert Manager and I have no way from their interface to revert the changes.
To deal with the situation, I contacted Godaddy Support immediately with the following inquiry:
Other : Revoked SSL Certificate
Issue :
Hello we have revoked the SSL certificate for our domain our.domain-name.com.
Can we revert back the certificate as it was.
If not how to generate a new key for our domain https://our.domain-name.com
Thanks in Advance.
Kindest Regards
"My-Company-name" Tech Support
In 5 hours time I received the following tech support answer:
Dear Tech Support,
Thank you for contacting Online Support. It is not possible to reinstate a canceled certificate. You will need to purchase a new certificate. I have requested that a refund be applied to your account. Once the credit appears in your account, please allow 5-7 business days to see the funds applied to the associated payment method. Thank you for your patience and understanding in this matter.
Please let us know if we can help you in any other way.
Sincerely,
Christian P.
Online Support Team
Customer Inquiry
Name : Cadia Tech Support
Domain Name : our.domain-name.com
ShopperID : xxxxxxxxx
Phone : xxxxxxxx
Shopper Validated : Yes
Browser : Mozilla/5.0 (Windows; U; Windows NT 6.1; en-US; rv:1.9.2.3) Gecko/20100401 Firefox/3.6.3
Apparently Godaddy, can work out a bit on their tech support answering time 5 hours for a simple reply is quite long.
Now taking in consideration, above reply from Godady, my only options are to either wait for 5 to 7 (business days) or buy a new credit for SSL certificate.
Buying a new credit will probably not happen as our company is experiencing some financial troubles because of the crisis. So I guess we will have to wait for this 7 days at worst. So again if you wonder to REVOKE or not an SSL certificate. Think again …
Just a small note to make here, that Godaddy has a very straight forward way to just renew an expered certificate, which I succesfully later have done for 4 domains. Well, if only I knew earlier what REVOKE SSL cert really does I wouldn't have ended in this mess …
Tags: answer, Apparently Godaddy, business days, Button, Cancelled, cert, certificate, certificate issue, com, company, Company-name, Credit, customer inquiry, deal, Dear Tech Support, domain certificate, domain name, gecko, godaddy, https certificates, hurry, interface, issue, key, kindest regards, menu, Mozilla, nbsp, patience, quot, reply, revert, Revoking, rv, Shopper, SSL, ssl certificate, stuffs, support domain, team, tech support, thanks in advance, time, wait, xxxxxxxxx
Posted in Everyday Life, Various, Web and CMS | 6 Comments »
Monday, July 16th, 2012 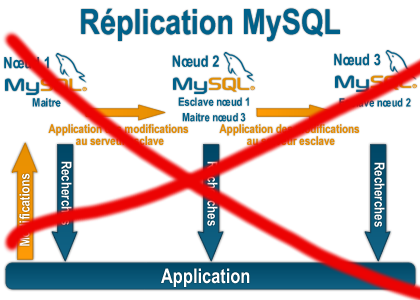
Some time ago on one of the Database MySQL servers, I've configured replication as it was required to test somethings. Eventually it turned out replication will be not used (for some reason) it was too slow and not fitting our company needs hence we needed to disable it.
It seemed logical to me that, simply removing any replication related directives from my.cnf and a restart of the SQL server will be enough to turn replication off on the Debian Linux host. Therefore I proceeded removed all replication configs from /etc/my/my.cnf and issued MySQL restart i. e.:
sql-server:~# /etc/init.d/mysql restart

....
This however didn't turned off replication,as I thought and in phpmyadminweb frontend interface, replication was still appearing to be active in the replication tab.
Something was still making the SQL server still act as an Replication Slave Host, so after a bit of pondering and trying to remember, the exact steps I took to make the replication work on the host I remembered that actually I issued:
mysql> START SLAVE;
Onwards I run:
mysql> SHOW SLAVE STATUS;

....
and found in the database the server was still running in Slave Replication mode
Hence to turn off the db host run as a Slave, I had to issue in mysql cli:
mysql> STOP SLAVE;

Query OK, 0 rows affected, 1 warning (0.01 sec)

mysql> RESET SLAVE;

Query OK, 0 rows affected, 1 warning (0.01 sec)
Then after a reload of SQL server in memory, the host finally stopped working as a Slave Replication host, e.g.
sql-server:~# /etc/init.d/mysql restart

....
After the restart, to re-assure myself the SQL server is no more set to run as MySQL replication Slave host:
mysql> SHOW SLAVE STATUS;

Empty set (0.00 sec)
Cheers 😉
Tags: Cheers, cli, cnf, Database, debian gnu, debian linux, exact steps, frontend, host, How to, init, interface, Linux, memory, Mysql, Onwards, phpmyadminweb, Query, reason, replication, reset, run, running, servers, Slave, Slave Replication, slave status, something, SQL, sql server, status, Stop, tab, time, turn, work, working
Posted in MySQL, System Administration | 1 Comment »
Saturday, August 21st, 2010 
In my previous post I've blogged how to install and configure Trac on Debian
The next logical question for me was how to use trac with multiple user accounts.
Thanksfully this happened to be very easy. All I had to do to setup different trac users was to add different Apache htaccess authentication accounts.
Consequently you will be logged in in Trac's interface after you login with your Apache htaccess user and password with the same user as provided in the Apache authentication dialog.
Of course to create the required Trac login accounts, you need to first have setup an Apache AuthType Basic declaration.
For example you will have to add something similar to:
<Location "/">

AuthType Basic

AuthName "Trac - projects"

AuthUserFile /etc/apache2/trac.passwd

Require valid-user

</Location>
your Apache virtualhost or domain configuration file.
In order to add the two users user1 and user2 then I simply had to add the users with the htpasswd Apache password tool.
debian:~# htpasswd -c /etc/apache2/trac.passwd user1

debian:~# htpasswd -c /etc/apache2/trac.passwd user2
Thanks God this was easy 🙂
Tags: apache, apache authentication, apache htaccess, apache password, apache virtualhost, apache2, authentication dialog, AuthType, AuthUserFile, configuration file, configure, course, dialog, domain, domain configuration, file, god, How to, How to add/create user accounts to be used with Trac (issue tracking system) on Linux, htaccess authentication, htpasswd, interface, issue, Linux, logical question, login, lt, order, passwd, password, password tool, question, quot, setup, something, system, Thanksfully, tool, trac, user accounts, Virtualhost
Posted in Linux, System Administration, Web and CMS | No Comments »
Friday, February 20th, 2015 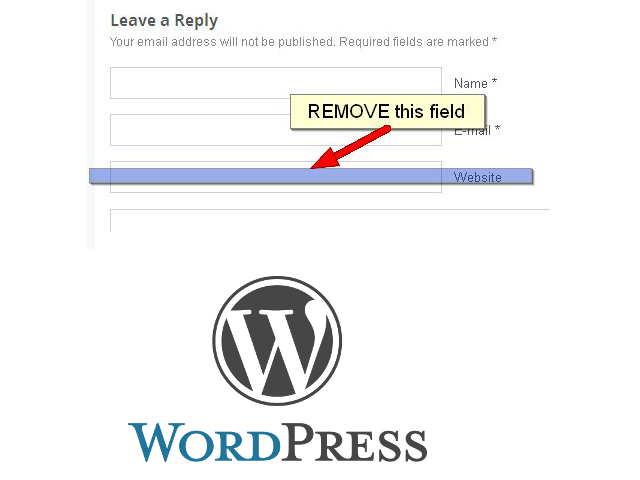
If you're running a WordPress blog or Website where you have enabled comments for a page and your article or page is well indexing in Google (receives a lot of visit / reads ) daily, your site posts (comments) section is surely to quickly fill in with a lot of "Thank you" and non-sense Spam comments containing an ugly link to an external SPAM or Phishing website.
Such URL links with non-sense message is a favourite way for SPAMmers to raise their website incoming (other website) "InLinks" and through that increase current Search Engine position.
We all know a lot of comments SPAM is generally handled well by Akismet but unfortunately still many of such spam comments fail to be identified as Spam because spam Bots (text-generator algorithms) becomes more and more sophisticated with time, also you can never stop paid a real-persons Marketers to spam you with a smart crafted messages to increase their site's SEO ).
In all those cases Akismet WP (Anti-Spam) plugin – which btw is among the first "must have" WP extensions to install on a new blog / website will be not enough ..
To fight with worsening SEO because of spam URLs and to keep your site's SEO better (having a lot of links pointing to reported spam sites will reduce your overall SEO Index Rate) many WordPress based bloggers, choose to not use default WordPress Comments capabilities – e.g. use exnternal commenting systems such as Disqus – (Web Community of Communities), IntenseDebate, LiveFyre, Vicomi …
However as Disqus and other 3rd party commenting systems are proprietary software (you don't have access to comments data as comments are kept on proprietary platform and shown from there), I don't personally recommend (or use) those ones, yes Disqus, Google+, Facebook and other comment external sources can have a positive impact on your SEO but that's temporary event and on the long run I think it is more advantageous to have comments with yourself.
A small note for people using Disqos and Facebook as comment platforms – (just imagine if Disqos or Facebook bankrupts in future, where your comments will be? 🙂 )
So assuming that you're a novice blogger and I succeeded convincing you to stick to standard (embedded) WordPress Comment System once your site becomes famous you will start getting severe amount of comment spam. There is plenty of articles already written on how to remove URL comment form spam in WordPress but many of the guides online are old or obsolete so in this article I will do a short evaluation on few things I tried to remove comment spam and how I finally managed to disable URL link spam to appear on site.
1. Hide Comment Author Link (Hide-wp-comment-author-link)
This plugin is the best one I found and I started using it since yesterday, I warmly recommend this plugin because its very easy, Download, Unzip, Activate and there you're anything typed in URL field will no longer appear in Posts (note that the URL field will stay so if you want to keep track on person's input URL you can get still see it in Wp-Admin). I'm using default WordPress WRC (Kubrick), but I guess in most newer wordpress plugins is supposed to work. If you test it on another theme please drop a comment to inform whether works for you. Hide Comment Author Link works on current latest Wordpress 4.1 websites.
A similar plugin to hide-wp-author-link that works and you can use is Hide-n-Disable-comment-url-field, I tested this one but for some reason I couldn't make it work.
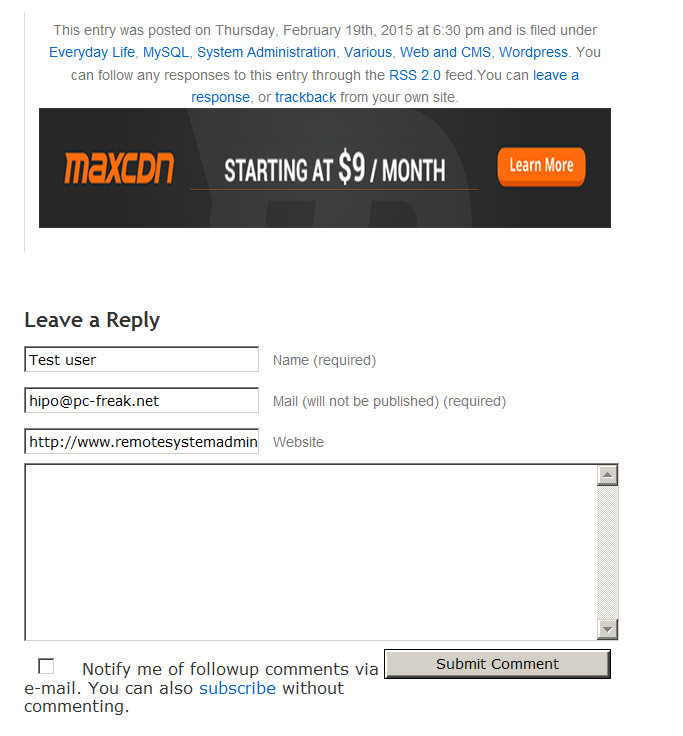
Whatever I type in Website field in above form, this is wiped out of comment once submitted 🙂
2. Disable hide Comment URL (disable-hide-comment-url)
I've seen reports disable-hide-comment-url works on WordPress 3.9.1, but it didn't worked for me, also the plugin is old and seems no longer maintaned (its last update was 3.5 years ago), if it works for you please please drop in comment your WP version, on WP 4.1 it is not working.

3. WordPress Anti-Spam plugin
WordPress Anti-Spam plugin is a very useful addition plugin to install next to Akismet. The plugin is great if you don't want to remove commenter URL to show in the post but want to cut a lot of the annoying Spam Robots crawling ur site.
Anti-spam plugin blocks spam in comments automatically, invisibly for users and for admins.
- no captcha, because spam is not users' problem
- no moderation queues, because spam is not administrators' problem
- no options, because it is great to forget about spam completely
Plugin is easy to use: just install it and it just works.
Anti bot works fine on WP 4.1
4. Stop Spam Comments
Stop Spam Comments is:
- Dead simple: no setup required, just activate it and enjoy your spam-free website.
- Lightweight: no additional database queries, it doesn't add script files or other assets in your theme. This means your website performance will not be affected and your server will thank you.
- Invisible by design: no captchas, no tricky questions or any other user interaction required at all.
Stop Spam Comments works fine on WP 4.1.
I've mentioned few of the plugins which can help you solve the problem, but as there are a lot of anti-spam URL plugins available for WP its up to you to test and see what fits you best. If you know or use some other method to protect yourself from Comment Url Spam to share it please.
Import thing to note is it usually a bad idea to mix up different anti-spam plugins so don't enable both Stop Spam Comments and WordPress Anti Spam plugin.
5. Comment Form Remove Url field Manually
This (Liberian) South) African blog describes a way how to remove URL field URL manually
In short to Remove Url Comment Field manually either edit function.php (if you have Shell SSH access) or if not do it via Wp-Admin web interface:
WordPress admin page –> Appearance –> Editor
Paste at the end of file following PHP code:
add_filter('comment_form_default_fields', 'remove_url');
function remove_url($fields)
{
if(isset($fields[‘url’]))
unset($fields[‘url’]);
return $fields;
}
Now to make changes effect, Restart Apache / Nginx Webserver and clean any cache if you're using a plugin like W3 Total Cache plugin etc.
Other good posts describing some manual and embedded WordPress ways to reduce / stop comment spam is here and here, however as it comes to my blog, none of the described manual (code hack) ways I found worked on WordPress v. 4.1.
Thus I personally stuck to using Hide and Disable Comment URL plugin to get rid of comment website URL.
Tags: article, bloggers, btw, data, interface, lot, page, php, platform, problem, running, Search Engine, SEO, spam, Spam Robots, Stop Spam Comments, theme, URLs, use, website, Wordpress Comments, wordpress plugins, wp
Posted in Curious Facts, Various, Web and CMS, Wordpress | 2 Comments »
Monday, November 24th, 2014 
If you're a web-hosting company or a web-development using WordPress to build multitudes of customer blogs or just an independent blogger or sys-admin with a task to optimize a server's MySQL allocated storage / performance on triads of WordPress-es a a good tip that would help is to removing wp_comments marked as spam.
Even though sites might be protected of thousands of spam message daily caught by WP anti-spam plugin Akismet, spam caught messages aer forwarder by Akismet to WP's Spam filter and kept wp_comments table with comments_approved column record 'spam'.
Therefore you will certainly gain of freeing disk space uselessly allocated by spam messages into current MySQL server storage dir (/var/lib/mysql /usr/local/mysql/data – the directory where my.cnf tells the server to keep its binary data .MYI, .MYD, .frm files) as well as save a lot of disk space by excluding the useless spam messages from SQL daily backup archives.
Here is how to remove manually spam comments from a WordPress blog under database (wp_blog1);
mysql> use wp_blog1;
mysql> describe wp_comments;
+———————-+———————+——+—–+———————+—————-+
| Field | Type | Null | Key | Default | Extra |
+———————-+———————+——+—–+———————+—————-+
| comment_ID | bigint(20) unsigned | NO | PRI | NULL | auto_increment |
| comment_post_ID | bigint(20) unsigned | NO | MUL | 0 | |
| comment_author | tinytext | NO | | NULL | |
| comment_author_email | varchar(100) | NO | | | |
| comment_author_url | varchar(200) | NO | | | |
| comment_author_IP | varchar(100) | NO | | | |
| comment_date | datetime | NO | | 0000-00-00 00:00:00 | |
| comment_date_gmt | datetime | NO | MUL | 0000-00-00 00:00:00 | |
| comment_content | text | NO | | NULL | |
| comment_karma | int(11) | NO | | 0 | |
| comment_approved | varchar(20) | NO | MUL | 1 | |
| comment_agent | varchar(255) | NO | | | |
| comment_type | varchar(20) | NO | | | |
| comment_parent | bigint(20) unsigned | NO | MUL | 0 | |
| user_id | bigint(20) unsigned | NO | | 0 | |
+———————-+———————+——+—–+———————+—————-+
The most common and quick way useful for scripting (whether you have to do it for multiple blogs with separate dbs) is to delete all comments being filled as 'Spam'.
To delete all messages which were filled by Akismet's spam filter with high probabily being a spam issue from mysql cli interface:
DELETE FROM wp_comments WHERE comment_approved = 'spam';
For Unread (Unapproved) messages the value of comment_approved field are 0 or 1, 0 if the comment is Red and Approved and 1 if still it is to be marked as read (and not spam).
If a wordpress gets heavily hammered with mainly spam and the probability that unapproved message is different from spam is low and you want to delete any message waiting for approvel as not being spam from wordpress use following SQL query:
DELETE FROM wp_comments WHERE comment_approved = 0;
Another not very common you might want to do is delete only all apprved comments:
DELETE FROM wp_comments WHERE comment_approved = 1;
For old installed long time unmaintained blogs (with garbish content), it is very likely that 99% of the messages might be spam and in case if there are already >= 100 000 spam messages and you don't have the time to inspect 100 000 spam comments to get only some 1000 legitimate and you want to delete completely all wordpress comments for a blog in one SQL query use:
TRUNCATE wp_comments;
Another scenario if you know a blog has been maintained until certain date and comments were inspected and then it was left unmaintained for few years without any spam detect and clear plugin like Akismet, its worthy to delete all comments starting from the date wordpress site stopped to be maintained:
DELETE FROM wp_comments WHERE comment_date > '2008-11-20 05:00:10' AND comment_date <= '2014-11-24 00:30:00'
Tags: binary data, blogs, command delete coments wordpress, common, disk space, interface, manually delete spam comments, multiple, server, spam messages, SQL, use, Wordpress, wordpress delete comments query, wp
Posted in MySQL, System Administration, Various, Web and CMS, Wordpress | No Comments »
Tuesday, April 5th, 2011 
Since I’m using wordpress as a blogging platform for about two years now and I’m constantly experimenting with valueable wordpress plugins.
I’ve decided to publish a compilation of wordpress plugins that empowers my blog
The plugins included in the compilation are quite various, some of the plugins aims at easy post sharing via the general social networks and main websites used by users today, others significantly helps in increasing the blog ranking in major search engines, there are some that adds like button to the blog.
These plugins also strenghthen the easy blog RSS file sharing, some post straight to twitter all your blog posts, generate tags automatically, puts a better features to the default wordpress commenting mechanism, prevent from spam comments, add features for easily adding Google adsense to the wordpress installation to help you advertise on your blog.
There are also plugins which delete duplicate posts (if you have such), puts better wordpress blog search bar, generates a sitemap to the blog, add an option to include php codes straight into your posts, adds wordpress an option to easily put mod rewrite rules straight from the wordpress interface, boost wordpress speed by adding static html generation cache, boost performance etc. etc.
Here is the complete list of wordpress plugins which I have currently installed on my wordpress blog:
ad-squares-widget

add-to-any-subscribe

advertising-manager

ajax-comments

akismet

all-in-one-adsense-and-ypn

all-in-one-seo-pack

askapache-google-404

auto-tag

bm-custom-login

commentluv

comments-statistics

cyr2lat-slugs

delete-duplicate-posts

easy-adsenser

extended-search-plugin

facebook-share-new

favourite-bible-verse

feedburner-plugin

feedburner-widget

feedburner_feedsmith_plugin_2.3

feedlist

force-publish-schedule

google-analytics-for-wordpress

google-sitemap-generator

headspace2

my-link-order

php-code-widget

platinum-seo-pack

post-plugin-library

post-to-twitter

profile-pic

profile-pics

redirection

rss-atom-avatar

seo-automatic-links

seo-slugs

share-on-facebook

share-this

similar-posts

simple-tags

subscribe-to-comments-reloaded

subscribe-to-comments

subscribe2

text-control

tidy-up

tinymce-advanced

what-would-seth-godin-do

wordbook

wordpress-23-related-posts-plugin

wordpress-mobile-edition

wordpress-thread-comment

wp-codebox

wp-keiths-easy-rss

wp-likes

wp-o-matic

wp-postviews

wp-super-cache

wp-syntax

yourls-wordpress-to-twitter
I do have enabled most of the plugins, though some are disabled but still might be helpful somewhere in the close-future thus I still keep them installed.
I would skip the time to describe one by one what each of the above list of plugins will do for your wordpress, since the list is quite long.
However I defnitely think this is a list of plugins you might want to have installed in a newly established wordpress blog for sure.
Note that the versions of the plugins which are included in this must have wordpress plugins collection might not be the latest as the included ones are the ones I do have installed at the time of writting of this article.
Also be aware that some of the plugins might create some issues with newer versions of wordpress (your blog might beak up!), however most of the plugins should work out of the box by just enabling each one of them from the wordpress interface via the menus:
Settings -> Plugins -> Inactive
To straight install my bundled package of plugins you have to issue the commands:
linux:~# cd /var/www/blog/wp-content/plugins

linux:/var/www/blog/wp-content/plugins# wget https://www.pc-freak.net/files/a_must_have_wordpress_plugins_collection.tar.gz

linux:/var/www/blog/wp-content/plugins# tar -zxvf a_must_have_wordpress_plugins_collection.tar.gz

...

linux:/var/www/blog/wp-content/plugins# unzip *.zip
Now as they should be installed under the plugins directory go and enable the plugins.
Further on many of the plugins will require configuration from the menus:
Settings
or in the menu
Tools
After being setup up your new wordpress installation will look significantly better, you will notice a tons of useful features which you might have previously missing and desperately needed 😉
Most of the bundled package of wordpress plugins works fine with wordpress version 3.1, if you’re trying to install enable and configure the plugins on some other versions of wordpress, there might be problems!
If you experience problems by trying out my bunch of wordpress plugins please drop me a comment.
I hope you enjoyed this improvised article, if these bunch of plugins are useful to you please give me a thanks 🙂
Thanks!
Tags: adsense, advertising manager, aims, ajax, analytics, auto tag, bible, bible verse, blog, boost, Button, collection, commentluv, compilation, complete list, configure, custom login, cyr, drop, extended search, generation, google, google sitemap generator, html generation, Inactive, installation, interface, major search engines, mechanism, mod, option, package, php, platform, plugin, post, Search, search bar, search plugin, SEO, Settingsor, Slugs, social networks, squares, time, twitter, wget, widget, wordbook, Wordpress, wordpress blog, wordpress plugins, ypn
Posted in SEO, Web and CMS, Wordpress | 8 Comments »
Tuesday, July 23rd, 2013 
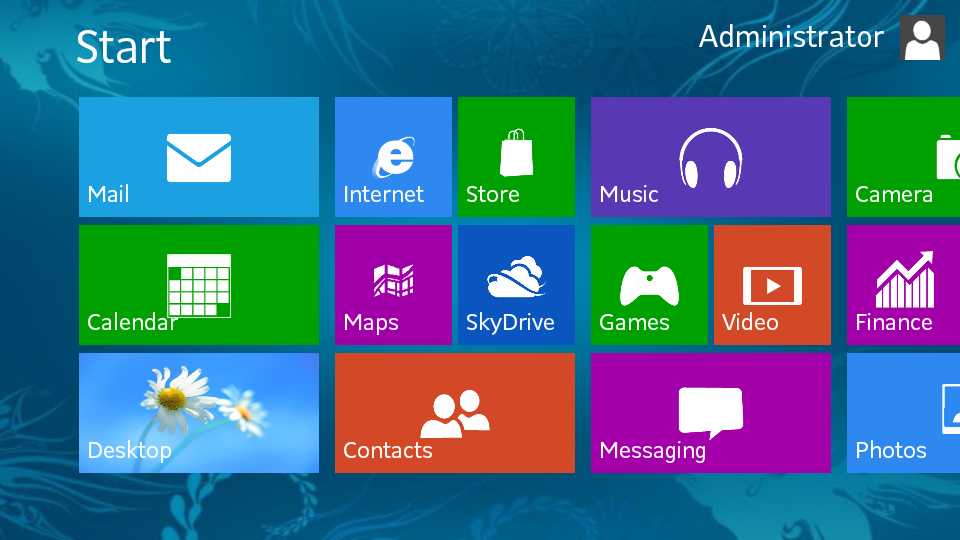
Whether you just installed to try Win 8 or received an office work notebook configured to work with Microsoft Windows 8, you certainly are already annoyed by changed Mobile phone like interface. First time I saw Windows 8 interface I was in shock what kind of mess this interface is. I understand Microsoft's desire to make Windows Mobile ready, but maybe it was wise idea to allow the user with option to revert back to old Windows XP / Vista /7 interface for the sake of some compitability and user friendliness. Even for young people who already worked with computers this "chopped" interface is surely horrible. I even can't imagine how hard it is for older people to get used to this weird interface.
Today in my work place, the husband of our Second Executive, brought to me a relatively new Sony VAIO notebook bought with pre-installed Win 8.
Just like any normal person, he was in shock with Windows 8 weird interface and he asked me to explain him the interface. Well I will immediately after someone explain me the interface 🙂
He so much didn't like Win 8 that he even asked to re-install computer with Windows 7. I'm a lazy person plus I like saving my time. So looked quickly online if it is possible to make Windows 8 interface with Start button similar to older Windows releases. Actually there are plenty of ways to do it via both, Free and paid Software.
I'm a Free Software supporter, so I didn't even considered checking non-free or freeware ones. And I sticked directly to Open Source – Classic Shell.
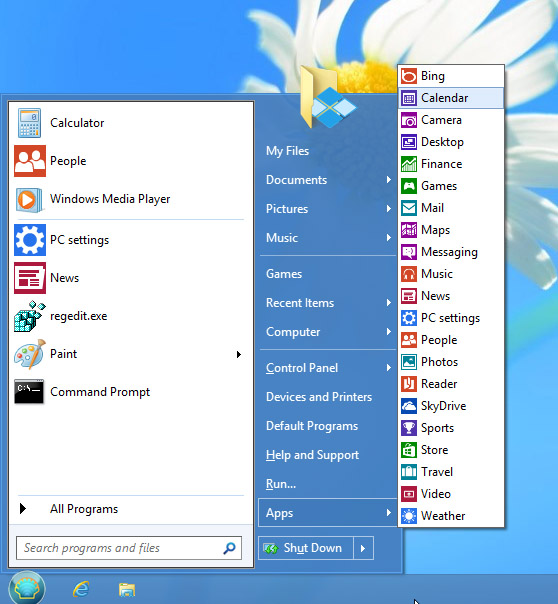
What Classic Shell does is it turns interface of Internet Explorer to look like IE 9, adds a Start Menu button With Programs etc. to left Win corner (of course it doesn't place Windows Start button as this one is patented and forbidden to use in Free Soft).
Unlike most Start menu replacements, Classic Shell has been around for 4 years already. Its first version came out in November 2009, long before Windows 8 was even close to public. At the time, it was meant to fix interface annoyances in Windows Vista. That was version 0.9 (the first publicly available version).
Here is main list of current Classic Shell features:
- Highly customizable start menu with multiple styles and skins
- Start button for Windows 7 and Windows 8
- Toolbar and status bar for Windows Explorer
- Caption and status bar for Internet Explorer
Program is in very active development (last beta released is from 2 days ago) meaning it is very popular among Windows users. As of time of writting its stable release is at ver. 3.6.8. It has even translations in in 18 languages including (my native Bulgarian)
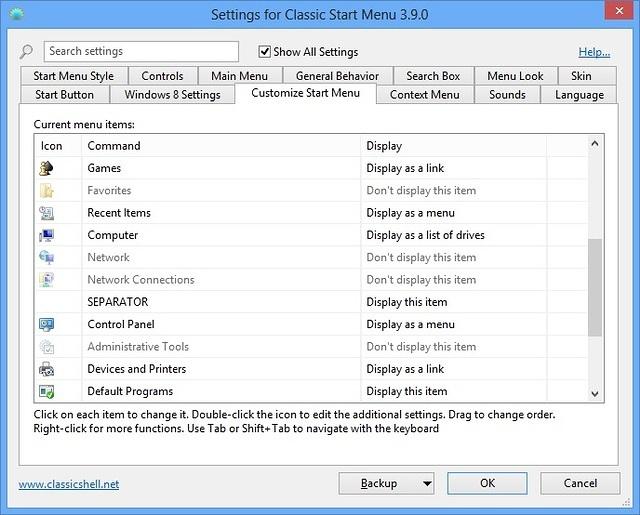
There are plenty of things to configure on how Classic Shell behaves;
I was a little bit scared it might break up Win 8 first time I installed it, but installation went quite smoothly and even there was no need for restart for new Win start menu to appear.
Classic Shell, Search option works fine too and is quite fast (dunno if it is due to Windows indexing) or it use some custom acceleration. It has also a number of Skins to choose from to change appearance of Start Menu button.
To sum it up Classic Shell does well what it is meant for, I guess in any future Windows install it will be the first program to install and save myself those terrible Windows 8 UI!
Tags: change windows, interface, Microsoft, microsoft windows, mobile phone, place windows, shock, sony vaio notebook, start button, start menu, user friendliness, win 8, wise idea, work notebook
Posted in Everyday Life, Various, Windows | No Comments »


Remove URL from comments in WordPress Blogs and Websites to mitigate comment spam URLs in pages
Friday, February 20th, 2015If you're running a WordPress blog or Website where you have enabled comments for a page and your article or page is well indexing in Google (receives a lot of visit / reads ) daily, your site posts (comments) section is surely to quickly fill in with a lot of "Thank you" and non-sense Spam comments containing an ugly link to an external SPAM or Phishing website.
Such URL links with non-sense message is a favourite way for SPAMmers to raise their website incoming (other website) "InLinks" and through that increase current Search Engine position.
We all know a lot of comments SPAM is generally handled well by Akismet but unfortunately still many of such spam comments fail to be identified as Spam because spam Bots (text-generator algorithms) becomes more and more sophisticated with time, also you can never stop paid a real-persons Marketers to spam you with a smart crafted messages to increase their site's SEO ).
In all those cases Akismet WP (Anti-Spam) plugin – which btw is among the first "must have" WP extensions to install on a new blog / website will be not enough ..
To fight with worsening SEO because of spam URLs and to keep your site's SEO better (having a lot of links pointing to reported spam sites will reduce your overall SEO Index Rate) many WordPress based bloggers, choose to not use default WordPress Comments capabilities – e.g. use exnternal commenting systems such as Disqus – (Web Community of Communities), IntenseDebate, LiveFyre, Vicomi …
However as Disqus and other 3rd party commenting systems are proprietary software (you don't have access to comments data as comments are kept on proprietary platform and shown from there), I don't personally recommend (or use) those ones, yes Disqus, Google+, Facebook and other comment external sources can have a positive impact on your SEO but that's temporary event and on the long run I think it is more advantageous to have comments with yourself.
A small note for people using Disqos and Facebook as comment platforms – (just imagine if Disqos or Facebook bankrupts in future, where your comments will be? 🙂 )
So assuming that you're a novice blogger and I succeeded convincing you to stick to standard (embedded) WordPress Comment System once your site becomes famous you will start getting severe amount of comment spam. There is plenty of articles already written on how to remove URL comment form spam in WordPress but many of the guides online are old or obsolete so in this article I will do a short evaluation on few things I tried to remove comment spam and how I finally managed to disable URL link spam to appear on site.
1. Hide Comment Author Link (Hide-wp-comment-author-link)
This plugin is the best one I found and I started using it since yesterday, I warmly recommend this plugin because its very easy, Download, Unzip, Activate and there you're anything typed in URL field will no longer appear in Posts (note that the URL field will stay so if you want to keep track on person's input URL you can get still see it in Wp-Admin). I'm using default WordPress WRC (Kubrick), but I guess in most newer wordpress plugins is supposed to work. If you test it on another theme please drop a comment to inform whether works for you. Hide Comment Author Link works on current latest Wordpress 4.1 websites.
A similar plugin to hide-wp-author-link that works and you can use is Hide-n-Disable-comment-url-field, I tested this one but for some reason I couldn't make it work.
Whatever I type in Website field in above form, this is wiped out of comment once submitted 🙂
2. Disable hide Comment URL (disable-hide-comment-url)
I've seen reports disable-hide-comment-url works on WordPress 3.9.1, but it didn't worked for me, also the plugin is old and seems no longer maintaned (its last update was 3.5 years ago), if it works for you please please drop in comment your WP version, on WP 4.1 it is not working.
3. WordPress Anti-Spam plugin
WordPress Anti-Spam plugin is a very useful addition plugin to install next to Akismet. The plugin is great if you don't want to remove commenter URL to show in the post but want to cut a lot of the annoying Spam Robots crawling ur site.
Anti-spam plugin blocks spam in comments automatically, invisibly for users and for admins.
Plugin is easy to use: just install it and it just works.
Anti bot works fine on WP 4.1
4. Stop Spam Comments
Stop Spam Comments is:
Stop Spam Comments works fine on WP 4.1.
I've mentioned few of the plugins which can help you solve the problem, but as there are a lot of anti-spam URL plugins available for WP its up to you to test and see what fits you best. If you know or use some other method to protect yourself from Comment Url Spam to share it please.
Import thing to note is it usually a bad idea to mix up different anti-spam plugins so don't enable both Stop Spam Comments and WordPress Anti Spam plugin.
5. Comment Form Remove Url field Manually
This (Liberian) South) African blog describes a way how to remove URL field URL manually
In short to Remove Url Comment Field manually either edit function.php (if you have Shell SSH access) or if not do it via Wp-Admin web interface:
Paste at the end of file following PHP code:
Now to make changes effect, Restart Apache / Nginx Webserver and clean any cache if you're using a plugin like W3 Total Cache plugin etc.
Other good posts describing some manual and embedded WordPress ways to reduce / stop comment spam is here and here, however as it comes to my blog, none of the described manual (code hack) ways I found worked on WordPress v. 4.1.
Thus I personally stuck to using Hide and Disable Comment URL plugin to get rid of comment website URL.
Tags: article, bloggers, btw, data, interface, lot, page, php, platform, problem, running, Search Engine, SEO, spam, Spam Robots, Stop Spam Comments, theme, URLs, use, website, Wordpress Comments, wordpress plugins, wp
Posted in Curious Facts, Various, Web and CMS, Wordpress | 2 Comments »