Posts Tagged ‘eth’

Text Monitoring of connection server (traffic RX / TX) business in ASCII graphs with speedometer / Easy Monitor network traffic performance

Friday, May 4th, 2012

While reading some posts online related to MS-Windows TcpViewnetwork traffic analyzing tool. I've came across very nice tool for tracking connection speed for Linux (Speedometer). If I have to compare it, speedometer is somehow similar to nethogs and iftop bandwidth network measuring utilities .

What differentiates speedometer from iftop / nethogs / iptraf is it is more suitable for visualizing a network file or data transfers.
The graphs speedometer draws are way easier to understand, than iftop graphs.

Even complete newbies can understand it with no need for extraordinary knowledge in networking. This makes Speedometer, a top tool to visually see the amount of traffic flowing through server network interface (eth0) … (eth1) etc.

What speedometer shows is similar to the Midnight Commander's (mc) file transfer status bar, except the statistics are not only for a certain file transfer but can show overall statistics over server passing network traffic amount (though according to its manual it can be used to also track individual file transfers).

The simplicity for basic use makes speedometer nice tool to track for network congestion issues on Linux. Therefore it is a  must have outfit for every server admin. Below you see a screenshot of my terminal running speedometer on a remote server.
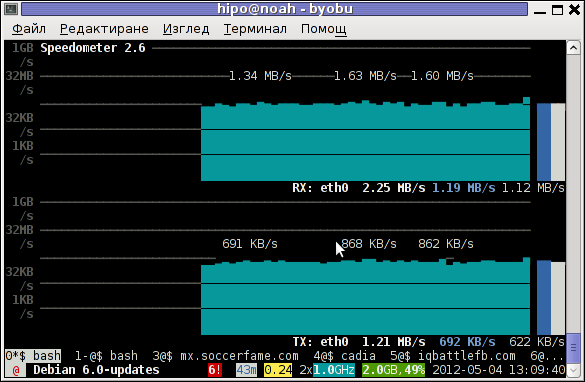
Speedometer ascii traffic track server network business screenshot in byobu screen like virtual terminal emulator

1. Installing speedometer on Debian / Ubuntu and Debian derivatives

For Debian and Ubuntu server administrators speedometer is already packaged as a deb so its installation is as simple as:

debian:~# apt-get --yes install speedometer
....

2. Installing speedometer from source for other Linux distributions CentOS, Fedora, SuSE etc.

Speedometer is written in python programming language, so in order to install and use on other OS Linux platforms, it is necessery to have installed (preferably) an up2date python programming language interpreter (python ver. 2.6 or higher)..
Besides that it is necessary to have installed the urwid -( console user interface library for Python) available for download via excess.org/urwid/


Hence to install speedometer on RedHat based Linux distributions one has to follow these steps:

a) Download & Install python urwid library

[root@centos ~]# cd /usr/local/src
[root@centos src]# wget -q http://excess.org/urwid/urwid-1.0.1.tar.gz
[root@centos src]# tar -zxvvf urwid-1.0.1.tar.gz
....
[root@centos src]# cd urwid-1.0.1
[root@centos urwid-1.0.1]# python setup.py install
running install
running build
running build_py
creating build
creating build/lib.linux-i686-2.4
creating build/lib.linux-i686-2.4/urwid
copying urwid/tests.py -> build/lib.linux-i686-2.4/urwid
copying urwid/command_map.py -> build/lib.linux-i686-2.4/urwid
copying urwid/graphics.py -> build/lib.linux-i686-2.4/urwid
copying urwid/vterm_test.py -> build/lib.linux-i686-2.4/urwid
copying urwid/curses_display.py -> build/lib.linux-i686-2.4/urwid
copying urwid/display_common.py -> build/lib.linux-i686-2.4/urwid
....

b) Download and install python-setuptools

python-setuptools is one other requirement of speedometer, happily on CentOS and Fedora the rpm package is already there and installable with yum:

[root@centos ~]# yum -y install python-setuptools
....

c) Download and install Speedometer

[root@centos urwid-1.0.1]# cd /usr/local/src/
[root@centos src]# wget -q http://excess.org/speedometer/speedometer-2.8.tar.gz
[root@centos src]# tar -zxvvf speedometer-2.8.tar.gz
.....
[root@centos src]# cd speedometer-2.8
[root@centos speedometer-2.8]# python setup.py install
Traceback (most recent call last):
File "setup.py", line 26, in ?
import speedometer
File "/usr/local/src/speedometer-2.8/speedometer.py", line 112
n = n * granularity + (granularity if r else 0)
^

While running the CentOS 5.6 installation of speedometer-2.8, I hit the
"n = n * granularity + (granularity if r else 0)
error.

After consultation with some people in #python (irc.freenode.net), I've figured out this error is caused due the outdated version of python interpreter installed by default on CentOS Linux 5.6. On CentOS 5.6 the python version is:

[root@centos ~]# python -V
Python 2.4.3

As I priorly said speedometer 2.8's minimum requirement for a python to be at v. 2.6. Happily there is quick way to update python 2.4 to python 2.6 on CentOS 5.6, as there is an RPM repository maintained by Chris Lea which contains RPM binary of python 2.6.

To update python 2.4 to python 2.6:

[root@centos speedometer-2.8]# rpm -Uvh http://yum.chrislea.com/centos/5/i386/chl-release-5-3.noarch.rpm[root@centos speedometer-2.8]# rpm --import /etc/pki/rpm-gpg/RPM-GPG-KEY-CHL[root@centos speedometer-2.8]# yum install python26

Now the newly installed python 2.6 is executable under the binary name python26, hence to install speedometer:

[root@centos speedometer-2.8]# python26 setup.py install
[root@centos speedometer-2.8]# chown root:root /usr/local/bin/speedometer
[root@centos speedometer-2.8]# chmod +x /usr/local/bin/speedometer

[root@centos speedometer-2.8]# python26 speedometer -i 1 -tx eth0

The -i will instruct speedometer to refresh the screen graphs once a second.

3. Using speedometer to keep an eye on send / received traffic network congestion

To observe, the amount of only sent traffic via a network interface eth0 with speedometer use:

debian:~# speedometer -tx eth0

To only keep an eye on received traffic through eth0 use:

debian:~# speedometer -rx eth0

To watch over both TX and RX (Transmitted and Received) network traffic:

debian:~# speedometer -tx eth0 -rx eth0

If you want to watch in separate windows TX and RX traffic while  running speedometer you can run in separate xterm windows speedometer -tx eth0 and speedometer -rx eth0, like in below screenshot:
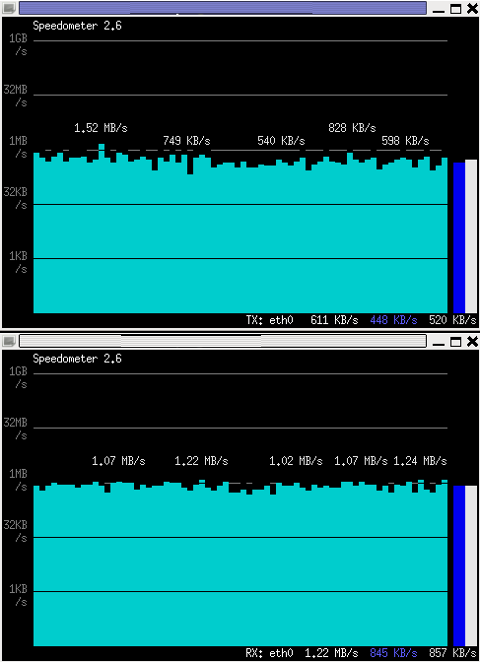
Monitor Received and Transmitted server Network traffic in two separate xterm windows with speedometer ascii graphs

4. Using speedometer to test network maximum possible transfer speed between server (host A) and server (host B)

The speedometer manual suggests few examples one of which is:

How fast is this LAN?

host-a$ cat /dev/zero | nc -l -p 12345
host-b$ nc host-a 12345 > /dev/null
host-b$ speedometer -rx eth0

When I red this example in speedometer's manual, it wasn't completely clear to me what the author really meant, but a bit after when I thought over the example I got his point.

The idea behind this example is that a constant stream of zeros taken from /dev/zero will be streamed over via a pipe (|) to nc which will bind a port number 12345, anyone connecting from another host machine, lets say a server with host host-b to port 12345 on machine host-a will start receiving the /dev/zero streamed content.

Then to finally measure the streamed traffic between host-a and host-b machines a speedometer is started to visualize the received traffic on network interface eth0, thus measuring the amount of traffic flowing from host-a to host-b

I give a try to the exmpls, using for 2 test nodes my home Desktop PC, Linux running  arcane version of Ubuntu and my Debian Linux notebook.

First on the Ubuntu PC I issued
 

hipo@hip0-desktop:~$ cat /dev/zero | nc -l -p 12345
 

Note that I have previously had installed the netcat, as nc is not installed by default on Ubuntu and Debian. If you, don't have nc installed yet, install it with:

apt-get –yes install netcat

"cat /dev/zero | nc -l -p 12345" will not produce any output, but will display just a blank line.

Then on my notebook I ran the second command example, given in the speedometer manual:
 

hipo@noah:~$ nc 192.168.0.2 12345 > /dev/null

Here the 192.168.0.2 is actually the local network IP address of my Desktop PC. My Desktop PC is connected via a normal 100Mbit switch to my routing machine and receives its internet via  NAT. The second test machine (my laptop), gets its internet through a WI-FI connection received by a Wireless Router connected via a UTP cable to the same switch to which my Desktop PC is connected.

Finally to test / get my network maximum thoroughput I had to use:

hipo@noah:~$ speedometer -rx wlan0

Here, I  monitor my wlan0 interface, as this is my (laptop) wireless card interface over which I have connectivity to my local network and via which through the the WI-FI router I get connected to the internet.

Below is a snapshot captured showing approximately what is the max network thoroughput from:

Desktop PC -> to my Thinkpad R61 laptop
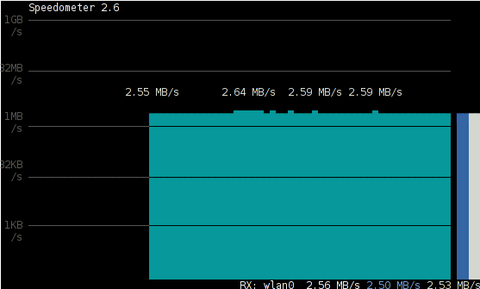
Using Speedometer to test network thorougput between two network server hosts screenshot Debian Squeeze Linux

As you can see in the shot approximately the maximum network thoroughput is in between:
2.55MB/s min and 2.59MB/S max, the speed is quite low for a 100 MBit local network, but this is normal as most laptop wireless adapters hardly transfer traffic in more than 10 to 20 MBits per sec.

If the same nework thoroughput test is conducted between two machines both connected to a same 100 M/bit switch, the traffic should be at least a 8 MB/sec.

There is something, else to take in consideration that probably makes the provided example network thoroughput measuring a bit inaccurate. The fact that the /dev/zero content is stremed over is slowing down the zeroes sent over network because of the  pipe ( | ) use slows down the stream.

5. Using speedometer to visualize maximum writting speed to a local hard drive on Linux

In the speedometer manual, I've noticed another interesting application of this nifty tool.

speedometer can be used to track and visualize the maximum writing speed a hard disk drive or hard drive partition can support on Linux OS:

A copy paster from the manual text is as follows:

How fast can I write data to my filesystem? (with at least 1GB free)
dd bs=1000000 count=1000 if=/dev/zero of=bigfile &
speedometer bigfile

However, when I tried copy/pasting the example in terminal, to test the maximum writing speed to an external USB hard drive, only dd command was started and speedometer failed to initialize and display graphs of the file creation speed.

I've found a little "hack" that makes the man example work by adding a 3 secs sleep like so:

debian:/media/Expansion Drive# dd bs=1000000 count=1000 if=/dev/zero of=bigfile & sleep 3; speedometer bigfile

Here is a screenshot of the bigfile created by dd and tracked "in real time" by speedometer:
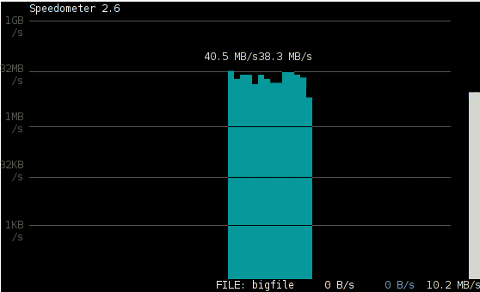
How fast is writting data to local USB expandable hard disk Debian Linux speedometer screenshot

Actually the returned results from this external USB drive are, quite high, the possible reason for that is it is connected to my laptop over an USB protocol verion 3.

6. Using Speedometer to keep an eye on file download in progress

This application of speedometer is mostly useless especially on Linux where it is used as a Desktop.

However in some occasions if files are transferred over ssh or in non interactive FTP / Samba file transfers between Linux servers it can come handy.

To visualize the download and writing speed of lets say FTP transferred .AVI movie (during the actual file transfer) on the download host issue:

# speedometer Download-Folder/What-goes-around-comes-around.avi

7. Estimating approximate time for file transfer

There is another section in the speedometer manual pointing of the program use to calculate the time remaining for a file transfer.

The (man speedometer) provided example text is:

How long it will take for my 38MB transfer to finish?
speedometer favorite_episode.rm $((38*1024*1024))

At first glimpse it hard to understand (like the other manual example). A bit of reasoning and I comprehend what the man author meant by the obscure calculation:

$((38*1024*1024))

This is a formula used in which 38 has to be substituted with the exact file size amount of the transferred file. The author manual used a 38MB file so this is why he put $((38* … in the formula.

I give it a try – (just for the sake to see how it works) with a file with a size of 2500MB, in below two screenshot pictures I show my preparation to copy the file and the actual copying / "real time" transfer tracking with speedometer's status percentage completion bar.
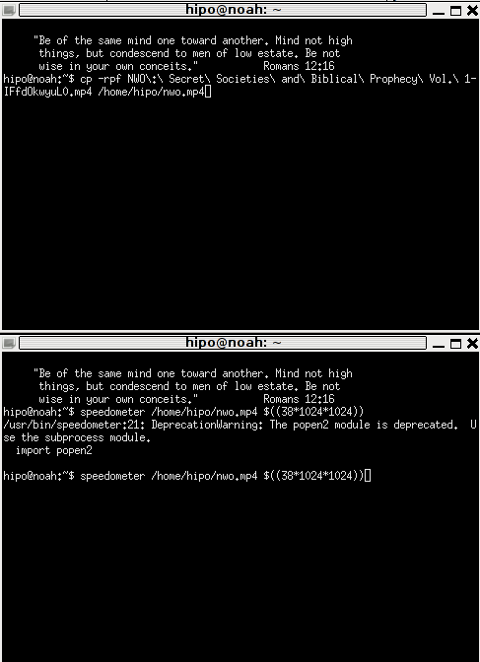
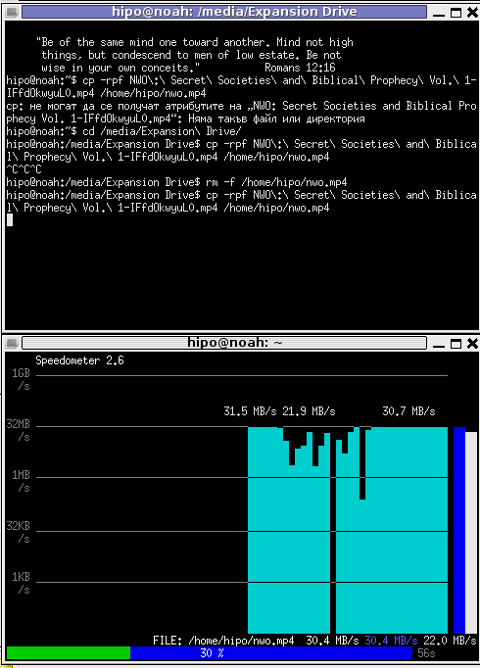
xterm terminal copy file and estimate file copying operation speed on linux with speedometer preparation

Two xterm terminals one is copying a file the other one uses speedometer to estimate the time remaining to complete the file transfer from expansion USB hard drive to my laptop harddrive


How to configure manually static IP address on Debian GNU/Linux / How to fix eth0 interface not brought up with error (networking restart is deprecated)

Friday, July 29th, 2011

I’ve recently had to manually assign a static IP address on one of the servers I manage, here is how I did it:             

debian:~# vim /etc/network/interfaces

Inside the file I placed:

# The primary network interface
allow-hotplug eth0
auto eth0
iface eth0 inet static address 192.168.0.2 netmask 255.255.255.0 broadcast 192.168.0.0 gateway 192.168.0.1 dns-nameservers 8.8.8.8 8.8.4.4 208.67.222.222 208.67.220.220

The broadcast and gateway configuration lines are not obligitory.
dns-nameservers would re-create /etc/resolv.conf file with the nameserver values specified which in these case are Google Public DNS servers and OpenDNS servers.

Very important variable is allow-hotplug eth0
If these variable with eth0 lan interface is omitted or missing (due to some some weird reason), the result would be the output you see from the command below:

debian:~# /etc/init.d/networking restart
Running /etc/init.d/networking restart is deprecated because it may not enable again some interfaces ... (warning).
Reconfiguring network interfaces...

Besides the /etc/init.d/networking restart is deprecated because it may not enable again some interfaces … (warning). , if the allow-hotplug eth0 variable is omitted the eth0 interface would not be brough up on next server boot or via the networking start/stop/restart init script.

My first reaction when I saw the message was that probably I’ll have to use invoke-rc.d, e.g.:
debian:~# invoke-rc.d networking restart
Running invoke-rc.d networking restart is deprecated because it may not enable again some interfaces ... (warning).

However as you see from above’s command output, running invoke-rc.d helped neither.

I was quite surprised with the inability to bring my network up for a while with the networking init script.
Interestingly using the command:

debian:~# ifup eth0

was able to succesfully bring up the network interface, whether still invoke-rc.d networking start failed.

After some wondering I finally figured out that the eth0 was not brought up by networking init script, because auto eth0 or allow-hotplug eth0 (which by the way are completely interchangable variables) were missing.

I added allow-hotplug eth0 and afterwards the networking script worked like a charm 😉

FreeBSD Jumbo Frames network configuration short how to

Wednesday, March 14th, 2012

FreeBSD Jumbo Frames Howto configure FreeBSD

Recently I wrote a post on how to enable Jumbo Frames on GNU / Linux , therefore I thought it will be useful to write how Jumbo Frames network boost can be achieved on FreeBSD too.

I will skip the details of what is Jumbo Frames, as in the previous article I have thoroughfully explained. Just in short to remind you what is Jumbo Frames and why you might need it? – it is a way to increase network MTU transfer frames from the MTU 1500 to MTU of 9000 bytes

It is interesting to mention that according to specifications, the maximum Jumbo Frames MTU possible for assignment are of MTU=16128
Just like on Linux to be able to take advantage of the bigger Jumbo Frames increase in network thoroughput, you need to have a gigabyt NIC card/s on the router / server.

1. Increasing MTU to 9000 to enable Jumbo Frames "manually"

Just like on Linux, the network tool to use is ifconfig. For those who don't know ifconfig on Linux is part of the net-tools package and rewritten from scratch especially for GNU / Linux OS, whether BSD's ifconfig is based on source code taken from 4.2BSD UNIX

As you know, network interface naming on FreeBSD is different, as there is no strict naming like on Linux (eth0, eth1, eth2), rather the interfaces are named after the name of the NIC card vendor for instance (Intel(R) PRO/1000 NIC is em0), RealTek is rl0 etc.

To set Jumbro Frames Maximum Transmission Units of 9000 on FreeBSD host with a Realtek and Intel gigabyt ethernet cards use: freebsd# /sbin/ifconfig em0 192.168.1.2 mtu 9000
freebsd# /sbin/ifconfig rl0 192.168.2.2 mtu 9000

!! Be very cautious here, as if you're connected to the system remotely over ssh you might loose connection to it because of broken routing.

To prevent routing loss problems, if you're executing the above two commands remotely, you better run them in GNU screen session:

freebsd# screen
freebsd# /sbin/ifconfig em0 192.168.1.2 mtu 9000; /sbin/ifconfig rl0 192.168.1.2 mtu 9000; \
/etc/rc.d/netif restart; /etc/rc.d/routed restart

2. Check MTU settings are set to 9000

If everything is fine the commands will return empty output, to check further the MTU is properly set to 9000 issue:

freebsd# /sbin/ifconfig -a|grep -i em0em0: flags=8843<UP,BROADCAST,RUNNING,SIMPLEX,MULTICAST> metric 0 mtu 9000freebsd# /sbin/ifconfig -a|grep -i rl0
rl0: flags=8843<UP,BROADCAST,RUNNING,SIMPLEX,MULTICAST> metric 0 mtu 9000

3. Reset routing for default gateway

If you have some kind of routing assigned for em0 and rl0, network interfaces they will be affected by the MTU change and the routing will be gone. To reset the routing to the previously properly assigned routing, you have to restart the BSD init script taking care for assigning routing on system boot time:

freebsd# /etc/rc.d/routing restart
default 192.168.1.1 done
add net default: gateway 192.168.1.1
Additional routing options: IP gateway=YES.

4. Change MTU settings for NIC card with route command

There is also a way to assign higher MTU without "breaking" the working routing, e.g. avoiding network downtime with bsd route command:

freebsd# grep -i defaultrouter /etc/rc.conf
defaultrouter="192.168.1.1"
freebsd# /sbin/route change 192.168.1.1 -mtu 9000
change host 192.168.1.1

5. Finding the new MTU NIC settings on the FreeBSD host

freebsd# /sbin/route -n get 192.168.1.1
route to: 192.168.1.1
destination: 192.168.1.1
interface: em0
flags: <UP,HOST,DONE,LLINFO,WASCLONED>
recvpipe sendpipe ssthresh rtt,msec rttvar hopcount mtu expire
0 0 0 0 0 0 9000 1009

6. Set Jumbo Frames to load automatically on system load

To make the increased MTU to 9000 for Jumbo Frames support permanent on a FreeBSD system the /etc/rc.conf file is used:

The variable for em0 and rl0 NICs are ifconfig_em0 and ifconfig_rl0.
The lines to place in /etc/rc.conf should be similar to:

ifconfig_em0="inet 192.168.1.1 netmask 255.255.255.0 media 1000baseTX mediaopt half-duplex mtu 9000"

Change in the above lines the gateway address 192.168.1.1 and the netmask 255.255.255.0 to yours corresponding gw and netmask.
Also in the above example you see the half-duplex ifconfig option is set insetad of full-duplex in order to prevent some duplex mismatches. A full-duplex could be used instead, if you're completely sure on the other side of the host is configured to support full-duplex connections. Otherwise if you try to set full-duplex with other side set to half-duplex or auto-duplex a duplex mismatch will occur. If this happens insetad of taking the advantage of the Increase Jumbo Frames MTU the network connection could become slower than originally with standard ethernet MTU of 1500. One other bad side if you end up with duplex-mismatch could be a high number of loss packets and degraded thoroughout …

7. Setting Jumbo Frames for interfaces assigning dynamic IP via DHCP

If you need to assign an MTU of 9000 for a gigabyt network interfaces, which are receiving its TCP/IP network configuration over DHCP server.
First, tell em0 and rl0 network interfaces to dynamically assign IP addresses via DHCP proto by adding in /etc/rc.conf:

ifconfig_em0="DHCP"
ifconfig_rl0="DHCP"

Secondly make two files /etc/start_if.em0 and /etc/start_if.rl0 and include in each file:

ifconfig em0 media 1000baseTX mediaopt full-duplex mtu 9000
ifconfig rl0 media 1000baseTX mediaopt full-duplex mtu 9000

Copy / paste in root console:

echo 'ifconfig em0 media 1000baseTX mediaopt full-duplex mtu 9000' >> /etc/start_if.em0
echo 'ifconfig rl0 media 1000baseTX mediaopt full-duplex mtu 9000' >> /etc/start_if.rl0

Finally, to load the new MTU for both interfaces, reload the IPs with the increased MTUs:

freebsd# /etc/rc.d/routing restart
default 192.168.1.1 done
add net default: gateway 192.168.1.1

8. Testing if Jumbo Frames is working correctly

To test if an MTU packs are transferred correctly through the network you can use ping or tcpdumpa.) Testing Jumbo Frames enabled packet transfers with tcpdump

freebsd# tcpdump -vvn | grep -i 'length 9000'

You should get output like:

16:40:07.432370 IP (tos 0x0, ttl 50, id 63903, offset 0, flags [DF], proto TCP (6), length 9000) 192.168.1.2.80 > 192.168.1.1.60213: . 85825:87285(1460) ack 668 win 14343
16:40:07.432588 IP (tos 0x0, ttl 50, id 63904, offset 0, flags [DF], proto TCP (6), length 9000) 192.168.1.2.80 > 192.168.1.1.60213: . 87285:88745(1460) ack 668 win 14343
16:40:07.433091 IP (tos 0x0, ttl 50, id 63905, offset 0, flags [DF], proto TCP (6), length 9000) 192.168.1.2.80 > 192.168.1.1.60213: . 23153:24613(1460) ack 668 win 14343
16:40:07.568388 IP (tos 0x0, ttl 50, id 63907, offset 0, flags [DF], proto TCP (6), length 9000) 192.168.1.2.80 > 192.168.1.1.60213: . 88745:90205(1460) ack 668 win 14343
16:40:07.568636 IP (tos 0x0, ttl 50, id 63908, offset 0, flags [DF], proto TCP (6), length 9000) 192.168.1.2.80 > 192.168.1.1.60213: . 90205:91665(1460) ack 668 win 14343
16:40:07.569012 IP (tos 0x0, ttl 50, id 63909, offset 0, flags [DF], proto TCP (6), length 9000) 192.168.1.2.80 > 192.168.1.1.60213: . 91665:93125(1460) ack 668 win 14343
16:40:07.569888 IP (tos 0x0, ttl 50, id 63910, offset 0, flags [DF], proto TCP (6), length 9000) 192.168.1.2.80 > 192.168.1.1.60213: . 93125:94585(1460) ack 668 win 14343

b.) Testing if Jumbo Frames are enabled with ping

Testing Jumbo Frames with ping command on Linux

linux:~# ping 192.168.1.1 -M do -s 8972
PING 192.168.1.1 (192.168.1.1) 8972(9000) bytes of data.
9000 bytes from 192.168.1.1: icmp_req=1 ttl=52 time=43.7 ms
9000 bytes from 192.168.1.1: icmp_req=2 ttl=52 time=43.3 ms
9000 bytes from 192.168.1.1: icmp_req=3 ttl=52 time=43.5 ms
9000 bytes from 192.168.1.1: icmp_req=4 ttl=52 time=44.6 ms
--- 192.168.0.1 ping statistics ---
4 packets transmitted, 4 received, 0% packet loss, time 3003ms
rtt min/avg/max/mdev = 2.397/2.841/4.066/0.708 ms

If you get insetad an an output like:

From 192.168.1.2 icmp_seq=1 Frag needed and DF set (mtu = 1500)

--- 192.168.1.1 ping statistics ---
0 packets transmitted, 0 received, +4 errors

This means a packets with maximum MTU of 1500 could be transmitted and hence something is not okay with the Jumbo Frames config.
Another helpful command in debugging MTU and showing which host in a hop queue support jumbo frames is Linux's traceroute

To debug a path between host and target, you can use:

linux:~# traceroute --mtu www.google.com
...

If you want to test the Jumbo Frames configuration from a Windows host use ms-windows ping command like so:

C:\>ping 192.168.1.2 -f -l 8972
Pinging 192.168.1.2 with 8972 bytes of data:
Reply from 192.168.1.2: bytes=8972 time=2ms TTL=255
Ping statistics for 192.168.1.2:
Packets: Sent = 4, Received = 4, Lost = 0 (0% loss),
Approximate round trip times in milli-seconds:
Minimum = 2ms, Maximum = 2ms, Average = 2ms

Here -l 8972 value is actually equal to 9000. 8972 = 9000 – 20 (20 byte IP header) – 8 (ICMP header)

Boost local network performance (Increase network thoroughput) by enabling Jumbo Frames on GNU / Linux

Saturday, March 10th, 2012

Jumbo Frames boost local network performance in GNU / Linux

So what is Jumbo Frames? and why, when and how it can increase the network thoroughput on Linux?

Jumbo Frames are Ethernet frames with more than 1500 bytes of payload. They can carry up to 9000 bytes of payload. Many Gigabit switches and network cards supports them.
Jumbo frames is a networking standard for many educational networks like AARNET. Unfortunately most commercial ISPs doesn't support them and therefore enabling Jumbo frames will rarely increase bandwidth thoroughput for information transfers over the internet.
Hopefully in the years to come with the constant increase of bandwidths and betterment of connectivity, jumbo frames package transfers will be supported by most ISPs as well.
Jumbo frames network support is just great for is small local – home networks and company / corporation office intranets.

Thus enabling Jumbo Frame is absolutely essential for "local" ethernet networks, where large file transfers occur frequently. Such networks are networks where, there is often a Video or Audio streaming with high quality like HD quality on servers running File Sharing services like Samba, local FTP sites,Webservers etc.

One other advantage of enabling jumbo frames is reduce of general server overhead and decrease in CPU load / (CPU usage), when transferring large or enormous sized files.Therefore having jumbo frames enabled on office network routers with GNU / Linux or any other *nix OS is vital.

Jumbo Frames traffic is supported in GNU / Linux kernel since version 2.6.17+ in earlier 2.4.x it was possible through external third party kernel patches.

1. Manually increase MTU to 9000 with ifconfig to enable Jumbo frames

debian:~# /sbin/ifconfig eth0 mtu 9000

The default MTU on most GNU / Linux (if not all) is 1500, to check the default set MTU with ifconfig:

linux:~# /sbin/ifconfig eth0|grep -i mtu
UP BROADCAST MULTICAST MTU:1500 Metric:1

To take advantage of Jumbo Frames, all that has to be done is increase the default Maximum Transmission Unit from 1500 to 9000

For those who don't know MTU is the largest physical packet size that can be transferred over the network. MTU is measured by default in bytes. If a information has to be transferred over the network which exceeds the lets say 1500 MTU (bytes), it will be chopped and transferred in few packs each of 1500 size.

MTUs differ on different netework topologies. Just for info here are the few main MTUs for main network types existing today:
 

  • 16 MBit/Sec Token Ring – default MTU (17914)
  • 4 Mbits/Sec Token Ring – default MTU (4464)
  • FDDI – default MTU (4352)
  • Ethernet – def MTU (1500)
  • IEEE 802.3/802.2 standard – def MTU (1492)
  • X.25 (dial up etc.) – def MTU (576)
  • Jumbo Frames – def max MTU (9000)

Setting the MTU packet frames to 9000 to enable Jumbo Frames is done with:

linux:~# /sbin/ifconfig eth0 mtu 9000

If the command returns nothing, this most likely means now the server can communicate on eth0 with MTUs of each 9000 and therefore the network thoroughput will be better. In other case, if the network card driver or card is not a gigabit one the cmd will return error:

SIOCSIFMTU: Invalid argument

2. Enabling Jumbo Frames on Debian / Ubuntu etc. "the Debian way"

a.) Jumbo Frames on ethernet interfaces with static IP address assigned Edit /etc/network/interfaces and you should have for each of the interfaces you would like to set the Jumbo Frames, records similar to:

Raising the MTU to 9000 if for one time can be done again manually with ifconfig

debian:~# /sbin/ifconfig eth0 mtu 9000

iface eth0 inet static
address 192.168.0.5
network 192.168.0.0
gateway 192.168.0.254
netmask 255.255.255.0
mtu 9000

For each of the interfaces (eth1, eth2 etc.), add a chunk similar to one above changing the changing the IPs, Gateway and Netmask.

If the server is with two gigabit cards (eth0, eth1) supporting Jumbo frames add to /etc/network/interfaces :

iface eth0 inet static
address 192.168.0.5
network 192.168.0.0
gateway 192.168.0.254
netmask 255.255.255.0
mtu 9000

iface eth1 inet static
address 192.168.0.6
network 192.168.0.0
gateway 192.168.0.254
netmask 255.255.255.0
mtu 9000

b.) Jumbo Frames on ethernet interfaces with dynamic IP obtained via DHCP

Again in /etc/network/interfaces put:

auto eth0
iface eth0 inet dhcp
post-up /sbin/ifconfig eth0 mtu 9000

3. Setting Jumbo Frames on Fedora / CentOS / RHEL "the Redhat way"

Enabling jumbo frames on all Gigabit lan interfaces (eth0, eth1, eth2 …) in Fedora / CentOS / RHEL is done through files:
 

  • /etc/sysconfig/network-script/ifcfg-eth0
  • /etc/sysconfig/network-script/ifcfg-eth1

etc. …
append in each one at the end of the respective config:

MTU=9000

[root@fedora ~]# echo 'MTU=9000' >> /etc/sysconfig/network-scripts/ifcfg-eth


a quick way to set Maximum Transmission Unit to 9000 for all network interfaces on on Redhat based distros is by executing the following loop:

[root@centos ~]# for i in $(echo /etc/sysconfig/network-scripts/ifcfg-eth*); do \echo 'MTU=9000' >> $i
done

P.S.: Be sure that all your interfaces are supporting MTU=9000, otherwise increase while the MTU setting is set will return SIOCSIFMTU: Invalid argument err.
The above loop is to be used only, in case you have a group of identical machines with Lan Cards supporting Gigabit networks and loaded kernel drivers supporting MTU up to 9000.

Some Intel and Realtek Gigabit cards supports only a maximum MTU of 7000, 7500 etc., so if you own a card like this check what is the max MTU the card supports and set it in the lan device configuration.
If increasing the MTU is done on remote server through SSH connection, be extremely cautious as restarting the network might leave your server inaccessible.

To check if each of the server interfaces are "Gigabit ready":

[root@centos ~]# /sbin/ethtool eth0|grep -i 1000BaseT
1000baseT/Half 1000baseT/Full

If you're 100% sure there will be no troubles with enabling MTU > 1500, initiate a network reload:

[root@centos ~]# /etc/init.d/network restart
...

4. Enable Jumbo Frames on Slackware Linux

To list the ethernet devices and check they are Gigabit ones issue:

bash-4.1# lspci | grep [Ee]ther
0c:00.0 Ethernet controller: D-Link System Inc Gigabit Ethernet Adapter (rev 11)
0c:01.0 Ethernet controller: D-Link System Inc Gigabit Ethernet Adapter (rev 11)

Setting up jumbo frames on Slackware Linux has two ways; the slackware way and the "universal" Linux way:

a.) the Slackware way

On Slackware Linux, all kind of network configurations are done in /etc/rc.d/rc.inet1.conf

Usual config for eth0 and eth1 interfaces looks like so:

# Config information for eth0:
IPADDR[0]="10.10.0.1"
NETMASK[0]="255.255.255.0"
USE_DHCP[0]=""
DHCP_HOSTNAME[1]=""
# Config information for eth1:
IPADDR[1]="10.1.1.1"
NETMASK[1]="255.255.255.0"
USE_DHCP[1]=""
DHCP_HOSTNAME[1]=""

To raise the MTU to 9000, the variables MTU[0]="9000" and MTU[1]="9000" has to be included after each interface config block, e.g.:

# Config information for eth0:
IPADDR[0]="172.16.1.1"
NETMASK[0]="255.255.255.0"
USE_DHCP[0]=""
DHCP_HOSTNAME[1]=""
MTU[0]="9000"
# Config information for eth1:
IPADDR[1]="10.1.1.1"
NETMASK[1]="255.255.255.0"
USE_DHCP[1]=""
DHCP_HOSTNAME[1]=""
MTU[1]="9000"

bash-4.1# /etc/rc.d/rc.inet1 restart
...

b.) The "Universal" Linux way

This way is working on most if not all Linux distributions.
Insert in /etc/rc.local:

/sbin/ifconfig eth0 mtu 9000 up
/sbin/ifconfig eth1 mtu 9000 up

5. Check if Jumbo Frames are properly enabled

There are at least two ways to display the MTU settings for eths.

a.) Using grepping the MTU from ifconfig

linux:~# /sbin/ifconfig eth0|grep -i mtu
UP BROADCAST MULTICAST MTU:9000 Metric:1
linux:~# /sbin/ifconfig eth1|grep -i mtu
UP BROADCAST MULTICAST MTU:9000 Metric:1

b.) Using ip command from iproute2 package to get MTU

linux:~# ip route get 192.168.2.134
local 192.168.2.134 dev lo src 192.168.2.134
cache mtu 9000 advmss 1460 hoplimit 64

linux:~# ip route show dev wlan0
192.168.2.0/24 proto kernel scope link src 192.168.2.134
default via 192.168.2.1

You see MTU is now set to 9000, so the two server lans, are now able to communicate with increased network thoroughput.
Enjoy the accelerated network transfers 😉


How to solve “IPv6 addrconf: prefix with wrong length 48”

Friday, December 9th, 2011

While reading some log files on one of the co-located servers at UK2.net , I’ve noticed dmesg log was filling in with tons of junk messages like:

[4288245.609762] IPv6 addrconf: prefix with wrong length 48
[4288445.984153] IPv6 addrconf: prefix with wrong length 48
[4288646.296110] IPv6 addrconf: prefix with wrong length 48
[4288846.609119] IPv6 addrconf: prefix with wrong length 48
[4289046.922604] IPv6 addrconf: prefix with wrong length 48
[4289247.267273] IPv6 addrconf: prefix with wrong length 48
[4289447.545800] IPv6 addrconf: prefix with wrong length 48
[4289647.857789] IPv6 addrconf: prefix with wrong length 48
[4289848.169308] IPv6 addrconf: prefix with wrong length 48
[4290048.595104] IPv6 addrconf: prefix with wrong length 48
[4290248.808497] IPv6 addrconf: prefix with wrong length 48
[4290449.103503] IPv6 addrconf: prefix with wrong length 48
[4290649.418747] IPv6 addrconf: prefix with wrong length 48
[4290849.742731] IPv6 addrconf: prefix with wrong length 48

After checking the message to make sure it would not suddeny lead to server hang ups I figured out the message is not dangerous but just an annoying warning that some other (routing) host on the same network as mine is advertising something using IPv6, that doesn’t fit with my IPv6 server config.
Actually the server doesn’t use the IPv6 configuration at all, and the assigned configuration is just some kind of auto set IPv6 IP address.
The server, where this message appeared is powered by 64 bit Debian GNU / Linux Squeeze

To resolve the annoying message, 5 of the kernel sysctl settings needs to be modified with cmds:

debian:~# sysctl net.ipv6.conf.all.accept_ra=0
debian:~# sysctl net.ipv6.conf.all.autoconf=0
debian:~# sysctl net.ipv6.conf.lo.autoconf=0
debian:~# sysctl net.ipv6.conf.eth0.autoconf=0
debian:~# sysctl net.ipv6.conf.eth1.autoconf=0

Furthermore to prevent the IPv6 addrconf: prefix with wrong length 48 to re-appear after future server reboots / boots the two sysctl values of course needs to be included in /etc/sysctl.conf e.g.:

debian:~# echo 'net.ipv6.conf.all.accept_ra = 0' >> /etc/sysctl.conf
debian:~# echo 'net.ipv6.conf.all.autoconf = 0' >> /etc/sysctl.conf
echo 'net.ipv6.conf.lo.autoconf = 0' >> /etc/sysctl.conf
echo 'net.ipv6.conf.eth0.autoconf = 0' >> /etc/sysctl.conf
echo 'net.ipv6.conf.eth1.autoconf = 0' >> /etc/sysctl.conf

My server has 2 etherhet interfaces, eth0 and eth1 that’s the reason I had to set up autoconf kernel the two vars net.ipv6.conf.eth0.autoconf and net.ipv6.conf.eth1.autoconf , for more interfaces more kernel vars (eth2, eth3) etc. needs to be set to “0”

I’ve seen posts online of people complaining about a similar errors to IPv6 addrconf: prefix with wrong length 48, like:

IPv6 addrconf: prefix with wrong length 96
IPv6 addrconf: prefix with wrong length 128

The solution to this messages is also done by setting the above described sysctl kernel vars. Setting the vars will suppress the messages which by the way with time could take up A LOT of disk space and fills /var/log/dmesg with this useless message, hence applying the “fix” is a must 😉

Another thing, I’ve noticed while I was researching about the error and the respective fix is that people on other deb based distributions like Ubuntu as well as on Fedora GNU / Linux had also experienced the issue.

Fix vnstat error “eth0: Not enough data available yet.” on Debian GNU / Linux

Monday, November 21st, 2011

Vnstat GNU Linux console terminal traffic statistics logo

After installing vnstat to keep an eye on server IN and OUT traffic on a Debian Squeeze server. I used the usual:

debian:~# vnstat -u -i eth0

In order to generate the initial database for the ethernet interface used by vnstat to generate its statistics.

However even though /var/lib/vnstat/eth0 got generated with above command statistics were not further generated and trying to check them with command:

debian:~# vnstat --days

Returned the error message:

eth0: Not enough data available yet.

To solve the eth0: Not enough data available yet. message I tried completely removing vnstat package by purging the package e.g.:

debian:~# apt-get --yes remove vnstat
...
debian:~# dpkg --purge vnstat
...

Even though dpkg –purge was invoked /var/lib/vnstat/ refused to be removed since it contained vnstat’s db file eth0

Therefore I deleted by hand before installing again vnstat:

debian:~# rm -rf /var/lib/vnstat/

Tried installing once again vnstat “from scratch”:

debian:~# apt-get install vnstat
...

After that I tried regenerating the vnstat db file eth0 once again with vnstat -u -i eth0 , hoping this should fix the error but it was no go and after that the error:

debian:~# vnstat --hours
eth0: Not enough data available yet.

persisted.

I checked in Debian bugs mailing lists and I found, some people complaining about the same issue with some suggsetions on how the error can be work arouned, anyways none of the suggestions worked for me.

Being irritated I further removed / purged once again vnstat and decided to give it a try by installing vnstat from source
As of time of writting this article, the latest stable vnstat version is 1.11 .
Therefore to install vnstat from source I issued:

debian:~# cd /usr/local/src
debian:/usr/local/src# wget http://humdi.net/vnstat/vnstat-1.11.tar.gz
...
debian:/usr/local/src# tar -zxvvf vnstat-1.11.tar.gz
debian:/usr/local/src# cd vnstat-1.11
debian:/usr/local/src/vnstat-1.11# make & make all & make install
debian:/usr/local/src/vnstat-1.11# cp examples/vnstat.cron /etc/cron.d/vnstat
debian:/usr/local/src/vnstat-1.11# vnstat -u -i eth0
Error: Unable to read database "/var/lib/vnstat/eth0".
Info: -> A new database has been created.

As a last step I put on root crontab to execute:

debian:~# crontab -u root -e

*/5 * * * * /usr/bin/vnstat -u >/dev/null 2>&1

This line updated vnstat db eth0 database, every 5 minutes. After the manual source install vnstat works, just fine 😉

A sysctl Linux variable to change randomly temporary the PC mac address for IPv6 and increase anonymity on IPv6 networks

Tuesday, September 20th, 2011

To prevent tracking and increase anonymity in IPv6 networks the Linux kernel has a variable to change randomly the MAC identifier. This feature will be very useful in terms of security in the short future, when all the IPv4 IP addresses are finished. The UIE (Extended Unified Udentifier) for an ipv6 address can be changed with command:

sysctl -w net.ipv6.conf.all.use_tempaddr=2 Microsoft Windows Vista and Windows 7 has the UIE enabled by default, enabling the random MAC changes automatically for a host cvan be done as usual by adding the net.ipv6.conf.all_use_tempaddr=2 to /etc/sysctl.conf

On an IPv6 network every ifconfig eth0 down and ifconfig eth0 up will instruct the lan card to be set a different MAC address for the ipv6 ip on the interface.

Changing the UIE randomly however also have security downsides if the host gets infected with a Virus or Worm. The security downsides of the enabled UIE affects mainly Windows hosts on IPv6 networks as UIE variable is enabled by default there.I’ve found this great tip in an article in the latest Linux Magazine October 2011. Its the first time I saw a paper Linux Magazine, the magazine contains a lot of helpful info on the latest Linux developments and latest trends in the Linux world. Subscription to receive the magazine via normal post is for the magazine costs 6.65 EUR per month (80 EUR) yearly. The 80 euro yearly includes 12 CDS (each magazine is bundled with a newly launched new version of a Linux distribution).
There is also a cheaper subscription for the magazine which costs 64.90 EUR.

How to make NAT enable hosts in a local network to access the internet, create port forwarding to local IPs behind the router using iptables

Tuesday, August 23rd, 2011

I’m bulding new iptables firewall on one Linux server. The Debian GNU/Linux is required to act as firewall do Network Adress Translation for a small network of office PCs as well as forward some of the inbound ports to hosts from the local network located behind the router.

The local network besides the router had an IP addressing in the class C network e.g. (192.168.1.1-255)

First I procceded and enabled the Network Address Translation via the Linux kernel variable:

linux:~# sysctl -w net.ipv4.ip_forward=1
linux:~# echo 'net.ipv4.ip_forward=1' >> /etc/sysctl.conf

Initially I even forgot to switch on the net.ipv4.ip_forward to 1 (by default this value is set to 0) – GNU/Linux’s default network behaviour is not predetermined to act as network router.
However, since I haven’t configured Network Address Translation for quite some time it completely slipped my mind!

Anyways next the actual iptables rule which makes NAT possible I used is:

linux:~# /sbin/iptables -t nat -A POSTROUTING -s 192.168.1.0/24 ! -d 192.168.1.0/24 -j SNAT --to-source xxx.xxx.xxx.xxx

Whether xxx.xxx.xxx.xxx is the External IP address assigned to the router on eth0

With this very simple rules now Network the local network is capable of accessing the Internet withotu problem.

It’s a good time to say that still many system administrators, still erroneously use MASQUERADE rules instead of SNAT .
IP MASQUERADING is an ancestry from ipchains and these days should be completely abandonded, especially where no often change of primary IP address to access the internet is made.
For dial-ups or other kind of networking, where the IP addresses are often changed still IP MASQUERADING might be a good idea though.

My next goal was to make the Linux router to do port forwarding of Traffic which arrives on port 80 to a IIS server assigned with a local IP address of 192.168.1.5
I did the webserver (port 80), port forwarding from IP xxx.xxx.xxx.xxx to 192.168.1.5 with the iptables rule:

linux:~# /sbin/iptables -t nat -A PREROUTING -d xxx.xxx.xxx.xxx/32 -p tcp -m tcp --dport 80 -j DNAT --to-destination 192.168.1.5:80

There was a requirement to do port forwarding for a Windows remote Desktop running on standard port 3389 from the router to the internal Windows IP address running the IIS webserver, however the company required me to only allow access to the rdesktop 3389 port to certain real IP addresses.
Initially I thought about using the above PREROUTING rule which makes the port redirection to the IIS server and only change port 80 to port 3389 , and then use filter table INPUT chain rules like:

/sbin/iptables -A INPUT -s xx1.xx2.xx3.xx4,1xx,2xx,3xx,4xx,xxx.xxx.xxx.xxx -p tcp -m tcp --dport 3389 -j ACCEPT/sbin/iptables -A INPUT -p tcp -m tcp --dport 3389 -j REJECT --reject-with icmp-port-unreachable
32

However this did not work out, so I decided to give a try to do the same within the filter table using the FORWARD chain, like so:

FORWARD/sbin/iptables -A FORWARD -p tcp -m tcp -s xx1.xx2.xx3.xx4,1xx,2xx,3xx,4xx,xxx.xxx.xxx.xxx -p tcp -m tcp --dport 3389 -j ACCEPT
/sbin/iptables -A FORWARD -p tcp -m tcp --dport 3389 -j REJECT --reject-with icmp-port-unreachable

Adding this rules did not added any filtering to the forwarded remote desktop port. I suspected that somehow probably my above PREROUTING nat rules are read before any other rules and therefore automatically allows any IP address to port fortward traffic.
I’ve checked the iptables documentation and it seems my guess was partially right.

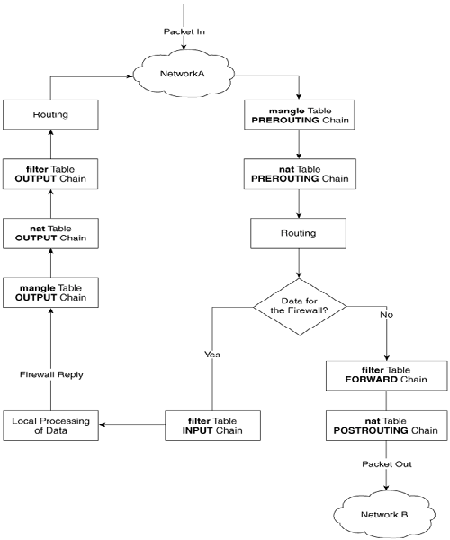
When some kind of network traffic enters the iptables firewall it first goes through the PREROUTING channel and then the traffic flows in a certain order.
iptables packet flow diagram

The iptables network packets flow is clearly seen in above’s diagram a thorough looks gives a very good idea on how packet is being processed by iptables

Finally as I couldn’t think about a good solution on how to only filter the port redirected traffic, which always firstly entered in the POSTROUTING chain, I’ve consulted with the guys in irc.freenode.net in #Netfilter.

I’m quite thanksful as a guy nicknamed Olipro has given me a pretty good picture on the port forwarding POSTROUTING problem and has provided me with a very logical easy and great fix.
He suggested that I only do port forwarding for certain IP addresses instead of allowing all IP addresses and then lookup for a way to allow only some of them and filter the rest.

The iptables rule to restrict the incoming traffic to the remote desktop forwarded port 3389 to few only allowed IP addresses looks like so:

linux:~# /sbin/iptables -t nat -A PREROUTING -d xxx.xxx.xxx.xxx/32 -s xx1.xx2.xx3.xx4,1xx,2xx,3xx,4xx,xxx.xxx.xxx.xxx -p tcp -m tcp –dport 3389 -j DNAT –to-destination 192.168.1.5:3389

Now the three sample IPs passed xx1.xx2.xx3.xx4,1xx,2xx,3xx,4xx,xxx.xxx.xxx.xxx has added to port forward traffic on 3389 to 192.168.1.5

By the way I did not know that newer versions of iptables support passing by multiple IP addresses to the –source or –destination IP. This is really great feature I’ve learned from the good guys from #Netfilter. However one should be careful when using the multiple IPs with -s or -d, it’s really important that the passed consequent IPs has no space between the , delimiter.

Now that’s all my task is completed. All computerse inside the Network 192.168.1.1-255 on the Linux router freely can access the Internet, all IPs are also capable to access the IIS server located behind the NAT as well as only certain IPs are capable of accessing to the IIS remote desktop.
Hope the article helps somebody 😉

How to delete entries from routing table on Linux

Thursday, July 7th, 2011

Every now and then I had to tamper routing tables in Linux and every time I had to do it I forgot how I did it last time so finally I decided to put it on my blog and find how I can delete from Linux routing table easier

Deleting a record from a wrong routing table on Linux is a piece of cake basicly, here is an example:

linux:~# route -n
Kernel IP routing table
Destination Gateway Genmask Flags Metric Ref Use Iface
192.168.0.1 0.0.0.0 255.255.255.0 U 0 0 0 eth0
169.254.0.0 0.0.0.0 255.255.0.0 U 0 0 0 eth0
0.0.0.0 192.168.0.1 0.0.0.0 UG 0 0 0 eth0

Let’s say this is the routing table and it’s incorrect as the routing through the node 169.254.0.0 should not be there.
Here is how the routing through 169.254.0.0 can be deleted:

linux:~# /sbin/route del -net 169.254.0.0 netmask 255.255.0.0

Now here is the difference after deletion:

linux:~# route -n
Kernel IP routing table
Destination Gateway Genmask Flags Metric Ref Use Iface
192.168.0.1 0.0.0.0 255.255.255.0 U 0 0 0 eth0
0.0.0.0 192.168.0.1 0.0.0.0 UG 0 0 0 eth0

If you want to delete the default gateway just use 0.0.0.0, e.g. -net 0.0.0.0 .. in above cmd example.
This would delete default gateway record from routing table which by the way in routing tables is marked with the UG flag.
Cheers 😉