Posts Tagged ‘menus’

How to add multi-lingual (multi language) support in Joomla 1.5

Friday, June 3rd, 2011

Joomfish MultiLanguage Support enable plugin

If you are facing the task to build a multi-language enabled Joomla website like me then I think my experience on building a multi-language website with Joomla CMS might be beneficial to you.

In order to build a multi-language website in Joomla you will have to use Joom!Fish multilanguage Joomla support plugin.

The plugin is a bit buggy, but in overall it will allow you to build a multi language website and consequently add the page different languate translations.

To install the plugin on your 1.5 Joomla based install;

1. Download the JoomFish plugin

Install it the usual joomla way joomla plugins are installed, via;

Extensions -> Install/Uninstall

2. Enable the Joom!Fish plugin

To do so navigate to;

Extensions -> Module Manager

Enable the module by ticking under the Enabled column on the line where you read Language Selection

3. Install Language packs for all languages which should be supported by JoomFish

Now as the JoomFish Language selection module is enabled, one needs to install the necessery Joomla Language Packs for all the languages which the Joomla based website is planned to support.

In my case I neede a three lingual website, which will support only the Languages:
 

  • Bulgarian
  • Russian
  • and

  • English

Thus I went on Joomla! Extensions Directory – extensions.joomla.org and downloaded the the three language packs I needed (English, Russian and Bulgarian).

Again the Installation of the language packs is trivial and is done through the Joomla’s:

Extensions -> Install/Uninstall

After installation to find out all the languages your Joomla installation will support you can navigate inside Joomla admin to:

Extensions -> Install/Uninstall -> Languages

Screenshot of my installed list of Joomla Language packs 
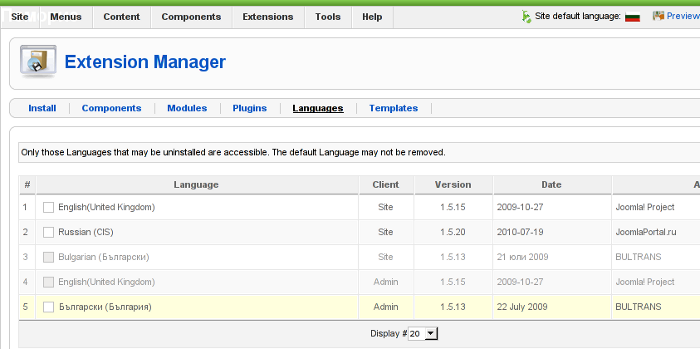
Screenshot of my installed list of Joomla Language Packs (Multi-Language setup)

Another way to check the list of enabled installed languages supported in your Joomla is via the menu:

Site -> Control Panel -> Language Manager

Something important here is to a default language is set in the Language Manager

4. Create translations from default installed language to the rest of the installed ones

Go to the JoomFish component through the menus:

Components -> Joom!Fish -> Control Panel

If all your language packs are correctly installed and enabled so far you should notice them listed while clicking on Content Languages

If all the Joomla Languages which your website is supposed to support are not there, this means something is generally wrong with installed lanaguage packs and you need to go back few steps and check what might be wrong, hopefully that’s not the case 😉

To immediately start translating your Joomla website to another from one language to another one, use the control menus:

Components -> Joom!Fish -> Translation

Here is screenshot on how this menu would look like:

Joomla JoomFish Plugin Translate Menu Screenshot

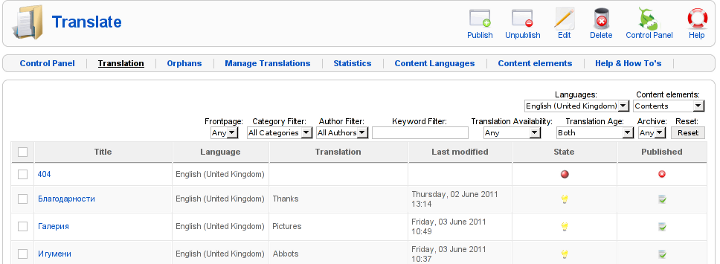
Notice in the above screenshot the Languages: and Content Elements dropdown menus, this ones are actually the two menus used for all language translations.

One needs to select under Languages: menu the Language to which will be translated to, while in Content Elements: has to be choseen the exact site elements which are about to be translated.

The Content Elements: necessery to be translated in most of the cases would be just Menus and Contents

Translating that will have your website user frontend be completely translated info the foreign language choosen in the Languages: dialog.

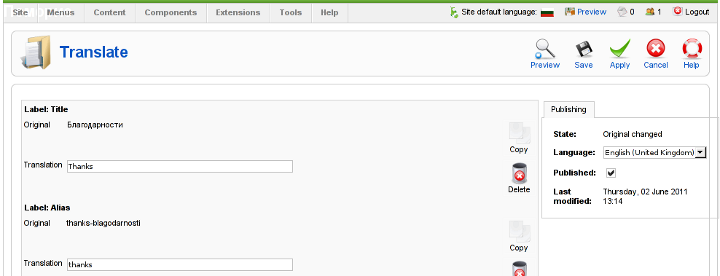
After finalizing the translations of all Articles available in Menus and Contents make sure the translation is Published, by selecting the Published tick, below I show you an example language translation edit of an article, on the left side you see the Published tick which need to be enabled, for translation to appear officially in Joomla.

Joomla Joomfish published tick enabled screenshot

After completing all the translations of elements offered by the translation window, save the translation by pressing the Apply buttonFurther on you can check the website in a new tab, if everything is okay with translations, on the down left corner of the website footer you should notice the flags of enabled languages to appear.
Clicking on each of the languages should show you the website in the language choosen (if you have previously done the translation to the respective menus).

5. Solving a minor bug in JoomlaFish which prevents translated language text to display on webpages

During translation of my website from Bulgarian to English, I have noticed a bug of JoomFish, even though I did the translation of all my Menus and website Content elements and saved the translations, refreshing the website in a new tab and choosing the desired translation was constantly displaying the error message:

“There are no translations available”

I was not able to find a good explanation on the Internet on why exactly and how this bug occurs, but by some experiments I come up with a workaround.

If you get the “There are no translations available” after properly configuring Joom!Fish Multilang support, in order to solve the error you will have to select temporary a different default website language from the one currently specified by your website.

(E.g.) go to jooma admin panel location:

Site -> Control Panel -> Language Manager

and trigger the default language configured to some of the other available ones. After reverting back in a couple of seconds this setting to your desired default language the annoying: “There are no translations available” message will disappear and your translated content will appear on the website.

6. Changing the location of language flags (language links) in Joomla’s JoomFish

I have seen plenty of people online looking for a solution on how they can change the default image flags location, which by default is placed a place which is not that intuitive and visible by the user.

Maybe I did not searched enough but from my quick research it appears there is no information available on how the placement of language flags switching menu can be changed.

Even though I couldn’t find a solution to change the langage flags in JoomFish , after a bunch of experiments I find a way to do it! 🙂

The placement of Language selector buttons can be easily adjusted through following the Joomla Admin menu:

Extensions -> Module Mamager -> Language Selection

After opening the Language Selection , you will notice the Position: dropdown menu setting. The setting has a bunch of optionsand allows you to choose the best preferred placement of the language selector flag buttons, just take few minutes to experiment which settingfits you best and choose the one most suitable to you and you’re done! 😉

Honestly I never imagined that building a multi-lingual website with Joomla will be such a piece of cake.

The only drawback with JoomFish, is the way language translation is implemented as it is not enough user friendly, anyways having the option to build multi language website for free using open source CMS solution is great. Ain’t it? 🙂

W3 total Cache a nice wordpress “all in one” wordpress Caching plugin

Friday, September 23rd, 2011

w3 total cache logo wordpress speed up w3tc

In my recent question of looking for best ways to optimize my wordpress blog, as well as other wordpress based websites, I’m managing I’ve come across a great plugin called W3 Total Cache or W3TC as it’s widely known among wordpress geeks.

The full caching wordpress solution in face of W3TC is already actively deployed among many major wordpress powered websites, to name a few:
stevesouders.com, mattcutts.com, mashable.com

I gave a try W3 Total Cache and was amazed about the rich caching functionality it provides. Having the W3TC plugin installed adds a whole menu on the left wordpress admin panel reading Performance , clicking on it shows a menu with thorough choices on numerous things which deal with the running of wordpress on the server.
Here is a screenshot on the menus W3 Total Cache provides:

w3 total cache whole wordpress caching pages and sql solution

The plugin has support for html caching, sql caching, CDN, CSS and Javascript compress & minify etc.
To test the plugin adequately I disabled HyperCache and Db Cache . My observations is that with W3TC wordpress renders php and the overall user experience and download times in wordpress are better. Therefore I’ll probably use only W3 Total Cache as a cacher for wordpress installs.
Besides that I had some issues on some wordpress based websites with the Db Cache SQL caching.
On these websites after enabling Db Cache, suddenly page edditing of the created existing pages started returning empty pages. This could be due to the fact that these wordpress based websites was customly tailered and many code was wiped out, however it could also be a Db Cache bug. So to conclude W3TC is the perfect solution for wordpress caching 😉

Installing Linux on old hardware PC. Few thoughs on Puppy and Xubuntu Linux

Tuesday, January 24th, 2012

I needed a G/Linux distribution that will work fine on an old PC with hardware configuration:

guest@xubuntu-desktop:~$ grep -i cpu /proc/cpuinfo; free -m; df -h
cpu family : 6
cpu MHz : 797.613cpuid level : 2
total used free shared buffers cachedMem: 497 470 26 0 35 259-/+ buffers/cache: 176 321Swap: 1454 10 1444File System Size Used Free % Mounted on
/dev/sda1 37G 4,3G 31G 13% /

I've read a lot on the internet and come to the conclusion I have basicly two popular Linux distros as option to install on archaic x86 hardware:

1. Puppy Linux
2. Xubuntu Linux

I first give Puppy Linux a try. It worked quite nice, but the interface was too old school and the desktop felt like a bit out-dated.
Besides that many of the Puppy Linux shipped programs were not a mainstream programs available across most of the other Linux distributions.

Many of the programs shipped with Puppy are great, but more suitable for a computer geek than for a Windows accustomed GUI user.
Puppy Linux Screenshot

My opinion on Puppy (from what I've seen) is that its great distro for old school hardcore Linux users.
Anyways its not suitable for absolutely "uniniated" users who encounter Linux for a first time.

Secondly I installed Xubuntu. Most of the archaic hardware on the PC was detected during install time (a pleasently surprise).
Xubunto works fast and Xfce menus opens "light fast" as on the old 800Mhz pc with 512 mem of ram. Generally the GUI worked quick and responsive.
To conclude I liked Xubuntu a lot and I strongly recommend it to anyone who want to quickly roll on Linux on an old PC.
Xubuntu GNU / Linux theme

What impressed me most is the minimalistic look & feel and simplicity.

I'm sure Debian will be working great on old hardware as well, however configuring it will be hell a lot of work. Thus I think Xubuntu is a good choice for people who want save some time in obscure configurations and easily have a neat Linux ready for desktop use.

How to change GNOME Resolution with a command using terminal or console on Debian GNU / Linux and FreeBSD

Friday, January 6th, 2012

I'm testing some old school arcade games, available from Debian's package repositories and quitting one of the games ended me up with a GNOME Screen Resolution of 640×480 pixels.

I wanted to revert back to the Classics resolution, so what I would normally do to do that is use >GNOME menus:

System -> Preferences -> Monitors

In that huge screen resolution on my 14 inch lenovo notebook screen, however the System menu cannot fit in 640×480 resolution. You can see the non-screen fitting System on the screenshot below:

Screenshot Debian GNU / Linux Squeeze GNOME Desktop 640x480

Having this situation, I needed a way to change back to my normal daily used 1024x768px screen resolution to continue my daily work by some other way.
One possible solution I thought of was Logging Off Gnome and logging again. Loggig off and log on again would usually restart the initiated GNOME session and therefore will reset the screen resolution to my default 1024×768 / 32 bit color.

Having the unobservable System gnome panel menu on my screen however made using the usual Log off procedure via System -> Log Out myusername impossible…

Another possible way to actually restart my screen and hence revert back to my original resolution is achiavable using the classical restart X server key switch CTRL + ALT + backspace (bckspc) . Though this was a possible approach to the situation, I had a bunch of programs already running on my desktop and I did not wanted to interrupt my desktop session, what I was looking for is simply change the screen resolution size .

With all said I had to look up for alternative way (preferably easy) way, to revert back my screen resolution to my desired 1024×768.

As a console guy, I was interested if there is some kind of possibility to change my GNOME resolution directly using xterm or gnome-terminal , after a bit of check up online, I've found few threads started by people who were looking just like me for a way to change GNOME / KDE screen resolution size on various distributions Linux desktops as well on Free/Net/Open/BSDs. The answer to the question on few places was the command xrandr which I had used some few years ago to initiate remote X server connections via SSH

xrandr is actually a great tool part of the x11-xserver-utils

Actually xrandr is capable of doing a few things besides setting the screen resolution size, just to name a few it supports change the screen orientation, reflection of the output of the screen, adjust brightness, set color gamma etc. etc.

It is good to mention that xrandr changes the resolution not on a GNOME level but on Xorg server level.

Using xrandr to change the screen resolution appeared to be very easy.

1. First I issued xrandr to check all the supported xrandr resolutions by my X server hipo@noah:~/Desktop$ xrandr Screen 0: minimum 320 x 200, current 1024 x 768, maximum 8192 x 8192VGA1 disconnected (normal left inverted right x axis y axis)LVDS1 connected 1024x768+0+0 (normal left inverted right x axis y axis) 304mm x 228mm 1024x768 60.0*+ 50.0 800x600 60.3 56.2 640x480 60.0 59.9 TV1 disconnected (normal left inverted right x axis y axis)hipo@noah:~/Desktop$

From the output you can see I have 3 basic resolutions configured in my Xorg, I can switch between.

2. To switch to my previous default screen resolution

hipo@noah:~/Desktop$ xrandr -s 1024x768

After using xrandr command to revert back to my default screen size, I realized there is two other (partially command line partially gui) way to change to 1024×768 pixels.3. Through launching gnome Control Center and searching for Monitors menu.

If one prefers this way he can;

i) press ALT+F2 to invoke Gnome's Run Application dialog

ii) issue gnome-control-center command:

GNOME run application Dialog GNOME Control Center cmd debian GNU / Linux

GNOME Control Center search Monitors menu debian GNU / Linux

4. By invoking gnome's Control Panel -> Monitors settings window by a command

hipo@noah:~/Desktop$ gnome-display-properties

GNOME display properties command to launch monitors screen resolution settings
 

How to fix “Could not verify this certificate for unknown reasons” SSL certificate lighttpd troubles

Tuesday, June 28th, 2011

Firefox SSL Pro could not verify for uknown reasons solve error

I’ve been issuing new wildcard multiple SSL certificate to renew an expiring ones. After I completed the new certificate setup manually on the server (a CentOS 5.5 Final running SoluSVM Pro – Virtual Private Manager), I launched Firefox to give a try if the certificate is properly configured.

Instead of my expectations that the browser would just accept the certificate without spitting any error messages and all will be fine, insetad I got error with the just installed certificate and thus the browser failed to report the SSL cert is properly authenticated.

The company used to issue the SSL certificate is GlobeSSL – http://globessl.com , it was quite “hassle”, with the tech support as the first certficate generated by globessl was generation based on SSL key file with 4096 key encryption.

As the first issued Authenticated certificate generated by GlobeSSL was not good further on about a week time was necessery to completethe required certificate reissuing ….

It wasn’t just GlobeSSL’s failure, as there were some spam filters on my side that was preventing some of GlobeSSL emails to enter normally, however what was partially their fault as they haven’t made their notification and confirmation emails to pass by a mid-level strong anti-spam filter…

Anyways my overall experience with GlobeSSL certificate reissue and especially their technical support is terrible.
To make a parallel, issuing certificates with GoDaddy is a way more easier and straight forward.

Now let me come back to the main certificate error I got in Firefox …

A bit of further investigation with the cert failure, has led me to the error message which tracked back to the newly installed SSL certificate issues.
In order to find the exact cause of the SSL certificate failure in Firefox I followed to the menus:

Tools -> Page Info -> Security -> View Certificate

Doing so in the General browser tab, there was the following error:

Could not verify this certificate for unknown reasons

The information on Could not verify this certificate for unknown reasons on the internet was very mixed and many people online suggested many possible causes of the issue, so I was about to loose myself.

Everything with the certificate seemed to be configured just fine in lighttpd, all the GlobeSSL issued .cer and .key file as well as the ca bundle were configured to be read used in lighttpd in it’s configuration file:
/etc/lighttpd/lighttpd.conf

Here is a section taken from lighttpd.conf file which did the SSL certificate cert and key file configuration:

$SERVER["socket"] == "0.0.0.0:443" {
ssl.engine = "enable"
ssl.pemfile = "/etc/lighttpd/ssl/wildcard.mydomain.bundle"
}

The file /etc/lighttpd/ssl/wildcard.mydomain.bundle was containing the content of both the .key (generated on my server with openssl) and the .cer file (issued by GlobeSSL) as well as the CA bundle (by GlobeSSL).

Even though all seemed to be configured well the SSL error Could not verify this certificate for unknown reasons was still present in the browser.

GlobeSSL tech support suggested that I try their Web key matcher interfacehttps://confirm.globessl.com/key-matcher.html to verify that everything is fine with my certificate and the cert key. Thanks to this interface I figured out all seemed to be fine with the issued certificate itself and something else should be causing the SSL oddities.
I was further referred by GlobeSSL tech support for another web interface to debug errors with newly installed SSL certificates.
These interface is called Verify and Validate Installed SSL Certificate and is found here

Even though this SSL domain installation error report and debug tool did some helpful suggestions, it wasn’t it that helped me solve the issues.

What helped was First the suggestion made by one of the many tech support guy in GlobeSSL who suggested something is wrong with the CA Bundle and on a first place the documentation on SolusVM’s wiki – http://wiki.solusvm.com/index.php/Installing_an_SSL_Certificate .
Cccording to SolusVM’s documentation lighttpd.conf‘s file had to have one extra line pointing to a seperate file containing the issued CA bundle (which is a combined version of the issued SSL authority company SSL key and certificate).
The line I was missing in lighttpd.conf (described in dox), looked like so:

ssl.ca-file = “/usr/local/solusvm/ssl/gd_bundle.crt”

Thus to include the directive I changed my previous lighttpd.conf to look like so:

$SERVER["socket"] == "0.0.0.0:443" {
ssl.engine = "enable"
ssl.pemfile = "/etc/lighttpd/ssl/wildcard.mydomain.bundle"
ssl.ca-file = "/etc/lighttpd/ssl/server.bundle.crt"
}

Where server.bundle.crt contains an exact paste from the certificate (CA Bundle) mailed by GlobeSSL.

There was a couple of other ports on which an SSL was configured so I had to include these configuration directive everywhere in my conf I had anything related to SSL.

Finally to make the new settings take place I did a lighttpd server restart.

[root@centos ssl]# /etc/init.d/lighttpd restart
Stopping lighttpd: [ OK ]
Starting lighttpd: [ OK ]

After lighttpd reinitiated the error was gone! Cheers ! 😉