Posts Tagged ‘CPU’

Create Linux High Availability Load Balancer Cluster with Keepalived and Haproxy on Linux

Tuesday, March 15th, 2022

keepalived-logo-linux

Configuring a Linux HA (High Availibiltiy) for an Application with Haproxy is already used across many Websites on the Internet and serious corporations that has a crucial infrastructure has long time
adopted and used keepalived to provide High Availability Application level Clustering.
Usually companies choose to use HA Clusters with Haproxy with Pacemaker and Corosync cluster tools.
However one common used alternative solution if you don't have the oportunity to bring up a High availability cluster with Pacemaker / Corosync / pcs (Pacemaker Configuration System) due to fact machines you need to configure the cluster on are not Physical but VMWare Virtual Machines which couldn't not have configured a separate Admin Lans and Heartbeat Lan as we usually do on a Pacemaker Cluster due to the fact the 5 Ethernet LAN Card Interfaces of the VMWare Hypervisor hosts are configured as a BOND (e.g. all the incoming traffic to the VMWare vSphere  HV is received on one Virtual Bond interface).

I assume you have 2 separate vSphere Hypervisor Physical Machines in separate Racks and separate switches hosting the two VMs.
For the article, I'll call the two brand new brought Virtual Machines with some installation automation software such as Terraform or Ansible – vm-server1 and vm-server2 which would have configured some recent version of Linux.

In that scenario to have a High Avaiability for the VMs on Application level and assure at least one of the two is available at a time if one gets broken due toe malfunction of the HV, a Network connectivity issue, or because the VM OS has crashed.
Then one relatively easily solution is to use keepalived and configurea single High Availability Virtual IP (VIP) Address, i.e. 10.10.10.1, which would float among two VMs using keepalived so at a time at least one of the two VMs would be reachable on the Network.
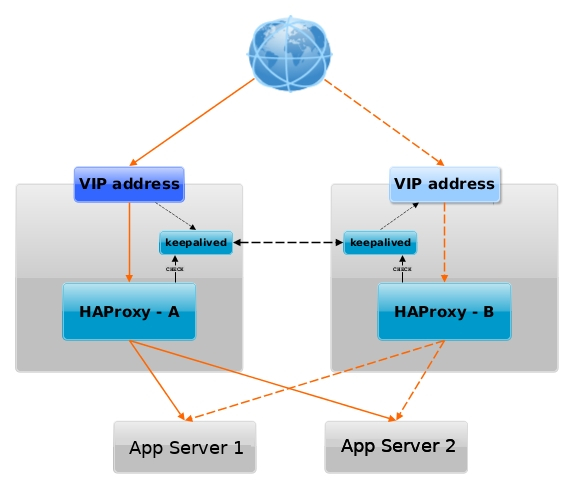
haproxy_keepalived-vip-ip-diagram-linux

Having a VIP IP is quite a common solution in corporate world, as it makes it pretty easy to add F5 Load Balancer in front of the keepalived cluster setup to have a 3 Level of security isolation, which usually consists of:

1. Physical (access to the hardware or Virtualization hosts)
2. System Access (The mechanism to access the system login credetials users / passes, proxies, entry servers leading to DMZ-ed network)
3. Application Level (access to different programs behind L2 and data based on the specific identity of the individual user,
special Secondary UserID,  Factor authentication, biometrics etc.)


1. Install keepalived and haproxy on machines

Depending on the type of Linux OS:

On both machines
 

[root@server1:~]# yum install -y keepalived haproxy

If you have to install keepalived / haproxy on Debian / Ubuntu and other Deb based Linux distros

[root@server1:~]# apt install keepalived haproxy –yes

2. Configure haproxy (haproxy.cfg) on both server1 and server2


Create some /etc/haproxy/haproxy.cfg configuration


[root@server1:~]vim /etc/haproxy/haproxy.cfg

#———————————————————————
# Global settings
#———————————————————————
global
    log          127.0.0.1 local6 debug
    chroot       /var/lib/haproxy
    pidfile      /run/haproxy.pid
    stats socket /var/lib/haproxy/haproxy.sock mode 0600 level admin 
    maxconn      4000
    user         haproxy
    group        haproxy
    daemon
    #debug
    #quiet

#———————————————————————
# common defaults that all the 'listen' and 'backend' sections will
# use if not designated in their block
#———————————————————————
defaults
    mode        tcp
    log         global
#    option      dontlognull
#    option      httpclose
#    option      httplog
#    option      forwardfor
    option      redispatch
    option      log-health-checks
    timeout connect 10000 # default 10 second time out if a backend is not found
    timeout client 300000
    timeout server 300000
    maxconn     60000
    retries     3

#———————————————————————
# round robin balancing between the various backends
#———————————————————————

listen FRONTEND_APPNAME1
        bind 10.10.10.1:15000
        mode tcp
        option tcplog
#        #log global
        log-format [%t]\ %ci:%cp\ %bi:%bp\ %b/%s:%sp\ %Tw/%Tc/%Tt\ %B\ %ts\ %ac/%fc/%bc/%sc/%rc\ %sq/%bq
        balance roundrobin
        timeout client 350000
        timeout server 350000
        timeout connect 35000
        server app-server1 10.10.10.55:30000 weight 1 check port 68888
        server app-server2 10.10.10.55:30000 weight 2 check port 68888

listen FRONTEND_APPNAME2
        bind 10.10.10.1:15000
        mode tcp
        option tcplog
        #log global
        log-format [%t]\ %ci:%cp\ %bi:%bp\ %b/%s:%sp\ %Tw/%Tc/%Tt\ %B\ %ts\ %ac/%fc/%bc/%sc/%rc\ %sq/%bq
        balance roundrobin
        timeout client 350000
        timeout server 350000
        timeout connect 35000
        server app-server1 10.10.10.55:30000 weight 5
        server app-server2 10.10.10.55:30000 weight 5 


You can get a copy of above haproxy.cfg configuration here.
Once configured roll it on.

[root@server1:~]#  systemctl start haproxy
 
[root@server1:~]# ps -ef|grep -i hapro
root      285047       1  0 Mar07 ?        00:00:00 /usr/sbin/haproxy -Ws -f /etc/haproxy/haproxy.cfg -p /run/haproxy.pid
haproxy   285050  285047  0 Mar07 ?        00:00:26 /usr/sbin/haproxy -Ws -f /etc/haproxy/haproxy.cfg -p /run/haproxy.pid

Bring up the haproxy also on server2 machine, by placing same configuration and starting up the proxy.
 

[root@server1:~]vim /etc/haproxy/haproxy.cfg


3. Configure keepalived on both servers

We'll be configuring 2 nodes with keepalived even though if necessery this can be easily extended and you can add more nodes.
First we make a copy of the original or existing server configuration keepalived.conf (just in case we need it later on or if you already had something other configured manually by someone – that could be so on inherited servers by other sysadmin)
 

[root@server1:~]# mv /etc/keepalived/keepalived.conf /etc/keepalived/keepalived.conf.orig
[root@server2:~]# mv /etc/keepalived/keepalived.conf /etc/keepalived/keepalived.conf.orig

a. Configure keepalived to serve as a MASTER Node


[root@server1:~]# vim /etc/keepalived/keepalived.conf

Master Node
global_defs {
  router_id server1-fqdn # The hostname of this host.
  
  enable_script_security
  # Synchro of the state of the connections between the LBs on the eth0 interface
   lvs_sync_daemon eth0
 
notification_email {
        linuxadmin@notify-domain.com     # Email address for notifications 
    }
 notification_email_from keepalived@server1-fqdn        # The from address for the notifications
    smtp_server 127.0.0.1                       # SMTP server address
    smtp_connect_timeout 15
}

vrrp_script haproxy {
  script "killall -0 haproxy"
  interval 2
  weight 2
  user root
}

vrrp_instance LB_VIP_QA {
  virtual_router_id 50
  advert_int 1
  priority 51

  state MASTER
  interface eth0
  smtp_alert          # Enable Notifications Via Email
  
  authentication {
              auth_type PASS
              auth_pass testp141

    }
### Commented because running on VM on VMWare
##    unicast_src_ip 10.44.192.134 # Private IP address of master
##    unicast_peer {
##        10.44.192.135           # Private IP address of the backup haproxy
##   }

#        }
# master node with higher priority preferred node for Virtual IP if both keepalived up
###  priority 51
###  state MASTER
###  interface eth0
  virtual_ipaddress {
     10.10.10.1 dev eth0 # The virtual IP address that will be shared between MASTER and BACKUP
  }
  track_script {
      haproxy
  }
}


 To dowload a copy of the Master keepalived.conf configuration click here

Below are few interesting configuration variables, worthy to mention few words on, most of them are obvious by their names but for more clarity I'll also give a list here with short description of each:


  • vrrp_instance – defines an individual instance of the VRRP protocol running on an interface.
  • state – defines the initial state that the instance should start in (i.e. MASTER / SLAVE )state –
  • interface – defines the interface that VRRP runs on.
  • virtual_router_id – should be unique value per Keepalived Node (otherwise slave master won't function properly)
  • priority – the advertised priority, the higher the priority the more important the respective configured keepalived node is.
  • advert_int – specifies the frequency that advertisements are sent at (1 second, in this case).
  • authentication – specifies the information necessary for servers participating in VRRP to authenticate with each other. In this case, a simple password is defined.
    only the first eight (8) characters will be used as described in  to note is Important thing
    man keepalived.conf – keepalived.conf variables documentation !!! Nota Bene !!! – Password set on each node should match for nodes to be able to authenticate !
  • virtual_ipaddress – defines the IP addresses (there can be multiple) that VRRP is responsible for.
  • notification_email – the notification email to which Alerts will be send in case if keepalived on 1 node is stopped (e.g. the MASTER node switches from host 1 to 2)
  • notification_email_from – email address sender from where email will originte
    ! NB ! In order for notification_email to be working you need to have configured MTA or Mail Relay (set to local MTA) to another SMTP – e.g. have configured something like Postfix, Qmail or Postfix

b. Configure keepalived to serve as a SLAVE Node

[root@server1:~]vim /etc/keepalived/keepalived.conf
 

#Slave keepalived
global_defs {
  router_id server2-fqdn # The hostname of this host!

  enable_script_security
  # Synchro of the state of the connections between the LBs on the eth0 interface
  lvs_sync_daemon eth0
 
notification_email {
        linuxadmin@notify-host.com     # Email address for notifications
    }
 notification_email_from keepalived@server2-fqdn        # The from address for the notifications
    smtp_server 127.0.0.1                       # SMTP server address
    smtp_connect_timeout 15
}

vrrp_script haproxy {
  script "killall -0 haproxy"
  interval 2
  weight 2
  user root
}

vrrp_instance LB_VIP_QA {
  virtual_router_id 50
  advert_int 1
  priority 50

  state BACKUP
  interface eth0
  smtp_alert          # Enable Notifications Via Email

authentication {
              auth_type PASS
              auth_pass testp141
}
### Commented because running on VM on VMWare    
##    unicast_src_ip 10.10.192.135 # Private IP address of master
##    unicast_peer {
##        10.10.192.134         # Private IP address of the backup haproxy
##   }

###  priority 50
###  state BACKUP
###  interface eth0
  virtual_ipaddress {
     10.10.10.1 dev eth0 # The virtual IP address that will be shared betwee MASTER and BACKUP.
  }
  track_script {
    haproxy
  }
}


Download the keepalived.conf slave config here


c. Set required sysctl parameters for haproxy to work as expected
 

[root@server1:~]vim /etc/sysctl.conf
#Haproxy config
# haproxy
net.core.somaxconn=65535
net.ipv4.ip_local_port_range = 1024 65000
net.ipv4.ip_nonlocal_bind = 1
net.ipv4.tcp_tw_reuse = 1
net.ipv4.tcp_max_syn_backlog = 10240
net.ipv4.tcp_max_tw_buckets = 400000
net.ipv4.tcp_max_orphans = 60000
net.ipv4.tcp_synack_retries = 3

4. Test Keepalived keepalived.conf configuration syntax is OK


[root@server1:~]keepalived –config-test
(/etc/keepalived/keepalived.conf: Line 7) Unknown keyword 'lvs_sync_daemon_interface'
(/etc/keepalived/keepalived.conf: Line 21) Unable to set default user for vrrp script haproxy – removing
(/etc/keepalived/keepalived.conf: Line 31) (LB_VIP_QA) Specifying lvs_sync_daemon_interface against a vrrp is deprecated.
(/etc/keepalived/keepalived.conf: Line 31)              Please use global lvs_sync_daemon
(/etc/keepalived/keepalived.conf: Line 35) Truncating auth_pass to 8 characters
(/etc/keepalived/keepalived.conf: Line 50) (LB_VIP_QA) track script haproxy not found, ignoring…

I've experienced this error because first time I've configured keepalived, I did not mention the user with which the vrrp script haproxy should run,
in prior versions of keepalived, leaving the field empty did automatically assumed you have the user with which the vrrp script runs to be set to root
as of RHELs keepalived-2.1.5-6.el8.x86_64, i've been using however this is no longer so and thus in prior configuration as you can see I've
set the user in respective section to root.
The error Unknown keyword 'lvs_sync_daemon_interface'
is also easily fixable by just substituting the lvs_sync_daemon_interface and lvs_sync_daemon and reloading
keepalived etc.

Once keepalived is started and you can see the process on both machines running in process list.

[root@server1:~]ps -ef |grep -i keepalived
root     1190884       1  0 18:50 ?        00:00:00 /usr/sbin/keepalived -D
root     1190885 1190884  0 18:50 ?        00:00:00 /usr/sbin/keepalived -D

Next step is to check the keepalived statuses as well as /var/log/keepalived.log

If everything is configured as expected on both keepalived on first node you should see one is master and one is slave either in the status or the log

[root@server1:~]#systemctl restart keepalived


[root@server1:~]systemctl status keepalived|grep -i state
Mar 14 18:59:02 server1-fqdn Keepalived_vrrp[1192003]: (LB_VIP_QA) Entering MASTER STATE

[root@server1:~]systemctl status keepalived

● keepalived.service – LVS and VRRP High Availability Monitor
   Loaded: loaded (/usr/lib/systemd/system/keepalived.service; enabled; vendor preset: disabled)
   Active: inactive (dead) since Mon 2022-03-14 18:15:51 CET; 32min ago
  Process: 1187587 ExecStart=/usr/sbin/keepalived $KEEPALIVED_OPTIONS (code=exited, status=0/SUCCESS)
 Main PID: 1187589 (code=exited, status=0/SUCCESS)

Mar 14 18:15:04 server1lb-fqdn Keepalived_vrrp[1187590]: Sending gratuitous ARP on eth0 for 10.44.192.142
Mar 14 18:15:50 server1lb-fqdn systemd[1]: Stopping LVS and VRRP High Availability Monitor…
Mar 14 18:15:50 server1lb-fqdn Keepalived[1187589]: Stopping
Mar 14 18:15:50 server1lb-fqdn Keepalived_vrrp[1187590]: (LB_VIP_QA) sent 0 priority
Mar 14 18:15:50 server1lb-fqdn Keepalived_vrrp[1187590]: (LB_VIP_QA) removing VIPs.
Mar 14 18:15:51 server1lb-fqdn Keepalived_vrrp[1187590]: Stopped – used 0.002007 user time, 0.016303 system time
Mar 14 18:15:51 server1lb-fqdn Keepalived[1187589]: CPU usage (self/children) user: 0.000000/0.038715 system: 0.001061/0.166434
Mar 14 18:15:51 server1lb-fqdn Keepalived[1187589]: Stopped Keepalived v2.1.5 (07/13,2020)
Mar 14 18:15:51 server1lb-fqdn systemd[1]: keepalived.service: Succeeded.
Mar 14 18:15:51 server1lb-fqdn systemd[1]: Stopped LVS and VRRP High Availability Monitor

[root@server2:~]systemctl status keepalived|grep -i state
Mar 14 18:59:02 server2-fqdn Keepalived_vrrp[297368]: (LB_VIP_QA) Entering BACKUP STATE

[root@server1:~]# grep -i state /var/log/keepalived.log
Mar 14 18:59:02 server1lb-fqdn Keepalived_vrrp[297368]: (LB_VIP_QA) Entering MASTER STATE
 

a. Fix Keepalived SECURITY VIOLATION – scripts are being executed but script_security not enabled.
 

When configurating keepalived for a first time we have faced the following strange error inside keepalived status inside keepalived.log 
 

Feb 23 14:28:41 server1 Keepalived_vrrp[945478]: SECURITY VIOLATION – scripts are being executed but script_security not enabled.


To fix keepalived SECURITY VIOLATION error:

Add to /etc/keepalived/keepalived.conf on the keepalived node hosts
inside 

global_defs {}

After chunk
 

enable_script_security

include

# Synchro of the state of the connections between the LBs on the eth0 interface
  lvs_sync_daemon_interface eth0


5. Prepare rsyslog configuration and Inlcude additional keepalived options
to force keepalived log into /var/log/keepalived.log

To force keepalived log into /var/log/keepalived.log on RHEL 8 / CentOS and other Redhat Package Manager (RPM) Linux distributions

[root@server1:~]# vim /etc/rsyslog.d/48_keepalived.conf

#2022/02/02: HAProxy logs to local6, save the messages
local7.*                                                /var/log/keepalived.log
if ($programname == 'Keepalived') then -/var/log/keepalived.log
if ($programname == 'Keepalived_vrrp') then -/var/log/keepalived.log
& stop

[root@server:~]# touch /var/log/keepalived.log

Reload rsyslog to load new config
 

[root@server:~]# systemctl restart rsyslog
[root@server:~]# systemctl status rsyslog


rsyslog.service – System Logging Service
   Loaded: loaded (/usr/lib/systemd/system/rsyslog.service; enabled; vendor preset: enabled)
  Drop-In: /etc/systemd/system/rsyslog.service.d
           └─rsyslog-service.conf
   Active: active (running) since Mon 2022-03-07 13:34:38 CET; 1 weeks 0 days ago
     Docs: man:rsyslogd(8)

           https://www.rsyslog.com/doc/
 Main PID: 269574 (rsyslogd)
    Tasks: 6 (limit: 100914)
   Memory: 5.1M
   CGroup: /system.slice/rsyslog.service
           └─269574 /usr/sbin/rsyslogd -n

Mar 15 08:15:16 server1lb-fqdn rsyslogd[269574]: — MARK —
Mar 15 08:35:16 server1lb-fqdn rsyslogd[269574]: — MARK —
Mar 15 08:55:16 server1lb-fqdn rsyslogd[269574]: — MARK —


If once keepalived is loaded but you still have no log written inside /var/log/keepalived.log

[root@server1:~]# vim /etc/sysconfig/keepalived
 KEEPALIVED_OPTIONS="-D -S 7"

[root@server2:~]# vim /etc/sysconfig/keepalived
 KEEPALIVED_OPTIONS="-D -S 7"

[root@server1:~]# systemctl restart keepalived.service
[root@server1:~]#  systemctl status keepalived

● keepalived.service – LVS and VRRP High Availability Monitor
   Loaded: loaded (/usr/lib/systemd/system/keepalived.service; enabled; vendor preset: disabled)
   Active: active (running) since Thu 2022-02-24 12:12:20 CET; 2 weeks 4 days ago
 Main PID: 1030501 (keepalived)
    Tasks: 2 (limit: 100914)
   Memory: 1.8M
   CGroup: /system.slice/keepalived.service
           ├─1030501 /usr/sbin/keepalived -D
           └─1030502 /usr/sbin/keepalived -D

Warning: Journal has been rotated since unit was started. Log output is incomplete or unavailable.

[root@server2:~]# systemctl restart keepalived.service
[root@server2:~]# systemctl status keepalived

6. Monitoring VRRP traffic of the two keepaliveds with tcpdump
 

Once both keepalived are up and running a good thing is to check the VRRP protocol traffic keeps fluently on both machines.
Keepalived VRRP keeps communicating over the TCP / IP Port 112 thus you can simply snoop TCP tracffic on its protocol.
 

[root@server1:~]# tcpdump proto 112

tcpdump: verbose output suppressed, use -v or -vv for full protocol decode
listening on eth0, link-type EN10MB (Ethernet), capture size 262144 bytes
11:08:07.356187 IP server1lb-fqdn > vrrp.mcast.net: VRRPv2, Advertisement, vrid 50, prio 53, authtype simple, intvl 1s, length 20
11:08:08.356297 IP server1lb-fqdn > vrrp.mcast.net: VRRPv2, Advertisement, vrid 50, prio 53, authtype simple, intvl 1s, length 20
11:08:09.356408 IP server1lb-fqdn > vrrp.mcast.net: VRRPv2, Advertisement, vrid 50, prio 53, authtype simple, intvl 1s, length 20
11:08:10.356511 IP server1lb-fqdn > vrrp.mcast.net: VRRPv2, Advertisement, vrid 50, prio 53, authtype simple, intvl 1s, length 20
11:08:11.356655 IP server1lb-fqdn > vrrp.mcast.net: VRRPv2, Advertisement, vrid 50, prio 53, authtype simple, intvl 1s, length 20

[root@server2:~]# tcpdump proto 112

tcpdump: verbose output suppressed, use -v or -vv for full protocol decode
​listening on eth0, link-type EN10MB (Ethernet), capture size 262144 bytes
11:08:07.356187 IP server1lb-fqdn > vrrp.mcast.net: VRRPv2, Advertisement, vrid 50, prio 53, authtype simple, intvl 1s, length 20
11:08:08.356297 IP server1lb-fqdn > vrrp.mcast.net: VRRPv2, Advertisement, vrid 50, prio 53, authtype simple, intvl 1s, length 20
11:08:09.356408 IP server1lb-fqdn > vrrp.mcast.net: VRRPv2, Advertisement, vrid 50, prio 53, authtype simple, intvl 1s, length 20
11:08:10.356511 IP server1lb-fqdn > vrrp.mcast.net: VRRPv2, Advertisement, vrid 50, prio 53, authtype simple, intvl 1s, length 20
11:08:11.356655 IP server1lb-fqdn > vrrp.mcast.net: VRRPv2, Advertisement, vrid 50, prio 53, authtype simple, intvl 1s, length 20

As you can see the VRRP traffic on the network is originating only from server1lb-fqdn, this is so because host server1lb-fqdn is the keepalived configured master node.

It is possible to spoof the password configured to authenticate between two nodes, thus if you're bringing up keepalived service cluster make sure your security is tight at best the machines should be in a special local LAN DMZ, do not configure DMZ on the internet !!! 🙂 Or if you eventually decide to configure keepalived in between remote hosts, make sure you somehow use encrypted VPN or SSH tunnels to tunnel the VRRP traffic.

[root@server1:~]tcpdump proto 112 -vv
tcpdump: listening on eth0, link-type EN10MB (Ethernet), capture size 262144 bytes
11:36:25.530772 IP (tos 0xc0, ttl 255, id 59838, offset 0, flags [none], proto VRRP (112), length 40)
    server1lb-fqdn > vrrp.mcast.net: vrrp server1lb-fqdn > vrrp.mcast.net: VRRPv2, Advertisement, vrid 50, prio 53, authtype simple, intvl 1s, length 20, addrs: VIPIP_QA auth "testp431"
11:36:26.530874 IP (tos 0xc0, ttl 255, id 59839, offset 0, flags [none], proto VRRP (112), length 40)
    server1lb-fqdn > vrrp.mcast.net: vrrp server1lb-fqdn > vrrp.mcast.net: VRRPv2, Advertisement, vrid 50, prio 53, authtype simple, intvl 1s, length 20, addrs: VIPIP_QA auth "testp431"

Lets also check what floating IP is configured on the machines:

[root@server1:~]# ip -brief address show
lo               UNKNOWN        127.0.0.1/8 
eth0             UP             10.10.10.5/26 10.10.10.1/32 

The 10.10.10.5 IP is the main IP set on LAN interface eth0, 10.10.10.1 is the floating IP which as you can see is currently set by keepalived to listen on first node.

[root@server2:~]# ip -brief address show |grep -i 10.10.10.1

An empty output is returned as floating IP is currently configured on server1

To double assure ourselves the IP is assigned on correct machine, lets ping it and check the IP assigned MAC  currently belongs to which machine.
 

[root@server2:~]# ping 10.10.10.1
PING 10.10.10.1 (10.10.10.1) 56(84) bytes of data.
64 bytes from 10.10.10.1: icmp_seq=1 ttl=64 time=0.526 ms
^C
— 10.10.10.1 ping statistics —
1 packets transmitted, 1 received, 0% packet loss, time 0ms
rtt min/avg/max/mdev = 0.526/0.526/0.526/0.000 ms

[root@server2:~]# arp -an |grep -i 10.44.192.142
? (10.10.10.1) at 00:48:54:91:83:7d [ether] on eth0
[root@server2:~]# ip a s|grep -i 00:48:54:91:83:7d
[root@server2:~]# 

As you can see from below output MAC is not found in configured IPs on server2.
 

[root@server1-fqdn:~]# /sbin/ip a s|grep -i 00:48:54:91:83:7d -B1 -A1
 eth0: <BROADCAST,MULTICAST,UP,LOWER_UP> mtu 1500 qdisc mq state UP group default qlen 1000
    link/ether 00:48:54:91:83:7d brd ff:ff:ff:ff:ff:ff
inet 10.10.10.1/26 brd 10.10.1.191 scope global noprefixroute eth0

Pretty much expected MAC is on keepalived node server1.


7. Testing keepalived on server1 and server2 maachines VIP floating IP really works
 

To test the overall configuration just created, you should stop keeaplived on the Master node and in meantime keep an eye on Slave node (server2), whether it can figure out the Master node is gone and switch its
state BACKUP to save MASTER. By changing the secondary (Slave) keepalived to master the floating IP: 10.10.10.1 will be brought up by the scripts on server2.

Lets assume that something went wrong with server1 VM host, for example the machine crashed due to service overload, DDoS or simply a kernel bug or whatever reason.
To simulate that we simply have to stop keepalived, then the broadcasted information on VRRP TCP/IP proto port 112 will be no longer available and keepalived on node server2, once
unable to communicate to server1 should chnage itself to state MASTER.

[root@server1:~]# systemctl stop keepalived
[root@server1:~]# systemctl status keepalived

● keepalived.service – LVS and VRRP High Availability Monitor
   Loaded: loaded (/usr/lib/systemd/system/keepalived.service; enabled; vendor preset: disabled)
   Active: inactive (dead) since Tue 2022-03-15 12:11:33 CET; 3s ago
  Process: 1192001 ExecStart=/usr/sbin/keepalived $KEEPALIVED_OPTIONS (code=exited, status=0/SUCCESS)
 Main PID: 1192002 (code=exited, status=0/SUCCESS)

Mar 14 18:59:07 server1lb-fqdn Keepalived_vrrp[1192003]: Sending gratuitous ARP on eth0 for 10.10.10.1
Mar 15 12:11:32 server1lb-fqdn systemd[1]: Stopping LVS and VRRP High Availability Monitor…
Mar 15 12:11:32 server1lb-fqdn Keepalived[1192002]: Stopping
Mar 15 12:11:32 server1lb-fqdn Keepalived_vrrp[1192003]: (LB_VIP_QA) sent 0 priority
Mar 15 12:11:32 server1lb-fqdn Keepalived_vrrp[1192003]: (LB_VIP_QA) removing VIPs.
Mar 15 12:11:33 server1lb-fqdn Keepalived_vrrp[1192003]: Stopped – used 2.145252 user time, 15.513454 system time
Mar 15 12:11:33 server1lb-fqdn Keepalived[1192002]: CPU usage (self/children) user: 0.000000/44.555362 system: 0.001151/170.118126
Mar 15 12:11:33 server1lb-fqdn Keepalived[1192002]: Stopped Keepalived v2.1.5 (07/13,2020)
Mar 15 12:11:33 server1lb-fqdn systemd[1]: keepalived.service: Succeeded.
Mar 15 12:11:33 server1lb-fqdn systemd[1]: Stopped LVS and VRRP High Availability Monitor.


On keepalived off, you will get also a notification Email on the Receipt Email configured from keepalived.conf from the working keepalived node with a simple message like:

=> VRRP Instance is no longer owning VRRP VIPs <=

Once keepalived is back up you will get another notification like:

=> VRRP Instance is now owning VRRP VIPs <=

[root@server2:~]# systemctl status keepalived
● keepalived.service – LVS and VRRP High Availability Monitor
   Loaded: loaded (/usr/lib/systemd/system/keepalived.service; enabled; vendor preset: disabled)
   Active: active (running) since Mon 2022-03-14 18:13:52 CET; 17h ago
  Process: 297366 ExecStart=/usr/sbin/keepalived $KEEPALIVED_OPTIONS (code=exited, status=0/SUCCESS)
 Main PID: 297367 (keepalived)
    Tasks: 2 (limit: 100914)
   Memory: 2.1M
   CGroup: /system.slice/keepalived.service
           ├─297367 /usr/sbin/keepalived -D -S 7
           └─297368 /usr/sbin/keepalived -D -S 7

Mar 15 12:11:33 server2lb-fqdn Keepalived_vrrp[297368]: Sending gratuitous ARP on eth0 for 10.10.10.1
Mar 15 12:11:33 server2lb-fqdn Keepalived_vrrp[297368]: Remote SMTP server [127.0.0.1]:25 connected.
Mar 15 12:11:33 server2lb-fqdn Keepalived_vrrp[297368]: SMTP alert successfully sent.
Mar 15 12:11:38 server2lb-fqdn Keepalived_vrrp[297368]: (LB_VIP_QA) Sending/queueing gratuitous ARPs on eth0 for 10.10.10.1
Mar 15 12:11:38 server2lb-fqdn Keepalived_vrrp[297368]: Sending gratuitous ARP on eth0 for 10.10.10.1

[root@server2:~]#  ip addr show|grep -i 10.10.10.1
    inet 10.10.10.1/32 scope global eth0
    

As you see the VIP is now set on server2, just like expected – that's OK, everything works as expected. If the IP did not move double check the keepalived.conf on both nodes for errors or misconfigurations.

To recover the initial order of things so server1 is MASTER and server2 SLAVE host, we just have to switch on the keepalived on server1 machine.

[root@server1:~]# systemctl start keepalived

The automatic change of server1 to MASTER node and respective move of the VIP IP is done because of the higher priority (of importance we previously configured on server1 in keepalived.conf).
 

What we learned?
 

So what we learned in  this article?
We have seen how to easily install and configure a High Availability Load balancer with Keepalived with single floating VIP IP address with 1 MASTER and 1 SLAVE host and a Haproxy example config with few frontends / App backends. We have seen how the config can be tested for potential errors and how we can monitor whether the VRRP2 network traffic flows between nodes and how to potentially debug it further if necessery.
Further on rawly explained some of the keepalived configurations but as keepalived can do pretty much more,for anyone seriously willing to deal with keepalived on a daily basis or just fine tune some already existing ones, you better read closely its manual page "man keepalived.conf" as well as the official Redhat Linux documentation page on setting up a Linux cluster with Keepalived (Be prepare for a small nightmare as the documentation of it seems to be a bit chaotic, and even I would say partly missing or opening questions on what does the developers did meant – not strange considering the havoc that is pretty much as everywhere these days.)

Finally once keepalived hosts are prepared, it was shown how to test the keepalived application cluster and Floating IP does move between nodes in case if one of the 2 keepalived nodes is inaccessible.

The same logic can be repeated multiple times and if necessery you can set multiple VIPs to expand the HA reachable IPs solution.
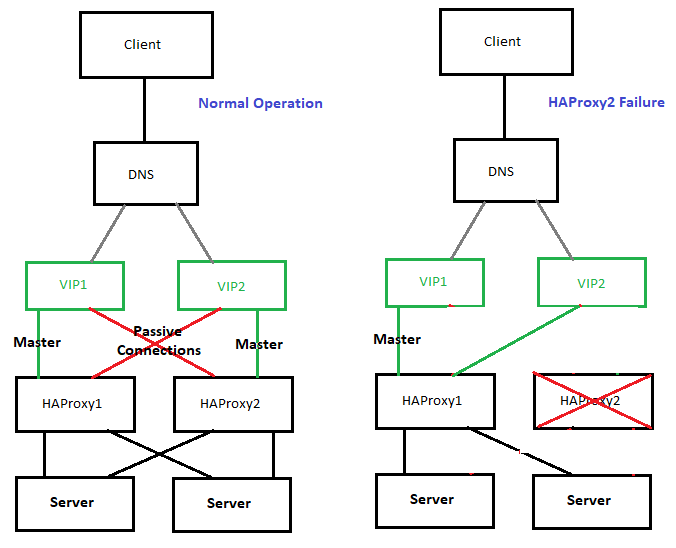
high-availability-with-two-vips-example-diagram

The presented idea is with haproxy forward Proxy server to proxy requests towards Application backend (servince machines), however if you need to set another set of server on the flow to  process HTML / XHTML / PHP / Perl / Python  programming code, with some common Webserver setup ( Nginx / Apache / Tomcat / JBOSS) and enable SSL Secure certificate with lets say Letsencrypt, this can be relatively easily done. If you want to implement letsencrypt and a webserver check this redundant SSL Load Balancing with haproxy & keepalived article.

That's all folks, hope you enjoyed.
If you need to configure keepalived Cluster or a consultancy write your query here 🙂

Vodka! :)

Wednesday, September 12th, 2007

Yesterday I drinked 200 gr. of Vodka yesterday Night, it was pretty refreshing for me but I got drunk a little.I'm smoking again … Things are going bad in my life recently. I have health issues. And I intend to go to doctor today.Yesterday I went to the polyclinic but my personal Dr. Nikolay  was not there (I was angry, I went to doctor once in years and he is not there) so I'll try again today. I had pains somewhere around the stomach. At least at work things are going smoothly at least God hears my prayers about this. I'm very confused and I have completely no idea what to do with my life. Yesterday I was out with Lily and Kiril on the fountain. The previous day Nomen, I, Yavor, Kiro and Bino went to the "Kobaklyka" (a woody place which is close to Dobrich.) Well that's most of what's happening lately with my life. I wrote a little script to make that nautilus to get restarted if it starts burning the cpu. It's a dumb script (the bad thing is that I'm loosing form scripting, Well I don't script much lately). Here is the script http://pcfreak.d-bg.net/bshscr/restart_nautilus.sh https://www.pc-freak.net/bshscr/restart_nautilus.sh. The days before the 4 days weekend, I hat to spend a lot of time on one of the servers fighting with Spammers. Hate spammers really! I ended removing bounce messages at all for one of the domains, which fixed the bounce spam method spammers use (btw qmail's chkuser seems to not work properly for some reason) … Also I started watching Stargate – SG1. First I thought it's a stupid sci-fi serial. But after the first serie I now think it has it's good moments :]. Also I had something like a Mortification Day going on during Monday. The whole day I listened to Mortification (The first Christian Death Metal Band). I Liked much the "Hammer of God" album. In the evening Sabin (Bino) came home and we watched some Mortification videos at Youtube. Right now I listen again to "Ever – Idyll" a pretty great song. And yeah I keep listening to ChristianIndustrial.net a lot, a great radio. Try it if you haven't!END—–

Monitoring Linux hardware Hard Drives / Temperature and Disk with lm_sensors / smartd / hddtemp and Zabbix Userparameter lm_sensors report script

Thursday, April 30th, 2020

monitoring-linux-hardware-with-software-temperature-disk-cpu-health-zabbix-userparameter-script

I'm part of a  SysAdmin Team that is partially doing some minor Zabbix imrovements on a custom corporate installed Zabbix in an ongoing project to substitute the previous HP OpenView monitoring for a bunch of Legacy Linux hosts.
As one of the necessery checks to have is regarding system Hardware, the task was to invent some simplistic way to monitor hardware with the Zabbix Monitoring tool.  Monitoring Bare Metal servers hardware of HP / Dell / Fujituse etc. servers  in Linux usually is done with a third party software provided by the Hardware vendor. But as this requires an additional services to run and sometimes is not desired. It was interesting to find out some alternative Linux native ways to do the System hardware monitoring.
Monitoring statistics from the system hardware components can be obtained directly from the server components with ipmi / ipmitool (for more info on it check my previous article Reset and Manage intelligent  Platform Management remote board article).
With ipmi
 hardware health info could be received straight from the ILO / IDRAC / HPMI of the server. However as often the Admin-Lan of the server is in a seperate DMZ secured network and available via only a certain set of routed IPs, ipmitool can't be used.

So what are the other options to use to implement Linux Server Hardware Monitoring?

The tools to use are perhaps many but I know of two which gives you most of the information you ever need to have a prelimitary hardware damage warning system before the crash, these are:
 

1. smartmontools (smartd)

Smartd is part of smartmontools package which contains two utility programs (smartctl and smartd) to control and monitor storage systems using the Self-Monitoring, Analysis and Reporting Technology system (SMART) built into most modern ATA/SATA, SCSI/SAS and NVMe disks

Disk monitoring is handled by a special service the package provides called smartd that does query the Hard Drives periodically aiming to find a warning signs of hardware failures.
The downside of smartd use is that it implies a little bit of extra load on Hard Drive read / writes and if misconfigured could reduce the the Hard disk life time.


linux:~#  /usr/sbin/smartctl -a /dev/sdb2
smartctl 6.6 2017-11-05 r4594 [x86_64-linux-4.19.0-5-amd64] (local build)
Copyright (C) 2002-17, Bruce Allen, Christian Franke, www.smartmontools.org

=== START OF INFORMATION SECTION ===
Device Model:     KINGSTON SA400S37240G
Serial Number:    50026B768340AA31
LU WWN Device Id: 5 0026b7 68340aa31
Firmware Version: S1Z40102
User Capacity:    240,057,409,536 bytes [240 GB]
Sector Size:      512 bytes logical/physical
Rotation Rate:    Solid State Device
Device is:        Not in smartctl database [for details use: -P showall]
ATA Version is:   ACS-3 T13/2161-D revision 4
SATA Version is:  SATA 3.2, 6.0 Gb/s (current: 3.0 Gb/s)
Local Time is:    Thu Apr 30 14:05:01 2020 EEST
SMART support is: Available – device has SMART capability.
SMART support is: Enabled

=== START OF READ SMART DATA SECTION ===
SMART overall-health self-assessment test result: PASSED

General SMART Values:
Offline data collection status:  (0x00) Offline data collection activity
                                        was never started.
                                        Auto Offline Data Collection: Disabled.
Self-test execution status:      (   0) The previous self-test routine completed
                                        without error or no self-test has ever
                                        been run.
Total time to complete Offline
data collection:                (  120) seconds.
Offline data collection
capabilities:                    (0x11) SMART execute Offline immediate.
                                        No Auto Offline data collection support.
                                        Suspend Offline collection upon new
                                        command.
                                        No Offline surface scan supported.
                                        Self-test supported.
                                        No Conveyance Self-test supported.
                                        No Selective Self-test supported.
SMART capabilities:            (0x0002) Does not save SMART data before
                                        entering power-saving mode.
                                        Supports SMART auto save timer.
Error logging capability:        (0x01) Error logging supported.
                                        General Purpose Logging supported.
Short self-test routine
recommended polling time:        (   2) minutes.
Extended self-test routine
recommended polling time:        (  10) minutes.

SMART Attributes Data Structure revision number: 1
Vendor Specific SMART Attributes with Thresholds:
ID# ATTRIBUTE_NAME          FLAG     VALUE WORST THRESH TYPE      UPDATED  WHEN_FAILED RAW_VALUE
  1 Raw_Read_Error_Rate     0x0032   100   100   000    Old_age   Always       –       100
  9 Power_On_Hours          0x0032   100   100   000    Old_age   Always       –       2820
 12 Power_Cycle_Count       0x0032   100   100   000    Old_age   Always       –       21
148 Unknown_Attribute       0x0000   100   100   000    Old_age   Offline      –       0
149 Unknown_Attribute       0x0000   100   100   000    Old_age   Offline      –       0
167 Unknown_Attribute       0x0000   100   100   000    Old_age   Offline      –       0
168 Unknown_Attribute       0x0012   100   100   000    Old_age   Always       –       0
169 Unknown_Attribute       0x0000   100   100   000    Old_age   Offline      –       0
170 Unknown_Attribute       0x0000   100   100   010    Old_age   Offline      –       0
172 Unknown_Attribute       0x0032   100   100   000    Old_age   Always       –       0
173 Unknown_Attribute       0x0000   100   100   000    Old_age   Offline      –       0
181 Program_Fail_Cnt_Total  0x0032   100   100   000    Old_age   Always       –       0
182 Erase_Fail_Count_Total  0x0000   100   100   000    Old_age   Offline      –       0
187 Reported_Uncorrect      0x0032   100   100   000    Old_age   Always       –       0
192 Power-Off_Retract_Count 0x0012   100   100   000    Old_age   Always       –       16
194 Temperature_Celsius     0x0022   034   052   000    Old_age   Always       –       34 (Min/Max 19/52)
196 Reallocated_Event_Count 0x0032   100   100   000    Old_age   Always       –       0
199 UDMA_CRC_Error_Count    0x0032   100   100   000    Old_age   Always       –       0
218 Unknown_Attribute       0x0032   100   100   000    Old_age   Always       –       0
231 Temperature_Celsius     0x0000   097   097   000    Old_age   Offline      –       97
233 Media_Wearout_Indicator 0x0032   100   100   000    Old_age   Always       –       2104
241 Total_LBAs_Written      0x0032   100   100   000    Old_age   Always       –       1857
242 Total_LBAs_Read         0x0032   100   100   000    Old_age   Always       –       1141
244 Unknown_Attribute       0x0000   100   100   000    Old_age   Offline      –       32
245 Unknown_Attribute       0x0000   100   100   000    Old_age   Offline      –       107
246 Unknown_Attribute       0x0000   100   100   000    Old_age   Offline      –       15940

SMART Error Log Version: 1
No Errors Logged

SMART Self-test log structure revision number 1
No self-tests have been logged.  [To run self-tests, use: smartctl -t]

Selective Self-tests/Logging not supported


2. hddtemp


Usually if smartd is used it is useful to also use hddtemp which relies on smartd data.
 The hddtemp program monitors and reports the temperature of PATA, SATA
 or SCSI hard drives by reading Self-Monitoring Analysis and Reporting
 Technology (S.M.A.R.T.)
information on drives that support this feature.
 

linux:~# /usr/sbin/hddtemp /dev/sda1
/dev/sda1: Hitachi HDS721050CLA360: 31°C
linux:~# /usr/sbin/hddtemp /dev/sdc6
/dev/sdc6: KINGSTON SV300S37A120G: 25°C
linux:~# /usr/sbin/hddtemp /dev/sdb2
/dev/sdb2: KINGSTON SA400S37240G: 34°C
linux:~# /usr/sbin/hddtemp /dev/sdd1
/dev/sdd1: WD Elements 10B8: S.M.A.R.T. not available


3. lm-sensors / i2c-tools 

 Lm-sensors is a hardware health monitoring package for Linux. It allows you
 to access information from temperature, voltage, and fan speed sensors.
i2c-tools
was historically bundled in the same package as lm_sensors but has been seperated cause not all hardware monitoring chips are I2C devices, and not all I2C devices are hardware monitoring chips.

The most basic use of lm-sensors is with the sensors command


linux:~# sensors
i350bb-pci-0600
Adapter: PCI adapter
loc1:         +55.0 C  (high = +120.0 C, crit = +110.0 C)


coretemp-isa-0000
Adapter: ISA adapter
Physical id 0:  +28.0 C  (high = +78.0 C, crit = +88.0 C)
Core 0:         +26.0 C  (high = +78.0 C, crit = +88.0 C)
Core 1:         +28.0 C  (high = +78.0 C, crit = +88.0 C)
Core 2:         +28.0 C  (high = +78.0 C, crit = +88.0 C)
Core 3:         +28.0 C  (high = +78.0 C, crit = +88.0 C)


On CentOS Linux useful tool is also  lm_sensors-sensord.x86_64 – A Daemon that periodically logs sensor readings to syslog or a round-robin database, and warns of sensor alarms.

In Debian Linux there is also the psensors-server (an HTTP server providing JSON Web service which can be used by GTK+ Application to remotely monitor sensors) useful for developers
psesors-server

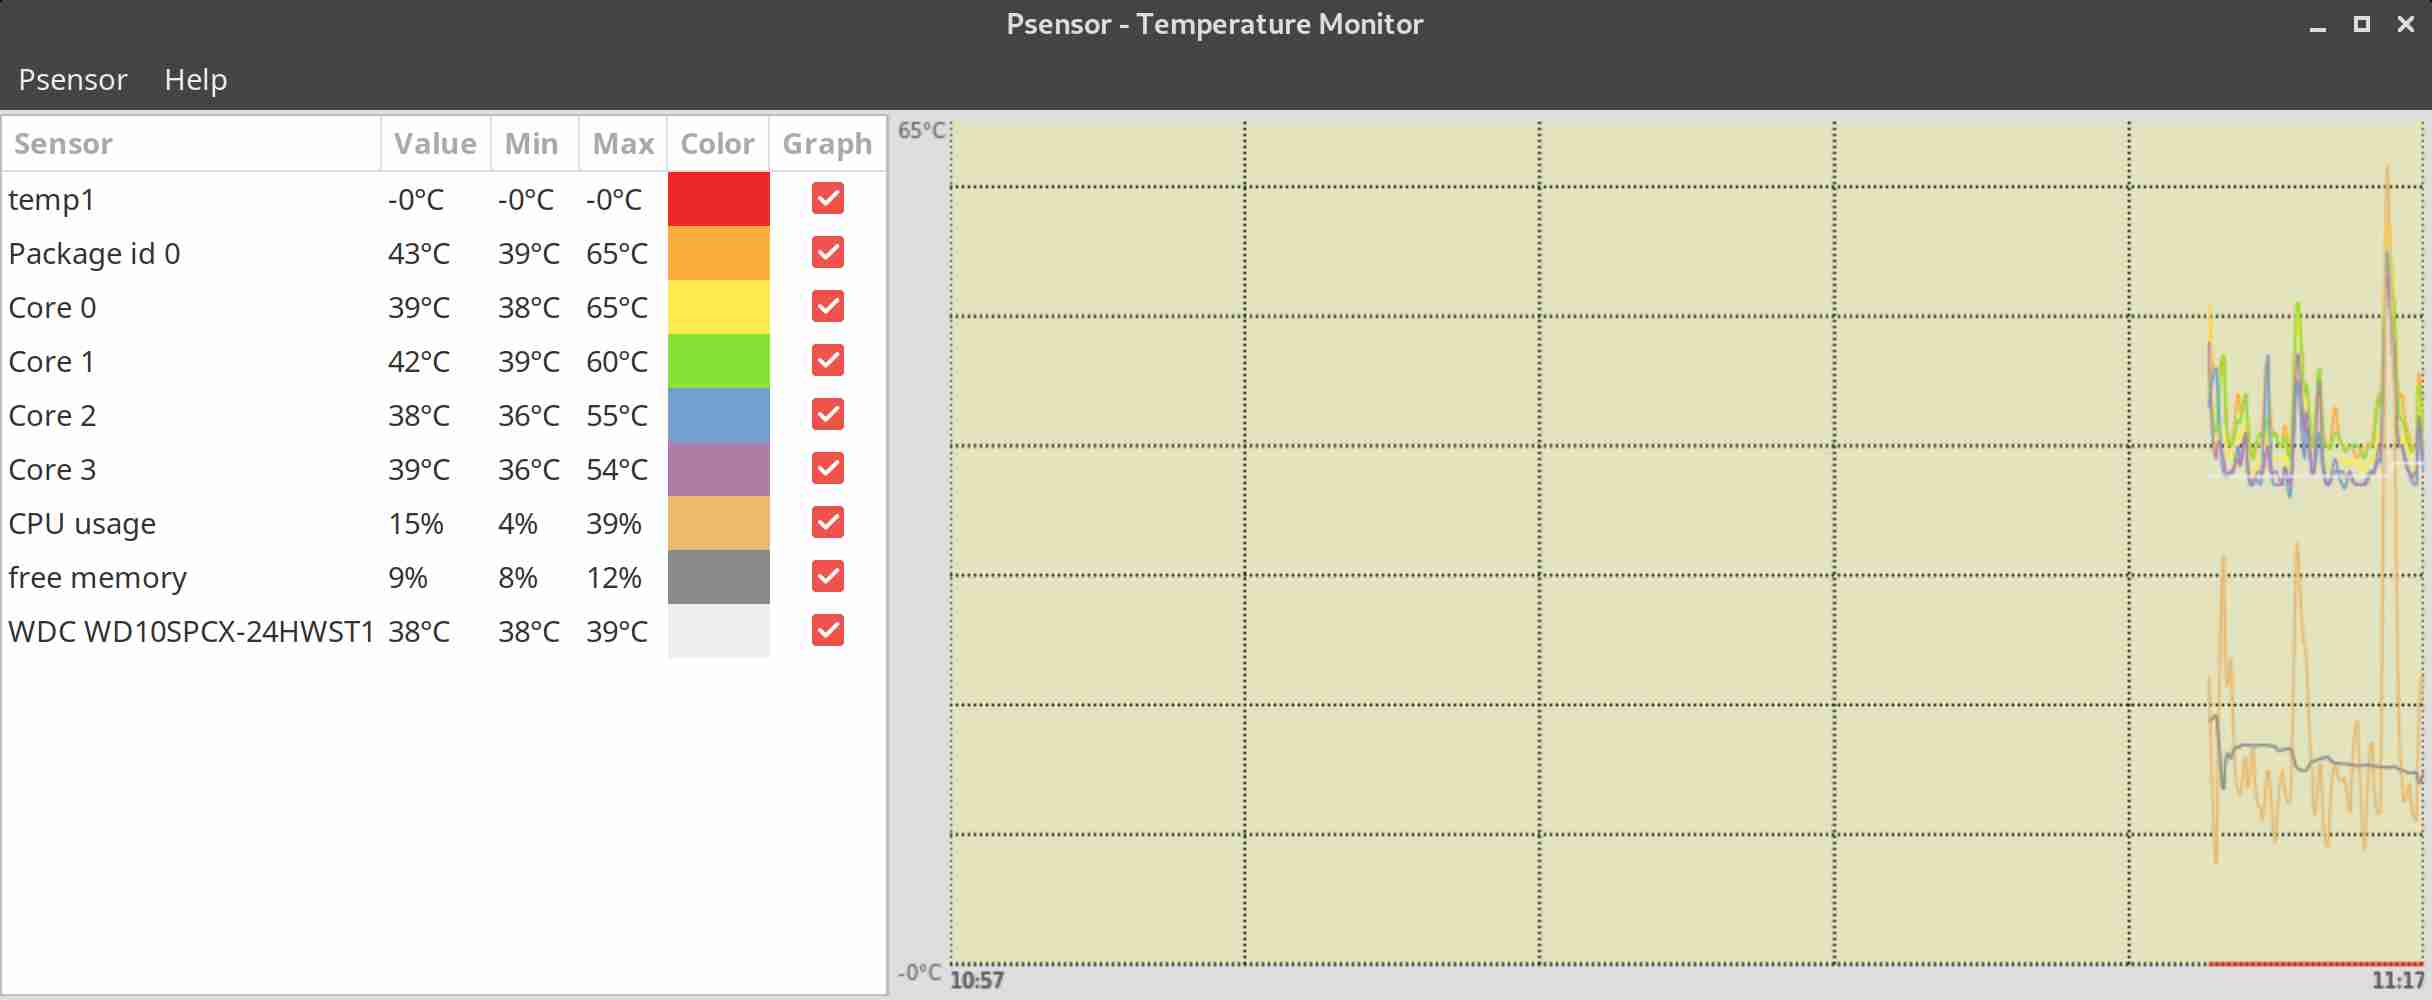
psensor-linux-graphical-tool-to-check-cpu-hard-disk-temperature-unix

If you have a Xserver installed on the Server accessed with Xclient or via VNC though quite rare,
You can use xsensors or Psensora GTK+ (Widget Toolkit for creating Graphical User Interface) application software.

With this 3 tools it is pretty easy to script one liners and use the Zabbix UserParameters functionality to send hardware report data to a Company's Zabbix Sserver, though Zabbix has already some templates to do so in my case, I couldn't import this templates cause I don't have Zabbix Super-Admin credentials, thus to work around that a sample work around is use script to monitor for higher and critical considered temperature.
Here is a tiny sample script I came up in 1 min time it can be used to used as 1 liner UserParameter and built upon something more complex.

SENSORS_HIGH=`sensors | awk '{ print $6 }'| grep '^+' | uniq`;
SENSORS_CRIT=`sensors | awk '{ print $9 }'| grep '^+' | uniq`; ;SENSORS_STAT=`sensors|grep -E 'Core\s' | awk '{ print $1" "$2" "$3 }' | grep "$SENSORS_HIGH|$SENSORS_CRIT"`;
if [ ! -z $SENSORS_STAT ]; then
echo 'Temperature HIGH';
else 
echo 'Sensors OK';
fi 

Of course there is much more sophisticated stuff to use for monitoring out there


Below script can be easily adapted and use on other Monitoring Platforms such as Nagios / Munin / Cacti / Icinga and there are plenty of paid solutions, but for anyone that wants to develop something from scratch just like me I hope this
article will be a good short introduction.
If you know some other Linux hardware monitoring tools, please share.

A lightweight Email Client Graphical client for old computers with Linux (Claws)

Sunday, August 12th, 2018

claws-email-logo-best-email-leightweight-client-for-older-computer-configurations-with-linux.

If you happen to be system administrating an old computers with some 512 Megabytes of RAM or 1 Gigabyte of Memory with preinstalled some archaic version of GNU / Linux distro such as Slackware, Calderra Linux,  Debian / Ubuntu / Fedora etc. and there is suddenly need to use this PCs with a decent graphical email client for its existing GUI environment LXDE / XFCE / WindowMaker / Mate etc. then Mozilla Thunderbird

Definitely won't be the client of choice especially if you have to add 5 or 10 email accounts (with a few hundred of emails laying on the remote mail server) to be periodically fetched via POP3 or IMAP protocol.

Of course there is always the option to just use a simple Text Email clients such as Fetchmail, PINE or MUTT and unload the PCs memory and CPU with the simplistic text interface however as most people are totally unacquainted with Linux console or terminal, for most that won't be the option of choice.
 

  • So what is the best solution for a lightweight Graphical Email Client for Linux for Old Computers ?


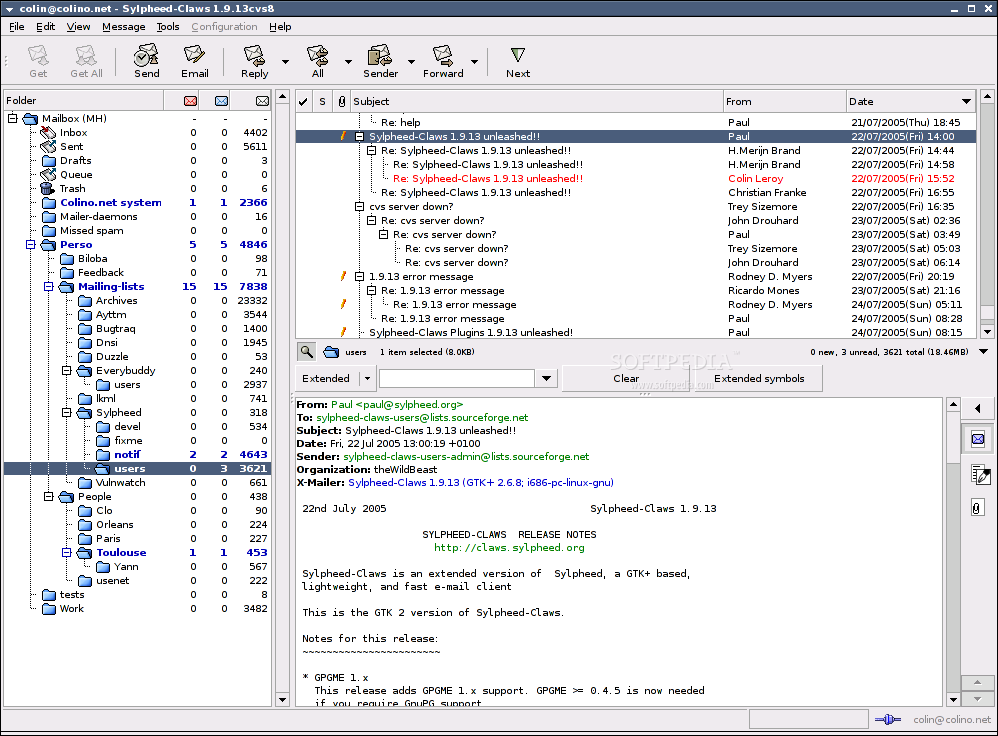
!!! Say Hello to Sylpheed CLAWS EMail Desktop client !!!

Best-Email-client-for-old-computers-with-Linux-Sylpheed-Claws_1-screenshot-on-Window-Maker


linux:~# apt-cache show claws-mail|grep -i descrip -A 3 -B 1
Breaks: claws-mail-extra-plugins (<< 3.9.1-1)
Description-en: Fast, lightweight and user-friendly GTK+2 based email client
 Claws Mail is a powerful and full-featured mail client formerly called
 Sylpheed-Claws. It is also extensible using loadable plugins, which can
 provide support for additional features, like other storage formats,
 feed reader, calendar management, mail filtering, etc.

Description-md5: f9d9f85803d938ab3d5fbc85f90e263a
Multi-Arch: foreign
Homepage: http://www.claws-mail.org
Section: mail


A. Installing Claws Email on Debian Linux distribution
 

Assuming you need to install claws on Debian based Linux distributions;


debian:~# apt-get install –yes claws-mail


B. Installing Claws on Fedora Linux distribution

For older Fedora Linux:
 

[root@fedora ~:]# yum install claws-mail


On a newer Fedora Linux installations (for those who are already used to Claws and migrate to a newer computer with a fresh Fedora install)
 

[root@fedora ~:]# dhf install claws-mail


Note that newer versions of Fedora Linux the default yum package manager has been substituted for the newer and (said to be more) advanced dhf
 

C. Installing Claws email on Slackware Linux

Claws Mail is also available as a (Tar XZ – That's a slackware highly compressed .tar.gz equivallent which saves a lot of space for its packages), to install on slack get the package from the CD / DVD or download from internet and:


darkstar:~# installpkg claws-mail*.txz


By the way Claws mail might be also the email client of choice (for those who don't have to be bound by the slavery of Office 365 / Microsoft Office and transporters and Active Domain Controller Directory with Outlook Express.

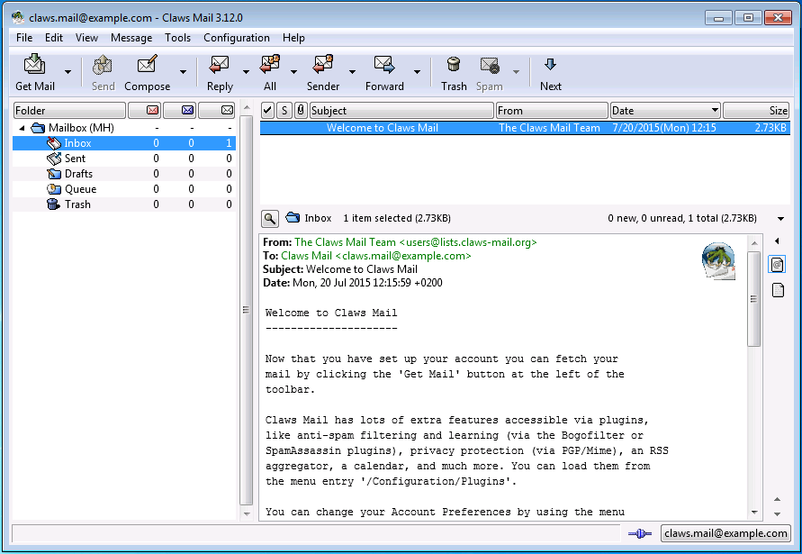
windows_claws-email-lightweight-email-client-screenshot

Even on old Computers with Microsoft Windows Claws email (which has also a Windows 32 Bit Port) might be among the best options for those who value their computer resources and interface simplicity and hence want to save memory and CPU load.

That is it,  try and enjoy Sylpheed Claws !


Play Midis on Linux / Make Linux MIDI Ready for the Future – Enable embedded MIDI music to play in a Browser, Play MIDIs with VLC and howto enjoy Midis in Text Console

Wednesday, October 4th, 2017

how-to-play-midi-on-gnu-linux-in-graphic-environment-console-and-browser-midi-synthesizer-and-linux-tux-together


Play Midis on Linux or Make Linux MIDI Ready for the Future – Enable embedded MIDI music to play in a Browser, Play MIDIs with VLC and howto enjoy Midis in Text Console HOWTO


Playing MIDI has been quite a lot of fun historically,

if you grow up in the days when personal computers were still young and the Sound Blaster was a luxury, before the raise of Mp3 music format, you have certainly enjoyed the beeping of PC Speaker and later on during 386 and 486 / 586 computers the enjoyment of playing tracked music such as S3M and MOD,

in that good days playing MIDI music was the only alternative for PC maniacs who doesn't own a CD Drive (which itself) was another luxury and even thouse who had a CD ROM device, were mainly playing music in CD audio format (.CDA).
Anyhow MIDI was a cheap and a CPU unintensive way to listen to equivalent of favourite popular Audio Songs and for those who still remember many of the songs were recreated in MIDI format, just with a number of synthesized instruments without any voice (as MIDI is usually).

The same was true also for the good old days of raise of Mobile Phones, when polyphonic was a standard as CPU power was low MIDI was a perfect substitute for the CPU heavy Encoded MP3s / OGG and other formats that required a modern for that time Intel CPU running in 50+ Mhz usually 100 / 166Mhz was perfect for the days to play Mp3 but still even on that PCs we listened to Midi songs.

Therefore if you're one of those people like me who still enjoy to play some Midi Music in the year 2017 and feel a bit like Back into the Future movie and a Free Software fan and user, especially if you're a novice GNU  / Linux Free Software user, you will be unpleasently surprised that most today's default Linux distributions doesn't have an easy way to play Midi music format out of the box right after install.

Hence below article aims to give you an understanding on

How you can play Midi Music on GNU / Linux Operating System

First, lets Prepare to load necessery Linux kernel modules to make sure MIDI can be played by soundcard:

In /etc/modules make sure you have the following list of modules loaded:
 

linux-desktop:~# cat /etc/modules
3c59x
snd-emu10k1
snd-pcm-oss
snd-mixer-oss
snd-seq-oss

!Note the modules are working as of time of writting and in time can change to some other modules, depending on how the development of ALSA (Advanced Linux Sound Architecture) goes, and if the developers decide to rename the upmentioned modules

If you just have added the modules to /etc/modules with vim / nano to reload modules into the Linux kernel run:


linux-desktop:~# modprobe -a


Secondly, Installing a whole bunch of MIDI music related program tools can be achieved in Debian by installing the multimedia-midi package, e.g.:


linux-desktop:~# apt-get install –yes multimedia-midi


1. Playing Midi in Graphical environment with a double click using VLC


How to make MIDI easy listanable in Linux graphical environment like GNOME / KDE / XFCE desktop ?


If you want to make Midi music execution sa easy as  just clicking on the .MIDI file format on Linux you can do that with a midi extension available for VLC (Video Lan Client) Universal Multi Platform Media Player player

To install it on Debian Ubuntu GNU / Linux
 

# apt-get install –yes vlc-plugin-fluidsynth


Необходимо е да се изтеглят 6754 B архиви.
След тази операция ще бъде използвано 35,8 kB допълнително дисково пространство.
Изт:1 http://deb.debian.org/debian stretch/main amd64 vlc-plugin-fluidsynth amd64 2.2.6-1~deb9u1 [6754 B]
Изтеглени 6754 B за 0с (33,6 kB/сек)           
Selecting previously unselected package vlc-plugin-fluidsynth:amd64.
(Reading database … 382976 files and directories currently installed.)
Preparing to unpack …/vlc-plugin-fluidsynth_2.2.6-1~deb9u1_amd64.deb …
Unpacking vlc-plugin-fluidsynth:amd64 (2.2.6-1~deb9u1) …
Setting up vlc-plugin-fluidsynth:amd64 (2.2.6-1~deb9u1) …
Processing triggers for libvlc-bin:amd64 (2.2.6-1~deb9u1) …


Besides making your MIDI play on the GUI environment easy as a a point and click VLC will also be able to play MIDIs on GNU / Linux from your favourite browser (nomatter Firefox / Chrome or Opera), even though the player would play in a new PopUP Window it is easy to select once MIDI file from a random website for example – here is a directory listing of Webserver with Doom II Soundtrack in MIDI format , click over any file from list and Choose option for VLC to always remember that MIDI files has to be opened with VLC player.


2. Enable Firefox / IceWeasel browser to Support Website embedded MIDI files


So VLC could make you listen the downloadable MIDIs from Web pages but,
 

What if you have stumbled on an old website which was configured with very OLD HTML Code to play some nice music (or even different MIDI songs) for each part of the website (for each webpage) and you want to have the Websites created with embedded MIDIs to automatically play on Linux oncce you visit the site?


Sadly default support in Browser for MIDI across all GNU / Linux, I've used so far never worked out of the box, not that still anyone is developing modern websites with MIDIs, but still for the sake of backward compitability and for sake of interactivity it is worthy to enable embedded MIDI support in Linux

But with a couple of tunings as usual GNU / Linux can do almost everything, so here is how to enable embedded browser support for Midi on Linux (That should work with minor modifications not only on Debian / Ubuntu / ArchLinux but also on Fedoras, CentOS etc.
If you try it on any of this distributions, please drop a short comment and tell me in few lines how you made embedded midi worked on that distros.


apt-get install –yes timidity mozplugger

Next do restart firefox

Sometimes in order to work you might need to delete /home/[YOUR_USERNAME]/.mozilla/pluginreg.dat and restart firefox again, e.g. make a backup and give it a try:


cp -rpf /home/hipo/.mozilla/pluginreg.dat /home/hipo/.mozilla/pluginreg.dat.bak
rm -f /home/hipo/.mozilla/pluginreg.dat


Another good tip as talking for embedding MIDI support is to embed XPDF to render PDF pages inside the Browser, by default this is done by GNOME's Evince PDF reader but as it is sometimes buggy and might crash it is generally a good idea to switch to xpdf instead, if for some reason PDF is not directly displaying in browser or suddenly stopped working after some distro uipgrade, you might want to do below as well:
 

apt-get install xpdf

vim /etc/mozpluggerrc

Fin d and Comment out the line starting with:

It should look like this afterwards:

 Repeat Swallow ….
 

text/x-pdf: pdf: PDF file
#      repeat swallow(documentShell) fill: acroread -geometry +9000+9000 +useFrontEndProgram "$file"
        repeat noisy swallow(Xpdf) fill: xpdf -g +9000+9000 "$file"
        repeat noisy swallow(gv) fill: gv –safer –quiet –antialias -geometry +9000+9000 "$file"


3. Play Midi music in Linux text console / terminal


There is a console tool that historically has been like the Linux standard for playing midis over the years as I remember, its called timidity


To install timidity on .Deb based Linux:
 

linux-desktop:~$ su root
Password:
linux-desktop:~# apt-get install –yes timidity

Необходимо е да се изтеглят 0 B/580 kB архиви.
След тази операция ще бъде използвано 0 B допълнително дисково пространство.
(Reading database … 382981 files and directories currently installed.)
Preparing to unpack …/timidity_2.13.2-40.5_amd64.deb …
Unpacking timidity (2.13.2-40.5) over (2.13.2-40.5) …
Processing triggers for menu (2.1.47+b1) …
Processing triggers for man-db (2.7.6.1-2) …
Setting up timidity (2.13.2-40.5) …
Processing triggers for menu (2.1.47+b1) …


To test your new MIDI Synthesizer tool and make the enjoyment full you can download Doom 2 extracted MIDI Soundtrack from here
 

Once you have downloaded above Metal MIDI DOOM old school arcade soundtrack and untarred it into your home directory be it ~/doom-midis

A remark to make here is timidity is quite CPU intensive, but on modern Dual and Quad-Core PC Notebooks, the CPU load is not of a big concern.

To test and play with timidity:
 

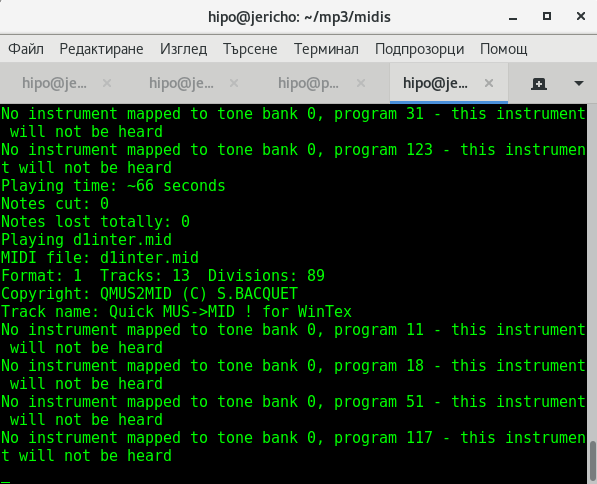
linux-desktop~$ timidity ~/mp3/midis/*


timidity-playing-doom-midi-bunny-song-on-debian-stretch-gnome-terminal-screenshot
 

hipo@jericho:~/mp3/midis$ aplaymidi -l
 Port    Client name                      Port name
 14:0    Midi Through                     Midi Through Port-0
128:0    TiMidity                         TiMidity port 0
128:1    TiMidity                         TiMidity port 1
128:2    TiMidity                         TiMidity port 2
128:3    TiMidity                         TiMidity port 3


We have also the playmidi  (simple midi text console terminal player), which historically was working quite decent and I use it to in the past on my RedHat 6.0 and RedHat 7.0 to listen to my .MID format files but unfortunately as of time of writting something is wrong with it, so when I try to play MIDIs with it instead of timidity I get this erro:


$ playmidi *.mid
Playmidi 2.4 Copyright (C) 1994-1997 Nathan I. Laredo, AWE32 by Takashi Iwai
This is free software with ABSOLUTELY NO WARRANTY.
For details please see the file COPYING.
open /dev/sequencer: No such file or directory

Even though I tried hard to resolve that error by loading various midi related MIDI modules and following a lot of the suggestions online on how to  make /dev/sequencer work again it was all no luck.
 

Some people back in the distant year 2005, reported the problem was solved by simply loading snd-seq

But as of time of writting:


# modprobe snd-seq


Some people said in archlinux's Forum

/dev/sequencer sequencer: No such file or directory


is solved by loading snd-seq-oss kernel module, but on my Debian Linux 9.1 Stretch, this ain't work as well :


root@jericho:/home/hipo/mp3/midis# modprobe snd-seq-oss
modprobe: FATAL: Module snd-seq-oss not found in directory /lib/modules/4.9.0-3-amd64
root@jericho:/home/hipo/mp3/midis# uname -a;
Linux jericho 4.9.0-3-amd64 #1 SMP Debian 4.9.30-2+deb9u5 (2017-09-19) x86_64 GNU/Linux


Another invention of mine was to try to also link /dev/snd/seq to /dev/sequencer but this produced no positive result either:


# ln -sf /dev/snd/seq /dev/sequencer
# ls -al /dev/sequencer
lrwxrwxrwx 1 root root 12 окт  4 16:48 /dev/sequencer -> /dev/snd/seq


Note that after lining in that way I got following error with my attempt to play MIDIs with playmidi

# playmidi *.mid
Playmidi 2.4 Copyright (C) 1994-1997 Nathan I. Laredo, AWE32 by Takashi Iwai
This is free software with ABSOLUTELY NO WARRANTY.
For details please see the file COPYING.
there is no soundcard


Anyhow on some other Linux distributions (especially with Older Kernel versions), some of the above 3 suggested Fix might work perfectly fine so if you have some time give it a try please and drop me  a comment on how it went, you will help the GNU / Linux community out there that way.

Well never mind the bollocks, so

Now back to where I started timidity even though it will play fine it will not give any indication on the lenght of the midi song (precious information such as how much time is left until the end is over).

Hence if you prefer a player that gives you an indicator on how much is left towards the end length of each of the played MIDI file you can give a try to wildmidi:


linux-desktop:~$ apt-cache show wildmidi|grep -i description -A 2

Description-en: software MIDI player
 Minimal MIDI player implementation based on the wildmidi library that
 can either dump to WAV or playback over ALSA. It is intended to

Description-md5: b4b34070ae88e73e3289b751230cfc89
Homepage: http://www.mindwerks.net/projects/wildmidi/
Tag: implemented-in::c, role::program, sound::midi, sound::player,

Description: software MIDI player
Description-md5: 4673a7051f104675c73eb344bb045607
Homepage: http://wildmidi.sourceforge.net/
Bugs: https://bugs.launchpad.net/ubuntu/+filebug


If yet not installed install it after becoming admin user:


linux-desktop:~$ su root
Password:

linux-desktop:~# apt-get install –yes wildmidi


wildmidi is much less CPU intensive (it uses gstreamer to play (Gstreamer – open source multimedia framework)

And next give it a try by running:


linux-desktop:~$ wildmidi ~/mp3/midis/*


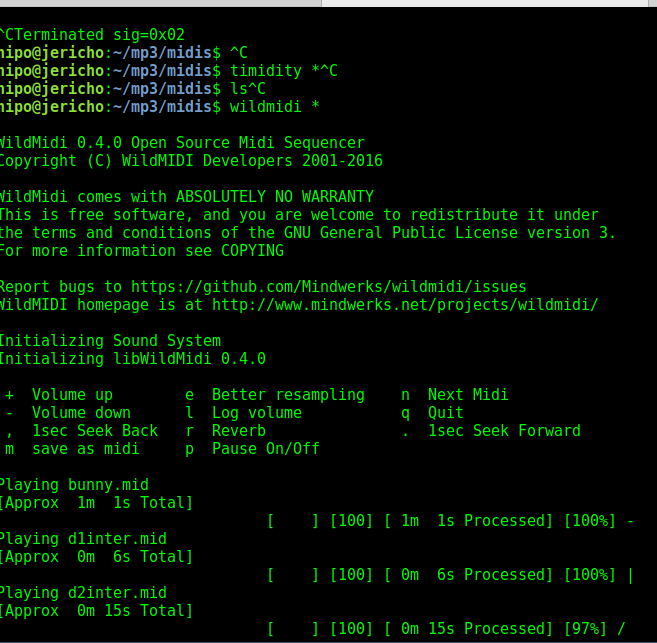
wildmidi-midi-lenght-status-text-console-player-for-linux-ubuntu-debian-fedora-suse


4. Editting MIDI files with Free Software and Proprietary MIDI Editor Programs


If you want a professional software that can play Midi in a fuzzy interactive GUI way and have some extra possibilities to edit MIDIs and other format give a try to Muse Sequencer:


linux-desktop:~$ sudo apt-get install –yes muse

The following NEW packages will be installed:
  muse
0 upgraded, 1 newly installed, 0 to remove and 38 not upgraded.
Need to get 5814 kB of archives.
After this operation, 21.0 MB of additional disk space will be used.
Get:1 http://deb.debian.org/debian stretch/main amd64 muse amd64 2.1.2-3+b1 [5814 kB]
Fetched 5814 kB in 2s (2205 kB/s)                             
    are supported and installed on your system.
Preconfiguring packages …
Selecting previously unselected package muse.
(Reading database … 382981 files and directories currently installed.)
Preparing to unpack …/muse_2.1.2-3+b1_amd64.deb …
Unpacking muse (2.1.2-3+b1) …
Processing triggers for mime-support (3.60) …
Processing triggers for desktop-file-utils (0.23-1) …
Processing triggers for doc-base (0.10.7) …
Processing 1 added doc-base file…
Registering documents with scrollkeeper…
Processing triggers for man-db (2.7.6.1-2) …
Processing triggers for shared-mime-info (1.8-1) …
Unknown media type in type 'all/all'
Unknown media type in type 'all/allfiles'
Processing triggers for gnome-menus (3.13.3-9) …
Setting up muse (2.1.2-3+b1) …
Processing triggers for hicolor-icon-theme (0.15-1) …


Below is short description what Muse can do for you:


MusE is a MIDI/audio sequencer with recording and editing capabilities.
 Some Highlights:
 

  * Standard midifile (smf) import-/export.
  * Organizes songs in tracks and parts which you can arrange with
    the part editor.
  * MIDI editors: pianoroll, drum, list, controller.
  * Score editor with high quality postscript printer output.
  * Realtime: editing while playing.
  * Unlimited number of open editors.
  * Unlimited undo/redo.
  * Realtime and step-recording.
  * Multiple MIDI devices.
  * Unlimited number of tracks.
  * Sync to external devices: MTC/MMC, Midi Clock, Master/Slave.
  * Audio tracks, LADSPA host for master effects.
  * Multithreaded.
  * Uses raw MIDI devices.
  * XML project file.
  * Project file contains complete app state (session data).
  * Application spanning Cut/Paste Drag/Drop.


linux-desktop~:$ muse

muse-advanced-midi-editor-free-software-for-linux


Below is another non-free program that you might, try if MusE doesn't fit your needs (is not rich enough for editting capabilities is bitwig (though I don't recommend since it is not free software)

bitwig – Bitwig Studio is a multi-platform music-creation system for production, performance and DJing, with a focus on flexible editing tools and a super-fast workflow.


bitwig-midi-and-audio-non-free-software-advanced-useful-sound-editor-for-linx


5. Some examples for Text editing and MIDI Conversion to CSV and ABC file formats There is pretty much more

For the MIDI Extremists who or people that create MIDIs and want to learn how a MIDI is made (the content of it etc.), I suggest you take a look at these 3 command line MIDI editing / conversion tools
 

  • midi2abc – A little tool to create MIDI formats to ABC format
  • midi2csv – Conver tour Favourite MIDI files to CSV for educational purposes so see what Channels, Tracks and Time Intervals is a MIDI song mad
  • midicopy – Copy selected, track, channel, time interval of MIDI file to another MIDI file3


Well, that's all folks now enjoy your MIDIs and don't forget to donate, as I'm jobless at the moment and the only profit I make is just a few bucks out of advertisement on this blog.
 

Block Web server over loading Bad Crawler Bots and Search Engine Spiders with .htaccess rules

Monday, September 18th, 2017

howto-block-webserver-overloading-bad-crawler-bots-spiders-with-htaccess-modrewrite-rules-file

In last post, I've talked about the problem of Search Index Crawler Robots aggressively crawling websites and how to stop them (the article is here) explaning how to raise delays between Bot URL requests to website and how to completely probhit some bots from crawling with robots.txt.

As explained in article the consequence of too many badly written or agressive behaviour Spider is the "server stoning" and therefore degraded Web Server performance as a cause or even a short time Denial of Service Attack, depending on how well was the initial Server Scaling done.

The bots we want to filter are not to be confused with the legitimate bots, that drives real traffic to your website, just for information

 The 10 Most Popular WebCrawlers Bots as of time of writting are:
 

1. GoogleBot (The Google Crawler bots, funnily bots become less active on Saturday and Sundays :))

2. BingBot (Bing.com Crawler bots)

3. SlurpBot (also famous as Yahoo! Slurp)

4. DuckDuckBot (The dutch search engine duckduckgo.com crawler bots)

5. Baiduspider (The Chineese most famous search engine used as a substitute of Google in China)

6. YandexBot (Russian Yandex Search engine crawler bots used in Russia as a substitute for Google )

7. Sogou Spider (leading Chineese Search Engine launched in 2004)

8. Exabot (A French Search Engine, launched in 2000, crawler for ExaLead Search Engine)

9. FaceBot (Facebook External hit, this crawler is crawling a certain webpage only once the user shares or paste link with video, music, blog whatever  in chat to another user)

10. Alexa Crawler (la_archiver is a web crawler for Amazon's Alexa Internet Rankings, Alexa is a great site to evaluate the approximate page popularity on the internet, Alexa SiteInfo page has historically been the Swift Army knife for anyone wanting to quickly evaluate a webpage approx. ranking while compared to other pages)

Above legitimate bots are known to follow most if not all of W3C – World Wide Web Consorium (W3.Org) standards and therefore, they respect the content commands for allowance or restrictions on a single site as given from robots.txt but unfortunately many of the so called Bad-Bots or Mirroring scripts that are burning your Web Server CPU and Memory mentioned in previous article are either not following /robots.txt prescriptions completely or partially.

Hence with the robots.txt unrespective bots, the case the only way to get rid of most of the webspiders that are just loading your bandwidth and server hardware is to filter / block them is by using Apache's mod_rewrite through


.htaccess


file

Create if not existing in the DocumentRoot of your website .htaccess file with whatever text editor, or create it your windows / mac os desktop and transfer via FTP / SecureFTP to server.

I prefer to do it directly on server with vim (text editor)


vim /var/www/sites/your-domain.com/.htaccess


RewriteEngine On

IndexIgnore .htaccess */.??* *~ *# */HEADER* */README* */_vti*

SetEnvIfNoCase User-Agent "^Black Hole” bad_bot
SetEnvIfNoCase User-Agent "^Titan bad_bot
SetEnvIfNoCase User-Agent "^WebStripper" bad_bot
SetEnvIfNoCase User-Agent "^NetMechanic" bad_bot
SetEnvIfNoCase User-Agent "^CherryPicker" bad_bot
SetEnvIfNoCase User-Agent "^EmailCollector" bad_bot
SetEnvIfNoCase User-Agent "^EmailSiphon" bad_bot
SetEnvIfNoCase User-Agent "^WebBandit" bad_bot
SetEnvIfNoCase User-Agent "^EmailWolf" bad_bot
SetEnvIfNoCase User-Agent "^ExtractorPro" bad_bot
SetEnvIfNoCase User-Agent "^CopyRightCheck" bad_bot
SetEnvIfNoCase User-Agent "^Crescent" bad_bot
SetEnvIfNoCase User-Agent "^Wget" bad_bot
SetEnvIfNoCase User-Agent "^SiteSnagger" bad_bot
SetEnvIfNoCase User-Agent "^ProWebWalker" bad_bot
SetEnvIfNoCase User-Agent "^CheeseBot" bad_bot
SetEnvIfNoCase User-Agent "^Teleport" bad_bot
SetEnvIfNoCase User-Agent "^TeleportPro" bad_bot
SetEnvIfNoCase User-Agent "^MIIxpc" bad_bot
SetEnvIfNoCase User-Agent "^Telesoft" bad_bot
SetEnvIfNoCase User-Agent "^Website Quester" bad_bot
SetEnvIfNoCase User-Agent "^WebZip" bad_bot
SetEnvIfNoCase User-Agent "^moget/2.1" bad_bot
SetEnvIfNoCase User-Agent "^WebZip/4.0" bad_bot
SetEnvIfNoCase User-Agent "^WebSauger" bad_bot
SetEnvIfNoCase User-Agent "^WebCopier" bad_bot
SetEnvIfNoCase User-Agent "^NetAnts" bad_bot
SetEnvIfNoCase User-Agent "^Mister PiX" bad_bot
SetEnvIfNoCase User-Agent "^WebAuto" bad_bot
SetEnvIfNoCase User-Agent "^TheNomad" bad_bot
SetEnvIfNoCase User-Agent "^WWW-Collector-E" bad_bot
SetEnvIfNoCase User-Agent "^RMA" bad_bot
SetEnvIfNoCase User-Agent "^libWeb/clsHTTP" bad_bot
SetEnvIfNoCase User-Agent "^asterias" bad_bot
SetEnvIfNoCase User-Agent "^httplib" bad_bot
SetEnvIfNoCase User-Agent "^turingos" bad_bot
SetEnvIfNoCase User-Agent "^spanner" bad_bot
SetEnvIfNoCase User-Agent "^InfoNaviRobot" bad_bot
SetEnvIfNoCase User-Agent "^Harvest/1.5" bad_bot
SetEnvIfNoCase User-Agent "Bullseye/1.0" bad_bot
SetEnvIfNoCase User-Agent "^Mozilla/4.0 (compatible; BullsEye; Windows 95)" bad_bot
SetEnvIfNoCase User-Agent "^Crescent Internet ToolPak HTTP OLE Control v.1.0" bad_bot
SetEnvIfNoCase User-Agent "^CherryPickerSE/1.0" bad_bot
SetEnvIfNoCase User-Agent "^CherryPicker /1.0" bad_bot
SetEnvIfNoCase User-Agent "^WebBandit/3.50" bad_bot
SetEnvIfNoCase User-Agent "^NICErsPRO" bad_bot
SetEnvIfNoCase User-Agent "^Microsoft URL Control – 5.01.4511" bad_bot
SetEnvIfNoCase User-Agent "^DittoSpyder" bad_bot
SetEnvIfNoCase User-Agent "^Foobot" bad_bot
SetEnvIfNoCase User-Agent "^WebmasterWorldForumBot" bad_bot
SetEnvIfNoCase User-Agent "^SpankBot" bad_bot
SetEnvIfNoCase User-Agent "^BotALot" bad_bot
SetEnvIfNoCase User-Agent "^lwp-trivial/1.34" bad_bot
SetEnvIfNoCase User-Agent "^lwp-trivial" bad_bot
SetEnvIfNoCase User-Agent "^Wget/1.6" bad_bot
SetEnvIfNoCase User-Agent "^BunnySlippers" bad_bot
SetEnvIfNoCase User-Agent "^Microsoft URL Control – 6.00.8169" bad_bot
SetEnvIfNoCase User-Agent "^URLy Warning" bad_bot
SetEnvIfNoCase User-Agent "^Wget/1.5.3" bad_bot
SetEnvIfNoCase User-Agent "^LinkWalker" bad_bot
SetEnvIfNoCase User-Agent "^cosmos" bad_bot
SetEnvIfNoCase User-Agent "^moget" bad_bot
SetEnvIfNoCase User-Agent "^hloader" bad_bot
SetEnvIfNoCase User-Agent "^humanlinks" bad_bot
SetEnvIfNoCase User-Agent "^LinkextractorPro" bad_bot
SetEnvIfNoCase User-Agent "^Offline Explorer" bad_bot
SetEnvIfNoCase User-Agent "^Mata Hari" bad_bot
SetEnvIfNoCase User-Agent "^LexiBot" bad_bot
SetEnvIfNoCase User-Agent "^Web Image Collector" bad_bot
SetEnvIfNoCase User-Agent "^The Intraformant" bad_bot
SetEnvIfNoCase User-Agent "^True_Robot/1.0" bad_bot
SetEnvIfNoCase User-Agent "^True_Robot" bad_bot
SetEnvIfNoCase User-Agent "^BlowFish/1.0" bad_bot
SetEnvIfNoCase User-Agent "^JennyBot" bad_bot
SetEnvIfNoCase User-Agent "^MIIxpc/4.2" bad_bot
SetEnvIfNoCase User-Agent "^BuiltBotTough" bad_bot
SetEnvIfNoCase User-Agent "^ProPowerBot/2.14" bad_bot
SetEnvIfNoCase User-Agent "^BackDoorBot/1.0" bad_bot
SetEnvIfNoCase User-Agent "^toCrawl/UrlDispatcher" bad_bot
SetEnvIfNoCase User-Agent "^WebEnhancer" bad_bot
SetEnvIfNoCase User-Agent "^TightTwatBot" bad_bot
SetEnvIfNoCase User-Agent "^suzuran" bad_bot
SetEnvIfNoCase User-Agent "^VCI WebViewer VCI WebViewer Win32" bad_bot
SetEnvIfNoCase User-Agent "^VCI" bad_bot
SetEnvIfNoCase User-Agent "^Szukacz/1.4" bad_bot
SetEnvIfNoCase User-Agent "^QueryN Metasearch" bad_bot
SetEnvIfNoCase User-Agent "^Openfind data gathere" bad_bot
SetEnvIfNoCase User-Agent "^Openfind" bad_bot
SetEnvIfNoCase User-Agent "^Xenu’s Link Sleuth 1.1c" bad_bot
SetEnvIfNoCase User-Agent "^Xenu’s" bad_bot
SetEnvIfNoCase User-Agent "^Zeus" bad_bot
SetEnvIfNoCase User-Agent "^RepoMonkey Bait & Tackle/v1.01" bad_bot
SetEnvIfNoCase User-Agent "^RepoMonkey" bad_bot
SetEnvIfNoCase User-Agent "^Zeus 32297 Webster Pro V2.9 Win32" bad_bot
SetEnvIfNoCase User-Agent "^Webster Pro" bad_bot
SetEnvIfNoCase User-Agent "^EroCrawler" bad_bot
SetEnvIfNoCase User-Agent "^LinkScan/8.1a Unix" bad_bot
SetEnvIfNoCase User-Agent "^Keyword Density/0.9" bad_bot
SetEnvIfNoCase User-Agent "^Kenjin Spider" bad_bot
SetEnvIfNoCase User-Agent "^Cegbfeieh" bad_bot


<Limit GET POST>
order allow,deny
allow from all
Deny from env=bad_bot
</Limit>


Above rules are Bad bots prohibition rules have RewriteEngine On directive included however for many websites this directive is enabled directly into VirtualHost section for domain/s, if that is your case you might also remove RewriteEngine on from .htaccess and still the prohibition rules of bad bots should continue to work
Above rules are also perfectly suitable wordpress based websites / blogs in case you need to filter out obstructive spiders even though the rules would work on any website domain with mod_rewrite enabled.

Once you have implemented above rules, you will not need to restart Apache, as .htaccess will be read dynamically by each client request to Webserver

2. Testing .htaccess Bad Bots Filtering Works as Expected


In order to test the new Bad Bot filtering configuration is working properly, you have a manual and more complicated way with lynx (text browser), assuming you have shell access to a Linux / BSD / *Nix computer, or you have your own *NIX server / desktop computer running
 

Here is how:


lynx -useragent="Mozilla/5.0 (compatible; MegaIndex.ru/2.0; +http://megaindex.com/crawler)" -head -dump http://www.your-website-filtering-bad-bots.com/


Note that lynx will provide a warning such as:

Warning: User-Agent string does not contain "Lynx" or "L_y_n_x"!

Just ignore it and press enter to continue.

Two other use cases with lynx, that I historically used heavily is to pretent with Lynx, you're GoogleBot in order to see how does Google actually see your website?
 

  • Pretend with Lynx You're GoogleBot


lynx -useragent="Mozilla/5.0 (compatible; Googlebot/2.1; +http://www.google.com/bot.html)" -head -dump http://www.your-domain.com/


  • How to Pretend with Lynx Browser You are GoogleBot-Mobile


lynx -useragent="Mozilla/5.0 (iPhone; U; CPU iPhone OS 4_1 like Mac OS X; en-us) AppleWebKit/532.9 (KHTML, like Gecko) Version/4.0.5 Mobile/8B117 Safari/6531.22.7 (compatible; Googlebot-Mobile/2.1; +http://www.google.com/bot.html)" -head -dump http://www.your-domain.com/


Or for the lazy ones that doesn't have Linux / *Nix at disposal you can use WannaBrowser website

Wannabrowseris a web based browser emulator which gives you the ability to change the User-Agent on each website req1uest, so just set your UserAgent to any bot browser that we just filtered for example set User-Agent to CheeseBot

The .htaccess rule earier added once detecting your browser client is coming in with the prohibit browser agent will immediately filter out and you'll be unable to access the website with a message like:
 

HTTP/1.1 403 Forbidden


Just as I've talked a lot about Index Bots, I think it is worthy to also mention three great websites that can give you a lot of Up to Date information on exact Spiders returned user-agent, common known Bot traits as well as a a current updated list with the Bad Bots etc.

Bot and Browser Resources information user-agents, bad-bots and odd Crawlers and Bots specifics

1. botreports.com
2. user-agents.org
3. useragentapi.com


An updated list with robots user-agents (crawler-user-agents) is also available in github here regularly updated by Caia Almeido

There are also a third party plugin (modules) available for Website Platforms like WordPress / Joomla / Typo3 etc.

Besides the listed on these websites as well as the known Bad and Good Bots, there are perhaps a hundred of others that might end up crawling your webdsite that might or might not need  to be filtered, therefore before proceeding with any filtering steps, it is generally a good idea to monitor your  HTTPD access.log / error.log, as if you happen to somehow mistakenly filter the wrong bot this might be a reason for Website Indexing Problems.

Hope this article give you some valueable information. Enjoy ! 🙂


Windows XP multicore not detected after CPU update – XP Enable multicore after singlecore install

Friday, April 8th, 2016

windows-xp-add-multicore-with-command-after-multiple-cpu-not-detected
These days it is not common to install Windows XP however for some old unsupproted applications that still work on XP in many countries  in Africa, Asia, Europe and even America. Custom patched Windows XP is still heaveily used for some corporate businesses in accounting and on airports and other government institutions even to these day, I'm aware of Windows still heavily used especially in  Russia, Belarus,Ukraine, Kazakhstan, Armenia, Bulgaria etc.

Hence still there is plenty of softwares designed to work XP the good old Win XP and thus often XP needs to be emulated on VMs though officially not supported any longer  by Microsoft (its Support lifecycle End was for a last time on April 14, 2009).

Now I guess these days I guess nobody doesn't install and use Windows XP on a normal hardware PC Desktop / laptop but XP is continually installed on Virtual machine servers VMWare / VirtualBox.

Hence if you happen to have already migrated or installed some old Windows XP operating systems under VMWare for a corporate clients single core machine (no matter virtual or physical) and the client requires an update of hardware of the Virtual Machine you will be surprised that even though you add a second / third etc. core (new CPUs) the virtual machine hardware and restart the Windows XP installation.

It seems XP is designed to remember the install time CPU model hardware so once the VM and doesn't have a way to update its HAL (Hardware Abstraction Layer) definitions if you install it in Virtualbox thus to make XP recognize the extra added CPU cores it is necessery to do a small hack with a devcon.exe utility downloadable from Microsoft site to do the trick

1. Download the command line devicemanager utility (devcon.exe) from Microsoft Development Network MSDN here.

Note that it will work only if you use the correct version depending whether XP is  (x86/x64) bit install so check it out from My Computer -> Properties.

windows-xp-multicore-not-detected-enable-add-multicore-after-singlecore-windows-xp-install-with-devcon-exe

2  Next. Execute the following 2 commands:

    devcon sethwid @ROOT\ACPI_HAL\0000 := +acpiapic_mp !acpiapic_up
    devcon update c:\windows\inf\hal.inf acpiapic_mp

devcon.exe will  let the automatic hardware detection find out the extra CPU (multicores) added.
Wait 'till you get prompted for a reboot.
Be brave Reboot! 🙂

There is pretty much more fun useful things you can do with devcon.exe such as disabling USBs from command line,

DEVCON-command-DisableUSB_on-windows-xp-7-8-howto

listing your PCI devices and so on:

devcon-windows-command-to-list-pci-devices-on-xp7-win8-win10

You should now see all cores, hooray cores will appear in Task Manager / System Information.

Windows: command to show CPU info, PC Motherboard serial number and BIOS details

Wednesday, March 2nd, 2016

windows-command-to-show-motherboard-bios-and-cpu-serials-and-specific-info-with-wmic

Getting CPU information, RAM info and other various hardware specifics on Windows from the GUI interface is pretty trivial from Computer -> Properties
even more specifics could be obtained using third party Windows software such as CPU-Z

Perhaps there are plenty of many other ones to get and log info about hardware on PC or notebook system, but for Windwos sysadmins especially ones who are too much in love with command prompt way of behaving and ones who needs to automatizate server deployment processes with BATCH (.BAT)  scripts getting quickly info about hardware on freshly installed remote host Win server with no any additional hardware info tools, you'll be happy to know there are command line tools you can use to get extra hardware information on Windows PC / server:

The most popular tool available to present you with some basic hardware info is of course systeminfo


C:\> systeminfo

Host Name:                 REMHOST
OS Name:                   Microsoft Windows Server 2012 R2 Standard
OS Version:                6.3.9600 N/A Build 9600
OS Manufacturer:           Microsoft Corporation
OS Configuration:          Member Server
OS Build Type:             Multiprocessor Free
Registered Owner:          Registrar
Registered Organization:   Registrar
Product ID:                00XXX-X0000-00000-XX235
Original Install Date:     17/02/2016, 11:38:39
System Boot Time:          18/02/2016, 14:16:48
System Manufacturer:       VMware, Inc.
System Model:              VMware Virtual Platform
System Type:               x64-based PC
Processor(s):              1 Processor(s) Installed.
                           [01]: Intel64 Family 6 Model 45 Stepping 7 GenuineInt
el ~2600 Mhz
BIOS Version:              Phoenix Technologies LTD 6.00, 11/06/2014
Windows Directory:         C:\Windows
System Directory:          C:\Windows\system32
Boot Device:               \Device\HarddiskVolume1
System Locale:             de;German (Germany)
Input Locale:              de;German (Germany)
Time Zone:                 (UTC+01:00) Amsterdam, Berlin, Bern, Rome, Stockholm,
 Vienna
Total Physical Memory:     4,095 MB
Available Physical Memory: 2,395 MB
Virtual Memory: Max Size:  10,239 MB
Virtual Memory: Available: 8,681 MB
Virtual Memory: In Use:    1,558 MB
Page File Location(s):     C:\pagefile.sys
Domain:                    dom1.domain.com
Logon Server:              \\DOM
Hotfix(s):                 148 Hotfix(s) Installed.
                           [01]: KB2894852
                           [02]: KB2894856
                           [03]: KB2918614
                           [04]: KB2919355
…..


Now though systeminfo's hardware details and installed Windows KBXXXXX OS Hotfix patches are getting lists the command does not provide you with info about  system’s BIOS, thus to get this info you'll have to use also wmic (Windows Management Instrumentation Command).


So What Is WMIC?

WMIC extends WMI for operation from several command-line interfaces and through batch scripts. Before WMIC, you used WMI-based applications (such as SMS), the WMI Scripting API, or tools such as CIM Studio to manage WMI-enabled computers. Without a firm grasp on a programming language such as C++ or a scripting language such as VBScript and a basic understanding of the WMI namespace, do-it-yourself systems management with WMI was difficult. WMIC changes this situation by giving you a powerful, user-friendly interface to the WMI namespace.

WMIC is more intuitive than WMI, in large part because of aliases. Aliases take simple commands that you enter at the command line, then act upon the WMI namespace in a predefined way, such as constructing a complex WMI Query Language (WQL) command from a simple WMIC alias Get command. Thus, aliases act as friendly syntax intermediaries between you and the namespace. For example, when you run a simple WMIC command such as

Here is how to wmic to get PC Motherboard serial numbers, CPU and BIOS details:


C:\> wmic bios get name,serialnumber,version


Above will print  name if your BIOS, current version and it’s serial number if there is any.

If you need to get more info about the specific Motherboard installed on host:


C:\> wmic csproduct get name,identifyingnumber,uuid


This command will show motherboard modification and it’s UUID

If you want to quickly get what is Windows running hardware CPU clock speed
 

C:\> wmic cpu get name,CurrentClockSpeed,MaxClockSpeed


Also if you have turbo boost CPUs above command will help you find what’s the Max Clock Speed your system is capable of for the current hardware configuration.

If you do have dynamic clock speed running, then add this line, will refresh and monitor the Clock speed every 1 second.
 

C:\> wmic cpu get name,CurrentClockSpeed,MaxClockSpeed /every:1

Actually wmic is a great tool

Check Windows load avarage command – Get CPU usage from Windows XP / 7 / 8 / 2012 server cmd prompt

Wednesday, August 19th, 2015

Check_Windows-load-avarage-command-Get_CPU_usage_from_Windows_XP-7-8-2003-2010-2012_server_cmd_prompt

If you used to be a long years Linux / UNIX sysadmin and you suddenly have to also admistrate a bunch of Windows hosts via RDP (Remote Desktop Protocol)  / Teamviewer etc. and you need to document The Load Avarage of a Windows XP / 7 / 8 servers but you're puzzled how to get an overall load avarage of Windows host via command in a UNIX way like with the good old uptime  Linux / BSD command e.g.

 ruth:$ uptime
 11:43  up 713 days 22:44,  1 user,  load average: 0.22, 0.17, 0.15

Then its time to you to get used to WMICWMIC extends WMI for operation from several command-line interfaces and through batch scripts. wmic is a wonderful command for Command addicted Linux guys and gives a lot of opportunities to query and conduct various sysadmin tasks from Windows command prompt.

To get an loadavarage with wmic use:
 

C:\>wmic cpu get loadpercentage
LoadPercentage
1


or
 

@for /f "skip=1" %p in ('wmic cpu get loadpercentage') do @echo %p%
1%
%


on Windows 7 / 8 and 10 as well Windows Server 2010 and Windows Server 2012 for more precise CPU loadavarage results, you can also use:
 

C:\> typeperf "\processor(_total)\% processor time"

"(PDH-CSV 4.0)","\\Win-Host\processor(_total)\% processor time"
"08/19/2015 12:52:53.343","0.002288"
"08/19/2015 12:52:54.357","0.000000"
"08/19/2015 12:52:55.371","0.000000"
"08/19/2015 12:52:56.385","0.000000"
"08/19/2015 12:52:57.399","0.000799"
"08/19/2015 12:52:58.413","0.000000"
"08/19/2015 12:52:59.427","0.000286"
"08/19/2015 12:53:00.441","0.000000"
"08/19/2015 12:53:01.455","0.000000"
"08/19/2015 12:53:02.469","0.008678"
"08/19/2015 12:53:03.483","0.000000"
"08/19/2015 12:53:04.497","0.002830"
"08/19/2015 12:53:05.511","0.000621"
"08/19/2015 12:53:06.525","0.768834"
"08/19/2015 12:53:07.539","0.000000"
"08/19/2015 12:53:08.553","1.538296"


Command to get CPU server load in % percentage using bash and /proc/stat on Linux

Wednesday, March 11th, 2015

Command-to-get-CPU-server-load-in-percentage-using-bash-shell-script-and-linux-proc-stat

Getting load avarage is easy with uptime command, however since nowadays Linux servers are running on multiple CPU machines and Dual cores, returned load avarage shows only information concerning a single processor. Of course seeing overall CPU server load is possible with TOP / TLoad command  / HTOP and a bunch of other monitoring commands, but how you can get a CPU percentage server load using just  /proc/stat and bash scripting? Here is hwo:
 

:;sleep=1;CPU=(`cat /proc/stat | head -n 1`);PREV_TOTAL=0;for VALUE in "${CPU[@]}”; do let “PREV_TOTAL=$PREV_TOTAL+$VALUE”;done;PREV_IDLE=${CPU[4]};sleep $sleep; CPU=(`cat /proc/stat | head -n 1`);unset CPU[0];IDLE=${CPU[4]};TOTAL=0; for VALUE in “${CPU[@]}"; do let "TOTAL=$TOTAL+$VALUE"; done;echo $(echo "scale=2; ((($sleep*1000)*(($TOTAL-$PREV_TOTAL)-($IDLE-$PREV_IDLE))/($TOTAL-$PREV_TOTAL))/10)" | bc -l );

52.45

As you can see command output shows CPU is loaded on 52.45%, so this server will soon have to be replaced with better hardware, because it gets CPU loaded over 50%

It is useful to use above bash shell command one liner together with little for loop to refresh output every few seconds and see how the CPU is loaded in percentage over time.


for i in $(seq 0 10); do :;sleep=1;CPU=(`cat /proc/stat | head -n 1`);PREV_TOTAL=0;for VALUE in "${CPU[@]}”; do let “PREV_TOTAL=$PREV_TOTAL+$VALUE”;done;PREV_IDLE=${CPU[4]};sleep $sleep; CPU=(`cat /proc/stat | head -n 1`);unset CPU[0];IDLE=${CPU[4]};TOTAL=0; for VALUE in “${CPU[@]}"; do let "TOTAL=$TOTAL+$VALUE"; done;echo $(echo "scale=2; ((($sleep*1000)*(($TOTAL-$PREV_TOTAL)-($IDLE-$PREV_IDLE))/($TOTAL-$PREV_TOTAL))/10)" | bc -l ); done

47.50

13.86
27.36
82.67
77.18

To monitor "forever" output from all server processor overall load use:
 

while [ 1 ]; do :;sleep=1;CPU=(`cat /proc/stat | head -n 1`);PREV_TOTAL=0;for VALUE in “${CPU[@]}”; do let “PREV_TOTAL=$PREV_TOTAL+$VALUE”;done;PREV_IDLE=${CPU[4]};sleep $sleep; CPU=(`cat /proc/stat | head -n 1`);unset CPU[0];IDLE=${CPU[4]};TOTAL=0; for VALUE in “${CPU[@]}"; do let "TOTAL=$TOTAL+$VALUE"; done;echo $(echo "scale=2; ((($sleep*1000)*(($TOTAL-$PREV_TOTAL)-($IDLE-$PREV_IDLE))/($TOTAL-$PREV_TOTAL))/10)" | bc -l ); done