Posts Tagged ‘right’

How to make 27 inch monitor to work on 2560×1440 with Virtualbox Linux

Wednesday, October 4th, 2023

make-virtualbox-with-linux-work-on-2k-2560x1440-howto

I've bought a new "second hand" refurbished EIZO Flexscan Monitor EV2760 S1 K1 awesome monitor re from Kvant Serviz a company reseller of Second Hand electronics that is located on the territy of Bulgarian Academy of Sciences (BAN / BAS) and was created by BAS people originally for the BAS people and am pretty happy with it for doing my daily job as system administrator, especially as the monitor has been used on very short screen time for only 256 use hours (which is less than a year of full-use time), whether EIZO does guarantee their monitors to be able to serve up to 5 Full years monitor use time.

For those who deals with Graphics such as Designers and people into art working with Computers knows EIZO brand Monitors for quite some time now and it seems as much of those people are using Windows or Macintoshes, these monitors have been mainly created to work optimally with Windows / Mac computers on a higher resolution.
My work PC that is Dell Latitude 5510 with its HDMI cable has been running perfect with The EIZO with Windows 10, however as I'm using a Virtualbox virutal machines with CentOS Linux, the VM does not automatically detected the highest resolution 2K that this monitors supports 2560×1440 at 60 Hz is the best one can use to get more things fit into the screen and hopefully also good for the Eyes, the Ecoview shoulk also be a good idea for the eyes, as the Ecoview by EIZO tries to adjust the monitor brightness to lower levels according to the light in the room to try to minimize the eye strain on the eyes. The Ecoview mode is a little bit I guess like the famous BENQ's monitors Eye care. 
I'm talking about all this Displays specifics as I spend quite a lot of time to learn the very basics about monitors as my old old 24 Inch EIZO Monitor Flexscan model 2436W started to wear off with time and doesn't support HDMI cable input, so I had to use a special. cable connector that modifies the signal from HDMI to DVI (and I'm not sure how this really effects the eyes), plus the DVI quality is said to be a little bit worse than HDMI as far as I read a bit on the topic online.

Well anyways currently I'm a happy owner of the EIZO EV2760 Monitor which has a full set of inputs of:

  • 27" In-Plane Switching (IPS) Panel
  • DisplayPort | HDMI | DVI-D | 3.5mm Audio
  • 2560 x 1440 Native Resolution
  • 1000:1 Typical Contrast Ratio
     

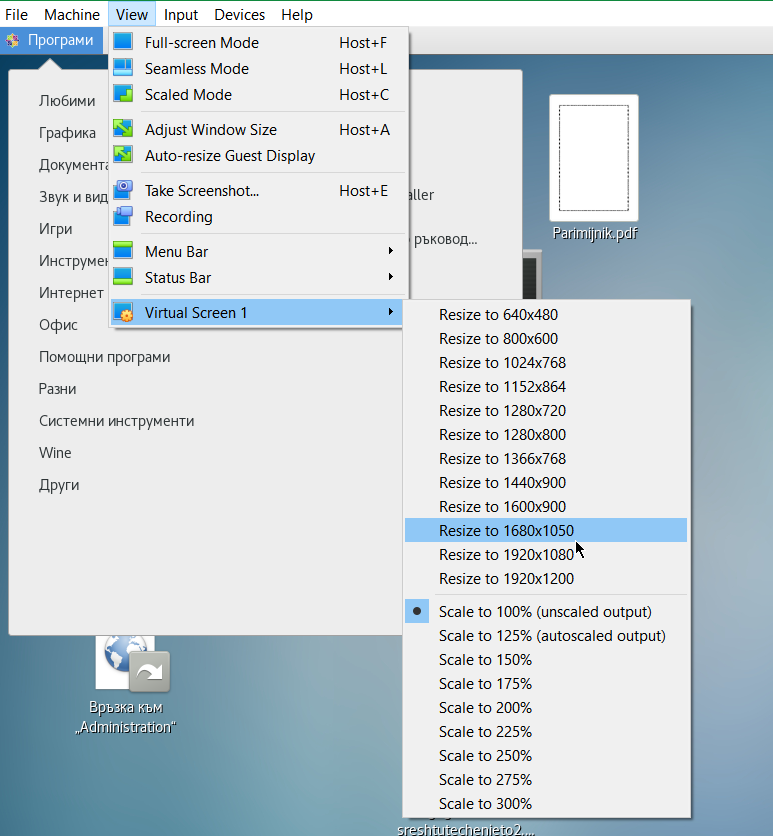
I've tried to make the monitor work with Linux and my first assumption from what I've read was that I have to reinstall the Guess Addition Tools on the Virtualbox with additing the Guest Addition Tools via the Vbox GUI interface:

Devices -> Insert Guest Additions CD Image

virtualbox-resolutions-screenshot

But got an error that the Guest additions tools iso is missing
So eventually resolved it by remounting and reinstalling the guest addition tools with the following set of commands:

[root@localhost test]# yum install perl gcc dkms kernel-devel kernel-headers make bzip2
[root@localhost test]# cd /mnt/cdrom/
[root@localhost cdrom]# ls
AUTORUN.INF  runasroot.sh                       VBoxSolarisAdditions.pkg
autorun.sh   TRANS.TBL                          VBoxWindowsAdditions-amd64.exe
cert         VBoxDarwinAdditions.pkg            VBoxWindowsAdditions.exe
NT3x         VBoxDarwinAdditionsUninstall.tool  VBoxWindowsAdditions-x86.exe
OS2          VBoxLinuxAdditions.run


[root@localhost cdrom]# ./VBoxLinuxAdditions.run 

Verifying archive integrity… All good.
Uncompressing VirtualBox 6.1.34 Guest Additions for Linux……..
VirtualBox Guest Additions installer
Removing installed version 6.1.34 of VirtualBox Guest Additions…
Copying additional installer modules …
Installing additional modules …
VirtualBox Guest Additions: Starting.
VirtualBox Guest Additions: Building the VirtualBox Guest Additions kernel
modules.  This may take a while.
VirtualBox Guest Additions: To build modules for other installed kernels, run
VirtualBox Guest Additions:   /sbin/rcvboxadd quicksetup <version>
VirtualBox Guest Additions: or
VirtualBox Guest Additions:   /sbin/rcvboxadd quicksetup all
VirtualBox Guest Additions: Building the modules for kernel
3.10.0-1160.80.1.el7.x86_64.
ERROR: Can't map '//etc/selinux/targeted/policy/policy.31':  Invalid argument

ERROR: Unable to open policy //etc/selinux/targeted/policy/policy.31.
libsemanage.semanage_read_policydb: Error while reading kernel policy from /etc/selinux/targeted/active/policy.kern. (No such file or directory).
OSError: No such file or directory
VirtualBox Guest Additions: Running kernel modules will not be replaced until
the system is restarted


The solution to that was to reinstal the security policy-target was necessery

[root@localhost test]# yum install selinux-policy-targeted –reinstall


And of course rerun the reinstall of Guest addition tools up to the latest

[root@localhost cdrom]# ./VBoxLinuxAdditions.run 

Unfortunately that doesn't make it resolve it and even shutting down the VM machine and reloading it again with Raised Video Memory for the simulated hardware from settings from 16 MB to 128MB for the VM does not give the option from the Virtualbox interface to set the resolution from
 

View -> Virtual Screen 1 (Resize to 1920×1200)

to any higher than that.

After a bit of googling I found some newer monitors doesn't seem to be seen by xrandr command and few extra commands with xrandr need to be run to make the 2K resolution 2560×1440@60 Herzes work under the Linux virtual machine.

These are the extra xranrd command that make it happen

# xrandr –newmode "2560x1440_60.00" 311.83  2560 2744 3024 3488  1440 1441 1444 1490  -HSync +Vsync
# xrandr –addmode Virtual1 2560x1440_60.00
# xrandr –output Virtual1 –mode "2560x1440_60.00"

As this kind of settings needs to be rerun on next time the Virtual Machine runs it is a good idea to place the commands in a tiny shell script:

[test@localhost ~]$ cat xrandr-set-resolution-to-2560×1440.sh 
#!/bin/bash
xrandr –newmode "2560x1440_60.00" 311.83  2560 2744 3024 3488  1440 1441 1444 1490  -HSync +Vsync
xrandr –addmode Virtual1 2560x1440_60.00
xrandr –output Virtual1 –mode "2560x1440_60.00"


You can Download  the xrandr-set-resolution-to-2560×1440.sh script from here

Once the commands are run, to make it affect the Virtualbox, you can simply put it in FullScreen mode via


View -> Full-Screen Mode (can be teriggered from keyboard by pressing Right CTRL + F) together

[test@localhost ~]$ xrandr –addmode Virtual1 2560x1440_60.00
[test@localhost ~]$ xrandr –output Virtual1 –mode "2560x1440_60.00"
[test@localhost ~]$ xrandr 
Screen 0: minimum 1 x 1, current 2560 x 1440, maximum 8192 x 8192
Virtual1 connected primary 2560×1440+0+0 (normal left inverted right x axis y axis) 0mm x 0mm
   1920×1200     60.00 +  59.88  
   2560×1600     59.99  
   1920×1440     60.00  
   1856×1392     60.00  
   1792×1344     60.00  
   1600×1200     60.00  
   1680×1050     59.95  
   1400×1050     59.98  
   1280×1024     60.02  
   1440×900      59.89  
   1280×960      60.00  
   1360×768      60.02  
   1280×800      59.81  
   1152×864      75.00  
   1280×768      59.87  
   1024×768      60.00  
   800×600       60.32  
   640×480       59.94  
   2560x1440_60.00  60.00* 
Virtual2 disconnected (normal left inverted right x axis y axis)
Virtual3 disconnected (normal left inverted right x axis y axis)
Virtual4 disconnected (normal left inverted right x axis y axis)
Virtual5 disconnected (normal left inverted right x axis y axis)
Virtual6 disconnected (normal left inverted right x axis y axis)
Virtual7 disconnected (normal left inverted right x axis y axis)
Virtual8 disconnected (normal left inverted right x axis y axis)

Tadadadam ! That's all folks, enjoy having your 27 Inch monitor running at 2560×1440 @ 60 Hz 🙂


Remove “Windows 7 PC is out of Support” annoying reoccuring warning popup alert

Friday, September 10th, 2021

Windows-7-End-of-life-pc-is-out-of-support-removal-rip-win-7

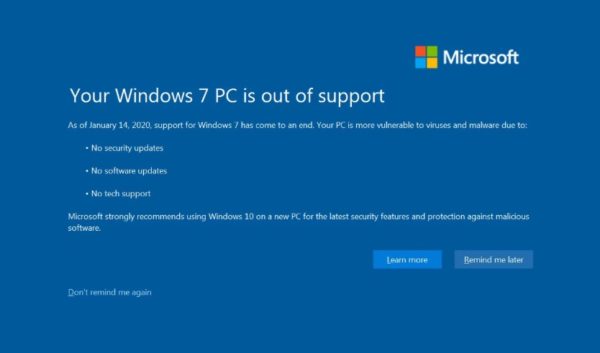
Since January 15th 2020, Windows 7 which reached its End of Life (EOL)  and is no longer Supported. Windows 7 Service Pack 1 Starter, Home Basic, Home Premium, and Professional installations will display the message


"Your Windows 7 PC is out of support".

The use of Windows 7, since 2020 is steadily declining but some hard core maniacs, who refuse to be in tune with latest fashion do still roll Windows 7 on dedicated VPS Servers (running on Xen / VMWare etc.).
With the reach of End of Support, people who still run Windows 7 have no longer the usual Operating system provided.

  • No security updates
  • No software updates
  • No tech support

Even though running End of Support system is quite dangerous and you might get hacked easily by autometed bot, still for some custom uses and if the Windows 7 Runs behind a solid firewall it could be considered relatively safe.

Microsoft hence made their Windows (remote controlled system) to have an annoying pop up window with the "YOUR WINDOWS 7 PC IS OUT OF SUPPORT" as shown in below screenshot:

windows-7-disable-pc-is-out-of-support-popup-annoying-message-screenshot.

For those who don't plan to migrate from Windows 7 to Windows 10, this message becomes quickly very annoying especially if you happen to access remotely your Windows 7 VPS and use it for simple things as browsing a few news websites or you're a marketer and you use the Windows for accessing Amazon / Ebay from a different country as many Marketers do to access General Webstores emulating access from a remote location. 


Disable "Your Windows 7 PC is out of support" popup alert
 

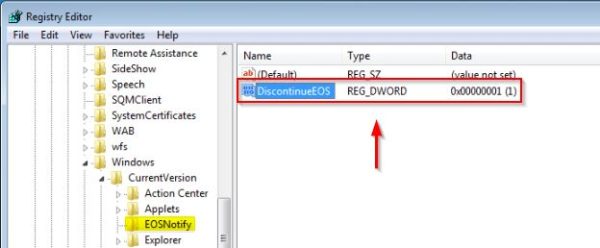
Luckily it is possible to disable this annoying Your Windows 7 pop-up alert by setting a value key in Windows Registry
DiscontinueEOS to 1.

To do so launch from Administrator command  line cmd.exe prompt (or start it from Windows start menu):

regedit

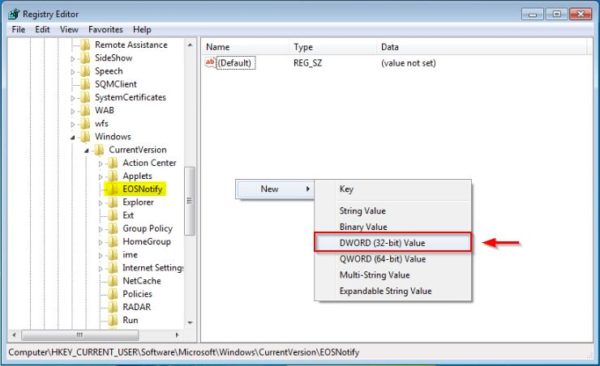
1. Open Windows Registry Editor and navigate to

HKEY_CURRENT_USER\Software\Microsoft\Windows\CurrentVersion\EOSNotify.

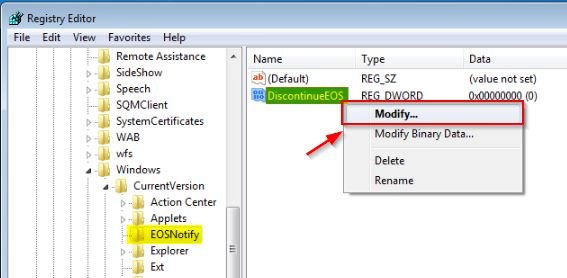
 You will need to set the DWORD DiscontinueEOS value to 1 in the Windows Registry
 

windows-7-disable-pc-is-out-of-support-popup-eosnotify-dword-registry-03-600x366

windows-7-disable-pc-is-out-of-support-popup-discontinueEOS-registry-modify

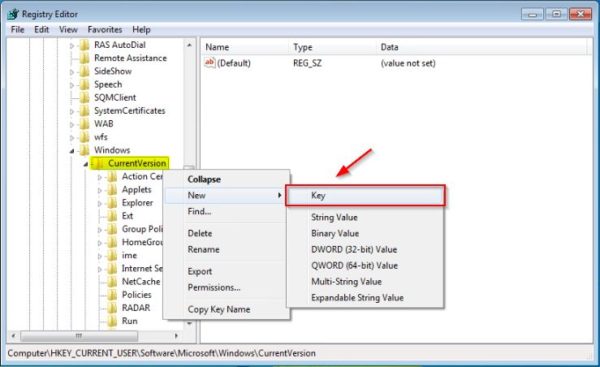
–  In case EOSNotify key is not available, right-click the CurrentVersion key and select New > Key and name it EOSNotify.

windows-7-disable-pc-is-out-of-support-popup-EOSNotify-create-new-key-600x367

2. Right click anywhere in the right pane and select New > DWORD (32-bit) Value and name it DiscontinueEOS.

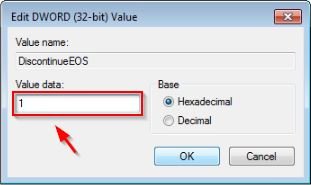
3. Set Value data to 1 and click OK.

windows-7-disable-pc-is-out-of-support-popup-edit-dword-32-bit-value-regedit-screenshot.

4. When the new value has been set, Restart the Windows7 computer / Virtual machine, to make sure registry setting take effect.

windows-7-disable-pc-is-out-of-support-popup-discontninueEOS-reg-dword-0x000000001-600x248


To automate the procedure in large environments, you can create a small script using the reg  command load the Registry key or use Windows GPO (Group Policy Object) to enforce the setting across all Active Directory PC members.
 

[HKEY_CURRENT_USER\Software\Microsoft\Windows\CurrentVersion\EOSNotify]
"DiscontinueEOS"=dword:00000001
custom GPO in Active Directory.

To avoid potential issues using a non supported OS, you should start planning to upgrade your Windows 7 clients to Windows 10.

That's it ! Out of support Windows 7  alert should no longer bug you 🙂

Cracking zip protected password files on GNU/Linux and FreeBSD

Wednesday, October 5th, 2011

crack-zip-freebsd

Its not very common, but sometimes it happens you have to crack some downloaded file from thepiratebay.com or some other big torrent tracker. An example scenario would be downloading a huge words dictionary (a rainbow tables) dictionary etc., which was protected by the author with a password and zipped.

Fortunately Mark Lehmann developed a software called fcrackzip which is capable of brute forcing zip protected file passwords straight on UNIX like operating systems (GNU/Linux, FreeBSD).

fcrackzip is available from package repositories on Debian and Ubuntu Linuces to install via apt:

linux:~# apt-get install frackzip
...

fcrackzip is also available on FreeBSD via the ports tree and can be installed with:

freebsd# cd /usr/ports/security/fcrackzip
freebsd# make install cleam

On Debian it's worthy to have a quick look on the README file:

linux:~# cat /usr/share/doc/fcrackzip/READMESee fcrackzip.txt (which is derived from the manpage), or fcrackzip.html

There is a web page with more information at
http://lehmann.home.ml.org/fcrackzip.html or
http://www.goof.com/pcg/marc/fcrackzip.html

A sample password-protected .zip file is included as "noradi.zip". It's
password has 6 lower case characters, and fcrackzip will find it (and a
number of false positives) with

fcrackzip -b -c a -p aaaaaa ./noradi.zip

which will take between one and thirty minutes on typical machines.

To find out which of these passwords is the right one either try them out
or use the –use-unzip option.

Marc

Cracking the noradi.zip password protected sample file on my dual core 1.8 ghz box with 2gb, it took 30 seconds.

linux:~# time fcrackzip -u -b -c a -p aaaaaa noradi.zip

PASSWORD FOUND!!!!: pw == noradi

real 0m29.627s
user 0m29.530s
sys 0m0.064s

Of course the sample set password for noradi.zip is pretty trivial and with more complex passwords, sometimes cracking the password can take up to 30 minutes or an hour and it all depends on the specific case, but at least now we the free software users have a new tool in the growing arsenal of free software programs 😉

Here are the options passed on to the above fcrackzip command:

-uTry to decompress with the detected possible archive passwords using unzip (This is necessery to precisely find the archive password, otherwise it will just print out a number of possible matching archive passwords and you have to try each of the passwords one by one. Note that this option depends on a working unzip version installed.)

-c ainclude all charsets to be tried with the generated passwords

-bSelect brute force mode – Tries all possible combinations of letters specified

-p aaaaaainit-password string (Look up for a password between the password length 6 characters long)

FCrackZip is partly written in assembler and thus is generally works fast, to reduce the CPU load fcrackzip will put on the processor its also capable of using external words dictionary file by passing it the option:

-DThe file should be in a format one word per line and be preliminary alphabetically sorted with let's say sort

Also fcrackzip supports parallel file brute force, for example if you have 10 zip files protected with passwords it can paralelly try to brute force the pwds.

As of time of writting frackzip reached version 1.0 and seems to be pretty stable. Happy cracking.
Just to make sure fcrackzip's source is not lost somewhere in the line in the long future to come, I've created a fcrackzip download mirror here

Helpful Hints For Starting A Small WordPress Website or Ecomerce Business

Wednesday, August 14th, 2019

hints-for-starting-wordpress-site

Wordpress is the web application collection of PHP program behind thirty four percent (43%) of the internet’s websites, and fifteen percent (50%) of the top one hundred websites in the world, so if you’re considering it for your website then you’re perhaps thinking in the right direction. Small start-up projects a community website or even a small personal owned blog or mid to even large business presentation site  can benefit greatly from setting up their Web Platrform or Ecommerce shops on a WordPress website platform (that of itself depends just on a small number of technologies such as a Linux server with a Web Server installed on it to serve PHP as well as some kind of Linux host installed Database  backend engine such as MYSQL / PostgreSQL etc. …

But if you really want to create a successful ecommerce website on WordPress, that can seem a little intimidating at first as the general complexity to start up with WordPress looks very scary in the beginning. However in this article I’ll point to fewhelpful hints should get you off on the right foot, and make your entry into the world of Wodpress / WP Ecommerce a little easier and less scary.

This article is to be less technical than expected and in that will contrast slightly with many of the articles on this blog, the target audience is more of Web Marketing Manager or a Start-up Search Engine Optimization person at a small personal project or employed in the big bad corporate world.This is no something new that is going to be outlined in this article but a general rules that are known for the professional SEO Gurus but is most likely to be helpful for the starting persons.

If you happen to be one of these you should know you have to follow a set of well known rules on the website structure text, descriptions, text, orientation, ordering of menus and data etc. in order to have the WordPress based website running at full speed attracting more visitors to your site.
 

Photos


Importance of Photos on a Webiste
Although the text for your website is very important – more on that later – when a user first opens up your website in their browser, their eyes are going to be caught by the images that you have laid out on your website. Not using images is a big mistake, since it bores users’ eyes and makes your website seem amateur and basic, but using low quality images or irrelevant images can also harm your chances of appearing authentic to a user (yes here on this blog there are some of this low quality pictures but this is due to fact this website is more of information blog and not ecommerce. Thus at best case always make sure that you find the best, high-quality images for your website – make sure that you have the correct rights to use the images as well (as copyright infrignmenets) could cause you even a law suits ending in hundred or thousand dollar fines or even if this doesn't happen any publicity of such would reduce your website indexing rating. The images placed should always be relevant to your website. If you find a breath-taking sunset or tech-gadget picture, that’s great, but maybe not for your healthy food ecommerce store, but for your personal ranting or describing a personal experience.


Product Photos


Assuming that sooner or later even if you have a community website you will want to monerize it to bring back to yourself in material form at least part of the many years effort to bring the site to the web rank gained.
Leading on from that point, you’re going to be selling or advertise items – that’s the whole point of ecommerce. But users often find ads / online shopping frustrating due to not being able to properly see and understand what they’re buying before they make their purchase. This can lead to ‘buyer’s remorse’, and, consequently, refunds galore, which is not what you want. Make sure that images of your products are always available and of a high quality – investing in a fairly high quality camera might be a good idea – and consider many pictures for different angles or even rotating images so that the user can decide for themself which angle they want to look at.


Engaging Descriptions


“I can guarantee that you can’t remember the last five product descriptions you read – not even word-for-word, but the general ideas and vocabulary used will have been tossed into your short-term memory and forgotten in an instant. This is where your website can shine, and become better than ninety percent of those lingering on the internet,” Matthew Kelly, a project manager at WriteMyX and NextCoursework, suggests, “since putting effort into writing your product descriptions and making them lively and engaging will make your website memorable, and your subscribers will turn helpfully soon loyal customers will be more likely to come back time and time again and become repeat business, as well as mention you to their friends (social mounth to mouth marketing) and that way working as free advertising for you and making your website incredibly effective.”


Mobile-Friendly


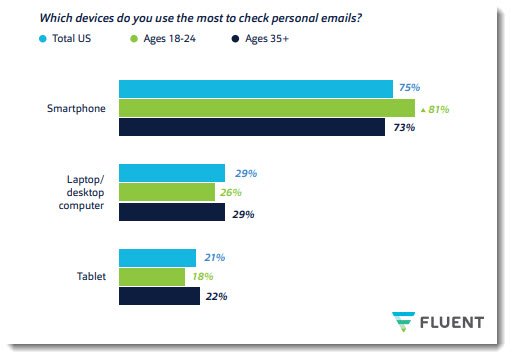
Which device is most used to check email Laptop / PC or Mobile statistics as of year 2019

These days with the bloom of Mobile Devices that are currently overrunning the user of normal Desktop PCs, Laptops and Tablets and this trend is likely to stay and even increase, “If your website isn’t mobile-friendly in this day and age, then you won’t get anywhere with it.” Anne Baker, a marketer at BritStudent and Australia2Write, states. “Most people use their phones when they access websites, especially when they go shopping on the internet.

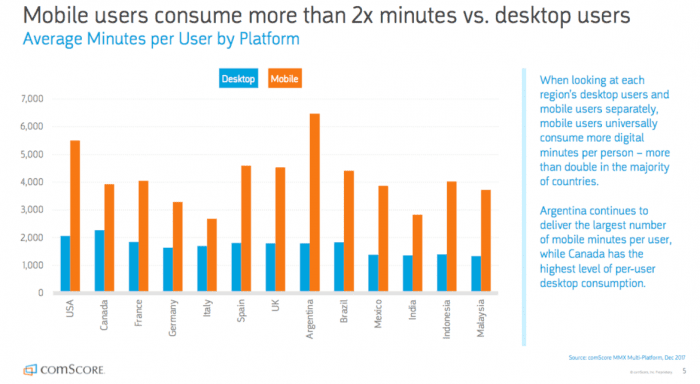
Statistics on user stay (secs / mins) stay on a website from Desktop PC and Mobile devices

On WordPress, this means finding a more recent theme – an older theme, maybe four-five years old, will probably not support mobile, and you just can’t afford to lose out on the mobile market.” In short, find yourself a mobile-friendly theme or install the right WordPress Pluguin that will enable you to have a Mobile Friendly theme in case if blog is accessed from a Mobile Dev or many of your customers will become frustrated with the badly formatted ‘mobile’ version of your website that they end up using, which might be for instance meant for a much larger screen. It can also ruin the atmosphere (experience) created at the accessed user site and have negative impact on your audience opion of your site or business. This is even more the case  if your website or webapp is targetting to be modern and keeping with the times – or especially if it deals with IT and electronics (where the competition is huge)!


Registration


Registration Ecommerce website

Registration form (Sign Up) on a website and the overall business cycle idea behind web product or business is of critical importance as this is the point that will guarantee intimidation with the customer, failing to have the person be engaged will quickly make your website rank lower and your producs less wanted. The general rule here is to make your registration be an easy (to orientate for the user) and be present on a very visible place on the site.

Registration steps should be as less as possible as this might piss off the user and repel him out of the site before the registration is completed. Showing oportunity to register with a Pop-Up window (while the user clicks on a place showing interest for the produce might be useful in some cases but generally might also push the user back so if you decide to implement it do it with a lot of care (beware of too much aggressive marketing on our site).

An example


The registration process should be as intimidating as possible to leave joy in the user that might later return and log in to your site or ecommerce platform, e.g. be interested to stay for a longer time. The marketing tactic aiming to make the user stay for a longer time on the website (dragging his attention / interest to stuff)  is nothing new by the way as it is well known marketing rule integrated in every supermarket you buy groceries, where all is made to keep you in the shop for as longer as possible. Research has shown that spending longer time within the supermarket makes the user buy more.


Returning customers can be intimidated with membership or a free gift (be it even virtual picture gift – free email whatever) or information store place could be given or if products are sold, registration will be obligatory to make them use their payment method or delivery address on next login to easify the buy out process. But if registration is convoluted and forced (e.g. user is somehow forced to become meber) then many customers will turn away and find another website for their shopping needs. Using a method like Quora’s ‘login to see more’ in that case might be a good idea even though for me this is also a very irritating and irritating – this method however should never be used if you run a ecommerce selling platform, on ecommerce site gatekeeping will only frustrate customers. Login is good to be implmeneted as a popup option (and not taking too much of the screen). Sign up and Login should be simplistic and self-explanatory – always not required but optioned and user should get the understanding of the advantage to be a member of the website if possible before the sign up procedure. Then, customers are more likely to sign up and won’t feel like they’ve been pushed into the decision – or pushed away, as the case may be.

Katrina Hatchett works as a lifestyle blogger at both Academic Brits and Assignment Help, due to a love of literature and writing, which she has had since youth. Throughout her career, she has become involved with many projects, such as writing for the PhD Kingdom blog.

Installing the phpbb forum on Debian (Squeeze/Sid) Linux

Saturday, September 11th, 2010

howto-easily-install-phpbb-on-debian-gnu-linux

I've just installed the phpbb forum on a Debian Linux because we needed a goodquick to install communication media in order to improve our internal communication in a student project in Strategic HR we're developing right now in Arnhem Business School.

Here are the exact steps I followed to have a properly it properly instlled:

1. Install the phpbb3 debian package
This was pretty straight forward:

debian:~# apt-get install phpbb3

At this point of installation I've faced a dpkg-reconfigure phpbb deb package configuration issue:
I was prompted to pass in the credentials for my MySQL password right after I've selected the MySQL as my preferred database back engine.
I've feeded my MySQL root password as well as my preferred forum database name, however the database installation failed because, somehow the configuration procedure tried to connect to my MySQL database with the htcheck user.
I guess this has to be a bug in the package itself or something from my previous installation misconfigured the way the debian database backend configuration was operating.
My assumption is that my previously installed htcheck package or something beforehand I've done right after the htcheck and htcheck-php packages installation.

after the package configuration failed still the package had a status of properly installed when I reviewed it with dpkg
I've thought about trying to manually reconfigure it using the dpkg-reconfigure debian command and I gave it a try like that:

debian:~# dpkg-reconfigure phpbb3

This time along with the other fields I've to fill in the ncurses interface I was prompted for a username before the password prompted appeared.
Logically I tried to fill in the root as it's my global privileges MySQL allowed user.
However that didn't helped at all and again the configuration tried to send the credentials with user htcheck to my MySQL database server.
To deal with the situation I had to approach it in the good old manual way.

2. Manually prepare / create the required phpbb forum database

To completet that connected to the MySQL server with the mysql client and created the proper database like so:

debian:~# mysql -u root -p
mysql>
CREATE database phpbb3forum;

3. Use phpmyadmin or the mysql client command line to create a new user for the phpbb forum

Here since adding up the user using the phpmyadmin was a way easier to do I decided to go that route, anyways using the mysql cli is also an option.

From phpmyadmin It's pretty easy to add a new user and grant privileges to a certain database, to do so navigate to the following database:

Privileges -> -> Add a new user ->

Now type your User name: , Host , Password , Re-type password , also for a Host: you have to choose Local from the drop down menu.

Leave the Database for user field empty as we have already previously created our desired database in step 2 of this article

Now press the "Go" button and the user will get created.

Further after choose the Privileges menu right on the bottom of the page once again, select through the checkbox the username you have just created let's say the previously created user is phpbb3

Go to Action (There is a picture with a man and a pencil on the right side of this button

Scroll down to the page part saying Database-specific privileges and in the field Add privileges on the following database: fill in your previosly created database name in our case it's phpbb3forum

and then press the "Go" button once again.
A page will appear where you will have to select the exact privileges you would like to grant on the specific selected database.
For some simplicity just check all the checkbox to grant as many privilegs to your database as you could.
Then again you will have to press the "Go" button and there you go you should have already configured an username and database ready to go with your new phpbb forum.

4. Create a virtualhost if you would like to have the forum as a subdomain or into a separate domain

If you decide to have the forum on a separate sub-domain or domain as I did you will have to add some kind of Virtualhost into either your Apache configuration /etc/apache2/apache2.conf or into where officially the virutualhosts are laid in Debian Linux in /etc/apache2/sites-available
I've personally created a new file like for instance /etc/apache2/sites-available/mysubdomain.mydomain.com

Here is an example content of the new Virtualhost:

<VirtualHost *>
ServerAdmin admin-email@domain.com
ServerName mysubdomain.domain.com

# Indexes + Directory Root.
DirectoryIndex index.php index.php5 index.htm index.html index.pl index.cgi index.phtml index.jsp index.py index.asp

DocumentRoot /usr/share/phpbb3/www/

# Logfiles
ErrorLog /var/log/apache2/yourdomain/error.log
CustomLog /var/log/apache2/yourdomain/access.log combined
# CustomLog /dev/null combined
<Directory /usr/share/phpbb3/www/>
Options FollowSymLinks MultiViews -Includes ExecCGI
AllowOverride All
Order allow,deny
allow from all </Directory>
</VirtualHost>

In above Virtualhost just change the values for ServerAdmin , ServerName , DocumentRoot , ErrorLog , CustomLog and Directory declaration to adjust it to your situation.

5. Restart the Apache webserver for the new Virtualhost to take affect

debian:~# /etc/init.d/apache2 restart

Now accessing your http://mysubdomain.domain.com should display the installed phpbb3 forum
The default username and password for your forum you can use straight are:

username: admin
password: admin

So far so good you by now have the PHPBB3 forum properly installed and running, however if you try to Register a new user in the forum you will notice that it's impossible because of a terrible ugly message reading:

Sorry but this board is currently unavailable.

I've spend few minutes online to scrape through the forums before I can understand what I have to stop that annoying message from appearing and allow new users to register in the phpbb forum

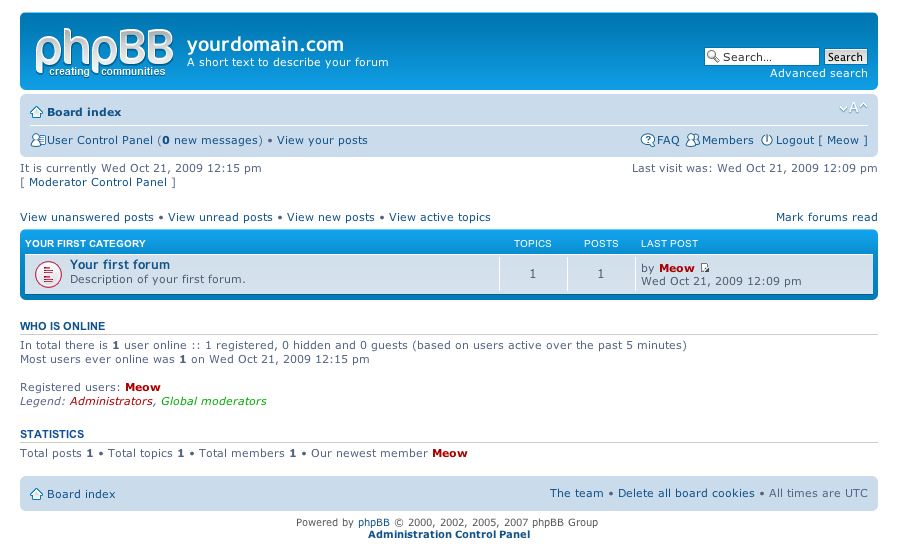
The solution came natural and was a setting that had to be changed with the forum admin account, thus login as admin and look at the bottom of the page, below the text reading Powered by phpBB © 2000, 2002, 2005, 2007 phpBB Group you will notice a link with Administration Control Panel
just press there a whole bunch of menus will appear on the screen allowing you to do numerous things, however what you will have to do is go to
Board Settings -> Disable Board

and change the radio button there to say No

That's all now your forum will be ready to go and your users can freely register and if the server where the forum is installed has an already running mail server, they will receive an emails with a registration data concerning their new registrations in your new phpbb forum.
Cheers and Enjoy your new shiny phpbb Forum 🙂

How to get rid of “PHP Warning: PHP Startup: Unable to load dynamic library ‘/usr/lib/php5/20090626/suhosin.so'” on Debian GNU / Linux

Tuesday, October 25th, 2011

PHP-warning-how-to-fix-warnings-and-errors-php-logo

After a recent new Debian Squeeze Apache+PHP server install and moving a website from another server host running on CentOS 5.7 Linux server, some of the PHP scripts running via crontab started displaying the following annoying PHP Warnings :

debian:~# php /home/website/www/cron/update.php

PHP Warning: PHP Startup: Unable to load dynamic library '/usr/lib/php5/20090626/suhosin.so' – /usr/lib/php5/20090626/suhosin.so: cannot open shared object file: No such file or directory in Unknown on line 0

Obviously the error revealed that PHP cli is not happy that, I've previously removes the suhosin php5-suhosin module from the system.
I wouldn't have removed php5-suhosin if sometimes it doesn't produced some odd experiences with the Apache webserver.
To fix the PHP Warning, I used first grep to see, where exactly the suhosin module gets included in debian's php.ini config files. debian:~# cd /etc/php5
debian:/etc/php5# grep -rli suhosin *
apache2/conf.d/suhosin.ini
cgi/conf.d/suhosin.ini
cli/conf.d/suhosin.ini
conf.d/suhosin.ini

Yeah that's right Debian has three php.ini php config files. One for the php cli/usr/bin/php, another for the Apache webserver loaded php library/usr/lib/apache2/modules/libphp5.so and one for Apache's cgi module/usr/lib/apache2/modules/mod_fcgid.so .

I was too lazy to edit all the above found declarations trying to include the suhosin module in PHP, hence I remembered that probably all this obsolete suhosin module declaration are still present because probably the php5-suhosin package is still not purged from the system.

A quick check with dpkg , further strenthened my assumption as the php5-suhosin module was still hanging around as an (rc – remove candidate);

debian:~# dpkg -l |grep -i suhosin
rc php5-suhosin 0.9.32.1-1 advanced protection module for php5

Hence to remove the obsolete package config and directories completely out of the system and hence solve the PHP Warning I used dpkg –purge, like so:

debian:~# dpkg --purge php5-suhosin
(Reading database ... 76048 files and directories currently installed.)
Removing php5-suhosin ...
Purging configuration files for php5-suhosin ...
Processing triggers for libapache2-mod-php5 ...
Reloading web server config: apache2.

Further on to make sure the PHP Warning is solved I did the cron php script another go and it produced no longer errors:

debian:~# php /home/website/www/cron/update.php
debian:~#

Axion Estin – It is Truly Meet feast in Bulgarian Orthodox Church

Thursday, June 11th, 2015

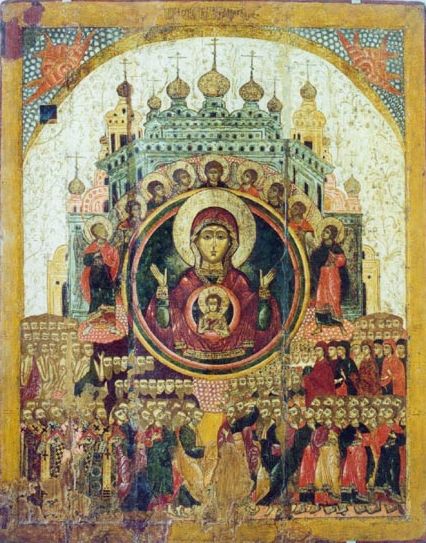
Today is a glorious feast in Eastern Orthodox Churches (especially in Slavonic ones) because on this day an ArchAngel Gabiel on Holy Mount Athos in year 773  handed an Angel song in praise of the Theotokos (Virgin Mary), Mother of our Lord and Saviour Jesus Christ.


Dostojno_est_It-is-truly-meet-orthodox_icon
 

Liturgical use

The hymn is chanted at Matins, Compline, and other services; but its most important occurrence is at the Divine Liturgy, where it is chanted at the conclusion of the Anaphora. The second half of the hymn, "More honorable…" is frequently chanted before the dismissal which concludes services.

Often, the chanting of this hymn is followed by either a metania or a prostration.

It is truly meet In Church Slavonic

Досто́йно ’е́сть ’я́ко вои́стину блажи́ти Тѧ֨, Богоро́дицу,
Присноблаже́нную ’и Пренепоро́чную ’и Ма́терь Бо́га на́шего.
Честне́йшую херуви́мъ ’и сла́внейшую безˈ сравне́ния серафи́мъ, безי ᾿истле́ния Бо́га Сло́ва ро́ждшую,
су́щую Богоро́дицу, Тя֙ велича́емъ.


It is Truly Meet in Bulgarian / Достойно есть


Достойно е, наистина, да Те облажаваме, Богородице,
винаги блажена и пренепорочна и Майка на нашия Бог.

По-чтима от херувимите и несравнено по-славна от серафимите,
нетленно родила Бог Слово, същинска Богородица, Те величаем.


Holy_Mother-of-God-Theotokos-All-the-world-rejoice-in-you

All the World rejoices in You Holy Icon

Axion Estin (Greek) – It is truly meet

It is truly right to bless thee, O Theotokos,
thou the ever blessed, and most pure, and the Mother of our God.
Thou the more honorable than the cherubim,
and beyond compare more glorious than the seraphim,
who without corruption gavest birth to God the Word,
thou the true Theotokos, we magnify thee.

Some of the most important Symbols for Orthodox Christians in The Eastern Orthodox Church – Symbols in the Eastern Orthodox Christian Faith (Eastern Orthodox Symbolism) and Christian Symbolism in the Roman Catholic Church (Symbolism in Western Catholicism)

Tuesday, April 13th, 2010

Some-of-the-most-important-symbols-for-orthodox-christiains-in-the-eastern-orthodox-church-symbols-in-eastern-orthodox-faith.

Yesterday, while browsing randomly I came across an interesting Roman Catholic webpage.
The website is created by Catholics with the idea to better explain the Catholic religion and Symbolism.
Though as an Orthodox Christian, my interest towards Roman Catholicism is only scientific, it's really interesting to see the common symbolism surrounding Roman Catholicism and compare with the Orthodox Christian symbolism. Many of the Roman Catholic Symbols are equal symbol with the one we nowadays used in the orthodox church.
I presume this common symbolism between Orthodox and Roman Catholic church,has stayed the same from the time before Roman Catholics split from the Only Holy Apostolic Church  to become the Church of the West Roman Empire, that's how the naming Roman Catholic came forward.

To find out more about Roman Catholic symbolism please see the following links I've mirrored the information from Fisheater's website which is btw is a great website targeting Roman Catholic layman. Everything on the website is explained in a simple everyday language without too much terminology which makes it a great resource for Roman Catholic Christians and people like me who who like to take a look in Roman Catholicism.

It's really a strange and intriguing fact let's call it a "co-incidence" that the inverted cross (upside-down) cross,also called "Peter's cross" on which saint Peter was crucified is also a symbol of Papacy .
It's a popular fact that nowadays Satanist use a similar inverted cross to the one said to be symbol of papacy for their "Black Masses" (Satanic Masses). Maybe some Roman Catholic priest or Cardinal has to explain, how comes that the Roman Catholics ended with such a significant symbol used nowdays in anti-christian satanic religion to be also a symbol of their beloved Pope??

I will skip forward to the heart of this article, which is to explain the Christian Symbolism which is important for us the Eastern Orthodox Christians. Many of the symbols might have in common, also with other Christian early Churches like the Coptic Oriental Orthodox Church, the Armenian Apostolic Orthodox Churches and other Chruches which somehow are closer to the One Holy and Apostolic Church – the Orthodox Church but officially are not in communion with us the Orthodox Christians.

Here I'll share only the most notable Christian Symbolism which is also used in the Eastern Orthodox Church.

Many of this symbolism was always bothering me while in Churches or Monasteries and was always pushing me to more and more questions without answers, thus I finally did some research on this symbols in get a better understanding on my Orthodox Christian faith.

Since I don't have a Theologian education and many of us the ordinary layman's in the church doesn't have such education I hope this orthodox Christian symbolism shared here and it's meanings will be of interest and will help you fortify your good faith in God and our Orthodox Christian faith.

Lamb of God Christian Symbol
Lamb

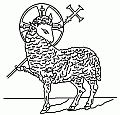
Lamb: symbol of Christ as the Paschal Lamb and also a symbol for Christians (as Christ is our Shepherd and Peter was told to feed His sheep).

This symbol is also presented in Bulgaria on the little yellow book they sell in our Bulgarian Orthodox Churches.
This tiny book contains the Divine Liturgy compiled by God's inspiration by st. John Chrysostom
If you're coming from an Catholic Background and you hold interest for Orthodox Christianity, as historically East Orthodox Christianity Symbol of Faith as well as basic doctrines were kept untouched, you might consider reading online here The Divine Liturgy by St. John Chrysostom
It's really important to say that the Divine Liturgy by St. John Chrysostom is the "backbone" of the church life, since it's the main and most served Liturgy in the eastern Orthodox Churches around the world.

Dove and Russian Patriarch
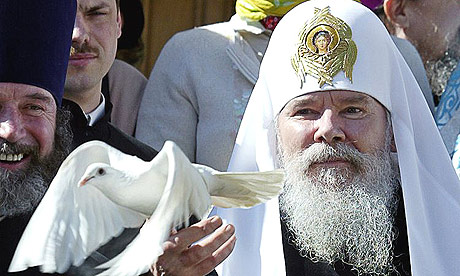
Dove: symbol of the The Holy Spirit and used especially in representations of our Lord's Baptism and the Pentecost. It is also used to recall Noe's dove, a harbinger of hope.

Chirchoao, Chi-Rho Sigla
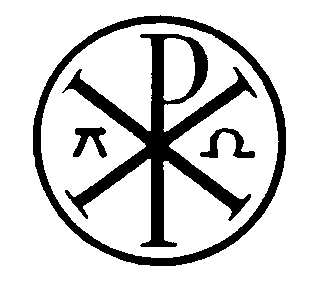
"Chi-Rho" or "sigla": the letters "X" and "P," representing the first letters of the title "Christos," were eventually put together to form this symbol for Christ ("Chi" is pronounced "Kie"). It is this form of the Cross that the Emperor of Byzantia Constantine saw in his vision along with the Greek words, TOUTO NIKA, and which mean "in this sign thou shalt conquer.

Orthodox Tau Cross
"thau" or "tau": the T-shaped cross is mentioned in the Old Testament and is seen as a foreshadowing of the Cross of Christ.
Ezechiel 9:4:
"And the Lord said to him: Go through the midst of the city, through the midst of Jerusalem: and mark Thau upon the foreheads of the men that sigh, and
mourn for all the abominations that are committed in the midst thereof."
I've noticed that the tau_cross is often worn by Orthodox Monks as "a badge" on their clothes somewhere in the right of their chest

Greek Orthodox Cross
The Greek Orthodox Cross This symbol is one of the earliest Christian symbols which emerged right after Christ's resurrection.
The Greek Cross has all fours members the same shape and form (crux quadrata) and usually suggests the Christian church rather than a symbol of Christ's suffering.

Jerusalem Cross
Jerusalem Cross: also called the "Crusaders' Cross," it is made up of 5 Greek Crosses which are said to symbolize a) the 5 Wounds of Christ; and/or b) the 4 Gospels and the 4 corners of the earth (the 4 smaller crosses) and Christ Himself (the large Cross). This Cross was a common symbol used during the wars against Islamic aggression. (see less stylized version at right)

Baptismal Cross
Baptismal Cross: consisting of the Greek Cross with the Greek letter "X", the first initial of the title "Christ," this Cross is a symbol of regeneration, hence, its association with Baptism. Usually the Orthodox priest dress is decorated with a sign like this.

Red Orthodox Egg
The Scarlet red Egg:
Church tradition has it that St. Mary Magdalen went to Rome and met with the Emperor Tiberius to tell him about the Resurrection of Jesus. She held out an egg to him as a symbol of this, and he scoffed, saying that a man could no more rise from the dead than that egg that she held could turn scarlet. The egg turned deep red in her hands, and this is the origin of Easter eggs, and the reason why Mary Magdalen is often portrayed holding a scarlet egg.

Ichthus an early Christian Symbol
Ichtus (Ichthys) – The Fish:
Fish: the fish — ever-watchful with its unblinking eyes — was one of the most important symbols of Christ to the early Christians. In Greek, the phrase, "Jesus Christ, Son of God Savior," is "Iesous Christos Theou Yios Soter." The first letters of each of these Greek words, when put together, spell "ichthys," the Greek word for "fish" (ICQUS ). This symbol can be seen in the Sacraments Chapel of the Catacombs of St. Callistus. Because of the story of the miracle of the loaves and fishes, the fish symbolized, too, the Eucharist (see stylized fish symbol at right). Important note to make, here is that nowdays this sign's variations is not too often to be seen in Orthodox Churches. It's highly adopted by protestant Christians, seeing this sign on somebody's car or inside his home is a sure sign that probably he adhere's to Christian teachings different from orthodoxy.

Alpha Omega orthodox symbol
The Alpha-Omega symbol
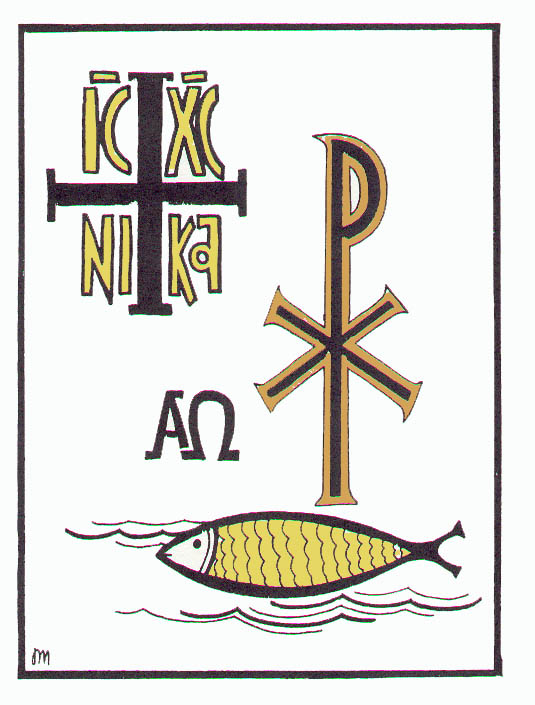
Alpha, the first letter of the Greek alphabet, and Omega, the last letter of the Greek alphabet, became a symbol for Christ due to His being called "the First and the Last." The roots of symbolizing these attributes of God go back further, all the way to the Old Testament where, in Exodus 34:6, God is said to be "full of Goodness and Truth." The Hebrew spelling of the word "Truth" consists of the 3 letters "Aleph," "Mem," and "Thaw" — and because "Aleph" and "Thaw" are the first and last letters of the Hebrew alphabet, the ancients saw mystical relevance in God's being referred to as "Truth." At any rate, the Greek Alpha and Omega as a symbol for Christ has been found in the Catacombs, Christian signet rings, post-Constantine coins, and the frescoes and mosaics of ancient churches.

IC XC Nika Orthodox Symbol
The "IC XC Nika":
comes from Ancient Greek and was a widespread ancient Christian Symbol which is nowadays still present in the Eastern Orthodox Churches. IC XC Nika literally translated to english means "IC XC = Jesus Christ, NIKA = Glory to". In other words translated to modern english IC XC NIKA means Glory be to Jesus Christ!

Many Protestant Christians, nowdays falsely believe and claims this fish Christian symbol preceded the Crucifix as a symbol of veneration of Jesus and his Cross sufferings in the Church. This kind of belief is a falsely spread along many Protestant or "Evangelical" Christian denominations and Methodists. to be seen in many ancient Christian Church buildings is a Christian symbol. Today, some ancient Orthodox Churches still contain the "Christian fish" symbol. The reason why this symbol was used by early Christians is as a remembrance of the great miracle of Jesus to feed 5000 with 2 fishes and seven breads.

Holy Eucharist Cup, Bread and Wine

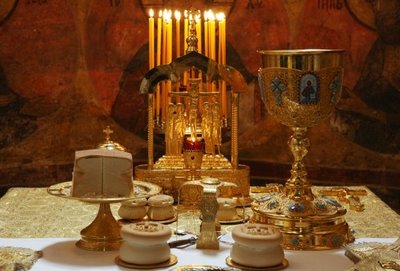
The Holy Eucharist vessels used by Orthodox Priests This is the cup of salvation as also called during the Divine Liturgy each time, the Wine and the Blood that the priest prepares in that Holy Cup is transformed by The Holy Spirit into a veracious flesh and blood of our Lord Jesus Christ.

Orthodox Byzantine Coat of Arms
The byzantine coat of arms
is an ancient Christian symbol used in the early Byzantine Church, nowadays it can be observed only in the Orthodox Churches.
It symbolizes the power of the Byzantian empire under the guidance of the the Holy Lord and the Gospel Truths.

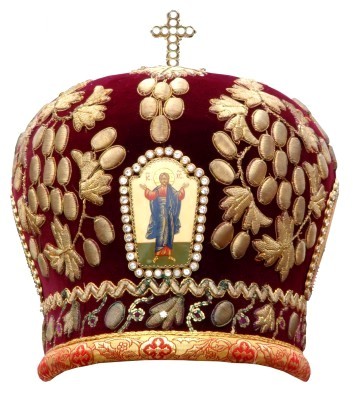
Orthodox Bishop Crown
The Orthodox Bishop Crown is only worn by Bishops in the Orthodox Church. This crown indicates the Bishop's Church and spiritual (rank) and dignity.

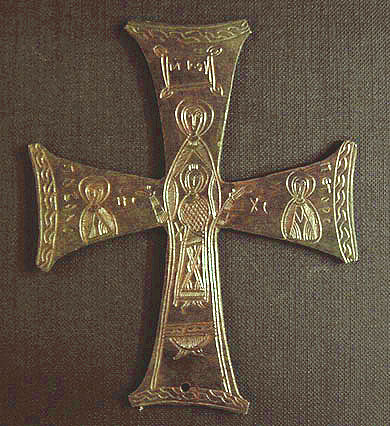
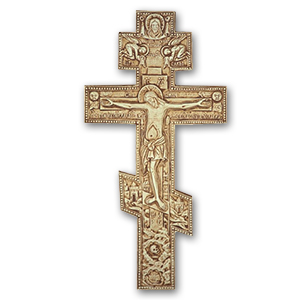
Byzantine Orthodox Cross
Byzantine Orthodox or Russian Orthodox Cross
Is used most often by Eastern Catholics and Russian Orthodox, this Cross is the Byzantine Cross with the footrest at a diagonal. This slant is said to represent one of a few things:
– the footrest wrenched loose from the Christ's writhing in intense physical suffering; lower side representing "down," the fate of sinners, while the elevated side represents Heaven;
– the lower side represents the bad thief (known to us as Gestas through the apocryphal "Acts of Pilate" ("Gospel of Nicodemus") while the elevated side to Christ's right represents the thief who would be with Him in Paradise (St. Dismas);
– the "X" shape of the slanted "footrest" against the post symbolizes the cross on which St. Andrew was crucified.

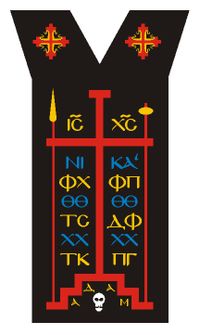
Megaloschema a dress of a schimonk
The Megaloschema is a dress worn by schimonks. This monk rank is actually the highest possible rank an orthodox Christian monk can achieve. The symbolism on the dress is a brief form of:

  • IC XC (IECOYC XPICTOC) "Jesus Christ"
  • IC XC NIKA ("IECOYC XPICTOC NIKA") meaning: "Jesus Christ is Victorious"

The letters below IC XC Nika has a meaning – The Light of Christ shines on all.

  • XX. X.X letters. – means "Christ bestows grace on Christians"
  • The 4 Thitha (called) signs are a symbol for: Vision of God Divine wonder

Then the

  • T. K. P. G – Means "The Place of the Skull becomes Paradise"
  • The text placed in the lowest translated to English is "AdamThe First Man" and also is a symbol for the Place of the Skull (Golgotha).
  • In the Orthodox Church and the Church fathers teaches us that Golgotha or the Place of the Skull is the Place where the first man (Adam) was buried, and by God's divine providence coincides with the place where our Saviour Jesus Christ was crucified.

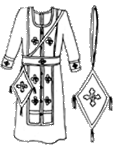
Orthodox Bishop Dress
Orthodox Priest dress / robe
This dress is only worn by Orthodox Christian Bishops.

Bulgarian Orthodox cross with 4 lights
The Cross with four lights emitating near the center of the cross This cross is actually used in more modern times as a Christian Orthodox symbol, The four lights coming out of the cross are added,
as the gospels speak that Christ is the Sun of righteousness
I've had quite a long time trying to figure out why exactly this cross is made with this 4 lights. It was a real joy when one time a priesttold me the meaning.
It's interesting fact that most of the Roman Catholic's crosses nowdays have the four lights radiating from Christ's Crucifix or the Cross symbolizing the Crucifix.

This is all I will say for symbolism for now. I hope this Christian symbolism will shed some light on the matters of Symbolism in both the Orthodox and the Catholoic eastern Church. I'll be glad if somebody out there more literate on the subject comment on my post and correct me if I'm wrong with smething.

Websites I view per daily basis

Friday, January 11th, 2008

milw0rm.com linux-bg.org packetstormsecurity.nl securityfocus.com debian-administration.org sciencedaily.com httpd.apache.org lwn.net php.net freebsd.org news.bg That’s most of which I can think right now ..END—–

12 must have Joomla extension plugins / Essential modules for new Joomla CMS install

Thursday, June 16th, 2011

Joomla bundle of must have extensions picture

These days very often I have to install, plain new Joomla based websites. I’ve realized that since there is no structured guide to follow describing the most essential plugins that every new fresh new joomla installation is required to have.
Thus I took the time and wrote this post, as it will be useful to myself in my future new joomla based websites establishment, I also believe these guide will be useful to other Joomla enthusiasts or administrators in their daily work.

Below I will describe in short the installation, configuration and oddities I’ve faced during installment of the above described bundle of plugins on a plan Joomla 1.5 install.These article will walk through 12 joomla essential plugins that I believe every fresh Joomla installation should be equipped with.
Hope this guide will be helpful to you. Now let’s start it up:

1. JoomlaXplorer – A sophisticated web file explorer for Joomla

One of the basic modules, beneficial with a new joomla CMS install is Joomla Xptplorer . This module enables the joomla admin to browse files in a web file explorer, on the server where the joomla CMS is installed. Below you see how handy the joomla web explorer provided by the plugin is:
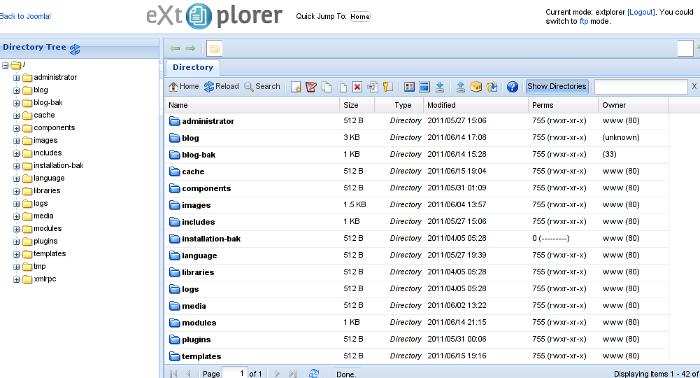
Joomla file explorer extplorer module

Installing and using the plugin is a piece of cake. To install the plugin:

a. download Joomla file Xplorer from here or from the official plugin website.

b. Install the plugin through the admin joomla menu:

Extensions -> Install/Uninstall

c. Start using the newly installed plugin by following to menus:

Components -> eXtplorer

2. JCrawler Generate easily sitemap.xml to aim the overall Joomla website SEO optimization

JCrawler logo plugin joomla

I have previously written a very through tutorial on how to install configure and generate website sitemap with Jcrawler module, You can read my article titled: How to build website sitemap.xml in Joomla here

3. sh404SEF – Make your Joomla links and content more user friendly

sh404sef Joomla Search Engine Optimization plugin

sh404SEF is a great Joomla plugin, which will seriously improve SEO and could contribute well for a website to be better indexed with major search engines.

I have previously written an article describing thoroughfully the install and use procedures for the module.
You can read the article Making your Joomla URLS Google friendly with sh404sef plugin / Simple Joomla link SEO here

4. Akeeba Backup Joomla solution

Akeeba backup Joomla Module

Installing a joomla backup solution is very essential if you does take care about your data, it often happens that server hard disk got crashes or a RAID massives got corrupted or some kind of other unexpected disaster hits the server. In these terrible times, having a website backup will save you nerves and data recovery funds, not to mention that in many cases data recovery is impossible.

Joomla has a very easy to use software for creating full website backup called Akeeba Backup

To start using the software one must:

a. Download Akeeba Backup and install it via:

Extensions -> Install/Uninstall

After the Akeeba Backup installation is over, to create your first backup, one needs to navigate to:

Components -> Akeeba Backup -> Backup Now

Each Akeeba backup (a version of the website’s files data and sql info) will be created in an archive file with the extension .jpa
The backup files are created under joomla’s website (main) root directory in directory location administrator/components/com_akeeba/backup

The Akeeba plugin also has capabilities to recover a (.jpa) backup restore point easily.
To recover a backup with the Akeeba plugin one needs to do it once again, via the plugin joomla web interface.
5. Google Analytics (place easy tracking code) in Joomla

Google Analytics Tracking Module for Joomla

a. Download the Google Analytics Tracking Module
The module is available from Joomla Extensions on joomla.org

At the current time of writting you need to download the analytics_tracking15,zip file

b. Install the Google Analytics Tracking Module;
Login as joomla admin and navigate to;

Extensions -> Install

Place the analytics_tracking15.zip url to the Install URL: field.
Again as of time of writting you need to place https://www.pc-freak.net/files/analytics_tracking15.zip;

c. Open the Module Manager

Extensions -> Module Manager

d. Click over Google Analytics Tracking Module
On the right pane you will notice in the Module Parameters the Analytics_uacct_code field. In the uacct_code field you need to paste your UA obtained from your created google-analytics account.
This code is usually something like UA-2101595-10
Now place your code their and press the save green button located near the right top of the screen. You should see the text in blue Item Saved which would indicate your UA code is stored already in the Google Analytics Tracking Module, now press the Cancel button located again on the right top.
As a last step before the Google analytics is set-up on the Joomla you need to enable the plugin to do you need to press over the tick left sided from the text reading Google Analytics Tracking Module in the Module Manager
e. Click over the Enabled button in Module Manager;
Google Analytics Tracking Module -> Enabled

6. Itprism (Facebook, Twitter etc.) Social Network share buttons Joomla plugin

ITPShare Large Social Buttons Joomla

a. to add the itpsocialbuttons to joomla Download the Itpsocialbuttons latest module files from http://itprism.com/free-joomla-extensions/social-buttons-plugin or use my mirrored module files below:

Download mod_itpsocialbuttons .zip file
Download plg_itpsocialbuttons .zip

After having the two files necessery to be installed to make the ITPSocialButtons appear on website, installation is done like with any other installation:

Extensions -> Install/Uninstall -> Upload Package File (Choose File)

Next its necessery to configure the plugin to do so, follow to menus:

Extensions -> Module Manager -> Share

You will notice the Share dialog in the list of Module Name column in Module Manager

Here is a screenshot on how the settings options for ITpsocialbuttons will look like:
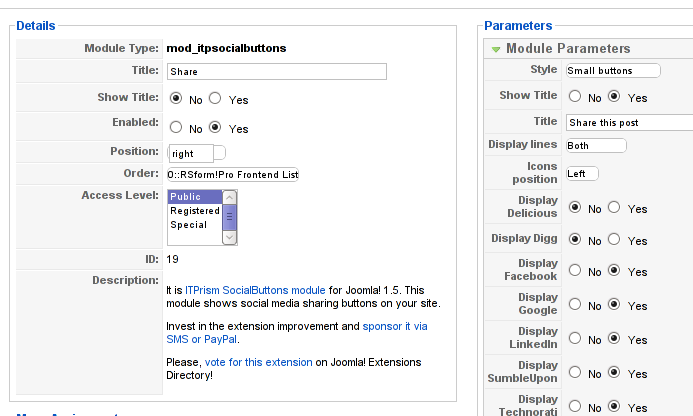
Mod ITpSocialButtons settings screen

The options which I personally changed was:

Show Title – I set this one to No as I wanted to omit the plugin title text to appear on my website.
Further on I’ve set the Enabled option to Yes to enable the plugin and choose the buttons Style option to be of a Small buttons type.
I’ve also found that the most suitable position for the Social Share buttons were to be of a right – Position .

Here is how the social network itprism share buttons looks like:
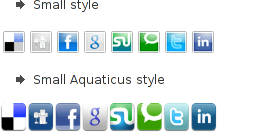
ITprism Joomla Social Share Plugin various button types

The plugin supports sharing of joomla pages to the following list of social networks:
 

  • Delicios.com
  • Digg.com
  • Facebook
  • Google Bookmarks
  • StumbleUpon
  • Technorati
  • Twitter
  • LinkedIn

The module configuration, also allows the user to configure the type of social network buttons, one wants to display on the website.

7. Joomla JCE Content Editor

This content editor is really awesome compared to the default editor TinyMCE. If you want to have an options rich content editor for Joomla, then this is the one for you 🙂
download JCE Content Editor here

After installing the JCE Joomla content editor in order to enable it as a default editor you need to go to the following location:

Site -> Global Configuration -> Default WYSIWYG Editor

There place on Editor TinyMCE and change it with Editor – JCE

Now go to edit some article, and you will see the difference in the editor 🙂

8. Add gallery Joomla capabilities with sigplus (Image Gallery Plus) and Very Simple Image Gallery

Image Gallery Plus sigplus Joomla Screenshot

Image Gallery Plus plugin (sigplus) gallery review screenshot

sigplus Image Gallery Plus is a straightforward way to add image or photo galleries to a Joomla article with a simple syntax. It takes a matter of minutes to set up a gallery but those who are looking for a powerful gallery solution will not be disappointed either: sigplus is suitable for both beginner and advanced users.

Download Sigplus Joomla Image Gallery plugin here
Using sigllus is quite easy all one has to do is use Joomla Media Manager from links:

Site -> Media Manager

Create new folder in the stories folder, let’s say New Pictures and further on use Media Manager to upload all desired pictures to be later displayed.

Being done with uploading the images you want to display, go to Article Manager :

Content -> Article Manager

From there choose your article where new uploaded pictures you want to display and type in the article:

{gallery}New Pictures{/gallery}.

Note that New Pictures is the directory just recently created as stated below, it’s important that there is no spacing between {gallery}and New Pictures, if one tries {gallery} New Pictures {/gallery} instead of {gallery}New Pictures{/gallery} an error will occur instead of the pictures being displayed in a scrolled gallery.

Sigplus Image Gallery has also a number of configuration options, which might make it look a bit more decent.
I have to say in my view the default way sigplus displays pictures is awful!

Another alternative if you don’t like Sigplus ‘s way of creating new galleries is to use Very Simple Image Gallery
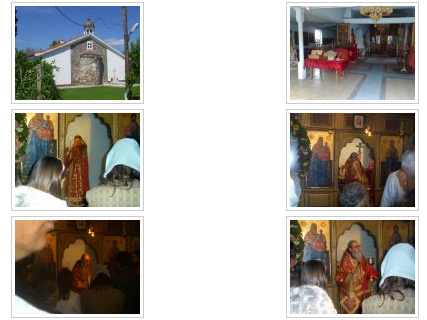
Very Simple Image Gallery joomla screenshot

Here is a screenshot on a sample gallery created with Very Simple Image Gallery Joomla Plugin

You can download Very simple image gallery here

After installing the plugin. It’s use is analogous to the Sigplus . To use it likewise sigplus create new directory through Media Manager and in stories and upload your files in let’s say New Pictures1 . Later on in your article place, the code

{vsig}New Pictures1{/vsig}

Gallery will be generated automatically by the plugin. I think Simple Image Gallery is a bit more advanced and gives a better outlook to Galleries, though it’s configuration settings are much less than with SigPlus image gallery.

To add pictures comments e.g. img link alt=” and title=” tib you need to place a code within the Article manager similar to:

{vsig_c}0|Picture_1.JPG|Some sample text|Some other text{/vsig_c}
{vsig_c}0|Picture_2.JPG|Some example text|Some text{/vsig_c}
etc. ..

Note that the 0 in above example specifies the gallery number if you for instance are using a couple of galleries with Simple Image Gallery , the first one you used would be call 0 . The text specified as comments to the picture will also appear after you preview the gallery right below the picture when clicked on as a picture description in a really nice way.
9. Install Google maps plugin for Joomla
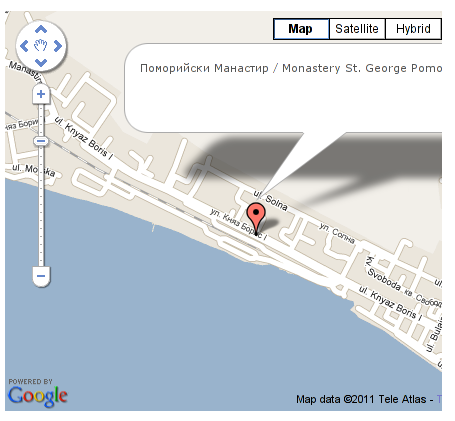
Google Maps plugin for Joomla screenshot

It’s a wise idea that every website has a location map on it’s website, for that reason Google maps is just great.
To install Google maps capability to joomla one can use a plugin called Google Maps .

You can straighly download Joomla’s Googlemap plugin from here

Afterwards use Extension Manager to install the plugin e.g. follow:

Extensions -&gr; Install/Uninstall (Choose File)

and click on Upload File & Install button.

To further enable and configure the Joomla Googlemap plugin you will have to go to the location:

Extensions -> Plugin Manager

Therein you will have to find and enable the Google Maps plugin which is to be found in the column named Plugin Manager
On my Joomla installation the plugin was located in the second page with modules, so if you don’t find the module on the listing with modules on the first page, make sure you scroll to the bottom of the page and click on Next button.

Therein in the list you will most likely notice Google Maps use the Enable button to enable it.

Next step is to configure the plugin, to do so press on the plugin name Google Maps
All configuration necessery here is to place Googlemaps API Key in the respective field (you will see it among config options).

Issuing a new Google Maps api key takes just few seconds, if you already have a gmail account just go to http://code.google.com/apis/maps/signup.html and take few seconds to issue the key.

You will get the key right on your gmail account after being issued (to repeat myself issuing takes few seconds so no worrier here).

One moreOnce having the key place it in the Googlemaps API Key field and configuring Address (which is one of the list of many options the plugin provides) you will be done with configuration.

To display a google map the location you just configured go to the Article Manager , select the article where you want the google maps location picture of your address to appear and type in the Article:

{mosmap|text='Exact street address location'|zoom='15'|zoomType='Large'|zoomNew='0'}

After you save the article a very nice Google map showing you the location’s streets will appear.
You can further conifgure a number of things related to the google map to appear, one thing you might want to play with is the zoom option which as you see in below’s code is equal to 15, e.g. zoom=’15’
Set it to another one if you want to regulate your googlemaps zoom level. For more thoroughful options take a look at the extensive plugin documentation.

10. Joomla Xmap (generating static HTML sitemap) Download Xmap from here , install it the usual plugin way.

Right after installation on the plugin succesful install screen you will notice the link component menu .
Clicking on the component menu you will be leaded to a page showing you few links Sitemap’s URL :
 

  • XML Sitemap:
  • HTML Sitemap:
  • News Sitemap:
  • Images Sitemap:

11. Add Joomla donate Paypal capabilities with Joomla PAYPAL DONATION MODULE

Paypal Donation Module Joomla Screenshot

Just recently I’ve written a a post on how to add a paypal donation capabilities to joomla, you can read my previous post here

12. Install Joomla RSForms Module (Advanced Joomla Forms Support)
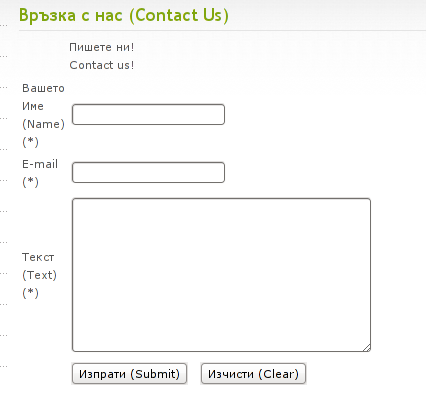
Simple Joomla RsForm contact form

If you’re planning to add a complicated form support for Joomla, there are plenty of plugins, however one that was suggested by a friend of mine which is deep in Joomla world and moreover works good on my joomla installations is RSForms

Joomla – RSForms! is free to download and has great and easy interface to create new joomla forms.

At the time of writting I use these three RSForms components on new Joomla installations:

RSform Pro 1.1.0 com
Mod RsForm for Joomla 1.5
Mod Rsform list for Joomla

For latest release of RSForms! use the link http://www.rsjoomla.com/joomla-components/rsform.html

Installation is like any other module and is done through Extensions -> Install/Uninstall menu.

After installation, setting up a new form is available from the Joomla Menus:

Components -> RSform!Pro -> Manage Forms

I would not enter in details on how to edit the default RSForms or create a new RSForm. Just take some time and learn it by trying 😉
After the rsform is ready, to enable the new form, navigate to Joomla menus:

Menus -> Main Menu

Press the New button located in the buttons bar nearby the page header in the list of options in Select Menu item Type you will notice the RSForm!Pro as an option, press on it to establish the new form in the menus.

A follow up window will appear where one can set a Title: and Alias: for the new form as well as few other options.
After finalizing the settings press on Apply button to save the settings and the new form should appear in Joomla.

Probably there are many more handy plugins, which I’m missing here thus I’ll be glad if readers suggest some more helpful essential (must have plugins) for Joomla.
Feedback on this tutorial is very welcome!
Looking forward to hear for your opinions if my article was helpful to you 😉