Posts Tagged ‘key file’

How to convert .CRT SSL Certificate to .PFX format (with openssl Linux command) and Import newly generated .PFX to Windows IIS Webserver

Tuesday, September 27th, 2016

IIS8_Windows_Webserver_logo_convert_CRT_and_import_PFX-certificate

1. Converting to .CRT to.PFX file format with OpenSSL tool on GNU / Linux to import in Windows (for example, IIS)

Assuming you have generated already a certificate using the openssl Linux command and you have issued the .CRT SSL Certificate issuer file
and you need to have the new .CRT SSL Certificate installed on Windows Server (lets say on Windows 2012) with IIS Webserver version 8.5, you will need a way to convert the .CRT file to .PFX, there is plenty of ways to do that including using online Web Site SSL Certificate converter or use a stand alone program on the Windows server or even use a simple perl / python / ruby script to do the conversion but anyways the best approach will be to convert the new .CRT file to IIS supported binary Certificate format .PFX on the same (Linux certificate issuer host where you have first generated the certificate issuer request .KEY (private key file used with third party certificate issuer such as Godaddy or Hostgator to receive the .CRT / PEM file).

Here is how to generate the .PFX file based on the .CRT file for an Internal SSL Certfiicate:


openssl pkcs12 -export -in server.crt -inkey server.key -out server.pfx

On the password prompt to appear use any password because otherwise the future IIS Webserver certificate import will not work.
 

To do a certificate chain SSL export to be accessed from the  internet.


openssl pkcs12 -export -in server.crt -inkey server.key -out server.pfx -certfile internet v2.crt

2. Import the PFX file in Windows


Run: mmc, add snap, Certificates, Computer account, Local Computer; in the
Console:

Certificates (Local Computer) > Personal > Certificates: Select All Tasks > Import File

Enter previously chosen password.
You should get further the Message "Import was successful."

You can import the PFX file by simply copying it to the server where you want it imported and double click it this will  open Windows Importwizzard.

Then select the IIS:


Site, Properties, Directory Security, Server Certificate, Replace the current certficate, select proper Certificate. Done.

Alternatively to complete the IIS Webserver certificate import within one step when a new certificate is to be imported:

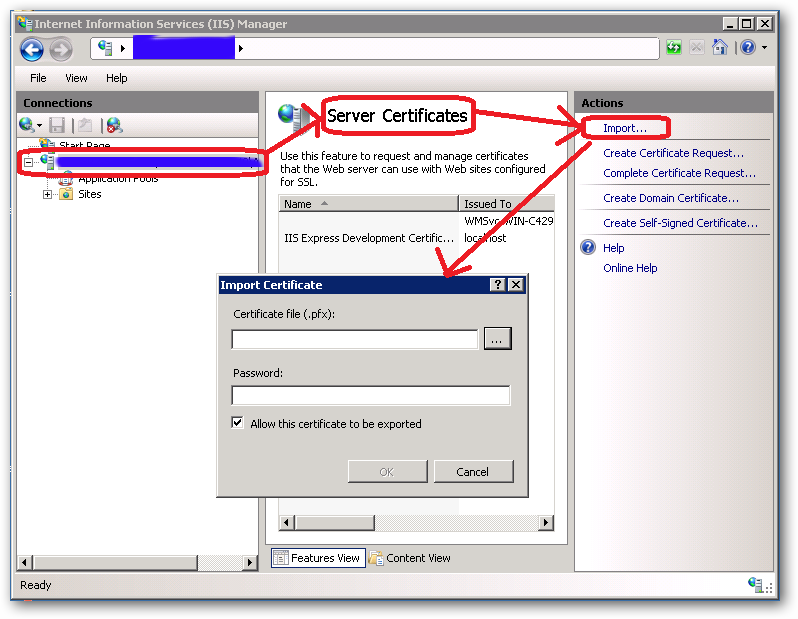
In IIS Manager interface go to :

Site, Properties, Directory Security, Server Certificate, Server Certificate Wizard


Click on

Next

Choose

import a certificate from a .pfx file, select and enter password.

Internet_Information_Server_IIS_Windows-SSL_Certificate-import-PKF-file

3. Import the PFX file into a Java keystore


Another thing you might need if you have the IIS Webserver using a backend Java Virtual Machine on the same or a different Windows server is to import the newly generated .PFX file within the Java VM keystore.

To import with keytool command for Java 1.6 type:


keytool -importkeystore -deststorepass your_pass_here -destkeypass changeit -destkeystore keystore.jks -srckeystore server.pfx -srcstoretype PKCS12 -srcstorepass 1234 -srcalias 1 -destalias xyz


Also the .CRT file could be directly imported into the Java keystore


Import a .crt in a Java keystore


/usr/java/jre/bin/keytool -import -keystore /webdienste/java/jdk/jre/lib/security/cacerts -file certificate.crt -alias Some alias


4. Get a list of Windows locally installed certificates

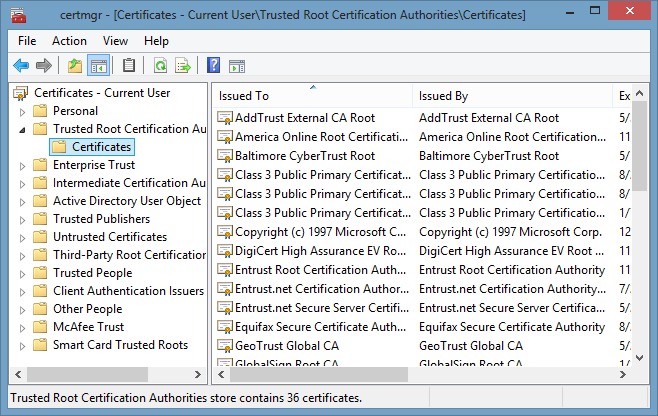
To manager installed certificates on Windows 7 / 8 / 2012 Server OS is to run command via

Start -> Run


certmgr.msc

certmgr_trca_windows_check-windows-installed-ssl-certificates


One other way to see the installed certificates on your Windows server is checking within

Internet Explorer

Go to Tools (Alt+X) → Internet Options → Content → Certificates.


To get a a complete list of installed Certificate Chain on Windows you can use PowerShell


Get-ChildItem -Recurse Cert:


That's all folks ! 🙂


Create and Configure SSL bundle file for GoGetSSL issued certificate in Apache Webserver on Linux

Saturday, November 3rd, 2018

gogetssl-install-certificate-on-linux-howto-sslcertificatechainfile-obsolete

I had a small task to configure a new WildCard SSL for domains on a Debian GNU / Linux Jessie running Apache 2.4.25.

The official documentation on how to install the SSL certificate on Linux given by GoGetSSL (which is by COMODO was obsolete as of time of writting this article and suggested as install instructions:
 

SSLEngine on
SSLCertificateKeyFile /etc/ssl/ssl.key/server.key
SSLCertificateFile /etc/ssl/ssl.crt/yourDomainName.crt
SSLCertificateChainFile /etc/ssl/ssl.crt/yourDomainName.ca-bundle


Adding such configuration to domain Vhost and testing with apache2ctl spits an error like:


root@webserver:~# apache2ctl configtest
AH02559: The SSLCertificateChainFile directive (/etc/apache2/sites-enabled/the-domain-name-ssl.conf:17) is deprecated, SSLCertificateFile should be used instead
Syntax OK


To make issued GoGetSSL work with Debian Linux, hence, here is the few things done:

The files issued by Gogetssl.COM were the following:


AddTrust_External_CA_Root.crt
COMODO_RSA_Certification_Authority.crt
the-domain-name.crt


The webserver had already SSL support via mod_ssl Apache module, e.g.:


root@webserver:~# ls -al /etc/apache2/mods-available/*ssl*
-rw-r–r– 1 root root 3112 окт 21  2017 /etc/apache2/mods-available/ssl.conf
-rw-r–r– 1 root root   97 сеп 19  2017 /etc/apache2/mods-available/ssl.load
root@webserver:~# ls -al /etc/apache2/mods-enabled/*ssl*
lrwxrwxrwx 1 root root 26 окт 19  2017 /etc/apache2/mods-enabled/ssl.conf -> ../mods-available/ssl.conf
lrwxrwxrwx 1 root root 26 окт 19  2017 /etc/apache2/mods-enabled/ssl.load -> ../mods-available/ssl.load


For those who doesn't have mod_ssl enabled, to enable it quickly run:


# a2enmod ssl


The VirtualHost used for the domains had Apache config as below:


NameVirtualHost *:443

<VirtualHost *:443>
    ServerAdmin support@the-domain-name.com
    ServerName the-domain-name.com
    ServerAlias *.the-domain-name.com the-domain-name.com

    DocumentRoot /home/the-domain-namecom/www
    SSLEngine On
#    <Directory />
#        Options FollowSymLinks
#        AllowOverride None
#    </Directory>
    <Directory /home/the-domain-namecom/www>
        Options Indexes FollowSymLinks MultiViews
        AllowOverride None
        Include /home/the-domain-namecom/www/htaccess_new.txt
        Order allow,deny
        allow from all
    </Directory>

    ScriptAlias /cgi-bin/ /usr/lib/cgi-bin/
    <Directory "/usr/lib/cgi-bin">
        AllowOverride None
        Options +ExecCGI -MultiViews +SymLinksIfOwnerMatch
        Order allow,deny
        Allow from all
    </Directory>

    ErrorLog ${APACHE_LOG_DIR}/error.log

    # Possible values include: debug, info, notice, warn, error, crit,
    # alert, emerg.
    LogLevel warn

    CustomLog ${APACHE_LOG_DIR}/access.log combined

#    Alias /doc/ "/usr/share/doc/"
#   <Directory "/usr/share/doc/">
#       Options Indexes MultiViews FollowSymLinks
#       AllowOverride None
#       Order deny,allow
#       Deny from all
#       Allow from 127.0.0.0/255.0.0.0 ::1/128
#   </Directory>
SSLCertificateKeyFile /etc/apache2/ssl/the-domain-name.com.key
SSLCertificateFile /etc/apache2/ssl/chain.crt


</VirtualHost>

The config directives enabling and making the SSL actually work are:
 

SSLEngine On
SSLCertificateKeyFile /etc/apache2/ssl/the-domain-name.com.key
SSLCertificateFile /etc/apache2/ssl/chain.crt


The chain.crt file is actually a bundle file containing a bundle of the gogetssl CA_ROOT and RSA_Certification_Authority 3 files, to prepare that file, I've used bundle.sh small script found on serverfault.com here I've made a mirror of bundle.sh on www.pc-freak.net here   the script content is as follows:

To prepare the chain.crt  bundle, I ran:


sh create-ssl-bundle.sh _iq-test_cc.crt chain.crt
sh create-ssl-bundle.sh _iq-test_cc.crt >chain.crt
sh create-ssl-bundle.sh COMODO_RSA_Certification_Authority.crt >> chain.crt
sh create-ssl-bundle.sh bundle.sh AddTrust_External_CA_Root.crt >> chain.crt


Then I copied the file to /etc/apache2/ssl together with the-domain-name.com.key file earlier generated using openssl command earlier explained in my article how to install RapidSSL certificate on Linux

/etc/apache2/ssl was not previously existing (on Debian Linux), so to create it:


root@webserver:~# mkdir /etc/apache2/ssl
root@webserver:~# ls -al /etc/apache2/ssl/chain.crt
-rw-r–r– 1 root root 20641 Nov  2 12:27 /etc/apache2/ssl/chain.crt
root@webserver:~# ls -al /etc/apache2/ssl/the-domain-name.com.key
-rw-r–r– 1 root root 6352 Nov  2 20:35 /etc/apache2/ssl/the-domain-name.com.key


As I needed to add the SSL HTTPS configuration for multiple domains, further on I've wrote and used a tiny shell script add_new_vhost.sh which accepts as argument the domain name I want to add. The script works with a sample Skele (Template) file, which is included in the script itself and can be easily modified for the desired vhost config.
To add my multiple domains, I've used the script as follows:
 

sh add_new_vhost.sh add-new-site-domain.com
sh add_new_vhost.sh add-new-site-domain1.com


etc.

Here is the complete script as well:


#!/bin/sh
# Shell script to add easily new domains for virtual hosting on Debian machines
# arg1 should be a domain name
# This script takes the domain name which you type as arg1 uses it and creates
# Docroot / cgi-bin directory for the domain, create seperate site's apache log directory
# then takes a skele.com file and substitutes a skele.com with your domain name and directories
# This script's aim is to easily enable sysadmin to add new domains in Debian
sites_base_dir=/var/www/jail/home/www-data/sites/;
# the directory where the skele.com file is
skele_dir=/etc/apache2/sites-available;
# base directory where site log dir to be created
cr_sep_log_file_d=/var/log/apache2/sites;
# owner of the directories
username='www-data';
# read arg0 and arg1
arg0=$0;
arg1=$1;
if [[ -z $arg1 ]]; then
echo "Missing domain name";
exit 1;
fi


# skele template
echo "#
#  Example.com (/etc/apache2/sites-available/www.skele.com)
#
<VirtualHost *>
        ServerAdmin admin@design.bg
        ServerName  skele.com
        ServerAlias www.skele.com


        # Indexes + Directory Root.
        DirectoryIndex index.php index.htm index.html index.pl index.cgi index.phtml index.jsp index.py index.asp

        DocumentRoot /var/www/jail/home/www-data/sites/skelecom/www/docs
        ScriptAlias /cgi-bin "/var/www/jail/home/www-data/sites/skelecom/cgi-bin"
        
        # Logfiles
        ErrorLog  /var/log/apache2/sites/skelecom/error.log
        CustomLog /var/log/apache2/sites/skelecom/access.log combined
#       CustomLog /dev/null combined
      <Directory /var/www/jail/home/www-data/sites/skelecom/www/docs/>
                Options FollowSymLinks MultiViews -Includes
                AllowOverride None
                Order allow,deny
                allow from all
                # This directive allows us to have apache2's default start page
                # in /apache2-default/, but still have / go to the right place
#               RedirectMatch ^/$ /apache2-default/
        </Directory>

        <Directory /var/www/jail/home/www-data/sites/skelecom/www/docs/>
                Options FollowSymLinks ExecCGI -Includes
                AllowOverride None
                Order allow,deny
                allow from all
        </Directory>

</VirtualHost>
" > $skele_dir/skele.com;

domain_dir=$(echo $arg1 | sed -e 's/\.//g');
new_site_dir=$sites_base_dir/$domain_dir/www/docs;
echo "Creating $new_site_dir";
mkdir -p $new_site_dir;
mkdir -p $sites_base_dir/cgi-bin;
echo "Creating sites's Docroot and CGI directory";
chown -R $username:$username $new_site_dir;
chown -R $username:$username $sites_base_dir/cgi-bin;
echo "Creating site's Log files Directory";
mkdir -p $cr_sep_log_file_d/$domain_dir;
echo "Creating sites's VirtualHost file and adding it for startup";
sed -e "s#skele.com#$arg1#g" -e "s#skelecom#$domain_dir#g" $skele_dir/skele.com >> $skele_dir/$arg1;
ln -sf $skele_dir/$arg1 /etc/apache2/sites-enabled/;
echo "All Completed please restart apache /etc/init.d/apache restart to Load the new virtual domain";

# Date Fri Jan 11 16:27:38 EET 2008


Using the script saves a lot of time to manually, copy vhost file and then edit it to change ServerName directive, for vhosts whose configuration is identical and only the ServerName listener has to change, it is perfect to create all necessery domains, I've created a simple text file with each of the domains and run it in a loop:
 

while :; do sh add_new_vhost.sh $i; done < domain_list.txt


How to renew self signed QMAIL toaster and QMAIL rocks expired SSL pem certificate

Friday, September 2nd, 2011

qmail_toaster_logo-fix-qmail-rocks-expired-ssl-pem-certificate

One of the QMAIL server installs, I have installed very long time ago. I've been notified by clients, that the certificate of the mail server has expired and therefore I had to quickly renew the certificate.

This qmail installation, SSL certificates were located in /var/qmail/control under the names servercert.key and cervercert.pem

Renewing the certificates with a new self signed ones is pretty straight forward, to renew them I had to issue the following commands:

1. Generate servercert encoded key with 1024 bit encoding

debian:~# cd /var/qmail/control
debian:/var/qmail/control# openssl genrsa -des3 -out servercert.key.enc 1024
Generating RSA private key, 1024 bit long modulus
...........++++++
.........++++++
e is 65537 (0x10001)
Enter pass phrase for servercert.key.enc:
Verifying - Enter pass phrase for servercert.key.enc:

In the Enter pass phrase for servercert.key.enc I typed twice my encoded key password, any password is good, here though using a stronger one is better.

2. Generate the servercert.key file

debian:/var/qmail/control# openssl rsa -in servercert.key.enc -out servercert.key
Enter pass phrase for servercert.key.enc:
writing RSA key

3. Generate the certificate request

debian:/var/qmail/control# openssl req -new -key servercert.key -out servercert.csr
debian:/var/qmail/control# openssl rsa -in servercert.key.enc -out servercert.key
Enter pass phrase for servercert.key.enc:writing RSA key
root@soccerfame:/var/qmail/control# openssl req -new -key servercert.key -out servercert.csr
You are about to be asked to enter information that will be incorporated
into your certificate request.
What you are about to enter is what is called a Distinguished Name or a DN.
There are quite a few fields but you can leave some blank
For some fields there will be a default value,
If you enter '.', the field will be left blank.
-----
Country Name (2 letter code) [AU]:UK
State or Province Name (full name) [Some-State]:London
Locality Name (eg, city) []:London
Organization Name (eg, company) [Internet Widgits Pty Ltd]:My Company
Organizational Unit Name (eg, section) []:My Org
Common Name (eg, YOUR name) []:
Email Address []:admin@adminmail.com

Please enter the following 'extra' attributes
to be sent with your certificate request
A challenge password []:
An optional company name []:

In the above prompts its necessery to fill in the company name and location, as each of the prompts clearly states.

4. Sign the just generated certificate request

debian:/var/qmail/control# openssl x509 -req -days 9999 -in servercert.csr -signkey servercert.key -out servercert.crt

Notice the option -days 9999 this option instructs the newly generated self signed certificate to be valid for 9999 days which is quite a long time, the reason why the previous generated self signed certificate expired was that it was built for only 365 days

5. Fix the newly generated servercert.pem permissions debian:~# cd /var/qmail/control
debian:/var/qmail/control# chmod 640 servercert.pem
debian:/var/qmail/control# chown vpopmail:vchkpw servercert.pem
debian:/var/qmail/control# cp -f servercert.pem clientcert.pem
debian:/var/qmail/control# chown root:qmail clientcert.pem
debian:/var/qmail/control# chmod 640 clientcert.pem

Finally to load the new certificate, restart of qmail is required:

6. Restart qmail server

debian:/var/qmail/control# qmailctl restart
Restarting qmail:
* Stopping qmail-smtpd.
* Sending qmail-send SIGTERM and restarting.
* Restarting qmail-smtpd.

Test the newly installed certificate

To test the newly installed SSL certificate use the following commands:

debian:~# openssl s_client -crlf -connect localhost:465 -quiet
depth=0 /C=UK/ST=London/L=London/O=My Org/OU=My Company/emailAddress=admin@adminmail.com
verify error:num=18:self signed certificate
verify return:1
...
debian:~# openssl s_client -starttls smtp -crlf -connect localhost:25 -quiet
depth=0 /C=UK/ST=London/L=London/O=My Org/OU=My Company/emailAddress=admin@adminmail.com
verify error:num=18:self signed certificate
verify return:1
250 AUTH LOGIN PLAIN CRAM-MD5
...

If an error is returned like 32943:error:140770FC:SSL routines:SSL23_GET_SERVER_HELLO:unknown protocol:s23_clnt.c:607: this means that SSL variable in the qmail-smtpdssl/run script is set to 0.

To solve this error, change SSL=0 to SSL=1 in /var/qmail/supervise/qmail-smtpdssl/run and do qmailctl restart

The error verify return:1 displayed is perfectly fine and it's more of a warning than an error as it just reports the certificate is self signed.

Howto install GeoTrust RapidSSL certificate on Debian Lenny / Squeeze / Wheezy Linux

Thursday, March 25th, 2010

I faced the task of generating official Validated SSL Certificates by in mydaily duties as a System Administrator at cadiaholding.com . Though generating self-signedSSL certificate is comparatively easy task. It was a pain in the ass setting Apache version 2.2.9-10+lenny6to correctly serve pages through https:// protocol over openssl version 0.9.8g-15+lenny6.I’ll try to go through the whole process of Generating the certificate in order to help some other Debianusers out there to face less setbacks in such a simple task as installing a Trusted SSL Certificate issued(bought) by RapidSSL. Even though this article will mostly deal with SSL certificate issued by RapidSSL,it should be not a problem to apply this methodogy with Verisign or some of the other Geotrust issuedSecure Socket Layer certificates.

In generating the Validated certficate I used enom which is a domain name,ssl certificates, email and hosting company whole-saler.
Fron emon’s website after logging in and using the web interface, there are two major things required to fill inin order to issue your Trusted SSL certificate.

1. Fill in in a form a CSR file, this is usually generated on the Linux server using the openssl.
To issue the CSR file required by Enom use the following commands:

a. First we generate an DES3 RSA encrypted key which we will use next to generate the opeensl CSR file required by ENOM.
debian:~# /usr/bin/openssl genrsa -des3 -out www.domain.com.key 2048
Enter pass phrase for www.domain.com.key:

You’ll be required to fill in a pass-phrase that will be later be required to fill in before Apache servers starts or restarts,so make sure you fill something you either remember or you keep the password stored in a file.
You have to change also the www.domain.com.key in accordance with your domain name.
Now as we already have a proper generated DES3 RSA key afterwards it’s necessery to generate the CSR file with the openssl command line frontend.
So here is how:

debian:~# /usr/bin/openssl req -new -key /home/hipo/www.domain.com.key -out /home/hipo/www.domain.com.csr

Again in the above example change all the paths and file names as you wish.
It’s necessery that the end user fill in a number of questions related to the Certificate Signing Request.
Herein I’ll list what kind of prompts will emerge after executing the above command:

Enter pass phrase for /home/hipo/www.domain.com.key:
You are about to be asked to enter information that will be incorporated
into your certificate request.
What you are about to enter is what is called a Distinguished Name or a DN.
There are quite a few fields but you can leave some blank
For some fields there will be a default value,
If you enter '.', the field will be left blank.
-----
Country Name (2 letter code) [AU]:
State or Province Name (full name) [Some-State]:
Locality Name (eg, city) []:
Organization Name (eg, company) [Internet Widgits Pty Ltd]:
Organizational Unit Name (eg, section) []:
Common Name (eg, YOUR name) []:
Email Address []:
Please enter the following 'extra' attributes
to be sent with your certificate request
A challenge password []:
An optional company name []:

Note that you’ll hav eto fill in the pass phrase previously entered during the generation of the www.domain.com.key file.
In case if you’d like to read more thoroughly on the subject of howto create a Certificate Signing Request or (CSR) as we called it on multiple times, you can read About Certificate Signing Request (CSR) Generation Instructions – Apache SSL more in depth here

2. Hopefully following the above instructions you’ll now have a file named www.domain.csrJust open the www.domain.scr and copy paste it’s content to the ENOM website CSR * webform.

3. Further on select your Webserver type on Enom’s website:In our case we have to select Apache + ApacheSSL

4. What follows next is filling in your company contact information This is also required for proper certificate generation, you have to think twice before you fill in this data, take a note this can’t be changed later on without issuing a brand SSL new certificate.

Apart from the 3 major above requirements to fill in Enom there are some few more radio buttons to use to make some selections according to your personal preferences, however I won’t take time to dig in that and I’ll leave this to you.
After all the above is fulfilled you’ll have to submit your certificate details and choose an email address to which you will receive in a minute a RapidSSL Certificate Request Confirmation

Following a link from the email, will show you some basic information about the certificate about to be generated. That’s your final chance to cancel the issued Trusted Certificated.
If you’re absolutely sure the information about to enter the certificate is correct then you’ll have to follow a link and approve the certificate.

You’ll be informed that you’ll receive your certificate either through Certifier website (e.g. Enom’s website) or via another email.
I thought it’s more probable I receive it via email but anyways I was wrong. More thank 4 hours has passed since the certificate was issued and is available via Enom’s interface but I haven’t received nothing on my mail.
Therefore my friendly advice is to check about your brand new shiny Trusted Certificate on Emom’s website. I had mine ready in about 10 minutes after the CSR was issued.

Assuming that you’ve succesfully obtained the SSL Trusted certificate from RapidSSL what follows is setting up the certificate.
Initially I tried using documentation from RapidSSL website called Installing your SSL Certificate / Web Server Certificate / Secure Server Certificate from RapidSSL.com
I tried to configure one of my Virtualhost as shown in their example inserting in my /etc/apache/sites-available/www.domain.com file, few directives within the VirtualHost something like the shown below

SSLEngine on
# domain.com.crt cointains the Trusted SSL certificate generated and obtained by you from RapidSSL
SSLCertificateFile /etc/apache2/ssl/www.domain.com.crt
# www.domain.com.key contains the file used to generate the CSR file as described earlier in this post
SSLCertificateKeyFile /etc/apache2/ssl/www.domain.com.key

It is also possible insetad of using the SSLCertificateFile and SSLCertificateKeyFile directvies directives in Apache config to use:


Another alternative is to use

SSLCertificateFile /etc/ssl/certs/your-domain-name.crt
SSLCertificateKeyFile /etc/ssl/certs/your-domain-name.key
SSLCACertificateFile /etc/ssl/certs/gd_bundle.crt

The key file is the one generated earlier on the server and handed to the SSL regisrar, the files:

your-domain-name.crt and gd_bundle.crt files are provided by RapidSSL or from whatever SSL registrater the SSL was purchased.

After trying the above configuration and restarting apache with:

/etc/init.d/apache2 restart

Apache failed to start, it might be helpful to somebody out there the error I had in my apache error.log:
The error.log red the following:

[warn] RSA server certificate is a CA certificate (BasicConstraints: CA == TRUE !?)

After some 30 minutes or an hour of Googling on the error I came to the conclusion that the error is caused, becauseApache is supposed to work with .PEM files instead of the classical .CRT and .KEY files asnormally approached in most of the other Unix operating systems.

It took me a bit more of reading on the internet to find out that actually the .pem files so widely adopted in Debian simply contain both the www.domain.com.key file and the www.domain.com.crt key simply pasted one after another, this I also observed from the default Apache self-signed certificate that I believe comes with debian /etc/apache2/ssl/apache.pem .
So I copied both the content of my www.domain.com.key and www.domain.com.crt and store it in one file:
/etc/apache2/ssl/www.domain.com.pem

Also the following configuration:
SSLEngine on
SSLCertificateFile /etc/apache2/ssl/www.domain.com.pem

had to go in your
/etc/apache2/sites-enabled/www.domain.com

Last thing that’s left is to restart your Apache;

/etc/init.d/apache2 restart

Apache will prompt you for your certificate password entered by you during the www.domain.com.key generation. Type your password and with a bit of luck and hopefully with God’s help you’ll be having a Trusted Certificate on your webserver.

Last step is to check if the certificate is okay accessing your domain https://www.domain.com.

Well this is the end of the article, hope you enjoy.If you do please leave your comments, any corrections are also welcomed 🙂

How to solve “Incorrect key file for table ‘/tmp/#sql_9315.MYI’; try to repair it” mysql start up error

Saturday, April 28th, 2012

When a server hard disk scape gets filled its common that Apache returns empty (no content) pages…
This just happened in one server I administer. To restore the normal server operation I freed some space by deleting old obsolete backups.
Actually the whole reasons for this mess was an enormous backup files, which on the last monthly backup overfilled the disk empty space.

Though, I freed about 400GB of space on the the root filesystem and on a first glimpse the system had plenty of free hard drive space, still restarting the MySQL server refused to start up properly and spit error:

Incorrect key file for table '/tmp/#sql_9315.MYI'; try to repair it" mysql start up error

Besides that there have been corrupted (crashed) tables, which reported next to above error.
Checking in /tmp/#sql_9315.MYI, I couldn't see any MYI – (MyISAM) format file. A quick google look up revealed that this error is caused by not enough disk space. This was puzzling as I can see both /var and / partitions had plenty of space so this shouldn't be a problem. Also manally creating the file /tmp/#sql_9315.MYI with:

server:~# touch /tmp/#sql_9315.MYI

Didn't help it, though the file created fine. Anyways a bit of a closer examination I've noticed a /tmp filesystem mounted besides with the other file system mounts ????
You can guess my great amazement to find this 1 Megabyte only /tmp filesystem hanging on the server mounted on the server.

I didn't mounted this 1 Megabyte filesystem, so it was either an intruder or some kind of "weird" bug…
I digged in Googling to see, if I can find more on the error and found actually the whole mess with this 1 mb mounted /tmp partition is caused by, just recently introduced Debian init script /etc/init.d/mountoverflowtmp.
It seems this script was introduced in Debian newer releases. mountoverflowtmp is some kind of emergency script, which is triggered in case if the root filesystem/ space gets filled.
The script has only two options:

# /etc/init.d/mountoverflowtmp
Usage: mountoverflowtmp [start|stop]

Once started what it does it remounts the /tmp to be 1 megabyte in size and stops its execution like it never run. Well maybe, the developers had something in mind with introducing this script I will not argue. What I should complain though is the script design is completely broken. Once the script gets "activated" and does its job. This 1MB mount stays like this, even if hard disk space is freed on the root partition – / ….

Hence to cope with this unhandy situation, once I had freed disk space on the root partition for some reason mountoverflowtmp stop option was not working,
So I had to initiate "hard" unmount:

server:~# mount -l /tmp

Also as I had a bunch of crashed tables and to fix them, also issued on each of the broken tables reported on /etc/init.d/mysql start start-up.

server:~# mysql -u root -p
mysql> use Database_Name;
mysql> repair table Table_Name extended;
....

Then to finally solve the stupid Incorrect key file for table '/tmp/#sql_XXYYZZ33444.MYI'; try to repair it error, I had to restart once again the SQL server:

Stopping MySQL database server: mysqld.
Starting MySQL database server: mysqld.
Checking for corrupt, not cleanly closed and upgrade needing tables..
root@server:/etc/init.d#

Tadadadadam!, SQL now loads and works back as before!

How to fix “Could not verify this certificate for unknown reasons” SSL certificate lighttpd troubles

Tuesday, June 28th, 2011

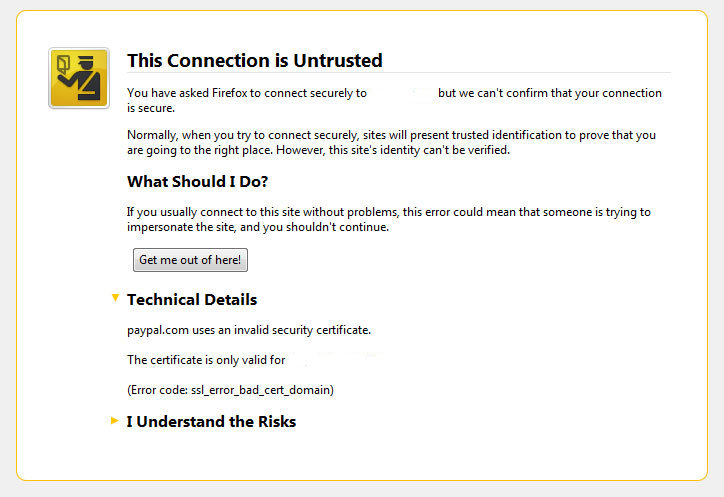
Firefox SSL Pro could not verify for uknown reasons solve error

I’ve been issuing new wildcard multiple SSL certificate to renew an expiring ones. After I completed the new certificate setup manually on the server (a CentOS 5.5 Final running SoluSVM Pro – Virtual Private Manager), I launched Firefox to give a try if the certificate is properly configured.

Instead of my expectations that the browser would just accept the certificate without spitting any error messages and all will be fine, insetad I got error with the just installed certificate and thus the browser failed to report the SSL cert is properly authenticated.

The company used to issue the SSL certificate is GlobeSSL – http://globessl.com , it was quite “hassle”, with the tech support as the first certficate generated by globessl was generation based on SSL key file with 4096 key encryption.

As the first issued Authenticated certificate generated by GlobeSSL was not good further on about a week time was necessery to completethe required certificate reissuing ….

It wasn’t just GlobeSSL’s failure, as there were some spam filters on my side that was preventing some of GlobeSSL emails to enter normally, however what was partially their fault as they haven’t made their notification and confirmation emails to pass by a mid-level strong anti-spam filter…

Anyways my overall experience with GlobeSSL certificate reissue and especially their technical support is terrible.
To make a parallel, issuing certificates with GoDaddy is a way more easier and straight forward.

Now let me come back to the main certificate error I got in Firefox …

A bit of further investigation with the cert failure, has led me to the error message which tracked back to the newly installed SSL certificate issues.
In order to find the exact cause of the SSL certificate failure in Firefox I followed to the menus:

Tools -> Page Info -> Security -> View Certificate

Doing so in the General browser tab, there was the following error:

Could not verify this certificate for unknown reasons

The information on Could not verify this certificate for unknown reasons on the internet was very mixed and many people online suggested many possible causes of the issue, so I was about to loose myself.

Everything with the certificate seemed to be configured just fine in lighttpd, all the GlobeSSL issued .cer and .key file as well as the ca bundle were configured to be read used in lighttpd in it’s configuration file:
/etc/lighttpd/lighttpd.conf

Here is a section taken from lighttpd.conf file which did the SSL certificate cert and key file configuration:

$SERVER["socket"] == "0.0.0.0:443" {
ssl.engine = "enable"
ssl.pemfile = "/etc/lighttpd/ssl/wildcard.mydomain.bundle"
}

The file /etc/lighttpd/ssl/wildcard.mydomain.bundle was containing the content of both the .key (generated on my server with openssl) and the .cer file (issued by GlobeSSL) as well as the CA bundle (by GlobeSSL).

Even though all seemed to be configured well the SSL error Could not verify this certificate for unknown reasons was still present in the browser.

GlobeSSL tech support suggested that I try their Web key matcher interfacehttps://confirm.globessl.com/key-matcher.html to verify that everything is fine with my certificate and the cert key. Thanks to this interface I figured out all seemed to be fine with the issued certificate itself and something else should be causing the SSL oddities.
I was further referred by GlobeSSL tech support for another web interface to debug errors with newly installed SSL certificates.
These interface is called Verify and Validate Installed SSL Certificate and is found here

Even though this SSL domain installation error report and debug tool did some helpful suggestions, it wasn’t it that helped me solve the issues.

What helped was First the suggestion made by one of the many tech support guy in GlobeSSL who suggested something is wrong with the CA Bundle and on a first place the documentation on SolusVM’s wiki – http://wiki.solusvm.com/index.php/Installing_an_SSL_Certificate .
Cccording to SolusVM’s documentation lighttpd.conf‘s file had to have one extra line pointing to a seperate file containing the issued CA bundle (which is a combined version of the issued SSL authority company SSL key and certificate).
The line I was missing in lighttpd.conf (described in dox), looked like so:

ssl.ca-file = “/usr/local/solusvm/ssl/gd_bundle.crt”

Thus to include the directive I changed my previous lighttpd.conf to look like so:

$SERVER["socket"] == "0.0.0.0:443" {
ssl.engine = "enable"
ssl.pemfile = "/etc/lighttpd/ssl/wildcard.mydomain.bundle"
ssl.ca-file = "/etc/lighttpd/ssl/server.bundle.crt"
}

Where server.bundle.crt contains an exact paste from the certificate (CA Bundle) mailed by GlobeSSL.

There was a couple of other ports on which an SSL was configured so I had to include these configuration directive everywhere in my conf I had anything related to SSL.

Finally to make the new settings take place I did a lighttpd server restart.

[root@centos ssl]# /etc/init.d/lighttpd restart
Stopping lighttpd: [ OK ]
Starting lighttpd: [ OK ]

After lighttpd reinitiated the error was gone! Cheers ! 😉

Howto create a (wildcard / multiple) SSL certificate

Thursday, June 23rd, 2011

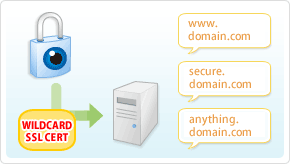
Wildcard SSL picture

It’s the first time I’m creating a wildcard ssl certificate. It appeared there is no fundamental difference between generating a normal SSL certificate and generating a wildcard certificate.

The procedure for generating a wildcard SSL certificate is as follows:

1. Generate an SSL key file

server:~# /usr/bin/openssl genrsa -des3 -out domain.com.key 2048
Enter pass phrase for domain.com.key:

Fill in any passphrase you like, the 2048 specifies the encryption level, 2048 is good enough and is the most commonly used as of today.
I’ve saw there is also an option to use 4096 bits encryption but I never tried that myself, I would be glad if somebody can share if he has succesfully established an SSL certificate with 4096 encryption.

2. Generate the certificate request file

server:~# /usr/bin/openssl req -new -key /home/hipo/domain.com.key -out /home/hipo/domain.com.csr

Further on it’s necessery to fill in some info concerning the newly generated webserver SSL, e.g.:

Enter pass phrase for /home/hipo/domain.com.key:
You are about to be asked to enter information that will be incorporated
into your certificate request.
What you are about to enter is what is called a Distinguished Name or a DN.
There are quite a few fields but you can leave some blank
For some fields there will be a default value,
If you enter '.', the field will be left blank.
-----
Country Name (2 letter code) [AU]:
State or Province Name (full name) [Some-State]:
Locality Name (eg, city) []:
Organization Name (eg, company) [Internet Widgits Pty Ltd]:
Organizational Unit Name (eg, section) []:
Common Name (eg, YOUR name) []:
Email Address []:
Please enter the following 'extra' attributes
to be sent with your certificate request
A challenge password []:
An optional company name []:

Fill all the values according to your requirements, the only vital thing here is to fill in a proper Common Name (eg, YOUR name) []:

The Common Name should always be equal to *.domain.com , if something else is typed in the SSL certificate won’t be considered a valid one when placed on the multiple subdomains.

The newly generated domain.com.csr file should be looking something similar to:

server:~# less < domain.com.csr
-----BEGIN CERTIFICATE REQUEST-----
MIIC2jCCAcICAQAwgZQxCzAJBgNVBAYTAkdCMQ8wDQYDVQQIEwZMb25kb24xDzAN
BgNVBAcTBkxvbmRvbjEQMA4GA1UEChMHU2FudHJleDEWMBQGA1UECwwNKi5zYW50
cmV4Lm5ldDEWMBQGA1UEAwwNKi5zYW50cmV4Lm5ldDEhMB8GCSqGSIb3DQEJARYS
bWFzcmF3eXpAeWFob28uY29tMIIBIjANBgkqhkiG9w0BAQEFAAOCAQ8AMIIBCgKC
AQEAlm9NwcQiA+AAVuVIjg8nCCn5nN14C3rSdcRNuE6oFo9E5uhl9yz8YDIg7wNx
FNQsmw0AwMzkao5Qv9yrmHqbht8qqPfG7YpcTiAoAuSaN6Nm25/zYrSu1uRsnc4C
9lINS8Va+n0Jt+CCQmomTKSarJqNfgo3j1ZU/HuOKcCEktIe0eKigMWxFKCM8wLh
CIdj6AwburckW1/ubOGlu2XKdcY5CbFe4cNGyME3rg33ft8b6v/ORWLSBMrt3QGP
bj42uZP6NoLaZCpsquJLeziLkT4rxdArUApdaTaEFrNMnwzGmUK10qmfx8SQodUl
QXmyd+PpQtaglymjIKN0L8Y36QIDAQABoAAwDQYJKoZIhvcNAQEFBQADggEBAIKe
UTXUt7XvaqVOesTmGCuVmv+Lz/GtGOEw+lfCNM4UFB950H975hHKo63YQr9Vqqqn
WlqZ0nXuwbZdfIh3xhTxzUqF/4m00OFQTbM9hwt6dyqLkmcc4J0rnTsvqjPkUsW5
U7iAIB/UIyDYUcAEky3gnokq3MLH42zXBViPM2+g/fkmJA4jaeoHGINbYMuxFh6Z
r2fIgAfGjms+hNaJvINDoBN5y6YUQbeJc+RoXMrG9clrDsUIGfmkTKCkG0BRJ2ki
Sdbm4IZMtQKU/C4a8vxZkFdleGqWeWL1SBtjjAnTtpb0uF+QmOPLcCoKnBwtEUU9
dPJlEzI+TCgAmKhZoXo=
-----END CERTIFICATE REQUEST-----

Next on this BEGIN CERTIFICATE REQUEST will have to be filled in to the certificate issuer website, whether it’s requested, let’s say in GlobeSSL.

Based on the certificate request a valid SSL certificate will be issued by the SSL provider.
Here one important note to make is that if your domain contians some prohibited keywords like, let’s say bank, finance, poker etc., a keywords which might be considered a fraud or forgery then probably the SSL certificate won’t be issued by the SSL issuer and you will have to further contact the SSL cert provider and send them some more information related to the type of business the new website is going to run.
This kind of domain keyword filter, that is implemented by SSL certificate issuer companies is made to protect internet users from possible frauds or scam websites as well as reduce the level of potential dangerous pyramid like businesses that are so modern on the net these days.

Last step before the certificate will be visible in a browser is to set it for a domain name or virtualhost in Apache, lighttpd or whatever webser is used.
As I’m personally using it with Apache webserver, below I’ll describe how to set it in Apache version 2.x.
3. Configure the newly configured SSL certificate to run on Apache virtualhost

Open up the virtualhost file which coresponds to the domain name to be secured with SSL, for example /etc/apache/sites-available/www.domain.com
Within the <Virtualhost> directives place in a code similar to:

SSLEngine on
# domain.com.crt cointains the wildcard SSL certificate generated and obtained by you from RapidSSL
SSLCertificateFile /etc/apache2/ssl/domain.com.pem

Here the file /etc/apache2/ssl/domain.com.pem should contain both the:

—-BEGIN RSA PRIVATE KEY—– issued earlier in step one with openssl command, as well as:

—–BEGIN CERTIFICATE—– which will be issued by the SSL certificate reseller.

Finally it’s necessery that Apache is restarted to load the new configured certificate:

server:~# /etc/init.d/apache2 restart

The above described steps need to be repeated for all the wildcard subdomains which will use the multiple SSL generated certificate and hopefully if all is well tuned, the certificates should start appearing to all the web domain subdomains immediately.