Posts Tagged ‘target’

How to log multiple haproxy / apache / mysql instance via haproxy log-tagging / Segregating log management for multiple HAProxy instances using rsyslog

Tuesday, May 23rd, 2023

rsyslog-logo-picture-use-programname-and-haproxy-log-tag-directives-together-to-log-as-many-process-streams-as-you-like


Introduction

This article provides a guide on refining haproxy  logging mechanism by leveraging the `programname` property in rsyslog, coupled with the `log-tag` directive in haproxy.
This approach will create a granular logging setup, separating logs according to their originating services and specific custom tags, enhancing overall log readability.

Though the article is written concretely for logging multiple log streams from haproxy this can be successfully applied
for any other Linux service to log as many concrete log-tagged data streams as you prefer.

Scope

The guide focuses on tailoring the logging mechanisms for two haproxy  instances named `haproxy` and `haproxyssl`, utilizing the `programname` property in rsyslog and the `log-tag` directive in haproxy for precise log management.

The haproxy and haproxyssl instances are two separate systemd config file prepared instances.
haproxy instance is simple haproxy proxying tcp traffic in non-encrypted form, whether haproxyssl is a special instance
prepared to tunnel the incoming http traffic in ssl form. Both instances of haproxy runs as a separate processes on the server.

Here is the systemd configuration of haproxy systemd service file:

# cat /usr/lib/systemd/system/haproxy.service
[Unit]
Description=HAProxy Load Balancer
After=network-online.target
Wants=network-online.target

[Service]
Environment="CONFIG=/etc/haproxy/haproxy.cfg" "PIDFILE=/run/haproxy.pid"
EnvironmentFile=/etc/sysconfig/haproxy
ExecStartPre=/usr/sbin/haproxy -f $CONFIG -c -q $OPTIONS
ExecStart=/usr/sbin/haproxy -Ws -f $CONFIG -p $PIDFILE $OPTIONS
ExecReload=/usr/sbin/haproxy -f $CONFIG -c -q $OPTIONS
ExecReload=/bin/kill -USR2 $MAINPID
SuccessExitStatus=143
KillMode=mixed
Type=notify

[Install]
WantedBy=multi-user.target


As well as the systemd service configuration for haproxyssl:
 

# cat /usr/lib/systemd/system/haproxyssl.service
[Unit]
Description=HAProxy Load Balancer
After=network-online.target
Wants=network-online.target

[Service]
Environment="CONFIG=/etc/haproxy/haproxy_ssl_prod.cfg" "PIDFILE=/run/haproxy_ssl_prod.pid"
EnvironmentFile=/etc/sysconfig/haproxy
ExecStartPre=/usr/sbin/haproxyssl -f $CONFIG -c -q $OPTIONS
ExecStart=/usr/sbin/haproxyssl -Ws -f $CONFIG -p $PIDFILE $OPTIONS
ExecReload=/usr/sbin/haproxyssl -f $CONFIG -c -q $OPTIONS
ExecReload=/bin/kill -USR2 $MAINPID
SuccessExitStatus=143
KillMode=mixed
Type=notify

[Install]
WantedBy=multi-user.target


Step 1: Configuring HAProxy instances with `log-tag`
 

To distinguish between logs from two HAProxy instances, `log-tag` directive is used to add tags to logs. This tag is used to filter these logs in rsyslog.
Modify the HAProxy configuration file in `/etc/haproxy/haproxy.*.cfg`

HAProxy Instance 1 (haproxy)
 

#———————————————————————
# Global settings
#———————————————————————
global
      log          127.0.0.1 local6 debug
      log-tag      haproxy

HAProxy Instance 2 (haproxyssl)


#———————————————————————
# Global settings
#———————————————————————
global
    log          127.0.0.1 local5 debug
    log-tag      haproxyssl


Step 2: Implementing rsyslog configuration for haproxy logs
 

Next, create a new rsyslog configuration file, stored in /etc/rsyslog.d/. Ensure the new configuration file ends in `.conf`

HAProxy Instance 1 (haproxy)

Now add rsyslog rules to filters logs based on the `programname` and the custom log tag:
 

# vi /etc/rsyslog.d/55_haproxy.conf
if $programname == 'haproxy' then /var/log/haproxy.log
&stop

HAProxy Instance 2 (haproxyssl)
# vi /etc/rsyslog.d/51_haproxy_ssl.conf
if $programname == 'haproxy_ssl' then /var/log/haproxy_ssl.log
&stop


These rules filter logs that originate from haproxy  and contain the respective string haproxy   or haproxy_ssl , directing them to their respective log files. The `& stop` directive ensures that rsyslog stops processing the log once a match is found, preventing dublication.

Finally, restart both the haproxy and rsyslog services for the changes to take effect:

# systemctl restart haproxy
# systemctl restart haproxyssl
# systemctl restart rsyslog


Reading References

haproxy:   log-tag directive

rsyslog:    rsyslogd documentation

This is a guest article originally written by: Dimitar Paskalev, guest blogging with good interesting articles is always mostly welcome 

How to remove GNOME environment and Xorg server on CentOS 7 / 8 / 9 Linux

Wednesday, April 13th, 2022

centos-linux-remove-gnome-gui-remove-howto-logo

If you have installed recent version of CentOS, you have noticed by default the Installator did setup Xserver and GNOME as Graphical Environment as well the surrounding GUI Administration tools. That's really not needed on "headless" monitorless Linux servers as this wastes up for nothing a very tiny amount of the machine CPU and RAM and Disk resource on keeping services up and running. Even worse a Graphical Environment on a Production server poses a security breach as their are much more services running on the OS that could be potentially hacked.

Removal of GUI across CentOS is similar but slightly differs. Hence in this article, I'll show how it can be removed on CentOS Linux 7 / 8 and 9. Removal of Graphics is usual operation for sysadmins thus there is plenty of info on the net,how this is done on CentOS 7 and COS 8 but unfortunately as of time of writting this article, couldn't find anything on the net on how to Remove GUI environment on CentOS 9.

The reason for this article is mostly for documentation purposes for myself

First list the available meta-package groups installed on the OS:

1. List machine installed package groups


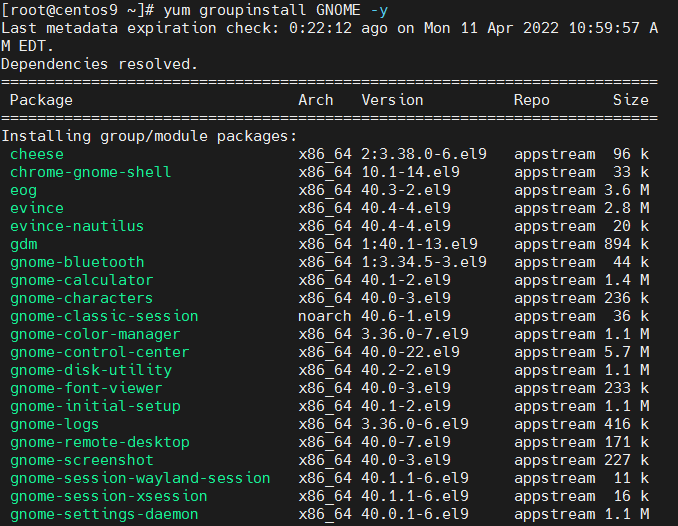
yum-groupinstall-gnome

[root@centos ~]# yum grouplist
Last metadata expiration check: 3:55:48 ago on Mon 11 Apr 2022 03:26:06 AM EDT.
Available Environment Groups:
   Server
   Minimal Install
   Workstation
   KDE Plasma Workspaces
   Custom Operating System
   Virtualization Host
Installed Environment Groups:
   Server with GUI
Installed Groups:
   Container Management
   Headless Management
Available Groups:
   Legacy UNIX Compatibility
   Console Internet Tools
   Development Tools
   .NET Development
   Graphical Administration Tools
   Network Servers
   RPM Development Tools
   Scientific Support
   Security Tools
   Smart Card Support
   System Tools
   Fedora Packager


On CentOS 8 and CentOS 9 to list the installed package groups, you can use also:

[root@centos ~]# dnf grouplist

Installed Environment Groups:
   Server with GUI

2. Remove GNOME and Xorg GUIs on CentOS 7

[root@centos ~]# yum groupremove "Server with GUI" –skip-broken

[root@centos ~]# yum groupremove "GNOME Desktop" -y

3. Remove GNOME and X on CentOS 8

[root@centos ~]# dnf groupremove 'X Window System' 'GNOME' -y

4. Remove Graphical Environment on CentOS 9


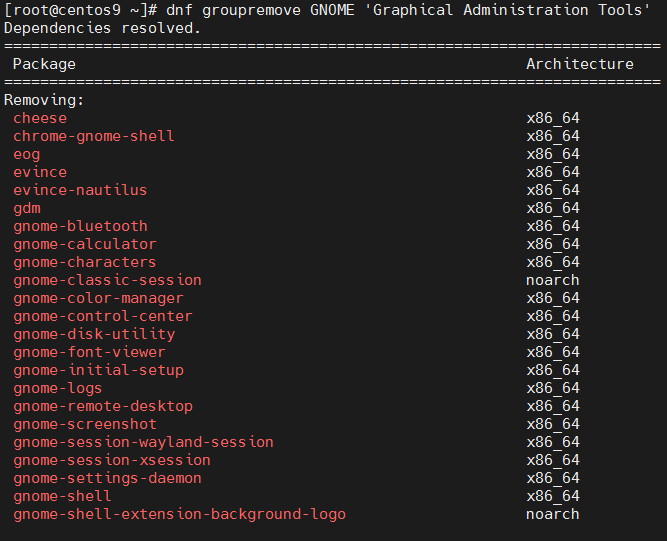
centos9-linux-groupremove-command-screenshot

[root@centos ~]# yum groupremove GNOME 'Graphical Administration Tools' -y


Removing Groups:
 GNOME

Transaction Summary
====================================================
Remove  123 Packages

Freed space: 416 M
Is this ok [y/N]: y
Is this ok [y/N]: y
Running transaction check
Transaction check succeeded.
Running transaction test
Transaction test succeeded.


  xorg-x11-drv-libinput-1.0.1-3.el9.x86_64
  xorg-x11-server-Xorg-1.20.11-10.el9.x86_64
  xorg-x11-server-Xwayland-21.1.3-2.el9.x86_64
  xorg-x11-server-common-1.20.11-10.el9.x86_64
  xorg-x11-server-utils-7.7-44.el9.x86_64
  xorg-x11-xauth-1:1.1-10.el9.x86_64
  xorg-x11-xinit-1.4.0-11.el9.x86_64

Complete!


Graphical Administration Tools – is a group of tools that 

Or alternatively you can do

[root@centos ~]# yum remove gnome* xorg* -y


5. Change the Graphical boot to text multiuser

[root@centos ~]# systemctl set-default multi-user.target


6. Install GNOME / X GUI on the CentOS 7 / 8 / 9

Sometimes GNOME Desktop environment and Xorg are missing on previously delpoyed installs but you need it back for some reason.For example it was earlier removed a year ago on the server as it was not needed, but the machine use type changes and now you need to have installed an Oracle Server / Oracle Client which usually depends on having at least a minimal working version of X environment ont the Linux.


To install back the GNOME and X back on the machine:

[root@centos ~]# yum groupistall "Server with GUI" –skip-broken

[root@centos9 network-scripts]# yum groupinstall "Server with GUI" –skip-broken
Last metadata expiration check: 0:09:26 ago on Mon 11 Apr 2022 07:43:11 AM EDT.
No match for group package "insights-client"
No match for group package "redhat-release"
No match for group package "redhat-release-eula"
Dependencies resolved.
===================================================
 Package                                       Arch       Version              Repository     Size
===================================================
Installing group/module packages:
 NetworkManager-wifi                           x86_64     1:1.37.2-1.el9       baseos         75 k
 cheese                                        x86_64     2:3.38.0-6.el9       appstream      96 k
 chrome-gnome-shell                            x86_64     10.1-14.el9          appstream      33 k
 eog                                           x86_64     40.3-2.el9           appstream     3.6 M
 evince                                        x86_64     40.4-4.el9           appstream     2.8 M
 evince-nautilus                               x86_64     40.4-4.el9           appstream      20 k
 gdm                                           x86_64     1:40.1-13.el9        appstream     894 k
 gnome-bluetooth                               x86_64     1:3.34.5-3.el9       appstream      44 k
 gnome-calculator                              x86_64     40.1-2.el9           appstream     1.4 M
 gnome-characters                              x86_64     40.0-3.el9           appstream     236 k
 gnome-classic-session                         noarch     40.6-1.el9           appstream      36 k
 gnome-color-manager                           x86_64     3.36.0-7.el9         appstream     1.1 M
 gnome-control-center                          x86_64     40.0-22.el9          appstream     5.7 M
 gnome-disk-utility                            x86_64     40.2-2.el9           appstream     1.1 M
 gnome-font-viewer                             x86_64     40.0-3.el9           appstream     233 k
 gnome-initial-setup                           x86_64     40.1-2.el9           appstream     1.1 M
 gnome-logs                                    x86_64     3.36.0-6.el9         appstream     416 k

Installing dependencies:
 cheese-libs                                   x86_64     2:3.38.0-6.el9       appstream     941 k
 clutter                                       x86_64     1.26.4-7.el9         appstream     1.1 M
 clutter-gst3                                  x86_64     3.0.27-7.el9         appstream      85 k
 clutter-gtk                                   x86_64     1.8.4-13.el9         appstream      47 k
 cogl                                          x86_64     1.22.8-5.el9         appstream     505 k
 colord-gtk                                    x86_64     0.2.0-7.el9          appstream      33 k
 dbus-daemon                                   x86_64     1:1.12.20-5.el9      appstream     202 k
 dbus-tools                                    x86_64     1:1.12.20-5.el9      baseos         52 k
 evince-previewer                              x86_64     40.4-4.el9           appstream      29 k

Installing weak dependencies:
 gnome-tour                                    x86_64     40.1-1.el9           appstream     722 k
 nm-connection-editor                          x86_64     1.26.0-1.el9         appstream     838 k
 p11-kit-server                                x86_64     0.24.1-2.el9         appstream     199 k
 pinentry-gnome3                               x86_64     1.1.1-8.el9          appstream      41 k
Installing Environment Groups:
 Server with GUI
Installing Groups:
 base-x
 Container Management
 core
 fonts
 GNOME
 guest-desktop-agents
 Hardware Monitoring Utilities
 hardware-support
 Headless Management
 Internet Browser
 multimedia
 networkmanager-submodules
 print-client
 Server product core
 standard

Transaction Summary
=======================================================
Install  114 Packages

Total download size: 96 M
Installed size: 429 M
Is this ok [y/N]: y

or yum groupinstall GNOME

[root@centos9 ~]# yum grouplist
Last metadata expiration check: 3:55:48 ago on Mon 11 Apr 2022 03:26:06 AM EDT.
Available Environment Groups:

Installed Environment Groups:
   Server with GUI

Next you should change the OS default run level to 5 to make CentOS automatically start the Xserver and gdm.

To see the list of available default Login targets do:


[root@centos ~]# find / -name "runlevel*.target"
/usr/lib/systemd/system/runlevel0.target
/usr/lib/systemd/system/runlevel1.target
/usr/lib/systemd/system/runlevel2.target
/usr/lib/systemd/system/runlevel3.target
/usr/lib/systemd/system/runlevel4.target
/usr/lib/systemd/system/runlevel5.target
/usr/lib/systemd/system/runlevel6.target

The meaning of each runlevel is as follows:

Run Level Target Units Description
0 runlevel0.target, poweroff.target Shut down and power off
1 runlevel1.target, rescue.target Set up a rescue shell
2,3,4 runlevel[234].target, multi- user.target Set up a nongraphical multi-user shell
5 runlevel5.target, graphical.target Set up a graphical multi-user shell
6 runlevel6.target, reboot.target Shut down and reboot the system


If this does not work you can try:

yum-groupinstall-gnome

[root@centos ~]#  yum -y groups install "GNOME Desktop"


7. To check the OS configured boot target
 

[root@centos ~]# systemctl get-default
multi-user.target


multi-user.target is a mode of operation that is text mode only with multiple logins supported on tty and remotely.

To change it to graphical

[root@centos ~]# systemctl set-default graphical.target


or simply link it yourself
 

[root@centos ~]# ln -sf /lib/systemd/system/runlevel5.target /etc/systemd/system/default.target

[root@centos ~]# reboot


If the X was not used so far ever, you will get a few graphial screens to accept the License Information and Finish the configuration,i .e.

1. Accept the license by clicking on the “LICENSE INFORMATION“.

2. Tick mark the “accept the license agreement” and click on “Done“.

3. Click on “FINISH CONFIGURATION” to complete the setup.
And voila GDM (Graphical Login) Greater should shine up.
 

You could also go the manual route by adding an .xinitrc file in your home directory (instead of making the graphical login screen the default, as done above with the sudo systemctl set-default graphical.target command). To do this, issue the command:

[root@centos ~]# echo "exec gnome-session" >> ~/.xinitrc


IBM TSM dsmc console client use for listing configured backups, checking set scheduled backups and backup and restore operations howto

Friday, March 6th, 2020

tsm-ibm-logo_tivoli-dsmc-console-client-listing-backups-create-backups-and-restore-on-linux-unix-windows

Creating a simple home based backup solution with some shell scripting and rsync is a common use. However as a sysadmin in a middle sized or large corporations most companies use some professional backup service such as IBM Tivoli Storage Manager TSM – recently IBM changed the name of the product to IBM Spectrum.

IBM TSM  is a data protection platform that gives enterprises a single point of control and administration for backup and recovery that is used for Privare Clouds backup and other high end solutions where data criticality is top.
Usually in large companies TSM backup handling is managed by a separate team or teams as managing a large TSM infrastructure is quite a complex task, however my experience as a sysadmin show me that even if you don't have too much of indepth into tsm it is very useful to know how to manage at least basic Incremental backup operations such as view what is set to be backupped, set-up a new directory structure for backup, check the backup schedule configured, check what files are included and which excluded from the backup store etc. 

TSM has multi OS support ans you can use it on most streamline Operating systems Windows / Mac OS X and Linux in this specific article I'll be talking concretely about backing up data with tsm on Linux, tivoli can be theoretically brought up even on FreeBSD machines via the Linuxemu BSD module and the 64-Bit Tivoli Storage Manager RPMs.
Therefore in this small article I'll try to give few useful operations for the novice admin that stumbles on tsm backupped server that needs some small maintenance.
 

1. Starting up the dsmc command line client


Nomatter the operating system on which you run it to run the client run:

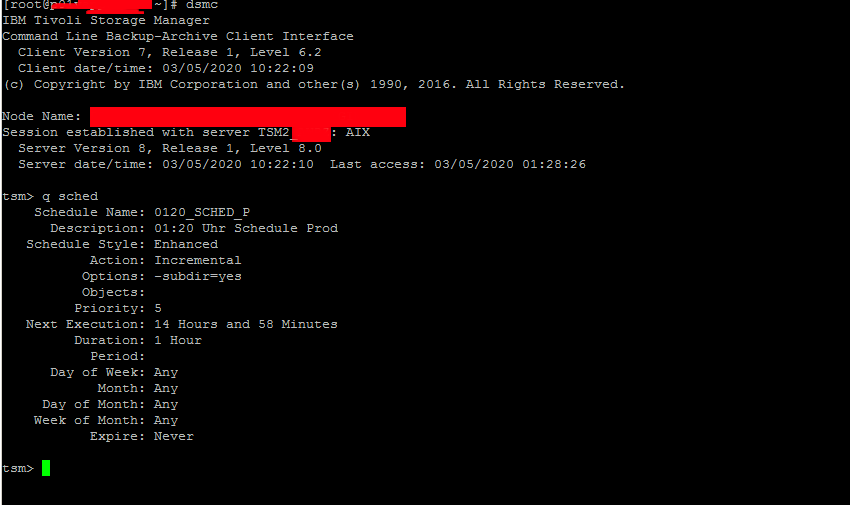
# dsmc


tsm-check-backup-schedule-set-time

Note that usually dsmc should run as superuser so if you try to run it via a normal non-root user you will get an error message like:


[ user@linux ~]$ dsmc
ANS1398E Initialization functions cannot open one of the Tivoli Storage Manager logs or a related file: /var/tsm/dsmerror.log. errno = 13, Permission denied


Tivoli SM has an extensive help so to get the use basics, type help
 

tsm> help
1.0 New for IBM Tivoli Storage Manager Version 6.4
2.0 Using commands
  2.1 Start and end a client command session
    2.1.1 Process commands in batch mode
    2.1.2 Process commands in interactive mode
  2.2 Enter client command names, options, and parameters
    2.2.1 Command name
    2.2.2 Options
    2.2.3 Parameters
    2.2.4 File specification syntax
  2.3 Wildcard characters
  2.4 Client commands reference
  2.5 Archive
  2.6 Archive FastBack

Enter 'q' to exit help, 't' to display the table of contents,
press enter or 'd' to scroll down, 'u' to scroll up or
enter a help topic section number, message number, option name,
command name, or command and subcommand:    


2. Listing files listed for backups


A note to make here is as in most corporate products tsm supports command aliases so any command supported described in the help like query, could be
abbreviated with its first letters only, e.g. query filespace tsm cmd can be abbreviated as

tsm> q fi

Commands can be run non-interactive mode also so if you want the output of q fi you can straight use:

tsm> dsmc q fi


tsm-check-included-excluded-files-q-file-if-backupped-list-backup-set-directories

This shows the directories and files that are set for backup creation with Tivoli.


3. Getting included and excluded backup set files


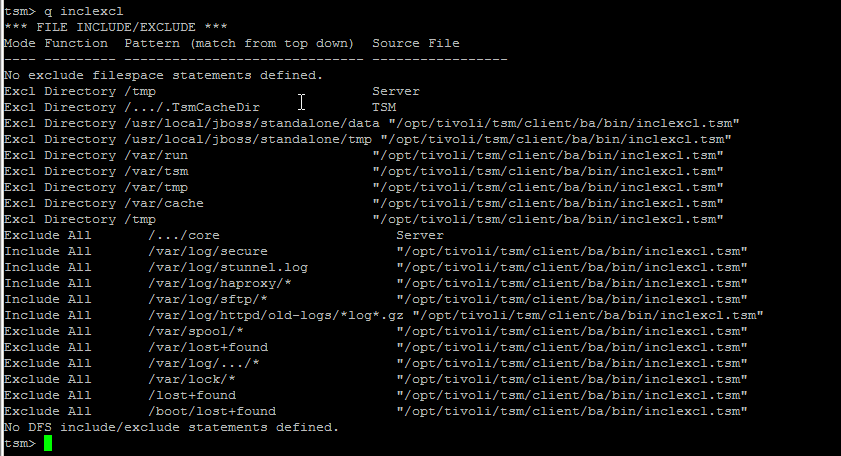
It is useful to know what are the exact excluded files from tsm set backup this is done with query inclexcl

tsm-check-excluded-included-files


4. Querying for backup schedule time

Tivoli as every other backup solution is creating its set to backup files in a certain time slot periods. 
To find out what is the time slot for backup creation use;

tsm> q sched
Schedule Name: WEEKLY_ITSERV
      Description: ITSERV weekly incremental backup
   Schedule Style: Classic
           Action: Incremental
          Options: 
          Objects: 
         Priority: 5
   Next Execution: 180 Hours and 35 Minutes
         Duration: 15 Minutes
           Period: 1 Week  
      Day of Week: Wednesday
            Month:
     Day of Month:
    Week of Month:
           Expire: Never  


tsm-query-partitions-backupeed-or-not


5. Check which files have been backed up

If you want to make sure backups are really created it is a good to check, which files from the selected backup files have already
a working backup copy.

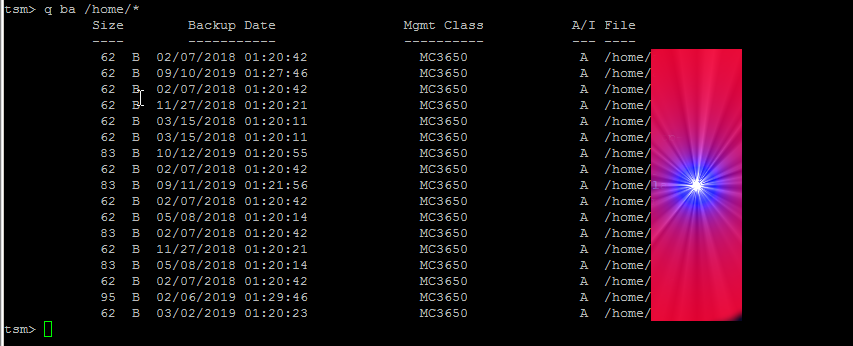
This is done with query backup like so:

tsm> q ba /home/*


tsm-dsmc-query-user-home-for-backups

If you want to query all the current files and directories backed up under a directory and all its subdirectories you need to add the -subdir=yes option as below:


tsm> q ba /home/hipo/projects/* -subdir=yes
   
Size      Backup Date        Mgmt Class A/I File
   —-      ———–        ———- — —-
    512  12-09-2011 19:57:09    STANDARD    A  /home/hipo/projects/hfs0106
  1,024  08-12-2011 02:46:53    STANDARD    A  /home/hipo/projects/hsm41perf
    512  12-09-2011 19:57:09    STANDARD    A  /home/hipo/projects/hsm41test
    512  24-04-2012 00:22:56    STANDARD    A  /home/hipo/projects/hsm42upg
  1,024  12-09-2011 19:57:09    STANDARD    A  /home/hipo/projects/hfs0106/test
  1,024  12-09-2011 19:57:09    STANDARD    A  /home/hipo/projects/hfs0106/test/test2
 12,048  04-12-2011 02:01:29    STANDARD    A  /home/hipo/projects/hsm41perf/tables
 50,326  30-04-2012 01:35:26    STANDARD    A  /home/hipo/projects/hsm42upg/PMR70023
 50,326  27-04-2012 00:28:15    STANDARD    A  /home/hipo/projects/hsm42upg/PMR70099
 11,013  24-04-2012 00:22:56    STANDARD    A  /home/hipo/projects/hsm42upg/md5check  


  • To make tsm, backup some directories on Linux / AIX other unices:


tsm> incr /  /usr  /usr/local  /home /lib


  • For tsm to backup some standard netware drives, use:


tsm> incr NDS:  USR:  SYS:  APPS:  


  • To backup C:\ D:\ E:\ F:\ if TSM is running on Windows


tsm> incr C:  D:  E: F:  -incrbydate 


  • To back up entire disk volumes irrespective of whether files have changed since the last backup, use the selective command with a wildcard and -subdir=yes as below:


tsm> sel /*  /usr/*   /home/*  -su=yes   ** Unix/Linux


7. Backup selected files from a backup location


It is intuitive to think you can just add some wildcard characters to select what you want
to backup from a selected location but this is not so, if you try something like below
you will get an err.


tsm> incr /home/hipo/projects/*/* -su=yes      
ANS1071E Invalid domain name entered: '/home/hipo/projects/*/*'


The proper way to select a certain folder / file for backup is with:


tsm> sel /home/hipo/projects/*/* -su=yes


8. Restoring tsm data from backup


To restore the config httpd.conf to custom directory use:


tsm> rest /etc/httpd/conf/httpd.conf  /home/hipo/restore/


N!B! that in order for above to work you need to have the '/' trailing slash at the end.

If you want to restore a file under a different name:


tsm> rest /etc/ntpd.conf  /home/hipo/restore/


9. Restoring a whole backupped partition


tsm> rest /home/*  /tmp/restore/ -su=yes


This is using the Tivoli 'Restoring multiple files and directories', and the files to restore '*'
are kept till the one that was recovered (saying this in case if you accidently cancel the restore)


10. Restoring files with back date 


By default the restore function will restore the latest available backupped file, if you need
to recover a specific file, you need the '-inactive' '-pick' options.
The 'pick' interface is interactive so once listed you can select the exact file from the date
you want to restore.

General restore command syntax is:
 

tsm> restore [source-file] [destination-file]


tsm> rest /home/hipo/projects/*  /tmp/restore/ -su=yes  -inactive -pick

TSM Scrollable PICK Window – Restore

     #    Backup Date/Time        File Size A/I  File
   ————————————————————————————————–
   170. | 12-09-2011 19:57:09        650  B  A   /home/hipo/projects/hsm41test/inclexcl.test
   171. | 12-09-2011 19:57:09       2.74 KB  A   /home/hipo/projects/hsm41test/inittab.ORIG
   172. | 12-09-2011 19:57:09       2.74 KB  A   /home/hipo/projects/hsm41test/inittab.TEST
   173. | 12-09-2011 19:57:09       1.13 KB  A   /home/hipo/projects/hsm41test/md5.out
   174. | 30-04-2012 01:35:26        512  B  A   /home/hipo/projects/hsm42125upg/PMR70023
   175. | 26-04-2012 01:02:08        512  B  I   /home/hipo/projects/hsm42125upg/PMR70023
   176. | 27-04-2012 00:28:15        512  B  A   /home/hipo/projects/hsm42125upg/PMR70099
   177. | 24-04-2012 19:17:34        512  B  I   /home/hipo/projects/hsm42125upg/PMR70099
   178. | 24-04-2012 00:22:56       1.35 KB  A   /home/hipo/projects/hsm42125upg/dsm.opt
   179. | 24-04-2012 00:22:56       4.17 KB  A   /home/hipo/projects/hsm42125upg/dsm.sys
   180. | 24-04-2012 00:22:56       1.13 KB  A   /home/hipo/projects/hsm42125upg/dsmmigfstab
   181. | 24-04-2012 00:22:56       7.30 KB  A   /home/hipo/projects/hsm42125upg/filesystems
   182. | 24-04-2012 00:22:56       1.25 KB  A   /home/hipo/projects/hsm42125upg/inclexcl
   183. | 24-04-2012 00:22:56        198  B  A   /home/hipo/projects/hsm42125upg/inclexcl.dce
   184. | 24-04-2012 00:22:56        291  B  A   /home/hipo/projects/hsm42125upg/inclexcl.ox_sys
   185. | 24-04-2012 00:22:56        650  B  A   /home/hipo/projects/hsm42125upg/inclexcl.test
   186. | 24-04-2012 00:22:56        670  B  A   /home/hipo/projects/hsm42125upg/inetd.conf
   187. | 24-04-2012 00:22:56       2.71 KB  A   /home/hipo/projects/hsm42125upg/inittab
   188. | 24-04-2012 00:22:56       1.00 KB  A   /home/hipo/projects/hsm42125upg/md5check
   189. | 24-04-2012 00:22:56      79.23 KB  A   /home/hipo/projects/hsm42125upg/mkreport.020423.out
   190. | 24-04-2012 00:22:56       4.27 KB  A   /home/hipo/projects/hsm42125upg/ssamap.020423.out
   191. | 26-04-2012 01:02:08      12.78 MB  A   /home/hipo/projects/hsm42125upg/PMR70023/70023.tar
   192. | 25-04-2012 16:33:36      12.78 MB  I   /home/hipo/projects/hsm42125upg/PMR70023/70023.tar
        0———10——–20——–30——–40——–50——–60——–70——–80——–90–
<U>=Up  <D>=Down  <T>=Top  <B>=Bottom  <R#>=Right  <L#>=Left
<G#>=Goto Line #  <#>=Toggle Entry  <+>=Select All  <->=Deselect All
<#:#+>=Select A Range <#:#->=Deselect A Range  <O>=Ok  <C>=Cancel
pick> 


To navigate in pick interface you can select individual files to restore via the number seen leftside.
To scroll up / down use 'U' and 'D' as described in the legenda.


11. Restoring your data to another machine


In certain circumstances, it may be necessary to restore some, or all, of your data onto a machine other than the original from which it was backed up.

In ideal case the machine platform should be identical to that of the original machine. Where this is not possible or practical please note that restores are only possible for partition types that the operating system supports. Thus a restore of an NTFS partition to a Windows 9x machine with just FAT support may succeed but the file permissions will be lost.
TSM does not work fine with cross-platform backup / restore, so better do not try cross-platform restores.
 Trying to restore files onto a Windows machine that have previously been backed up with a non-Windows one. TSM created backups on Windows sent by other OS platforms can cause  backups to become inaccessible from the host system.

To restore your data to another machine you will need the TSM software installed on the target machine. Entries in Tivoli configuration files dsm.sys and/or dsm.opt need to be edited if the node that you are restoring from does not reside on the same server. Please see our help page section on TSM configuration files for their locations for your operating system. 

To access files from another machine you should then start the TSM client as below:


# dsmc -virtualnodename=RESTORE.MACHINE      


You will then be prompted for the TSM password for this machine.


You will probably want to restore to a different destination to the original files to prevent overwriting files on the local machine, as below:


  • Restore of D:\ Drive to D:\Restore ** Windows 


tsm> rest D:\*   D:\RESTORE\    -su=yes 


  • Restore user /home/* to /scratch on ** Mac, Unix/Linux


tsm> rest /home/* /scratch/     -su=yes  


  • Restoring Tivoli data on old netware


tsm> rest SOURCE-SERVER\USR:*  USR:restore/   -su=yes  ** Netware


12. Adding more directories for incremental backup / Check whether TSM backup was done correctly?

The easiest way is to check the produced dschmed.log if everything is okay there should be records in the log that Tivoli backup was scheduled in a some hours time
succesfully.
A normally produced backup scheduled in log should look something like:


14-03-2020 23:03:04 — SCHEDULEREC STATUS BEGIN
14-03-2020 23:03:04 Total number of objects inspected:   91,497
14-03-2020 23:03:04 Total number of objects backed up:      113
14-03-2020 23:03:04 Total number of objects updated:          0
14-03-2020 23:03:04 Total number of objects rebound:          0
14-03-2020 23:03:04 Total number of objects deleted:          0
14-03-2020 23:03:04 Total number of objects expired:         53
14-03-2020 23:03:04 Total number of objects failed:           6
14-03-2020 23:03:04 Total number of bytes transferred:    19.38 MB
14-03-2020 23:03:04 Data transfer time:                    1.54 sec
14-03-2020 23:03:04 Network data transfer rate:        12,821.52 KB/sec
14-03-2020 23:03:04 Aggregate data transfer rate:        114.39 KB/sec
14-03-2020 23:03:04 Objects compressed by:                    0%
14-03-2020 23:03:04 Elapsed processing time:           00:02:53
14-03-2020 23:03:04 — SCHEDULEREC STATUS END
14-03-2020 23:03:04 — SCHEDULEREC OBJECT END WEEKLY_23_00 14-12-2010 23:00:00
14-03-2020 23:03:04 Scheduled event 'WEEKLY_23_00' completed successfully.
14-03-2020 23:03:04 Sending results for scheduled event 'WEEKLY_23_00'.
14-03-2020 23:03:04 Results sent to server for scheduled event 'WEEKLY_23_00'.


in case of errors you should check dsmerror.log
 

Conclusion


In this article I've briefly evaluated some basics of IBM Commercial Tivoli Storage Manager (TSM) to be able to  list backups, check backup schedules and how to the files set to be
excluded from a backup location and most importantly how to check that data backed up data is in a good shape and accessible.
It was explained how backups can be restored on a local and remote machine as well as how to  append new files to be set for backup on next incremental scheduled backup.
It was shown how the pick interactive cli interface could be used to restore files at a certain data back in time as well as how full partitions can be restored and how some
certain file could be retrieved from the TSM data copy.

Procedure Instructions to safe upgrade CentOS / RHEL Linux 7 Core to latest release

Thursday, February 13th, 2020

safe-upgrade-CentOS-and_Redhat_Enterprise_Linux_RHEL-7-to-latest-stable-release

Generally upgrading both RHEL and CentOS can be done straight with yum tool just we're pretty aware and mostly anyone could do the update, but it is good idea to do some
steps in advance to make backup of any old basic files that might help us to debug what is wrong in case if the Operating System fails to boot after the routine Machine OS restart
after the upgrade that is usually a good idea to make sure that machine is still bootable after the upgrade.

This procedure can be shortened or maybe extended depending on the needs of the custom case but the general framework should be useful anyways to someone that's why
I decided to post this.

Before you go lets prepare a small status script which we'll use to report status of  sysctl installed and enabled services as well as the netstat connections state and
configured IP addresses and routing on the system.

The script show_running_services_netstat_ips_route.sh to be used during our different upgrade stages:
 

# script status ###
echo "STARTED: $(date '+%Y-%m-%d_%H-%M-%S'):" | tee /root/logs/yumcheckupdate-$(hostname)-$(date '+%Y-%m-%d_%H-%M-%S').out
systemctl list-unit-files –type=service | grep enabled
systemctl | grep ".service" | grep "running"
netstat -tulpn
netstat -r
ip a s
/sbin/route -n
echo "ENDED $(date '+%Y-%m-%d_%H-%M-%S'):" | tee /root/logs/yumcheckupdate-$(hostname)-$(date '+%Y-%m-%d_%H-%M-%S').out
####


– Save the script in any file like /root/status.sh

– Make the /root/logs directoriy.
 

[root@redhat: ~ ]# mkdir /root/logs
[root@redhat: ~ ]# vim /root/status.sh
[root@redhat: ~ ]# chmod +x /root/status.sh


1. Get a dump of CentOS installed version release and grub-mkconfig generated os_probe


[root@redhat: ~ ]# cat /etc/redhat-release  > /root/logs/redhat-release-vorher-$(hostname)-$(date '+%Y-%m-%d_%H-%M-%S').out
[root@redhat: ~ ]# cat /etc/grub.d/30_os-prober > /root/logs/grub2-efi-vorher-$(hostname)-$(date '+%Y-%m-%d_%H-%M-%S').out


2. Clear old versionlock marked RPM packages (if there are such)


On servers maintained by multitude of system administrators just like the case is inside a Global Corporations and generally in the corporate world , where people do access the systems via LDAP and more than a single person
has superuser privileges. It is a good prevention measure to use yum package management  functionality to RPM based Linux distributions called  versionlock.
versionlock for those who hear it for a first time is locking the versions of the installed RPM packages so if someone by mistake or on purpose decides to do something like :

[root@redhat: ~ ]# yum install packageversion

Having the versionlock set will prevent the updated package to be installed with a different branch package version.

Also it will prevent a playful unknowing person who just wants to upgrade the system without any deep knowledge to be able to
run

[root@redhat: ~ ]# yum upgrade

update and leave the system in unbootable state, that will be only revealed during the next system reboot.

If you haven't used versionlock before and you want to use it you can do it with:

[root@redhat: ~ ]# yum install yum-plugin-versionlock

To add all the packages for compiling C code and all the interdependend packages, you can do something like:


[root@redhat: ~ ]# yum versionlock gcc-*

If you want to clear up the versionlock, once it is in use run:

[root@redhat: ~ ]#  yum versionlock clear
[root@redhat: ~ ]#  yum versionlock list


3.  Check RPC enabled / disabled


This step is not necessery but it is a good idea to check whether it running on the system, because sometimes after upgrade rpcbind gets automatically started after package upgrade and reboot. 
If we find it running we'll need to stop and mask the service.


# check if rpc enabled
[root@redhat: ~ ]# systemctl list-unit-files|grep -i rpc
var-lib-nfs-rpc_pipefs.mount                                      static
auth-rpcgss-module.service                                        static
rpc-gssd.service                                                  static
rpc-rquotad.service                                               disabled
rpc-statd-notify.service                                          static
rpc-statd.service                                                 static
rpcbind.service                                                   disabled
rpcgssd.service                                                   static
rpcidmapd.service                                                 static
rpcbind.socket                                                    disabled
rpc_pipefs.target                                                 static
rpcbind.target                                                    static

[root@redhat: ~ ]# systemctl status rpcbind.service
● rpcbind.service – RPC bind service
   Loaded: loaded (/usr/lib/systemd/system/rpcbind.service; disabled; vendor preset: enabled)
   Active: inactive (dead)


[root@redhat: ~ ]# systemctl status rpcbind.socket
● rpcbind.socket – RPCbind Server Activation Socket
   Loaded: loaded (/usr/lib/systemd/system/rpcbind.socket; disabled; vendor preset: enabled)
   Active: inactive (dead)
   Listen: /var/run/rpcbind.sock (Stream)
           0.0.0.0:111 (Stream)
           0.0.0.0:111 (Datagram)
           [::]:111 (Stream)
           [::]:111 (Datagram)


4. Check any previously existing downloaded / installed RPMs (check yum cache)


yum install package-name / yum upgrade keeps downloaded packages via its operations inside its cache directory structures in /var/cache/yum/*.
Hence it is good idea to check what were the previously installed packages and their count.


[root@redhat: ~ ]# cd /var/cache/yum/x86_64/;
[root@redhat: ~ ]# find . -iname '*.rpm'|wc -l


5. List RPM repositories set on the server


 [root@redhat: ~ ]# yum repolist
Loaded plugins: fastestmirror, versionlock
Repodata is over 2 weeks old. Install yum-cron? Or run: yum makecache fast
Determining fastest mirrors
repo id                                                                                 repo name                                                                                                            status
!atos-ac/7/x86_64                                                                       Atos Repository                                                                                                       3,128
!base/7/x86_64                                                                          CentOS-7 – Base                                                                                                      10,019
!cr/7/x86_64                                                                            CentOS-7 – CR                                                                                                         2,686
!epel/x86_64                                                                            Extra Packages for Enterprise Linux 7 – x86_64                                                                          165
!extras/7/x86_64                                                                        CentOS-7 – Extras                                                                                                       435
!updates/7/x86_64                                                                       CentOS-7 – Updates                                                                                                    2,500


This step is mandatory to make sure you're upgrading to latest packages from the right repositories for more concretics check what is inside in confs /etc/yum.repos.d/ ,  /etc/yum.conf 
 

6. Clean up any old rpm yum cache packages


This step is again mandatory but a good to follow just to have some more clearness on what packages is our upgrade downloading (not to mix up the old upgrades / installs with our newest one).
For documentation purposes all deleted packages list if such is to be kept under /root/logs/yumclean-install*.out file

[root@redhat: ~ ]# yum clean all |tee /root/logs/yumcleanall-$(hostname)-$(date '+%Y-%m-%d_%H-%M-%S').out


7. List the upgradeable packages's latest repository provided versions


[root@redhat: ~ ]# yum check-update |tee /root/logs/yumcheckupdate-$(hostname)-$(date '+%Y-%m-%d_%H-%M-%S').out


Then to be aware how many packages we'll be updating:


[root@redhat: ~ ]#  yum check-update | wc -l


8. Apply the actual uplisted RPM packages to be upgraded


[root@redhat: ~ ]# yum update |tee /root/logs/yumupdate-$(hostname)-$(date '+%Y-%m-%d_%H-%M-%S').out


Again output is logged to /root/logs/yumcheckupate-*.out 


9. Monitor downloaded packages count real time


To make sure yum upgrade is not in some hanging state and just get some general idea in which state of the upgrade is it e.g. Download / Pre-Update / Install  / Upgrade/ Post-Update etc.
in mean time when yum upgrade is running to monitor,  how many packages has the yum upgrade downloaded from remote RPM set repositories:


[root@redhat: ~ ]#  watch "ls -al /var/cache/yum/x86_64/7Server/…OS-repository…/packages/|wc -l"


10. Run status script to get the status again


[root@redhat: ~ ]# sh /root/status.sh |tee /root/logs/status-before-$(hostname)-$(date '+%Y-%m-%d_%H-%M-%S').out


11. Add back versionlock for all RPM packs


Set all RPM packages installed on the RHEL / CentOS versionlock for all packages.


#==if needed
# yum versionlock \*


12. Get whether old software configuration is not messed up during the Package upgrade (Lookup the logs for .rpmsave and .rpmnew)


During the upgrade old RPM configuration is probably changed and yum did automatically save .rpmsave / .rpmnew saves of it thus it is a good idea to grep the prepared logs for any matches of this 2 strings :
 

[root@redhat: ~ ]#   grep -i ".rpm" /root/logs/yumupdate-server-host-2020-01-20_14-30-41.out
[root@redhat: ~ ]#  grep -i ".rpmsave" /root/logs/yumupdate-server-host-2020-01-20_14-30-41.out
[root@redhat: ~ ]#  grep -i ".rpmnew" /root/logs/yumupdate-server-host-2020-01-20_14-30-41.out


If above commands returns output usually it is fine if there is is .rpmnew output but, if you get grep output of .rpmsave it is a good idea to review the files compare with the original files that were .rpmsaved with the 
substituted config file and atune the differences with the changes manually made for some program functionality.

What are the .rpmsave / .rpmnew files ?
This files are coded files that got triggered by the RPM install / upgrade due to prewritten procedures on time of RPM build.


If a file was installed as part of a rpm, it is a config file (i.e. marked with the %config tag), you've edited the file afterwards and you now update the rpm then the new config file (from the newer rpm) will replace your old config file (i.e. become the active file).
The latter will be renamed with the .rpmsave suffix.

If a file was installed as part of a rpm, it is a noreplace-config file (i.e. marked with the %config(noreplace) tag), you've edited the file afterwards and you now update the rpm then your old config file will stay in place (i.e. stay active) and the new config file (from the newer rpm) will be copied to disk with the .rpmnew suffix.
See e.g. this table for all the details. 

In both cases you or some program has edited the config file(s) and that's why you see the .rpmsave / .rpmnew files after the upgrade because rpm will upgrade config files silently and without backup files if the local file is untouched.

After a system upgrade it is a good idea to scan your filesystem for these files and make sure that correct config files are active and maybe merge the new contents from the .rpmnew files into the production files. You can remove the .rpmsave and .rpmnew files when you're done.


If you need to get a list of all .rpmnew .rpmsave files on the server do:

[root@redhat: ~ ]#  find / -print | egrep "rpmnew$|rpmsave$


13. Reboot the system 

To check whether on next hang up or power outage the system will boot normally after the upgrade, reboot to test it.


you can :


[root@redhat: ~ ]#  reboot


either

[root@redhat: ~ ]#  shutdown -r now


or if on newer Linux with systemd in ues below systemctl reboot.target.

[root@redhat: ~ ]#  systemctl start reboot.target


14. Get again the system status with our status script after reboot

[root@redhat: ~ ]#  sh /root/status.sh |tee /root/logs/status-after-$(hostname)-$(date '+%Y-%m-%d_%H-%M-%S').out


15. Clean up any versionlocks if earlier set


[root@redhat: ~ ]# yum versionlock clear
[root@redhat: ~ ]# yum versionlock list


16. Check services and logs for problems


After the reboot Check closely all running services on system make sure every process / listening ports and services on the system are running fine, just like before the upgrade.
If the sytem had firewall,  check whether firewall rules are not broken, e.g. some NAT is not missing or anything earlier configured to automatically start via /etc/rc.local or some other
custom scripts were run and have done what was expected. 
Go through all the logs in /var/log that are most essential /var/log/boot.log , /var/log/messages … yum.log etc. that could reveal any issues after the boot. In case if running some application server or mail server check /var/log/mail.log or whenever it is configured to log.
If the system runs apache closely check the logs /var/log/httpd/error.log or php_errors.log for any strange errors that occured due to some issues caused by the newer installed packages.
Usually most of the cases all this should be flawless but a multiple check over your work is a stake for good results.
 

How to start / Stop and Analyze system services and improve Linux system boot time performance

Friday, July 5th, 2019

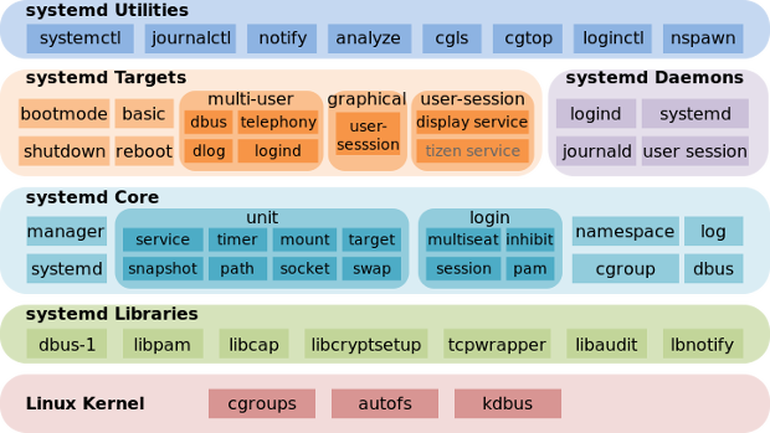
systemd-components-systemd-utilities-targets-cores-libraries
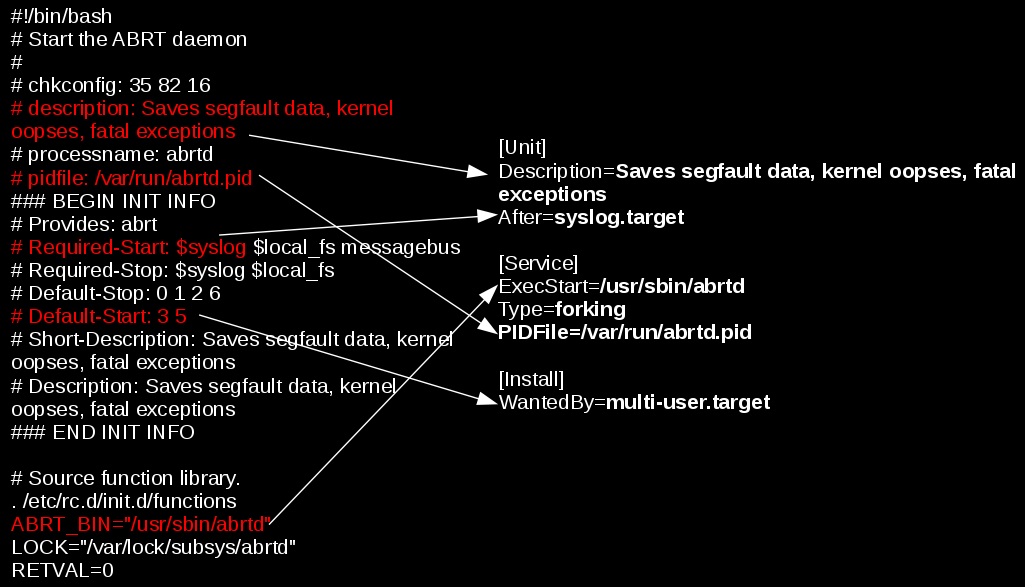
This post is going to be a very short one and to walk through shortly to System V basic start / stop remove service old way and the new ways introduced over the last 10 years or so with the introduction of systemd on mass base across Linux distributions.
Finally I'll give you few hints on how to check (analyze) the boot time performance on a modern GNU / Linux system that is using systemd enabled services.
 

1. System V and the old days few classic used ways to stop / start / restart services (runlevels and common wrapper scripts)


The old fashioned days when Linux was using SystemV / e.g. no SystemD used way was to just go through all the running services with following the run script logic inside the runlevel the system was booting, e.g. to check runlevel and then potimize each and every run script via the respective location of the bash service init scripts:


root@noah:/home/hipo# /sbin/runlevel 
N 5


Or on some RPM based distros like Fedora / RHEL / SUSE Enterprise Linux to use chkconfig command, e.g. list services:

~]# chkconfig –list

etworkManager  0:off   1:off   2:on    3:on    4:on    5:on    6:off
abrtd           0:off   1:off   2:off   3:on    4:off   5:on    6:off
acpid           0:off   1:off   2:on    3:on    4:on    5:on    6:off
anamon          0:off   1:off   2:off   3:off   4:off   5:off   6:off
atd             0:off   1:off   2:off   3:on    4:on    5:on    6:off
auditd          0:off   1:off   2:on    3:on    4:on    5:on    6:off
avahi-daemon    0:off   1:off   2:off   3:on    4:on    5:on    6:off

And to start stop the service into (default runlevel) or respective runlevel:


~]#  chkconfig httpd on

~]# chkconfig –list httpd
httpd            0:off   1:off   2:on    3:on    4:on    5:on    6:off


~]# chkconfig service_name on –level runlevels


Debian / Ubuntu and other .deb based distributions with System V (which executes scripts without single order but one by one) are not having natively chkconfig but instead are famous for update-rc.d init script wrapper, here is few basic use  of it:

update-rc.d <service> defaults
update-rc.d <service> start 20 3 4 5
update-rc.d -f <service>  remove

Here defaults means default set boot runtime for system and numbers are just whether service is started or stopped for respective runlevels. To check what is your default one simply run /sbin/runlevel

Other useful tool to stop / start services and analyze what service is running and which not in real time (but without modifying boot time set for a service) – more universal nowadays is to use the service command.

root@noah:/home/hipo# service –status-all
 [ + ]  acpid
 [ – ]  alsa-utils
 [ – ]  anacron
 [ + ]  apache-htcacheclean
 [ – ]  apache2
 [ + ]  atd
 [ + ]  aumix

root@noah:/home/hipo# service cron restart/usr/sbin/service command is just a simple wrapper bash shell script that takes care about start / stop etc. operations of scripts found under /etc/init.d

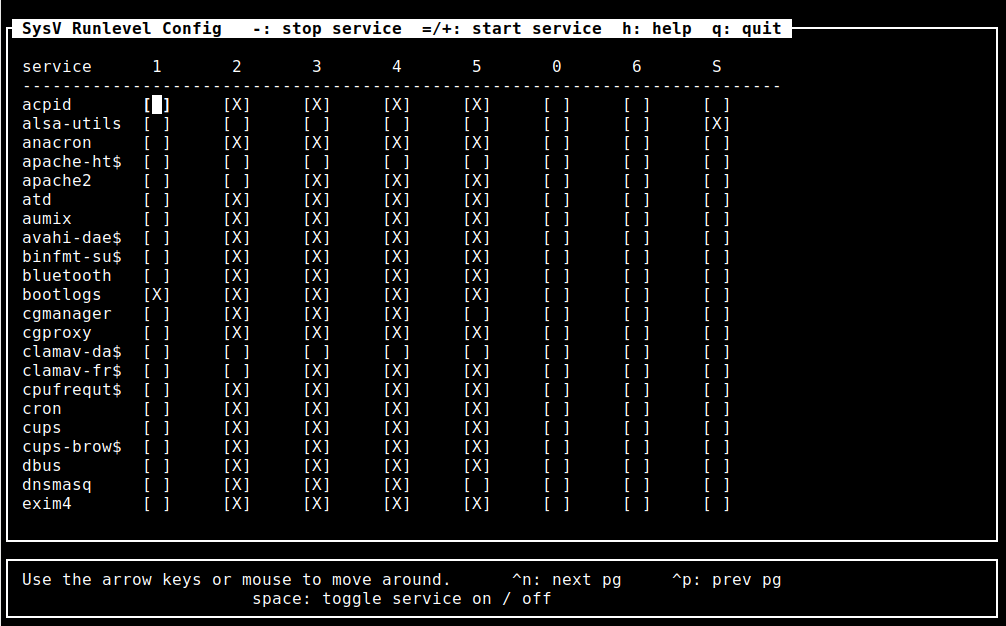
For those who don't want to tamper with too much typing and manual configuration there is an all distribution system V compatible ncurses interface text itnerface sysv-rc-conf which could make your life easier on configuring services on non-systemd (old) Linux-es.

To install on Debian distros:

debian:~# apt-get install sysv-rc-conf

debian:~# sysv-rc-conf


SysV RC Conf desktop on GNU Linux using sysv-rc-conf systemV and systemd
 

2. SystemD basic use Start / stop check service and a little bit of information
for the novice

As most Linux kernel based distributions except some like Slackware and few others see the full list of Linux distributions without systemd (and aha yes slackw. users loves rc.local so much – we all do 🙂  migrated and are nowadays using actively SystemD, to start / stop analyze running system runnig services / processes

systemctl – Control the systemd system and service manager

To check whether a service is enabled

systemctl is-active application.service

To check whether a unit is in a failed state

systemctl is-failed application.service

To get a status of running application via systemctl messaging

# systemctl status sshd
● ssh.service – OpenBSD Secure Shell server Loaded: loaded (/lib/systemd/system/ssh.service; enabled; vendor preset: enabled) Active: active (running) since Sat 2019-07-06 20:01:02 EEST; 2h 3min ago Main PID: 1335 (sshd) Tasks: 1 (limit: 4915) CGroup: /system.slice/ssh.service └─1335 /usr/sbin/sshd -D юли 06 20:01:00 noah systemd[1]: Starting OpenBSD Secure Shell server… юли 06 20:01:02 noah sshd[1335]: Server listening on 0.0.0.0 port 22. юли 06 20:01:02 noah sshd[1335]: Server listening on :: port 22. юли 06 20:01:02 noah systemd[1]: Started OpenBSD Secure Shell server.

To enable / disable application with systemctl systemctl enable application.service

systemctl disable application.service

To stop / start given application systemcl stop sshd

systemctl stop tor

To reload running application

systemctl reload sshd

Some applications does not have the right functionality in systemd script to reload configuration without fully restarting the app if this is the case use systemctl reload-or-restart application.service

systemctl list-unit-files

Then to view the content of a single service unit file:

:~# systemctl cat apache2.service
# /lib/systemd/system/apache2.service
[Unit]
Description=The Apache HTTP Server
After=network.target remote-fs.target nss-lookup.target

[Service]
Type=forking
Environment=APACHE_STARTED_BY_SYSTEMD=true
ExecStart=/usr/sbin/apachectl start
ExecStop=/usr/sbin/apachectl stop
ExecReload=/usr/sbin/apachectl graceful
PrivateTmp=true
Restart=on-abort

[Install]
WantedBy=multi-user.target


converting-traditional-init-scripts-to-systemd-graphical-diagram

systemd's advancement over normal SystemV services it is able to track and show dependencies
of a single run service for proper operation on other services

:~# systemctl list-dependencies sshd.service


● ├─system.slice
● └─sysinit.target
●   ├─dev-hugepages.mount
●   ├─dev-mqueue.mount
●   ├─keyboard-setup.service
●   ├─kmod-static-nodes.service
●   ├─proc-sys-fs-binfmt_misc.automount
●   ├─sys-fs-fuse-connections.mount
●   ├─sys-kernel-config.mount
●   ├─sys-kernel-debug.mount
●   ├─systemd-ask-password-console.path
●   ├─systemd-binfmt.service
….

.


You can also mask / unmask service e.g. make it temporary unavailable via systemd with

sudo systemctl mask nginx.service

it will then appear as masked if you do list-unit-files

If you want to change something on a systemd unit file this is done with

systemctl edit –full nginx.service

In case if some modificatgion was done to systemd service files e.g. lets say to
/etc/systemd/system/apache2.service or even you've made a Linux system Upgrade recently
that added extra systemd service config files it will be necessery to reload all files
present in /etc/systemd/system/* with:

systemctl daemon-reload


Systemd has a target states which are pretty similar to the runlevel concept (e.g. runlevel 5 means graphical etc.), for example to check the default target for a system:

One very helpful feature is to restart systemd but it seems this is not well documented as of now and though this might work after some system package upgrade roll-outs it is always better to reboot the system, but you can give it a try if restart can't be done due to application criticallity.

To restart systemd and its spawned subprocesses do:
 

systemctl daemon-reexec


root@noah:/home/hipo# systemctl get-default
graphical.target


 to check all targets possible targets

root@noah:/home/hipo# systemctl list-unit-files –type=target
UNIT FILE                 STATE   
basic.target              static  
bluetooth.target          static  
busnames.target           static  
cryptsetup-pre.target     static  
cryptsetup.target         static  
ctrl-alt-del.target       disabled
default.target            static  
emergency.target          static  
exit.target               disabled
final.target              static  
getty.target              static  
graphical.target          static  

you can put the system in Single user mode if you like without running the good old well known command:

/sbin/init 1 

command with

systemctl rescue

You can even shutdown / poweroff / reboot system via systemctl (though I never did that and I don't recommend) 🙂
To do so use:

systemctl halt
systemctl poweroff
systemctl reboot


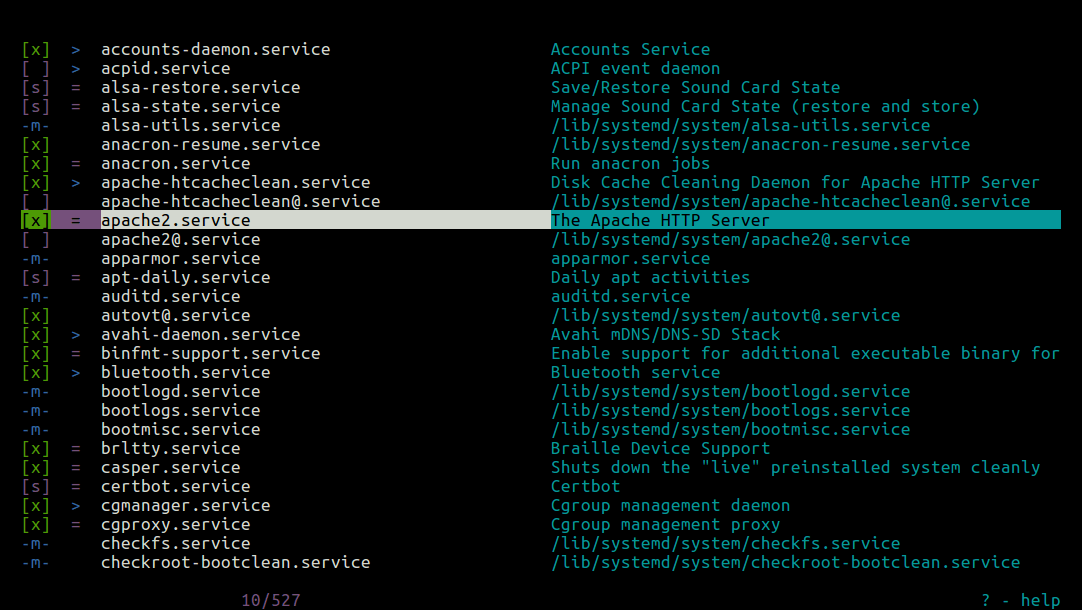
For the lazy ones that don't want to type all the time like crazy to configure and manage simple systemctl set services take a look at chkservice – an ncurses text based menu systemctl management interface

As chkservice is relatively new it is still not present in stable Stretch Debian repositories but it is in current testing Debian unstable Buster / Sid – Testing / Unstable distribution and has installable package for Ubuntu / Arch Linux and Fedora

chkservice-Linux-systemctl-ncurses-text-menu-service-management-interface-start-chkservice
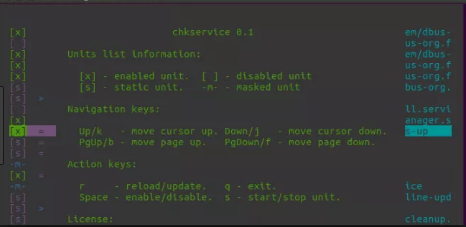
Picture Source Tecmint.com

chkservice linux help screen


3. Analyzing and fix performance boot slowness issues due to a service taking long to boot


The first very useful thing is to know how long exactly all daemons / services got booted
on your GNU / Linux OS.

linux-server:~# systemd-analyze 
Startup finished in 4.135s (kernel) + 3min 47.863s (userspace) = 3min 51.998s

As you can see it reports both the kernel boot time and userspace (surrounding services
that had to boot for the system to be considered fully booted).


Once you have the system properly booted you have a console or / ssh access

root@pcfreak:/home/hipo# systemd-analyze blame
    2min 14.172s tor@default.service
    1min 40.455s docker.service
     1min 3.649s fail2ban.service
         58.806s nmbd.service
         53.992s rc-local.service
         51.458s systemd-tmpfiles-setup.service
         50.495s mariadb.service
         46.348s snort.service
         34.910s ModemManager.service
         33.748s squid.service
         32.226s ejabberd.service
         28.207s certbot.service
         28.104s networking.service
         23.639s munin-node.service
         20.917s smbd.service
         20.261s tinyproxy.service
         19.981s accounts-daemon.service
         18.501s loadcpufreq.service
         16.756s stunnel4.service
         15.575s oidentd.service
         15.376s dev-sda1.device
         15.368s courier-authdaemon.service
         15.301s sysstat.service
         15.154s gpm.service
         13.276s systemd-logind.service
         13.251s rsyslog.service
         13.240s lpd.service
         13.237s pppd-dns.service
         12.904s NetworkManager-wait-online.service
         12.540s lm-sensors.service
         12.525s watchdog.service
         12.515s inetd.service


As you can see you get a list of services time took to boot in secs and you can
further debug each of it to find out why it boots so slow (netwok / DNS / configuration isssue whatever).

On a servers it is useful to look up for some processes slowing it down like gdm.service etc.


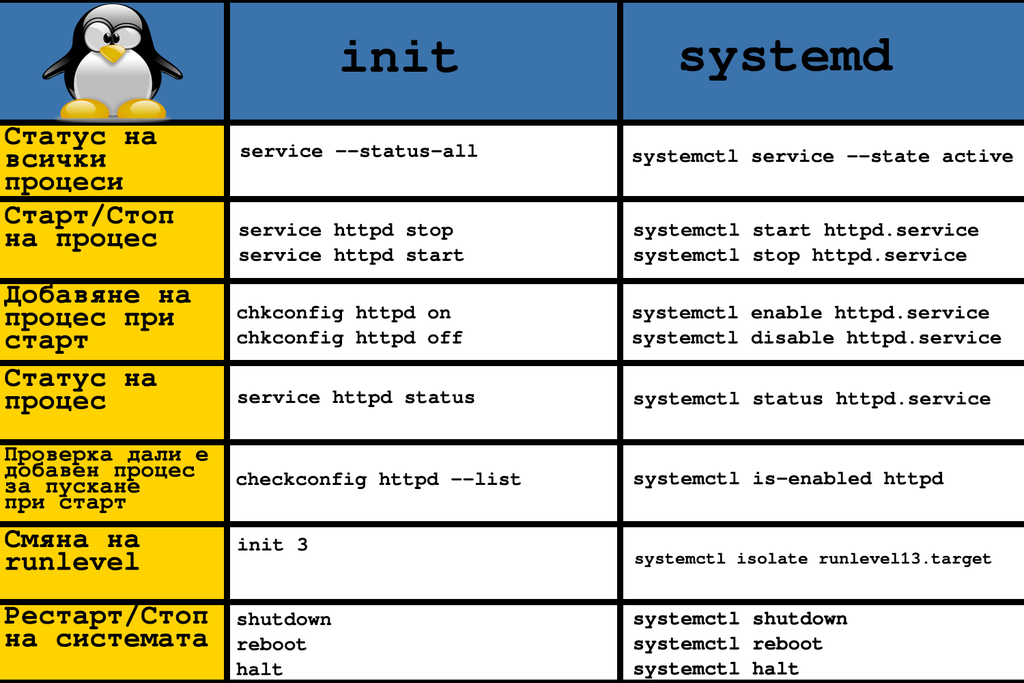
Close up words rant on SystemD vs SysemV

init-and-systemd-comparison-commands-linux-booting-1

A lot could be ranted on what is better systemd or systemV. I personally hated systemd since day since I saw it being introduced first in Fedora / CentOS linuxes and a bit later in my beloved desktop used Debian Linux.
I still remember the bugs and headaches with systemd's intruduction as it is with all new the early adoption of technology makes a lot of pain in the ass.
Eventually systemd has become a standard and with my employment as a contractor through Itelligence GmBH for SAP AG I now am forced to work with systemd daily on SLES 12 based Linuces and I was forced to get used to it. 
But still there is my personal preference to SystemV even though the critics of slow boot etc.but for managing a multitude of Linux preinstalled servers like Virtual Machines and trying to standardize a Data Center with Tens of Thousands of Linuxes running on different Hypervisors VMWare / OpenXen + physical hosts etc. systemd brings a bit of more standardization that makes it a winner.

How to downgrade package with apt-get on Debian / Ubuntu / Mint Linux

Thursday, October 19th, 2017

how-to-downgrade-debian-package-to-an-older-version-debian_package-box


How can I downgrade a debian package to an older version with apt-get?

Downgrading a package in Debian is not frequently required but sometimes it is a must lets say a package you just upgraded fails to communicate properly to an application, in my case that's Ejabberd server which was working pretty well with Yaxim, Bruno or Xabber Mobile android application clients, unfortunately right after periodic apt-get upgrades I do with apt due to security upgrade of deb package ejabberd=2.1.10-4+deb7u1 to ejabberd=2.1.10-4+deb7u2 it messed up and even though it worked fine with Desktop clients such as Gajim and Pidgin, there was no Android application on my Phone with Android 4.4 which was able to communicate properly with the TLS encrypted Jabber server so my only option was to downgrade back to ejabberd=2.1.10-4+deb7u1.

I looked through duckduckgo.com a short URL is (ddg.gg) but I couldn't find the old deb file to downgrade so I was in a situation …

 Then I duckduck goed (I've recently stopped using Google as Google is collecting too much data and sharing with NSA) and I found following instructions on downgrade

——— 

If you have the version number, or the target release, apt-get supports choosing a particular version or target release. More details can be found on manual page of apt-get. It can also be accessed from terminal by typing man apt-get

sudo apt-get install <package-name>=<package-version-number> OR

sudo apt-get -t=<target release> install <package-name>

is the command to be run. This can be used to down-grade a package to a specific version.

It has been helpfully pointed out in the comments that

    apt-cache showpkg <package-name> – lists all available versions. (h/t Sparhawk)
    apt-mark hold <package-name> "holds" – the package at the current version, preventing automatic upgrades. (h/t Luís de Sousa )


In other words All I had to do is as root superuser is:
 

apt-get install «pkg»=«version»

OR

aptitude install «pkg»=«version»

Where «pkg» is the name of the package, and «version» is the version number.


So I just issued following cmd:

root@pcfreak:~# apt-get install ejabberd=2.1.10-4+deb7u1
Четене на списъците с пакети… Готово
Изграждане на дървото със зависимости       
Четене на информацията за състоянието… Готово
Предложени пакети:
  libunix-syslog-perl
Следните НОВИ пакети ще бъдат инсталирани:
  ejabberd
0 актуализирани, 1 нови инсталирани, 0 за премахване и 3 без промяна.
Необходимо е да се изтеглят 1795 kB архиви.
След тази операция ще бъде използвано 3699 kB допълнително дисково пространство.
Изт:1 http://ftp.uk.debian.org/debian/ wheezy/main ejabberd amd64 2.1.10-4+deb7u1 [1795 kB]


P.S. Sorry for the cyrillic for those who can't read it but it is standard messages that Debian does in package install time.

Analogously you can do it for any other newer package that upgraded, later on to prevent further security updates of the package you will have to put the package on hold, that's as easy as running:
 

root@pcfreak:~# aptitude hold ejabberd
No packages will be installed, upgraded, or removed.
0 packages upgraded, 0 newly installed, 0 to remove and 4 not upgraded.
Need to get 0 B of archives. After unpacking 0 B will be used.


PortQRY Native Windows command line Nmap like port scanner – Check status of remote host ports on Windows

Monday, June 30th, 2014

Windows_command_line_and_gui_port-scanner-portqry-like-nmap-check-status-of-remote-host-service-windows-xp-7-2000-2003-2008-server
Linux users know pretty well Nmap (network mapper) tool which is precious in making a quick server host security evaluation.
Nmap binary port is available for Windows too, however as nmap is port for its normal operation you have to install WinPcap (Packet Capture Library).
And more importantly it is good to mention if you need to do some remote port scanning from Windows host, there is Microsoft produced native tool called PortQry (Port Query).

PortQRY is a must have tool for the Windows Admin as it can help you troubleshoot multiple network issues.

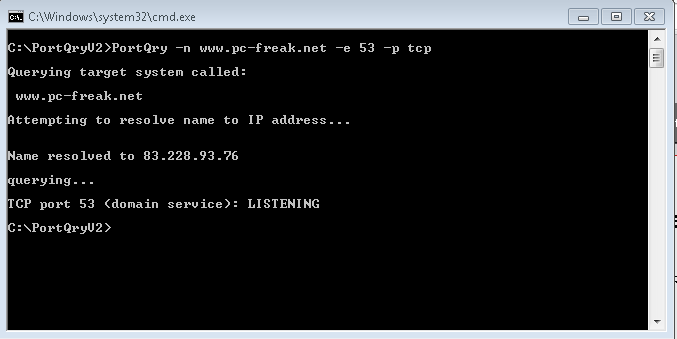
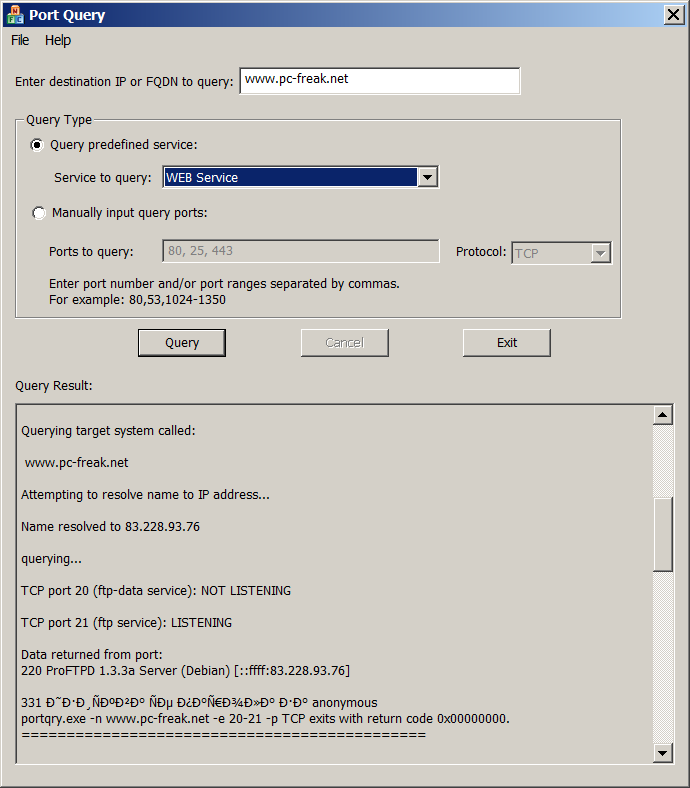
windows-nmap-native-alternative-portqry-gui-ui-web-service-port-scan-screenshot
As of time of writting this post PortQRY is at version 2, PortQRY tool has also a GUI (UI) Version for those lazy to type in command line.

Port Query UI tool (portqueryui.exe) is a tool to query open ports on a machine. This tool makes use of command line version port query tool (portqry.exe). The UI provides the following functionalities:

   1. Following "Enter destination IP or FQDN to query:”, an edit box needs the user to specify the IP address or FDQN name of the destination to query port status.

   2. The end user is able to choose Query type:

        – Predefined services type. It groups ports into service, so that you can query multiple ports for a service by a single click. Service includes "Domains and Trusts", "DNS Queries", "NetBIOS     communication", "IPSEC", "Networking", "SQL Service", "WEB Service", "Exchange Server",          "Netmeeting", and other services.

You can check detail port and protocol info for each service category by opening Help -> Predefined Services…

PORTQRY is part of Windows Server 2003 Support Tools and can be added to any NT based Windows (XP, 2003, Vista, 7, 8)
 You can download portqry command line tool here or my mirrored portqry version command line port scanner here and PortQRY UI here.

PortQRY comes in PortQryV2.exe package which when run extracts 3 files: PortQry.exe program, EULA and readme file. Quickest way to make portqry globally accessible from win command prompt is to copy it to %SystemRoot% (The environment variable holding default location for Windows Installation directory).
It is good idea to add PortQRY to default PATH folder to make it accessible from command line globally.

PorQry has 3 modes of operation:

Command Line Mode, Interactive Mode and Local Mode

portqry-windows-native-security-port-network-scanner-nmap-equivalent-help-screenshot
 

Command Line Mode – is when it is invoked with parameters.

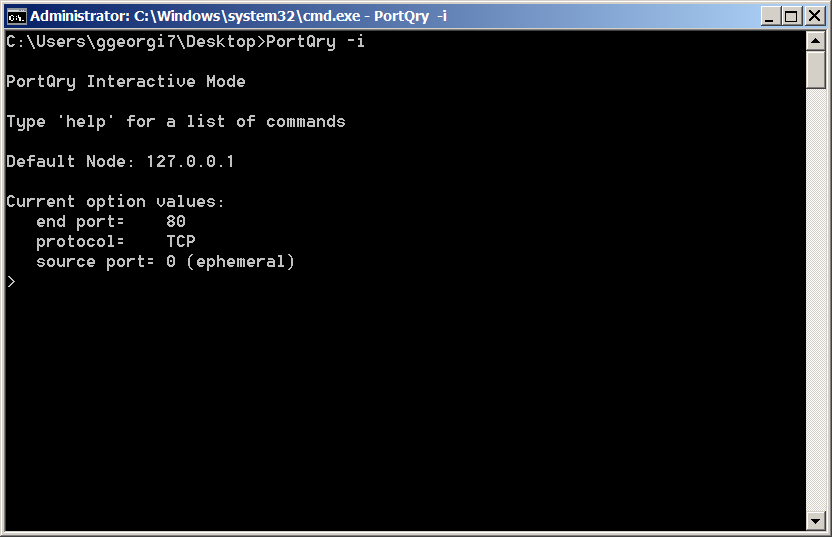
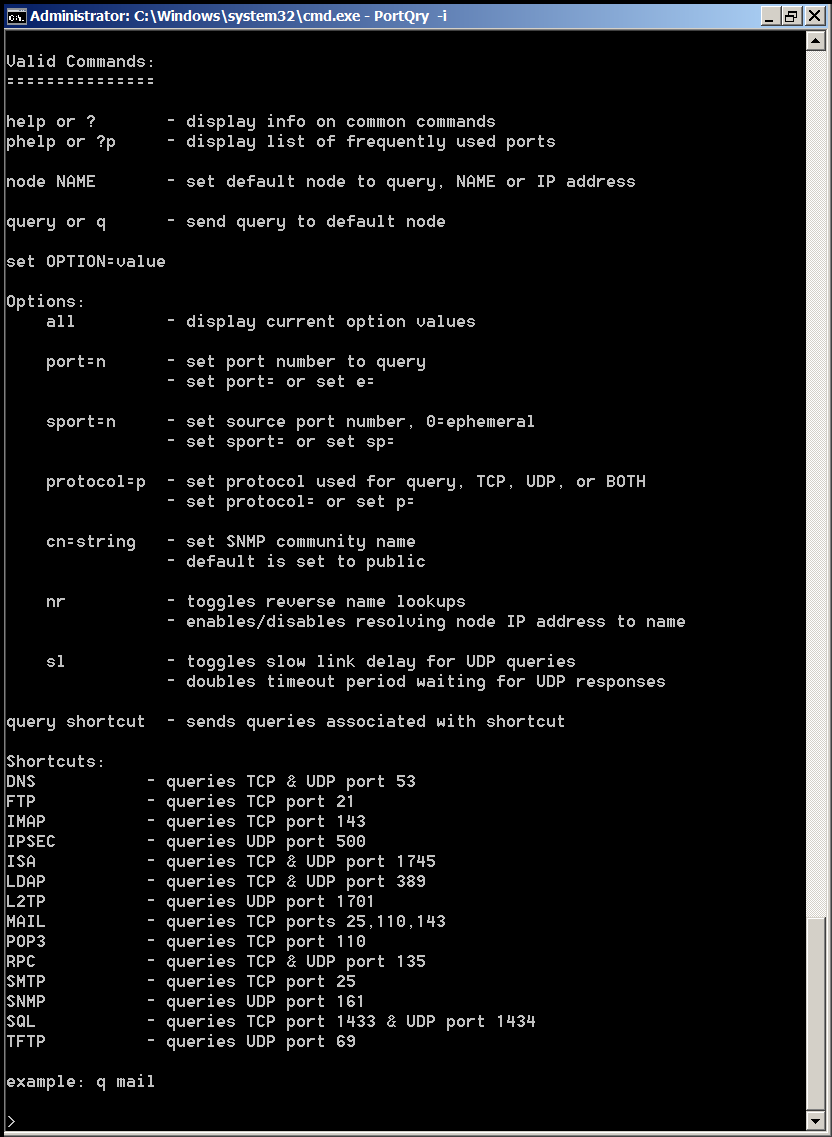
Interactive Mode is when it runs in interactive CLI console

portqry-windows-native-security-port-network-scanner-nmap-equivalent-interactive-mode-screenshot

portqry-windows-native-security-port-network-scanner-nmap-equivalent-interactive-mode-help-screenshot
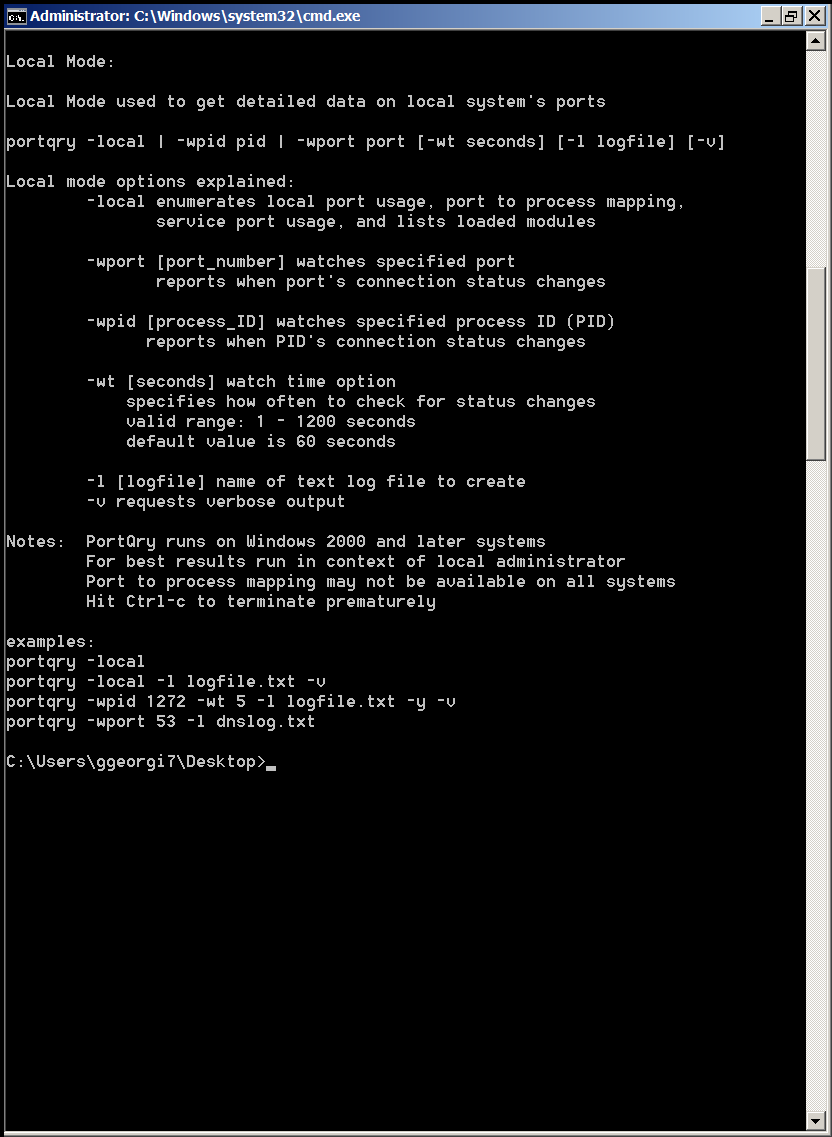
and Local Mode is used whether information on local system ports is required.

portqry-windows-native-security-port-network-scanner-nmap-equivalent-local-mode-screenshot


Here are some examples on basic usage of portqry:
 

1. Check if remote server is running webserver is listening on (HTTPS protocol) TCP port 80

portqry -n servername -e 80
 

Querying target system called:

 www.pc-freak.net

Attempting to resolve name to IP address…


Name resolved to 83.228.93.76

querying…

TCP port 80 (http service): FILTERED

2. Check whether some common Samba sharing and DNS UDP ports are listening

portqry -n servername -p UDP -o 37,53,88,135
 

Querying target system called:

servername

Attempting to resolve name to IP address…


Name resolved to 74.125.21.100

querying…

UDP port 37 (time service): NOT LISTENING

UDP port 53 (domain service): NOT LISTENING

UDP port 88 (kerberos service): NOT LISTENING

UDP port 135 (epmap service): NOT LISTENING

3. Scan open ports in a port range – Check common services port range (port 1-1024)

portqry -n 192.168.1.20 -r 1:1024 | find ": LISTENING"

4. Logging network scan output to file

Portqry –n localhost –e 135 -l port135.txt
 

Querying target system called:

 localhost

Attempting to resolve name to IP address…


Name resolved to 127.0.0.1

querying…

TCP port 135 (epmap service): LISTENING

Using ephemeral source port
Querying Endpoint Mapper Database…
Server's response:

UUID: d95afe70-a6d5-4259-822e-2c84da1ddb0d
ncacn_ip_tcp:localhost[49152]

UUID: 2f5f6521-cb55-1059-b446-00df0bce31db Unimodem LRPC Endpoint
ncacn_np:localhost[PIPEwkssvc]

Total endpoints found: 38


5. Scanning UDP and TCP protocols port

PortQry -n www.pc-freak.net -e 25 -p both


Querying target system called:

 www.pc-freak.net

Attempting to resolve name to IP address…


Name resolved to 83.228.93.76

querying…

TCP port 53 (domain service): LISTENING

UDP port 53 (domain service): LISTENING or FILTERED

Sending DNS query to UDP port 53…


6. Checking remote server whether LDAP ports are listening

Portqry -remotehost.com -p tcp -e 389
Portqry -n remotehost.com -p tcp -e 636
Portqry -n remotehost.com -p both -e 3268
Portqry -n remotehost.com -p tcp -e 3269


7. Making SNMP community name requests

portqry -n host2 -cn !my community name! -e 161 -p udp


8. Initiating scan from pre-selected source port

A network socket request initiation is useful from certain port because, some remote services expect connection from certain ports, lets say you're connecting to mail server, you might want to set as a source port – port 25, to make remote server another SMTP is connecting.

portqry -n www.pc-freak.net -e 25 -sp 25


9. Scanning whether server ports required by Active Directories are opened

Common ports used in Windows hosts to communicate between each other to sustain Active Directory are:

88 (Kerberos)
135 (RPC)
389 (LDAP)
445 (CIFS)
3268 (Global Catalog)

portqry -n remote-host.com -o 88,135,389,445,3268 -p both

portqry has also a silent mode with the "-q" switch if you want to get only whether a port is LISTENING (opened).

On port scan it returns three major return codes (very useful for scripting purposes);

  • returncode 0 – if port / service is listening
  • returncode 1 – if service is not listening
  • returncode 2 – if service is listening or filtered

PortQry is very simple port scanner for win sysadms and is precious tool for basic network debugging (services)  on Windows farms, however it doesn't have the powerful cracker functionality, application / OS versioning etc. like Nmap.


Install Sendmail mail server on Debian GNU / Linux

Sunday, March 31st, 2013

Installing sendmail on Debian Linux is something not so common these days. As sendmail has been overshadowed by his competitors Exim and Postfix. By default Debian Linux comes with Exim (light) installed as Exim is tiny and perfectly suitable for dealing with small and mid-sized SMTP needs. The reason why sendmail has been moved out by its competitors over the last 15 years is sendmail configuration is one big hell and besides that sendmail has been well known for its many security remote exploit holes – making it a famous target for crackers. Well anyways in some cases sendmail is necessary to install especially if you have a client which wants to have it set up. In this short article I will show how very basic sendmail installation on Debian host is done.

 blackstar:~# apt-get install sendmail-bin sensible-mda

Reading package lists… Done
Building dependency tree      
Reading state information… Done

The following extra packages will be installed:
  sendmail-base sendmail-cf sensible-mda
Suggested packages:
  sendmail-doc logcheck resolvconf sasl2-bin
The following packages will be REMOVED:
  exim4 exim4-base exim4-config exim4-daemon-light sa-exim task-mail-server
The following NEW packages will be installed:
  sendmail-base sendmail-bin sendmail-cf
0 upgraded, 3 newly installed, 6 to remove and 26 not upgraded.
Need to get 1,626 kB of archives.
After this operation, 592 kB disk space will be freed.
Do you want to continue [Y/n]? Y
Get:1 http://ftp.bg.debian.org/debian/ wheezy/main sendmail-base all 8.14.4-2.1 [362 kB]
Get:2 http://ftp.bg.debian.org/debian/ wheezy/main sendmail-cf all 8.14.4-2.1 [300 kB]
Get:3 http://ftp.bg.debian.org/debian/ wheezy/main sendmail-bin i386 8.14.4-2.1 [964 kB]
Fetched 1,626 kB in 0s (3,057 kB/s)  
(Reading database … 199577 files and directories currently installed.)
Removing task-mail-server …
Selecting previously unselected package sendmail-base.
(Reading database … 199577 files and directories currently installed.)
Unpacking sendmail-base (from …/sendmail-base_8.14.4-2.1_all.deb) …
Selecting previously unselected package sendmail-cf.
Unpacking sendmail-cf (from …/sendmail-cf_8.14.4-2.1_all.deb) …
Processing triggers for man-db …
(Reading database … 199939 files and directories currently installed.)
Removing sa-exim …
[….] Reloading exim4 configuration files:invoke-rc.d: initscript exim4, action "reload" failed.
dpkg: exim4-config: dependency problems, but removing anyway as you requested:
 exim4-base depends on exim4-config (>= 4.30) | exim4-config-2; however:
  Package exim4-config is to be removed.
  Package exim4-config-2 is not installed.
  Package exim4-config which provides exim4-config-2 is to be removed.
 exim4-base depends on exim4-config (>= 4.30) | exim4-config-2; however:
  Package exim4-config is to be removed.
  Package exim4-config-2 is not installed.
  Package exim4-config which provides exim4-config-2 is to be removed.

Removing exim4-config …
dpkg: exim4-daemon-light: dependency problems, but removing anyway as you requested:
 exim4 depends on exim4-daemon-light | exim4-daemon-heavy | exim4-daemon-custom; however:
  Package exim4-daemon-light is to be removed.
  Package exim4-daemon-heavy is not installed.
  Package exim4-daemon-custom is not installed.
 bsd-mailx depends on default-mta | mail-transport-agent; however:
  Package default-mta is not installed.
  Package exim4-daemon-light which provides default-mta is to be removed.
  Package mail-transport-agent is not installed.
  Package exim4-daemon-light which provides mail-transport-agent is to be removed.

Removing exim4-daemon-light …
[ ok ] Stopping MTA:.
ALERT: exim paniclog /var/log/exim4/paniclog has non-zero size, mail system possibly broken
dpkg: exim4-base: dependency problems, but removing anyway as you requested:
 exim4 depends on exim4-base (>= 4.80).

Removing exim4-base …
Processing triggers for man-db …
Selecting previously unselected package sendmail-bin.
(Reading database … 199786 files and directories currently installed.)
Unpacking sendmail-bin (from …/sendmail-bin_8.14.4-2.1_i386.deb) …
Processing triggers for man-db …
Setting up sendmail-base (8.14.4-2.1) …
adduser: Warning: The home directory `/var/lib/sendmail' does not belong to the user you are currently creating.
Setting up sendmail-cf (8.14.4-2.1) …
Setting up sendmail-bin (8.14.4-2.1) …
update-rc.d: warning: default stop runlevel arguments (0 1 6) do not match sendmail Default-Stop values (1)
update-alternatives: using /usr/lib/sm.bin/sendmail to provide /usr/sbin/sendmail-mta (sendmail-mta) in auto mode
update-alternatives: using /usr/lib/sm.bin/sendmail to provide /usr/sbin/sendmail-msp (sendmail-msp) in auto mode
update-alternatives: warning: not replacing /usr/share/man/man8/sendmail.8.gz with a link

You are doing a new install, or have erased /etc/mail/sendmail.mc.
If you've accidentaly erased /etc/mail/sendmail.mc, check /var/backups.

I am creating a safe, default sendmail.mc for you and you can
run sendmailconfig later if you need to change the defaults.

[ ok ] Stopping Mail Transport Agent (MTA): sendmail.
Updating sendmail environment …
Validating configuration.
Writing configuration to /etc/mail/sendmail.conf.
Writing /etc/cron.d/sendmail.
Could not open /etc/mail/databases(No such file or directory), creating it.
Could not open /etc/mail/sendmail.mc(No such file or directory)
Reading configuration from /etc/mail/sendmail.conf.
Validating configuration.
Writing configuration to /etc/mail/sendmail.conf.
Writing /etc/cron.d/sendmail.
Turning off Host Status collection
Could not open /etc/mail/databases(No such file or directory), creating it.
Reading configuration from /etc/mail/sendmail.conf.
Validating configuration.
Creating /etc/mail/databases…

Checking filesystem, this may take some time – it will not hang!
  …   Done.
 
Checking for installed MDAs…
Adding link for newly extant program (mail.local)
Adding link for newly extant program (procmail)
sasl2-bin not installed, not configuring sendmail support.

To enable sendmail SASL2 support at a later date, invoke "/usr/share/sendmail/update_auth"

 
Creating/Updating SSL(for TLS) information
Creating /etc/mail/tls/starttls.m4…
Creating SSL certificates for sendmail.
Generating DSA parameters, 2048 bit long prime
This could take some time
…+………………..+.+..+..+++
..+.+………….+.++++++++++++++++++++++++++++++*
Generating RSA private key, 2048 bit long modulus
………………..+++
…………………+++
e is 65537 (0x10001)

*** *** *** WARNING *** WARNING *** WARNING *** WARNING *** *** ***

Everything you need to support STARTTLS (encrypted mail transmission
and user authentication via certificates) is installed and configured
but is *NOT* being used.

To enable sendmail to use STARTTLS, you need to:
1) Add this line to /etc/mail/sendmail.mc and optionally
   to /etc/mail/submit.mc:
  include(`/etc/mail/tls/starttls.m4')dnl
2) Run sendmailconfig
3) Restart sendmail

 
Updating /etc/hosts.allow, adding "sendmail: all".

Please edit /etc/hosts.allow and check the rules location to
make sure your security measures have not been overridden –
it is common to move the sendmail:all line to the *end* of
the file, so your more selective rules take precedence.
Checking {sendmail,submit}.mc and related databases…
Reading configuration from /etc/mail/sendmail.conf.
Validating configuration.
Creating /etc/mail/databases…
Reading configuration from /etc/mail/sendmail.conf.
Validating configuration.
Creating /etc/mail/databases…
Reading configuration from /etc/mail/sendmail.conf.
Validating configuration.
Creating /etc/mail/Makefile…
Reading configuration from /etc/mail/sendmail.conf.
Validating configuration.
Writing configuration to /etc/mail/sendmail.conf.
Writing /etc/cron.d/sendmail.
Disabling HOST statistics file(/var/lib/sendmail/host_status).
Creating /etc/mail/sendmail.cf…
*** ERROR: FEATURE() should be before MAILER()
*** MAILER(`local') must appear after FEATURE(`always_add_domain')*** ERROR: FEATURE() should be before MAILER()
*** MAILER(`local') must appear after FEATURE(`allmasquerade')*** ERROR: FEATURE() should be before MAILER()
 
Creating /etc/mail/submit.cf…
Informational: confCR_FILE file empty: /etc/mail/relay-domains
Warning: confCT_FILE source file not found: /etc/mail/trusted-users
 it was created
Informational: confCT_FILE file empty: /etc/mail/trusted-users
Warning: confCW_FILE source file not found: /etc/mail/local-host-names
 it was created
Warning: access_db source file not found: /etc/mail/access
 it was created
Updating /etc/mail/access…
Linking /etc/aliases to /etc/mail/aliases
Updating /etc/mail/aliases…

WARNING: local host name (blackstar) is not qualified; see cf/README: WHO AM I?
/etc/mail/aliases: 13 aliases, longest 10 bytes, 145 bytes total
 
Warning: 3 database(s) sources
    were not found, (but were created)
    please investigate.
 
Warning: These messages were issued while creating sendmail.cf
    make sure they are benign before starting sendmail!
 
Errors in generating sendmail.cf
*** ERROR: FEATURE() should be before MAILER()
*** MAILER(`local') must appear after FEATURE(`always_add_domain')*** ERROR: FEATURE() should be before MAILER()
*** MAILER(`local') must appear after FEATURE(`allmasquerade')*** ERROR: FEATURE() should be before MAILER()
 
[ ok ] Starting Mail Transport Agent (MTA): sendmail.
(Reading database … 199837 files and directories currently installed.)
Removing exim4 …
 

Right after packages gets installed it is good idea to get rid of any remains of previous exim SMTP install, run;

blackstar:~# dpkg --purge exim4
blackstar:~# dpkg --purge exim4-base
blackstar:~# dpkg --purge exim4-config
blackstar:~# dpkg --purge exim4-daemon-light
blackstar:~# dpkg --purge sa-exim

blackstar:~# grep -i sendmail /etc/passwd
smmta:x:121:128:Mail Transfer Agent,,,:/var/lib/sendmail:/bin/false
smmsp:x:124:129:Mail Submission Program,,,:/var/lib/sendmail:/bin/false
blackstar:~# grep -i -E "smmta|smmsp" /etc/passwd
smmta:x:121:128:Mail Transfer Agent,,,:/var/lib/sendmail:/bin/false
smmsp:x:124:129:Mail Submission Program,,,:/var/lib/sendmail:/bin/false

Sendmail install does create two new users smmta and smmsp in /etc/passwd and /etc/group

As you see from earlier apt-get output sendmail is provided on Debian via 4 packs:

root@blackstar:~# dpkg -l |grep -i sendmail
ii  libmail-sendmail-perl                0.79.16-1                          all          Send email from a perl script
ii  sendmail-base                        8.14.4-2.1                         all          powerful, efficient, and scalable Mail Transport Agent
ii  sendmail-bin                         8.14.4-2.1                         i386         powerful, efficient, and scalable Mail Transport Agent
ii  sendmail-cf                          8.14.4-2.1                         all          powerful, efficient, and scalable Mail Transport Agent

libmail-sendmail-perl installs a perl module (class)  /usr/share/perl5/Mail/Sendmail.pm.

sendmail-bin contains main sendmail components binary files, cron bindings related to sendmail, some manual pages and creates structure necessary for sendmail to process email queue. sendmail-cf provides a multitude of sendmail configurations in macroses and few documentation files on the macros configuration. All sendmail configuration macros are stored in /usr/share/sendmail/* – there are pleny of .m4 configs so for people who never installed sendmail it is really confusing.

sendmail-base package contains some bindings on how to to log rotate sendmail log files, few more sendmail binaries who deal with sendmail architecture, few files whether sendmail is run via PPP or DHCP connection, some documentation and example files. Sendmail documentation is installed in /usr/share/doc/sendmail*,  unfortunately documentation there is scarce so for extended documentation it is good to check Sendmail's Official site

To check if sendmail is running you should have it visible  in the list of running processes;

root@blackstar:~# ps xa|grep sendmail|grep -v grep
  468 ?        Ss     0:00 sendmail: MTA: accepting connections        

Further on it should be accepting connections on localhost / 25, i.e.

root@blackstar:~# telnet localhost 25
Trying ::1...
Trying 127.0.0.1...
Connected to localhost.
Escape character is '^]'.
220 blackstar ESMTP Sendmail 8.14.4/8.14.4/Debian-2.1; Sat, 30 Mar 2013 19:09:47 +0200; (No UCE/UBE) logging access from: localhost(OK)-localhost [127.0.0.1] ^]
telnet> quit


Sendmail's configuration is being generated using a macro file using a macro processor via m4 command. There are few files, used as a basis for generation the final m4 most important of course is /etc/mail/sendmail.mc and sendmail.cf  –  /etc/mail/sendmail.cf, sendmail.mc after processed with the mambo-jambo with m4 generates the complex and about 15 times larger by size sendmail.cf.
All configs related to generating files instructing how sendmail will operate are stored in /etc/mail;

blackstar:~#  ls -1
access
access.db
address.resolve
aliases
aliases.db
databases
helpfile
local-host-names
m4
Makefile
peers
sasl
sendmail.cf
sendmail.cf.errors
sendmail.conf
sendmail.mc
service.switch
service.switch-nodns
smrsh
spamassassin
submit.cf
submit.mc
tls

sendmail.cf.errors
– contains errors during processing of macros config files.


root@blackstar:/etc/mail# cat sendmail.cf.errors
*** ERROR: FEATURE() should be before MAILER()
*** MAILER(`local') must appear after FEATURE(`always_add_domain')*** ERROR: FEATURE() should be before MAILER()
*** MAILER(`local') must appear after FEATURE(`allmasquerade')*** ERROR: FEATURE() should be before MAILER()

This errors, are not fatal as sendmail.cf is there and sendmail is from now on ready to send mails via localhost.

To check if sendmail delivers mails onwards, use mail cmd;
 

hipo@blackstar:~$ mail -s "testing" test@www.pc-freak.net
this is a simple test email
Do you get it?
.
Cc:

To see all is fine with mail delivery check out /var/log/mail.log

blackstar:~# tail -f /var/log/mail/log
Mar 30 21:23:05 blackstar sm-msp-queue[1495]: unable to qualify my own domain name (blackstar) -- using short name
Mar 30 21:23:09 blackstar sm-mta[1499]: STARTTLS=client, relay=mail.www.pc-freak.net., version=TLSv1/SSLv3, verify=FAIL, cipher=AES256-SHA, bits=256/256
Mar 30 21:23:11 blackstar sm-mta[1524]: r2UJN8x2001524: localhost [127.0.0.1] did not issue MAIL/EXPN/VRFY/ETRN during connection to MTA-v4
Mar 30 21:23:13 blackstar sm-mta[1499]: r2UJKwqR001412: to=<hipo@www.pc-freak.net>, ctladdr=<root@blackstar> (0/0), delay=00:02:15, xdelay=00:00:10, mailer=esmtp, pri=210313, relay=mail.www.pc-freak.net. [83.228.93.76], dsn=2.0.0, stat=Sent (ok 1364671405 qp 7492)
Mar 30 21:24:28 blackstar sendmail[1532]: My unqualified host name (blackstar) unknown; sleeping for retry
Mar 30 21:27:16 blackstar sendmail[1633]: My unqualified host name (blackstar) unknown; sleeping for retry

As you see there is an error in mail.log
 

blackstar sendmail[1532]: My unqualified host name (blackstar) unknown; sleeping for retry


This is because blackstar is not assigned as a a host recognized to 127.0.0.1 in /etc/hosts. To solve it on my host I had to change /etc/hosts which looked like so:

blackstar:~# cat /etc/hosts
127.0.0.1    localhost
127.0.1.1    blackstar
# The following lines are desirable for IPv6 capable hosts
::1     localhost ip6-localhost ip6-loopback
ff02::1 ip6-allnodes
ff02::2 ip6-allrouters

to

blackstar:~# vim /etc/hosts

127.0.0.1    localhost localhost.localdomain blackstar
127.0.1.1    blackstar

# The following lines are desirable for IPv6 capable hosts
::1     localhost ip6-localhost ip6-loopback
ff02::1 ip6-allnodes
ff02::2 ip6-allrouters


Then restart sendmail to reread /etc/hosts
 

root@blackstar:/etc/mail# /etc/init.d/sendmail restart
[ ok ] Restarting Mail Transport Agent (MTA): sendmail.


How to reboot remotely Linux server if reboot, shutdown and init commands are not working (/sbin/reboot: Input/output error) – Reboot Linux in emergency using MagicSysRQ kernel sysctl variable

Saturday, July 23rd, 2011

SysRQ an alternative way to restart unrestartable Linux server

I’ve been in a situation today, where one Linux server’s hard drive SCSI driver or the physical drive is starting to break off where in dmesg kernel log, I can see a lot of errors like:

[178071.998440] sd 0:0:0:0: [sda] Result: hostbyte=DID_BAD_TARGET driverbyte=DRIVER_OK,SUGGEST_OK
[178071.998440] end_request: I/O error, dev sda, sector 89615868

I tried a number of things to remount the hdd which was throwing out errors in read only mode, but almost all commands I typed on the server were either shown as missng or returning an error:
Input/output error

Just ot give you an idea what I mean, here is a paste from the shell:

linux-server:/# vim /etc/fstab
-bash: vim: command not found
linux-server:/# vi /etc/fstab
-bash: vi: command not found
linux-server:/# mcedit /etc/fstab
-bash: /usr/bin/mcedit: Input/output error
linux-server:/# fdisk -l
-bash: /sbin/fdisk: Input/output error

After I’ve tried all kind of things to try to diagnose the server and all seemed failing, I thought next a reboot might help as on server boot the filesystems will get checked with fsck and fsck might be able to fix (at least temporary) the mess.

I went on and tried to restart the system, and guess what? I got:

/sbin/reboot init Input/output error

I hoped that at least /sbin/shutdown or /sbin/init commands might work out and since I couldn’t use the reboot command I tried this two as well just to get once again:

linux-server:/# shutdown -r now
bash: /sbin/shutdown: Input/output error
linux-server:/# init 6
bash: /sbin/init: Input/output error

You see now the situation was not pinky, it seemed there was no way to reboot the system …
Moreover the server is located in remote Data Center and I the tech support there is conducting assigned task with the speed of a turtle.
The server had no remote reboot, web front end or anything and thefore I needed desperately a way to be able to restart the machine.

A bit of research on the issue has led me to other people who experienced the /sbin/reboot init Input/output error error mostly caused by servers with failing hard drives as well as due to HDD control driver bugs in the Linux kernel.

As I was looking for another alternative way to reboot my Linux machine in hope this would help. I came across a blog post Rebooting the Magic Wayhttp://www.linuxjournal.com/content/rebooting-magic-way

As it was suggested in Cory’s blog a nice alternative way to restart a Linux machine without using reboot, shutdown or init cmds is through a reboot with the Magic SysRQ key combination

The only condition for the Magic SysRQ key to work is to have enabled the SysRQ – CONFIG_MAGIC_SYSRQ in Kernel compile time.
As of today luckily SysRQ Magic key is compiled and enabled by default in almost all modern day Linux distributions in this numbers Debian, Fedora and their derivative distributions.

To use the sysrq kernel capabilities as a mean to restart the server, it’s necessery first to activate the sysrq through sysctl, like so:

linux-server:~# sysctl -w kernel.sysrq=1
kernel.sysrq = 1

I found enabling the kernel.sysrq = 1 permanently in the kernel is also quite a good idea, to achieve that I used:

echo 'kernel.sysrq = 1' >> /etc/sysctl.conf

Next it’s wise to use the sync command to sync any opened files on the server as well stopping as much of the server active running services (MySQL, Apache etc.).

linux-server:~# sync

Now to reboot the Linux server, I used the /proc Linux virtual filesystem by issuing:

linux-server:~# echo b > /proc/sysrq-trigger

Using the echo b > /proc/sysrq-trigger simulates a keyboard key press which does invoke the Magic SysRQ kernel capabilities and hence instructs the kernel to immediately reboot the system.
However one should be careful with using the sysrq-trigger because it’s not a complete substitute for /sbin/reboot or /sbin/shutdown -r commands.
One major difference between the standard way to reboot via /sbin/reboot is that reboot kills all the running processes on the Linux machine and attempts to unmount all filesystems, before it proceeds to sending the kernel reboot instruction.

Using echo b > /proc/sysrq-trigger, however neither tries to umount mounted filesystems nor tries to kill all processes and sync the filesystem, so on a heavy loaded (SQL data critical) server, its use might create enormous problems and lead to severe data loss!

SO BEWARE be sure you know what you’re doing before you proceed using /proc/sysrq-trigger as a way to reboot ;).